

Page 1
Congratulations on purchasing the Pocket PC. This Quick Start Guide helps you
through a successful setup of your Pocket PC and familiarizes you with the basic
skills of using your Pocket PC.
NOTE: Depending on the model you purchased, the cabinet color may be different from the
color shown in this guide.
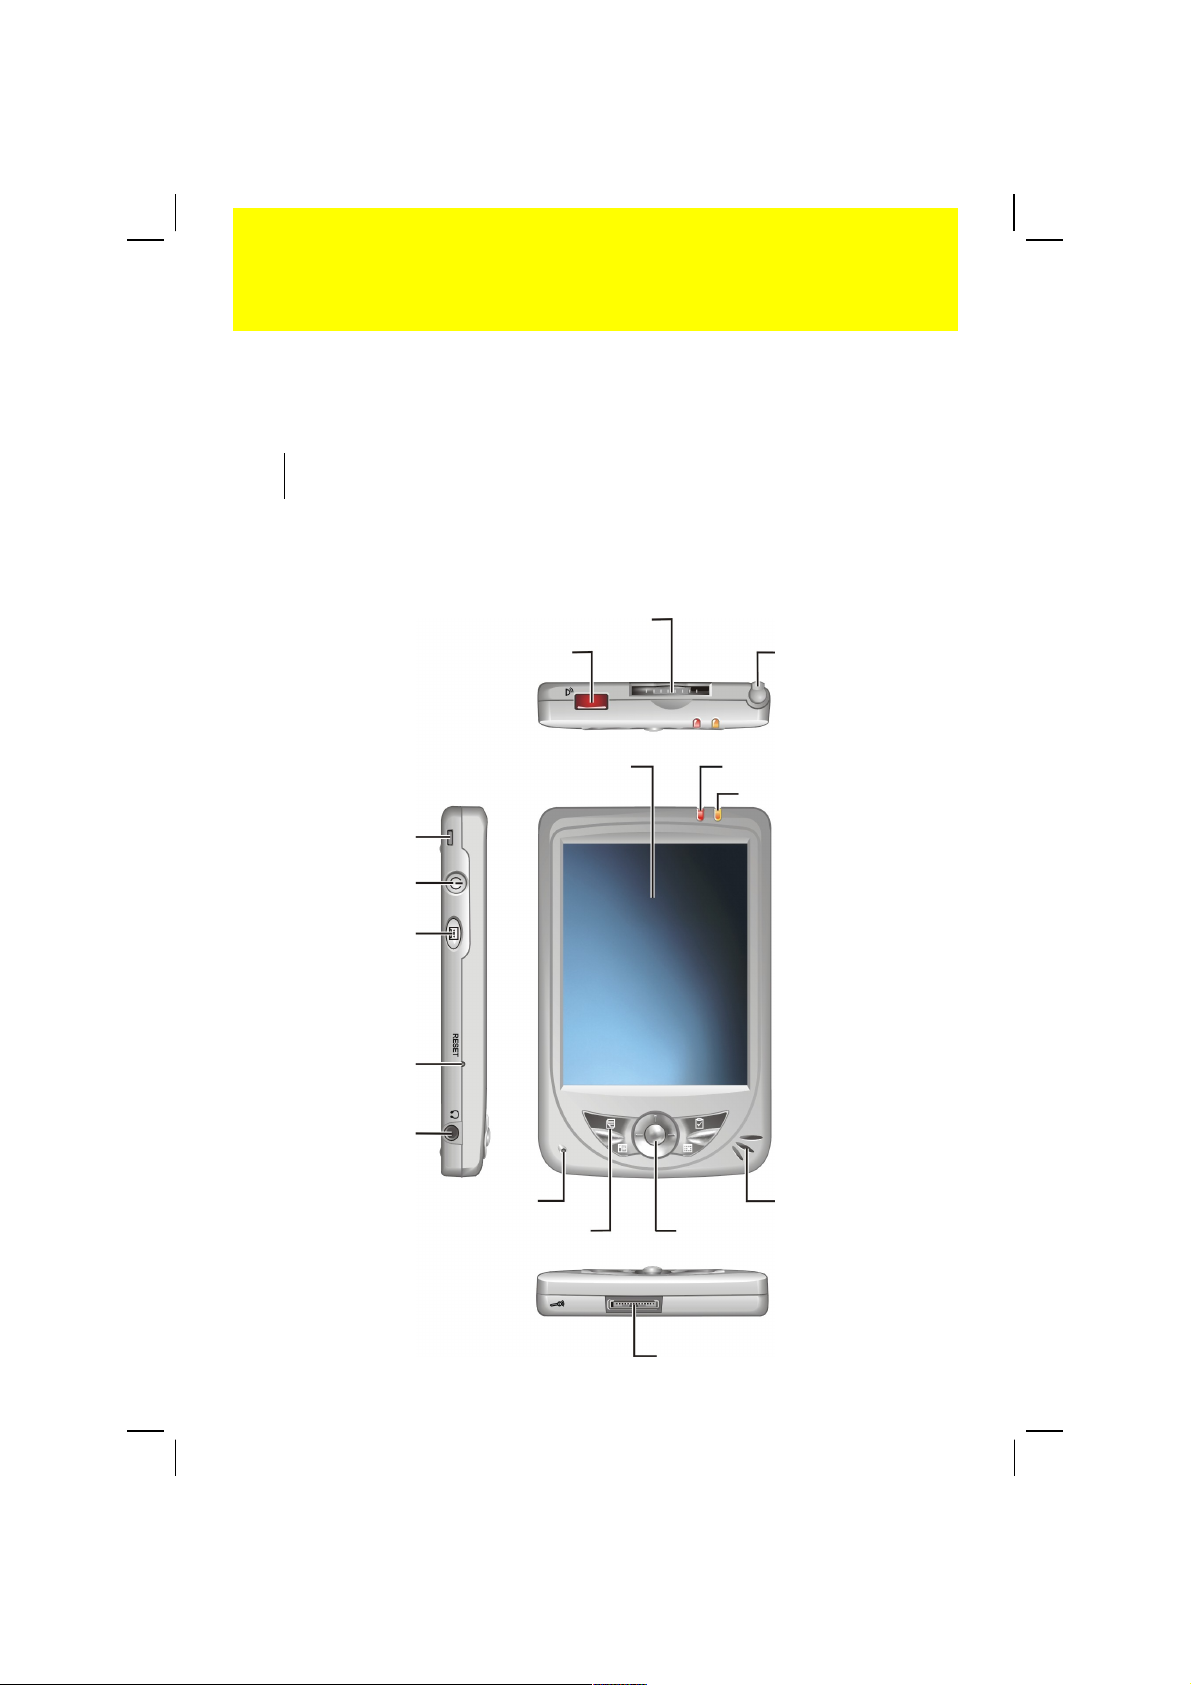
Step 1. Identify Components
Quick Start Guide
IR Port
SD/MMC Card Slot
Stylus
Lanyard Eyelet
Power Button
Record Button
Reset Button
Headphone Connector
Touch Screen
Microphone
Program Buttons (4)
Notification Indicator
Charge Indicator
Speaker
Navigation Stick
ActiveSync Connector
Page 2
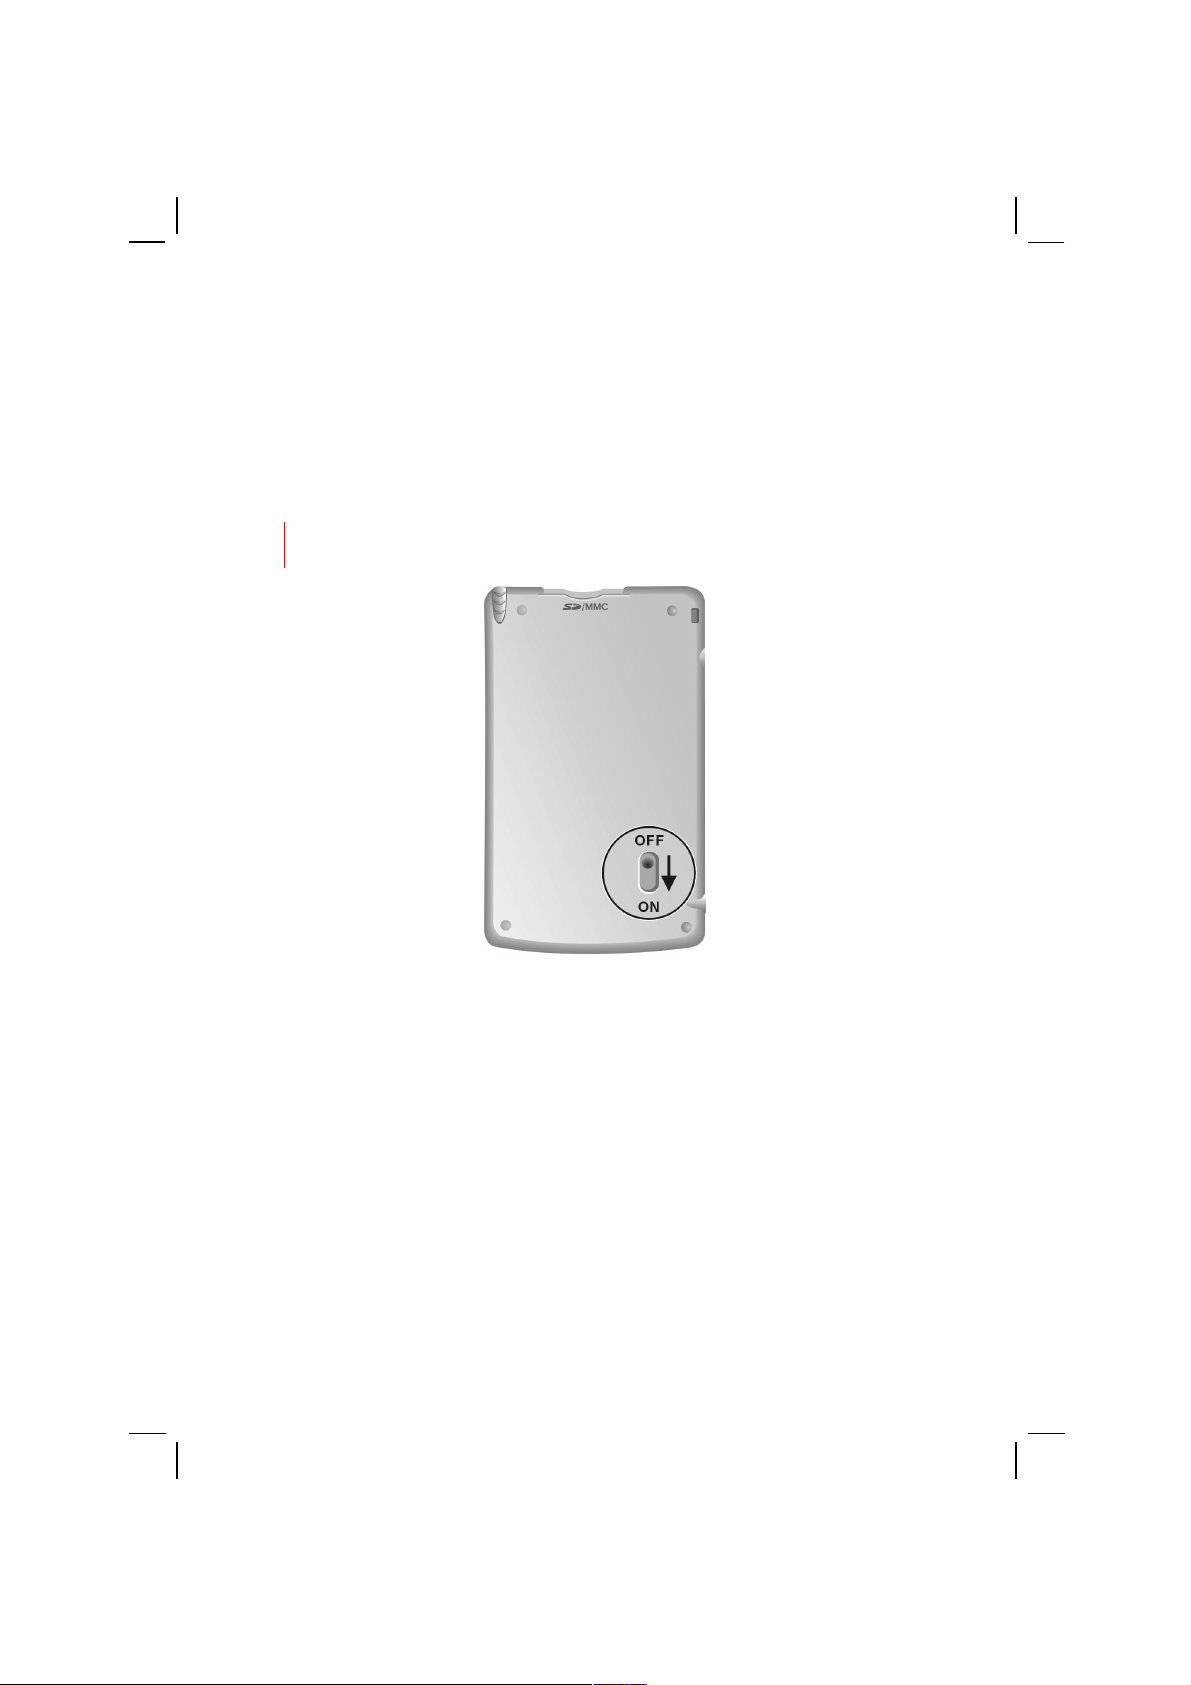
Step 2. Perform the Initial Startup
Initial startup includes setting the battery switch and completing the Welcome
Wizard.
1. The battery switch should be set to the ON (down) position for normal
operation. Pull out the stylus and use it to slide the battery switch to the ON
(down) position.
CAUTION: Always leave the battery switch in the ON position for normal operation.
Changing the switch will cause your data to be lost.
2. Your Pocket PC will automatically turn on and display the “Welcome” screen.
3. To begin the “Welcome” Wizard, tap the screen with the stylus and follow the
onscreen instructions to complete the wizard. The wizard presents a brief
orientation to Microsoft® Windows® for Pocket PC, helps you align the
touch screen and prompts you to select your city and time zone.
Page 3
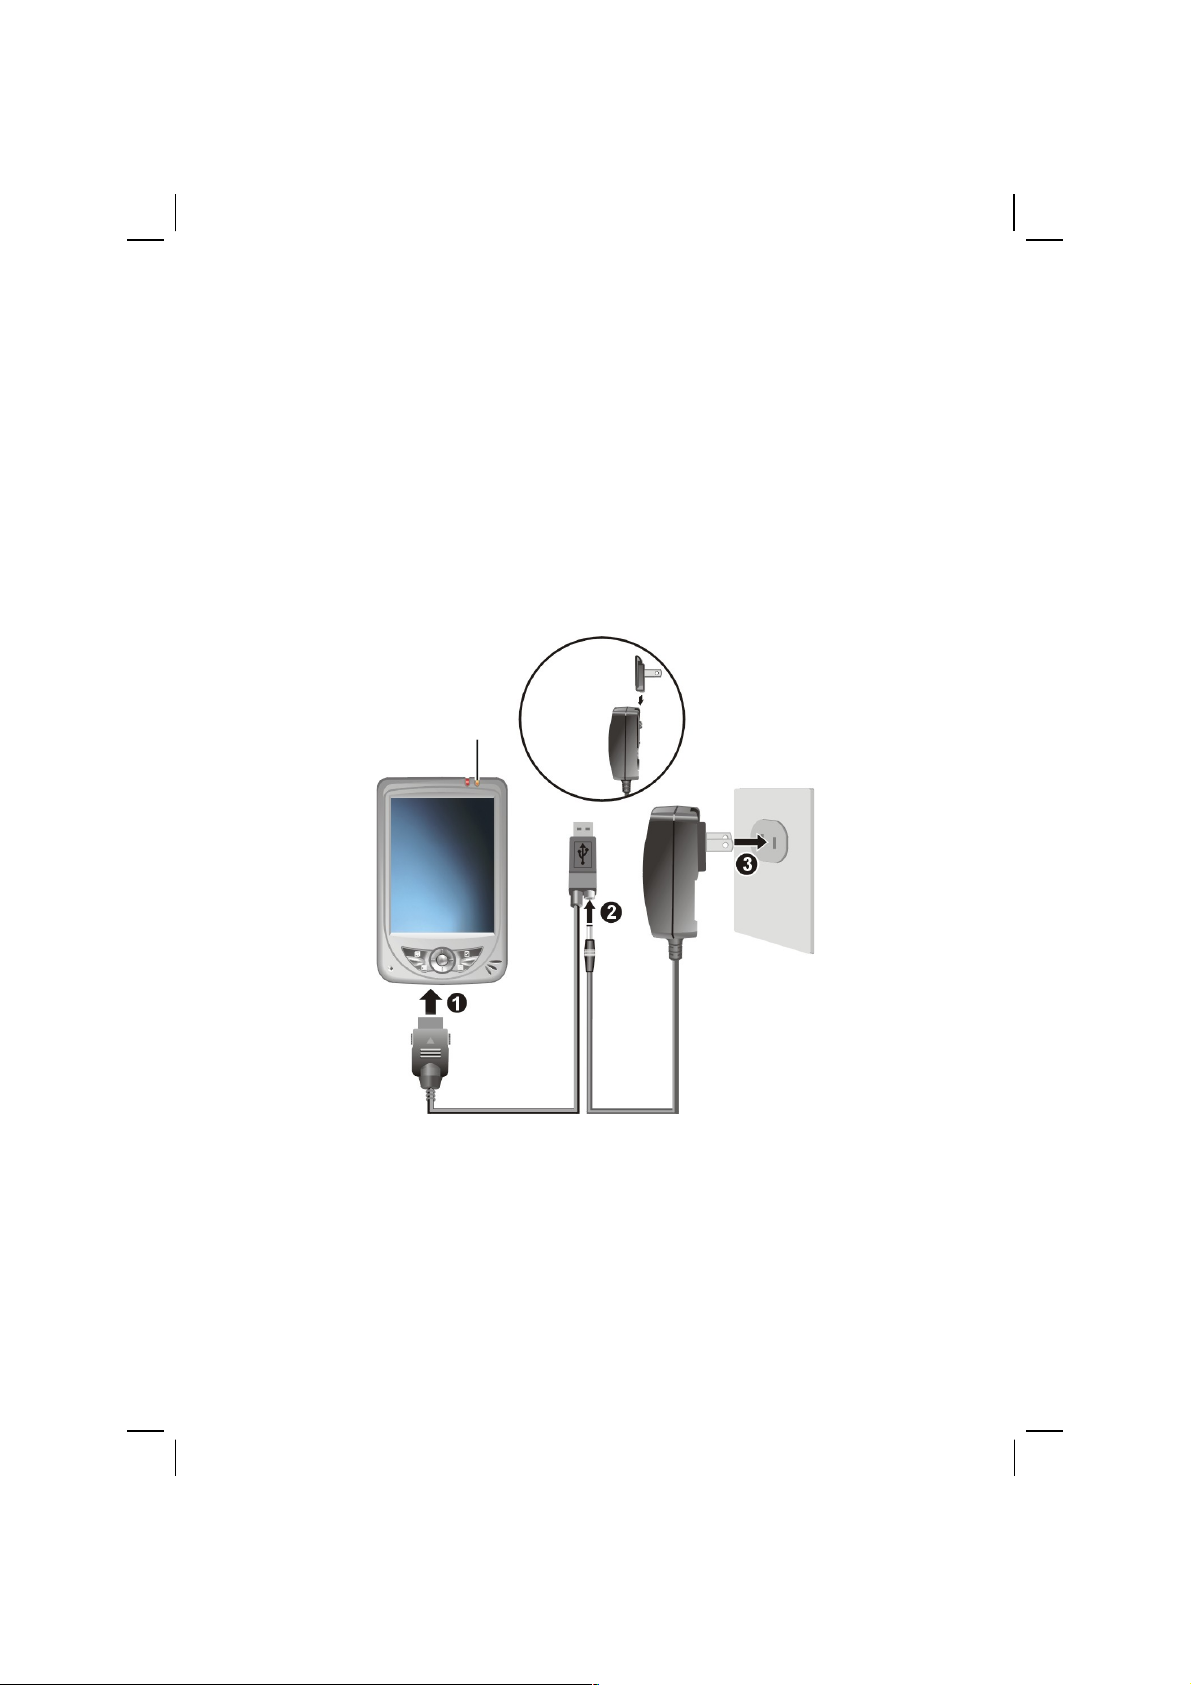
Step 3. Charge the Battery
Fully charge the battery before starting to use your Pocket PC for the first time.
1. Plug the converter to the AC adapter.
2. Connect to AC power.
Connect the appropriate end of the ActiveSync cable to the bottom of your
Pocket PC.
Connect the appropriate end of the AC adapter to the power connector
on the ActiveSync cable.
Plug the other end of the AC adapter into a wall outlet.
3. The charge indicator glows amber when charging is in progress. Do not
disconnect your Pocket PC from AC power until the battery is fully charged,
as indicated by the amber indicator turning into green. This will take a couple
of hours.
Whenever possible, keep your Pocket PC connected to the AC adapter and a
power source. Doing so keeps the battery charged.
Converter
Charge Indicator
Page 4

Step 4. Install Microsoft ActiveSync
You can use Microsoft ActiveSync® technology to synchronize information on
your desktop computer and/or a Microsoft Exchange Server with the information
on your Pocket PC with the information on the desktop computer and/or the
server and updates all locations, keeping you up-to-date with the most recent
information.
ActiveSync is already installed on your Pocket PC. You need to install
ActiveSync on your desktop computer. Follow the procedure below:
CAUTION:
Before installation, make sure that you have Microsoft Outlook installed on your desktop
computer. If you do not have Outlook or your version of Outlook is earlier than the
version provided on the Companion CD, install Outlook from the Companion CD.
Do not connect your Pocket PC to your desktop computer before ActiveSync is installed.
During the New Partnership setup, select “Synchronize with this desktop computer.” Do
not select “Synchronize with Microsoft Mobile Information Server and/or this desktop
computer” unless you are sure that your company is running Microsoft Mobile
Information Server 2002 or later. Contact your network administrator or ISP for detailed
information.
1. Turn on your desktop computer.
2. Insert the Companion CD into the CD-ROM drive of your desktop computer.
3. Click the arrow on the first screen to enter the main screen and click Start Here.
4. In the “Start Here” screen, click Install ActiveSync 3.7 on the left column.
5. In the “Install ActiveSync 3.7” screen, click Install to start installation.
6. In the “File Download” screen, click on Open if your operating system is
Windows XP or click Run this program from its current location if your operating
system is Windows 2000/Me/98.
Page 5

7. Follow the onscreen instructions to install
ActiveSync.
8. When prompted, connect your Pocket PC to
your desktop computer. Connect the appropriate
end of the ActiveSync cable to the bottom of
your Pocket PC. Connect the USB end of the
cable to a USB port on your desktop computer.
9. The “Add New Hardware Wizard” should automatically install the USB
driver. (If you need to specify the location of the driver, click Browse and
select the drive containing the Companion CD.)
10. Follow the onscreen instructions to establish a partnership and synchronize
your Pocket PC with your desktop computer.
After your first synchronization, the data you have stored on your desktop
computer such as Calendar, Contacts and Tasks is copied to your Pocket PC. You
are now ready to take it along with you when you go.
Get Familiar with Your Pocket PC
Page 6
Stylus
Use the stylus to navigate and select objects on the
screen. Touch the screen once with the stylus to open
items and select options.
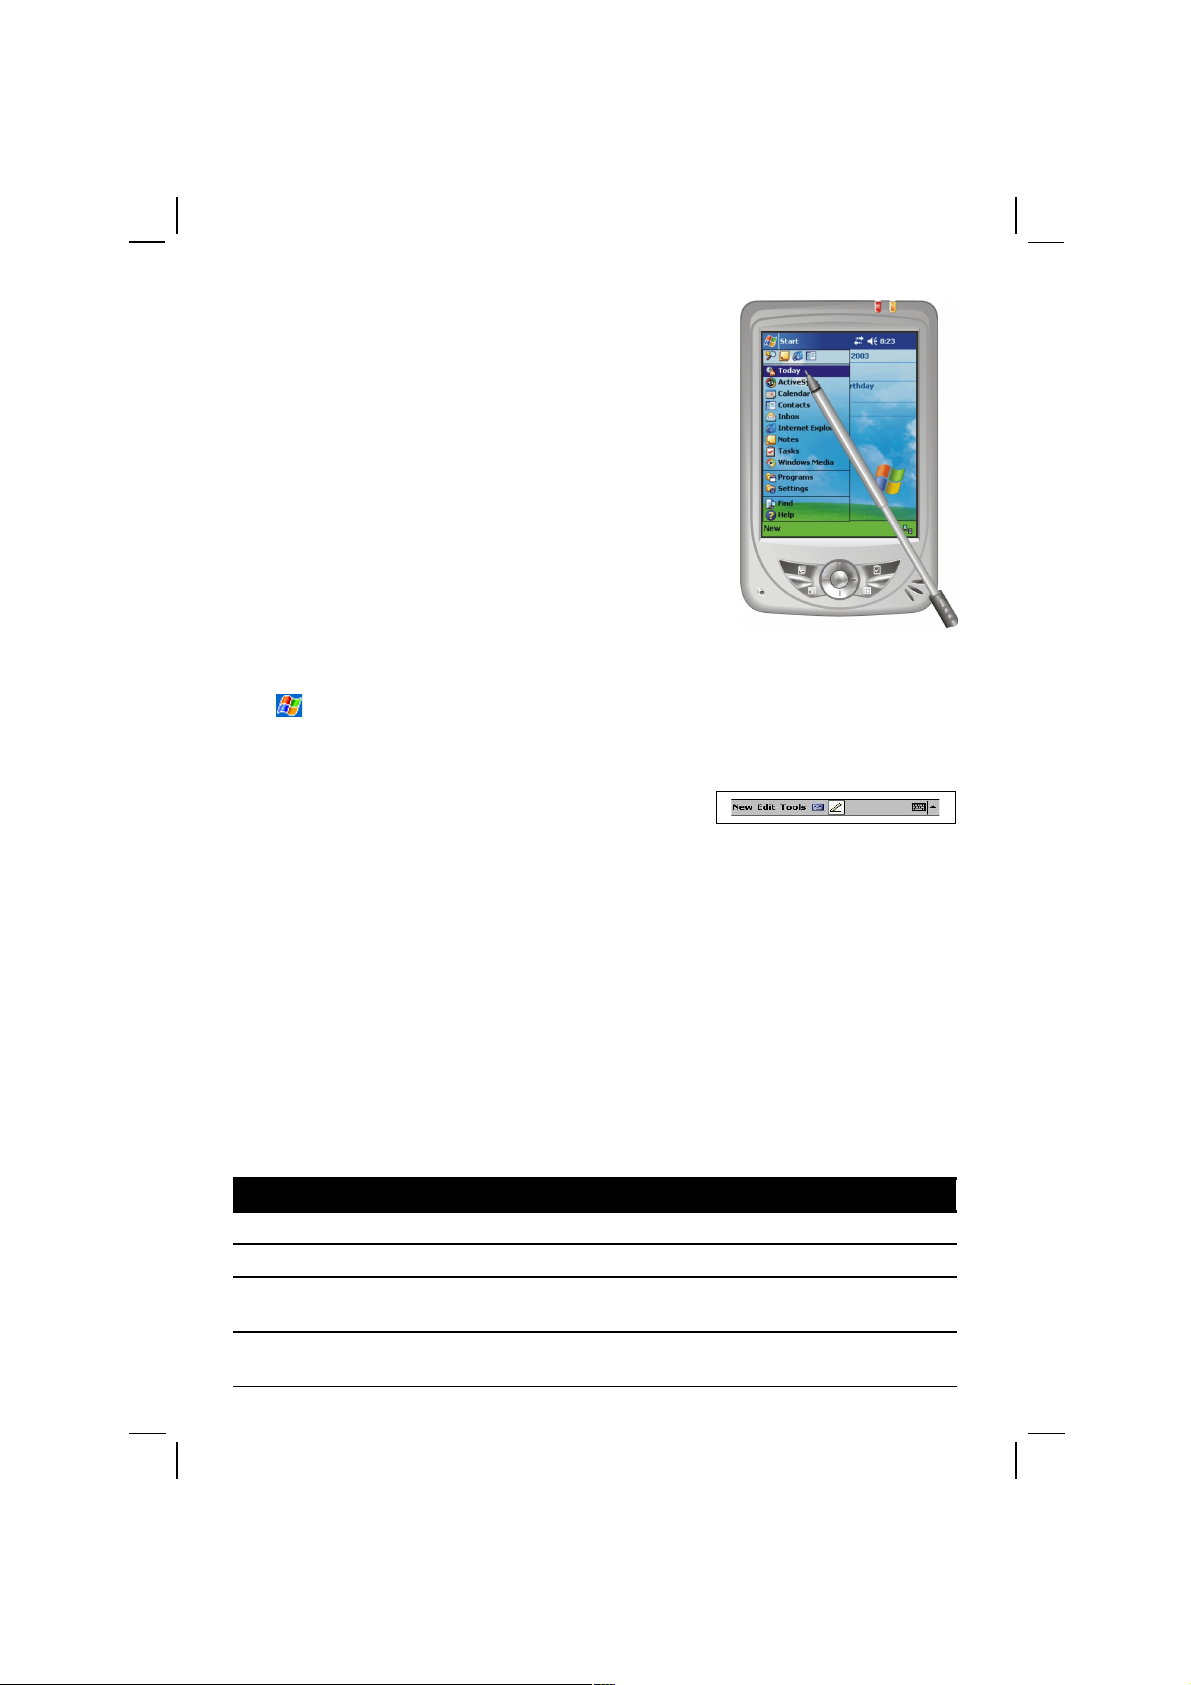
Today Screen
When you turn on your Pocket PC for the first time
each day (or after 4 hours of inactivity), you will see
the Today screen. On the Today screen, you can see at a
glance important information for the day.
Start Menu
Tap at the upper left corner of the screen to pop up the Start menu where you
can select a program to open, customize your Pocket PC or get help.
Command Bar
Use the Command bar at the bottom of the screen to perform tasks in programs.
The Command bar includes menu names, buttons and the Input panel button.
Where to Find Information
For information on See this source
Detailed operating information User’s Manual
Programs on your Pocket PC User’s Manual or Pocket PC online Help
Additional programs that can be
installed on your Pocket PC
Companion CD or other CD(s) supplied with
your Pocket PC
Connecting to and synchronizing
with a desktop computer
User’s Manual or ActiveSync Help on your
desktop computer
Page 7

Troubleshooting User’s Manual
Last-minute updates and detailed
technical information
The Read Me files in the “Microsoft
ActiveSync” folder on your desktop computer
or the Companion CD
The latest on Windows Powered
Pocket PCs
The Microsoft Mobile Devices Web site:
www.pocketpc.com
Microsoft, Windows, the Windows logo, Windows Media, Outlook and ActiveSync are registered trademarks or
trademarks of Microsoft Corporation in the United States and/or other countries. Microsoft products are licensed
to OEMs by Microsoft Licensing, Inc., a wholly owned subsidiary of Microsoft Corporation.
 Loading...