

Page 1
Page 2

US Version
Revision: R00
April 2005
Trademarks
All brand and product names are trademarks or registered trademarks of their
respective companies.
Note
The information in this manual is subject to change without notice.
Page 3

Table of Contents
Before You Begin.................................................................................. vii
Features ...................................................................................................... viii
About this Manual .........................................................................................ix
Part I. Basic Operations ........................................................................ 1
1 Getting Started .................................................................................3
1.1 Performing the Initial Start Up .............................................................. 3
1.2 Connecting to AC Power and Charging the Battery............................. 5
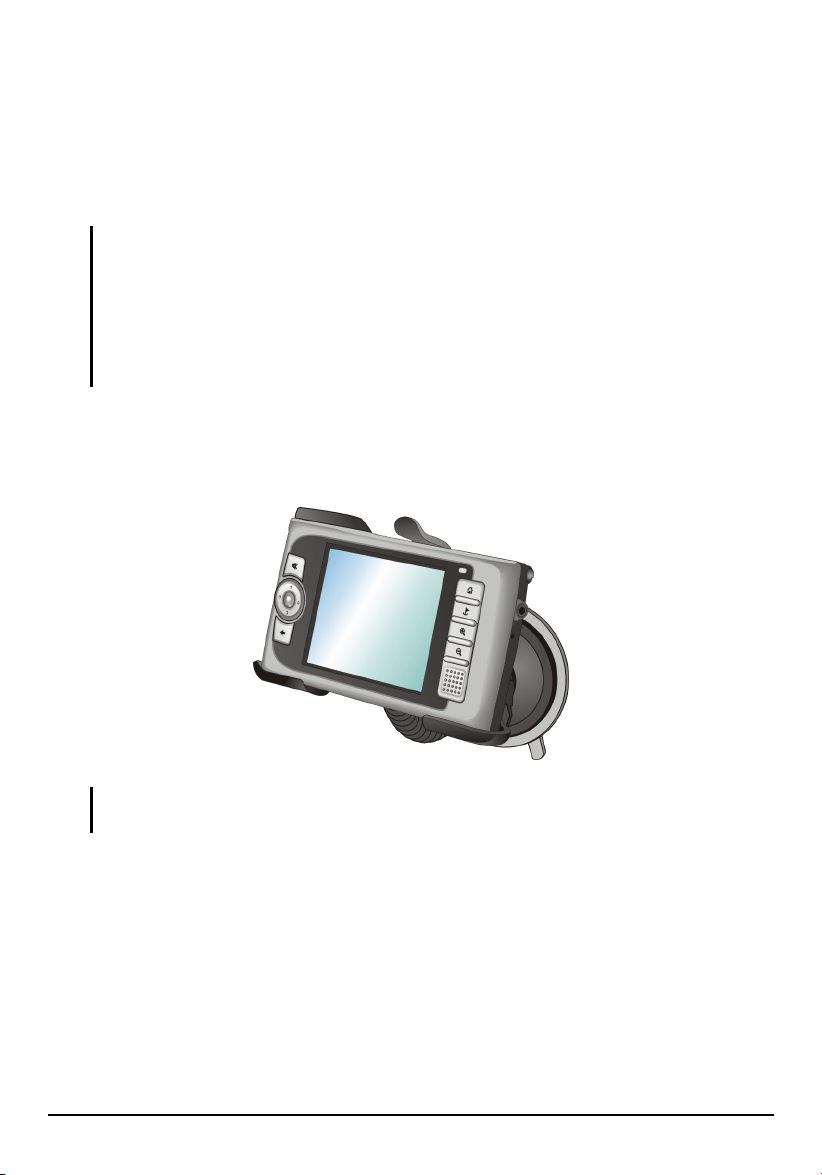
1.3 Using Your Device in a Vehicle............................................................ 6
Using the Car Holder............................................................................ 6
Connecting the Car Charger ................................................................ 7
1.4 Understanding Hardware Features ...................................................... 8
Front Components................................................................................ 8
Back Components................................................................................ 9
Left-Side Components ......................................................................... 9
Right-Side Components ..................................................................... 10
Top Components................................................................................ 10
Bottom Components........................................................................... 11
2 Basic Skills .....................................................................................13
2.1 Turning On and Off Your Device........................................................ 13
Home Screen ..................................................................................... 13
2.2 Operating Your Device....................................................................... 14
Using Hardware Buttons .................................................................... 14
Using the Navigation Pad................................................................... 15
Using the Volume Control .................................................................. 15
Using the Stylus ................................................................................. 16
2.3 Using a SD/MMC Card....................................................................... 17
iii
Page 4

3 System Settings..............................................................................19
3.1 Using System Settings .......................................................................19
3.2 Backlight ............................................................................................. 20
3.3 Volume ............................................................................................... 21
3.4 Screen ................................................................................................ 21
3.5 Power ................................................................................................. 23
3.6 Date&Time.......................................................................................... 24
3.7 Switch Language ................................................................................ 25
3.8 Back 26
Part II. GPS Navigation ........................................................................27
4 Mio Map Overview ..........................................................................29
4.1 Navigation Terminology...................................................................... 29
4.2 Starting Mio Map ................................................................................30
Getting Help........................................................................................ 31
4.3 Map, Buttons, and Status Icons .........................................................32
Map Screen Buttons........................................................................... 32
Status Icons........................................................................................34
Zooming the Map................................................................................ 35
Dragging the Map (In 2D View Only).................................................. 35
4.4 Navigation Settings Menus................................................................. 36
4.5 Quitting Mio Map ................................................................................36
5 Basic Navigation.............................................................................37
5.1 Selecting an Origin ............................................................................. 37
5.2 Selecting a Destination....................................................................... 37
Using Address .................................................................................... 38
Using Point of Interest (POI) .............................................................. 42
Using Favorites................................................................................... 45
Using History ...................................................................................... 47
Using Map Cursor............................................................................... 48
Using Home........................................................................................49
5.3 Navigational Aids................................................................................ 49
Calculating a Route ............................................................................ 49
Recalculating the Route .....................................................................50
5.4 Show Route ........................................................................................ 51
5.5 Cancel Route......................................................................................52
iv
Page 5

6 More Navigation Features .............................................................53
6.1 Walker Mode ...................................................................................... 53
6.2 Avoid Roads ....................................................................................... 55
Creating a List of Roads to Avoid....................................................... 55
Selecting the Roads to Avoid ............................................................. 58
6.3 Favorites and Auto Alerts................................................................... 60
Creating Favorites.............................................................................. 60
Configuring Auto Alert Category ........................................................ 62
Managing Favorites............................................................................ 62
6.4 History ................................................................................................ 64
6.5 Trip Planner........................................................................................ 65
Part 1. Select Planner Mode .............................................................. 65
Part 2. Manually Select the Origin...................................................... 66
Part 3. Set Waypoints ........................................................................ 66
Part 4. Calculate the Route ................................................................ 70
6.6 Recording a Journey .......................................................................... 71
Playing a Recording ........................................................................... 72
Deleting a Recording.......................................................................... 72
7 Changing Map Views .....................................................................73
7.1 Types of View..................................................................................... 73
7.2 View the Route ................................................................................... 74
Turn by Turn....................................................................................... 74
Driving Directions ............................................................................... 76
7.3 Switch Maps ....................................................................................... 78
8 Options, Settings, and Preferences.............................................. 79
8.1 GPS Status......................................................................................... 79
8.2 Home Button Settings ........................................................................ 80
8.3 General Settings................................................................................. 81
8.4 Map Settings ...................................................................................... 81
8.5 Route Settings.................................................................................... 82
8.6 Alert Settings ...................................................................................... 83
8.7 Visual Notifications ............................................................................. 84
Part III. More Tools............................................................................... 85
9 MP3 Player ...................................................................................... 87
9.1 Starting and Exiting MP3 Player ........................................................ 87
9.2 Preparing the MP3 Files for You Device ............................................ 88
v
Page 6

9.3 Playing MP3 Files............................................................................... 88
MP3 Playback Control........................................................................89
9.4 Using Play Lists .................................................................................. 90
Creating a Play List ............................................................................90
Opening a Play List ............................................................................ 91
Managing Your Play Lists................................................................... 92
9.5 Equalizer............................................................................................. 92
10 Contacts: Tracking Friends and Colleagues................................93
10.1 Starting and Exiting Contacts ............................................................. 93
10.2 Creating a Contact.............................................................................. 94
10.3 Displaying the Contacts Summary Screen.........................................94
10.4 Editing or Deleting a Contact..............................................................95
11 Mio Transfer ....................................................................................97
11.1 Installing Mio Transfer ........................................................................ 97
11.2 Starting Mio Transfer .......................................................................... 98
11.3 Using MP3 Assistant .......................................................................... 99
Copying MP3 Files to Your Device..................................................... 99
Managing Your MP3 Files ................................................................ 100
11.4 Using ESync ..................................................................................... 101
11.5 Using Recover .................................................................................. 102
Part IV. References ............................................................................105
12 Troubleshooting and Maintenance .............................................107
12.1 Resetting Your System.....................................................................107
12.2 Troubleshooting................................................................................ 108
Power Problems ............................................................................... 108
Screen Problems .............................................................................. 109
Connection Problems ....................................................................... 109
GPS Problems..................................................................................110
12.3 Maintaining Your Device .................................................................. 110
13 Regulatory Information ................................................................113
13.1 Regulations Statements ...................................................................113
Class B Regulations ......................................................................... 113
European Notice............................................................................... 114
13.2 Safety Precautions ........................................................................... 115
About Charging................................................................................. 115
About the AC Adapter ...................................................................... 115
About the Battery.............................................................................. 115
vi
Page 7

Before You Begin
Precautions and Notices
For your own safety, do not operate the controls of the product while driving.
Use this product prudently. The product is intended to be used only as a
navigation aid. It is not for precise measurement of direction, distance,
location or topography.
The calculated route is for reference only. It is the user’s responsibility to
follow the traffic signs and local regulations along the roads.
When you get off the car, do not leave your device on the dashboard that is
subject to direct sunlight. The overheating of the battery can cause
malfunction and/or danger.
GPS is operated by the United States government, which is solely responsible
for the performance of GPS. Any change to the GPS system can affect the
accuracy of all GPS equipments.
GPS satellite signals cannot pass through solid materials (except glass). When
you are inside a tunnel or building, GPS positioning is not available.
A minimum of 4 GPS satellite signals is needed to determine current GPS
position. Signal reception can be affected by situations such as bad weather or
dense overhead obstacles (e.g. trees and tall buildings).
Other wireless devices in the vehicle might interfere with the reception of
satellite signals and cause the reception to be unstable.
vii
Page 8

A car holder is needed when using the device in a car. Be sure to place the
device in an appropriate place, so as not to obstruct the driver’s view, or
deployment of airbags.
Do not mount where the driver’s
field of vision is blocked.
Do not place unsecured
on the dashboard.
Do not mount in front of
airbag panels.
Do not mount in front of an
airbag field of deployment.
Features
GPS Navigation Features
Electronic maps of North America with roads, freeways, highways, railways,
rivers, lakes, points of interest, etc.
GPS positioning
Optimal route calculation and trip plan
Friendly and efficient navigation with turn-by-turn, voice, and visual guidance
Various ways for searching a location on the map
− Using a known address
− Using a POI (point of interest)
− Using Favorites (personal stored locations)
− Using History (previous destinations)
Viewing modes for different needs and situations:
− 2D, 2D Night, 3D, 3D Night view
− Turn-by-turn view of the route
− Driving direction of the route
Recording and playback of journeys
viii
Page 9

Other Features
MP3 Player: playing MP3 music.
Contacts: viewing and managing contacts information.
About this Manual
This manual is divided into four major parts:
Part I “Basic Operations” (Chapters 1 to 3) tells you how to get your device
running and customize system settings.
Part II “GPS Navigation” (Chapters 4 to 8) tells you how to use the GSP
navigation functions.
Part III “More Tools” (Chapters 9 and 11) introduces MP3 Player, Contacts,
and data transfer tools.
Part IV “References” (Chapters 12 and 13) gives guidelines on
troubleshooting and maintenance and provides the regulatory information.
ix
Page 10

Page 11

Part I. Basic Operations
Part I guides you through the process of getting your device running, familiarizes
you with the external components, and tells you how to customize system settings.
1
Page 12

Page 13
1 Getting Started
This chapter tells you step by step how to perform the initial startup and introduces
the components of your device.
1.1 Performing the Initial Start Up
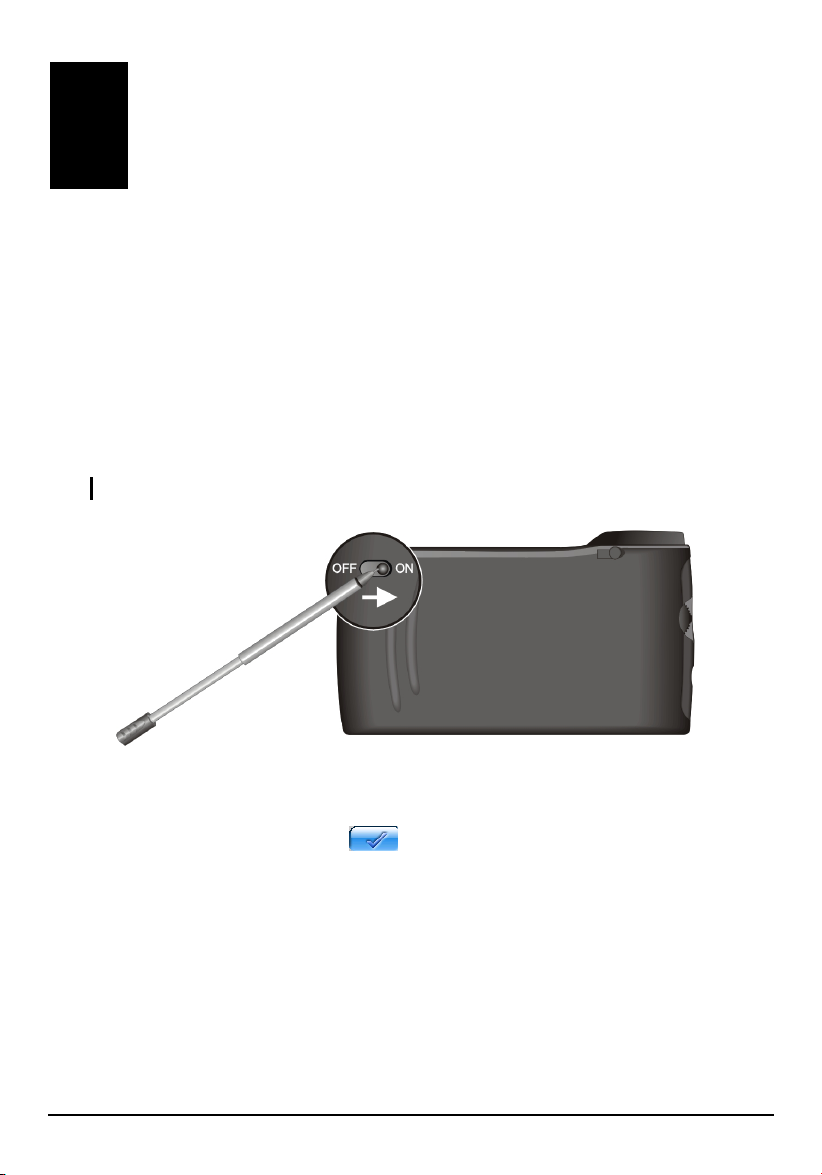
1. Pull out the stylus and use it to slide the ON/OFF switch to the ON (right)
position.
CAUTION: Always leave the ON/OFF switch in the ON position for normal operation.
2. Your device turns on and displays the “Switch Language” screen. You can tap
the left/right arrow to select a language if your region of purchase is a country
with multiple languages. Tap
3
to continue.
Page 14
NOTE: If multiple languages are available, you can change the language later on by tapping
Setting Switch Language. (See section 3.6 for details.)
3. The “Date&Time” screen appears. Tap the appropriate arrow button to select
the time zone, date, and time. Then tap
to continue.
NOTE: You can change the time zone, date, and time later on by tapping Setting
Date&Time. (See section 3.5 for details.)
4. The Home screen appears as shown below. You can now use your device.
4
Page 15
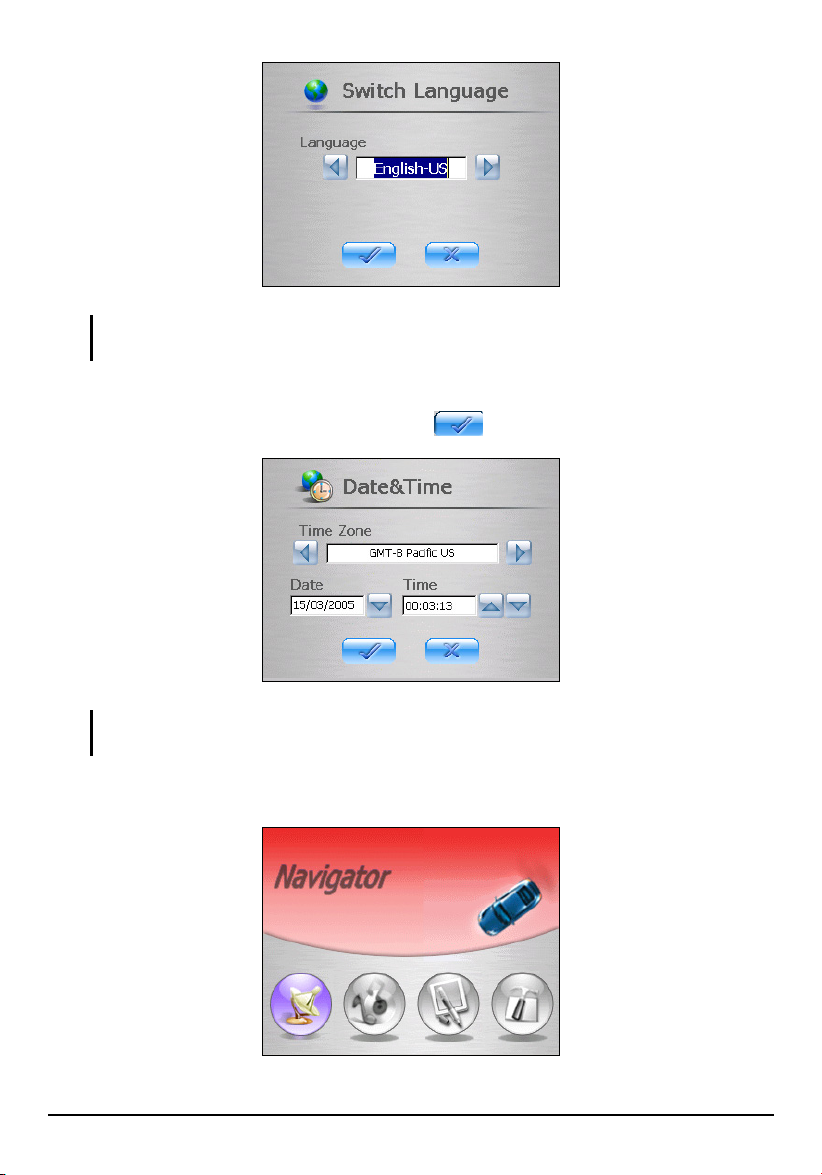
1.2 Connecting to AC Power and Charging the
r
r
Battery
Fully charge the battery before using your device for the first time.
1. Slide and click the connector converter onto the AC adapter.
2. Connect the adapter cable to the bottom of your device.
3. Plug the AC adapter into a wall outlet.
Converte
Charge Indicato
The charge indicator glows amber when charging is in progress. Do not disconnect
your device from AC power until the battery is fully charged, when the charge
indicator turns green. This will take a couple of hours.
NOTE:
When charging the battery for the very first time, you should charge it for at least 8 hours.
Do not immediately turn on your device after connecting the AC adapter to charge a
power-depleted battery. If you need to turn on the device again, wait for at least one
minute.
Depending on your region of purchase, the connector converter may not look exactly the
same as the picture shown.
5
Page 16
1.3 Using Your Device in a Vehicle
A car holder and a car charger are supplied with your device.
Using the Car Holder
CAUTION:
Select an appropriate location for the car holder. Never place the holder where the driver’s
field of vision is blocked.
If the car’s windshield is tinted with a reflective coating, an external antenna (optional) may
be needed to route the antenna to the top of the car through a window. When closing the
car window, be careful not to pinch the antenna cable. (Cars with an anti-jam window
design may automatically leave adequate space as needed.)
The car holder consists of a bracket and a flexible window mount. Use the car
holder to fix your device in a vehicle. (See the document supplied with the car
holder for the installation instruction.)
NOTE: Depending upon the specific model purchased, the car holder supplied with your
device may not look exactly the same as the picture shown.
6
Page 17
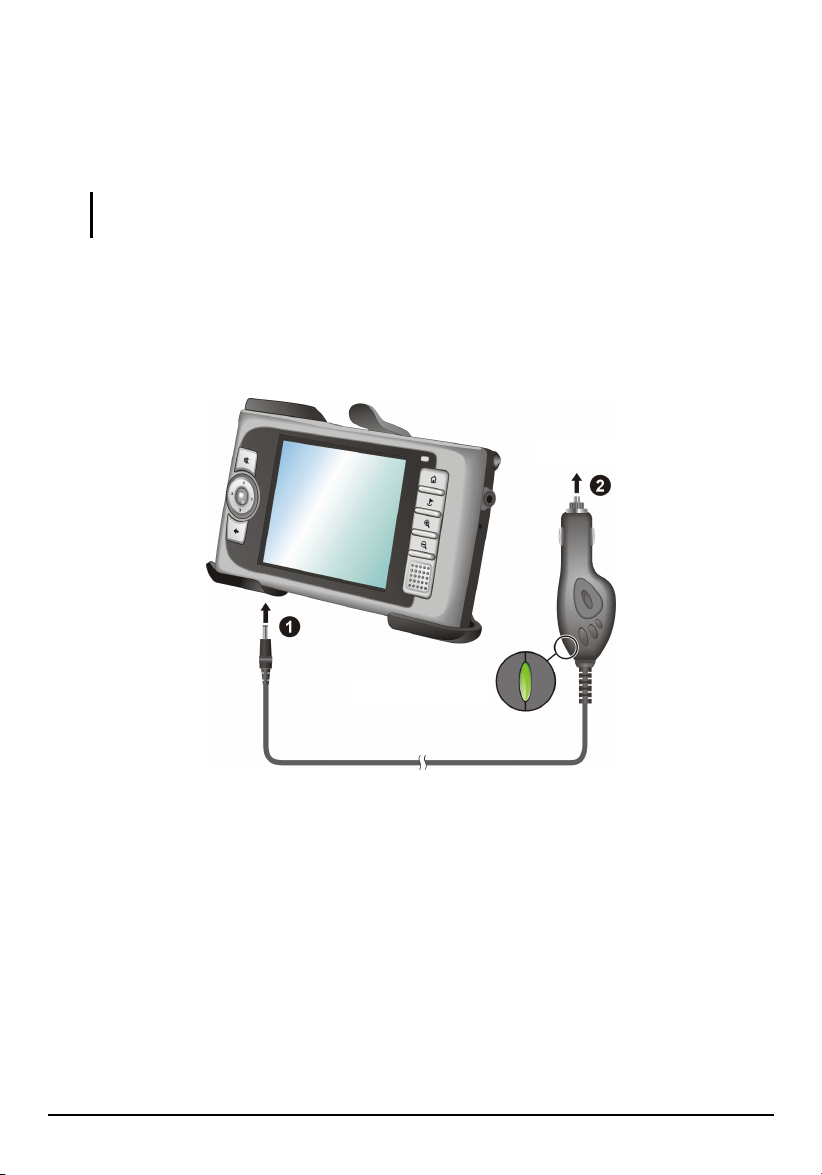
Connecting the Car Charger
r
The car charger supplies power to your device when you are using the device in a
car.
CAUTION: To protect your device against sudden surges in current, connect the car charger
only after the car engine has been started.
1. Connect one end of the car charger to the power connector of your device.
2. Connect the other end to the cigarette lighter in the car to power and charge
your device. The indicator on the car charger lights in green to indicate that
power is being supplied to your device.
To Cigarette Lighter
Power Indicato
7
Page 18
1.4 Understanding Hardware Features
NOTE: Depending upon the specific model purchased, the color of your device may not exactly
match the device shown in this manual.
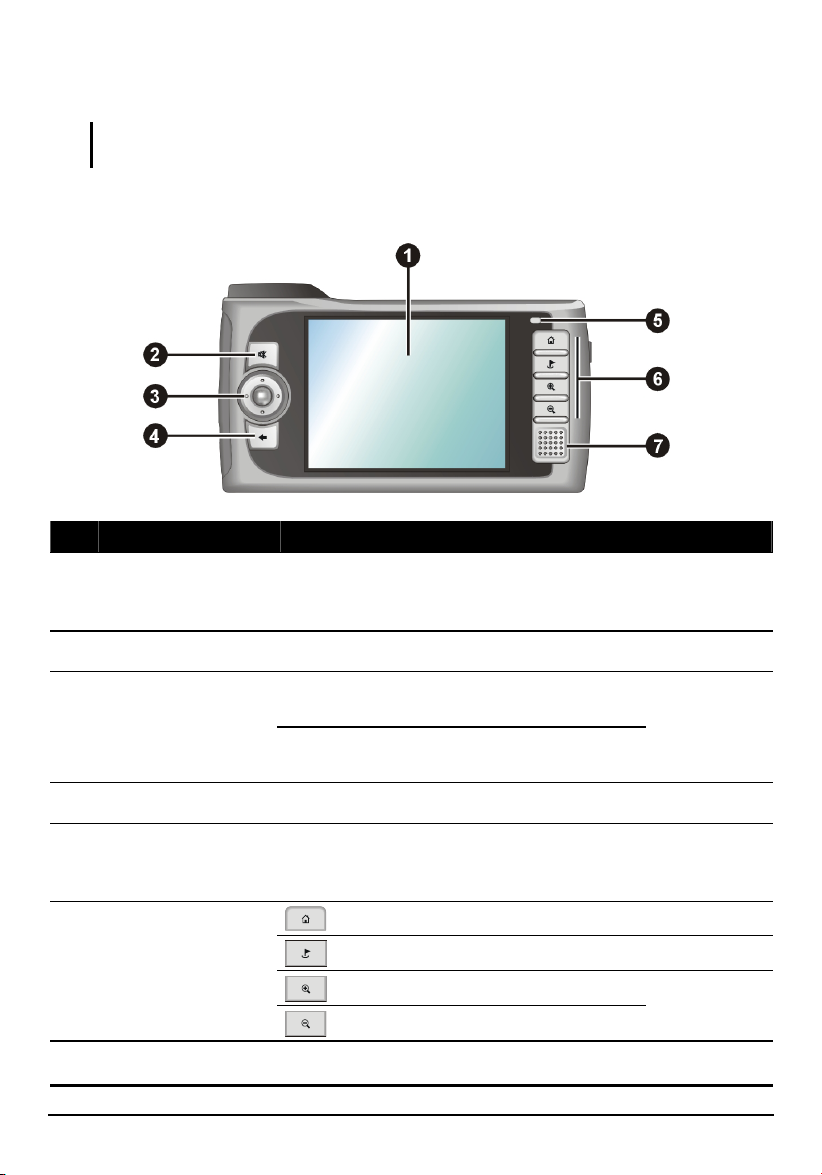
Front Components
Ref Component Description See Also
Touch Screen
Mute Button
Navigation Pad
Back Button
Charge Indicator
Quick Buttons
]
Displays the output of your device. Tap the
screen with the stylus to select menu
commands or enter information.
Toggles the mute on and off. Section 2.2
Moves up, down, left or right by pressing the
corresponding area of the pad.
Selects highlighted item by pressing in the
center.
Goes back to the previous screen. Section 2.2
Glows bright amber to indicate that the
battery is charging, and turns green when the
battery is fully charged.
Home
Navigation Settings
Zoom In
Section 2.2
Section 1.2
Section 2.2
Chapters 5~8
Section 4.3
8
^
Speaker
Zoom Out
Sends out music, sounds and voice.
Page 19
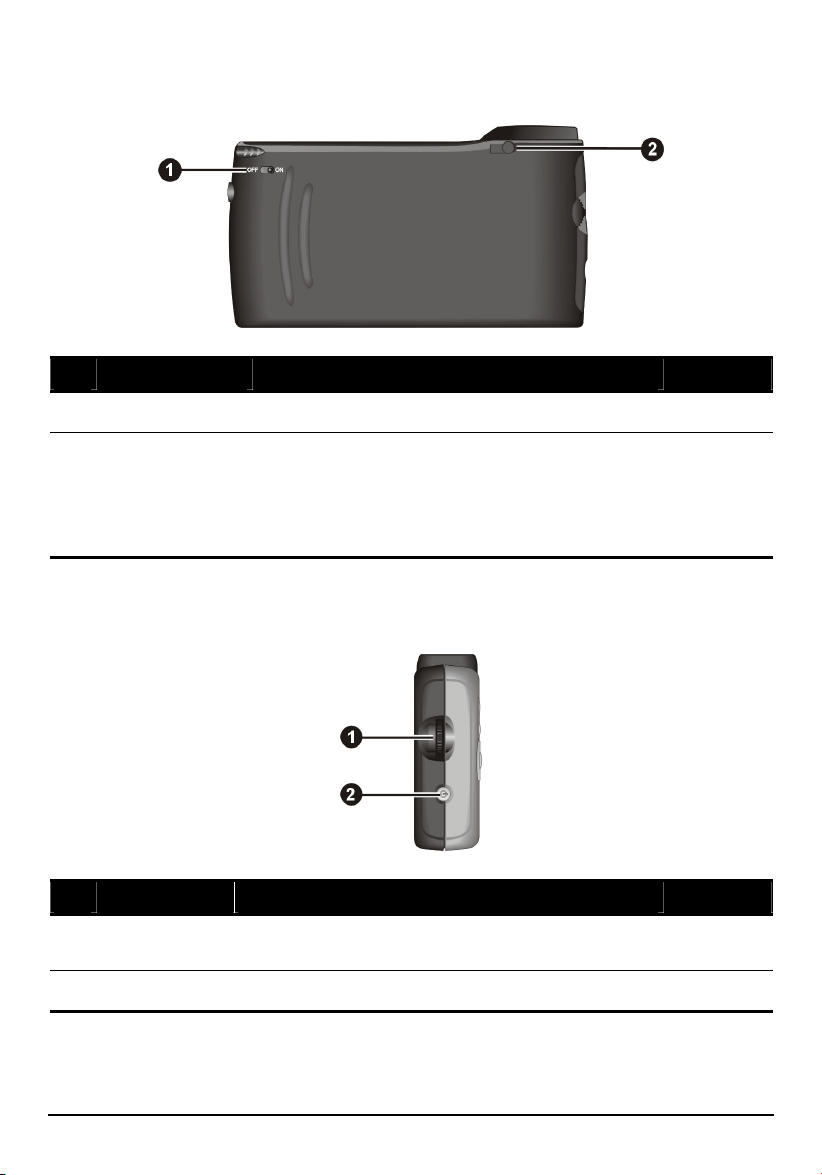
Back Components
Ref Component Description See Also
ON/OFF Switch
External
Antenna
Connector
The main power/battery cutoff switch. Section 1.1
This connector (under rubber dust cover) allows
use of an optional external antenna with magnetic
mount, which may be positioned on top of the car
for better signal reception in areas with poor
reception.
Left-Side Components
Ref Component Description See Also
Volume
Control
Power Button
Adjusts the volume level of your device. Section 2.2
Turns on and off the device. Section 2.1
9
Page 20
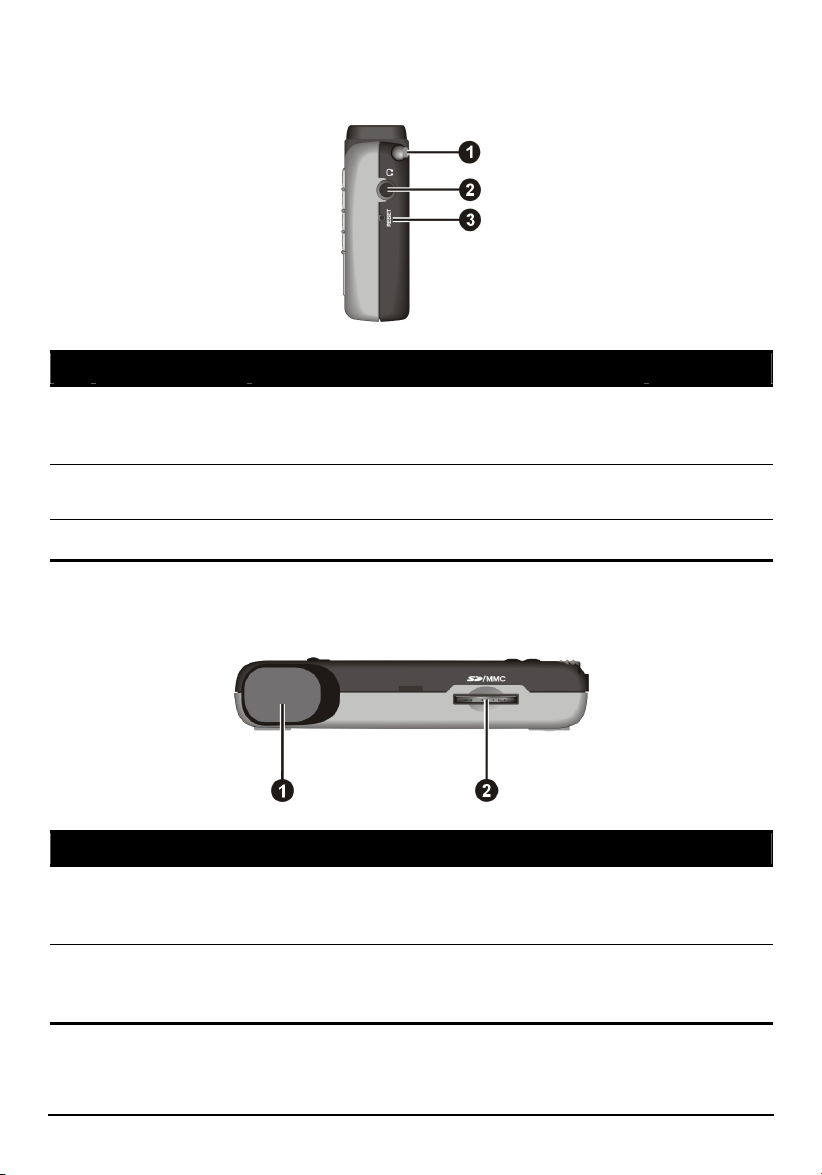
Right-Side Components
Ref Component Description See Also
Stylus
Headphone
Connector
Reset Button
Tap on the touch screen to make selections and
enter information. Pull the stylus out of its slot
to use it, and store it in the slot when not in use.
Connects to stereo headphones.
Restarts your device (soft reset). Section 12.1
Section 2.2
Top Components
Ref Component Description See Also
GPS antenna
SD/MMC Slot
Receives signals from the GPS satellites
overhead. Make sure that it has a clear view of
the sky.
Accepts a SD (Secure Digital) or MMC
(MultiMediaCard) card for accessing data such
as MP3 music.
Section 2.3
10
Page 21
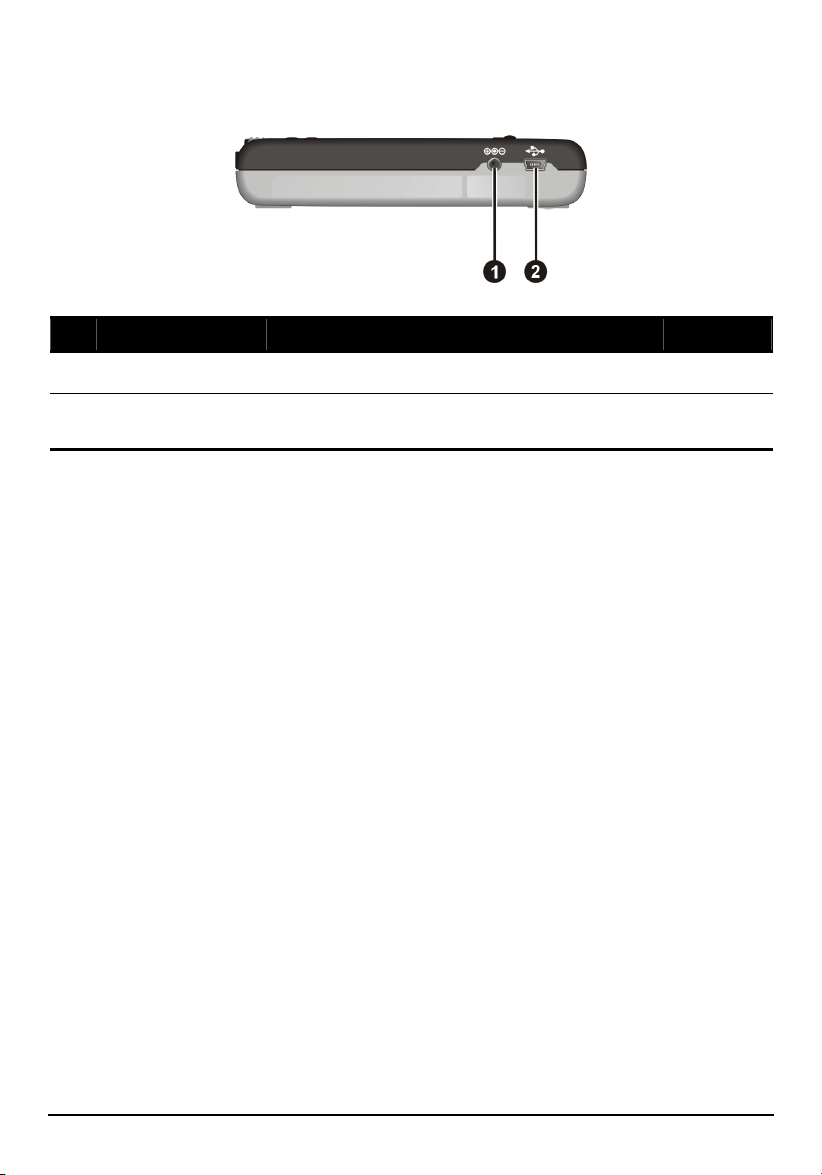
Bottom Components
Ref Component Description See Also
Power Connector
Connects to the AC adapter. Section 1.2
Mini-USB
Connector
Connects to your computer for data transfer. Chapter 11
11
Page 22

Page 23
2 Basic Skills
This chapter familiarizes you with the basic operations of your device such as
using the Home screen and the hardware components.
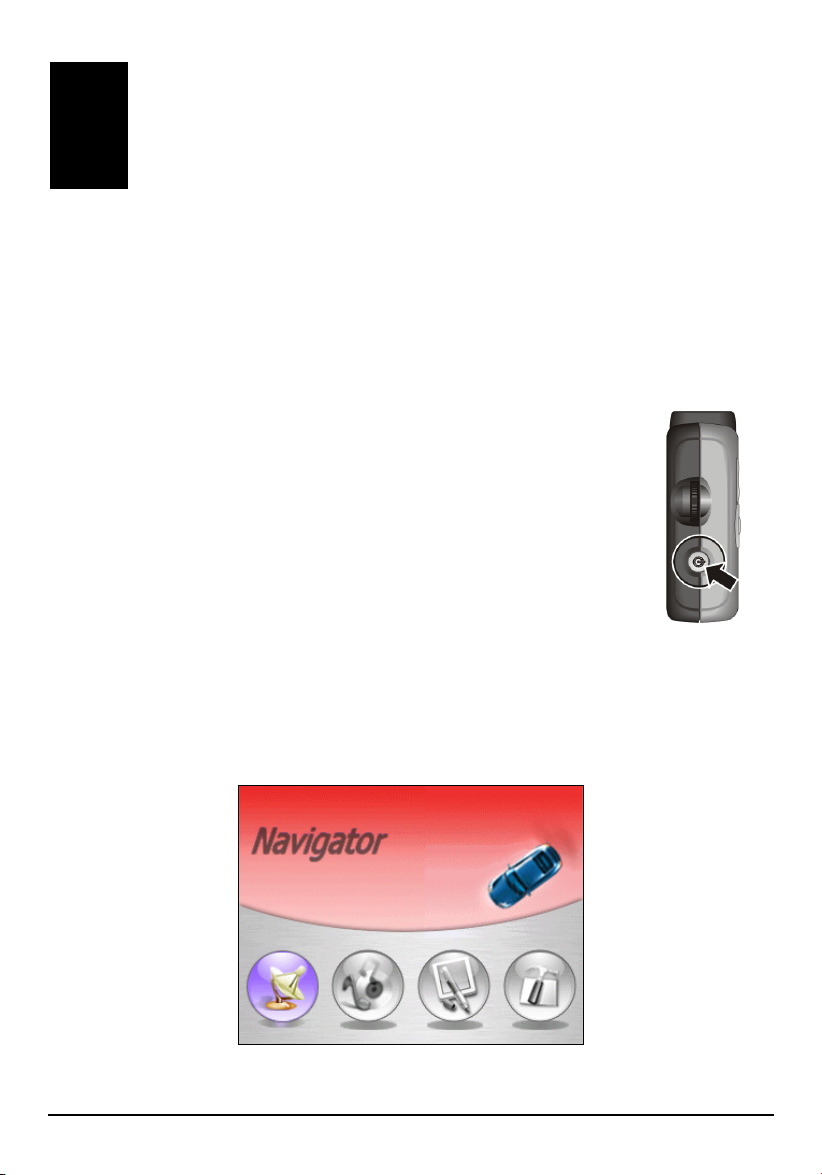
2.1 Turning On and Off Your Device
Use the power button on the side of your device to turn on and off
your device.
When you press the power button to turn off the unit, your device
actually enters a suspend state and the system stops operating.
Once you turn on the system again, it resumes.
Home Screen
The first time you turn on your device, the Home screen appears. The Home screen
is your starting place for various tasks. Tap a button to start an application or open
another menu screen.
X Y Z [
13
Page 24

Ref Button Description See Also
Navigator
X
Music
Y
Tool
Z
Setting
[
Starts the Mio Map navigation software. Chapters 4~8
Enables you to play MP3 files. Chapter 9
Allows you to view and manage your contacts
information.
Allows you to customize system settings. Chapter 3
Chapter 10
Whenever you quit an application, you are back to the Home screen. You can also
access the Home screen at any time (except when running the navigation software)
by pressing the Home button
.
2.2 Operating Your Device
To operate your device, use the hardware buttons and/or the stylus.
Using Hardware Buttons
Button Name Description See Also
Mute
Back
Home
Navigation
Settings *
Toggles mute on and off.
Goes back to the previous screen.
Not in Navigator:
Returns to the Home screen.
In Navigator:
Defines an address or a POI as your home
destination.
- or -
Navigates from your GPS position to your home
destination if you have already set the home
destination.
Access to 22 different navigation related tools
categorized under Destinate, View and
Options menu screens.
Press the button repeatedly to cycle through the
available menus.
Section 6.1
Chapters 5~8
14
Page 25

Zoom In *
Zoom Out *
* Table Note: This button works only when running the navigation software.
Increases the map scale.
Decreases the map scale.
Using the Navigation Pad
Section 4.3
With the navigation pad, you can move up, down, left and
Up
right within a menu.
To move in a direction, simply press the corresponding
arrow on the button. To activate the selected item, press
the center of the button.
Left
Down
Right
Using the Volume Control
You device provides 10 volume levels (from mute to the maximum). When you
use the volume control on the left side of the device to adjust volume, bar(s) will
appear on the screen to indicate the current volume level.
Up
To increase the volume
Rotate the volume control upward and then release.
To decrease the volume
Rotate the volume control downward and then release.
Down
15
Page 26
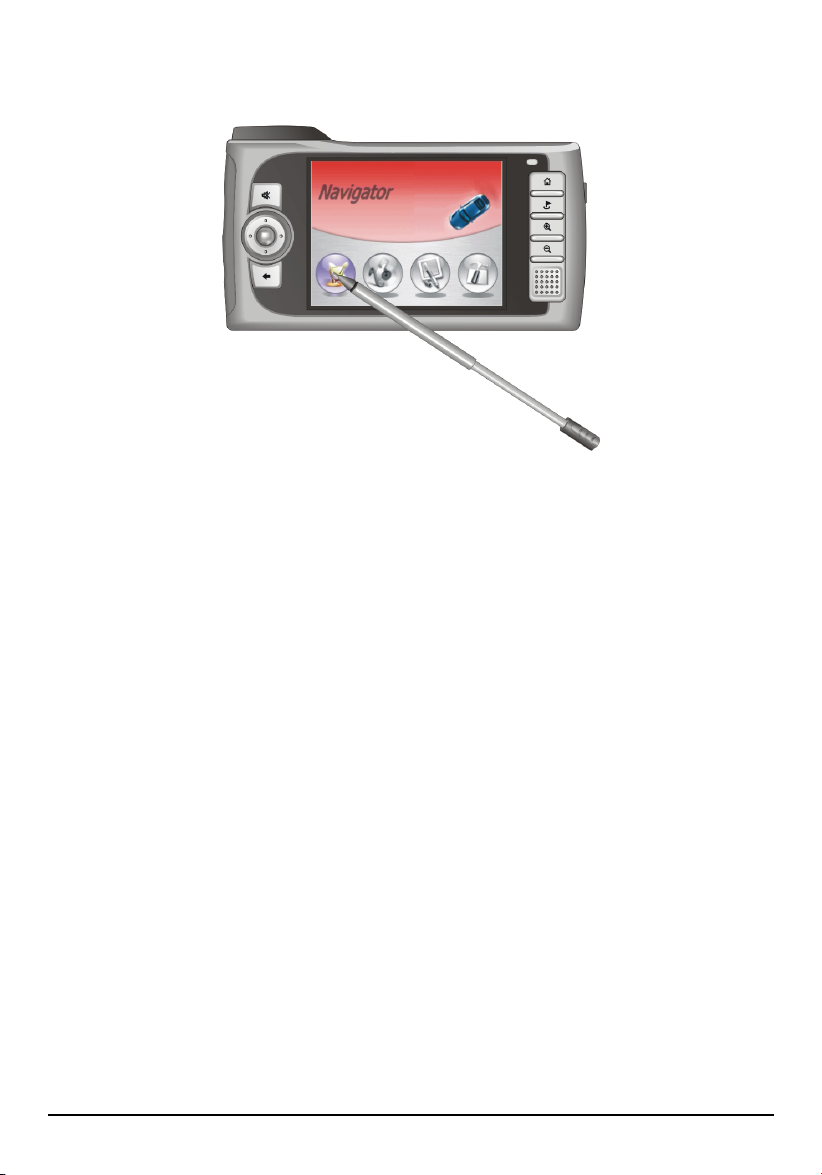
Using the Stylus
The stylus is your input device. You use it to navigate and select objects on the
screen.
Pull the stylus out of the slot and extend it for ease of use. Store it in the slot when
not in use.
You can use the stylus to do the following actions:
Tap
Touch the screen once with the stylus to open items or select options.
Drag
Hold the stylus on the screen and drag up/down/left/right or across the screen.
Tap and hold
Tap and hold the stylus until an action is complete, or a result or menu is
shown.
16
Page 27
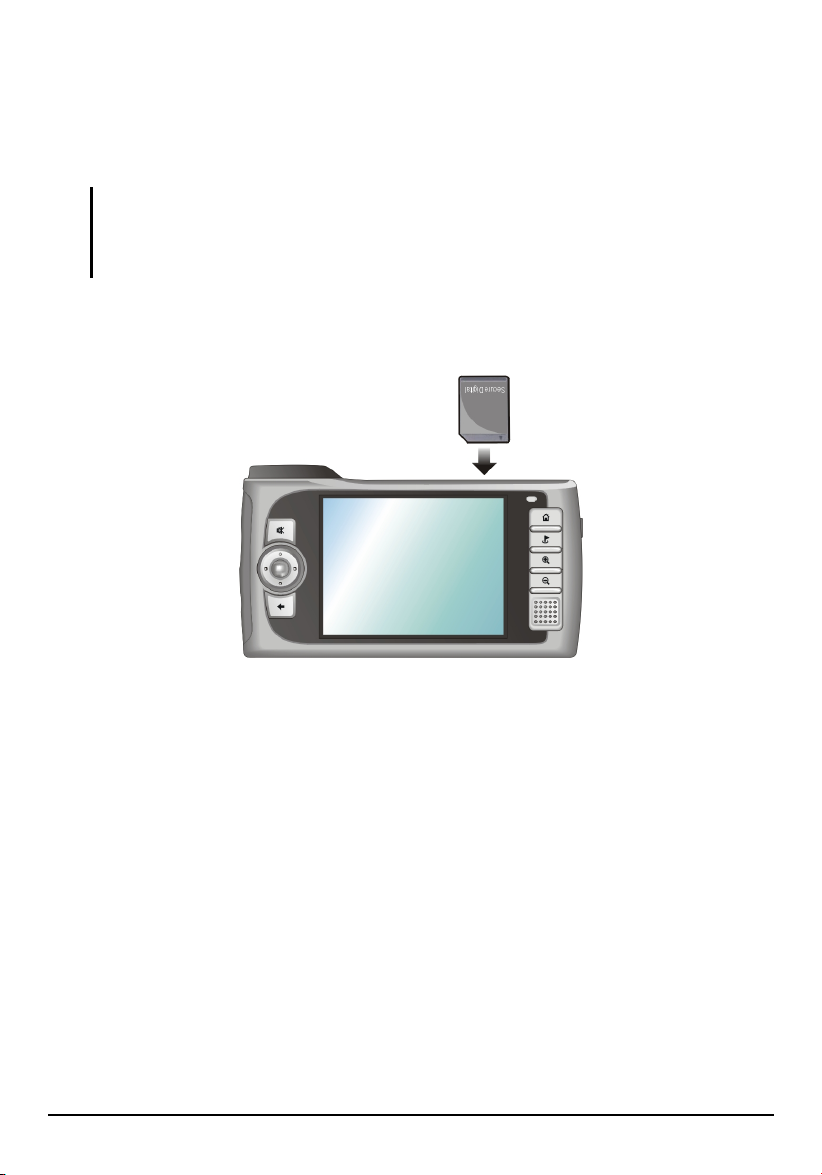
2.3 Using a SD/MMC Card
Your device has a SD/MMC slot where you can insert an optional Secure Digital
or MultiMediaCard storage card.
NOTE:
Make sure that no foreign objects enter the slot.
Keep a SD or MMC card in a well-protected box to avoid dust and humidity when you are
not using it.
To use a SD/MMC card, insert it into the slot, with the connector pointing to the
slot and its label facing the front of the device.
To remove a card, first make sure that no application is accessing the card, then
slightly push the top edge of the card to release it and pull it out of the slot.
17
Page 28

Page 29
3 System Settings
Your device has default system settings. You can customize the settings to suit
your personal needs. Once you change settings, your new settings will remain until
you change them again.
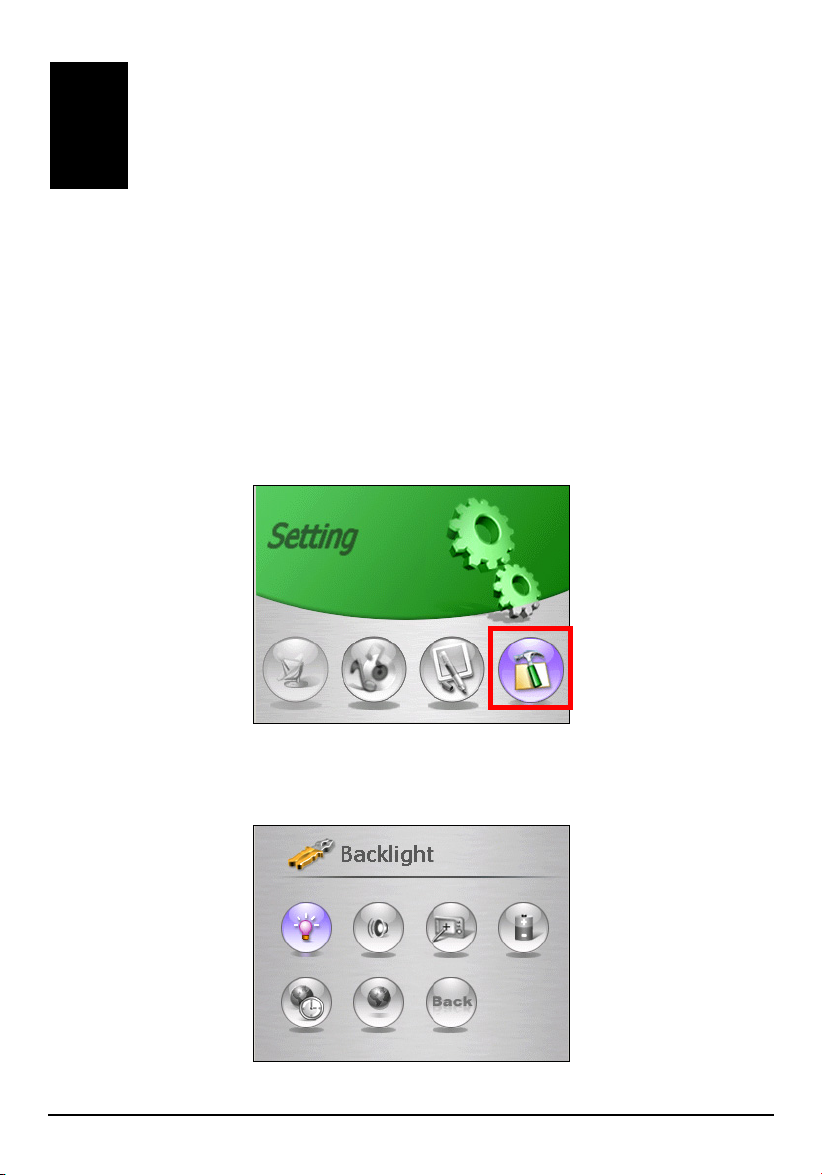
3.1 Using System Settings
To open the Settings screen, tap the Setting button on the Home screen.
The Settings screen contains seven buttons as shown below. The following
sections describe these buttons and their functions.
19
Page 30
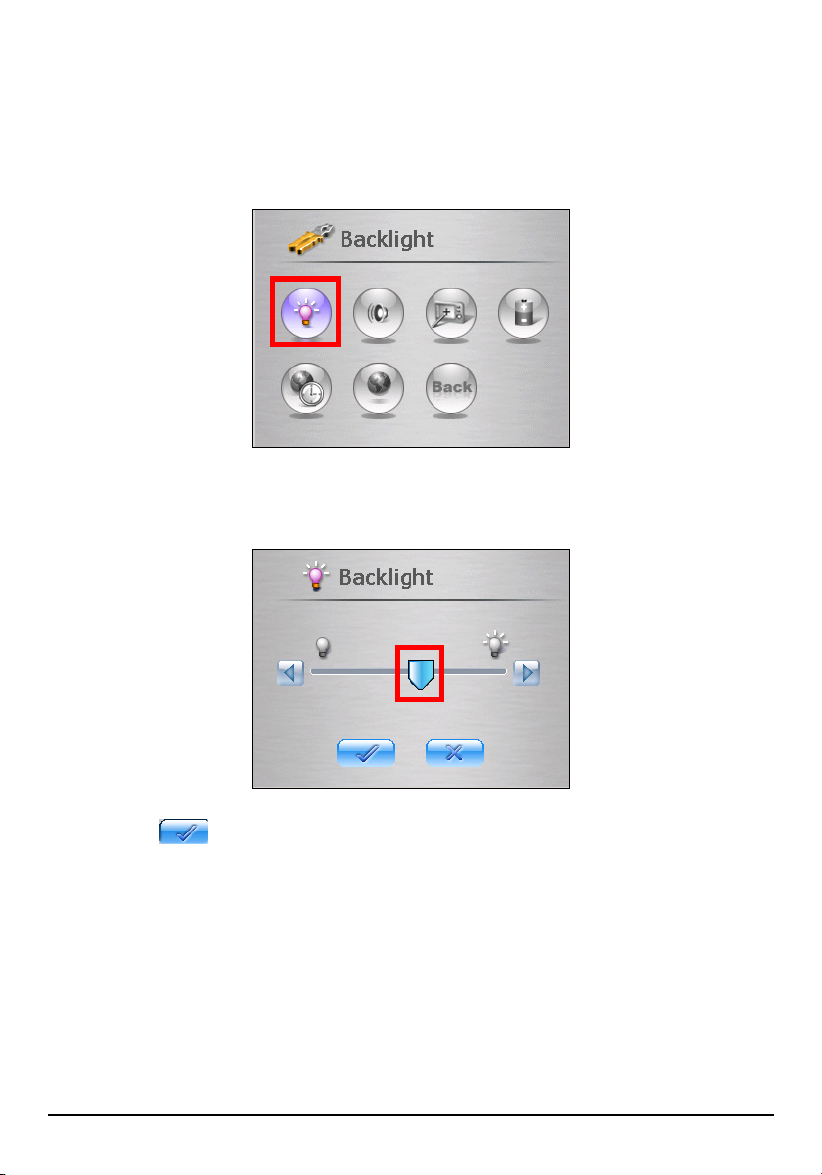
3.2 Backlight
1. Tap the Setting button on the Home screen to open the Settings screen.
2. Tap the
3. Move the slider along the track bar to adjust. To darken the screen, move the
slider to the left. To lighten the screen, move the slider to the right.
Backlight button on the Settings screen.
4. Tap the
20
button to save the changes and go back to the Settings screen.
Page 31

3.3 Volume
1. Tap the Setting button on the Home screen.
2. Tap the
3. Move the slider along the track bar to adjust. To decrease the volume, move
the slider to the left. To increase the volume, move the slider to the right.
Volume button on the Settings screen.
4. Tap the
button to save the changes and go back to the Settings screen.
3.4 Screen
You can calibrate the touch screen if it is not responding accurately to your stylus
taps.
1. Tap the Setting button on the Home screen.
2. Tap the
21
Screen button.
Page 32

3. Tap
4. Tap and hold at the center of the target.
to start the calibration.
5. When the target moves to another position, tap and hold at the center of the
new target. Repeat each time to complete the calibration process.
6. When completed, tap
button to return to the Settings screen.
22
Page 33

3.5 Power
To check the remaining power level of your battery and/or set up the power saving
feature:
1. Tap the
2. Tap the
3. The Power screen appears showing the remaining power of your battery.
You can set a timer to automatically turn off your device when it is idle for a
set period of time. The options include Never, 30 minutes, 20 minutes, and
10 minutes.
Setting button on the Home screen.
Power button.
NOTE: If the level of power is too low, be sure to charge the battery with the AC adapter or the
car charger.
4. Tap the
button to save the changes and go back to the Settings screen.
23
Page 34

3.6 Date&Time
To set the date and time:
1. Tap the
2. Tap the
3. To change the time zone, tap the left/right arrow in the Time Zone item.
Setting button on the Home screen.
Date&Time button.
4. To change the date, tap the down arrow in the Date item. A calendar pops up.
Tap the left arrow on the calendar to go to the earlier month and year or the
right arrow to the later month and year. Alternatively, you can tap the month or
year on top of the calendar to directly change the month or year.
When the calendar shows the current month, tap the date on the calendar.
24
Page 35

5. To set the time, first tap the hour, minute, or second in the Time item and then
tap the up arrow to increase or down arrow to decrease the value.
6. Tap the button to save the changes and go back to the Settings screen.
3.7 Switch Language
To change the system and voice language:
1. Tap the
2. Tap the
3. If your device supports multi-languages, tap the left or right arrow to select the
system language.
Setting button on the Home screen.
Switch Language button.
25
Page 36

NOTE: The available language options depend on your region of purchase.
4. Tap the button to save the changes and go back to the Settings screen.
The language change will take effect after you exit the Settings screen.
3.8 Back
The Back button brings you back to the Home screen.
26
Page 37

Part II. GPS Navigation
Part II tells you how to use the Mio Map GPS navigation software.
27
Page 38

Page 39

4 Mio Map Overview
Mio Map is a full-featured mobile satellite navigation software. Utilizing the
onboard GPS (Global Positioning System), Mio Map can pinpoint your location
and give accurate directions to your destinations with turn-by-turn, voice, and
visual guidance.
NOTE: In case the map data or Mio Map software in the hard drive is lost or damaged, you
can use the Recover tool to restore. (See section 11.5 for instructions.)
4.1 Navigation Terminology
Get familiar with some terminology used by Mio Map and you are ready to start.
GPS
Route
Origin
Destination
Destinate
Navigation
GPS (Global Positioning System) is a “constellation” of 24
well-spaced satellites that orbit the Earth and make it possible
for vehicles/people/assets enabled with GPS antennas to
pinpoint their location.
Route is a course calculated by Mio Map, starting from the
origin to the destination.
Origin is your starting point for a route. It is either your GPS
position or a location selected by you on the map.
Destination is your end point for a route.
Destinate is the menu that provides you with several ways of
selecting a location, including Address, POI, Favorites and
History.
Navigation is the process where Mio Map leads you from your
origin to your destination.
29
Page 40

Navigate
Navigate is the command that you use, after determining the
origin and destination, to calculate a route and start navigation.
Navigation mode
vs.
Planner mode
Mio Map can operate in either of the two modes:
Navigation Mode
This is the default mode of operation. In this mode, GPS
positioning is on. A blue route with a moving icon shows
your progress.
Planner Mode
In this mode, GPS positioning is off. Mio Map displays
planned calculated routes, but not your progress.
Vehicle mode
vs.
Walker mode
Mio Map can operate in either of the two travel modes:
Vehicle Mode
This is the default travel mode. An icon of green car
indicates your GPS position on the map.
Walker Mode
This mode is ideal when you are walking instead of driving.
In this mode, an icon of footsteps indicates your GPS
position. Several functions are closed while in this mode.
4.2 Starting Mio Map
1. Make sure that either the external power is available or the battery has power.
2. Make sure that the GPS antenna has a clear view of the sky.
3. Press the power button to turn on your device. If you see another program
screen (such as MP3 player), exit the program to go back to the Home screen.
4. Tap the
Navigator button on the Home screen to start the Mio Map navigation
program.
NOTE: Whenever you start Mio Map, an agreement screen appears. Tap Agree or press the
Back key to use Mio Map.
30
Page 41

5. When you start Mio Map for the very first time, the default map in use is
Pacific, Mountain. You must select a map that matches your location. To
switch to another map, press the Navigation Settings button
tap
Switch Maps. (See section 7.3 for details.)
twice and
6. After the map is loaded, GPS positioning automatically starts. Once the system
has a fix on your position, you will see a green car icon
on the map
indicating your current position.
NOTE:
For initial positioning, make sure that you remain at the same spot with a clear view of the
sky. The GPS may take a few minutes to find its current location initially.
The descriptions above assume that you are in the default Navigation mode (for Planner
mode, see section 6.5) and Vehicle mode (for Walker mode, see section 6.1).
You can tap the
status. (See section 8.1 for further information.)
icon at the bottom right corner of the screen to check the current GPS
Getting Help
Mio Map has a tutorial available with basic navigational definitions and
instructions. At the map screen, press the Navigation Settings button twice to
access the Options menu and tap
Help.
31
Page 42

4.3 Map, Buttons, and Status Icons
r
The map screen contains a scalable map in the middle, map screen buttons along
the left side, and status icons along the right side.
Show Direction
GPS position
Compass
Map Views
GPS-Generated
Details
Route Details
Map Scale Indicato
Travel Mode
Power Status
GPS Status
Map Screen Buttons
Map screen buttons provide a quick way to switch modes or view information
without leaving the map screen. They operate in a cyclic way. The current icon
indicates the next mode to use or item to display. See the table below for
descriptions of the buttons.
Name Description See Also
Show Directions
Tap to show the next turn or driving direction
information. This button works only after a route has
been calculated.
Tap to show the next turn information in a
details bar.
Tap to show a complete list of driving
directions.
Tap to close the driving direction screen.
Section 7.2
32
Page 43

Map Views
s
Tap to switch the map view to one of the following. Section 7.1
GPS-Generated
Details
Route Details
2D Night view
3D view
3D Night view
2D view
Tap to display GPS-generated details as below in a detail
bar. This button works only when there is a GPS fix.
Current time and power status
Latitude and longitude of the current GPS
position
Street name of the current GPS position
Altitude of the current GPS position
Current driving or moving speed
Tap to close the GPS details bar.
Tap to display details of the calculated route as below.
This button works only after a route has been calculated.
ETA and ETR information of your route
Distance to your destination
Tap to close the route details bar.
33
Page 44

NOTE: Map screen buttons are still valid for tapping even though they dim out after a short
period of time.
Status Icons
Status icons show the current status of Mio Map. You can also tap some of the
icons to view details or switch to a different mode. See the table below for
descriptions of the icons.
Name Icon Description See Also
Compass
Travel Mode
Power Status
GPS Status
Shows the direction of north.
Indicates that you are currently in Vehicle
mode. Tap to switch to Walker mode.
Indicates that you are currently in Walker
mode. Tap to switch to Vehicle mode.
Displays the battery status with the yellow
segment indicating the remaining battery
level. When the battery power is low, a
warning message will appear.
Indicates that AC power is in use.
A red icon indicates that no GPS fix is
available. Tap to display the GPS status
screen.
A green icon indicates that there is a GPS fix.
Tap to display the GPS status screen.
Section 6.1
Section 8.1
34
Page 45

Zooming the Map
You can zoom the map from 100 yards (75 meters) to 1000 miles (1500 km). To
zoom in or out the map, press the Zoom In button
NOTE: You may need to press the Zoom In or Zoom Out button several times for the map
scale indicator to update.
or Zoom Out button
Automatic Zoom On
While in Navigation mode, the Automatic Zoom mode is turned on by default.
The zoom level automatically adjusts for the current speed of the vehicle. You can
still manually zoom in/out to override the auto zoom. After a few seconds, the
zoom level automatically returns to the default setting.
Automatic Zoom Off
If you turn off Automatic Zoom mode, you can zoom in or out manually and the
map display will remain at that level. To turn off Automatic Zoom, just press the
Navigation Settings button
Automatic Zoom.
twice and tap
Map Settings, then un-tick
Dragging the Map (In 2D View Only)
.
When you drag the screen with the stylus, the map moves accordingly. You can
also use the navigation pad on your device to scroll the map in all four directions.
However, the map always returns to the GPS position if there is a GPS fix.
35
Page 46

4.4 Navigation Settings Menus
Press the Navigation Settings button
Options, and Settings menus.
Destinate Menu
Provides ways and options for selecting
your destination.
Options Menu
Provides route and map options.
Settings Menu
Allows you to customize Mio Map settings.
repeatedly to cycle through Destinate,
4.5 Quitting Mio Map
Always quit Mio Map when you have finished using the program.
To quit, tap the Back button
36
on your device and tap Yes.
Page 47

5 Basic Navigation
For Mio Map to calculate a route, you need an origin (starting point) and a
destination (end point). Then, you can start your journey with Mio Map guiding
you along the roads.
NOTE: This chapter assumes that you are in the default Navigation and Vehicle mode. To
know how to use the other modes (Planner mode and Walker mode), see sections 6.5 and 6.1
respectively.
5.1 Selecting an Origin
By default, you origin is your GPS position.
5.2 Selecting a Destination
You can easily select a destination from any of the followings:
A known address, intersection, or zip code
A Point Of Interest (POI) from the list
A location in Favorites (personal stored locations)
An address in History (previous destinations)
A location on the map (with stylus taps)
Home (predefined location)
NOTE: If there are roads that you want Mio Map to avoid when calculating a route, use the
Avoid Roads function. (See section 6.2 for instructions.)
37
Page 48

Using Address
r
If you have information such as address, intersection, or zip code of your
destination, you can use this method to select a location.
1. Press the Navigation Settings button
once and tap Address.
2. By default, the sequence for entering the address is
City Street Number.
Displayed on the screen is the city name that tops the city list in the
alphabetical order.
Sequence change
Scroll list
Input field
Information
Tap to expand scroll list.
Key letter search
Soft keyboard
Space ba
Keyboard switch
Backspace
NOTE:
By tapping Region, you can switch to another map. This cross-region navigation feature
allows you to navigate a route that extends across more than one region (map).
You can change the sequence for entering the address using the button. (See the
subsection later on for instructions on using a different address sequence.)
When using the soft keyboard, tap the
button once to switch to the alphabetical-order
keyboard and twice to switch to the number/symbol keyboard.
38
Page 49

3. Use one of the following ways to select a city.
Search from the full scroll list. (This method is slower.)
Tap the
button to expand the scroll list of all the cities in the
current region. You can then scroll through the list and tap (highlight) the
desired city.
Use the soft keyboard.
Tap the soft keyboard to enter the first few characters of the city name. As
you enter characters, the scroll list updates according with the first match
displaying on the screen. For more matching choices, tap the
button to expand the scroll list and tap (highlight) the desired city.
Scroll to select.
Tap to close the
scroll list.
Input field
Use the key letter search.
If you don’t know the entire name of a city, you can type in part of the
name and tap the
button. Then tap the
button to expand the
scroll list that displays all names containing your typed sequence and tap
(highlight) the desired city.
39
Page 50

NOTE: To close the scroll list, tap the button.
4. After selecting the city, tap Street to select the street name. You can select the
street name the same way you select the city name.
5. After selecting the street, tap
Number. Tap twice to switch to the numerical
keyboard and enter the numbers.
NOTE: Tapping provides more information on the selected location.
6. You can preview your destination by tapping Show (top toolbar).
40
Page 51

7. To calculate the route, tap
Navigate (top toolbar). The route is shown as a
highlighted blue line starting from your origin to your destination. (See section
5.3 for more information.)
Using a Different Address Sequence
Tapping the
address.
City Street Number
This is the default sequence.
Street City Number
This sequence is recommended for larger cities.
Zip Street Number
Street Zip Number
Intersection
If your destination is an intersection and you know the names of the two
streets, you can use this method. After you select the first street and tap the
Street (top of the screen), the names of the streets that intersected with the
next
first street are displayed. You can then select the second street.
button cycles through the different ways of specifying your
41
Page 52

Using Point of Interest (POI)
POI on a map represents local places of interest or importance. POIs are identified
on the maps by various icons (e.g.
Mio Map allows you to choose your destination from a vast database of POIs. POI
navigation is especially handy when you need to find a facility, attraction or
amenity by the type or sort. For example, you can ask Mio Map to guide you to the
closest bank, mall, hotel, restaurant, gas station, etc.
for Banks or for Restaurants).
1. Press the Navigation Settings button
2. In the category list, tap (highlight) the desired category name (not the check
box). You can scroll up or down for other choices. Expand categories with a
[+] beside them for more detailed choices.
once and tap POI.
42
Page 53

NOTE:
By tapping Region, you can switch to another map. This cross-region navigation feature
allows you to navigate a route that extends across more than one region (map).
A check mark () before a category means that the POI icons will display on the map.
The plus sign (+) located to the left indicates that the main category contains at least one
sub-category (e.g. Restaurants - Italian, Indian, Barbecue or Cajun).
3. Tap Items. Use one of the following ways to select a POI.
NOTE: The POIs are listed in order of distance. To sort them alphabetically, tap the
button.
Search from the full scroll list.
Tap the
button to expand the list of all the POIs matching the
selected category or categories. You can then scroll through the list and
tap (highlight) the desired POI.
Use the soft keyboard.
To speed up the selection if you know the name of the POI, tap the soft
keyboard to enter the first few characters of the name. As you enter
characters, the scroll list updates according with the first match displaying
on the screen. For more matching choices, tap the
button to expand
the scroll list and tap (highlight) the desired POI.
43
Page 54

Use the key letter search.
If you don’t know the entire name of a POI, you can type in part of the
name and tap the
button. Then tap the
button to expand the
scroll list that displays all names containing your typed sequence and tap
(highlight) the desired city.
NOTE:
To close the scroll list, tap the button.
Tapping provides more information on the selected location.
4. You can preview your destination by tapping Show (top toolbar).
5. To calculate the route, tap
Navigate (top toolbar). The route is shown as a
highlighted blue line starting from your origin to your destination. (See section
5.3 for more information.)
POI Settings
By default, Mio Map displays POIs in a 50-mile search radius with your current
origin as the center. You can change the radius and center by using
toolbar) Settings.
The Search Radius options are Whole Map, 100 mi, 50mi, 25mi, 12mi, 6mi, and
3mi. The Search Center options are Current Location, Address, Favorites, and
History.
NOTE: POI settings will always return to the default values when you next use the POI
function.
44
Tools (top
Page 55

Using Favorites
Favorites is a collection of locations previously stored by you for future use. (See
Section 6.3 for information on creating Favorites.)
You can select a destination from the list of stored
1. Press the Navigation Settings button
2. In the category list, tap (highlight) the desired category name (not the check
box).
NOTE: A check mark () before a category means the Favorites icons will display on the
map.
Favorites.
once and tap Favorites.
45
Page 56

3. Tap
Items. The favorite items for the selected category are listed.
4. Tap (highlight) the desired item.
5. You can preview your destination by tapping
6. To calculate the route, tap
Navigate (top toolbar). The route is shown as a
Show (top toolbar).
highlighted blue line starting from your origin to your destination. (See section
5.3 for more information.)
46
Page 57

Using History
Use History to select an existing destination from a list of previously traveled
destinations. Mio Map automatically stores the last few destinations in memory.
(See section 6.4 for more information.)
1. Press the Navigation Settings button
2. Tap (highlight) the desired item in the history list.
once and tap History.
3. You can preview your destination by tapping
4. To calculate the route, tap
highlighted blue line starting from your origin to your destination. (See section
5.3 for more information.)
Navigate (top toolbar). The route is shown as a
Show (top toolbar).
47
Page 58

Using Map Cursor
Map Cursor means using the stylus to pinpoint a location on the map and then
view details, set as origin, save the location to Favorites or initiate navigation to
the location.
Navigate to Map Cursor is especially handy when you want to navigate to a
physical location, facility, or attraction by its location on the map rather than by its
street address.
1. Use the stylus to drag the map to a specific location or intersection of your
choice.
2. Tap and hold the location with your stylus until the Map Cursor pop-up menu
appears.
NOTE: To clear the pop-up menu, just tap the screen anywhere besides the menu.
3. Tap Navigate on the pop-up menu. The route is immediately calculated and
shown as a highlighted blue line from your origin. (See Section 5.3 for more
information.)
48
Page 59

Using Home
Home is a friendly feature of your system. It allows you to press one single button
, and immediately a route is calculated starting from your GPS position to
your home.
To use this feature, you need to first set up the location of your “home.” (See
section 8.2 for instructions.)
NOTE: If you press the Home button
Home Button Settings screen.
without setting up first, you will be brought to the
5.3 Navigational Aids
Calculating a Route
With a destination selected, tap Navigate (top toolbar). Mio Map calculates the route
and shows the route in a blue line on the map.
You can start your journey right away. As you go along, Mio Map gives you
turn-by-turn voice prompts to get you to your destination.
NOTE: When Mio Map program starts, the sound volume of your device is automatically
adjusted to its highest level.
By default, Mio Map gives both voice and visual alerts at 3 miles, 2 miles, 1 mile,
500 yards, 300 yards, and 100 yards announcing upcoming turns or change of
direction.
49
Page 60

You may enable or disable voice and visual notifications by pressing the
Navigation Settings button
8.6 for more information.)
three times and tapping Alert Settings. (See section
Recalculating the Route
While on the road, Mio Map automatically recalculates the route when you have
deviated from the original route suggested. You can also tap and hold on the screen
to bring up the Map Cursor pop-up menu and tap
recalculate the route.
Recalculate to immediately
If you hear on the radio that there are construction zones or traffic jams along your
planned route, you can simply turn off to avoid those streets or highways, and Mio
Map will automatically recalculate a new route.
50
Page 61

5.4 Show Route
NOTE: Show Route is not available in Walker mode.
The Show Route feature displays the entire route, plus details as name, time, and distances of the route.
After calculating a route, you can show route in one of the two ways:
Press the Navigation Settings button twice and tap Show Route.
Tap the button (upper left corner) twice until the Driving Directions
screen appears and tap (top toolbar).
The Show Route screen provides the following information:
51
Page 62

On the map:
The starting point is indicated with a green car, and the destination with a
black and white checkered flag. The calculated route is always displayed in
blue.
In the top details bar:
Total length of journey and address of the destination.
In the bottom details bar
Estimate Time Of Arrival (ETA) and Estimated Time Remaining (ETR)
To exit the Show Route screen, press the Back button
.
5.5 Cancel Route
Use Cancel Route to terminate navigation to a destination at any time. To cancel the route, you can use one of the two ways:
Press the Navigation Settings button twice and tap Cancel Route.
Tap the button (upper left corner) twice until the Driving Directions
screen appears and tap
Once you cancel the route, the route is cleared and you can start all over again.
52
(top toolbar).
Page 63

6 More Navigation Features
Mio Map provides various tools for easier, flexible, and enhanced use of
navigation features.
6.1 Walker Mode
Walker mode is ideal when you are walking instead of driving. In Walker mode,
Mio Map calculates a route appropriate for pedestrians, avoiding highways and
freeways.
By default, Mio Map is in Navigation mode. To switch to Walker mode, use one of
the two methods:
Tap the status icon on the right side of the map screen. The icon changes
to
.
Press the Navigation Settings button once and tap Walker.
The icon of green car on the map changes to footsteps
53
.
Page 64

You can select a destination the same way as in Vehicle mode. When you tap
Navigate, Mio Map calculates a route and shows the route in a shaded blue line. You
can then follow the planned route on the map. Note that navigational aids such as
voice and visual prompts are not available in Walker mode.
NOTE:
In Walker mode, your destination is limited to within around 6 miles.
In Walker mode, the following navigation features are not available: Avoid Roads, Trip
Planner, Show Route, Driving Directions, and Turn by Turn.
54
Page 65

6.2 Avoid Roads
NOTE: Avoid Roads is not available in Walker mode.
Avoid Roads allows you to specify that certain roads not be included in your route calculations. For example, there might be road works, detours, or other obstacles along your planned route. You can avoid these, as well as certain roads such as highways, expressways or toll roads.
A Toll Roads category is already built into Mio Map. You can also create your
own restriction category.
Using Avoid Roads is a two-part process:
Part 1: Create a list of roads to avoid
Part 2: Select the roads to be avoided before calculating a route
Creating a List of Roads to Avoid
You can create your own list of roads to avoid.
1. Press the Navigation Settings button
2. You can tap a predefined category such as Default or create a new category.
To add a category, tap
Bypass), and tap
Add (top toolbar), enter the desired category name (e.g.
Save.
once and tap Avoid Roads.
55
Page 66

3. Tap
Items.
4. Tap
Add (top toolbar). The City Street Number menu appears.
5. Enter the city name using the soft keyboard. Or you can tap the
to expand the scroll list and tap (highlight) the city name.
button
56
or
Page 67

6. Tap Street and enter the street name using the soft keyboard. Or you can tap the
button to expand the scroll list and tap (highlight) the street name.
NOTE: If you make a mistake, tap Cancel (top toolbar) and repeat with the correct city and
street names.
7. Tap
OK (top toolbar). The “Edit Item Properties” screen appears. Enter a name
that helps identify the item.
8. Tap
Save to add the street to your list.
57
Page 68

NOTE:
You can save the selected street to another category if you wish.
You can delete or edit a personal category or item using Tools on the top toolbar. (You
cannot delete or edit the predefined categories and items.)
9. If there is more than one road to avoid, repeat and enter all the streets.
10. To go back to the map screen, press the Back button
.
Selecting the Roads to Avoid
NOTE: By default, the Toll Road category is not avoided.
After creating the Avoid Roads list as described earlier, simply make sure that all
the streets, roads or highways you want to avoid have a before it. Then, Mio
Map will avoid the selected roads when calculating the route.
If you are not avoiding all the roads in your next route, you can change the attribute
of the road from
1. Press the Navigation Settings button
2. To change the attribute of a category, tap (highlight) the desired category and
Use or Avoid (top toolbar). The attributes of all the items in the category will
tap
be changed accordingly.
(avoid) to (use).
once and tap Avoid Roads.
58
Page 69

3. If you are not avoiding all the roads in a category, select the category and then
tap
Items. Tap (highlight) the desired road in the list and tap Use or Avoid (top
toolbar) as required.
4. Press the Back button
to exit and save any changes you have made.
59
Page 70

6.3 Favorites and Auto Alerts
The Favorites feature allows you to save your frequently used locations for easy
access later. It also includes two automatic alert categories - Auto Alerts 1 and
Auto Alerts 2. An “automatic alert” refers to an item that you configure so that
Mio Map will alert you when you are within a certain distance of the item’s
location.
Creating Favorites
You select a location for your Favorites the same way you select a destination.
Follow this procedure to create a Favorites location:
1. Press the Navigation Settings button
Address, POI or History. (See section 5.2 for detailed information.) Then, tap
Tools (top toolbar) Favorites.
Or, you can drag the map and tap the location on the map. Then, tap
the Map Cursor pop-up menu.
once and select a location from
Favorites in
2. In the “Edit Item Properties” menu, enter a name and comment, if not already
existing. Select a category as needed. (Default categories are My Favorites,
Auto Alert 1, and Auto Alert 2.)
60
Page 71

NOTE:
Only those items found in either Auto Alert 1 or Auto Alert 2 will function as auto alerts. You
must configure the Auto Alert categories for the audio alerts to take effect. (See
“Configuring Auto Alert Category” later.)
You may want to create a new category to store your Favorites in different groups. Tap the
down arrow to pull down the menu of Categories and tap New Category Save. Then
type a name in the Edit Category Properties screen, select an icon for the category, and tap
Save.
3. Tap
Save to store the location as one of your favorites. The location will be
added to the list of your favorite items.
4. Press the Back button to exit and save the changes.
61
Page 72

Configuring Auto Alert Category
You can configure two distances for each automatic alert. Mio Map will first alert
you when you are within the first distance and then alert you when you are within
the second.
1. Press the Navigation Settings button
2. Tap (highlight) the
3. Tap
4. To enable both alerts, check both boxes. Or, you can disable one of the alerts
5. From the pull-down menus, select a distance for each enabled alert. Mio Map
Tools (top toolbar) Edit.
by clearing the box next to it. If you configure two alerts, the first must have a
greater distance than the second.
will alert you when the distance between your current traveling position and
the location of the alert equals the distance you enter here.
Auto Alert 1 or Auto Alert 2 category you want to configure.
once and tap
Favorites.
6. Tap
Save to complete the configuration.
Managing Favorites
Editing or Deleting an Item in Favorites
1. Press the Navigation Settings button once and tap Favorites.
2. Tap (highlight) the category.
3. Tap
62
Items.
Page 73

4. Tap (highlight) the item you want to edit or delete.
5. Tap
Tools (top toolbar) Edit or Delete.
Editing or Deleting Your New Category in Favorites
NOTE: You cannot edit or delete My Favorites, Auto Alert 1 and Auto Alert 2 categories.
1. Press the Navigation Settings button once and tap Favorites.
2. Tap (highlight) the category (the one you created).
3. To edit or delete the category, tap
Tools (top toolbar) Edit or Delete.
Displaying Favorites Icons on the Map
If you want the Favorite icons to display on the map, press the Navigation Settings
button
once and tap Favorites. Tap the checkbox before the category name.
63
Page 74

6.4 History
History is a list of previous destinations. It allows you to select a previous destination for searching, viewing, or use again.
NOTE: Mio Map automatically stores the last few in memory. As newer destinations are
written, to the top of the stack, the older destinations at the bottom of the stack are erased.
To use History, press the Navigation Settings button once and tap History
With a history selected, you can do any of the followings:
To reuse it as your destination, tap Navigate (top toolbar) to calculate a route.
To view the location details, tap Show (top toolbar).
To save it as one of your Favorites, tap Tools (top toolbar) Favorites.
To use it as your origin, tap Tools (top toolbar) Set as Origin.
64
Page 75

6.5 Trip Planner
NOTE: Trip Planner is not available in Walker mode.
The Trip Planner feature allows you to calculate a route any time without
initiating GPS positioning.
You can manually select your own origin, waypoints, and destination. Then you
can calculate a route for future use.
Trip Planner includes four major parts:
Part 1: Select Planner mode
Part 2: Manually select the origin
Part 3: Set waypoints
Part 4: Calculate the trip route
Part 1. Select Planner Mode
You can use the Trip Planner feature only if you are in Planner mode.
Press the Navigation Settings button
Planner mode and then press the Back button .
three times and tap
Route Settings. Tap
65
Page 76

Part 2. Manually Select the Origin
Press the Navigation Settings button
Address, POI, Favorites, or History. (See section 5.2 for details.) Then, tap
(Top toolbar)
Or, you can drag the map and tap and hold the location on the map. Then, tap
in the Map Cursor pop-up menu.
Origin
Set as Origin.
once and select a location from
Tools
Set as
Part 3. Set Waypoints
You can set one or more waypoints if necessary. A waypoint is a stop or break in
your journey along a route.
1. Press the Navigation Settings button
66
once and tap Trip planner.
Page 77

2. If this is the first time you use Trip Planner, you will need to create a trip
category in which to store your trip details. To create a trip, tap
toolbar)
Add.
Tools (top
3. Type a name (e.g. My trip) using the soft keyboard and tap
NOTE: You can rename an existing category name using Tools (top toolbar) Edit.
Save.
67
Page 78

4. Tap the trip category you just created and tap
5. Tap
Tools (top toolbar) Add.
Waypoints.
6. Select a waypoint – be it an Address, POI, Favorites or History. (See section
5.2 for details.)
68
Page 79

7. With a location selected, tap OK (top toolbar).
8. In “Edit Waypoint Properties” fields, enter a waypoint name or change the
default details and tap
Save to save the waypoint.
9. Repeat steps 5 to 8 to enter all the waypoints.
10. You can use
Waypoint Down or Waypoint Up to move the waypoints around to suit
your purposes or driving needs.
Or, you can tap Tools Optimize to automatically sort the waypoints in the
most effective and quickest route. Note that Optimize does not change the
position of the first (origin) or last (destination) items on the list.
11. You can tap
Show (top toolbar) to view the complete route.
69
Page 80

Part 4. Calculate the Route
To calculate the route, tap Navigate (top toolbar).
The route is calculated in stages from the departure point to the first waypoint.
Once there, it recalculates to the second waypoint, and then recalculates for the
third waypoint and so on.
If you tap
Show, the first part of the route is shown with the normal blue double
lines, but the second, third and parts of the route (after the waypoints) are shown in
a series of single line vectors.
NOTE: To start the trip, remember to change back to Navigation mode by pressing the
Navigation Settings button
mode.
three times and tapping Route Settings Navigation
70
Page 81

6.6 Recording a Journey
You can record your journey to share with your friends and family or perhaps just
to replay your journey.
1. When you are about to begin your journey after calculating a route, press the
Navigation Settings button
NOTE: A filename GPRSr00xx.DAT (where xx = the recorded route number) is automatically
created.
2. As you travel, Mio Map records your trip.
twice and tap
Play Record (top toolbar).
3. When you have reached the end of your journey, press the Navigation Settings
button
4. To exit the screen, press the Back button
twice and tap
Play Stop (top toolbar).
.
71
Page 82

Playing a Recording
1. Press the Navigation Settings button twice and tap Play.
2. Tap the file you want to play back and tap
3. You can advance the playback to start at a different point by moving the slider
at the bottom of the screen along the progress track.
You can also adjust the playback speed i.e.: from normal to 3x normal from the
pop up list at the top of the screen.
4. To stop the replay, press the Navigation Settings button
Play Stop
(top toolbar).
Play (top toolbar).
twice and tap
Deleting a Recording
1. Press the Navigation Settings button twice and tap Play.
2. Select the GPSr00xx.DAT file (where xx = the recorded route number) to be
deleted.
3. Tap
Delete (top toolbar) Yes.
CAUTION: Once the recorded route is deleted, it is not retrievable.
72
Page 83

7 Changing Map Views
Mio Map provides different views of the map to enhance your viewing and
navigational experience.
7.1 Types of View
The button at the left side of the map screen allows you to easily switch the
map view among four different views including: 2D, 2D Night, 3D and 3D Night.
Hot Key Map View Description
The default 2D view is the
straightforward two-dimensional
normal view.
The 2D Night view is a high
contrast, two-dimensional view,
optimized for night driving or
adverse weather conditions.
73
Page 84

7.2 View the Route
3D view is a simplified
three-dimensional view showing
the map in a basic 3D relief. It
shows the basic outline and details
of the surrounding roads and
general area.
3D Night view is a simplified
three-dimensional view with
high-contrast colorization
optimized for night driving or
adverse weather conditions.
Turn by Turn
NOTE: Turn by Turn is not available in Walker mode.
After calculating a route, you can view turn-by-turn instructions on the map using
one of the two methods:
Press the Navigation Settings button twice and tap Turn by Turn.
74
Page 85

Tap the
appears and tap
button (top left corner) twice until the Driving Directions screen
(bottom toolbar).
The Turn by Turn screen displays one turn of the planned route at a time
Next or Prev icon at the top of the screen to see the next or previous turn.
. Tap the
75
Page 86

Driving Directions
NOTE: Driving Directions is not available in Walker mode.
After calculating a route, you can view driving directions using one of the two
methods:
Press the Navigation Settings button twice and tap Driving Directions.
Tap the hot key (top left corner) twice screen until the Driving Directions
screen appears.
The Driving Directions screen displays a complete list of all turns. You can scroll
through the list using the scroll bar on the right side of the screen and review the
entire route.
76
Page 87

Route Options
The Driving Directions screen also gives you several route options.
Show Route
Displays the Sow Route screen. This screen displays your route on the map
screen in its entirety, plus details such as the address of your destination, the
ETA, and the ETR.
Cancel Route
Cancels and clears the route from the map screen.
Show Turn
Displays the Turn by Turn screen for the highlighted turn in the list.
Avoid Turn
Recalculates the route to exclude a particular turn. When you tap (highlight) a
turn in the list and tap
, the route is automatically recalculated and a
new route is displayed.
77
Page 88

7.3 Switch Maps
Mio Map provides maps for North America including seven regions or parts of
USA, USA Roads, and Canada. To switch to another map, press the Navigation
Settings button
The middle of the screen shows the current map in use. To change to the map that
matches your area, tap the top scroll bar to scroll through the list and tap
(highlight) the desired map. The bottom of the screen displays the details of the
selected map.
twice and tap Switch Maps.
To switch to the selected map, tap
Switch Map (top toolbar). To leave without
changing the map, press the Back button
Other maps
Current map in use
Selected map
78
.
Scroll down for
more maps (three at
a time).
Scroll down for
more details.
Scroll down for
Scroll down
more details.
for more
Page 89

Options, Settings, and
8 Options, Settings, and Preferences
Mio Map initially has default settings when it is installed. You can customize the
settings to suit your personal needs. Once you change the settings, your new
settings will remain until you change them again.
Preferences
8.1 GPS Status
Press the Navigation Settings button three times and tap GPS Status to check the current GPS status. At least four different satellite signals are needed to get a fix on your current position
NOTE: You can also tap the icon at the lower right corner of the map screen to directly
access the status screen.
Mio Map uses GPS signals to pinpoint your location. Mio Map remembers your
last location. However, to continually update your location, the software must
acquire fresh GPS signals. In Navigation mode, the software automatically
acquires GPS signals and constantly updates your position.
To exit the screen, press the Back button
79
.
Page 90

8.2 Home Button Settings
Press the Navigation Settings button three times and tap Home Button Settings
to define an address or a POI as your home destination. With a home destination,
you can press the Home button
from your GPS position.
You can set two types of home and use one of them:
Address Mode
Address Mode and tap Set Address to select an address as your home. (See
Tap
section 5.2 for instructions on selecting an address.) After selecting the
address, tap
OK to go back to Home Button Settings screen. The address will
appear on the Home Button Settings screen. If this type of home is selected,
you will be navigated to the specified address when you press the Home button
.
to directly navigate to your home destination
POI Mode
Tap
POI Mode and tap Set POI to select a POI category as your home. (See
section 5.2 for instructions on selecting a POI.) After selecting the POI, tap OK
to go back to Home Button Settings screen. The POI will appear on the Home
Button Settings screen. If this type of home is selected, you will be navigated
to the nearest POI of the specified category when you press the Home button
.
Press the Back button
to exit and save any changes you have made.
80
Page 91

8.3 General Settings
Press the Navigation Settings button three times and tap General Settings to choose the unit of measurement for your route.
You can select Miles/hour or Kilometers/hour to display distances.
Press the Back button
to exit and save any changes you have made.
8.4 Map Settings
Press the Navigation Settings button three times and tap Map Settings to access the following settings:
81
Page 92

Map Settings Descriptions
Map Orientation
Zoom Mechanism
Map Font
Press the Back button
Select Forward is up to use dynamic map notation. The
map will rotate as you turn the direction. Mio Map will also
update the compass to show the north-south direction after
the turns.
Select North is up to keep the map static in a north-up
orientation.
Select Automatic Zoom to allow Mio Map to automatically
scale the map appropriately, according to the current speed
of the vehicle/person.
Select Use Large labels for easier reading under adverse
lighting conditions.
to exit and save any changes you have made.
8.5 Route Settings
Press the Navigation Settings button three times and tap Route Settings to
access the following settings:
Route Settings Descriptions
Routing Mode
Select Navigation mode for normal driving with GPS on.
Select Planner mode if you want to display planned routes,
or to plan routes, but not show your progress, as you travel.
(See section 6.5 for more information.)
82
Page 93

Route generation
U Turn Usage
Press the Back button
Select Quickest route to allow Mio Map to calculate and to
estimate the best route based upon both shorter distance and
higher speed limits.
Select Shortest route to allow Mio Map to calculate the
route only considering the shortest distance.
Select U Turn enabled to allow U turns while calculating
the route.
to exit and save any changes you have made.
8.6 Alert Settings
Press the Navigation Settings button three times and tap Alert Settings to
access the following settings:
Alert Settings Descriptions
Voice Prompts
Select the item(s) you want to hear:
“…Over the Speed limit!” – gives you a voice reminder
when your car exceeds the speed limit on this section of the
road.
“Route recalculation” – gives a voice prompt that Mio Map
will automatically recalculate new route.
“Low signal..” – Warning that you are in an area of low
signal.
“GPS Not Found” – Alerts you if GPS signal is lost.
“Drive Carefully” – Friendly reminder at the start of each
journey.
83
Page 94

Press the Back button
to exit and save any changes you have made.
8.7 Visual Notifications
Press the Navigation Settings button three times and tap Visual Notifications to
select the way of notification for the upcoming turns.
Visual Notifications Descriptions
Visual Notifications
Press the Back button
Select one of the following three types:
Text – Displays guidance prompts in the form of text.
Symbols –Displays guidance prompts in the form of
symbols. The screen will flash with an enlarged sign
showing the next change of direction.
None – No visual prompts displayed.
to exit and save any changes you have made.
84
Page 95

Part III. More Tools
Part III introduces MP3 Player, Contacts, and Mio Transfer.
85
Page 96

Page 97

9 MP3 Player
This chapter tells you how to play MP3 files on your device.
9.1 Starting and Exiting MP3 Player
The MP3 Player program turns your device into an MP3 player. It features:
Playback of MP3 and WAV files
Basic playback controls such as play, pause, stop, next and previous
Graphic equalizer settings with 17 presets
Playback includes single selection playback, repeat, single repeat, sampling
playback, normal sequence and random sequence.
Play list support
Tap the
The control panel will appear on the screen where you can easily control the MP3
player by tapping the control buttons.
Music button on the Home screen to start the MP3 Player program.
87
Page 98

To exit the program, tap
on the lower right of the screen.
9.2 Preparing the MP3 Files for You Device
Before you can play MP3 files, you need to have the files ready on either your
device hard drive or a storage card.
A tool called “MP3 Assistant” is supplied to let you easily copy MP3 files from
your computer to the correct location. (See section 11.3 for instructions.)
9.3 Playing MP3 Files
1. If your MP3 files are in a storage card, insert the card into your device.
2. Tap the
3. The program will search for the MP3 files in your device hard drive or in the
storage card. When MP3 files are detected, they will be added to the play list.
3. To start the playback, tap . To control the playback, use the control buttons
as described later.
Music button on the Home screen to start the MP3 Player program.
NOTE: You can create your own play lists for future playback. (See section 9.4 for details.)
88
Page 99

4. To exit the program, tap
on the lower right of the screen. You will return to
the Home screen.
MP3 Playback Control
You can control the MP3 Player via control buttons. See the table below for
details:
Control
Button
or
or
or
Name Description
Play/Pause Play or pause the playback.
Stop Stop the playback.
Previous/
Next
Volume
Playback Mode*
Move to the previous or next file.
Increase or decrease the volume.
The indicator on the upper right corner of the panel
shows the current volume level.
Cycle through the following modes:
Repeat the current file
Repeat all (Default)
Single playback
Sampling playback
89
Page 100

Sequence*
Normal sequence (Default)
Random sequence
Open Play List
Equalizer
Help
Close MP3
Player
* Table Note: When you restart the MP3 Player, both playback mode and sequence will
return to its default settings.
Open play list. (See Section 9.4 for more
information.)
Open or close the equalizer panel.
(See Section 4.5 for more information.)
Introduce the function and operation of each icon.
Tap an icon to see a description line at the bottom of
the screen.
Close the program and return to the Home screen.
9.4 Using Play Lists
By default, the system automatically loads all MP3 files in the play list. You can
also create your own play lists for future use.
Creating a Play List
1. After starting MP3 Player, tap
screen.
on the right toolbar to open the play list
90
 Loading...