


www.mio-tech.be

Revision: R00
August 2005
Trademarks
All brand and product names are trademarks or registered trademarks of their
respective companies.
Note
The information in this manual is subject to change without notice.

Table of Contents
Preface .................................................................................................. v
Precautions and Notices.............................................................................v
About this Manual ...................................................................................... vi
1 Getting Started ............................................................................. 1
1.1 Performing the Initial Start Up ............................................................1
1.2 Connecting to AC Power and Charging the Battery...........................4
1.3 Using Your Device in a Vehicle..........................................................5
Using the Car Holder..........................................................................5
Connecting the Car Charger ..............................................................6
1.4 Understanding Hardware Features....................................................7
Front Components .............................................................................7
Back Components..............................................................................8
Left-Side Components .......................................................................9
Right-Side Components .....................................................................9
Top Components..............................................................................10
Bottom Components ........................................................................10
2 Basic Skills ................................................................................. 11
2.1 Turning On and Off Your Device......................................................11
Home Screen ...................................................................................11
2.2 Operating Your Device.....................................................................12
Using Hardware Buttons ..................................................................12
Using the Navigation Pad.................................................................13
Using the Remote Control................................................................13
Using the Volume Control ................................................................13
Using the Stylus ...............................................................................14
2.3 Managing the Battery Power............................................................15
Battery Low Warning and Action......................................................15
2.4 Using a SD/MMC Card.....................................................................17
i

3 System Settings .......................................................................... 19
3.1 Using System Settings .................................................................... 19
3.2 Backlight .......................................................................................... 20
3.3 Volume ............................................................................................ 21
3.4 Screen ............................................................................................. 22
3.5 Power .............................................................................................. 23
3.6 Date&Time....................................................................................... 25
3.7 Switch Language............................................................................. 26
3.8 Back................................................................................................. 27
4 Mio Transfer ................................................................................29
4.1 Installing Mio Transfer ..................................................................... 29
4.2 Starting and Exiting Mio Transfer.................................................... 31
4.3 Copying MP3 or Pictures to Your Device........................................ 32
Using Mio Transfer .......................................................................... 32
Managing Your MP3 and Picture Files............................................ 34
4.4 Synchronizing Contacts of Your Device and PC............................. 34
4.5 Recovering Maps and Navigation Software .................................... 36
5 MP3 Player................................................................................... 39
5.1 Starting and Exiting MP3 Player...................................................... 39
5.2 Preparing the MP3 Files for You Device ......................................... 40
5.3 Playing MP3 Files............................................................................ 40
MP3 Playback Control..................................................................... 41
5.4 Using the Play Lists......................................................................... 42
Creating a Play List ......................................................................... 42
Opening a Play List ......................................................................... 43
Managing Your Play Lists................................................................ 44
5.5 Equalizer.......................................................................................... 45
6 Picture Viewer ............................................................................. 47
6.1 Starting and Exiting Picture Viewer................................................. 47
6.2 Preparing the Pictures on Your Device ........................................... 47
6.3 Viewing Pictures in Thumbnail View ............................................... 48
6.4 Viewing a Picture Full Screen ......................................................... 48
Go to Next or Previous Picture........................................................ 49
Zooming In a Picture ....................................................................... 49
On-Screen Control Buttons ............................................................. 50
6.5 Viewing a Slideshow ....................................................................... 51
Setting the Interval Time for the Slideshow..................................... 52
6.6 Managing Your Pictures .................................................................. 53
Displaying Picture Information......................................................... 53
Deleting Pictures ............................................................................. 54
ii

6.7 Transferring Images .........................................................................54
7 Contacts: Tracking Friends and Colleagues ........................... 57
7.1 Starting and Exiting Contacts...........................................................57
7.2 Creating a Contact ...........................................................................58
7.3 Displaying the Contacts Summary Screen ......................................59
7.4 Navigating to Your Contact Address................................................59
7.5 Editing or Deleting a Contact ...........................................................60
8 Calculator.................................................................................... 61
8.1 Starting and Exiting Calculator.........................................................61
8.2 Using Calculator Mode.....................................................................62
Using Calculator Memory.................................................................63
8.3 Using Currency Mode ......................................................................64
Editing Exchange Rate.....................................................................66
8.4 Using Metrology Mode .....................................................................67
9 Troubleshooting and Maintenance............................................ 69
9.1 Resetting Your System ....................................................................69
9.2 Clearing the Memory........................................................................70
9.3 Troubleshooting................................................................................70
Power Problems...............................................................................70
Warning Screen................................................................................71
Screen Problems..............................................................................71
Connection Problems.......................................................................72
GPS Problems..................................................................................72
9.4 Maintaining Your Device ..................................................................72
9.5 Support Information..........................................................................74
A Regulatory Information............................................................... 75
A.1 Regulations Statements ...................................................................75
Class B Regulations.........................................................................75
European Notice...............................................................................76
A.2 Safety Precautions ...........................................................................77
About Charging ................................................................................77
About the AC Adapter ......................................................................77
About the Battery .............................................................................77
iii


3 Preface
Precautions and Notices
wn safety, do not operate the controls of the product while
For your o
driving.
Use this product prudently. The product is intended to be used only as a
navigation aid. It is not f
location or topography.
nsibility to
The calculated route is for reference only. It is the user’s respo
follow the traffic signs and local regulations along the roads.
that is
When you get off the car, do not leave your device on the dashboard
subject to direct sunlight. Th
malfunction and/or danger.
GPS is operated by the United States government, which is solely
responsible for the performance of GPS. Any
affect the accuracy of all GPS equipments.
or precise measurement of direction, distance,
e overheating of the battery can cause
change to the GPS system can
GPS satellite signals cannot pass through solid materials (except glass).
When you are inside a tunnel or building, GPS positioning is not available.
A minimum of 4 GPS satellite signals is needed to determine current GPS
position. Signal reception can be affected by situations such
or dense overhead obstacles (e.g. trees and tall buildings).
The wireless devices might interfere the reception of satellite signals and
cause the reception of the signal to be unstable. For be
it is recommended that you use car antenna (option).
as bad weather
tter signal reception,
v
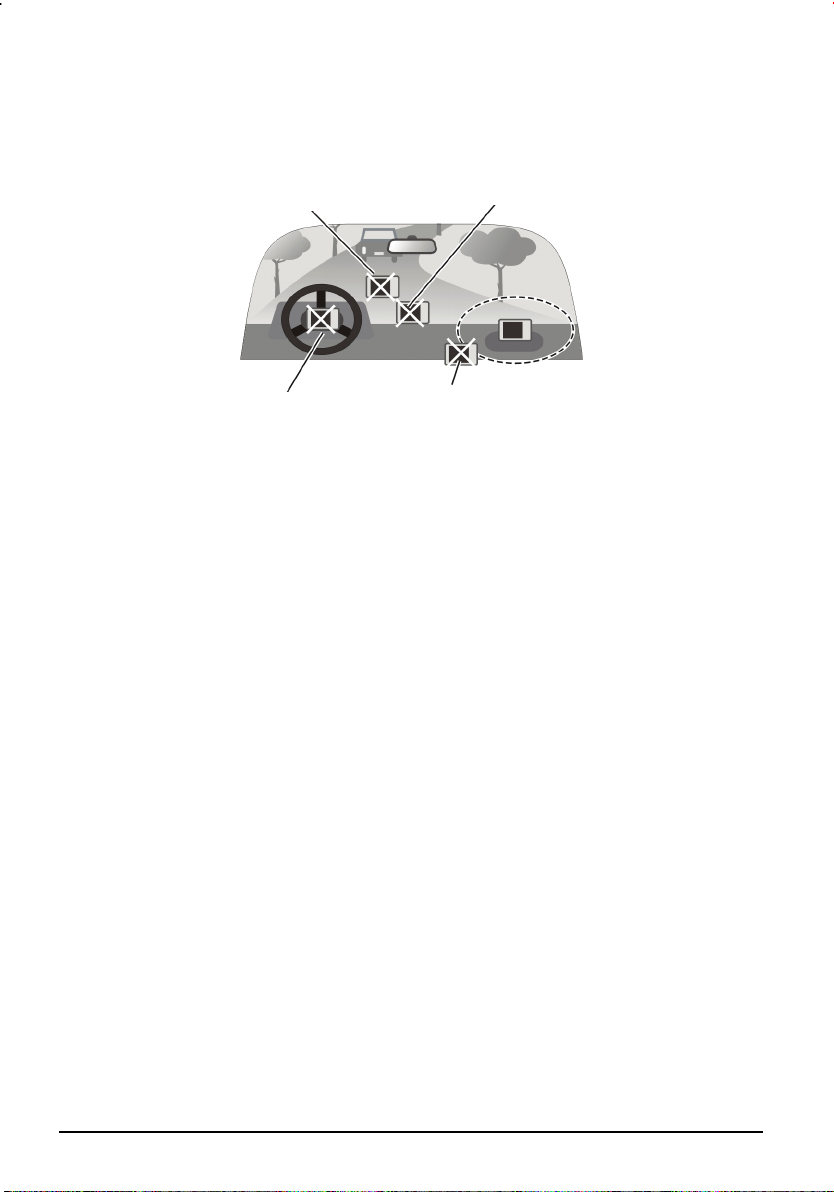
A car holder is needed when using the device in car. It is recommended that
you place the device in the appropriate place and avoid the areas as the
figure shows.
Do not mount where the driver’s field
of vision is blocked.
Do not place unsecured on the
dashboard.
Do not mount in front of airbag
panels.
Do not mount in front of an airbag
field of deployment.
About this Manual
This manual contains the instructions on using the device and the related
applications:
Operating the device (Chapter 1 to 3)
Guides you through the process of getting your device running, provides
you the basic skills of operating your device, and tells you how to customize
the system settings.
Using Tools (Chapter 4 to 8)
− Mio Transfer
tells you how to use Mio Transfer, a tool for data transfer and data
recover.
− MP3 Player
tells you how to play MP3 files on your device.
− Picture Viewer
tells you how to use Picture Viewer to view pictures on your device.
− Contact
tells you how to use Contacts for viewing and managing your contacts
information.
− Calculator
tells you how to use Calculator to perform basic arithmetic and convert
currency and measure.
vi

For instructions on using Navigator, refer to the Mio Map user’s manual
included on your Map CD.
vii

1 Getting Started
This chapter tells you step by step how to perform the initial startup and
introduces the components of your device.
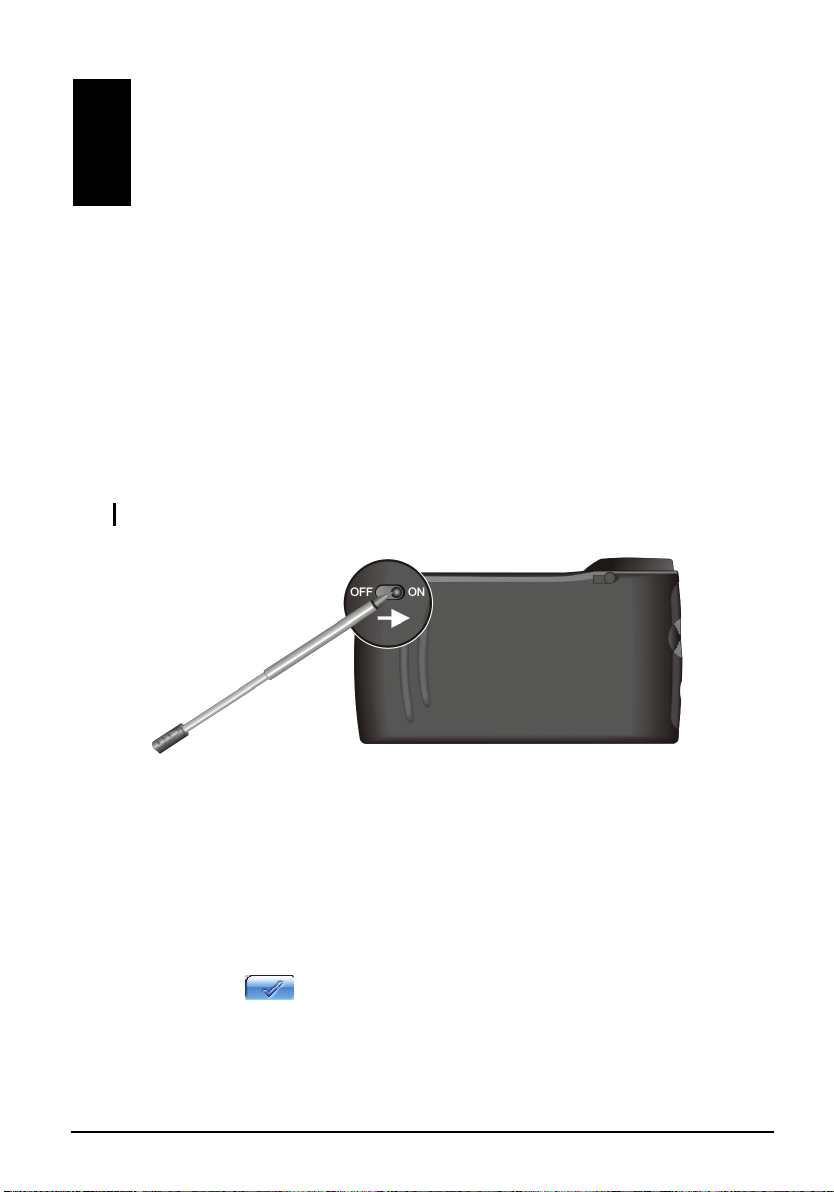
1.1 Performing the Initial Start Up
Pull out the
1. stylus and use it to slide the ON/OFF switch to the ON (right)
p
osition.
CAUTION: Always leave the ON/OFF switch in the ON position for normal operation.
For the first time power on, you need to connect your device to external
2. AC
power to perform the settings. This is to ensure the device from losing
power when you are usin
connecting AC power.)
3.
The Switch Language screen pops up. Depending on your region of
purchase, your system may support several languages. If your region is a
country with mu e languages, y
language. Tap
1
ltipl
g the device. (See Section 1.2 to learn more on
ou can tap the left/right arrow to select a
to continue.
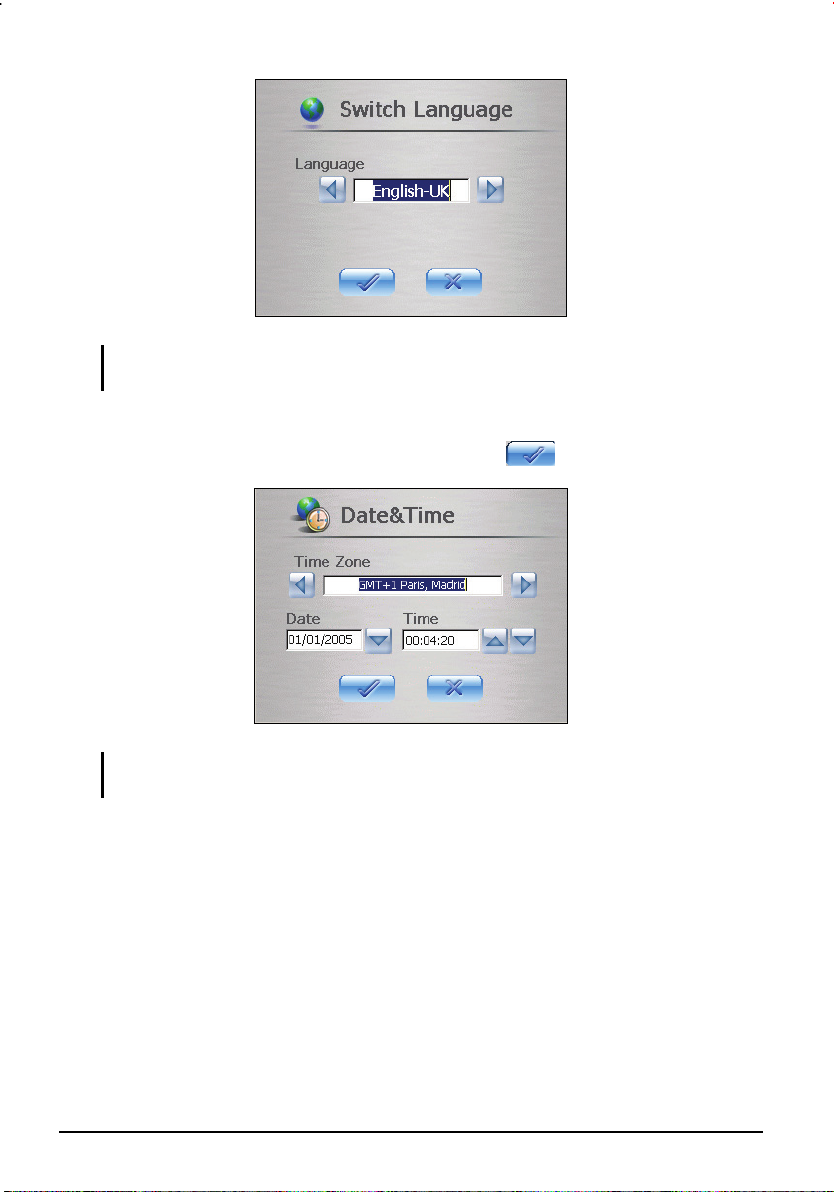
NOTE: If multiple languages are available, you can change the language later on by
tapping Settings Switch Language. (See Section 3.7 for more information.)
4. The Date&Time screen appears. Tap the arrow button to select the time
zone, date and time for your system. Then tap
to continue.
NOTE: You can change the time zone, date and time later on by tapping Settings
Date&Time. (See Section 3.6 for more information.)
5. The system will perform the initial startup. Wait for one or two minutes
until the installation is completed.
6. The Home screen appears as shown below. You can now start using your
device.
2

3
1.2 Connecting to AC Power and Charging the
r
r
Battery
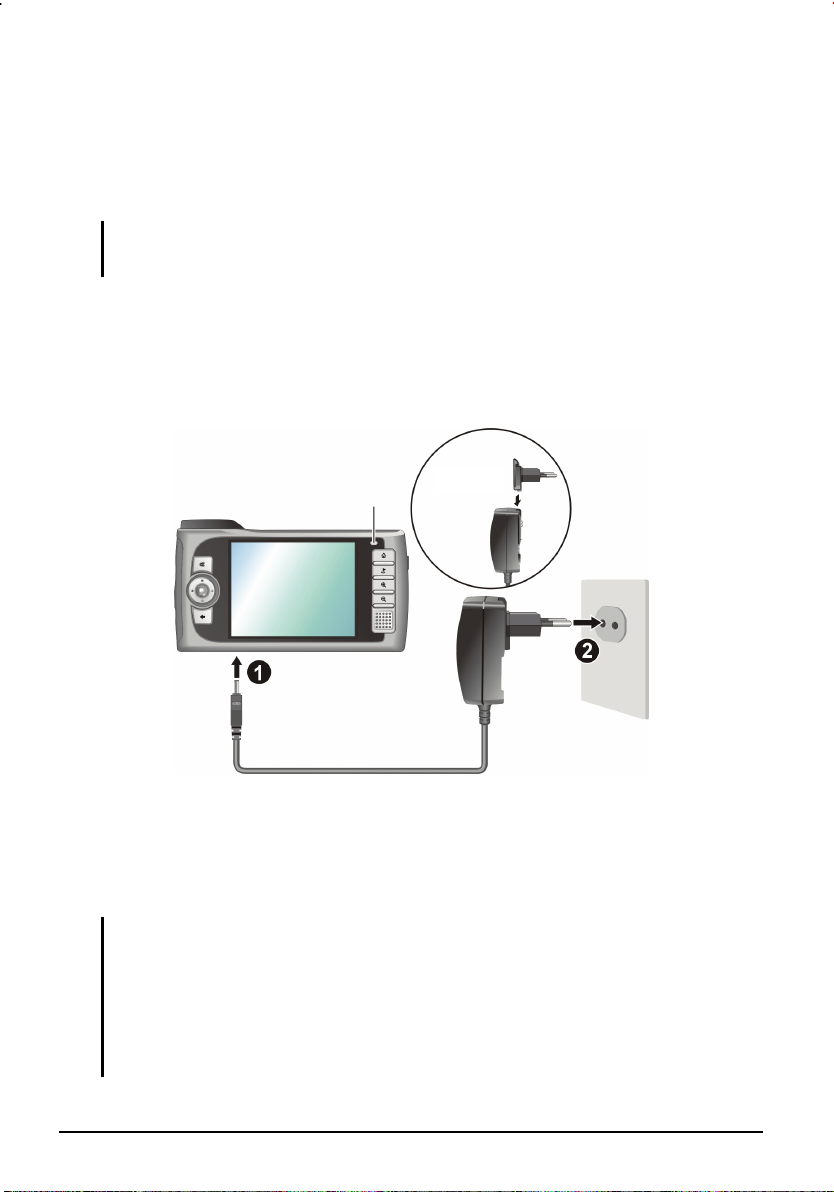
Fully charge the battery before starting to use your device for the first time.
NOTE: Depending on your region of purchase, the converter may not look exactly the
same as the picture shown.
1. Plug the converter to the AC adapter.
2. Connect the DC end of the AC adapter to the bottom of your device. ()
3. Plug the other end of the AC adapter into a wall outlet. ()
Charge Indicato
Converte
The charge indicator glows amber when charging is in progress. Do not
disconnect your device from AC power until the battery is fully charged, as
indicated by the amber indicator turning into green. This will take a couple of
hours.
NOTE: For optimal performance of the lithium battery, take note of the following:
Do not charge the battery where the temperature is high (e.g. in direct sunlight).
There is no need to fully discharge the battery before charging. You can charge the
battery before it is discharged.
If you will not use the product for a long period of time, be sure to fully charge the battery
at least once every two weeks. Over discharge of the battery can affect the charging
performance.
4
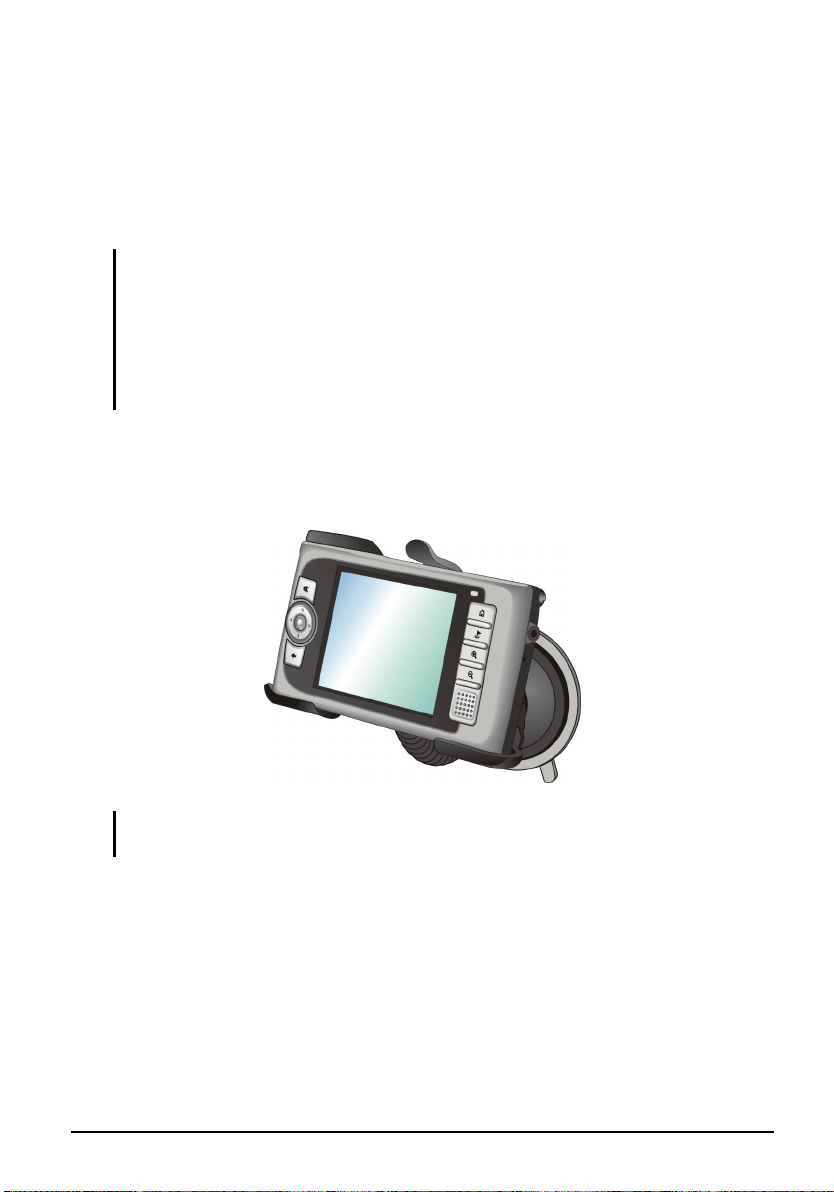
1.3 Using Your Device in a Vehicle
A car holder and a car charger are supplied with your device.
Using the Car Holder
CAUTION:
Select an appropriate location for the car holder. Never place the holder where the
driver’s field of vision is blocked.
If the car’s windshield has window tint, it is recommended that you use a car antenna
(optional) to route the antenna to the top of the car through the window. When closing
the car window, be careful not to pinch the antenna. (For a car with the anti-jam design,
the window will automatically leave space.)
The car holder consists of a bracket and a stand. Use the car holder to fix the
device near the windshield. (See the document supplied with the car holder for
the installation instruction.)
NOTE: This car holder shown is an example only. Your car holder may not look exactly the
same as this one.
5
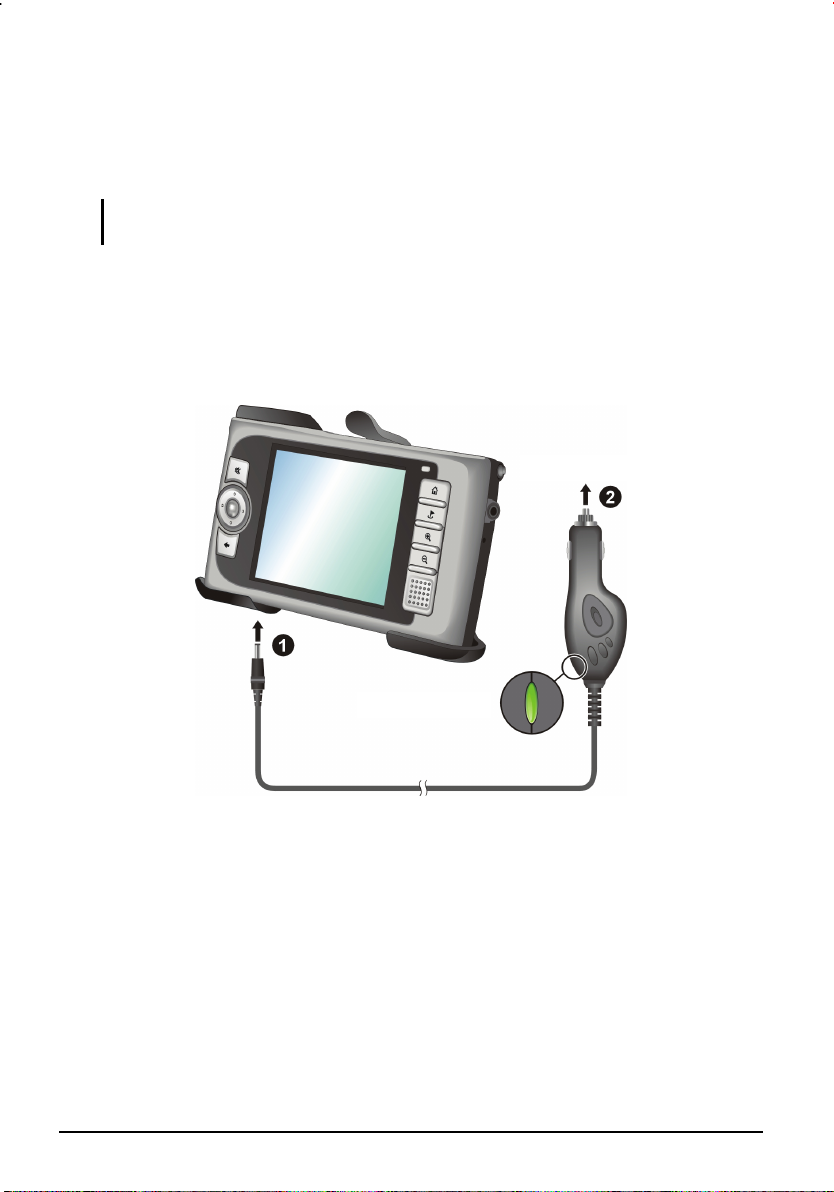
Connecting the Car Charger
r
The car charger supplies power to your device when you are using the device in
a car.
CAUTION: To protect your device against sudden current, connect the car charger only
after the car engine has been started.
1. Connect one end of the car charger to the power connector of your device.
2. Connect the other end to the cigarette lighter in the car. The indicator on the
car charger lights in green to indicate that power is being supplied to your
device.
To Cigarette Lighter
6
Power Indicato
1.4 Understanding Hardware Features
NOTE: Depending on the model you purchased, the color of the device might not be
exactly the same as the pictures shown in this manual.
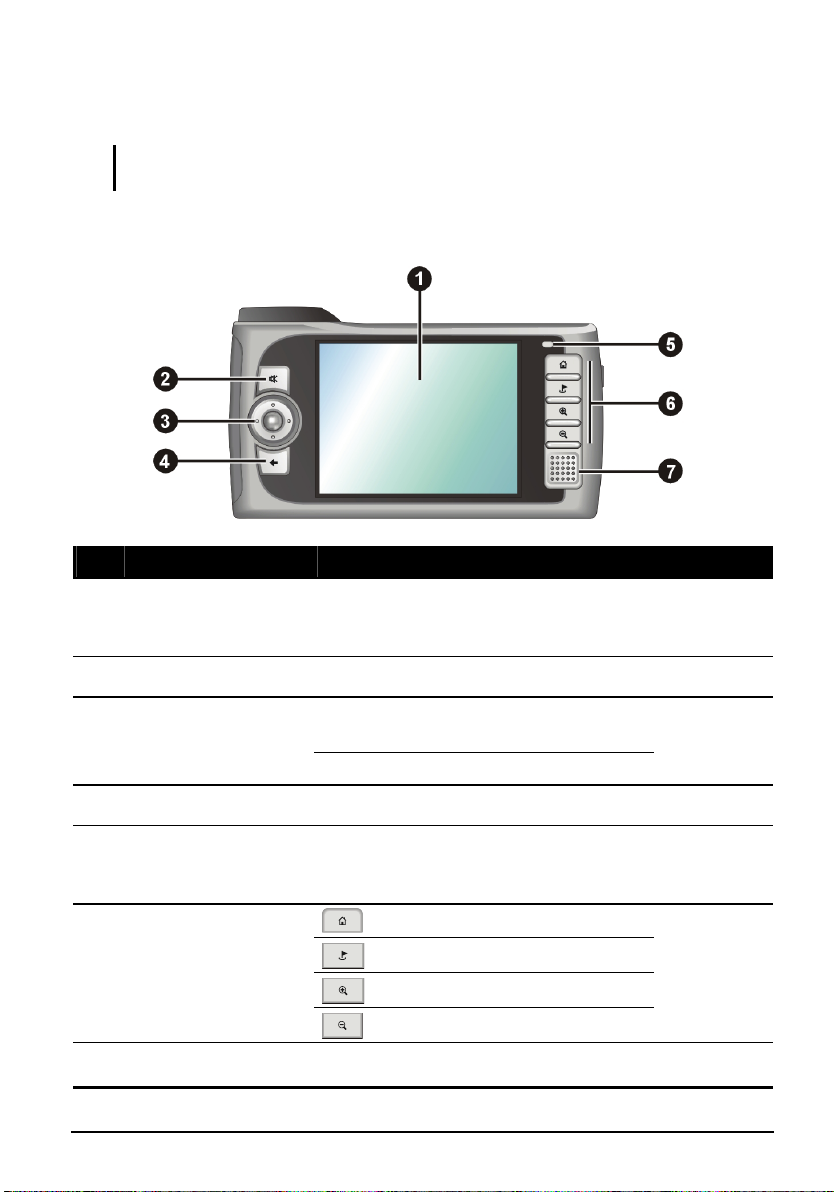
Front Components
Ref Component Description See Also
Touch Screen
Mute Button
Navigation Pad
Back Button
Charge Indicator
Hardware Buttons
Displays the output of your device. Tap
the screen with the stylus to select menu
commands or enter information.
Toggles the mute on and off. Section 2.2
Moves up, down, left or right by pressing
the corresponding area of the pad.
Selects by pressing in the center.
Goes back to the previous screen. Section 2.2
Glows in amber to indicate that battery
charging is in progress and in green
when the battery is fully charged.
Home button
Destination button
Section 2.2
Section 1.2
Section 2.2
Zoom in button
Zoom out button
Speaker
Sends out music, sounds and voice.
7

Back Components
Ref Component Description See Also
ON/OFF Switch
Car Antenna
Connector
Controls the main power switch. Section 1.1
Inside the rubber cover is a connector for
connecting a GPS car antenna (optional) so
that the antenna can be positioned on top of
the car for better signal reception.
8
Left-Side Components
Ref Component Description See Also
Volume
Control
Power Button
Adjusts the volume level of your device. Section 2.2
Turns on and off the device. Section 2.1
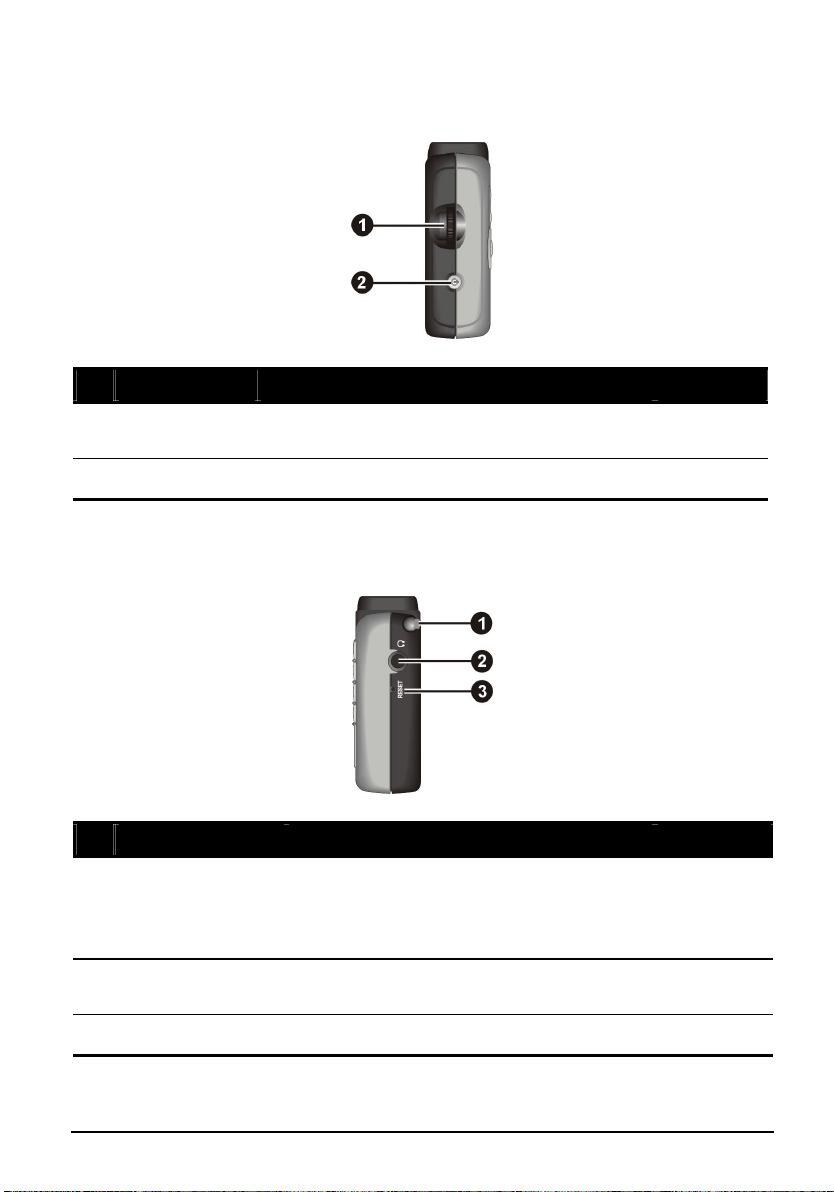
Right-Side Components
Ref Component Description See Also
Stylus
Headphone
Connector
Reset Button
Tap on the touch screen to make selections
and enter information. Pull the stylus out of
its slot to use and store it in the slot when not
in use.
Connects to a pair of stereo headphones.
Restarts your device. Section 9.1
Section 2.2
9
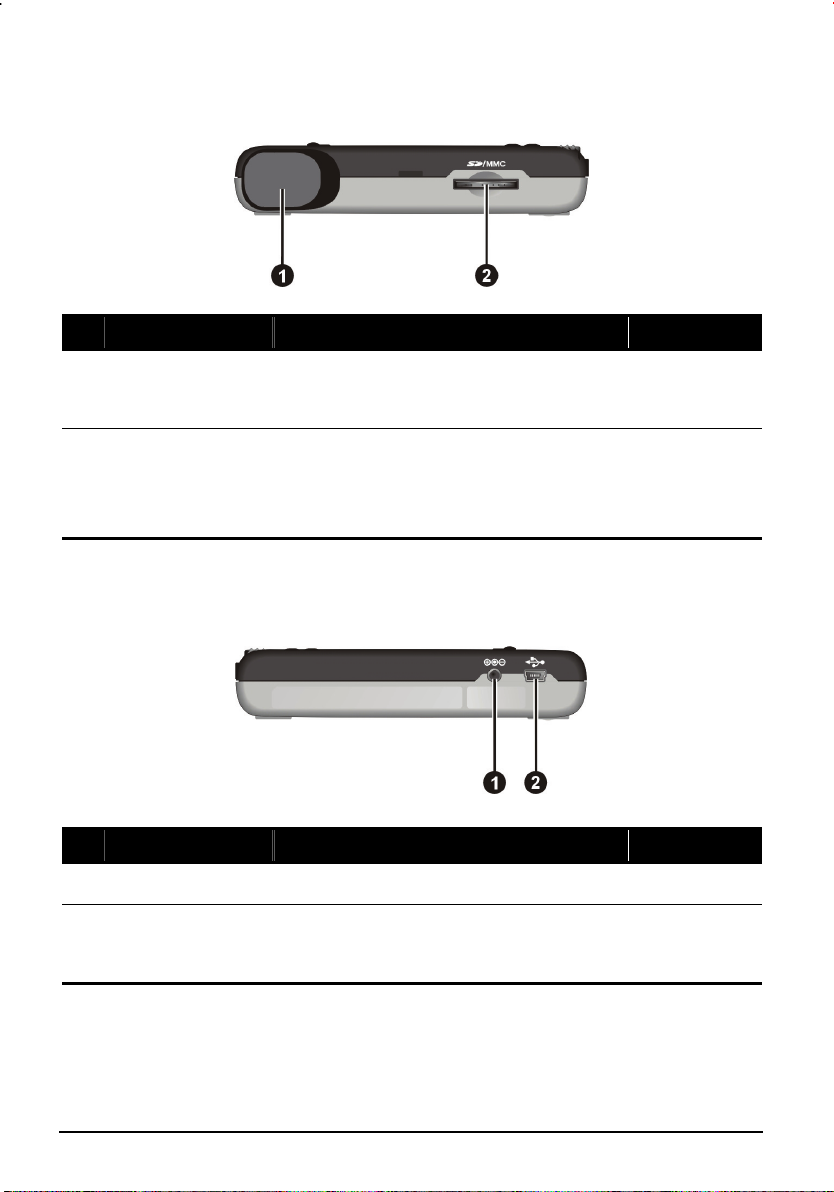
Top Components
Ref Component Description See Also
GPS Receiver
SD/MMC Slot
Receives signals from the GPS satellites
overhead. Make sure that it has a clear
view of the sky.
Accepts a SD (Secure Digital) or MMC
(MultiMediaCard) card for accessing data
such as MP3 music.
Section 2.4
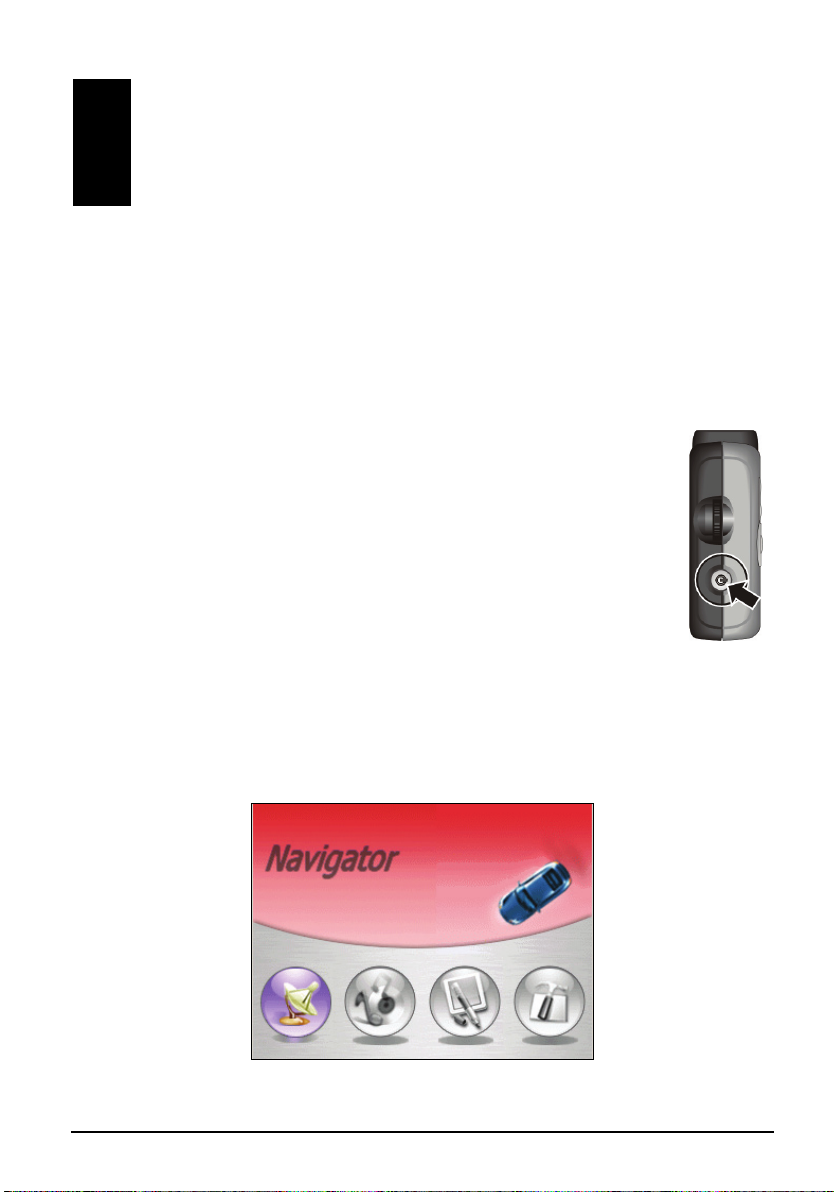
Bottom Components
Ref Component Description See Also
Power Connector
Mini-USB
Connector
Connects to the AC adapter. Section 1.2
Connects to your computer for data
transfer or connect to an optional TMC
adapter for traffic jam evasion.
Chapter 4
10
2 Basic Skills
f
This chapter familiarizes you with the basic operations of your device such as
using the Home screen and the hardware components.
2.1 Turning On and Off Your Device
Use the powe on on the side of your device to turn on an
your device.
When you press the power button to turn off the unit, your devi
actually enters a suspend state and the system st
Once you turn on the system again, it resumes.
r butt d of
ops operating.
ce
Home Screen
The first time you turn on your device, the Home screen appears. The H
screen is your starting place for various tas
application or open another menu screen.
ks. Tap a button to start an
ome
11

Ref Button Name Description See Also
Navigator
Multimedia
Tools
Settings
Starts the navigation program.
Enables you to play the MP3 music and view
the pictures.
Allows you to view and manage your contacts
information and use the calculator.
Allows you to customize the system settings
for your personal needs.
Mio Map
User’s
Manual
Chapter 5~7
Chapter 8 ~9
Chapter 3
Whenever you quit an application, you are back to the Home screen. You can
also access the Home screen at any time (except when running the navigation
software) by pressing the Home button
.
2.2 Operating Your Device
You use the hardware buttons and/or the stylus to operate your device.
Using Hardware Buttons
Button Name Description See Also
Mute
Back
Home
Destination
Zoom In
Zoom Out
Toggles mute on and off.
Goes back to the previous screen.
Not in Navigator:
Returns to the Home screen.
In Navigator:
Navigates to your home address if you have
set up the home address.
Goes back to the Desination Setting screen
when using the Navigator program.
Increases the map scale.
Decreases the map scale.
Section 2.1
Mio Map
User’s
Manual
Mio Map
User’s
Manual
12
Using the Navigation Pad
With the navigation pad, you can move up, down, left
and right within a menu.
To move in a direction, simply press the corresponding
area on the button. To activate the selected item, press
the center of the button.
Left
Up
Down
Right
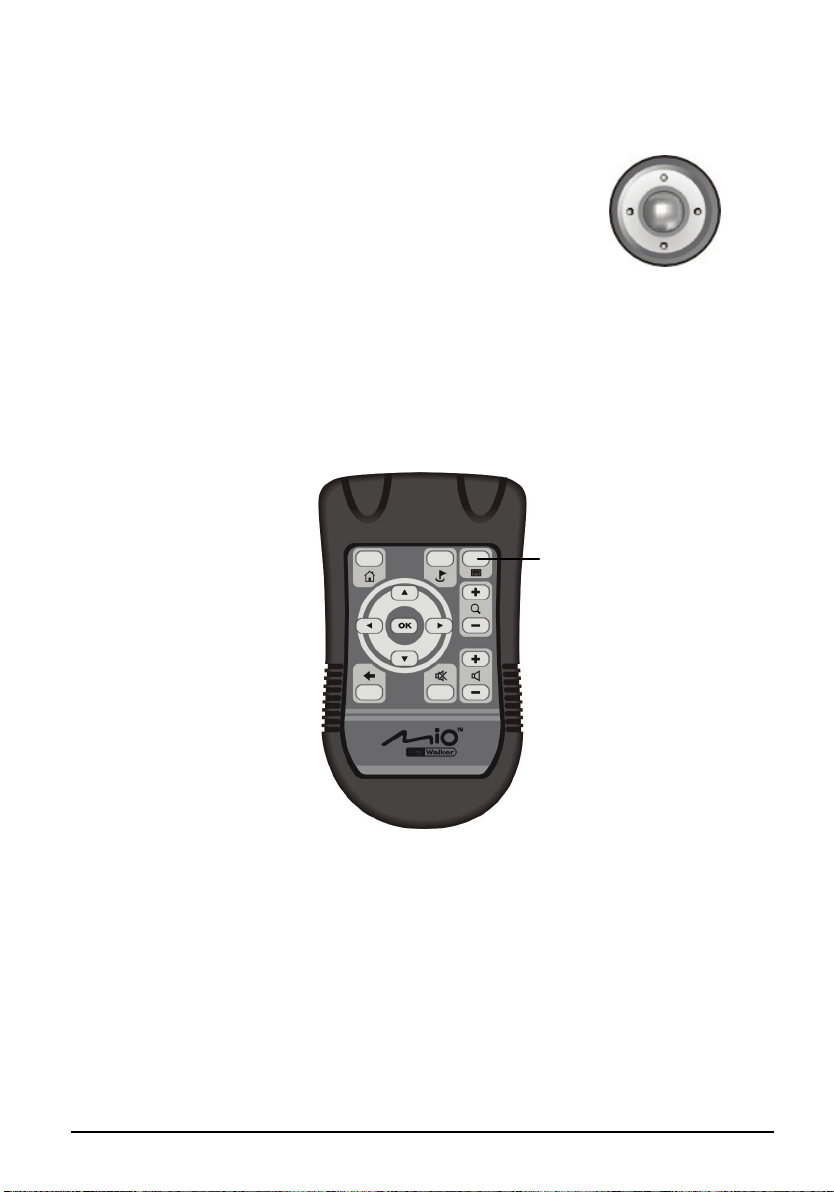
Using the Remote Control
A remote control is supplied with your device. The buttons on the remote
control correspond to the buttons on the device. Refer to the Hardware buttons
chart mentioned earlier for the descriptions of each button.
This button is
reserved for future
use.
Using the Volume Control
The system provides you with 0~10 volume levels (from mute to the
maximum). When you use the volume control on the left side of the device to
adjust volume, bar(s) will appear on the screen to indicate the current volume
level.
13
To increase the volume
Rotate the volume control upward and then release. Each
rotating and releasing increases one volume level.
To decrease the volume
Rotate the volume control downward and then release. Each
rotating and releasing decreases one volume level.
Up
Down
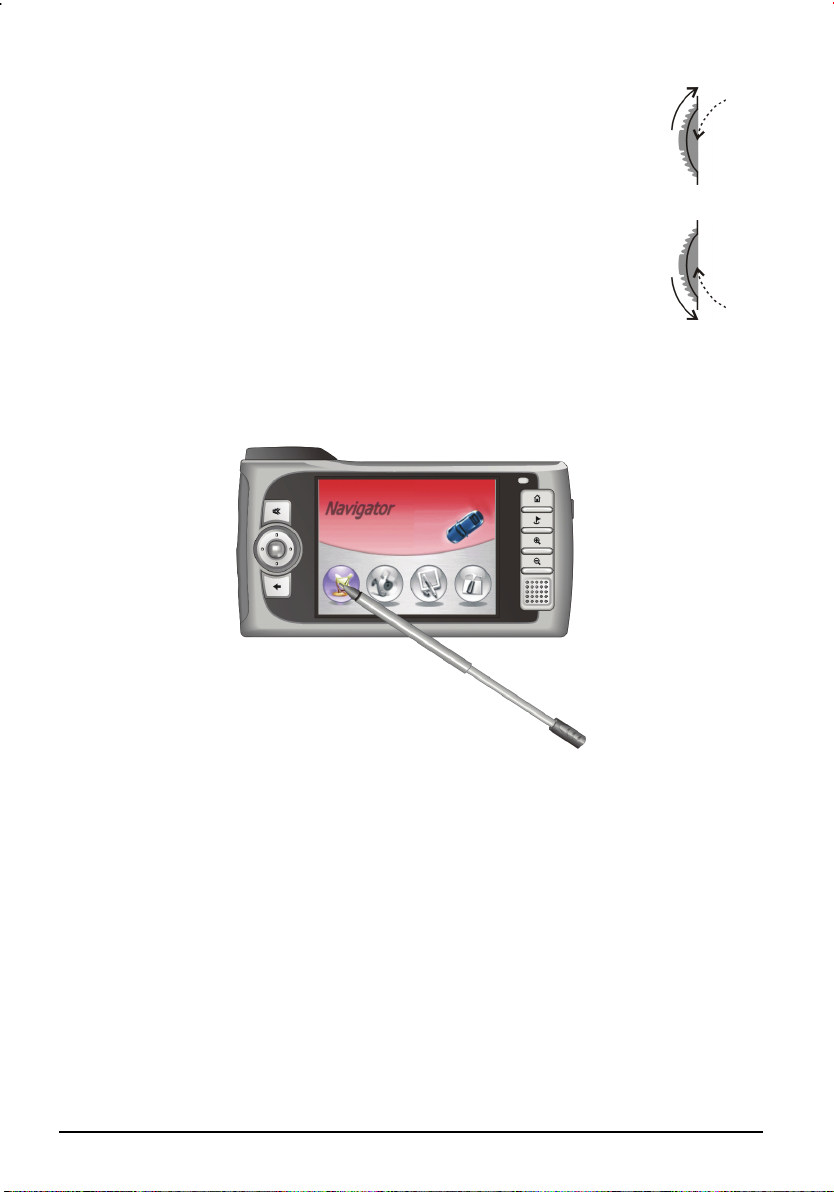
Using the Stylus
The stylus is your input device. You use it to navigate and select objects on the
screen.
Pull the stylus out of the slot and extend it for ease of use. Store it in the slot
when not in use.
You can use the stylus to do the following actions:
Tap
Touch the screen once with the stylus to open items or select options.
14

Drag
Hold the stylus on the screen and drag up/down/left/right or across the
screen.
Tap and hold
Tap and hold the stylus on an item to see a list of actions available for that
item. On the pop-up menu that appears, tap the action you want to perform.
2.3 Managing the Battery Power
A fully charged battery can provide power for up to 4~5 hours. However, the
actual operating time depends on how you are using the device. You can check
the remaining power level of your battery regularly by tapping
The remaining power is displayed on a status bar on the Power screen. (See
Section 3.5 for more details.)
Some operations such as brighter LCD display, higher volume settings and
receiving GPS signal will consume more power than the others. Follow the
power-saving tips to save power:
Decrease the brightness of the LCD by tapping Settings Backlight. (See
Section 3.2 for details.)
Lower the volume by tapping Settings Volume. (See Section 3.3 for
details.)
Settings Power.
Set up a timer to automatically turn off the device when being idle by
tapping
Settings Power. (See Section 3.2 for details.)
Battery Low Warning and Action
Battery Warning screen appears when the level of battery power is below 25%.
When this happens, tap
device to an external AC power to charge the battery.
15
OK and save your data immediately. Then connect your
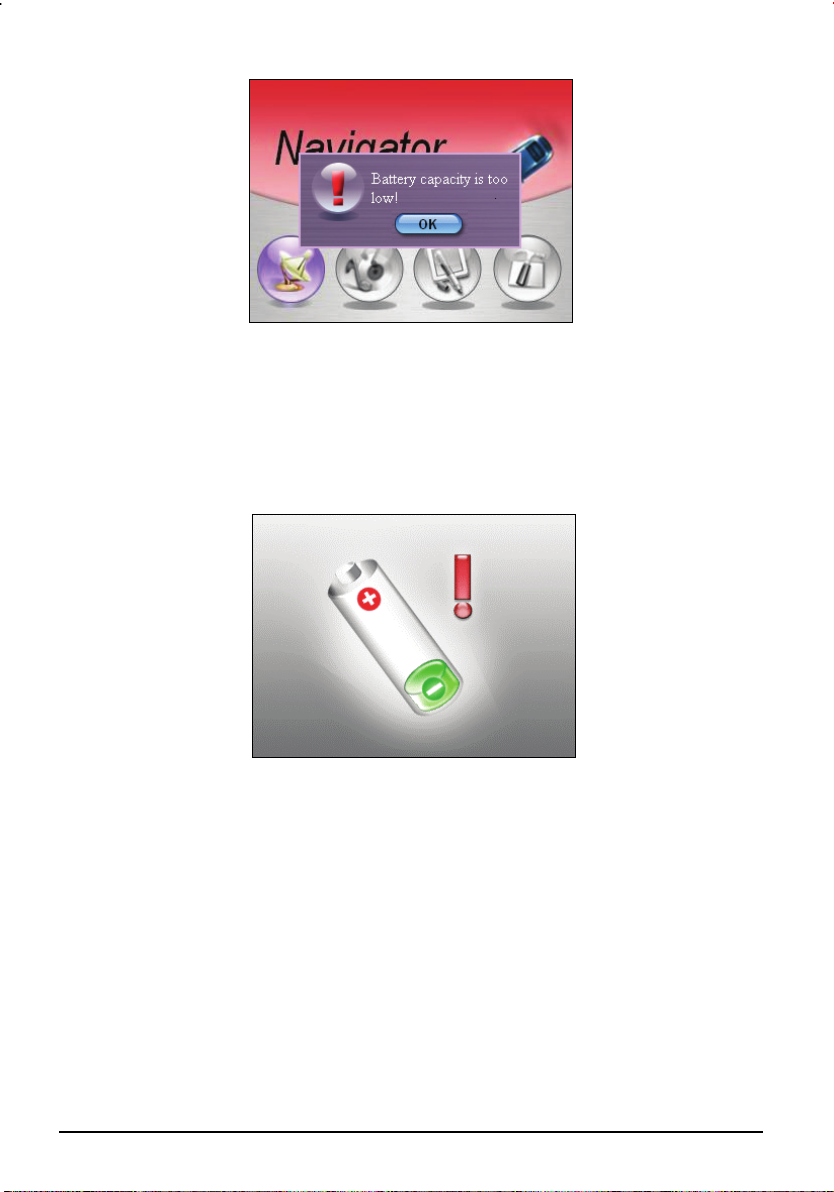
If you do not take any action to charge the battery, the remaining operating time
depends on how you are using the device. Approximately, you will have 50
minutes~1 hour left for the normal operation.
When the battery has only 5% power left, another warning screen will appear
preventing you from using the device until you recharge the battery.
16
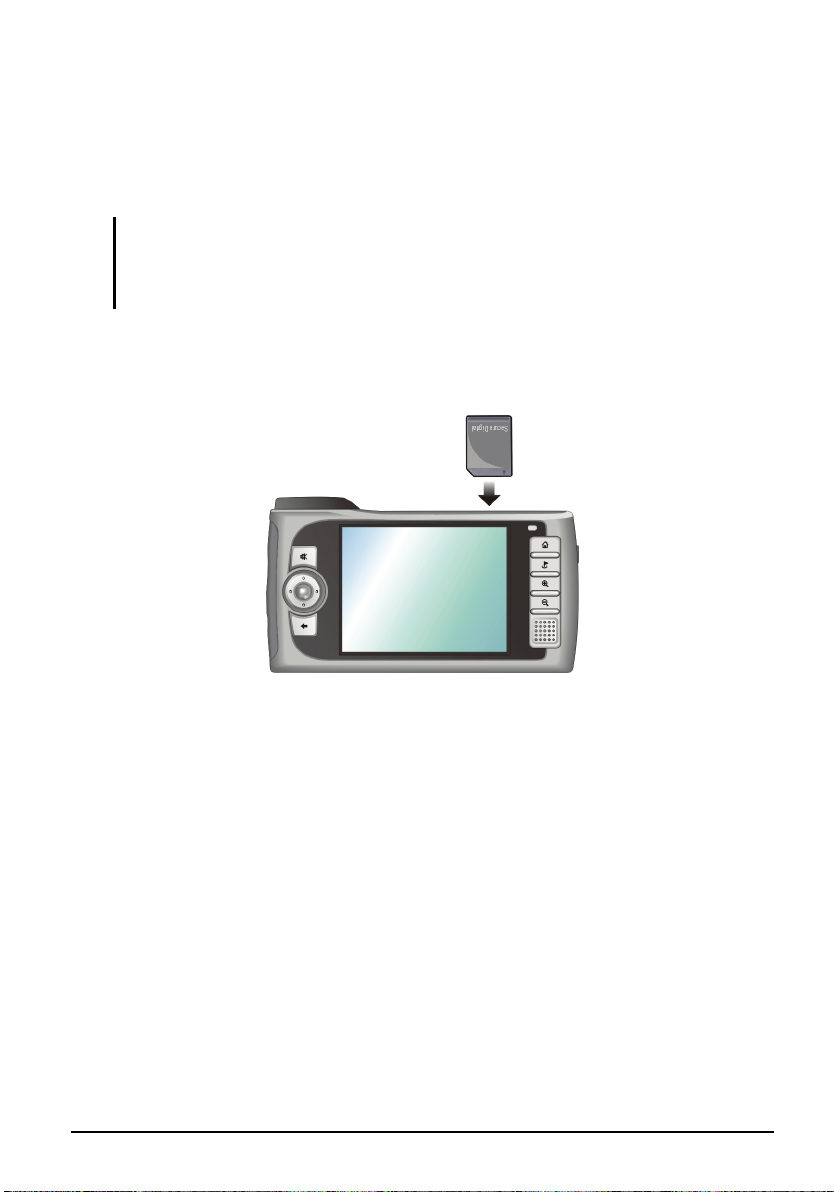
2.4 Using a SD/MMC Card
Your device has a SD/MMC slot where you can insert an optional Secure
Digital or MultiMediaCard storage card.
NOTE:
Make sure that no foreign objects enter the slot.
Keep a SD or MMC card in a well-protected box to avoid dust and humidity when you
are not using it.
To use a SD/MMC card, insert it into the slot, with the connector pointing to the
slot and its label facing the front of the device.
To remove a card, first make sure that no application is accessing the card, then
slightly push the top edge of the card to release it and pull it out of the slot.
17
 Loading...