

Page 1
WOODWORKS: INTERMEDIATE PROJECT
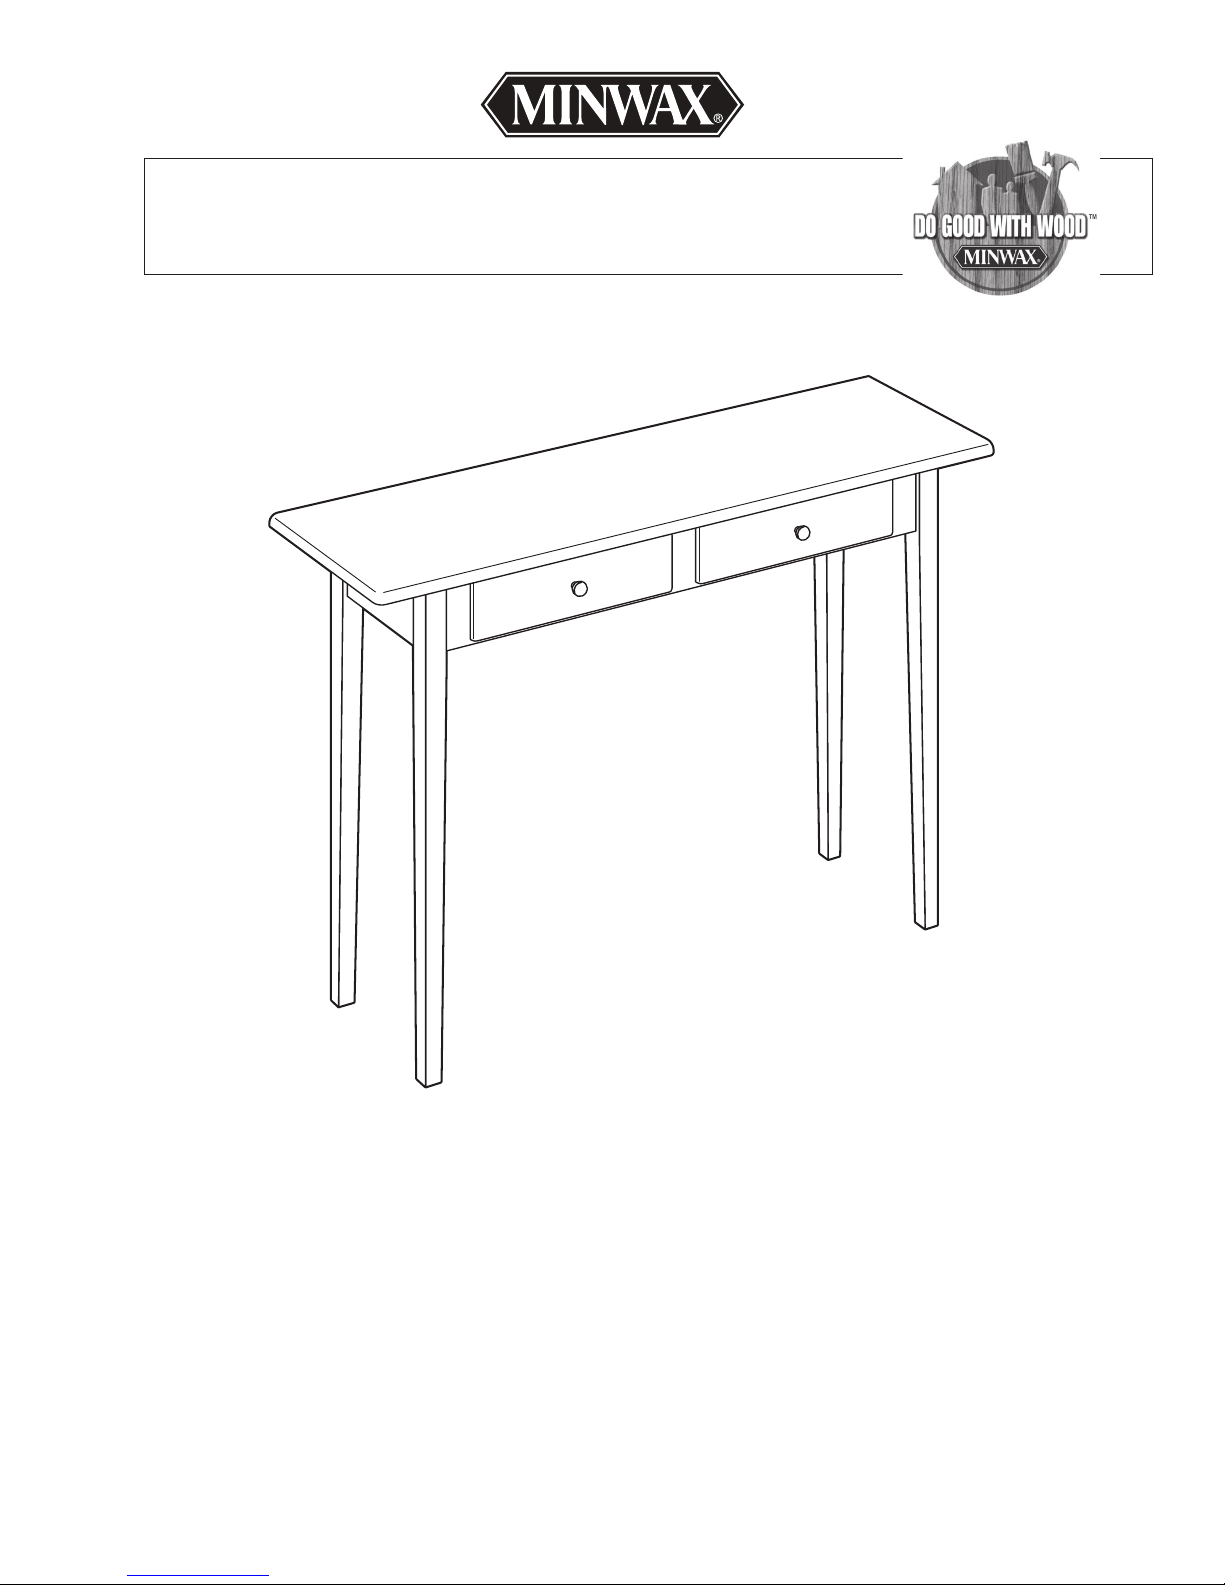
SIDE TABLE
Here’s a perfect table for use in a front hall, behind a living-room sofa or in your bedroom for showcasing your favorite knickknacks. Besides being
narrow enough to fit in a variety of locations, its two drawers provide convenient storage for small items. For intermediate woodworkers, the tapered
legs, doweled joints and close tolerances throughout will present a challenge but also produce great satisfaction when properly executed. And when
it’s all assembled, you’ll learn more about applying and using stains and finishes to protect the wood and keep it looking beautiful.
–1–
Page 2
CONTINUED - WOODWORKS: INTERMEDIATE PROJECT SIDE TABLE
TOOLS REQUIRED SHOPPING LIST
Hand Tools
– Hammer
– Nail set
– 4' pipe clamp
– 18" pipe clamps (4)
– Doweling jig
Power Tools
– Tablesaw with combination
rip/crosscut blade and dado blade
– Saber saw
– Router, 3/8" roundover bit
– Jigsaw
– Electric drill
Miscellaneous
– Pencil
– Tape measure
– Safety glasses
– Carpenter’s glue
– 120, 150 and 220-grit sandpaper
– Clean, lint-free cloths
– Respirator
– Gloves for finishing
– Mineral spirits (for oil-based stains
and finishes)
– Water-filled metal container with
tight-fitting lid (for oil-based stains
and finishes waste products)
®
– Minwax
Wood Finish™Stain
Brush or other good quality,
natural-bristle brush (for oilbased stains and finishes)
– Minwax®Polycrylic®Brush or other
good quality, synthetic-bristle brush
(for water-based stains and finishes)
ytitnauQ metI
'6 @ 2 ,'9 @ 1kao 8x1
'6 @ 1hcrib 4x2
'6 @ 2hcrib 6x1
'6 @ 2hcrib 4x1
1/4" birch plywood 1 @ 12" x 36"
4d finish nails 50
3/8" x 2" dowel pins 16
#8 x 3/4" pan-head screws with washers 2
Oak drawer knobs 2
Tabletop fasteners 6
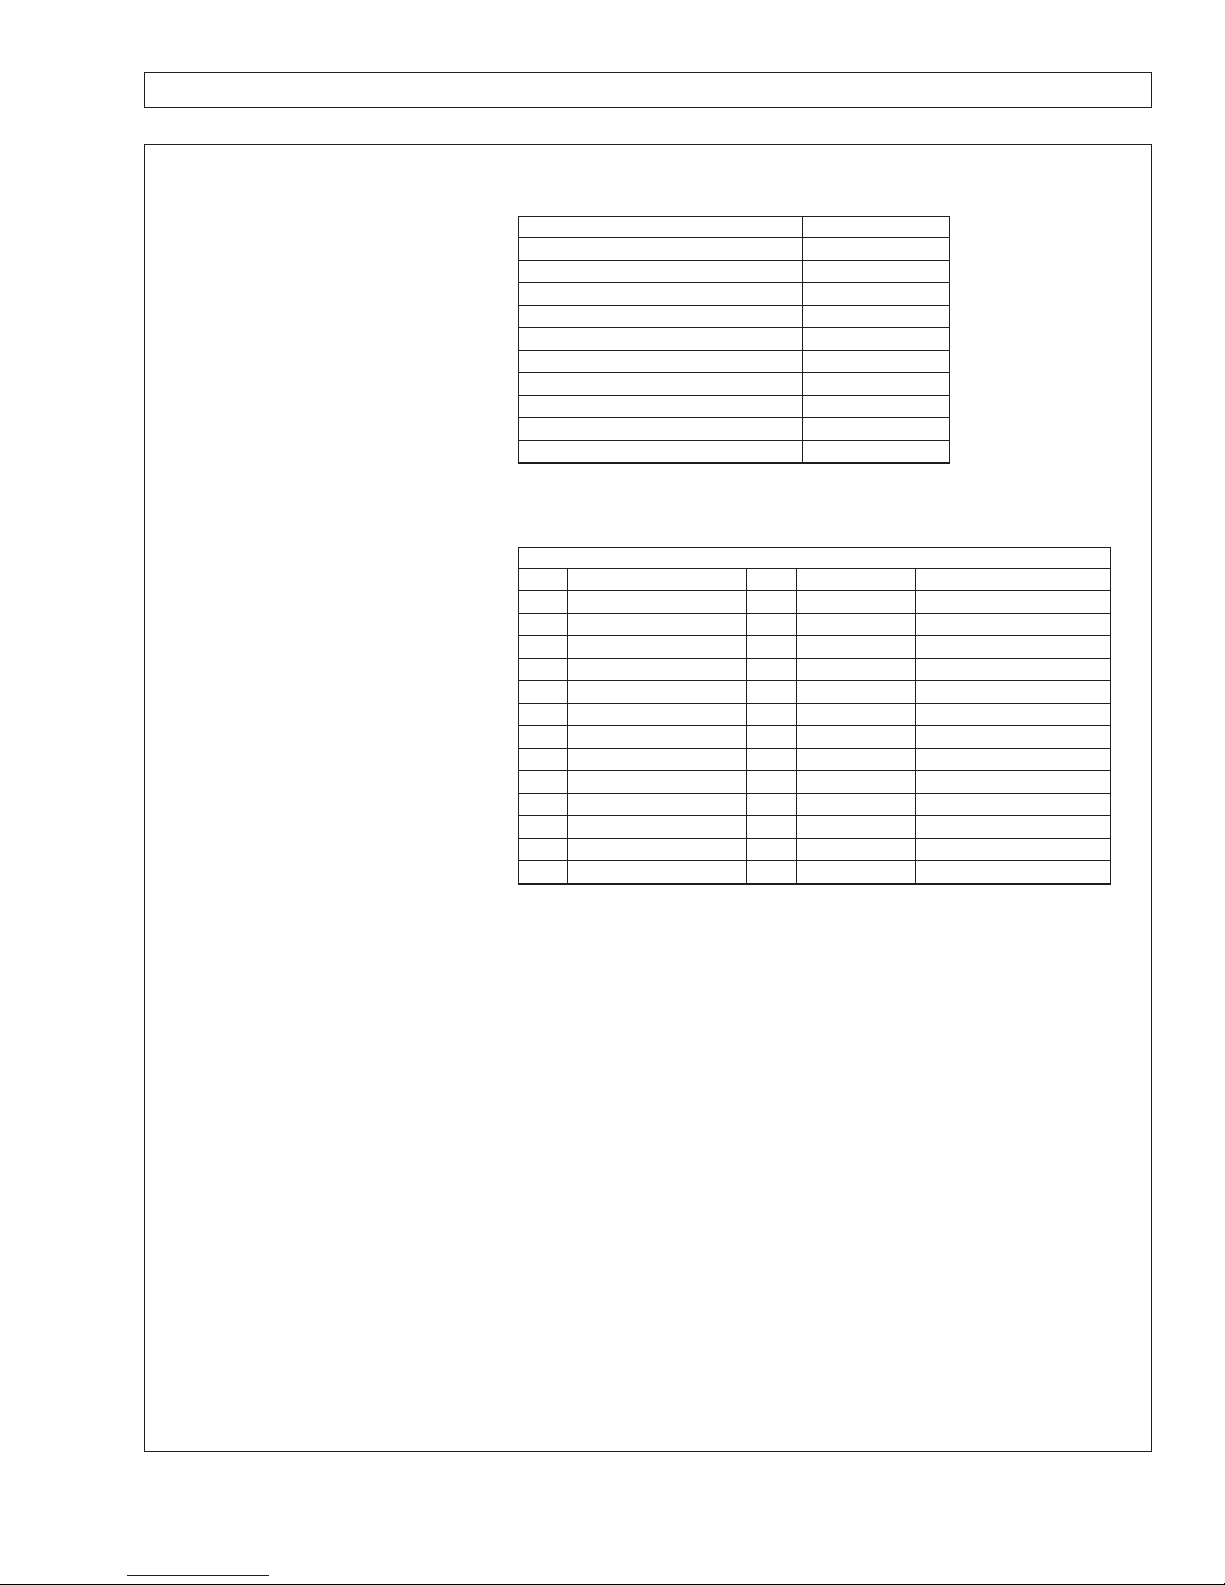
CUTTING LIST
Overall Dimensions: 32"H x 48"W x 14"D
Key Part Pcs. Material Dimensions
A Table top 1 oak 3/4" x 14" x 48"
B Legs 4 birch 1-1/2" x 1-1/2" x 31-1/4"
C Front & back aprons 2 birch 3/4" x 4-1/2" x 37"
D Side aprons 2 birch 3/4" x 4-1/2" x 10"
E Drawer fronts 2 birch 3/4" x 3-5/8" x 15-1/2"
F Drawer sides 4 birch 3/4" x 2-7/8" x 11"
G Drawer backs 2 birch 3/4" x 2-3/8" x 13-3/4"
H Upper drawer runners 2 birch 3/4" x 2" x 10-3/4"
J Drawer runners 4 birch 3/4" x 1-1/2" x 10-3/4"
K Drawer runners 4 birch 3/4" x 3/4" x 10-3/4"
L Stop blocks 2 birch 3/4" x 3/4" x 6"
M Drawer bottoms 2 birch plywood 1/4" x 10-3/4" x 13-3/4"
N Drawer stops 2 birch plywood 1/4" x 1" x 3"
Recommended Wood: Oak/Birch
Alternate Wood: Pine (stain grade)
WOOD FINISHING PRODUCTS
Recommended Finish
Prep: Minwax
Stain: Minwax
Finish: Minwax
®
Pre-Stain Wood Conditioner
®
Wood Finish™English Chestnut (or your choice
of any of the 24 Minwax®Wood Finish™Stain colors)
®
Wipe-On Poly Satin or Gloss
Alternate Finish
Prep: Minwax
Stain: Minwax
Minwax
®
Water Based Pre-Stain Wood Conditioner
®
Water Based Wood Stain Verdigris (or a
®
Water Based Wood Stain of your choice, available
in 50 custom-mixed colors and a White Wash Pickling Stain.)
Finish: Minwax
–2–
®
Polycrylic
®
Protective Finish Semi-Gloss
Page 3

CONTINUED - WOODWORKS: INTERMEDIATE PROJECT SIDE TABLE
BEFORE YOU BEGIN
Good craftsmanship begins and ends with good work habits, so make
the following steps part of your routine workshop practice. If you have
any doubts or questions about how to proceed with a project, always
discuss them with your shop instructor.
• Carefully and fully review plans and instructions before putting a
tool to the project lumber.
• Work sensibly and safely. Wear safety goggles when doing work that
creates flying chips and sawdust; wear the appropriate respirator
whenever making sawdust or working with thinners or other solvents.
• At the end of every work session, clean up your shop area and put
away all portable tools.
CUTTING AND ASSEMBLY
PROCEDURE
Glue the Top
1. To make the top (A), edge-glue together two 1 x 8 boards that are
49" long. Alternate the direction of the growth rings in the end grain of
the boards to prevent the top from warping. After the glue has dried,
cut the top to its finished dimension.
Make the Initial Cuts
2. Cut all the pieces, (B) through (N), to the dimensions given in the
CUTTING LIST. Glue the drawer runner pieces, (J) and (K), together.
Taper the Legs
The legs are made of solid birch stock 1-1/2" thick. If you have trouble
finding birch that thick, glue together two 3/4" pieces. The taper on
two sides of each leg is easy to cut with a homemade tapering jig.
The drawers are boxes assembled with nails–very easy to make and
align–and they ride on wooden runners.
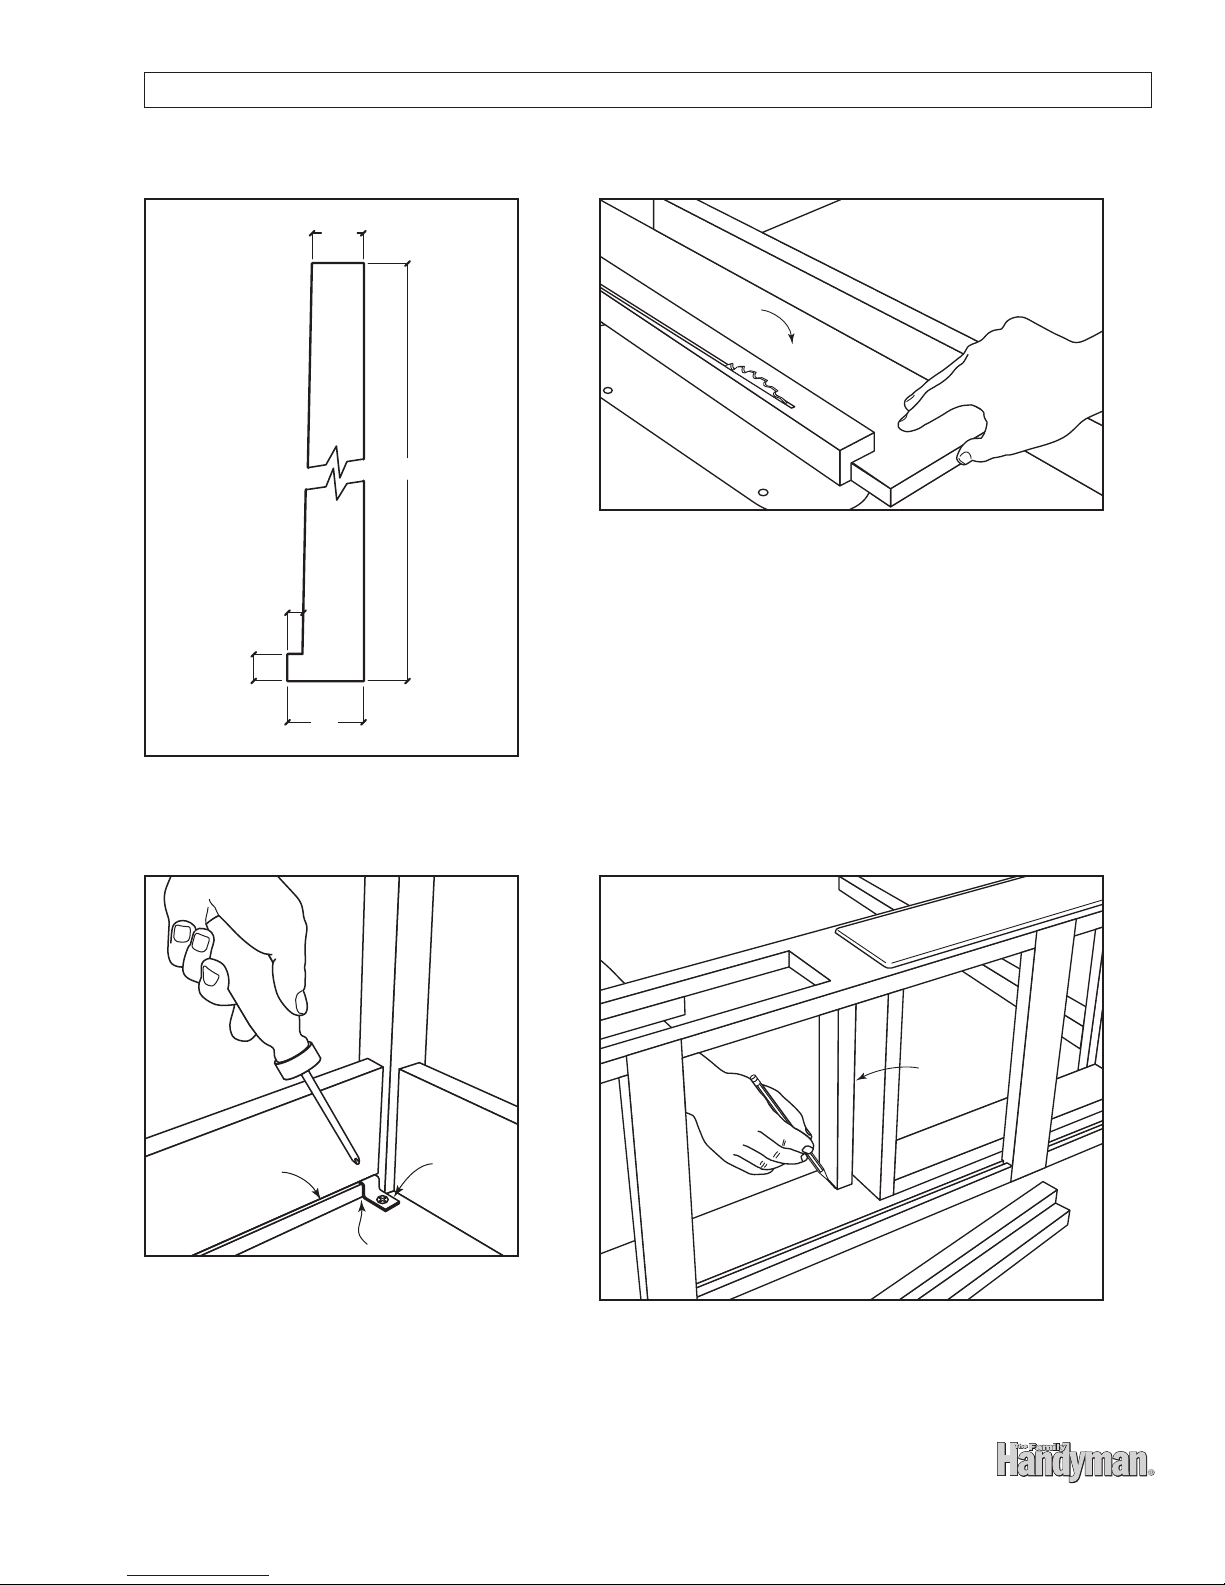
3. Make the leg-tapering jig by cutting a 3/4"-thick piece of scrap
plywood 5" wide by 33" long (Fig. 4). Draw the angled side as shown
in the diagram and cut out the notch with a saber saw.
4. To cut the legs, set the tablesaw fence 5" from the saw blade and
set the blade slightly higher than 1-1/2". You must cut a taper on two
adjacent sides of each leg and leave the sides that fit against the
aprons uncut. Place a leg (B) in the notch of the taper jig and slide
the jig across the table, holding it tight to the fence (Fig. 5). Use a
push stick to hold the leg tight against the side of the notch as you cut
the taper. Rotate the leg 90 degrees in the jig so the tapered side you
just cut is facing up, then cut the other tapered side of the leg. Repeat
these steps for the remaining three legs.
Drill the Dowel Holes
5. Drilling the dowel holes can be confusing unless you first mark
which sides of the legs (B) and ends of the apron pieces (C) go
together. The easiest way to do this is to place all the legs and apron
pieces upside down on your worktable in the relative positions they’ll
assume when the base is assembled. Label each joint with a different
identifying mark so you can assemble it the same way later.
oodworker’s Tip:
W
is simpler and more accurate if you use a dowel-drilling jig. Place a
piece of masking tape on the drill bit for a depth stop flat.
Drilling the dowel holes in the legs and aprons
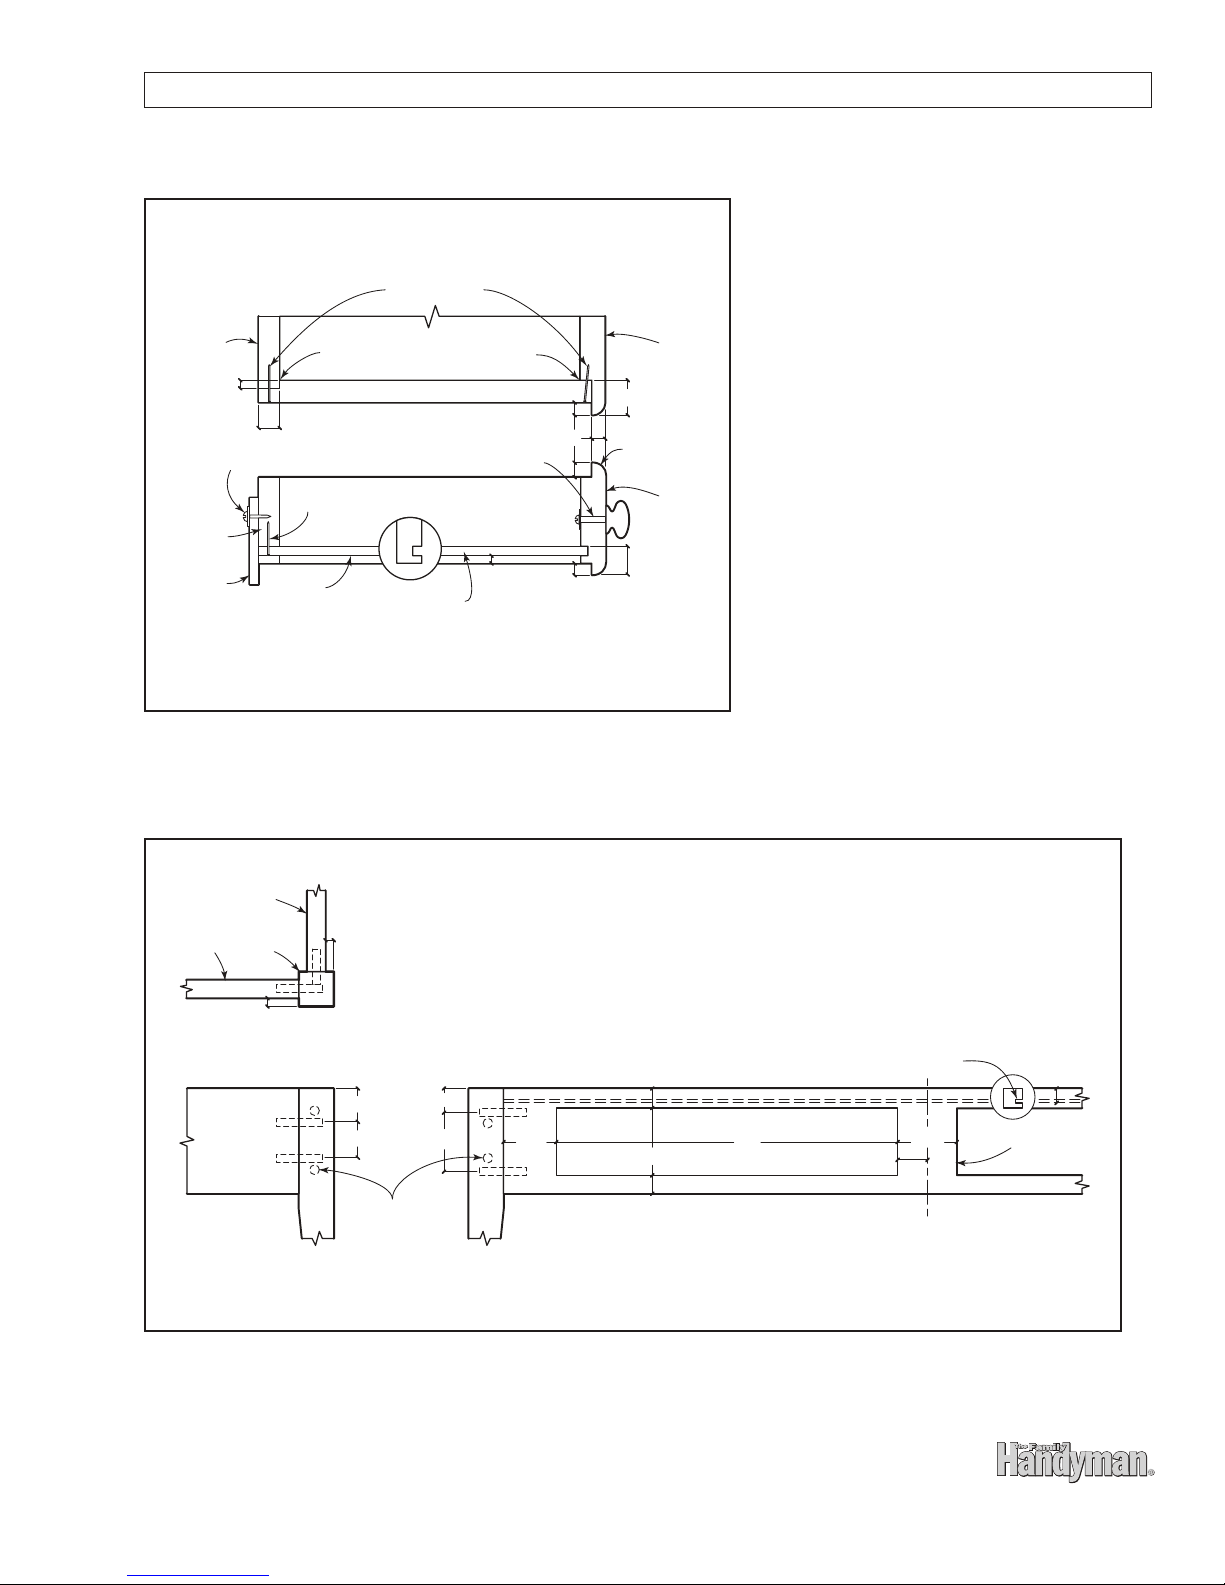
6. Mark the positions of the dowel holes in the sides of the legs and
the ends of the apron pieces (Fig. 3). Offset the dowels slightly on
each side of the legs so they won’t interfere with each other. Drill
the 3/8"-diameter dowel holes.
7. With the tablesaw blade set 1/4" high, cut the grooves for the
tabletop fasteners 1/2" from the top edge of the front and back
aprons (C, Figs. 3 and 6).
Assembling the Table
There are three stages in assembling the table. First, construct the
frame from the legs and apron pieces. Second, make the drawers.
Third, complete the top, which has already been glued together
and cut to size.
Construct the Frame
8. Lay out and cut the two drawer openings in one of the long apron
pieces (C). To do this, drill 3/8" holes within the cutout area of
each opening. Then use a saber saw to cut along each line. Proceed
slowly and carefully to ensure straight cuts and square corners.
After the cutting, file and sand all edges smooth.
9. Sand the legs and aprons with 120-grit paper, then smooth them all
with 180-grit paper. Dowel, glue and clamp the front legs to the front
apron and the back legs to the back apron. Then dowel, glue and
clamp the side aprons to the assembled front and back. Quickly wipe
away excess glue with a damp cloth.
Make the Drawers
10. Drill the holes for the knobs in the drawer fronts (E, Fig. 1).
Shape the drawer front edges with a router and 3/8" roundover bit.
11. Cut rabbets 1-1/8" wide by 3/8" deep on the inside ends of the
drawer fronts, using a dado blade on the tablesaw. Use the tablesaw
miter gauge to ensure square cuts. Clamp a stop block to the fence
to hold the piece the correct distance from the blade. Cut rabbets
3/4" wide x 1/4" deep on the back ends of the drawer sides (F) in
the same way (Fig. 2). Cut the grooves for the drawer bottoms (M)
in the drawer fronts and sides.
12. Sand all the drawer pieces, then glue and clamp all the pieces
together except for the drawer bottoms. Push the bottoms into their
grooves after finishing, to avoid having to wipe the stain and topcoat
out of the corners.
13. Drill pilot holes, and then drive finish nails through the drawer
sides into the drawer fronts and backs. To make nailing easier, clamp
the drawer front or back in a vise so that the drawer side is supported
on the top edge of the vise jaw. Use a nail set to finish driving the nails
into the drawer fronts past the lips of the fronts.
14. Align the upper drawer runners (H, Fig. 1) between the front
and back aprons. Use a clamp to hold them in place, then drill
pilot holes and drive finish nails. Use a nail set to drive the heads
below the surface. Fill the nail holes with wood putty. Then glue the
stop block (L) in place at the bottom of each drawer opening in
the front apron.
–3–
Page 4

CONTINUED - WOODWORKS: INTERMEDIATE PROJECT SIDE TABLE
Affix the Lower Runners
15. To mount the runners (J, K) that guide the sides and bottoms of
the drawers, set the table base on its back and align the drawers in
their openings. Set them tight to the bottom edge of the opening in the
apron, with an even gap on each side.
16. Set the drawer runners in place and mark their outside edges
on the front and back aprons (Fig. 6). Mark where the ends of the
drawer runners join the front and back apron pieces. Leave a 1/32"
gap between the runners and the sides of the drawers. Hammer finish
nails through the aprons and into the drawer runners to hold them
in place. Use a nail set to drive the nailheads slightly below the surface.
Fill the nail holes with wood putty.
17. Finish the drawer assembly after the final topcoat is dry. Slide the
drawer bottoms (M) into their grooves and then fasten them with two
4d finish nails driven into the drawer backs.
18. Attach the knobs to the drawer fronts and pivoted stops to the
backs of the drawers. The stops are 1"x 3" pieces of 1/4" plywood.
Attach them with a single pan-head screw and a washer (see Drawer
Section View, Fig. 2).
19. Reattach the top to the base with table fastener brackets (Fig 6).
Leave a 1/16" space between the fasteners and the aprons to allow the
top to expand. Turn the rear drawer stops horizontal so you can slide
the drawers in place. Then turn the stops downward so the drawers
won’t fall out when you open them.
STAINING AND FINISHING
Woodworker’s Tip:
your sanding, preparation and application time, don’t do it.
These tasks are very important steps in obtaining a high-quality
finish. Remember, it is the finish, just as much as the fit and
smoothness of the parts that will have great bearing on how
people judge your craftsmanship. To ensure an excellent result,
follow the steps listed in this section and also the instructions
the finish manufacturer puts on its products.
Though you may be tempted to cut short
remove any marks or scratches, then lightly sand by hand using withthe-grain sanding strokes. Dust off the piece and wipe it carefully with
a clean, lint-free cloth lightly dampened with mineral spirits.
Recommended Finish
21. Apply the Minwax
®
Wood Finish™you’ve chosen to the interior
surfaces using a natural-bristle brush and a clean, lint-free cloth
following the directions on the can. The brush will help you get the
stain into the many inside corners and other tight spots. Allow the
Wood Finish™to set for about 5 to 15 minutes, then wipe off any
excess. To achieve a deeper color, you may apply a second coat after
4-6 hours, repeating the application directions for the first coat.
Allow the stain to dry for 24 hours before applying the protective
clear finish.
W
oodworker’s Tip:
Different species of wood take to stain differently. When using a combination of woods like oak and birch,
you may need to apply a second or third coat to birch to achieve
a uniform finish. When wiping off stain, make certain that your
last wipe with the cloth goes with the grain of the wood. This
way, any stain you might miss during wipe-off will be visually
minimized by the wood grain.
22. Apply Minwax®Wipe-On Poly following the directions on the can.
Shake the can thoroughly. Apply a liberal amount of Wipe-On Poly on a
clean, soft, lint-free cloth into the wood. It can be brushed on or wiped
on with a cloth. Allow the first coat to dry for at least 4 hours.
23. Once completely dry, sand all surfaces very lightly with 220-grit
or finer sandpaper or very fine (000) steel wool using with-the-grain
strokes. Thoroughly wipe off all surfaces with a soft cloth. Apply a
®
second coat of Minwax
Wipe-On Poly and set the piece aside to dry
for at least 4 hours.
24. Once completely dry, sand all surfaces lightly with 220-grit or finer
sandpaper or very fine (000) steel wool. Thoroughly wipe off the piece
with a soft cloth and apply a third and final coat of Wipe-On Poly. Allow
the table to cure for several days before using it.
FINISHING TIPS
• Test the stains and finishes you are planning to use on scraps of
wood. On the back of the scrap, mark the stain/finish combination
and the type of wood. Allow all samples to dry thoroughly before
making your final finish selection. Save your samples for quick
reference on future projects.
• All stains and finishes must be allowed to dry thoroughly between
coats. Remember that drying times can vary due to humidity and
other climatic conditions.
• If you have some leftover stain or finish, wipe the can rim so that
stain or finish in the rim won’t dry out and prevent the lid from
forming a tight seal.
• Brushes used for water-based products, such as Minwax®WaterBased Wood Stains or Minwax®Polycrylic®Protective Finish, must
be cleaned with soap and water; oil-based finishes must be cleaned
with mineral spirits.
20. Sand all pieces starting with 120-grit paper, then move up to 220-
grit to complete the pre-finish smoothing. Use an orbital sander to
W
oodworker’s Tip:
For an ultrasmooth finish, use 400-grit
sandpaper to apply the final coat of Minwax®Wipe-On Poly.
Alternate Finish
25. Before applying Minwax®Water-Based Wood Stain to a hardwood
or softwood, apply Minwax®Pre-Stain Water-Based Wood Conditioner
following the directions on the can. This will help to ensure even
absorption of stain and prevent blotchiness that can occur with some
woods. After 1 to 5 minutes, wipe off all excess conditioner using a
clean, soft cloth. Wait 15 to 30 minutes then use 220-grit or finer sandpaper to sand off any “whiskers” raised by the conditioner. Proceed to
the staining within 2 hours.
26. Do the staining in two steps, starting on the interior surfaces and
then do to the exterior surfaces. Apply the Minwax®Water-Based
Wood Stain you’ve chosen to the table using either a nylon/polyester
brush or a cloth. Allow stain to penetrate no longer than 3 minutes.
While stain is still wet, wipe off all excess with a clean cloth that’s been
lightly dampened with stain. Allow the piece to dry for 2 hours before
–4–
Page 5

CONTINUED - WOODWORKS: INTERMEDIATE PROJECT SIDE TABLE
applying a second coat, if desired. Allow the piece to dry overnight
before applying the protective clear finish.
®
NOTE: Minwax
Water Based Wood Stain is available in 50 custommixed colors and a White Wash Pickling Stain. So, you can
actually pick and apply a color to complement the décor of the
room in which the table will be placed. For this reason, make sure
you look over all of the Minwax
®
color charts or go to minwax.com
before making your final selection.
27. After allowing the piece to dry overnight, apply Minwax®Polycrylic
Protective Finish following the directions on the can. Stir the can
contents thoroughly before starting and periodically repeat the stirring
during your work session.
28. Working a small area at a time to maintain a wet edge, apply
the first coat. Work quickly and make the final strokes in each
newly finished section using with-the-grain brushstrokes.
29. Allow the finish to dry a minimum of 2 hours. Then sand lightly
with 220-grit or finer sandpaper wrapped around a flexible sanding
block. Thoroughly dust off and wipe all surfaces with a cloth lightly
dampened with water.
30. Repeat steps 28 and 29 to apply the second and final coat.
PRODUCT SAFETY
For your safety and the safety of those you work with, always read the
safety warnings, which manufacturers print on their labels, and follow
them to the letter.
FIRST AID: In case of eye contact, flush thoroughly with large
amounts of water for 15 minutes and get medical attention. For skin
contact, wash thoroughly with soap and water. In case of respiratory
difficulty, provide fresh air and call physician. If swallowed, call Poison
Control Center, hospital emergency room, or physician immediately.
DELAYED EFFECTS FROM LONG-TERM OVEREXPOSURE.
Contains solvents which can cause permanent brain and nervous
system damage. Intentional misuse by deliberately concentrating and
inhaling contents may be harmful or fatal.
®
WARNING: This product contains chemicals known to the State of
California to cause cancer and birth defects or other reproductive harm.
DO NOT TAKE INTERNALLY. KEEP OUT OF REACH OF CHILDREN.
CONFORMS TO ASTM D-4326. Contact a physician for more health
information.
When using water-based wood finishing products:
CAUTIONS: Use Only With Adequate Ventilation. To avoid overexposure,
open windows and doors or use other means to ensure fresh air entry
during application and drying. If you experience eye watering, headaches,
or dizziness, increase fresh air, or wear respiratory protection (NIOSH
approved), or leave the area. Avoid contact with eyes and skin. Wash
hands after using. Keep container closed when not in use. Do not transfer
contents to other containers for storage.
FIRST AID: In case of eye contact, flush thoroughly with large amounts
of water. Get medical attention if irritation persists. If swallowed, get
medical attention immediately.
WARNING! Removal of old paint by sanding, scraping or other means
may generate dust or fumes that contain lead. Exposure to lead dust or
fumes may cause brain damage or other adverse health effects, especially
in children or pregnant women. Controlling exposure to lead or other
hazardous substances requires the use of proper protective equipment,
such as properly fitted respirator (NIOSH approved) and proper
containment and cleanup. For more information, call the National Lead
Information Center at 1-800-424-LEAD (in US) or contact your local
health authority.
DANGER: Rags, steel wool, other waste soaked with oil-based stains
and clear finishes, and sanding residue may spontaneously catch fire if
improperly
discarded. Immediately place rags, steel wool, other waste
soaked with these products, and sanding residue in a sealed, water-filled
metal container. Dispose of in accordance with local fire regulations.
When using oil-based wood finishing products:
CAUTIONS: CONTAINS ALIPHATIC HYDROCARBONS. Contents
are COMBUSTIBLE. Keep away from heat and open flame. VAPOR
HARMFUL. Use only with adequate ventilation. To avoid overexposure,
open windows and doors or use other means to ensure fresh air entry
during application and drying. If you experience eye watering, headaches,
or dizziness, increase fresh air, or wear respiratory protection (NIOSH
approved) or leave the area. Avoid contact with eyes and skin. Wash
hands after using. Keep container closed when not in use. Do not transfer
contents to other containers for storage.
WARNING: This product contains chemicals
known to the State of
California to cause cancer and birth defects or other reproductive harm.
DO NOT TAKE INTERNALLY. KEEP OUT OF REACH OF CHILDREN.
CONFORMS TO ASTM D-4326. Contact a physician for more health
information.
T
This project was adapted with permission from
Handyman
®
magazine, Home Services Publications, Inc., an
he Family
affiliate of Reader’s Digest Association, Inc., Suite 700, 2915
Commers Drive, Eagan, MN 55121. ©Copyright 1994. All rights
reserved. For subscriptions call toll-free: 1-800-285-4961.
–5–
Page 6
CONTINUED - WOODWORKS: INTERMEDIATE PROJECT SIDE TABLE
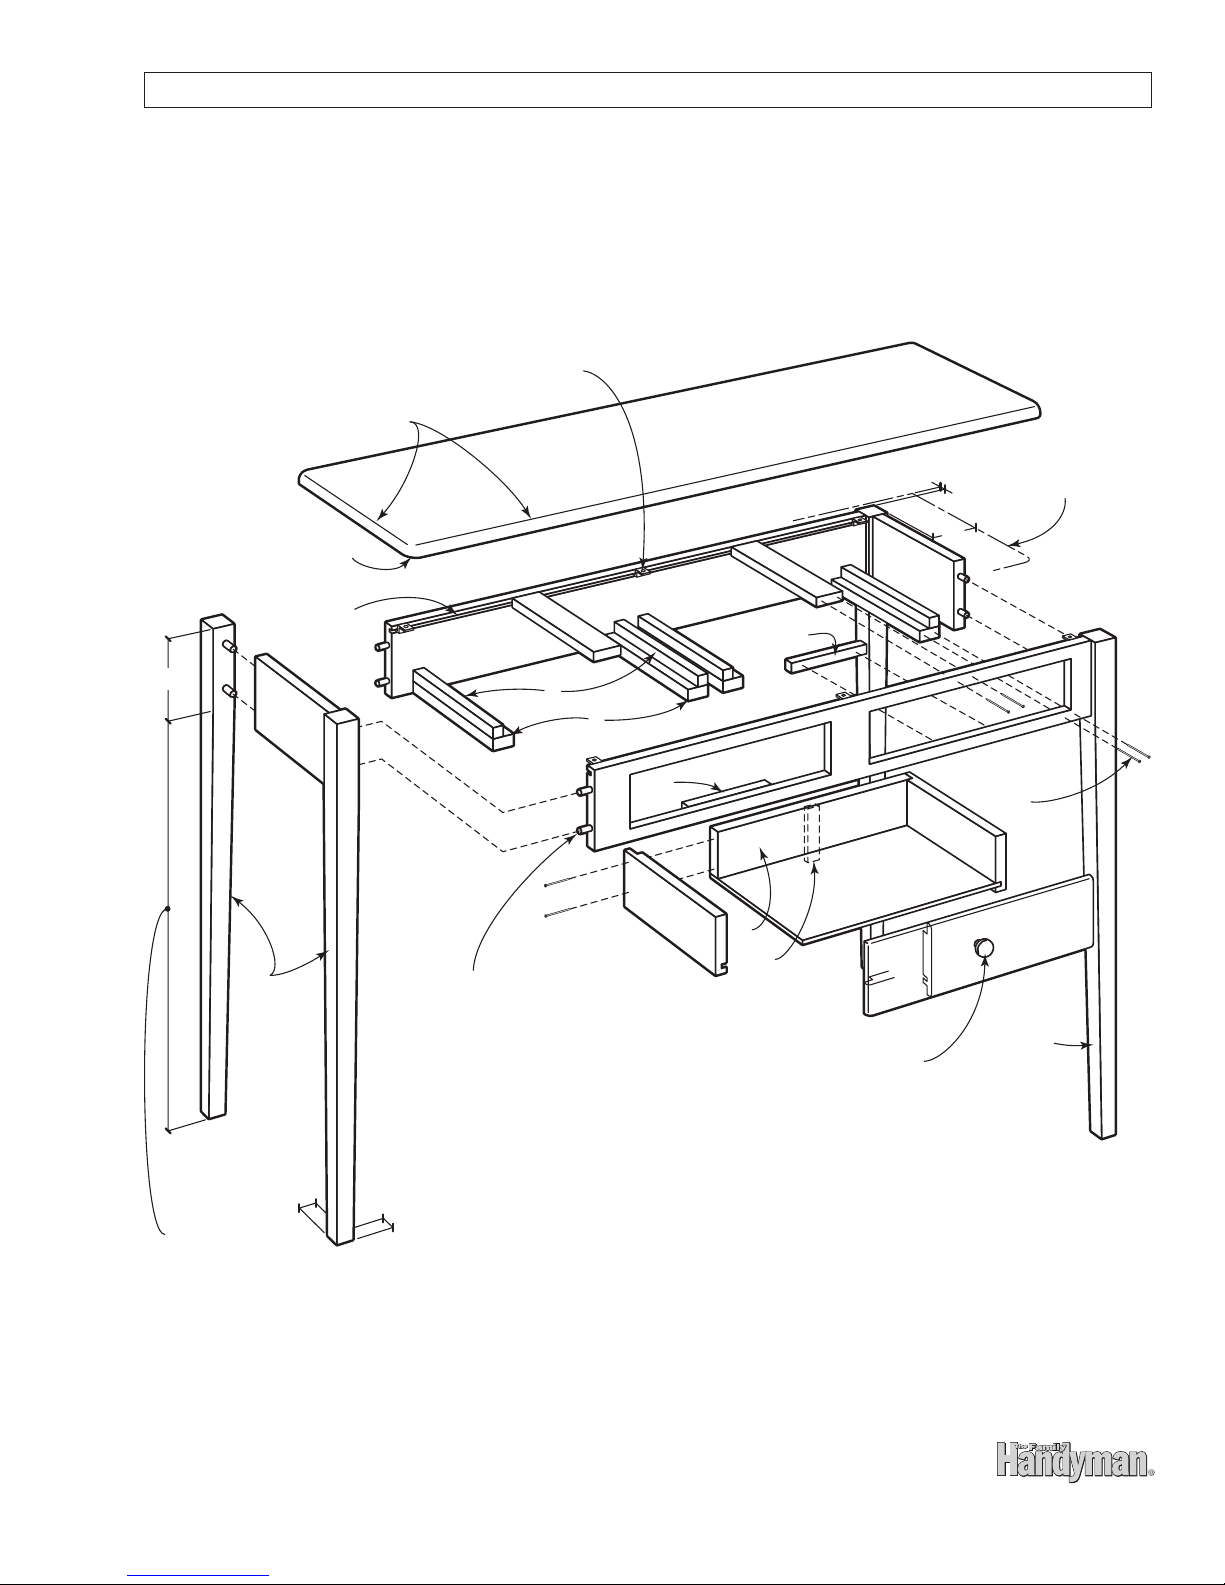
FIG 1. TABLE DETAILS
Tabletop Fastener (6 req’d.)
1
/2" Rad. (side and front edges)
1" Rad. (front corners)
Saw Kerf
A
1
/2"
Tabletop Overhang
4"
H
D
C
H
Glue Only
5"
In this area
taper leg on
inside two
sides to 1"
square (see
taper jig).
K
D
J
4d Finish Nail-
L
2 per Joint Set
and Fill
F
M
F
G
B
3
/8" Dia. x 2" Dowel Pin
N
E
(2 per joint)
1
1-
/4" Dia. Oak Knob
B
1"
1"
–6–
Page 7
CONTINUED - WOODWORKS: INTERMEDIATE PROJECT SIDE TABLE
4d Finish Nails
LIATED TNORFLIATED EDIS
FIG 2. DRAWER DETAILS
G
1
/4"
3
/4"
3
/4" Pan-head
No. 8 x
Screw and Washer
F
DRAWER ( PLAN VIEW)
1
/4" Dia. Hole
eulGeulG
3
/8"
4d Finish Nail
G
N
M
F
1
/4" x 1/4" Grooves
1
/4"
3
/8"
DRAWER (SECTION VIEW)
FIG 3. LEG AND APRON DETAILS
C
D
B
3
/8"
1
/8"
1
3
/8" Rad.
7
E
E
/8"
3
/8"
1
/2"
1
D
1
1
/2"
3
/8" Dia. x 1-1/16"–
Deep Dowel Holes
1
3
/4"
/8" x 1/4" Saw Kerf Front and Back
1
/2"
1"
1
/2"
2
1
/4"
2
BB
3"
3
/4"
15"
1
2
/2"
1
1
/4"
C
–7–
Page 8
CONTINUED - WOODWORKS: INTERMEDIATE PROJECT SIDE TABLE
FIG 4. TAPERING JIG
3
3
/8"
33"
1"
3
/4"
1
5"
FIG 5. CUTTING THE LEGS
Blade guard removed
for clarity only. Always
use your guard.
Taper Jig
FIG 6. REATTACH TO BASE
Sawn Groove
1
Tabletop
Fastener
/16" Gap
FIG 7. MARK THE DRAWER RUNNERS
1
/32" Gap
–8–
 Loading...