

Page 1

Minuteman
®
Excellence Meets
Clean
User
Manual and Parts
Guide
0~
Back
Pack
Page 2

Before Using
This manual
is
furnished with each new
V1
0 Pro and
V1
0 Pro Plus. This provides the necessary operating and preventative maintenance
instructions. Operators must read and understand this manual before operating or servicing this machine.
This machine was designed to give you excellent performance and efficiency. For best results and minimal cost please follow the general
guidelines below:
• Operate the machine with reasonable care.
• Follow the manufacturer's suggested maintenance instructions as provided
in
this manual.
• Use original manufacturer's supplied parts.
19.5"
(
495
mm)
2
Page 3
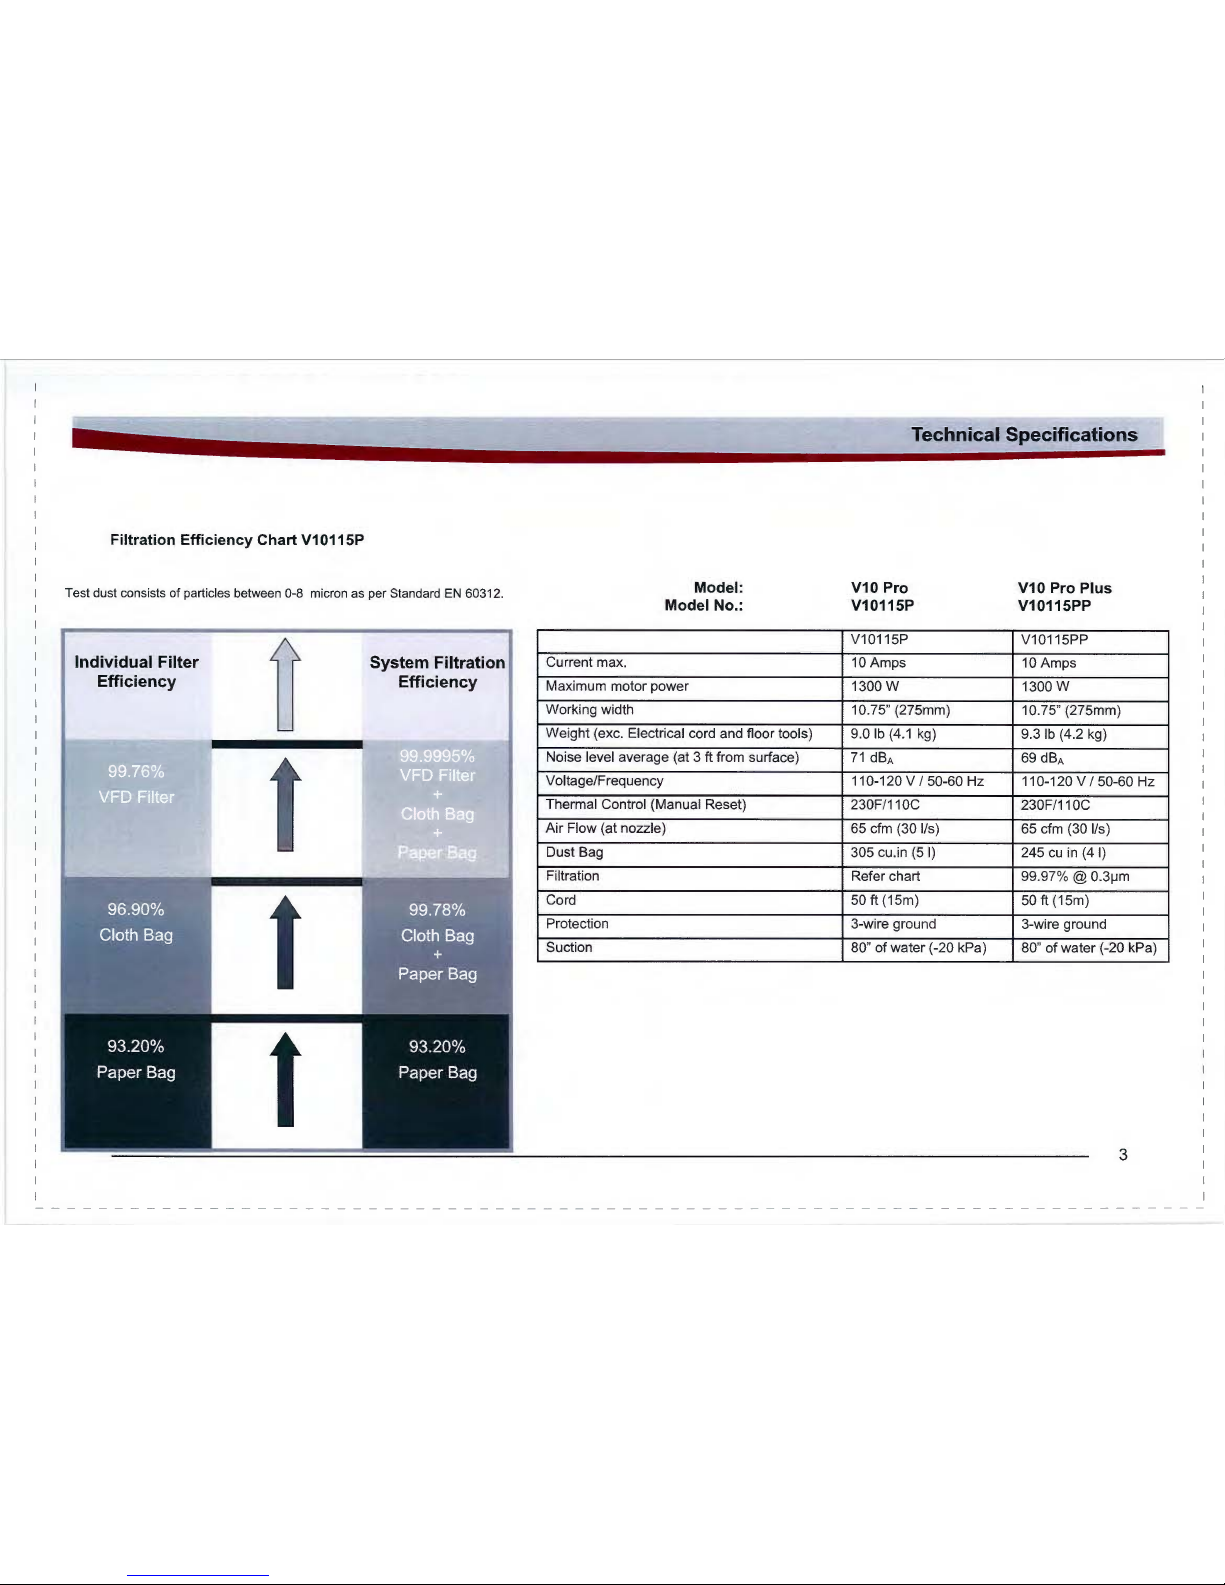
Filtration Efficiency Chart
V1
0115P
Test dust consists
of
particles between 0-8 mic
ron
as per Standard
EN
60312.
Individual Filter
Efficiency
System Filtration
Efficiency
Model:
Model No.:
Current max.
Maximum motor power
Worki
ng
width
Weight (exc. Electrical cord and floor tools)
Noise level average (at 3 ft from surface)
VoltageiF requency
Thermal Control (Manual Reset)
Air Flow (at nozzle)
Dust Bag
Filtration
Cord
Protection
Suction
Technical Specifications
V10 Pro
V10 Pro Plus
V10115P
V10115PP
V10115P
V10115PP
10 Amps 10 Amps
1300W
1300 w
10.75" (275mm)
10.75" (275mm)
9.0 lb
(4.1
kg)
9.3 lb (4.2 kg)
71
dBA
69 dBA
11
0-120 V I 50-60 Hz
110-120
VI
50-60Hz
230F/110C
230F/110C
65 cfm (30 lis) 65 cfm (30
1/s)
305 cu.in (5
I)
245
cu
in
(4
I)
Refer chart
99.97% @
0.3~m
50ft
(15m)
50ft
(15m)
3-wire ground
3-wire ground
80"
of
water (-20 kPa)
80"
of
water ( -20 kPa)
3
Page 4

4
Page 5

Before
Using
Page 2
Technical
Specifications
Page 3
Safety
Instructions
Page 6
Instructions
de
securite
Page 7
Unpacking
Instructions
and
Warnings
Page 8
Deballage
des
Instructions
et
Avertissements
Page 9
Machine
Overview
and
Assembly
Page
10
Machine
Overview
Page 11
Machine
Overview, Wearing and
Adjustment
Page
12
Safety and Maintenance
Checks
Page
13
Operating
and
Working
Page
14
Parts
Guide
and
Exploded
Diagram
Page 15
Electrical
Circu
it and
Warnings
Page
16
Trouble
Shooting
Page
17
Warranty
Page 18
Contact
Details Back Page
5
Page 6

Safety Instructions
THIS
APPLIANCE
IS
INTENDED
FOR
COMMERCIAL
USE ONLY
IMPORTANT SAFETY INSTRUCTIONS
When using an electrical appliance, basic precautions should always
be
followed,
Including the following:
READ
ALL
INSTRUCTIONS
BEFORE USING THE BACK PACK VACUUM CLEANER
•
Do
not leave the appliance when plugged
in.
Unplug from the power point when not
in
use and before servicing.
•
Do
not use outdoors or
on
wet surfaces.
•
Do
not allow
to
be
used as a toy. Close attention
is
necessary when used by or near children.
• Use only as described
in
this manual. Use only manufacturer's recommended attachments.
•
Do
not use with damaged cord or plug. If appliance
is
not working as it should, has been dropped, damaged, left outdoors, or dropped into water ,
return it to a service centre.
•
Do
not pull or carry by cord, use cord as a handle, close a door
on
cord, or pull cord around sharp edges or corners.
Do
not
run
appliance over
cord. Keep cord away from heated surfaces.
•
Do
not unplug by pulling
on cor
d.
To unplug, grasp the plug, not the cord.
•
Do
not handle plug or appliance with wet hands.
•
Do
not put any object into openings.
Do
not use with any opening blocked; keep free of dust, lint, hair, and anything that may reduce air flow .
• Keep hair, loose clothing, fingers and all parts of body away from openings and moving parts.
• Turn off all controls before unplugging.
• Use extra care when cleaning
on
stairs.
•
Do
not use to pick
up
flammable or combustible liquids, such as gasoline, or use
in
areas where they may be present.
• Connect to a properly grounded outlet only. See Grounding Instructions.
•
Do
not pick
up
anything that
is
burning or smoking, such as cigarettes, matches, or hot ashes.
•
Do
not use without dust bag and/or filters
in
place.
WARNING!
• No liability can
be
accepted for damages to persons and
or
objects caused by improper use, maintenance carried out by unauthorised personnel, use
of
unauthorised
and non original spare parts, any form
of
tampering and or modifications to the original product.
• The manufacturer reserves the right to modify the appliance and or the accessories supplies without prior notice.
SAVE THESE INSTRUCTIONS
6
Page 7

POUR USAGE COMMERCIAL SEULEMENT
MODE D'EMPLOI SECURITAIRE
Lorsque l'on utilse
un
appareil electrique, des precautions
de base doivent tourjours etre suivies telles que:
IMPORT ANTES MESURES DE SECURITE
Toute personne amenee a utiliser
ou
entretenir cette machine est tenue, auparavant, de lire toutes les instructions et recommandations de ce guide, et de s'assurer de les avoir toutes
comprises.
L'utilisation de cette machine a proximite de produits inflammables
ou
explosifs est formellement interdite.
Cette machine a ete
con<;:ue
pour aspirer les poussieres et saletes uniquement
en
interieur.
Minuteman deconseille fortement toute autre utilisation de
sa
machine.
Les conditions mentionnees ci-dessous presentent
un
danger pour l'operateur et l'appareil. Lisez attentivement ce guide pour reagir de Ia meilleure
far;:on
possible
si
l'une de ces condi-
tions vient a se produire. Reperez tous les dispositifs de securite equipant
Ia
machine et prevoyez des sessions de formation pour tous ceux pouvant etre amenes a utiliser
Ia
machine.
Signalez immediatement tout dommage
ou
fonctionnement anormal. N'utilisez pas
Ia
machine
si
elle n'est pas
en
parfaite condition de marche.
IMPORT ANTES MESURES DE SECURITE
L'utilisation d'un appareil electrique demande certaines precautions:
LIRE TOUTES LES INSTRUCTIONS AVANT
DE
FAIRE FONCTIONNER (CET APPAREIL)
AvERT
Iss
EM
EN
T.
Pour reduire les risques d'incendie, de choc electrique ou de blessure :
1.
Ne
pas laisser l'appareil sans surveillance lorsqu'
il
est branche. Debrancher lorsque l'appareil n'est pas utilise et avant l'entretien.
2. Ne pas utiliser a l'exterieur et
ne
pas aspirer de matieres humides.
3.
Ne pas permettre aux enfants de jouer avec l'appareil. Une attention particuliere est necessaire lorsque l'appareil est utilise par des enfants
ou
a proximite de ces derniers.
4.
N'utiliser que conformement a cette notice avec les accessoires recommandes par
le
fabricant.
5.
Ne pas utiliser
si
le
cordon
ou
Ia
fiche est endommage. Retourner l'appareil a
un
atelier de reparation s'
il
ne
fonctionne pas bien, s'
il
est tombe
ou
s'il a ete endommage, oublie a l'ex-
terieur
ou
immerge.
6.
Ne pas tirer soulever
ni
trainer l'appareil par
le
cordon.
Ne
pas utiliser le cordon comme une poignee,
le
coincer dans
I'
embrasure d'une porte ou l'appuyer contre des aretes vives
ou
des coins. Ne pas faire rouler l'appareil sur le cordon. Garder
le
cordona l'ecart des surfaces chaudes.
7. Ne pas debrancher
en
tirant sur le cordon. Tirer plutot
Ia
fiche.
8.
Ne pas toucher
Ia
fiche
ni
l'appareillorsque vos mains sont humides.
9.
N'inserer aucun objet dans les ouvertures. Ne pas utiliser l'appareillorsqu'une ouverture est bloquee. S'assurer que de
Ia
poussiere, de
Ia
peluche, des cheveux
ou
d'autres matieres
ne
reduisent pas le debit d'air.
10
. Maintenir les cheveux, les vetements amples, les doigts et toutes les parties du corps a l'ecart des ouvertures et des pieces mobiles.
11
. Mettre toutes les commandes a
Ia
position ARRET avant de debrancher l'appareil.
12.
User de prudence lors
du
nettoyage des escaliers.
13
. Ne pas aspirer des liquides inflammables ou combustibles, comme de
I'
essence, et
ne
pas faire fonctionner dans des endroits ou peuvent
se
trouver de tels liquides.
14. Ne rien ramasser de ce qui brule our de fumee tells que cigarettes, allumettes
ou
cendres
en
feu.
15. Ne pas employer sans filter de poussiere
ou
autre
en
position.
16. Brancher dans une prise avec une prise de terre seulement. Voir references pur prise de terre.
CONSERVER CES INSTRUCTIONS
7
Page 8

Unpacking Instructions and Warnings
Inspection
Carefully unpack and inspect your
V1
0 Pro and
V1
0 Pro Plus for shipping damage. Follow any unpacking instructions on shipping pallet. Each unit has
been tested and thoroughly inspected before shipment. Any damage is the responsibility
of
the delivery carrier who should
be
notified immediately.
Operator Responsibility
Read this manual carefully before operating this machine.
The operator
is
responsible for taking care
of
the daily maintenance and inspection
of
the machine to keep it
in
good working condition. The operator must
inform the service mechanic or supervisor when the scheduled maintenance intervals are required as stated in the MAINTENANCE section of this manual.
Grounding Instructions
This product must be grounded. If
it
should malfunction or break down, grounding provides a path
of
least resistance for electric current to reduce the risk
of
electric shock. This product
is
equipped with a cord hav i
ng
an equipment grounding conductor and a grounding plug. The pl
ug
must be plugged into
an
appropriate outlet that is properly installed and grounded
in
accordance with all local codes and ordinances.
Warning
Improper connecti
on
of
the equipment-grounding conductor can result
in
a risk
of
electric shock . Check with a qualified
electrician or serviceman if you are
in
doubt as to whether the product is properly grounded. Do not modify the plug
provided with the
product-
if it will not fit the outlet, have a proper outlet installed by a qualified electrician.
This product
is
for use
on
a nominal 120-volt circuit and has a grounding plug that looks like the plug illustrated at the
right. Make sure that the product
is
connected to an outlet having the same configuration as the plug. No adapter should
be
used with this product.
Warning
Grounding methods
GROU
NDEDm_l
OUTL
ET
a
rizJ
GROUNDED
OUTLET
BOX
This appliance is equipped with a thermal resetting protection device. This
is
a safety feature to protect the appliance from overheating. If the appliance
should suddenly stop and will not start, turn off the main switch and pull the plug off the socket outlet.
Do
not operate the appliance for at least 30 minutes.
8
Page 9

Deballage des Instructions et Avertissements
Inspection
Deballer soigneusement et inspecter
Ia
possibilite de tout dommage apparent. Chaque machine est completement inspectee a l'usine et les dommages
de transit sont
Ia
responsibilite de
Ia
compagnie de transport que devrait etre prevenue immediatement.
Instructions pour prisse de terre
Cet appariel doit posseder une prise de terre, S'il y avait malfunction ou brisure, une prise de terre offre une voie de moindre resistance de facon a ce que
le courant electrique reduise le risque de choc. Cet appareil est equippe d'une prise de terre de meme qu'une prise de courant avec prise de terre. Cette
prise doit etre deposee dans une sortie adequate qui sera installee selon les exigeances et les lois locales.
Danger
Un
mauvais assemblage du conducteur de prise de terre pourrait causer
un
risque de choc electrique. Verifier aupres d'un electrician certifie ou d'une per-
sonne qualifiee
si
vous avez des doutes a savoir
si
Ia
prise est bien completee Ne pas modifier
Ia
prise qui vient avec cet appariel.
Si
Ia
prise n'accede
pas
a
Ia
sortie,
un
electrician qualifie devrait
Ia
remplacer.
Cet appareil doit etre utilise sur
un
circuit de nominal de 115/120 volt et posseder une prise de terre que ressemble a
Ia
prise illustree dans le schema
A.
Bien vous asssurer que
Ia
sortie de courant soit de
Ia
meme configuration que
Ia
prise. Aucun adapteur
ne
doit etre utilise avec cet appareil.
Avertissement
Methode
de
Ia
terre
La
terre
sortie
Fourchone de prise
(A)
de mise a terre
Boite de
Ia
terre
Cet appareil est equipe d'un systeme de protection de reglage thermal.
II
s'agit d'un dispositif pour preserver l'appareil de
Ia
surchauffe.
Si
l'appareil s'ar-
rete subitement et
ne
redemarre pas, eteignez l'interrupteur principal et debranchez
Ia
prise. Attendez au mains 30 minutes avant de le reutiliser.
9
Page 10

Machine Overview and Assembly
Machine Overview and Assembly
A.
Lid
B.
Hose Release Button
C.
Inlet Elbow
D.
Back Pad
E.
Shoulder Pads
F.
Shoulder Buckle
G.
Shoulder Strap Guides
H.
Inlet Cord and Socket
I.
Cord Restraint
J. Waist Pad
K.
Tool Holders
L.
Belt Adjuster
M.
Side Release Buckle
N.
On/Off Remote Switch
0.
Cable Restrainer
P.
Magnetic Latch
Q . Frame Carry Handle
R.
Hose Inlet
S. Bent End Piece
T.
Air Regulator (BEP)
U.
Wand (2 Piece)
V.
Ezi-glide Floor Tool
W. Crevice Tool
p
Assembly Instructions
1.
Connect 2 piece Wand (U)
2.
Connect Wand (U) to Bent End Piece (S)
3.
Connect Inlet Elbow (C) to Lid (A)
4. Switch on at on/off button (N)
10
Page 11

Hose-
To Remove
Press Hose Release Button, and gently pull
Inlet Elbow from Lid.
Hose-
To Fit
Insert Inlet Elbow into lid opening.
Lid-
To Remove
Lift Magnetic Latch opposite side
of
inlet,
rotate Lid away from canister body.
Lid-
To Fit
Rotate onto canister body fitting inlet side first,
ensuring accurate alignment. Magnetic latch
will engage automatically .
NOTE: The lid can be fitted for either left or
right operation.
Cloth Filter
Bag-
To Remove
Lift from top
of
canister using bag rim.
Filter
Bag-
To Fit
Place over canister rim and press firmly ensuring
bag is level.
Machine Overview
VFD
Filter-
To Remove
Use the Panel Filter flaps to lift from canister base.
Remove with care from the canister .
VFD
Filter-
To Fit
Insert into canister base filter recess. Press firmly
around the edge
of
the filter to fit into position.
NOTE: Do not press on filter media.
HEPA Filter
-To
Remove
(V1
0 Pro-Plus Models only)
Loosen Wing Nut on top filter cartridge and remove
from canister vertically.
HEPA Filter
-To
Fit
Locate into Canister Base filter recess , tighten Wing
Nut until firm.
Paper Bag
Filter-
Removal & Disposal
Ease cardboard retainer off the groove on the
Inlet Spout. Fold card board tab over bag inlet
hole to prevent spillage. Dispose into garbage
bin.
NOTE: The paper bag is manufactured using
bio-degradable material.
Paper
Bag-
To Fit
~
/~w7
RB~);
portion
of
cardboard (A) into Inlet Spout groove. 1
/)
Ease the remaining serrated portion
of
cardboard (B) (\
·.
/ /
onto groove. Keep corners
of
paper folded down to \ ·
__
J_-:--
-..;;j'
avoid entrapment under lid edge. A
\...)
j
Align paper bag cardboard, engage non-serrated
11
Page 12

Machina Overview, Wearing and Adjustment
ON/OFF
Switch-
To
Operate
The switch is located on the left hand side
of
the
Waist Pad. Operation
is
0/1
for OFF/ON.
Cord-
To
Fit
For safety
in
reducing tripping hazards and for
unplugging, fit the cord into integral cord
restraint as shown.
Air
Regulator-
To
Adjust
Slide forward to close, this provides more air at
the nozzle. Slide back for less air,
th
is
is
to be
used when vacuuming loose materials
eg. curtains.
Attachments-
To
Fit
or
Remove.
Tw
ist and pull to disassemble. Attach at any
point from Bent End Piece to Wand end, to suit
application.
Tool
Holder-
To
Adjust
Size the adjustment loop before wearing to suit
the tool to be inserted.
Wearing and
Adjustment
Adjusting
shoulder
and
waist
pads
Shoulder
Pad
-to
loosen
Pull away from the
Shoulder Pad, this releases the Strap from the
Buckle.
Waist
Pad -
Preliminary
Adjustment
• Feed free end
of
Strap 1 through belt
adjuster 2 to release.
• Feed strap 1 through Buckle 3 to release.
• Adjust Strap 1, Buckle 3, Belt Adjuster 2, to
fit approx 1/2 girth of user.
• Belt
Ad
juster 5 gathers loose end of Strap
4.
• Pull
free end
of
Strap 4 for final adjustment.
Final
Fitting
• Loosen Shoulder
Pad
and Waist Pad. Lift
machine onto one shoulder by the shoulder
~
strap. Insert opposite arm through the
shoulder strap by which the machine
is
lifted. Slide other arm though the remaining
strap.
• Positi
on
the Waist Pad into the 'small' of
your back.
• Clip buckle together and tighten Waist Pad
until
secure and comfortable.
• Pull down
on
both ends
of
the shoulder strap
until the Back Pad contacts the back.
12
Page 13

Cloth Bag Filter
Regularly
Remove Cloth Filter Bag and empty.
Occasionally
Turn bag inside out and remove fine dust
coating using a soft
banister brush or vacuum.
Note: The filter material has been treated
with a moisture repelling agent for
improved dust release. There is
no
requirement for washing or dry cleaning the
Filter Bag.
VFD Filter
Regularly
Remove VFD Filter and tap out dust.
Occasionally
Brush surface using a soft nylon brush or
wash filter
in
neutral cleaner solution then
rinse
in
clean water.
Note: Ensure filter
is
completely dry before
recommencing vacuuming.
rooU'oor
Safety and Maintenance Checks
HEPA Filter (where fitted)
Regularly
Remove HEPA filter and tap out dust.
Occasionally
Wash
in
neutral cleaner solution using swirling
action only, then rinse
in
clean water.
Note: The filter material has been treated with
a soft polymer moisture repelling agent, do not
touch media surface by hand or any other
mechanical device. This can damage the media
and impair the filtration quality. Ensure filter
is
completely dry before recommencing
vacuuming.
As Needed
Check Inlet Elbow, Hose, Bent End Piece and
Floor Tool for blockages.
Regularly
Check cord for cuts, exposed wire, abrasion
and knuckling.
Replace cord only with original manufacturer's
part.
Note:
Always unplug cord from power point when not
in
use.
Gather the cord by winding from the machine
end.
Drape cord over handle for storage.
13
Page 14

Operation and Working
Using
• For comfortable operation, stand upright with a relaxed
posture, arms hanging loosely to the side.
• Maintaining a straight wrist, hold the hand grip section of
the wand with one hand,
parall
el
to the floor.
• When vacuuming under office desks , the reach
of
the
wand
is
sufficient to avoid bending at the wais
t.
• When vacuuming under lower profile objects or when
picking up items off the floor, bend the knees and
maintain a straight back.
• When turning, do not twist at the waist.
Turn using your feet.
Working
• Plan the work path based
on
location of the power
point, room/furniture layout, and entrance and exit
points.
• Commence vacuumi
ng
using a systematic approach
working one half
of
the area first, away from the power
point, and then the other half of the area, returning
back to the start.
• Ensure that the power cord
is
clear of feet to reduce
likelihood
of
tripping.
ODD
14
Page 15

No. Part Name Part No.
1 Lid Assy V10
13717001
2 Elbow Inlet
13640001
3 Hose BEP Assy
032
13677002
4 Hose
032
x 1.2m Blk
13670006
4a Ring Click Blk
13770003
4b Fitting Screwed Hose HUL
032
13650002
5 Elbow BEP
032
Blk
13640002
6 Wand
032
x 550mm Cr. Steel
13820011
7 Tool Flo
or
Ezi-Giide
13797001
8 Tool Crevice
032
Blk
13790001
9 Filter HEPA
& Fastener Assy
13657004
10 Label Maintenance USA
13710010
11
Pad Back Blk
13750003
12 Buckle Adjuster 38
13610006
13 Pad Shoulder Blk L
& R Set
13750004
14 Buckle Side Release 38
13610005
15
Buckle Shoulder LL 38
13610007
16 Pad Waist Blk
13750005
17 Screw WN1412 KB50 x 16 ZP
13780003
18 Frame RVXP-
V1
0
13650001
19 Cord USA 15m V10 12-04
13620008
20 Insulation End Cap (set)
13680003
21
Clamp Motor
13620005
22
Motor Vacuum Harbin 120V 13727001
23 Baffle Motor Housing
13610004
24
Seal Motor Harbin
13780006
25
Screw WN1412 KB40 x 12 ZP
13780002
26
Base Upper Canister 13610003
No. Part Name
27 Seal Canister Housing
28 Label Pro
28a
Label Pro Plus
29 Housing Upper Canister Assy
30
Filter VFO Assy
31
Filter Bag Assy 5L (standard}
31a
Filter Bag Assy
4L
(HEPA)
32 Filter Paper Bag 5/Pkt (Standard}
32a Filter Paper Bag 5/Pkt (HEPA)
33 Socket Inlet C14
34 Wire E V10
35 Insulation Motor Housing End
36 Housing Lower Canister
In
& Remote
37 Cap Motor Housing
V1
0
38 Insulation Motor Housing Side (set)
39 Grommet Strain Relief
V1
0
40 Nut Hex
M3ZP
41
Housing Remote Switch
V1
0
42 Switch Rocker 2HP
43
Washer Flat M3 ZP
44 Screw M3x25 Pan Hd. ZP
45 Cord Remote Switch
V1
0
46 Cord Grip
V1
0
47 Clamp P
08
48 Washer 410 x 9.
500
ZP
49 Washer M3 Ex
t.
Shake proof
50
Screw No.6 x 10 Mush. Hd ZP
Part No.
13780004
13710007
13710008
13677001
13657003
13657001
13657002
13657006
13657007
13780007
13820001
13680001
13670002
13620003
13680002
13660001
13730001
13670005
13780014
13820009
13780001
13620006
13620007
13620012
13820012
13820010
13780016
Parts Guide and Exploded Diagram
---
--------,
I
I
I
I
I
I
I
~
,
,'
i
~\
i
~
---
~
:
~
I
§~
.·
:
~
I
~'
I
(x
4) o I
~---
-----
_
_____
]
15
Page 16

Electrical Circuit and Warnings
Electrical Circuit
Warnings
Do Not
DOUB
LE
POL
E
SINGLE THROW
SWITCH
WHITE
(NEUTRAL)
BLACK
• Do not vacuum wet surfaces, damp areas or suck up water.
VACUUM MOTOR
• Do not use machine if water has been picked up by the vacuum system without an
electrical inspection by a qualified person.
• Do not vacuum anything that is burning or smoking such as cigarettes, matches
or
hot
ashes.
• Do not use the machine
in
areas where flammable or combustible liquids, vapors or gas
are present.
• Do not operate near explosive materials such as solvents, thinners, fuels or grain dust.
POWER
INLET
)--CZJ
3 3
Ground
Green
,
Green/Ye
llow
16
Page 17

Always switch off machine and unplug prior to correcting any problems. If you are unable to rectify the problem, contact your service agent.
Problem: Machine not working
Cause
No power at power point.
Solution Connect machine to a functional power point.
Cause
Power cord not plugged into power point or machine.
Solution Check plug
is
firmly plugged into power supply and machine.
Cause
Machine or power supply not switched on.
Solution Turn on/off switch to
ON
(1)
. Turn power supply outlet on.
Cause Machine has switched off due to overheating.
Solution
Switch off and unplug machine. Check for any blockages
in
wand, floor tool and inlets. Ensure filters and paper and cloth bags are clean.
Wait for
30
minutes and switch machine back on. If machine does not start up, contact service agent.
Problem: Poor or
No
Suction
Cause
Solution
Cause
Solution
Cause
Solution
Cause
Solution
Cause
Solution
Blockage.
Turn off machine and unplug. Check wand, suction hose, floor tool, elbow inlets for obstructions and remove.
Paper or Cloth Filter Bags are full.
Check paper bag and if full, remove and replace. Check Cloth Filter Bag, turn inside out and brush with a soft banister brush before
replacing.
Hose not installed properly or damaged.
Check hose connection and ensure it
is
locked
in.
Replace if damaged.
VFD Filter
is
blocked.
Remove VFD Filter and tap gently to remove excess dust before replacing.
Air Regulator needs adjustment.
Close Air Regulator
on
hose to obtain suction required.
Problem: Backpack
is
Uncomfortable to Wear
Cause
Backpack is not fitted correctly to your body.
Solution Adjust waist bands and shoulder straps as described
on
page 12 to ensure correct fit.
Cause
Pads or straps are worn.
Solution Replace padding/straps.
17
Page 18

Minuteman International Made Simple Commercial Limited Warranty
REVISION F EFFECTIVE 6/1/2009
Minuteman International, Inc. warrants to the original purchaser/user that the product is free from defects
in
workmanship and materials
under normal use. Minuteman will, at its option, repair
or
replace without charge, parts that fail under normal use and service when operated
and maintained
in
accordance with the applicable operation and instruction manuals. All warranty claims must be submitted through and
approved by factory authorized repair stations.
This warranty does not apply to normal wear, or to items whose life is dependent on their use and care, such as belts, cords, switches, hoses,
rubber parts, electrical motor components
or
adjustments. Parts manufactured by Minuteman are covered by and subject to the warranties
and/or guarantees
of
their manufacturers. Please contact Minuteman for procedures
in
warranty claims against these manufacturers.
Special warning to
purchaser-
Use
of
replacement filters and/or prefilters not manufactured by Minuteman or its designated licensees, will
void all warranties expressed or implied. A potential health hazard exists without original equipment replacement.
All warranted items become the sole property
of
Minuteman or its original manufacturer, whichever the case may be.
Minuteman disclaims any implied warranty, including the warranty
of
merchantability and the warranty
of
fitness for a particular purpose.
Minuteman assumes no responsibility for any special, incidental or consequential damages.
This limited warranty is applicable only
in
the U.S.A. and Canada, and is extended only to the original user/purchaser
of
this product.
Customers outside the U.S.A. and Canada should contact their local distributor for export warranty policies. Minuteman is not responsible for
costs
or
repairs performed by persons other than those specifically authorized by Minuteman. This warranty does not apply to damage from
transportation, alterations by unauthorized persons, misuse
or
abuse
of
the equipment, use
of
non-compatible chemicals,
or
damage to
property,
or
loss
of
income due to malfunctions
of
the product.
If a difficulty develops with this machine, you should contact the dealer from whom it was purchased.
This warranty gives you specific legal rights, and you may have other rights which vary from state to state. Some states do not allow the
exclusion or limitation
of
special, incidental or consequential damages, or limitations on how long
an
implied warranty lasts, so the above
exclusions and limitations may not apply to you.
18
Page 19

Cord Electric Group: Three years parts, two years labor, ninety days travel (Not to exceed two hours)
Exceptions
..........
Model
Port A Scrub
MPV 13
MPV 14
& 18
V Series Upright Vacuums
Rapid Air Blower
Explosion Proof Vacuum
X12, X12H
& TRS 14
E17
& E20 Electric Scrubbers
Pneumatic Vacuums
Description
Battery Operated Group
Sweepers
Internal Combustion Group
Exception: PAS
148
Battery Chargers:
Replacement Parts:
Batteries:
Polyethylene Plastic Tanks:
Parts Labor Poly
1 yr
6 months 10 yrs
1 yr 0 0
2 yrs 1 yr 0
1 yr 1yr
0
1 yr 1 yr 10 yrs
1 yr 1 yr
0
1 yr 1 yr 10 yrs
1 yr 6 months 10 yrs
3 yr 1 yr 0
Parts Labor Poly
3 yrs 2 yrs 10
1 yr 1 yr 10
1 yr 1 yr
10
1
yr
1
yr
10
yr
One year replacement
Ninety days
Travel
0
0
0
0
0
0
0
0
0
Travel
90 days
90 days
90 days
Not to exceed two hours
0
0-3 months replacement, 4-12 months pro-rate
Tanks have 1
Oyr
warranty, no additional labor
19
Page 20

Minuteman®
Excellence
Meets
Clean
Minuteman International · 14N845 U.S. Route 20 · Pingree Grove, Illinois 60140 USA
Phone
800-323-9420 www.minutemanintl.com
A
Member
of
the
Hako
Group
988736
Rev*
07/09
 Loading...