

Minuteman PORT A User Manual

PORT A SCRUB 14
Floor Scrubber Drier

Contents
Instruction Manual
Preface...............................................................................................................
Introduction
Proper Use..........................................................................................................
Notes on Warranty...............................................................................................
Acceptance of the Machine.................................................................................
General Safety Provisions
Operation............................................................................................................
Transport.............................................................................................................
Park Position.......................................................................................................
Handling Mains Cable.........................................................................................
Operation
Machine...........................................................................................................
Useful Advice for Optimum Cleaning..................................................................
Working Principle................................................................................................
First Operation
2
4
5
5
5
6
6
6
7
7
7
Assembly............................................................................................................
Before Operation................................................................................................
Description
Controls..............................................................................................................
Control Panel......................................................................................................
Detergent Infeed................................................................................................
Squeegee Governor............................................................................................
Mount / Dismount Brushes..................................................................................
Squeegee............................................................................................................
Squeegee (Initial Fitting)......................................................................................
Change Sealing Strips.........................................................................................
Clean Nozzle.......................................................................................................
Fill Water..............................................................................................................
Operation
Operation.............................................................................................................
Soiled and Fresh Water Tanks.............................................................................
Electric System....................................................................................................
Technical Data.....................................................................................................
Maintenance
7
7
8
9
9
10
11
12
12
12
12
13
13
14
15
15
Maintenance works.............................................................................................
17
2

Contents
Spare Parts Manual
Chassis Group.....................................................................................................
Handle Group......................................................................................................
Brush Drive Group...............................................................................................
Brush Head Group...............................................................................................
Vacuum Motor Assembly.............................................................. .......................
Vacuum Motor Group.......................................................................... ................
Squeegee Group......................................................... ........................................
Squeegee Lifting System......................................................................................
Water Feed System.............................................................................................
Tank Group..........................................................................................................
Drive Group.........................................................................................................
Electrical Group...................................................................................................
Port A Scrub 14 Assy..........................................................................................
21
23
25
27
29
31
33
35
37
39
41
43
47
3
Instruction Manual
Preface
Dear customer,
It is our desire that the excellent properties of the Port Ascrub 14 should justify the confidence you demonstrated by
making this purchase. Before first operation of your read these instructions carefully. They will
inform you in detail about operation of the item and contains valuable information on operation, service and
maintenance.
Port A scrub 14 machine is an ideal machine to clean floors in small and medium areas like Offices, Hospital,
Restaurant, Shopping complexes and many commercial applications.
hasbeen used in thismanualat several placesandidentifiesparticularareas that areofessencefor your safety. Please
passallsafetyinstructionsontootherpersonsoperatingthismachine.”
The symbol,
hasbeen used in this manualatseveralplacesandidentifiesparticularareas that the operatorshouldbecautious.
Thesymbol,
Port A scrub 14
hasbeen used inthis manualatseveral places andidentifiesparticular areas thatthe operatorshouldnote at thetime of
operation
Priorto first operation, read themanualcarefullyandstrictlycomplywiththeinstructions contained.
Pleasebe advised explicitly that wecannotacceptanylegalclaimsoutofthe contents ofthismanual.
If repair work has to be performed, make sure that only genuine spare parts are used since genuine spare parts
only may guarantee continuous and dependable operation of your machine.
Valid as for JULY 2007
Minuteman International, Inc
111 South Rowling Road,
Addison, IL 60101-4244, USA.
Introduction
Proper Use
The vacuumscrubbing machine hasbeenexclusivelydesigned forfloor cleaning, such as wetscrubbing
PortAscrub14
and vacuuming .Whatever sort of use beyond the specified range will be deemed improper use: the manufacturer can
notbe held liable forconsequentialdamages.
The term of proper use also includes compliance with the manufacturer’s instructions about operation, maintenance
and repair.
The Port A scrub 14 may be used , serviced and repaired by persons only that are familiar with the machine and are
aware of possible hazards involved. The appropriateAccident Prevention Regulations as well as applicable general
regulations about safety and health at work will have to be complied with.
Modifications made to the Port A scrub 14 in absence of the manufacturer’s consent will relieve the manufacturer
from a possible liability for consequential damage.
Thismachine is not suitableforevacuationofdusts, whichareexplosiveordangeroustohealth.
4

Notes on Warranty
The terms of the sales contract apply. Damages are not subject to warranty if they are due to non-compliance with the
maintenanceand service provisions.
Any maintenance work has to be performed by an authorized Minuteman service workshop and confirmed in the
“Maintenancecertificate “which is the warrantydocument.
Thefollowing is excluded from warranty:
Natural wear and tear after overload, blown fuses and damages caused by inexpert handling and unauthorized
modificationof the machine.
Moreover,any claimfor warrantyexpires if damages at themachine are caused by fittingof parts oraccessories without
Minuteman’sprior andexplicitconsentorbynon-compliancewiththemaintenance instructions.
Acceptance of the machine
Upon arrival, check your consignment for possible transit damage. Please have the railway authorities or the freight
forwarderconfirm such damage and mailyourdamagereportandwaybillto:
Ours Address :
MinutemanInternational, Inc
111 South Rowling Road,
Addison, IL 60101-4244, USA.
General Safety Instructions
General Safety Instructions
Apartfrom theinformation contained in thismanual, the generallyapplicable legal provisionsfor safety andprevention of
accidentsmustbe adhered to. Donot putthis manualaside withouthaving readit, evenif youdid alreadyoperate similar
groundcleaningequipmentbefore.Allowyourselfthetimetodosoinordertosafetimeatalatermoment.The operator is
responsiblefor all persons intheworking area. Childrenhave tokeep clearofthe inoperation. Nobody is
allowedto stayinthezoneofdanger.
The warning and instruction plates attachedto the give important advice about safe operation .Replace
lost or illegible stickers. Before starting to work, the operator has to check that the and its working
implementsare inproperandsafeoperatingcondition.
Machines with known defects must not beused. It will be of essence to makeyourself familiar with all accessories and
controls,aswellas theirfunctions, before you start working.Avoidthe mess of having to readthisbookwhile trying to run
themachine.
Operation
Ground cleaning machines may be run by qualified personnel only; such personal will have to have evidenced their
qualification for running the machine to the owner or his authorized representative; operators explicitly will have to be
instructedby the owner or hisauthorizedrepresentativetousethemachine.
Themachine may be used forcleaningsuchsurfacesapprovedbytheownerorthis authorized representative.
PortAscrub 14
PortAscrub14
Port A scrub 14
To prevent damages at the brushes as well as at the floor, do not let the Machine run dry. The machine has been
exclusivelydesigned for wet scrubbing andvacuuming.
Turn the motors off, fold the support roller and the operating handle down and protect the machine against
unintended movements before leaving it unattended. Use genuine spare brushes as specified by the
manufacturer. Use of other than the indicated brush types may affect safety.
When transporting the , shut down the motors of the working implements. The operator has to use the
machine in accordance to its intended fields of application. During operation, he has to take account of the local
conditions(stairs,obstacles) and of other persons, in particular to children.Turnoffthe machine before any passage over
dormers.
Use cleaning agents only, which are suitable for automatic machines (low foaming), and adhere to the instructions for
use,disposal and to the precautionsspecifiedbythemanufacturerofthecleaningagent.
Port A scrub 14
5
Make sure to connect the to a socket equipped with earthed protective wire and to
Port A scrub 14
mainsof adequatevoltageand frequency
Nevercollect explosive fluids, undiluted acids and solvents!Thisincludese.g.gasoline,paintthinners or fuel oil,
Which-whenpenetrating the air being takeninmayformexplosivevaporsor mixtures; moreover acetone,
Undilutedacids and solventsiftheyshouldbeaggressivetothematerial used for the machinecomponents.
The machine may be used only on indoor hard floorings and for operation on level grounds with a maximum
inclinationof up to 2 %
Using the machine on public roads and places is not admitted. Qualified personnel only are admitted to perform
maintenanceand repairwork.
Turnthe machineoffand disconnect themains plug beforecleaningand maintaining themachine, when replacingparts
orwhen change over to anotherfunction.
Donot clean the machine bymeansofvapourjetorhighpressurecleaning equipment. Do not allow water
penetratethe electrical parts.
Themachine is splash-water proof (IPX3).
Useof the machine in areasendangeredbyexplosionhazardisnotadmitted.
Transport
Thefrontrollerof the PortAscrub14hasbeenfittedforparkingthemachineonlyandprecludesdamagestothefloor.Itis
thusrecommended to liftupthebrushheadasrepresentedbeforetransporting the PortAScrub14.
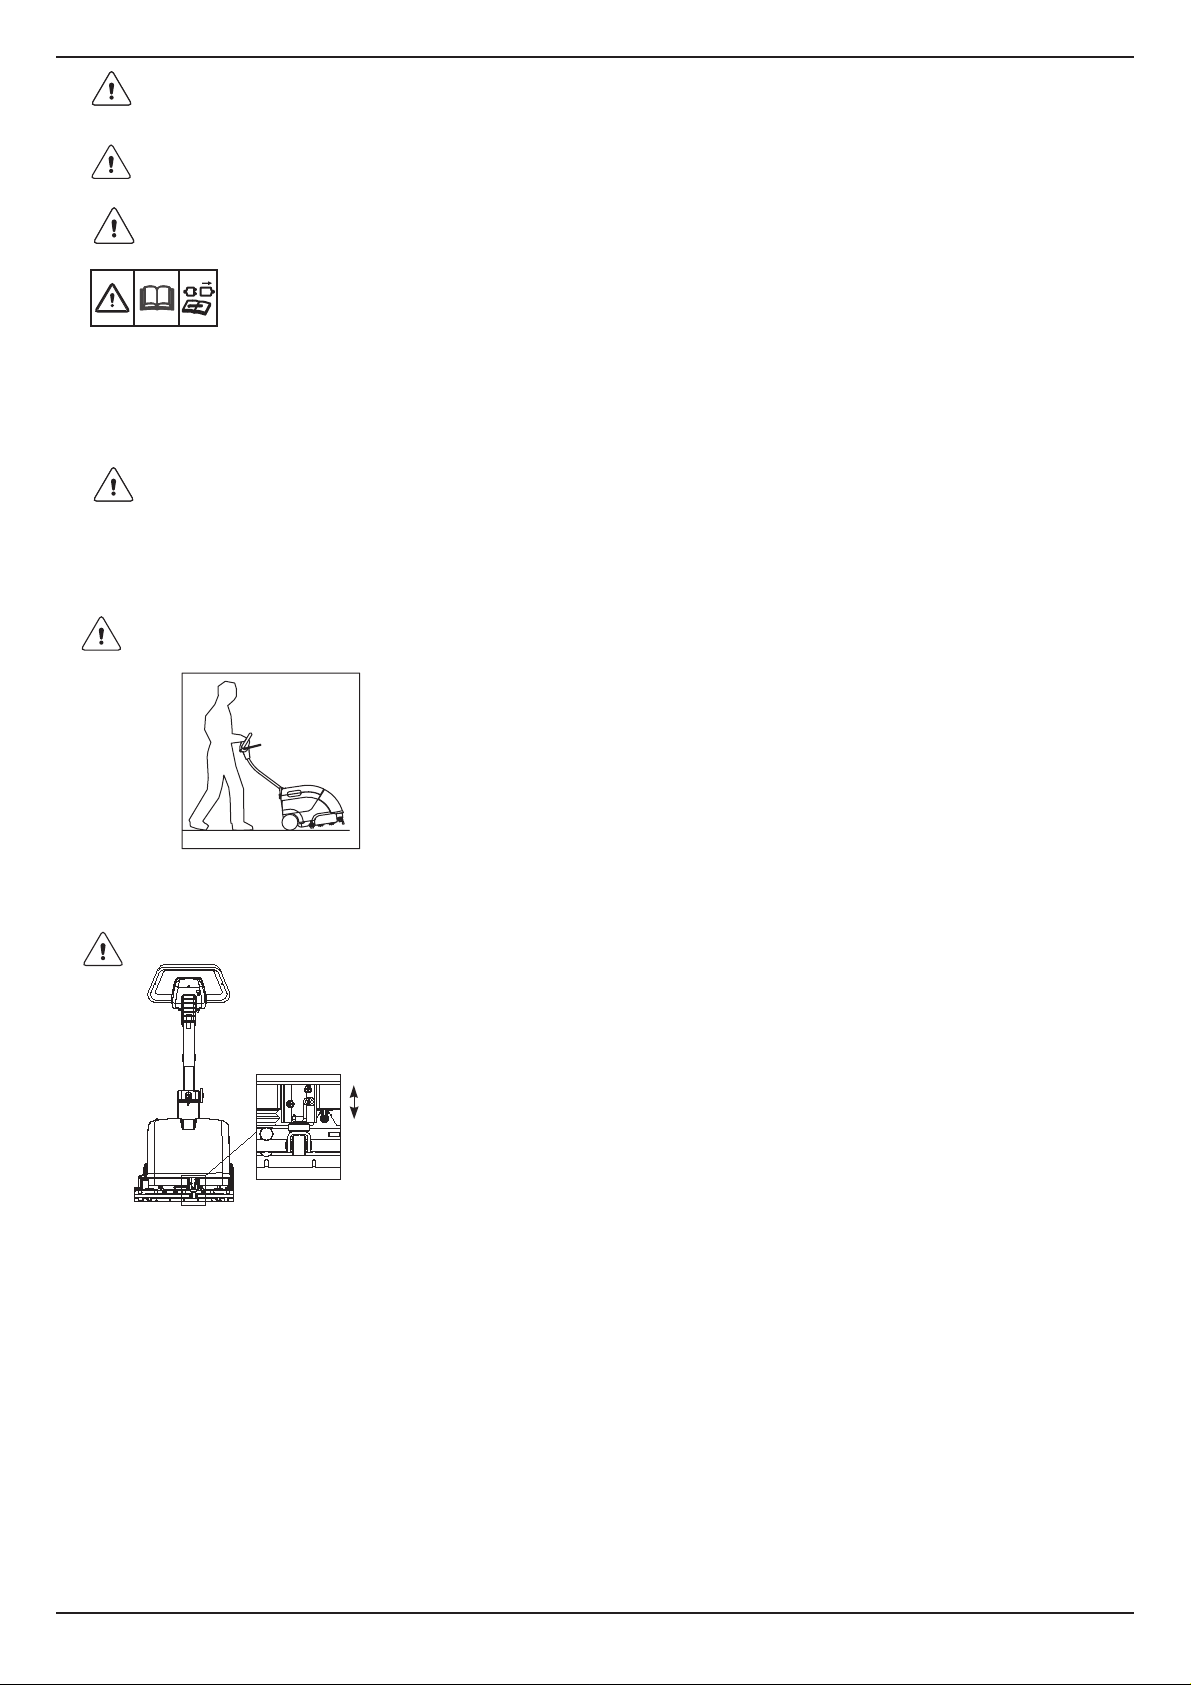
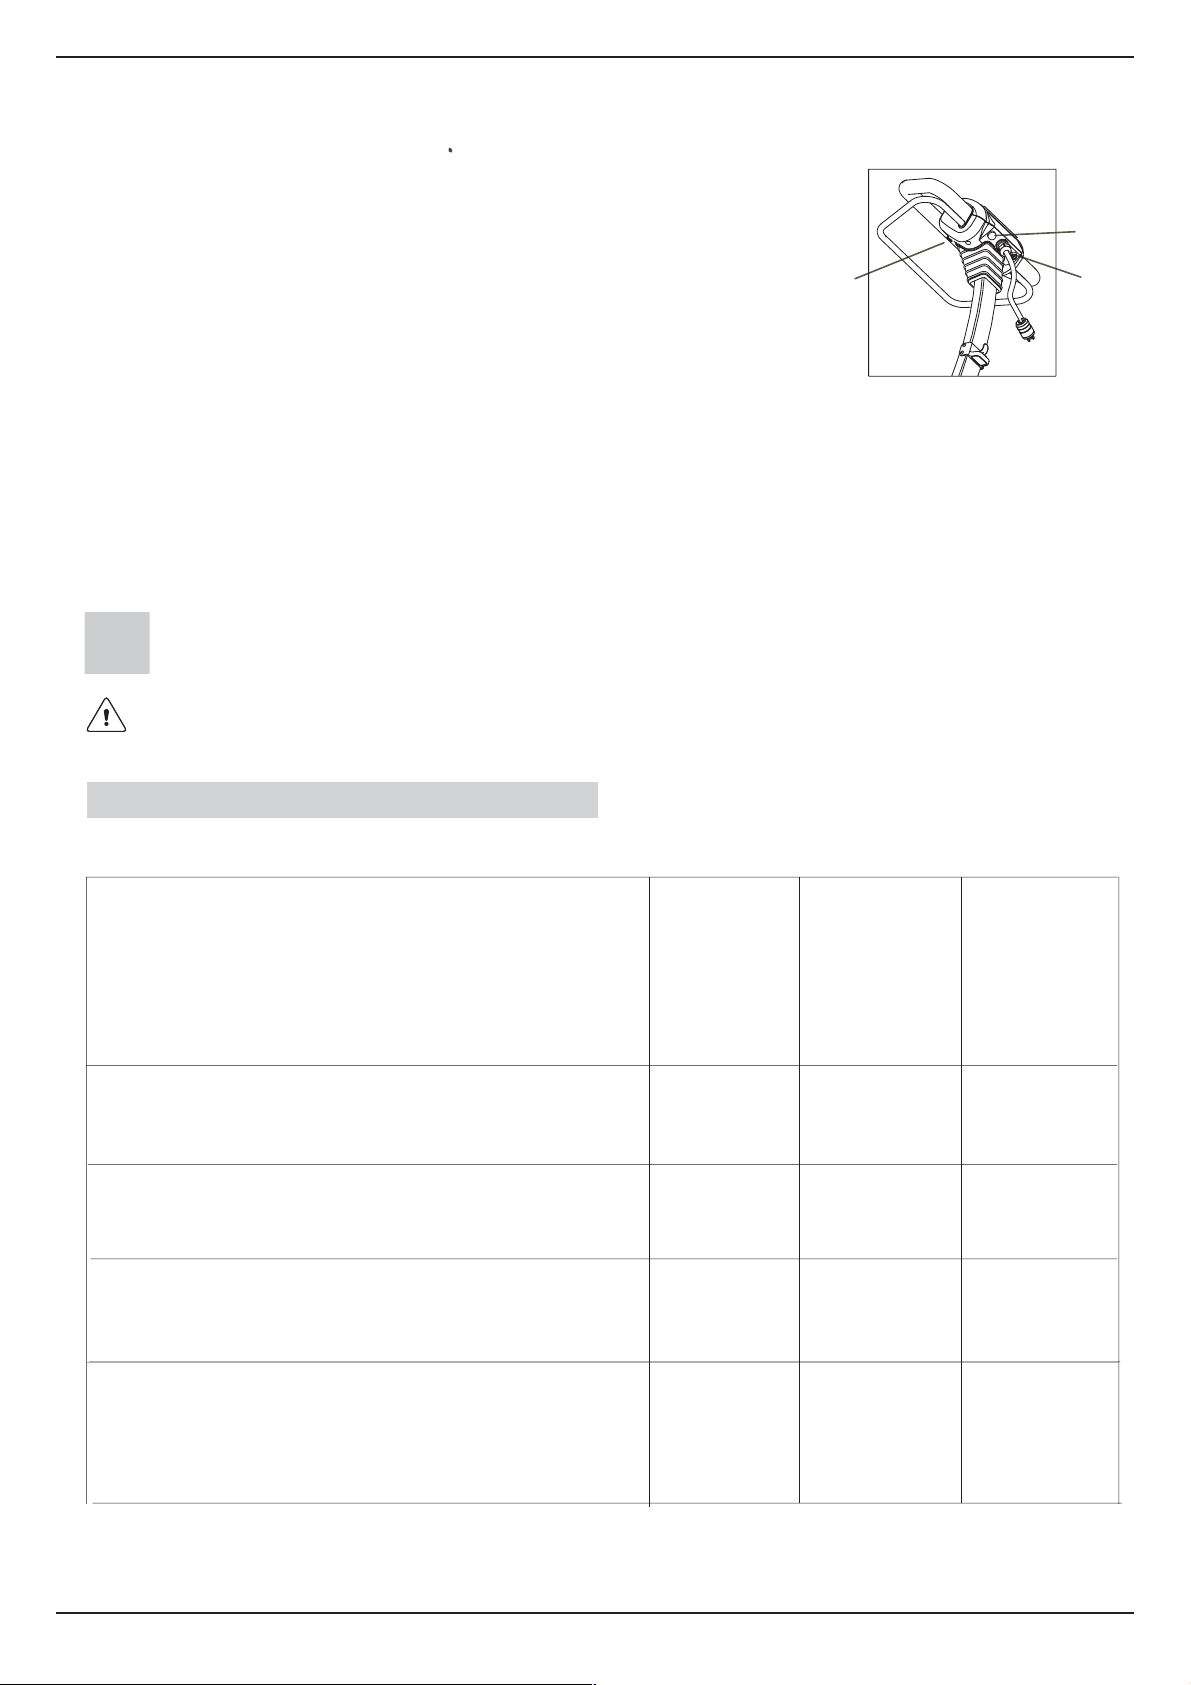
Park Position
Working Position
Parking Position
If not operated, the Machine has to be stored in its park position. This position is attained by using the support roller
located at the front of themachine asrepresented.Actuate thesupport bya lever located above the support roller (see
Fig.)Andthebrush head of the machineislightlylifted.This is to precludedeformationofthebrushes.
Handling Mains cable Assembly
Makesure that themains cables arenot damaged bypassingover them bypinching, pulling orother impacts. Check the
mainscablesforageing and damages at regularintervals. Replace themby the type STcable 14AWG/ 3 Core (UL/CSA
approved)with15mlength.Powerplugandconnectorsshallberatedfor125Volts,20Amps (UL/CSAapproved)having
standard NEMA configuration for locking types as specified by the manufacturer.When replacing the coupling plug of
themains cable or when connectinglinesrespectthesplashwaterprotectionandthe tensile strength of thecomponents.
6
Operation
Port A scrub 14
Wet cleaning of hard floorings requires equipment with
squeegee and brushes suitable for the type of floor to be
cleaned.
Therotating brushes and the cleaning lye scrubthedirtandclean
the floor thoroughly while the squeegee collects the lye
immediately. The floor is dry and clean can be stepped on
immediately.
Useful advice for optimum cleaning
Before wet cleaning, sweeping the floor is required. This is not
only to improve the cleaningeffect but to significantly reduce the
wearingof the machine.
In case of heavy soiling or for wax removal (basic cleaning), a
second treatment of the floor may be required. In the first cycle,
the floor is scrubbed with a detergent solution adopted to the
degreeof soiling.
This cleaning agent acts on the floor according to the
specificationsofthemanufacturerfor about 5 to 10 minutes,then
scrubthe floor gain with thesqueegeebeinglowered.
Comply with the instructions for correct dosage of
detergent. Correct dosage will help you save money
And protect the environment.
Working Principle
Occurrence of great quantities of foam will affect functioning of
your machine.
Actually, it indicates excessive dosage or improper suitability of
dosing and degree of soiling. Unused detergent particles in the
soiled water lead to formation of foam. Refer to the detergent
reservoir for information on correct dosage. Take the
manufacturer’s recommendations as a first basis. Test made by
yourself in practice will help you find the ideal type of detergent
andthe perfect dosage applicable toit.
First Operation
Assembly
The isdelivered in acardboard box. The bottomis a woodenpallet towhich themachineis fastened by
PortAscrub14
plastic straps. Open the bottom side of the box and pull it upwards, then loosen the straps and take the machine from
pallet.
Before Operation
Top insulation
1. Upon delivery, the has been secured by
insulation blocks at the bottom and the top to preclude unwanted
movement of the machine. After taking the machine from the
pallet:
Port A scrub 14
block
(I) Open the cardboard box at the top side
(II) Remove the insulation blocks
(III) Take the off the box and avoid any damage
to the machine
(IV)Theoperating handle of the Machineisstillinitstransport
position.
Port A scrub 14
Bottom insulation
block
7
CAUTION: Mains-operated machine! Qualified personnel only is admitted to open the machine; Any work
such as e.g.Maintenance or repairactions atthe electric componentshave to beexecuted withadequate tools
onlyand by qualified personnel only.
2.After taking the to its park position, set the
operating handle into its working position by releasing the
button at the side. After the handle has been set into service
position,engagethebutton again to preclude thehandle from
displacing. After operation, the handle can be folded back
againasdescribed above. In thisfolded positionthe handle is
protected against the damages and requires less storing
space.
3. Open the lateral brush head cover by loosening the screw.
Theninserttheenclosed brushes into thehousing.The
scrub 14
andfastening of the brushes
has been equippedwith screwsto facilitate removal
PortA scrub 14
PortA
Screw
4.Afterfolding of the lid, filling of the fresh water tankispossible.Beforefillingwithfreshwater,takethesupportrollerout
ofits parkingposition.
Makesure that all covers and flapshavebeen fitted before startingoperation
Adamagedmainscablehastobe replaced by specific cable available at themanufactureroran
authorizedservice centre.
Description
Controls
3
1
2
1.Adjustable handle
2.Button for Handle
3.Squeegee Governor (forward, reverse)
4.Screw for brush removal
4
8
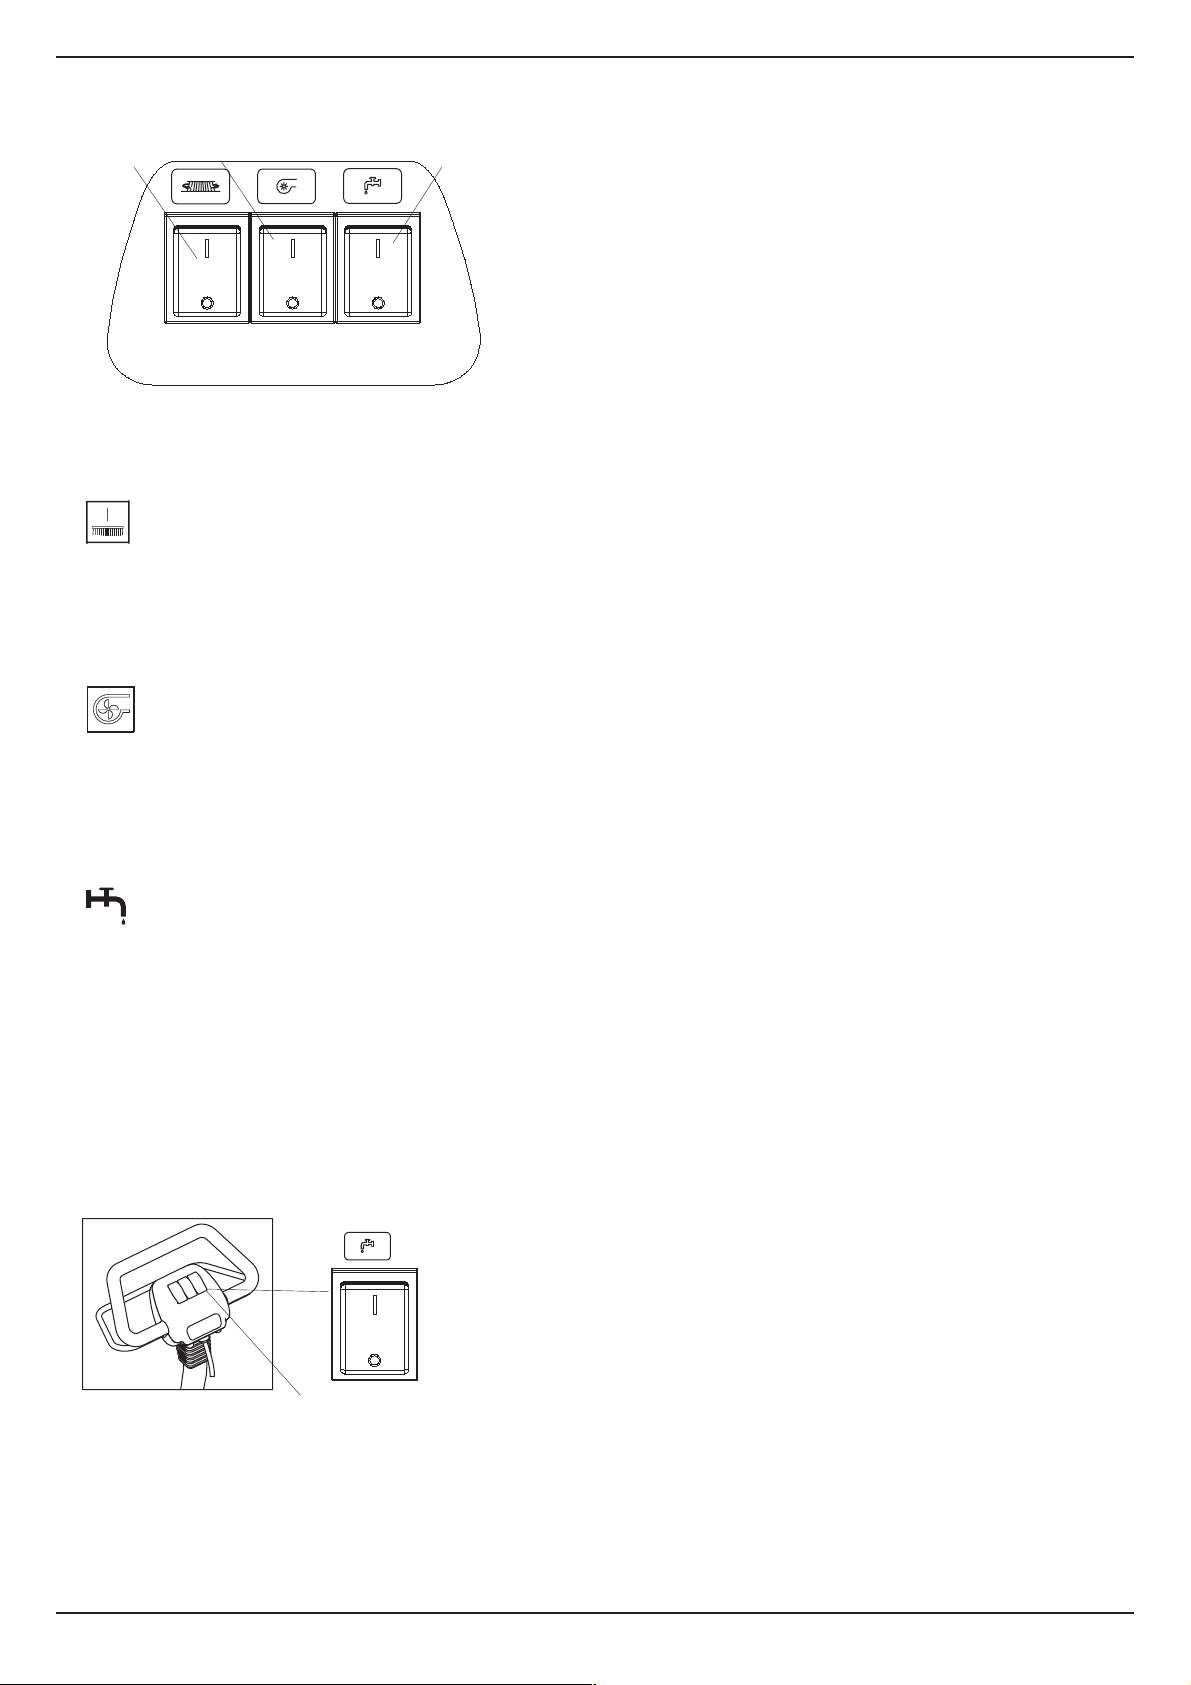
Control panel
A
1. Brush motor, suction motor and water pump switches
A. Brush motor switch ON / OFF
Function in ON if switch “A” is in position “I”
B
C
B. Suction motor switch ON / OFF
Function in ON if switch “B” is in position “I”
C Water pump switch ON / OFF
In “I” position of the switch, water is steadily pumped to the floor.
In “0” position of the switch, no water is pumped.
2.Detergent infeed
Pump Switch
The Port A Scrub 14 allows mixing of cleaning lye and fresh water in the tank. The amount of detergent required for
cleaning can be regulated by the pump switch. If the switch is set to the position “I” the cleaning lye is continuously
supplied.Ifthe solution isrequired byintervals only, press the switchandhold in position “I”.This function helpsto save
detergent.
9
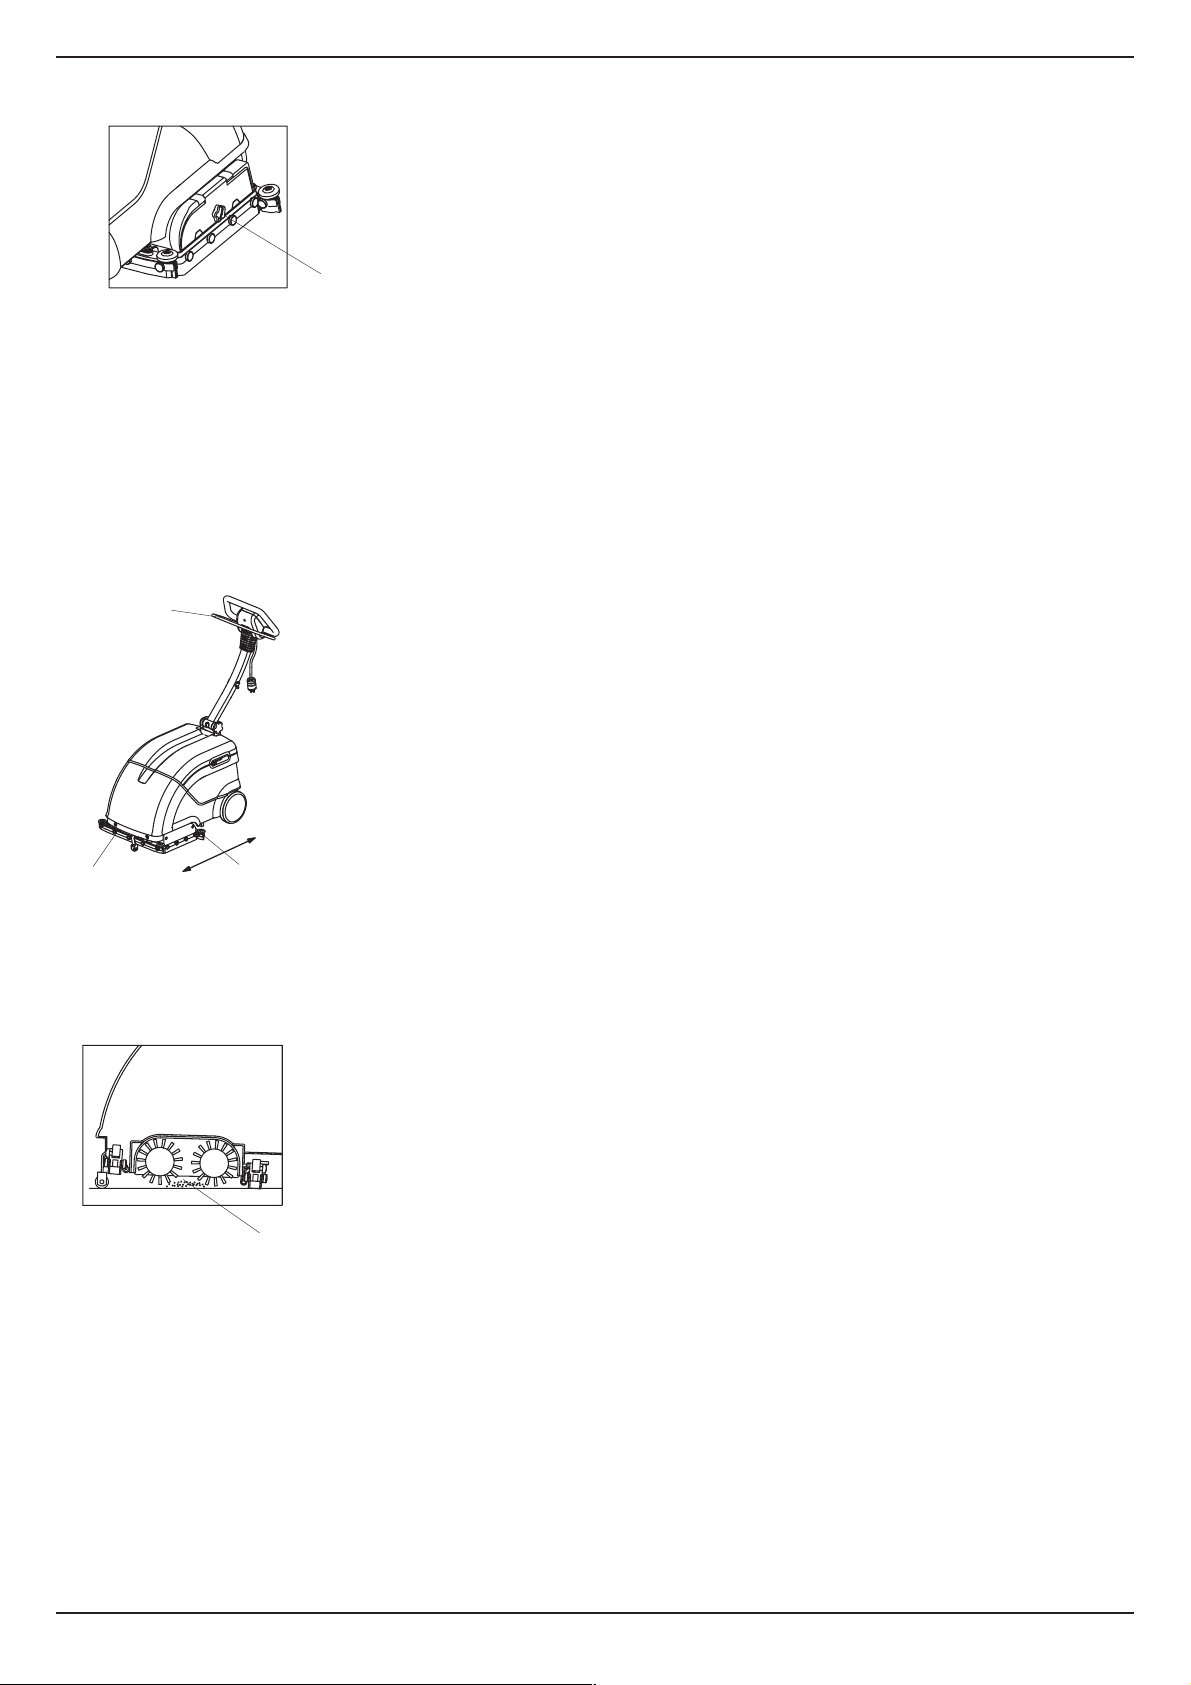
Screw for fitting the Brush
Screw
Disconnect the mainsplug before mountingor dismountingthe brush. Loosenthe screwfor fitting thebrush before use
of themachine and afterwardsfor removal of the brush. Change the brush position after each use in order to preclude
one-sidewearing.
Loosen the screw before dismounting the brush from the Port A Scrub 14
Dismount the brush from the Port A Scrub 14 after every use. Take the machine into the park position before
Squeegee Governor
1
1.Governing handle
2.Front squeegee
3.Rear squeegee
Reverse
2
3
Forward
·The front or the rear squeegee of the Port A Scrub 14 is lowered and has contact with the floor. The operator may
change squeegee position according to the direction of travel of the machine.
If the port A Scrub 14 is in its working position and pushed forward, the rear
squeegee has contact with the floor while the front squeegee is lifted.
Water
End of operation
Due to the counter-rotation of the brushes, some water remains between the brushes at the end of operation.
Proceed thus as follows at the end of operation
- Take the machine into park position
- Turn suction motor on
- Move the machine a little bit forward
During this movement, the rear squeegee takes in the water.
10
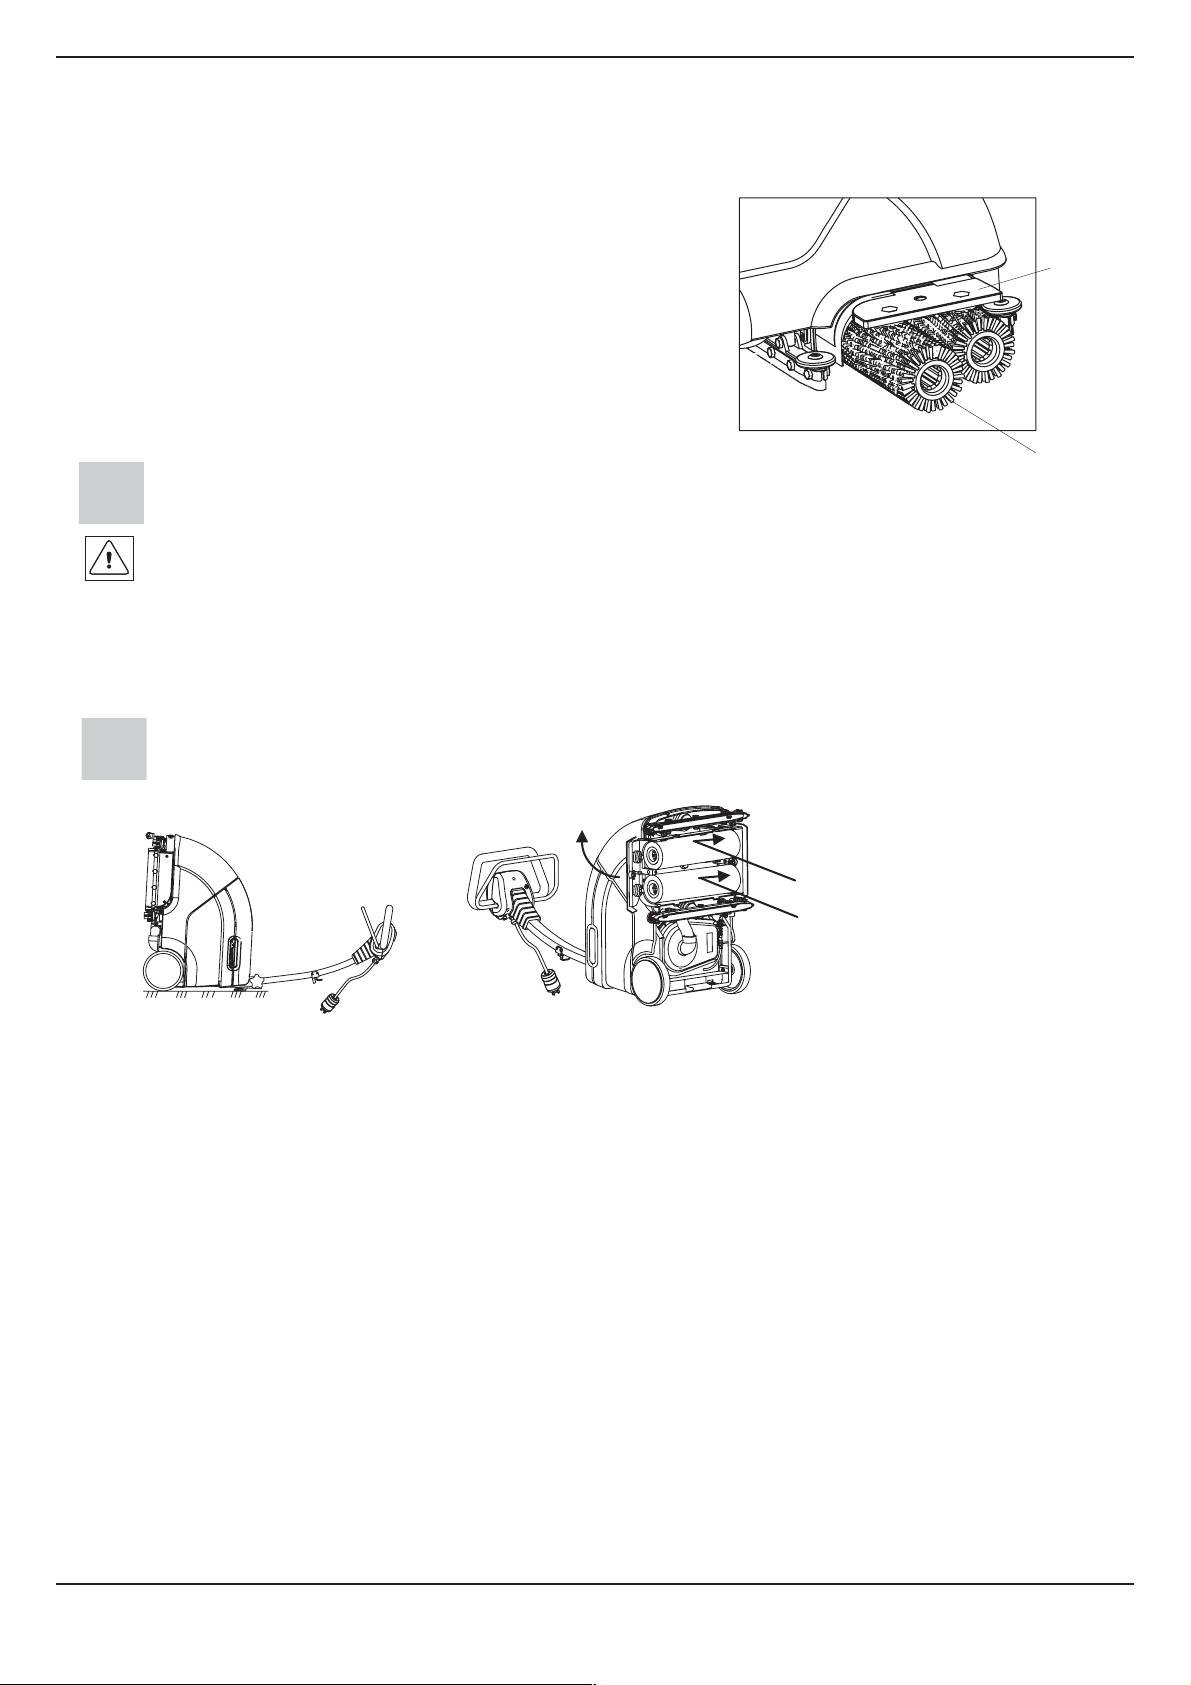
Mount / Dismount brushes
According to the type and degree of soiling, the Port A Scrub14 can be equipped with brushes from the
accessories. Refer to chapter ”Technical Data” on page 17.
Mount Brush
Use the support roller located at the handle side of the Port A Scrub
14 to set the machine into its park position.
Remove screw of the brush cover.
Fasten supplied brushes at the drive rollers at the inside of the
opposite cover.
Close brush cover such that the guiding rollers and the brushes
safely catch.
When mounting, check the safe catching of rollers and brushes..
Before cleaning or maintaining the machine as well as before replacing parts of it, turn the machine
off and disconnect the plug.
Dismount Brushes
Use the support roller located at the handle side of the Port A Scrub 14 to set the machine into its park position.
Brush
Cover
Brush
Loosen screw.
When inserting the brushes for the next operation, make sure to change position of the brush such
that one- sided brush wearing is precluded.
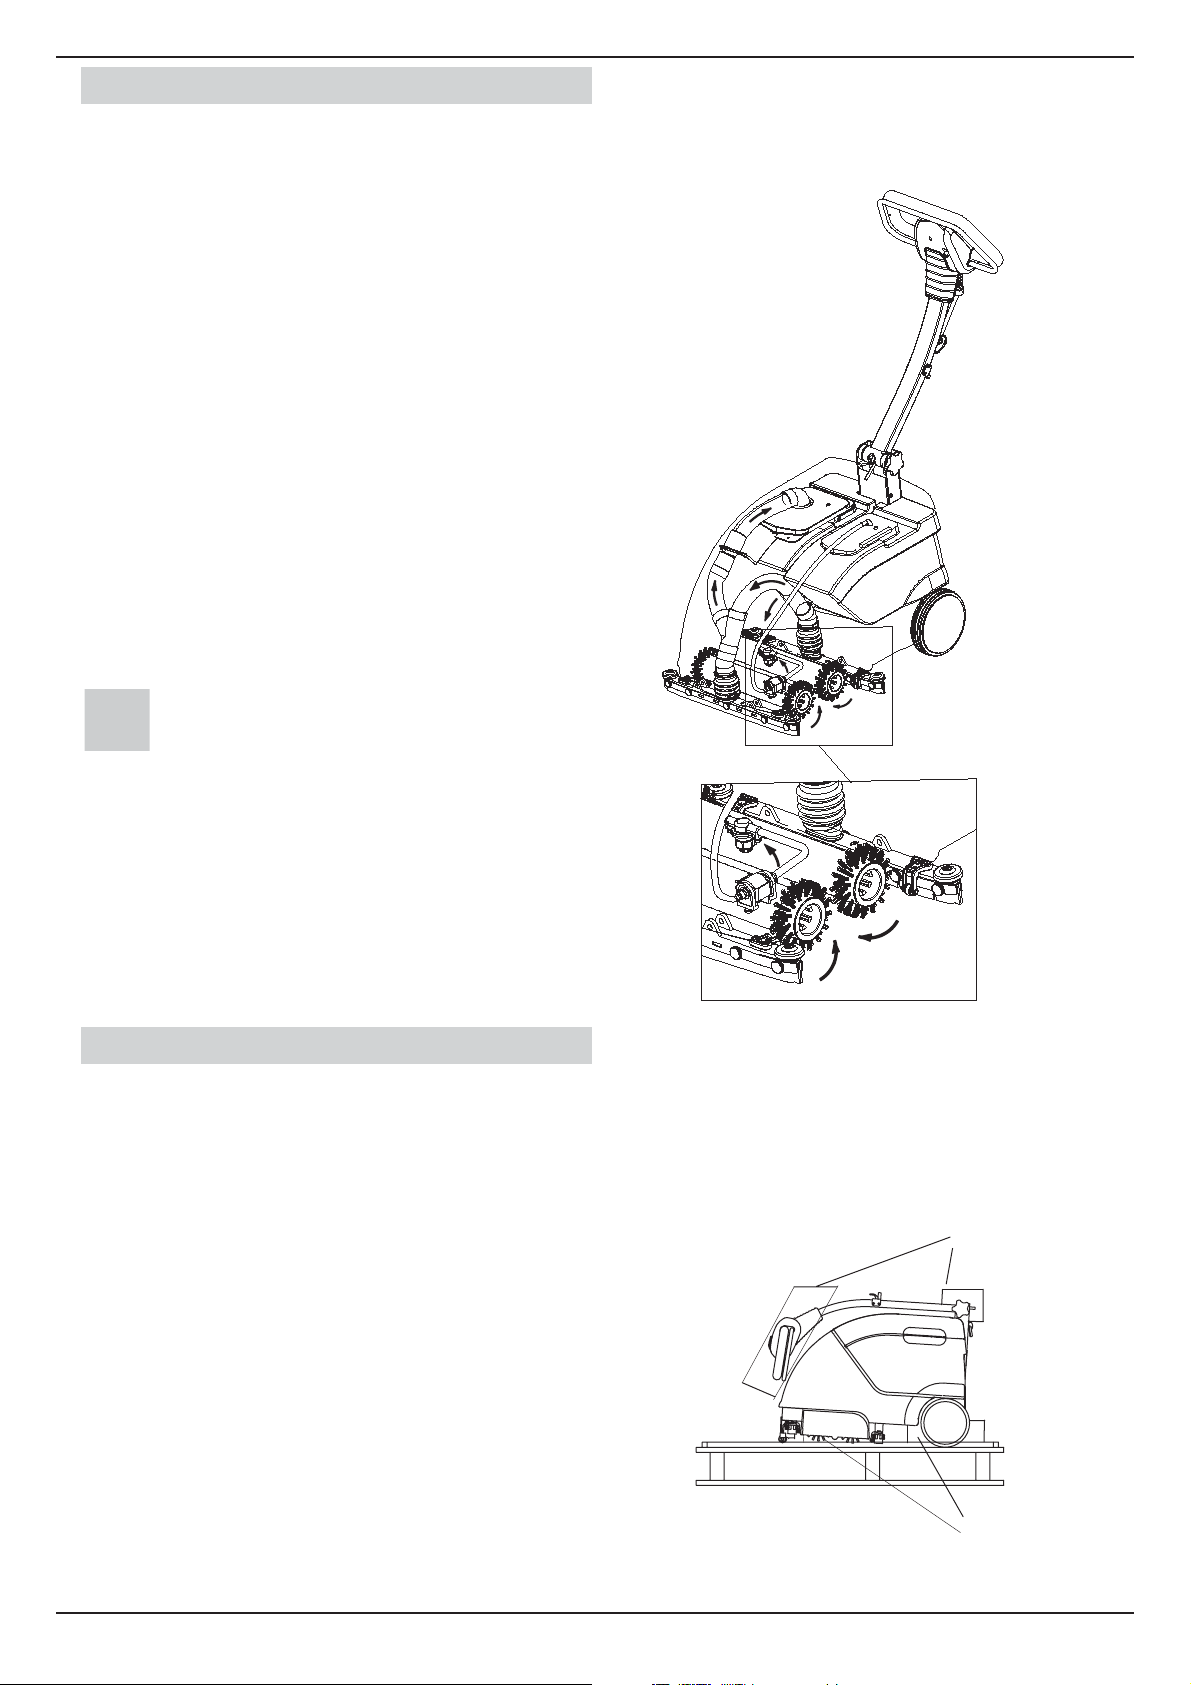
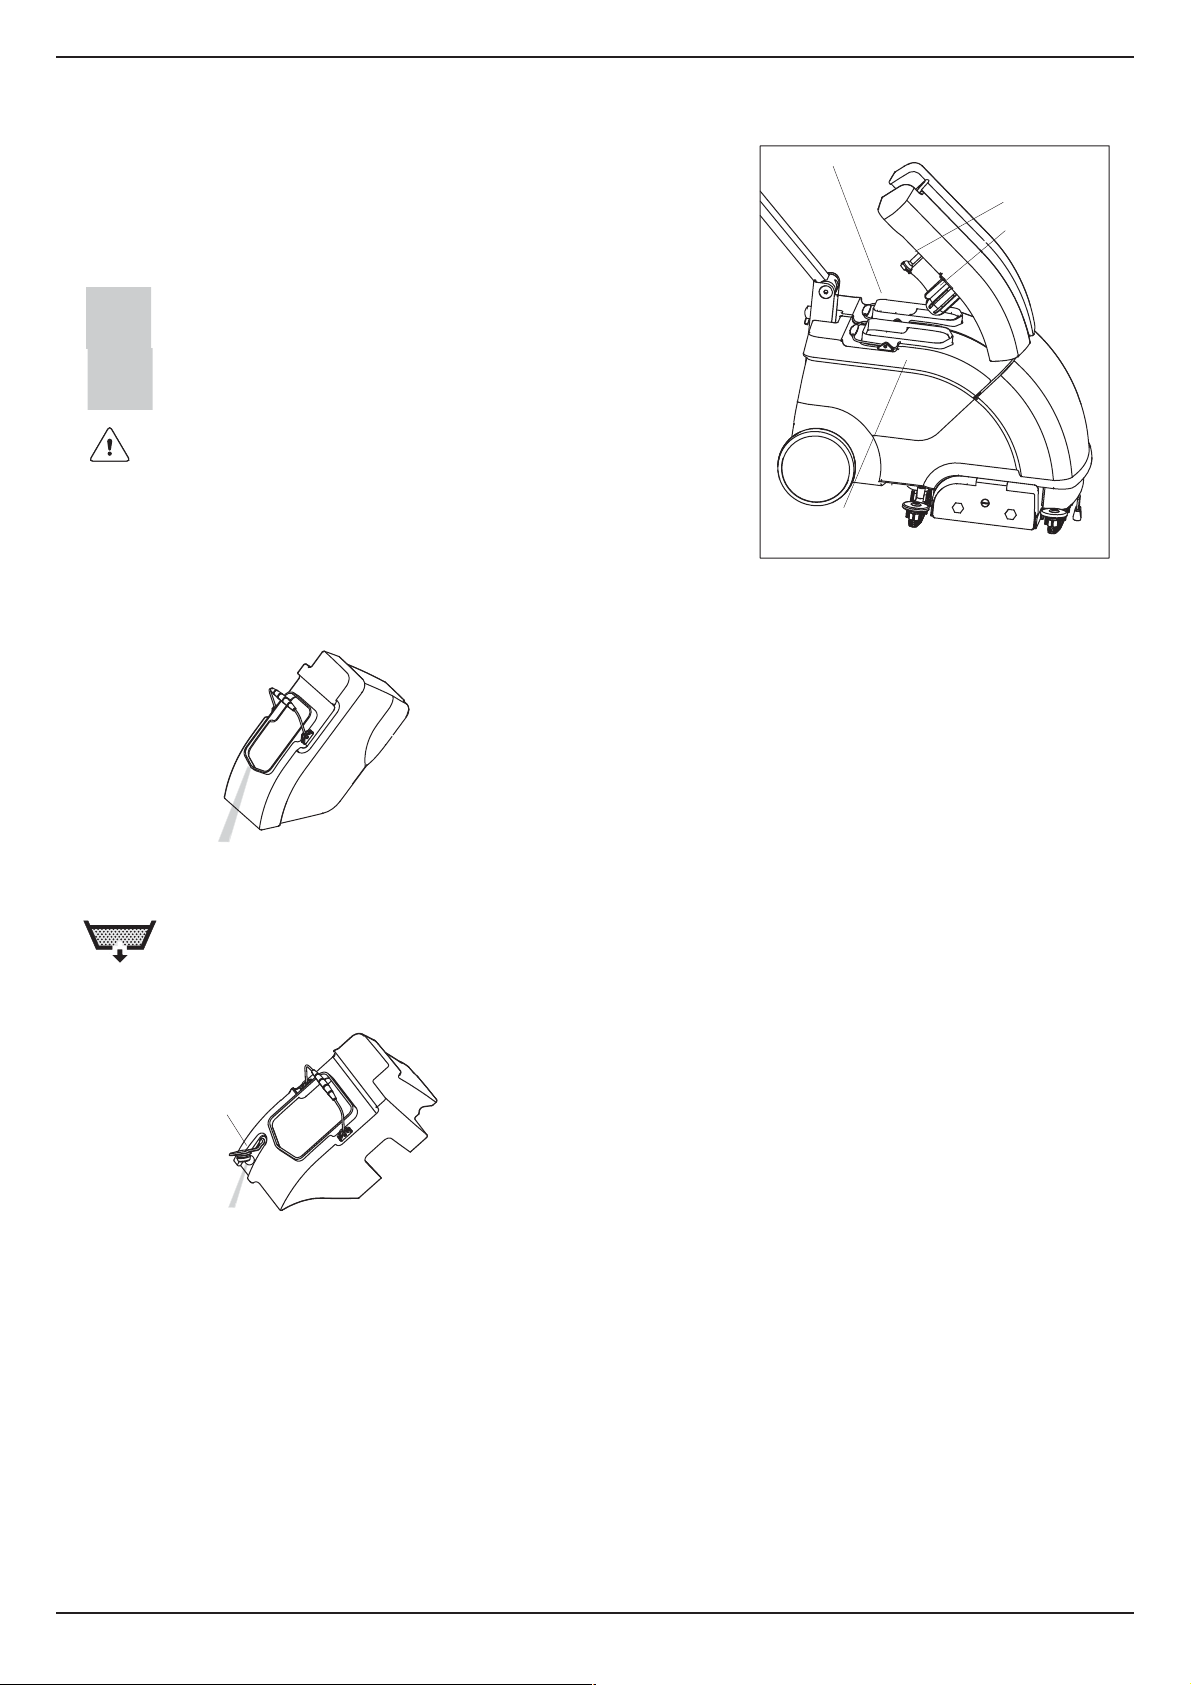
Brush maintenance
2
1
Remove fresh and soiled water tanks
Use the support roller located at the handle side of the Port A Scrub 14 to set the machine into its park position.
Use the adjustment screw to set the operating handle of the machine into vertical position, and then tilt the
machine down as represented.
Loosen screw and fix the brushes manually as represented in Fig. 2 in direction 1.
Open brush cover in direction 2.
Fig. 1
Fig. 2
Remove brushes
Clean brush compartment
Insert brushes, close brush cover and secure with screw.
Set Port A Scrub 14 in upright position.
Use adjustment screw to set the operating handle into working position
.
Set front support roller into working position.
Re-insert fresh and soiled water tanks.
11

Squeegee
The Port A scrub 14 has been equipped with a squeegee of 450 mm working width. The squeegees can be liftedout alternately
Check the squeegee for collected foreign particles and
Mount Squeegee (Initial Fitting)
Lift squeegee and hold it to the squeegee holders (3).
Mount squeegee (1) to the squeegee holder by means of screws (2) as
represented
Check the smooth running of the bottom sleeve at the squeegee
holders for perfect hinging.
Dismount Squeegee
Lift brush head of the PortA Scrub 14 in order to access the squeegee screws.
Remove both screws (2) as represented.
Pull squeegee to the bottom to remove it from the machine.
Change Sealing Strips
No tools are required for dismounting the sealing strips. Proceed as
follows:
Dismount squeegee (refer to paragraph “Dismount squeegee” ).
Unscrew knurled screw (1)
Remove support strip
Proceed to mounting of new sealing strip in reverse order.
3
2
1
1.squeegee
2.squeegee screw
3.squeegee holder
3
2
1
1. Knurled screw
2. Support strip
3. Sealing strip
Tighten the knurled screws (by hand) and from the centre towards the
outsides (slotted sealing strips point to the front, plain ones to the back)
The rear sealing strip can be turned round if worn at the front edge.
Clean nozzle
The nozzle clogs after some hours of operation. It thus
required to clean the nozzle at daily intervals before start of
operation.
Proceed as follows for cleaning the nozzle:
(I) Remove nozzle
Dismount brushes from the Port A Scrub 14 (see
“Dismount/Mount Brushes”).
Lift machine and lay down on its back as represented.
Turn the nozzle to the left
(II) Clean nozzle
·
Clean nozzle by compressed air or water
(III) Mount nozzle
·
After cleaning, insert nozzle by screwing clockwise
.
make sure that the nozzle slot is as the mounting direction of the brushes.
Upright machine
Loosen
Tighten
NOZZLE
Nozzle Slot
12

max.
50°C
Fill water
Fill fresh water and detergent as described below before start of operation.
Open tank lid and fold back
.
Fill fresh water tank with water (50°C max.) And detergent in relation to the dirt encountered and according to the
specifications by the manufacturer.
Filling Amount : 10 litres max.
Use detergents suitable for automatic machines (low foaming) in order to preclude damages at the
suction turbine. We recommend Minuteman detergents for cleaning and care, which are perfectly
adopted to the Port A Scrub 14. These products fulfil the requirements of the DetergentsAct
Operation
Operation
Use the button to take the support into working position.
Turn switch “A” ON to make the brush rotate.
Turn switch “C” ON to open supply of fresh water with or without detergent.
Turn switch “B” ON to start suction turbine running.
Turn all switches OFF after operation and remove the brushes from the Port A Scrub 14. Mount the brushes in inverse
order of dismounting before next operation. This measure extends service life of the brushes.
Start operation of the machine by pushing forward immediately after switching on. This measure
extends Service life of the brush motor. When bushing in reverse direction lift the rear squeegee with
the squeegee governor. Make sure that during the operation of the machine the mains cable always
Turn the brush drive off before passing over dormers of a height of 10mm and more.
Danger when passing over the mains cable with rotating brushes.
Startcleaning in the socket area and clean by stripes. Ifthe surface is not obstructed, start at borders and
forwardcounter-clockwise. Clean the remaining surface by stripesandstartingin the socket area.
Divide partly obstructed surfaces into areas in the reach of the mains cable. Within shortest time, the operator
willknow to avoid unnecessary hindrance causedbythemainscable.
At the end of cleaning:
Turn machine off and set it to its park position
Empty and rinse soiled water tank (see paragraph ”Soiled and Fresh Water Tanks”)
Clean sealing strips of the squeegee
Check the sieve at the inlet opening of the fresh water tank and clean if required in order to maintain suction
performance.
Do not clean the machine by means of a water jet or high-pressure cleaning equipment to avoid
endangering your safety and the operability of the machine.
13
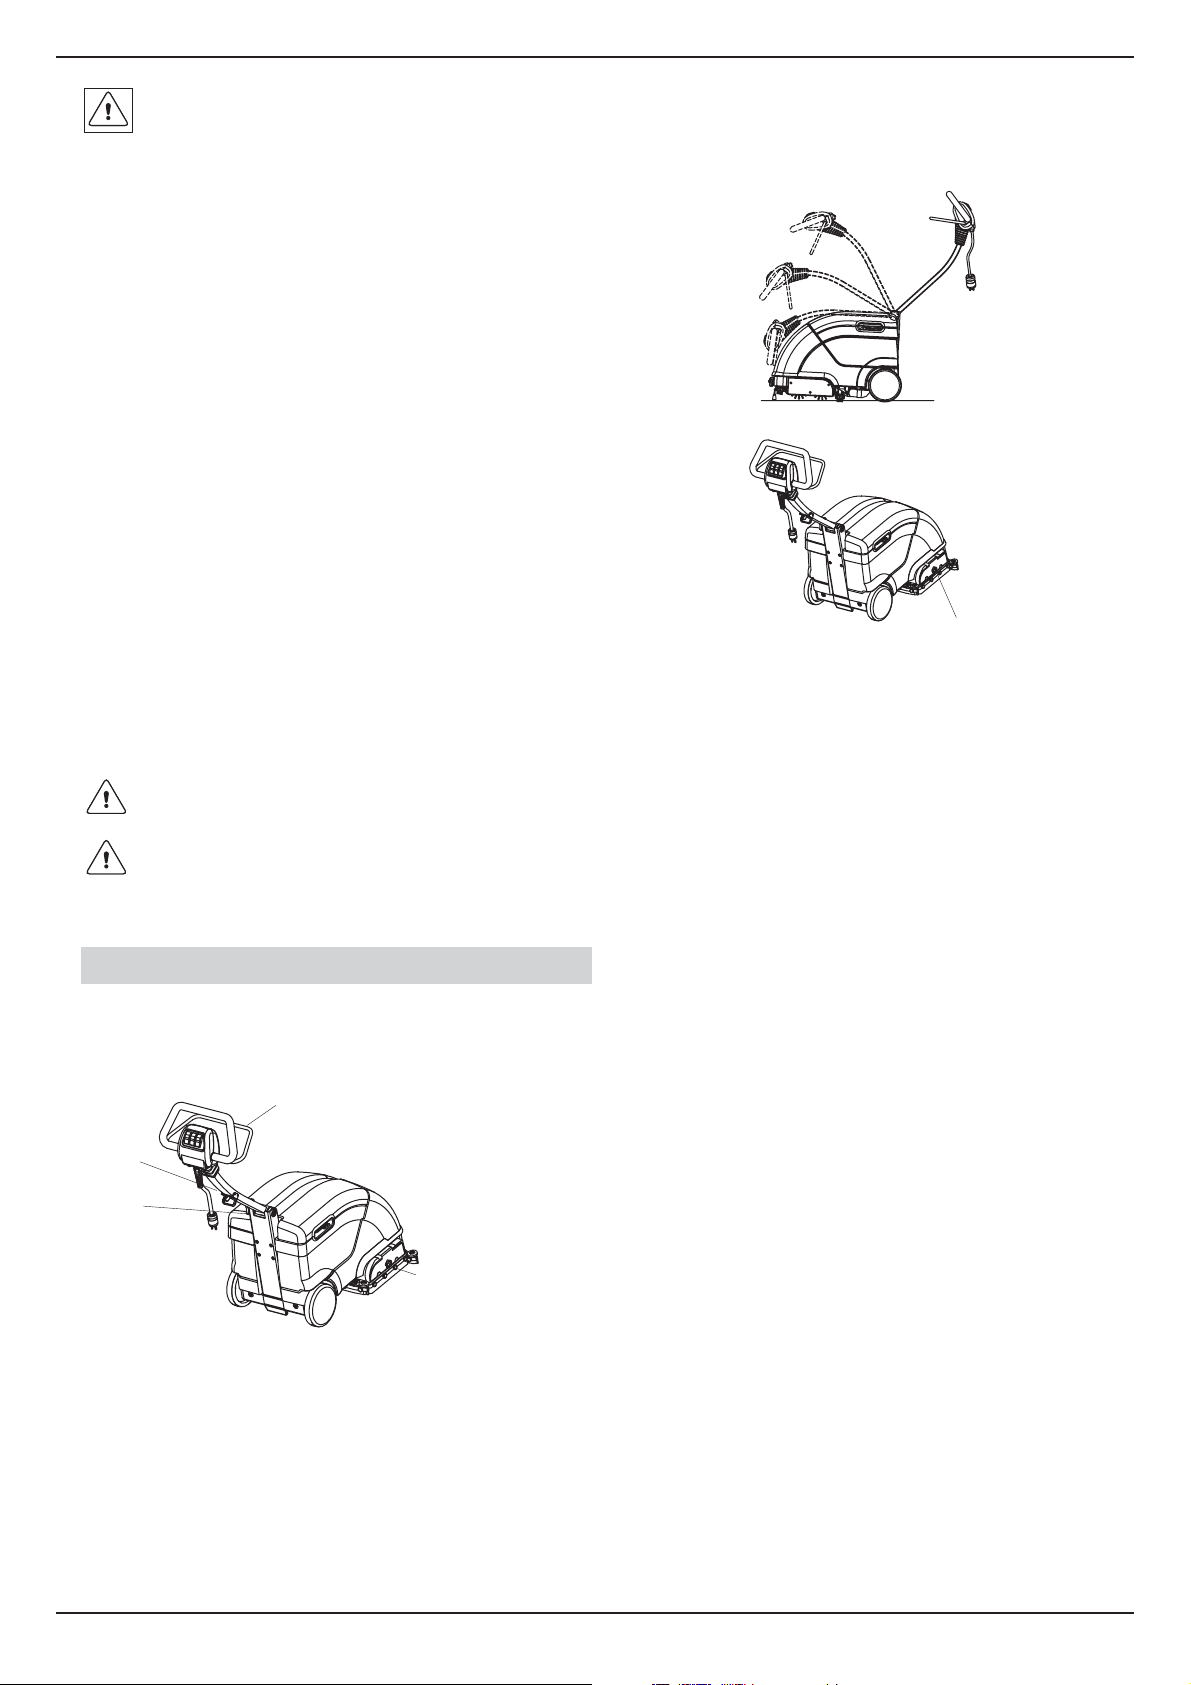
Soiled and fresh water tanks
The PortAScrub 14 is equipped witha soiledand a fresh water tank(lye
tank). The filling amounts to 10 litres. Do not fill beyond the maximum
markand do not exceed awatertemperatureof50°C
Asuctionhosedelivers the soiled water intothesoiledwatertank.
Do not take in larger amounts of secondary water (water
pools)
To avoid settling of residues empty and rinse the soiled
And fresh water tanks after work on principle.
Comply with the legal provisions for disposal of soiled
Water. Check and clean the suction filter in the tank lid for
soiling in regular intervals.
Clean soiled and fresh water tanks
Fresh water tank
Filter
Floater
Soiled water tank
Slowly tilt the tank as represented to drain water before cleaning the tank
Empty Soiled water tank
Cap
Hold the tank as represented
Open the tank and drain water
Close cap
14
Electric System
Theelectricsystem ofthePortAScrub 14 operates at a mainsvoltageof110-120V/
60Hz.
After opening the machine top, the brush motor and the suction turbine are well
accessible.
AT10A fuse (E) protects the suctionturbine and has tobe replaced bythe same type
ifblown (Tstandsforslow-blow).
The suction turbine is low-maintenance type; its carbon brushes only have to be
checkedafter every200hoursofoperation.
G
F
E
Thebrush motoris protected bya cutout (G)which can bemanually reset.Incase of
trippedcut-out, detect the cause andremedybeforere-startingthemachine.
Thepump is protected by aT0.5Afuse(F).Replacebythesame type of fuse.
Reset the cut-out by pushing down the transparent dome of the fuse box. After
tripping,wait for approx. 30 secondsbeforeresetting.
In case of repeated fuse blowing detect the cause. We recommend having all work at the electric
System done by qualified personnel only.
Before starting work at the electric system, disconnect the mains plug. After work at the electric
system is finished, proceed to a safety test
E .Suction motor fuse
F. Pump fuse
G. Brush motor cut-out
Technical Data
Dimensions
Length mm 700
Width mm 470
Height (with closed Handle) mm 540
Working width
Squeegee mm 450
Scrubbing mm 350
Surface performance,
Theoretical m2/h 1400
Driving speed Up to km/h 4
Weights
Deadweight, dry kg 40-43
Total weight, ready to operate, wet kg 50-53
15
 Loading...