

Page 1

Parts and Instruction Manual
MRS Mercury Vacuum
Page 2

This manual is furnished with each new MINUTEMAN MRS Vacuum. This provides the necessary
operating and preventive maintenance instructions. Operators must read and understand this manual
before operating or servicing this machine.
This machine was designed to give you excellent performance and efficiency. For best results and
minimal cost, please follow the general guidelines below:
· Operate the machine with reasonable care.
· Follow the manufacturers suggested maintenance instructions as provided in this booklet.
· Use original Minuteman supplied parts.
Model MRS 1-4
Model No. MRS-1 MRS-2 MRS-3 MRS-4
Stainless Steel C81015-01 C82015-01 C83015-01 C84015-01
Painted C81015-03 C82015-03 C83015-03 C84015-03
Page 3

Table of Contents
EXTENSION CORDS........................................................................................................................... 1
MAINTENANCE AND USAGE............................................................................................................. 1
INSPECTION........................................................................................................................................ 1
WARNING ............................................................................................................................................ 1
SPECIAL WARNING TO PURCHASER .............................................................................................. 1
ELECTRICAL....................................................................................................................................... 1
GROUNDING INSTRUCTIONS ........................................................................................................... 1
OPERA TING AND FILTER CARE INSTRUCTIONS............................................................................ 2
GENERAL INFORMATION .................................................................................................................. 2
Main Assembly MRS 1........................................................................................................................ 4
Assembly Procedure for MRS-2 AND MRS-3 ................................................................................... 5
Procedure for Cleaning MRS-2 AND MRS-3 ..................................................................................... 5
Main Assembly MRS 2 & 3 ................................................................................................................. 6
Assembly Procedure for MRS-4 ........................................................................................................ 7
Procedure for Cleaning MRS-4.......................................................................................................... 7
Main Assembly MRS 4........................................................................................................................ 8
Lid Assembly ...................................................................................................................................... 9
Lid Assembly BOM ........................................................................................................................... 10
Cloth Bag Assembly......................................................................................................................... 11
Adapter Assembly ............................................................................................................................ 12
Tank Assembly.................................................................................................................................. 13
T ank Assembly Bom......................................................................................................................... 14
Minuteman International Made Simple Commercial Limited Warranty........................................ 15
Page 4
INSPECTION
Carefully unpack and inspect your machine for shipping damage. Each unit is tested and thoroughly inspected before shipment, and any damage is
the responsibility of the delivering carrier who should be notified immediately. Read all instructions carefully before operati ng.
WARNING
Models C81015-01, 03; C82015-01, 03; C83015-01, 03 Dry Only
Electrical shock could occur if used on wet surfaces. Do not expose to rain. Store indoors.
WARNING
Models C84015-01, 03, Wet and Dry
To avoid electric shock, do not expose to rain. Store indoors.
Electric motors can cause explosions when operated near explosive materials or vapors. Do not operate this machine near flammable material such
as solvent, thinner, fuels, grain dust, etc.
SPECIAL WARNING TO PURCHASER
Use of replacement filters and/or prefilters not manufactured by Minuteman International Inc. or its designated licensees, will void all warranties
expressed or implied. A potential health hazard exists without exact original equipment replacement.
CAUTION
Hazardous materials must be disposed of properly. Never throw contaminated debris in your usual trash receptacle. Place debris in a plastic bag or
can marked “HAZARDOUS MATERIALS” and take to a hazardous waste handler.
ELECTRICAL
This machine is designed to operate on a standard 15 amp. 115 volt, 60 hz, AC circuit . Voltages below 105 volts AC or above 125 volts AC could
cause serious damage to the motor.
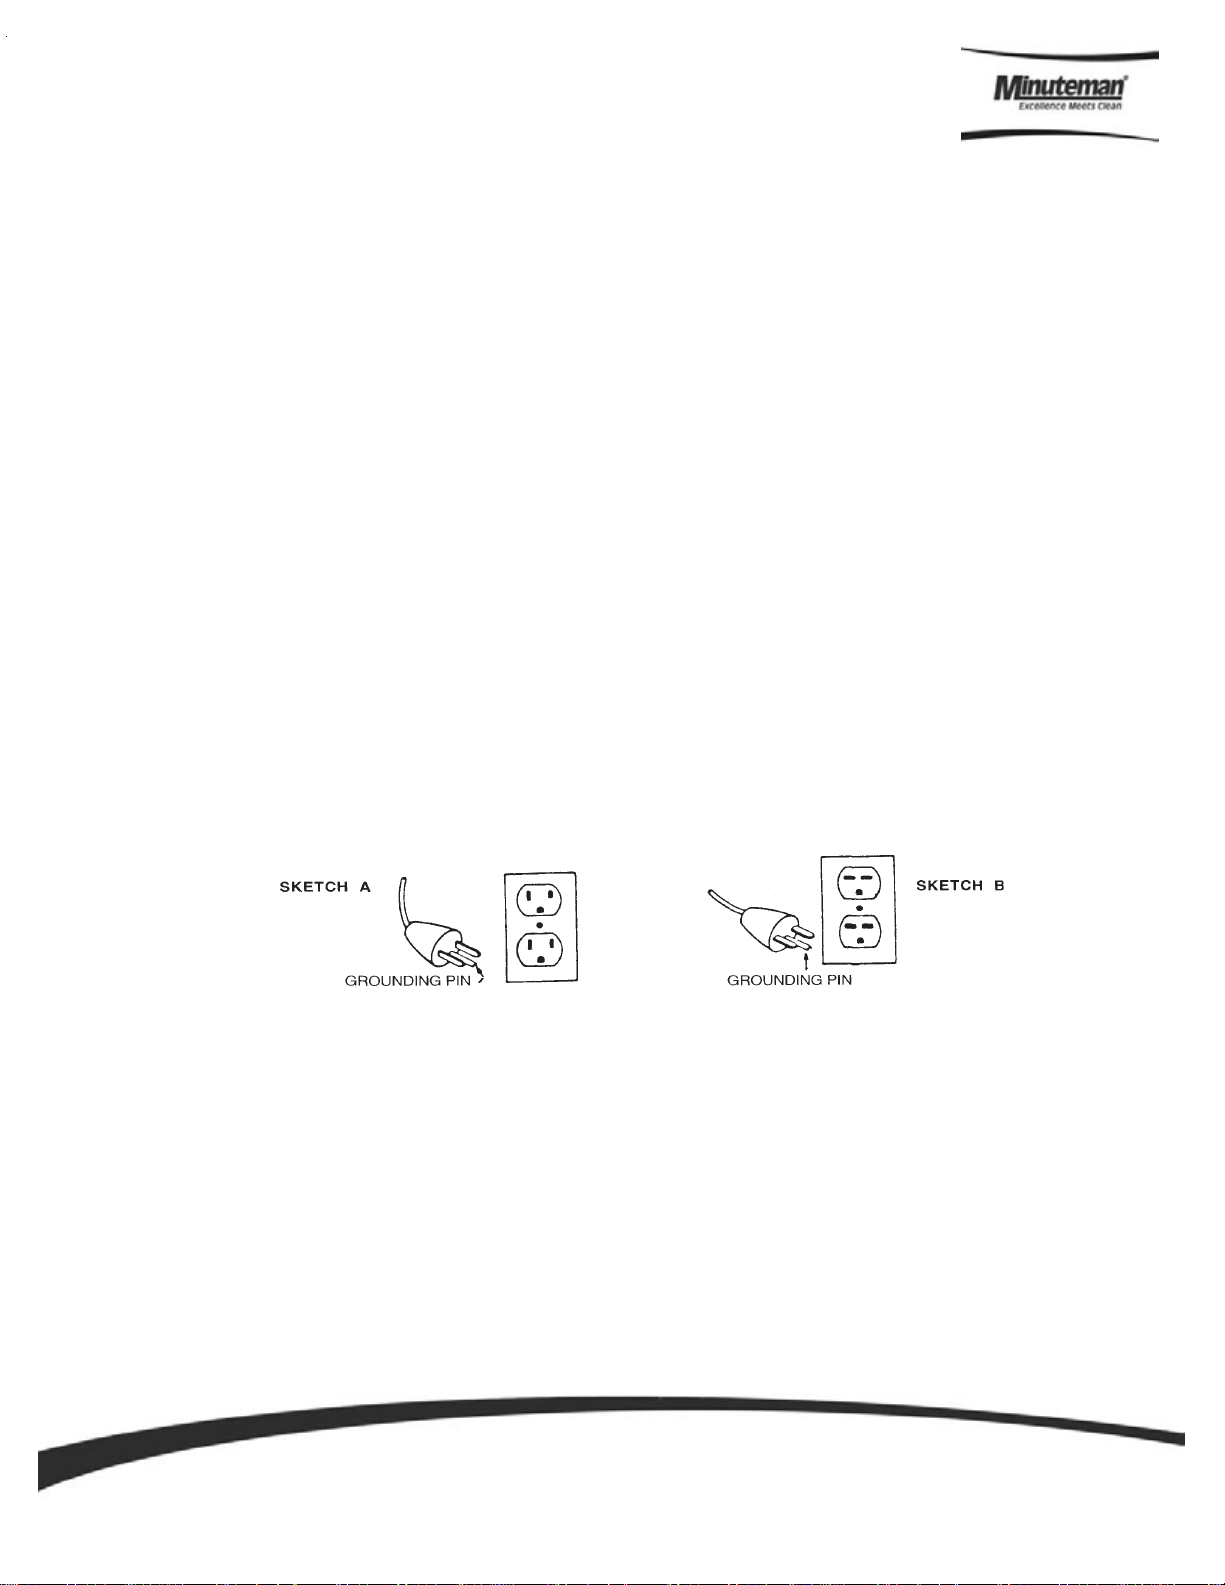
GROUNDING INSTRUCTIONS
To protect the operator from electrical shock, this machine must be grounded while in use. This machine is equipped with an approved threeconductor power cord and grounding type plug to fit the proper grounding type receptacle.
This machine is for use on a nominal 120 volt circuit and has a grounding plug that looks like the plug illustrated in sketch A. Make sure that the
machine is connected to an outlet having the same configuration as the plug. No adapter should be used with this machine.
For equipment rated 150-250 volts: If the machine is provided with an attachment plug as shown in sketch B, it is intended for use on a 240 volt
(nominal) circuit. No adapter is available for this plug
EXTENSION CORDS
If an extension cord is used, the wire size must be at least one size larger than the power cord on the machine and must be limited to 25 feet in length.
Extension cord must be three-wire grounded.
MAINTENANCE AND USAGE
Keep the motor intake cooling air screen clean. If this screen (on top of the motor) becomes clogged, it restricts the flow of cooling air to the motor and
will cause overheating.
No lubrication of the motor is required. Machine is equipped with sealed bearings.
For optimum performance, empty and clean filter bag regularly. A clogged and dirty bag restricts the flow of air and results in reduced vacuum.
Check carbon brush periodically. Replace when worn down to approximately 1/2" in length.
Always unplug the machine when removing the motor head off the tank. This will prevent the accidental starting of the motor and the possibility of fingers
or objects getting into the unprotected impeller intake.
CAUTION
The MRS-1, 2, 3, and 4 Mercury Recovery Vacuums have been designed for the recovery of liquid mercury or mercury oxides as a result of spills. They
should not be used as conventional vacuums for every day cleaning unless it applies to the recovery of mercury contaminated debris.
When not in use the machine and all its components should be stored in a cool, dry and well ventilated room. If possible, the room should be vented to
outside air. Storing area should not have air return vent leading to air circulating central system.
Always wear the required and proper face mask, gloves and protective clothing when cleaning up a mercury spill. Check with your Health/Safety
Department or your work supervisor if you are not familiar with the use and procedure for operating a Mercury Recovery Vacuum.
Parts an d Instruction Manual
Page 1
Page 5

OPERATING AND FIL TER CARE INSTRUCTIONS
The Minuteman Mercury Recovery Vacuums, MRS-1, 2, 3 and 4, have been designed to clean up liquid mercury and mercury
oxide spills. An activated charcoal canister filter is provided to absorb and contain the gas vapor given of f by the liquid mercury.
In some applications where the liquid mercury is in the presence of another dry toxic dust material, a U.L.P.A. (Ultra Low
Penetration Air) filter is also used.
Do not at any time attempt to bypass, remove, substitute, or by any other means change the filters recommended for use with
this vacuum. Use only approved Minuteman filters and filter bags.
Do not at any time, or in any way , attempt to clean or remove dust p articles that may collect or accumulate on the surface of t he
U.L..P.A. filter media.
Do not reverse or attempt to clean “prefilters” which have accumulated dust for the purpose of reusing them.
Since liquid mercury gives off a gas vapor, you are required to remove all traces of it within the vacuum tank assembly and the
mercury separator after each use and prior to storing the vacuum. Any mercury residue left in the vacuum will continue to give
off vapor which will be absorbed by the charcoal filter, thereby reducing the life of the charcoal filter.
Remove disposable collector bag and prefilters at the end of each cleanup period.
The efficiency of your vacuum will be determined by the amount and the density of the material you are vacuuming. All vacuums
will lose efficiency as they become filled. The operator must, therefore, be the one to determine the frequency for emptying and
changing filters based on the efficiency and performance of the vacuum during the cleaning process.
GENERAL INFORMATION
The charcoal filter supplied with your Mercury Recovery V acuum is a specially activated, impregnated carbon design to increase
the absorbent capacity for mercury vapor gases. The life of the charcoal canister is determined by the volume of mercury vapor
it is exposed to. To maximize the life of the charcoal filter, always store them in an air tight bag when not in use.
The vacuum lid assembly is equipped with a timer which will record actual running time of the unit. The timer is not resetable,
therefore, you are required to keep a permanent log book to indicate each replacement of the charcoal filter.
The log will give the vacuum operator a record of the life span of each filter and approximate time for changes.
Monitoring the exhaust air with vacuum running is the only accurate way to determine the continued efficiency of the
charcoal filter.
When not in use, your Mercury Recovery Vacuum and all its components should be stored in a cool, dry and well ventilated
room. If possible, the room should be vented to outside air. S toring area should not have air return vent leading to air circulating
central system.
Parts an d Instruction Manual
Page 2
Page 6

ASSEMBLY PROCEDURE FOR MRS-1
See Main Assembly MRS 1
1. Tank assembly is equipped with intake down tube for attaching disposable collector bag.
2. Carefully open the folds of disposable collector bag No. 8 and insert into tank.
3. Place the cardboard collar onto the intake tube and carefully pull the collar over the tube until the rubber gasket is past
the ring on the end of the tube.
4. Take the paper filter protector No. 7 and insert it into the tank. Snap the elastic band around the rim of the tank. allow
two inches to overlap the tank rim.
5. Place the white Dacron filter into the tank. Snap the elastic band around the rim of the tank in the same manner as the
filter protector.
6. Place bag frame No. 5 down into the Dacron filter.
7. Install adapter assembly No. 4 on top of tank as shown.
8. Assemble charcoal filter module:
a. Place holder assembly No. 2 with rim gasket down, clamps up, on table.
b. Remove any plastic wrapping from charcoal canister No. 3.
c. Place canister into holder with cover toward the seating gasket.
d. Position latches over the rim of the canister and snap down one at a time.
9. Place charcoal module assembly into the tank with gasket seating around adapter rim.
10. Place the vacuum motor lid assembly No. 1 onto the tank making sure it seats all the way around and engage
lid latches.
11. Screw collector jar No. 11 onto separator No. 10.
12. Insert separator onto tank intake.
13. Press the hose end without cuff onto the intake of the separator.
14. Assemble the wands and curved ends with floor tool on one end and hose adapter on other end. Attach this wand
assembly to end of vacuum hose.
15. Plug in electric cord and turn vacuum on. Spray aerosol anti-static spray in through floor tool for 2 to 3 seconds. Antistatic spray will coat the inside of the wand assembly hose and separator, reducing static electricity during liquid
mercury pickup.
PROCEDURE FOR CLEANING MRS-1
1. Remove wand assembly or other pickup tools from hose; disassemble and place in plastic bag.
2. Remove hose from separator, insert plugs provided at each end, and place in plastic bag with tools.
3. Remove jar from separator, then cap jar and store in safe place.
4. If separator is left on vacuum, plug all openings with caps provided.
5. Unplug electric cord from electric service and remove vacuum lid assembly.
6. Before removing charcoal filter module, take the elastic band of the Dacron filter bag and snap it over the rim gasket
of the module.
7. T o remove filter bag protector, reach down to the bottom of the filter, pull up on the center of the bag so you are turning
it inside out. Pull up as far as possible and carefully remove the elastic band around the rim of the tank without allowing
it to snap off. Crumple the filter bag into a tight ball and place it in a disposable plastic liner bag.
8. Reach into the tank and gently push the collar of the filter bag down and off the intake tube. Place one of the “mercury
caution decals” over the bag opening and carefully remove the disposable filter bag from the tank. Place in plastic liner
bag with other contaminated debris.
9. Using damp disposable paper towels or rags, wipe down the inside of tank assembly . Place wipers in plastic liner bags.
10. All traces of mercury residue must be removed prior to storing Mercury Recovery Vacuum. Inside of tank should be
checked with a “snifter” or comparable air measuring device to determine if all traces of mercury have been removed.
11. Re-assemble vacuum following procedure above on Page 3. Using a “snifter” or other air measuring device, plug in
electric cord and turn on vacuum. Monitor the exhaust air coming through the vacuum with all filters in place. The
highest safe exposure concentration level is 0.05 mg/M3. Any reading above this level coming through the exhaust
would indicate that the charcoal filter requires changing.
12. When charcoal filter is replaced, dispose of canister in same plastic bag with other contaminated debris. (DO
NOT STORE NEAR HEAT OR BURN ANY MERCURY CONT AMINATED ITEMS.)
Parts an d Instruction Manual
Page 3
Page 7
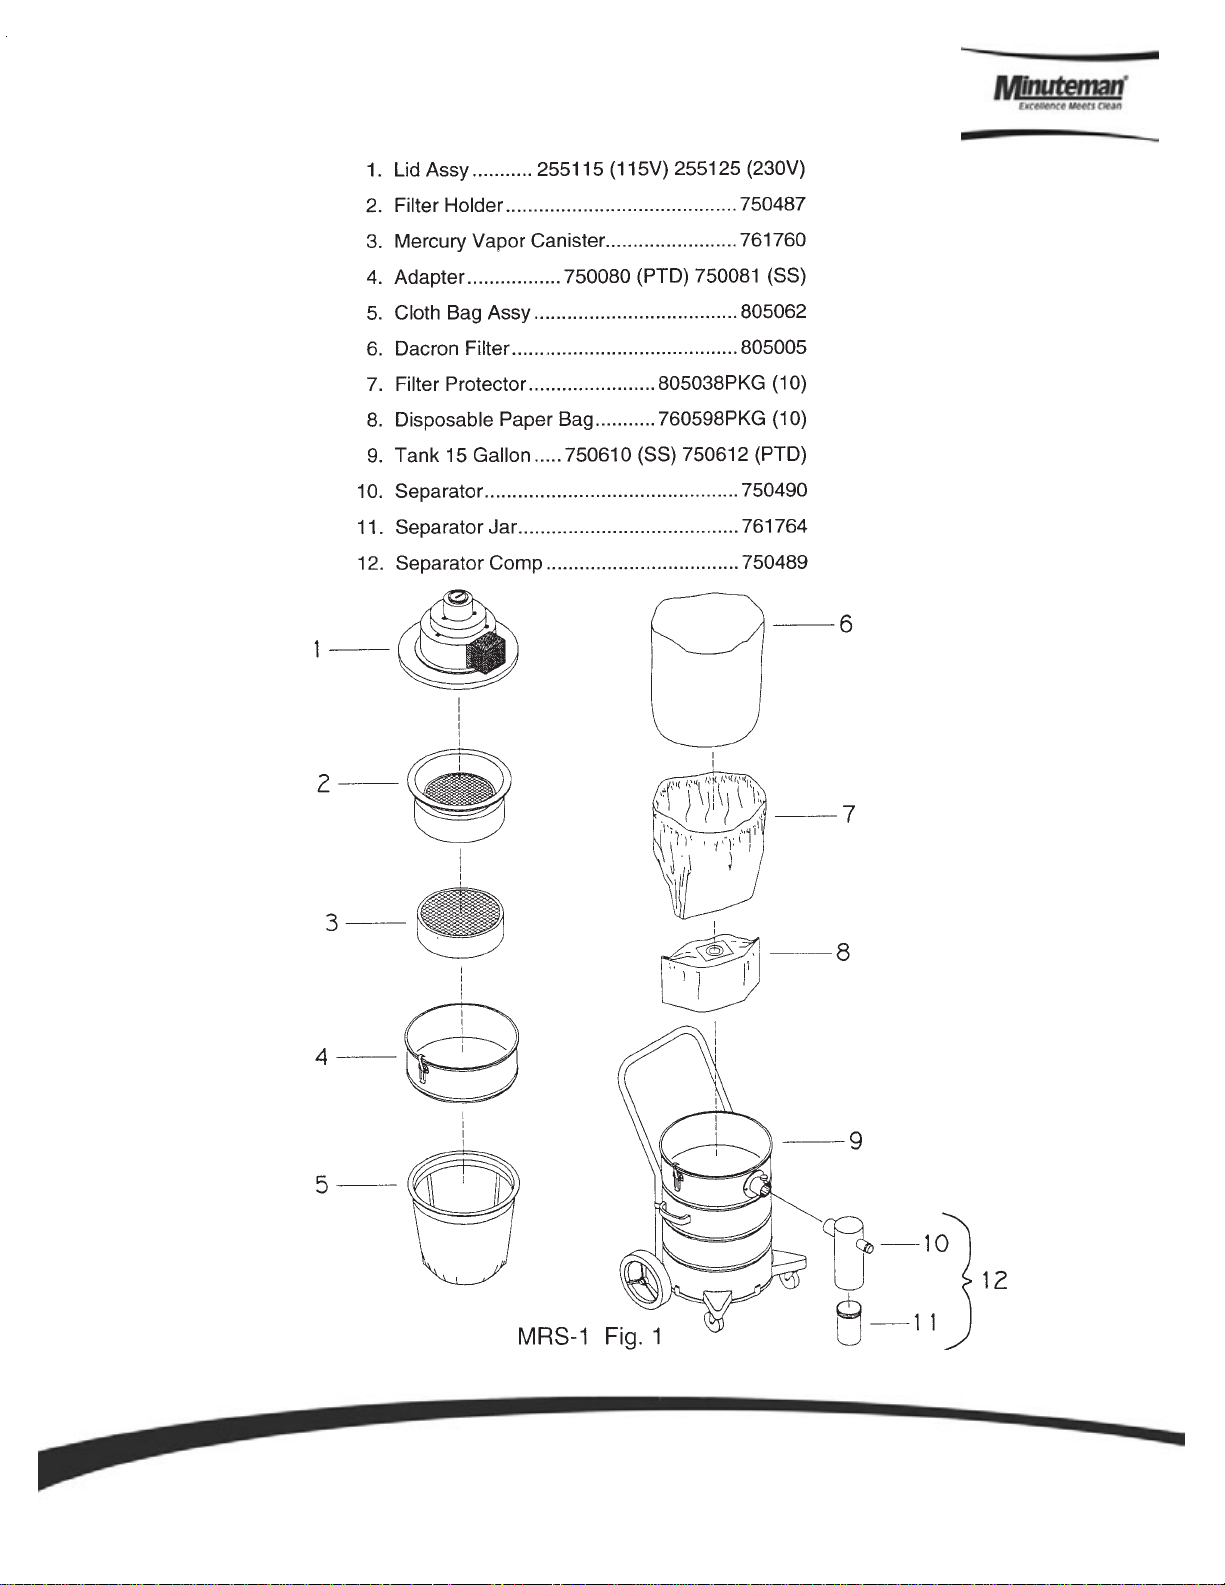
Main Assembly MRS 1
Parts an d Instruction Manual
Page 4
Page 8

ASSEMBLY PROCEDURE FOR MRS-2 AND MRS-3
Steps 1 through 9 follow same procedure as outlined for MRS-1 on Page 3.
10. Install adapter ring as shown.
11. Assemble U.L.P.A. filter module:
a. Place U.L.P.A. filter module No. 2 with rim gasket down on table.
b. Place prefilter No. 3 over the U.L.P.A. filter.
12. Set U.L.P.A. filter module into adapter assembly. Center so rim gasket seats evenly around tank.
13. Place the vacuum motor assembly No. 1 onto adapter and secure with lid latches.
* The MRS-2 is used for the recovery of mercury contaminated dirt in dry form. Assemble metal hose swivel connector
on hose and insert into hose intake. All dry debris recovered will go into the disposable filter bag.
* For model MRS-3, assembly is same as above with the addition of the separator No. 16 which is inserted into the tank
hose intake. This unit is used to recover liquid mercury spills in the presence of other toxic dust materials. The MRS-3
offers the capability to recover and separate the mercury from the dry material.
See Main Assembly MRS 2&3
PROCEDURE FOR CLEANING MRS-2 AND MRS-3
1. Remove vacuum hose, tools and attachments and place in plastic liner bag.
2. Unplug electric cord from electric service and remove vacuum lid assembly.
3. Remove U.L.P.A. filter assembly, and visually check the prefilter . If prefilter is discolored and p acked with dust particles,
replace it. Follow procedure No. 11 above.
4. Remove 1 to 1 adapter.
5. Remove charcoal filter assembly.
6. Remove white Dacron filter with bag frame.
Steps 7, 8, 9 and 10 follow same procedure as outlined for MRS-1 on Page 3.
11. On MRS-3 where the separator has been in use:
a. Remove jar from separator and then cap. Store in safe place or dispose in plastic liner bag
with other contaminated debris.
b. Remove separator from vacuum, plug all openings with caps provided. Store in plastic bag liner
with other tools and attachments.
c. Plug hose intake on vacuum tank.
12. Re-assemble vacuum following procedure above for MRS-2 and MRS-3, steps 1 through 13.
Parts an d Instruction Manual
Page 5
Page 9
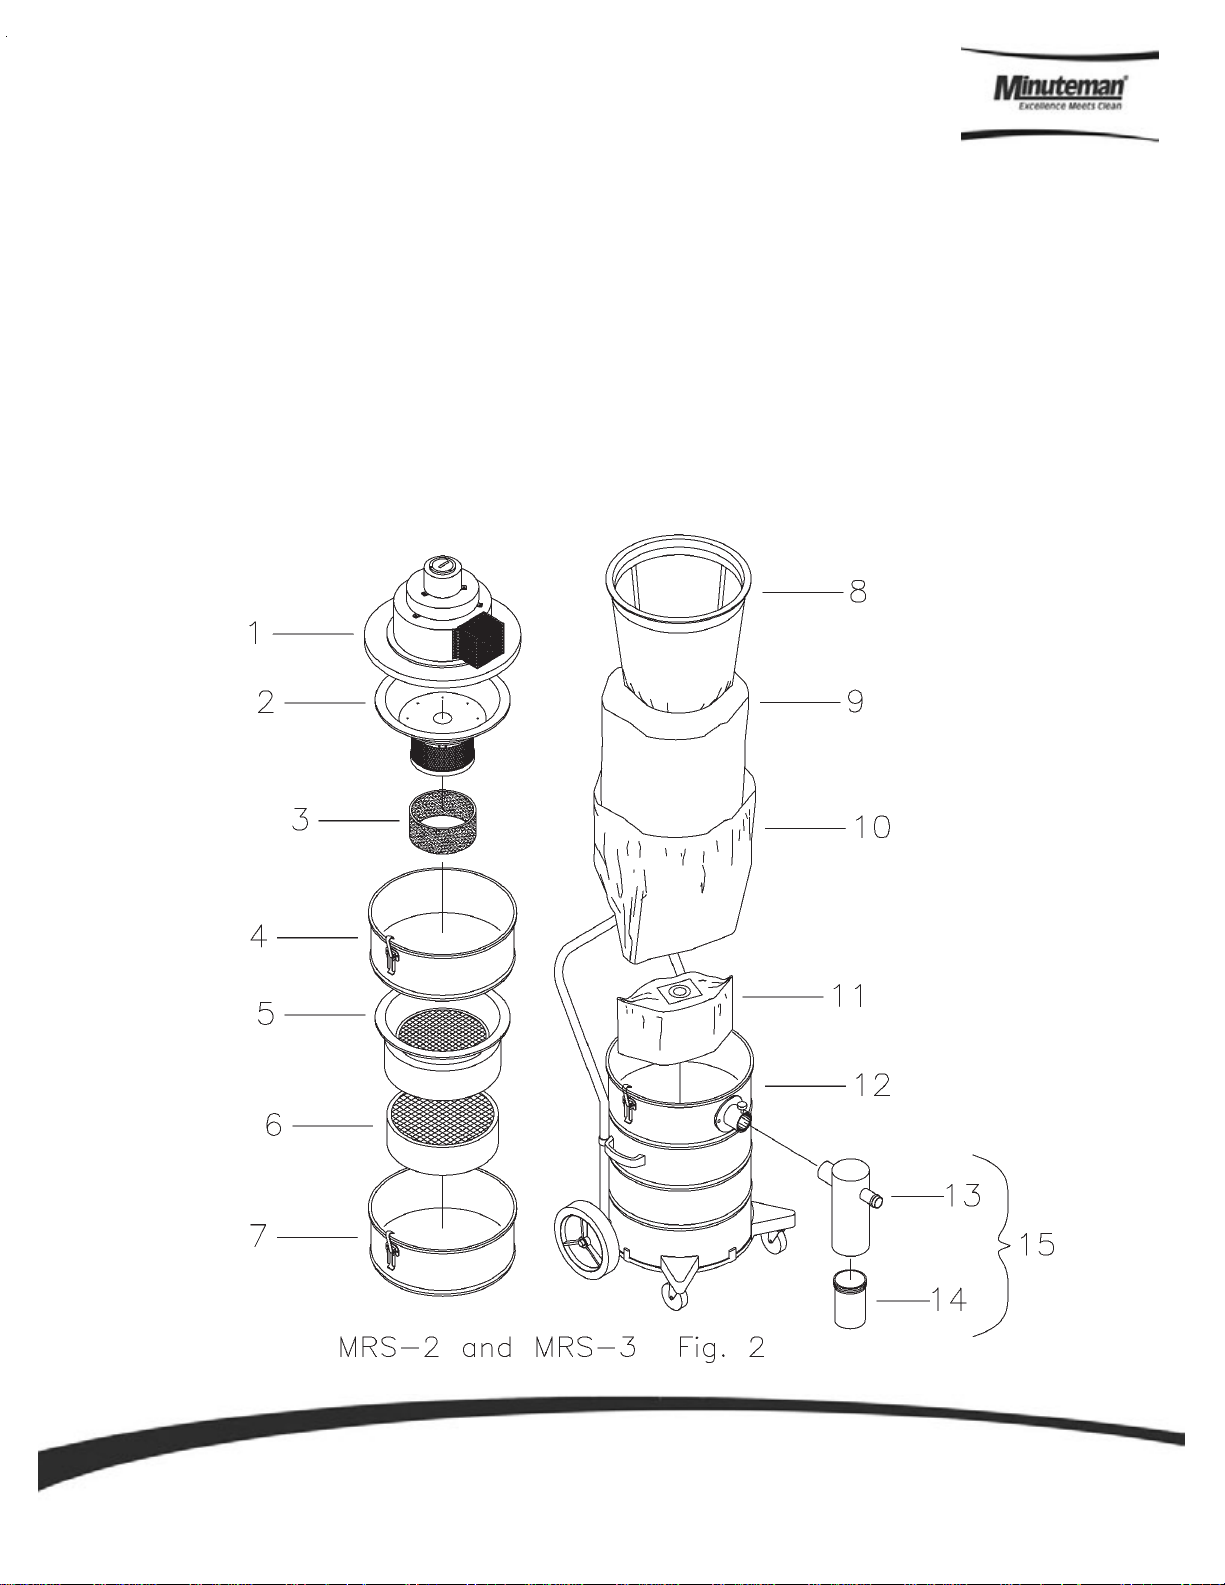
Main Assembly MRS 2 & 3
1 Lid Assy 255115 (115V) 255125 (230V)
2 ULPA Filter Module 750493
3 Prefilter Sleeve 110030PKG (6)
4 Adapter 750080 (PTD) 750081 (SS)
5 Filter Holder 750487
6 Mercury Vapor Cannister 761760
7 Adapter 750080 (PTD) 750081 (SS)
8 Cloth Bag Assy 805062
9 Dacron Filter 805005
10 Filter Protector 805038PKG (10)
11 Disposable Paper Bag 760598PKG (10)
12 Tank 15 Gallon 750612 (PTD) 750610 (SS)
13 Seperator 750490
14 Seperator Jar 761764
15 Seperator Comp 750489
Parts an d Instruction Manual
Page 6
Page 10

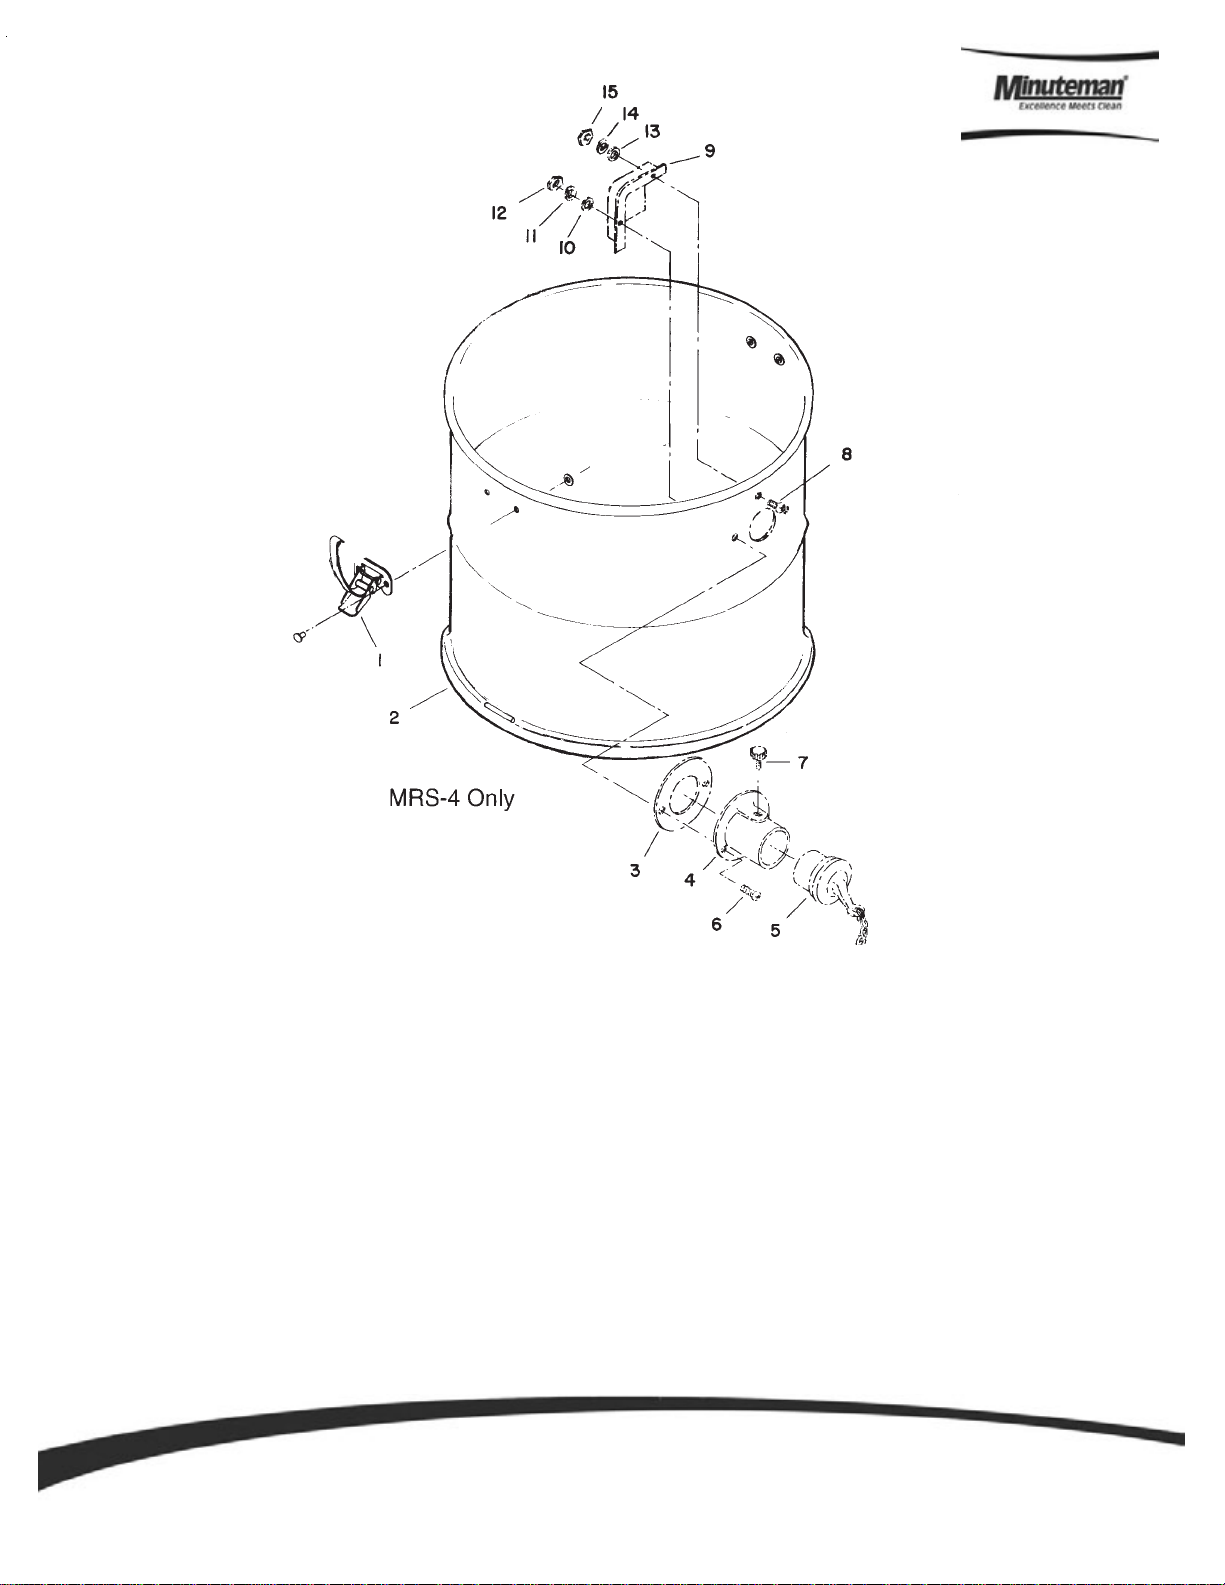
ASSEMBLY PROCEDURE FOR MRS-4
See Main Assembly MRS 4
1. Place water shutoff assembly No. 5 onto tank centering gasket around rim.
2. Place 1 to 1 adapter No. 4 onto tank, center and engage tank lid latches.
3. Install charcoal filter assembly No. 3 into adapter No. 2. Using latches place in assembly No. 4.
4. Place the vacuum motor lid assembly No. 1 onto tank making sure it seats all the way around the adapter rim.
MRS-4 is ready for the recovery of mercury contaminated liquids only.
5. Attach hose assembly and tools required for your job applications.
6. Turn on vacuum and spray anti-static spray into end of tool you are using, proceed with cleanup.
DO NOT USE THIS MACHINE TO PICK UP FLAMMABLE OR EXPLOSIVE LIQUIDS OR OTHER MATERIAL.
DO NOT USE THIS MACHINE IN AN EXPLOSIVE ATMOSPHERE.
PROCEDURE FOR CLEANING MRS-4
1. Check with your Health/Safety Department for the proper procedure for disposing mercury contaminated liquid which you
have recovered in the MRS-4 vacuum.
2. Unplug electric cord from electric service and remove vacuum lid assembly.
3. Remove charcoal filter assembly.
4. Remove 1 to 1 adapter.
5. Remove water shutoff assembly and wipe down underside of water shutoff. Place wiping material in plastic liner bag
with proper label.
6. Dispose of mercury contaminated liquid in vacuum tank in accordance with procedures set up by your Health/Safety
Department.
7. Wipe down inside of tank assembly, place wiping material in plastic liner bag.
8. Re-assemble MRS-4 following procedure above.
Parts an d Instruction Manual
Page 7
Page 11

Main Assembly MRS 4
Parts an d Instruction Manual
Page 8
Page 12

Lid Assembly
Parts an d Instruction Manual
Page 9
Page 13

Lid Assembly BOM
ITEM NO. P ART NO. QTY. DESCRIPTION
10 380032 1 Strain Relief
11 381020 1 Cord 16-3 x 50 ft .
12 250026 2 Gasket Motor
13 710356 3 SCR-MC 10-32 x 5/8
14 710330 8 SCR-MC 8/32 x 5/8
15 710356 8 SCR-MC 10/32 x 5/8
16 710365 2 SCR-MC 10/32 x 1 ¾
17 711304 8 Nut-Hex 8/32
18 711552 8 WSR-Lock #8
19 710362 4 SCR-MC 10/32 x
20 750492 1 HSG Weldment
21 750502 1 Lid SS, Incudes Items 33, 34
22 750509 1 Exhaust Air Cover
23 101041PLT 1 Top Dome
24 750508 1 Air Baffle
25 761758 1 Timer
26 101033 2 Insulation
27 101008 2 Grommet
28 480049 2 Gasket
29 711556 1 WSR-Loc ½
30 101009 1 Gasket
31 101007 1 Insulation
32 480049 1 Gasket
33 480052 1 Gasket
34 480053 1 Gasket
35 255008 2 Carbon Brush Replacement
36 101005 1 Rubber Gasket
37 710356 2 SCR-MC 10-32 x 5/8
38 101012 1 Gasket
39 805018 1 Gasket
40 750487 1 Filter Mounting Assy.
41 762184 1 Gasket
42 761760 1 Vapor Canister MRS
43 750494 1 Mercury V apor Assy.
44 762194 1 U.L.P.A. Mounting Plate
45 110039 1 U.L.P.A. Filter
46 110030PKG 1 Impact Filter, pkg. of 6
48 750493 1 U.L.P.A. Filter Assy.
1 101018 1 Cord Assy .
2 101019 1 Switch Box
3 101006PTD 1 Inter Vent Dome
4 101030 3 Bracket
5 255030 1 Gasket
6 255039 1 Motor 115V
7 255049 4 Spacer
8 255046PLT 1 Motor Retainer
9 380002 1 Switch, 1 ½ HP
Parts an d Instruction Manual
Page 10
Page 14

Cloth Bag Assembly
ITEM NO. PART NO. QUANTITY DESCRIPTION
1 750097 1 Bag Frame
2 805054 1 Bag Only
5 750405 1 Assembly-Plate Water Shutoff
6 760231MCH 1 Ring, Bag Retainer
7 380046 1 Ball, Float
8 380045CTD 1 Cage Float Assembly
9 760234 1 Lint Trap Bag
10 760260 1 Spring, Retainer
11 711203 4 BLT, 1/4-20 x .50 HHMS
12 711519 4 WSR, Flat 1/4 ID x 1" OD
13 711373 4 Nut, Nyloc 1/4-20
Parts an d Instruction Manual
Page 11
Page 15
Adapter Assembly
ITEM NO. PART NO. QUANTITY DESCRIPTION
10 711503 2 WSR, Flat #10
11 711543 2 WSR, Lock #10
12 711310 1 Nut-Hex 10/32
13 711502 1 WSR, Flat #8
14 711542 1 WSR, Lock #8
15 711304 1 Nut-Hex 8/32
Parts an d Instruction Manual
1 761054 2 Latch
2 110902 1 Adapter 1:1 PTD Inc. #1
2a 110901 1 Adapter 1:1 SS Inc. #1
3 900036 1 Gasket
4 900112POL 1 Intake
5 750402 1 Plug Assy .
6 710356 2 SCR-MC 10-32 x .62
7 500033 1 Knob
8 710530 1 SCR-MC 8/32 x .50
9 900035 1 Deflector
Page 12
Page 16
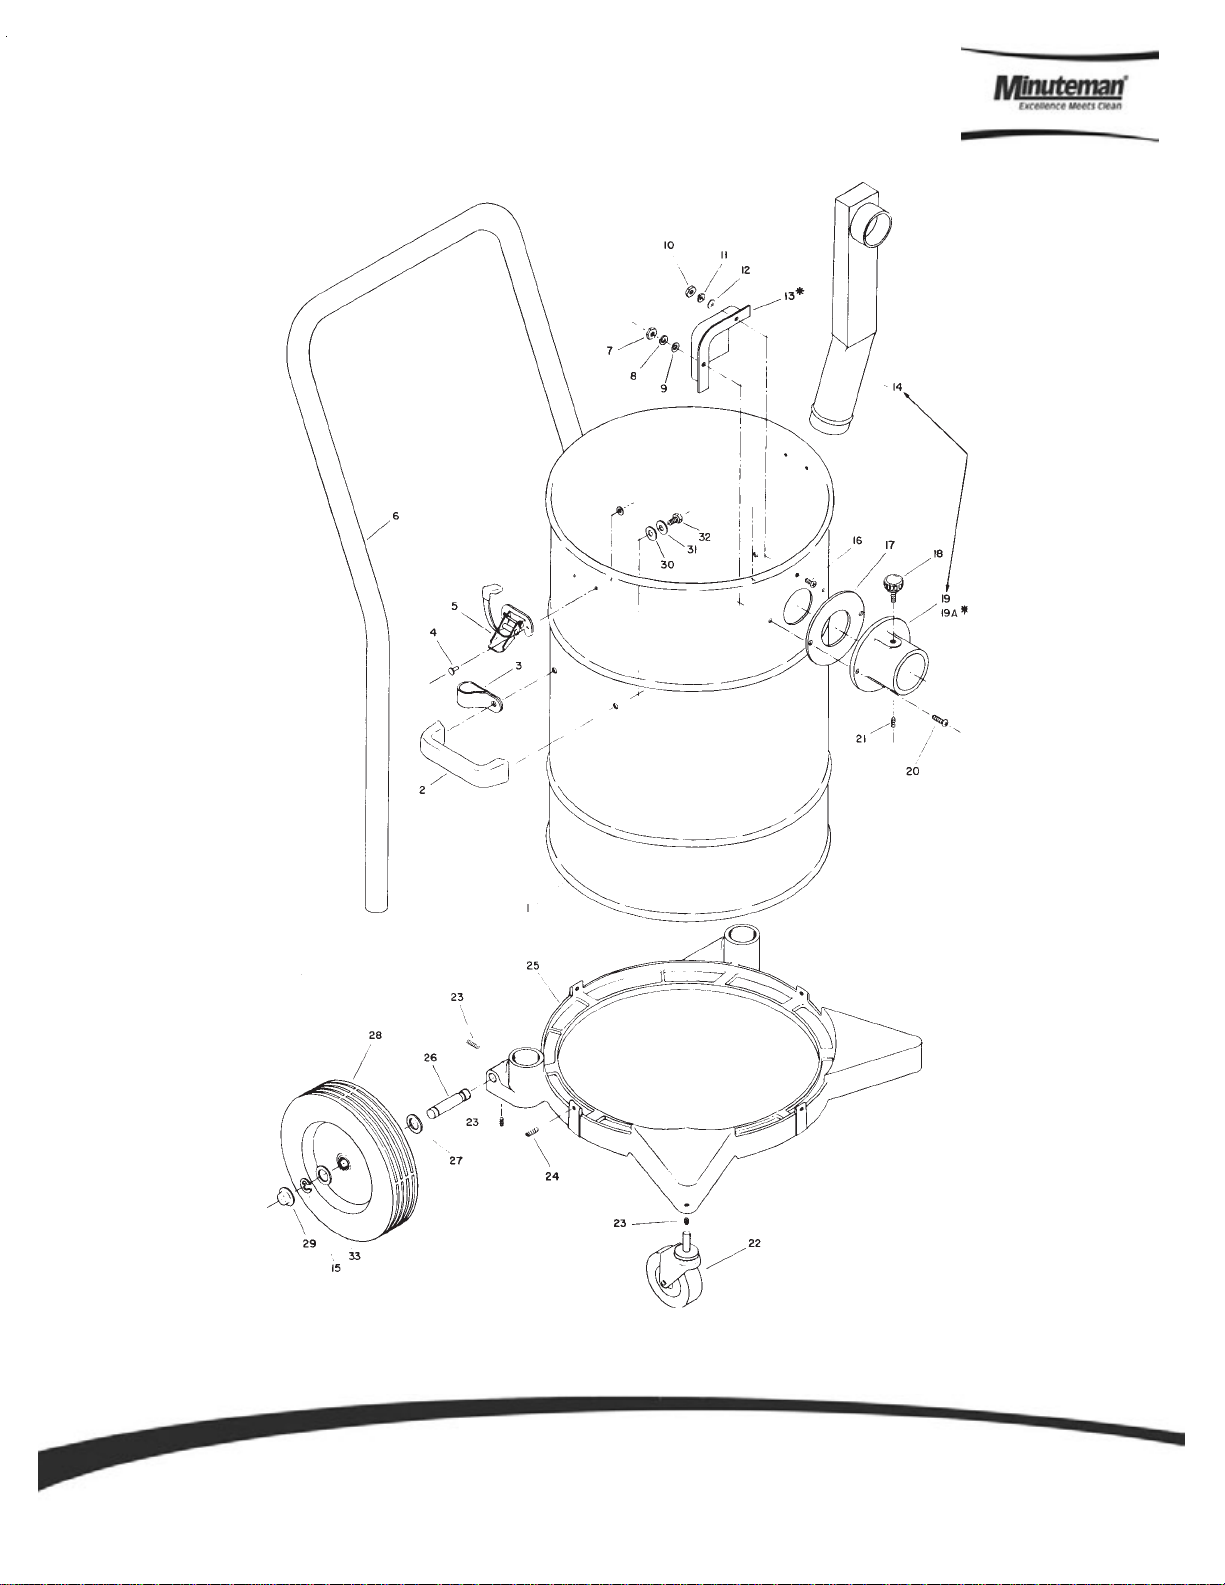
T ank Assembly
Parts an d Instruction Manual
Page 13
Page 17

T ank Assembly Bom
ITEM NO. PART NO. QTY. DESCRIPTION
1 900004POL 1 T
1A 900001 1 Tank, PLT 15 Gal.
2 900031POL 2 Handle, Tank Polished
3 900038 2 Clamp, Handle
4 711915 4 Rivet .19 x .28 x .37HD STNI
5 761054 2 Latch
6 900037PLT 1 Handle, Plated Common
7 711310 2 Nut, Hex 10-32 STPL
8 711543 2 WSR, Helical SPR LOC #10
9 711503 6 WSR, Flat #10
10 711304 1 Nut, Hex 8-32
11 711542 1 Washer, LOC #8
12 711502 1 Washer FLT #8
13 900035 1 Deflector
14 750498 1 Down Tube
15 711713 2 Retaining Ring E Type
16 710530 1 SCR-MC 8/32 x .50
17 900036 1 Gasket
18 500033 1 Knob
19 900113POL 1 Intake Polished for Item #14
‘ 19A 900112POL 1 Intake Polished for Item #13
19B 900113PTD 1 Intake Plated MRS only for Item #14 MRS
20 710356 2 SCR-MC 10-32 x .62 STPL
21 711005 1 Screw, Set ¼-20 x .31
22 900033 2 Caster, Swivel
23 711005 4 SCR, Set ¼-20 x .31
24 711006 4 SCR, Set /14-20 x .62
25 760984PTD 1 BKT, Wheel
26 900066 2 Axle
27 711582 2 WSR, Wave
28 900040 2 Wheel
29 130032 2 Cap, Retainer
30 711591 4 Washer, Rubber
31 711505 4 WSR, Flat ¼
32 711203 4 BLT, HH ¼-20 x .62
33 711594 2 Washer, FLT
**** 750322 Wheel Bkt. Assy. Complete
**** 750610 Tank Assy. Comp. SS w/Down Tube
**** 750612 Tank Assy. Comp. Painted w/Down Tube
**** 750616 Tank Assy. Comp. SS w/Deflector
**** 750614 Tank Assy. Comp. PTD w/Deflector
ank, Polished 15 Gal. SS
Parts an d Instruction Manual
Page 14
Page 18

Minuteman International Made Simple Commercial Limited Warranty
Minuteman International, Inc. warrants to the original purchaser/user that the product is free from defects in
workmanship and materials under normal use. Minuteman will, at its option, repair or replace without charge, parts
that fail under normal use and service when operated and maintained in accordance with t he applicable operati on and
instruction manuals. All warranty claims must be submitted through and approved by factory authorized repair
stations.
This warranty does not apply to normal wear, or to items whose life is dependent on their use and care, such as belts,
cords, switches, hoses, rubber parts, electrical motor components or adjustments. Parts not manufactured by
Minuteman are cover ed by and subject to the warranties and/or guarantees of their manufacturers. Please contact
Minuteman for procedures in warranty claims against these manufacturers.
Special warning to purchaser -- Use of replacement filters and/or prefilters not manufactur ed by Minuteman or its
designated licensees, will void all warranties expressed or implied. A potential health hazard exits without original
equipment replacem ent .
All warranted items become the sole property of Minutem an or its original manufactu rer , whichever the case may be.
Minuteman disclaims any implied warranty, including the warranty of merchantability and the warranty of fitness for a
particular purpose. Minuteman assumes no res ponsibility for any special, incidental or consequent ial damages.
This limited warranty is applicable only in the U.S.A. and Canada, and is extended only to the original user/purchaser
of this product. Customers outside the U.S.A. and Canada should contact their local distributor for export warranty
policies. Minuteman is not responsible for costs or repairs performed by persons other than those specifically
authorized by Minut eman. This war ranty does not apply to damage from transportation, alterations by unauthorized
persons, misuse or abuse of the equipment, use of non-compatible chemicals, or damage to property, or loss of
income due to malfunct io ns of th e product.
If a difficulty develops with this machine, you should contact the dealer from whom it was purchased.
This warranty gives you specific legal rights, and you may have other rights which vary from state to state. Some
states do not allow the exclusion or limitation of special, inci dental or consequent ial damages, or limit ations on how
long an implied warr anty lasts, so the above exclusions and limitations may not apply to you.
Cord Electric Group………. Three years parts, two years labor, ninety days travel (Not to exceed two hours)
Exceptions………. Port-A-Scrub, one year parts, six months labor
MPV 13, one year parts
MPV 14 and 18, two years parts, one y ear labo r
RapidAir blower, one year parts, one year labo r
Explosion-Proof Vacuum, one year parts, one year labor
Pneumatic Vacuums, three years parts, one year labor
EX 12 and EX12H, one year parts, one year labor
Battery Op er ated Group ….. Three years parts, two years labor, ninety days travel
(Not to exceed two hours)
Exceptions……Sweepers, one year parts, one year labor, ninety days travel
(Not to exceed two hours )
Internal Combustion Group….One year parts, one year labor, ninety day travel
(Not to exceed two hours)
Replac ement Parts……………..N i nety days
Batteries………………………….0-3 months replac em ent, 4-12 months pro-rate
Polypropylene Plastic Tanks…Ten years, no additional labor
111 South Rohlwin g Ro ad · Addison, Illi nois 60101 USA
Phone 630- 627-6900 · Fax 630- 627-1130
E-Mail, www.minutemanintl.com
A Member of the Hako Group
987842
Rev A 05/07
 Loading...