

Minuteman MC20115, MC20230, MC20230CE Service Manual
200 Floor
Model:
Scrubber
Electric
OPERATION
MC20230CE
SERVICE PARTS
MC20115
MC20230
CARE
Revised 8/03

TABLE OF CONTENTS
Page
Safety Instructions ............................................. 1
Electrical Requirements ................................... 2
Control Panel Identification ................................ 3
Brush Installation Instructions ............................. 4
Operating Instructions/Maintenance ................... 5
Main Polyethylene Components ........................ 6 - 7
Solution/Recovery Tank ..................................... 8 - 9
Vacuum Components ........................................ 10 - 11
Brush Drive Assemblies .................................... 12 - 13
Back Panel ....................................................... 14 - 15
Squeegee Assembly ......................................... 16 - 17
Wiring Diagram................................................. 18

FOR COMMERCIAL USE ONLY
IMPORTANT SAFETY INSTRUCTIONS
When using an electrical appliance, basic precautions should always be followed, including the
following:
READ ALL INSTRUCTIONS BEFORE USING
WARNING - To reduce the risk of fire, electric shock, or injury:
Do not leave appliance when plugged in. Unplug from outlet when not in use and before servicing,
cleaning or maintaining.
WARNING
To reduce the risk of electric shock - Do not expose to rain. Store indoors.
• Do not allow to be used as a toy. Close attention is necessary when used by or near children.
• This machine shall be used only by instructed and authorized persons.
• Use only as described in this manual. Use only manufacturer’s recommended attachments.
• Inspect cord regularly. Do not use with damaged cord or plug. If appliance is not working as it
should, has been dropped, damaged, left outdoors, or dropped into water, return it to a service
center. Use only cord specified by manufacturer.
• Do not pull or carry by cord, use cord as a handle, close a door on cord, or pull cord around sharp
edges or corners. Do not run appliance over cord. Keep cord away from heated surfaces.
• Do not unplug by pulling on cord. To unplug, grasp the plug, not the cord.
• Do not handle plug or appliance with wet hands.
• Do not put any object into openings. Do not use with any opening blocked; keep free of dust, lint,
hair, and anything that may reduce airflow.
• Keep hair, loose clothing, fingers, and all parts of body away from openings and moving parts.
• Do not pick up anything that is burning or smoking, such as cigarettes, matches, or hot ashes.
• Do not use without dustbag and/or filters in place.
• Turn off all controls before unplugging.
• Use extra care when cleaning on stairs.
• Do not use to pick up flammable or combustible liquids such as gasoline or use in areas they may
be present.
• Connect to a properly grounded outlet only. See grounding instructions.
• This machine is not suitable for picking up hazardous dust.
• Close tank and lid before use.
SAVE THESE INSTRUCTIONS
1

INSPECTION
Carefully unpack and inspect your machine for shipping damage. Each unit is tested and thoroughly
inspected before shipment and any damage is the responsibility of the delivering carrier who should
be notified immediately.
WARNING
• Read Instruction Manual before operating this piece of equipment.
• To reduce the risk of fire, use only commercially available floor cleaners and waxes intended for
machine application.
• To reduce the risk of electrical shock, do not expose to rain. Store indoors.
• Do not cross over supply cord, hazard exists when rotating brush passes over cord.
• Electrical motors and components can cause an explosion when operated near volatile materials
and vapors. Do not use this machine near flammable materials such as solvents, thinners, fuels,
grain dust, etc.
ELECTRICAL
(Model MC20115) This floor machine is designed to operate on a standard 15 amp. 120 volt, 60 hz,
AC circuit. Voltages below 105 volt AC or above 125 volts AC could cause serious damage to the
motor.
(Model MC20230) This machine is designed to operate on a standard 16 amp type L fused 230 volt,
50 hz, AC circuit. Voltages below 200 volts AC or above 250 volts AC could cause serious damage
to the motor I.E.C. Class 1.
GROUNDING INSTRUCTIONS
• This floor finishing machine should be grounded while in use to protect the operator from electric
shock. The machine is equipped with a three-prong grounding type attachment plug to fit the proper
grounding type receptacle. The green (or green and yellow) conductor in the cord is the grounding
wire. Never connect this wire to other than the grounding blade.
• Floor finishing machines rated less than 150 volts — If the machine is provided with an attachment
plug as shown in Sketch A it is intended for use on a 120-volt (nominal) circuit. If a properly grounded
receptacle as shown in Sketch A is not available, an adapter as shown in Sketch C is available and
should be installed as shown in Sketch B if the outlet box that houses the receptacle is grounded.
Be sure to fasten the grounding tab with the faceplate screw.
2
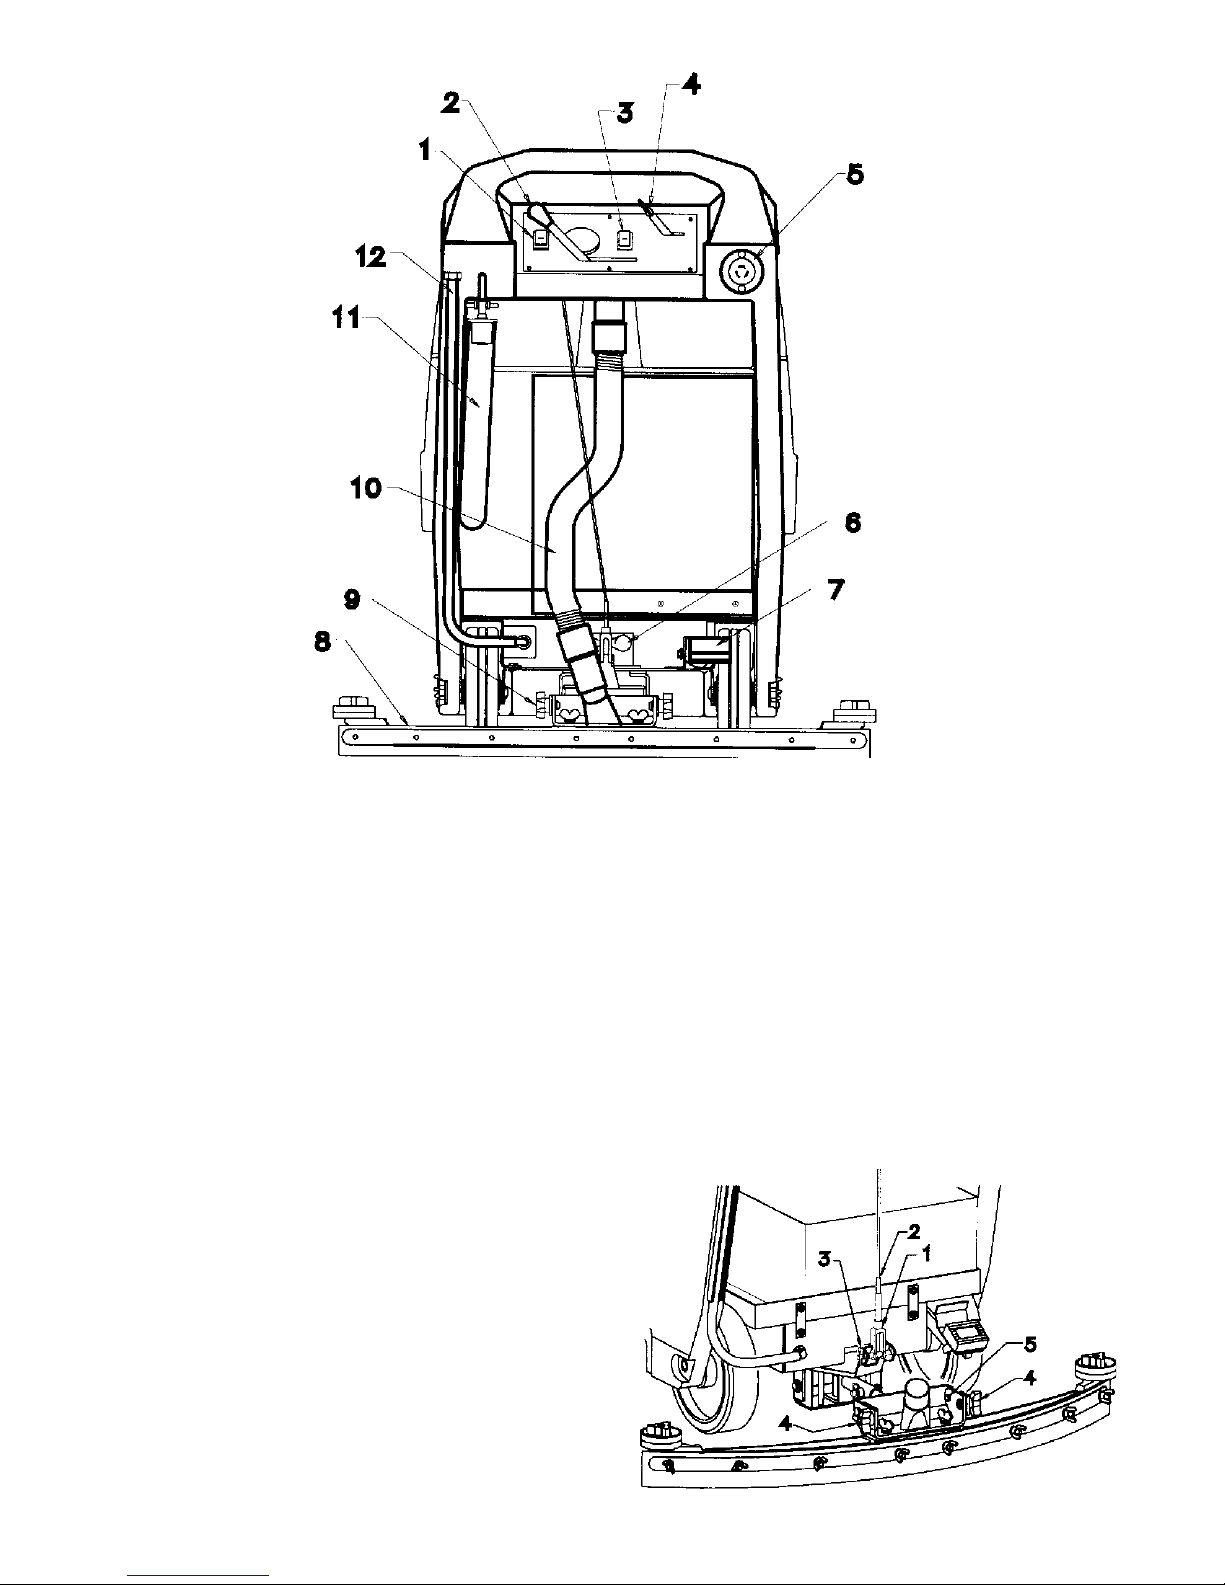
1. Vacuum switch 7. Foot pedal for lower/raising brush
2. Squeegee lift lever 8. Squeegee
3. Brush switch 9. Squeegee pitch control
4. Solution control lever 10. Recovery hose
5. Power connection cable 11. Recovery tank dump hose
6. Power assist control 12. Solution tank dump hose
SQUEEGEE PITCH CONTROL ADJUSTMENTS
Some minor adjustments may be required due to floor
types and conditions to extend downward travel. Remove
clevis pin (3) and unscrew yoke (1) from cable (2). To
adjust pitch (angle) of squeegee, loosen bolts (5) and
knobs (4). Squeegee angular position can now be
changed for best performance.
3
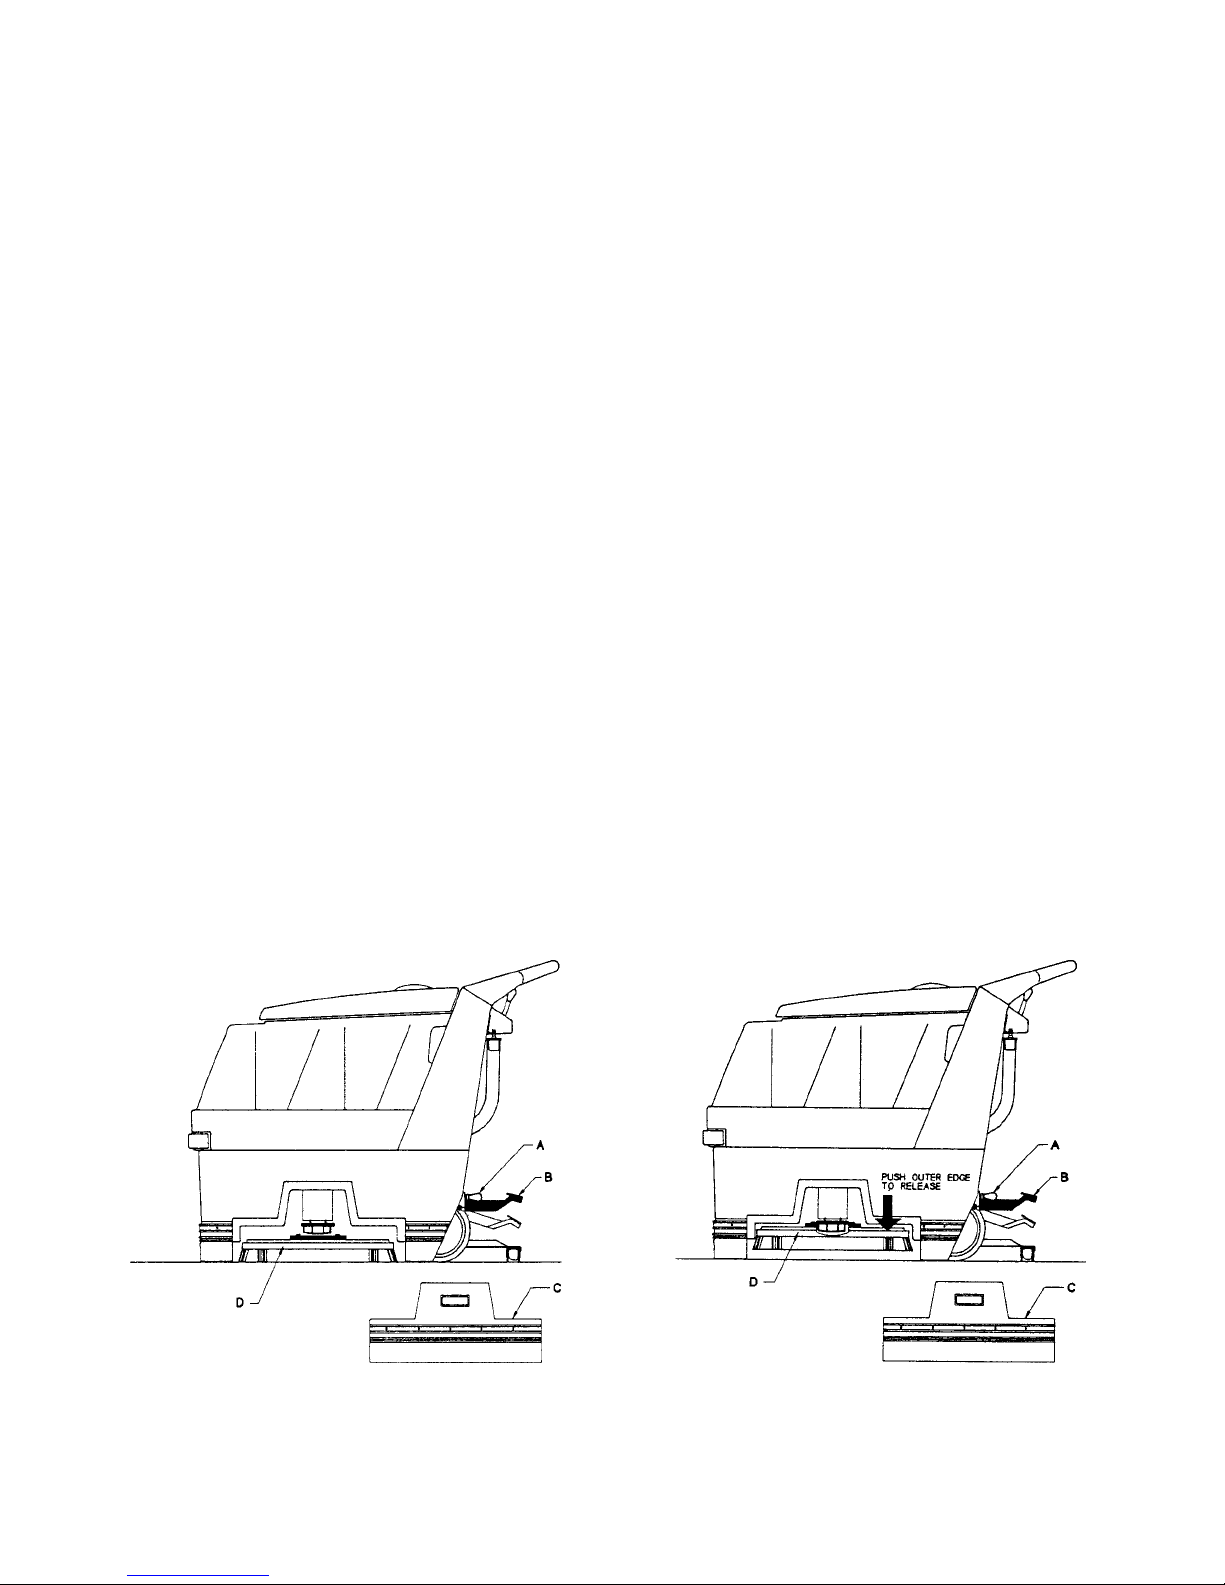
BRUSH INSTALLATION - REMOVAL
INSTALLATION - Figure 1
1. Disconnect power cable (mains) from machine.
2. Set brush assist lever (A) to rabbit.
3. Raise brush mechanism (B) to the “up” position by depressing pedal downward as shown.
4. Remove side skirt (C) by lifting up and away.
5. Center brush (D) under machine as shown lining up center
hex drive hub.
6. By releasing foot pedal (B) to lower brush mechanism, drive hub will engage.
REMOVAL - Figure 2
1. Disconnect power cable (mains) from machine.
2. Set brush assist lever (A) to rabbit.
3. Raise brush mechanism (B) to “up” position by depressing pedal downward as shown.
4. Remove side skirt (C) by lifting up and away.
5. Brush has snap-on push-off clutch plate. By pushing brush away from machine and from side it
will release brush assembly.
Fig. 1
Fig. 2
4
 Loading...