

Page 1
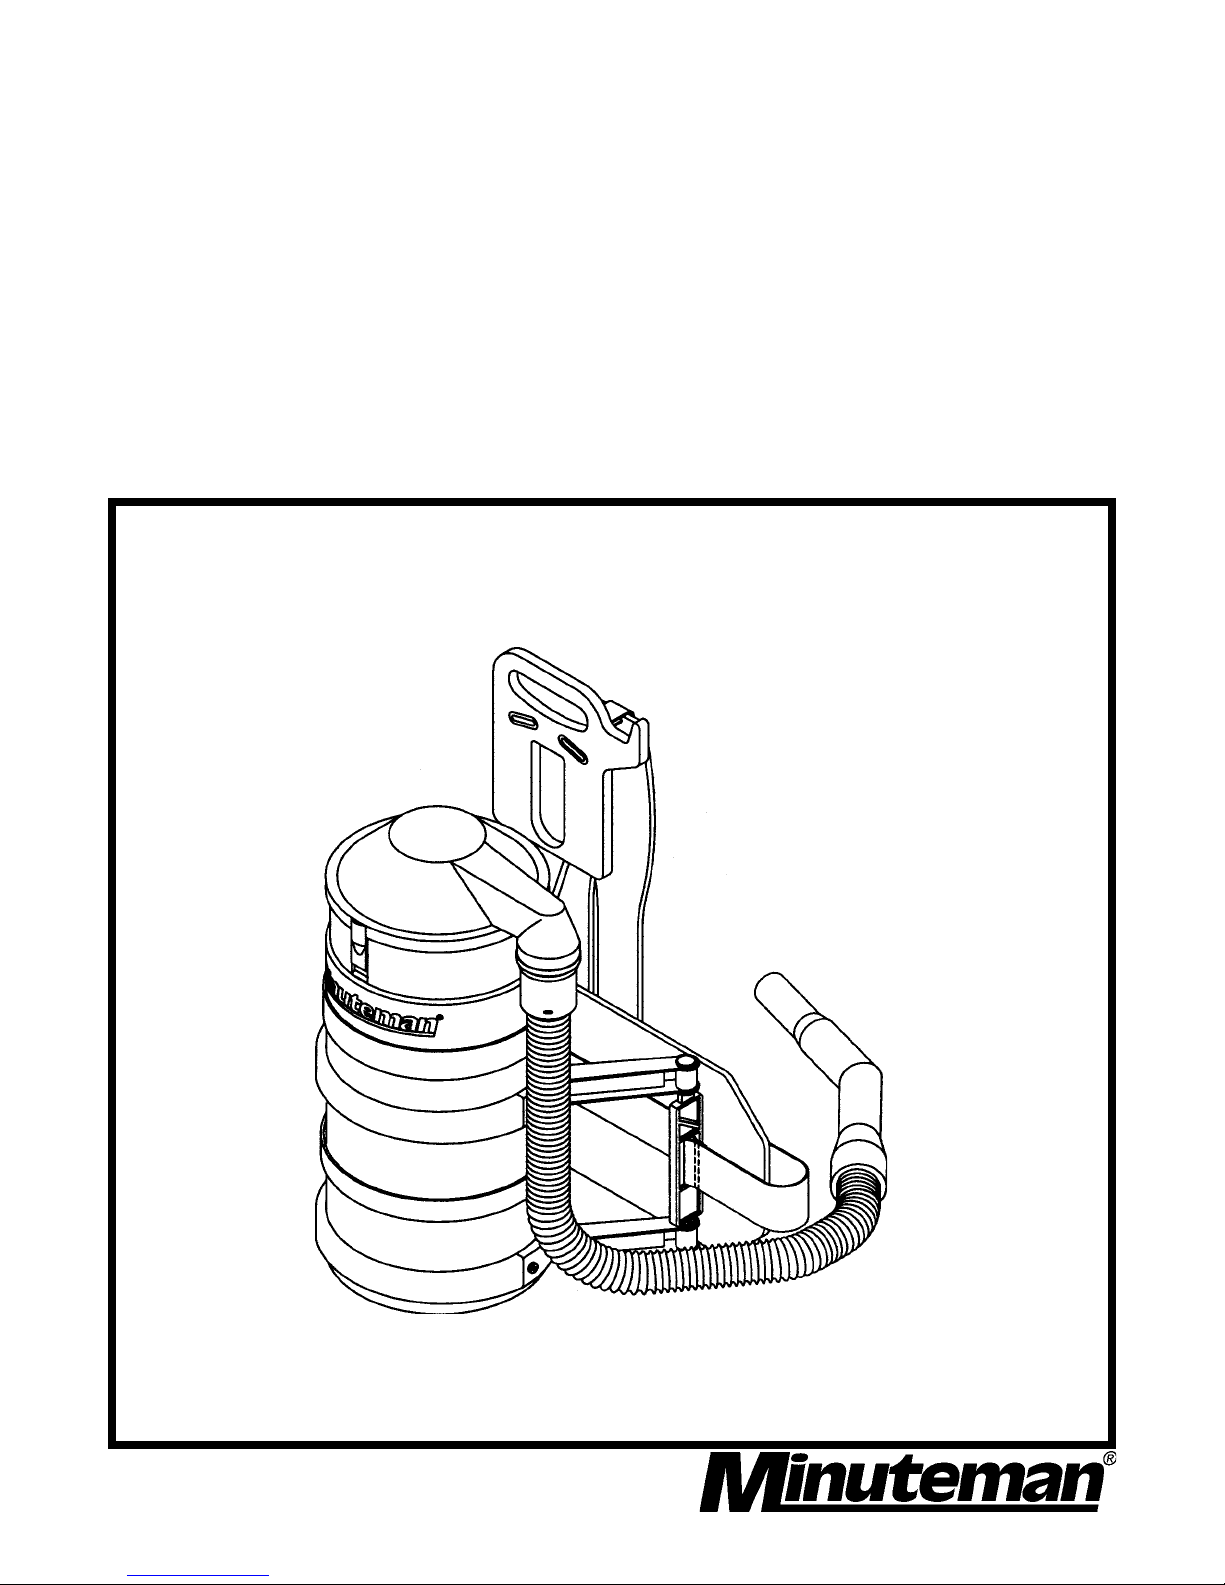
BPV
Back Pack
Vacuum
Model: C47185-00 115V
C47185-01 230V
C47400-00 115V, 400 HZ
C47195-00 115V
C47195-01 230V
C47190-00 115V
C4719O-01 230V
C47185-01CE 230V
C47185-01CEUK 230V
C47195-01CE 230V
C47190-01CE 230V
OPERATION
SERVICE PARTS
CARE
Revised 8/03
Page 2
Page 3

FOR COMMERCIAL USE ONLY
IMPORTANT SAFETY INSTRUCTIONS
When using an electrical appliance, basic precautions should always be followed, including the
following:
READ ALL INSTRUCTIONS BEFORE USING
WARNING
Electric shock could occur if used outdoors or on wet surfaces.
• Do not leave appliance plugged in. Unplug from outlet when not in use and before servicing.
• Do not allow to be used as a toy. Close attention is necessary when used by or near children.
• Use only as described in this manual. Use only manufacturer’s recommended attachments.
• Do not use with damaged cord or plug. If appliance is not working as it should, has been dropped,
damaged, left outdoors, or dropped into water, return it to a service center.
• Do not pull or carry by cord, use cord as a handle, close a door on cord, or pull cord around sharp
edges or corners. Do not run appliance over cord. Keep cord away from heated surfaces.
• Do not unplug by pulling on cord. To unplug, grasp the plug, not the cord.
• Do not handle plug or appliance with wet hands.
• Do not put any object into openings. Do not use with any opening blocked; keep free of dust, lint,
hair, and anything that may reduce air flow.
• Keep hair, loose clothing, fingers, and all parts of body away from openings and moving parts.
• Do not pick up anything that is burning or smoking, such as cigarettes, matches, or hot ashes.
• Do not use without dustbag and/or filters in place.
• Turn off all controls before unplugging.
• Use extra care when cleaning on stairs.
• Do not use to pick up flammable or combustible liquids such as gasoline or use in areas where
they may be present.
• Connect to a properly grounded outlet only. See grounding instructions.
• This machine is not suitable for picking up hazardous dust.
- To reduce the risk of fire, electric shock, or injury:
SAVE THESE INSTRUCTIONS
1
Page 4

INSPECTION
Carefully unpack and inspect your machine for shipping damage. Each unit is tested and thoroughly
inspected before shipment, and any damage is the responsibility of the delivery carrier who should
be notified immediately.
USER MAINTENANCE INSTRUCTIONS
All service and repair should be performed by qualified service representative or electrician. No
user serviceable components are employed in the electrical system. No lubrication of the motor is
required. While not in use storage can be accomplished by winding cord around rear of machine.
Cord hooks are provided. This equipment should be stored indoors and not exposed to rain.
ELECTRICAL
This machine is designed to operate on a standard 15 amp. 120 volt, 60 hz, AC circuit. Voltages
below 105 volt AC or above 125 volts AC could cause serious damage to the motor.
ELECTRICAL
This machine is designed to operate on a standard 10 amp. 230 volt, 50 hz, AC circuit.
WARNING
Electric motors can cause explosions when operated near explosive material or vapors. Do not
operate this machine near flammable materials such as solvents, thinner, fuels, grain dust, etc.
GROUNDING INSTRUCTIONS
This appliance must be grounded. If it should malfunction or breakdown, grounding provides a path
of least resistance for electric current to reduce the risk of electric shock. When applicable, this
appliance is equipped with a cord having an equipment-grounding conductor and grounding plug.
The plug must be plugged into an appropriate outlet that is properly installed and grounded in
accordance with all local codes and ordinances.
DANGER
Improper connection of the equipment-grounding conductor can result in a risk of electric shock.
Check with a qualified electrician or service person if you are in doubt as to whether the outlet is
properly grounded. Do not modify theplug provided with the appliance -- if it will not fit the outlet, have
a proper outlet installed by a qualified electrician.
This appliance is for use on a nominal 120 volt circuit and has a grounding plug that looks like the
plug illustrated in Sketch A below. Make sure that the appliance is connected to an outlet having the
same configuration as the plug. No adapter should be used with this machine.
2
Page 5

POUR USAGE COMMERCIAL SEULEMENT
MODE D’EMPLOI SECURITAIRE
Lorsque l’on utilise un appareil électrique, des précautions de base doivent toujours être suivies
telles que:
BIEN LIRE LE MODES D’EMPLOI AVANT USAGE
AVERTISSEMENT
Pour réduire le risques des chocs électriques - Ne pas exposer à la pluie - Entreposer à l’intérieur.
• Ne pas quitter l’appareil lorsque la prise de courant est branchée. Débrancher de la sortie electrique
lorsque la machine n’est pas en usage ou pour en faire le service.
• Ne pas permettre l’usage comme jouet. Etre très prudent lorsque l’appareil est utilisé en présence
d ‘enfants.
• Utiliser tel que prescrit dans le livre d’opération et seulement avec les attachements recommendés
par le manufacturier.
• Ne pas s’en servir avec corde ou prise de courant endommangée. Si l’appareil ne fonctionne pas
ou a été échappé, endommagé, entreposé à l’extérieur ou déposé dans l’eau, l’appareil devrait
être envoyé à un département de service pour inspection.
• Ne pas tirer ou porter par le câble ou se servir du câble comme poignée. Ne pas fermer de portes
sur le câble ou tirer le câble près d’objets pointus. Ne pas conduire l’appareil en écrasant le câble
et soyez certain de protéger le câble entre toutes surfaces de chauffage.
• Ne pas débrancher en se servant du câble. Pour débrancher tirer sur la prise et non sur le câble.
• Ne pas manipuler la prise ou l’appareil avec les mains mouillées.
• Ne placer aucun objet dans la sortie et ne pas s’en servir si la sortie est obstruée. Eliminer toute
poussière, maillon, cheveux ou quoique ce soit qui pourrait réduire le mouvement d’air.
• N’exposer aucun cheveux, vêtement, doigts ou autres aux ouvertures de l’appareil.
• Ne rien ramasser de ce qui brûle ou de fumée tels que cigarettes, allumettes ou cendres en feu.
• Ne pas employer sans filtre de poussière ou autre en position.
• Fermer tous les contrôles après utilisation.
• Soyez très prudent lors du nettoyage d’escaliers.
• Ne pas ramasser de liquide inflammable ou combustible tel que gazoline et ne pas utiliser dans
les endroits ou ces derniers pourraient être présent.
• Brancher dans une prise avec une prise de terre seulement. Voir références pour prise de terre.
- Pour réduire les risques de feu, choc électrique ou blessure:
CONSERVEZ CES RECOMMANDATIONS
DE MODE D’EMPLOI
3
Page 6

INSPECTION
Déballer soigneusement et inspecter la possibilité de tout dommage apparent. Chaque machine
est complètement inspectée a l’usine et les dommages de transit sont la responsabilité de la
compagnie de transport qui devrait être prévenue immédiatement.
INSTRUCTIONS A L’UTILISATEUR
Toute réparation ou entretien doit être fait par un représentant de service qualifié ouun électricien.
Aucune pièce de la tête de l’aspirateur ne nécessite d’entretien de la part de l’utilisateur. Aucune
lubrification du moteur n’est requise. Si non en service, on peut le ranger en enroulant le cordon à
l’arrière autour des crochets. Cet equipement doit être rangé à l’intérieur.
ELECTRICITE
Cette machine est concue pour opérer sur un circuit standard de 15 amp. 115 volt, 60 hz, circuit AC.
Tous voltages en bas de 105 volts AC ou au delà de 125 volts AC pourrait occasionner des dommages
au moteur.
ELECTRICITE
Cette machine est concue pour opérer sur un circuit standard de 10 amp. 230 volt, 50 hz, circuit AC.
AVERTISSEMENT
Les moteurs électriques peuvent être la cause d’explosion si utilisés près de matériaux ou vapeurs
explosifs. Ne pas opérer près de matériaux inflammables tels que solvant, gazolines, poussière de
grain etc.
INSTRUCTIONS POUR PRISSE DE TERRE
Cet appariel doit posséder une prise de terre, S’il y avait malfonction ou brisure, une prise de terre
offre une voie de moindre résistance de facon à ce que le courant électrique réduise le risque de
choc. Cet appareil est équippé d’une prise de terre de même qu’une prise de courant avec prise de
terre. Cette prise doit être déposée dans une sortie adéquate qui sera installée selon les exigeances
et les lois locales.
DANGER
Un mauvais assemblage du conducteur de prise de terre pourrait causer un risque de choc électrique.
Vérifier auprès d’un électricien certifié ou d’une personne qualifiée si vous avez des doutes à savoir
si la prise est bien complétée. Ne pas modifier la prise qui vient avec cet appariel. Si la prise
n’accéde pas à la sortie, un électricien qualifié devrait la remplacer.
Cet appareil doit être utilisé sur un circuit de nominal de 115/120 volt et posséder une prise de terre
qui ressemble à la prise illustrée dans le schéma A. Bien vous assurer que la sortie de courant soit
de la même configuration que la prise. Aucun adapteur ne doit être utilisé avec cet appareil.
ADAPTEUR (Non requis au Canada)
4
Page 7

Removal of Lid
To remove the lid place a finger under the lid tab in front of the unit ONLY - NOT at the back where the
handle is. Pull tab out and up slightly to disengage tab from the canister and to clear the black ring on
the filter bag. Grab lid by the elbow and pivot back towards the handle and lift up.
Fitting of Lid
The lid can be fitted so that the elbow (where the hose engages) is on the left or right sides. This
enables the vac hose to be used by left or right hand operators. Remember to position the lid for the
right or left before fitting the vacuum to your back.
To fit the lid, make sure the filter bag is located inside the canister so that the black ring on top of the
filter bag is flushed with the top of the canister. Then locate the lid over the filter bag ring so that the
tabs on the lid are in line with the inserts on the canister. Push lid firmly down so that tabs lock into
position.
Fitting Unit to Operators Back
The unit comes with straps fastened for ease of packing. There are two distinct types of support
pads.
Waist Back Pad Adjustments
· To unfasten hip belt buckle squeeze both “push-ins” with finger and thumb at the same time. To
fasten simply slide pronged end into receiving end of buckle.
· To adjust hip belt straps pull on the free strap (on the pronged side). To loosen hip belt, unfasten
buckle and slightly angle pronged part of buckle towards the vac and pull on the fixed end of the
strap.
Shoulder Strap Adjustment
· To loosen simply tilt up strap lock and allow straps to slide. To tighten pull down on the bottom
straps.
· Preferably lift the vac onto a table or countertop for ease of fitting.
· Loosen the shoulder straps (do not detach) slide arms under straps so that padding is over
shoulders, make sure straps do not twist. Take up any slack on shoulder straps so that padding
is over the shoulders.
· Sit the vac on your back so that the waist back pad is on top of the hips into the lower back. This
is important as the unit is ergonomically correct when the weight is distributed over the
hips and not solely on the shoulders.
· Tighten hip belt so that the unit is snug in the lower back on top of the hips.
· Now pull on the lower shoulder straps to make a final adjustment to shoulder pads to suit your
comfort.
· With the unit fitted comfortably, plug in electric cord into safe socket. To switch on, reach back
with your left hand to the lower side of the unit to engage the switch and turn on. Remember to
bend at the knees when plugging in the cable or when bending to pick something up.
5
Page 8

Operating the Vac
1. Stand upright as much as possible, your arm working the handle grip should be as straight as
possible this will ensure that a) your arm is more relaxed and b) that the angle of the tubes/floor
tool to the floor is easiest to push.
2. Remember to bend the knees to pick things up.
Removal of Unit
1. Turn off switch.
2. Release buckle on hip belt.
3. Loosen shoulder straps slightly, slide pad off one shoulder and then the unit from the other shoulder.
4. Unplug electric cable and wind the cable starting from machine end and NOT the plug end.
This will help to prevent the cable from twisting and premature failing. When the cable is wound,
place over the hook position on the carry handle - DO NOT wrap the cable around the
machine or place behind the vac between the handle bar.
Maintenance and Storage
• Always empty filter bag when full. The filter bag is removed by detaching the lid and then lifting out
the bag. Be careful not to get dust on the outside of the filter bag or inside the canister. Make sure
the bag support stand is in position at the bottom of the canister under the filter bag. This support
stand must always be in position to support the filter bag to maintain vacuum
performance.
• Check filter bag for holes or tears. Replace filter bag immediately if torn or otherwise damaged.
• The cleaner the filter bag is kept, the better the vacuum performs. Remember this vacuum
has powerful suction and can pull fine dust out of a carpet that other vacs may not have been able
to do - this can mean that fine dust will coat the inside of the filter bag that could effect the
performance - it could take a week or two to get all the fine dust out of the carpet. If fine dust, like
talc, cement/plaster and fine clay is picked up it will clog the filter bag and reduce suction.
Therefore, brush clean the inside of the filter bag regularly by turning the bag inside out to brush.
Alternatively fit a paper bag inside the cloth filter bag.
• Never wash the filter bag.
• After use detach hose and clean out any dust build-up around the swivel cuff - this can be done by
tilting and rotating detached cuff at vacuum inlet with vac switched on. Check hose, tubes, floor
tool and unit lid for blockages regularly.
• When electric cable is unplugged check for any damage especially cuts. If damaged replace
cable with a three core cable.
• Store unit upright on its base or hang by the carry handle. Always store cable on the hook of the
carry handle. DO NOT wrap cable around the machine and DO NOT store cable behind
the machine over the carry handle bar.
These are available from our supplier where you purchased this machine.
Paper filter bags
6
Page 9

FITTING THE PAPER BAGS
1. REMOVE THE LID.
2. OPEN UP THE PAPER BAG AND FIT INSIDE CLOTH FILTER (FIG.1)
3. THEN FIT THE PAPER BAG RING INSIDE THE PAPER BAG
4. GENTLY REST THE PAPER BAG RING ON THE LIP OF THE CLOTH BAG (FIG. 2)
5. GENLTY FOLD THE TOP OF THE PAPER INWARDS OVER THE PAPER BAG RING (FIG. 3)
REMOVING THE PAPER BAGS
1. REMOVE THE LID.
2. GRAB THE PAPER BAG WITH THE BAG RING (FIG.4).
3. HOLD OVER RUBBISH BIN AND PULL OUT THE PAPER BAG RING
THEN DISPOSE THE PAPER BAG (FIG. 5)
DO NOT THROW OUT THE PAPER BAG RING - IT IS TO BE RE-USED
7
Page 10

8
Page 11

Parts List
Item Part No. Qty. Description
1 293015 1 Inlet Cover Assembly
2 293017 1 Filter Bag
3 293018 1 Filter Disc
4 293019 1 Support Stand
5 293062 1 Filter Bag Ring
6 293075 1 Canister Assembly
7 293022 14 Screw #10 x 1.00
8 293065 1 Harness and Handle Assembly
9 293049 1 Shoulder Harness Assembly
10 293025 1 Bumper
11 293073 1 Back Pad Adjust Strap Assembly
12 293026 1 Motor Gasket
13 293028 1 Insulation, Top
14 293074 2 Back Pad
15 293030 1 Motor Support Disc
16 381001 1 Vac Motor 115V, Flow Thru
16A 381044 1 Vac Motor 230V, Flow Thru
16B 381062 1 Vac Motor 115V, H/P Flow Thru
16C 293066 1 Vac Motor 115V, Bypass
16D 293070 1 Vac Motor 230V, Bypass
16E 741028 1 Vac Motor 400 HZ, Flow Thru
16F 293077 1 Vac Motor 230V, H/P Flow Thru
17 740711 1 Switch
18 381020 1 Cord 120V, 50’
18A 740083 1 Cord 230V, 40’
18B 741019 1 Cord UK Plug, 50’
19 293080 2 Strain Relief (115V & UK Cord)
19A 380032 2 Strain Relief (230V Cord)
20 293031 1 Motor Shroud, Bottom
21 293032** 1 Insulation, Bottom
22 293033 1 End Disc, Bottom Flow Thru
22A 293068 1 End Disc, H/P Flow Thru
22B 293027 1 End Disc, Bottom Bypass
23 293034 1 Bottom Cap, Flow Thru
23B 293069 1 Bottom Cap, Bypass
24 293035 3 Screw CSK S/T #8 x 2.25
25 293036 1 Carry Handle
26 293037 3 Rivet
27 293067 2 Frame Bracket (Bottom RHS, Top LHS)
28 293072 2 Frame Bracket (Top RHS, Bottom LHS)
29 293047 2 Screw TEK #10 x 5/8”
30
31 293058 1 Swivel Cuff
32 293059 2 Clip Ring
33 293060 2 Screw on Hull
34 293061 1 Pistol Grip
35 293063 1 Hose, 1.25 dia. x 4 ft.
36 270162 1 Telescoping Wand 1.25 dia.
37 293010 1 Combination Floor Tool 12”
38 293076 1 Extension Strap
39 293012PKG Filter Bag, pkg. of 10
40 293092 1 Cord Strain Relief
41 710380 1 SCR-MC 1/4-20 x .75 STPL
42 711373 1 Nut-Nyloc 1/4-20
43 293083 2 Spacer .14 x .25 x .125 Nylon
44 711301 2 Nut-Hex 6-32 ST PL
45 711551 2 WSR-INT Lock #6
46 711597 2 WSR-Flat #6 x 3/8 Nylon
47 712123 2 SCR-BHMS #6-32 x .50 Nylon
48 740613 1 Capacitor Ass’y, 1UF
49 742391 1 RFI Filter
50 741195 1 Ground Wire
51 711124 1 SCR-ST-B 10 x .37 NI
52 711534 1 WSR-Ext Lock #10
**Not Used In By-Pass Model
CE Models ONLY
UK Models ONLY
9
Page 12

10
Page 13

11
Page 14

12
Page 15

LIMITED WARRANTY
Minuteman International, Inc. warrants to the original purchaser/user that this product is free from defects in workmanship and
materials under normal use and service for a period of three years from date of purchase. In addition, Minuteman International,
Inc. will, at its option, honor labor warranty claims for the first 12 months from date of sale, provided such claims are submitted
through and approved by factory authorized repair stations. Minuteman International, Inc. will, at its option, repair or replace
without charge, except for transportation costs, parts that fail under normal use and service when operated and maintained in
accordance with the applicable operation and instruction manuals.
This warranty does not apply to normal wear, or to items whose life is dependent on their use and care, such as belts, cords,
switches, hoses, rubber parts, electrical motor components or adjustments. Parts not manufactured by Minuteman International,
Inc. such as engines, batteries, battery chargers, hydraulic pumps, and tires are covered by and subject to the warranties and/
or guarantees of their manufacturers. Please contact Minuteman International, Inc. for procedures in warranty claims against
these manufacturers.
Special warning to purchaser — Use of replacement filters and/or prefilters not manufactured by Minuteman International, Inc.
or its designated licensees, will void all warranties expressed or implied.
A potential health hazard exists without exact original equipment replacement.
All warranteed items become the sole property of Minuteman International, Inc. or its original manufacturer, whichever the case
may be.
Minuteman International, Inc. disclaims any implied warranty, including the warranty of merchantability and the warranty of
fitness for a particular purpose. Minuteman International, Inc. assumes no responsibility for any special, incidental or consequential
damages.
This limited warranty is applicable only in the U.S.A. and Canada, and is extended only to the original user/purchaser of this
product. Customers outside the U.S.A. and Canada should contact their local distributor for export warranty policies. Minuteman
International, Inc. is not responsible for costs or repairs performed by persons other than those specifically authorized by Minuteman
International, Inc. This warranty does not apply to damage from transportation, alterations by unauthorized persons, misuse or
abuse of the equipment, use of non-compatible chemicals, or damage to property, or loss of income due to malfunctions of the
product.
If a difficulty develops with this machine, you should contact the dealer from whom it was purchased.
This warranty gives you specific legal rights, and you may have other rights which vary from state to state. Some states do not
allow the exclusion or limitation of special, incidental or consequential damages, or limitations on how long an implied warranty
lasts, so the above exclusions and limitations may not apply to you.
World Headquarters Minuteman Canada, Inc.
Minuteman International, Inc. 2210 Drew Road
111 South Rohlwing Road Mississauga, Ontario
Addison, Illinois 60101 L5S 1B1
(630) 627-6900 (905) 673-3222
FAX (630) 627-1130 FAX (905) 673-5161
999221
Printed in U.S.A.
 Loading...