

Page 1

Kleen Sweep 27
Page 2

Contents
Instruction Manual
Preface ...................................................................................................................................1
Introduction
Proper use ..............................................................................................................................1
Acceptance of the machine ................................................................................................... 2
General Safety Instructions
General Safety Instructions ................................................................................................... 2
How to put the machine into operation
Assembly.................................................................................................................................3
Side Brush Assembly...............................................................................................................3
Operation
Controls...................................................................................................................................4
Technical Specification.........................................................................................................6
Maintenance Schedule
Maintenance Works.................................................................................................................6
Maintenance Intervals..............................................................................................................6
Trouble Shooting...................................................................................................................7
Spare Parts Manual
Frame Group..........................................................................................................................11
Brush Shaft Group.................................................................................................................13
Handle and Gear Assembly...................................................................................................15
Hopper Group........................................................................................................................17
Side Brush Group..................................................................................................................19
Limited Warranty.................................................................................................................20
II
Page 3
Preface
Dear Customer,
It is our desire that the excellent properties of the Kleen Sweep 27 should justify the confidence you demonstrated in
making this purchase. Before first operation of your Kleen Sweep 27 read these instructions carefully. They will inform
you in detail about the operation of the item and contains valuable information on operation, service and maintenance.
Kleen Sweep 27 machine is an ideal machine to clean outdoors in large and medium areas like Offices, Hospital,
Restaurant, Shopping Complexes and many commercial applications.
The exclamation mark symbol
has been used in this manual at several places and identifies particular areas that are if essence for your safety.
Please pass all safety instructions on to other persons operating this machine.
The symbol,
has been used in the manual in several places and identifies particular areas that the operator should be cautious.
The symbol,
has been used in the manual in several places and identifies particular areas that the operator should note at the
time of operation.
Prior to first operation, read the manual carefully and strictly comply with the instructions contained.
2
Please be advised explicitly that we cannot accept any legal claims out of the contents of this manual.
If repair work has to be performed, make sure that only genuine spare parts are used since genuine spare parts
only may guarantee continuous and dependable operation of your machine.
Valid as for May 2011
Minuteman International 14N845 U.S Route 20 Pinegree Grove, Illinois 60140 USA
Phone 1-800-323-9420
E-Mail: www.minutemanintl.com
Introduction
Proper Use
Kleen Sweep 27
The machine has been exclusively designed for floor cleaning, such as dry sweeping .Whatever sort
of use beyond the specified range will be deemed improper use the manufacturer can not be held liable for
consequential damages.
The term of proper use also includes compliance with the manufacturer’s instructions about operation, maintenance
and repair .
The may be used , serviced and repaired by persons only that are familiar with the machine and are
Kleen Sweep 27
aware of possible hazards involved. The appropriate Accident Prevention Regulations as well as applicable general
regulations about safety and health at work will have to be complied with.
Modifications made to the in absence of the manufacturer’s consent will relieve the manufacturer from
a possible liability for consequential damage.
Kleen Sweep 27
1
Page 4
This machine is not suitable for evacuation of dusts, which are explosive or dangerous to health.
Notes on Warranty
The terms of the sales contract apply . Damages are not subject to warranty if they are due to non-compliance with the
maintenance and service provisions.
Any maintenance work has to be performed by an authorized Minuteman International service workshop and confirmed
in the “Maintenance certificate “which is the warranty document.
The following is excluded from warranty:
Natural wear and tear after overload, damages caused by inexpert handling and unauthorized modification of the
machine.
Moreover, any claim for warranty expires if damages at the machine are caused by fitting of part s or accessories without
Minuteman International prior and explicit consent or by non-compliance with the maintenance instructions.
Acceptance of the Machine
Upon arrival, check your consignment for possible transit damage. Please have the railway authorities or the freight
forwarder confirm such damage and mail your damage report and waybill to:
Our Address :
Minuteman International 14N845 U.S Route 20 Pinegree Grove, Illinois 60140 USA
Phone 1-800-323-9420
E-Mail: www.minutemanintl.com
General Safety Instructions
General Safety Instructions
Apart from the information contained in this manual, the generally applicable legal provisions for safety and prevention
of accidents must be adhered to. Do not put this manual aside without having read it, even if you did already operate
similar ground cleaning equipment before. Allow yourself the time to do so in order to safe time at a later moment. The
operator is responsible for all persons in the working area. Children have to keep clear of the in
operation. Nobody is allowed to stay in the zone of danger.
Machines with known defects must not be used. It is important to familiarize yourself with all accessories and controls,
as well as their functions, before you start working. A void the mess of having to reading this book while trying to run the
machine.
Machine Safety
Floor cleaning machines may be run by qualified personnel only;
The machine may be used for cleaning such surfaces approved by the owner or this authorized representative.
Do not use the machine in wet and slushy areas.
Park the machine in a dry place.
Do not use the machine in areas where there is no properly paved roads.
Kleen Sweep 27
Using the machine on public roads and places is not admitted.
Qualified personnel only are admitted to perform maintenance and repair work .
Do not clean the machine by means of vapour jet or high pressure cleaning equipment.
Use of the machine in areas endangered by explosion hazard is not admitted.
2
Page 5
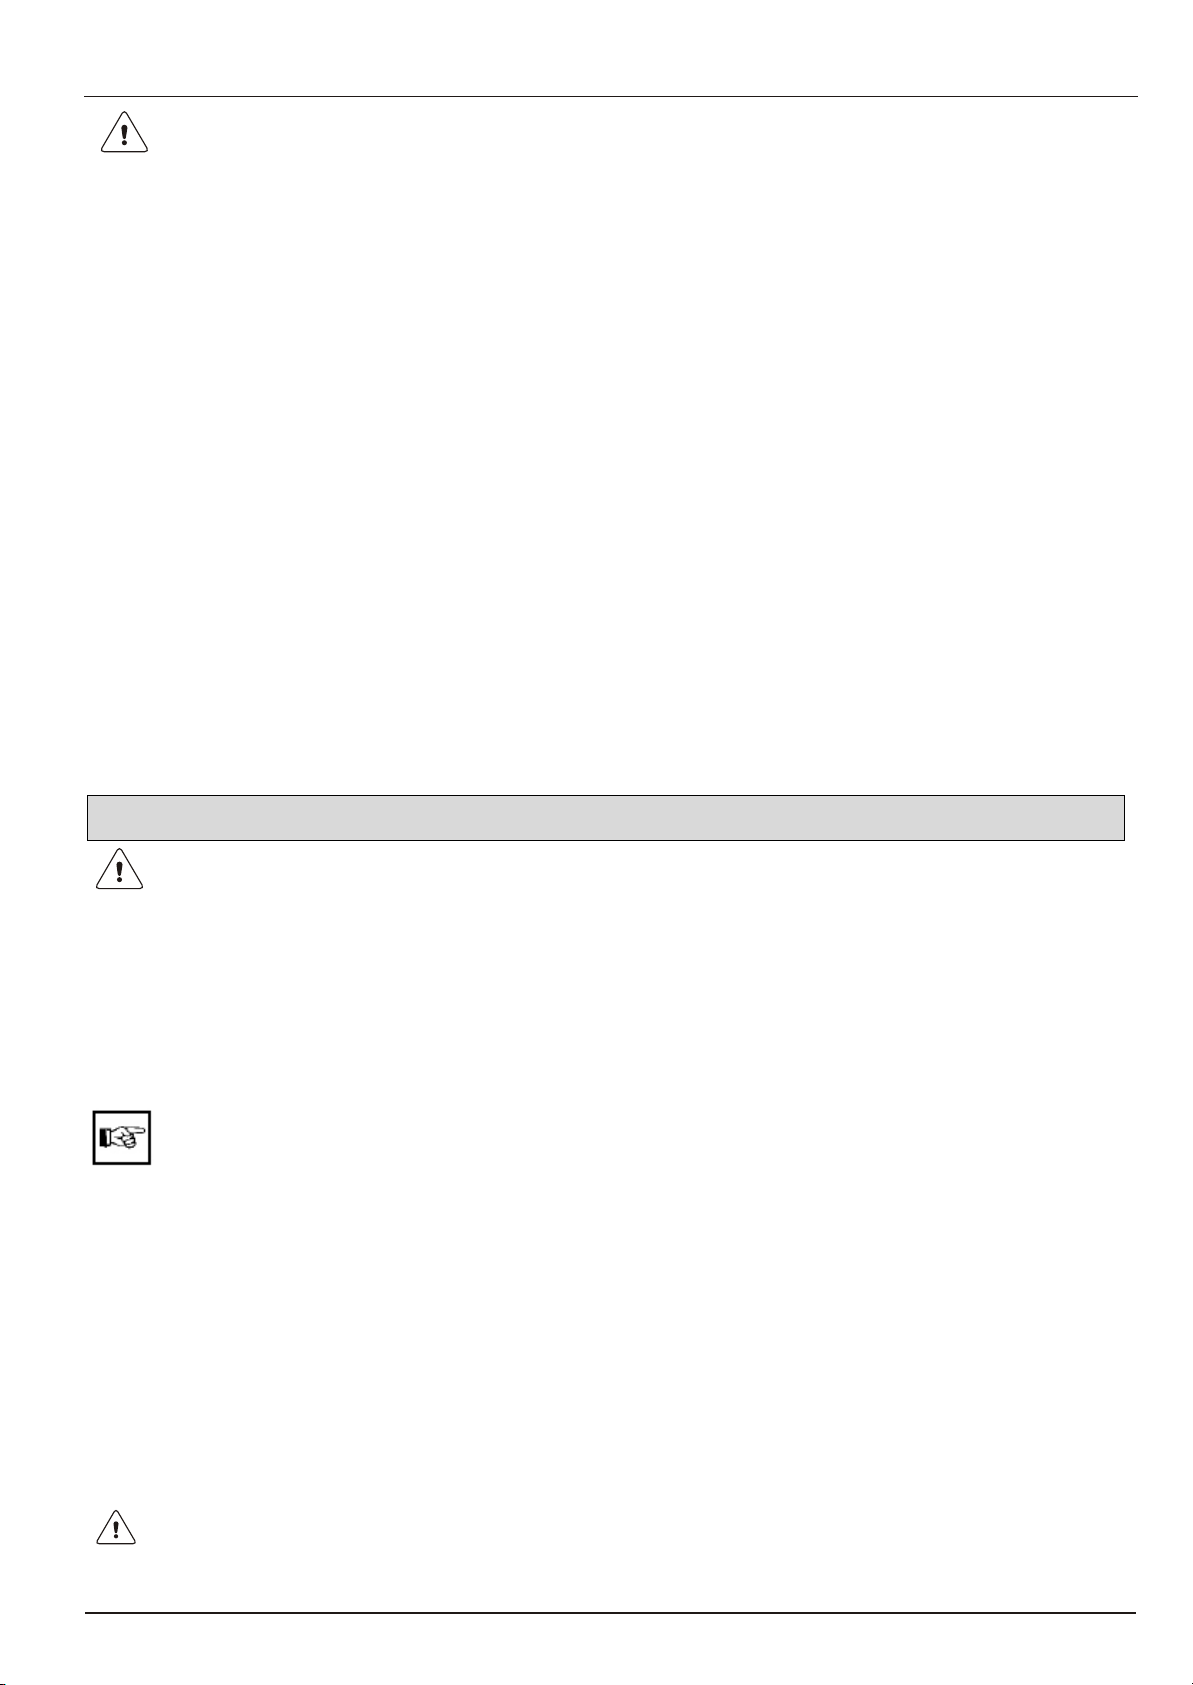
1.0 How to put the machine into operation
1.1 Assembly
For ease of packing, the handle and side brush assembly are packed separately.
These parts must be installed before the machine is put into operation.
The handle is mounted by means of knobs (3 - fig on next page)
Handle can be fixed in two different positions as shown below.
Handle position 1 Handle position 2
1.2 Side Brush Assembly
1. Mount the side broom to the brush plate on the side arm assembly using hex head bolt and nylock nut.
2. Position the V-Belt from the side arm assembly around the pulley attached to the backside of the right wheel.
In order to do this it will be necessary to twist the V-Belt. The lower loop of the v-belt should be coming from
the idler pulley (not from the broom pulley).
3. Attach the side arm assembly with the support side brush on the frame by loosening the screws fixed onto the
frame. Place the V-Belt on to the drive pulley on the wheel, adjust the arm assembly forwards or backwards
for the desired tension. Fasten the arm assembly by tightening the screws. Check the brush for free rotation.
4. Check for proper rotation and operation of the side broom. The broom should rotate counter clockwise when
the sweeper is pushed forward-if not the v-belt was installed incorrectly. If the belt slips the tension can be
adjusted by loosening the 2 screws that attach the support side brush to the frame, move the bracket forward,
then re-tighten the screws.
FROM IDLER PULLEY
SUPPORT
SIDE BRUSH
SIDE BRUSH ASSY
SCREWS
MOVE
3
Page 6
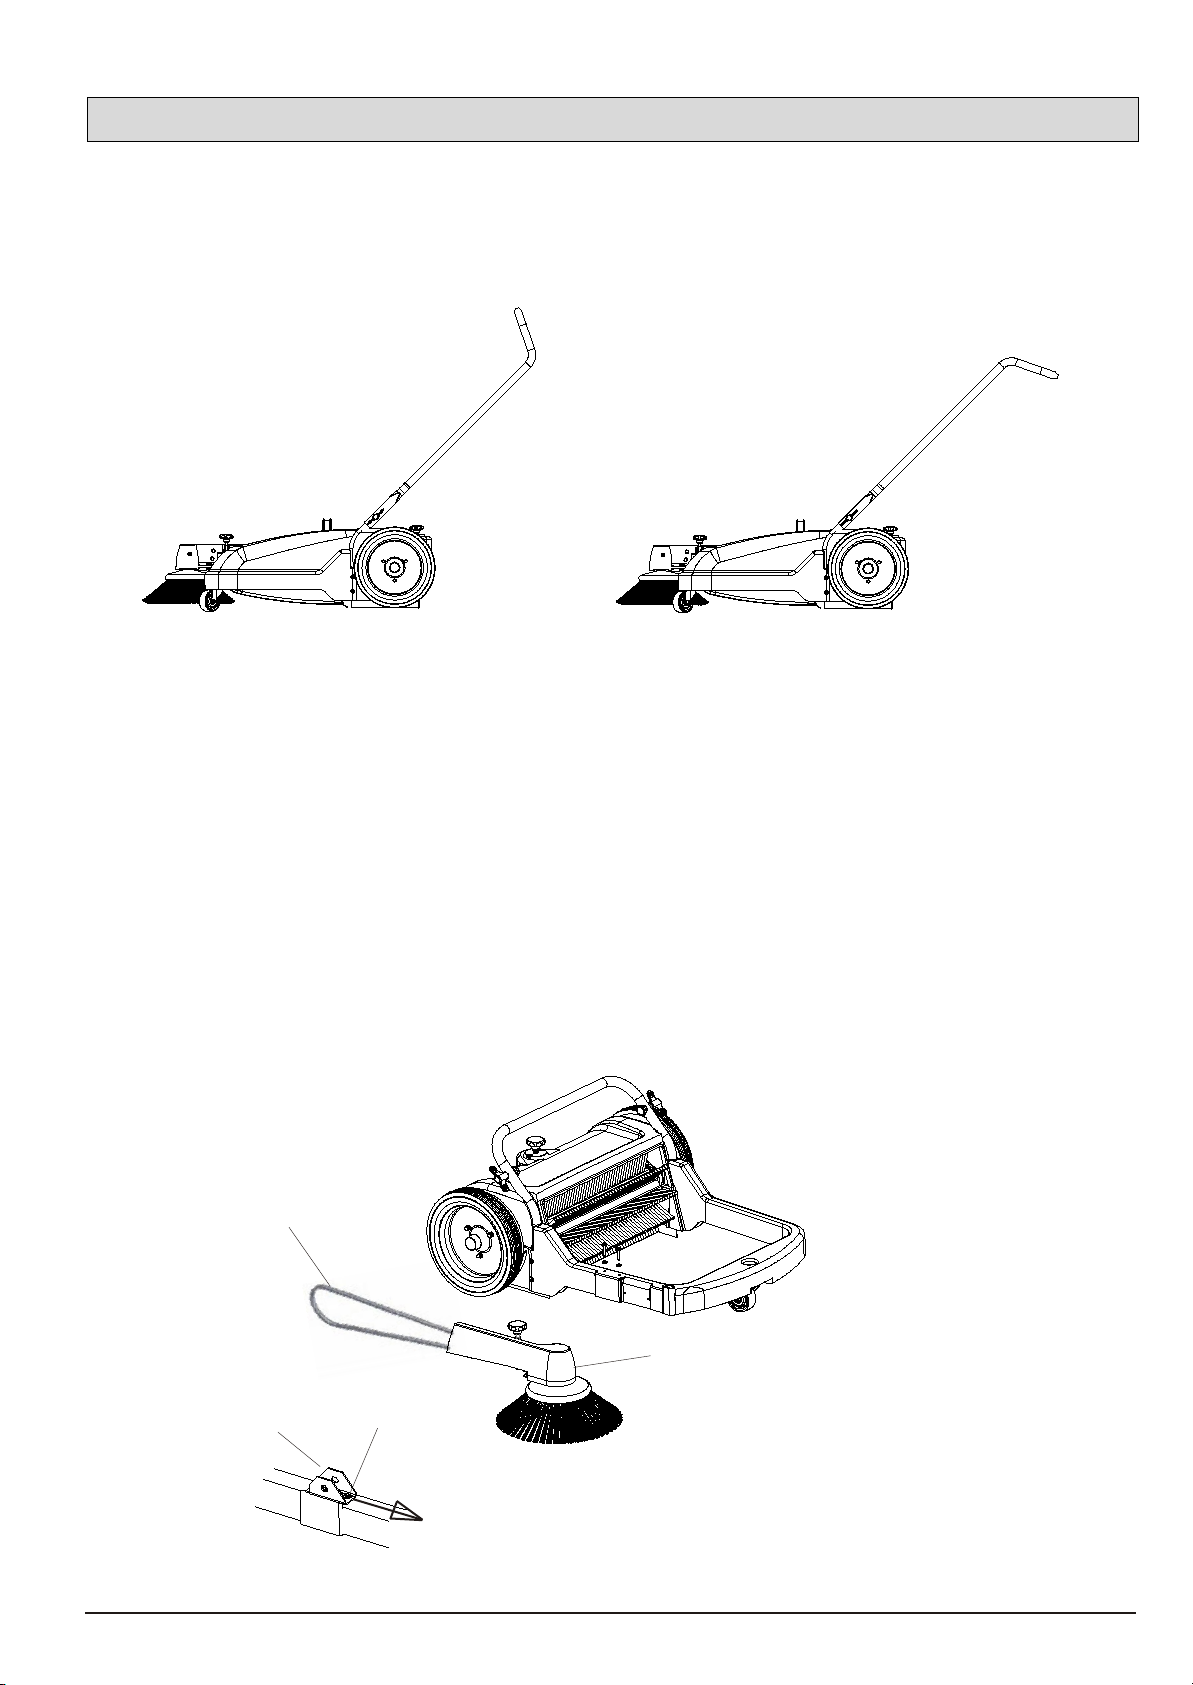
2.0 Operation
2.1 Controls
3
1
2
4
1. Pressure adjustment knob for Side Brush
Used for setting of the side brush. The side brush may touch the floor
only by its one third section, so as to throw the swept matter into the
machine.
The castor wheel is to keep the pre-set working height of the side
brush.
2. Pressure adjustment knob for Main Brush
Used for setting of the main brush pressure. The pressure must be set
so as to assure perfect cleaning operation.
3. Knobs
Used to secure the handle to the machine or to reposition it.
Excess pressure will cause unnecessary wear of the brush and increased load for the operator.
4. Main Brush Pressure Reading Scale
Indicates the pressure at which the main brush has been set.
Setting must be performed as described below :
Set the main brush by turning the knob clock-wise to increase the pressure, at this position the
scale should read ‘5’ .
Starting with this setting, the main brush pressure can be increased to meet the requirement.
(As the brush wears out)
Turn the knob in counter-clockwise direction to reduce the main brush pressure according to
the requirement.
4
Page 7
2.2 Operation of the Kleen Sweep 27
The Kleen Sweep 27 operates with two brushes. The side brush takes dirt from the side into the reach of the
main brush. The main brush maintains its direction of rotation to throw the dirt into the hopper in forward
direction of the machine.
2.3 Overcoming Obstacles
In case of normal obstacles coming in the way of sweeping the Kleen Sweep 27 should be pressed down at
the handle. This will cause the two brushes to lift off from the floor and the machine can easily surmount
these obstacles.
2.4 Emptying of Hopper
The hopper can be easily lifted by using the handle provided. The hopper is secured to the machine by
means of the frame. The hopper must be in direct contact with the brush compartment in order to prevent
leakage of dirt.
2.5 Renewal of Brush Assemblies
The main brush consists of a brush shaft with two brush core assemblies fastened with six self tapping
screws.
The brush cores can be replaced as below:
- Unscrew the self tapping screws
- Pull the brush core assembly to the front (broom viewed from user side) to remove it from the brush shaft.
When reassembly of the brush ensure the split pins are fixed in the holes to guide the brush.
2.6 Rubber Sealing Aprons
The rubber aprons avoid leaking of the dust produced by the brush. Damaged or used aprons
cannot fulfill this task any longer and must be replaced.
2.7 Greasing of the Main Wheels
For cleaning and greasing of the wheel axle and the gear ring, the main wheels must be
removed as described below.
1. Remove hood, remove the bolt and domed cap nut from the wheel and pull the main wheel.
2. Unscrew the gear cover and apply grease in the gear area.
3. Reposition the main wheel.
2.8 Replacement and Tensioning of the V-belt
1. Lift up the side brush arm
2. Loosen the clamp screw and pull out the side brush from the brush arm.
3. Place the V-belt through the brush arm and put it on the V-belt pulley on the brush shaft
4. Push the side brush back into the brush arm and re-tighten the clamp screw.
5. Place V-belt into the groove of the right-hand main wheel.
When the brush arm is put down, the V-belt must be tensioned so as to allow a perfect drive
transmission, if necessary re-tighten by shifting of the side brush arm bearing.
2.9 Replacement of the Side Brush
The side brush can be replaced after removing hex-bolts from the side brush.
2.9.a Regaining of Bristles
If the bristles have been bent inwards in transit the side brush must be placed on a flat base,
the bristles pointing outward and a weight must be placed on the plate. The bristles will
regain their correct position gradually.
If the bristles have been bent outwards, bring them together apply a rubber band around the
bristles and allow it to stay for sometime. The bristles will regain their correct position
gradually.
Refer figure on page 3 for point 2.8 and 2.9.
5
Page 8

3.0 Technical Specification
DESCRIPTION UNIT VALUE
WIDTH mm 725
WIDTH WITH SIDE BRUSH mm 785
HEIGHT WITH HANDLE mm 1020
HEIGHT WITHOUT HANDLE mm 400
LENGTH WITH SIDE BRUSH mm 1000
LENGTH WITHOUT SIDE BRUSH mm 800
WEIGHT WITH SIDE BRUSH GROUP kg 26
DIAMETER OF DRIVE WHEEL mm 280
SWEEPING WIDTH WITHOUT SIDE BRUSH mm 460
SWEEPING WIDTH WITH SIDE BRUSH mm 650
DIAMETER OF MAIN BRUSH mm 230
MAIN BRUSH BRISTLE DIA mm 0.30
BRUSH SPEED (THEORETICAL) rpm
SIDE BRUSH BRISTLE DIA mm 0.4
V-BELT (SIDE BRUSH) mm 8 x 1680
DIRT BOX CAPACITY Lit 40
DIRECTION OF ROTATION FOR SWEEPING Forward
AREA COVERAGE
273 at 4 kmph
Upto 2600 sq.mtr/hr at
4 kmph
4.0 Maintenance Schedule
4.1 Maintenance Works
Compliance with our operating and maintenance instructions will ensure trouble free and
smooth operation of the machine we have supplied.
If you are not capable of performing the works according to the maintenance schedule by
yourself, please contact your Minuteman dealer. Our agents, who have trained staff and stock
original Minuteman Spares will be glad to perform those works for you.
In case of all enquires and when ordering spare parts, please quote the machine No indicated
on the name plate and on the guarantee card. The nameplate is installed on the left side
of the frame.
4.2 Maintenance Intervals
Daily - empty dirt box
- clean the unit
- check brushs and sealing aprons
Weekly - remove the ropes, tapes etc entangled in the main brush shaft
Monthly - grease the track wheels
- check V-belt tension, if necessary, re-tighten
6
Page 9

5.0 Trouble Shooting
TROUBLE REMEDIAL ACTION
1. Machine hard to push/pull Decrease main brush pressure setting
Grease main Wheels
2. Sweeping unsatisfactory Increase Main/Side Brush Pressure
Clean Main/Side Brush
Check Main Brush for loose bristles
3. Traces of dirt left behind the machine Check side/rear rubber sealings
4. Side Brush not rotating Check V- Belt for transmission.
7
Page 10

Notes
8
Page 11

KLEEN SWEEP 27
Spare Parts Manual
9
Page 12

30
19
23
26
24
12
22
11
12
10
25
27
18
31
9
15
9
16-A
8
25
29
17
13
28
11
2
1
6
3
4
5
7
16 - 552180041-RUBBER STRIP KIT - FLIPPER +
REF NO
A
B
C
The above items will be supplied only as a kit.
PART NO
552130015
552130025
881097
DESCRIPTION
SIDE RUBBER STRIP
REAR RUBBER STRIP
ROCKET CLIP
QTY
12
14
21
16-B
20
16-C
2
1
Page 13

FRAME GROUP
Part No Description Qty Sl.No
1 552130007 FRAME 1
2 552130027 STEPPED WASHER 1
3 921007 WASHER STEEL 10.5X18.0X4.0 1
4 922824 CASTOR WHEEL ASSY (LOCAL) 1
5 844101 WASHER STEEL 10.5X20.0X2.0 1
6 802510 HEX HEAD SCREW - STEEL 8.8 - M10X45 1
7 859106 HEX NYLOCK NUT M10 1
8 552130051 SPLASH SHIELD 1
9 921131 SELF TAPPING SCREW W/COLLAR 4.8X13 9
10 552130028 HOLDER SIDE BRUSH ARM 1
11 844051 WASHER STEEL 5.3X10.0X1.0 19
12 837210 CRPH SELF TAPPING SCREW-4.8X13 11
13 923255 GASKET FRAME 1
11
14 552130090 CURVE PLATE LH 1
15 552130091 CURVE PLATE RH 1
16
17 552130075 SIDE STRIP HOLDER 2
18 845204 WASHER SS 304 12.5X24X2 1
19 926057 CRPH SELF TAPPING SCREW 3.5X16 2
20 552130074 REAR STRIP HOLDER 1
21 552180034 SIDE PLATE GROUP LH 1
22 552180035 SIDE PLATE GROUP RH 1
23 552130055 HANDLE 1
24 828512 HEX SOC CSK HEAD SCREW- STEEL M6X45 4
25 844061 WASHER STEEL 6.4X12.5X1.6 8
26 859068 HEX NYLOCK NUT-STEEL GR.8 -M6 4
27 552130008 COVER 1
28 817204 CR PAN HEAD SCREW - STEEL M5X12 8
29 835709 CRPH SELF TAPPING SCREW-6.3X30 4
30 844041 WASHER STEEL 4.3X9.0X0.8 2
552180041 RUBBER STRIP KIT FLIPPER + 1
31 552130084 BOTTOM COVER THREAD ROD 1
Page 14

13
12
11
4
9
8
2
1
14
7
6
3
4
5
10
15
16
17
Page 15

BRUSH SHAFT GROUP
Part No Description Qty Sl.No
1 552180031 BRUSH SHAFT GROUP 1
2 552180033 PRESSURE ADJUSTMENT GROUP 1
3 552130089 INDICAT OR 1
4 844041 WASHER STEEL 4.3X9.0X0.8 3
5 836210 CRPH SELF TAP SCREW 3.5X25 1
6 552130039 TRUNNION SHAFT 1
7 552130092 SPACER THREAD ROD 1
8 552180036 THREAD ROD GROUP 1
9 552130085 TOP COVER THREAD ROD 1
10 817207 CR PAN HEAD SCREW STEEL -M5X20 2
11 926057 CRPH SELF TAPPING SCREW- 3.5X16 2
12 833084 HEX LOCK NUT STEEL M8 2
13 921776 KNOB ASSY 1
13
14 552130056 SPLIT PIN 63 2
15 841110 CRCSK SELF TAPPING SCREW- STEEL- 3.5x12.7 4
16 552130079 BOOT 2
17 552130080 SEAL 2
Page 16

12
22
23
24
7 8
5
1
21
2
3
4
6
25
9
10
11
20
13
14
15
16 17 18 19
Page 17

HANDLE & GEAR ASSY
Part No Description Qty Sl.No
1 552130082 GEAR COVER BOTTOM 2
2 875010 DG BALL BEARING 6003 2 RS 2
3 923422 CIRCLIP EXTERNAL A17 2
4 921065 WASHER STEEL 16X22X1.5 2
5 552130044 PINION 2
6 921066 WASHER STEEL 16X22X0.5 2
7 552130078 WASHER STEEL 20X28X0.5 2
8 552180040 GEAR ASSY 2
9 552130083 GEAR COVER 2
10 926057 CRPH SELF TAPPING SCREW-3.5x16 6
11 552130081 PROTECTION DISK 2
12 921006 KEY 2
13 552130009 WHEEL RIM MM 2
15
14 921077 TYRE MAIN WHEEL 2
15 844061 WASHER-STEEL-6.4X12.5X1.6 6
16 838060 DOMED CAP NUT-SS 304-M6 6
17 553530019 WASHER WHEEL 2
18 829407 HEX SOC CSK HD SCREW - SS304 M8X20 2
19 552130067 WHEEL CAP 2
20 552180026 BRUSH FLIPPER 1 Set
21 835708 CRPH SELF TAPPING SCREW-STEEL-4.8x40 6
22 552130057 UPPER HANDLE 1
23 552130062 KNOB ASSY MALE 2
24 927872 KNOB-HANDLE 2
25 923429 CIRCLIP EXTERNAL A16 2
Page 18

1
6
7
11
12
5
2
3
4
8
13
9
10
Page 19

HOPPER GROUP
Part No Description Qty Sl.No
1 802307 HEX HEAD SCREW - M6X20 2
2 817207 CR PAN HEAD SCREW_M5X20 6
3 844061 WASHER STEEL 6.4X12.5X1.6 2
4 859068 HEX NYLOCK NUT M6 2
5 999161 WASHER STEEL 5.3X13X1 6
6 552130060 HANDLE FLIPPER 1
7 552130111 BOOT FRONT 2
8 552130098 STIFFNER HOPPER 1
9 552130099 STIFFNER HANDLE 1
10 552130100 GASKET HOPPER 1
11 553210222-00 HOPPER COLLECTION 1
12 552180049 HOPPER FLAP ASSY-IH 1
13 855004 MULTI GRIP BLIND RIVET 3.2X13 3
17
Page 20

12
1
13
17
18
19
20
22
23
25
26
28
30
11
21
24
32
10
27
29
8
9
14 1516
345 6 7
2
31
Page 21

SIDE BRUSH GROUP
Part No Description Qty Sl.No
1 552180025 SIDE BRUSH GROUP MM 1
2 921017 SUPPORT SIDE BRUSH ARM 1
3 844061 WASHER-STEEL-6.4X12.5X1.6 2
4 835709 CRPH SELF TAPPING SCREW-STEEL-6.3X30 2
5 921107 TAPER BUSH SIDE BRUSH ARM 1
6 921013 CLEVIS PIN SIDE BRUSH ARM 1
7 923418 CIRCLIP EXTERNAL A12 1
8 552130014 MOLDED SIDE ARM 1
19
9 833084
10 921018 NUT SIDE BRUSH KNOB 1
11 921011 THREADED ROD SIDE BRUSH 1
12 833084
13 921776 KNOB ASSY 1
14 921788 IDLER BRACKET ASSY 1
15 921133 HEX HEAD SCREW M6x16/13 mm COLLAR 2
16 921012 PROTECTION CAP THREAD ROD 1
17 921103 V-BELT 1
18 923427 EXTERNAL CIRCLIP A10 1
19 875001 BEARING 6000 ZZ 2
20 921015 BEARING HOUSING SIDE BRUSH ARM 1
21 921007 WASHER 10.5x18.0x4.0 1
22 921006 KEY 1
23 921014 V-BELT PULLEY 1
24 923429 EXTERNAL CIRCLIP A16 1
25 921066 WASHER 16.2x22x0.5 2
HEX LOCK NUT STEEL M8
HEX LOCK NUT STEEL M8
1
1
26 921141 AXLE SIDE BRUSH 1
27 802309
28 859066
29 923250 WASHER 14.2x20x0.5 1
30 923169 DEFLECTOR ROLLER 1
31 923783 SIDE BRUSH 1
32 552130102 CRPH STS 6.3X30 MACHINED 1
HEX HEAD SCREW - STEEL 8.8 - M6X30
HEX NYLOCK NUT-STEEL GR.6-M6-LOW
1
3
Page 22

Minuteman International Made Simple Commercial Limited Warranty
Minuteman International, Inc. warrants to the original purchaser/user that the product is free from defects in workmanship and
materials under normal use. Minuteman will, at its option, repair or replace without charge, parts that fail under normal use
and service when operated and maintained in accordance with the applicable operation and instruction manuals. All warranty
claims must be submitted through and approved by factory authorized repair stations.
This warranty does not apply to normal wear, or to items whose life is dependent on their use and care, such as belts, cords,
switches, hoses, rubber parts, electrical motor components or adjustments. Parts manufactured by Minuteman are covered
by and subject to the warranties and/or guarantees of their manufacturers. Please contact Minuteman for procedures in
warranty claims against these manufacturers.
Special warning to purchaser -- Use of replacement filters and/or prefilters not manufactured by Minuteman or its
designated licensees, will void all warranties expressed or implied. A potential health hazard exists without original equipment
replacement.
All warranted items become the sole property of Minuteman or its original manufacturer, whichever the case may be.
Minuteman disclaims any implied warranty, including the warranty of merchantability and the warranty of fitness for a
particular purpose. Minuteman assumes no responsibility for any special, incidental or consequential damages.
This limited warranty is applicable only in the U.S.A. and Canada, and is extended only to the original user/purchaser of this
product. Customers outside the U.S.A. and Canada should contact their local distributor for export warranty policies.
Minuteman is not responsible for costs or repairs performed by persons other than those specifically authorized by
Minuteman. This warranty does not apply to damage from transportation, alterations by unauthorized persons, misuse or
abuse of the equipment, use of non-compatible chemicals, or damage to property, or loss of income due to malfunctions of
the product.
If a difficulty develops with this machine, you should contact the dealer from whom it was purchased.
This warranty gives you specific legal rights, and you may have other rights which vary from state to state. Some states do
not allow the exclusion or limitation of special, incidental or consequential damages, or limitations on how long an implied
warranty lasts, so the above exclusions and limitations may not apply to you.
Cord Electric Group………. Three years parts, two years labor, ninety days travel (Not to exceed two hours)
Exceptions………. Port-A-Scrub, one year parts, six months labor
MPV 13, one year parts
V-14, One year parts, one year labor
MPV 14 and 18, two years parts, one year labor
RapidAir blower, one year parts, one year labor
Explosion-Proof Vacuum, one year parts, one year labor
Pneumatic Vacuums, three years parts, one year labor
EX 12 and EX12H, one year parts, one year labor
TRS 14, one year parts, one year labor
Battery Operated Group…..Three years parts, two years labor, ninety days travel
(Not to exceed two hours)
Exceptions……Sweepers, one year parts, one year labor, ninety days travel
(Not to exceed two hours)
Internal Combustion Group….One year parts, one year labor, ninety day travel
(Not to exceed two hours)
Battery Chargers ………………. ..One year replacement
Replacement Parts……………..Ninety days
Batteries………………………….0-3 months replacement, 4-12 months pro-rate
Polypropylene Plastic Tanks…Ten years, no additional labor
14N845 U.S. Route 20 Pingree grove, IL 60140
Phone: 800-237-3192
E-Mail: www.minutemanintl.com
A Member of the Hako Group
552170041
Rev.B 05/11
 Loading...