

Page 1
Page 2
Product introduction
Mintpad is a Wi-Fi enabled portable network device. It has communica-
tion functions, such as Internet blogging and chatting; and multimedia
functions, such as movies, music, and pictures. A user can create various
contents from the web and enjoy them on Mintpad. It is an exclusive
portable network device that has strong memo function, and it can take
pictures and upload them to the web directly.
Copyrights©2008 mintpass.Co., Ltd. All rights reserved.
Page 3

Chatting
wi-fi
Blog
wi-fi
Life
Bookstore
Schedule
Multimedia
Camera
wi-fi
Multi-fun,
Device-to-Device memo chatting
is possible.
The camera can capture motion pictures
as well as take pictures.
Various multimedia functions
like music, videos, photo album,
and voice recording can be enjoyed.
Photo, message, or personal memo can be directly
uploaded without using PC.
Mint Life contests can be enjoyed
with other Mintpad users.
Various contents created from the web
can be downloaded.
Personal name/business card & schedule making
is possible using the memo function.
Enjoying Mintpad
Page 4

Chapter 1. Getting started
06 Components
07 Locating each components
08 Retracting battery and SD card
09 connection and product registration
10 Using Sapphire
Chapter 4. Misc. Information
59 Funware upgrade, Window Browser
60 Troubleshooting
61 Precautions
63 Specification
64 Copyrights, Authentication,
Registered Trademarks, Disclamer
65 Warranty Information
Chapter 2. Basic operations
13 Power on/off
14 Using the menu
15 Using Quick menu and Status Bar
16 LED action
17 Lock switch, Reset
Chapter 3. Using Mintpass
19 Wireless connection
20 Memo
22 Bookstore
27 Text Viewer
31 Typing Tool
32 Blog
36 Life Contest
37 Chatting
39 Internet
41 Camera
42 Photo Album
53 Schedule
56 Namecard
47 Voice Recording
48 Music
50 Video
52 Internet streaming TV
56 Setting
Contents
Page 5

06 Components
07 Locating each components
08 Retracting battery and SD card
09 Connection and product registration
10 Using Sapphire
Chapter 1.
Getting started
Page 6
6
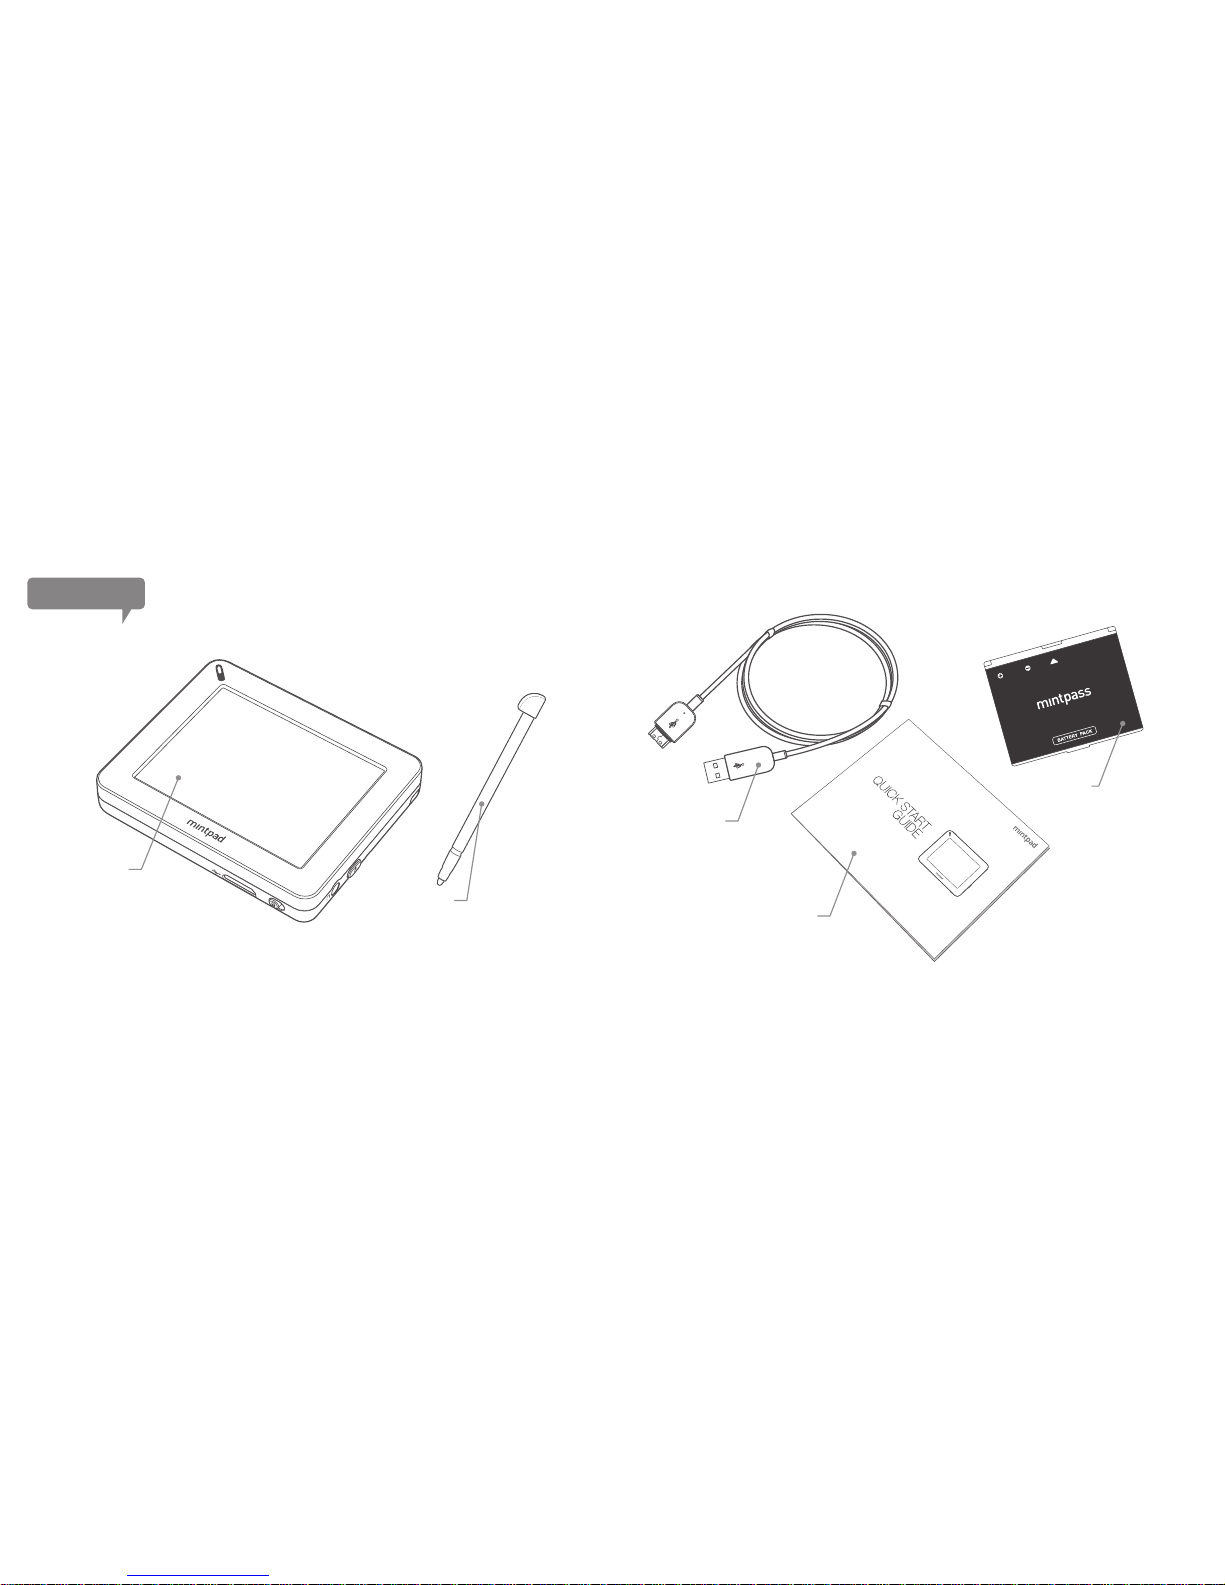
Mintpad
Stylus Pen
TTA USB cable
Battery pack
Quick Start Guide
It can be inserted into Mintpad
*Earphones are not included in the basic components.
Components
Page 7
7
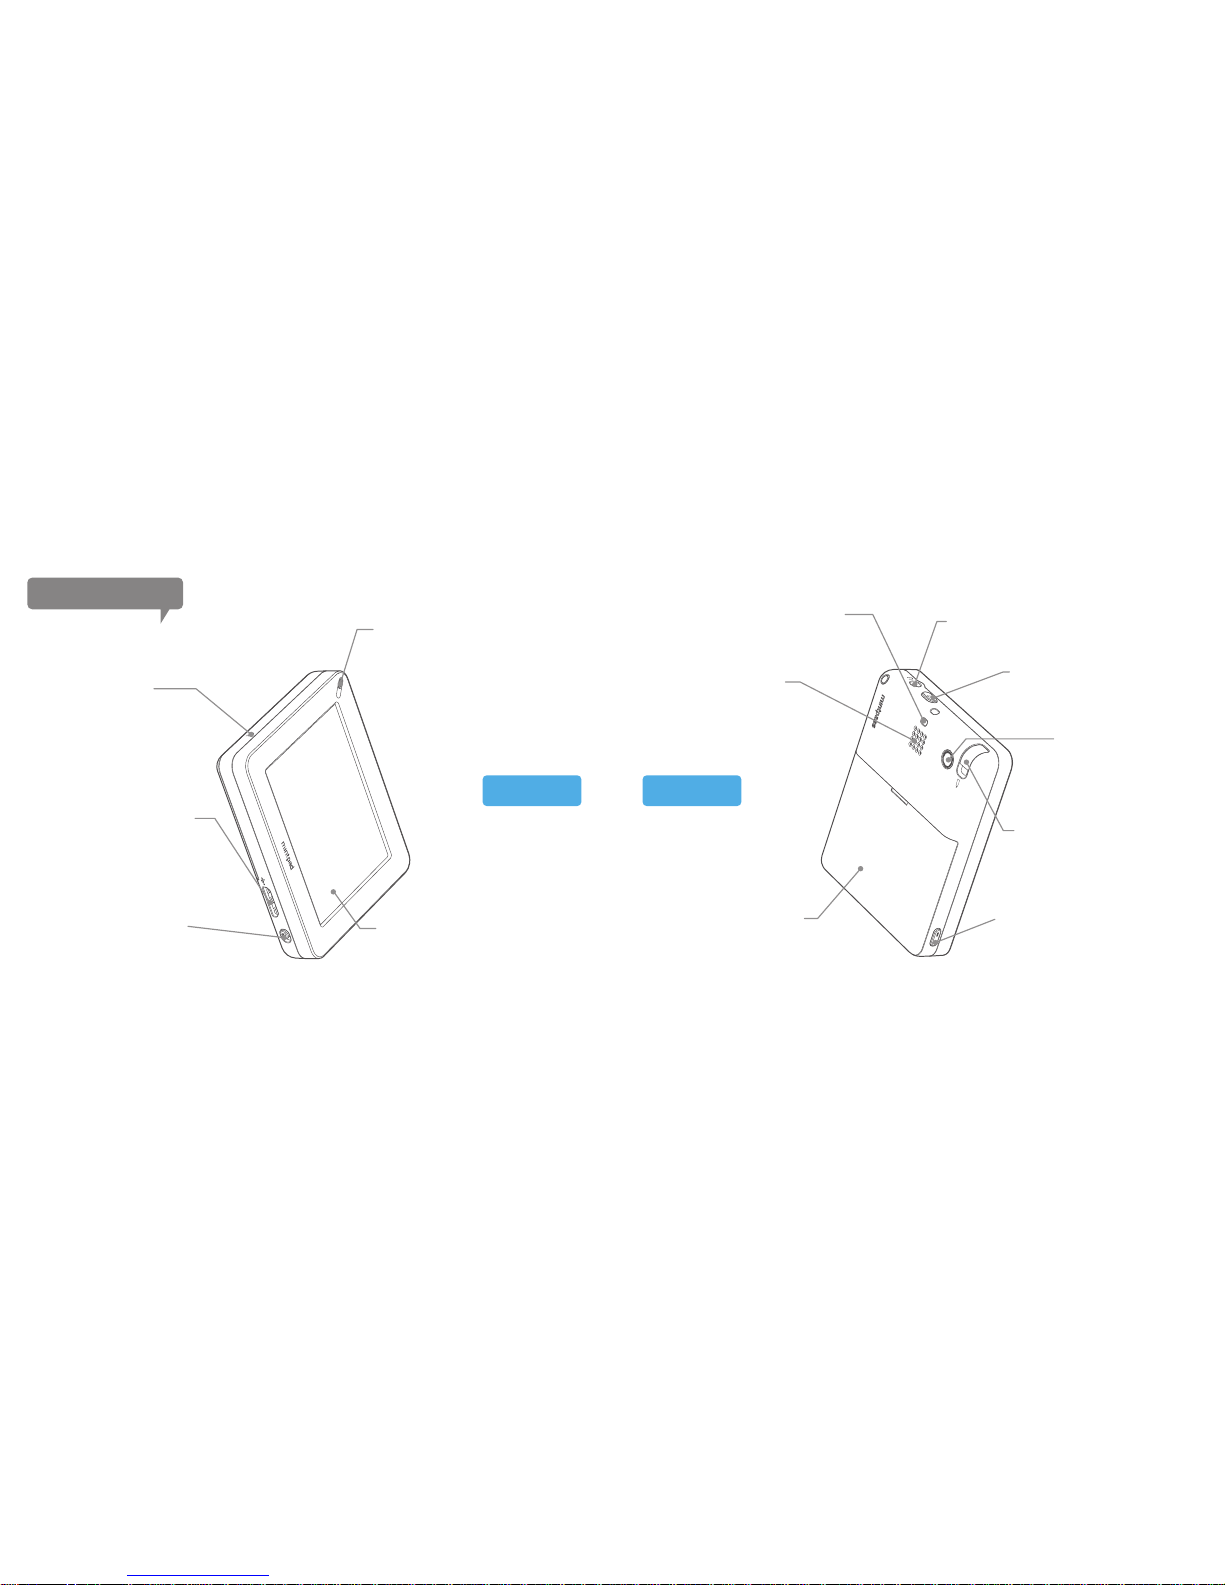
LED Display
Smart button
72.644mm(2.86inch)
Touch-screen
Stylus pen
Camera
Microphone
Earphones jack
Speaker
Battery cover
Power button
Strap hole
TTA USB connector
Hold-Switch
Used it for displaying battery, Wi-Fi,
and other status.
Use it to add a strap.
Use it to connect earphones.
Use it to power on/off.
Use it to take pictures
and capture videos.
Use it on the touch-screen.
Use it to display status bar
or other actions according
to the assigned setting.
Slide open to change battery
or micro SD card.
Use it for audio.
Use it for various actions and functions.
Use it to recharge
or to connect with PC.
Use it for voice recording.
Use it to lock the touch screen
or the buttons.
FRONT
BACK
Locating compoents
Page 8
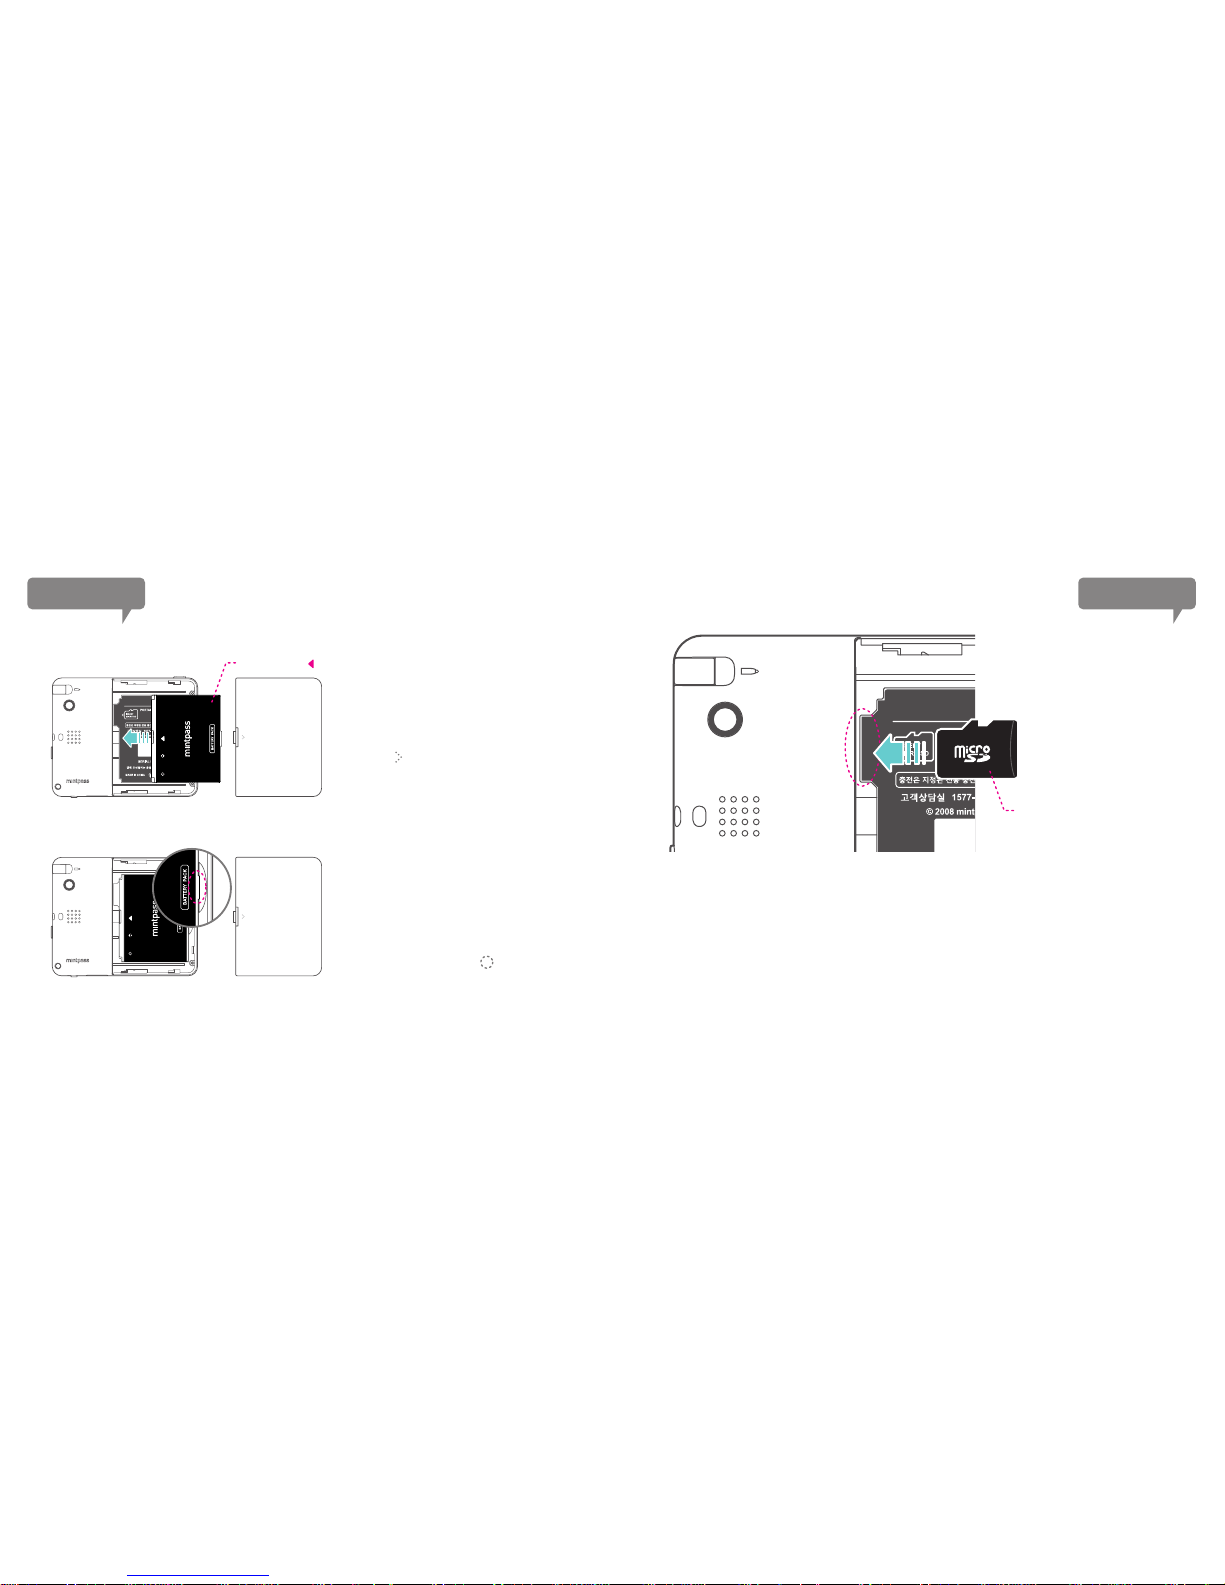
Push the battery cover to the direction
shown ( ) to separate.
Place the battery front side up and
then push it all the way.
The side with ( ) sign is the front side.
Once the battery is removed, the Micro SD card slot will be found.
If properly inserted, there will be a “click” sound.
To remove the Micro SD card, push the card and it will be pulled out.
Insert/remove Micro SD card
8
Battery
Inserting battery
Removing battery
Take out the battery by using a finger
nail to lift the part with sign.
Micro SD card
The side with Micro SD logo is
the front.
Page 9
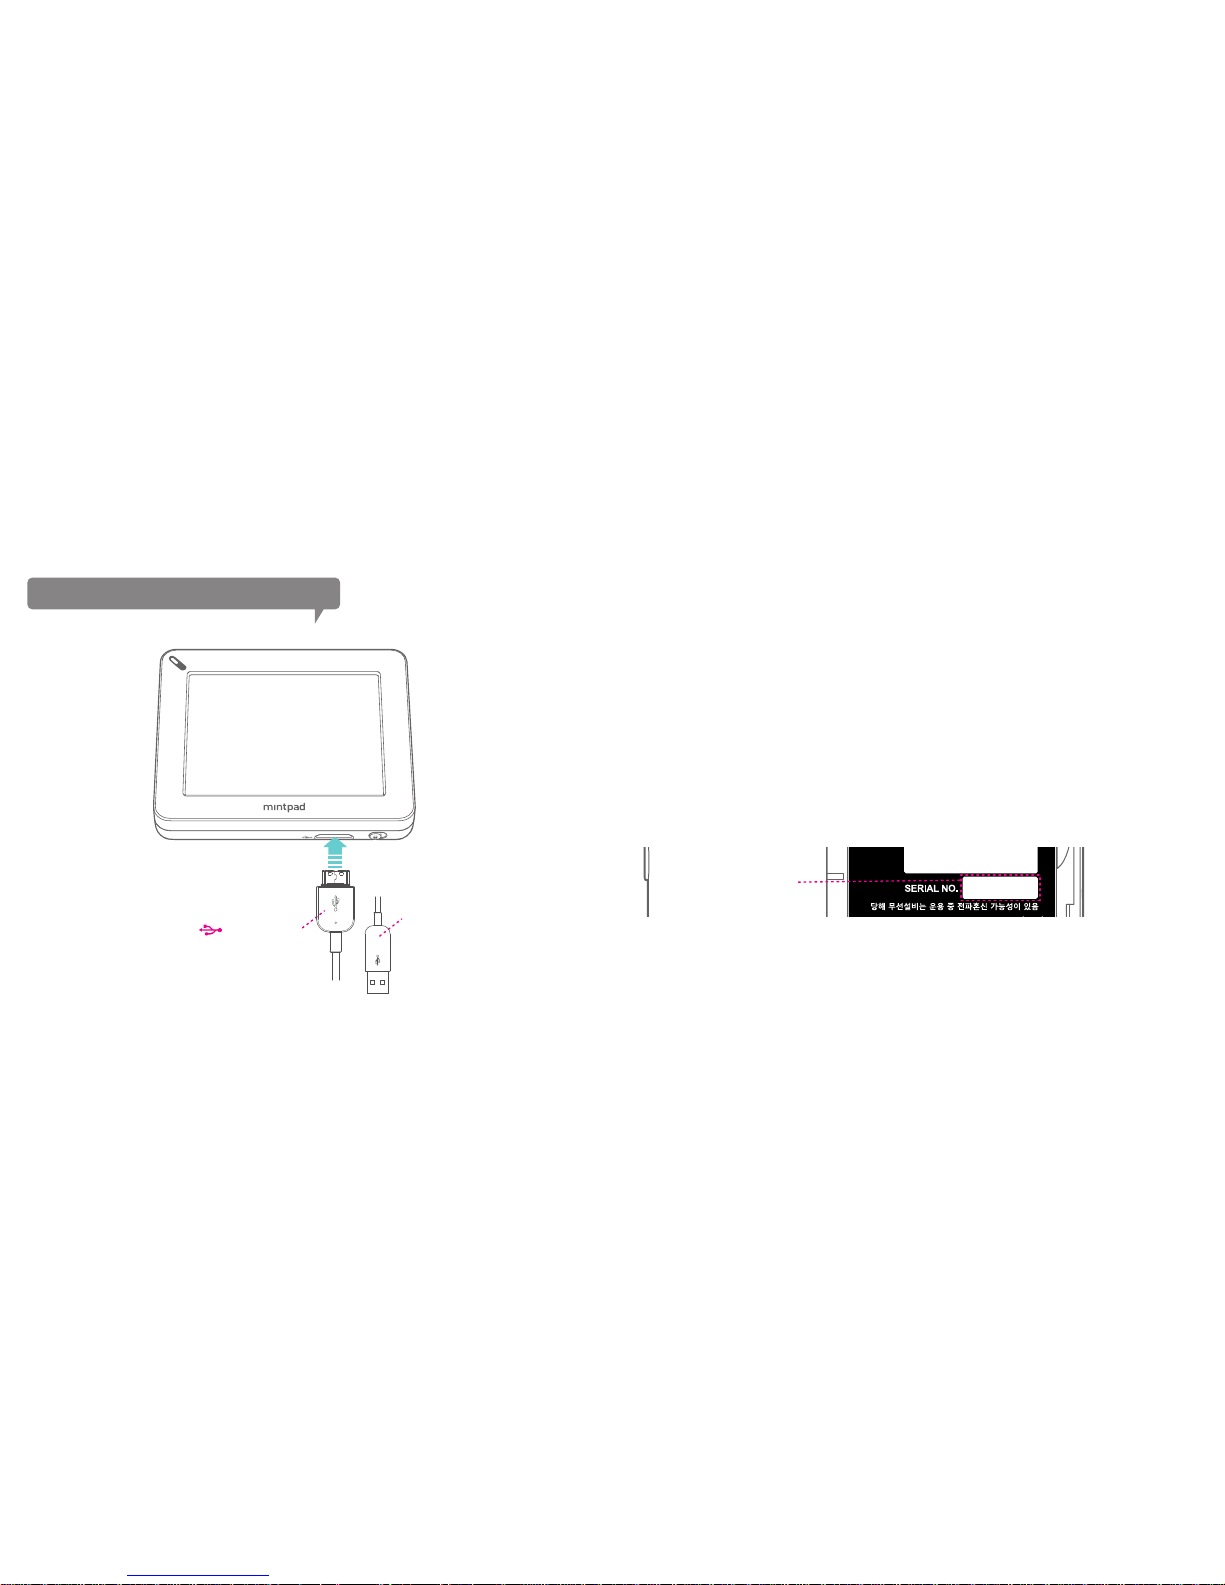
To use Mintpad properly, a user needs to register Mintpad online at (www.mintpass.com).
Go to the Mintpass homepage and follow through the membership sign up process. Find out the
serial number (15-digit) on the side of the Mintpad package or from inside the device after taking
out the battery. Connect Mintpad to a PC with Internet connection. It will launch the website
automatically. Go to “my mintpass” and find “product registration information” to register your
product.
*Caution: Mintpad needs to be connected to a PC during the entire product registration process.
If the battery is taken out in an attempt to find out the serial number, it will cut off the PC connection
and cause problems in Mintpad registration process. Please have your serial number ready prior to
registration process.
Membership sign up & product registration
The side with sign is the front.
The PC connection and product registration
9
Connect to the PC.
After registering the product, it will automatically load the Mintpass homepage and log in, when
connecting with to the PC via USB cable.
Connecting a registered Mintpad to the PC
15 digit, numerical and
alphabetical combination
Page 10
Introducing Sapphire
Mitpass’s Sapphire is a web-base portable device managing platform that
omits product installation after purchasing the product. Connecting it with
the PC makes automatic log-in to the webpage, where every function can
be done inside. As it is a device management program, at the same time, it
is a service program that connects the device to services. Moreover, it takes
away the need to upgrade the program time to time.
What is Sapphire?
10
Page 11
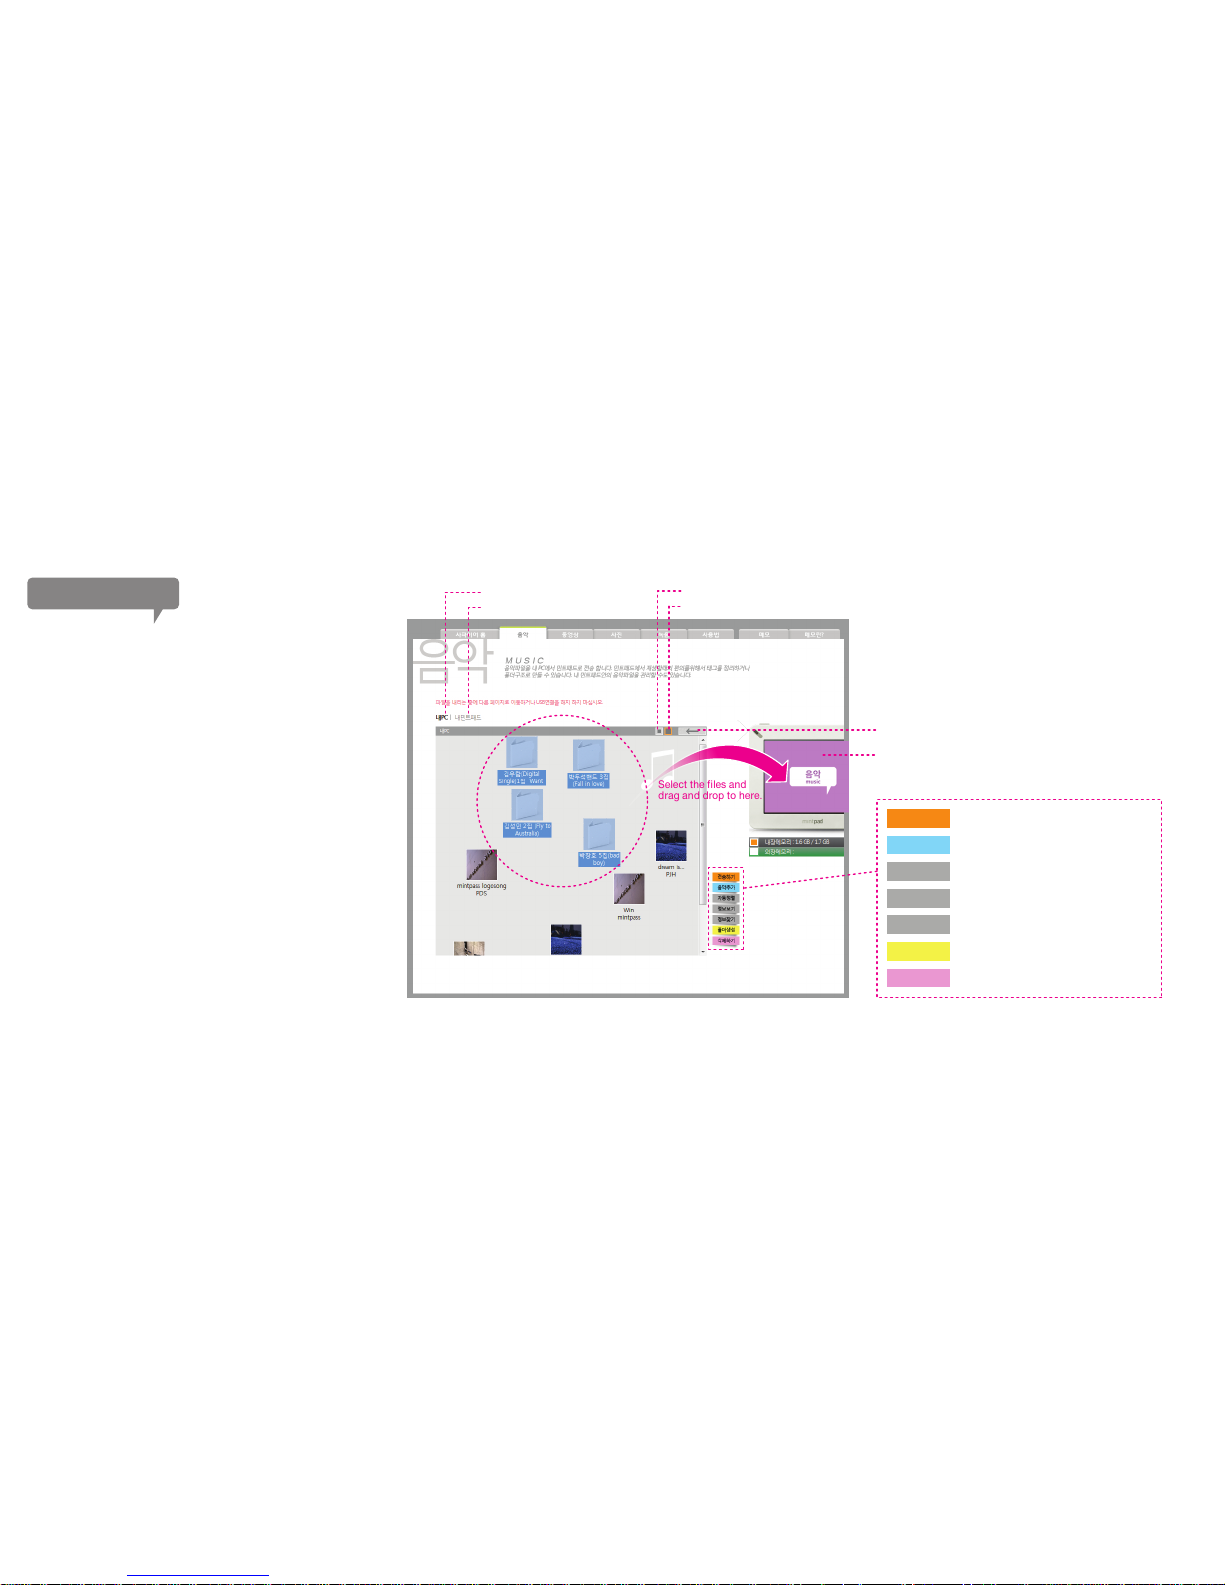
Once logged in to the Mintpass web page’s
Multimedia section, there are music, videos,
pictures, recordings tabs. In each tab, you can
transfer corresponding contents to Mintpad using
Sapphire. When connecting via Sapphire first time,
all the Active Xs must be installed to use the
program. For the functions that only exist in each
menu, please refer to the pages for the menu.
*The image on the right is a demonstration of music
file transfer; process of transfer may vary slightly
depending on the type of contents, but the basic
operation remains unchanged.
Select the files and
drag and drop to here.
Reduce the Sapphire file icons.
Increase the Sapphire file icons.
“Back” button.
Display files that are in my Mintpad.
Display files that are in my PC.
It displays the content’s menu
when Mintpad is connected.
11
How to use Sapphire
Transfering files using Sapphire
Send
Add music
Auto-arrange
View info
Find info
Make Folder
Delete
It transfer the selected files to Mintpad.
It adds music to Sapphire.
It arranges Sapphire files automatically.
It displays the file’s tag information.
It finds the file’s tag information.
It creates a new folder.
It deletes selected files.
Page 12

13 Power on/off
14 Using the menu (Basic operations)
15 Using Quick menu and Status Bar
16 LED action
17 Lock switch, Reset (Separating the battery)
Chapter 2.
Basic operations
Page 13

Power On/Off
*About power saving mode
Turning on the power
Press and hold the power button until the
start screen appears.
Turning off the power
Press and hold the power button until the
screen is turned off.
Power saving mode
Press the power button for 1 second when
the device is on.
Deactivating the power saving mode
Press the power button for 1 second when
the device is in the power saving mode.
13
This device has power saving mode installed
for reduce the battery consumption.
Depending on the time setting, when there
is no action for certain time that was set in
the setting, it automatically go into the
power saving mode.
For configuring the power saving mode, go
to [setting > time setting > power saving
mode].
However, there still is minute battery
consumption even when in the power
saving mode.
Page 14
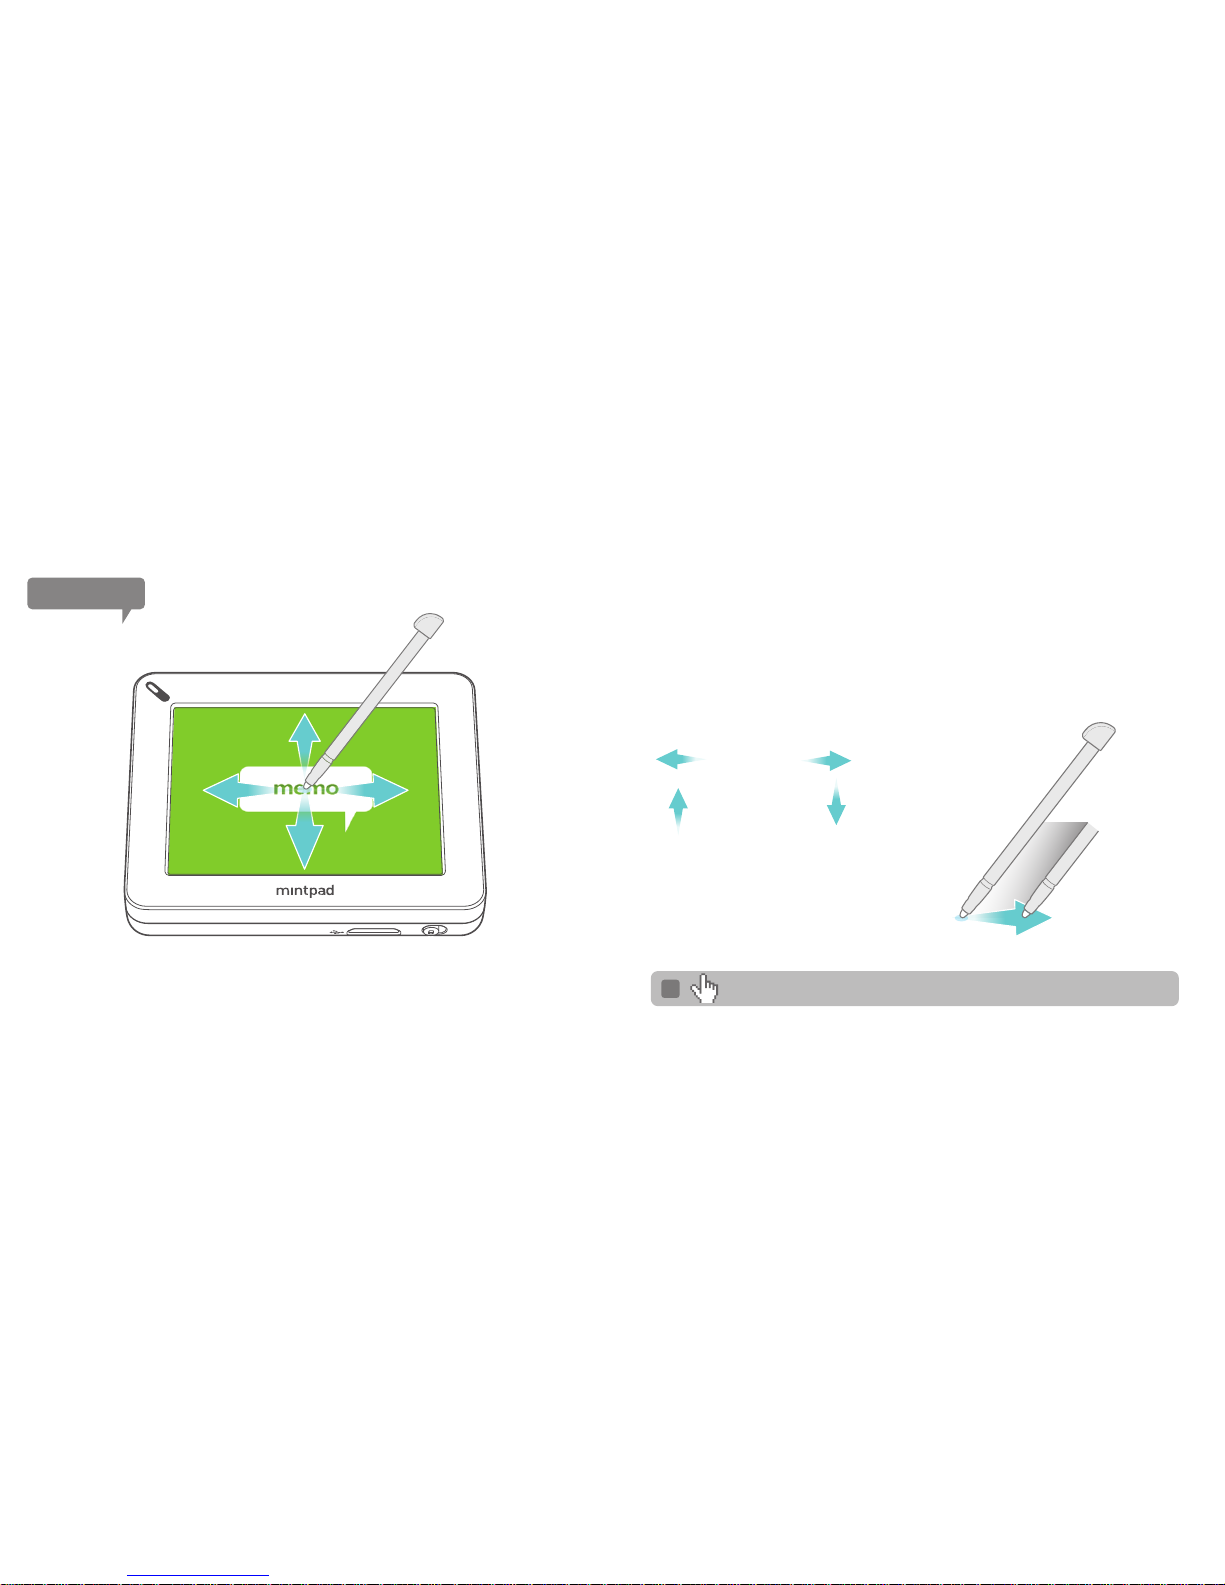
Using the manu
TIP
A finger can replace the stylus pen for any action.
14
Turn the power button on and the menu screen will appear soon.
Slide on the screen with left, right, up, down direction to scroll through menus.
As if flipping to the next page, slide on the screen from right to left to proceed
to the chosen menu.
The above actions are the basic operational instruction
for Mintpad.
Although most of the actions will comply
with the above instruction, they do not apply to
all of the applications, so actions may differ depending on the situations.
Play (next)
Move up the menu
Previous (back)
Move down the menu
Basic operations
sliding on the screen
Page 15
15
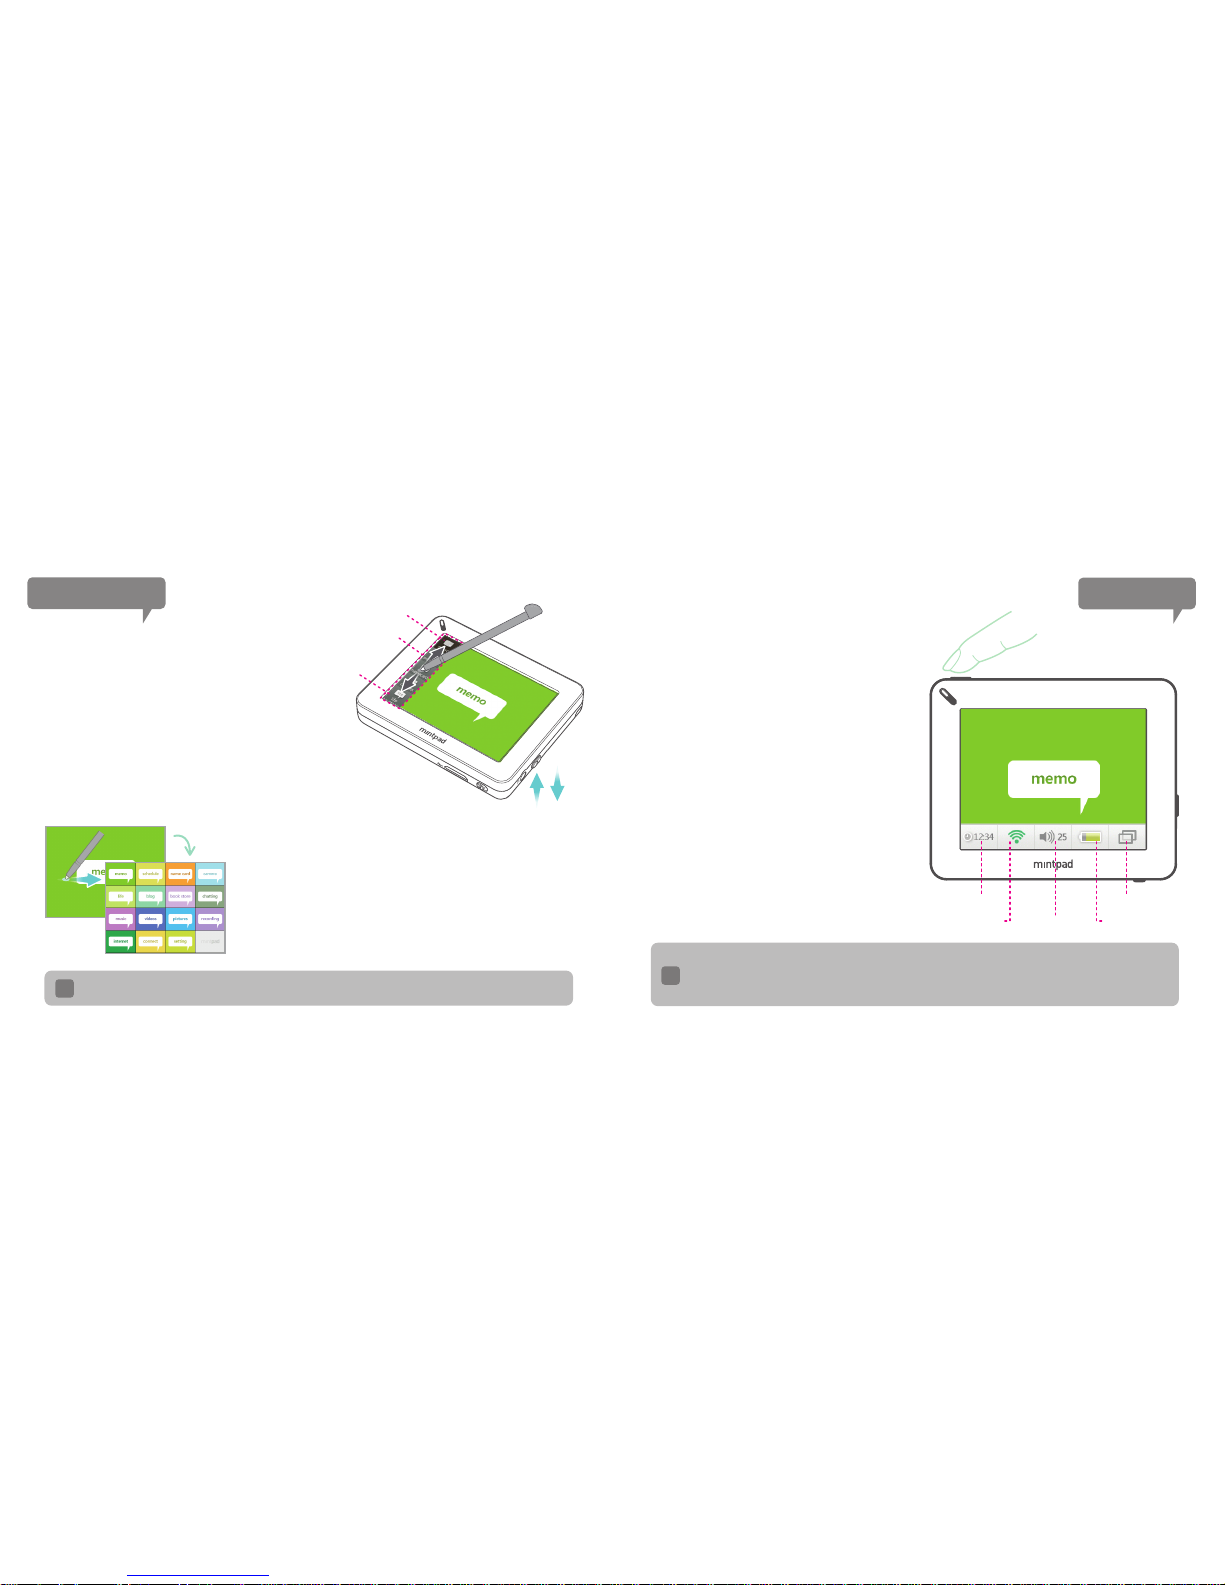
Using Quick-Menu
Quick-Menu
Current position display
Quick-Menu area
Quick scrolling through the menu
View all the menus
Moving thru menu
Click on the left side of the menu and
the Quick-Menu will appear.
For the Quick-Menu, up/down scroll is possible
like the menu screen. It displays current menu selection,
and it can scroll through the each menu quickly.
The Quick-Menu will disappear if no particular action is taken.
From the main menu screen, slide right on the screen to
view the menu thumbnails list. Double click on the desired
menu icon to proceed to that menu.
To go back to the menu thumbnails list, slide right on the
screen again.
If the menu screen is scrolled up/down, the current menu selection on the Quick-Menu
will be indicated accordingly.
TIP
Status Bar
Using the Status Bar
Shortly press the “Smart Button” to
display the Status Bar on the bottom of
the screen.
Current time, Wi-Fi status, volume, and
battery status are displayed on the Status
Bar on a real-time basis.
Through multitasking icon, you can use
other functions while listening to music.
Touch each of the area to set the
corresponding option.
Short-press the Smart Button
Current time & Alarm
Wi-Fi status Volume
Multitasking icon
Battery status
10
To remove the Status Bar, simply push the Smart Button again or click on the area
other than the bar.
Press and hold the Smart Button for action that was assigned.
(Go to the Menu Setting > Smart Button to assign the button’s action)
TIP
Page 16

16
LED Display
The LED display on the top-left side of Mintpad
shows the device’s status.
A user can recognize the status by the color and the
blinking type of LED.
Product status according to LED color
Low Battery
Red LED on +
Green LED Blinking
Red LED is on
Orange LED is on
Green LED is on
Orange LED on +
Green LED Blinking
- Red LED - Orange LED
* On - Light is constantly on
* Blinking - Light on and off repeatedly
- Green LED
Green LED on +
Green LED Blinking
Recharging
Fully
recharged
Battery Wi-Fi On Wi-Fi Off
Page 17
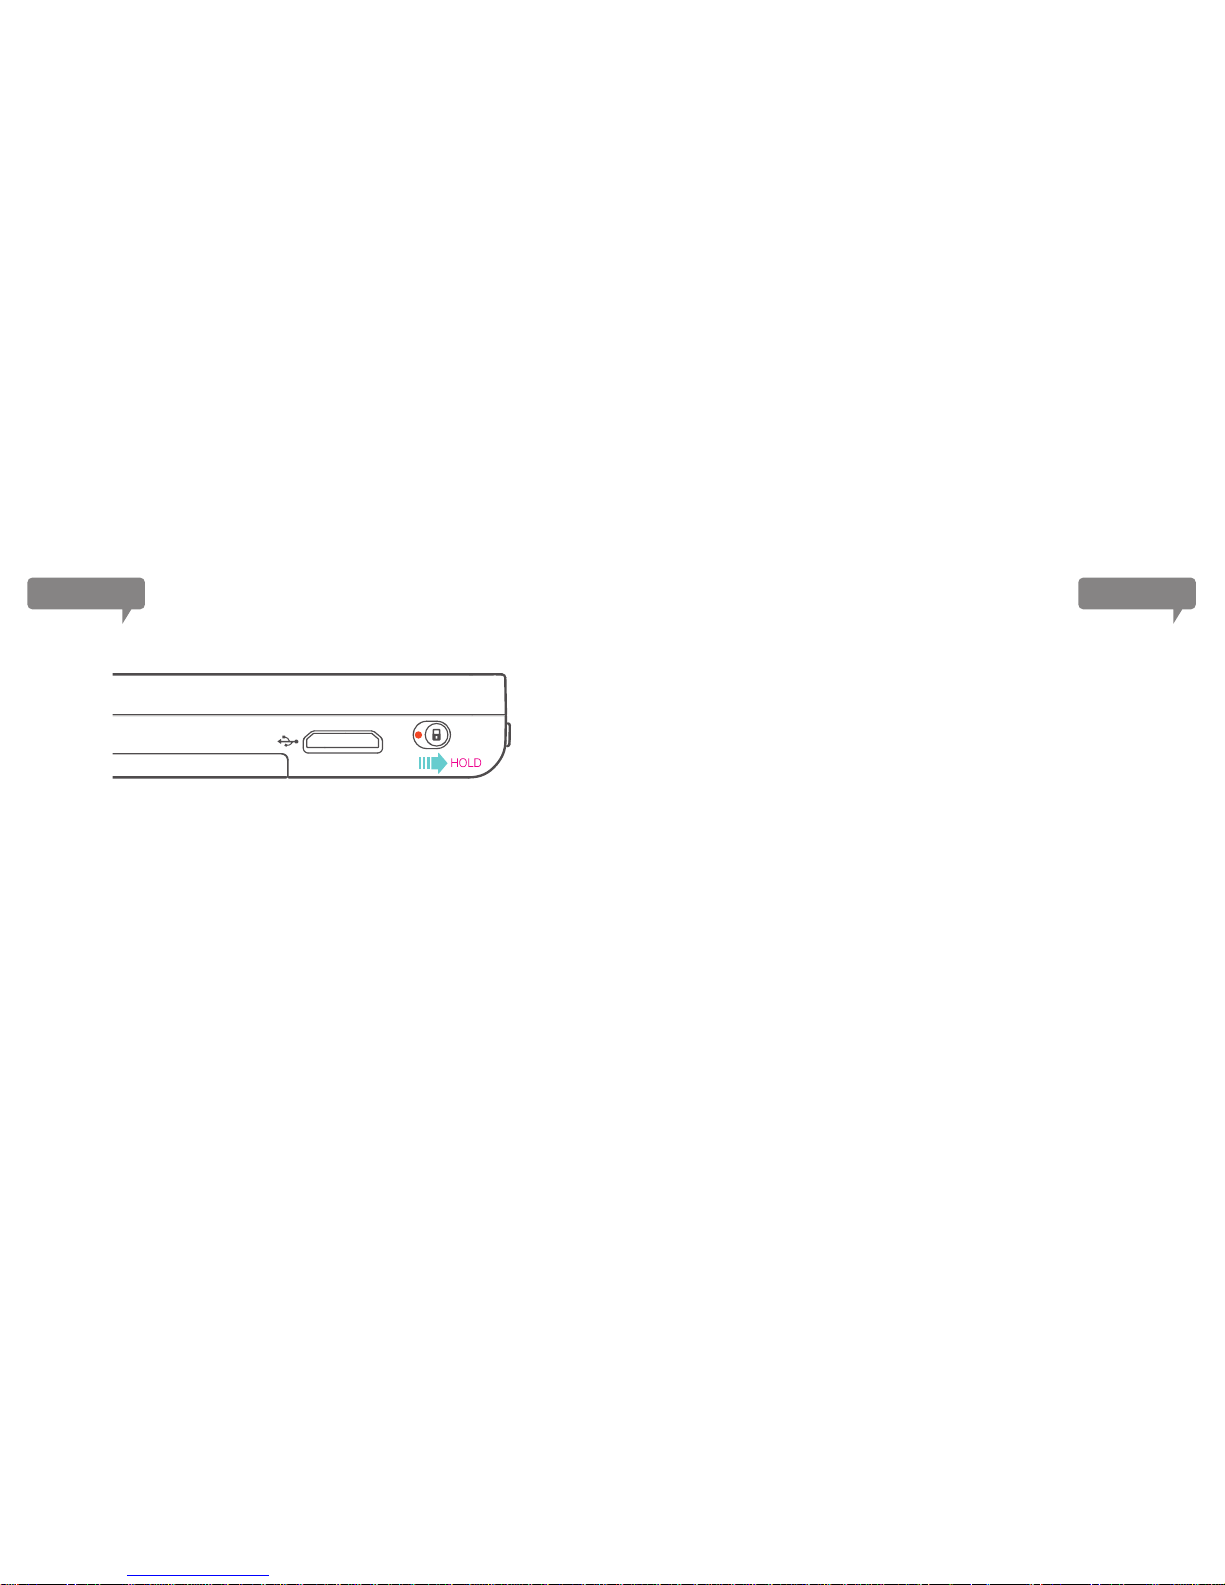
Hold switch
Using the hold switch
If the hold switch on the bottom of the device is pushed to the
direction of arrow, the hold function is enabled.
When the hold function is enabled, buttons and the screen are locked.
If the hold switch is pushed to the other direction, the hold function is
disabled.
Reset button
Should you encounter certain problems where the device is not
responding, please take out the battery and then put the battery in.
When the device is resetted, the date/time setting and the saved data
are not erased.
Resetting
17
Page 18

19 Wireless connection
20 Memo
22 Bookstore
27 Text viewer
31 Typing tool
32 Blog
36 Life contest
37 Chatting
39 Internet
41 Camera
42 Photo album
43 Schedule
45 Namecard
47 Voice recording
48 Music
50 Video
52 Internet streaming TV
56 Setting
Chapter 3.
Using Mintpad
Page 19
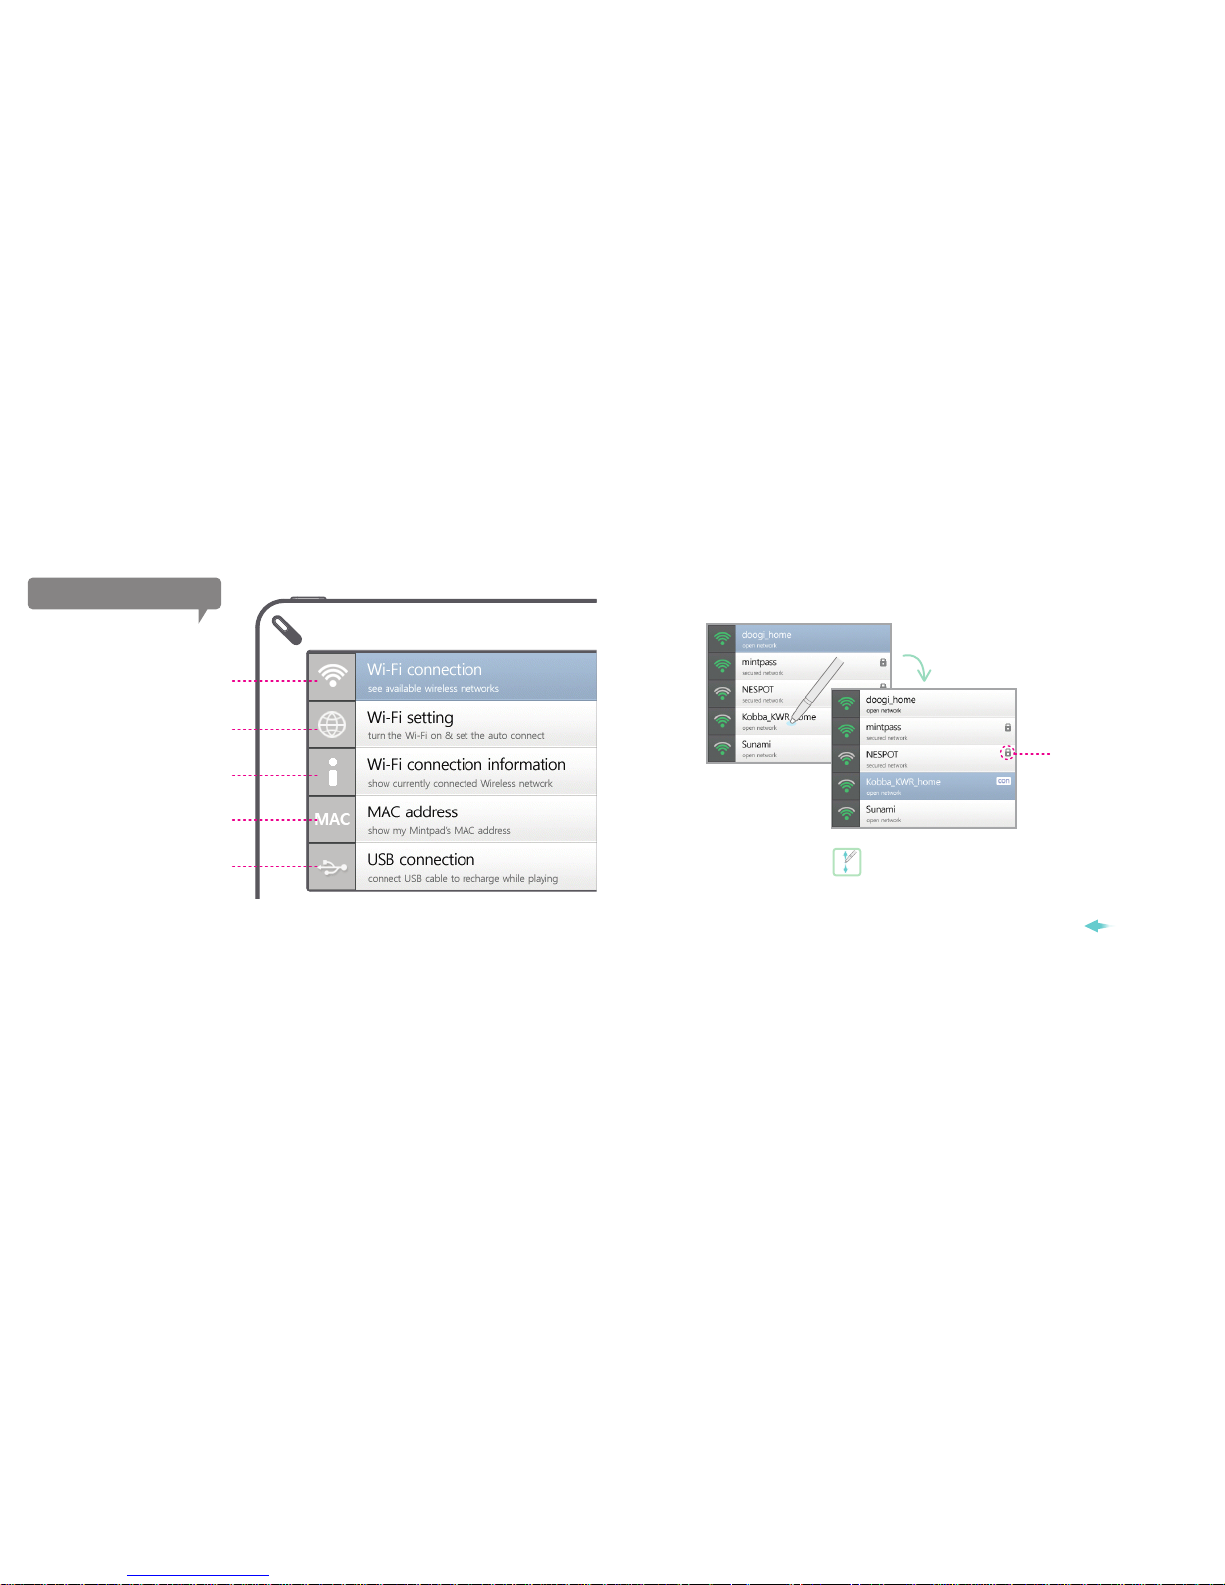
In order to make a connection, double-click or scroll from right to left( )
on the selected wireless network.
Password need to be entered for making a connection to the network with
a lock icon.
To view more wireless networks,
scroll up or down on the screen.
19
It shows the list of
available networks.
It turns on/off and
set auto-connection.
It shows currently
connected network information.
It shows your Mintpad’s
MAC address.
It is used to configure USB cable
connection to recharge while playing
Some of the Mintpad’s functions can only be used with Wi-Fi connection.
Once wirelessly connected, the list of Wi-Fi connection and USB connection will appear.
Making wireless network connection
Connecting wireless network
This network is
secured with password.
Connecting to the selected network
Page 20
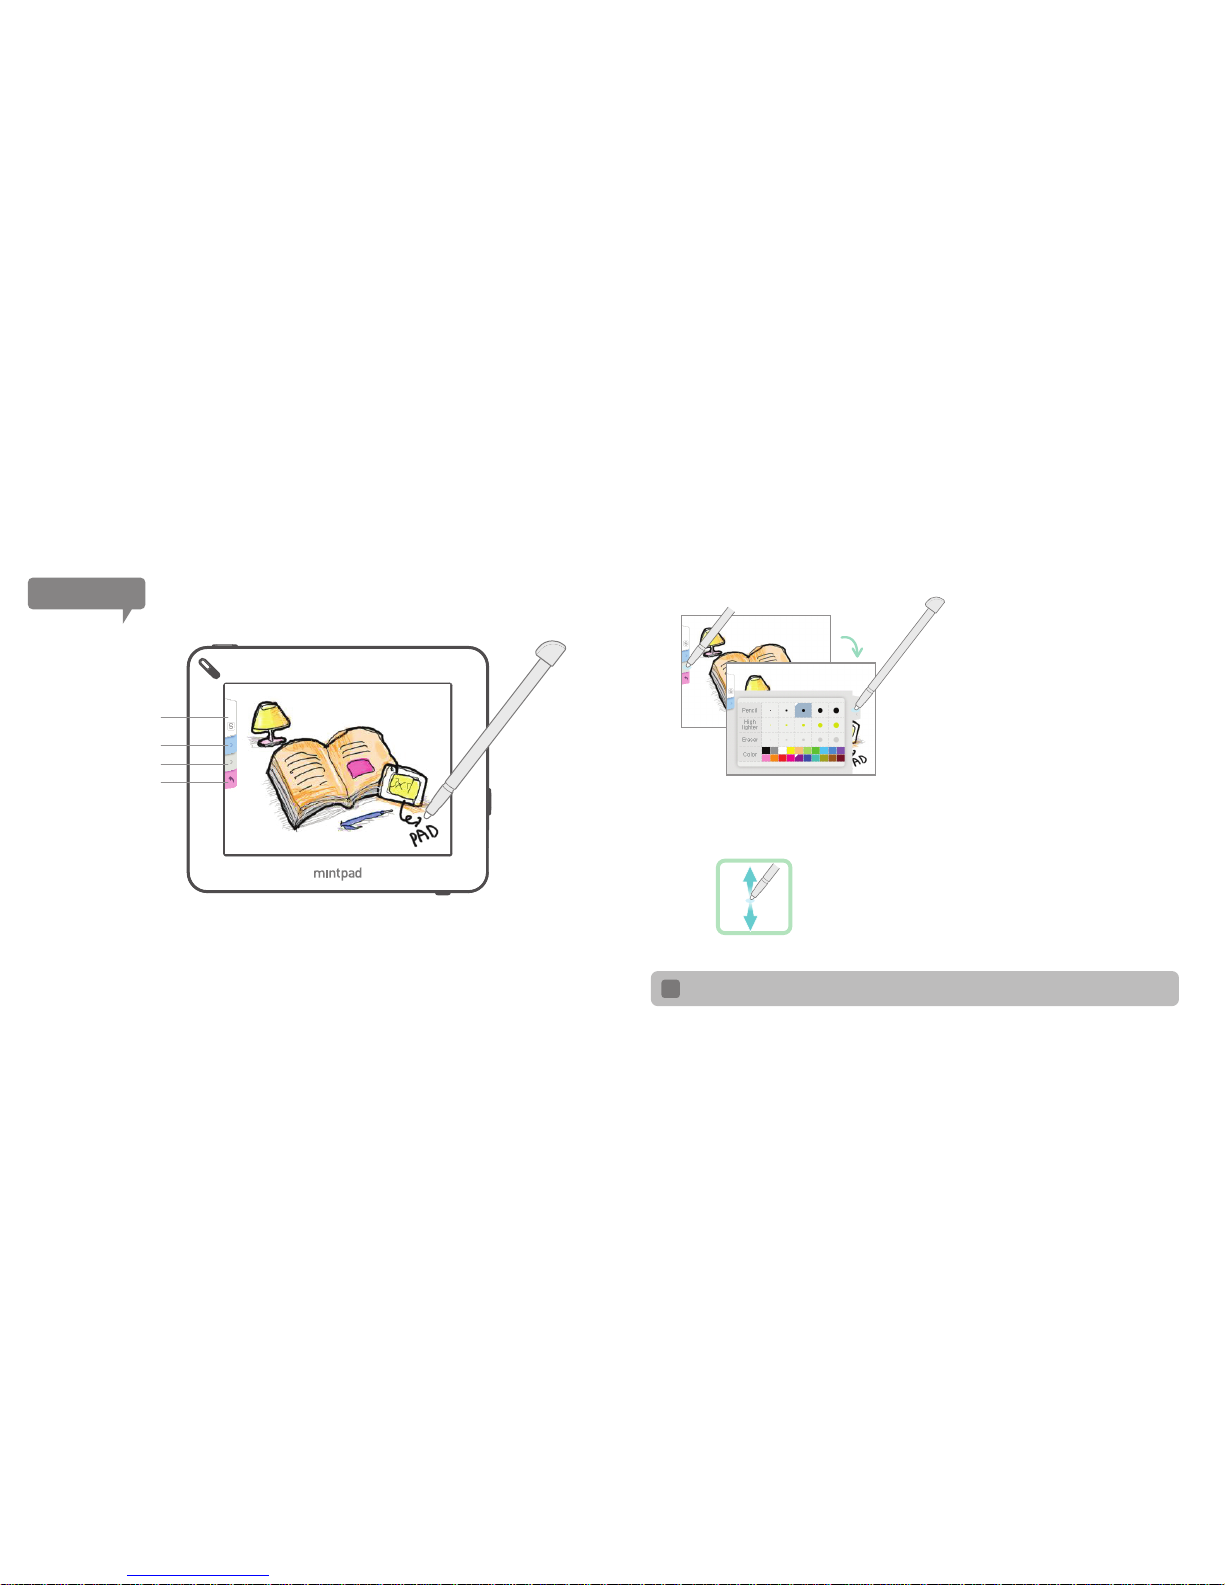
Click on the tab and option window will appear;
click on the tab to go back.
For quick saving the memo, shake the device.
TIP
20
Taking Memo
Save
(memo-by-memo view)
Calendar
Memo Option
Cancel memo
A new memo screen is pulled out, if the “Memo” is selected from the menu screen.
Take Memo
Click on the Memo option tab to select font
size and color.
To save the Memo, simply click on the
“save” tab or shake the device.
If the memo is saved, the background color will change
to white. At this mode, memo-by-memo viewing is
possible.
Slide on the screen up or down to view other memo
from here.
Memo taking and saving
Viewing the Memo
Page 21
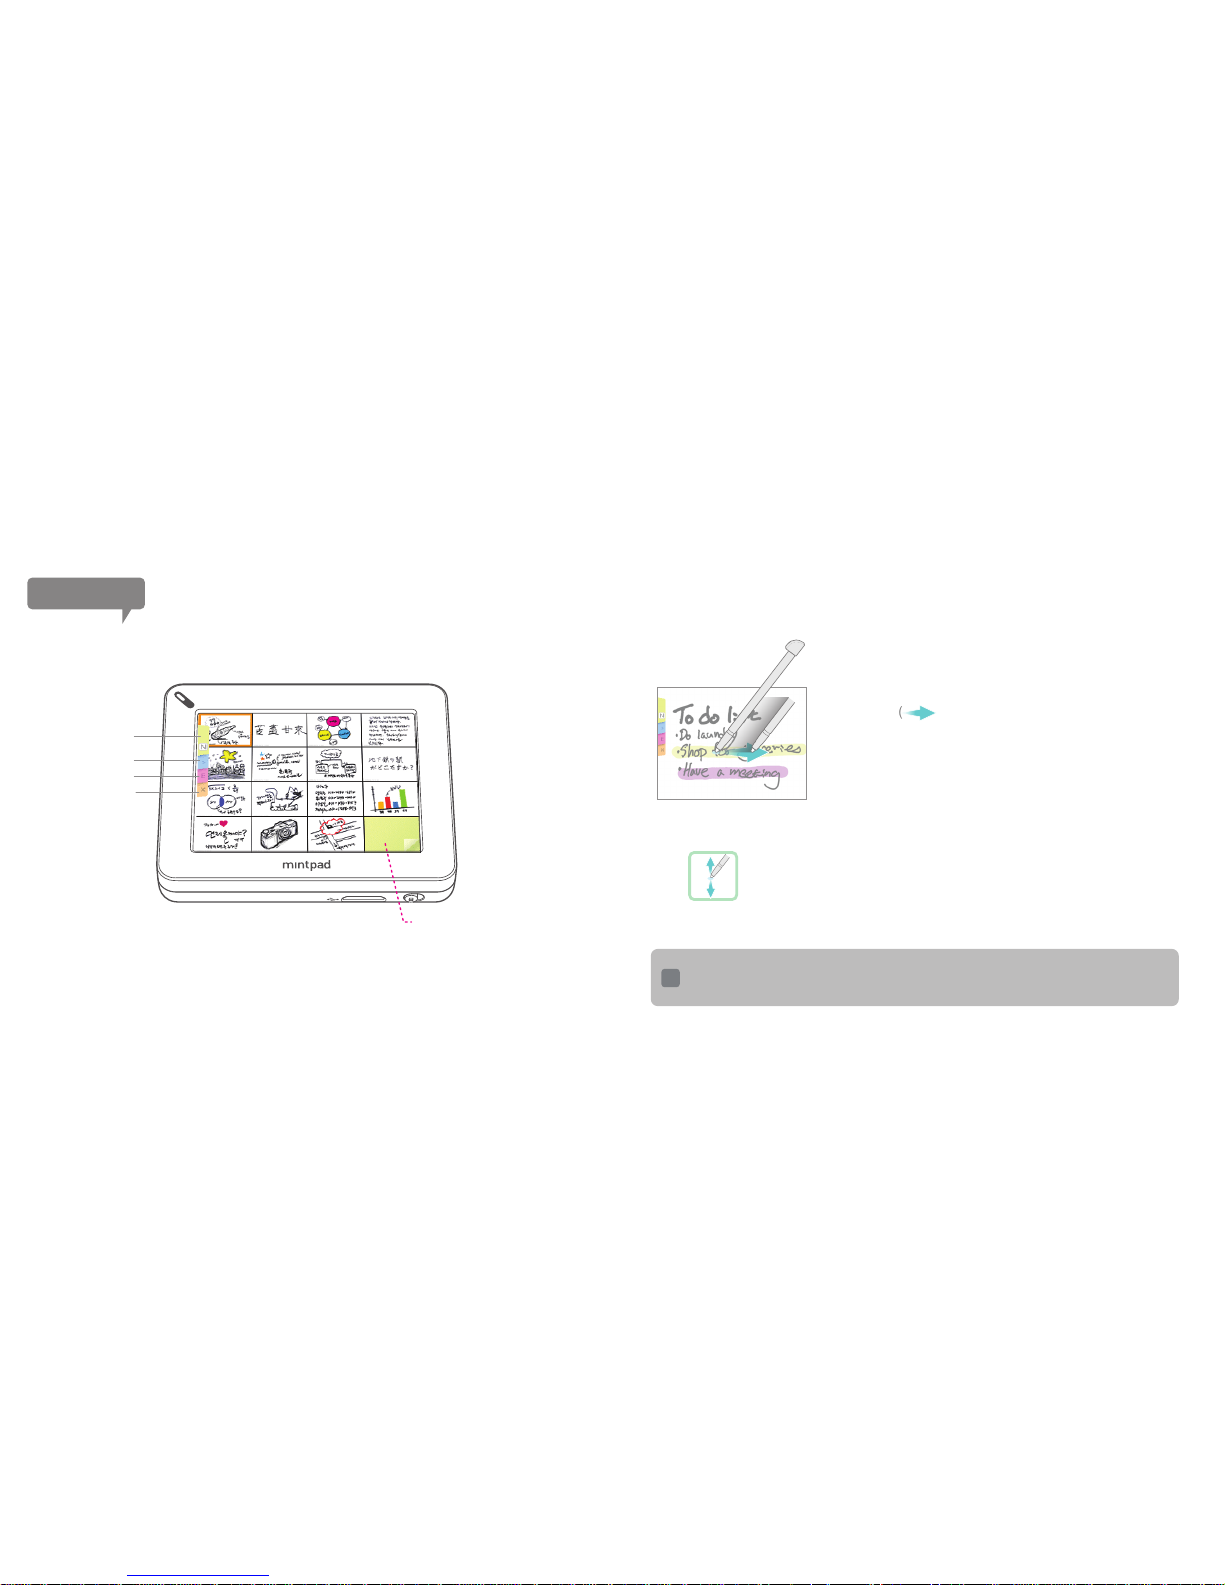
From the memo-by-memo view, slide on the screen from
left to right( )to view the thumbnails list.
You can view the saved memo or take a new memo.
Selected thumbnail can be edited or deleted.
Click the yellow tab on the left side or double-click the
memo icon on the bottom right side to take a new memo.
Taking Memo
New Memo
21
New Memo
Calendar
Edit
Delete
Slide on the screen up or down to view more saved memo on the next
thumbnails list.
Managing memo from thumbnails list
Scrolling through thumbnails list
From thumbnails list, double-clicking on the memo that you want to see will convert to
memo-by-memo view.
You can make a back up file for your memo by going on to the Mintpass homepage’s
memo category
TIP
Page 22
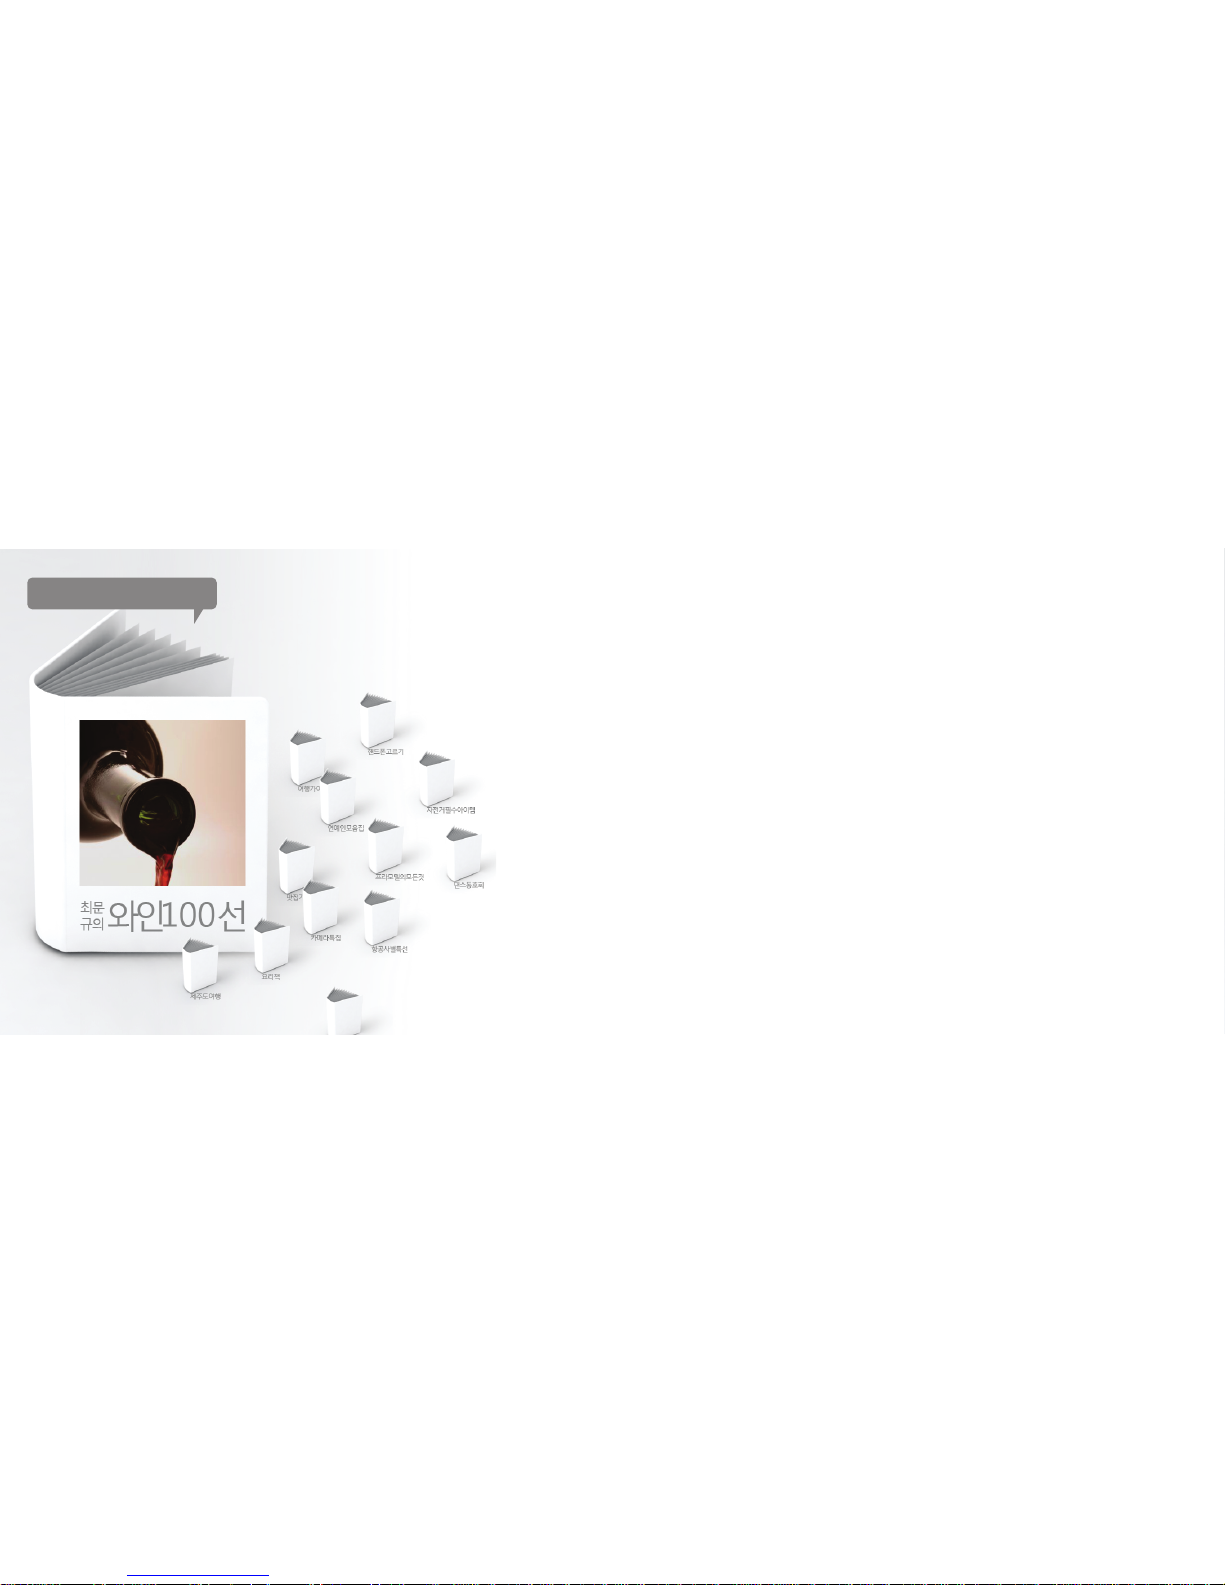
Introducing the book store
There are various books with various contents electronically published at the
Mintpass homepage.
Once you go into our book store home, Mintpad users own personally created
contents are made published into the books.
By subscribing to the published books, it can be transferred to Mintpad. Moreover,
what you created and published can help the other Mintpad users. Have fun sharing
your personal knowledge!
*All the books published from Mint bookstore have its own copyrights.
*Use of contents without permission is regulated by laws.
What is book store?
22
Page 23
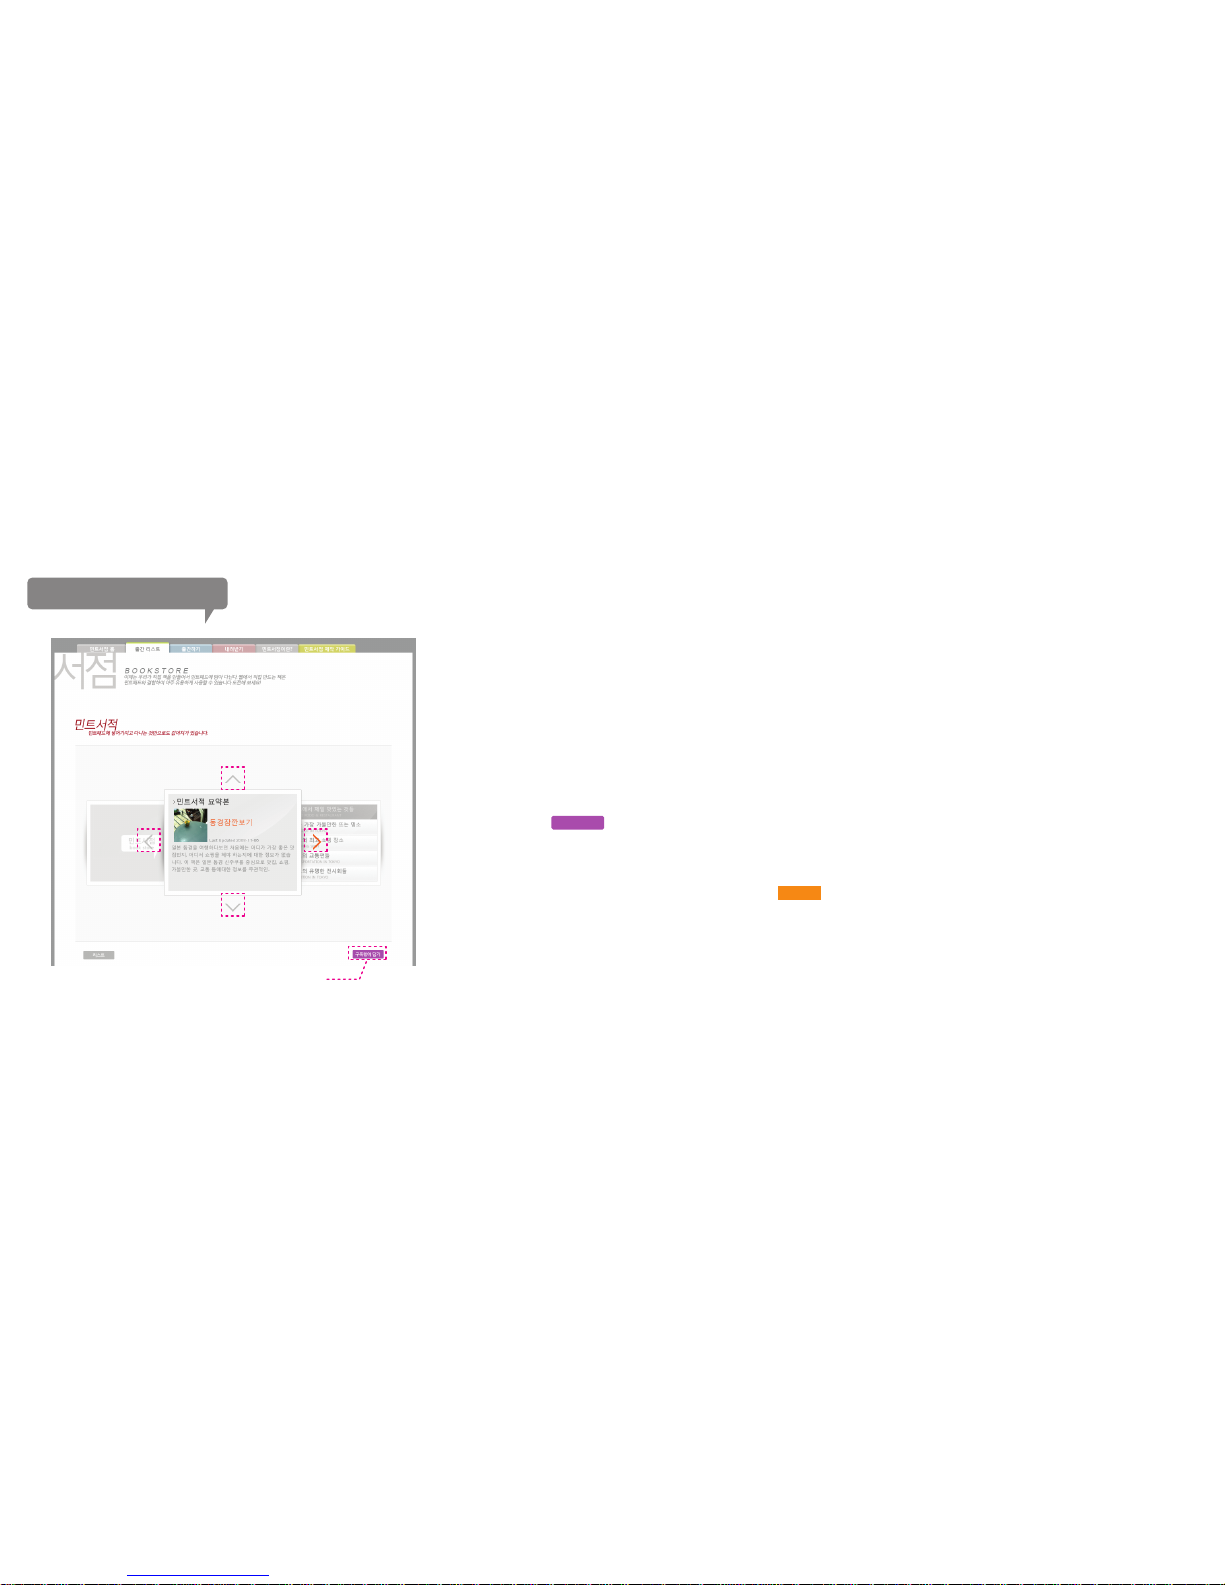
Subscribing from bookstore
Contents downloading to Mintpad
Subscribe and download various contents from Mint bookstore’s
homepage to your Mintpad and enjoy them anywhere.
How to subscribe
1. Go to Mintpass homepage.
2. Click on the desired contents from bookstore>Mint bookstore home.
3. Check the book contents by viewing contents preview
4. Click on the button if you would like to subscribe.
5. For other contents you would like to subscribe, repeat the same process.
6. Check if the subscribed contents are in Sapphire by going to
the Mintpass’s homepage bookstore>download.
7. Transfer the contents to Mintpad by clicking on the button or
simply drag the file to the Mintpad icon.
8. Read the downloaded books by entering into
“bookstore” menu >”My subscriptions” in Mintpad.
Transfer
Subscribe
23
Subscribe this book.
Previewing the book contents
Page 24
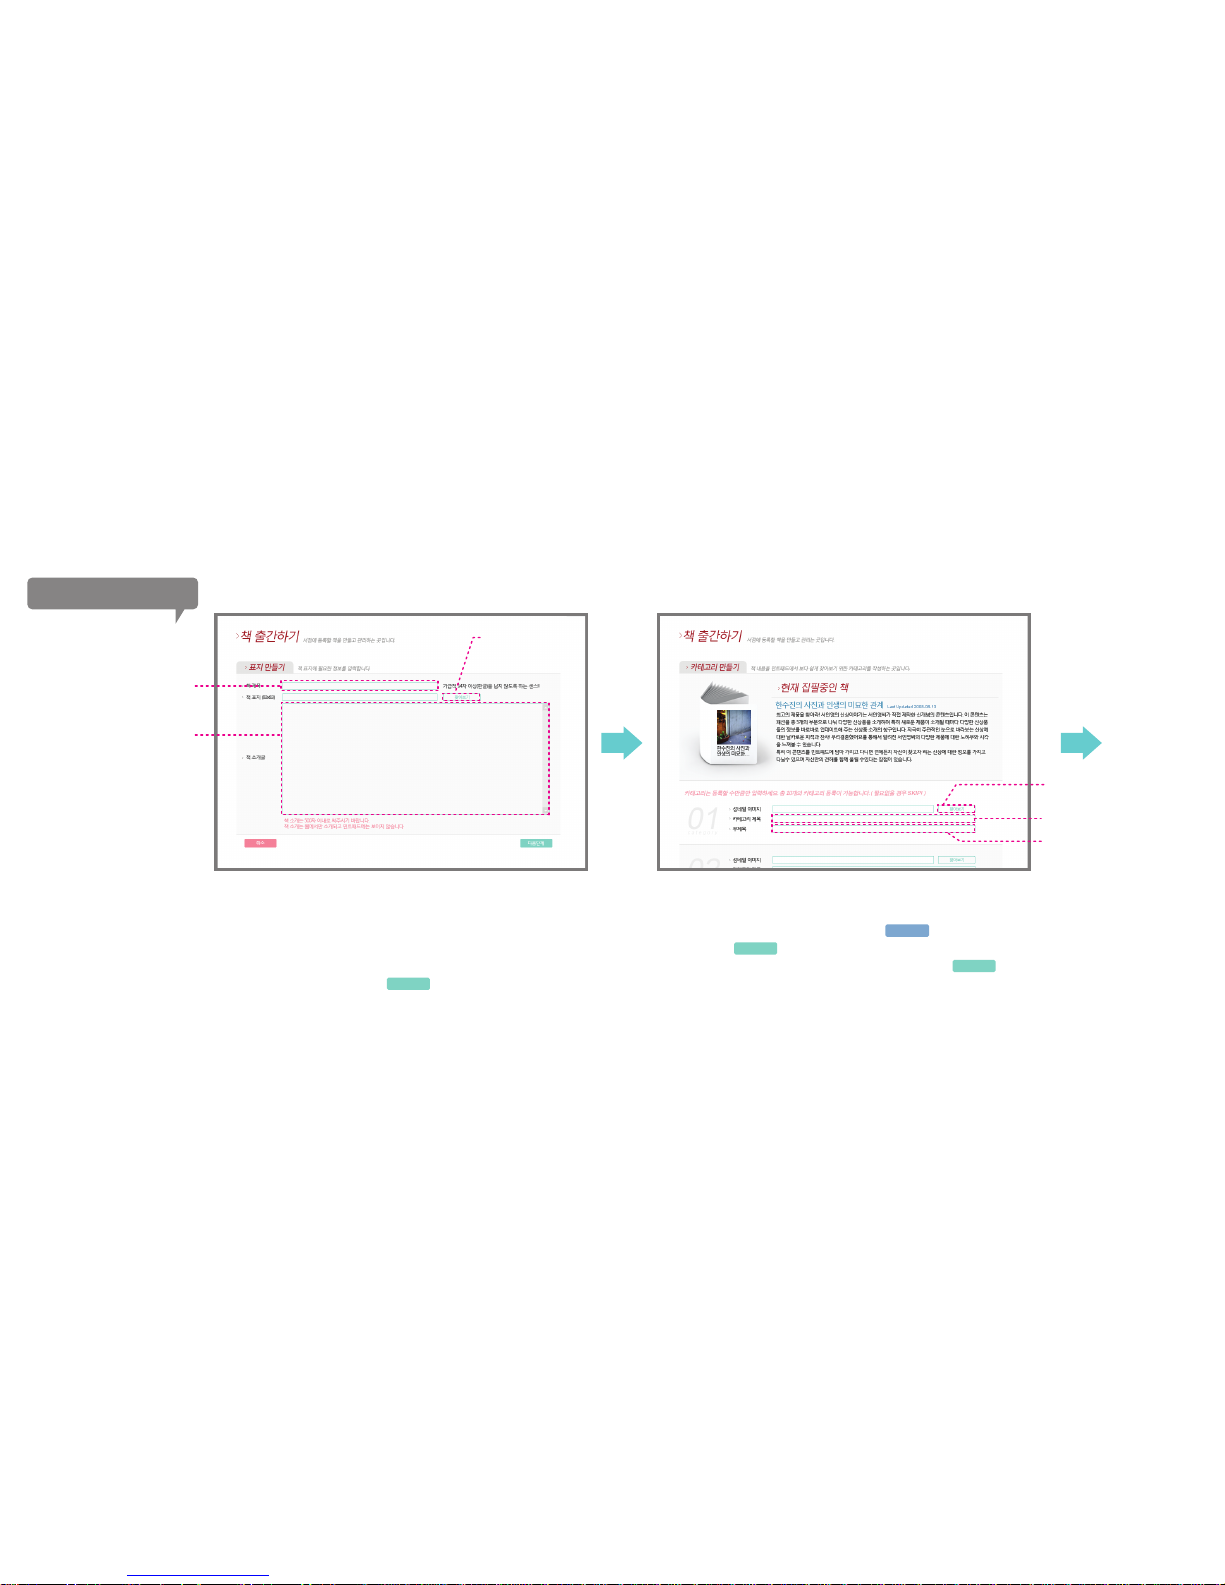
Make a category for easier searching of the contents. You can
create max 10 contents. Click on the button, and then
click on the button to go to the next step. If you don’t
need to categorize your contents, just click on the button.
If you click on the Bookstore>Publish list, the page you can
create the book will load.
First, you make the book’s cover. Compose a brief introduction, title, and cover image about the book.
Once finished, click on the
Step 01.
next
next
next
Step 02.
Save
Publishing the contents
24
Enter the book’s title.
Load the image for the book cover
(size 83X83)
Compose a brief introduction
about the book.
(max 500 chracters)
Load the category’s
thumbnails image.
Enter the category’s titile.
Enter the category’s sub-title.
Page 25
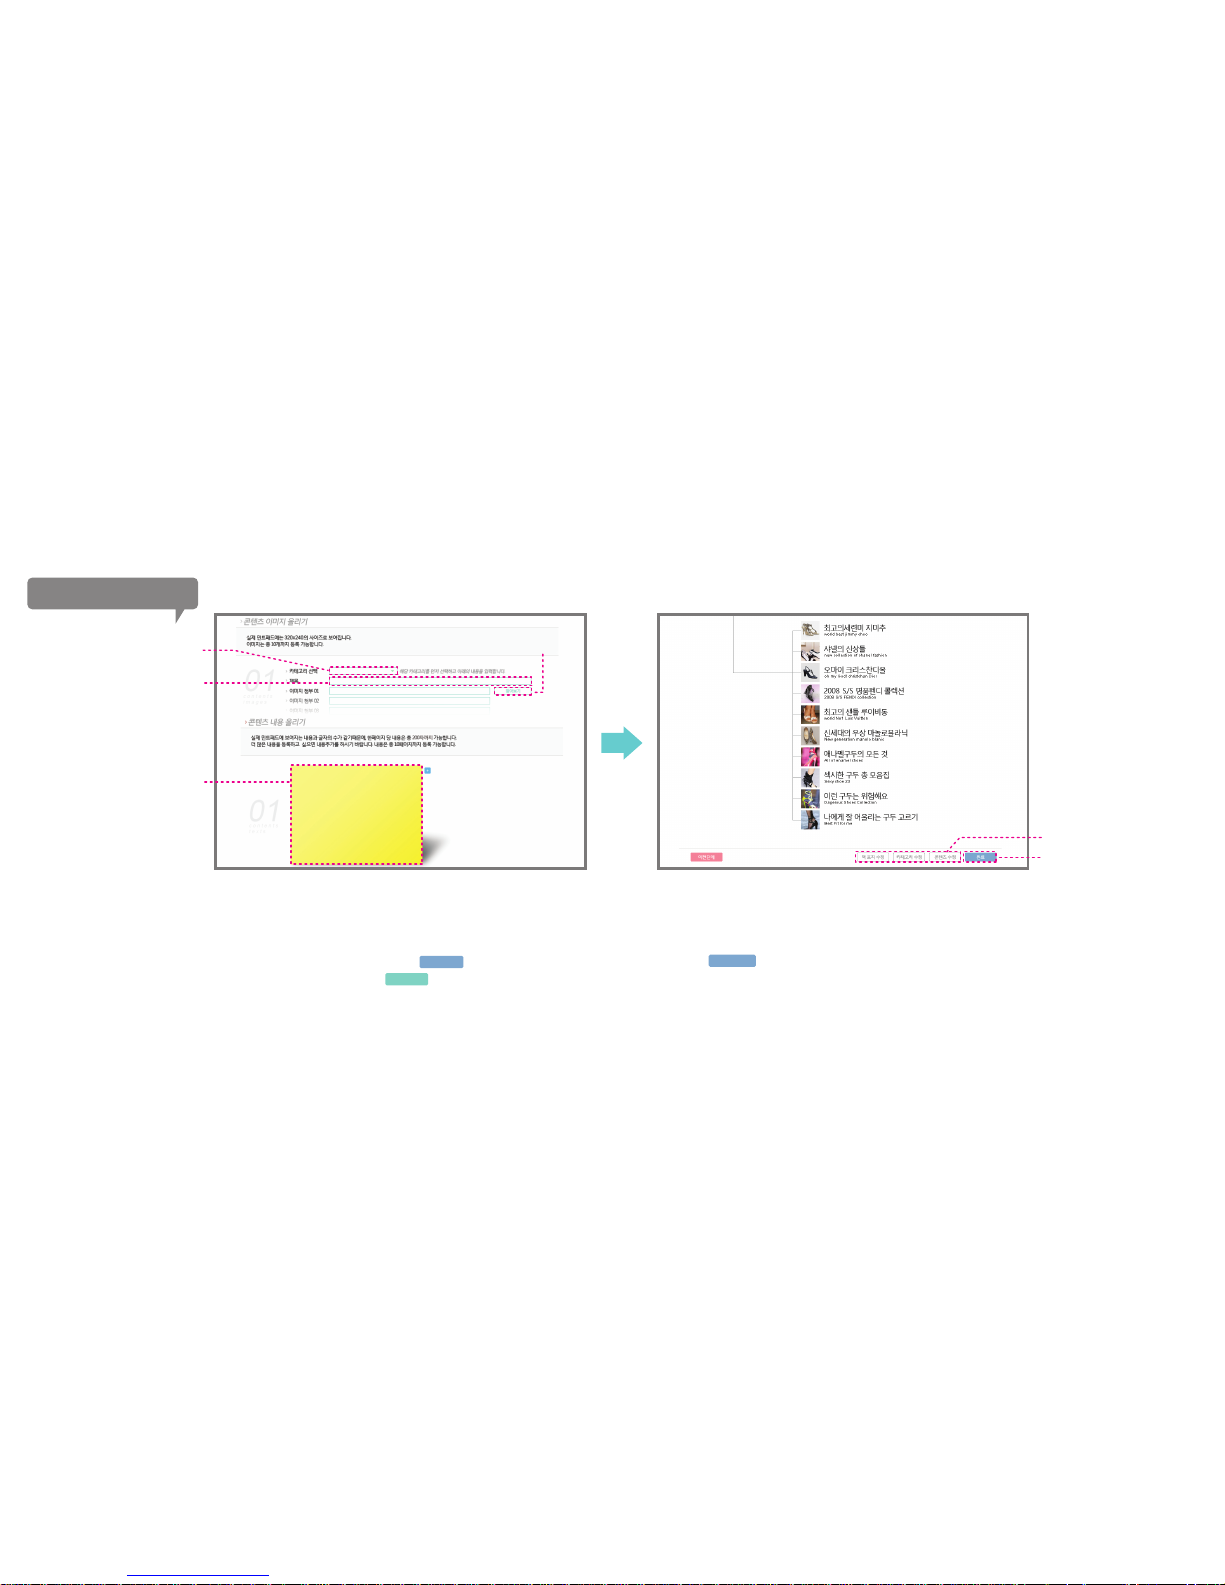
It shows all the works that are created up to now.
You can edit the cover, category, and contents with the “edit”
button, and you can finish up the contents creating by clicking
on the button.
Compose the book’s contents.
After a category selection, you can insert images (10 images
max) and contents (10 pages max).
Save your work by clicking on the button and go to the
next step by clicking on the button.
Step 03. Step 04.
Finish
25
Select from the
<step 02>’s categories.
You can load max 10 images.
Enter the book’s title.
Enter the book’s contents.
Maximum of 200 characters
are allowed per page;
and you can upload max 10 pages.
Finishing the contents making.
You can edit each category.
next
Save
Publishing the contents
Page 26
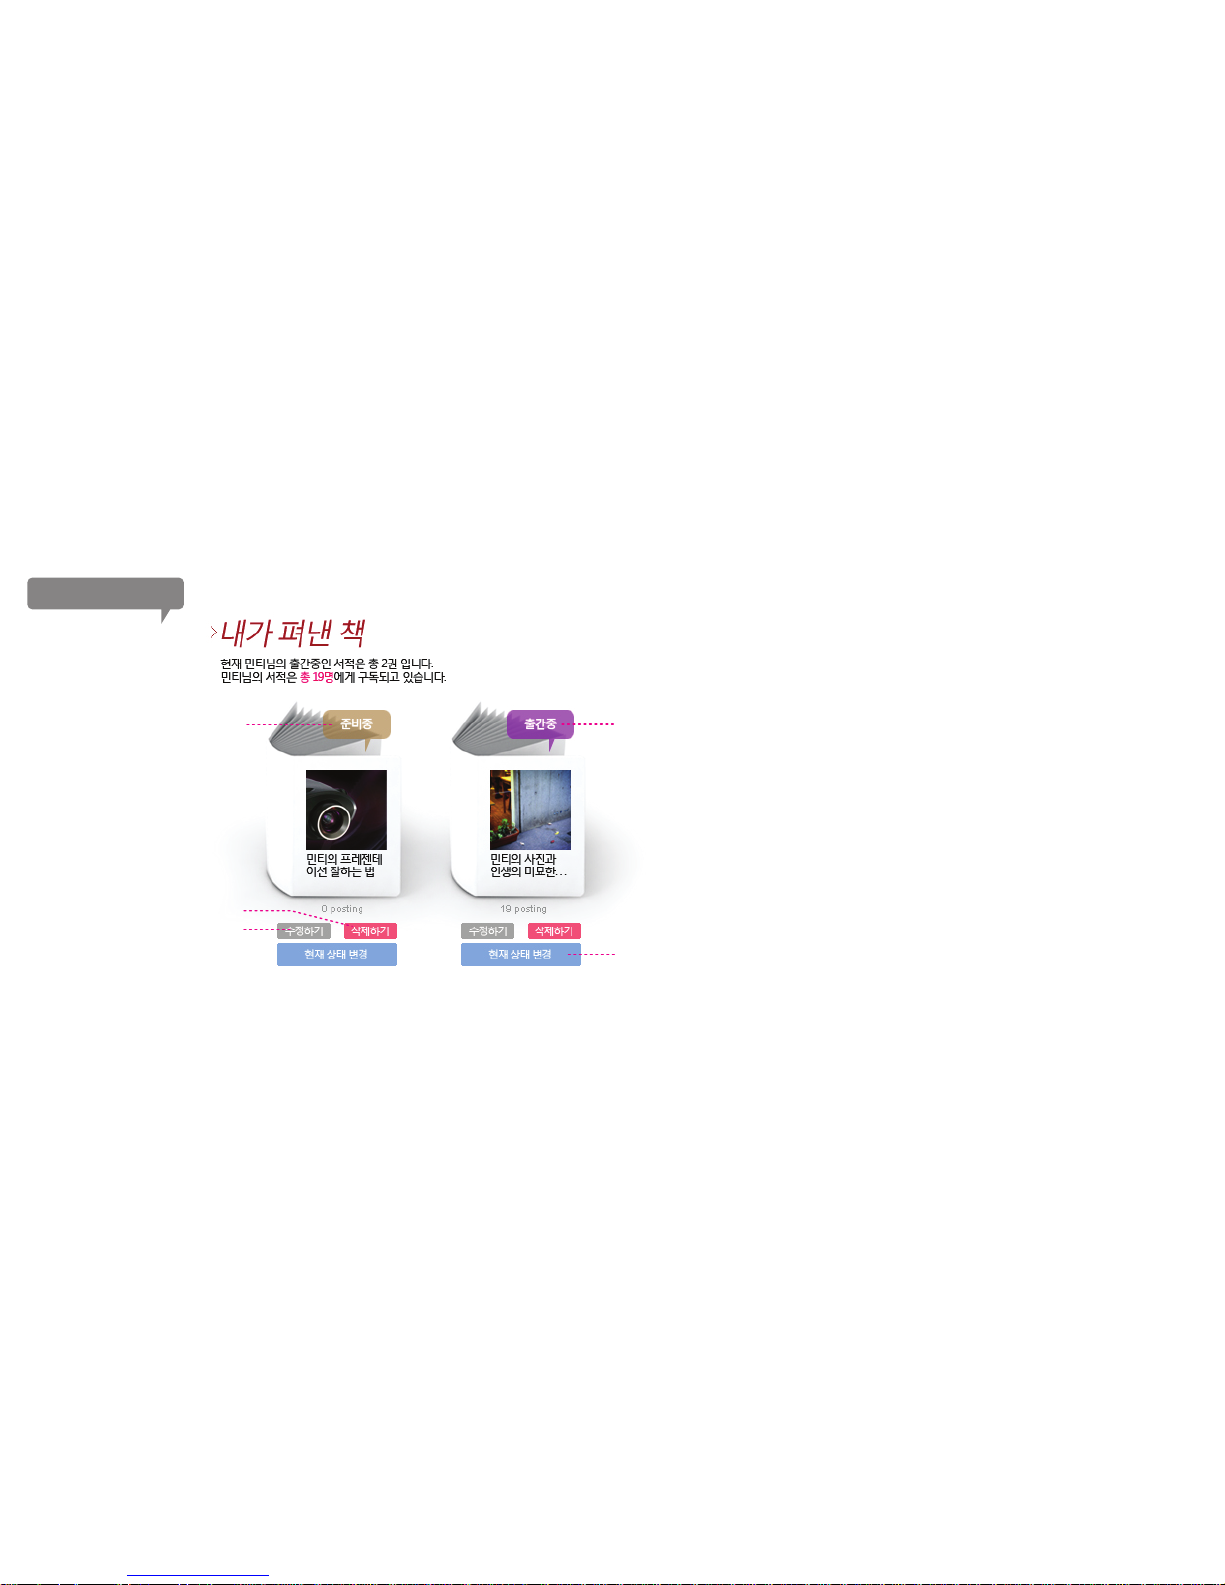
Go to the Mintpass homepage’s Bookstore>publish list, you
can manage the books that you have published. You can
edit or delete the books, and you can temporarily stop
publishing the books. You can also find out how many
member are subscribing to your book.
Managing the book publishing.
26
It shows the books
being prepared for publishing.
It shows the books
that are published.
Edit the book.
The status of the book changes;
“preparing” for the books that are being published;
“Publishing” for the books that are being prepared.
Delete the book.
Publishing managing
Page 27
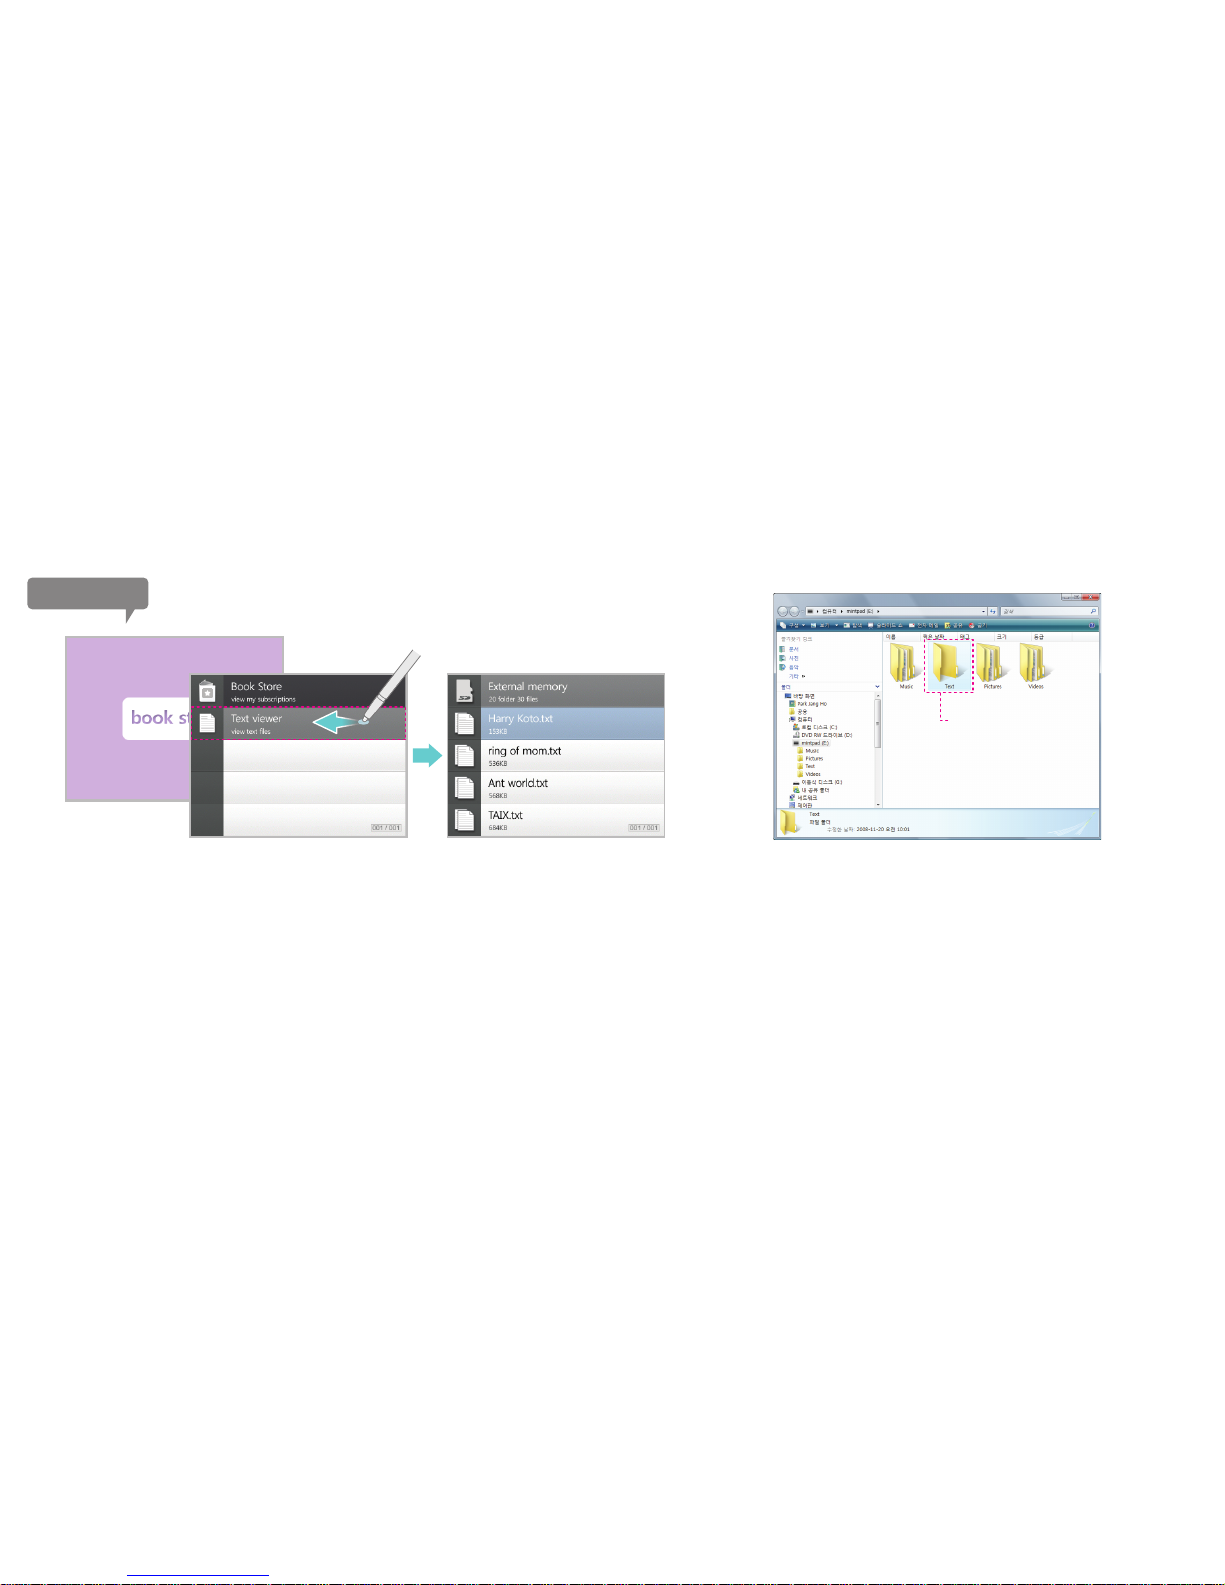
Text Viewer
Text viewer can be found from Mintpad’s “book store” menu. To read a text file, go to the “book store”
menu, and choose the “Text viewer” item to launch a list of text files saved in Mintpad. Select a file and
either double-click or slide left on the screen to proceed.
(The text files saved in external memory card can be accessed from the external memory card menu)
*You can resume up to 10 text files
1. Run the Windows Explorer or My Computer. Find and double-click on the drive
that is assigned to Mintpad.
2. Double-click on the newly created Text folder.
3. Copy the “txt” files to the Text folder. (“txt” is the only file extension supported)
4. View the text files from the “book store” menu in Mintpad.
How to use Text viewer
Copy text files to the Text folder
that is newly created in Mintpad
drive or external memory drive.
*Transferring text files to Mintpad
27
Page 28
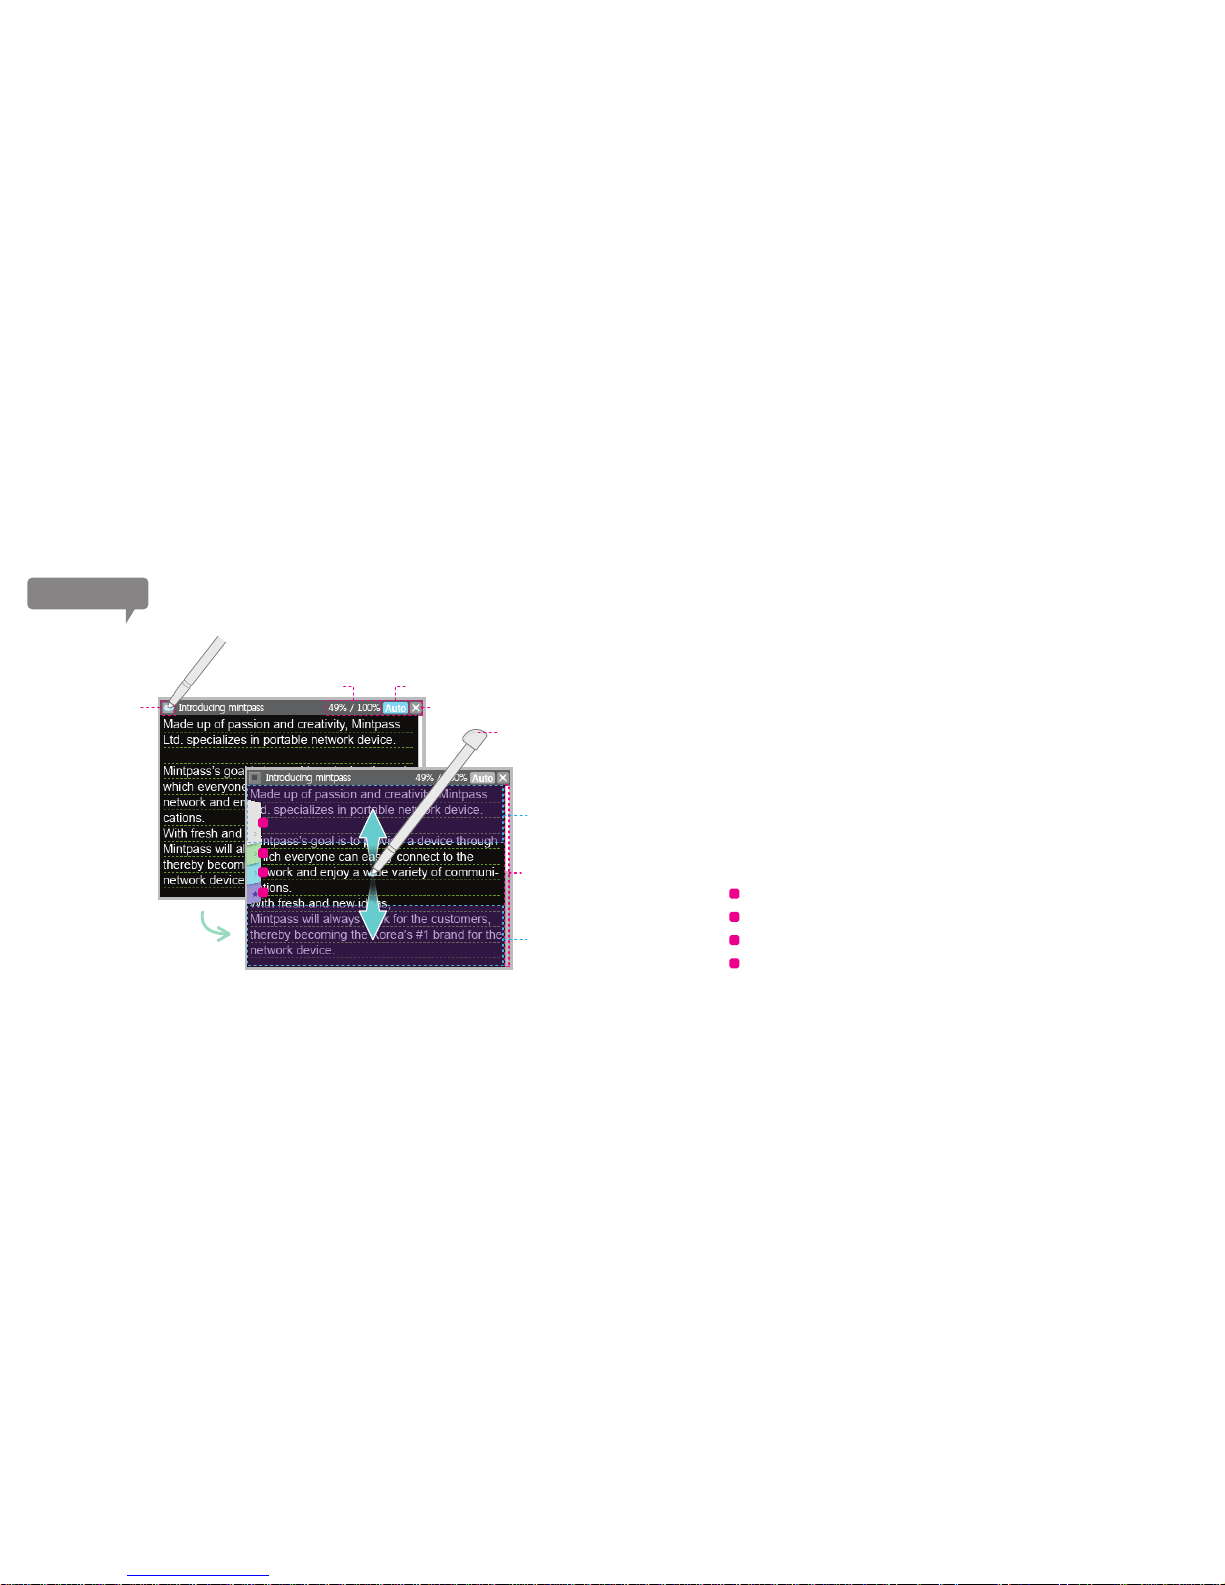
Using the option tab on text viewer, users can change its settings.
The option tab can be hidden to avoid blocking the text viewer contents.
To move through the pages, users can slide up or down on the screen to
go to next or previous page. Another way to move through the pages
would be clicking on the page scrolling area; or shaking the device can
also skip to the next page.
Clicking on the auto page skip button on the top will advance to the next
page automatically depending on the time setting set by the user. To
deactivate the auto page skip, click on the auto page skip button, or skip
the page manually.
Tab option
view/hide button
Current page/
he entire page
Page auto skip
on/off button
Close text viewer
Tab to change the setting for font color / size, spacing, underline and background colors.
Tab to set the page view, auto page skip (time), and font style.
Tab to set page skip option.
Tab for bookmarks.
1
2
3
4
Slide up to skip to next page,
down to skip to previous page.
Page scroll bar
1
2
3
4
Touch area for previous page
Touch area for next page
How to use text viewer
28
Text Viewer
Page 29
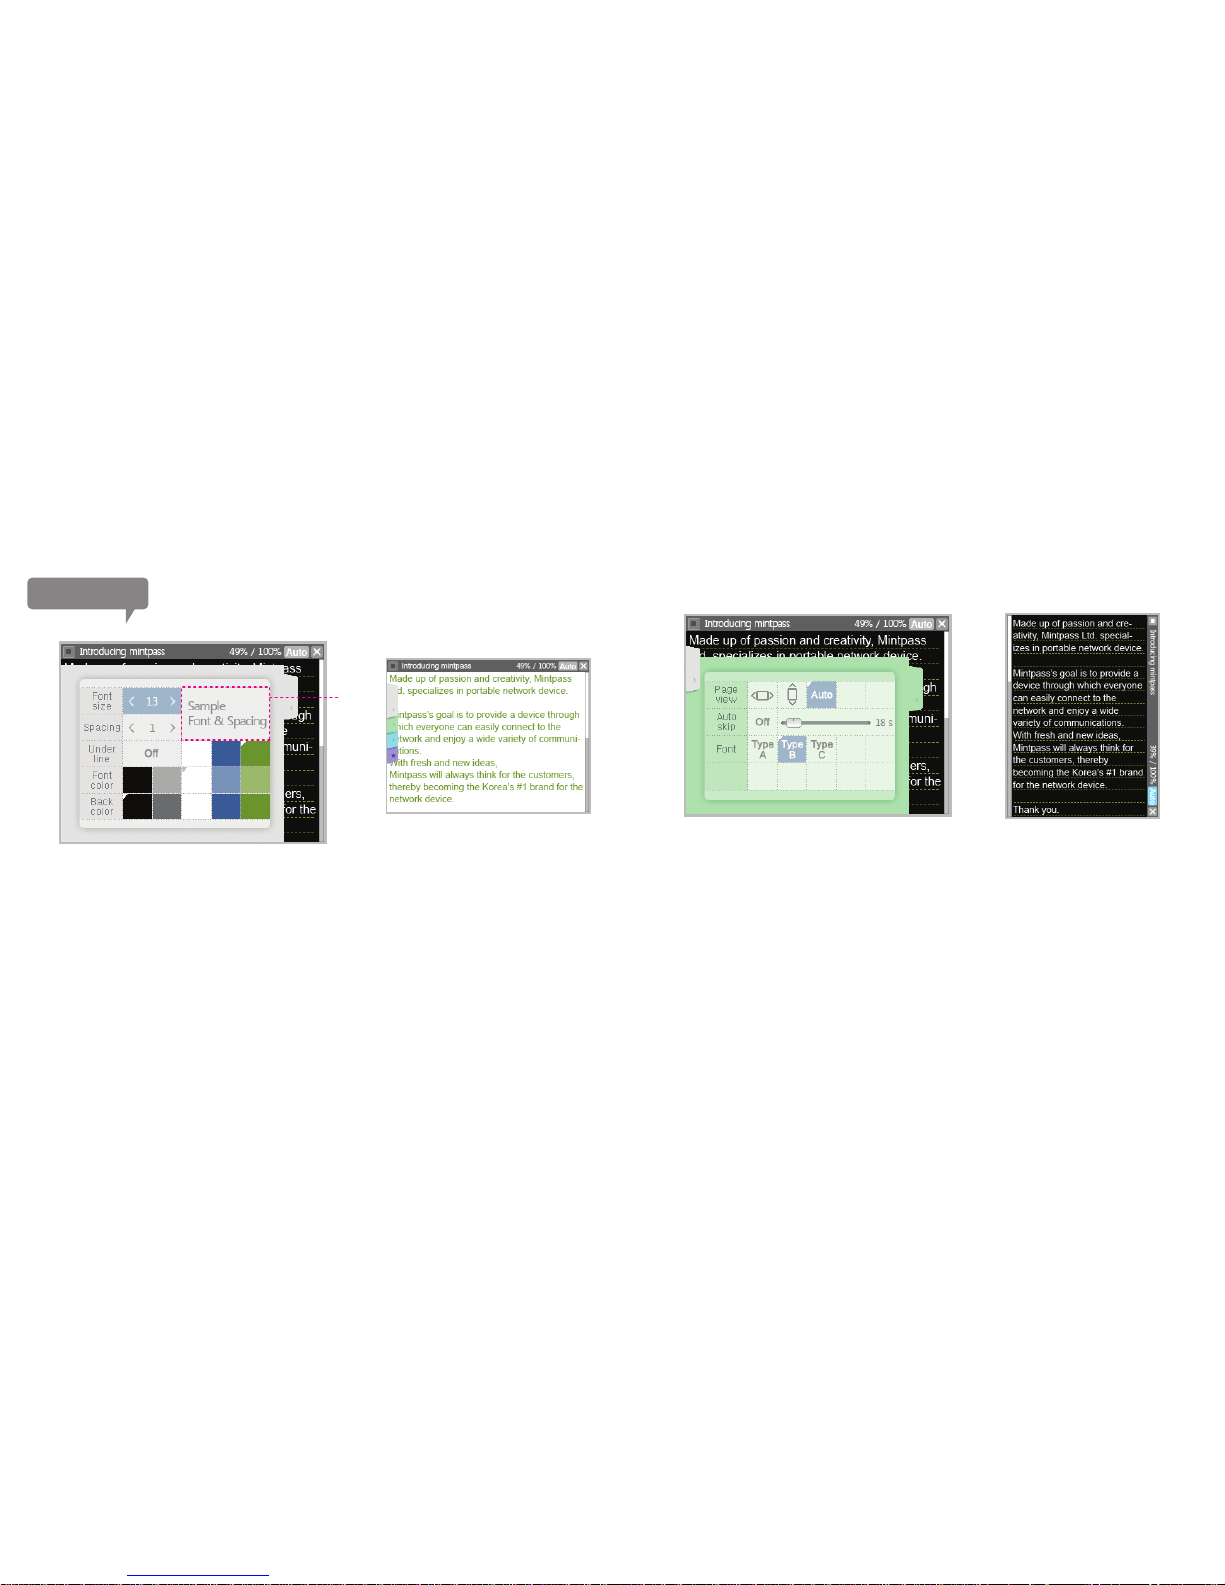
Font size/color, spacing, and color for underline and background are set from the first tab.
Choose font sizes from 7~20 and the spacing from 5~20. They are previewed in preview area
within the tab.
Preview
area
Example of background and font color change
Vertical page view
Changing font size/color, spacing, and color for underline and background
The page view, auto flip, and font style settings are done from the second tab. The
page view can be set to horizontal or vertical; when the “auto” setting is on, the
G-sensor from Mintpad detects the position in which the device is held and set the
page view accordingly. The auto skip time setting can be set from 0 second (off) to 45
second; the setting will be applied when the auto flip is turned on, and it will scroll
down each line after the set time. Font can be selected from three types.
Setting the page view, auto skip, and font style
29
Text Viewer
Page 30
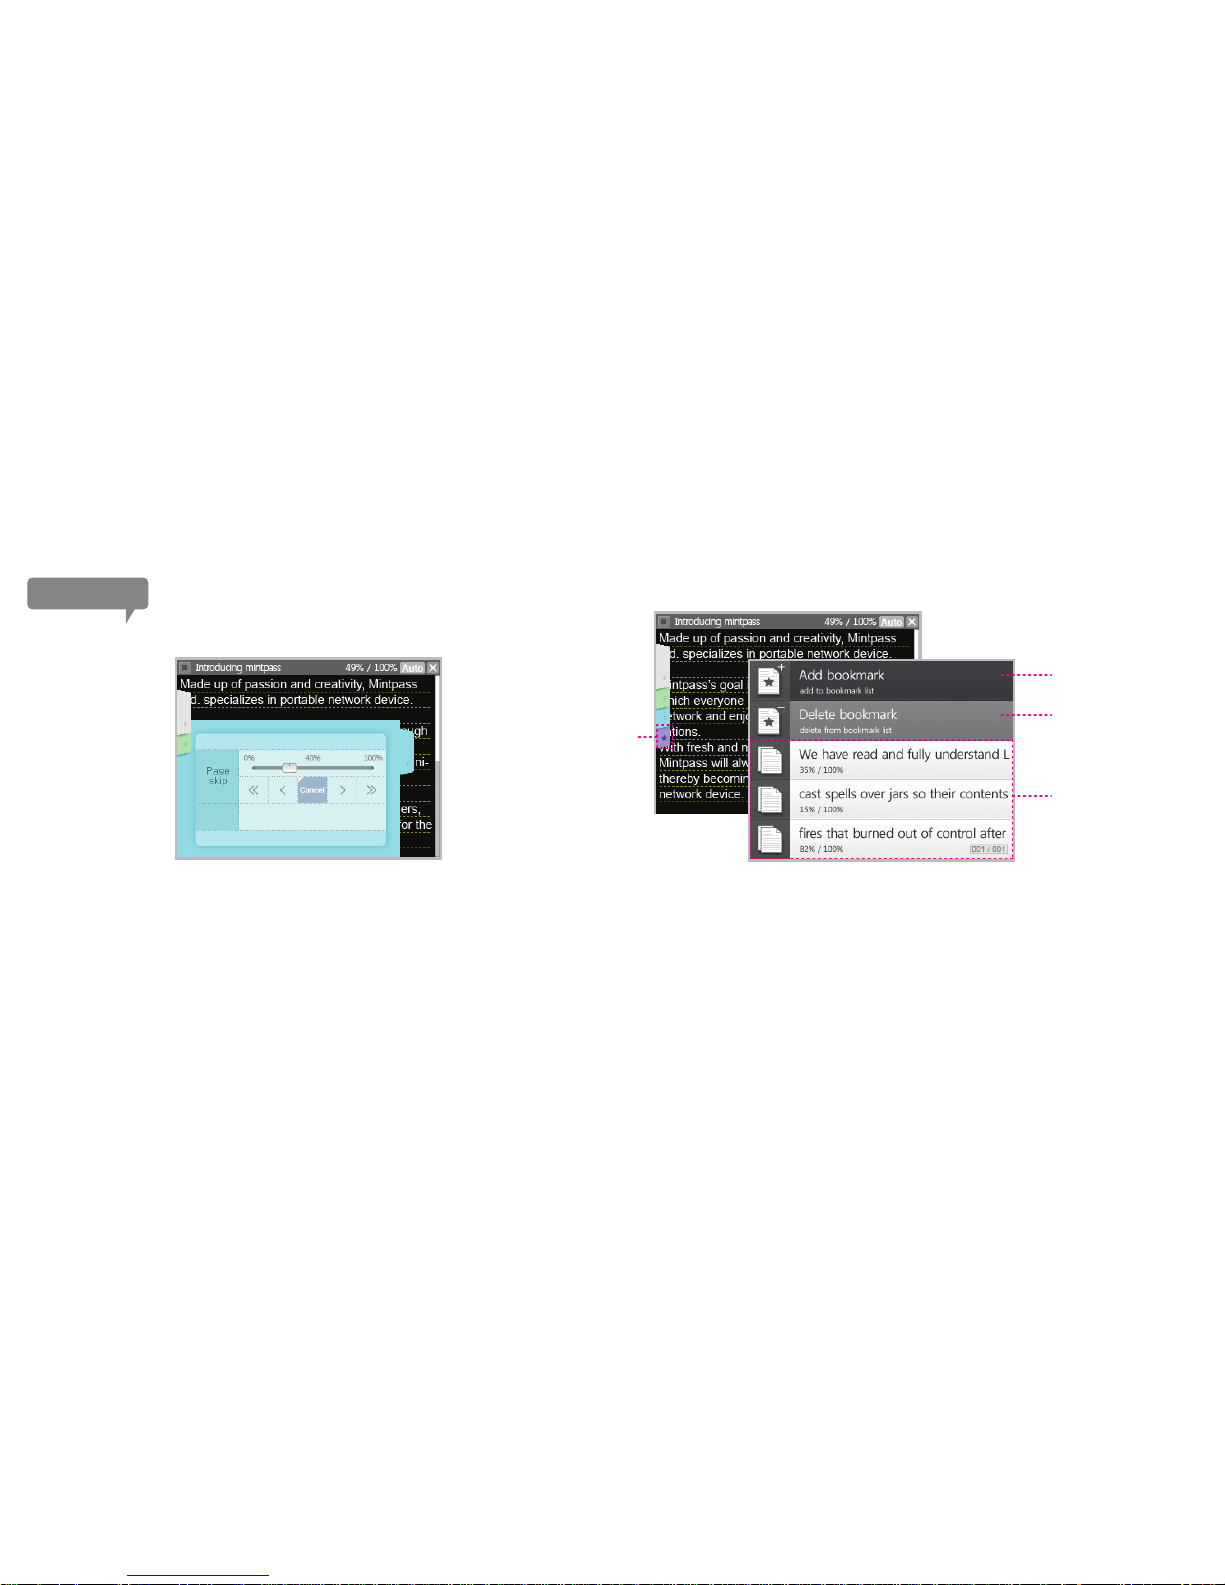
Page skip options can be set from the third tab. You can use << >> (10%
speed) and < > (1% speed) to set the speed of page skip. Clicking on the
“current page” will cancel the settings and return to current page.
BookMark tap
Bookmark
the current page.
Page skip
Clicking on the fourth tab, which is the bookmark tab, will bring you to bookmark list
screen. In here, you can add or delete bookmarks. Bookmark list will display only the
bookmarks for the file you are currently on.
Managing bookmarks
Delete a bookmark
from the bookmark list.
Bookmarks
(The first line from the page
will be displayed)
30
Text Viewer
Page 31
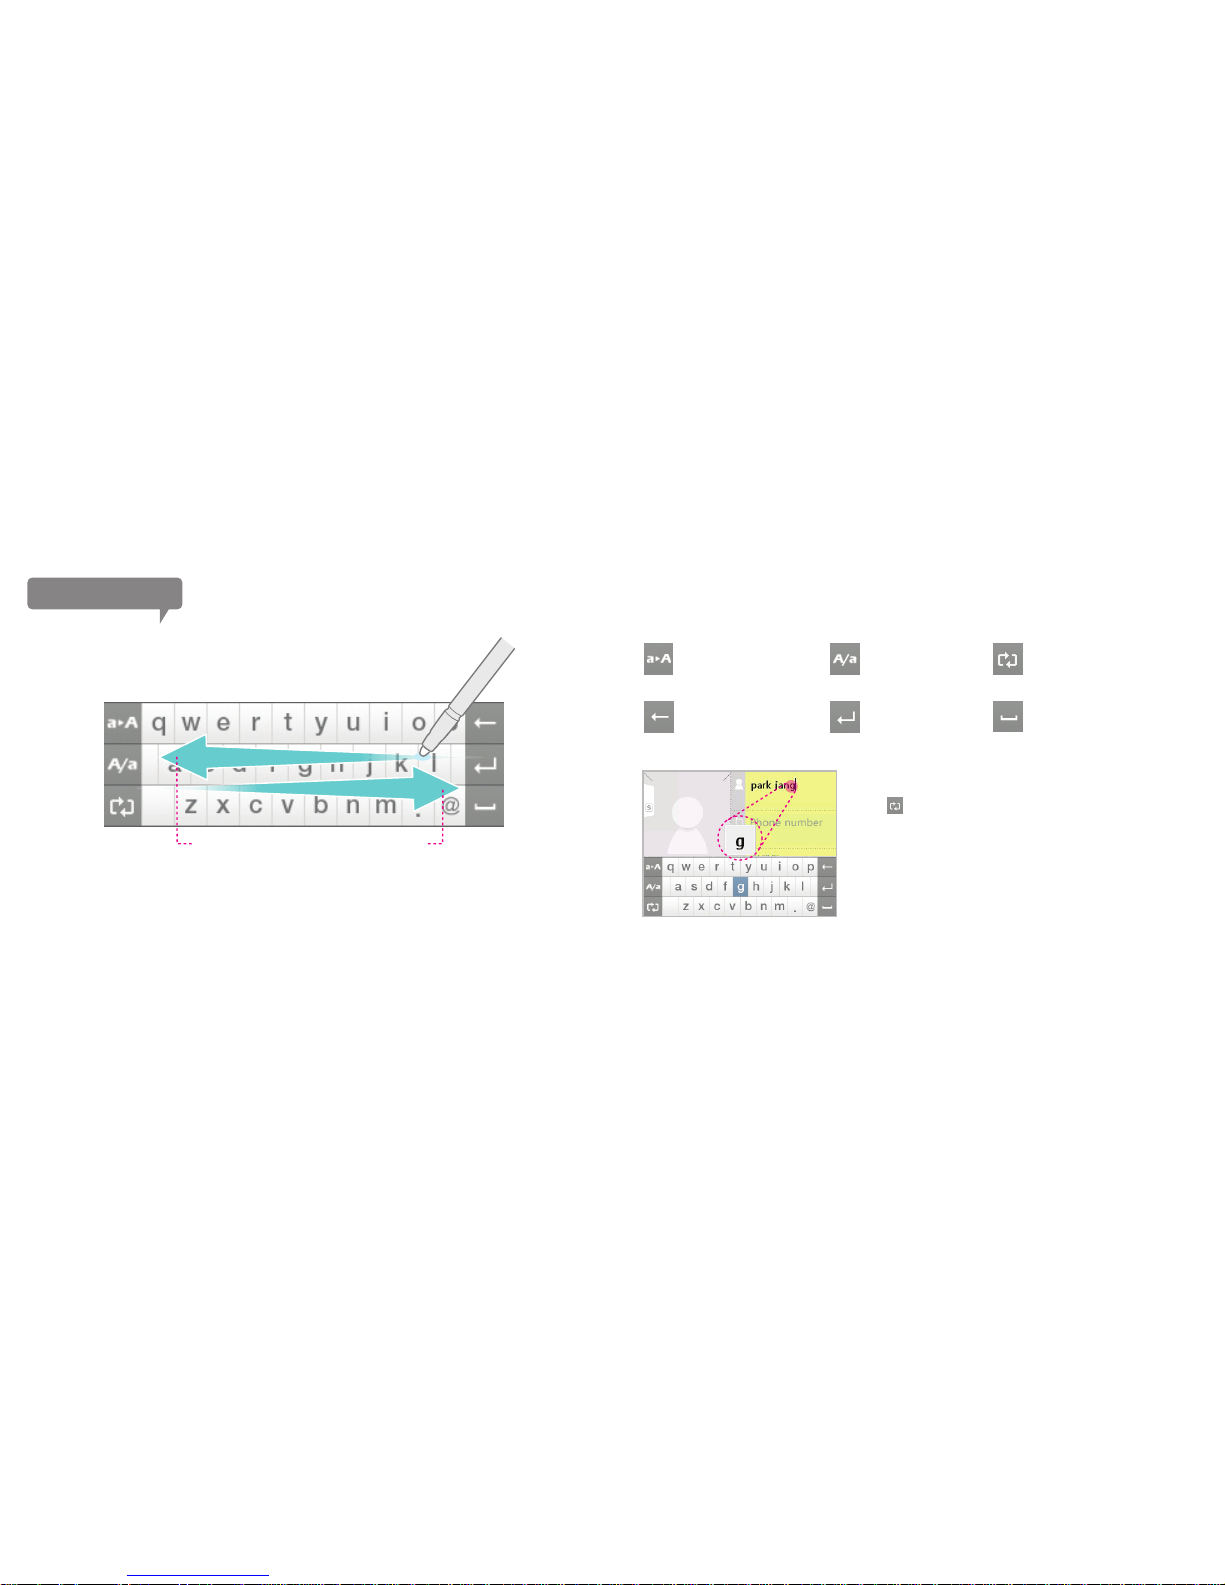
If the button is pressed and hold, the pop up
screen will appear. If you choose “on” the currently
selected character/letter will be zoomed in and will
appear in the center of the screen.
Using the Typing tool
Converting the typing tool.
Using the typing tool.
Use the typing tool when using the Internet, name card, and etc.
It converts what you typed
(small letters) to capital letters.
SHIFT key
Clicking or holding this button
will convert the input mode to
numerical/Korean/English/
symbols/setting.
Backspace key enter key space key
English>symbol>Korean>English Numerical
31
If you slide the typing tool to the left or right direction, you can change the language,
however, you will have to slide a bit longer than conventional slide.
If you slide left, it changes to the following order: English>symbols>Korean>English. If
you slide right, it converts to the numbers. From the numbers mode, you can change to
other mode by clicking on the empty space on the right side. If you want to rid the typing
tool, simply drag the upper edge of the typing tool down.
Page 32
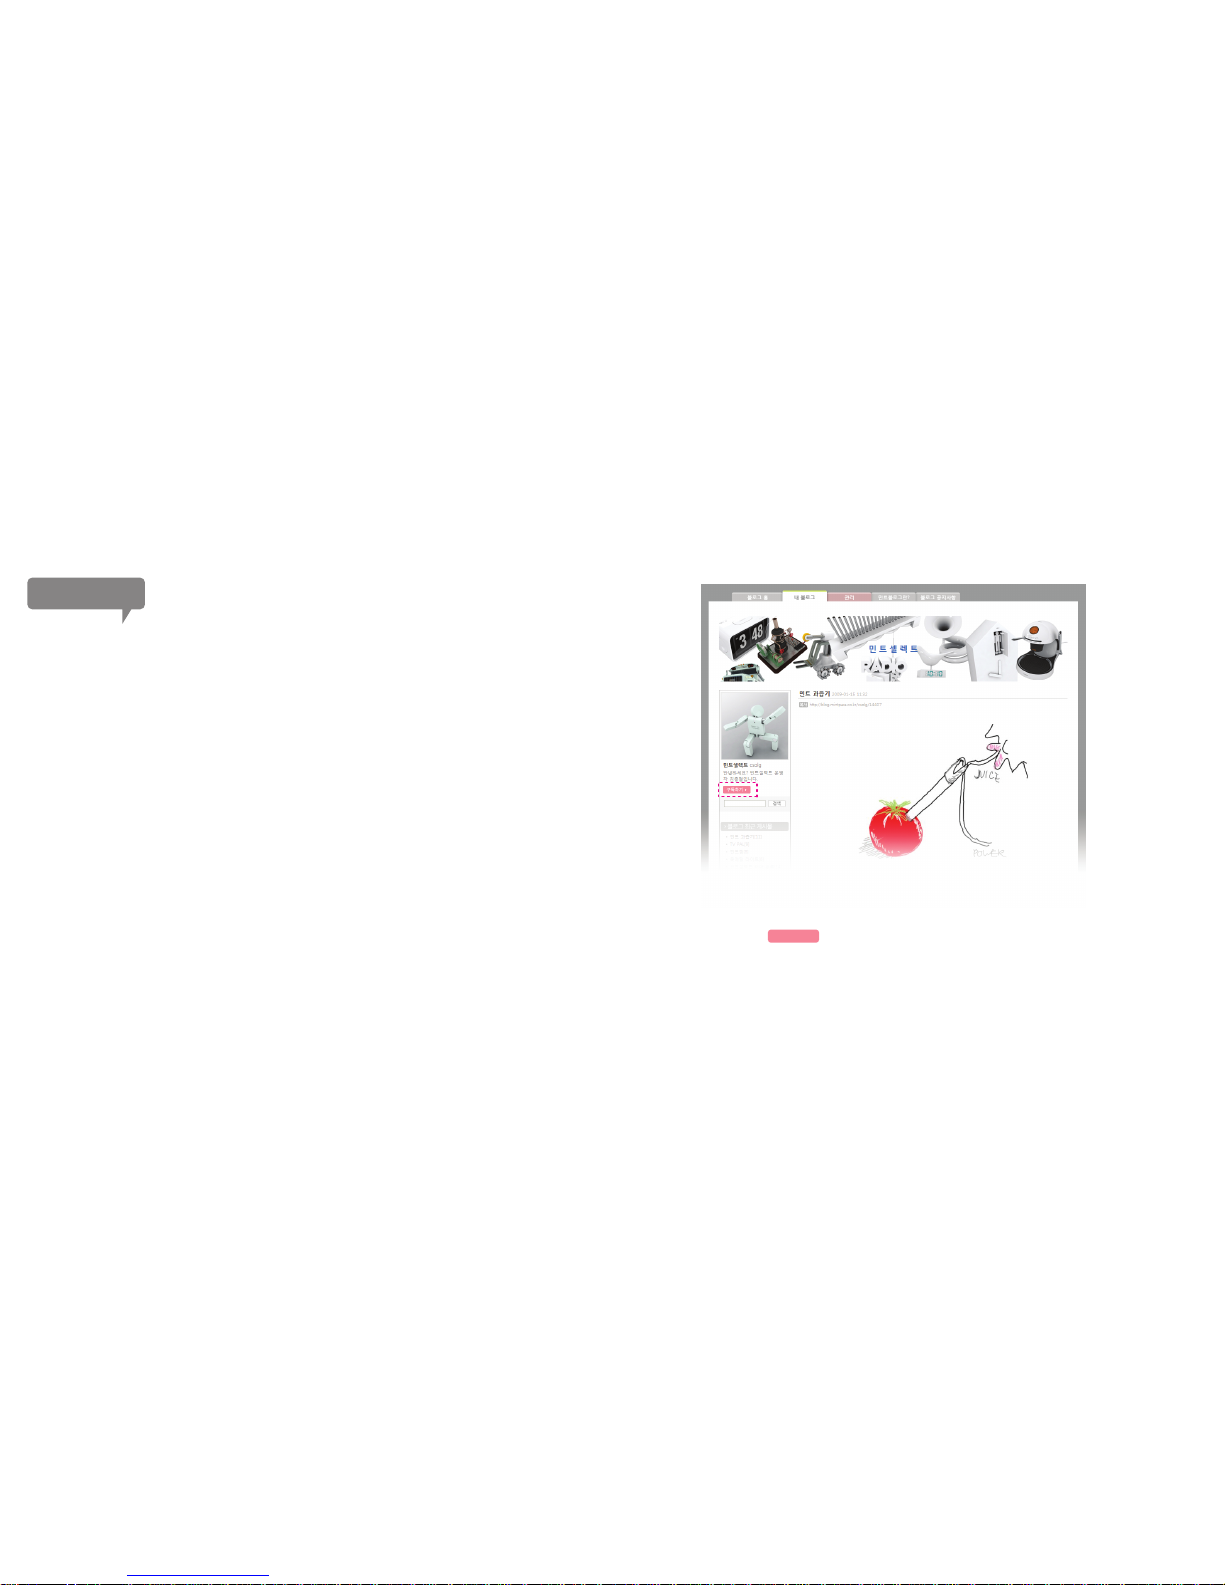
Blog
You can enjoy Blogging anywhere.
You can upload pictures, messages, replies, directly from the device or from the
web using the memo function or the typing function. The contents created from
Mintpad, such as memo or pictures become blog contents.
Moreover, you can visit other member’s blog directly from Mintpad.
*To enjoy Blog, Wi-Fi connection is needed.
What is the Mintpad Blog?
To use blog function from Mintpad, blog account needs to be set up from the web
first. Blog account can be set up by going on to Blog>management from Mintpass
homepage.
Making Blog
If you wish to visit mint blogs, you will need to subscribe to the blogs on the web.
1. Visit a blog from Mintpass homepage’s blog page.
2. Clicking on the button, next to the blog’s title, will complete the
subscription process.
Blog Subscription from homepage
Subcribe
▶
32
Page 33
33
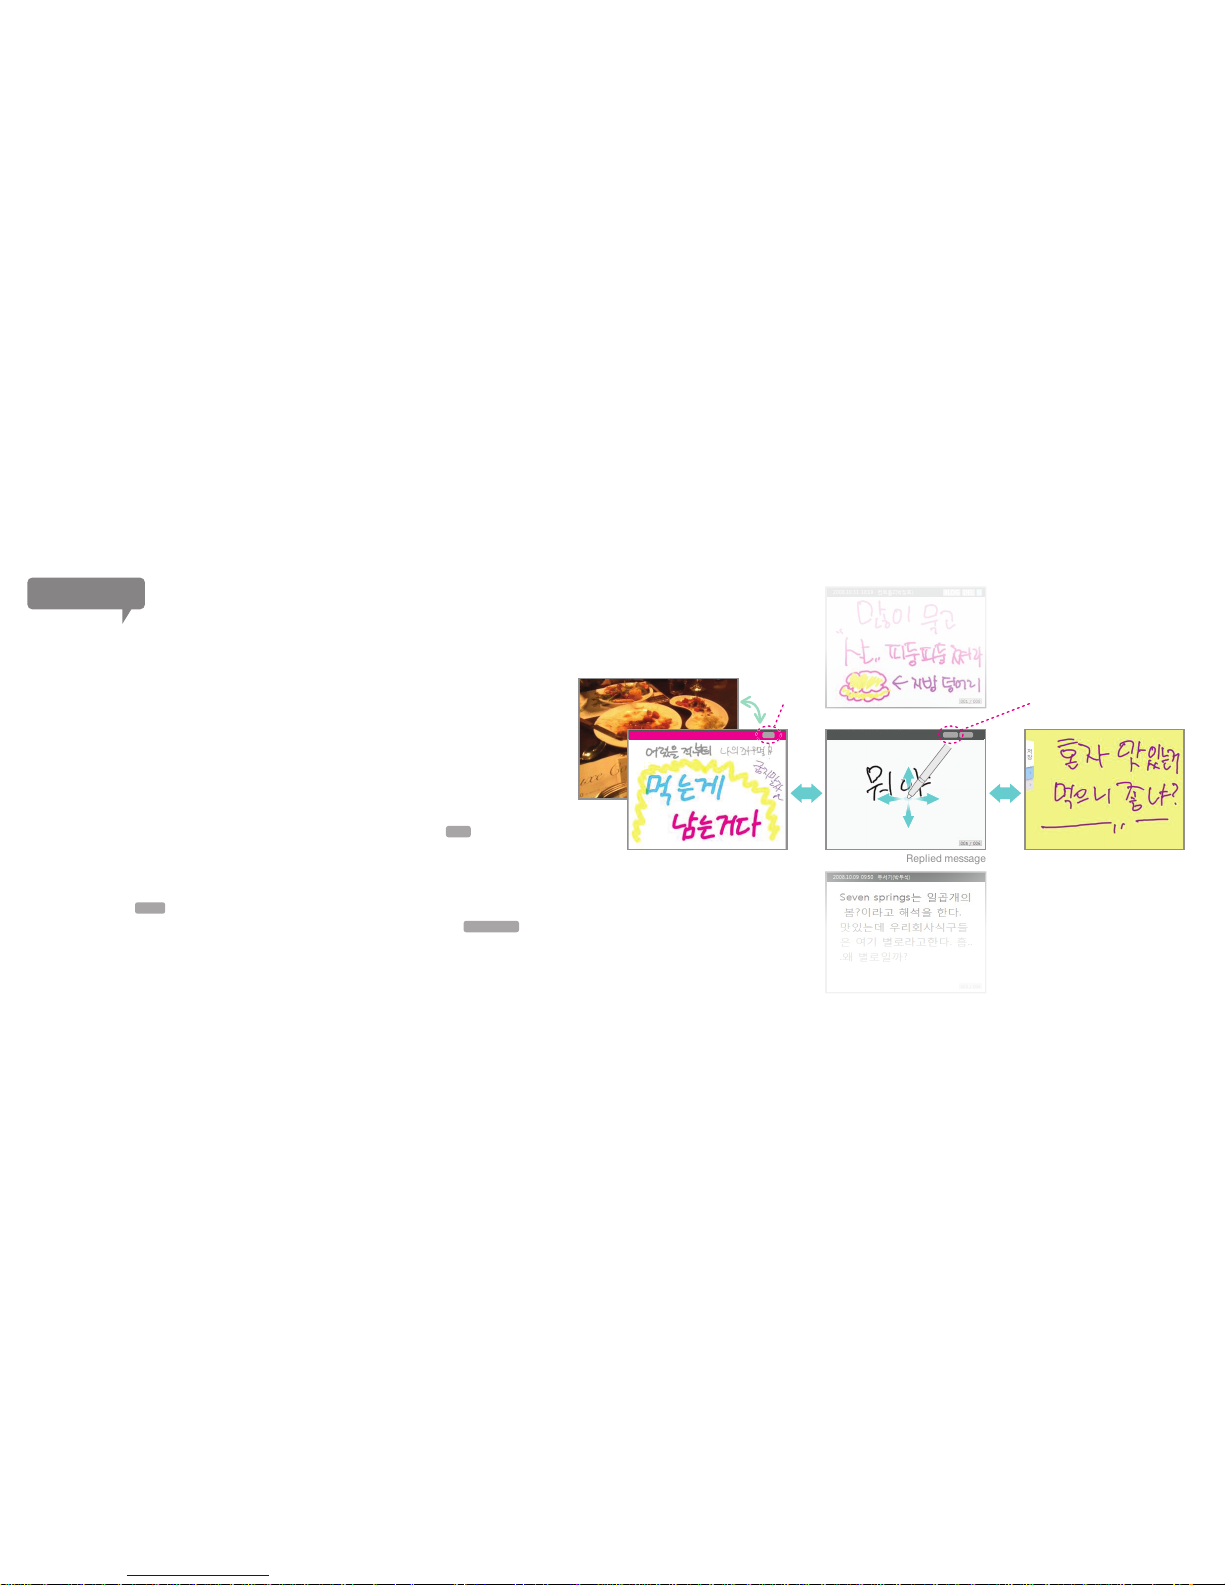
How to view the blogs
Visiting other member’s blog
The blog that you subscribed from the web can be viewed through Mintpad.
1. Subscribed blogs list can be found by entering into Blog>Subscribed
blog(s) from Mintpad.
2. Select the blog that you would like to view from the subscribed blogs list.
3. There are replied messages if you slide left on the blog post screen.
(Scroll up/down to scroll through replied messages)
4. To compose a replying message, slide left on the replied messages screen.
(How you compose a replying message is identical to memo taking function.)
*The reply messages you posted can be deleted by clicking on the button
located on the top side of the replied message window.
Photo (picture, memo)
Content (message, memo) Replied message Writing a replying message
Subscription
To visit the blog
Click on the button on the top side of the replied message window to go to the
blog page of the blogger who posted the reply message. Click on the button
to subscribe the blog that you are currently visiting without subscription.
BLOG
DEL
Subscribe
[글] 2009. 01. 19 21:40 먹는게 남는 거닷 [댓글] 2009. 01. 19 23:21 민트셀렉트
구독
BLOG DEL
Blog
Page 34
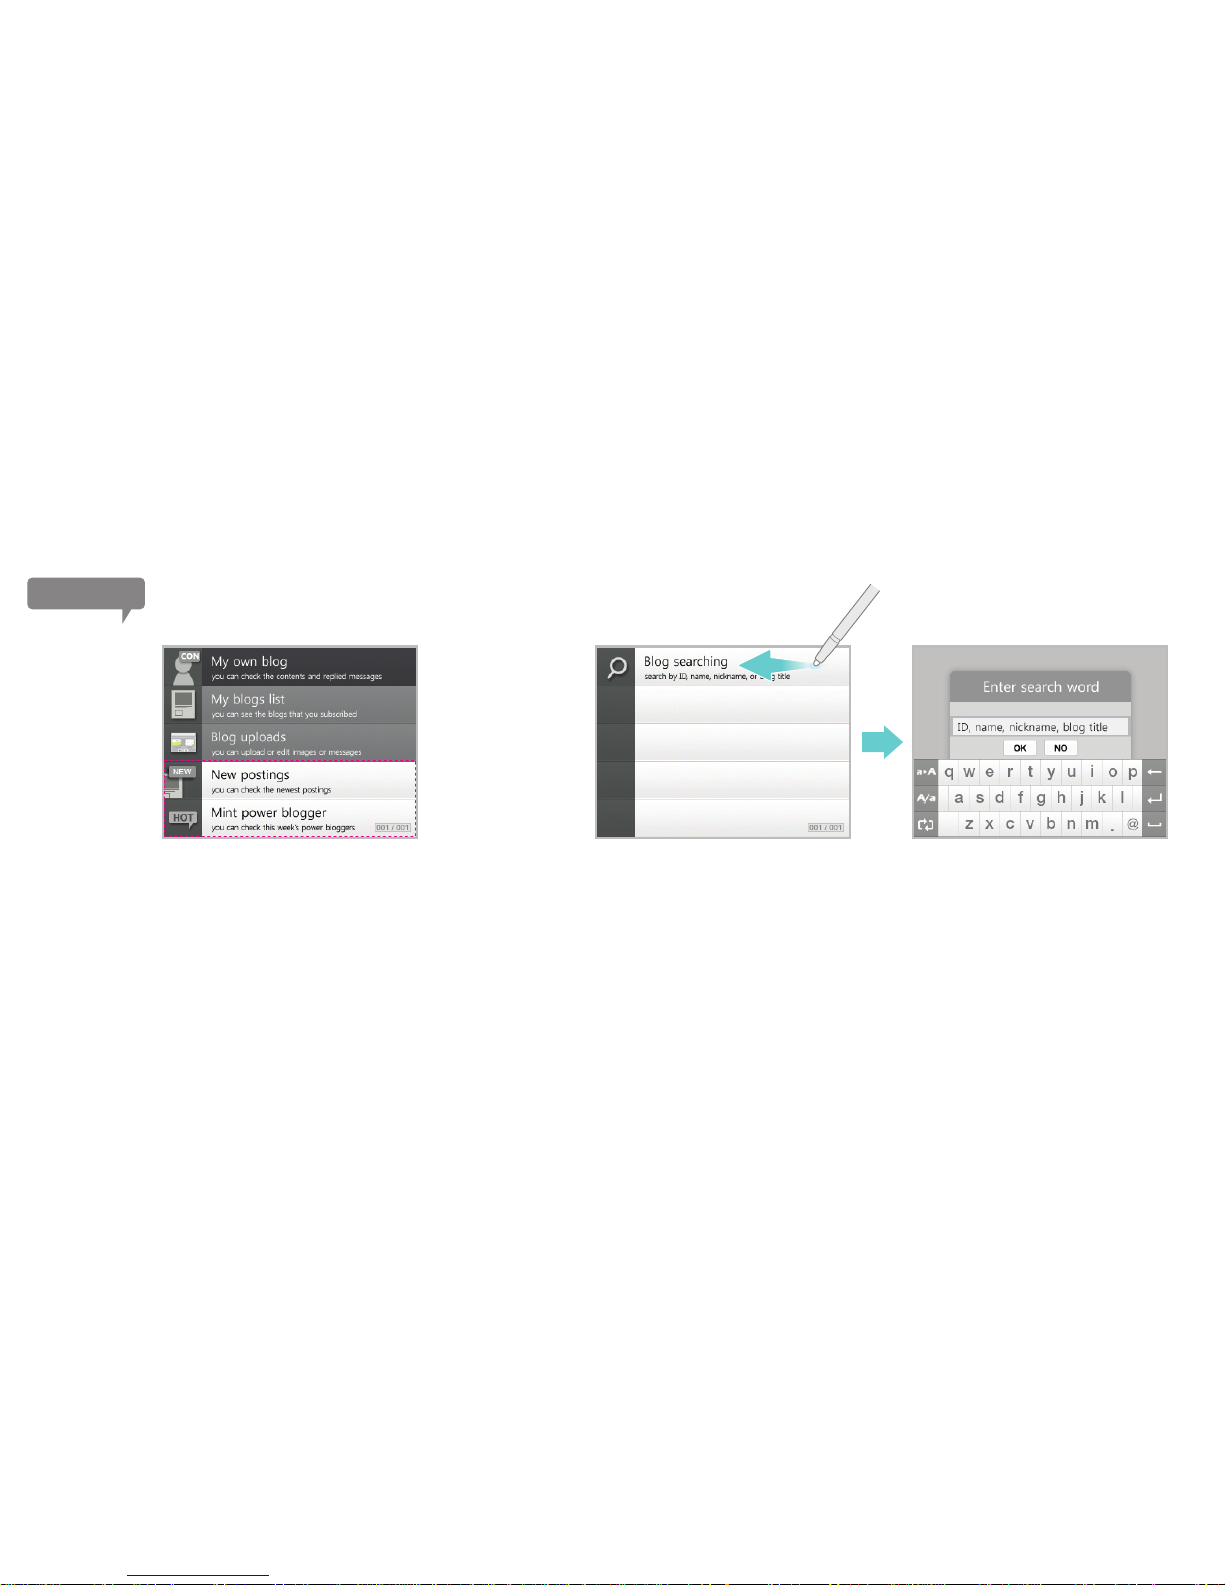
Viewing newly posted blogs and 10 Mint power bloggers’ blogs Blog searching from Mintpad
Click on “New postings” to view the latest blog entries posted on a real time basis.
Also, 10 Mint power bloggers’ blogs can be visited from the “Mint power blogger”
menu.
34
Search any Mint bloggers on the “Blog searching” option from Mintpad’s blog second menu.
Search by ID, name, nickname, or blog title, using the typing tool. Please refer to the page 31 for
more information on how to use the typing tool.
Blog
Page 35
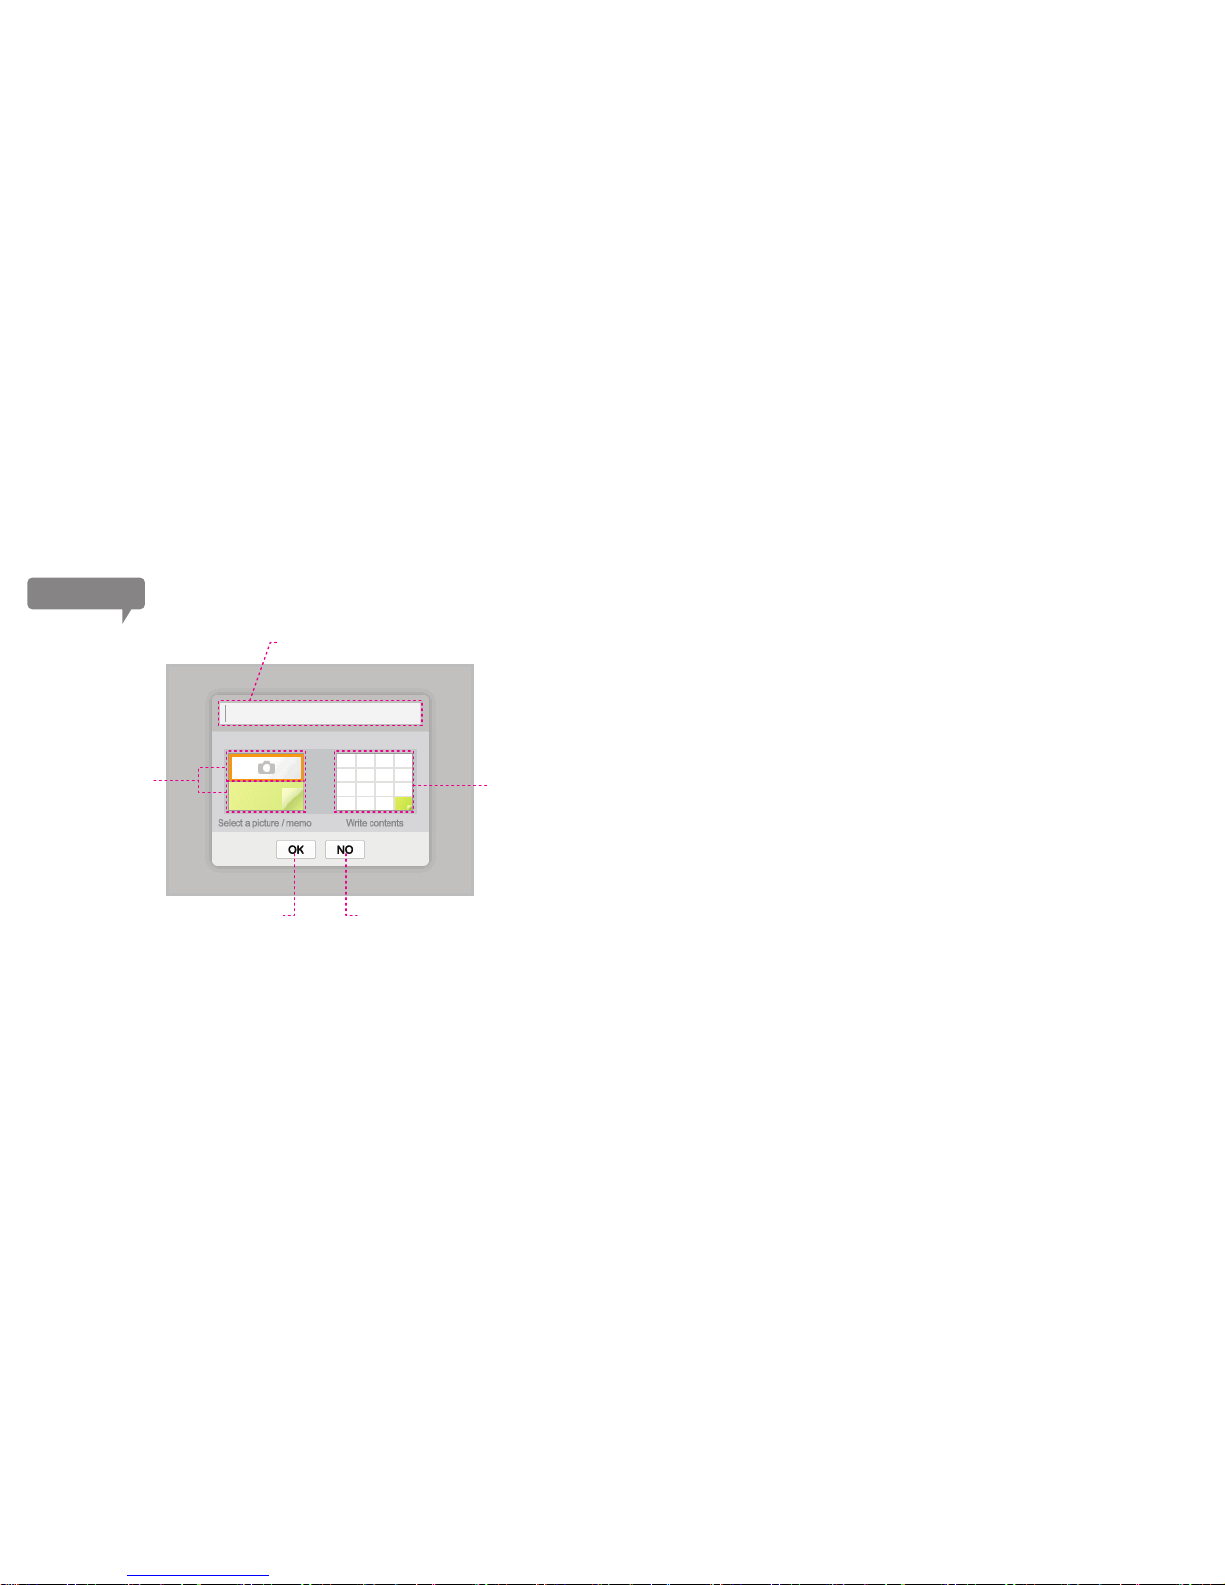
Blog posting using Mintpad
Using the memo function and the pictures from Mintpad, you can perform a blog
posting from the device.
*The following order is an example. (Orders can be rearranged)
1. Select a saved picture or memo from “Picture/Memo Select” option.
(You can choose from previously written memo or write a new memo; pictures taken
with Mintpad or pictures transferred from PC are all usable.)
2. In the “Compose a Message” option, you can either load the saved memo or write
a new memo.
3. Use the typing tool to enter the title of posting.
4. Upload your posting by clicking on the “check” button.
Enter the title for a new posting.
You can load
a saved memo or
write a new memo.
Upload a new posting to blog. Cancel the posting.
Load either
a saved picture
or memo.
35
Blog
Page 36
민트라이프민트블로그
Life Contest
TIP
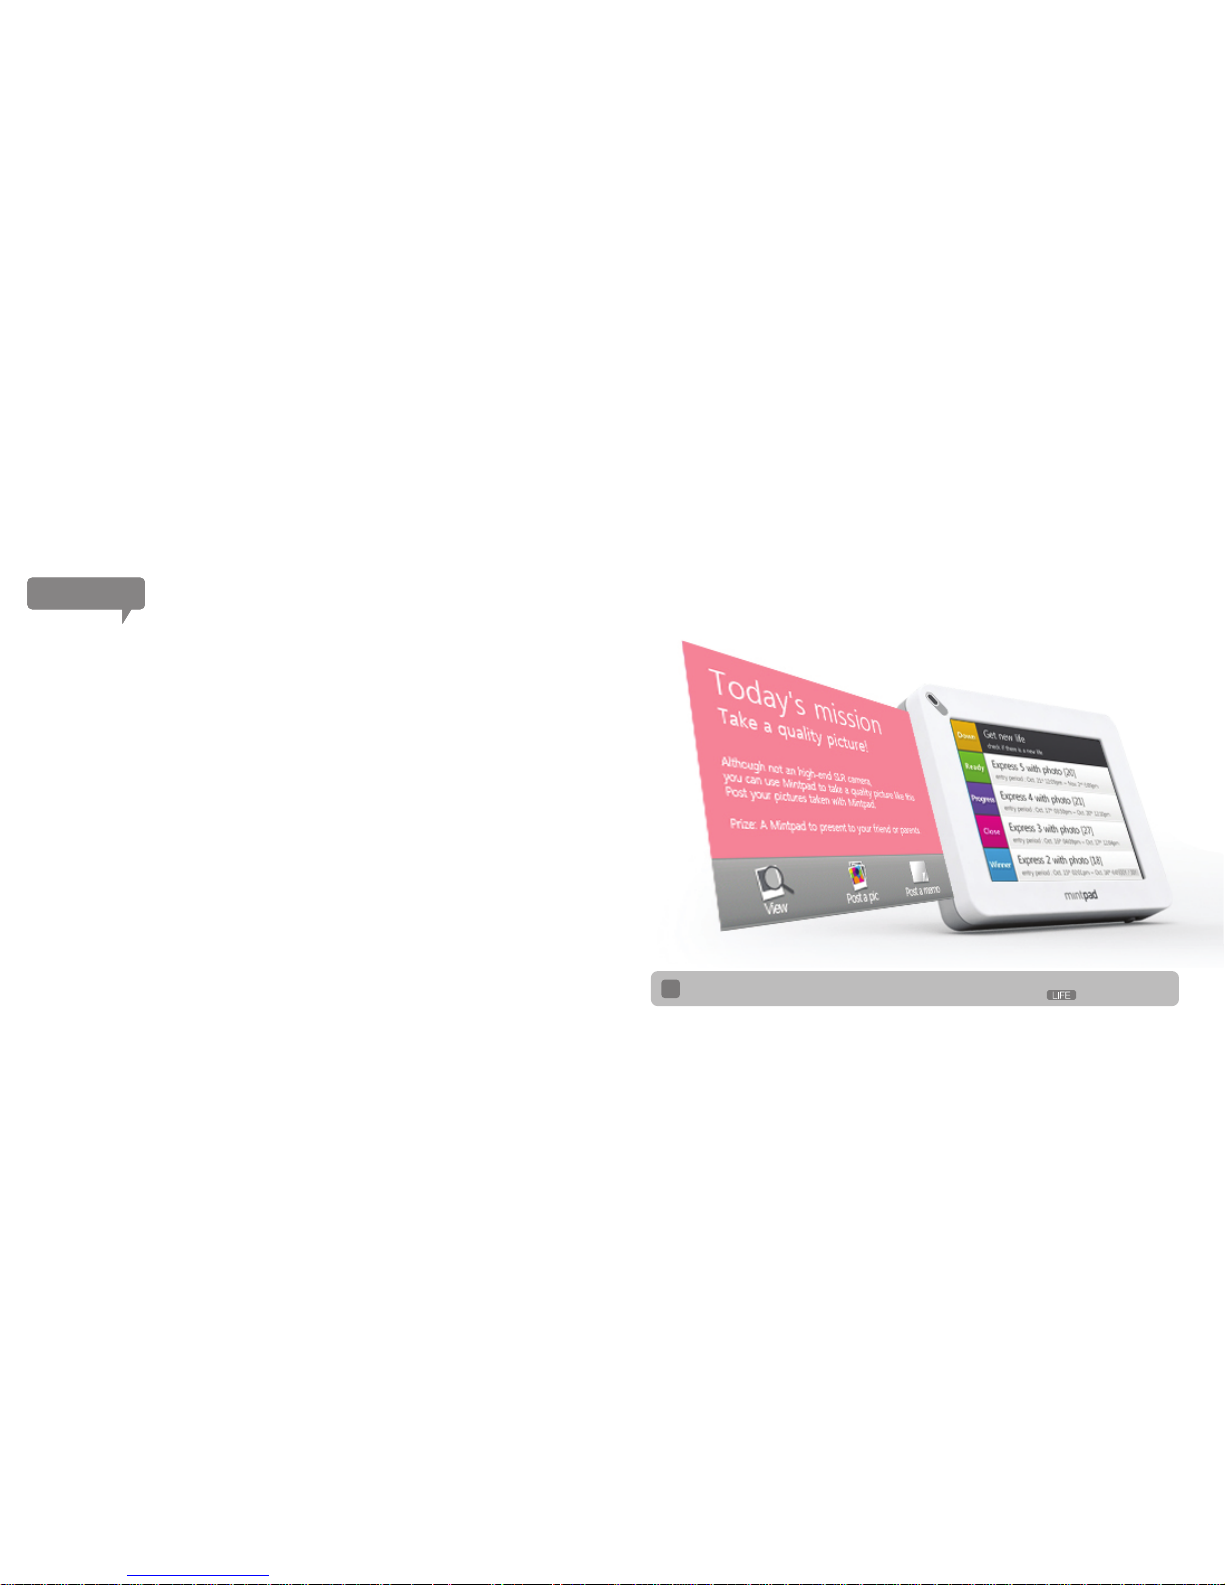
Mint Life is the space in which every Mintpad users can actively participate. An
exciting question is announced every morning and the prizewinner is selected. Then
the winner receives various prizes, and the results will be posted on the net as well as
on the Mintpads. However, time is limited.
*To participate in the Mint Life contest, Wi-Fi connection is required.
What is Life Contest?
1. Execute Mint Life option from Mintpad.
2. Select the “Get New Life” option.
3. It will be downloaded automatically into the device, when there is a new Mint Life.
4. Check the new Mint Life theme.
5. Participate in the contest by using the saved memo or pictures.
6. To view the other users’ works posted, select the “view other’s works” option,
and from there you can scroll up/down to view different works.
7. Accessing to Mintpass homepage or Mintpad to check the winner.
Participating in Life contest.
As the new Mint Life is posted, there will be “NEW” sign on the bottom of Mint Life menu.
The backed up memo in the PC can also be used by clicking on the button.
36
Page 37
민트라이프민트블로그
Chatting
Sending and receiving memo is possible with other Mintpad users who are in close
proximity. Even in the absence of Wi-Fi connection, memo chatting can be
enabled using the Ad-Hoc technology.
What is Chatting
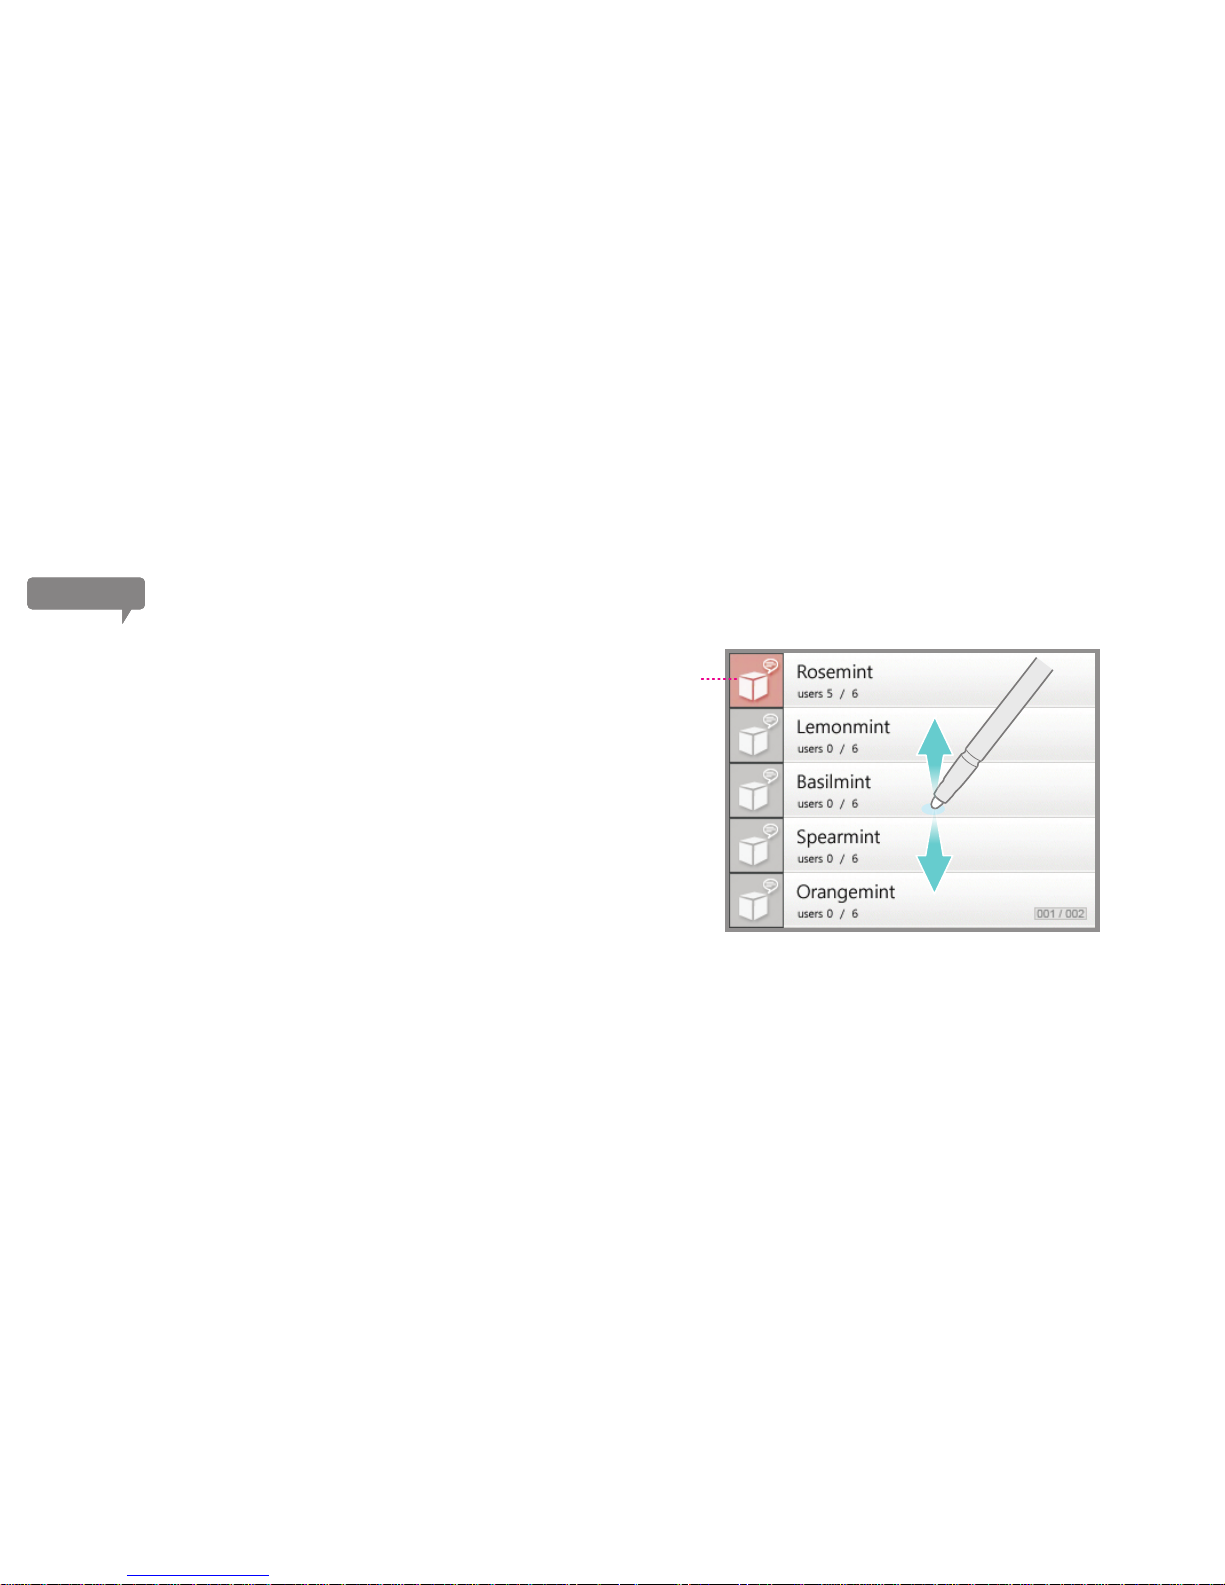
If you select the Mint Chat, the available chatting rooms will appear.
There are total of 10 rooms (5 rooms per page) and each room can host 6 users
max; the active rooms will be shown in red.
Enter a chat room by double clicking or sliding left on the screen.
How to enter a chatting room.
Active room
with users in it.
Scroll the screen up/down to check the chatting rooms.
37
Page 38
민트라이프민트블로그
Chatting
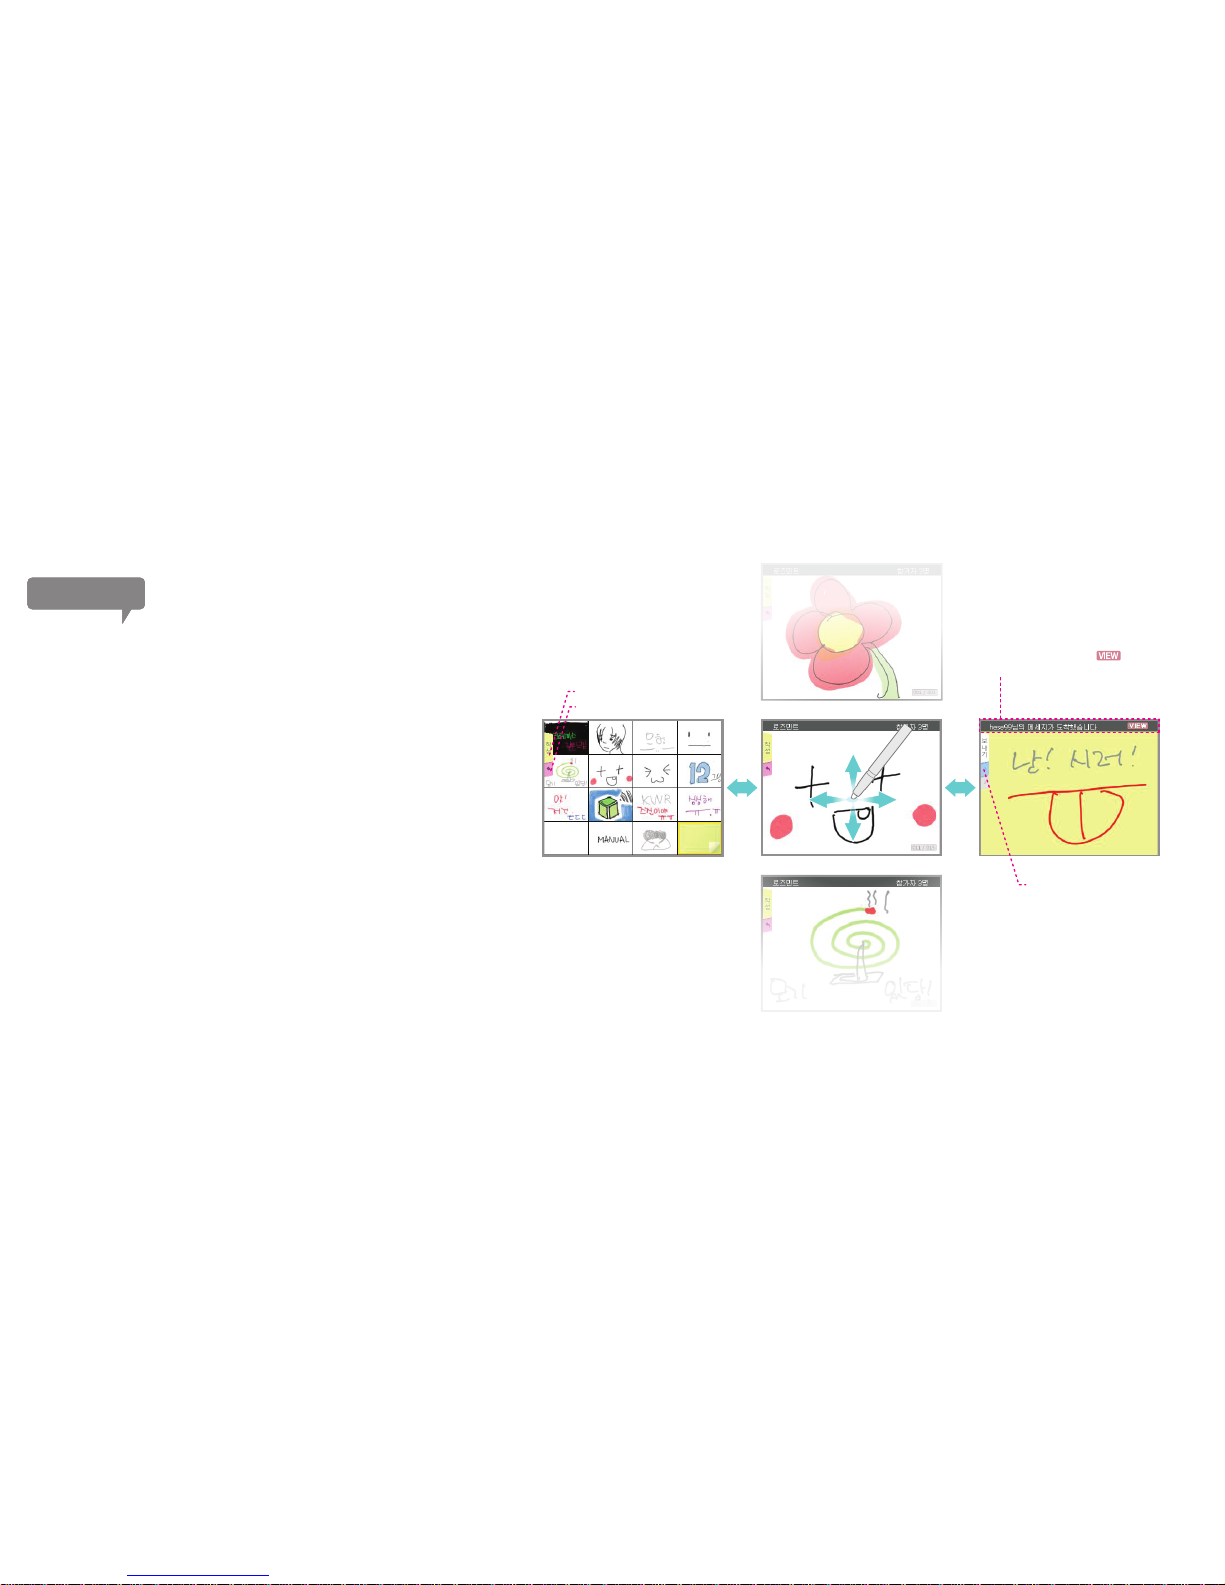
Thumbnails list of
sent and received memos
Sent and received memo Write new memo
To write new memo
To exit chatting room
You will be prompted if you receive
a message while writing a message.
To check the message, click on the button.
The ongoing message will be saved to be completed later.
To write a message shares the same procedures as memo writing, and
shaking the device or clicking on the “send” tab will send the message.
As the message is sent, the screen is converted to where you can see what
has been sent and received.
Scroll up/down on the screen to see the other memos.
To see the thumbnails list, scroll on the screen to the left.
Real-time memo exchange
To view who is in the room
38
Page 39
민트라이프민트블로그
Internet
Wherever there is Wi-Fi connection, you can surf the
Internet with Mintpad. Web searching, web surfing, or
news viewing is possible, just as you would with PC.
*Wi-Fi connection is required to use the Internet.
*Certain websites may not be accessible.
The Mintpad’s Internet
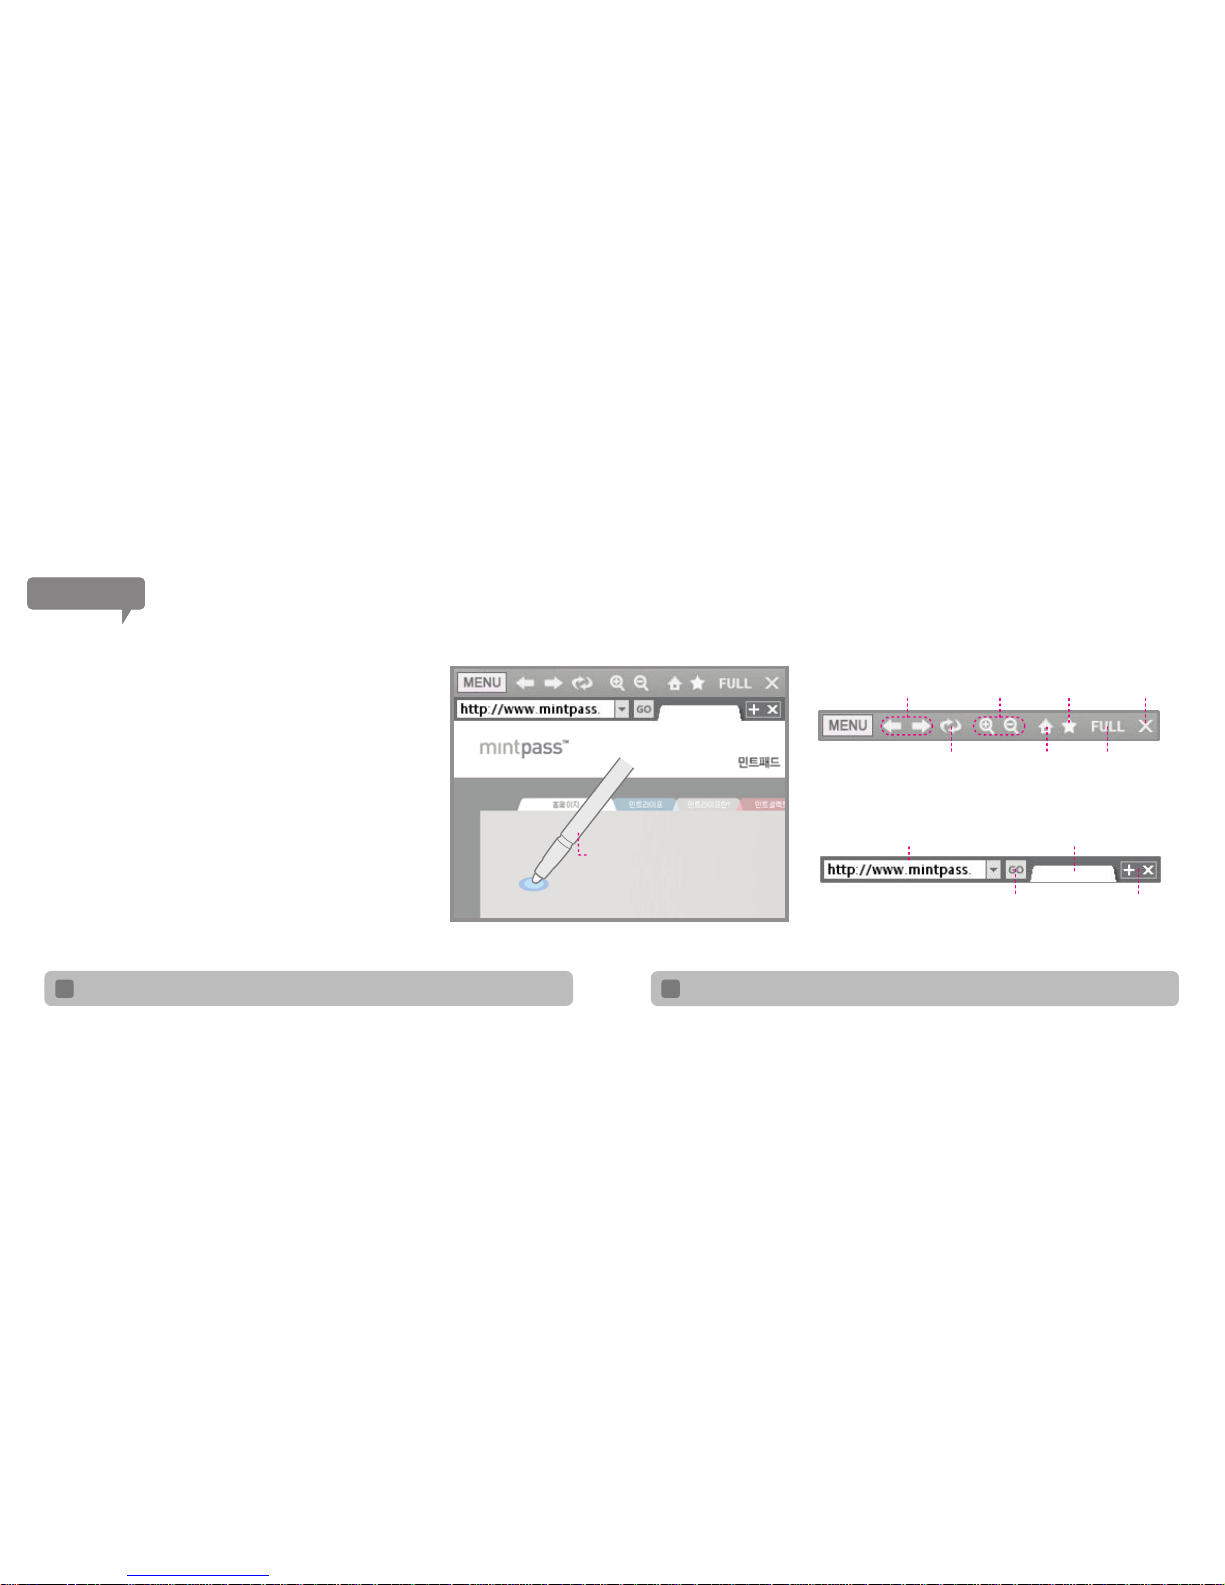
When the Internet function is executed, homepage (start
page) will be opened. Slide on the screen with the stylus
pen or finger to any direction to move the screen. To
navigate within the webpage, use the same principle just as
you would use the Internet explorer.
Using the Internet with Mintpad
To activate/deactivate the full screen mode,
double-click on the screen.
Enter the website’s address
To go to the entered webpage
Tab
Add/delete the tab
(You can add up to 2 tabs)
Move back/forward
Refresh
Zoom in/out Favorites Close
Homepage Full screen
To enter the URL address, ID, or password, use the typing tool.
Please refer to the page 31 in our manual to learn how to use typing tool.
TIP
39
Shaking the device will activate/deactivate the full screen mode.
To exit to the main menu, you must click on the “close (X)” button.
TIP
Page 40
민트라이프민트블로그
Internet
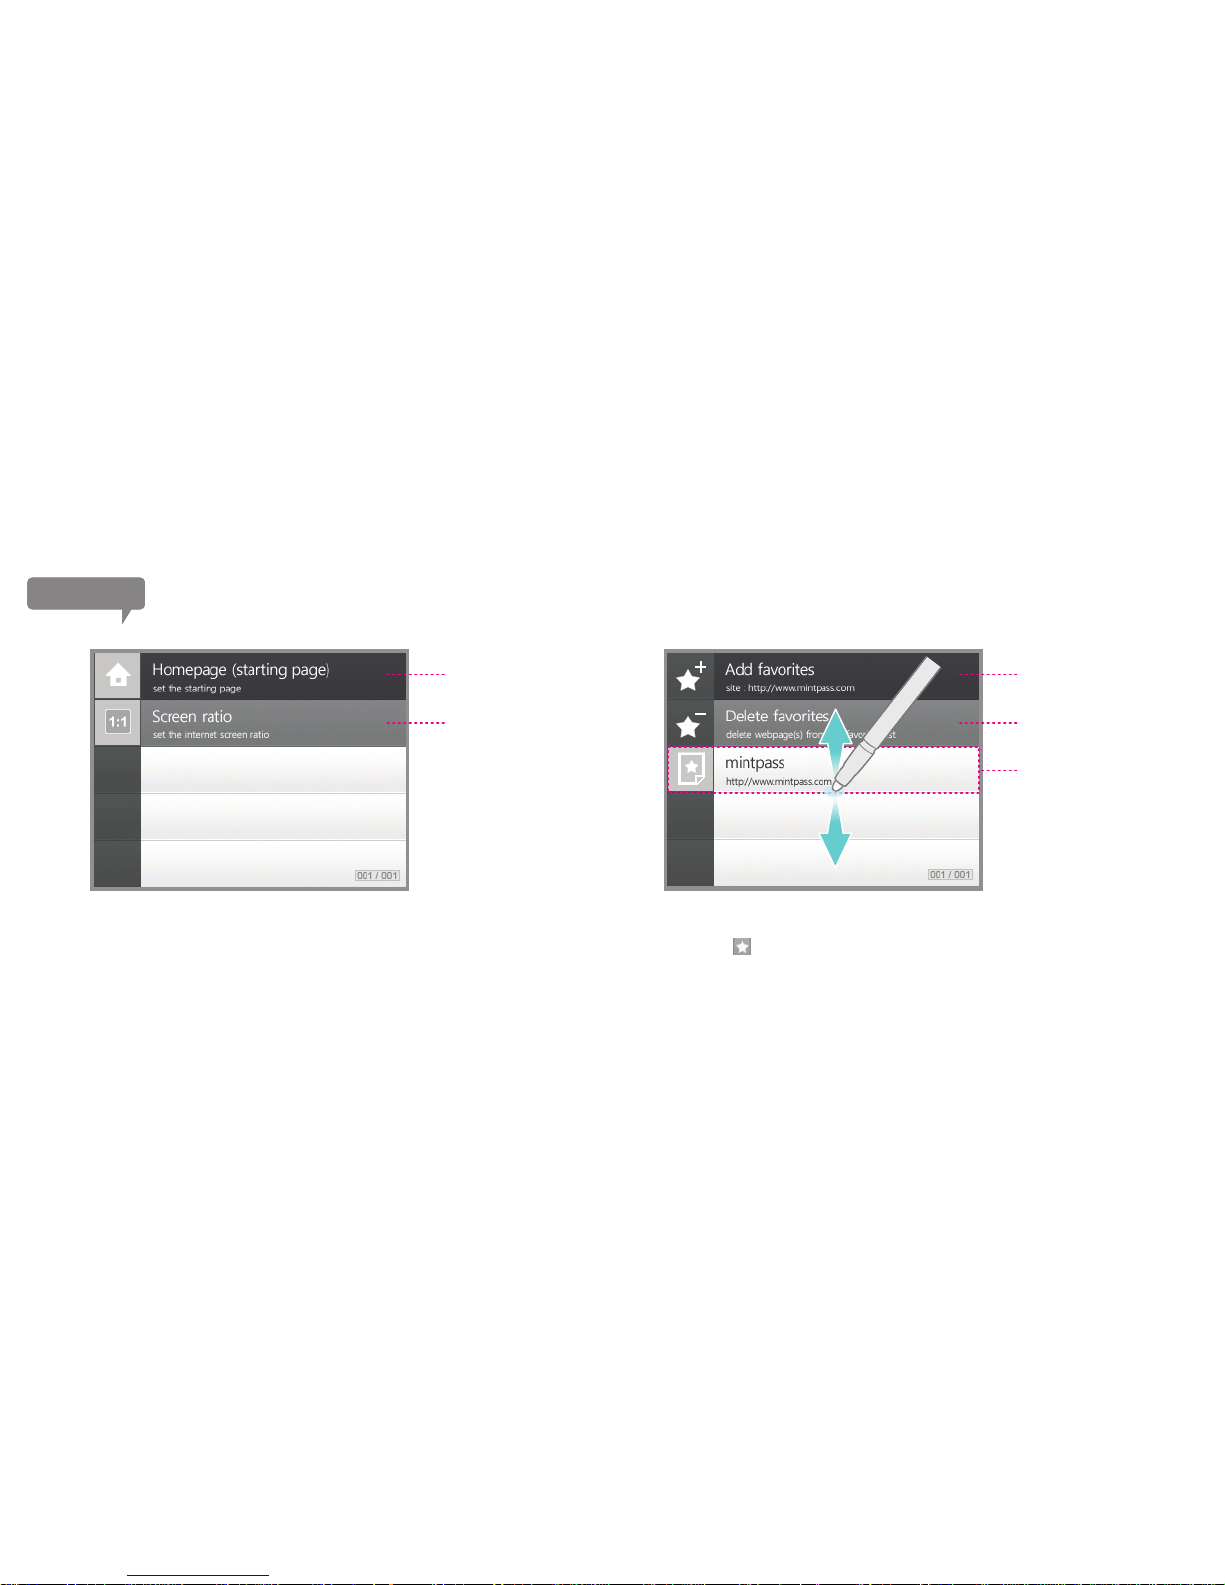
Clicking on the “Menu” button will load the screen where
you can set up the start page and screen ratio.
Menu button
Click on the button to manage the favorites list. You can add/delete
the webpage from the favorites list, as well as loading to a selected
website.
Favorites
Set the homepage
(start page) here.
Set the Internet screen ratio here.
Add the current webpage
to the favorites.
Delete webpage(s)
from the favorites list.
It will load the selected website.
40
Page 41
Camera
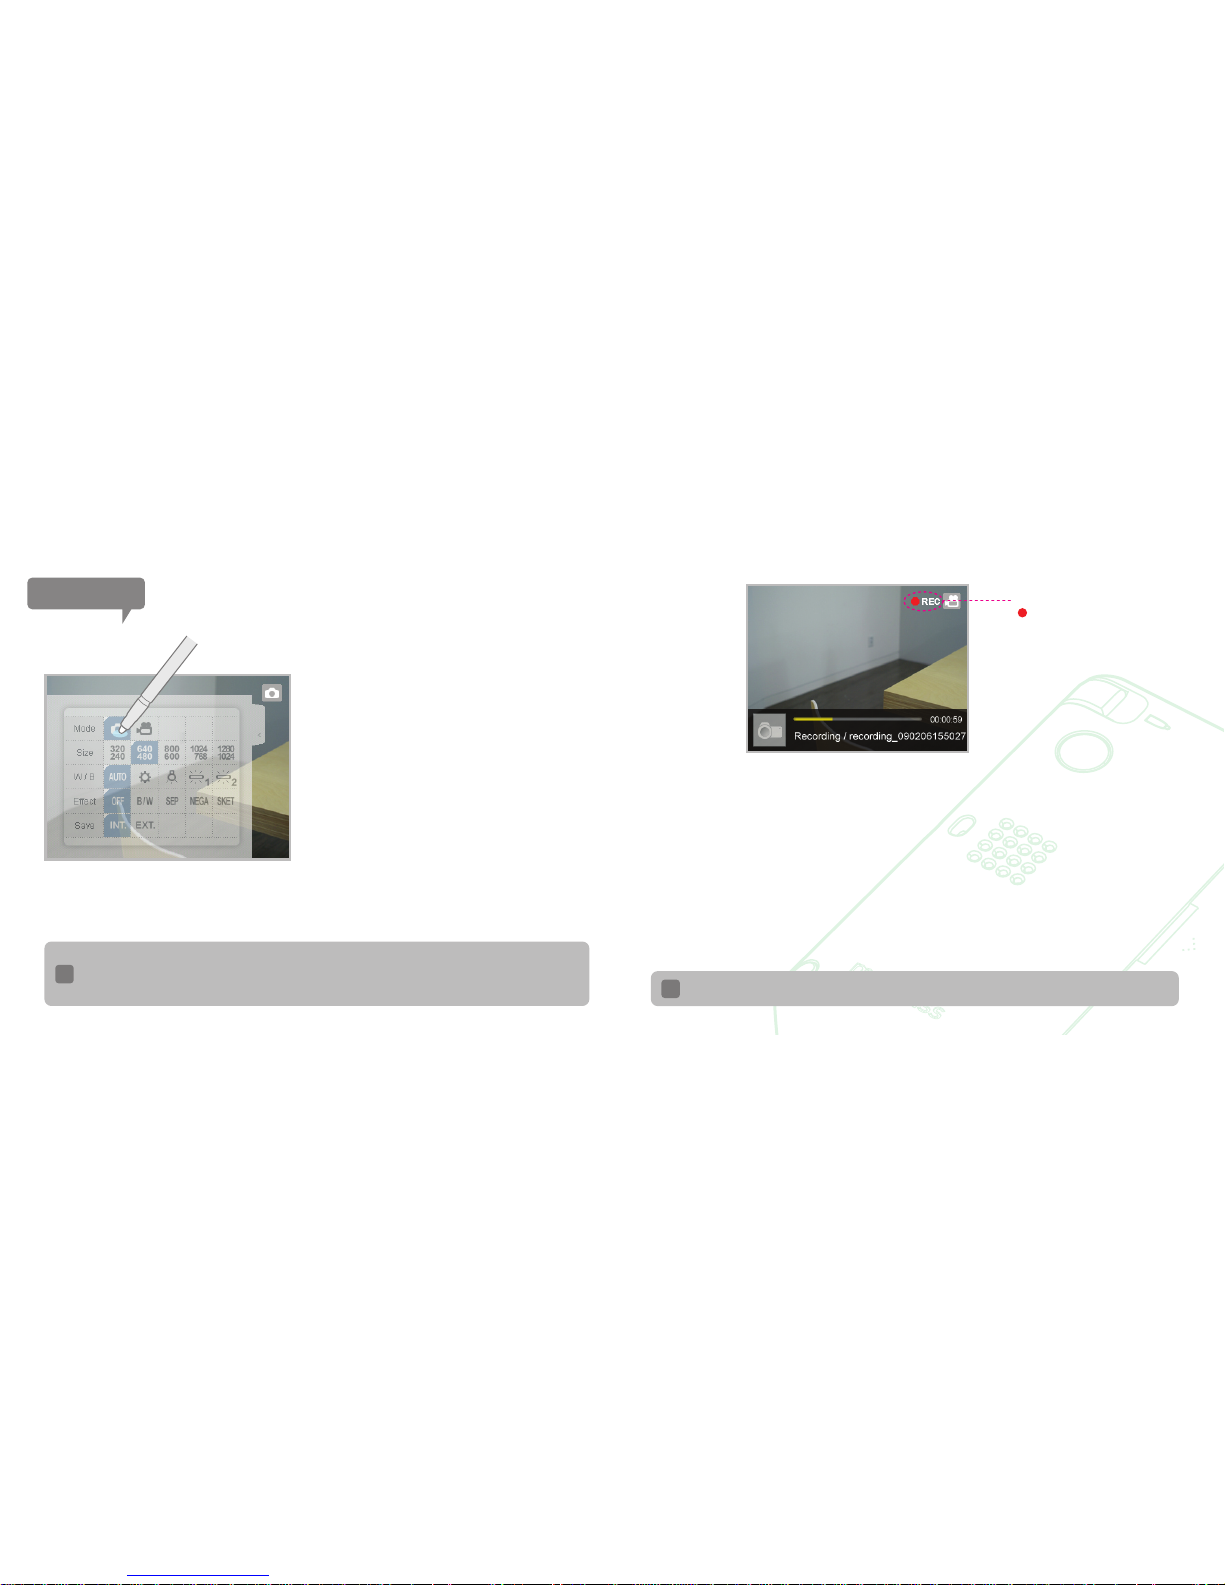
When you execute the camera function, the
view from camera will appear on the screen.
Press shortly on the Smart button to take a
picture and save.
To view the saved picture, slide left on the
screen. You can also view the saved pictures
from the Photo Album.
*The pictures are saved in JPG file format.
Taking pictures with camera
Recording videos with camera
To configure the camera setting option,
click on the tab that is on the left side of the screen.
During recording,
it will blink.
Transferring the saved pictures to PC can be done from Mintpass homepage’s
Sapphire > Pictures tab.
For the Fluorescent lamp 2 mode from the “White Balance” option, it should be used in the
country where different type of Fluorescent lamp frequency is used.
TIP
To record videos, click on the tab to convert to the videos recording
mode. To begin/stop the recording, press shortly on the Smart button.
When the recording is finished, it will be automatically saved and the
status returns to the recording mode again. You can slide left on the
screen to check the saved video files. You can also check the saved
video files from the “Recordings” folder from the videos menu.
*The recorded video files will be saved in AVI file format.
41
The recorded videos files can be transferred to the PC from Mintpass homepage’s
Sapphire > videos tab.
TIP
Page 42
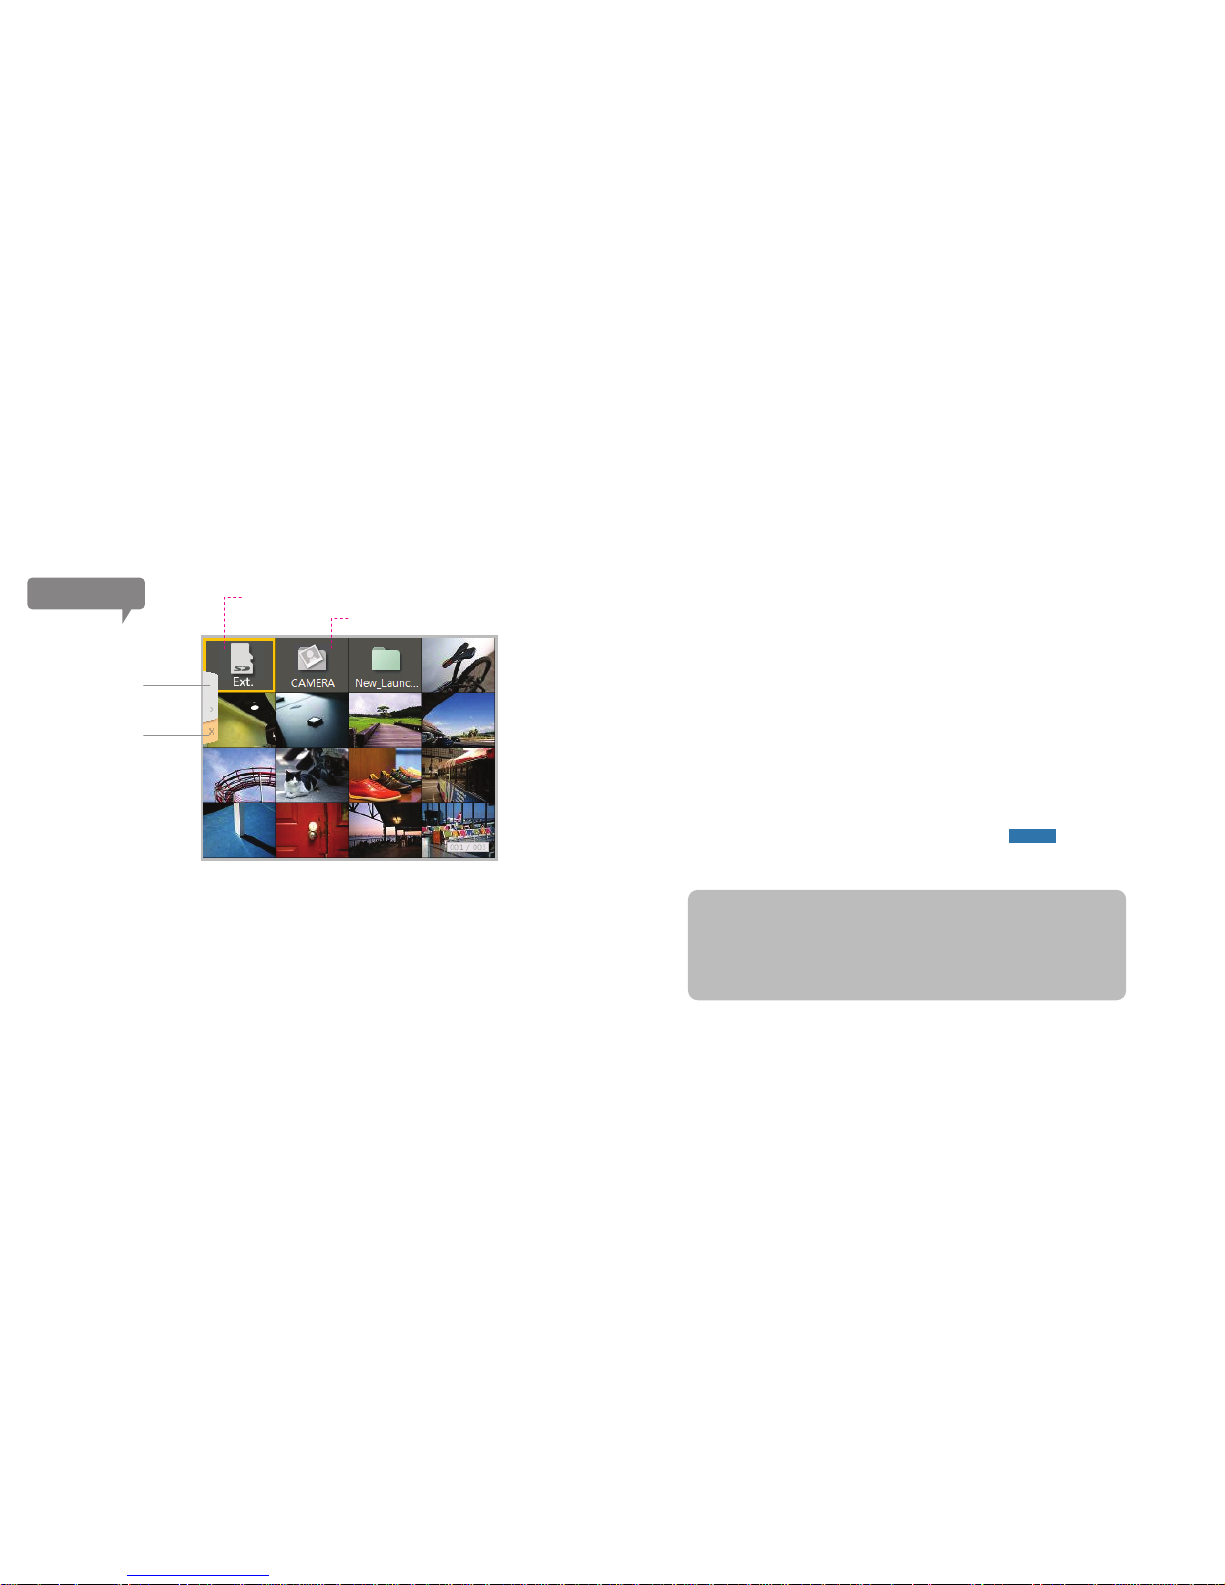
Photo album
Picture information &
slideshow
Delete
Using the photo album
When you execute the photo album from the main menu, thumbnails list of
the pictures will appear. After selecting a picture and click on the tab to see
that picture’s information, as well as setting up the option for slideshow.
Slideshow
After when you click on the tab and set the slideshow’s time interval,
double-click on the picture from which you want the slideshow to begin.
When not in the slideshow mode, you can scroll up/down on the picture to
view other pictures.
Transferring the picture using Sapphire
You can transfer the picture files using the Sapphire from Mintpass
homepage’s Sapphire > Pictures tab by simple “drag-and-drop” process.
You can transfer the individual files by clicking on the button.
*Supported file format: JPG (Progressive JPEG exception), BMP, PNG
*The max image resolution is 2048 X 2048.
*Certain files may not be compatible.
*There may be a problem viewing the file, if some other program is used to
transfer the file.
*You can write a memo when you are in picture-by-picture viewing mode.
The memo will be saved with the picture for later viewing.
Put Diretly
42
It only appears when the external memory
card is inserted.
The pictures taken with the device are automatically saved here.
Page 43
Schedule
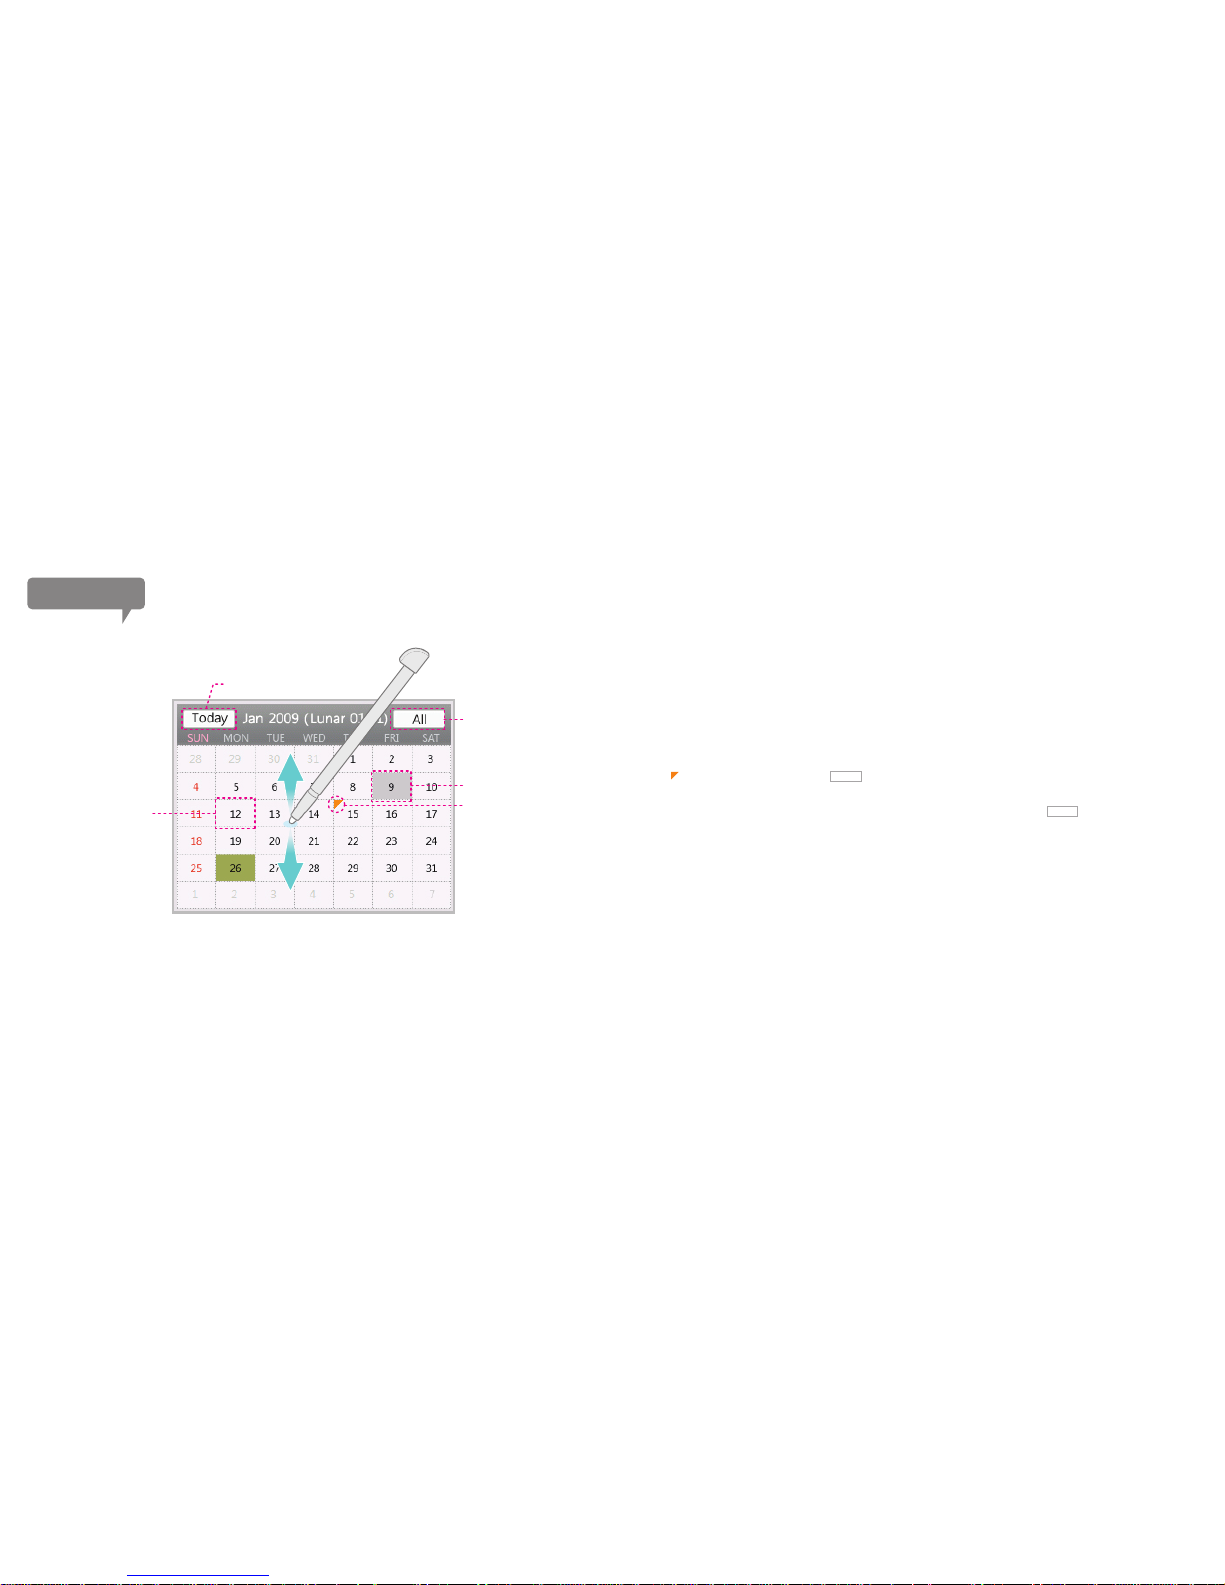
Click this to select today’s date
It will show all the
schedules from today.
If schedule is made,
it will be indicated with sign.
Today
Selected date
To view calendar
If you execute the schedule menu, the calendar will appear.
To see other month, scroll on the calendar up to go to the next month and down
to go to the previous month. If a schedule is made for a day, it will be indicated
with sign. You can click on the button to move to current date when viewing
the other month.
The entire schedules for the days ahead is viewed by clicking on the button.
In order to make a schedule, double-click on the date you want to make a
schedule.
*The lunar date displayed on top side of schedule is a lunar date for the
selected date.
Today
All
43
Page 44
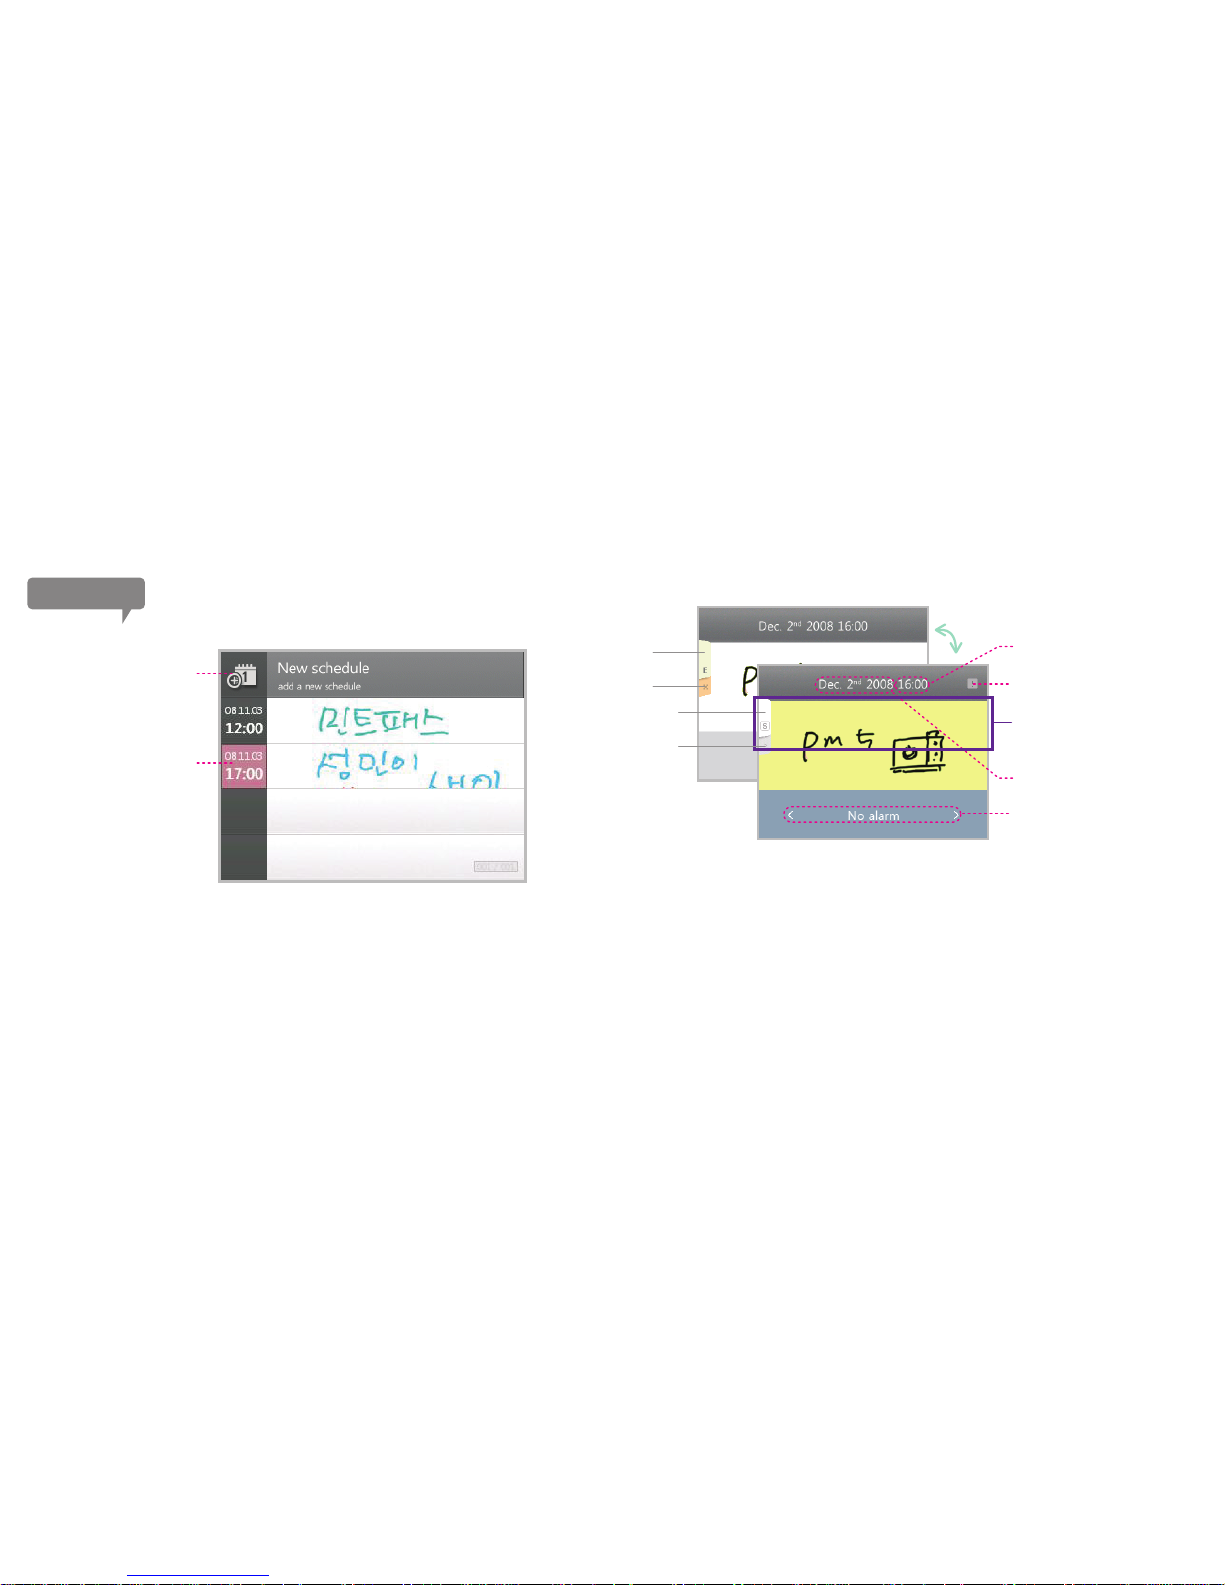
Creating a schedule
Click on the “New schedule” button to open a memo screen. Upon creating a
schedule, which takes the same method as writing a memo, click on the “save”
button to save and go to schedule view screen. Schedule view screen is launched
after double-clicking on a schedule from the schedule list. Schedules can be edited
or deleted here.
Schedule list
Double click on the date you wish to make a schedule, and it will
launch a schedule list (To do list). You can check your schedule this
way. Click on the “New schedule” to add a new schedule. Double
click on a schedule to view the schedule details.
A schedule with higher priority
will be expressed in red.
Save schedule
Edit schedule
Delete schedule
It displays the date and time
for the schedule.
Click on this button to
set the priority higher.
Only the area inside the
dotted line will show on schedule list.
Set the alarm time by
clicking on “<” or “>”.
Touch on the time to edit.
Schedule viewing
Create or edit schedule.
44
Memo option
Schedule
Add a new schedule
Page 45
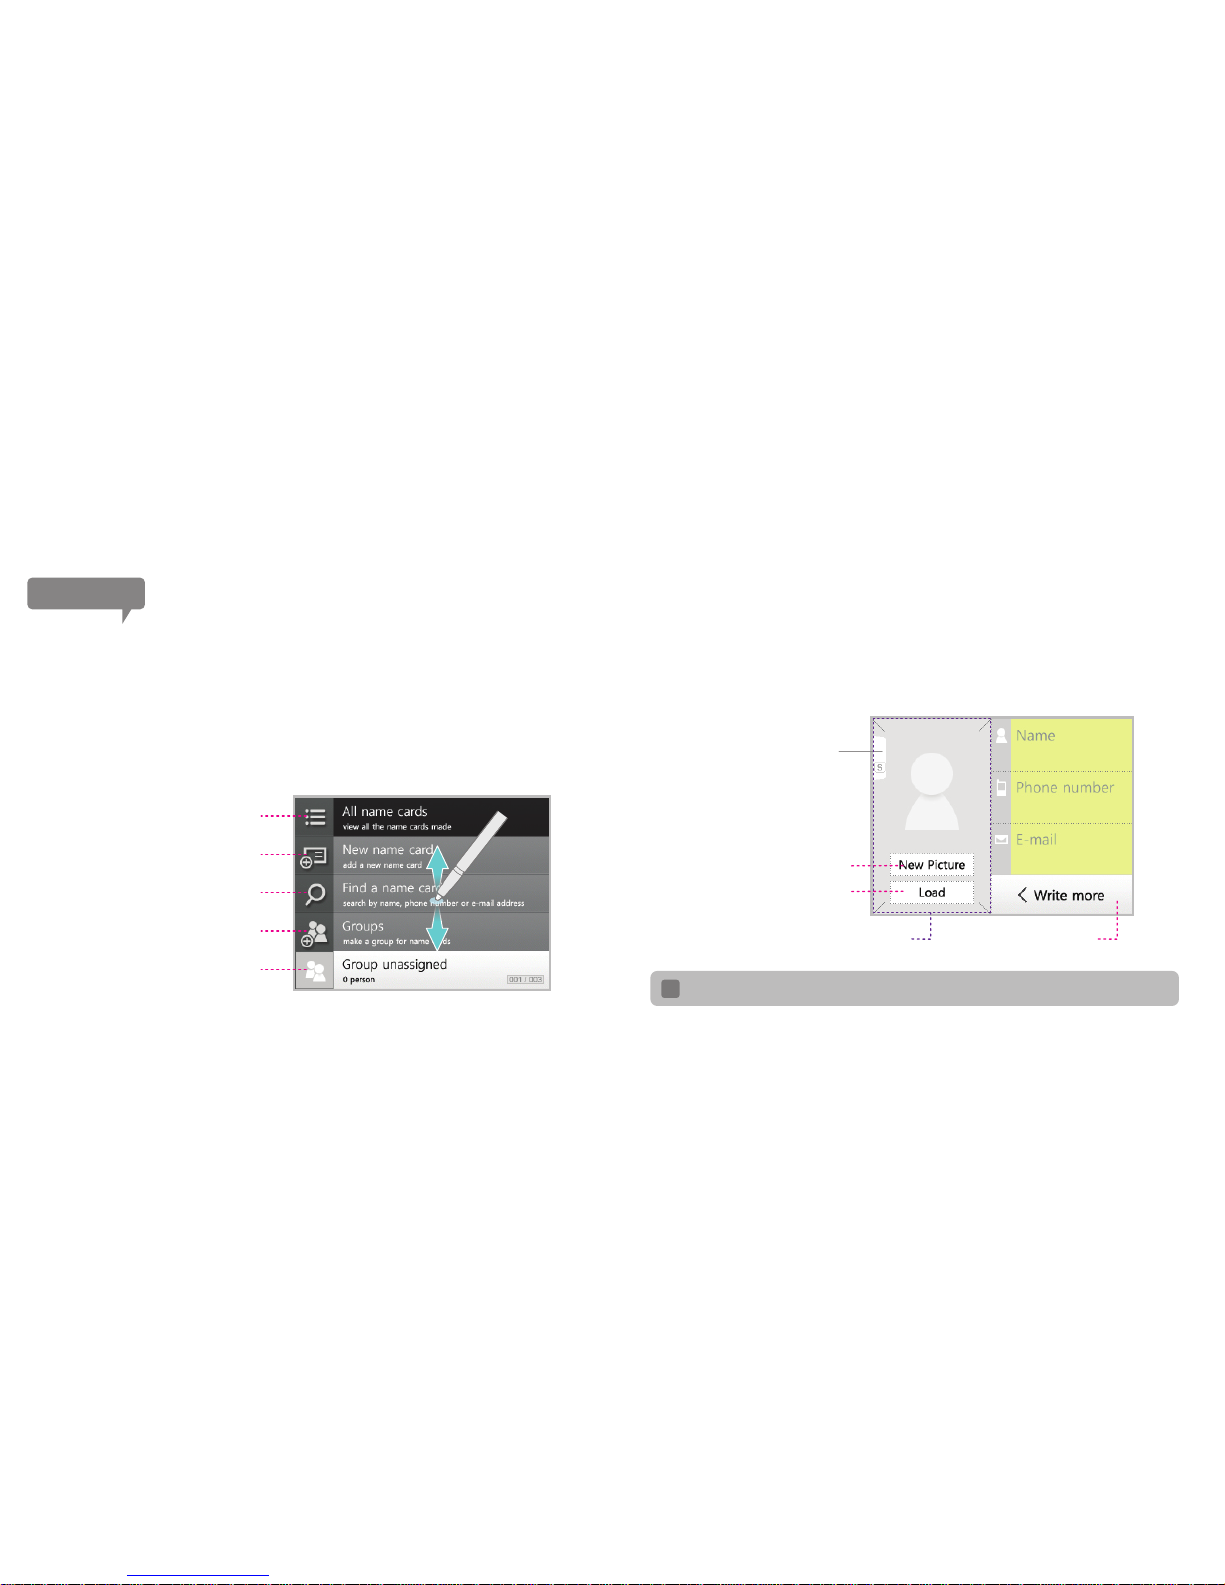
Name cards
Manage your personal network by using the camera to make name cards.
Managing personal network with name cards
When you execute this option, you can add a new memo.
*After you have made a name card, slide the screen to the left to write a memo.
The memo can be saved with the name card to be checked later.
Adding a name card
Name cards management screen will appear when you execute the name card
menu from the device. You can categorize people into groups. You can scroll the
screen up/down to view more groups (That is, if you have more than one group).
Managing name cards
This will view all the name cards made.
This will make a new name card.
Find the name card using name,
phone numbers, or e-mail address.
Manage the name cards by grouping them.
Check the name card within a group.
Save name card
You can use this option to
add further information or to set a group.
The picture will be displayed in this area.
You can delete the picture for the name card.
You can load the pictures from the photo album.
Please refer to the page 31 to learn how to use typing tool.
TIP
45
Page 46
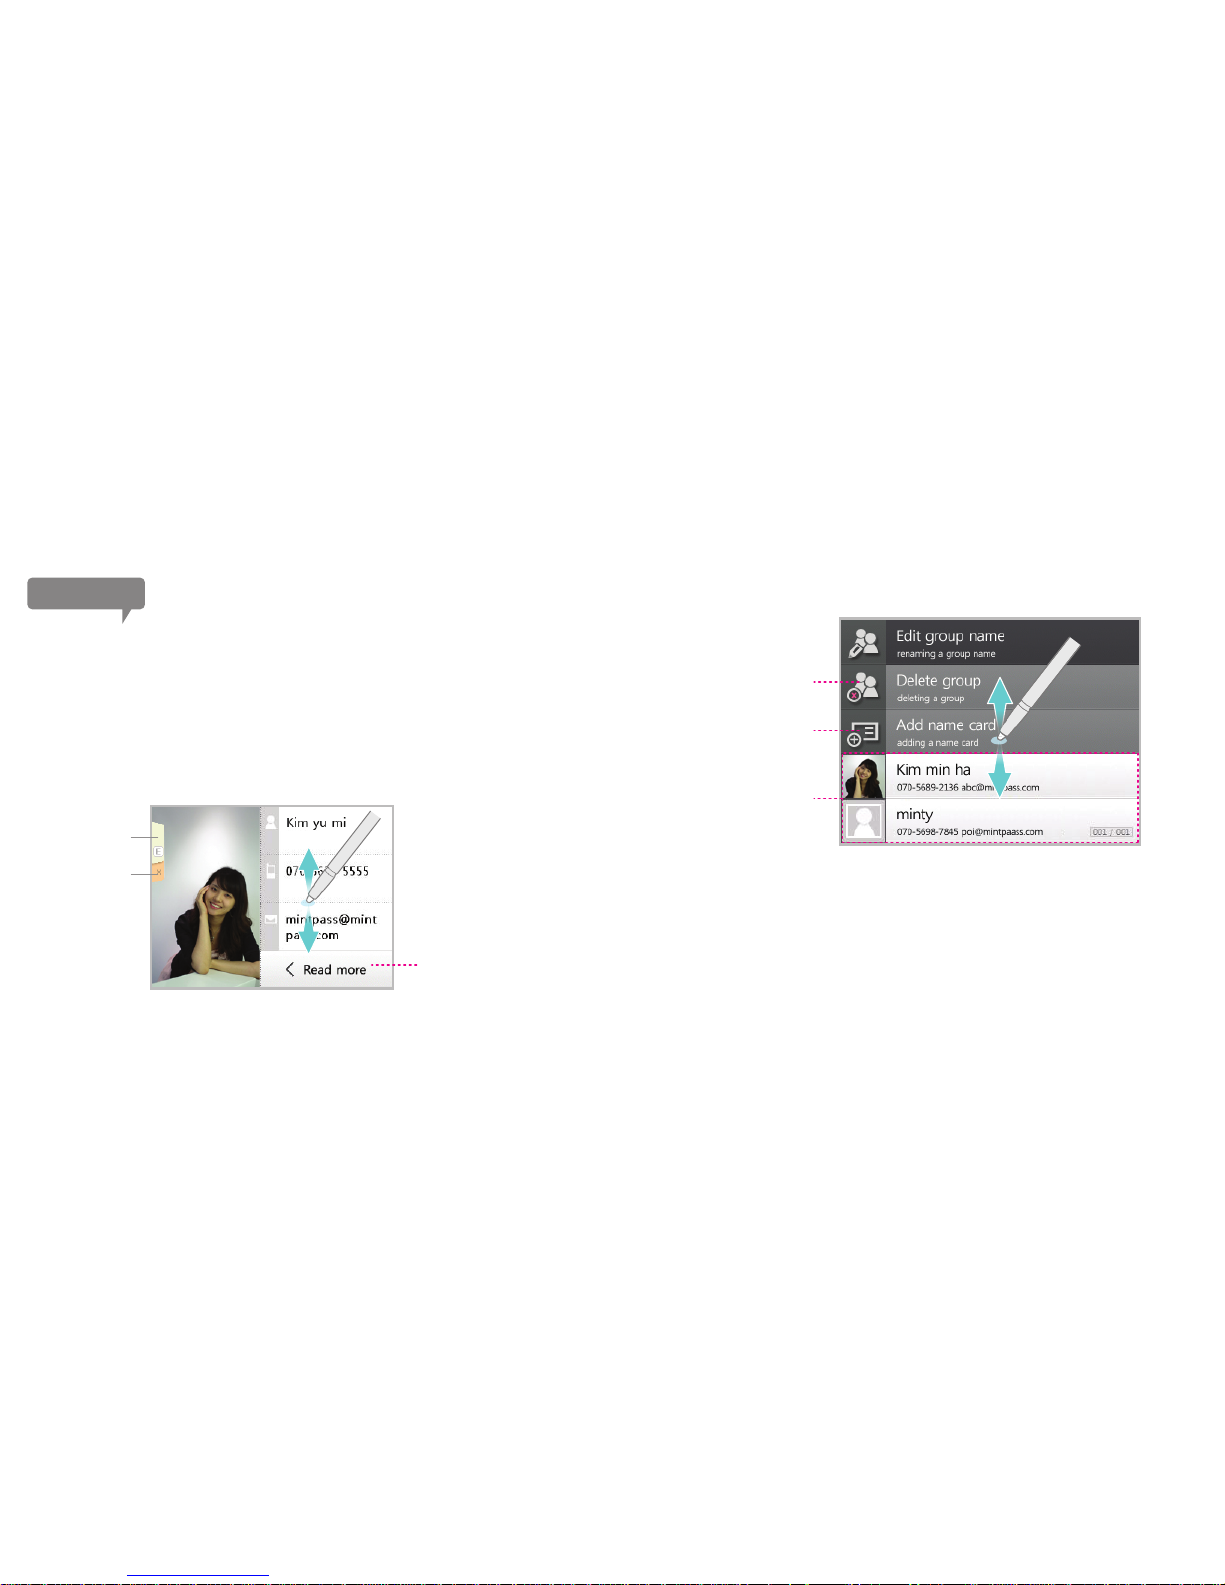
명함
After creating a new group, double-click on the group name or click on it
and drag it to the left and group management screen will appear. You can
edit a group name, delete a group, or add a name card to a group. You can
also view or edit the name cards of the people who belong to the group.
Managing the group
To view the name card, double-click on the name card or click and drag it to the
left. You can edit or delete the name card. To see other name cards, scroll the
screen up or down.
*When in a group, you can only view the name cards that are saved in the group.
To see all the name cards, click on the “View all name cards” button from the
name card management screen.
Viewing the name card
This will delete the current group.
(All the name cards will be
unassigned to any group)
This will add a new name card
to the current group.
The name cards that are saved
in the current group will be displayed here.
Click on this to view
any further information
on the name card.
Edit name card
Delete name card
46
Page 47
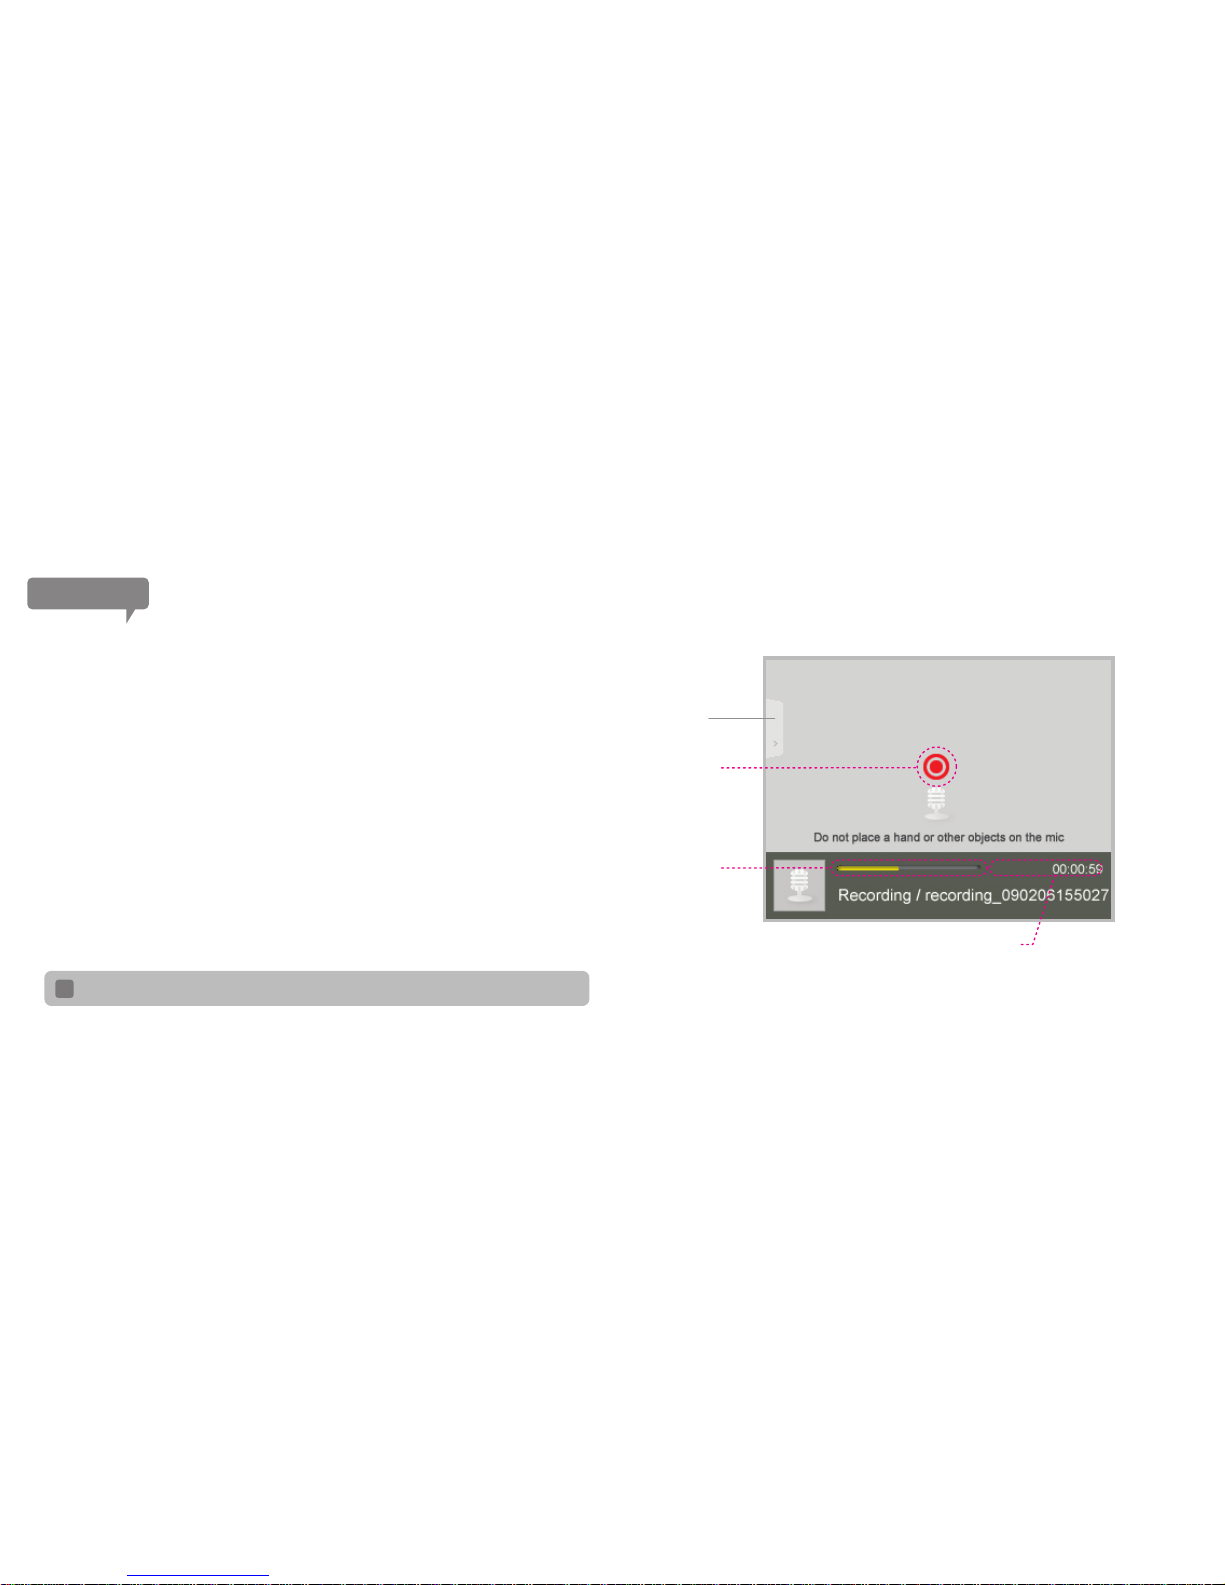
Voice Recording
When you execute the voice recording menu, it will bring you to
a stand-by status for voice recording.
Click on the option tab to set the voice recording quality,
recording time (recording stops after the time that was set by the
user), audio sensor (record only when the audio signal is
detected), and the location to which the recordings will be saved.
If you stop the recording, it will be automatically saved. You can
check the recordings by sliding the screen to the left. You can
also check them from the “recordings” folder from the music
menu.
*Voice recording files will be saved in WMA file format.
To use voice recording
Recording option
Click on this part or
use the Smart button
to start/stop recordings.
Recording process bar.
Saved recording files can be transferred to PC via Mintpass homepage.
TIP
Recorded time/remaining time.
47
Page 48
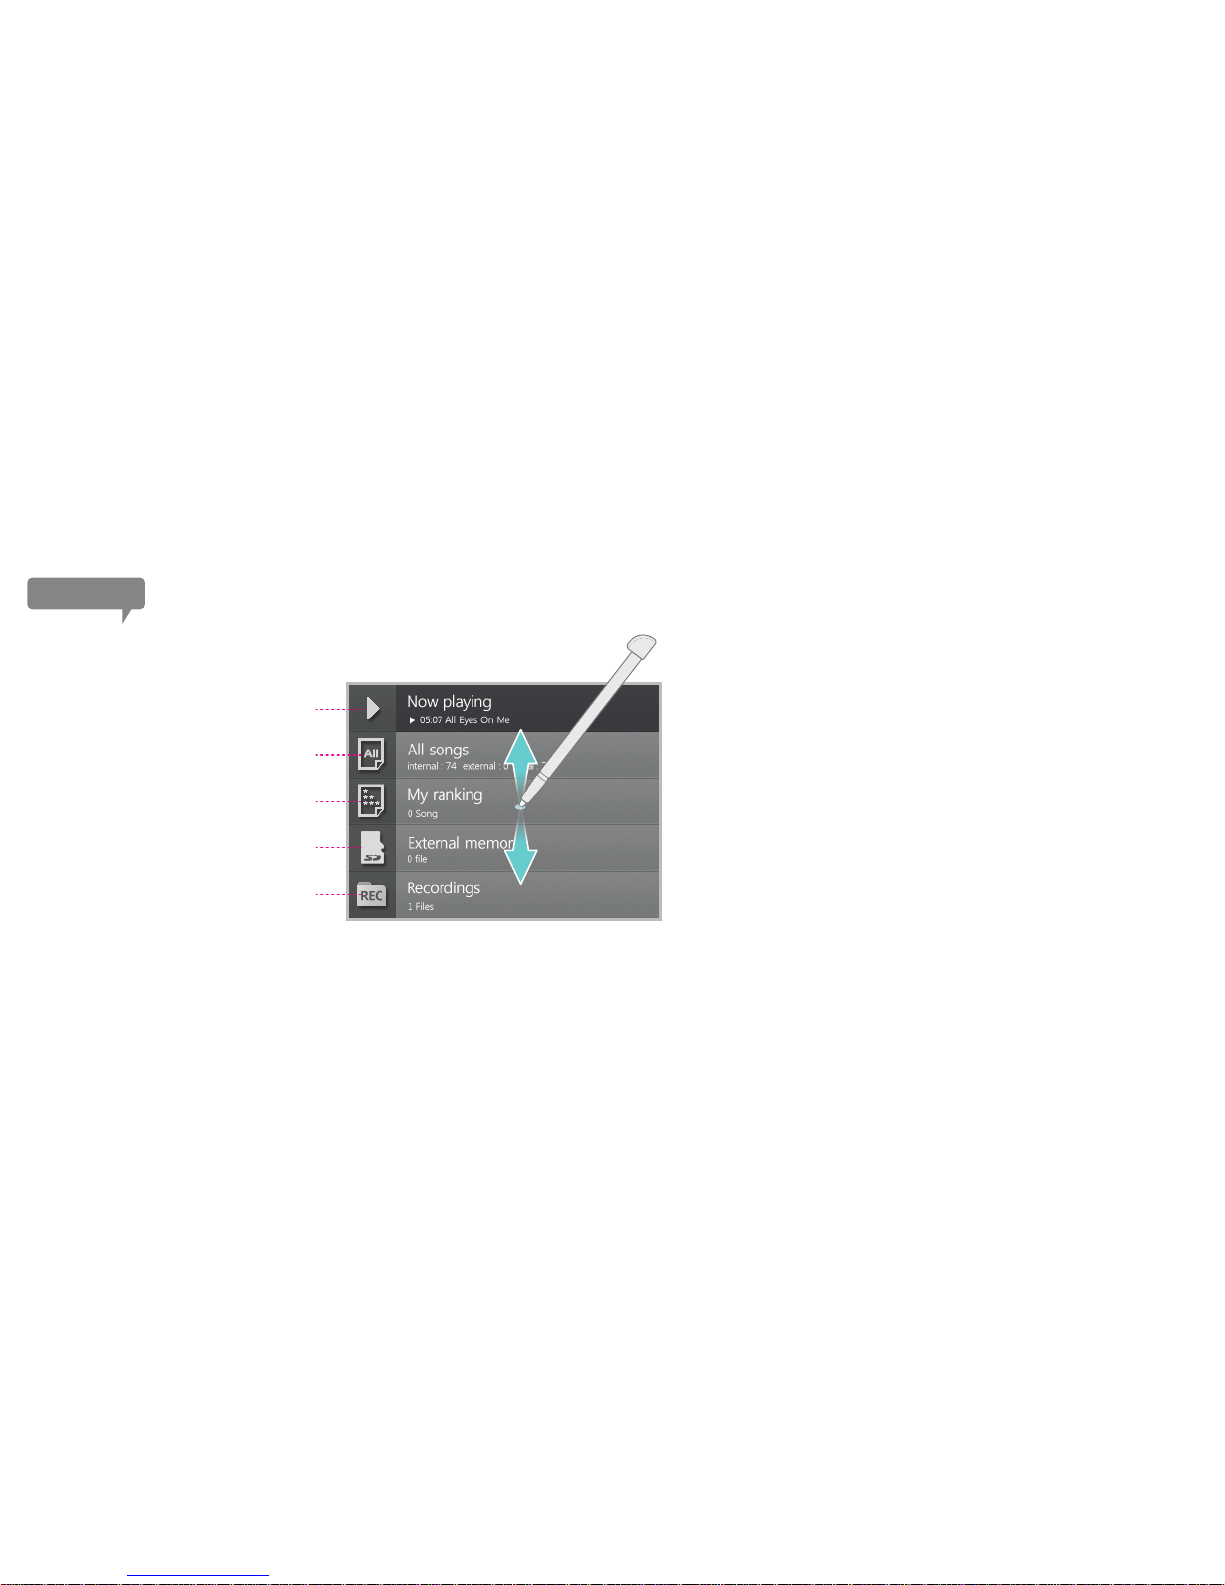
When you open the music menu from Mintpad, a list screen will be opened as
shown on the left. The “All songs” button will bring all the songs stored in
Mintpad; “My ranking” button will load only the songs with rating (done with
stars) and sort the songs by the number of stars given.
Slide up or down on the list screen to view the stored folders and songs.
To play a file, double click it or select (click once) the file and slide it to the left.
(Doing this on a folder will load a list of songs in the folder.)
*Same process can be used to play a song saved in external memory card or
in “All songs” list.
Selecting songs
Go back to current music play screen.
View all the music files stored in Mintpad
and external memory card.
View all music files with ratings.
View the music files stored in external memory card.
(Only when the memory card is inserted)
Listen to voice recordings files from Mintpad.
48
Music
Page 49
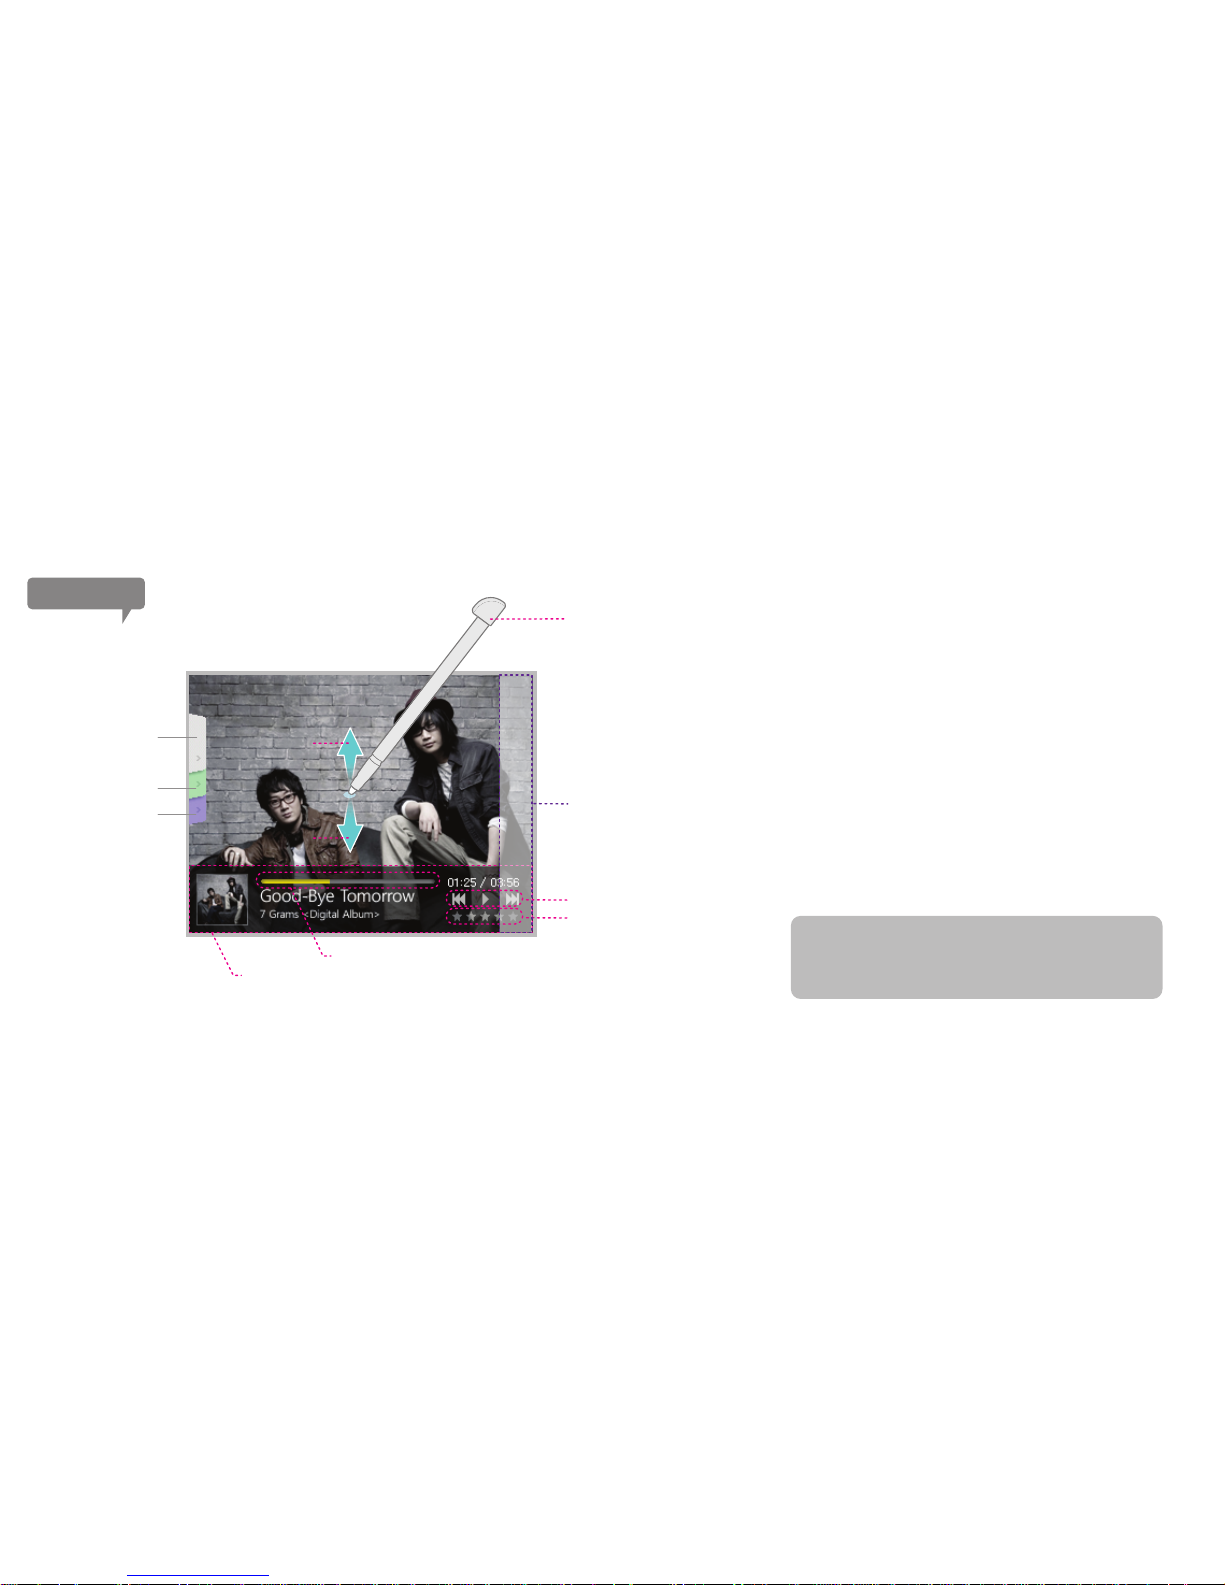
Music
Play mode,
Fade in/Fade out, etc.
EQ Setting
User EQ Setting
Music info. Bar: It shows the current song’s information.
Song progress bar: Touch to scan the song.
Click on this area to control volume.
Click on the screen
and music information
and the tab will appear.
Click on the screen once more
and the music will pause.
Slide up/down on the screen
to skip to next/previous song.
FF/RW scan and Pause
Ranking a song with stars.
Previous song
Listening to a song
Playing a music file will load music play screen, on which an
album art will be displayed in full screen, if the file contains
album art information. Click on the screen once and the tab
with song information and control option will pop up for 10
seconds. To skip to next song, slide up on the music play
screen; and slide down to go back to previous song.
Music transfer using Sapphire
Music files can be transferred using the Sapphire from the
Mintpass hompage’s Sapphire > Music tab.
For further detail on how to transfer the music file, please refer
to the manual’s page ten.
*Supported file format: mp3, ogg, wma, APE, FLAC
*Bit Rate : mp3, wma : 8kbps~320Kbps, ogg : Q10
*Files with variable Bit Rate may not be playable.
*Slide on the music playing screen to write a memo.
The composed memo will be saved with the song for later viewing.
Next song
49
Page 50
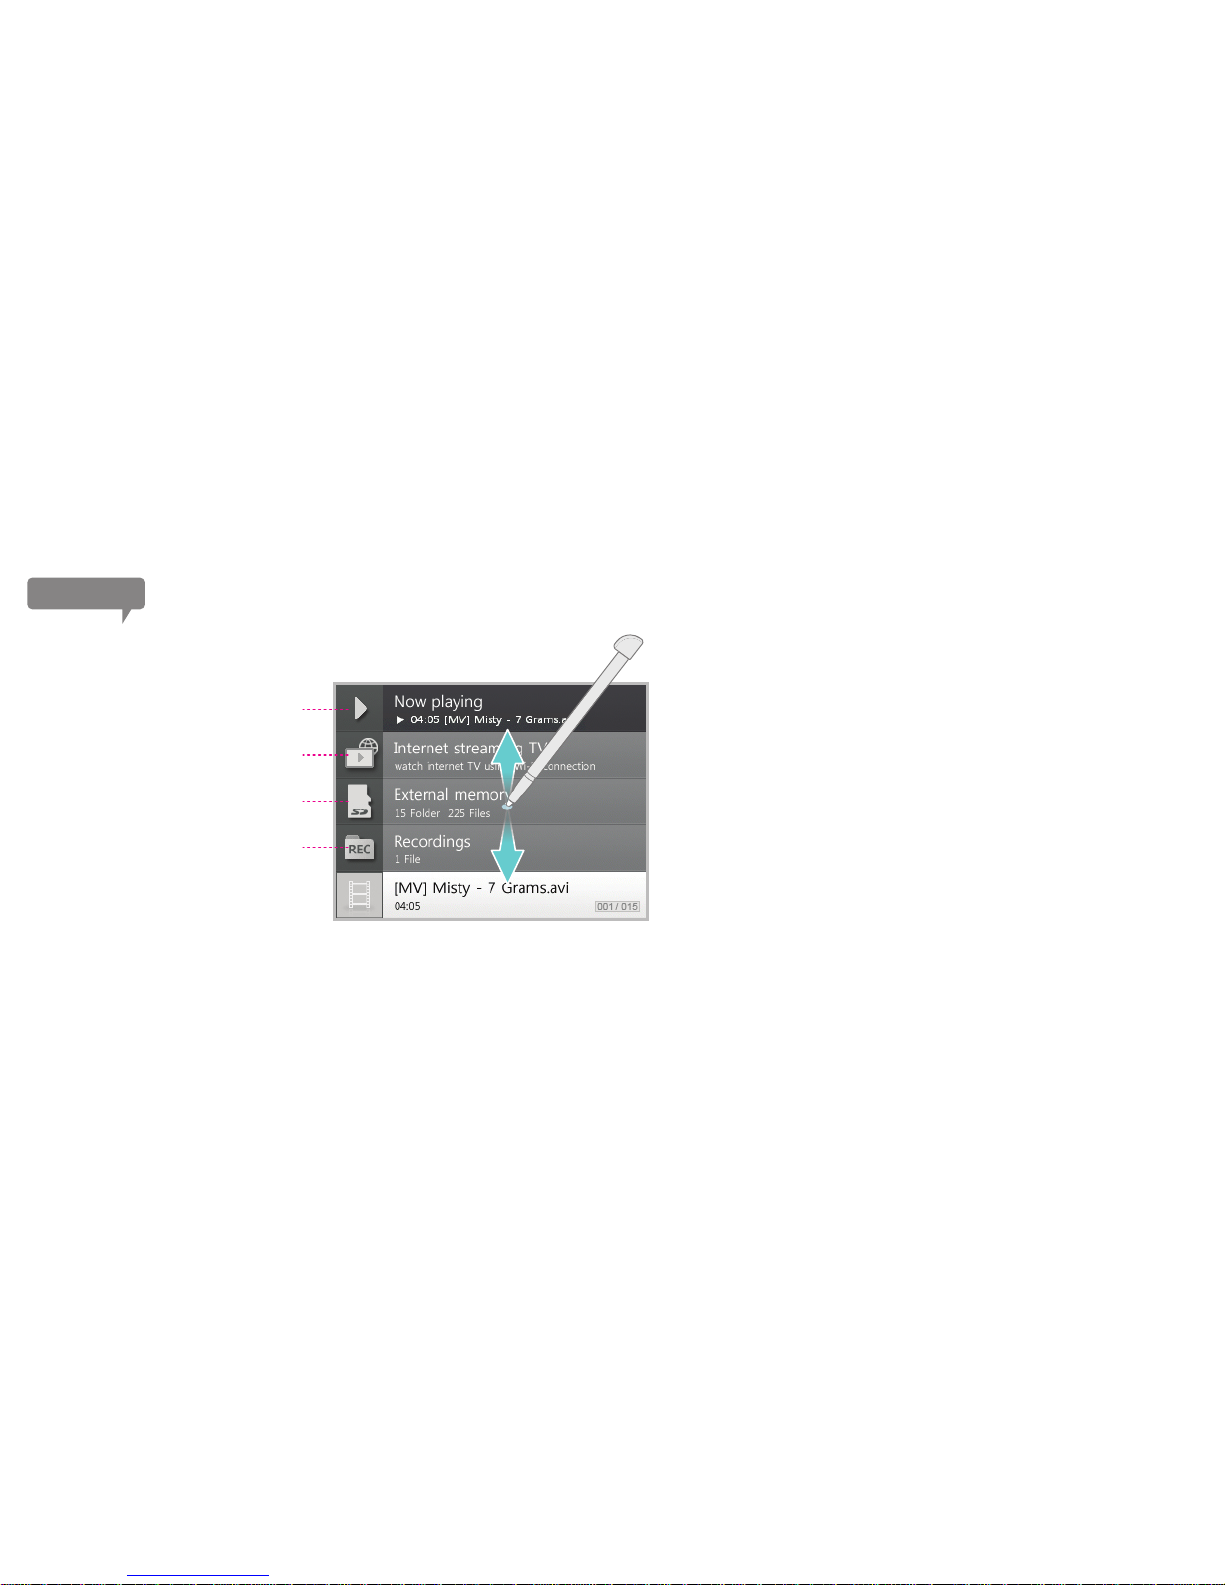
Open the videos menu and you will see a list, as shown on the left. View saved
videos files and folders by sliding up or down on the screen. Double-click or select
the file and slide to the left to play a video file.
(Doing this on a folder will load a list of files in the folder.)
*Same process can be used to play videos saved in external memory card.
*Please refer to the manual page 52 for more details on how to use Internet
streaming videos.
Selecting video files
Go back to currently playing video.
Watch Internet TV using Wi-Fi connection.
Access the video files stored in external memory card.
(It will only appear when a memory card in inserted)
Watch video clips recorded from Mintpad.
50
Videos
Page 51
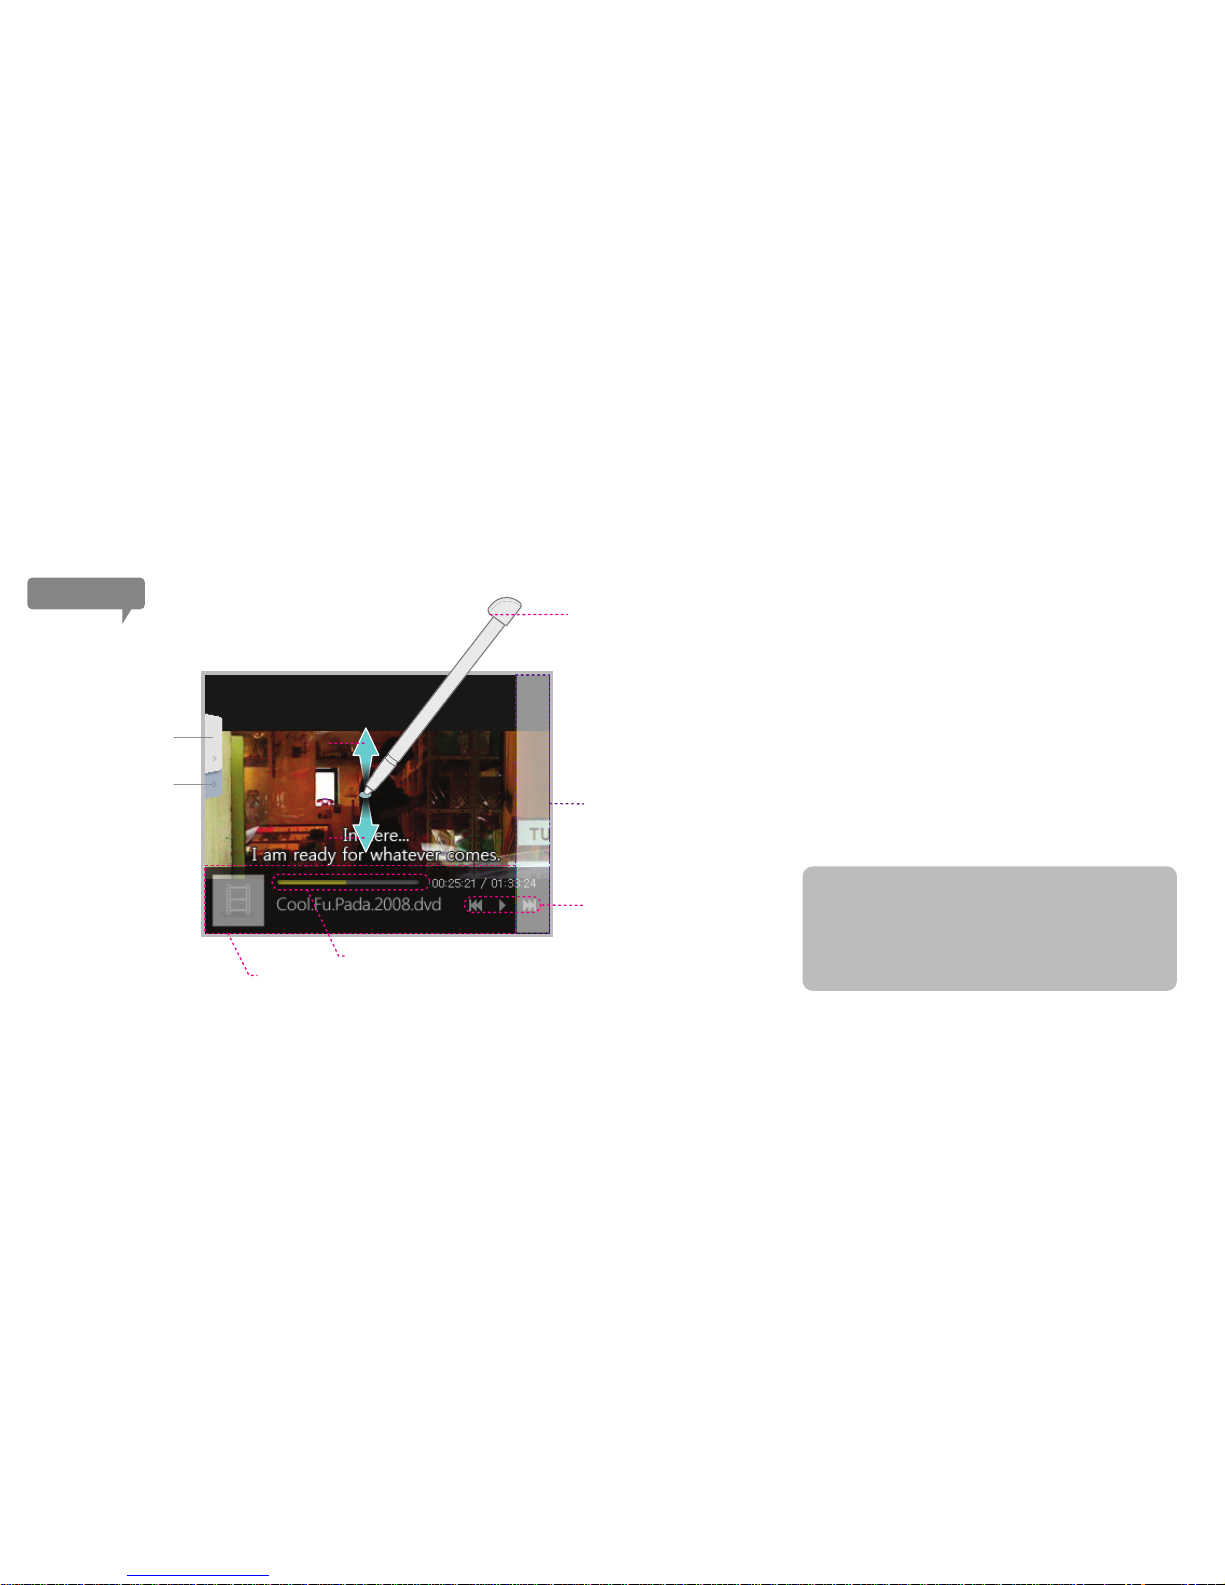
To watch a video, select and run any video file from the file list.
Click once on the video screen to view option tabs and file
information bar.
Slide upward to skip to next video file and downward for
previous file.
Videos
Screen ratio, play mode,
scan speed, and subtitle
Subtitle size and color,
multi subtitiles,
and subtitile synchronizing
Playing a video file
Videos files can be transferred using the Sapphire from
the Mintpass hompage’s Mulitimedia > Videos tab.
File Transfer using Sapphire
*Supported file extension: avi, wmv, mp4
*Supported file formats: mpeg4, wmv7~9
*Resolution and frame rate: 320X240(QVGA), 1.5Mbps, 30fps
*Slide on the videos playing screen to write a memo.
The composed memo will be saved with the song for later viewing.
(Videos will temporarily be paused and the memo screen will be
overlapped on the videos screen)
*Incompatible files may have problem playing on the device.
Click on the screen
and videos information
and the tab will appear.
Click on the screen
once more and the videos will pause.
Slide up/down on the screen
to skip to next/previous videos file.
You can scan
the videos, pause, etc.
Click on this area
to control volume.
Videos info. Bar: It shows the current song’s information.
Videos progress bar: Touch to scan the videos.
51
Previous file
Next file
Page 52
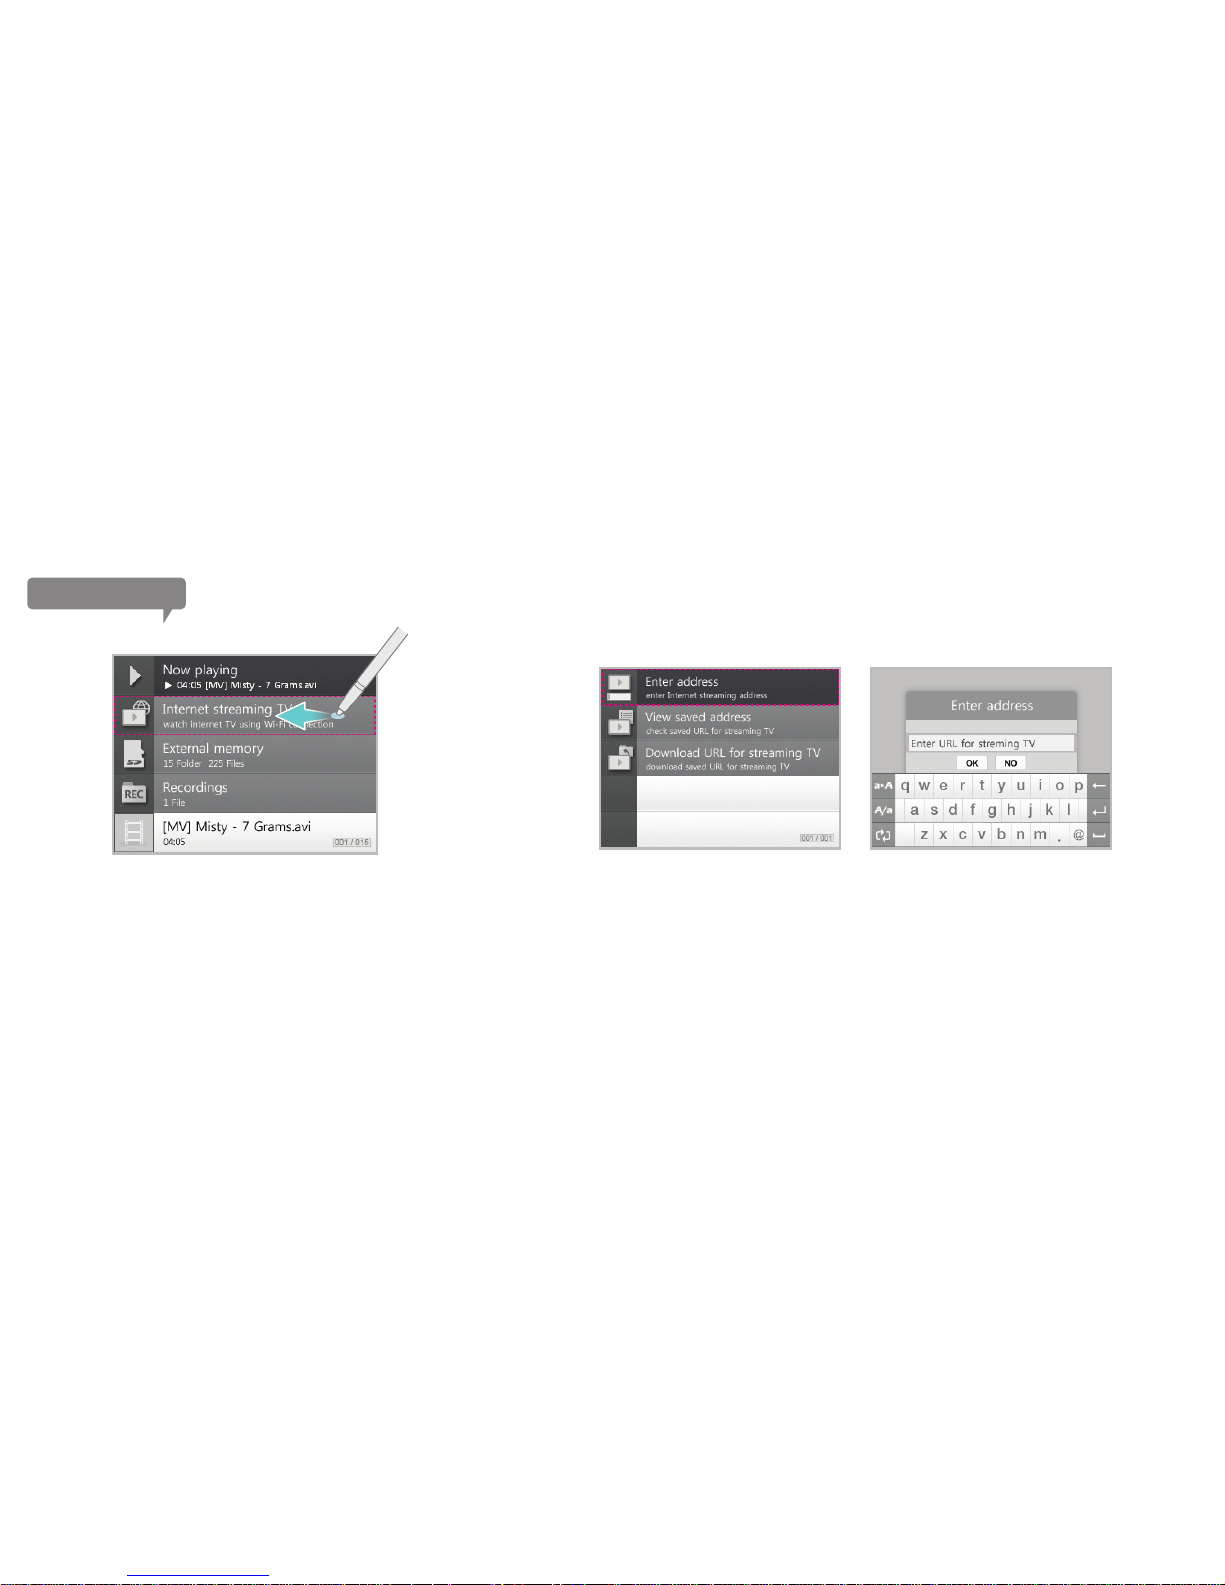
Watching Internet (Wi-Fi) streaming TV
Go to Videos > Video Streaming; Real-time Internet streaming TV
can be played on Mintpad.
*Wi-Fi connection is required for this option.
Open the “Enter address” option and type in the address from which you will download
Internet TV. The addresses will be saved for later use.
*Please refer to the page 31 for more information on how to use the typing tool.
Entering the address for video streaming
Internet streaming TV
52
Page 53
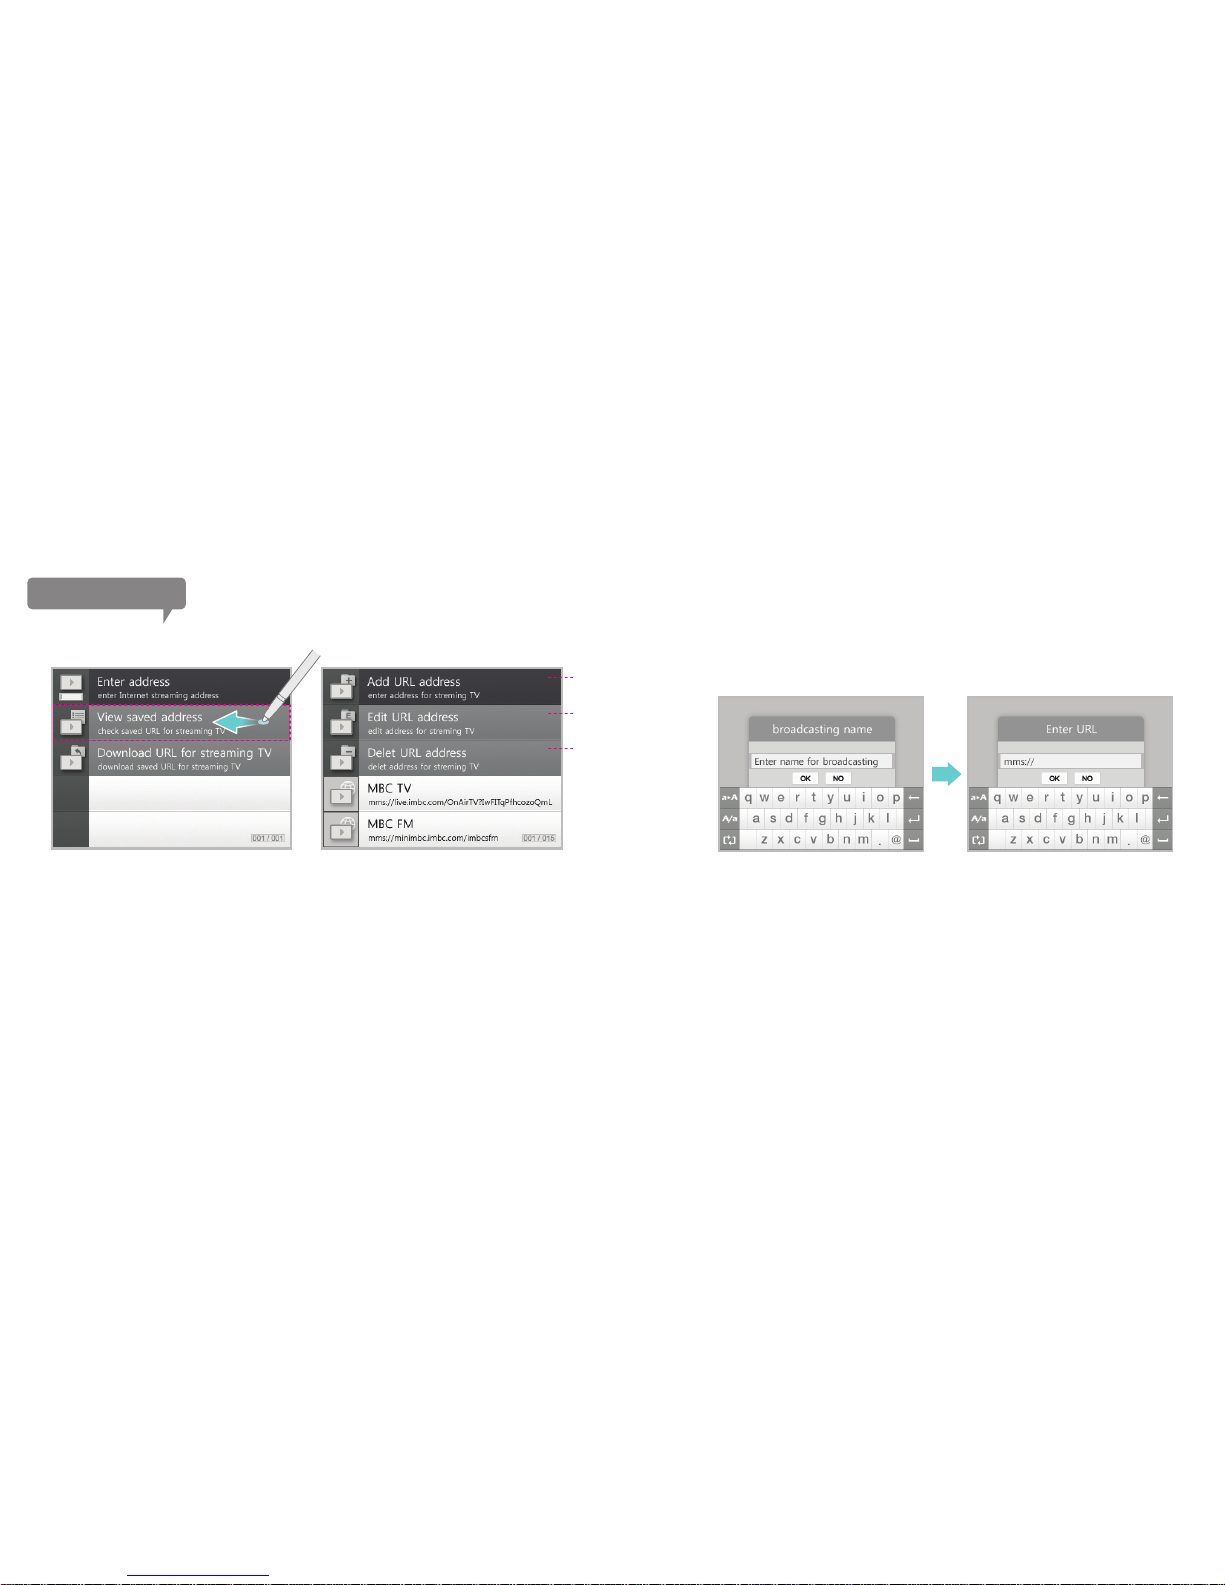
In this menu, there is a list that can add or delete an Internet address for video
steaming. Use this list to save your favorite Internet TV address. Internet address can
also be edited and deleted from the list.
Adding an address involves two steps. Enter the name of broadcasting by using the typing
tool and then click on OK. When a new screen is opened, enter the URL address for the
broadcast and click on OK.
*Please refer to the manual page 31 for more information on how to use the typing tool.
Viewing the saved streaming TV addresses.
*How to add an address
Add (save) an address
Edit a saved address.
Delete a saved address.
53
Internet streaming TV
Page 54
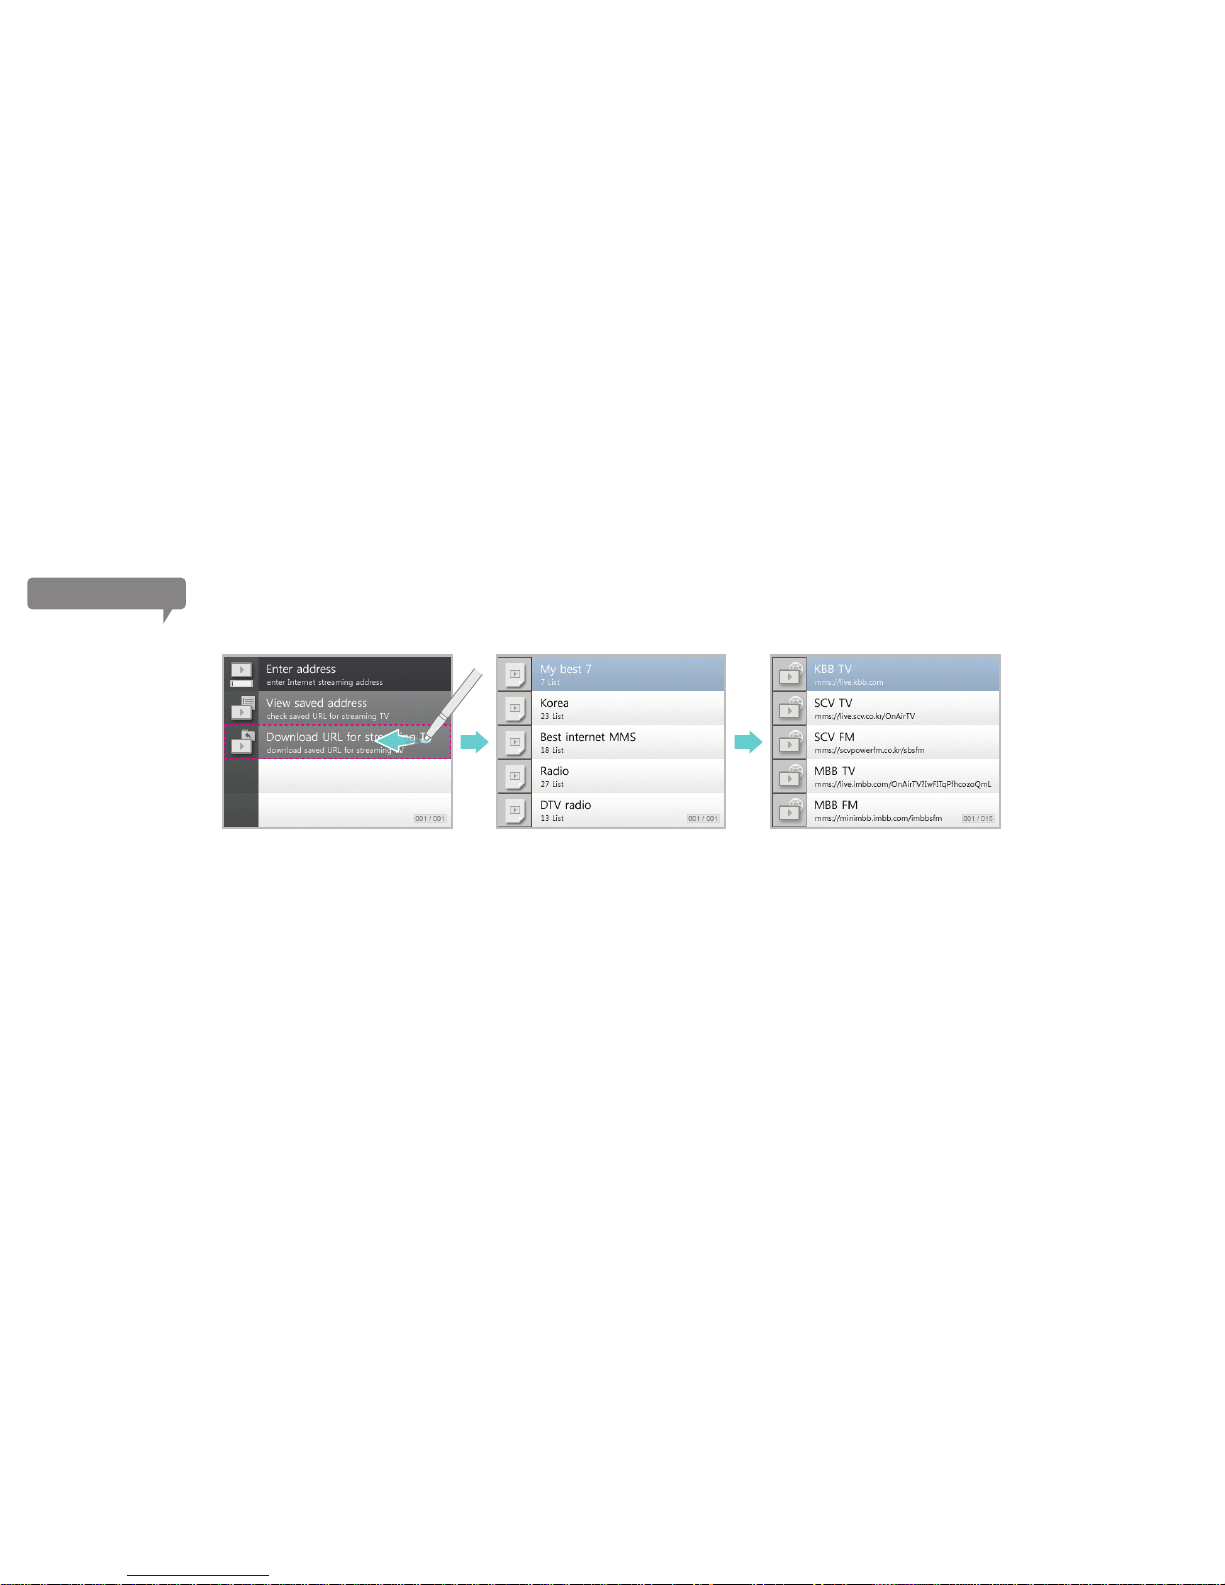
You can use the URL address from text file. (Please refer to page 55 for more information on
how to compose a streaming text file).
Run “Download address file” to view text files stored in Mintpad’s Videos folder. Double click
or slide left on the screen to run a text file. The addresses in text file are displayed in a list.
Double click or slide left on the address to play the Internet streaming video.
Loading the URL address stored in text file
Text files list in Videos folder Video streaming URL address in a txt file
54
Internet streaming TV
Page 55
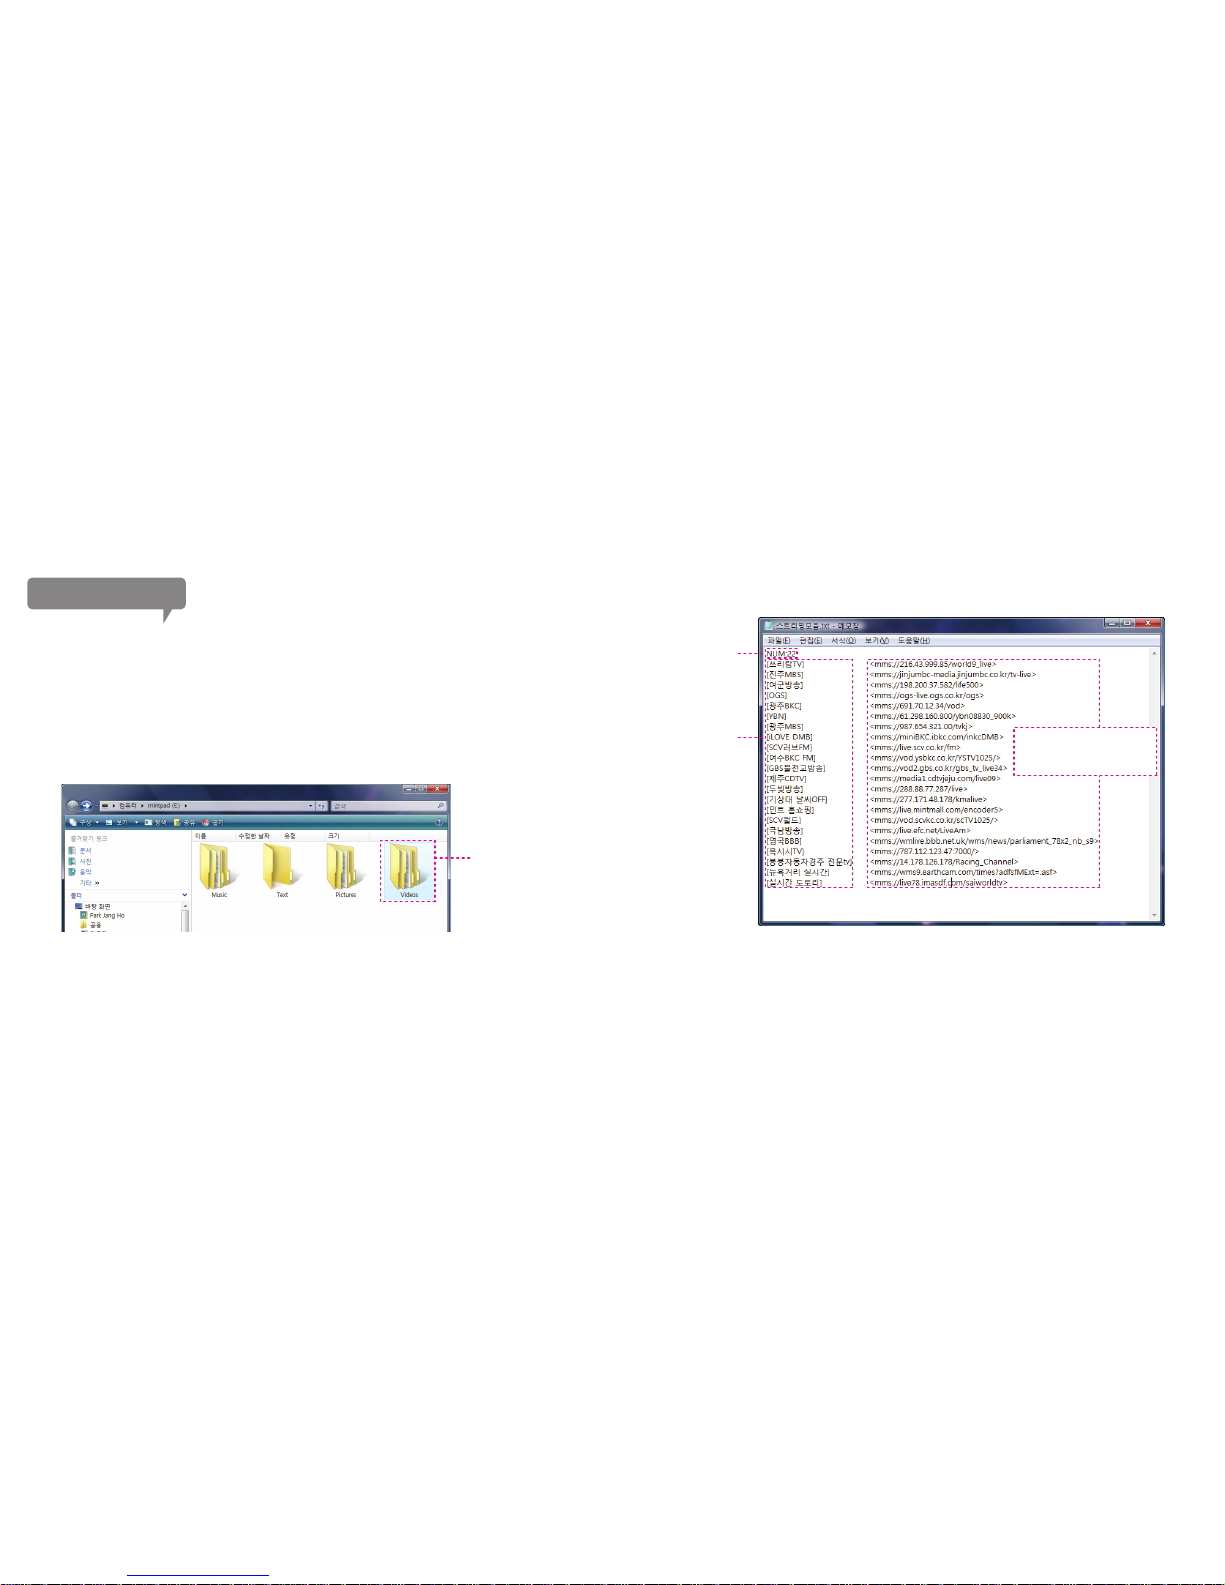
You can get the URL address from txt files stored in Mintpad to play streaming videos.
Follow through the instruction on the right and compose txt file.
Connect Mintpad to a PC and open the drive to which Mintpad is assigned. Copy the
txt files to the Mintpad’s Videos folder.
*How to compose and save txt file for Internet broadcasting.
* The URL addresses above are intended for demonstration only.
It is important to include “NUM:” in the first line,
and immediately after which enter the amount
of broadcastings in numbers.
This numerical value must match
the number of streaming in the list.
Ex) NUM:22
The name of broadcasting
must be within [ ] symbols.
Ex) [Gwang ju BKC]
Copy the composed txt files
to the Mintpad Videos folder.
The URL must typed
within < > symbol
ex) <mms://691.70.12.34/vod>
* To use the file properly, you must follow through the instruction above
and save the file in “txt” form
55
Internet streaming TV
Page 56
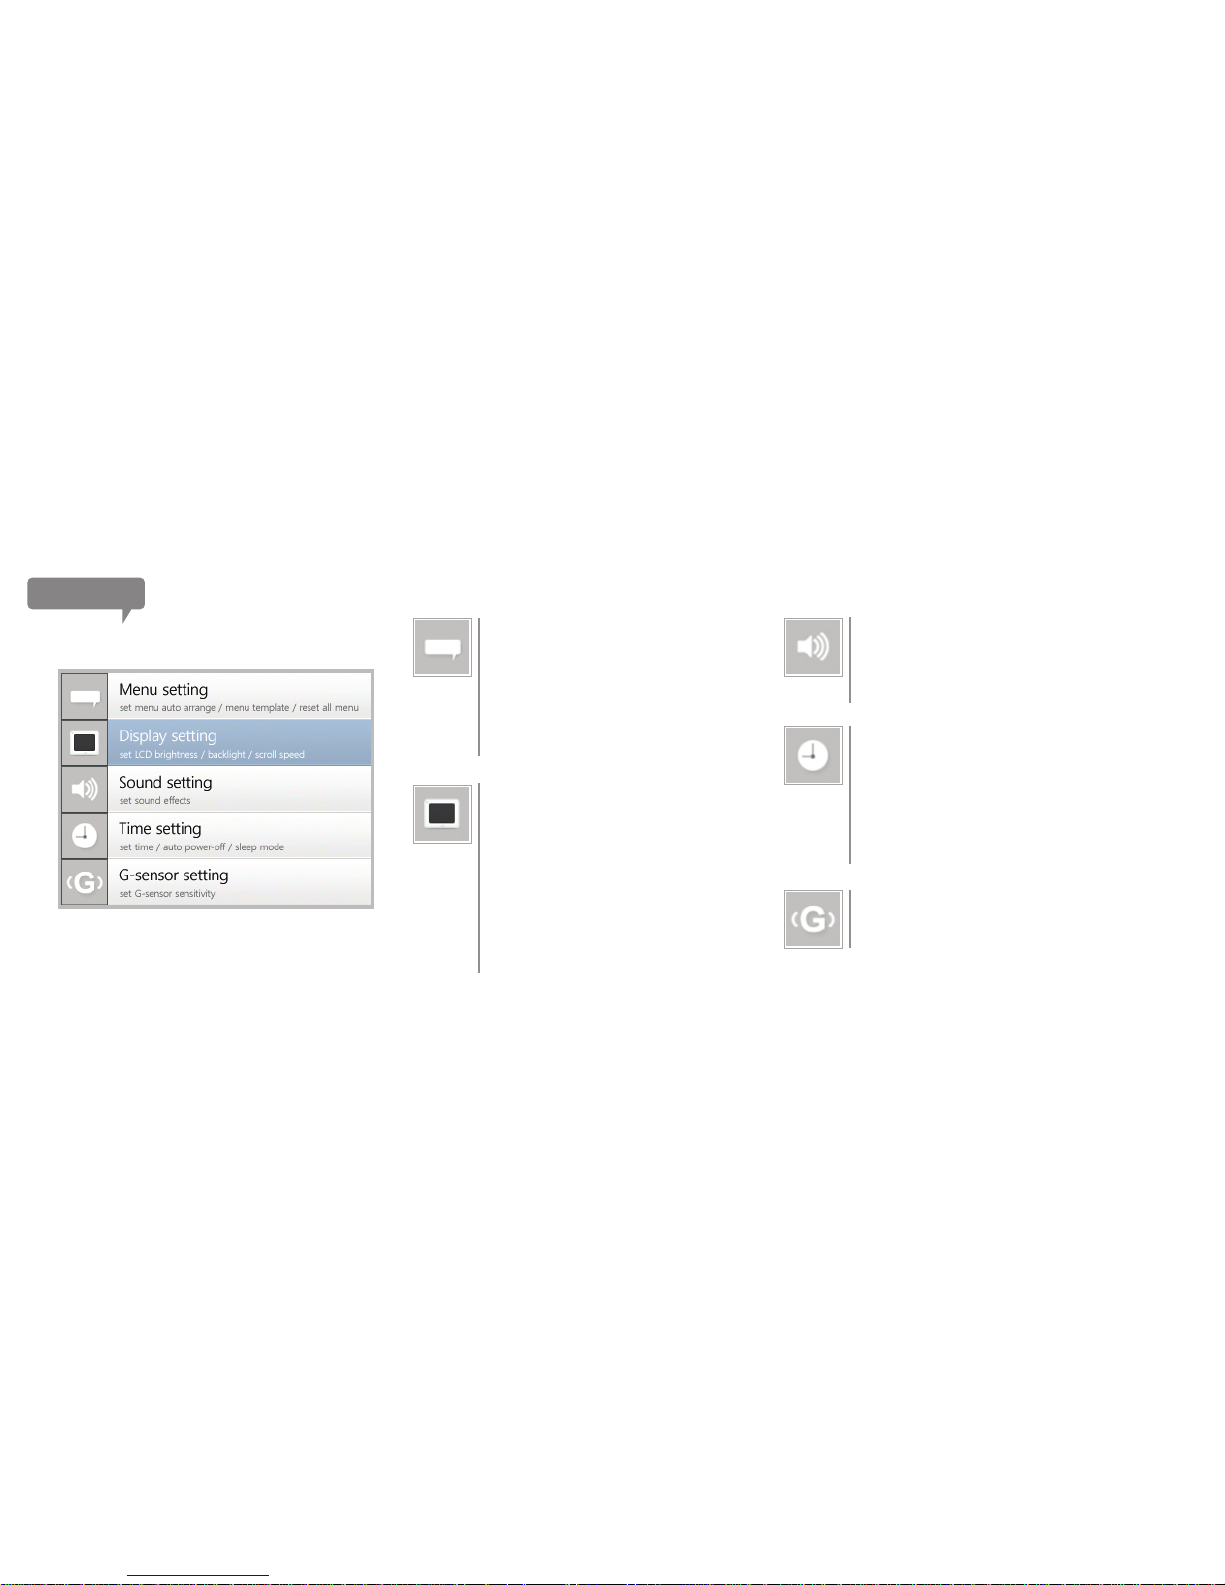
Setting
Menu theme types can be selected.
Menu templates
Menu Auto Arrange
Menu items can be sorted based on usage.
Reset All Menu
Menu settings can be initialized.
Screen brightness can be adjusted.
LCD Brightness
Backlight Timer
Backlight time can be adjusted.
Scroll Speed
Scrolling speed can be adjusted.
LCD Calibration
Touch screen can be calibrated.
G-Sensor Setting
Different level of G-Sensor sensitivity can be set.
Date and time can be set.
Time Setting
Auto Power Off
Auto power off time can be set.
Sleep
Sleep mode time can be set.
Different sound effects can be set.
Sound Effects Setting
Sound Effects Volume Setting
Effects volumes can be set.
56
Page 57
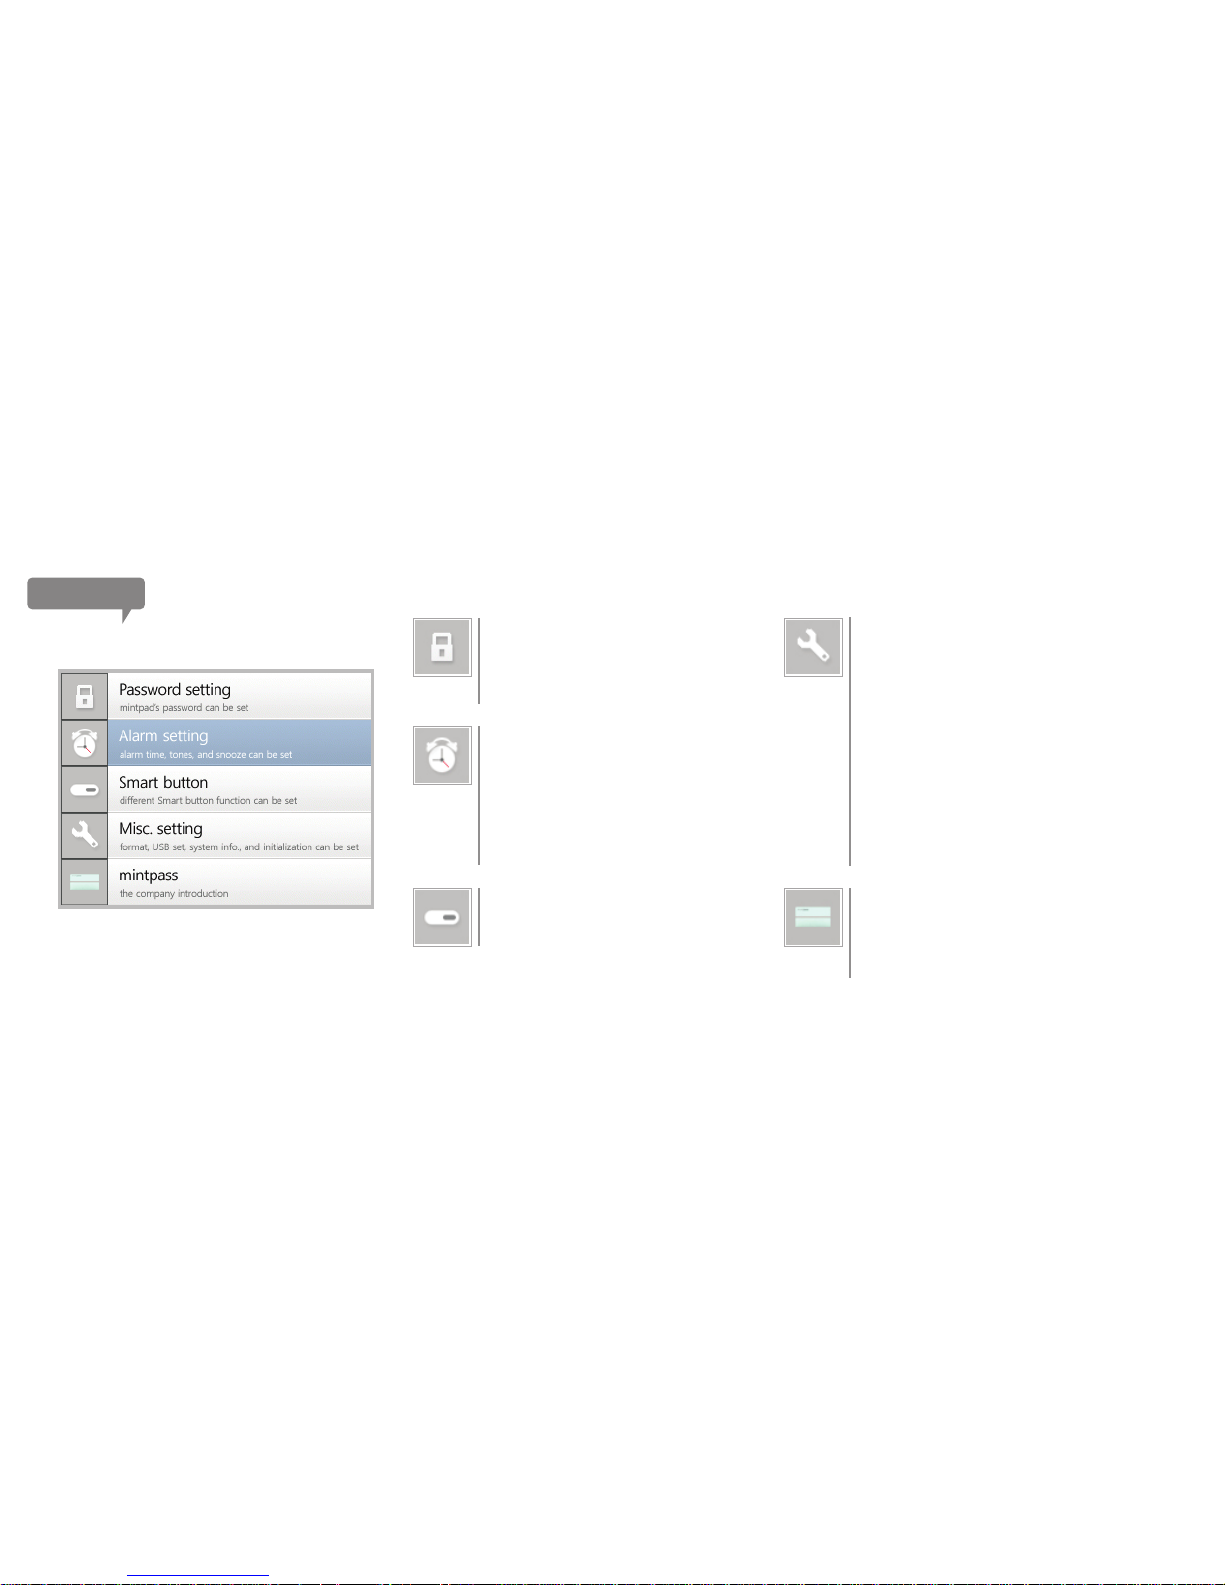
Password use can be set.
Lock Setting
Password Setting
Password can be set.
Formatting of internal/external memory.
Format
USB Setting
DB Restoration
Permitting interaction while USB connection is made.
Refreshing database to enhance file plays.
System Information
Displaying the device’s version and memory usage.
Initialization
Resetting all setting.
Push and hold functions can be set.
Smart Button
Alarm time can be set.
Alarm Time
Alarm Tones
Snooze
Alarm tones can be set.
Snooze duration can be set.
Company Introduction
Introducing Mintpass.
Mintpass Copyrights
Copyrights announcement.
57
Setting
Page 58

59 Funware upgrade, Window Browser
60 Troubleshooting
61 Precautions
63 Specification
64 Copyrights, Authentication,
Registered Trademarks, Disclamer
65 Warranty Information
Chapter 4.
Misc. Information
Page 59

In cases where Sapphire is unable to run, contents can be transferred to the
device using the Windows Explorer.
1. After connecting the device to PC, run the Windows Explorer or “My Computer.”
2. Find the drive where Mintpad is connected.
3. Depending on the types of contents, copy each of the music, pictures, and videos.
4. Run the “DB Restoration” from Setting > Misc. Setting on Mintpad.
*Incompatible files may have problem playing on the device.
Using the Windows Explorer
Funware is Mintpass's own way of caliing firmware that is upgraded and
improved continuously. Through its upgrade, we not only improve functions and
fix bugs, but also provide new kinds of fun.
What is Funware upgrade?
When Mintpad is hooked up to the PC, it automatically logs on to the Mintpass
homepage as the Funware is upgraded through a popup window. Agreeing to
the funware upgrade will enable automatic download of the new patch. When
the USB cable is disconnected, the upgrade will begin on the device.
*During the upgrade, please do not remove the battery or turn the device off.
How to upgrade the Funware
Windows ExplorerFunware Upgrade
59
Page 60

Troubleshooting
· Please check whether the batter pack is properly inserted.
· Please check whether the battery pack is leaking.
· Please check Hold Button if it is locked.
I can’t turn the power on!
· Please check if the volume is at 0.
· Please check if it is on mute.
· Please make sure if the earphones (headphone, speakers) are plugged properly.
The videos play, but there is no sound!
· Please check if the USB cable is properly connected.
· Please check if mintpad is already fully charged.
I can’t recharge!
· Please check the touch screen calibration.
· Please check if the LCD protection film is in place properly.
Touch screen does not react!
· Please check if the device is in auto power off mode.
Please check the time setting from the auto power off mode.
The battery runs out too quickly!
· For saving power, it turns off after a certain period of time.
Please check the Backlight timer’s time setting.
Screen keeps turning off!
· The memory size may increase/decrease depending on the PC OS environment.
After formatting, the memory size decreased!
· Please check if the device is in the Wi-Fi range.
· Please check the reception.
Wi-Fi connection can’t be made!
*After you have tried all of the above and there still remain problem(s),
please contact the Mintpass customer service center.
Before consulting our A/S center,
please check the followings again.
60
Page 61
61
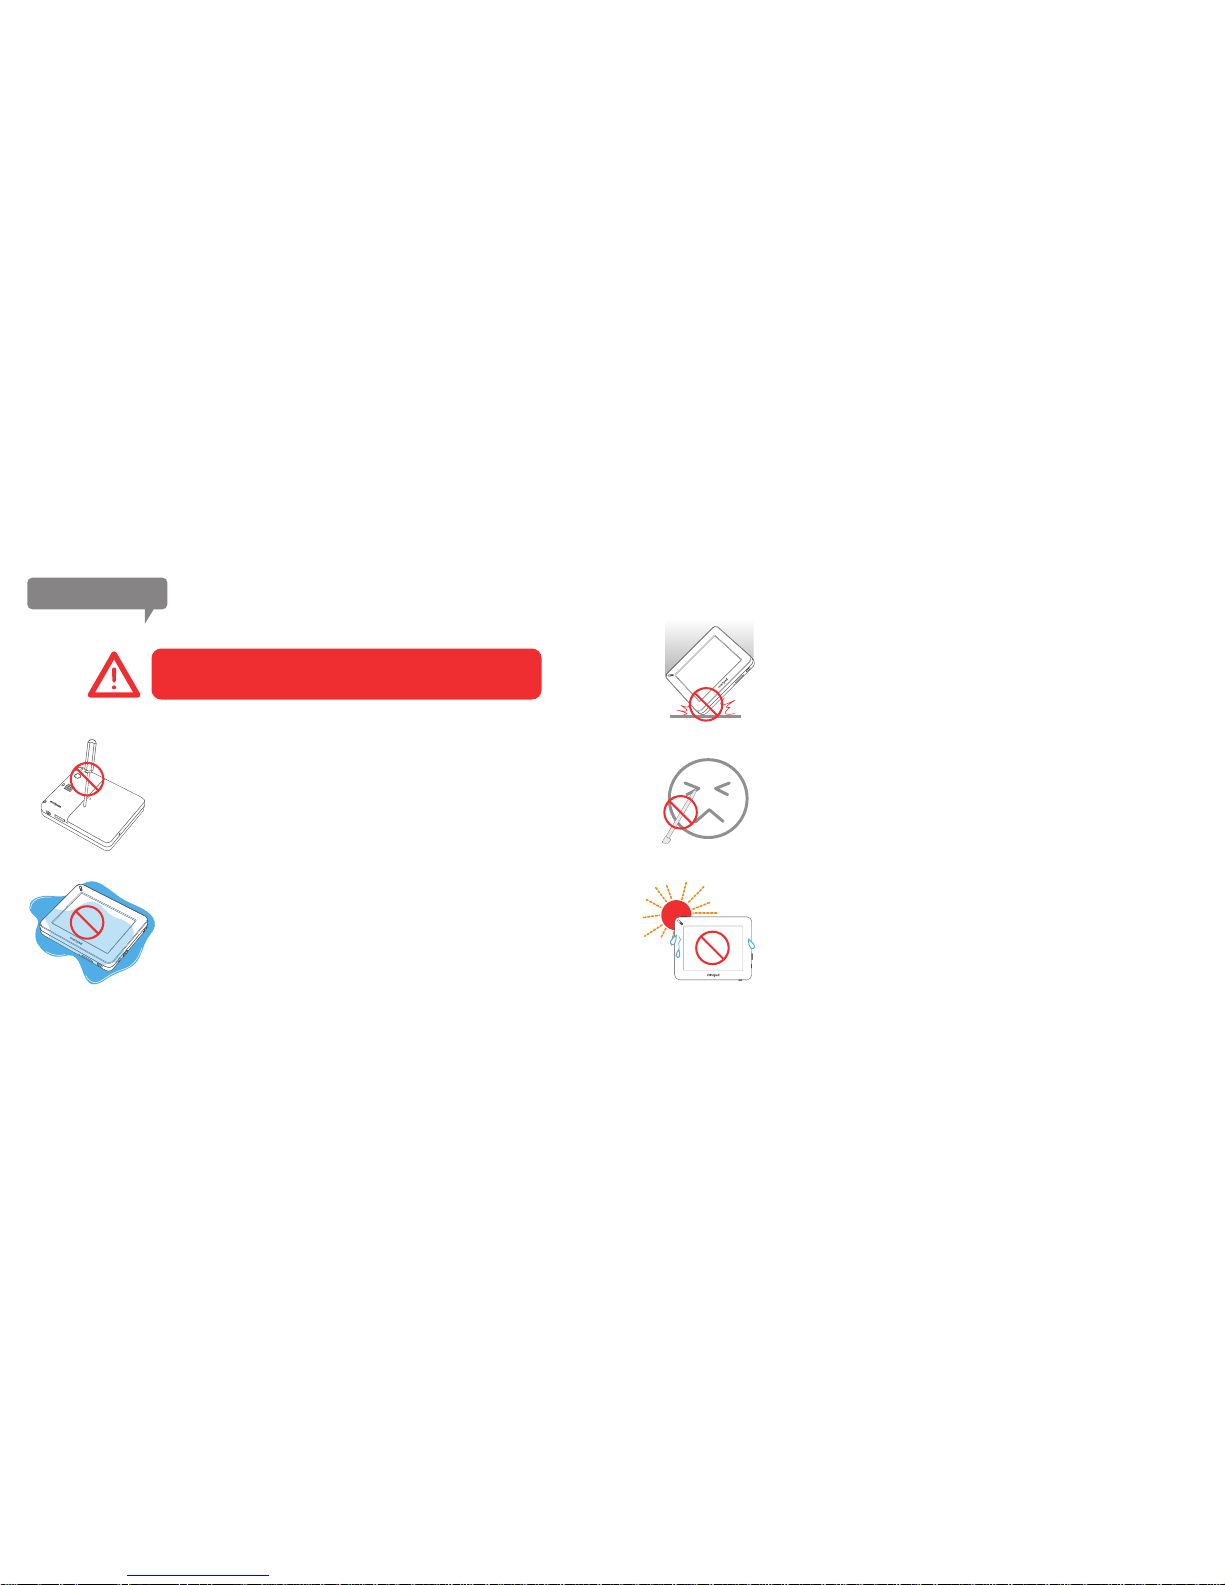
For safety reasons,
please read carefully the followings.
Please do not let any liquids, such as water, juice, coffee, oil, or pet’s
urine, contact with or smear into the device. In case the liquid has
smeared into the device, take out and wipe the battery immediately
and contact the mintpass customer support center.
If no action is taken when wet, it may cause fire, electric shock, and
malfunctions.
Avoid liquids at all times
Please do not disassemble, modify, or fix the device yourself.
Please do not damage the battery pack’s label, for it can cause
leakage, fire, electric shock, and malfunctions.
Do not disassemble or modify
Safety precautions
Do not use the stylus pen for other than the intended purpose. It may
cause injuries in some occasion.
The device may be damaged using the pen that is damaged or bent.
Precautions with using Stylus pen
Avoid using the device under the strong sun rays or in a freezing
weather.
Please avoid situation where dew forming from sudden temperature
change is possible. Moisture formed inside the machine may cause
problems.
Do not use in extreme weather
Please avoid dropping or applying strong force to the device.
It may cause internal damage or battery leakage; there may be
overheating or even fire as a result.
Do not impact the device
Page 62
62
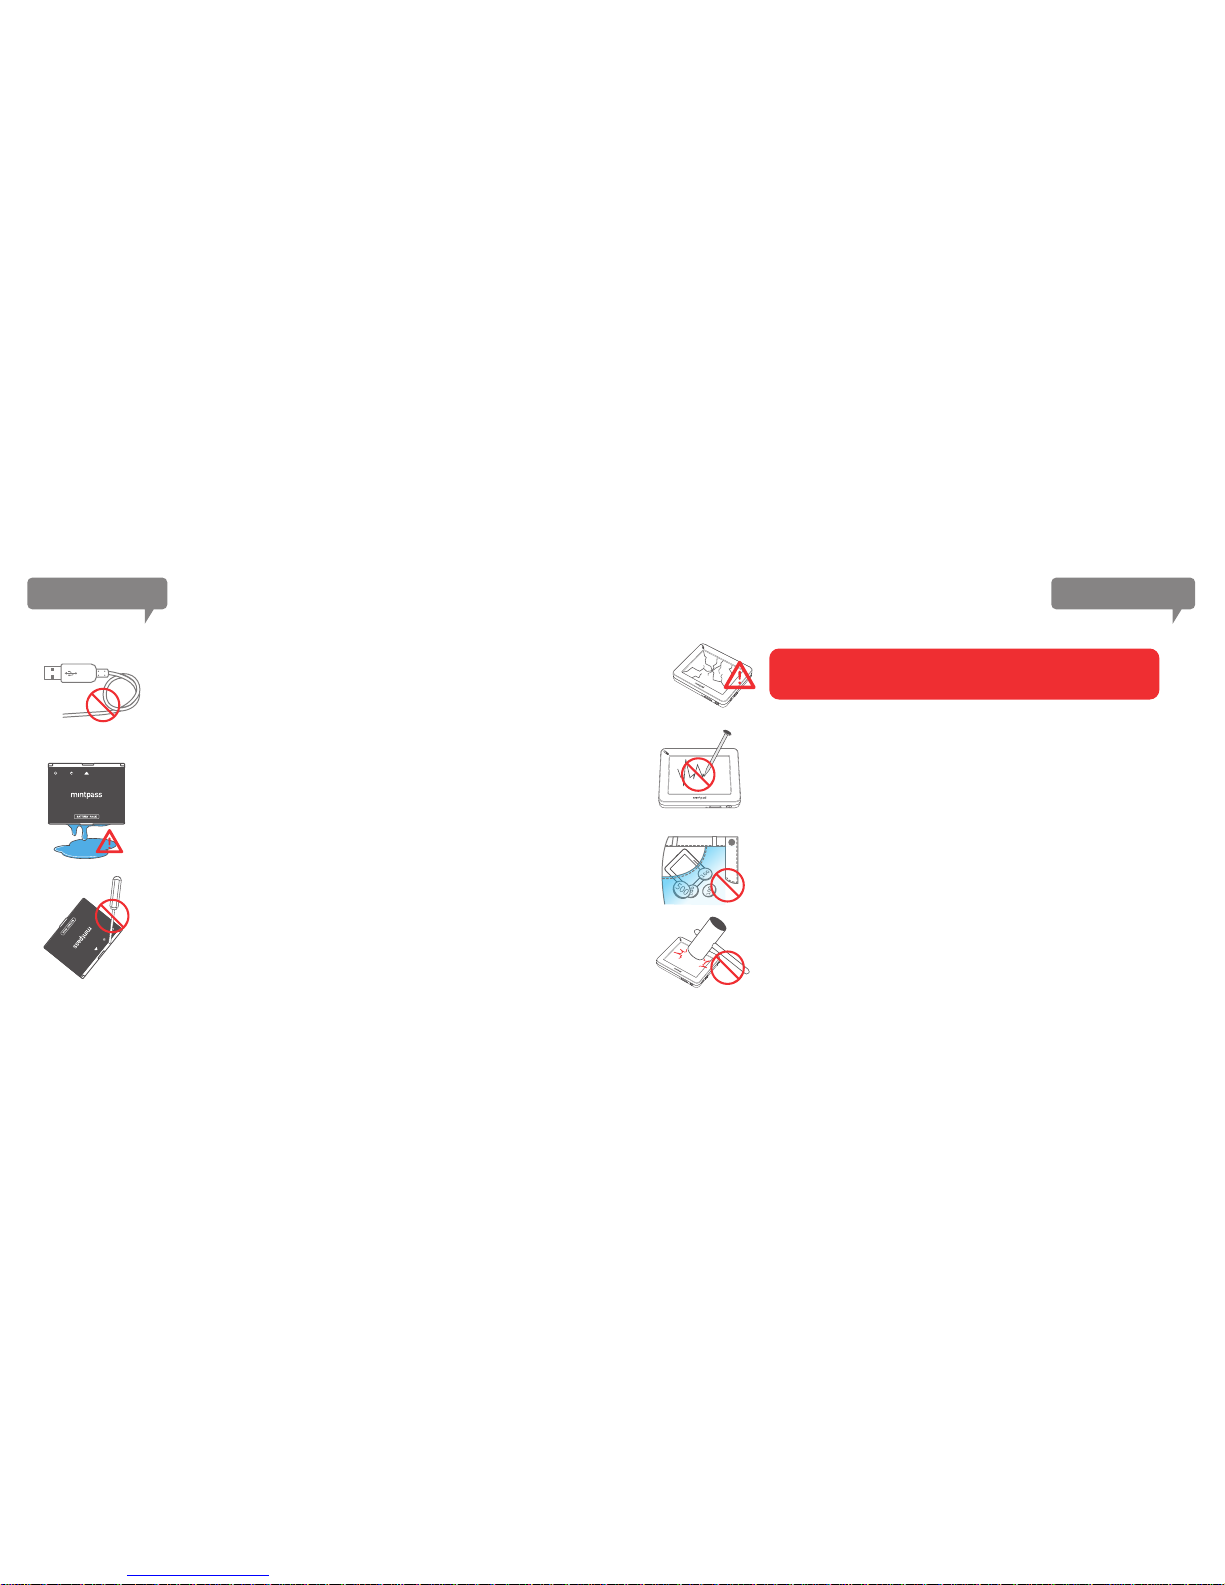
If the battery liquid is contacted with skin, rinse with water immediately and contact your physician.
Damaged battery
Avoid licking or contacting the negative (anode) and positive
(cathode) electrodes with metallic objects. Possible explosion or
overheating may occur.
Precaution on the battery electrodes
Please do not tie the USB cable too tight.
Please do not forcefully pull the cable nor damage the cable with
sharp items.
Do not damage the USB cord
Safety precautions Screen precautions
To avoid damaging the screen,
please read carefully.
Normal operation may be difficult, if the screen panel is damaged.
Please exercise caution or it may damage the LCD. Handle with care.
Sharp objects should be restricted
Other object can inadvertently damage the device or its screen to
cause problems or malfunctions.
Avoid storing the device in the pocket with other objects
It may cause internal damage or screen damage; it may cause injuries
or malfunction.
Avoid applying heavy force to the screen
Page 63
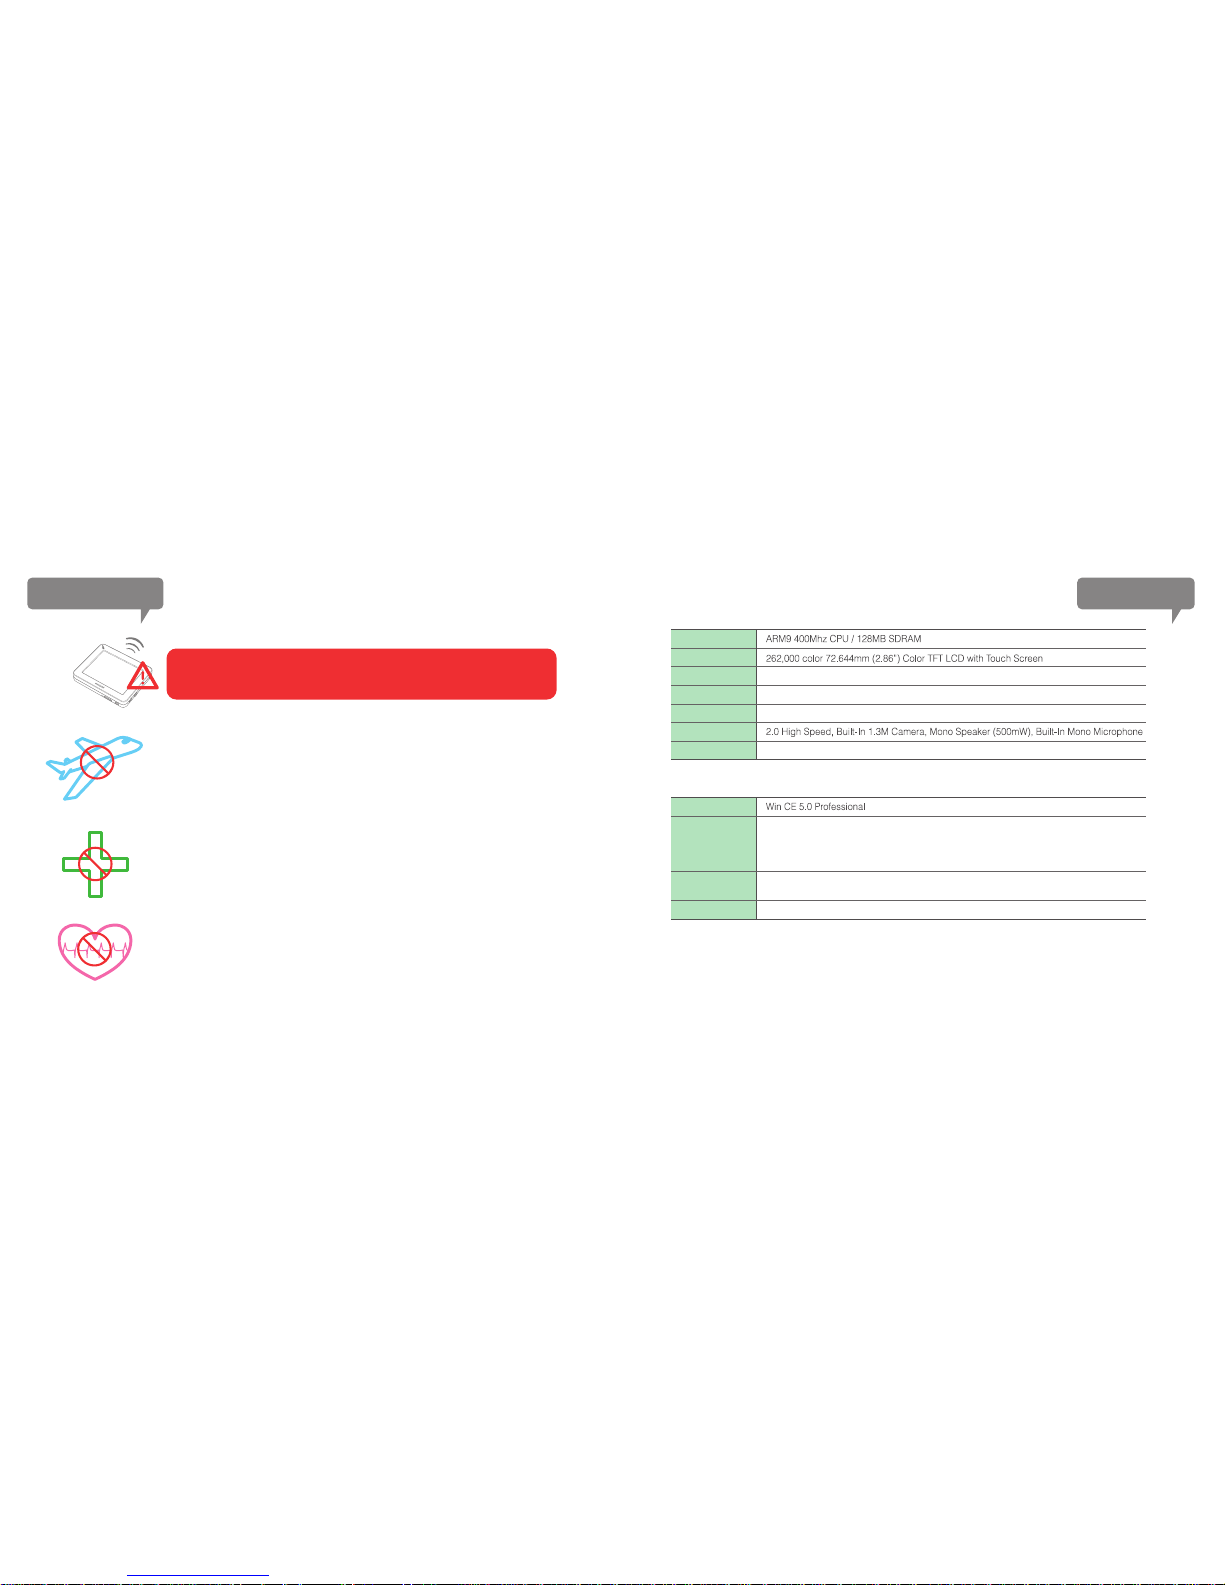
63
Specification
Hardware spec
Display
CPU/Memory
Int/Ext Memory
Wirless LAN
Battery
Etc.
Size&weight
Software spec
OS
Audio
Video
Image
*The statements above are subject to change without notification. The sizes and specs are Mintpad standard.
Depending upon environments the result may vary.
*The battery duration for music play time was using earphone and the following setting: 128KBPS, mp3, volume level 25, EQ preset-FLAT,
and screen off. The battery duration for video play time was based on MPEG4, SP, QVGA, 30fps.
*Depending on Flac/APE file’s compression mode, some limitation on the function can be applied.
*MPEG4 ASP support max 1Mbps; WMV 7, 8, 9 SP support max 0.5Mbps; MPEG-1 and MPEG2 support max 5 MBbps.
*FOR MICROSDHC 16GB, ONLY SANDISK'S CLASS 2 PRODUCT IS SUPPORTED. (PLANNED TO SUPPORT BIGGER SIZE IN THE FUTURE)
Nand Flash : 4GB, Memory Slot : MicroSD Support SDHC (up to 16GB)
When using Wi-Fi,
pay attention to the following.
Wi-Fi Precautions
According to the in-flight regulation, the use of all wireless communication devices is prohibited by law, unless instructed otherwise by the
navigating officer.
Do not use inside airplanes
The radio signal from Mintpad can inadvertently affect the medical
devices.
Do not use in hospitals
It may inadvertently affect the persons wearing the heart pacemaker.
Do not use in crowded areas
Li-Ion Battery Pack(900mAh), Music : appr. 30hr(mp3 standard), Videos : appr. 5hr
Dimension : 78.2mm x 63.8mm x 15.2mm, Weight : approx. 90g(Battery included)
802.11b/g, Security protocols : WEP
mp3, wma, ogg, wav, APE, FLAC (mp3, wma : 8kbps ~ 320kbps, ogg : Q10)
Tag : ID3 V1 Tag, ID3 V2 2.0, ID3 V2 3.0, EQ :12 band EQ, 7 Preset EQ
Frequency range : 20Hz ~ 20kHz, signal to noise ratio : 90dB, Frequency Response : ±3,
channel : Stereo (L+R)
avi, wmv, mp4 (mpeg4, wmv7 ~ 9, MPEG-1/2)
Supported Video resolution : 320x240 (QVGA), 30fps, Frame rate : 15fps @ QVGA
JPG(Progressive Jpeg excluded), BMP, PNG (max size 2048 x 2048)
Page 64

Copyrights
Copyrights
Mintpass Ltd. owns patents, copyright, trademark, and other intellectual properties
related to this manual. Without prior permission or consent by Mintpass Ltd., it is
unlawful to use or duplicate this manual for anything other than intended purpose.
Using parts or the entire contents of the document is punishable by laws. Software,
sounds, videos and other contents are all protected by copyrights. The persons
using this product to conduct unlawful copy or distribution of patented contents will
be held responsible for any damage or consequences. The companies, institutes,
products, individuals, and events are not real data. It should not be assumed that we
intent to promote or relate any companies, institutes, product, individuals, and events
through this user manual. It is up to a user to comply with the laws and regulations.
©2008 mintpass Limited. All rights reserved.
Exemption clause
Manufacturer, importers, and agencies will not take any responsibility for the
damages caused by accidents or inappropriate handling of the product by
users. The information provided in this user manual is based on the product’s
current specification. As a manufacturer, Mintpad Ltd. has been and will be
constantly upgrading the device with new functions, features, and technologies. All standards are subject to change without any notification.
64
 Loading...