

Page 1
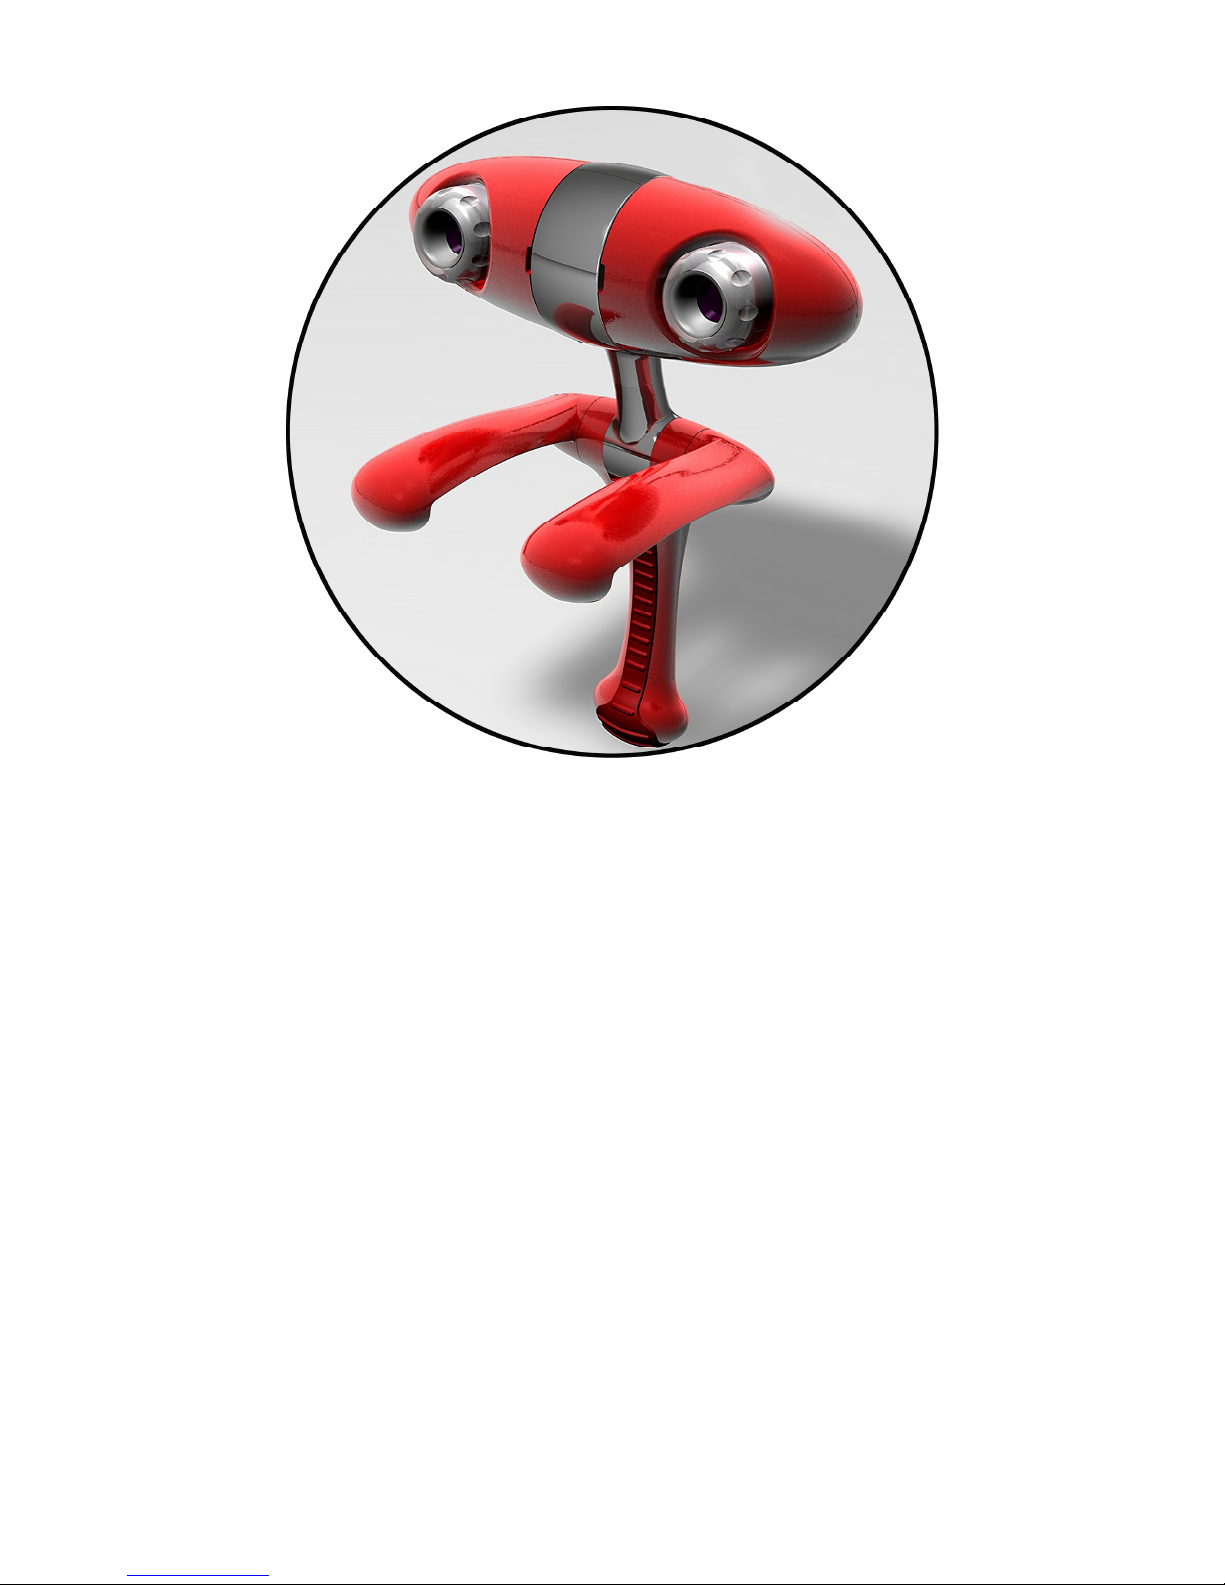
Minoru 3D
Webcam
User’s Guide
Page 2

M i n o r u 3 D W e b c a m U s e r ’ s G u i d e , R e v i s i o n 1 .
2 , F e b r
u a r y
2 0 0 9
P a g e | 2
Contents
Introduction ............................................................................................. 4
Installation .............................................................................................. 4
Hardware Installation ............................................................................... 4
Software Installation ................................................................................ 5
Minoru Settings ......................................................................................... 6
1 – Setup Wizard... .................................................................................. 7
2 - Mode .............................................................................................. 10
3 - Options ........................................................................................... 10
4 - Select Language ................................................................................. 11
5 – Minoru Website.................................................................................. 11
6 - About... .......................................................................................... 11
7 – Exit................................................................................................ 11
Recording application ................................................................................. 12
1 – Restart Minoru .................................................................................. 12
2 – Resolution........................................................................................ 13
3 – Screen mode ..................................................................................... 13
4 – Audio input select .............................................................................. 13
5 – Start/Stop Recording ........................................................................... 13
6 – Take Snapshot ................................................................................... 13
How to record and playback a 3D video ......................................................... 14
How to take and email a snapshot ............................................................... 16
Using Minoru with popular messaging applications ............................................... 17
Windows Live Messenger ........................................................................... 17
Skype ................................................................................................. 18
OoVoo ................................................................................................ 19
Recommended software to get the most from Minoru ........................................... 20
Videora ............................................................................................... 20
Windows Movie Maker .............................................................................. 20
Page 3

M i n o r u 3 D W e b c a m U s e r ’ s G u i d e , R e v i s i o n 1 .
2 , F e b r
u a r y
2 0 0 9
P a g e | 3
Stereoscopic Player................................................................................. 20
Troubleshooting ....................................................................................... 21
Specifications .......................................................................................... 21
CE compliance statement ............................................................................ 22
FCC statement ......................................................................................... 22
Product disposal instructions (European Union) .................................................. 22
Page 4
M i n o r u 3 D W e b c a m U s e r ’ s G u i d e , R e v i s i o n 1 .
2 , F e b r
u a r y
2 0 0 9
P a g e | 4
Introduction
Meet Minoru, meaning “Reality” in Japanese, the World’s first 3D webcam.
Connect Minoru to your PC and he will come alive, his eyes will light up and he will be
looking at you in 3D.
Your friends and family will now be able to see you in 3D over your favourite messaging
program like Windows Live Messenger, Skype, AOL instant messenger, OoVoo and many
others.
You will also be able to take 3D photos or even shoot 3D videos and upload them to
YouTube.
Installation
Hardware Installation
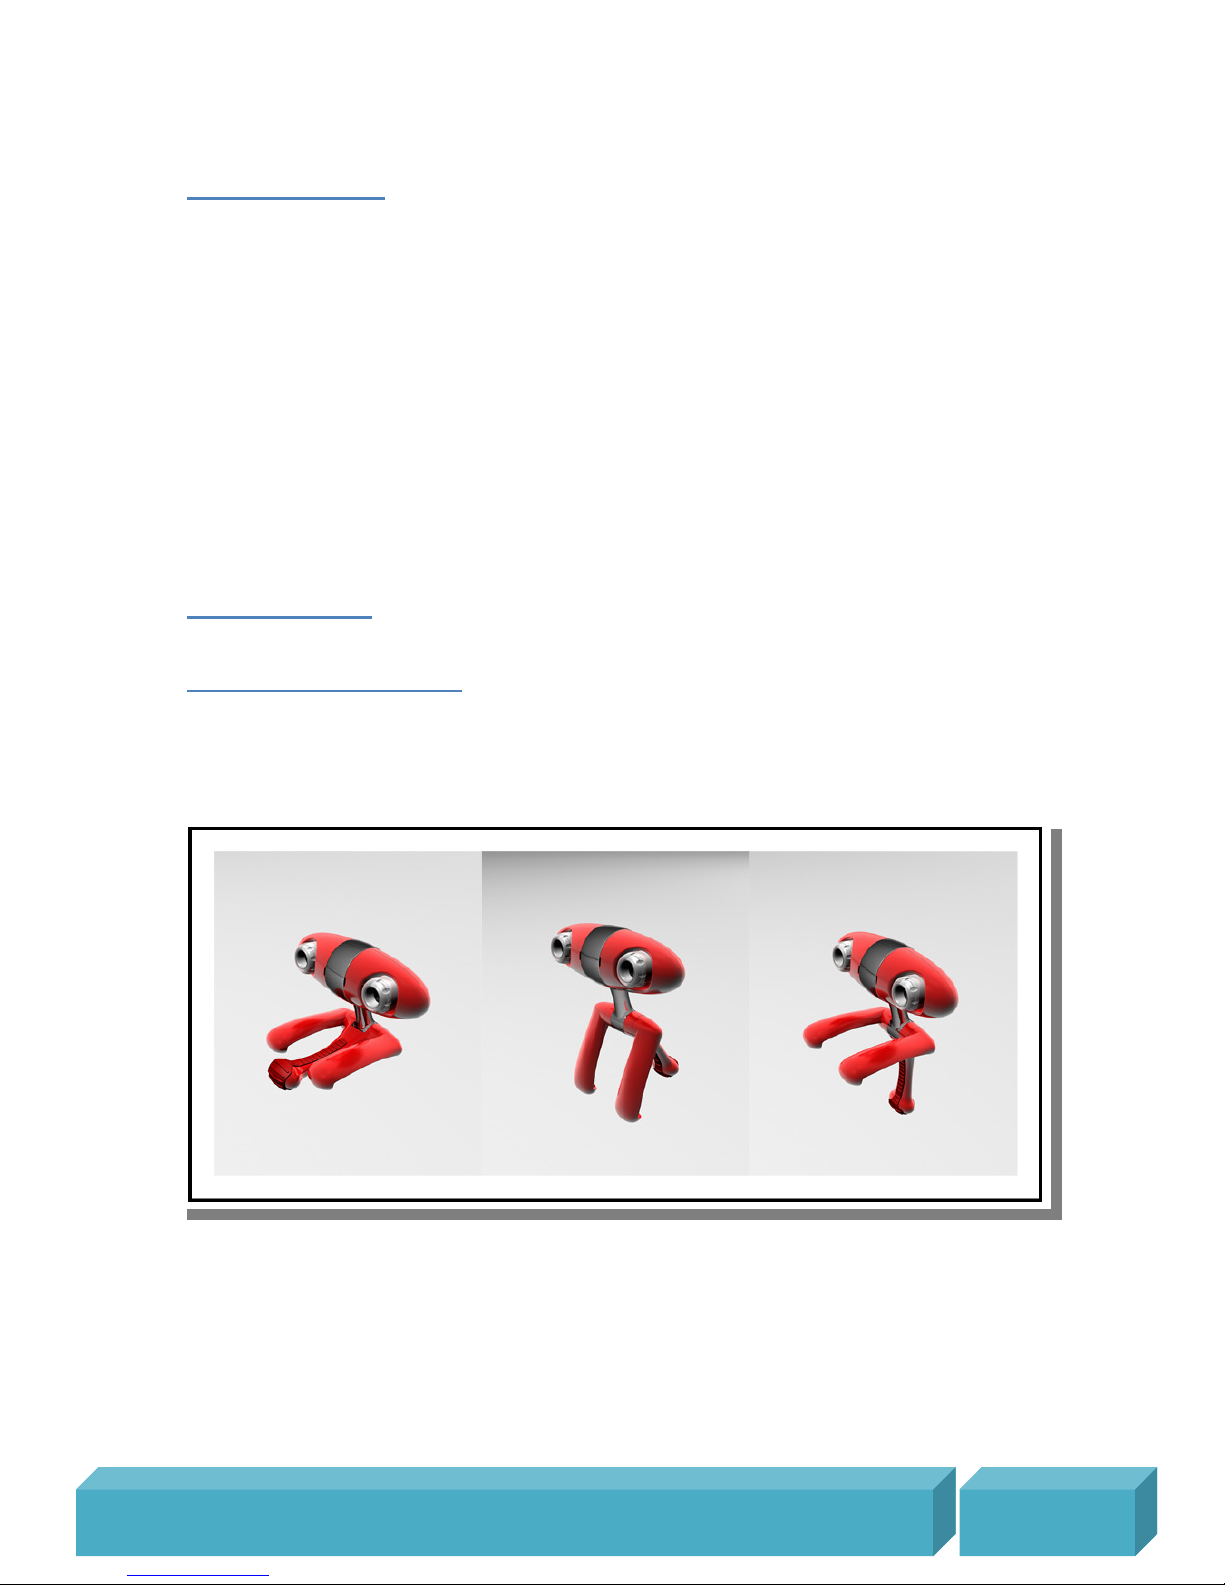
Carefully unpack Minoru and place on the desk in front of you or perch on the top of your
monitor as shown below. Ideally Minoru should be placed approximately 3 feet (1 metre)
away from you.
Plug Minoru into a high speed USB 2.0 port on your PC. If possible please use one of the
USB ports at the rear of your PC.
Note: Minoru will not work properly when connected to an older type USB 1.1 port!
A pop up should appear above the system tray, ‘New Hardware Found’ or ‘Installing Device
Driver Software’. Wait for this process to complete before installing the Minoru software.
Page 5

M i n o r u 3 D W e b c a m U s e r ’ s G u i d e , R e v i s i o n 1 .
2 , F e b r
u a r y
2 0 0 9
P a g e | 5
Software Installation
Open your CD ROM drive and place the software CD in the drive. Close the CD ROM drive
and follow the onscreen instructions to complete the installation of the Minoru software.
Page 6
M i n o r u 3 D W e b c a m U s e r ’ s G u i d e , R e v i s i o n 1 .
2 , F e b r
u a r y
2 0 0 9
P a g e | 6
Minoru Settings
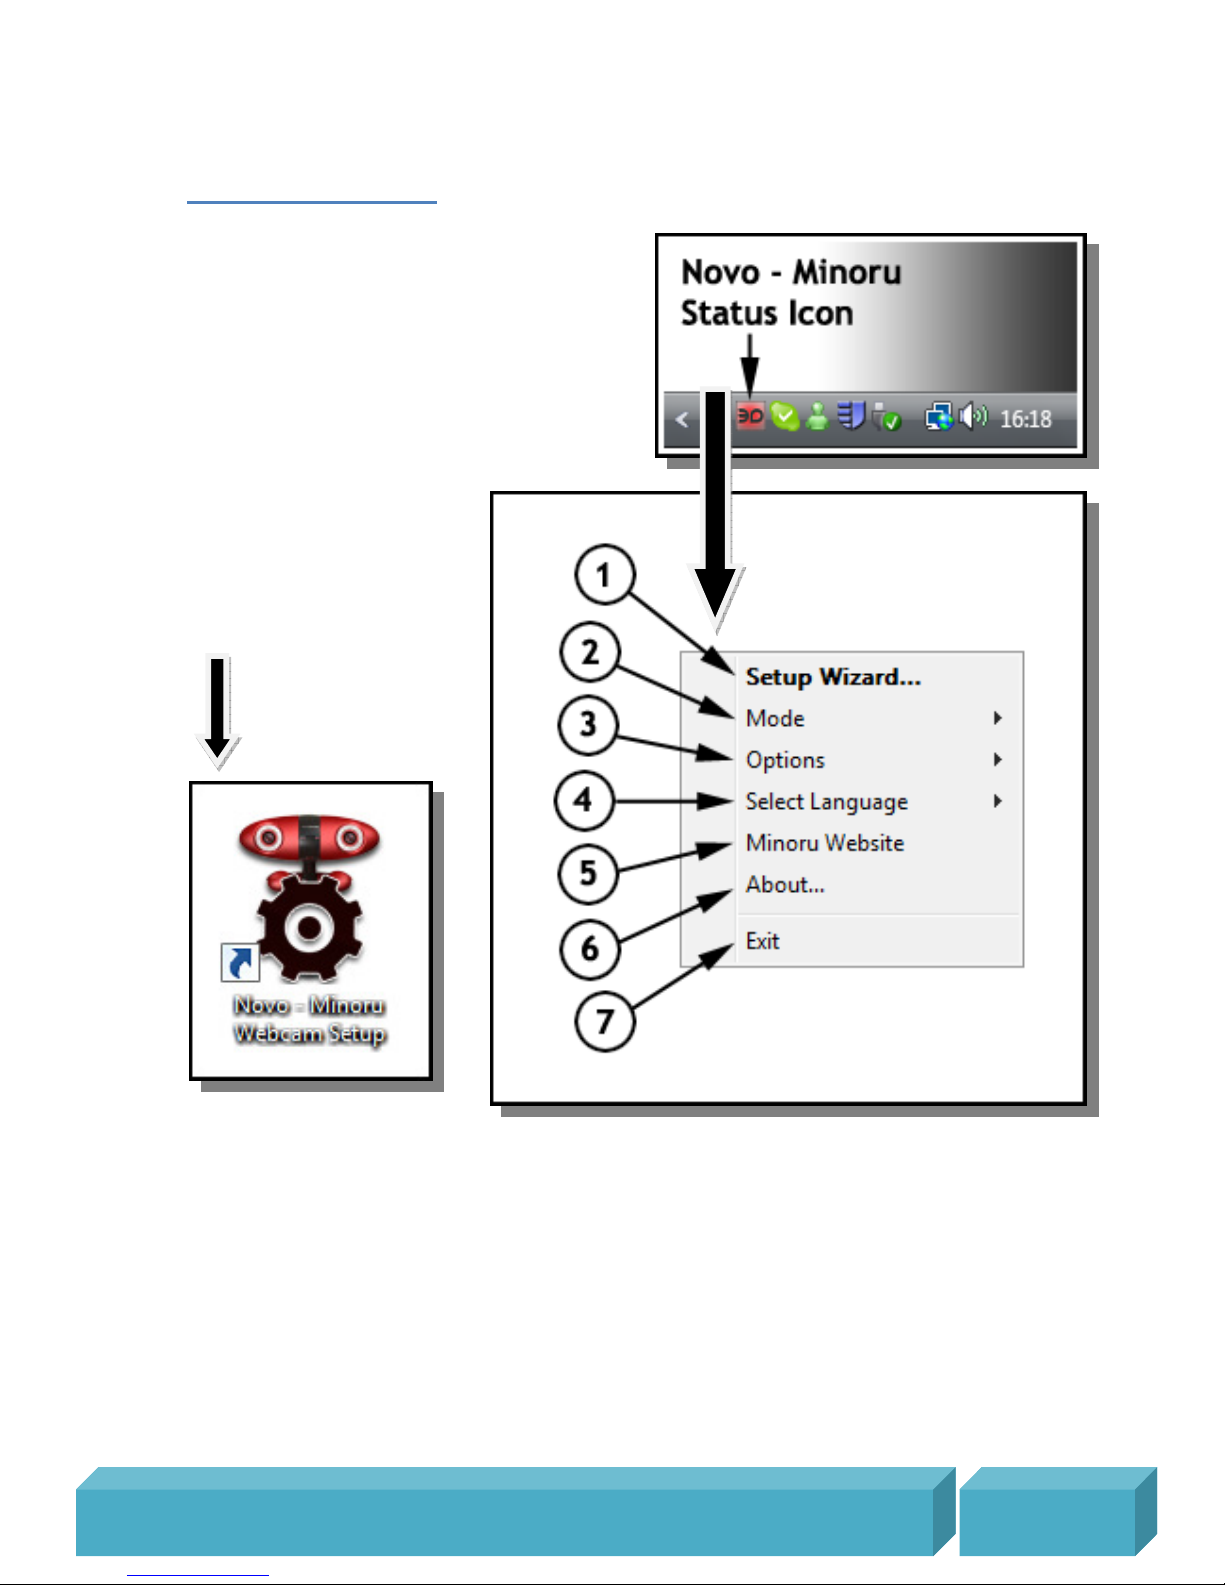
You can access Minoru’s settings at any time by
right clicking the Minoru status icon in the
system tray. You can access and change the
settings even while Minoru is in the middle of a
video call or during a video recording session.
Double clicking the icon will start the Minoru
setup wizard.
If the Minoru status icon does
not appear in the system tray
then you should start ‘Minoru
Webcam Setup’ by double
clicking the desktop shortcut.
Page 7
M i n o r u 3 D W e b c a m U s e r ’ s G u i d e , R e v i s i o n 1 .
2 , F e b r
u a r y
2 0 0 9
P a g e | 7
1 – Setup Wizard...
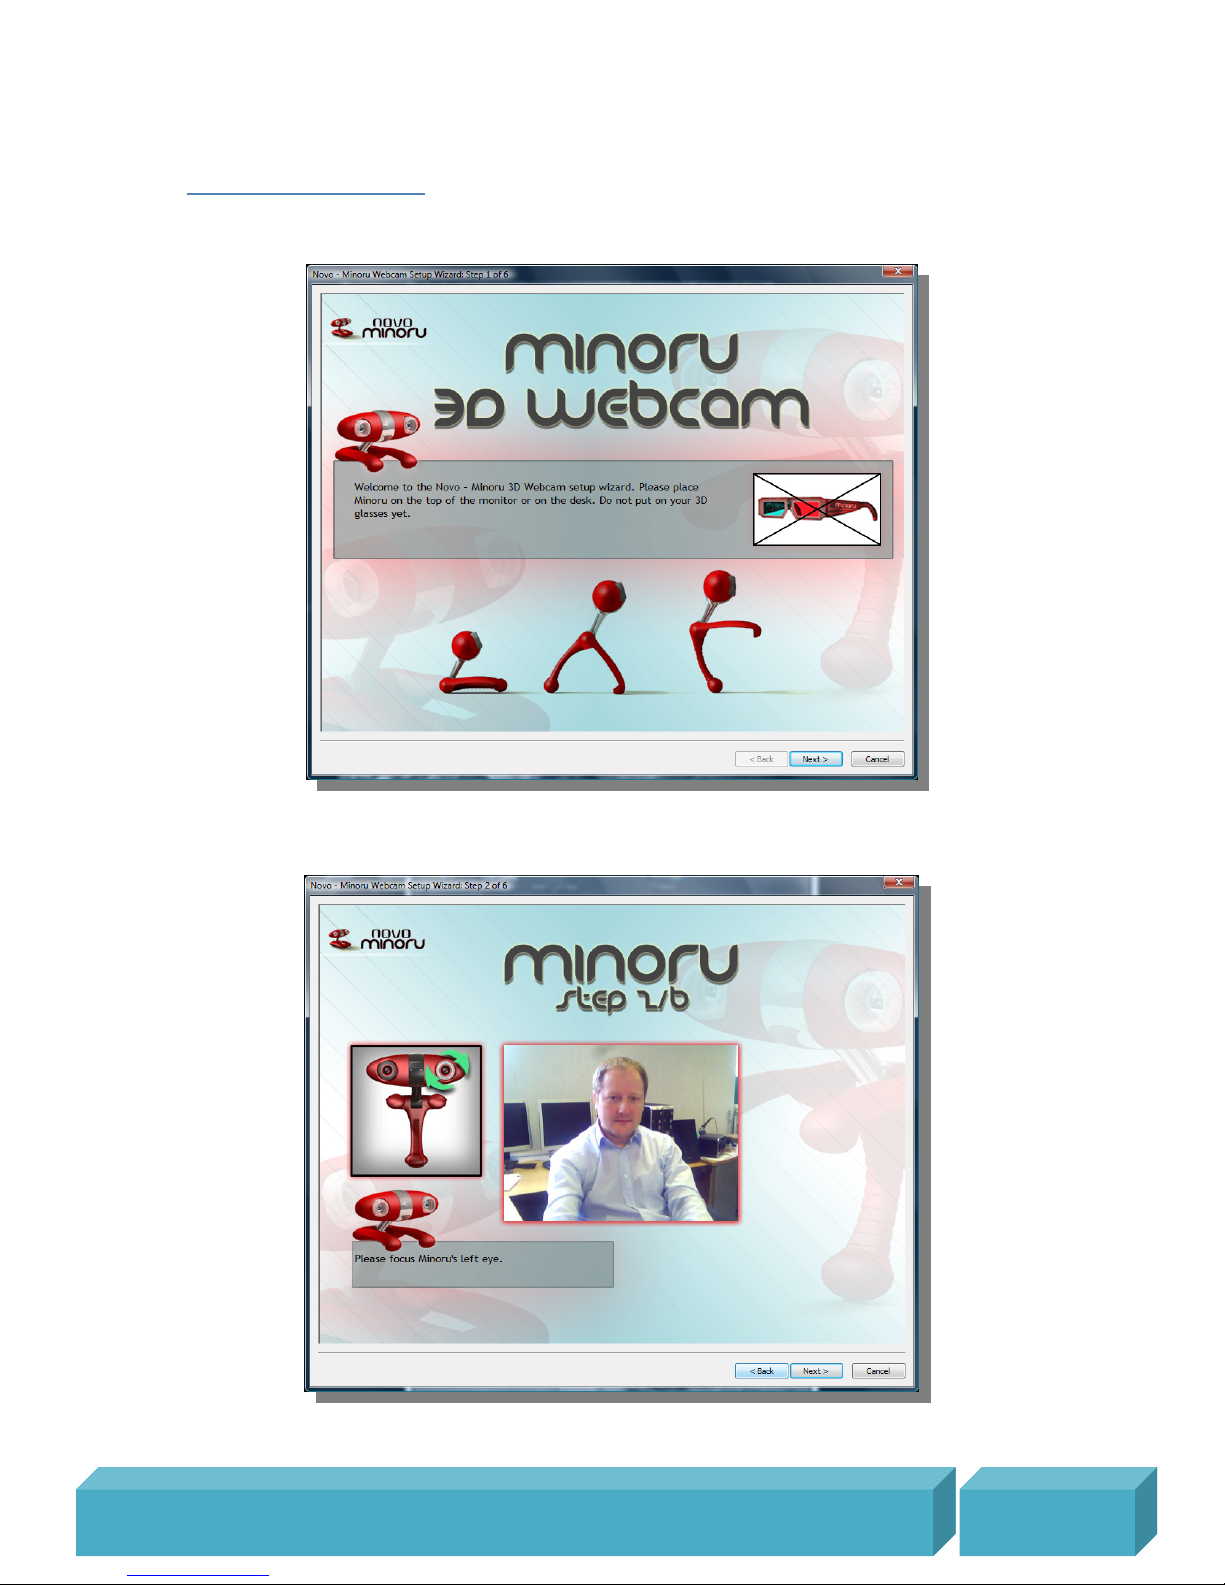
Before using Minoru for the first time you should focus and then line up Minoru’s two eyes.
First place Minoru on the desk or on the top of your monitor at a distance of about 3 feet
(1 metre) from your face. At this stage you should not wear the 3D glasses.
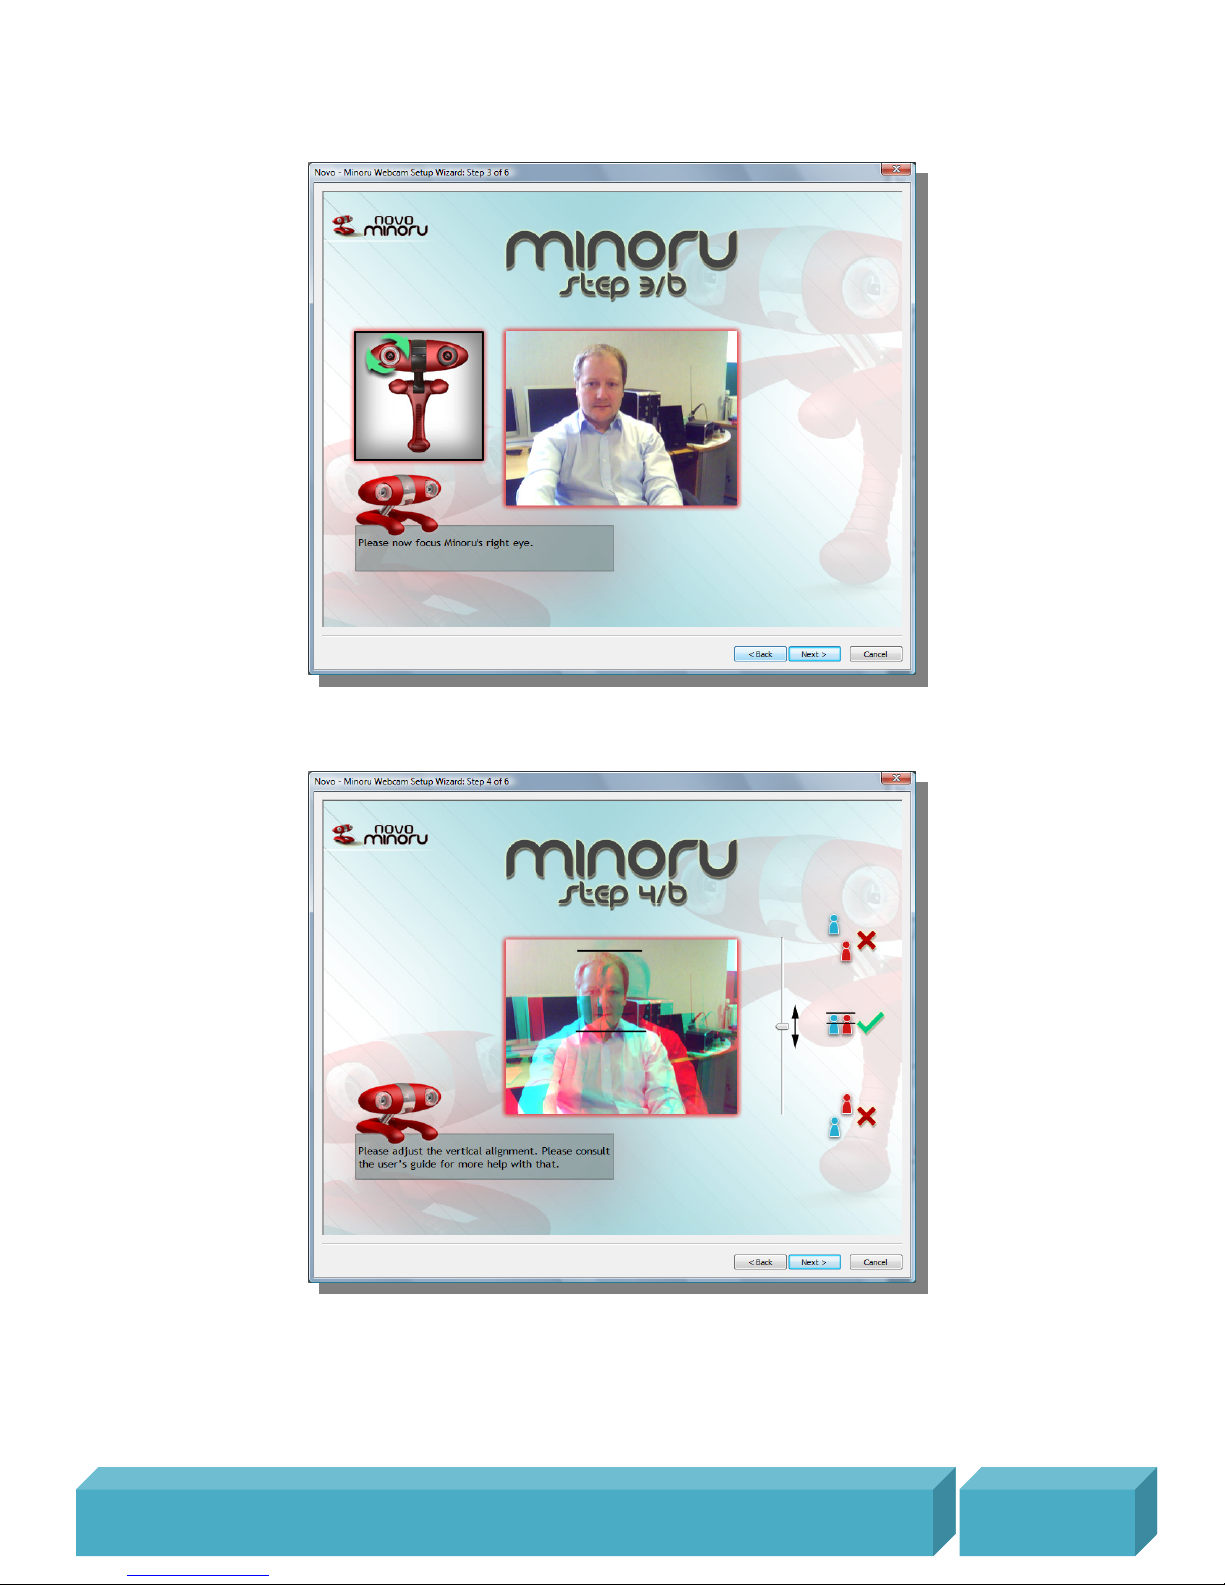
Focus Minoru’s left eye by turning the lens ring until the image of your face appears sharp.
Page 8
M i n o r u 3 D W e b c a m U s e r ’ s G u i d e , R e v i s i o n 1 .
2 , F e b r
u a r y
2 0 0 9
P a g e | 8
Focus Minoru’s right eye by turning the lens ring until the image of your face appears
sharp.
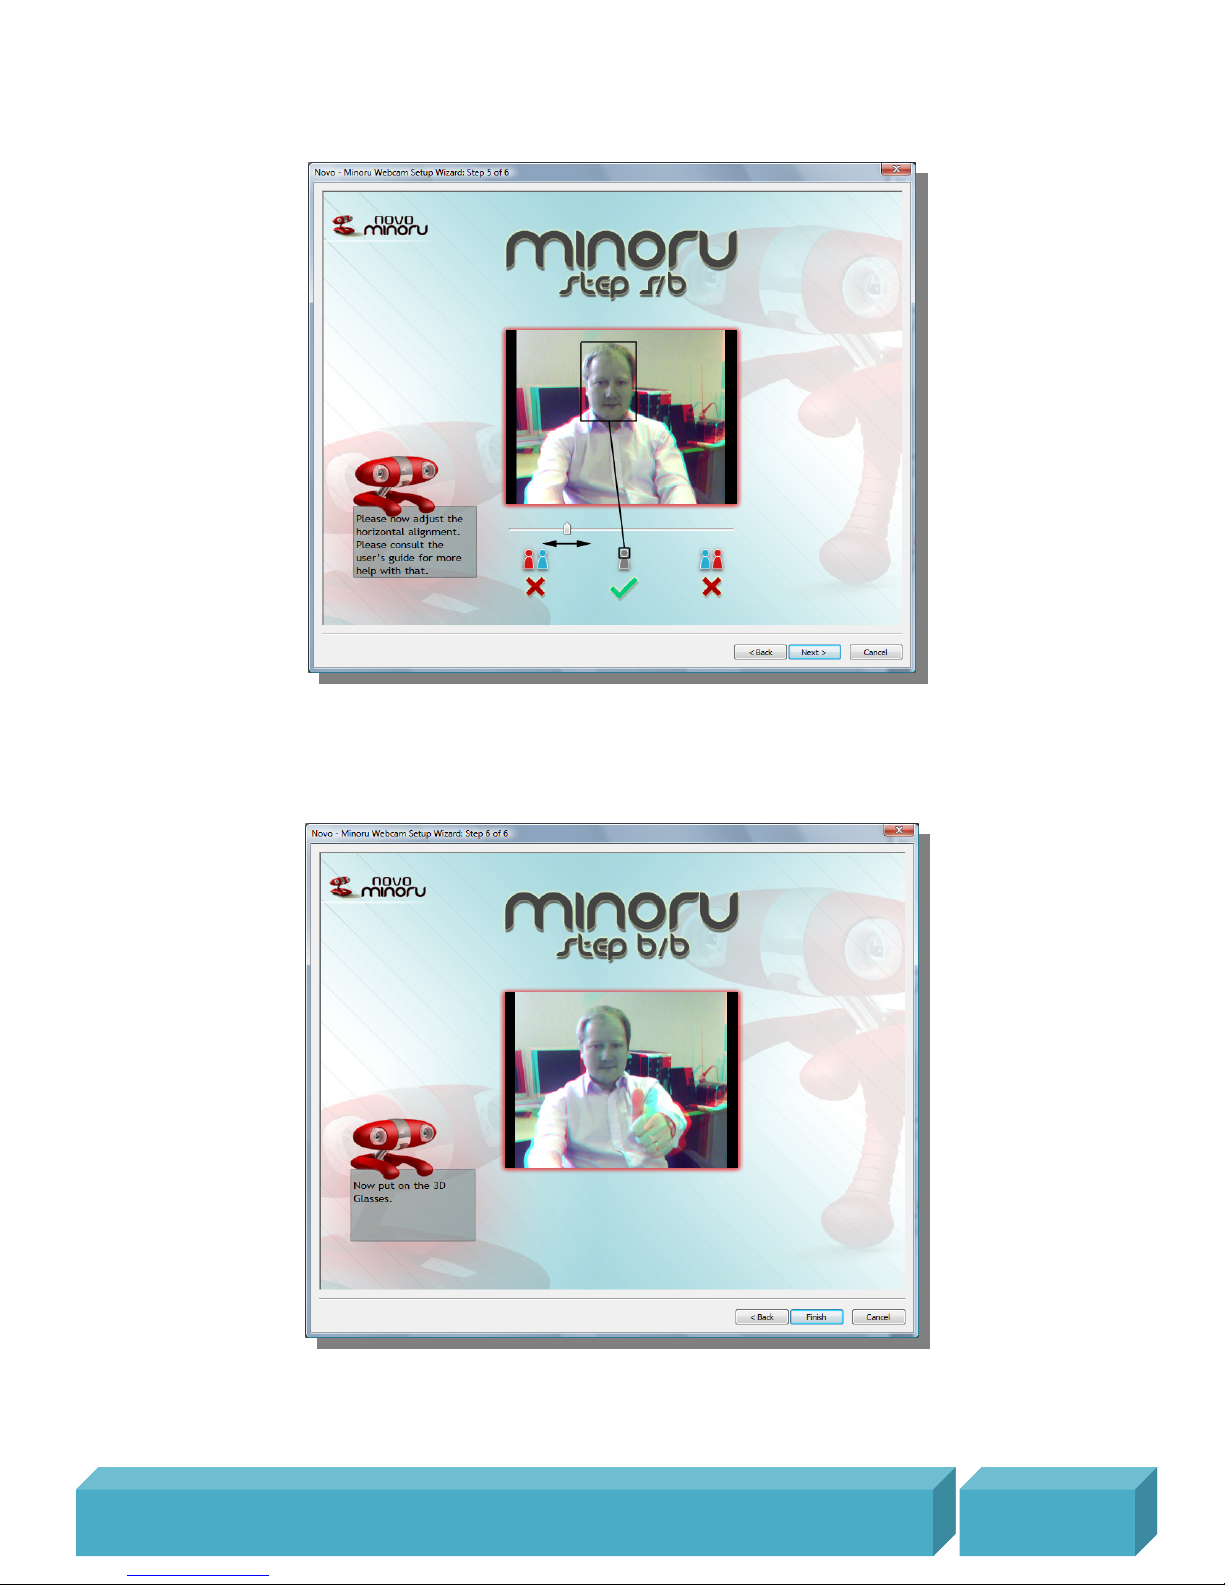
Vertical alignment...At this point you should still not wear the 3D glasses. Look at Minoru
and you should see two images of your face on the screen, a blue image and a red image.
Adjust the vertical slider so that the red and blue images of your face are at exactly the
same height on the screen. Sometimes it is easiest to look at the top or bottom of your
head or at your eyes in order to align the two images.
Page 9
M i n o r u 3 D W e b c a m U s e r ’ s G u i d e , R e v i s i o n 1 .
2 , F e b r
u a r y
2 0 0 9
P a g e | 9
Horizontal alignment...Still do not wear the 3D glasses, don’t worry you can put them on
very soon. Look at the two images of your face on screen and adjust the horizontal slider
so that the two images of your face merge into one. Note that you will still see red and
blue images of the objects in front and behind you.
Now put on the 3D glasses for the first time. Spend some time experiencing the 3D effect
for yourself. Stretch your arms out ahead of you and they will appear to come out from
the screen. Put your arms behind your head and they will appear to go into the screen.
Page 10
M i n o r u 3 D W e b c a m U s e r ’ s G u i d e , R e v i s i o n 1 .
2 , F e b r
u a r y
2 0 0 9
P a g e | 10
2 - Mode
You can select from three different operating modes for Minoru
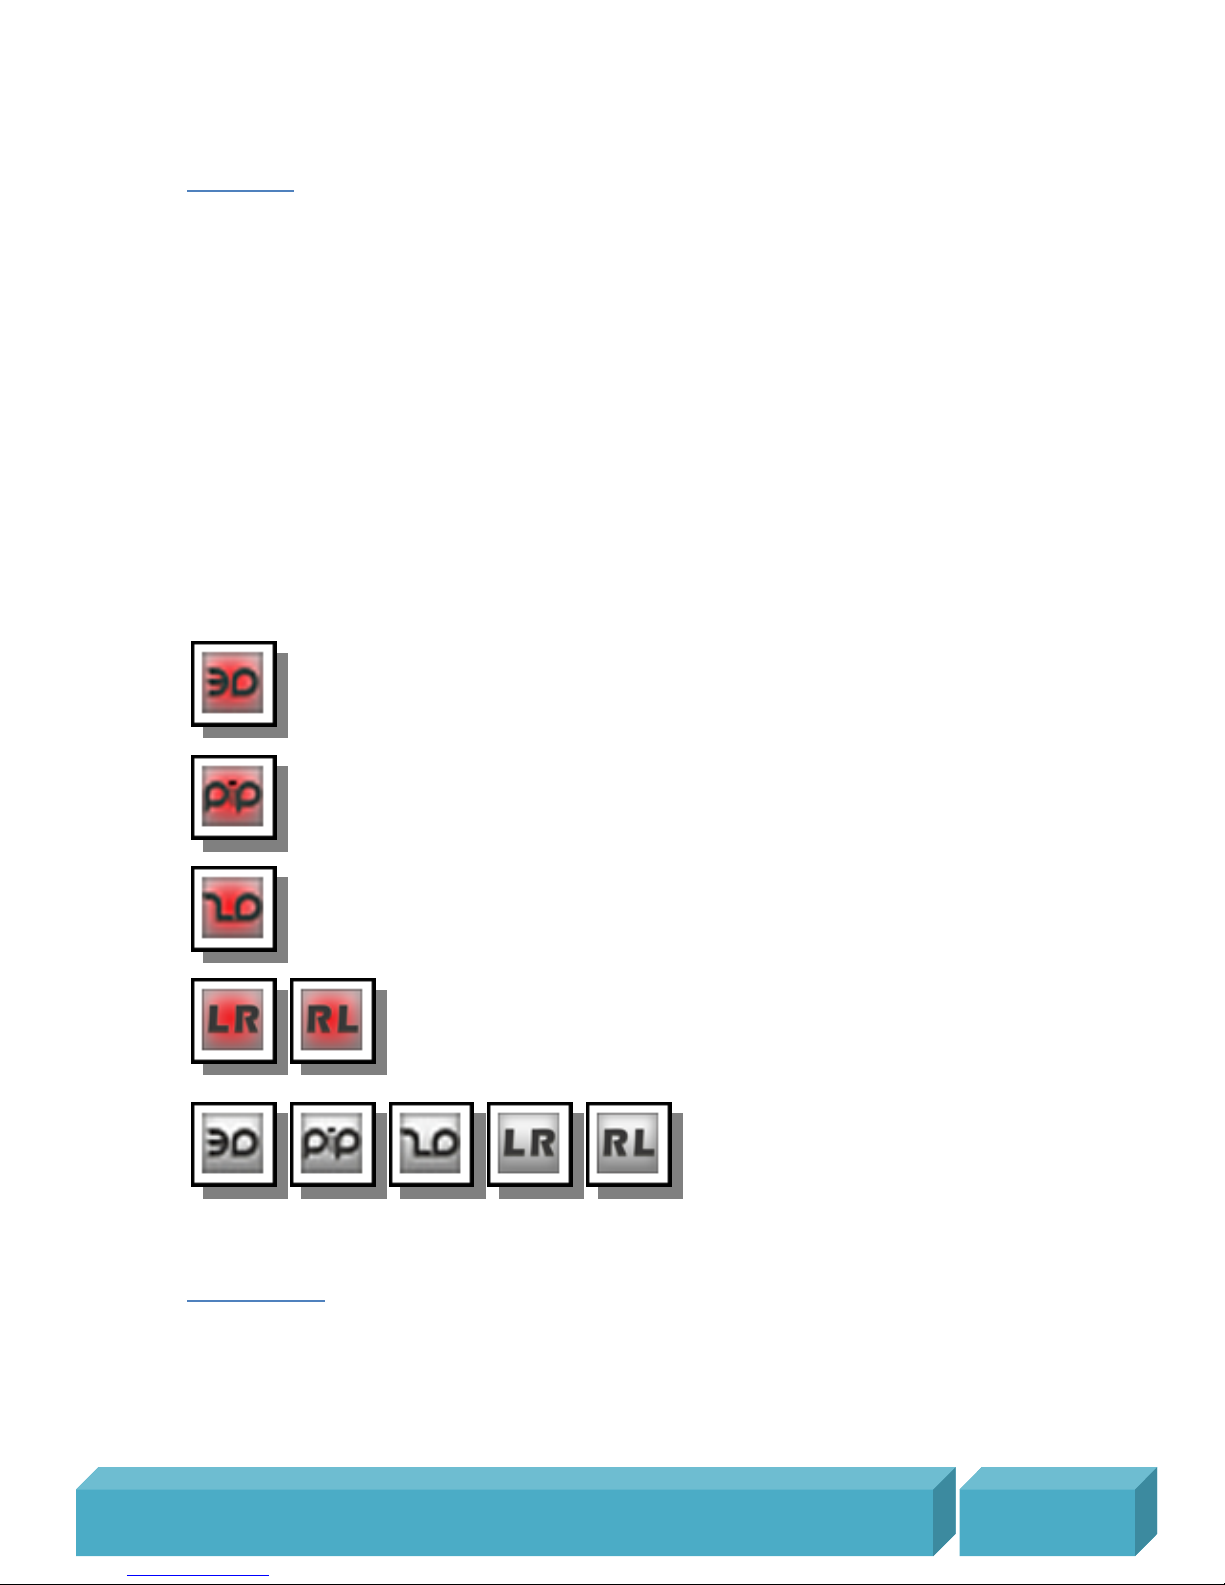
3D – The viewer of the 3D video will need to use the 3D glasses to see the 3D effect
Picture in Picture (PiP) – This mode is useful if you want to show some close up detail of
an item while maintaining the view of your face. Hold the item up to Minoru’s left eye and
the detailed image will appear in the large PiP window.
2D – You can use this mode if the viewer doesn’t have any 3D glasses.
Side by Side – For the real 3D enthusiast! Select from Left/Right (LR) or Right/Left (RL).
You can use these modes to record ‘Side by Side’ pictures. The recorded video can then be
played back using a stereoscopic player, see ‘Recommended software to get the most
from Minoru’, page 20.
The current mode is indicated by the Minoru status icon in the system tray
– Minoru is working in 3D mode
– Minoru is working in Picture in Picture (PiP) mode
– Minoru is working in 2D mode
- Minoru is working in ‘Side by Side’ mode
– Minoru is not connected to the PC.
Please check that Minoru’s USB plug
is connected to the PC.
3 - Options
Start Minoru when Windows starts. If this is ticked then the Minoru Webcam Setup starts
automatically when Windows starts.
Page 11

M i n o r u 3 D W e b c a m U s e r ’ s G u i d e , R e v i s i o n 1 .
2 , F e b r
u a r y
2 0 0 9
P a g e | 11
4 - Select Language
Select the language used for the Minoru setup wizard and recording application.
5 – Minoru Website
Click to go directly to the Minoru 3D Website.
6 - About...
The Minoru software version information is shown. Please note the version number in any
correspondence with Minoru customer support.
7 – Exit
Click to close the ‘Minoru Webcam Setup’. The Webcam Setup can be restarted by double
clicking the ‘Minoru Webcam Setup’ shortcut on the desktop.
Page 12
M i n o r u 3 D W e b c a m U s e r ’ s G u i d e , R e v i s i o n 1 .
2 , F e b r
u a r y
2 0 0 9
P a g e | 12
Recording application
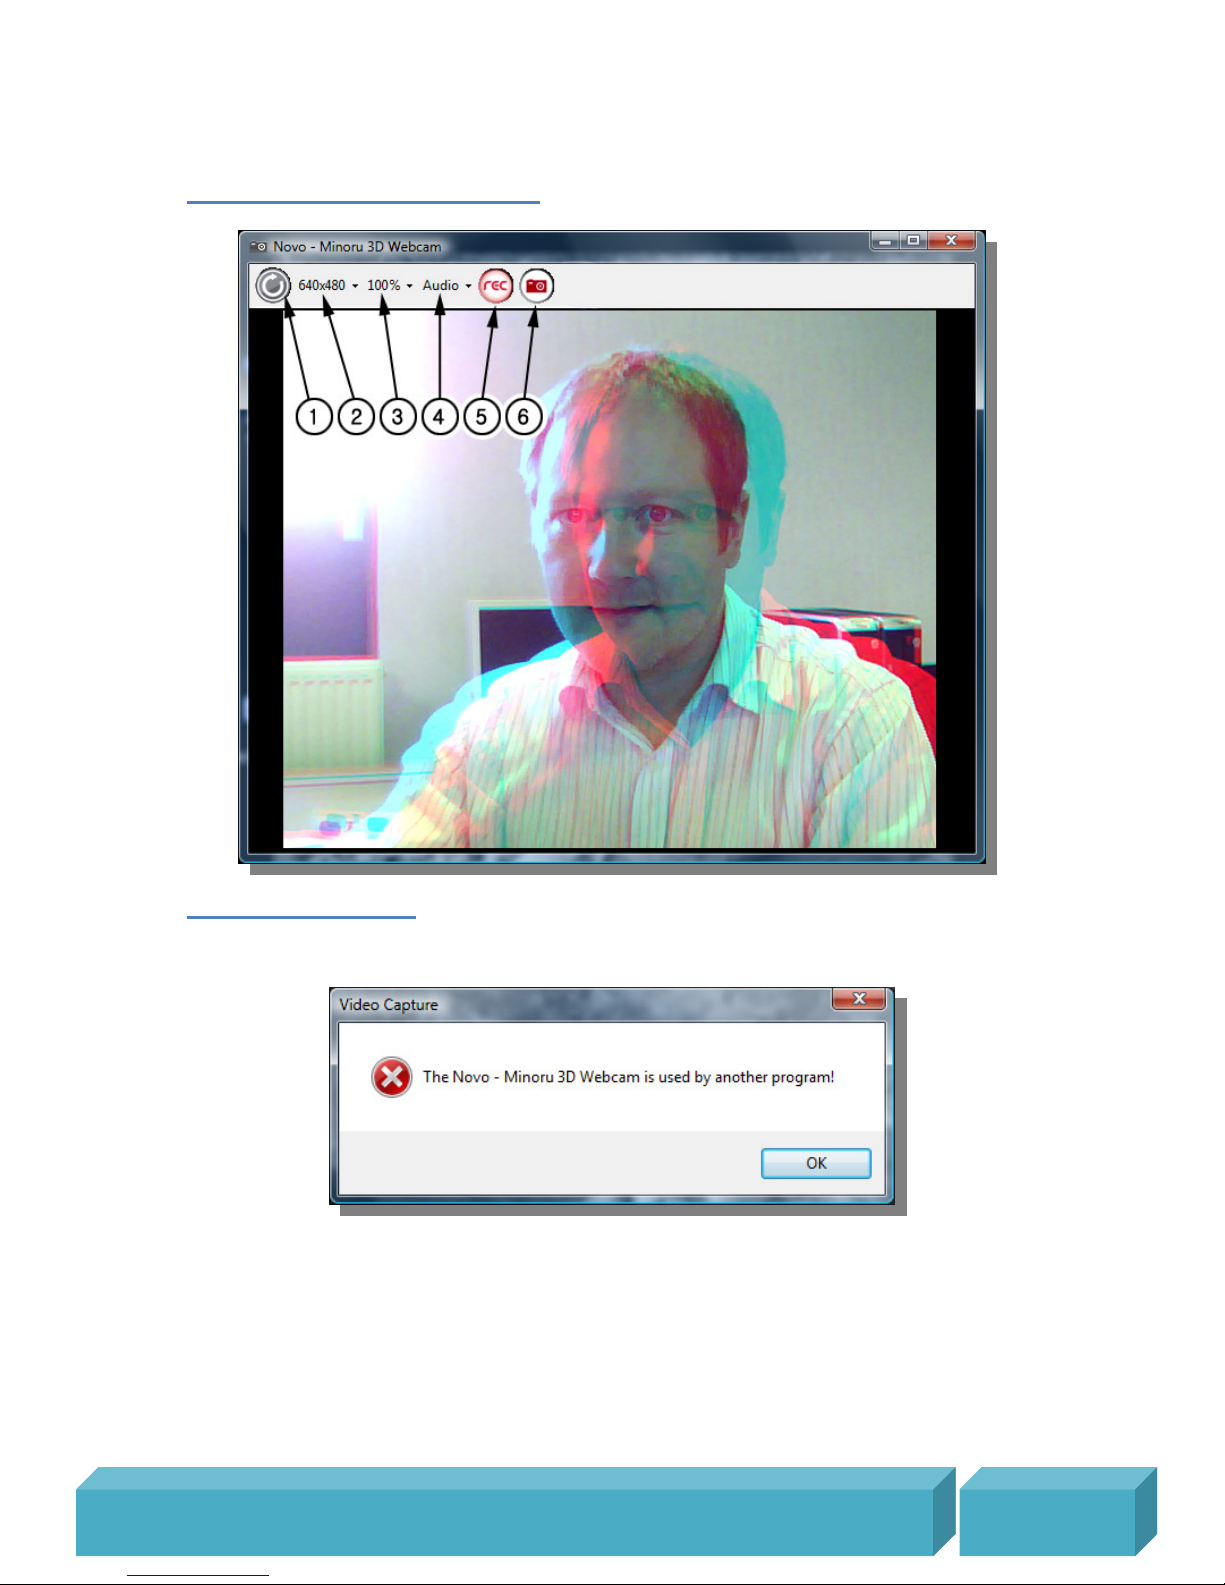
1 – Restart Minoru
When starting ‘Minoru Video Capture’ you may see the information message shown below.
Minoru is probably being used by another application such as messaging software, or the
‘Minoru Setup Wizard’ is running. Close the other application that is using Minoru or end
the video messaging call, then click the ‘Restart Minoru’ button. Minoru’s output should
then appear on screen.
Page 13

M i n o r u 3 D W e b c a m U s e r ’ s G u i d e , R e v i s i o n 1 .
2 , F e b r
u a r y
2 0 0 9
P a g e | 13
2 – Resolution
Select the output resolution for Minoru. Choose from 320 x 240, 352 x 288, 640 x 480 or
800 x 600 pixels. The chosen resolution is used for the recorded video or snapshot.
3 – Screen mode
Select the screen mode for the video preview. Choose from 100%, 200% or Full screen.
When viewing full screen video in 3D it is best to stand back from the monitor, 6 feet (2
metres) is the recommended viewing distance.
4 – Audio input select
By default, ‘Novo – Minoru’s Ears’ are used to record the soundtrack for the video file. You
can select a different recording device if you prefer to use that instead.
5 – Start/Stop Recording
This button is used for recording video; see below to learn how to record a video.
6 – Take Snapshot
This button is used to take a snapshot, see below to learn how to take and email
snapshots.
Page 14
M i n o r u 3 D W e b c a m U s e r ’ s G u i d e , R e v i s i o n 1 .
2 , F e b r
u a r y
2 0 0 9
P a g e | 14
How to record and playback a 3D video
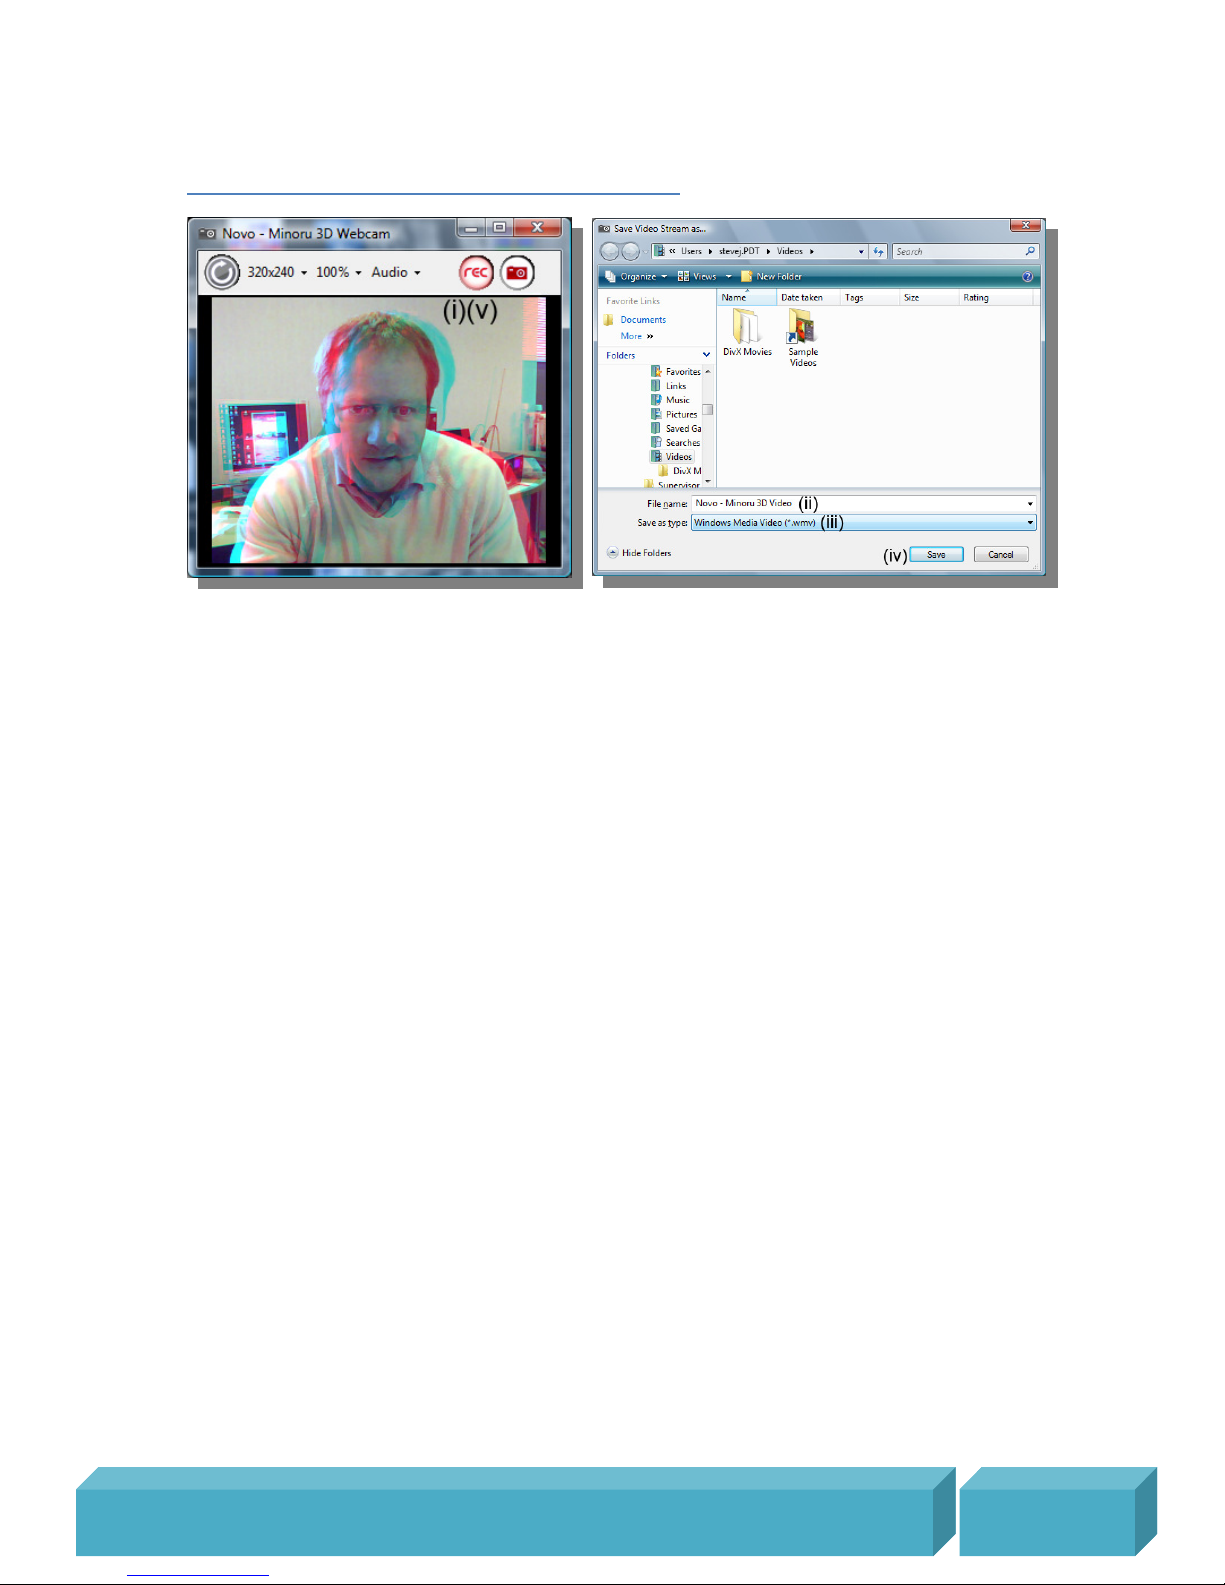
First you should select the resolution for the video. Next compose the picture and click
the ‘Start Recording’ button (i). You will then be asked to choose a filename (ii) and
choose the file type (iii).
The two file types available are .asf and .avi
Choose .asf if you want a smaller file size suitable for uploading to YouTube and other
social networking sites. By default .asf file type will be selected.
Choose .avi to record 3D in the best quality. These uncompressed video files will be very
large and not suitable for uploading. These files could fill up your hard disk very quickly so
it is best to use .asf instead as much as possible.
Click on ‘Save’ (iv) and the video will start to be recorded. To stop recording click the
‘Stop Recording’ button (v).
By default the videos will be recorded in the ‘Videos’ or ‘My Videos’ directory on the hard
disk.
Page 15
M i n o r u 3 D W e b c a m U s e r ’ s G u i d e , R e v i s i o n 1 .
2 , F e b r
u a r y
2 0 0 9
P a g e | 15
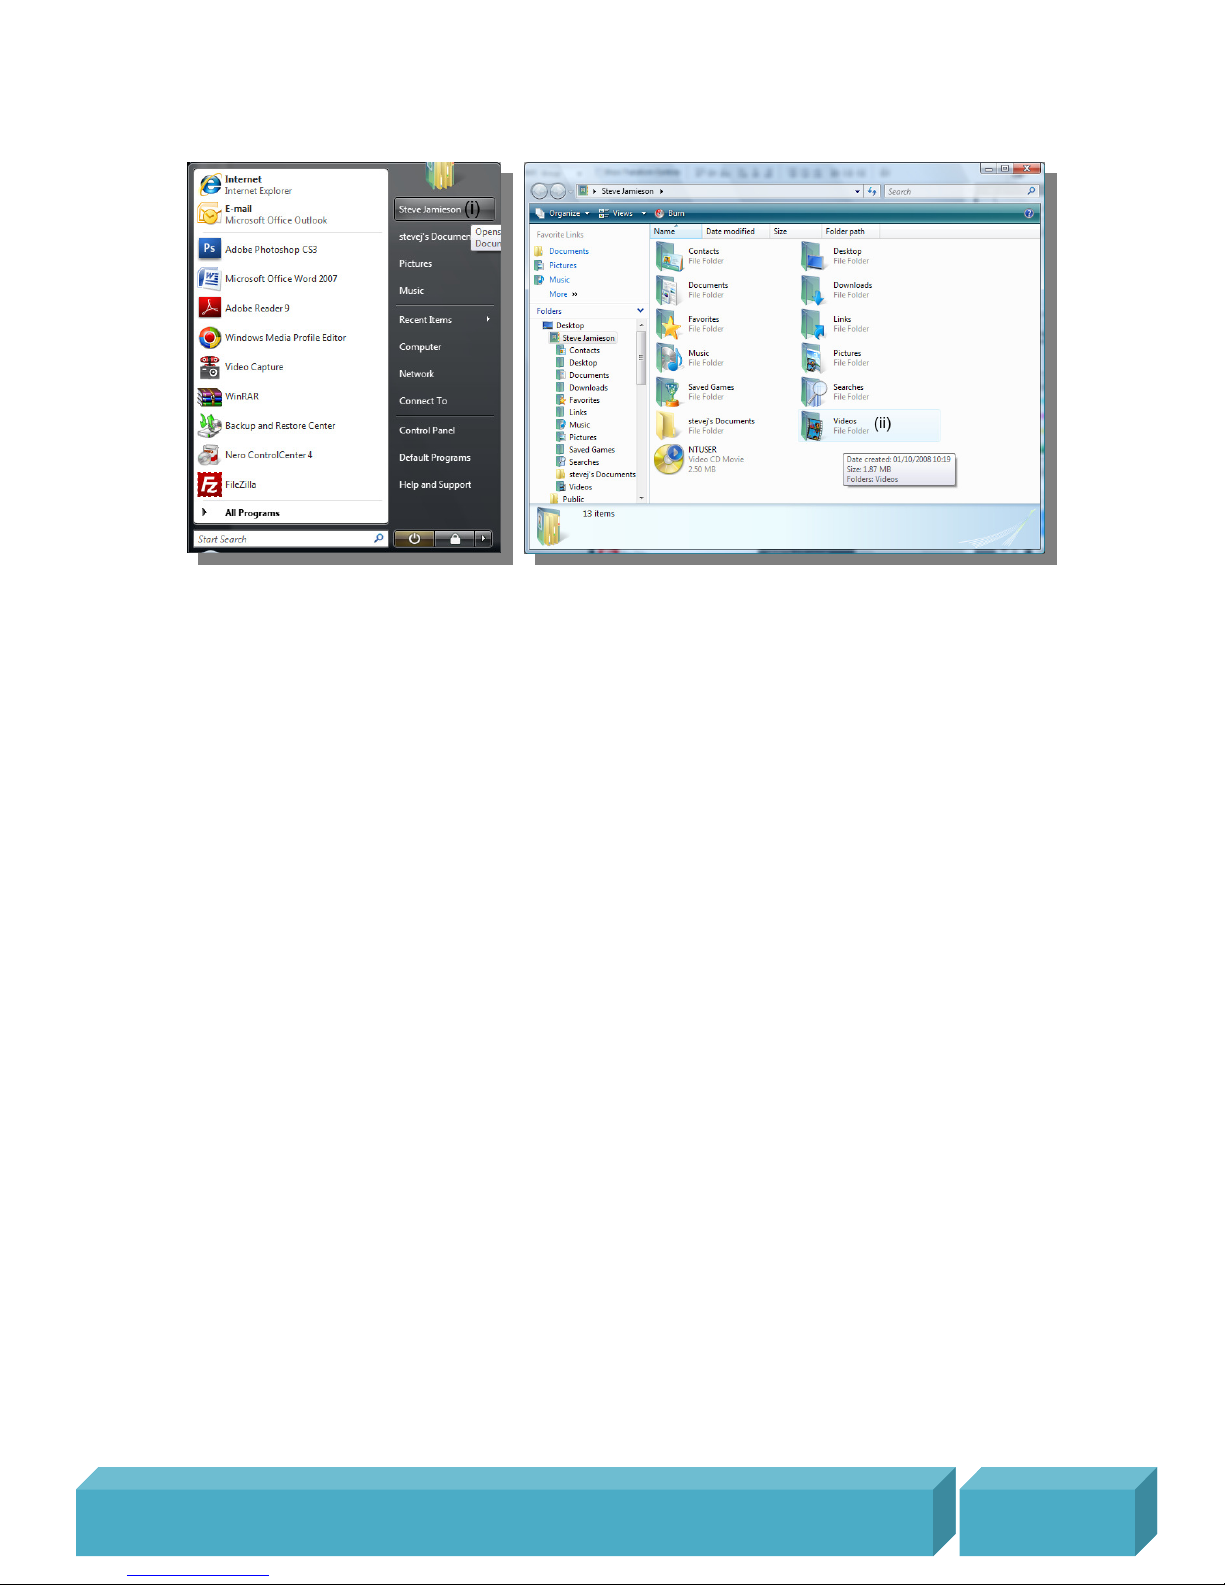
To playback the recorded video you should do one of the following;
On a Vista system click on Start..(Your user name) (i), then double click on Videos (ii).
Choose one of the videos and double click it to play it back.
On an XP system click on Start..My Documents (i), then double click on My Videos (ii).
Choose one of the videos and double click it to play it back.
Page 16
M i n o r u 3 D W e b c a m U s e r ’ s G u i d e , R e v i s i o n 1 .
2 , F e b r
u a r y
2 0 0 9
P a g e | 16
How to take and email a snapshot
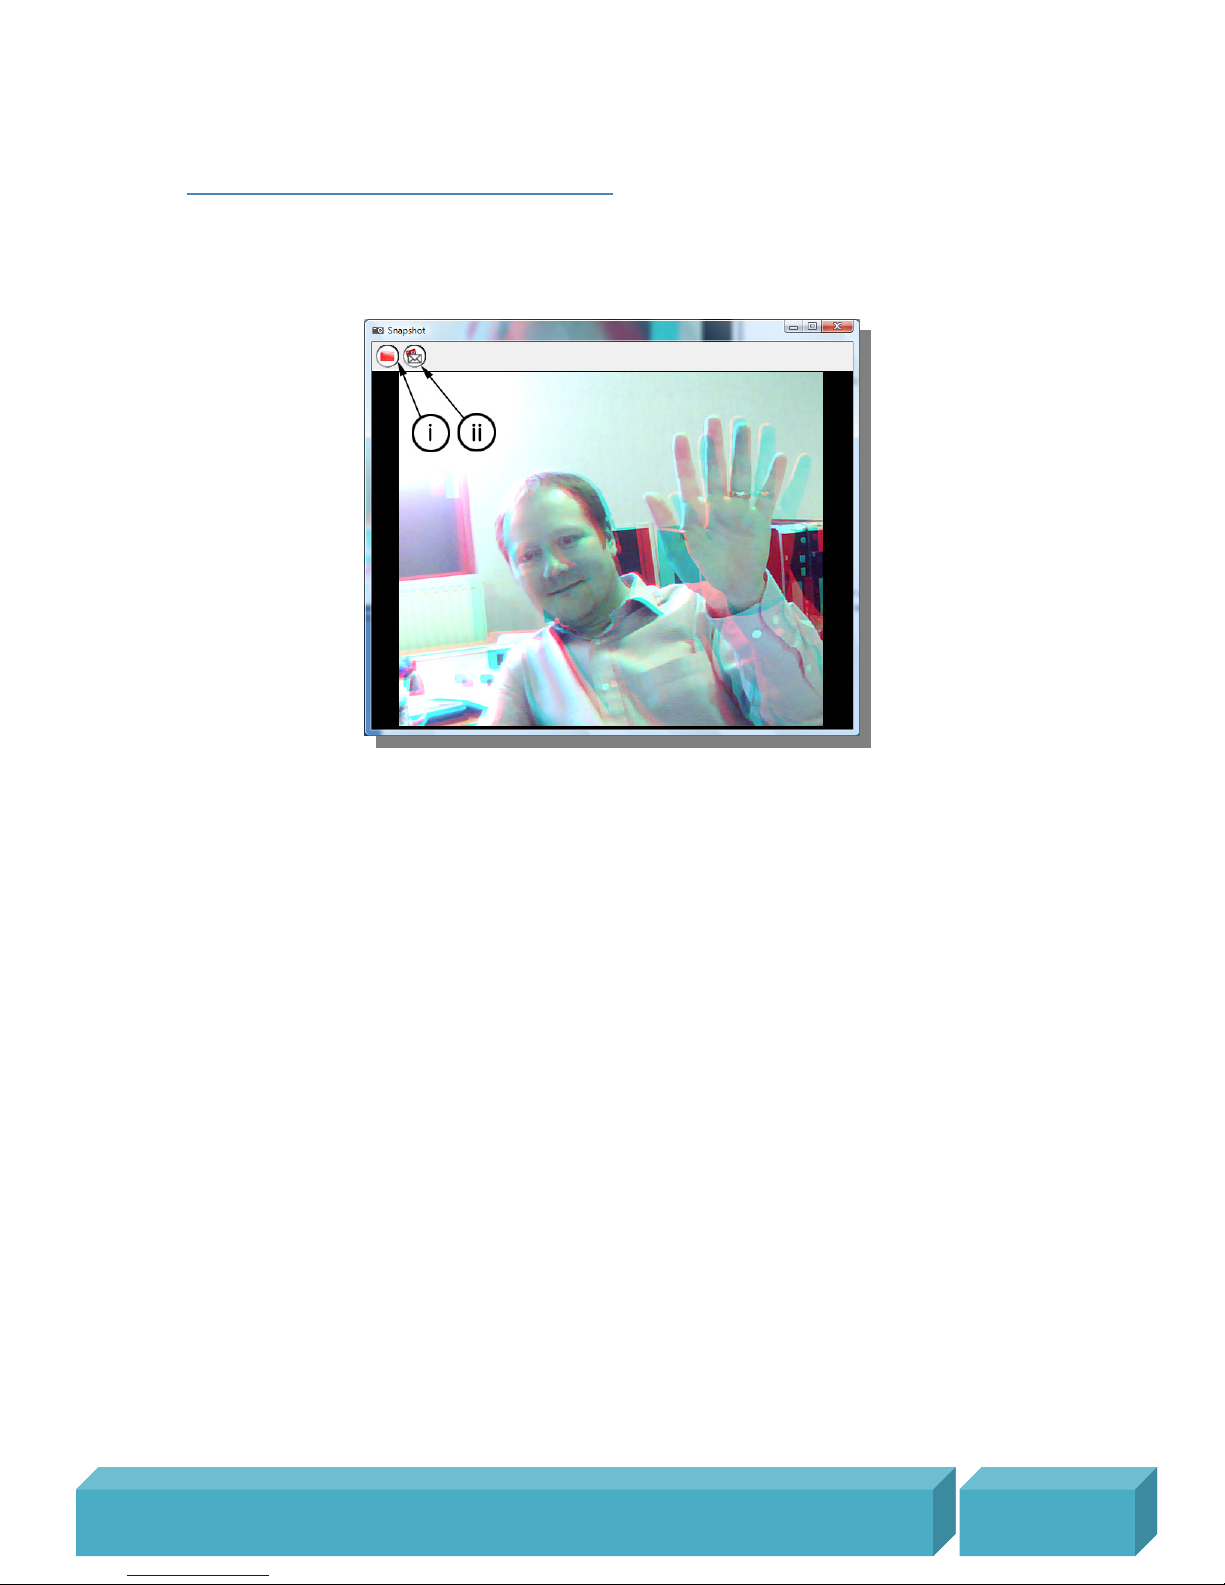
First you should select the resolution for the snapshot. Next compose the picture and click
the ‘Take Snapshot’ button. The snapshot will appear immediately in a separate window
and you will then have the choice to (i) save or (ii) email the image.
If you choose to save the image then click the ‘Save Snapshot’ button (i). You can then
choose to save the file as a bitmap (.bmp), jpeg (.jpg), tagged image (.tiff) or a portable
network graphics (.png). For the best 3D quality you should select .bmp or .tiff. You can
also select the location for the saved images before clicking ‘Save’.
If you choose to email the image then click the ‘E-mail Snapshot’ button (ii). A new email
will open automatically with the image attached as a bitmap (.bmp) ready for sending.
Just type in the recipients email address and click send. The image will be saved for you
automatically on your PC in the last selected save location.
Page 17
M i n o r u 3 D W e b c a m U s e r ’ s G u i d e , R e v i s i o n 1 .
2 , F e b r
u a r y
2 0 0 9
P a g e | 17
Using Minoru with popular messaging applications
Windows Live Messenger
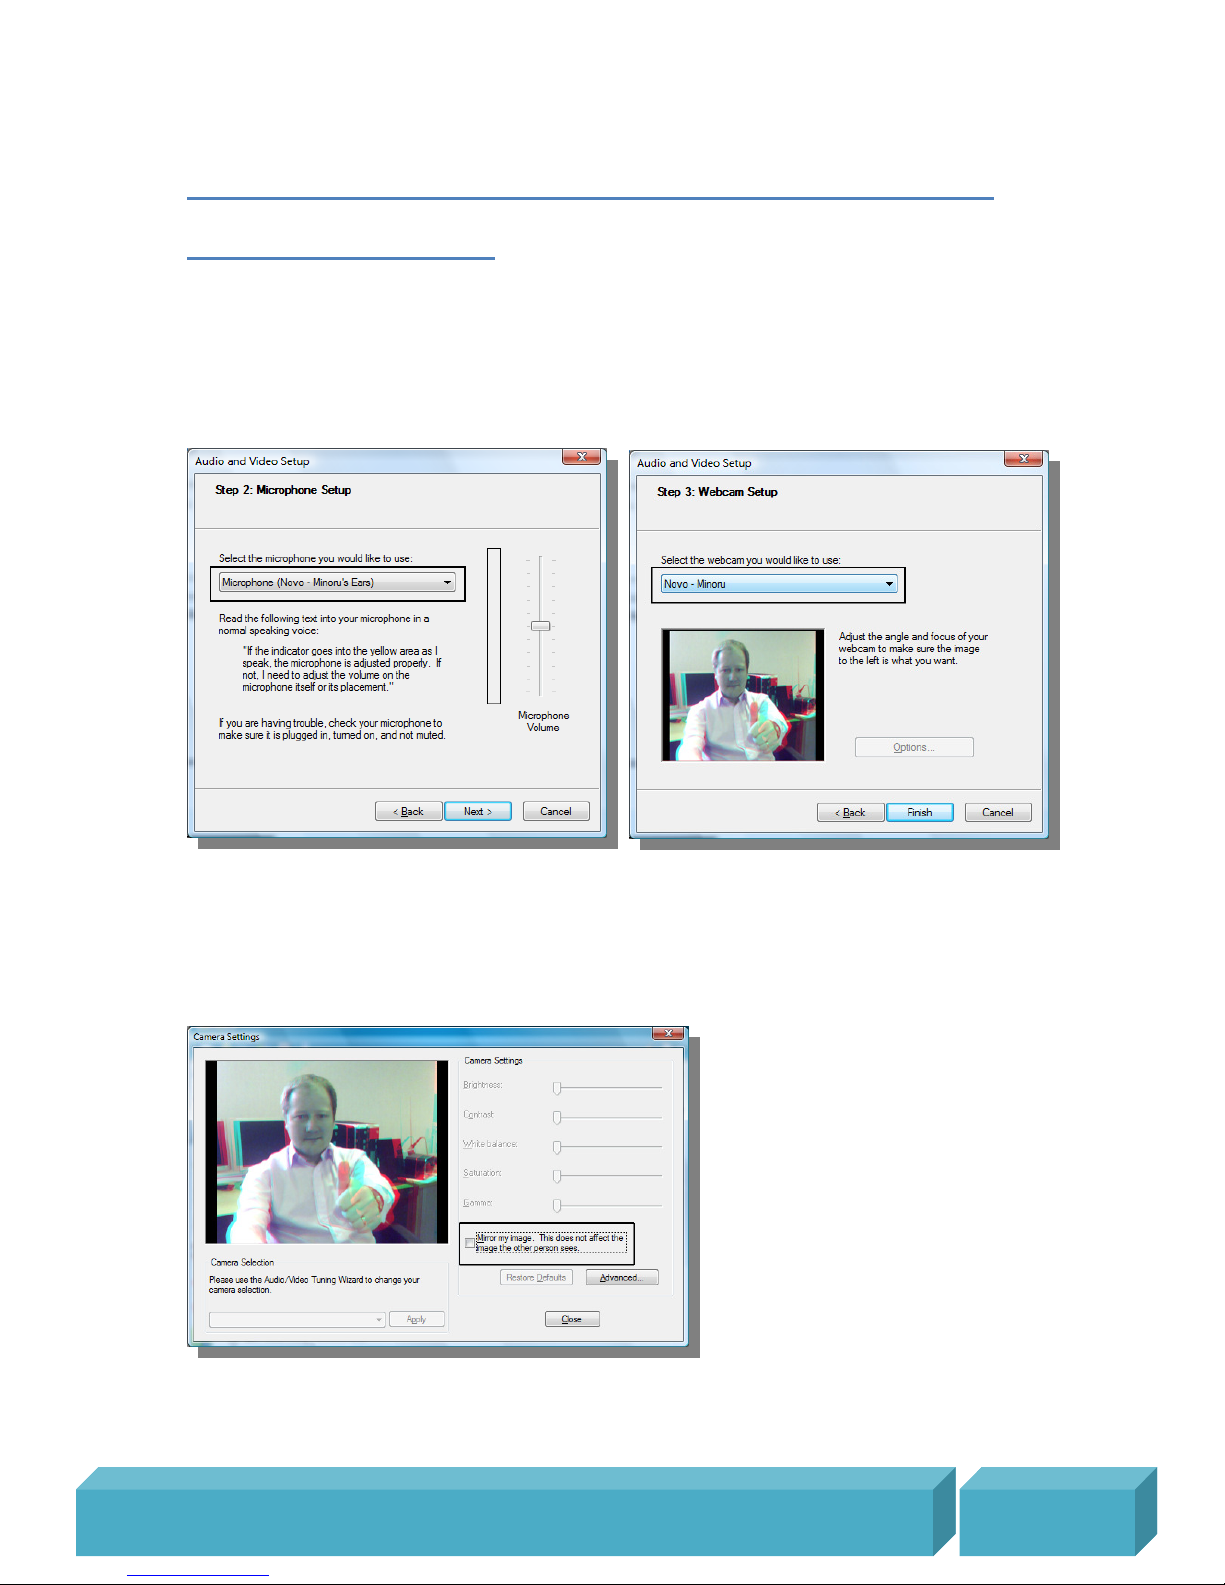
Open Windows Live Messenger and from the menu, select Tools – Audio and video
setup...
In Step 2: Microphone Setup, select ‘Novo – Minoru’s Ears’
In Step 3: Webcam Setup, select ‘Minoru 3D Webcam’
From the menu, select Tools – Webcam settings...
Make sure that ‘Mirror my image’ is not ticked.
Note: If ‘Mirror my image’ is ticked then you will not be able to see the 3D properly in the
Messenger preview window.
To make a video call, right click on the desired contact in the contact list and then click
Video – Start a Video Call.
Page 18
M i n o r u 3 D W e b c a m U s e r ’ s G u i d e , R e v i s i o n 1 .
2 , F e b r
u a r y
2 0 0 9
P a g e | 18
Skype
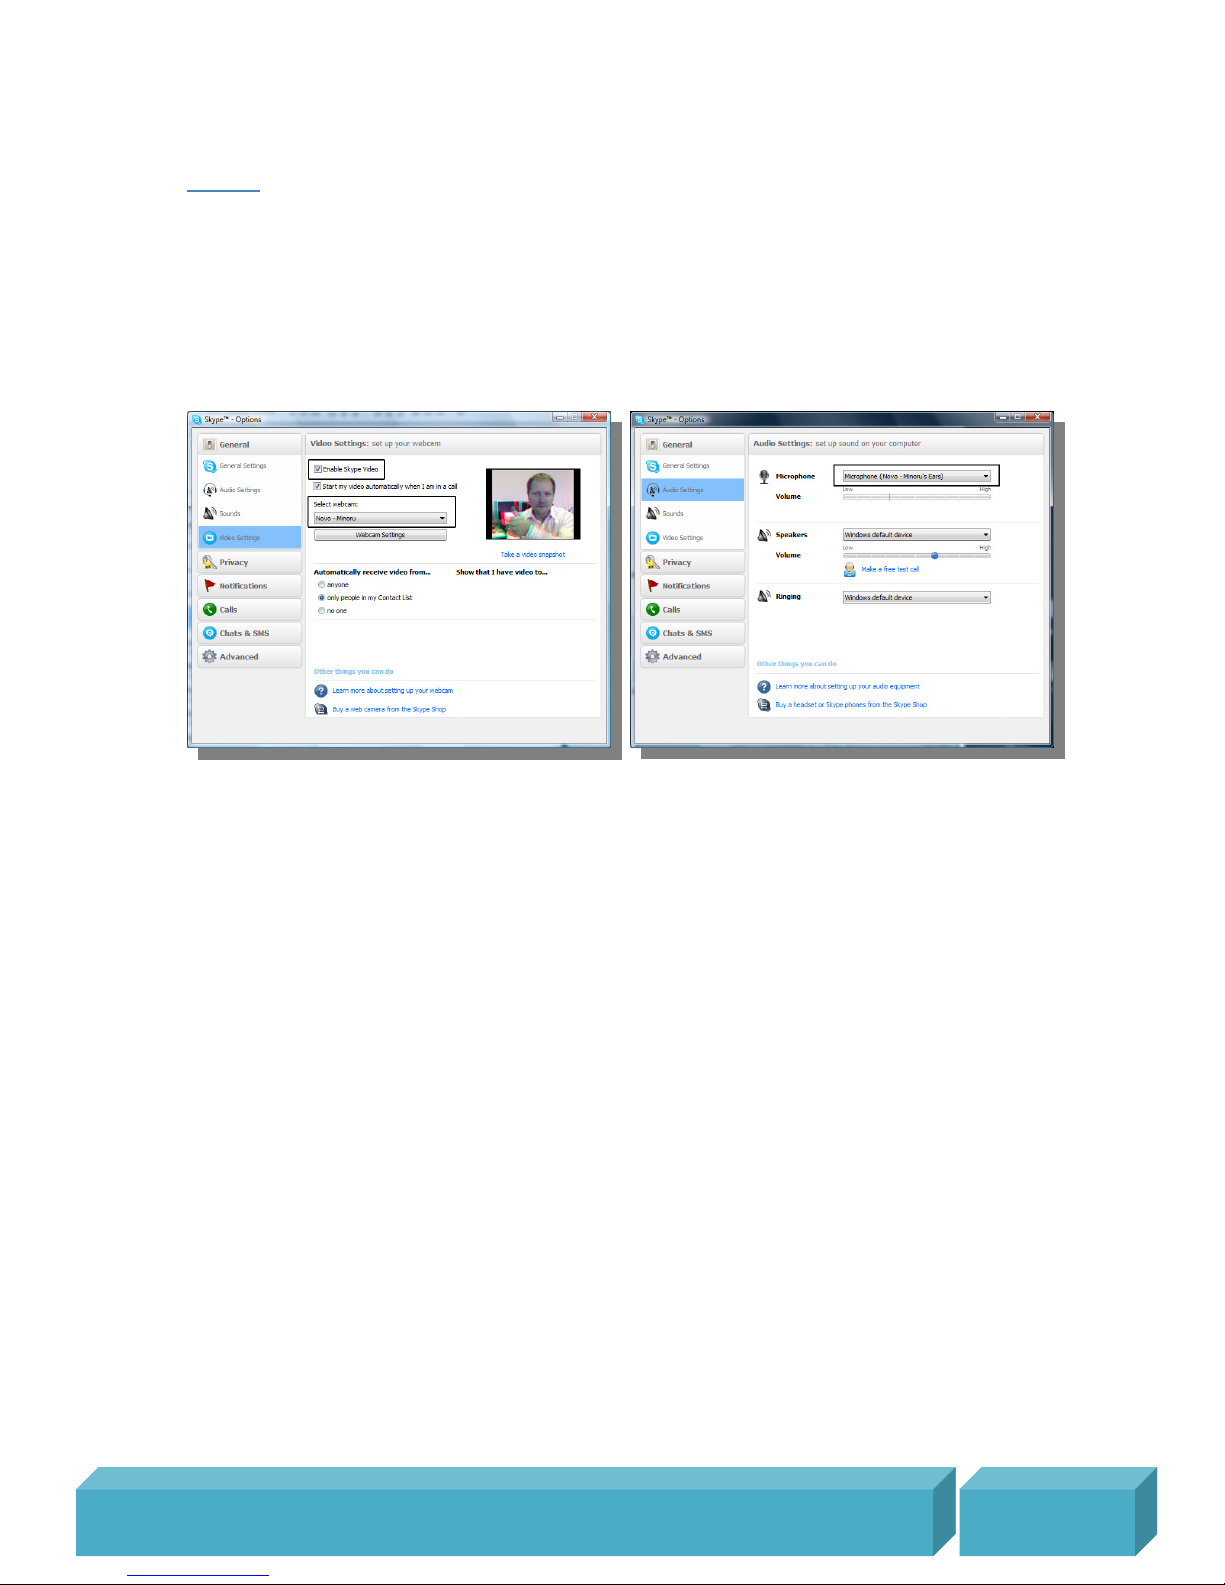
Open Skype and then click on, Tools - Options... – General - Video Settings. Make sure
that ‘Enable Skype Video’ is ticked.
From the ‘Select webcam:’ drop down list, select ‘Minoru 3D Webcam’.
Now click on ‘Audio Settings’ and from the ‘Microphone’ drop down list, select ‘Novo –
Minoru’s Ears’.
To make a video call, right click on the desired contact in the contact list and then click
Start Call – (Skype Call).
Page 19
M i n o r u 3 D W e b c a m U s e r ’ s G u i d e , R e v i s i o n 1 .
2 , F e b r
u a r y
2 0 0 9
P a g e | 19
OoVoo
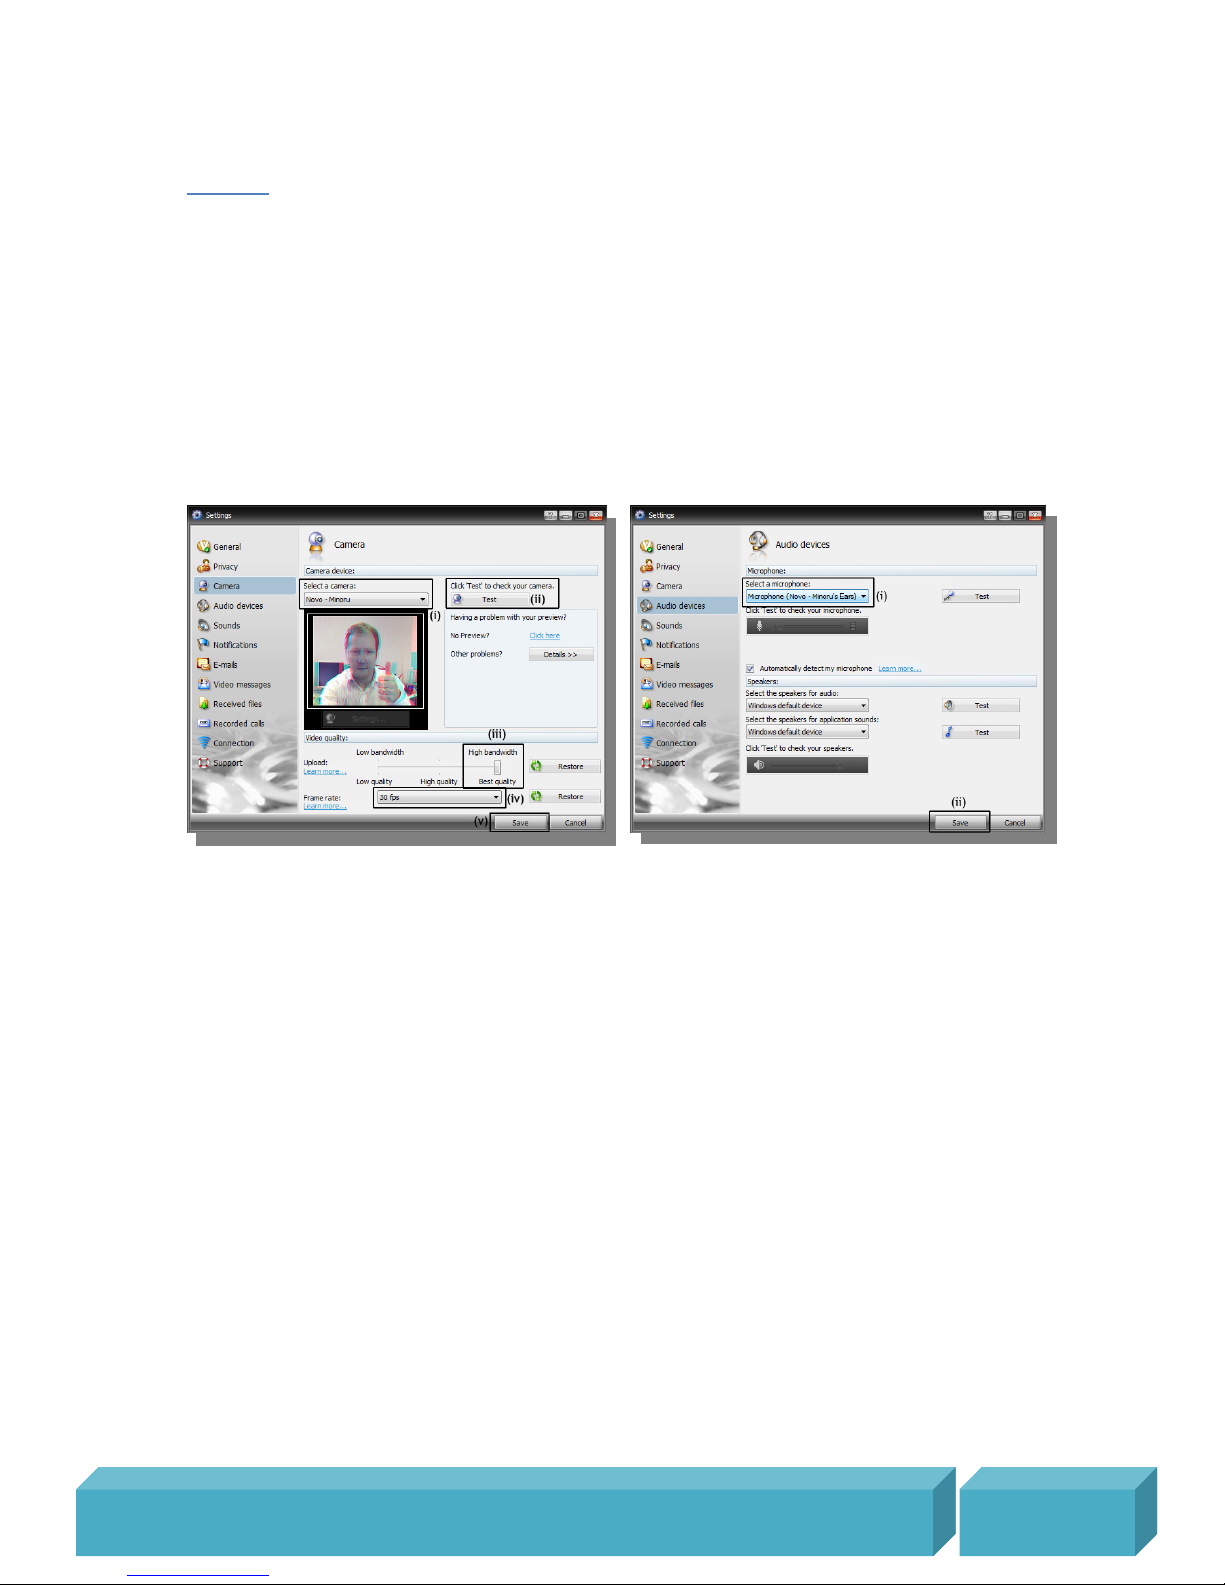
Open OoVoo and then click on, File – Settings – Camera.
From the ‘Select a camera:’ drop down list, select ‘Minoru 3D Webcam’. Click on ‘Test’
and the webcam video should appear in the preview window.
For the best quality video, select ‘High Bandwidth’ and ‘30 fps’, then click ‘Save’.
Next click on, File – Settings – Audio devices.
From the ‘Select a microphone:’ drop down list, select ‘Novo Minoru’s Ears’ and then
click ‘Save’.
To make a video call, right click on the desired contact in the contact list and then click
Start ooVoo video call.
Page 20

M i n o r u 3 D W e b c a m U s e r ’ s G u i d e , R e v i s i o n 1 .
2 , F e b r
u a r y
2 0 0 9
P a g e | 20
Recommended software to get the most from Minoru
Videora
Convert your 3D videos for viewing on your iPod.
http://www.videora.com/en-us/Converter/iPod/
Windows Movie Maker
Edit your 3D videos created by Minoru. Add special effects and transitions. We like the
‘Edge Detection’ effect the best that gives a cartoon like appearance to your 3D videos.
Windows Movie Maker is included free with some versions of Windows. You can start
Windows Movie Maker by clicking; Start...All Programs...Windows Movie Maker.
Stereoscopic Player
For the real 3D enthusiast! Play back your 3D videos to your 3D monitor or play back ‘Side
by Side’ videos for viewing with 3D glasses.
http://www.3dtv.at/
Page 21

M i n o r u 3 D W e b c a m U s e r ’ s G u i d e , R e v i s i o n 1 .
2 , F e b r
u a r y
2 0 0 9
P a g e | 21
Troubleshooting
Problem
• The webcam output freezes or the webcam cannot work in the higher resolution
modes 640 x 480 and 800 x 600.
• When Minoru is plugged into a front panel USB port you see a message, ‘USB Device
Not Recognised’.
Solution
• Plug Minoru into a USB port at the rear of your PC. The front panel USB ports on
some PC’s are not working properly to the high specification required by Minoru.
• Some older slower PC’s cannot display the video fast enough when the high
resolution modes are used. Please use the 320 x 240 mode instead.
Problem
• Minoru will not work with Yahoo Messenger
Solution
• Yahoo Messenger uses an old video technology and Minoru is not compatible with
that.
For further help please visit www.minoru3d.com
Specifications
High Speed USB 2.0 3D Webcam
2 x VGA 640x480 CMOS sensor
2 x High quality wide angle lens
Built in USB microphone
800 x 600, 640 x 480, 352 x 288 and 320 x 240 pixel output, up to 30 fps
Output - 3D optimised anaglyph (red/cyan), Picture in Picture (PiP) and standard 2D
Multi-position stand
Compatible with Microsoft Windows XP and Microsoft Windows Vista
Page 22
M i n o r u 3 D W e b c a m U s e r ’ s G u i d e , R e v i s i o n 1 .
2 , F e b r
u a r y
2 0 0 9
P a g e | 22
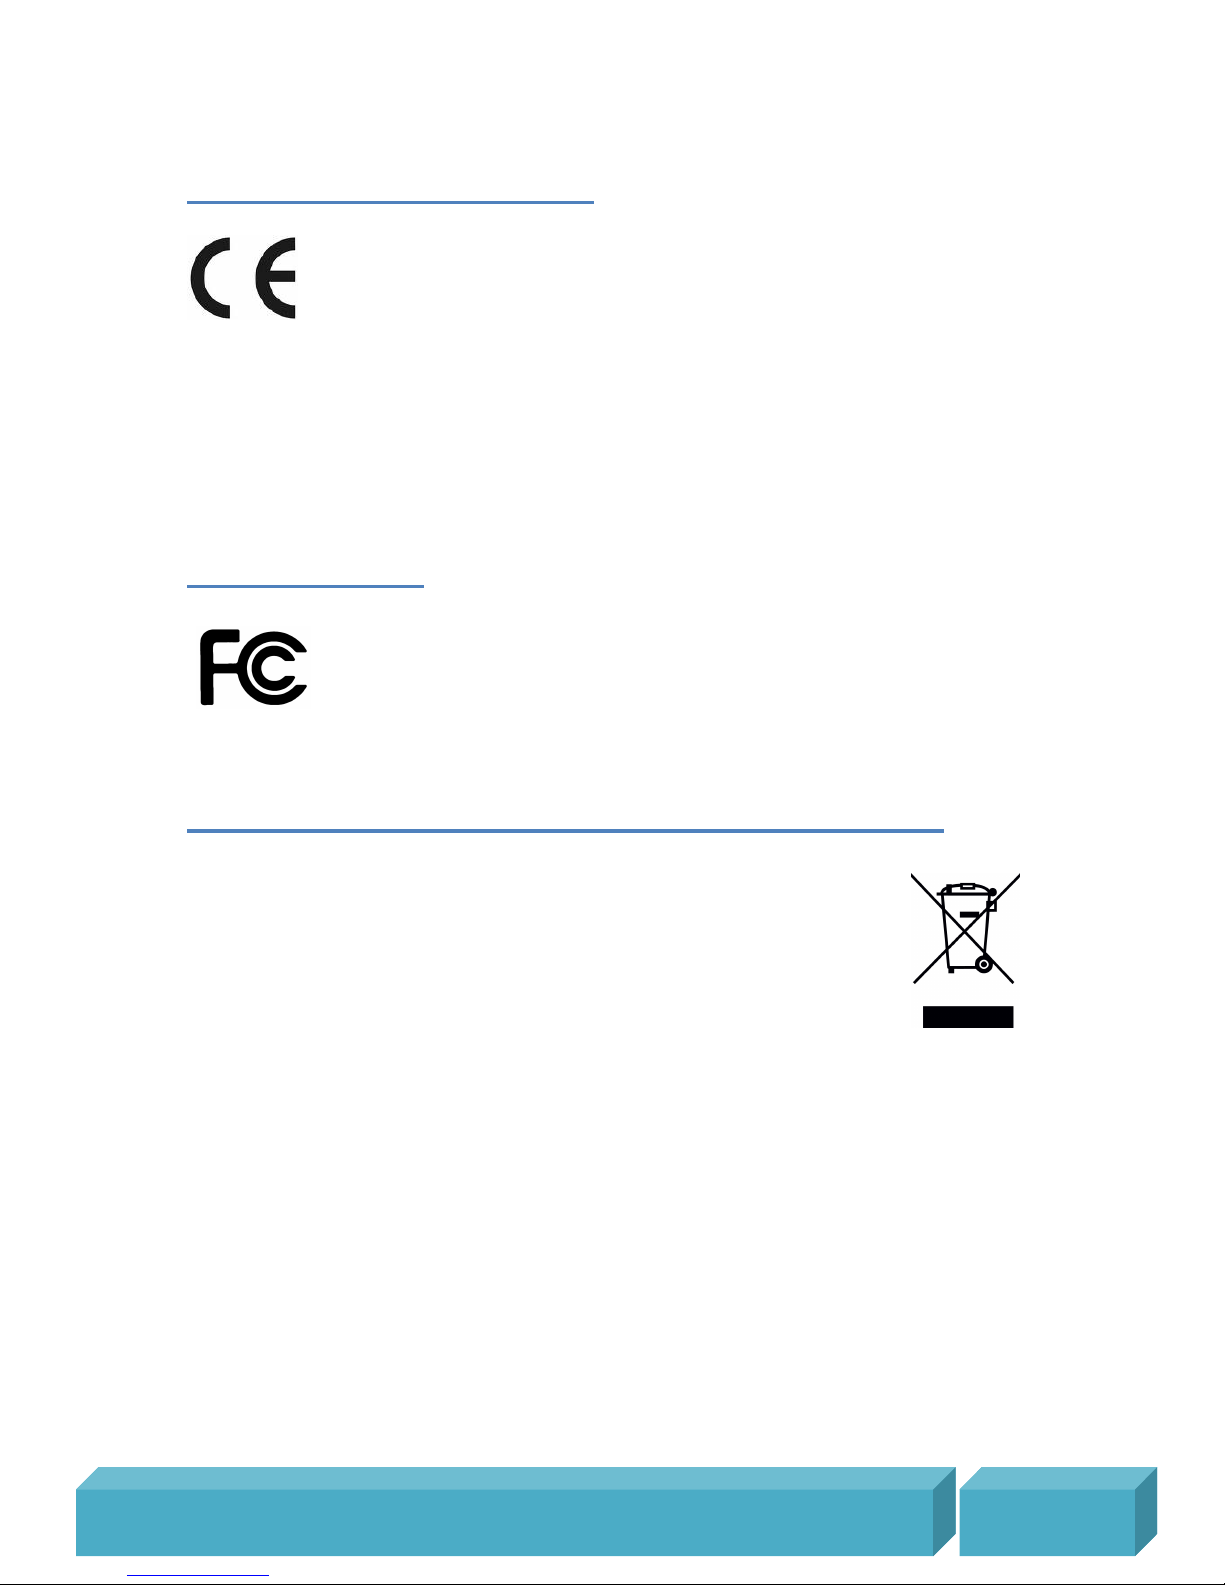
CE compliance statement
This product had been subject to the testing requirements for the CE mark,
and has been approved to claim the CE mark for the standards,
EN 55022:2006 + A1:2007
EN 55024:1998 + A1:2001, + A2:2003
The validity of the CE mark is restricted to those countries where it is legally enforced.
FCC statement
This device complies with Part 15 of FCC rules. Operation is subject to the
following two conditions: (1) this device may not cause harmful
interference, and (2) this device must accept any interference received,
including interference that may cause undesired operation.
Product disposal instructions (European Union)
The symbol shown here and on the product means that the product is
classed as Electrical or Electronic Equipment and should not be disposed
with other household or commercial waste at the end of its working life.
The Waste Electrical and Electronic Equipment (WEEE) Directive
(2002/96/EC) has been put in place to recycle products using best available
recovery and recycling techniques to minimise the impact on the
environment, treat any hazardous substances and avoid the increase of
landfill.
When you have no further use for this product, please dispose of it using your local
authority’s recycling processes. For more information please contact your local authority
or the retailer where the product was purchased.
All trademarks used are the property of their respective owners.
 Loading...