

MINOLTA-QMS PagePro 4100W User Manual

User Manual
PagePro 4100W
+ Documentation ++ Documentation ++ Documentation ++ Documentation ++ Documentation ++

Table of Contents
1 Introduction
1.1 Features .........................................................................................1-1
1.2 Printe r Parts and Accessories....... ................. ................. ............1-2
1.3 C o n tr o l P a nel........... ........ ....... ....... ... ....... ....... ....... ........ ....... ....... ..1-4
Indicator Lights................................................................................1-5
Acti on Key....... ... ....... ........ ....... ....... ....... ........ .. ....... ........ ....... ....... ..1-5
When th e Re a dy LE D is on... ........ ....... .. ........ ....... ....... ........ .. ....... ..1 -6
When th e E rr o r LED is on . .. .. ........ ....... ....... ........ ....... ....... ... ....... .... 1 -9
2Setting-up
2.1 Installation Precautions................................................................2-1
Selecting a L o ca ti o n fo r the Prin te r............. ........ .. ....... ........ ....... ....2-1
Powe r S o ur c e ....... ... ....... ....... ........ ....... ....... ........ .. ....... ........ ....... ....2-2
Grounding .......................................................................................2-2
Space Requireme n ts ...... ... ....... ....... ....... ........ ....... ....... ... ....... ....... ..2-3
2.2 Operational Precautions...............................................................2-4
Operating Environment ...................................................................2-4
Printer..............................................................................................2-4
Prin te r S u p pl ie s....... ....... ....... ........ ....... .. ........ ....... ....... ........ ....... ....2-6
2.3 Setting-up ......................................................................................2-7
Inst al lin g th e F a ce-Down T ra y ...... ....... ....... ........ .. ....... ........ ....... .... 2 -7
Installing Tray 1...............................................................................2-8
Connecting the Power Cord........ .......... .. .......... .......... .......... ..........2-9
Loading Paper ...............................................................................2-10
Turning On the Printer...................................................................2-12
Connecting to a Computer........................................................... .2-13
2.4 Options.........................................................................................2-14
SIMM (Single In-line Memory Module)..........................................2-14
Inst al lin g th e Op tional S IM M ......... ....... ....... ........ .. ....... ........ ....... ..2-15
2.5 Duplex Unit..................................................................................2-20
Inst al lin g th e D u p le x Un it ...... ... ....... ....... ... ....... ....... ........ ....... .. .....2 -20
2.6 Second/Third Paper Cassette Unit..................... ........ .. .............2-23
Installing the Optional Second/Third Paper Cassette Unit............2-23
2.7 N e t w o rk In te r fa c e C a rd (N IC) ..... .. ... ....... ....... ....... ........ ....... .......2-26
Inst al lin g th e Op tional N e tw o rk In te rf a ce C ar d . ....... ........ ....... .. .....2-2 6
PagePro 4100W -1

3 Using the Printer
3.1 Paper.............................................................................................. 3-1
Type................................................................................................ 3-1
Size................................................................................................. 3-2
Envelopes (Tray 1 and Manual Feed Tray)....................................3-2
3.2 Loading Paper............................................................................... 3-4
Loading Paper onto T ray 1.................... .. ........................... ............3-4
Loading Paper ont o Tray 2/Tray 3............ .. ................... .................3-6
Loading Paper onto Manual Feed Tray........................................3-10
Printing on Envelopes................................................................... 3-12
Duplex Printing ............................................................................. 3-14
4 Printer Driver and Status Display
4.1 S y s te m R e q u ir ements......... ........ .. ....... ........ ....... ....... ....... ... ....... . 4 -1
4.2 Installing the Printer Driver Under Windows 95/98 ................... 4-3
To Install the Printer Driver from the CD-ROM............................... 4-3
To Uninstall the Printer Driver ......................................................4-12
4.3 Installing the Printer Driver Under Windows NT 4.0 ............... 4-16
To Install the Printer Driver from the CD-ROM............................. 4-16
To Uninstall the Printer Driver ......................................................4-26
4.4 Registering the Status Display.................................................. 4-30
Registering the Status Display Under Windows 95/98......... ........4-30
Registering the Status Display Under Windows NT 4.0.......... .....4-34
4.5 Displaying th e Driver Setup Dialog
(Windows 95/98/NT 4.0)4-37
To Display the Driver Set up Dial og Under Windows 95/98..........4-37
To Display the Driver Set up Dial og Under Windows NT 4.0........4-38
4.6 Using the Pri nter Driver Under
Windows 95/98/NT4.04-40
Common But to n s......... ........ .. ........ ....... ....... ....... ........ .. ....... ........ . 4 -4 0
Paper............................................................................................4-41
Paper Size....................................................................................4-41
Page Layout ................. ........................... ........................... ..........4-43
Image............................................................................................4-47
Device Option............................................................................... 4-49
About............................................................................................4-49
4.7 Using the Printer Status Display............................................... 4-50
Opening the Printer Stat us Display .............. .......... .. .......... .. ........4-50
Using th e P ri nt e r S ta tu s Di sp la y.... ....... ....... ... ....... ....... ....... ........ . 4 -5 1
Controlling Pop Up Messages......................................................4-52
Switching Between the Expanded and Reduced Views...............4-52
-2 PagePr o 4100W

On-line Help ..................................................................................4-53
Displaying Printer Information.......................................................4-53
5 Maintenance
5.1 Replacing the Imaging Cartridge.................................................5-1
To Replace the Imaging Cartridge ..................................................5-2
5.2 C l ea n i ng the Pr in t er ........ ....... ....... ....... ... ....... ....... ........ ....... ....... ..5-5
Cleaning the Outside of the Printer.................................................5-5
Cleaning the Paper Transport Roller...............................................5-5
6 Troubleshooting
6.1 Clearing a Paper Misfeed .............................................................6-1
Insid e th e Pri n te r.. ........ ....... ....... ... ....... ....... ........ ....... ....... ... ....... ....6-1
Paper Output Misfeed..................................................................... 6-4
Paper Input Misfeed (from Tray 1).................................................. 6-4
Paper Input Misfeed (from Manual Feed Tray)...............................6-4
Paper Input Misfeed (from Second/Third Paper Cassette Unit) ...... 6-5
6.2 P a p e r Mis feed in th e Du p le x Unit ....... ........ .. ....... ........ ....... ....... ..6-6
Upper Misfeed .................................................................................6-6
Lowe r M is fe e d...... ........ ....... ....... ........ ....... .. ........ ....... ....... ....... .......6-6
6.3 Print Quality Problems .................................................................6-7
Blank pages..... .......... ........................... .. ........ .. ........................... .. .6-7
Black pages................................. ........ .. ................... ........ .. .............6-7
Prin to u t to o lig ht . .. ........ .. ....... ........ ....... ....... ... ....... ....... ........ ....... .. ..6 -8
Prin to u t to o dark........ ........ ....... .. ........ ....... ....... ....... ........ .. ....... .......6-8
Blurred background.........................................................................6-8
Unev en pr in t de ns it y ...... ... .. ....... ........ ....... .. ........ ....... ....... ....... ... ....6 -9
Irregularities ....................................................................................6-9
White or black line...........................................................................6-9
Toner smudges...... .. ........ .. ...........................................................6-10
6.4 N o out p u t .......... ....... ........ .. ....... ........ ....... ....... ....... ... ....... ....... .....6-1 0
Are you us i ng th e correct typ e of p rin t er ca b le ? .. ....... ....... ....... ... ..6-10
Are your computer’s communications port settings correct?........6-10
6.5 Messages.....................................................................................6-11
When th e Re a dy LE D is on .. ... ....... ....... ........ .. ....... ........ ....... .......6-12
When th e E rr o r LED is on ....... .. ........ ....... ....... ....... ........ ....... .. .....6-1 6
7 Specifications
7.1 PagePro 4100W Printer.................................................................7-1
7.2 Second Paper Cassette Unit (Option)......................................... 7-2
PagePro 4100W -3

7.3 Third Paper Cassette Unit (Option)............................................. 7-3
7.4 D u p le x Uni t (O p t io n ).. ........ ....... ....... ... ....... ....... ........ ....... ....... ...... 7 -3
7.5 Interface Connector and Cable ................................................... 7-4
7.6 SIMM (Option) ............................................................................... 7-4
8 Quick Reference
8.1 The LED Display ........................................................................... 8-1
Indicator Lights ............................................................................... 8-1
Acti o n Ke y ..... .. ........ ....... ....... ... ....... ....... ........ ....... ....... ... ....... ....... . 8 -1
When th e Rea dy LE D is on ........ ... ....... ....... ....... ........ ....... ....... ... ...8-2
When th e Err o r LED is on......... ....... ....... ... ....... ....... ........ ....... ....... . 8 -4
When the Error LED is on (Fatal Error) .......................................... 8-6
9 Glossary
10 Index
-4 PagePr o 4100W

Introduction
1 Introduction
1.1 Features
The Minolta /QMS PagePro 4100W is a las er printer develo ped exclusively
for use with Windows 95, Windows 98, and Windows NT 4.0 operati ng
systems.
The various featur es listed below make the Minol ta/QMS PagePro 4100W
the perfect pri n ter for any size offi ce.
l
Fast 18-page per minute print speed
l
Powerful Windows printing technology for fast output
l
Real 1200 × 600 dpi resolution
l
Optional 10/100BaseT Ethernet NIC
1
l
Windows host based PostScript level 2 standard for expanded
software compatibility
l
250-sheet paper capacity
m
1,250-sheet ma ximum paper-holdi ng capacity with optio nal
second and thir d cassette units installed
PagePro 4100W 1-1
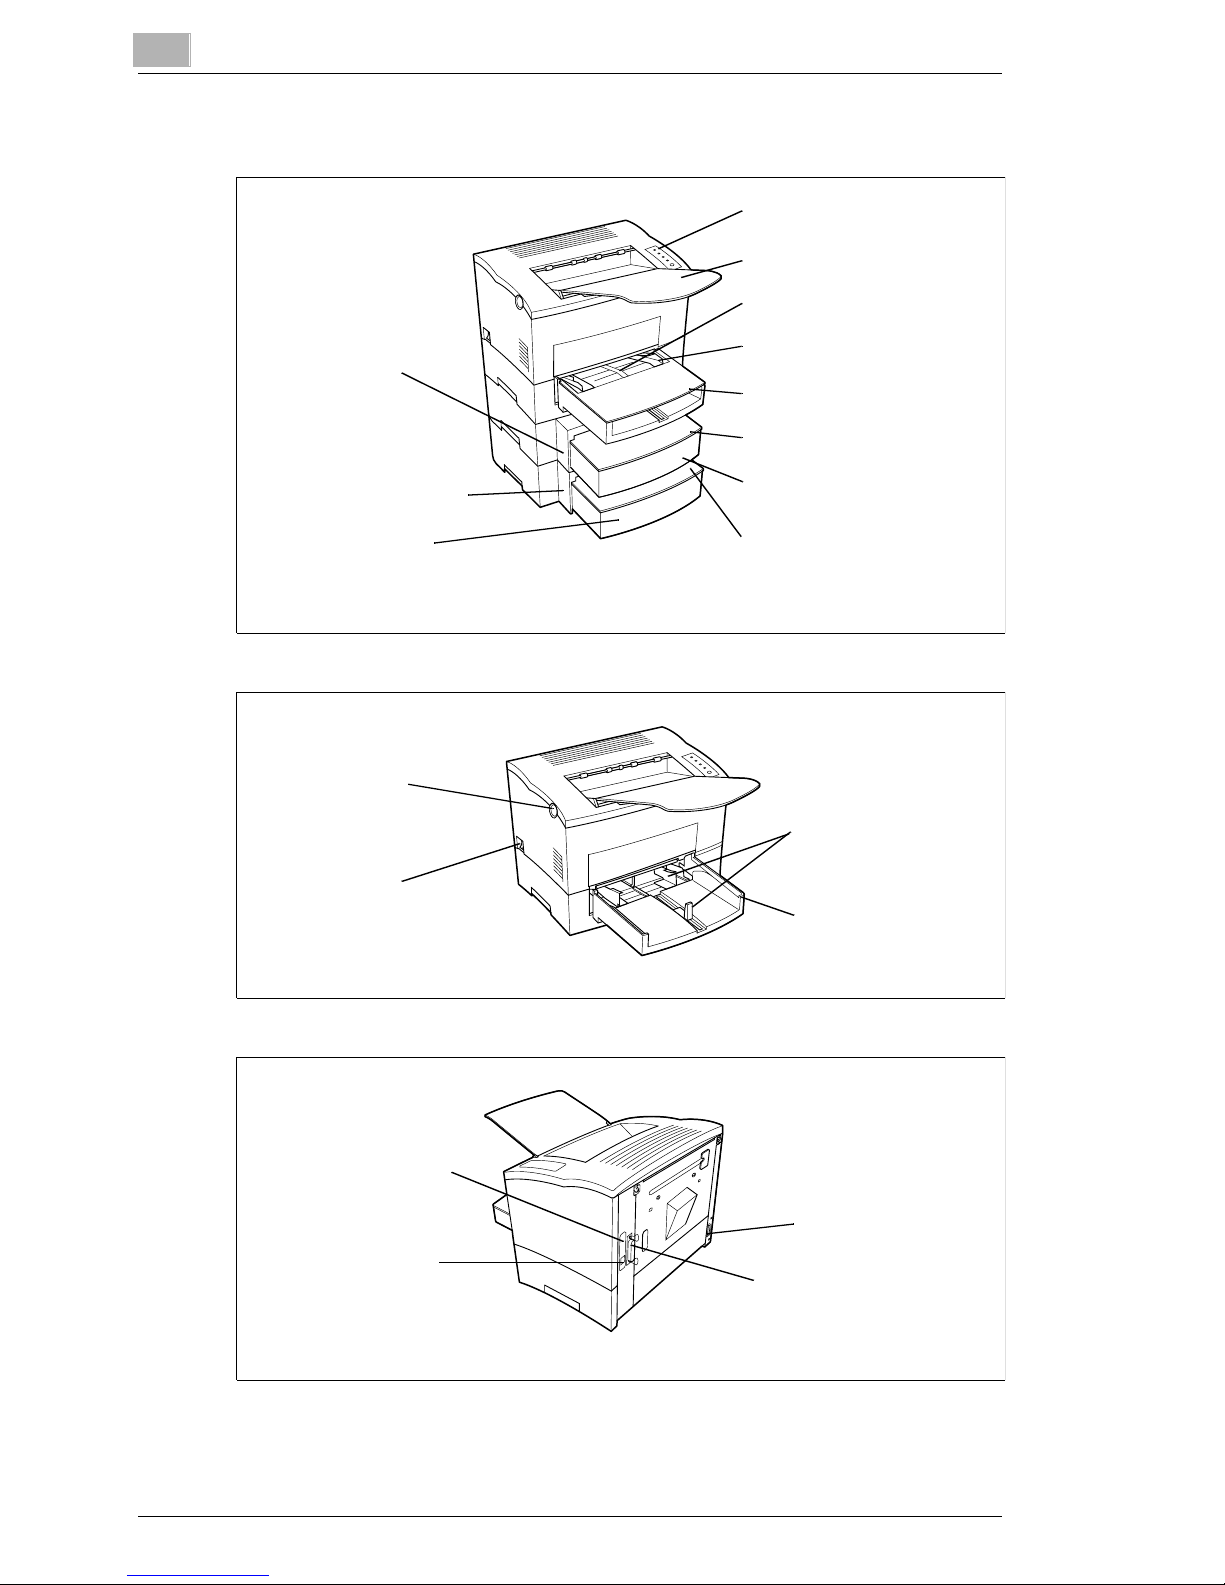
1
1.2 Printer Parts and Accessories
Second pape r
cassette unit
(option)
Thi rd pa pe r
cassette unit (option)
Tray 3 (500-s heet
thir d casset te)
(option)
Introduction
Control panel
Face-down tray
Manual feed tray
Paper size guide
Tray cover
Casset te cover (option)
Tray 2 (500-sheet
second cassette ) (option)
Cassette cover
(option)
Top cover
release bu tton
Power
switch
Netwo rk Int erf ace
Card (NIC) (option)
Ethernet interface
connector
(10/100BaseT)
(option)
Paper size guide
Tray 1
(multipurpose tray)
Power cord socket
Para ll el in ter f ac e
connector
1-2 PagePr o 4100W
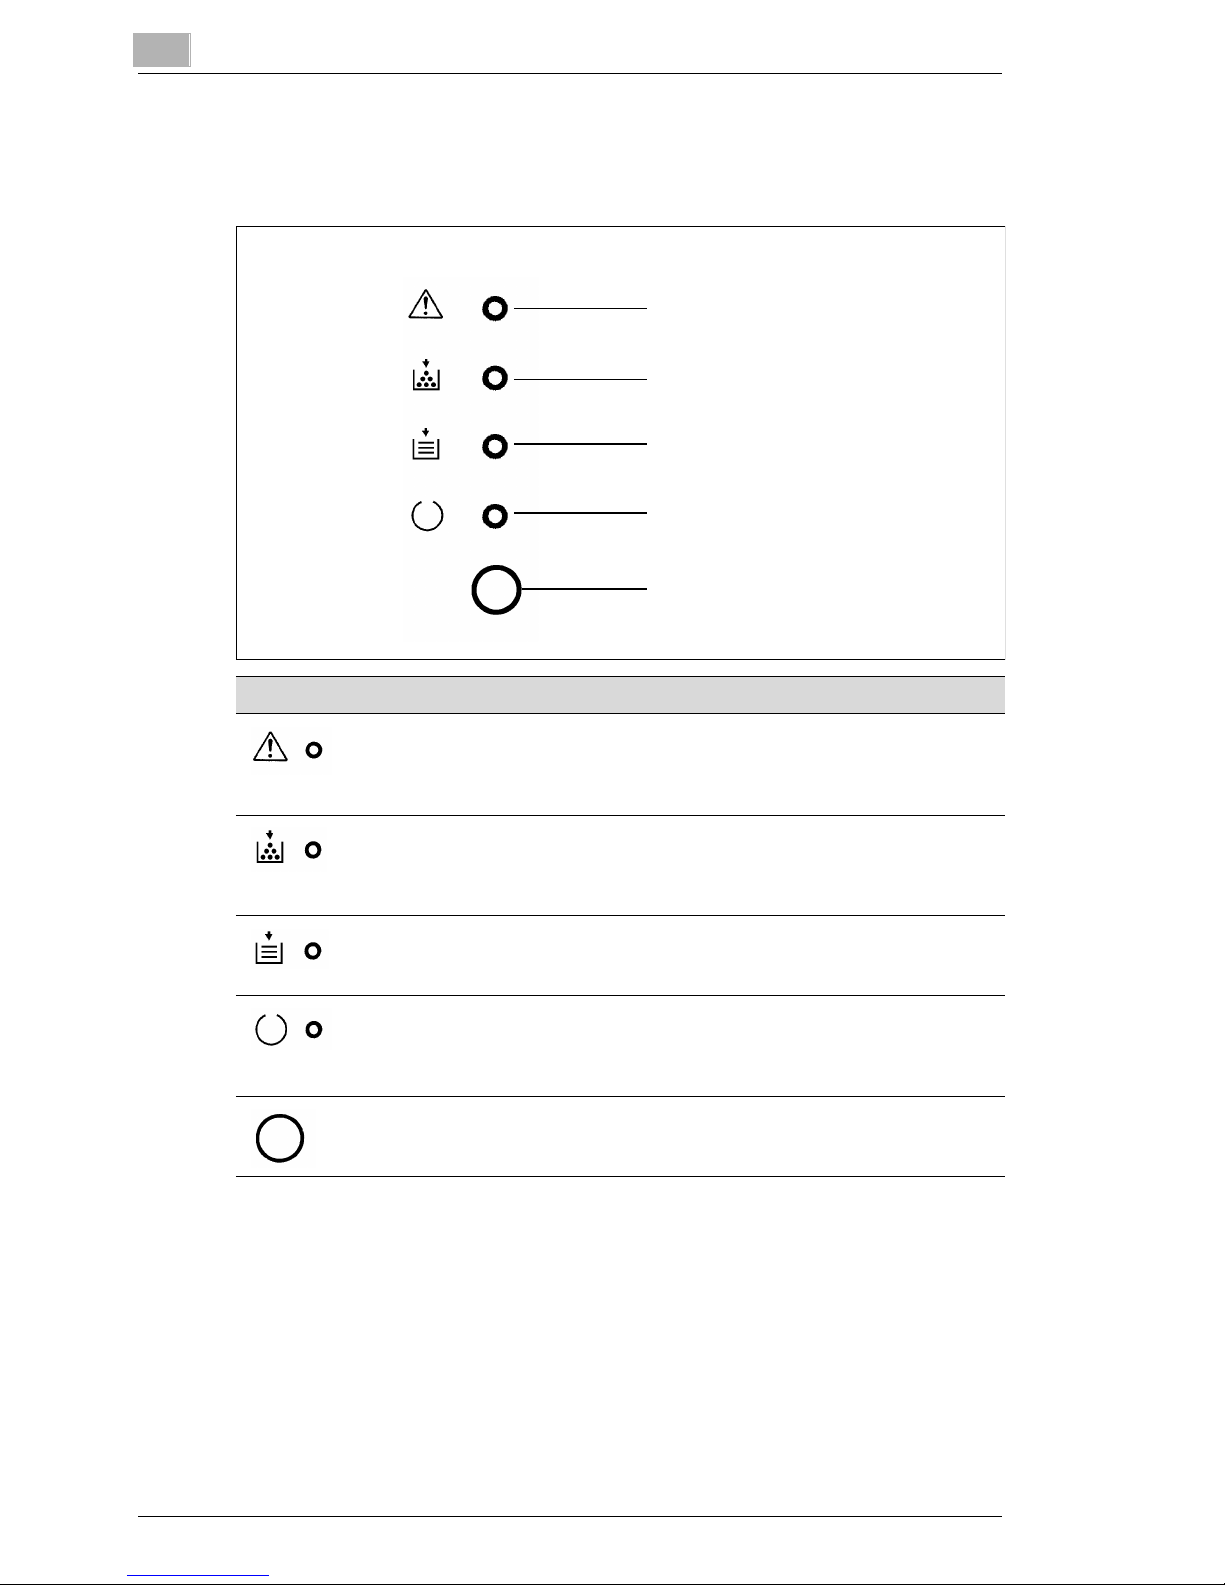
Introduction
1
Fusing unit
Top cover
Image transfer roller
Imaging cartr idge
PagePro 4100W 1-3
1
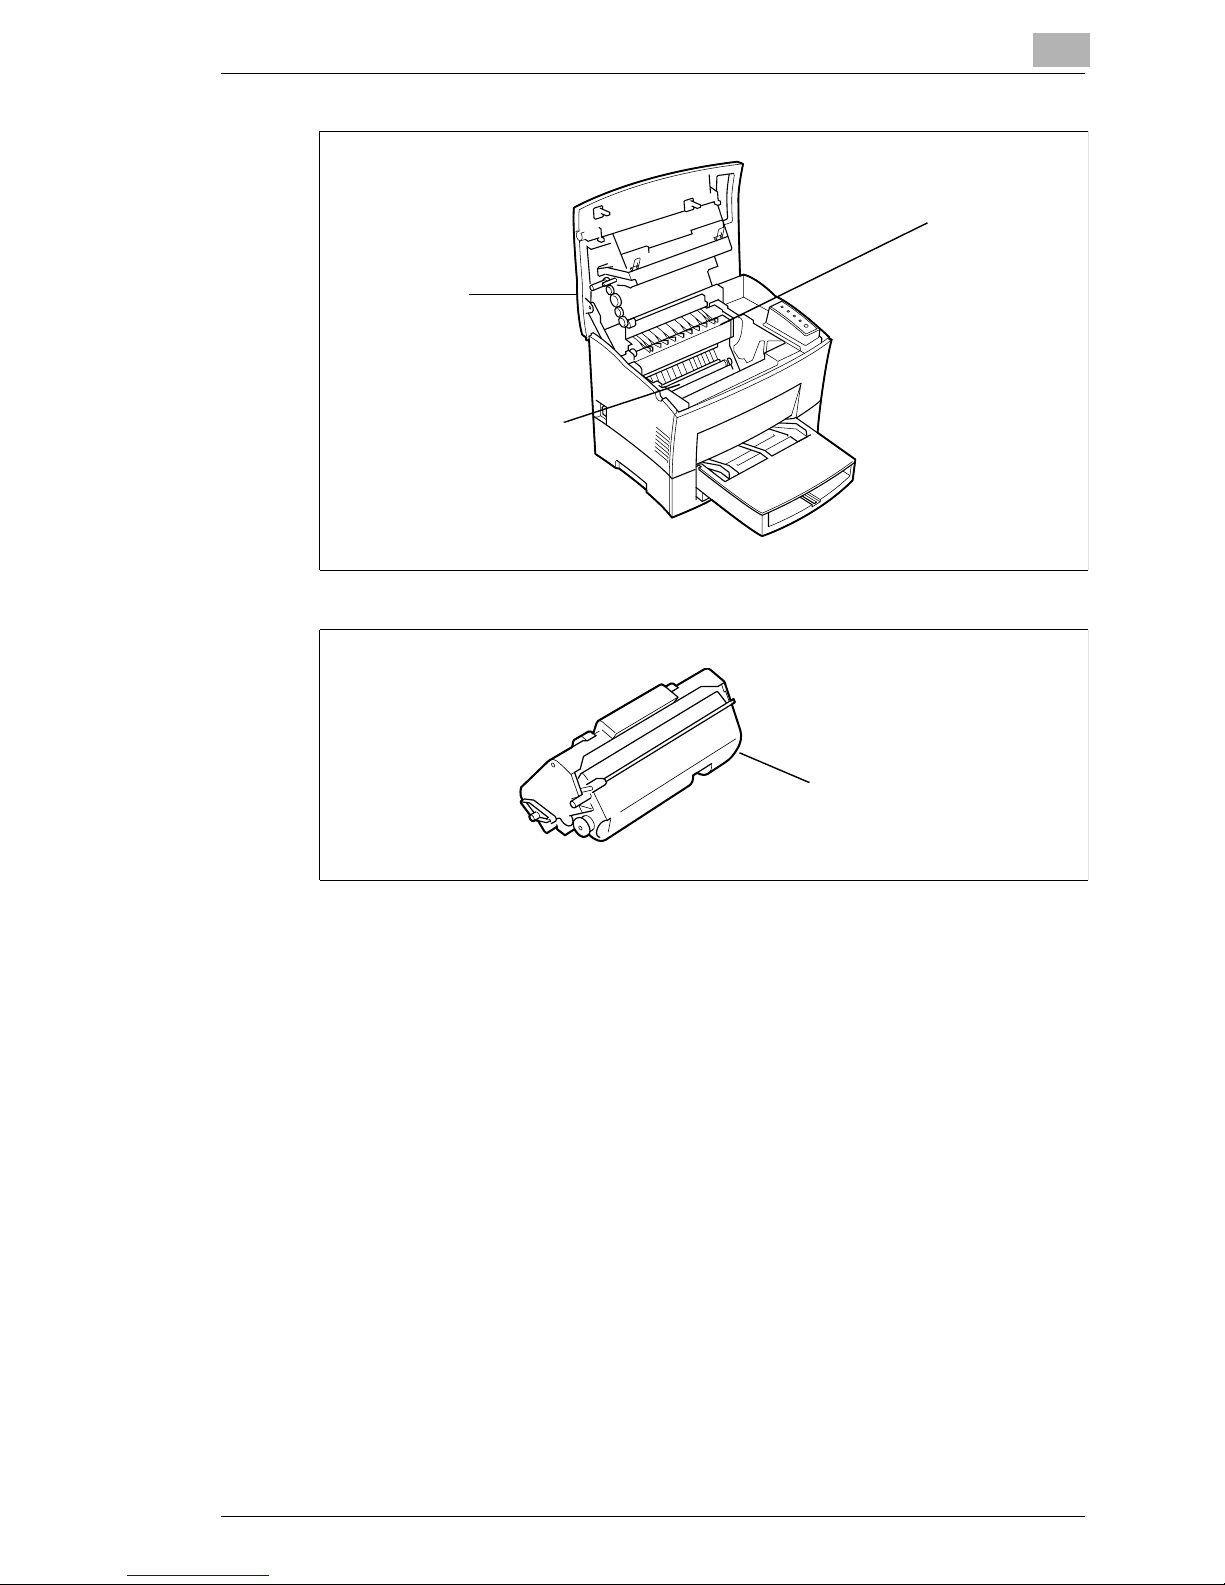
1.3 Control Panel
The control pan el has four indicator li ghts and one button.
Introduction
Error (amber)
Toner empty (amber)
Paper empty (amber)
Ready (green)
Action key
LED Status
Error LED
ON: A Fatal Err or has occurred
BLINKING: A recoverable error has occurred
OFF: Normal
Toner Empty LED
ON: The imaging cartridg e is empty
BLINKING: The imaging cartridge is almost empty
OFF: Normal
Paper Empty LED
ON: The selected paper tray is empty
OFF: Normal
Ready LED
ON: The printer can receive print jobs
BLINKING: The printer is warming up
OFF: The printer is off line
Action Key
Press this key if an error should occur in order to have the current condition
of the printer displayed through the LED.
1-4 PagePr o 4100W
Introduction
Indicator Lights
The four i ndicator li ghts tur n on, off, or blink i n combinati on to let you k now
the current status of the printer. You can find out details of the printer’s
status by check ing th e info rmatio n that a ppear s on your comput er scr een.
Action Key
1
BlinkingOffOn
The LED display will change as you press the Action key.
The appearance of this icon through out this manual indi cates
when you need to press th e Acti on key.
Examples of the messages that can be displayed by the LED are
presented on th e fol lowing page.
PagePro 4100W 1-5
1
Introduction
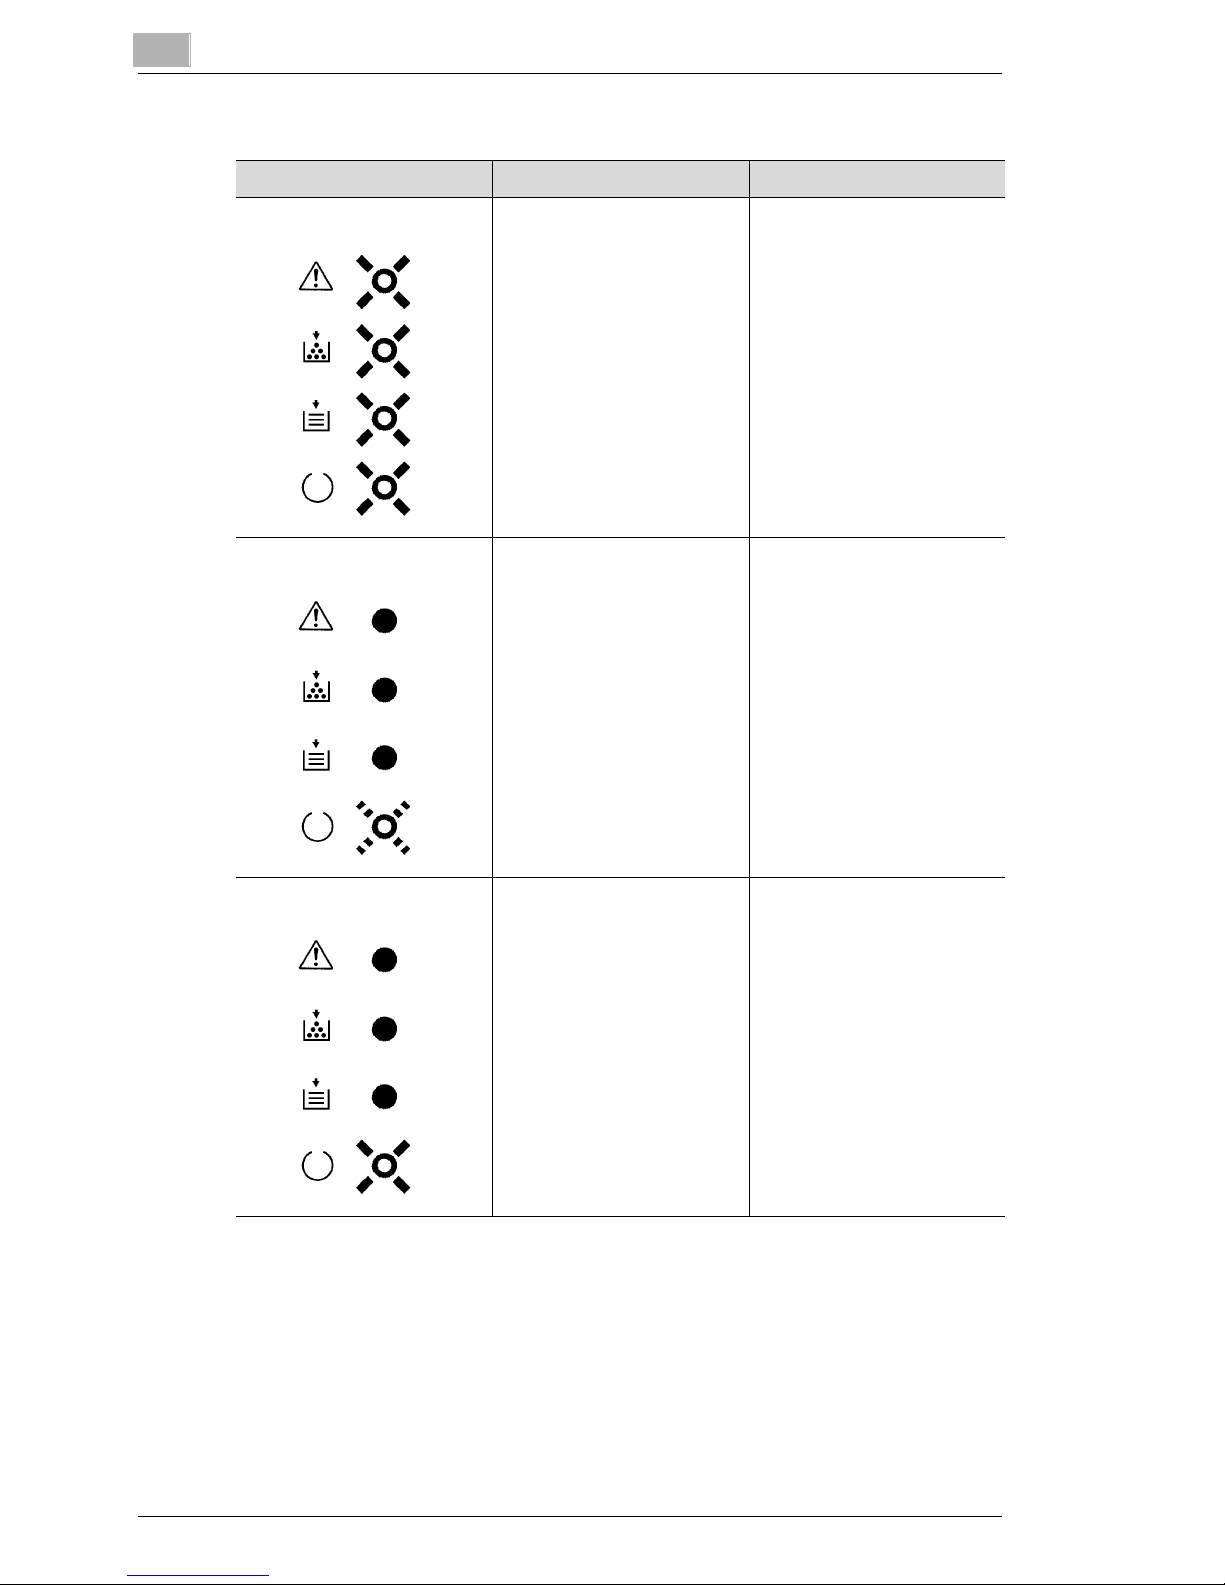
When the Ready LED is on
LED Display Description Response Required
Initializing Power on, initializing.
Warming Up Printer is warming up.
Ready Printer is ready and able to
print.
1-6 PagePr o 4100W
Introduction
1
LED Display Description Response Required
Power Save Printer has entered the
Power Save Mode.
Paper Empty The paper supply of one of
the trays is empty.
Size Mismatch The wrong size of paper has
been detected in Tray 1,
Tray 2 or Tray 3.
Press the Action key to see
which tray is out of paper.
For details, see page 6-12.
Load the specified size of
paper into the appropriate
tray or press and hold the
Action key for about 10
seconds until all of the LED’s
are on to cancel the print job,
see page 3-4.
PagePro 4100W 1-7
1
Introduction
LED Display Description Response Required
Wait Action Press the Action key in the
event of a paper size error or
when operating in the
manual mode.
Toner Low The imaging cartridge is low
on toner but printing is still
possible.
Press the Action key.
Printing will begin.
Ready a new imaging
cartridge. For details, see
page 5-1.
No Cassette/No Tray No Cassette:
The casstte for Tray 2 or
Tray 3 is not in place.
No Tray:
A print job was sent using the
Tra y 2 or T ray 3 set ti ng in t he
printer driver, even though
Tray 2 or Tray 3 is not
installed on the printer.
Press the Action key to see
which cassette is not in place
(see page 6-12).
Press the Action key to see
which tray is not in place
(see page 6-12).
1-8 PagePr o 4100W
Introduction
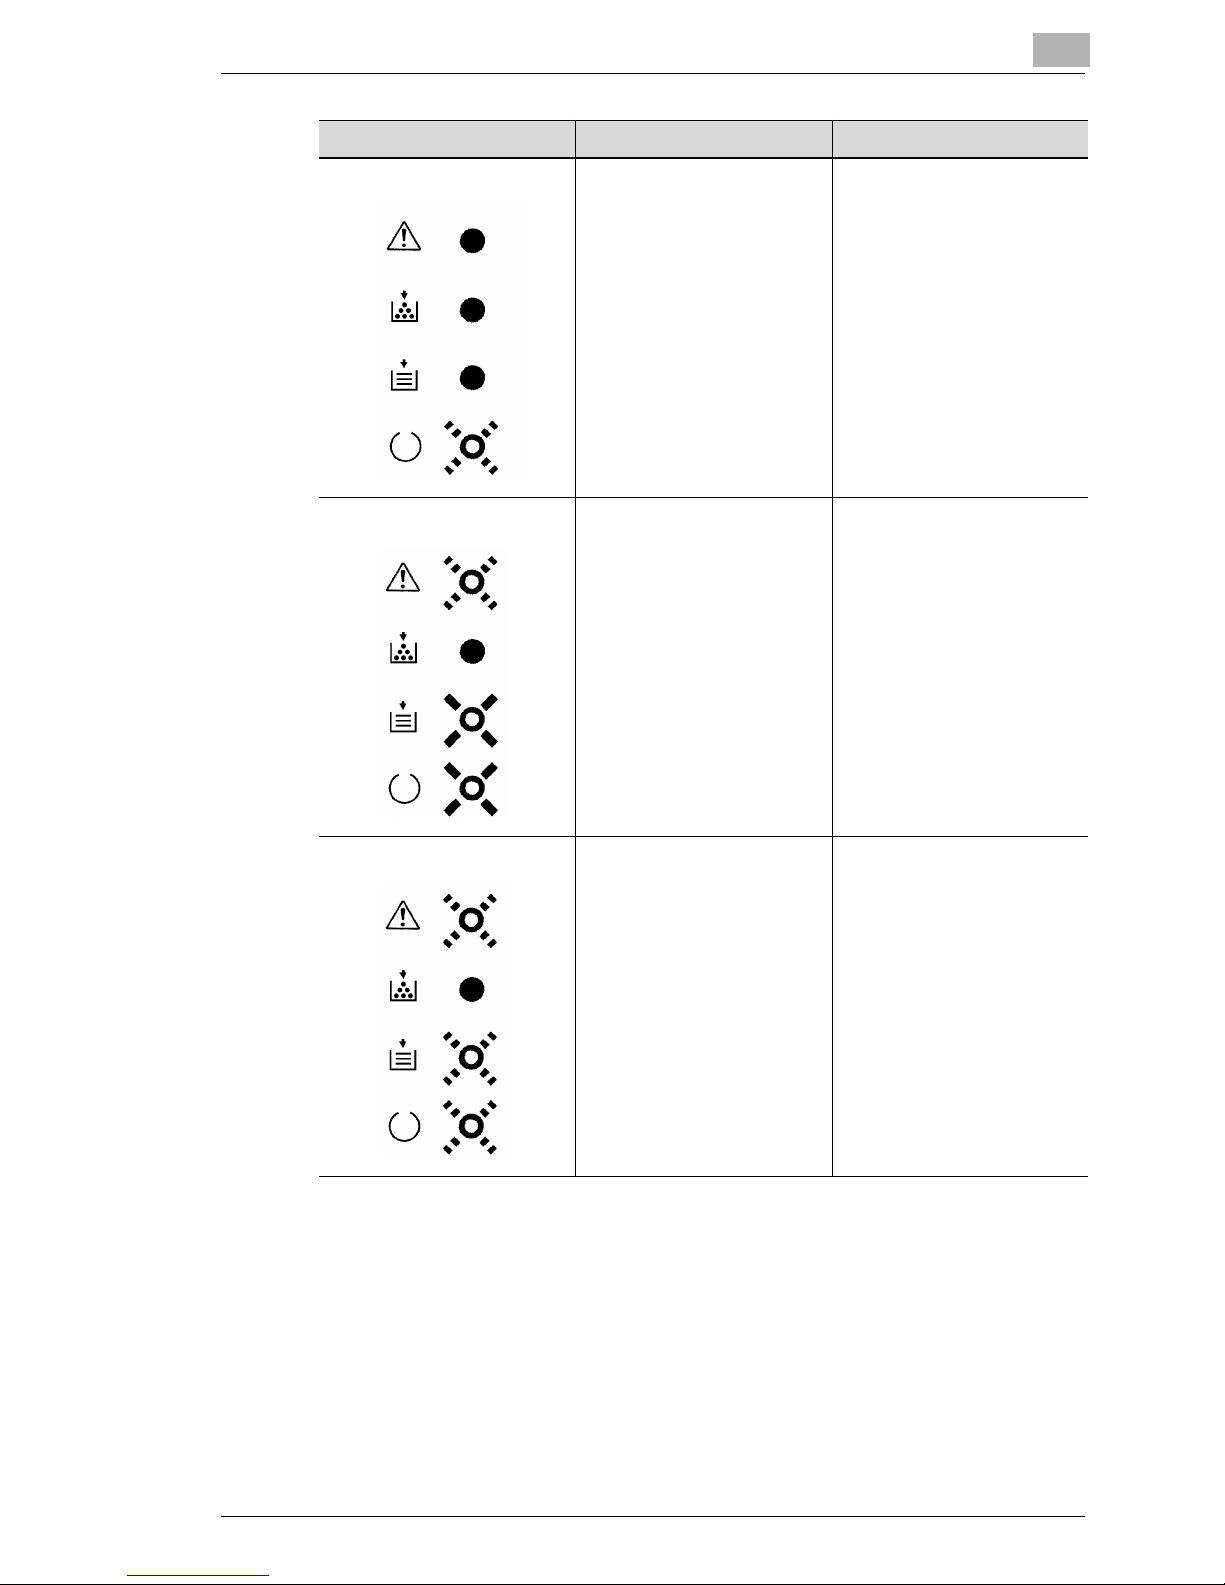
When the Error LED is on
1
LED Display Description Response Required
Paper Size Error The paper-size setting of the
printer driver does not match
the size of paper that has
been detected in the tray.
Paper Misfeed A paper misfeed occurred
near the Multipurpose tray,
Tray 2, Tray 3, Manual
feeding tray, Lower-duplex
unit, Drum unit, Fuser or
Upper-duplex unit.
Load the correct size of
paper or cancel the print job
(by pressing the Action key)
and change the paper-size
setting in the driver
(see page 3-4 and see page
6-16).
Press the Action key to see
where the paper misfeed
occurred. For details, see
page 6-16.
Replace Imaging Cartridge The imaging cartridge is out
of toner.
Replace the imaging
cartridge. For details, see
page 5-1.
PagePro 4100W 1-9

1
Introduction
1-10 PagePro 4100W

Setting-up
2 Setti ng-up
2.1 Installation Precautions
Note the f ollo wing i mportant preca utions when select ing a l ocatio n for the
printer and when connecting it to a power sour ce.
Selecting a Location for the Printer
A proper location helps to ensure that your printer provides you with the
long service life for which it is designed. Dou ble-check to make sure that
the location you select has the foll owing characteristics.
Choose a location that is well-ventilated.
á
Make sure there is no chance of ammonia or other organic gases
á
being generat ed in the area.
2
The power outlet you plan to connect to should be nearby and
á
unobstructed.
Make sure that the printer is not expo sed to direct sunlight.
á
Avoid areas in the di rect airflow of air conditioners, heaters, or
á
ventilators, and areas subjected to temperatur e and hum idity
extremes.
Choose a sturd y, level surf ace where the pr inter will not be exposed t o
á
strong vibration.
Keep the pri nter a way from any obj ects t hat m ight b lock i ts heat ven ts.
á
Do not locate the pri nter near curtains or other combustible objects.
á
Choose an area where there is no possibility of the printer being
á
splashed wit h wa ter or other liquid s.
Make sure that the surrounding area is clean, dry, and free of dust.
á
PagePro 4100W 2-1
2
Setting-up
Power Source
The following are the power source requirem ents for this printer.
l
Power source: 220 - 240 V at 50 - 60 Hz
l
Voltage fluctuation: Within 220 - 240 V ±10%
l
Frequency fluctuation: Within ±0.3%
NOTE
Í
Use a power source with mini ma l vol tage and frequency f luctuation.
Í
Only use an outlet that is rated for the voltage capacity specified for
this printer.
Í
Be sure to plug the power cor d all the way i nto the outlet. The outlet
should be loc ated near th e printer and be ea sily acces sible so you can
unplug the power cord imm ediately if necessary.
Í
Make sure the outl et you use is visible, and not hi dden behind the
printer or any other object.
Í
If any other ele ctrical equi pment is plugg ed into the same out let, make
sure that the capacity of the outlet is not exceeded.
Í
If you use an extensi on cord, m ake sure i ts capaci ty is gr eater than the
power consumpti on of the printer. Using an extension cord with a
lower capaci ty cr eates the danger of fire.
Í
Never use a multiple socket to connect other appliances or machines
to the same outlet being used to power the printer.
Grounding
Always ground the pri nter t o guard a gainst th e danger of elect rica l shock.
To ground the printer, connect the grou nding wire to the ground term inal
of the electri cal out let you are pl ugging in to or to a gro unding con tac t that
complies with local electric al st andards in your area.
NOTE
Í
Never connect the groundi ng wire to a gas pipe, the grounding wi re for
a telephone, or to a water pipe.
2-2 PagePr o 4100W
Setting-up
2
Space Requirements
Be sure to provi de sp ace aroun d the pr i nter as indi cated b elow, t o e nsure
easier printer operation, paper and toner replacement, and mainten ance.
24-3/4" (632mm)
or more
* 29-1/2" (746mm)
or more
** 34-1/4" (867mm)
or more
6
" (15 0 mm)
or more
*** 11-3/4"
(300mm)
or more
40-1/2"
(1,028mm) or more
*** 46-1/2"
(1,178mm) or more
11-3/4" (300mm)
or more
4"
(100mm)
23-1/2"
(600 mm)
or more
* When equipped with an optional second cassette unit.
** When equipped with an optional third cassette unit .
*** When equipped with an optional duplex unit.
11-3/4"
(300 mm)
or more
or more
33" (836mm)
or more
PagePro 4100W 2-3

2
2.2 Operational Precautions
Note the following important precautions whenever using the printer.
Operating Environment
The following describes the operating environment required when using
the printer.
l
Temperature: 10°C to 35°C (50°F to 95°F) with fluctuation of 10°C
(18°F) per hour
l
Humidity: 15% to 85% with fluctuation of 20% per hour
Printer
The following describes precautions for using the printer.
l
Never turn the printer off or open any of its covers during a print
operation.
Setting-up
l
Never place flamm able gasses, liquids or objects that gener ate
magnetic forces near the printer.
l
When unplugging th e power cord, always grasp the pl ug and never
pull on the cord. A damaged cord creates the dan ger of fire or
electrical shock.
l
Never touch the power cord when your hands are wet. Doing so
creates the dan ger of electrical shock.
l
Always unpl ug the p ower cord bef ore movi ng the pr inter . Fai lure t o do
so can damage the power cord, creat ing the danger of fi re or electri cal
shock.
l
Always unplug the power cord if you do not plan to use the printer for
a long time.
l
Never try to remove any secured panel or cover. The interior of the
printer contains high-voltage circuitry which creates the danger of
electrical shock when exposed.
l
Never try to modify t he pri nter. Doing so creates the danger of fire or
electrical shock.
l
Never place a ny hea vy obje cts on t he powe r cord, pull on it or bend i t.
Doing so creates the danger of fire or electrical shock.
l
Always make sure t he printer is not placed on the elect rical cor d or the
communications cables of any other electrical equipment. Also make
sure that cords and cables do not get into the pr inter’s mechanism.
Any of these conditions create the danger of malfunction and fire.
l
Always take care so t hat paper clips, staples, or ot her small pi eces of
metal do not get into t he printer through it s vents or other openings.
Such objects create the danger of fire or electrical shock.
2-4 PagePr o 4100W
Setting-up
l
Do not allow water or other liquids to spill on or near the pri nter. Fire
or electrical shock can occur should water or liquid come int o contact
with the printer.
l
Should liquid or any piece of metal accidently get inside the pr int er,
immediatel y turn it off, unplug the power cord, and cont act your dealer.
Failure to take this immediate action creates the danger of fire or
electrical shock.
l
Whenever the pri nter emits unusual ly high amounts of heat, smoke,
an unusual odor , or noise, immediatel y turn it off, unplug it, and contact
your dealer. Failure to take this immediate action creates the danger
of fire or elect ri cal shock.
NOTE
Í
Be sure to locate the pr int er in a well-ventilat ed location. A minimal
amount of ozone i s generated duri ng normal operat ion of this print er.
Because of this, an unpl easant odor may resul t when the printer is
used for extensi ve print ing in a poorl y venti lated a rea. For comfort able,
and safe operat ion, be sure to locate the printer in a well-ventilated
area.
2
PagePro 4100W 2-5
2
Setting-up
Printer Supplies
Note the foll owing precautio ns when handlin g printer supplies such as t he
imaging cartri dge, and paper.
l
Avoid storing printer supplie s in t he fol lowing locations:
m
Areas subjected to direct sunlight. Additionally, the imaging
cartridge mu st be pr otected from fluorescent light.
m
Areas exposed to open flame.
m
Areas subjected to high humidity.
m
Areas subjected to large amounts of dust.
l
Keep paper that has bee n removed from its wrapper, but not yet
loaded onto the pri nter tray, in a sealed plastic bag and store it in a
cool, dark location.
l
Only use imaging cartridges that are expressly specifi ed for this
printer.
l
Keep supplies out of the reach of childre n.
l
Should your ha nds becom e soil ed with toner , immediat ely wash t hem
with soap and water.
NOTE
Í
Whenever you remo ve the imaging cartridge from the printer ,
immediatel y wrap it wi th a cloth t o prot ect i t fr om o verexpos ure t o l ight.
2-6 PagePr o 4100W

Setting-up
2.3 Setting-up
See the Quick Guide for Installation and Reference printer before
unpacking.
Set-up the printer according to the following instructions.
NOTE
Í
Always use a shielded interfa ce cable. Use o f an un shielded c able can
result in radio interference with data.
Í
Keep all the boxes and pack ing material s that the printer comes in for
later use when transporting the printer
Installing the Face-Down Tray
2
With both hands, gently bend the face-down tr ay inwards and insert one
of its tabs into its holder on the upper portion of the printer. Continue to
bend the face-down tray so that it curves enough for the second tab t o fit
into its holde r and release the tray into position.
PagePro 4100W 2-7

2
Setting-up
Installing Tr ay 1
1 Using the left and right slots in the pri nter as guides, gently push
Tray 1 unti l i t cannot be inserted any further (as shown in the
illustration).
2 Attach the tray cover onto Tray 1.
2-8 PagePr o 4100W
Setting-up
2
Connecting the Power Cord
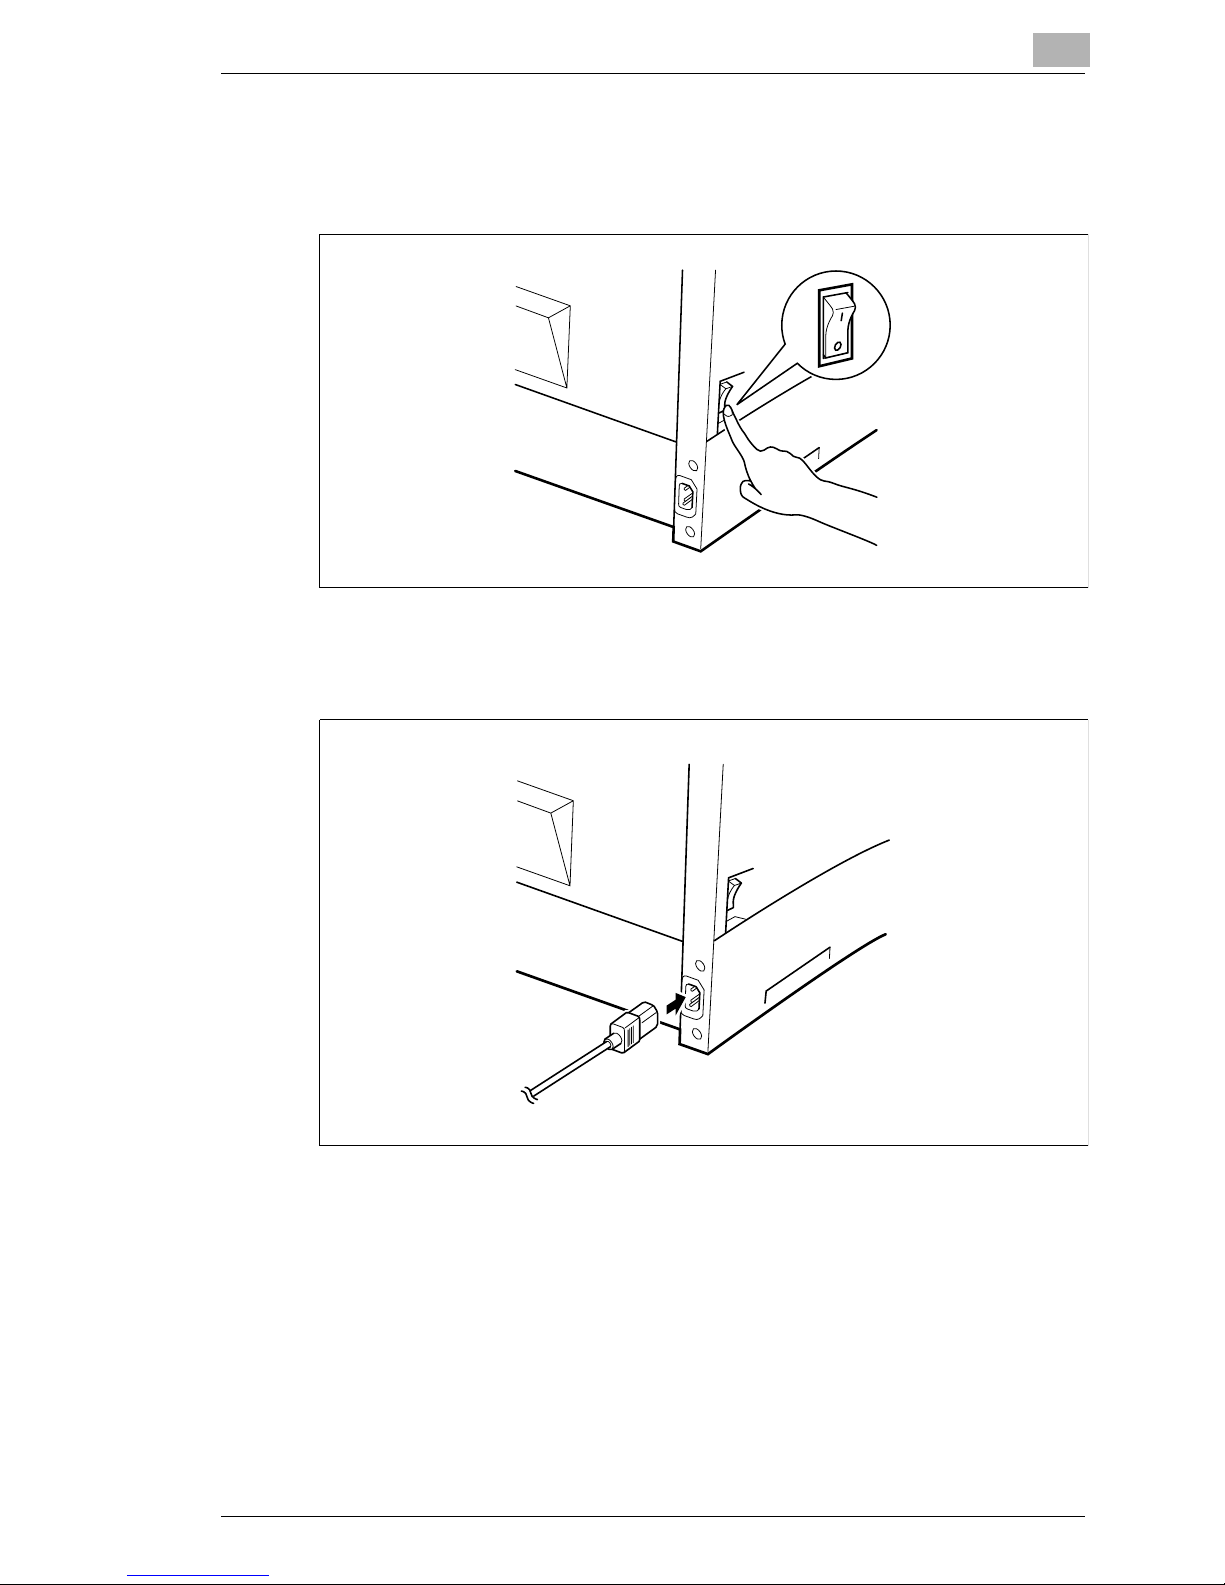
1 Make sure tha t th e printer’s power swit ch is in the O (Off) position.
2 Connect one end of the power cord that com es with the printer to t he
power cord socket . Plug the other end into a power outl et.
PagePro 4100W 2-9
2
Setting-up
Loading Paper
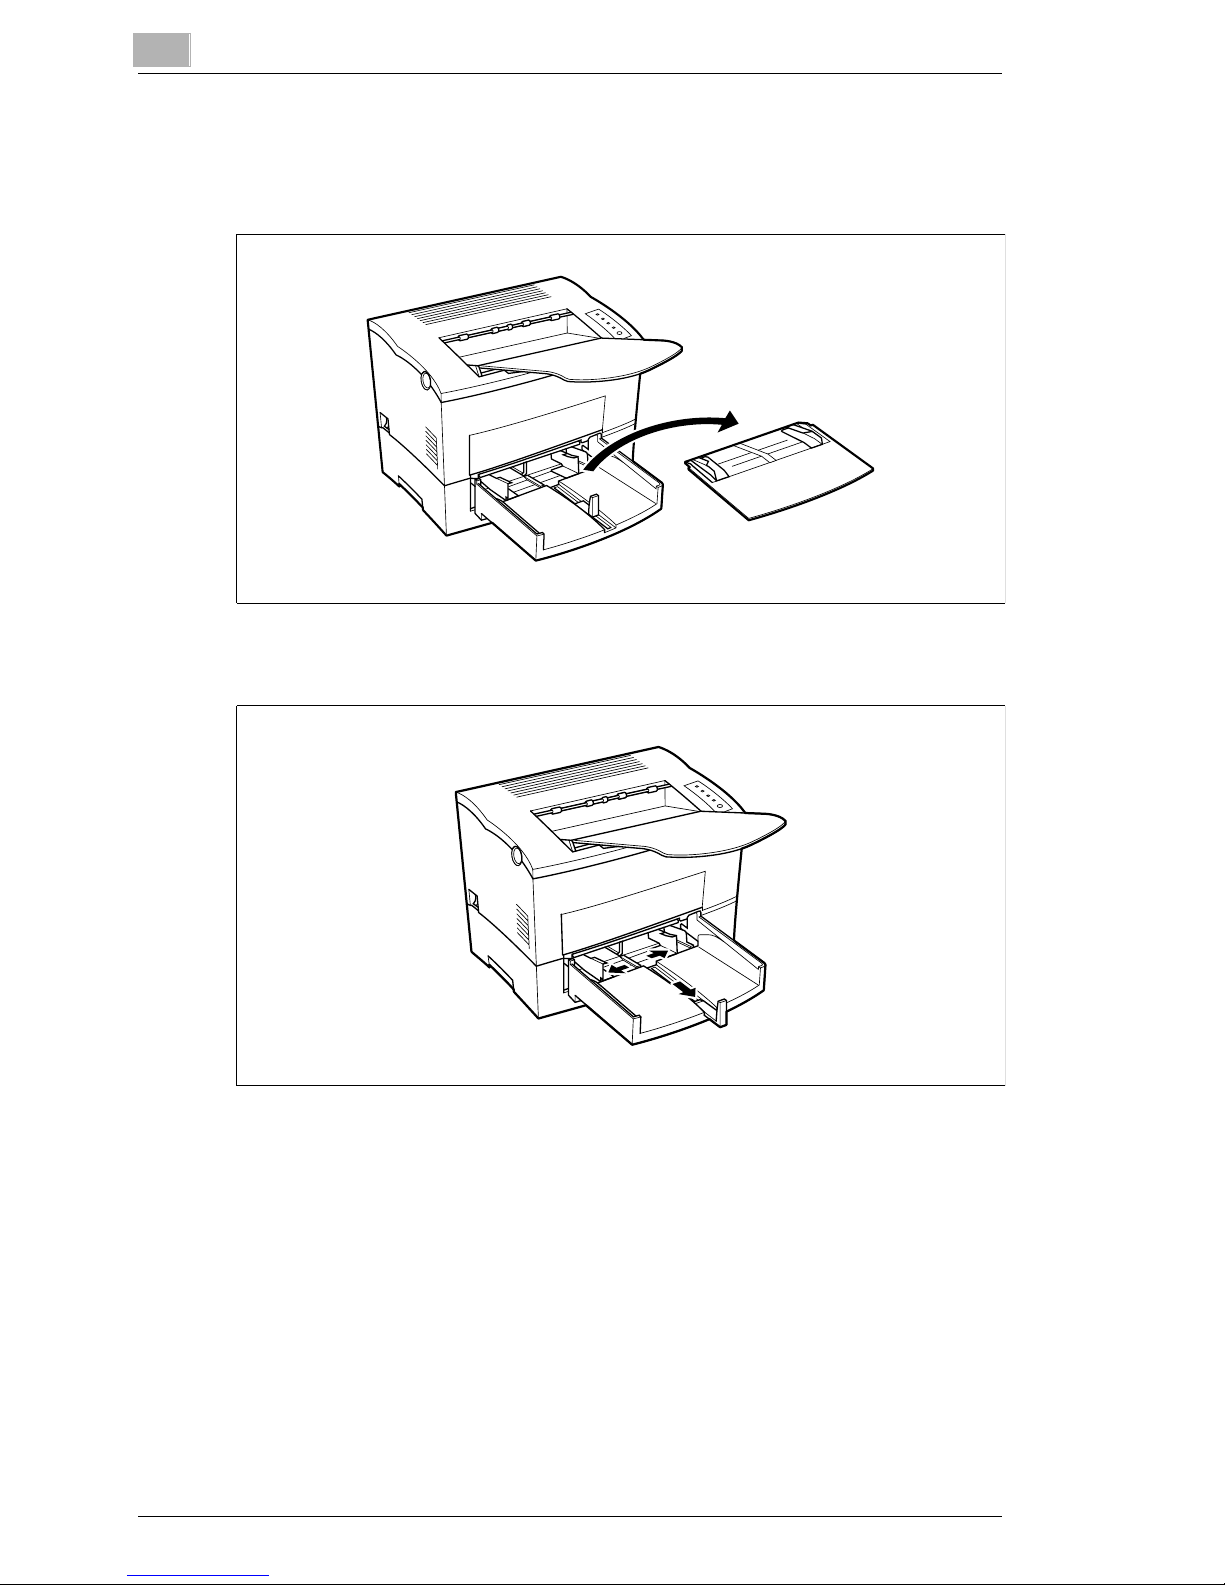
1 Remove the tray cover from Tray 1.
2 Open all three of the paper size guides.
2-10 PagePro 4100W
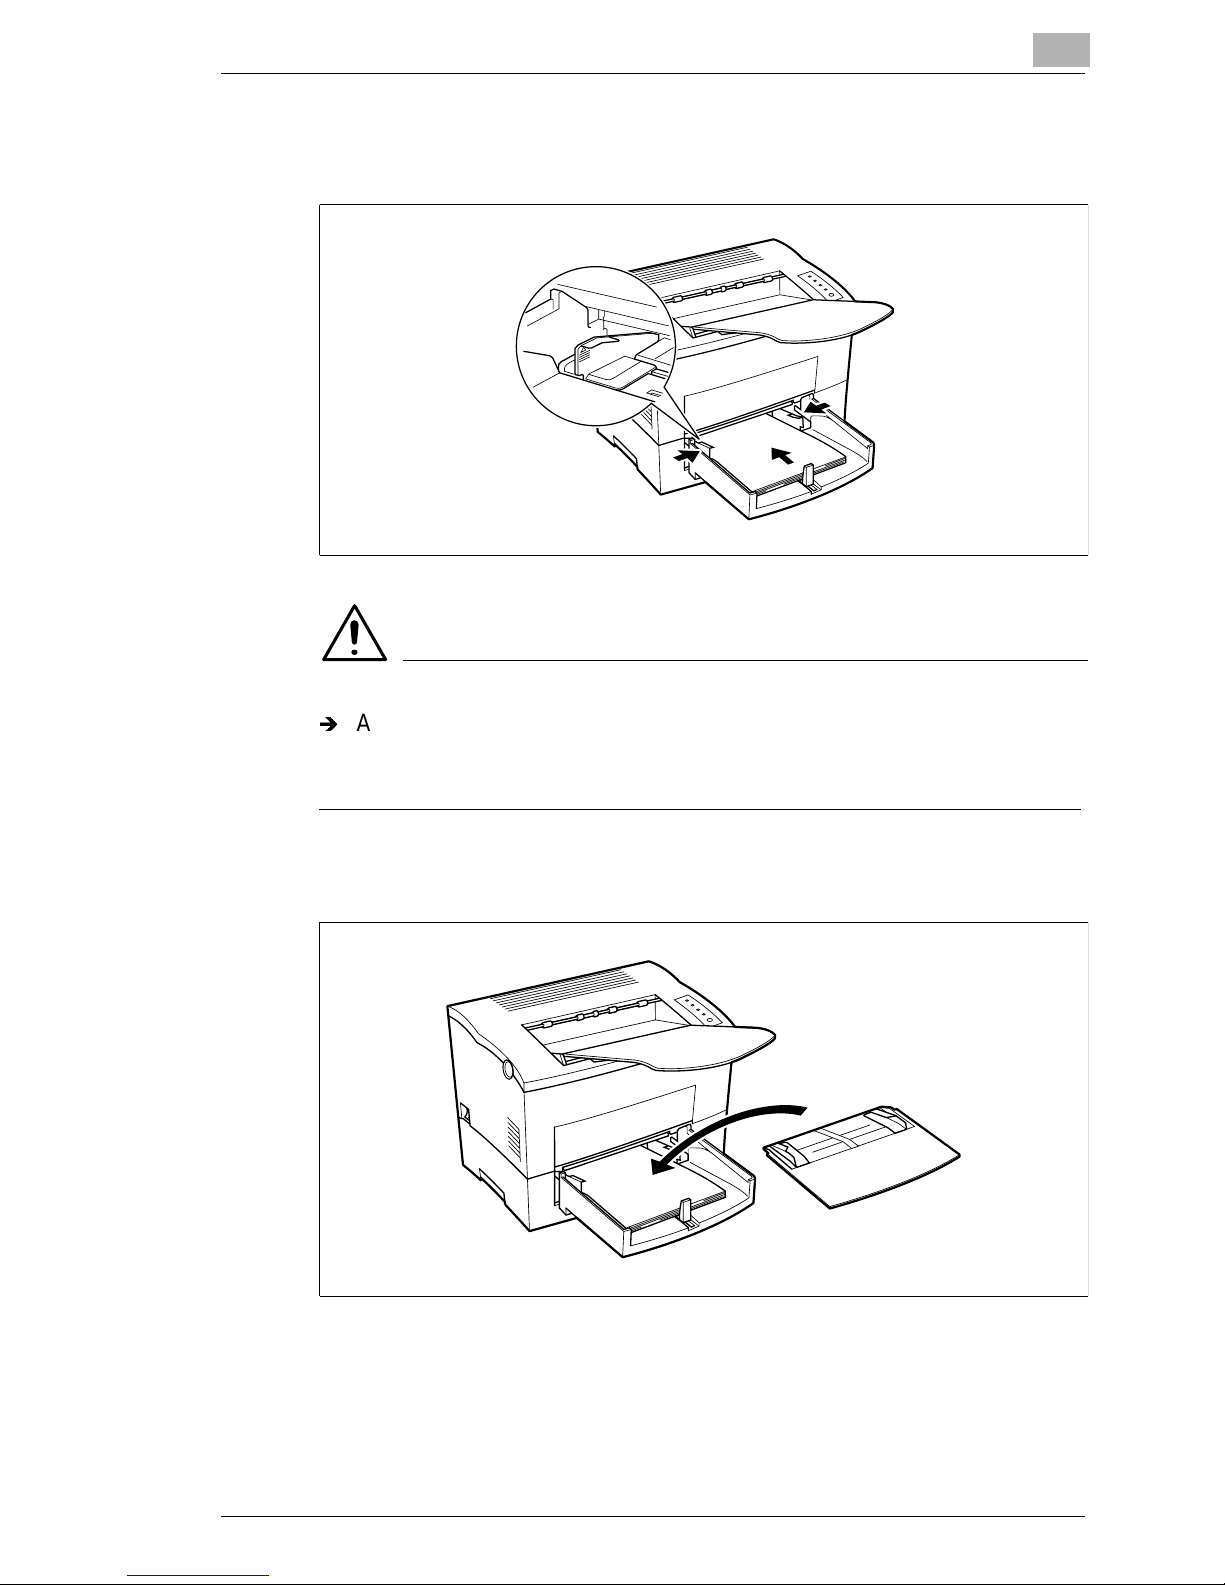
Setting-up
2
3 Place the p aper st ack o nto the tray, prin t-si de up . Secure the st ack b y
adjusting the paper size guides .
NOTE
Í
A maximum level mark on the paper size guide shows how high you
can stack paper on Tray 1. Make sur e th at paper i s stacked no higher
than th is mark .
4 Replace the tray cover onto Tray 1.
PagePro 4100W 2-11
2
Setting-up
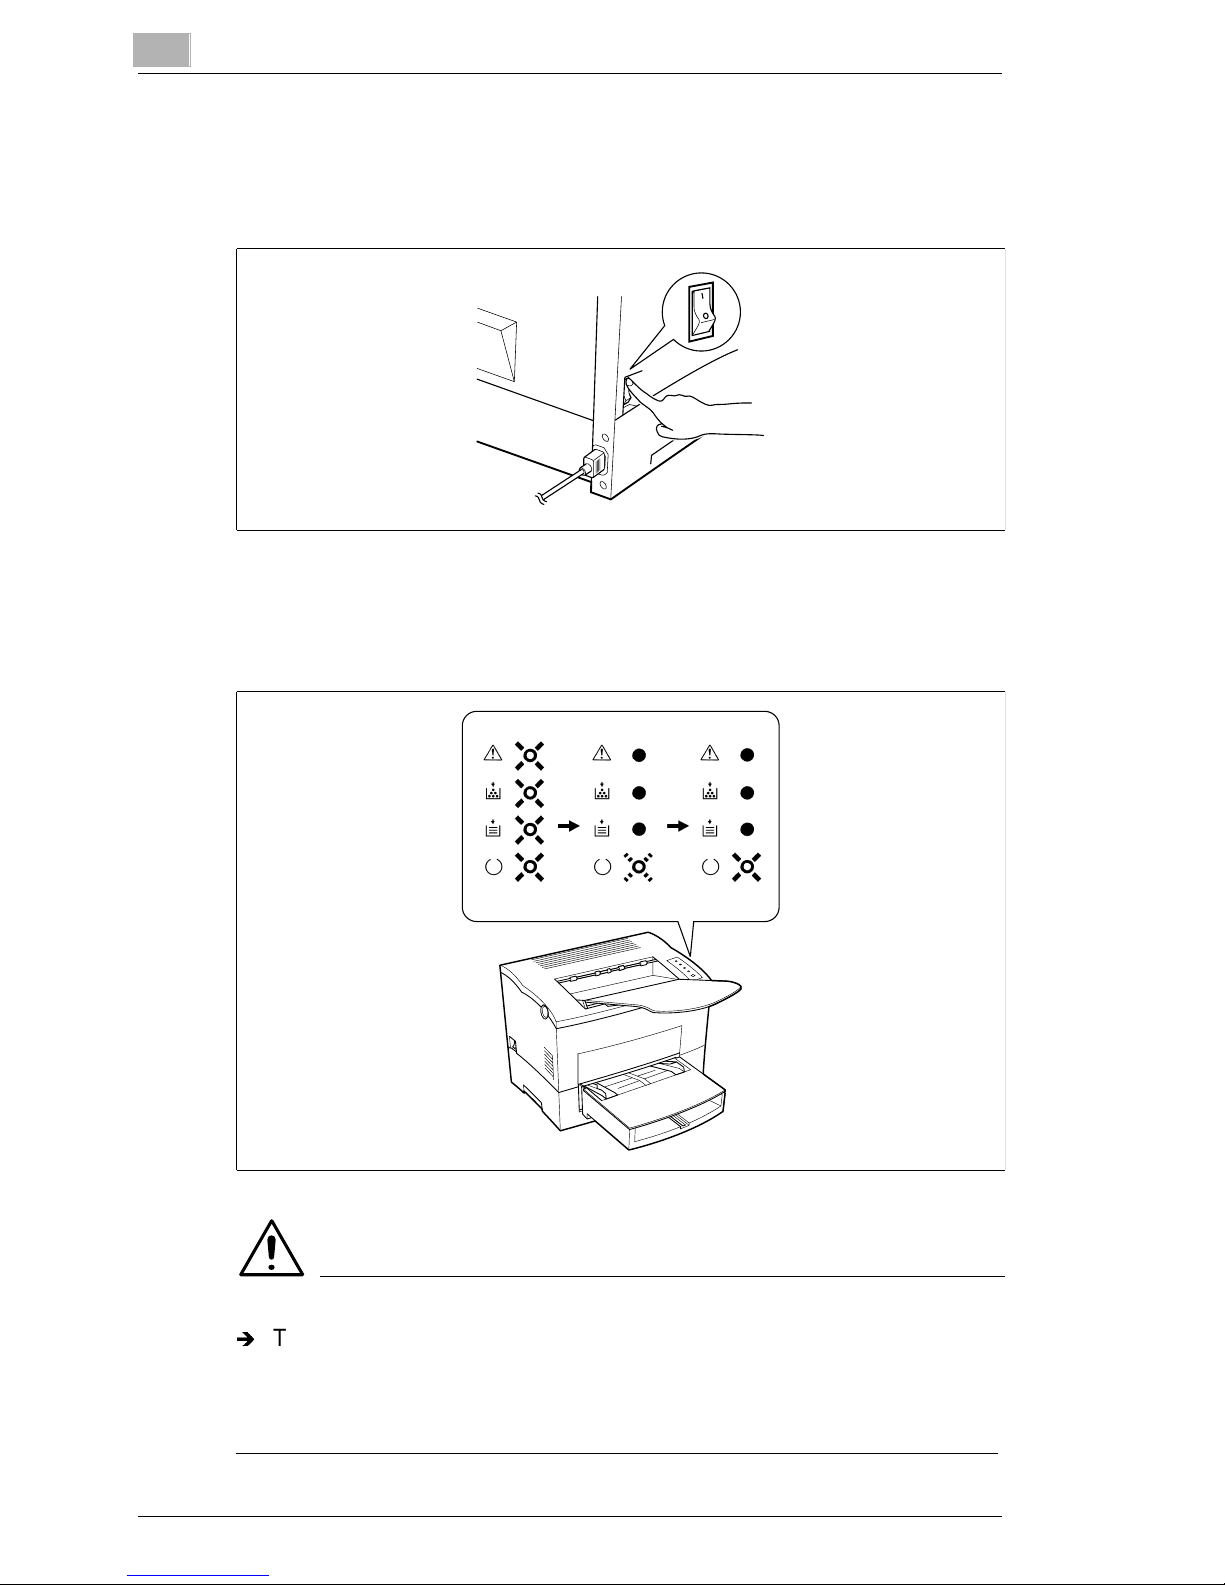
Turning On the Printer
After connecting the printer to a power outlet, press the power switch to
turn it on.
Turning on the print er causes all the indicat ors on the control panel to light,
which indicates that the printer is warming up. In about 23 seconds only
the ready indicator remains lit, indicating that the printer is ready to print.
Initializing Warming Up Ready
NOTE
Í
The printer aut omat ically en ters a powe r sav ing mode i f it recei ve s no
print commands for about 15 minutes. Whenever the printer receives
a print command while in t he power savi ng mode, it st arts to warm up
again and takes about 23 seconds before it is ready to print.
2-12 PagePro 4100W
Setting-up
2
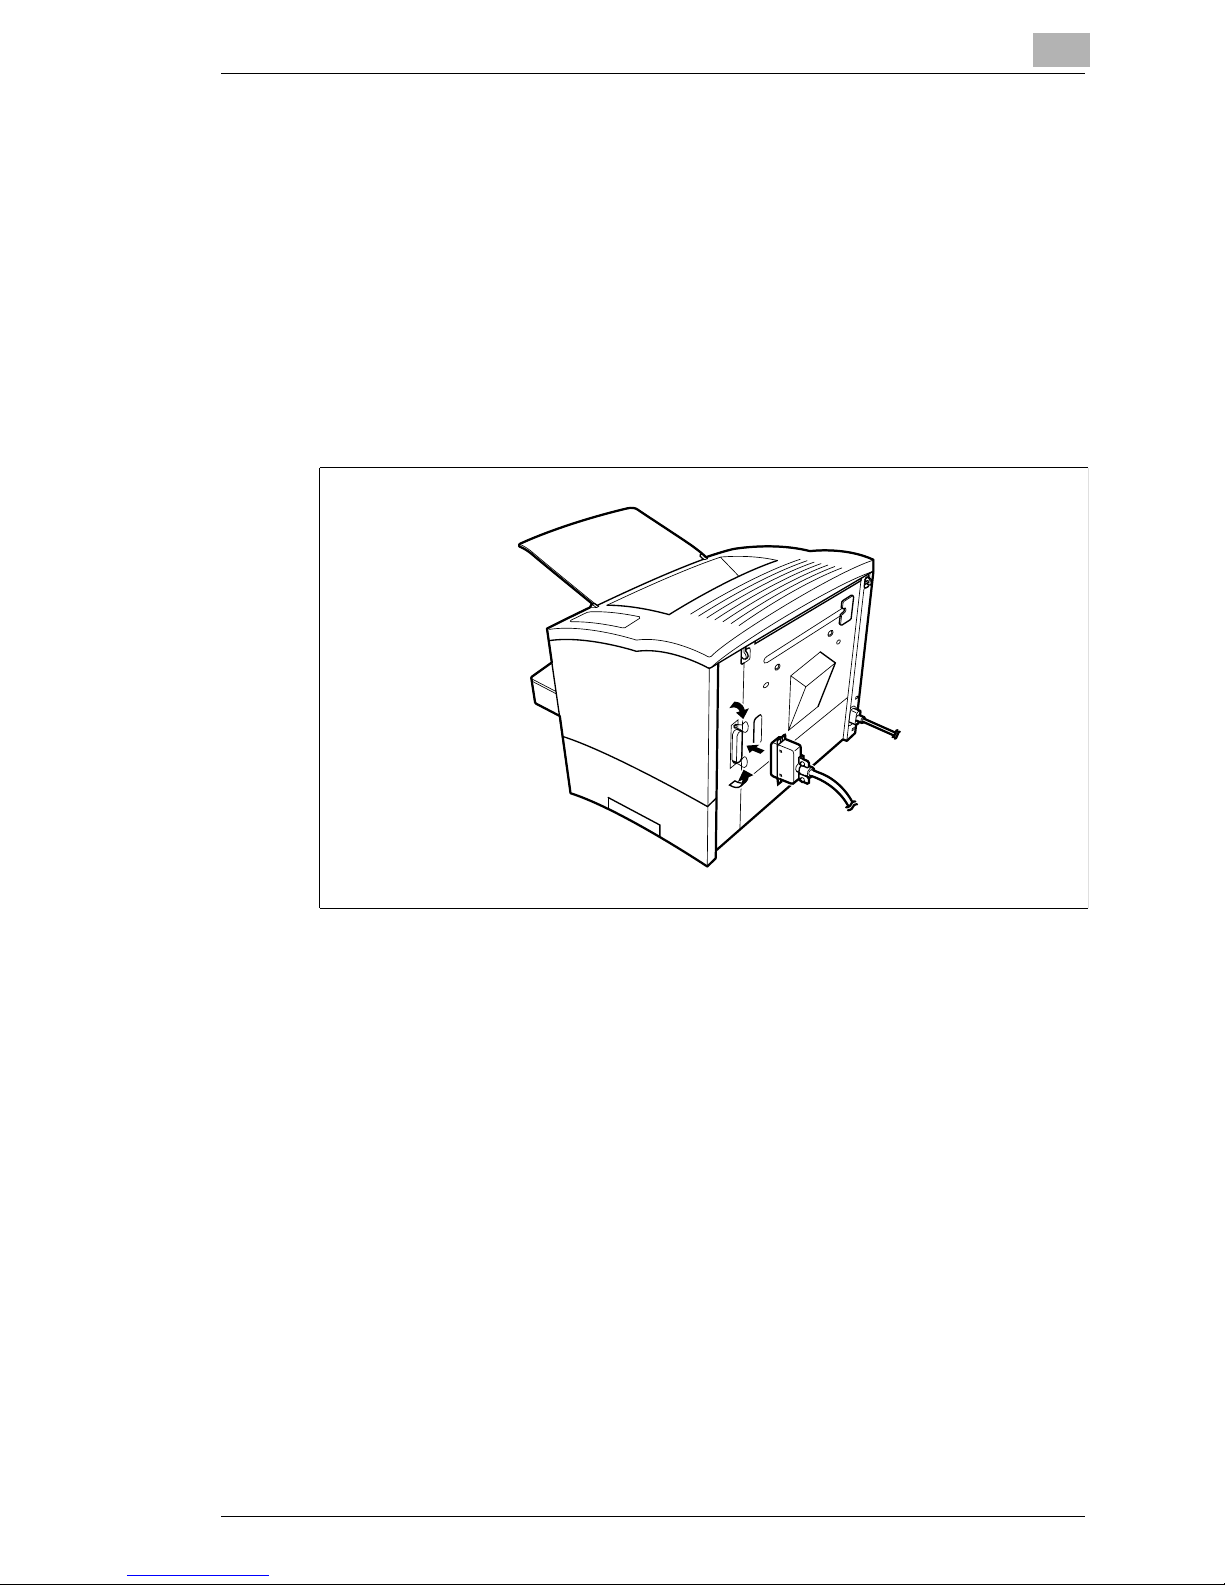
Connecting to a Computer
1 Make sure that the printer and the computer you are connecting it to
ar e b oth turned off .
2 Connect one end of the interface cable to the par allel port of the
computer.
3 Connect the othe r end of the cabl e to the parallel connector on the
back of the printe r. Secure the cable usi ng the two cli ps on the parallel
connector.
For cable specifications and pin assignments, see page 7-4 of this
User’s Manual.
PagePro 4100W 2-13

2
2.4 Options
This section desc ribes the opt ional item s that are avail able for this pr inter:
Memory SIMM(s), Duplex Unit, Second Paper Cassett e Unit , Thi rd Paper
Cassette Unit, and the Network Interface Card.
SIMM (Single In-line Memory Module)
Many errors caused by data overload can be avoided by installing
additional mem ory into the printe r.
This printer comes with 2 MB of memory. You can increase memory
capacity to up to 16 MB by installi ng an optional 8 or 16 MB SIMM into the
memory connector located inside of the printer.
NOTE
Í
Memory capacity can be increased to 16 MB by installing a 16 MB
SIMM into the printer. The successful installation of the expansion
memory can be confirmed by displayi ng the Printer In formati on in the
Printer Status Display. For details, see page 4-53 “Displaying Printer
Information...”.
Setting-up
Í
Installat ion of an optional SIMM will inc rease the memory capacity of
your printer. However, the memory of the optio nal SIMM will not be
combined with the ini tial 2 MB that came with the print er.
2-14 PagePro 4100W
Setting-up
Installing the Optional SIMM
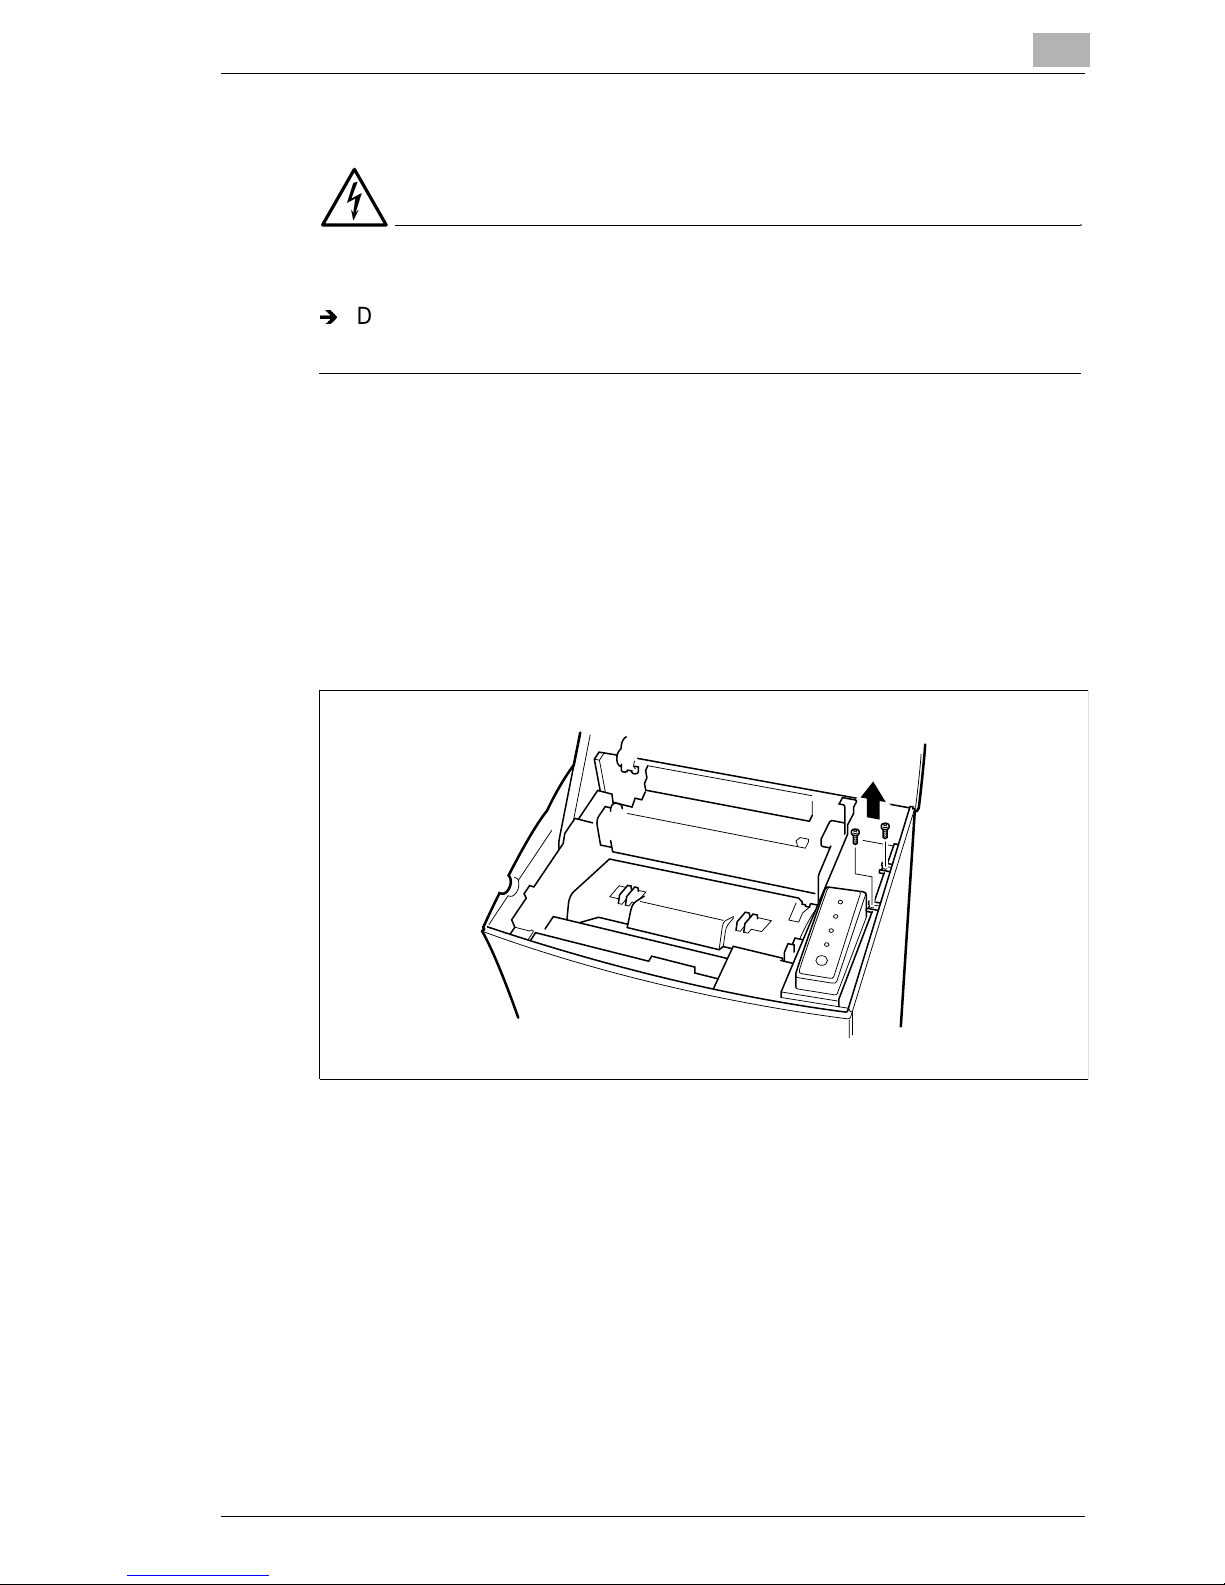
WARNING
Electric shock hazard!
Í
Do not remove any co ver of the pr inter that is not direct ly spec ifi ed for
remo va l in th e Us er ’s Manual.
1 Turn off the printer and unplug the power cord.
2 Disconnect the parallel cable from the printer.
3 Press the top cove r rel ease button and open the top cover.
4 Using a screwdriver, loosen and remove the two screws that secure
the exterior si de cover to the printer.
2
PagePro 4100W 2-15
 Loading...