

MINOLTA-QMS PagePro 4100GN User Manual

User Manual
PagePro 4100GN
+ Documentation ++ Documentation ++ Documentation ++ Documentation ++ Documentation ++

Contents
1 Introduction
1.1 Welcome to Minolta/QMS.............................................................1-1
1.2 Roadmap of this manual ..............................................................1-2
Where to find what in this User’s Manual........................................1-2
Brief explanation of special type styles and method of
presentation ....................................................................................1-3
1.3 Working safely with your l aser printer.......... ........................... .. .1-4
Notes on your safety and operating safety......................................1-4
Laser safety.....................................................................................1-6
Inte rn a l la se r rad i at io n.. .............. ... .. ....... ... .............. ... .............. ... .. ..1-6
CDRH regulations...........................................................................1-7
Laser safety label................... ........ .................................. .. ........ .. ...1-8
Laser caution label..........................................................................1-9
2 Unpacking, installing and setting up the printer
2.1 Unpacking the laser printer..........................................................2-1
2.2 Overview of the printer.................................................................2-3
External printer parts.......................................................................2-3
Inte rn a l pr in te r pa rt s................. .. ............... .. ............... .. ............... .. ..2 -4
Optional printer parts.......................................................................2-5
Printer control panel........................................................................2-6
2.3 Installing your laser printer.......................................................... 2-7
Place of installation.........................................................................2-7
Sto ra g e of co n s umables and ac c e ss o ri es ............ .. ... ....... ... ...........2-7
Ambient conditions..........................................................................2-8
Space required................................................................................2-9
Space required (when equipped with optional paper cassette
unit)...............................................................................................2-10
2.4 Set tin g u p yo ur la se r pr in te r. .. ........ .. .. ........ .. ....... ... .. ........ .. .. ..... 2 -1 1
Fitting the paper output tray and paper feed tray 1 ....................... 2-11
Connecting the power cable............. .......... ................... .......... ......2-12
Switching the printer on and off.....................................................2-13
Prin ti ng a configura ti on p age ..... ... .. ....... ... .............. ... .. ........ .. .......2-1 4
Connecting the pri nter to a computer (parallel port)......... .. ...........2-15
Connecting the printer to a network (network interface) ...............2-16
PagePro 4100GN TOC-1

3 Installing the PCL printer driver
3.1 S y s te m re q u ir e m e n ts ... .. ............... .. ........ .. ... ....... .. ... ....... .. ........... 3-1
3.2 N o t es o n ins ta l ling the pr in ter drive r.......... .. ....... ... .. ....... ... .. ...... 3-1
General information on the printer driver........................................3-2
Information on installation using Plug-and-Play ............................. 3-2
Information on installati on using the Add Printer Wizar d.............. ..3-2
Information on installing a network printer......................................3-2
3.3 CD-ROM installation for Win 95/98 or Win NT4.0 ...................... 3-3
3.4 C D - R OM in s ta ll a tion for Win d ows 3.1x ... ... .............. ... .............. . 3 -5
3.5 C D - R OM in s ta ll a tion for MS- D O S. .. ........ .. ... ....... .. ... ....... .. ........ .. . 3 -7
3.6 Uninstall ing the Windows printer driver ............ .......... .......... .. ..3-8
Deinstallation for Windows 95/98 and Windows NT4.0..................3-8
Deinstallation for Windows 3.1x.....................................................3-9
4 Working with the PCL printer driver
4.1 Displaying printer driver settings ............................................... 4-1
Displaying settings in Windows 95/98.......... .......... ................... .....4-1
Displaying settings in Windows NT 4.0 ..................... .....................4-3
Displaying the settings in Windows 3.1x ........................................ 4-4
4.2 P a p e r ind e x ca rd.... .............. ... .............. ... .............. ... .............. ... .. . 4-5
Selecting a paper format ................................................................ 4-6
Creating a custom paper format.............. ........ .. ................... ..........4-7
Adjusting the print-out to fit th e paper...................................... .......4-8
Specifying the number of copies ....................................................4-8
Specifying the orientation of the pri nt paper........ ........ .. ........ .. .......4-8
Switching on/off the printer’s sorting function.................................4-9
Specifying the paper source......................................................... 4-10
Recalling the original setings [DEFAULT] .................................... 4-10
4.3 Page layout index card .............................................................. 4-11
Printing mult ipl e document pages per pri nt page (N-up)........... ...4-12
Prin ti ng w a te rma rks..... ... .. ........ .. ... ....... .. ............... .. ............... .. ....4-13
Creating watermarks .................................................................... 4-14
Scaling the printed document....................................................... 4-15
Duplex function............................................................................. 4-15
4.4 Q u a l ity in d e x ca rd ... .. ... ....... ... .. ....... ... .............. ... .............. ... ...... 4-1 6
Optimizing data exchange with the printer (All raster) ..................4-17
Switching Toner Save function on and off....................................4-17
Specifying the graphics mode .......... .. ........ ..................................4-18
Optimizin g the print quality of text and graphics (Fine-ART)........4-18
Specifying TrueType mode........................................................... 4-19
Det er min in g th e res o lu tion ... ....... ... .............. ... .. ....... ... .............. ... . 4-19
TOC-2 PagePro 4100GN

Specifying the emulation mode.....................................................4-19
Optimizin g the pr esentation of gra phics in the print- out
(Detail of quality...)........................................................................4-20
4.5 Font index card ...........................................................................4-21
Adding fonts..................................................................................4-22
Deleting fonts................................................................................4-22
Setting the ID ................................................................................4-22
4.6 Device option index card............................................................4-23
Activating t he optional duplex unit......... .. ........ .. ........ .. ..................4-24
Activating opt ional paper feed tray 2 or 3...... .. ................... ........ .. .4-24
5 Working with the Windows PCL printer tools
5.1 Cal lin g up th e St a tu s Di splay..... .. ....... ... .............. ... .............. ... ....5-2
Calling up the Status Display in Windows 95/98, Windows NT4.0.5-2
Calling up the Status Display in Windows 3.1x...............................5-3
Altering the size of the Status Display window....... .. .................. .....5-4
5.2 Cal lin g up th e Co ntrol Pa n el. .. ........ .. .. ........ .. ............... .. ..............5-5
5.3 Pape r in d e x ca rd .......... ... .. ....... ... .............. ... .............. ... .............. ..5 -6
Defining the response in the case of a lack of suitable paper.........5-7
Specifying a paper format for paper feed tray 1..............................5-7
5.4 Prin t er setting in d e x car d. ....... ... .. ....... ... .............. ... .............. ... ....5 -8
Switching on/off the Power Save mode ..........................................5-9
Switching on/off the paper format error detection............ .. .............5-9
Detecting pap er misfeeds – Jam Re cov e ry ..... ... ....... .. ... ....... .. .......5-9
Switching preheat on/off.. ........ .. .. ........ .. .. ........ .. ........................... .. .5-9
Specifying the print language...... ..................................................5-10
5.5 Tes t print ind ex ca r d.... ....... ... .. ........ .. .. ........ .. ............... .. ............5-11
The various test prints...................................................................5-11
5.6 Counter index card............................... .......... ........................... .5-12
Checking the status of a counter......... .. ................... ........ .. ........ .. .5-13
Resetting a counter.......................................................................5-13
5.7 Configuration index card............................................................5-14
6 Working with the DOS PCL printer tools
6.1 Using the Status Display..............................................................6-1
Calling up the Status Display ..........................................................6-1
Switching on/off popup messages (Setup me nu)...... ................... ...6-2
Changing the hotkey com m and for the Status Display
(Setup menu)........... ........ .. ................... ........ .. ................... ........ .. ...6-2
Defining popup messages (Setup menu)........................................ 6-2
PagePro 4100GN TOC-3

6.2 U s i ng th e DOS Co n tr o l Pa n e l ..... .. ....... ... ....... .. ... ....... ... .. ....... ... ... 6-3
Calling up the Control Panel........................................................... 6-3
6.3 P a p e r pan e l ....... .. ....... ... .. ........ .. ... ....... .. ... ....... .. ............... .. ... ....... . 6-4
Selecting a paper format ................................................................ 6-5
Specifying the paper source........................................................... 6-6
Specifying the number of lines printed per page ............................ 6-6
Specifying the number of copies ....................................................6-6
Specifying the orientation of the pri nting paper........... .. ........ .. .......6-7
Defining the response to format errors ...........................................6-7
Specifying a paper format for paper feed tray 1.............................6-8
6.4 Font panel .....................................................................................6-9
6.5 Output Quality panel .................................................................. 6-10
Switching on/off the Toner Save function........ .. ................... ........6-11
Fine - A R T fea tu re................. .. ............... .. ............... .. ............... .. .... 6-1 1
Print language . .............................................................................6-11
6.6 Counter panel ......... .. .......... ............................. ...........................6-12
Checking the status of a counter................... .. .............................6-13
Rese tting a coun t e r . .. ....... ... .............. ... .............. ... .. ........ .. ...........6-13
6.7 Configuration panel.................................................................... 6-14
6.8 Printer Setting panel ..................................................................6-15
Switching on/off the Power Save mode........................................6-16
Switching on/off the paper format error detection...... .. .. ........ .. .. ...6-16
Pre -H e a t fe a tu re ........ .. ... ....... ... .. ....... ... .............. ... .............. ... ...... 6-1 6
Switching on/off the automatic cont inuation function............ ........6-16
Detecting paper misfeeds – Jam Recovery............. ... .............. ... . 6-17
Specifying the input/output t imeout ..... .. ................... ........ .. ........ ..6-17
7 Installing the PostScript printer driver
7.1 S y s te m re q u ir e m e n ts ... .. ............... .. ........ .. ... ....... .. ... ....... .. ........... 7-1
Win d ows 95 / 98 .......... .. ............... ... .............. ... .............. ... .............. . 7-1
Win d ows N T 4. 0 .............. .. ... ....... ... .. ....... ... .............. ... .. ....... ... ........ 7-1
Win d ows 3. 1 x ....... ... .. ....... ... .. ........ .. ............... .. ............... .. ............. 7-2
MacOS............................................................................................ 7-2
7.2 N o t es o n ins ta l ling the pr in ter drive r.......... .. ....... ... .. ....... ... .. ...... 7-2
General information on the printer driver........................................7-3
Information on installing a network printer......................................7-3
7.3 C D - R OM in s ta ll a tion for Win 9 5/ 9 8 o r Win N T 4. 0 ........ .. .. ........ .. . 7-4
Printer Test page (S am ple) ......... .......... .......... .............................7-10
7.4 C D - R OM in s ta ll a tion for Win 3 .1 x ..... .. ............... .. ............... .. .... 7-1 1
TOC-4 PagePro 4100GN

7.5 CD- RO M in s ta ll a ti on fo r Mac O S ............ .. ............... .. ............... ..7 -1 4
Inst a llin g Sc r e en Fo n ts ............. .. ... ....... .. ............... .. ... ....... ... .........7-1 8
8 Working with the PostScript printer driver
8.1 The Windows 95/98 PostScript print er properties dialogue.....8-2
The "Minolta/QMS PagePro 4100 -PS Properties" dialogue..... ......8-2
8.2 The Windows NT4.0 PostScript print er properties dialogues..8-4
Displaying the "P ri nters" dialogue....... ................... .. .......................8-4
The "Minolta/QMS PagePro 4100 -PS Default Document Pro pert ies"
dialogue...........................................................................................8-5
The "Minolta/QMS PagePro 4100 -PS Properties" dialogue..... ......8-6
8.3 The Windows 3.1x PostScript print er properties dialogue.......8-7
The "Minolta/QMS PagePro 4100 -PS Properties" dialogue..... ......8-7
8.4 The MacOS PostScript printer setup dialogue.............. .......... .. .8-9
The "Printer Specific Options" dialogue........................................8-10
Resolution .....................................................................................8-10
Jam Recovery...............................................................................8-10
Idiom Recognition .........................................................................8-11
9 Working with the printer
9.1 Please note the following points:................................................9-1
What should I watch out for when loading paper?............. .......... ...9-1
What should I watch out for when loading envelopes?............. ......9-1
Which sizes of paper can I use?....... ................. ........... ........ ..........9-2
What typ e s of p ape r can I use? ............. ... .. ........ .. ............... .. .. .......9 -3
Prin ta b le ar e a..... ............... .. ............... .. .. ........ .. ............... .. ..............9 -3
9.2 Usi ng th e co n tr o l b ut to n ....... ....... ... .. ....... ... .............. ... .............. ..9 -4
Canc e l th e cur re n t jo b.... ............... .. ............... .. ............... .. ... ....... .. ..9 -5
Printing out the configuration page.................................................9-5
Continuing a print job after an error message.................................9-5
9.3 Loading paper ...............................................................................9-6
Loading paper into paper feed tray 1..............................................9-6
Loading paper into the manual feed unit...... .......... ........ .. ...............9-7
Loading paper into paper feed tray 2/3 ............ ..............................9-8
9.4 Monitoring print jobs with the Status Display..........................9-10
10 Installing optional access ories
10.1 Installing paper feed tray 2/3......................................................10-1
10.2 Inst a ll in g the d uplex unit......... ... .. ....... ... .............. ... .............. ... ..1 0 -3
10.3 Installing a SIMM memory module.............. .. .......... .. .......... .. ....10-5
PagePro 4100GN TOC-5

11 Caring for and maintaining your printer
11.1 C l e an i n g th e prin ter............. ... .............. ... .. ....... ... .............. ... ...... 1 1 -2
Cleaning the case......................................................................... 11-2
Cleaning the paper feed roller ...................................................... 11-2
11.2 Replacing the imaging cartridge............................................... 11-5
12 Troubleshooting
12.1 C l e ar in g pa p e r misf e e ds... .. ........ .. .. ........ .. ............... .. ............... . 12-2
Clearing paper misfeeds at the imaging cartridge........................12-2
Clearing a paper misfeed at the fusing uni t..................................12-4
Clearing a paper misf eed at the output tray ......... .. ........ .. ............12-6
Clearing a paper misf eed at paper feed tray 1..................... ........12-7
Clearing a paper misf eed at the manual feed unit..... .. .................12-8
Clearing a paper misfeed at paper feed tray 2/ 3 (opt ional)..........12-9
Clearing paper misfeeds at the duplex unit – top (optional) ....... 12-10
Clearing paper misfeeds at the duplex unit – bottom (optional). 12-11
12.2 Problems with print quality ..................................................... 12-12
12.3 General printing problems.......................................................12-15
12.4 Printer messages...................................................................... 12-16
Lamp functions ........................................................................... 12-16
Status messages........................................................................12-17
User messages...........................................................................12-18
Ser vi ce me ss a g es ............ ... .. ........ .. .. ........ .. ............... .. ... ....... .. .. 12-20
13 Appendix
13.1 P e r fo r m a n ce fe a tu res ............... ... .............. ... .. ....... ... .............. ... . 13-1
Hardware...................................................................................... 13-1
Software ....................................................................................... 13-1
Operating system ......................................................................... 13-1
13.2 Technical specification .............................................................. 13-2
PagePro 4100GN printer............................ .. .......... .......... .. ..........13-2
500-sheet paper feed tray (option)................ .. ................... ........ ..13-3
Duplex unit (option) ......................................................................13-4
SDRAM-SIMM memory module (option)...................................... 13-4
Par al le l in te rf a ce s.... .. ....... ... .............. ... .............. ... .............. ... ...... 1 3 -4
Network interfaces........................................................................13-4
13.3 Minolta /QM S’s concern for environmental protec ti on ...........13-5
What does the energy st ar mean? ............................ .. .................13-5
13.4 Index ............................................................................................ 13-6
TOC-6 PagePro 4100GN

Introduction
1 Introduction
1.1 Welcome to Minolta/QMS
Thank you for purchasing a Minolta/QMS Page Pro 4100GN laser printer.
To achieve the best possible results and to use your laser print er
effectively, this User’s Manual provides you with information on the
foll o w ing topics:
G installing the printer driver,
G working with the printer drivers and tools,
G working with the printer,
G caring for and maintaining your printer,
G troubleshooting.
1
Read this User’s Manual care fully befor e operati ng your pr inter f or the f irst
time, and always keep the manual within easy reach.
We reserve the right to make changes to the cont ents of this manual.
Trademarks
PCL is a registered trademark of the Hewlett-P ackard Company.
Centronics is a reg istered trademark of Centronics, Inc.
MS-DOS, Microsoft, Windows and Windows NT are registered
trademarks of Microsoft Corporati on.
IBM is a registered trademark of the International Busi ness Machines
Corporation.
Apple, Macintosh and TrueType are registered trademarks of Apple
Computer, Inc.
PagePro is a registe red trademark of Minolt a.
Adobe and PostScript are trademarks of Adobe Systems, Inc.
Fine-ART and Fine Micro Toning are trademarks of Minolta Co. Ltd.
QMS and the QMS logo are registered trademarks of QMS, Inc.
All other names of products and brand-nam es are t rademarks or
registered trademarks of their respective proprietors.
PagePro 4100GN 1-1

1
1.2 Roadmap of this manual
Where to find what in this User’s Manual
You don’t know exactly where to find the information you need ? The
following tab le i s designed to help you.
Alternatively, to find information on a specific problem quickly and
precisely, please refer to the index at the end of the User’s Manual.
No. Title of chapter Content of chapter
Contents A complete list of all the chapters and sub-chapters in
this User’s Manual.
1 Introduction Introductory remarks and information on how to use
this manual as well as notes on the safe use of the
printer.
Introduction
2 Unpacking, installing and
setting up the printer
3 Installing the PCL printer
driver
4 Working with the PCL printer
drivers
5 Working with the Windows
PCL printer tools
6 Working with the DOS PCL
printer tools
7 Installing the PostScript
printer driver
8 Working with the PostScript
printer driver
9 Working with the printer Getting to know how your printer works. For example,
10 Installing optional
accessories
|nformation on how to set up the printer as well as an
introduction to the various features.
A step-by-step explanation of the routine for installing
the PCL printer driver.
Details of how to control the printer via the PCL
printer driver. This helps you learn how to use the
printer’s functions effective ly.
Details of how you can use the supplementary
Windows programs most effectively.
Details of how you can use the supplementary DOS
programs most effectively.
A step-by-step explanation of the routine for installing
the PostScript printer driver.
Details of how to control the printer via the PostScript
printer driver.
information on:
• loading paper
• monitoring print jobs
• cancelling print jobs
Details of how to install optional accessories
correctly, e.g.:
• 500-sheet paper feed tray
• Expansion memory
11 Caring for and maintaining
your printer
12 Troubleshooting Help with analysing and rectifying faults.
13 Appendix A collection of helpful additional information, e.g.:
1-2 PagePro 4100GN
Details of how to look after your printer and how you
can easily replace cerain parts yourself.
• technical specification
• index of keywords

Introduction
Brief explanati on of speci al type styles and method of present ation
Special type styles and methods of presentation are used in this User’s
Manual to highlight various circumstances. The fo ll owing examples will
help you to recognize and deal with the most important of these.
CAUTION
This is a warning!
A warning alerts you t o danger to life and limb or to damage that could
result to the machine by treating it improperly.
➜ The arrow refer s you to safety measur es that must be taken t o prevent
[MENU] Key on the control panel / butto n on the printer driver with
1
the hazard.
the description “Menu“
➜ Single action to be performed (there are no other steps)
1 St ep 1 of a series of actions
2 St ep 2 of a series of actions, etc.
Help is availabl e here.
?
➜ The approach that is suggested
here is sure to get you to you r
desired result.
Here you can see what has to be done.
✎
Thi s is a hel p fu l tip
Text passages that are i dentified in this manner provi de you with tri cks
and handy tips to make it even easier to work with the printer.
PagePro 4100GN 1-3

1
1.3 Working safely with your laser printer
Notes on your safety and operating safety
Working improp erly with the printer can r esult in health hazards, electric
shocks and even fires. Before you unpack the laser printer, you should
make yourself familiar with thi s inf ormation on your saf ety and operating
safety.
CAUTION
Observe the following information:
➜ Make sure that the power cable is correctly plugged into the socket
and that the sock et i s at all times visibl e and readily accessi ble.
➜ Do not pul l th e cable of the po wer pl ug as t his m ay dama ge the cab le.
The result could be an electric shock or a fire.
Introduction
➜ Remove the power p lug from t he socket if the machine wil l not be used
for an extended period of time.
➜ Do not remove th e power cable from the socke t with wet hands as this
may result in an electric shock.
➜ Do not move the unit unless the power ca ble has been removed from
the socket . Ot her wise y ou may d amage the c able. The resul t co uld be
a short-circuit or a fire.
➜ Do not plac e any heavy object s on the power cabl e. Do not pull or kink
the cable as this can result in damage to the cable. The result could
be an electric shock or a fire.
➜ Make sure that the machine is not standing on a cable connected to
another machi ne as thi s can r esu lt i n dam age to t hat c able. The r esult
could be a fire or impr oper functioning of t he unit in question.
➜ Make sure that the power supply to the unit has the correct voltage.
Otherwise the result could be a fire or an electric shock.
➜ Switch off the unit immediatel y and unplug the power cable if t he
power supply cable is damaged. Failure to do so cou ld result in a fi re
or an electric shock. Contact your customer support ser vice centre.
➜ Use only extens io n cables t hat are design ed for at least the maxi mum
power rating of the machine. Extension cables with lower ratings can
result in overheating and can even cause a fire.
1-4 PagePro 4100GN

Introduction
➜ Perform onl y the procedures that are described in t his manual. Usi ng
➜ Do not place any heavy objects on the machine.
➜ Do not open any covers on the machine while printing is in progress.
➜ Do not switch off the unit while printing is in progress.
➜ Do not place any magnetic object near the machine.
➜ Do not use any flammabl e sprays, li quids or gases i n the vicin ity of the
➜ Do not remove any saf ety devi ces and do not al ter th e constr uctio n of
➜ Do not inser t any paper cli ps, sta ples or othe r small metal ob jec ts into
1
the machine improperly can result in a fire or an electric shock.
machine.
the machine. The unit is equipped with high-voltage components.
Using the machine improperly can result in a fire or an electric shock.
openings on the machine. The result could be an electric shock or a
fire. If met al pi eces are f ed int o the m achine, switc h it off i mmedi ately ,
disconnect the power cable and contact your customer support
service centre.
➜ Do not place coffee cups, drinks bottles or other conta iners with liquids
in them on the machine. If liquid enters the ma chine the result could
be an electr ic shock or a fire. If liquid does g et into t he machine, swi tch
it off immediat ely, disconnect the power cable and contact your
customer support service centre.
➜ If the machine becom es unusually hot, or if you notice smoke or an
unusual odour comi ng from the machine , switch it off immediately and
remove the power cabl e fr om the socket. Contact your customer
support technical specialist.
PagePro 4100GN 1-5

1
Introduction
Laser safety
This printer is equipped with a laser unit. If the printer is used in
accordance wi th the instructions i n the User’s Manual, the laser presents
no danger.
The radiation emi tted is compl etely absorbed and attenuated by the case.
The laser r adiation c annot escape at any t ime dur ing the print ing pro cess .
This laser printer is categori zed as a Class 1 printer. Thi s classificati on
means that the printer does not produce any hazardous laser radiation.
This printer is certified as a Class I Laser product under the US
Department of Healt h and Human Services (DHHS) Radiation
Performance St andard accordi ng to the Radiat ion Control for Health and
Safety Act of 1968. Thi s means that the printer does not produce
hazardous laser radiation.
Internal laser radiation
Average radia ti on output:
1.03 mW at the laser aperture of the laser unit.
Wavelength: 770-810 nm
This device works wit h a laser diode of class 3b with inv isible laser
radiation. The laser diode and the pol ygon mirror for samplin g are
integrated into the laser unit.
The laser unit is NOT AN ITEM TO BE MAINTAINED ON SITE. You
should ther efor e not open it under any circumstance.
CAUTION
Dangerous laser radiation!
Using the printer in a manner other than as in dicated in this manual may
result in exposure to dangerous ra diation.
➜ Use the pri nter only according to the instructions contained in the
User’s Manual.
1-6 PagePro 4100GN

Introduction
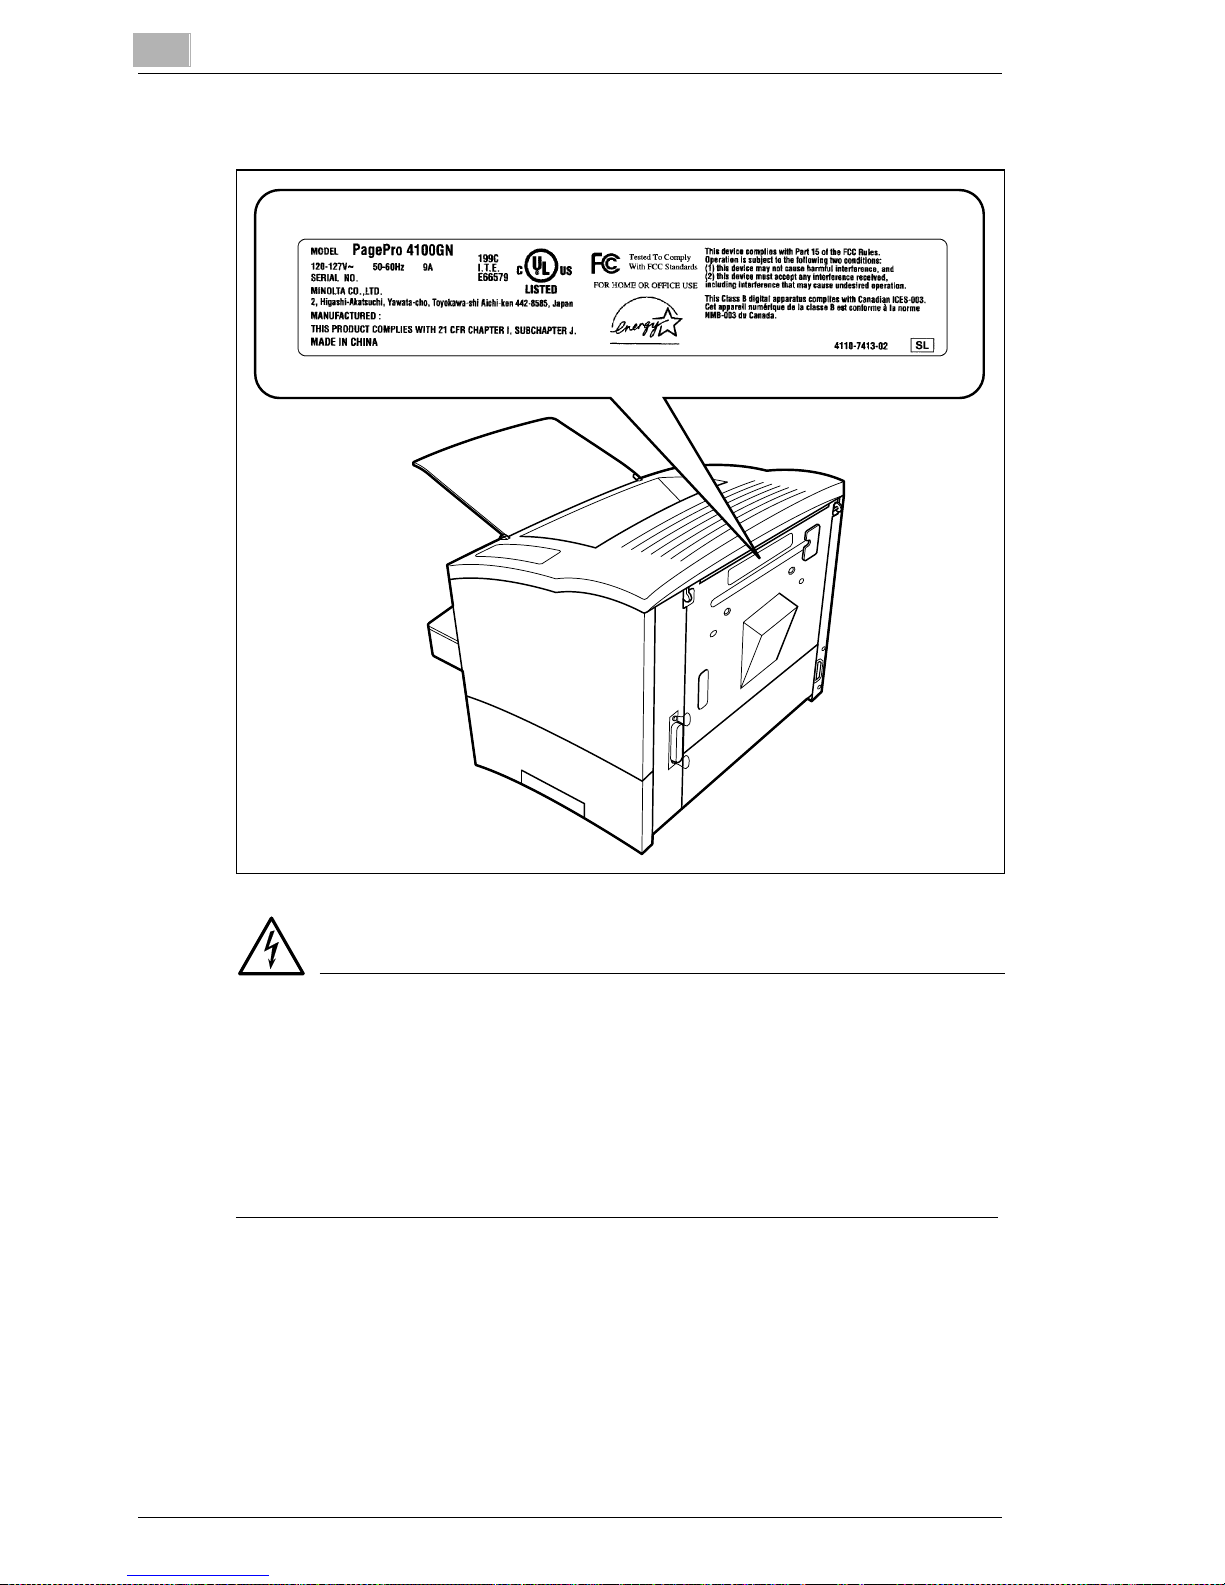
CDRH regulations
On 2 August 1976 the Center for Devices and Radiological Health
(CDRH), part of the US Food and Drug Administration, introdu ced
specifications for all prod ucts that operate wit h laser beams. Products
which are to be sold or used in the USA must comply wit h these st atuto ry
requirement s wit hout exception. The safety label shown here confirms
compliance with the CDRH regul ations . This label must be at tached t o all
products sold or used in the USA.
1
PagePro 4100GN 1-7
1
Introduction
Laser safety label
DANGER
Use the printer only as described in this manual!
Using the controls, adjusting the printer or performing procedures other
than as specif ied in this manual may result in exposure to hazardous
radiation.
➜ Use the pri nter only according to the instructions contained in the
User’s Manual.
1-8 PagePro 4100GN
Introduction
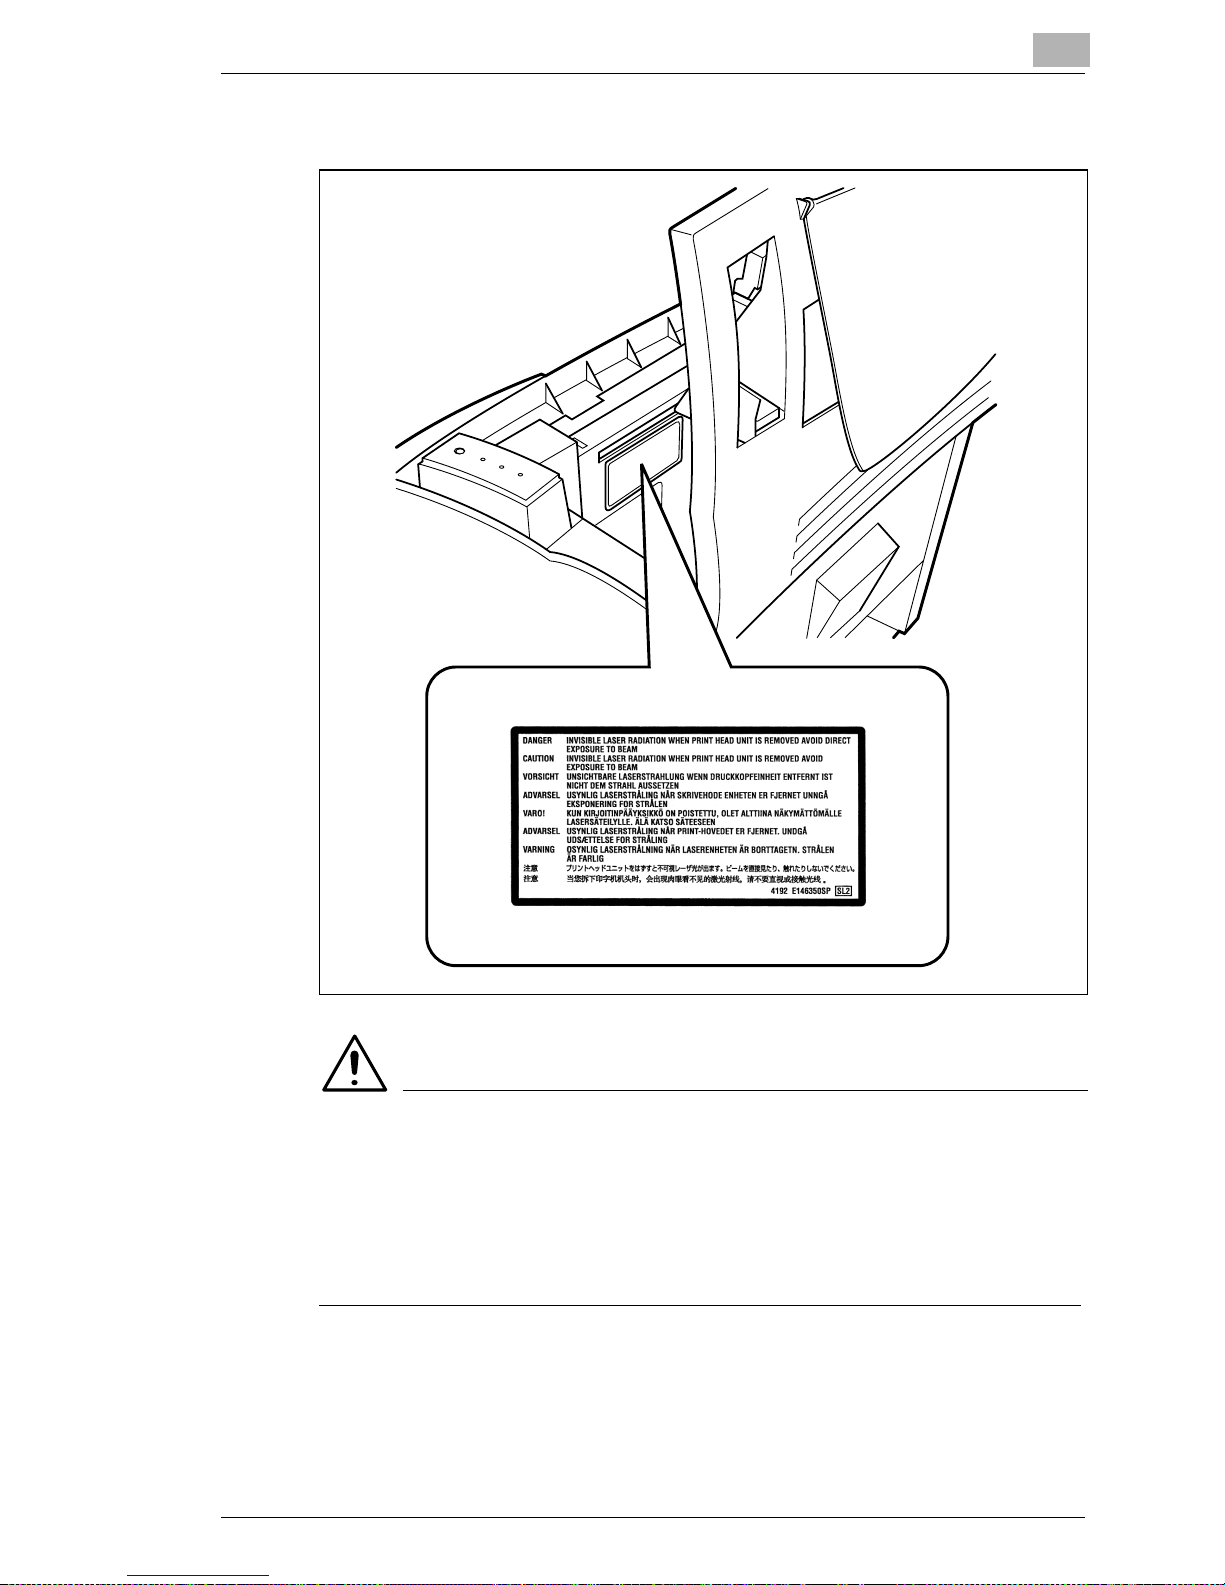
Laser caution label
1
CAUTION
Dangerous laser radiat ion!
This is a semicond uctor laser. The maximum power of the laser diode is
5 mW and the wavelength is 770–810 nm.
➜ Use the printer only according to the instructions contained in the
User's Manual.
PagePro 4100GN 1-9

1
Introduction
1-10 PagePro 4100GN
Unpacking, installing and setting up the print er
2 Unpacking, installing and settin g up
the printer
2.1 Unpacking the laser printer
CAUTION
Danger for children fr om packaging materials made of plastic!
➜ After unpac king, keep the pa ckaging materials out of reach of children.
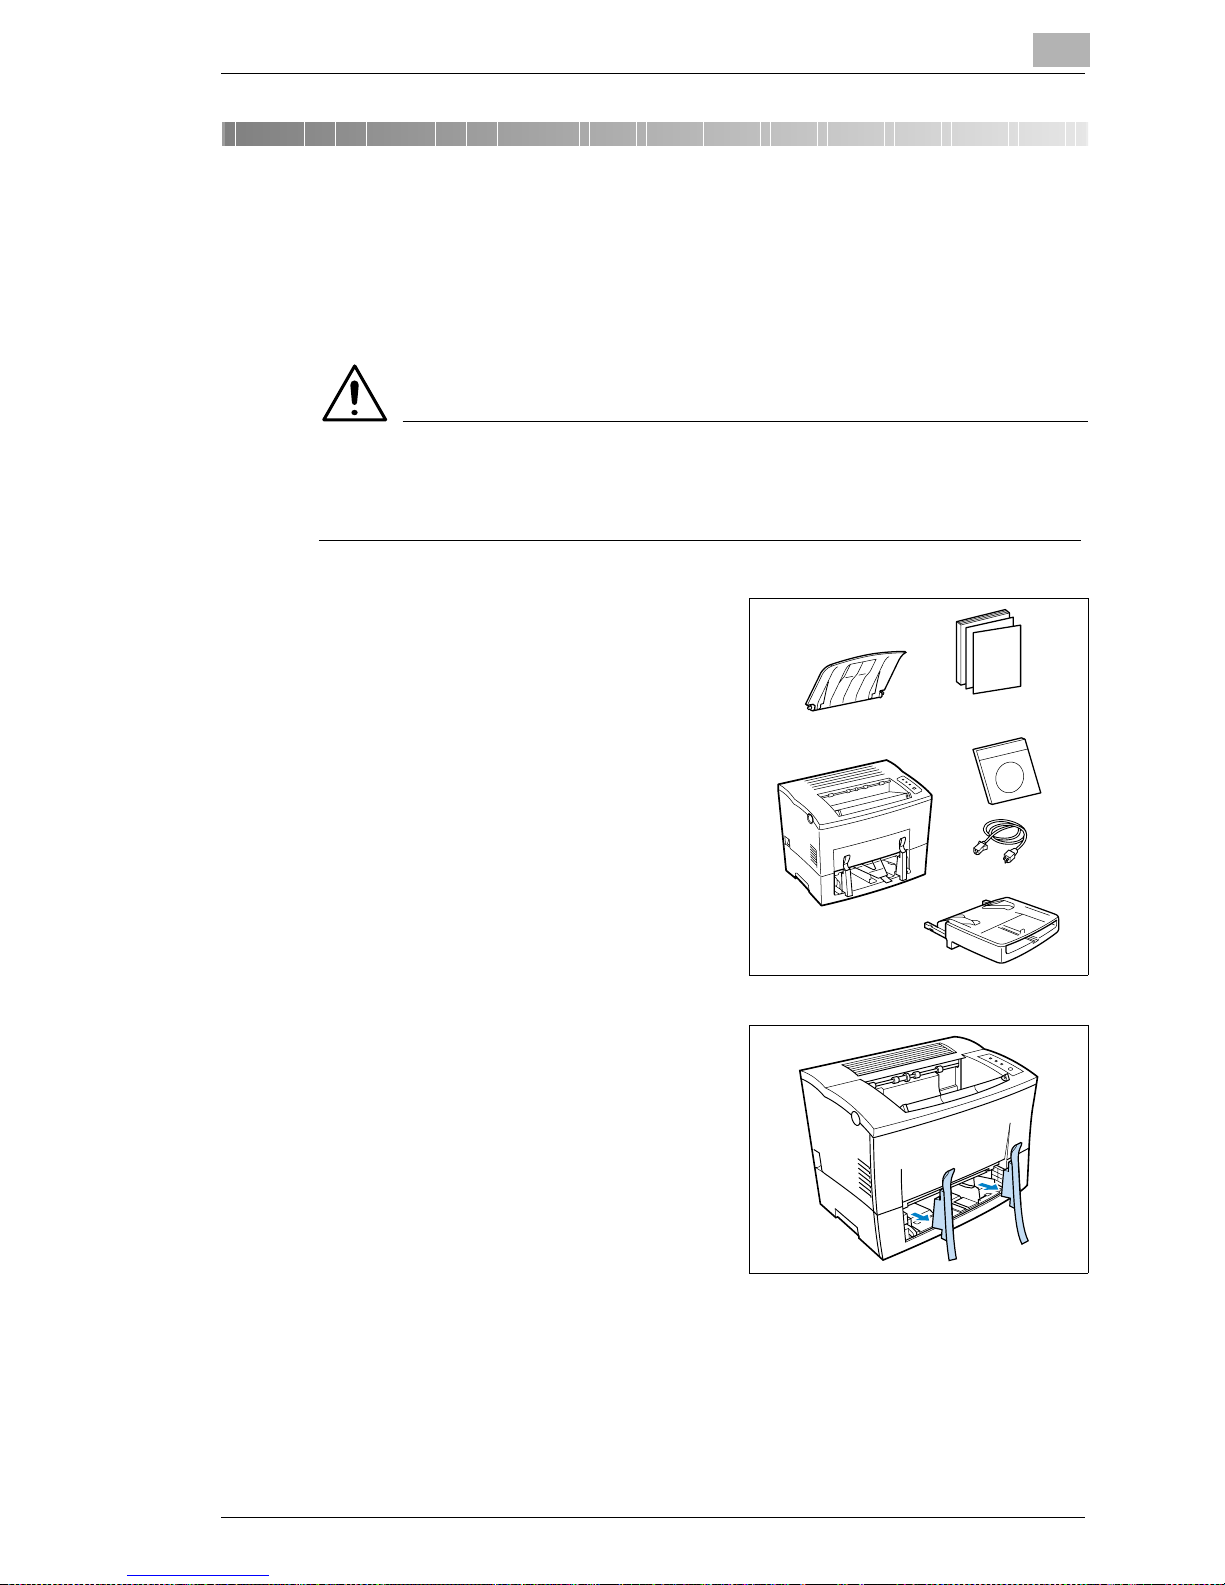
1 Remove the printer parts and
accessories from the box.
2
❍ Paper output tray
❍ Printer
❍ In st a llation Guid e
❍ CD-ROM
❍ Power cable
❍ Paper feed tray.
2 R emove the pack a ging m a teria l
from the printer.
3 Remove the transport retainers
from the printer.
PagePro 4100GN 2-1

2
Unpacking, installing and setting up the printer
4 Pull the plastic stri ps out of the
printer.
5 Remove the plastic strips from the
rear of the printer.
✎
Why save packaging mate rials?
If you need to move the print er, you can use the packagi ng again. In
this way you can be certain that your print er is correctly packed.
2-2 PagePro 4100GN

Unpacking, installing and setting up the print er
2.2 Overview of the print er
External printer parts
2
1
2
3
4
5
67
8
9
10
No. Description No. Description
1 Release button for top cover 6 Paper feed tray 1 (multipurpose tray)
2 Control panel 7 Power Switch (ON/OFF)
3 Paper output tray
(face down)
4 Top Cover 9 Ethernet interface connector
5 Paper guides 10 Parallel port
8 Socket for power cable
(10BaseT/100 BaseTX)
PagePro 4100GN 2-3
2
Unpacking, installing and setting up the printer
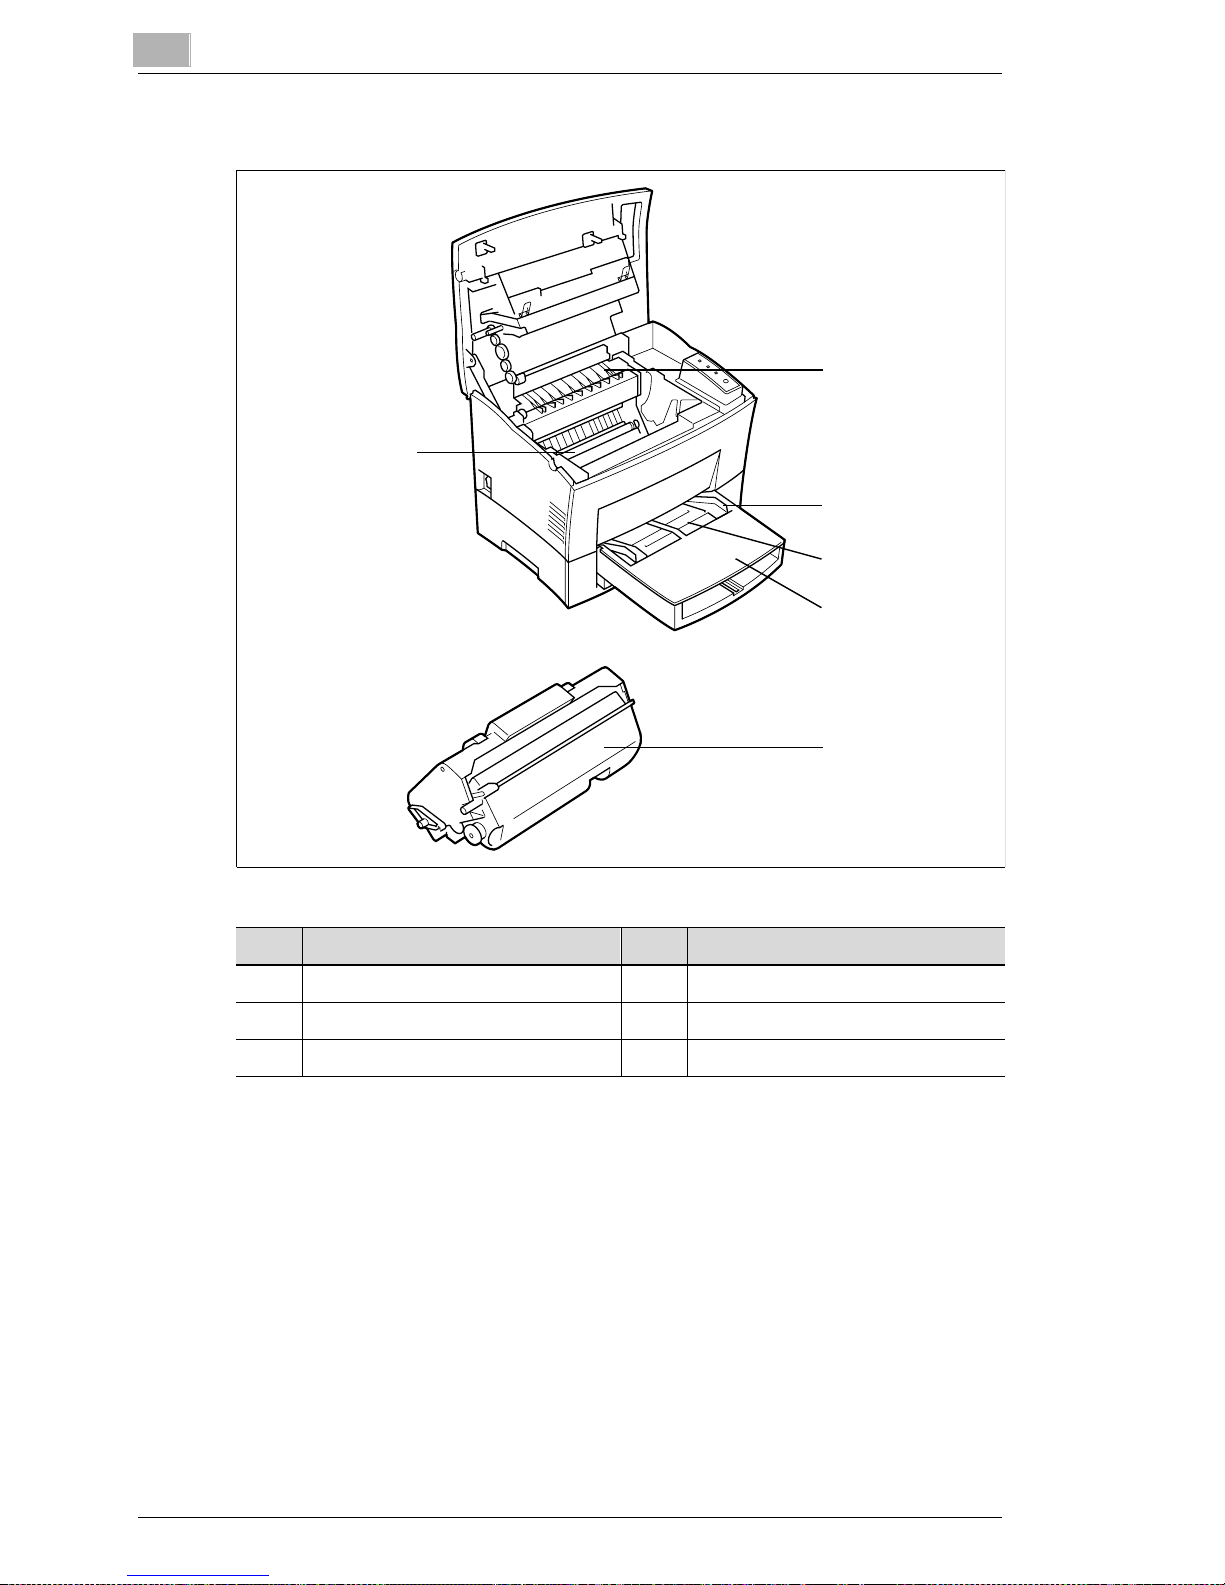
Internal printer parts
1
5
2
3
4
6
No. Description No. Description
1 Fusing unit 4 Cover to paper feed tray 2
2 Paper guide 5 Image transfer roller
3 Manual paper feed unit 6 Imaging cartridge
2-4 PagePro 4100GN
Unpacking, installing and setting up the print er
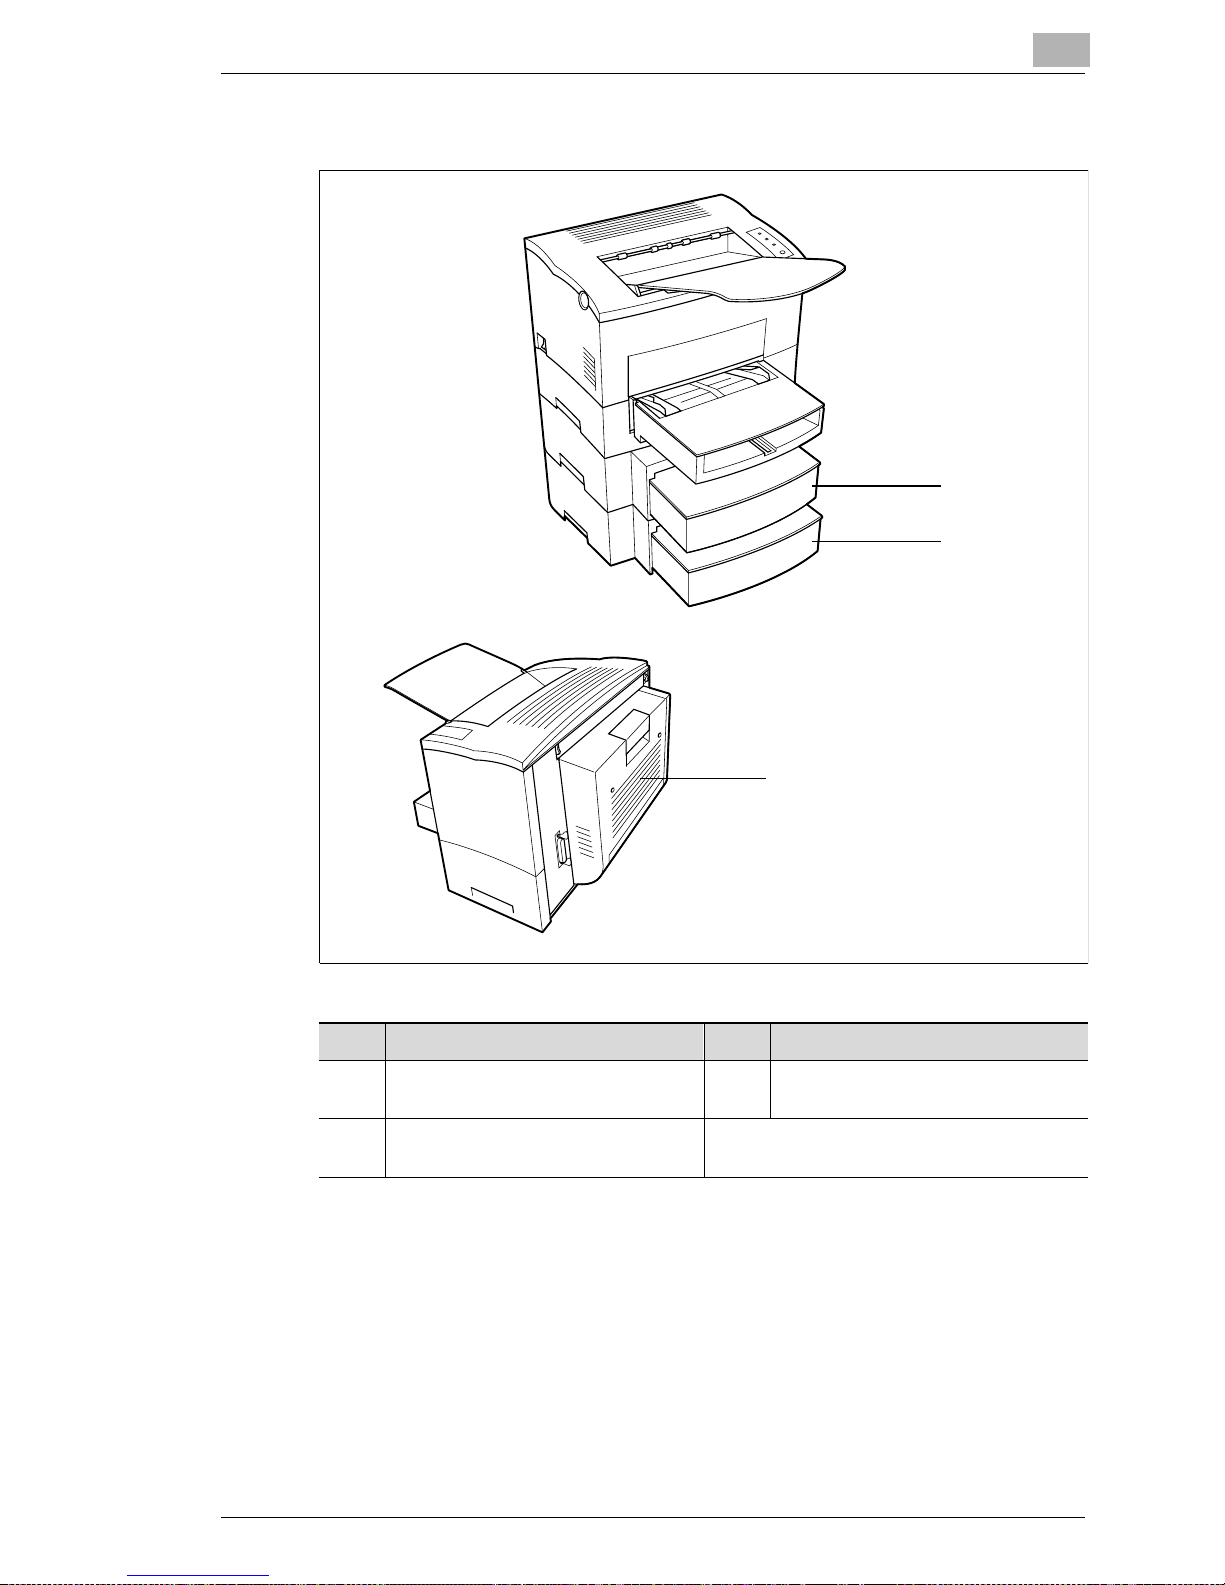
Opt io n a l pr in t e r pa r ts
2
1
2
3
No. Description No. Description
1 Paper feed tray 2
(500-sheet cassette)
2 Paper feed tray 3
(500-sheet cassette)
3 Duplex Unit
PagePro 4100GN 2-5
2
Unpacking, installing and setting up the printer
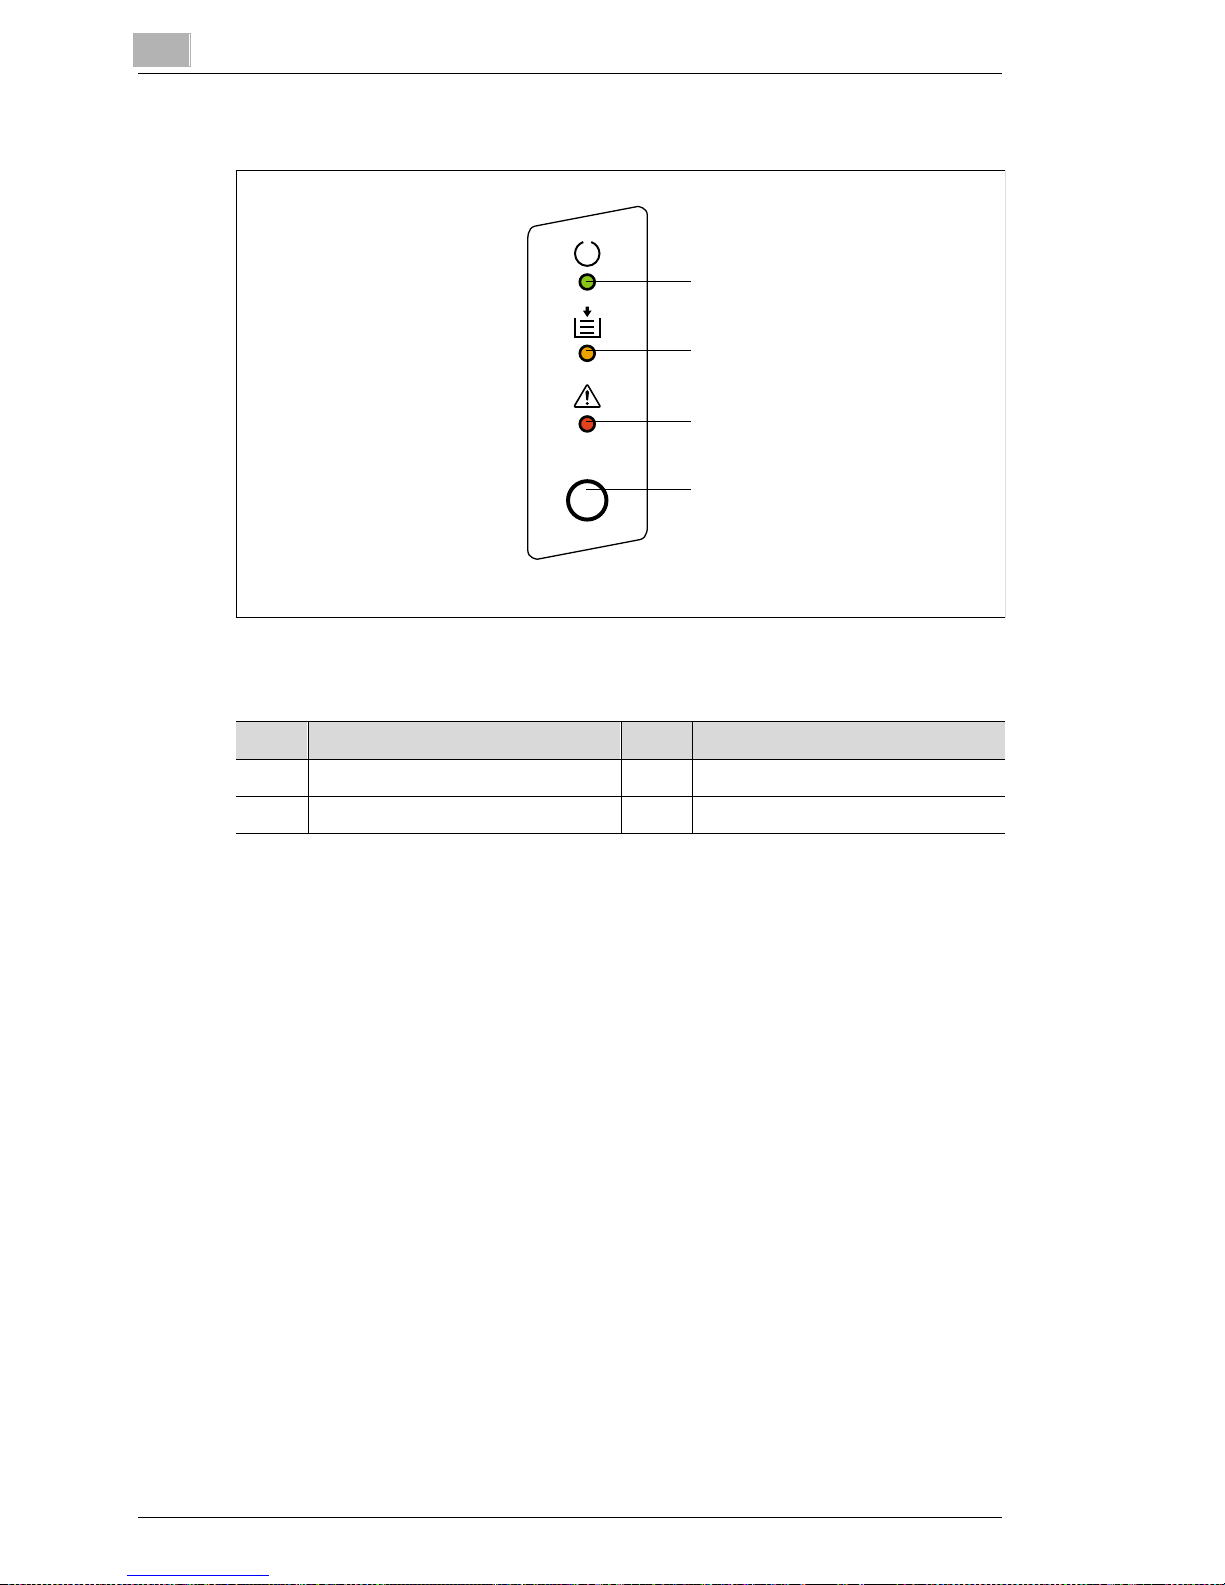
Printer control panel
1
2
3
4
The control panel has three lamps and one button.
No. Description No. Description
1 Stand-by lamp (green) 3 Fault (red)
2 Paper empty (orange) 4 Control button
2-6 PagePro 4100GN

Unpacking, installing and setting up the print er
2.3 Installing your laser printer
Place of installation
The printer should be set up in a place which is:
G dry and free from dust,
G on a stable su rface,
G well ventilated,
G away of highly flammable items, e.g. curtains,
G away of objec ts which might obstruct the pr inter’s ventilation slits,
G near to an easily accessible power socket.
The printer mus t be posi tioned in a way that it cann ot be adversely
affected by the following:
G splashi ng liquids,
G organic gases, e.g. ammoni a,
2
G direc t sunlight,
G severe temperature fluctuations,
G exhaust-air from heating, ventilation or air-conditi oning systems.
Storage of consumables and accessories
Printing consumables and accessories should be kept:
G sealed in their original packagings,
G protected against direct sunlight or heat ,
G protected against fluorescent light,
G in a cool, dry and dust-free place,
G out of reach of children.
CAUTION
Toner poses a health hazard!
Toner is harmful if swallowed.
➜ If you swallow toner, consult a doctor immediately.
➜ If you get toner on you r hands, wash t hem immediate ly with co ld water
and soap.
PagePro 4100GN 2-7

2
Unpacking, installing and setting up the printer
Ambient conditions
The optimum ambient conditions for your printer are as follows:
G Tem perature range 50°F to 95°F / 10°C to 35°C
(maximum variat ion of 18°F / 10°C per hour);
G Relative humidity of 15% to 85%
(maximum variat ion of 20% per hour).
2-8 PagePro 4100GN
Unpacking, installing and setting up the print er
Space required
Make certai n that there is enou gh sp ace a vaila ble ar ound the pri nter (see
figure). Thi s will facilitat e operation, reloading paper and toner, and
maintenance of the printer.
D
2
H
C
A
E
F
No. Dimension No. Dimension
A 40-1/2 in. / 1030 mm E 23-1/2 in. / 600 mm
B 33 in. / 840 mm F 11-3/4 in. / 300 mm
C 24-3/4 in. / 630 mm G 4 in. / 100 mm
D 6 in. / 150 mm H 11-3/4 in. / 300 mm
G
B
PagePro 4100GN 2-9
2
Unpacking, installing and setting up the printer
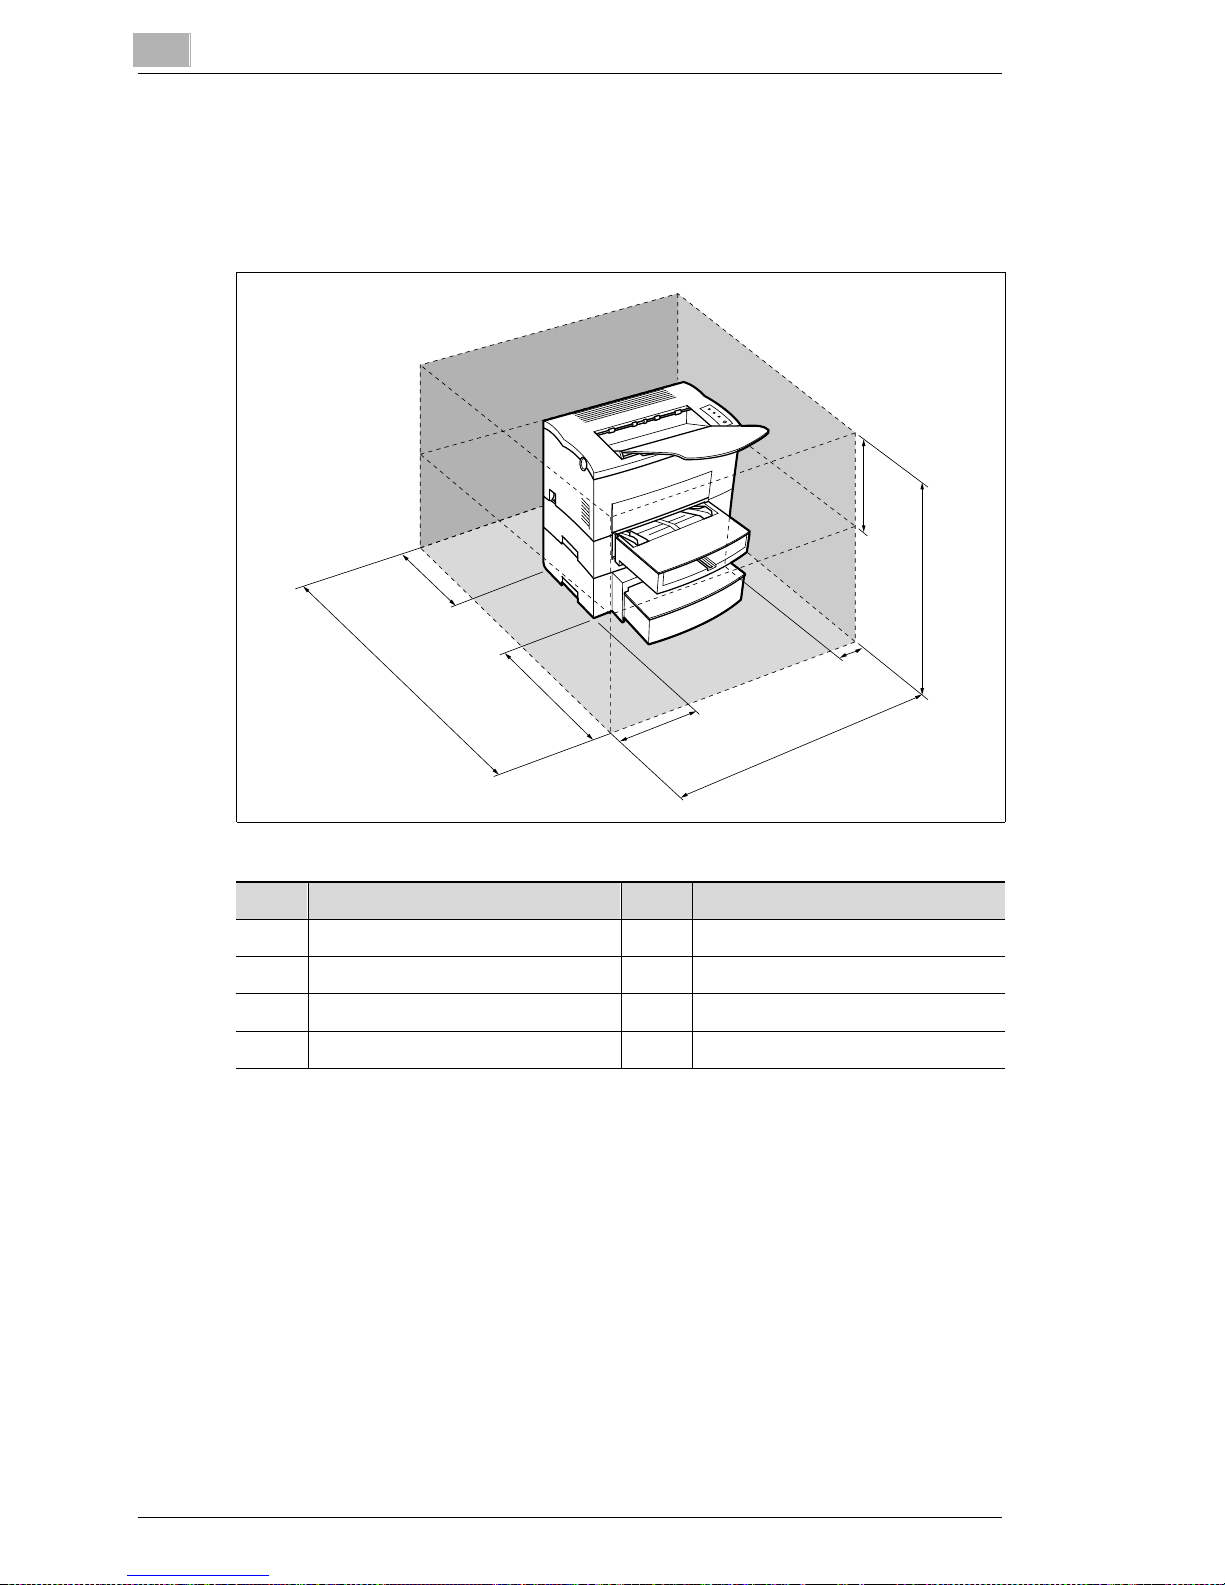
Space required (when equipped with optional paper cassette unit)
Make certai n that there is enou gh s pace avail able ar ound the print er (see
figure). Thi s will facilitat e operation, reloading paper and toner, and
maintenance of the printer.
H
D
A
No. Dimension No. Dimension
A 40-1/2 in. / 1030 mm E 23-1/2 in. / 600 mm
B 33 in. / 840 mm F 11-3/4 in. / 300 mm
C 29-1/2 in. / 750 mm G 4 in. / 100 mm
D 6 in. / 150 mm H 11-3/4 in. / 300 mm
E
F
B
C
G
2-10 PagePro 4100GN
Unpacking, installing and setting up the print er
2.4 Setting up your laser printer
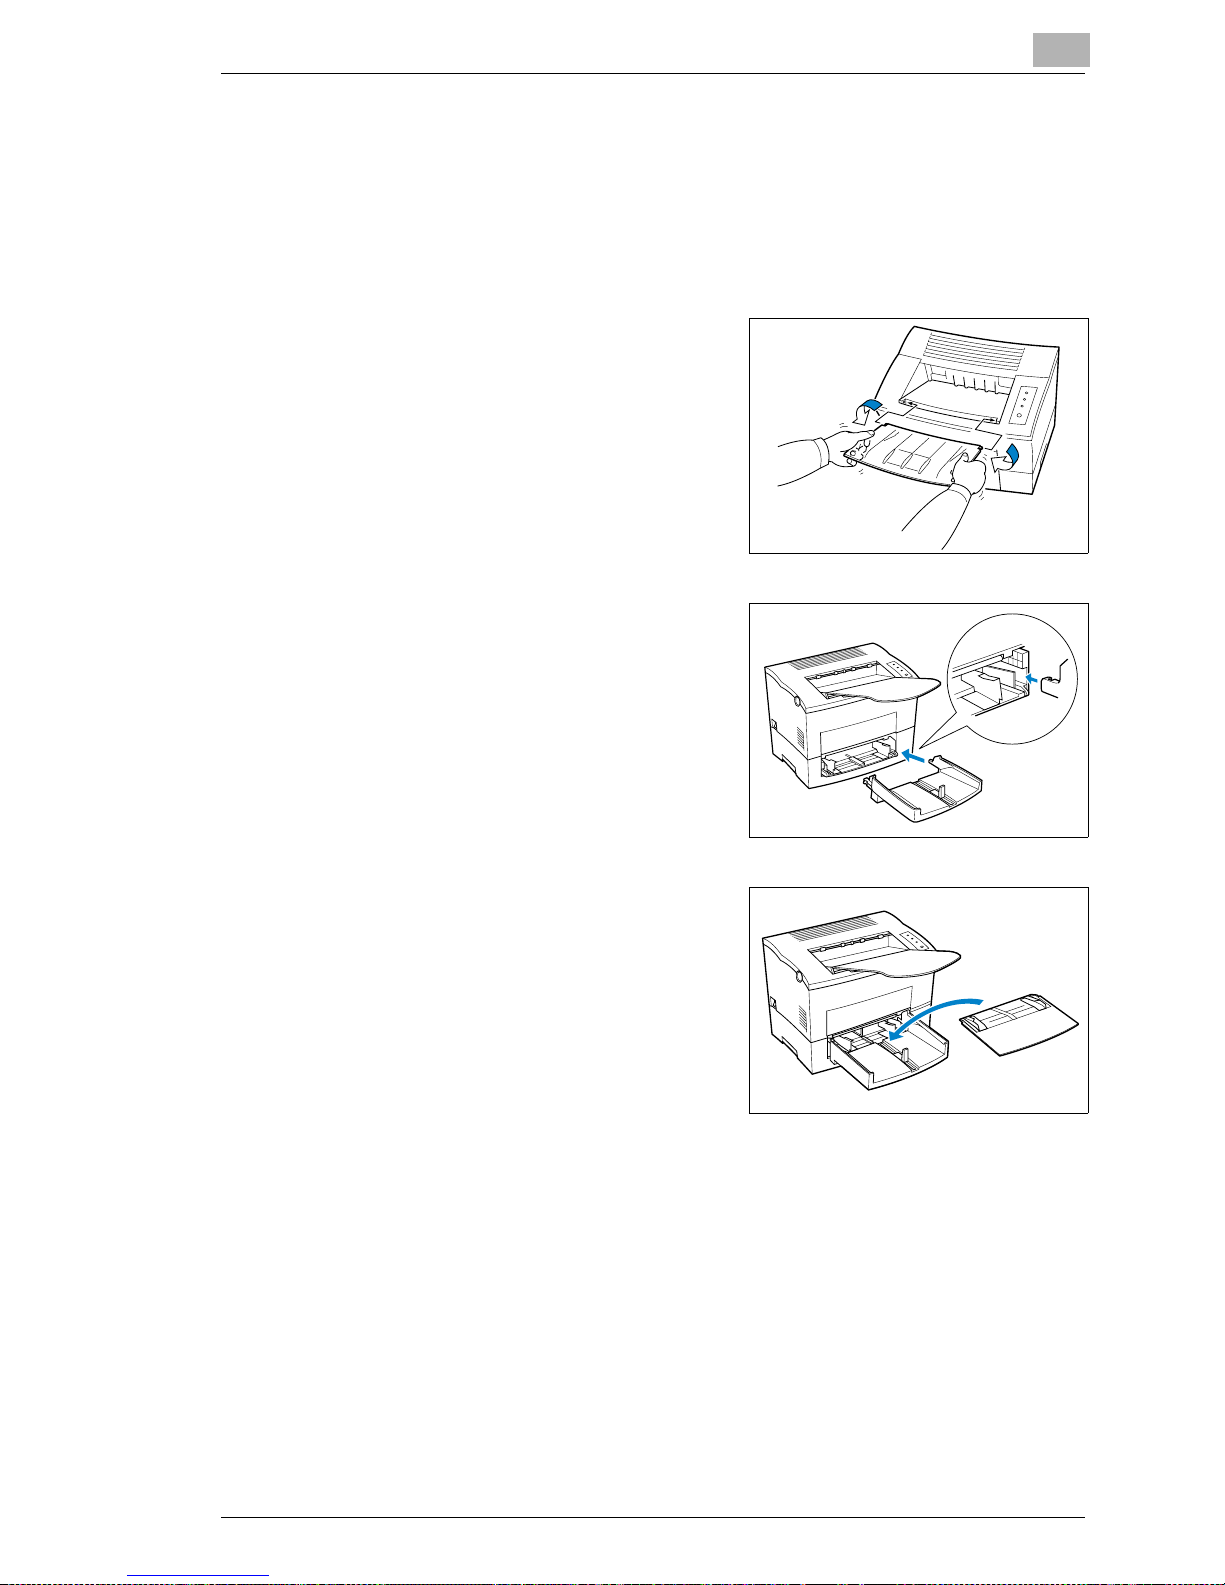
Fitting the paper out put t ray and paper feed tray 1
Set the guides of the paper feed tra y to match the si ze of paper you wish
to use.
1 At tach the paper output tray to the
printer as shown here.
2 Slide the lower part of the paper
feed tray int o the prin ter.
2
3 Fi t the cover of paper feed
tray 1.
PagePro 4100GN 2-11

2
Unpacking, installing and setting up the printer
Connecting the power cable
Only use the power cable supplied with the printer!
The laser printer requires a power supply with minimal voltage and
frequency f luctuation. If necessary, ask an elect rician for advice.
✔ Power supply: 120-127 V at 50-60 Hz / 220-240 V at 50-60 Hz
✔ Voltage fluctuation : 120 V -10%, 127 V +6% / 220-240 V ± 10%
✔ Frequency fluctuation: Within 3 Hz
1 Make sure that the printer ’s power
switch is in the "0" (OFF) position.
2 Insert the plug on the end of the
power cable (supplied) into the
power socket of the pri nter.
3 Insert the other end of the power
cable into a power socket.
CAUTION
Using the wrong power cable may lead to a short-circuit situation!
The use of a power cable of inadequate cross- section can lead to ove rheating of the cabl e.
➜ Only use an ext ension cable whi ch has a higher r ating than t he current
consumption of the printer.
➜ Only use cables with a ground connection.
➜ Always observe the relevant l ocal regulations regarding the
connection of electrical equipment to the mains network.
2-12 PagePro 4100GN

Unpacking, installing and setting up the print er
Switching the printer on and off
CAUTION
Improper handling may result in damge to the printer!
➜ Never switch off the printer while a print job is in progress, the printer
is receiving dat a from the computer (f lashing “Stand-by“ lamp on the
control panel) or the printer is being reset.
➜ Switch the power s witch to "I" (“On“)
in order to activate the printer.
The printer is rea dy for use after
approx. 23 seconds.
➜ Switch the power switch to
"0" (“Off“) in order to deactivate the
printer.
2
✎
Saving energy makes sense!
After the prin ter has not received a print command for a certain amount
of time, it automatically switches to the POWER SAVE mode. This
time interval can be adjusted via the pr int er tools, see page 5-9.
If the printer rece ives a new print job while it is in POWER SAVE
mode, or if the side cover is openend or if the [ON LINE] key is
pressed, the pri nter automatically starts its war m-up phase.
PagePro 4100GN 2-13
 Loading...