

MINOLTA-QMS PagePro 1100L User Manual
PagePro 1100L
User’s Guide
Bedienungsanleitung
Guide d’utilisation
Guía del usuario
Manuale d’uso
EnglishDeutschFrançaisEspañolItaliano

As an ENERGY STAR Partner, we have determined that this
machine meets the
efficiency.
E
NERGY STAR Guideline s for energy
What is an
E
NERGY STAR product has a spec ial featu re that allows it t o automaticall y switch to a
“low- power mode” aft er a period of inactivi ty. An
more effic iently, saves you money on uti lity bills and helps protect the environment.
E
NERGY STAR Partner haben wir best immt, daß dieses Gerät den ENERGY
Als
S
TAR-Richtlinien für den Energiewirkungsgrad erfüll t.
Was ist ein
E
Ein
NERGY STAR Produkt hat eine besondere Funktion, durch die es nach ein er Zeit-
spanne der Inaktivität automatisch in einen “Energiesparmodus” wechseln kann. Ein
E
NERGY STAR Produkt verwendet Energie effektiver, spart bei der Stromrechnung für
Sie Geld und hilft, die Umwelt zu schütz en.
En tant que partenaire
aux Directives
Qu’entend- on par produit
Les produits
passer automatiquemen t en “mode à faible consommation” au terme d’une période d’inacti-
E
NERGY STAR product?
E
NERGY STAR product uses ener gy
E
NERGY STAR Produkt?
E
NERGY STAR, nous avons vérifi é que cet appar eil est conforme
E
NERGY STAR sur l’efficacité énergétique.
E
NERGY STAR ?
E
NERGY STAR bénéficient d’une fonctionnalité spéciale qui leur permet de
vité. Un produi t
factures d’éle ctri cité et de contribuer à la protect ion de l’environnement.
Como socios de
E
mas
¿Qué es un producto
Los productos
máticamente a un “modo de ahorro de energía” después de un periodo de inactividad. Los
productos
mantenimiento y ayudan a proteger el medio ambiente.
In qualità di associati alla
soddisfa le dirett ive di
Cos’è un prodotto
NERGY STAR de ahorro de energía.
E
NERGY STAR fai t un usag e pl us eff icace de l’éne rgie , a fin de réduir e les
E
NERGY STAR, hemos determinado que esta máquina cumple las nor-
E
NERGY STAR?
E
NERGY STAR tienen una fu nción especial que les permite cambiar auto-
E
NERGY STAR utiliz an la ener gí a de f orma más ef icie nte, ahorr an diner o en e l
E
NERGY STAR , stabiliamo che la presente apparec chiatura
E
NERGY STAR in materia di efficienza energetica.
E
NERGY STAR ?

Un prodotto
zione automat ica in modo “risparmio energia” dopo un periodo di inatt ività. Un prodo tto
E
NERGY STAR utilizza l’energia in modo più efficiente, consent e rispa rmi sulle utenze
elettriche e contribuisce alla salvaguardia dell’ambiente.
E
NERGY STAR è dotato di una particolare funzione che attiva la commuta-

END US ER LI CENSE AG RE E MENT
PLEASE READ CAREFULLY THE LICENSE A GRE EMENT BELO W BE FORE OPENI NG THIS
PACKAGED SOFTWARE. OPENING THIS PACKAGE INDICATES YOUR ACCEPTANCE OF
THE TERMS AND CONDITIONS BELOW. IF YOU DO NOT AGREE WITH THEM, YOU
SHOULD PROMPT LY RETURN THE PA CKAGE UNUSED.
1. SOFTWARE
“Softw are” means the computer pr ogram contained in t his package (which may include digitally
encoded, machine readable, scalable outline font data as encoded in a special format), together with
all codes, techniques, software tools, format, design, concepts, methods and i deas associated w ith the
comput er program and all documentation related the reto.
2. LICENSE AGREEMENT
This is a li cense agreement and not an agreement for sale. Mi nolta owns, or has been licensed from
other ow ners, copyrights in the So ftware. Except as st ated in this Agreemen t, you are not gr anted any
rights to patents, copyrights, trade nam es, tra demarks (w hether registered or unregistered) , or any
other rights , franchises or licenses in respect of the Software. Ti tle to the Softwa re and any copy
made fr om it is retained by Minolta or such other owners.
3. LICENSE
Minol ta, hereb y grant to you, and you agree to accept a non-exclusiv e, non-transferable and limited
license and you may:
English
(1) install and use the S of tw are on a sing le computer an d one associated printer.
(2) use the Software only for your own customary business or persona l purposes.
(3) make a copy of the Software for backup or installation purposes only in support of the normal and
intended use of the Software.
(4) transfer possessi on of copies of the Soft w are to another party by transfe rring a copy of thi s
Agreeme n t and all other documentati on along with at least one complete unaltered copy of the
Softw are, provided that (i) you must, at the sa me time, either transfer to such other party or
destroy all your othe r copies of the Software. (ii) such transfer of posse ssion terminates your
license from Minolta, and (iii) such other party sha ll accept and be bound b y these li cense terms
by its initial use of the Software.
4. RESTRICTIONS
(1) You shall not without the written consent of Minolta:
(i) use, copy, modify, merge or transfer copies of the Software except as provided herein. (ii)
reverse assemble or re verse compile the Software except as permitted b y law; or (iii) Sublice n se,
rent, lease or distribute the Software or any copy thereof.
(2) You shall not export or re-e xport the Softw are in any form under viola tion of export re strict ions
by the government of your country.
5. LIMITED WARRANTY
Minolta warrants the media on which the Software is recorded to be free from defects in materials
and wor km anship under normal use. Warranty det ails and limitations for the Software are des cribed
in the Statement of Limited Warranty which was supplied with th e hardware. With the e x ception of
the foregoing express warranties appl icable to hardware and m edia only, the Soft w are is not warranted and is provided.
En-1

SUCH WARRANTIES ARE IN LIEU OF ALL OTHER WARRANTIES, EXPRESS OR IMPLIED,
INCLUDING, BUT NOT LIMITED TO, THE IMPLIED WARRANTIES OF MERCHANTABILITY AND FITNESS FOR A PARTICULAR PURPOSE.
6. LIMITATION OF REMEDIES
IN NO EVENT WILL MINOLT A BE LI ABLE FOR ANY LOST PROFI TS, LOST DA TA, OR ANY
OTHER INCIDE NTAL OR CONSEQUENTIAL DAMA GES THAT RESULT FROM USE OR
INABIL ITY TO USE THE SOFTWARE, EVEN IF MINOLTA OR ITS AUTHORISED REMARKETERS HAVE BEEN ADVISED OF THE POSSIBILITY OF SUCH DAM AGES OR FOR ANY
CLAIM BY YOU BASED ON A THIRD PARTY CLAIM.
7. TERMINATION
You may term inate your lic ense at any ti m e by destroying the So ftware and all your c opies of it or as
English
otherw ise described in these ter ms. Minol ta may terminate your license if you fail to com p ly with
these terms. Upon such termination, you agree to destroy all your copies of the Software.
8. GOVERNING LAW
This Agreement shall b e governed by the law s of the country wh ere the deli very is m ade to the original customer.
9. GOVERNMENT END USERS
If you are acquiring the Soft w are on behalf of any unit or agency of the United St ates Government,
the following provisions apply. Use, duplication or disclosure by th e G overnment is subject to res trictions as set forth in the Rights in Technical Data and C o m p uter Software claus e at FAR 252 .2277013, subdivision (b)(3)( ii) or subp aragraph (c)(1)(ii), as appropriate.
Further use, duplic ation or discl osure is subject to restrictions a pplicable to re stricted rights software
as set forth in FAR 52.227-19(c)(2).
YOU ACKNOWLEDGE THAT YOU HAVE READ THIS AGRE EMENT, UNDERSTAND IT, AND AGREE TO BE BOUND BY ITS TERMS AND CONDITIONS. NEITHER PARTY SHALL BE BOUND BY ANY STATEME NT OR REPRESENTATION
NOT CONTAINED IN THIS AGREEMENT. NO CHANGE IN THIS AGREEMENT IS
EFFECTIVE UNLESS WRITTEN AND SIGNED BY PROPERLY AUTHORISED REPRESENTATIVES OF EACH PARTY. BY OP ENING THE PA C KAGE, YOU A GREE TO
ACCEPT THE TERMS OF THI S AGREE M EN T.
En-2

Contents
END USER LICENSE AGREEMENT........... .................. .........En-1
Foreword ........................................ .................. .......................... .En-4
Safety Information.................................................................... En-4
Printer Parts and Accessories ................................................En-10
Control Pa nel.................. .................. .......................... ..............En-11
Installation Precautions................... .......................... ..............En-13
Selecting a Location for the Printer........................................En-13
Power Source.........................................................................En-13
Grounding..............................................................................En-14
Space Requirements .............. ........... .................. ..................En-15
Operational Precautions..........................................................En-16
Operating Envi ronment........ .................. ......................... .......En-16
Printer.................................. ......................... .........................En-16
Printer Supplies .....................................................................En-18
Step 1: Unpacking the Printer .................................................En-19
Step 2: Connecting the Power Cord .......................................En-21
Step 3: Loading Pa per..............................................................En-22
Step 4: Connecting to a Computer .........................................En-23
Step 5: Turning On the Printer.................................................En-24
English
Step 6: Installing the Printer Driver ........................................En-25
Step 7: Testing the Printer.......................................................En-33
Installing Options.....................................................................En-35
Second Paper Cassette Unit..................................................En-35
Face-Up Tray..........................................................................En-39
Replacing the Cartridges.......... .......................... .....................En-41
Cleaning the Printer .................................................................En-45
Clearing a Paper Misfeed.........................................................En-47
En-3

Foreword
Safety Information
Lase r S afet y
This is a page printer which operates by means of a laser. There is no possibility of
danger from the laser, pro vided the printer is operated according to the instructions
in this manual.
English
Since radiation emitted by the laser is completely confined within protective housing, the laser beam cannot escape from the machine during any phase of user
operation.
Internal Laser Radiation
Maximum Radiation Power:
0.6 mW at laser aperture of the print head unit
Wavelength:
770–810 nm
This product employs Class
Laser Diode and Scanning Polygon Mirror are incor porated in the print head unit.
The print head unit is not a field service item.
Therefore, the print head unit should not be opened under any circumstance.
III
b Laser Diode that emits an invisible laser beam.
Laser Safety
This printer is certified as a Class I Laser product under the
Health and Human Services (DHHS)
to the Radiation Control for Health and Safety Act of 1968. This means that the
printer does not produce hazardous laser radiation.
Radiation Perf ormance Standard according
U.S. Department of
En-4

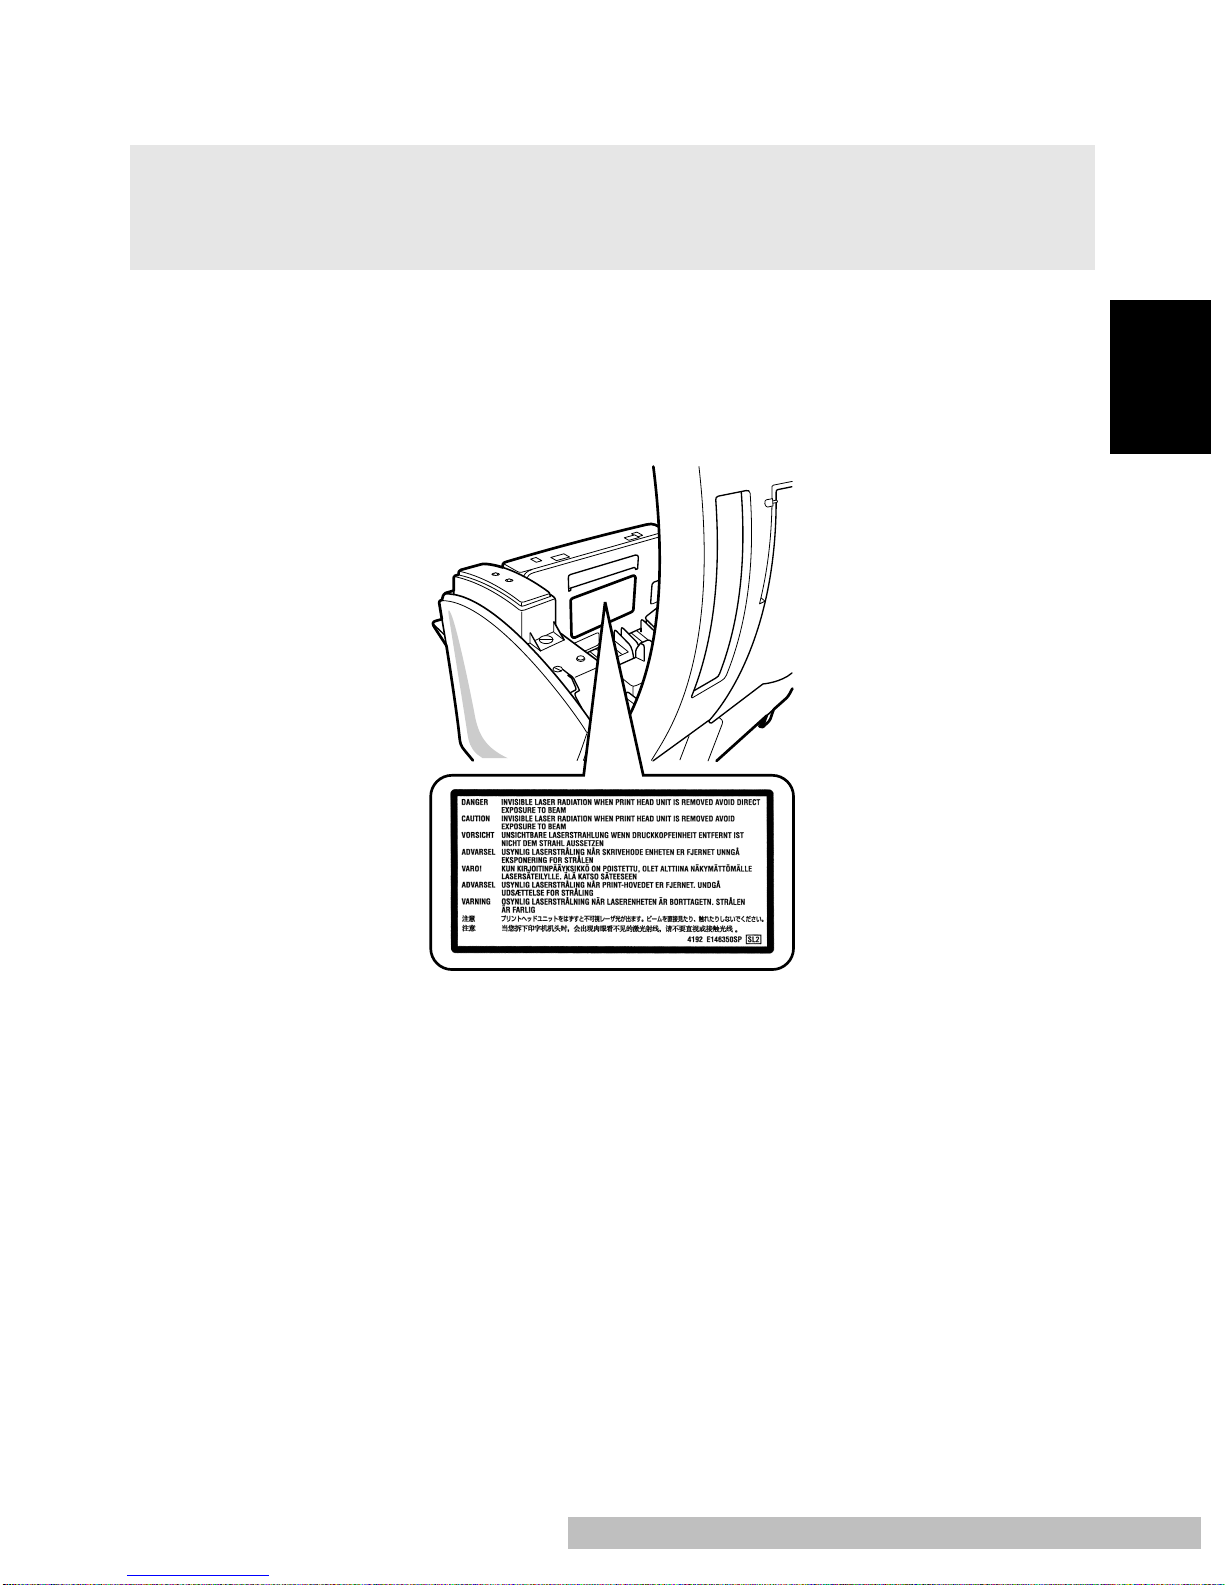
CDRH Regulations
The
Center for Devices and Radiological Health (CDRH)
Drug Administration implemented regulations for laser products on August 2, 1976.
Compliance is mandator y for products marketed in the United States. The label
shown below indicates compliance with the CDRH regulations and must be
attached to laser products marketed in the United States.
of the U.S. Food and
Laser Safety Label
English
Caution
• Use of contro ls, adjustments or performance of procedures othe r than those specified
in this manua l may resul t i n hazardous radi ation exposure.
Caution
• This is a sem iconductor laser. The maximum power of the l aser dio de is 5 mW and the
wavelength is 770–810 nm.
En-5

For Denmark Users
ADVARSEL
• Usynlig la serstråli ng ved åbning, når sikkerhedsafbrydere er ude af fun kti on. Undgå
udsættelse for stråling.
Klasse 1 laser produkt der opfylder IEC60825 sikkerheds kravene.
Dansk: Dette er en halvlederlaser. Laserdiodens højeste styrke er 5 mW og bølgelængden er 770–810 nm.
English
For Finland, Sweden Users
LUOKAN 1 LASERLAITE
KLASS 1 LASER APPARAT
VAROITUS!
• Laitteen käyttäminen muulla kuin tässä käyttöohjeessa mainitulla tavalla saatt aa altistaa käyttäjän turvallisuusluokan 1 ylittävälle näkymättömälle lasersäteilylle.
Tämä on puolijohdelaser. Laserdiodin suurin teho on 5 mW ja aallonpituus on
770–810 nm.
VARNING
• Om apparaten används på annat sätt än i denna bruksanvisning specificerats, kan
användaren utsättas för osynlig laserst rålning, som överskrider gr änsen för laserklass
1.
Det här är en halvledarlaser. Den maximala effekten för laserdioden är 5 mW och
våglängden är 770–810 nm.
VARO
• Avattaessa ja suojalukitus ohitettaessa olet alttiina näkymättömälle lasersäteilylle. Älä
katso sätees een.
VARNING
• Osynlig laserstrålning när denna del är öppnad och spärren är urkopplad. Betrakta ej
strålen.
En-6
For Norway Users
ADVARSEL
• Dersom apparatet brukes på annen måte enn spesifisert i denne bruksanvisning, kan
brukeren utsettes for unsynlig laserstråling som overskrider grensen for laser klass 1.
Dette en halvleder laser. Maksimal effekt till laserdiode er 5 mW og bølgelengde er
770–810 nm.
Laser Caution Label
English
User Instr u cti on s
CE Marking (Declaration of Conformity)
We declare under our sole responsibility that the printer and options to which this
declaration relates are in conformity with the specifications below.
This declaration is valid for the area of the European Union (EU) only.
En-7

Product Type Laser Beam Printer
Product Name PagePro 1100L
Options Second Paper Cassette Unit (4148-611)
Face-Up Tray (4121-0633)
English
Standard
Safety: EN60 950/1992 with Amendment s 1, 2, 3, 4, A11
Safety of inform ation tec hnology equipment, in cluding electrical business
equipment
EN60825-1/1994 with Amendment A11
Radiati on safety of las er produc ts, equipme nt classifi cation, requirem ents
and user’s guide
EMC: EN55 022 (
Limits and method for measurement of radio disturbance characteristic of
information technology equipment (ITE)
EN61000 -3-2 (
Electromagnetic compatibility (EMC)
Part 3: Limits Section 2: Limits for harmonic current emissions (equipment
input current ≤ 16A per pha se)
EN61000 -3-3/19 9 5
Electromagnetic compatibility (EMC)
Part 3: Limits Secti on 3: Limit at i on of voltage fluctuations and flicke r i n l owvoltage supply syst em s for equi pment wi th rated current ≤ 16A
EN55024 /1998
Informat i on technol ogy equipme nt – imm unity ch aracteri st i cs – Limits and
methods of m easurement
EN61000 –4–2/19 95
Electromagnetic compatibility (EMC)
Part 4: T esting and measurement techniques
Section 2: E l ectrosta tic disch arge immuni ty test
EN61000 –4–3/19 95
Electromagnetic compatibility (EMC)
Part 4: T esting and measurement techniques
Section 3: R adi ated, radi o-freq uency elec tromagnetic fie ld imm unity test
EN61000 –4–4/19 95
Electromagnetic compatibility (EMC)
Part 4: T esting and measurement techniques
Section 4: E l ectrical fas t t rans i ent/burst imm unity test
EN61000 –4–5/19 95
Electromagnetic compatibility (EMC)
Part 4: T esting and measurement techniques
Section 5: Surge immuni ty test
EN61000 –4–6/19 96
Electromagnetic compatibility (EMC)
Part 4: T esting and measurement techniques
Section 6: C onducte d di sturbances induc t ed by radio-fr equency fiel ds –
Immunity test
Class B
Clas s A
)/1998
)/1995 (A 13)
En-8

EN61000–4–8/1993
Electromagnetic compatibility (EMC)
Part 4: T esting and measurement techniques
Section 8: Power-frequ ency magnetic fie l d i m mu ni ty test
EN61000 –4–11/1 994
Electromagnetic compatibility (EMC)
Part 4: T esting and measurement techniques
Section 11: Voltage dips, short interruptions and voltage variations immunity
test
EC Directive Safety: 73/23/EEC
EMC: 89/ 336/ EEC and 93/68/EEC
• This device must be used with shielded interface (Parallel) cable.
The use of non-shielded cable is likely to result in int erference with radio communicatio ns and is pr ohibited under 89/ 336/EEC rules.
Ozone Rele ase
During printer operation, a small quantity of ozone is released. This amount is not
large enough to harm anyone adversely. However, be sure the room where the
machine is being used has adequate ventilation, especially if you are printing a
high volume of materials, or if the machine is being used continuously over a long
period.
English
En-9
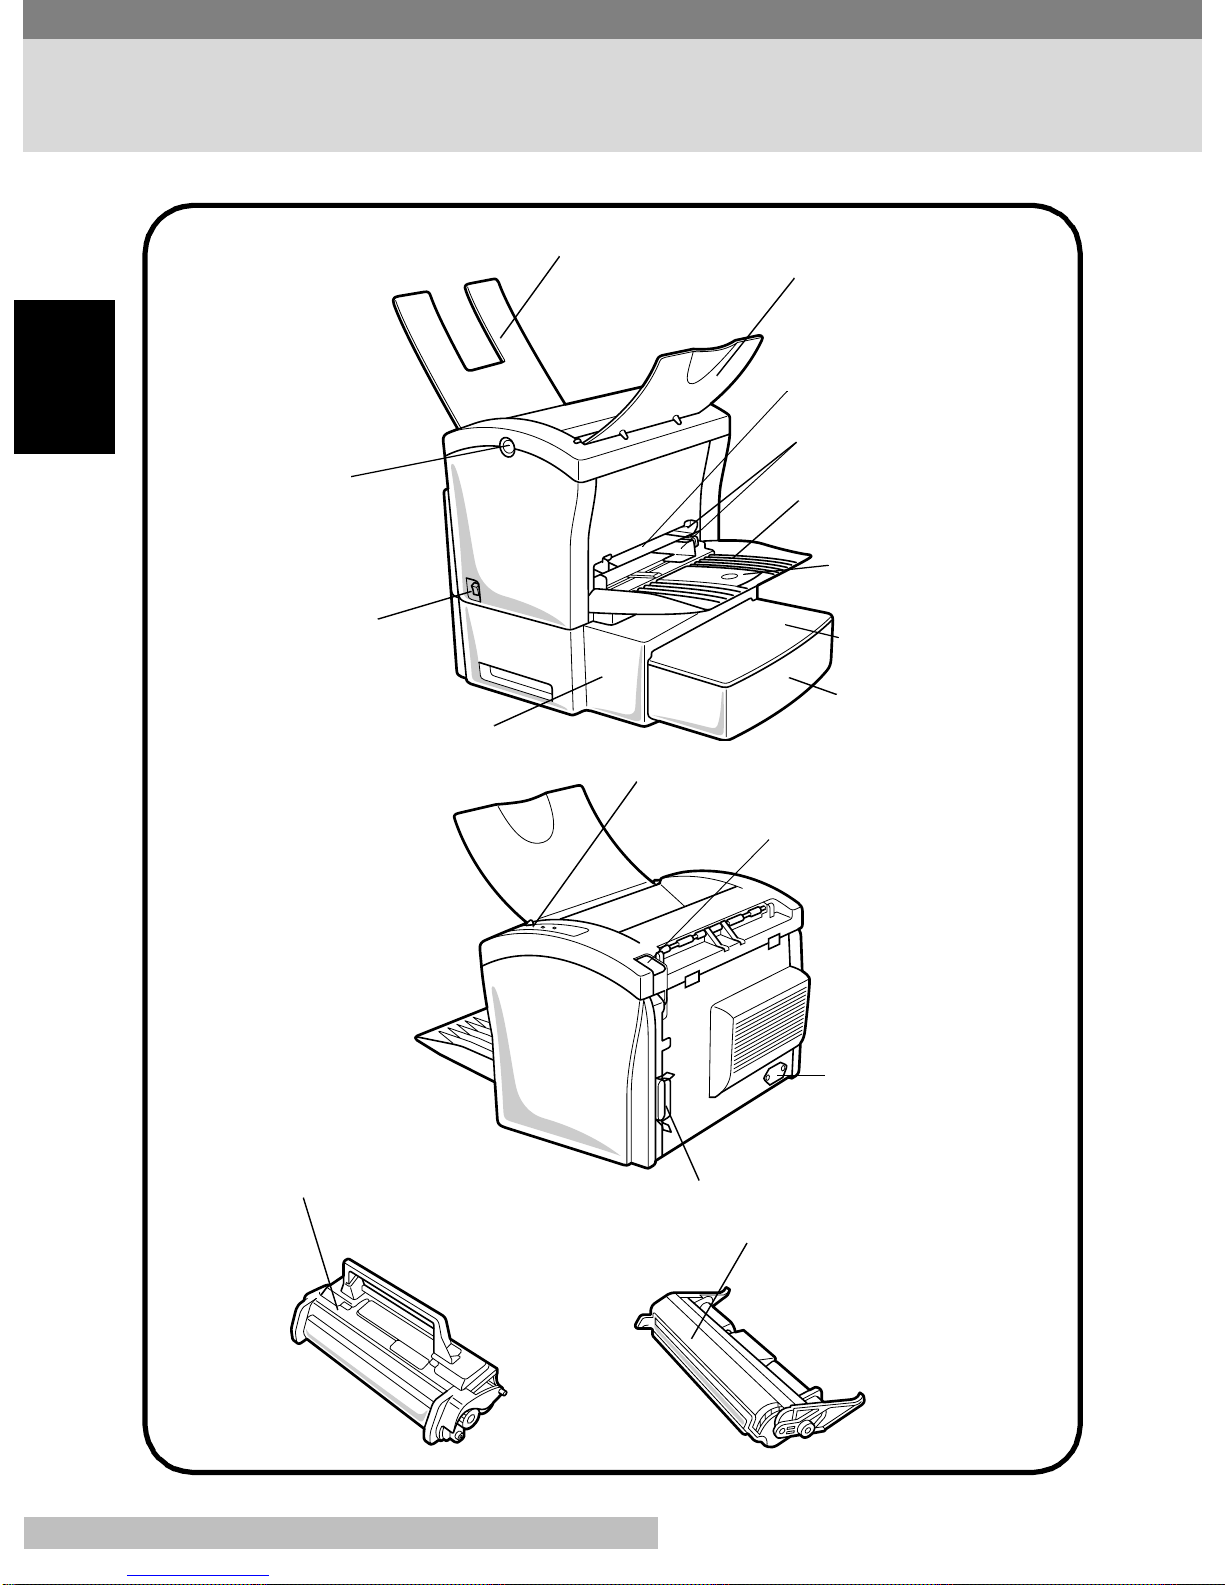
Printer Parts and Accessories
Face-up tray
(option)
English
Top cover
release button
Power switch
Face-down tray
Manu al feed tr ay
Pa per gui de
Tray 1
(Multipurpose tra y)
Paper support
Cass ett e c over
Second paper casset te
unit (option)
Toner cartridge
Tray2 (500-sheet
second cassette)
Control panel
Face-up/Face-down
selection switch
Power cord
socket
Prallel interface connector
Drum cartridge
En-10
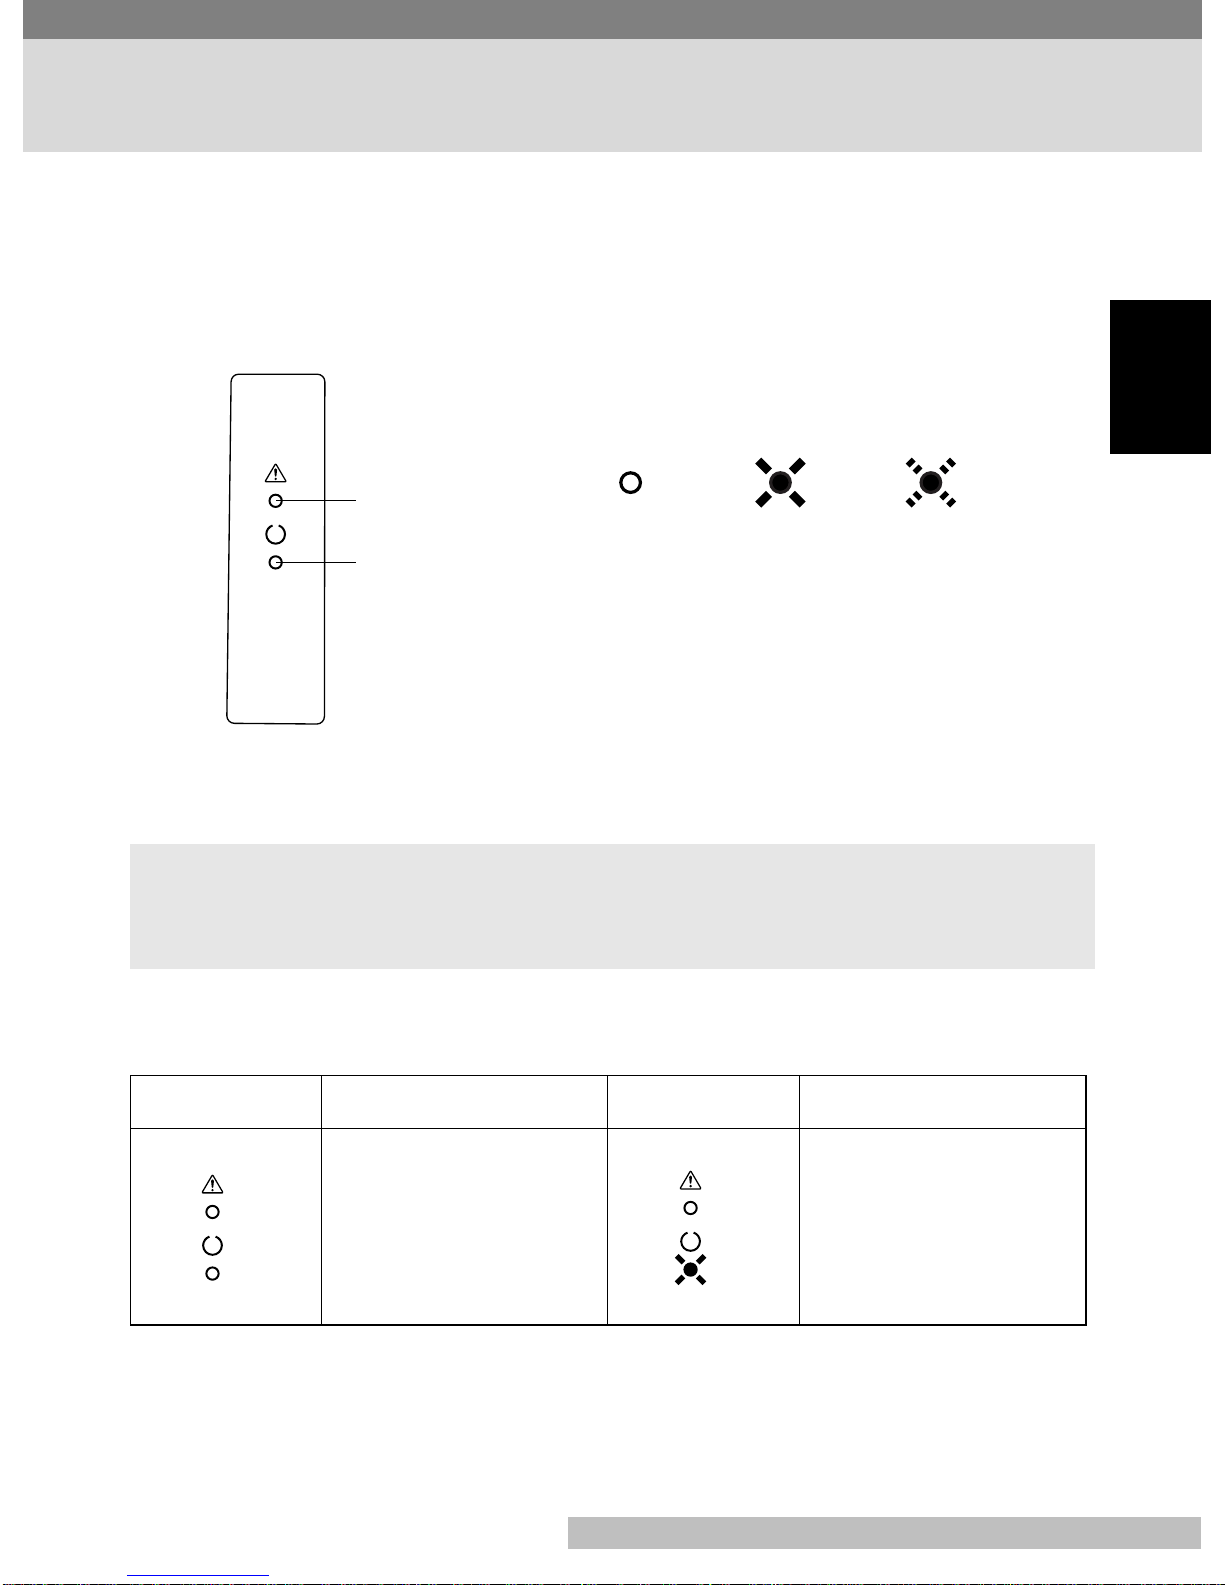
Control Panel
The two indicators on the printer’s control panel turn on, off, or blink in fixed patterns to let you know the current status of the printer. Refer to t he following section
for the description of each indicator light pattern and the action you need to take
when it occurs.
Error (amber)
indicator
Ready (green)
indicator
Off On Blinking
English
Note
• You can find out details of the printer’s status by checking the information that
appears on your computer screen.
Indicator Lights (Printer Messages)
Indicators Description Indicators Description
Power is off. Printer is ready.
Warming up.
En-11
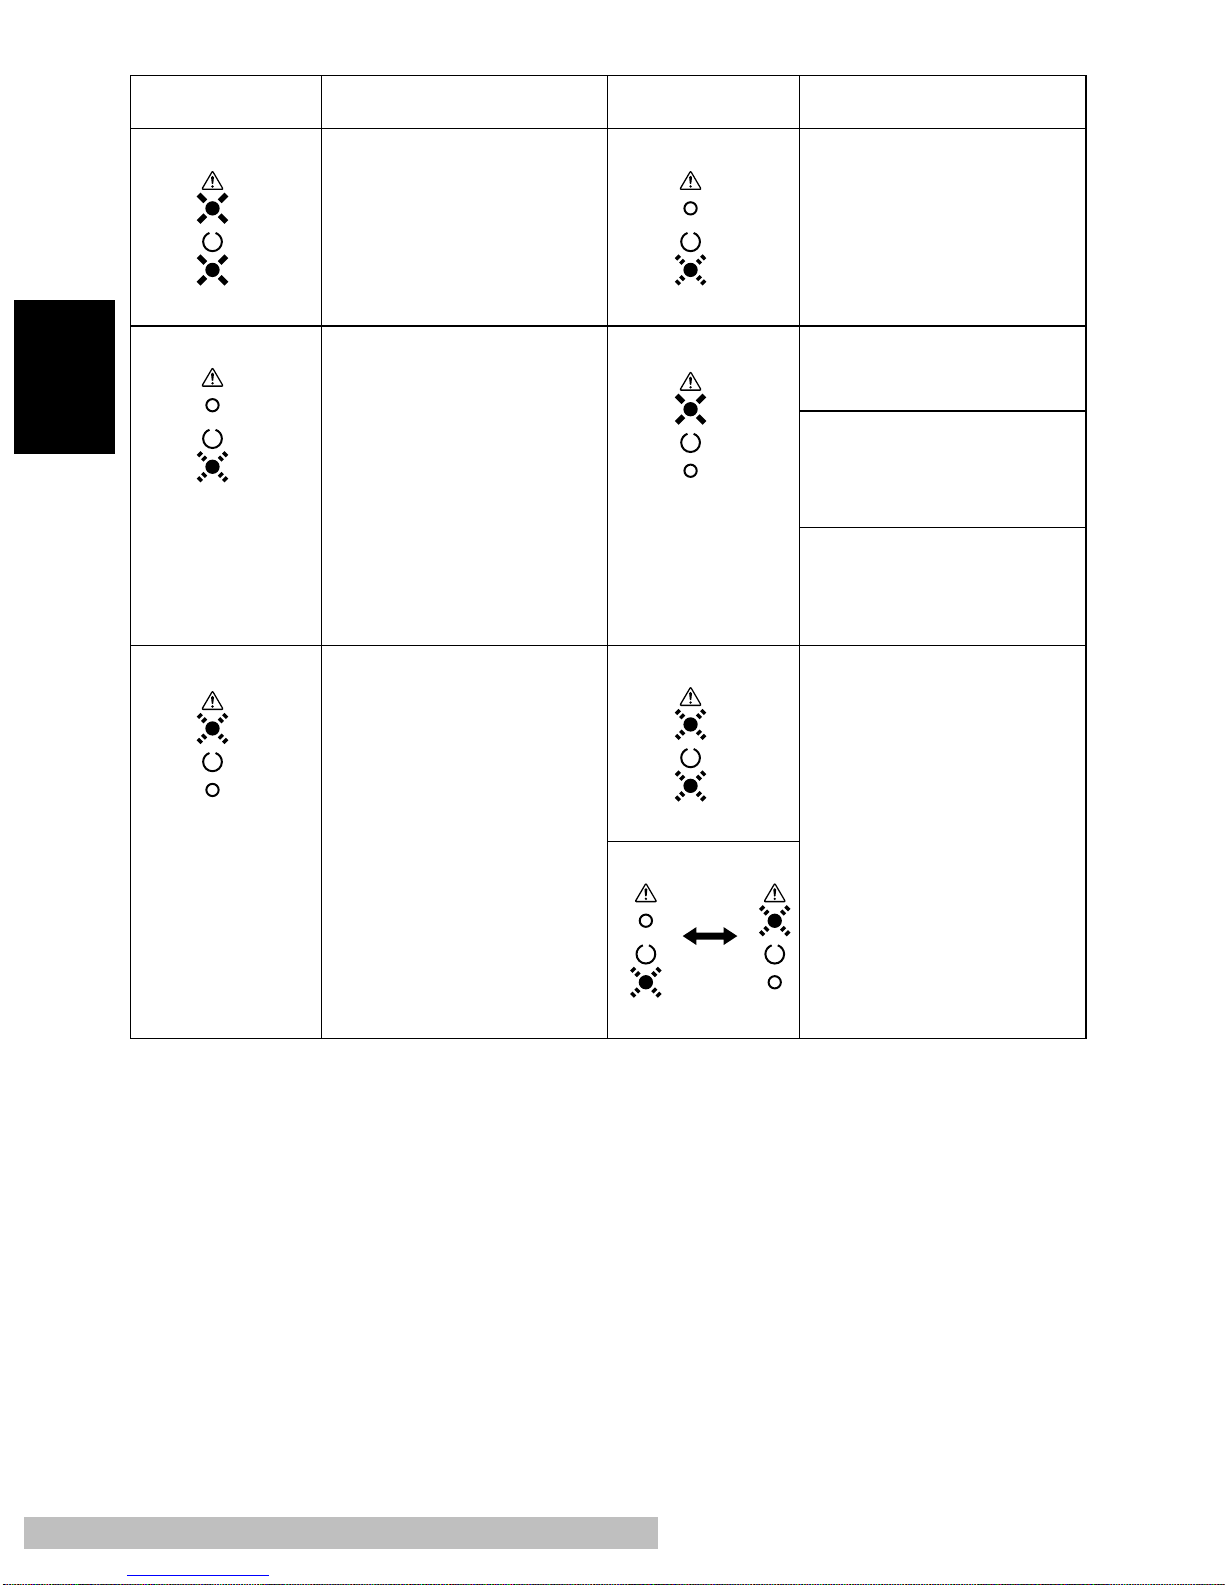
Indicators Description Indicators Descripti on
English
Power on initial setting.
(Slow blinking) Power
Save Mode.
The wrong size of
paper were fed into
the printer during
printing.
Load the appropriate
size of paper onto the
paper feed tray.
Receiving data.
Pr ocessing data .
Printi ng.
Top cover is open.
Close the top cover.
Paper misfeed.
Clear the misfeed
and continue printing.
Out of paper.
Load paper onto the
paper feed tray.
Engine communication error.
Engine error.
Turn off the printer
and contact your
dealer.
En-12

Installation Precautions
Note the following important precautions when selecting a location for the printer
and when connecting it to a power source.
Selecting a Location for the Printer
A proper location helps to ensure that your printer provides you with the long service life for which it is designed. Double-check to make sure that the location you
select has the following characteristics.
• Choose a locatio n that is well-ventilated.
• Make sure there is no ch ance of amm onia or other organic gasses being generated in the area.
• The power outlet you plan to connect to f or power should be nearby and unobstructed.
• Make sure that the pr inter is not exposed to direct sunlight.
English
• A void areas in the di rect airflow of air conditioners, heater s, or ventilators, and
areas subject ed to temperature and humidity extremes.
• Choose a sturdy, level surface where the printer will not be exposed t o strong
vibration.
• Keep the printer away from any obje cts that might block its heat vents.
• Do not locate the print er near curtains or other comb ustible objects.
• Choose an area where there is no possibility of the printer being splashed with
water or other liquids.
• Make sure that the surrounding area is clean, dry, and free of dust.
Power Source
The following are the power source requirements for this printer .
Power supply:
220–240 V at 50–60 Hz
Voltage fluctuation:
220–240 V ±10%
Frequency fluctuation:
Within ±3 Hz
En-13

Note
• Use a power source with minimal voltage and frequency fluctuation.
• Only use an outlet that is rated for the voltage capacity specified for this printer.
• Be sure to pl ug the power cord all the way int o the outlet. The outlet should be located
near the printer and be easily accessi ble so y ou can unplug the pow er cord immediately should any problem occur.
• Make sure the outlet you use is visib le, and not hidden behi nd the printer or an y other
object.
• If any othe r el ectrical equipment is plugged into the same outlet, make sure that the
English
capacity of the out let is not exceeded.
• If you use an extension cord, mak e sure i ts capacity is greater than the power consumption of the printer. Using an ex tension cord wi th a lowe r capacity creates the danger of fire.
• Nev er use a multiple sock et to connect other appliances or mac hines to the same outlet being used to power the printer.
Grounding
Always ground the printer to guard against the danger of electrical shock. To
ground the printer, connect the grounding wire to the ground terminal of the electrical outlet you are plugging in to or to a grounding contact that complies with local
electrical standards in your area.
Note
• Never connect the grounding wir e to a gas pipe, t he groundi ng wire for a telephone, or
to a water pipe.
En-14
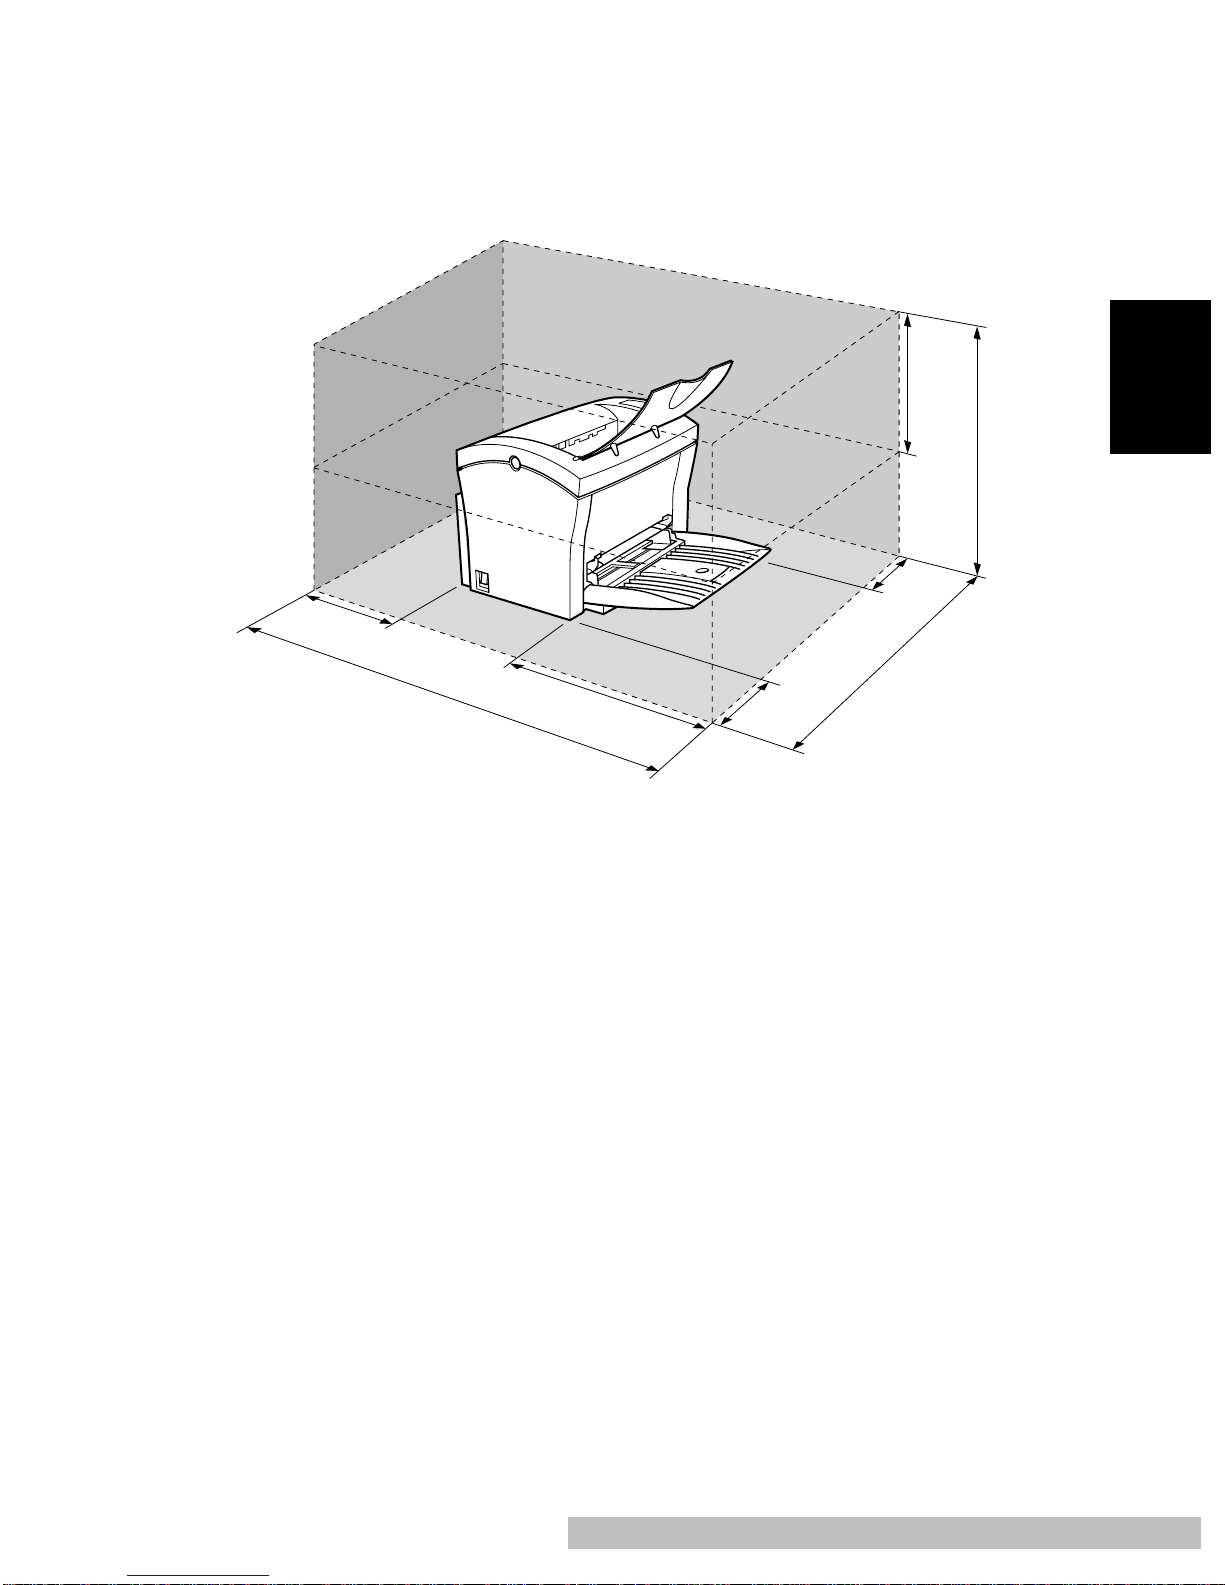
Space Requirements
Be sure to provide space around the printer as indicated below, to ensure easier
printer operation, paper and toner replacement, and maintenance.
250mm
(9-3/4 in.)
507mm
(20 in.)
100mm
(4 in.)
150mm
(6 in.)
660mm
672mm
(26-1/2 in.)
300mm
(11- 3/4 in .)
200mm
(7-3/4 in.)
(26 in.)
English
En-15

Operational Precautions
Note the following important precautions whenever using the printer.
Operating Envi ronment
The following describes the operating environment required when using the
printer.
Temperature:
English
10°C to 35°C (50°F to 95°F) with fluctuation of 10°C (18°F) per hour
Humidity:
15% to 85% with fluctuation of 20% per hour
Printer
The following describes precautions for using the printer.
• Never turn the printer off or open any of its covers during a print operation.
• Never place flammable gass es, liquids or objects that generate magnet ic forces
near the printer.
• When unplugging t he power cord, always grasp the plug and never pull on the
cord. A damaged cord create s the danger of fire or electrical shock .
• Never touch the power cor d w hen your hands are wet. Doing so creates the danger of electrical shock.
• Always unplug the power cord before moving the printer. Failure to do so can
damage the powe r cord, creatin g the danger of fire or electric al shock.
• Always unplug the power cor d if you do not plan to use the print er for a long time.
• Never try to re move any secured panel or cover. The interior of the prin ter contains high-voltage circuitry which creates the danger of electrical shoc k when
exposed.
• Never try to modif y the printer. Doing so creates the dange r of fire or electrical
shock.
• Never place any heavy objects on the power cord, pull on it or bend it. Doing so
creates the danger of fire or electrical shock.
• Alwa ys make sure the printer is not placed on the electrical co rd or the communications cables of any other electrical equipment. Also make sure that cords and
cables do not get into the print er’ s mechanism. Any of these conditi ons create
the danger of malfunction and fire.
En-16

• Always take care so that paper clips, staples, or other small pieces of metal do
not get into the printer t h rough its vents or other openings. Such objects create
the danger of fire or electrical shock.
• Do not all ow water or other liquid s to spill on or near the printer. Fire or electrical
shock can occur should water or liquid come int o contact with the printer.
• Should liquid or any piece of metal acci dently get inside the prin ter, immediately
turn it off, unplug the power cord, and contact your dealer. Failure to take this
immediate action creates the danger of fi re or electrical shock.
• Whenever the prin ter emits unusually high amounts of heat , smoke, an unusual
odor, or noise, immediately turn it off , unplug it, and contact your dealer. Failure
to take this immediate action creates the danger of fire or el ectrical shock.
Caution
• Be sure to locate the pri nter in a well-vent il ated location. A minimal am ount of ozone is
generated during normal operation of this printer. Because of this , an unplea sant odor
may result when the printer is used for extensive printing in a poorly ventilated area.
For comfortab le, healthy, and s afe operation, be sure to locate the print er in a w ell-ventilated area.
English
En-17

Printer Supplie s
Note the following precautions when handling printer supplies such as the toner
cartridge, the drum cartridge, and paper.
• Avoid storing printer supplies in the following locations.
• Areas subjec ted to di rect su nlight . Additi onall y, the drum cartridge must be protec ted
from fluorescent light.
• Areas exposed to open flame.
• Areas subjected to high humidity.
English
• Areas subjected to large amount s of dust.
• Keep paper that has been removed from its wrapper, but not yet loaded onto the
printer tray, in a sealed plastic bag and store it in a cool, dark location.
• Use only the toner cartridge that is expressly specified f o r thi s printer.
• Keep supplies out of the reach of chi ldren.
• Should your hands become soiled with toner, immediately wash them with soap
and water.
Caution
• Whenever you remove t he drum cartridge from the printer, immediately wrap it wit h a
cloth to protect it against overexposure to light.
En-18
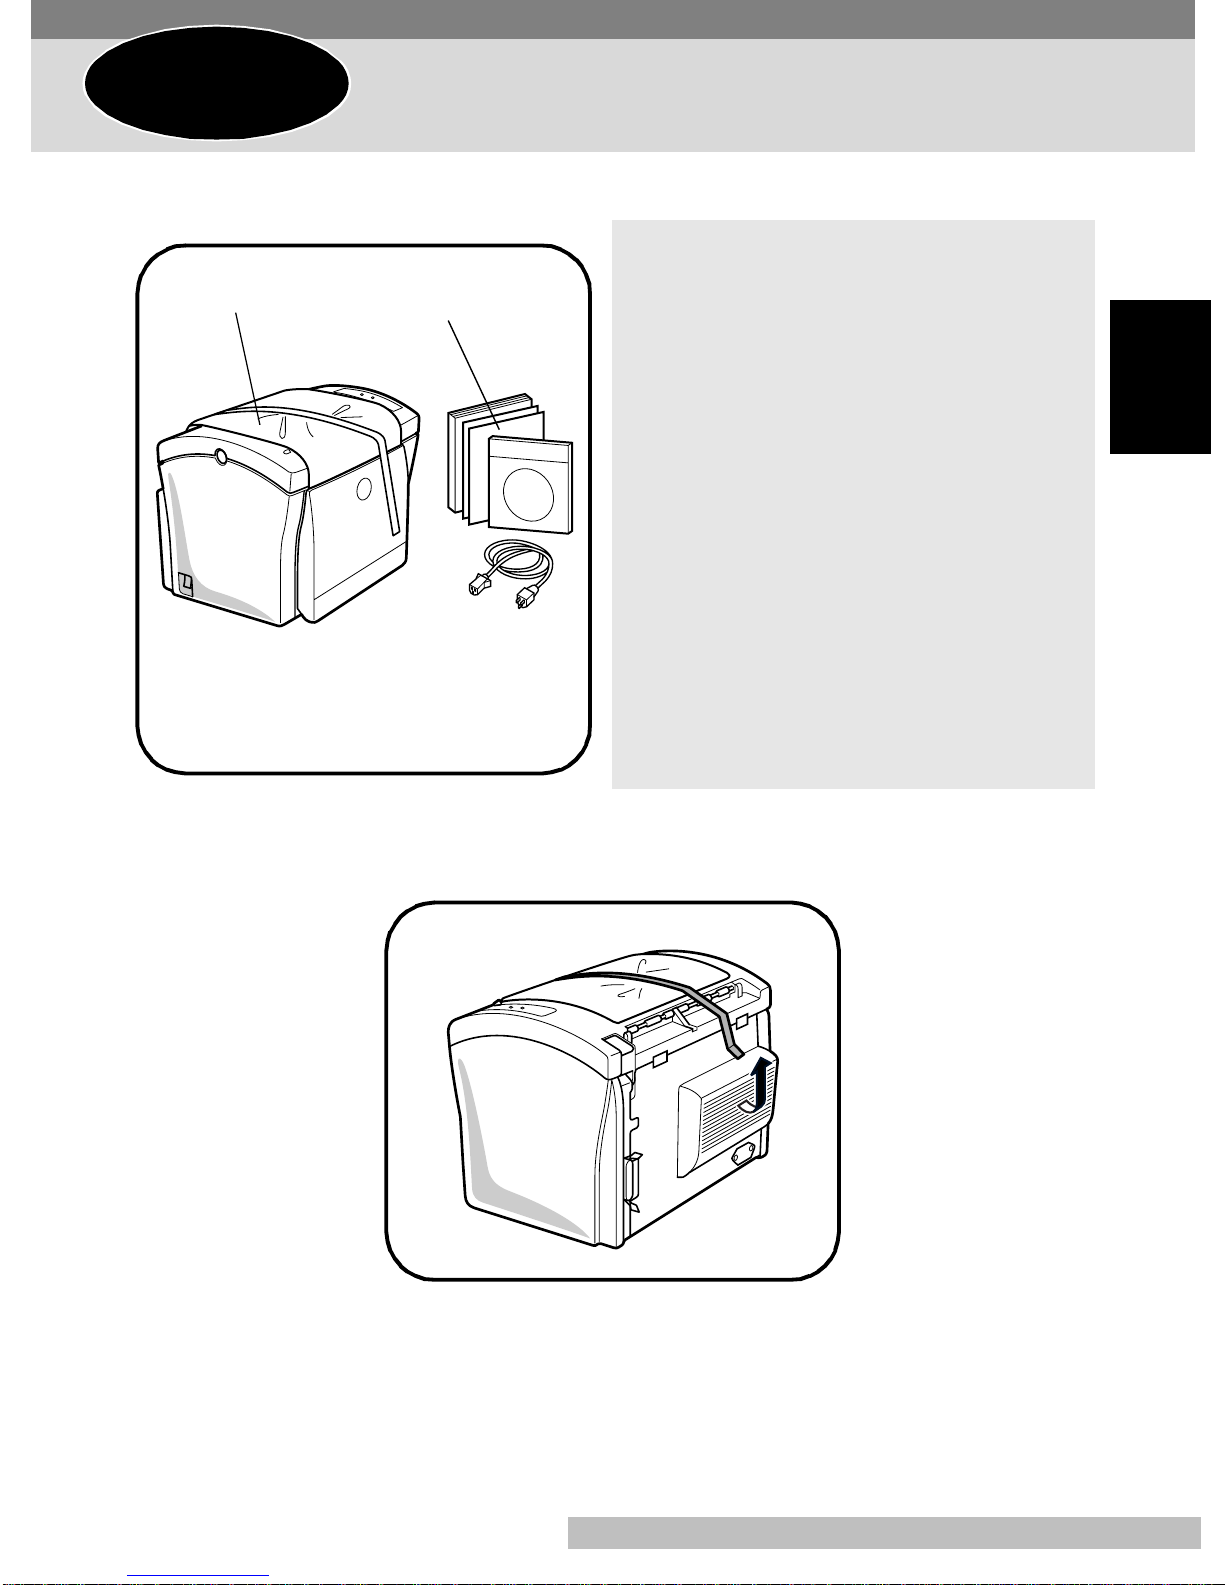
Step 1
Take the items and acc essories shown bel o w out of the carton.
1
1
Unpacking the Printer
1. Printer
2
2. Accessories
User’ s Guide
CD-ROM
Power cord
Wa rranty bo ok let
Regist rat ion card
Power Cord Instructions
Caution
• After unpacking, keep all packing materials out of the reach of chi ldren.
English
Remove the plasti c bag and peel off the shipping tape f rom the back of the
2
printer.
En-19
English
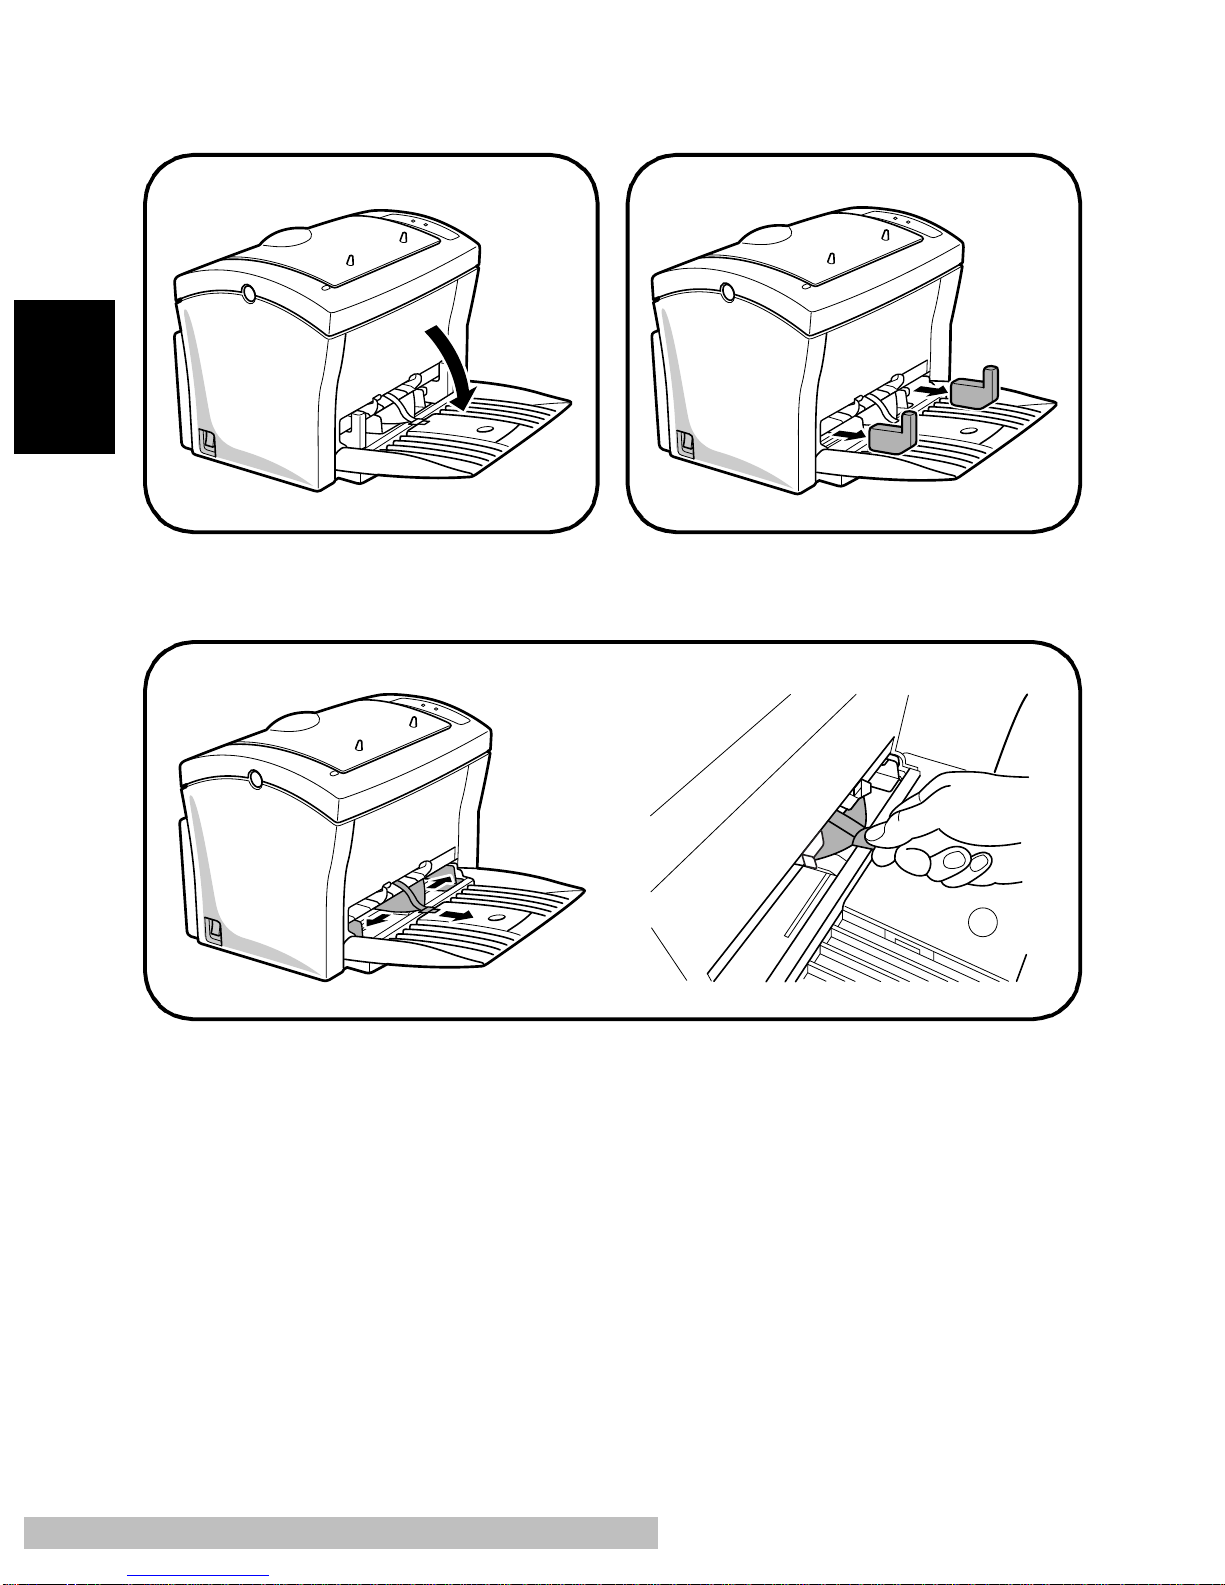
Pull the Tray1 from the printer with
3
both hands and lie it down flat.
Squeeze the ri ght paper size guide and open the paper size guides. Pull out the
5
plastic-lead strip from the paper feed inl et.
Pull out the two cushions from the
4
paper feed inlet.
En-20
Step 2
Connecting the Power Cord
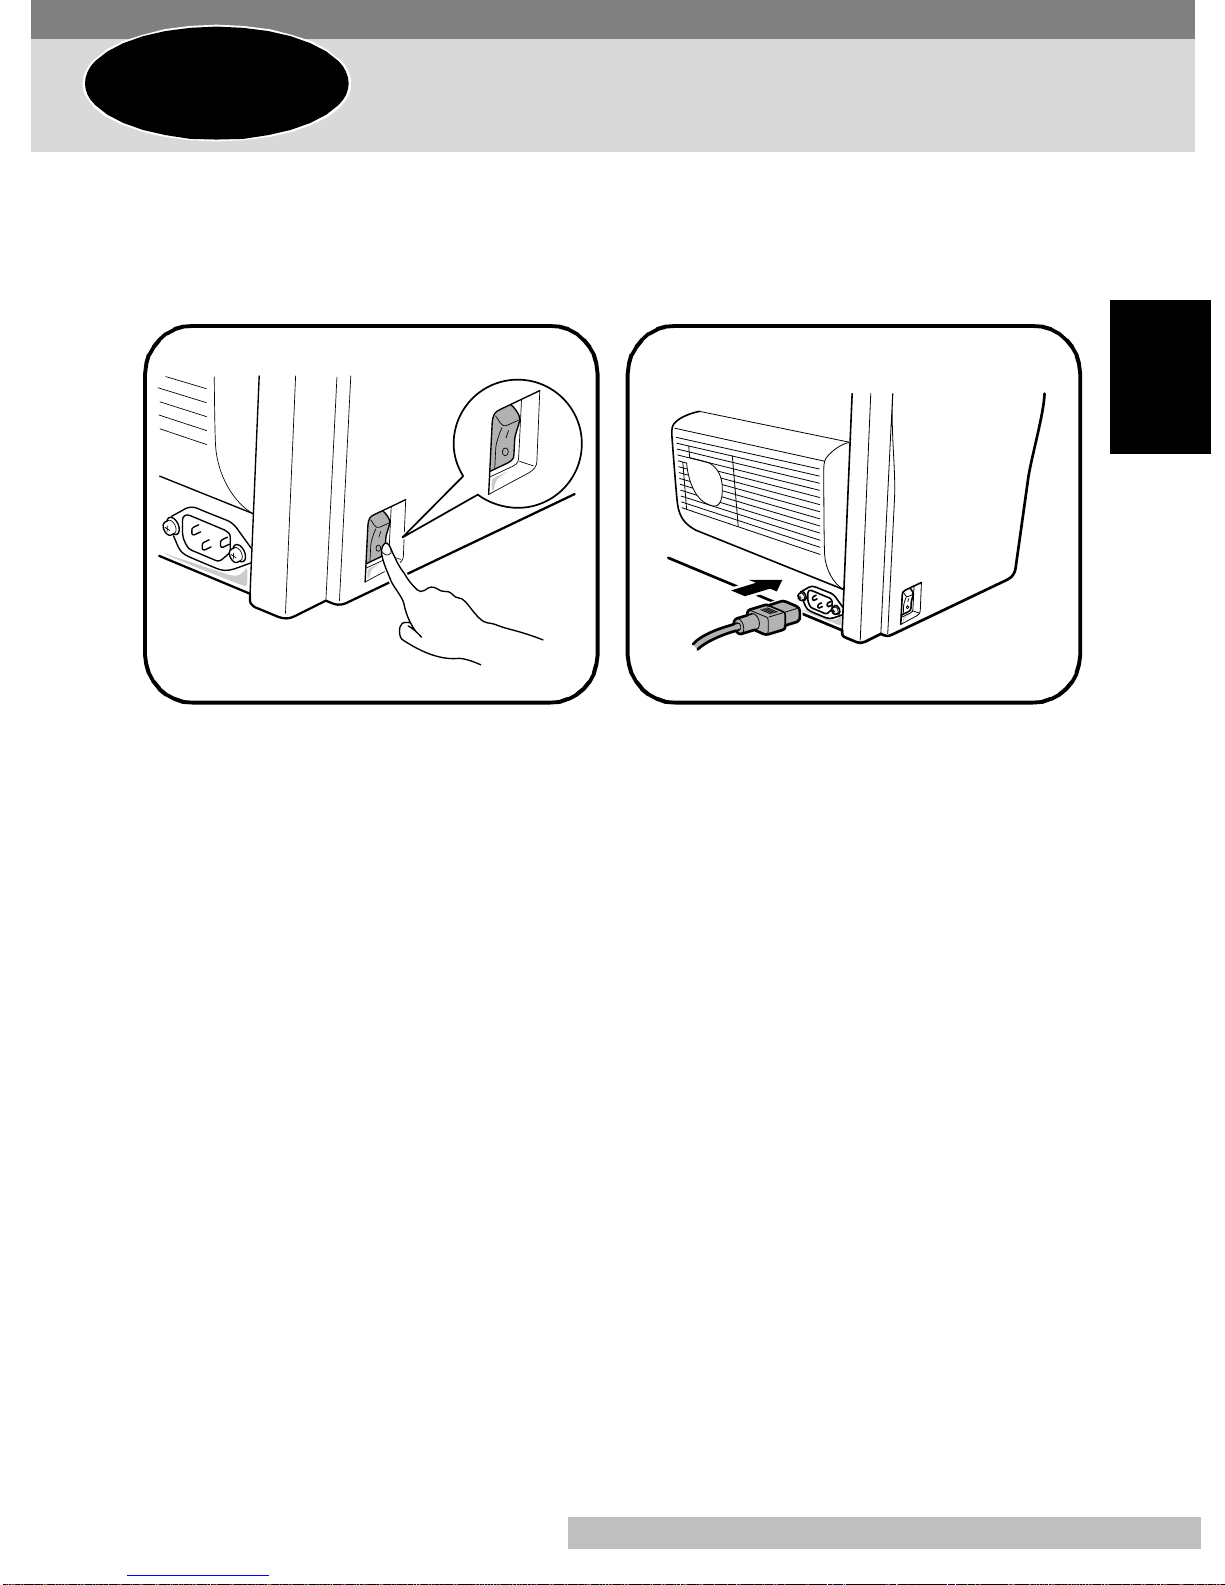
Make sure that the power switch is
1
in the
(Off) positi on.
❍
Connect one end of the power cord
2
that comes with the printer to the
power cord socket. Plug the other
end into a power outlet.
English
En-21
Step 3
Loading Paper
English
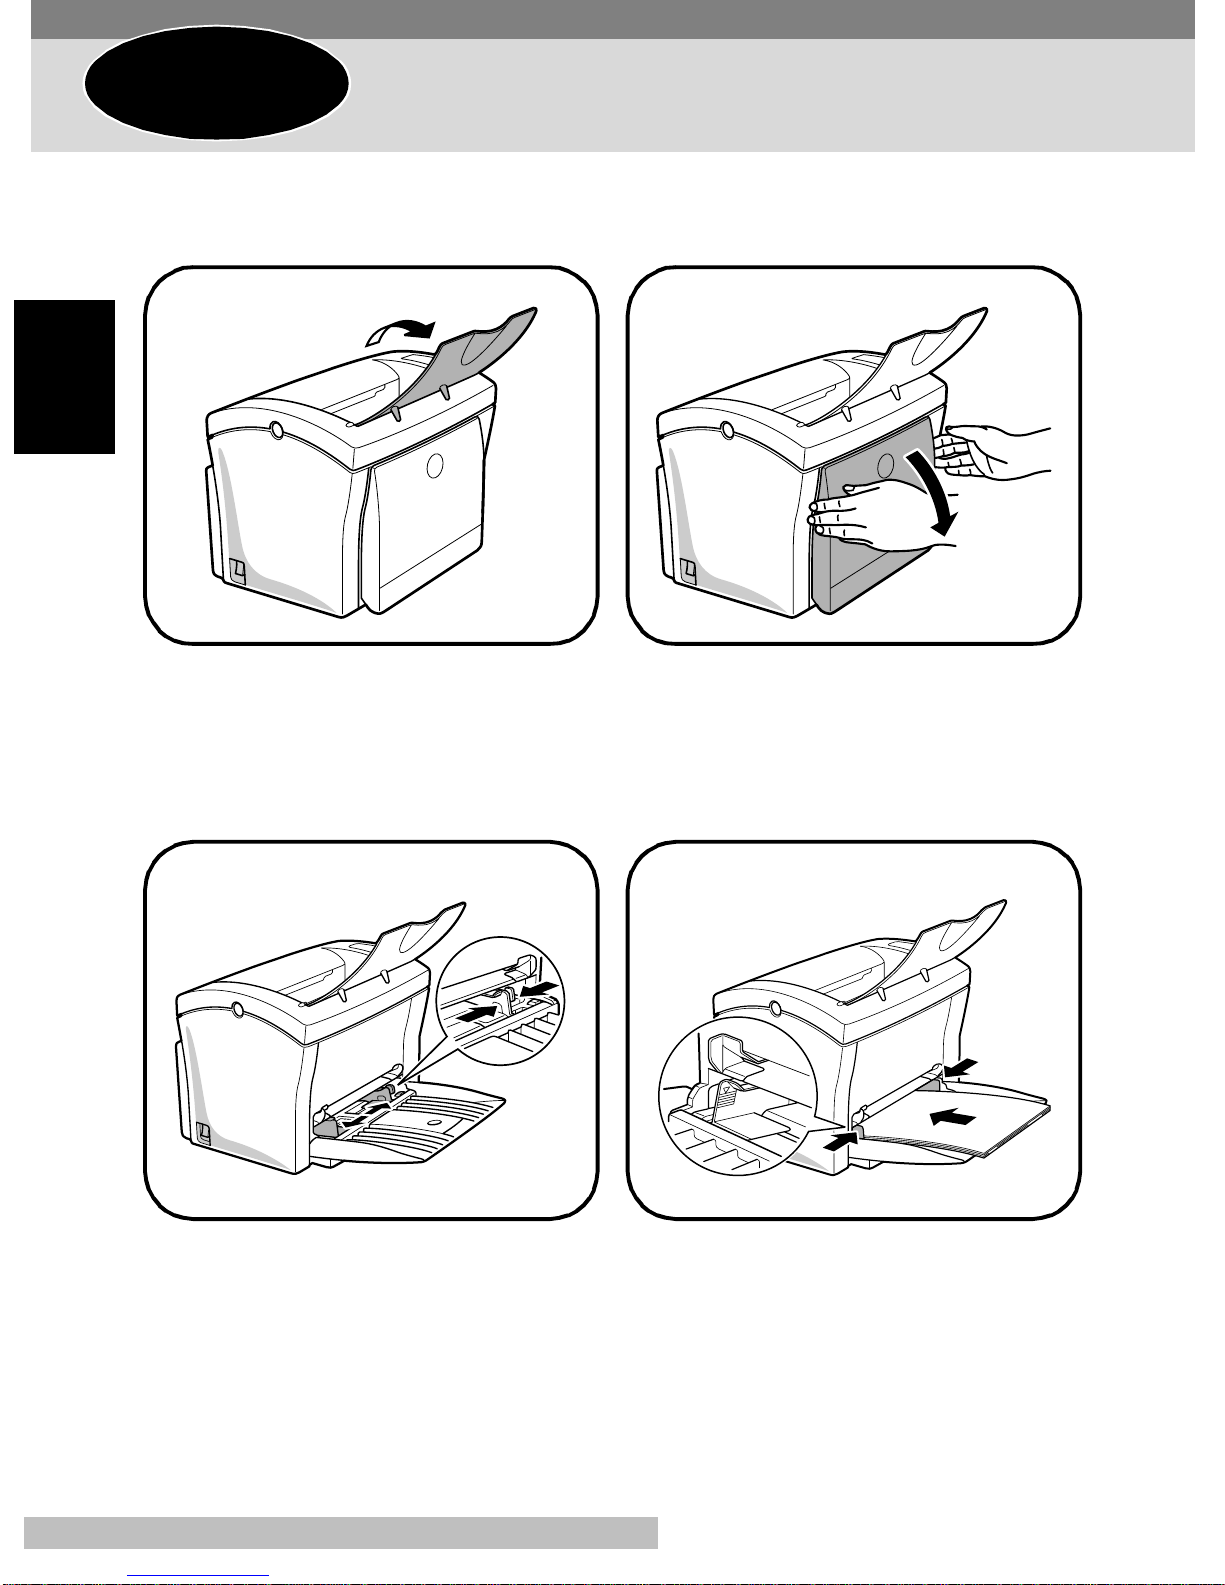
Open the face-down tr ay.
1
Squeeze the right paper guide and
3
open the paper guides.
Pull Tray1 from the printer with both
2
hands and lie it down flat.
Place a stack of pape r in the center
4
of Tray 1. Squeeze the right paper
guide and adjust the paper guides
so that both the left and ri ght sides
of the paper stack are secure.
En-22
Step 4
Connecting to a Computer
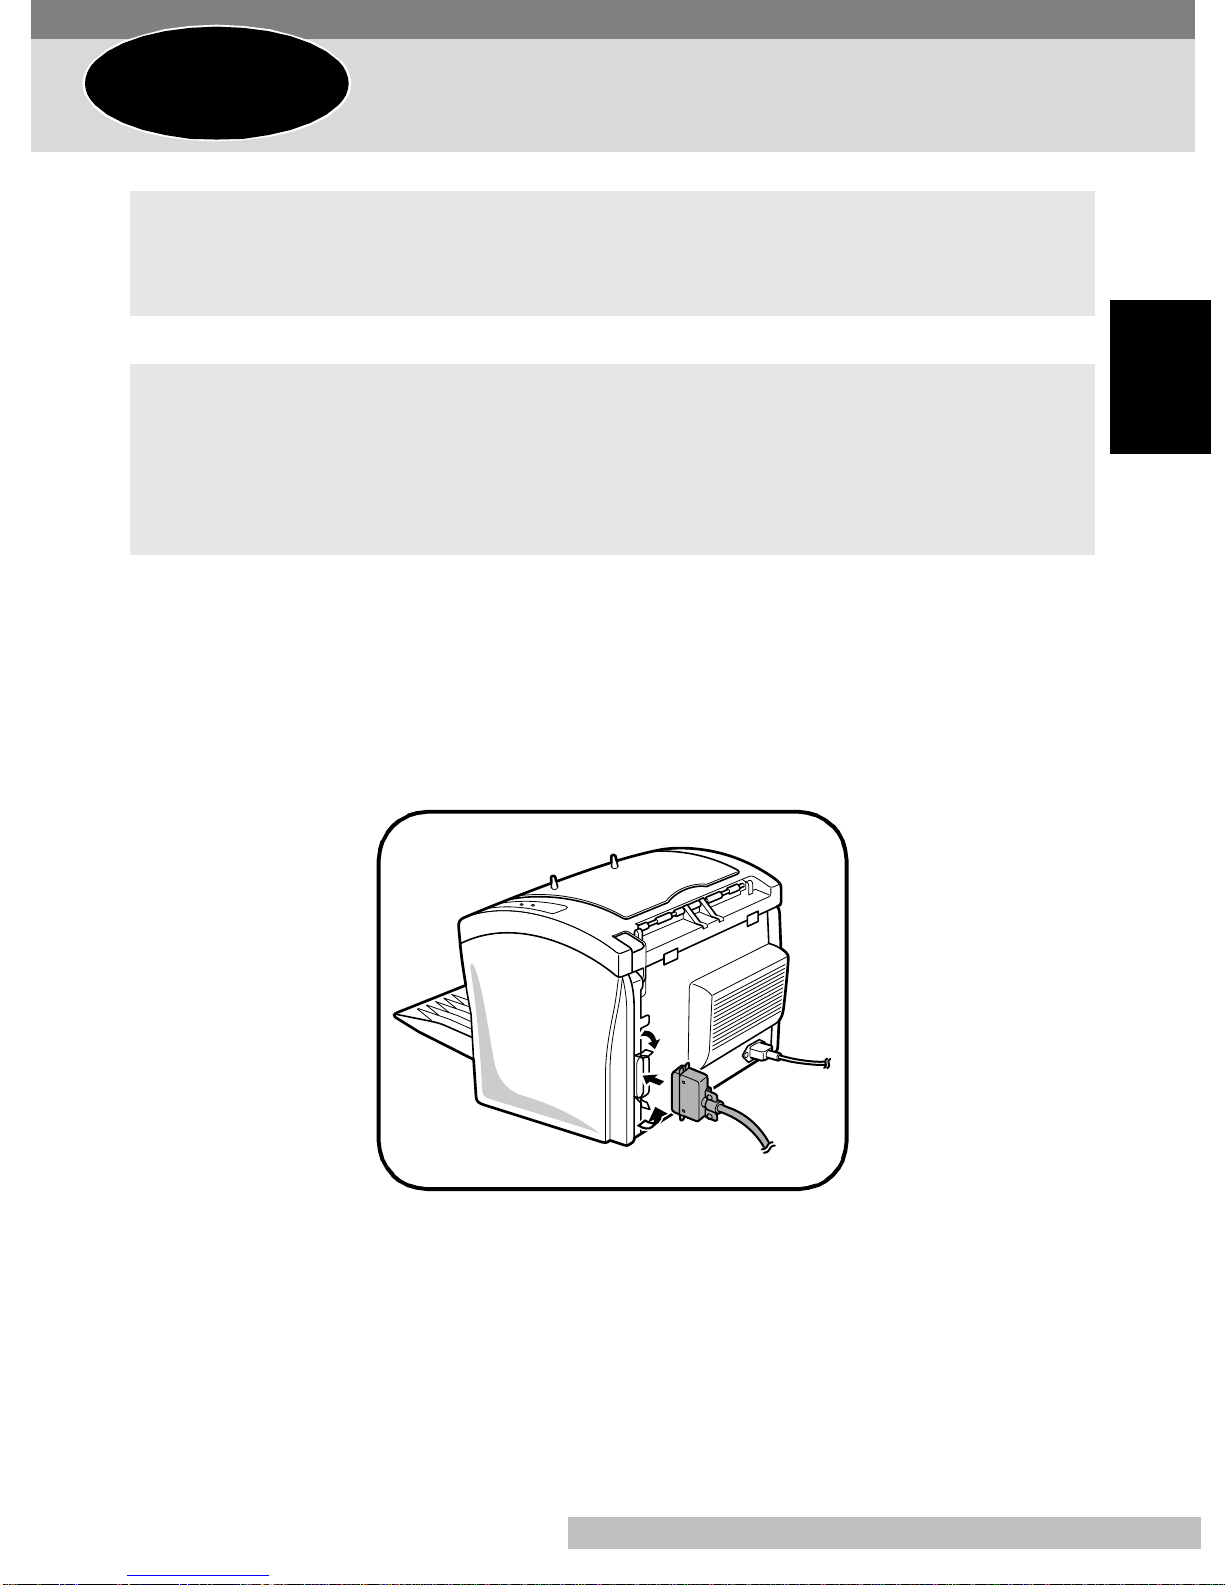
Caution
• Always use a shielded interface cabl e. Use of an unshielded cable can result in radio
interference with dat a.
Note
• You must purchase an IEEE 1284 type-B cabl e for connection b etween th e pri nter and
a computer. For more detai ls, refer to “Specifications” in the
• Minolta d oes not warrant t he use of any particular cabl e. The us er assumes all responsibilit y as to the quality and per formance of the cable .
Make sure that the printer and the computer you are connecting it to are bot h
1
turn ed o ff.
User’s Manu al ( CD-ROM)
English
.
Connect one end of the interface cable to the parallel port of the computer.
2
Connect the ot her end of the int erf ace cabl e to the pa ral lel i nterf ace con nector on
3
the back of th e printer. Secure the interface cab le using the two c lips on the paral lel interface connector.
En-23
Step 5
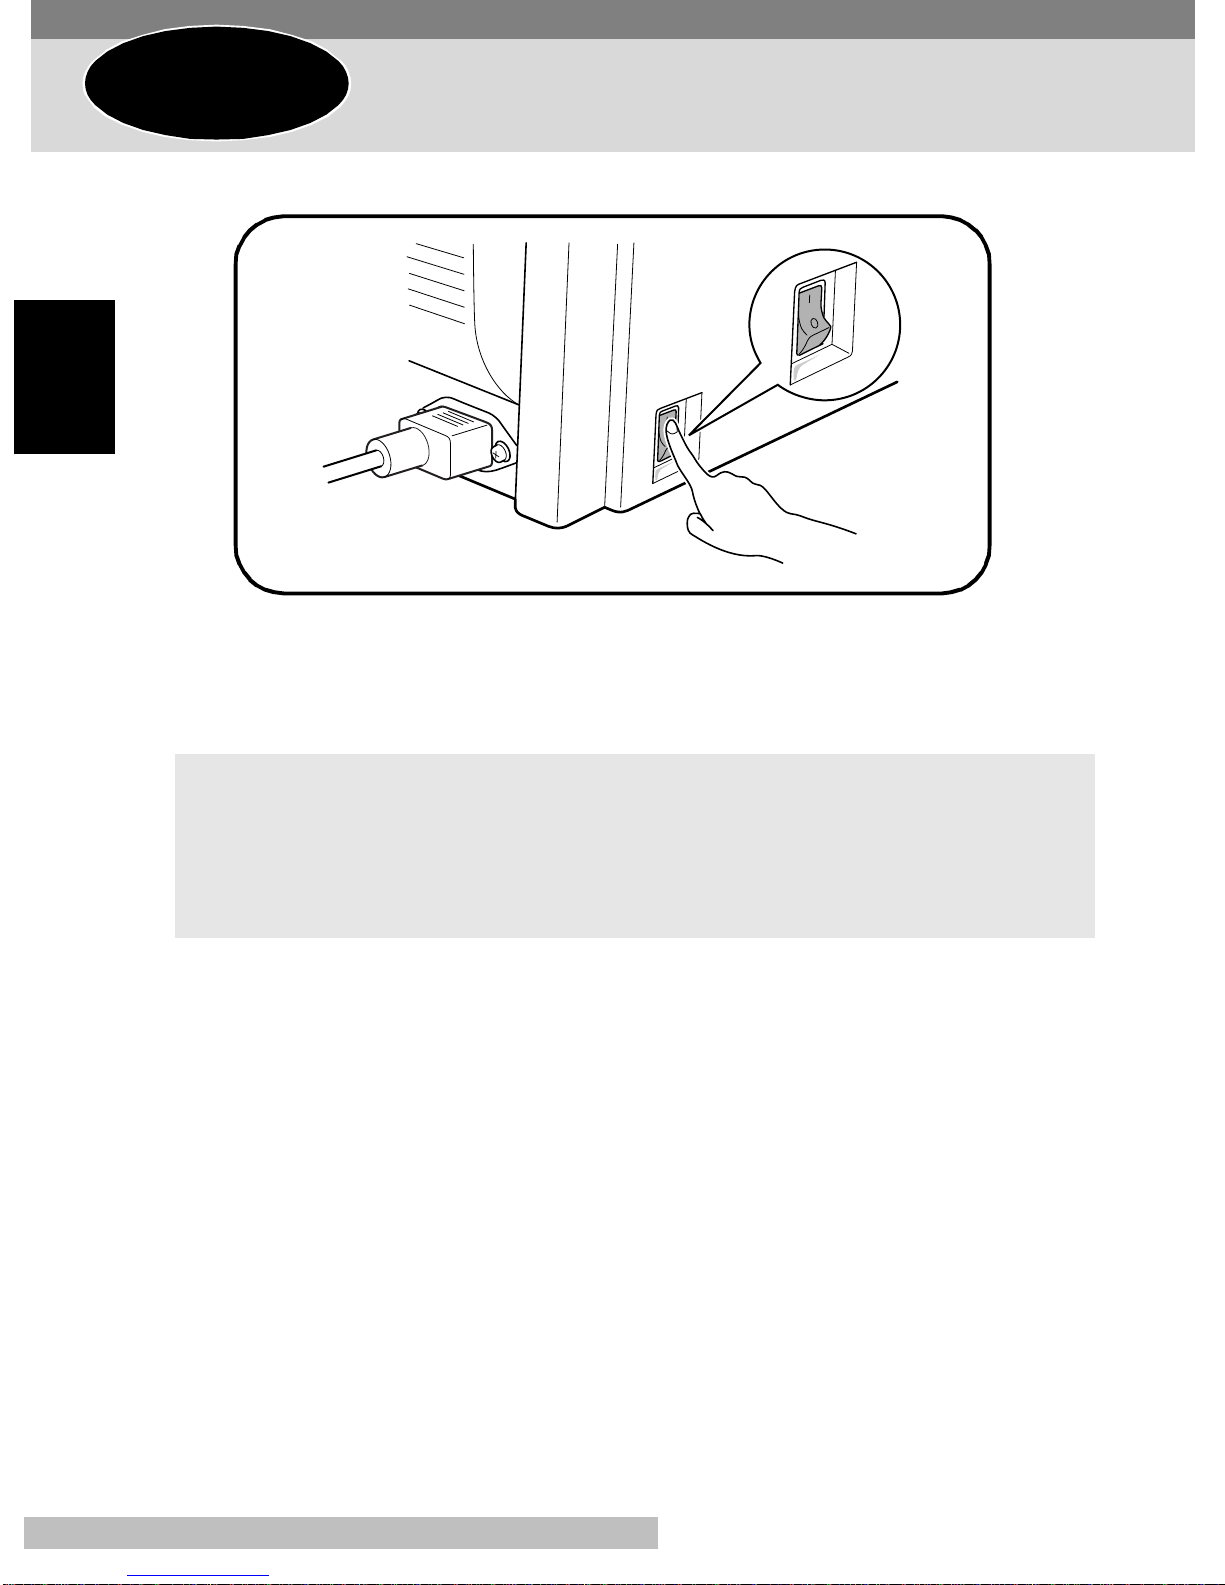
After connecting the printer to a power out let, press the power switch to turn i t on.
■
English
When the printer is tu rned on, bot h indicators on the control panel to light up, and then
the Error indi cator goes off while the Ready indicator stays on. After about 23 sec onds,
the printer is finished warming up and is ready to begin printing.
Turning On the Printer
Note
• The printer automatic ally enters a power saving m ode after about 15 minutes in
which it does not rec eive a print command fr om the computer. Whene ver the
printer recei ves a print command while in the power saving mode , it will automati cally start to warm up bef ore printing.
En-24

Step 6
The Minolta PagePro 1100L Printer Driver was specially dev eloped to provide true
Windows-based printing for users of the Minolta/QMS PagePro 1100L printer. The
PagePro 1100L Printer Driver consists of three programs: the Minolta PagePro
Printer Driver, the Printer Console and the Printer Status Display.
Installing the Printer Driver
System Requirements
The following describes the minimum system requirements that are necessary to
correctly run the Minolta PagePro 1100L Printer Driver.
Operating System: Microsoft Windows 95, Windows 98 or Windows NT 4.0
Personal Computer : IBM-com patible PC with at least a 386DX 16MHz CPU (Pen-
tium processor recommended)
CD-ROM drive
I/O Interface: IEEE 1284 parallel
Memor y: At least 16MB of PC RAM
F ree Disk Space: Approximately 20MB for files
English
En-25
Installing the PagePro 1100L Printer Driver
Under Windows 95/Windows 98/Windows NT
4.0
This section provides information on installing the PagePro 1100L Printer Driver
under Windows 95, Windows 98 or Windows NT 4.0.
You can use the following methods to install the PagePro 1100L Printer Driver.
English
Using the auto-run Installer on
the CD-ROM.
Plug-and-Play installation.
Using the Add Printer Wizard
❍
: Available —: Not available
Windows 95 Windows 98
❍❍❍
❍
——
❍❍
Windows
NT 4.0
To Install the PagePro 1100L Printer Driver Using the
Insta ller (Auto Run)
Turn on your comp uter and start up Windows 9 5, Windows 98 or Windows NT 4.0.
1
Note
• Under Windows 95 or Windows 98 when the Update Device Driver Wi zard or Add
New Hardware Wizard dialog appears on the display, click
Cancel
.
—
Insert the CD-ROM labeled Minolta/QMS PagePro 1100L Printer Drivers into your
2
computer’s CD-ROM drive.
The opening screen is automatically displayed.
3
Note
• The configuration of some computer s m ay prevent the opening screen fr om
appearing auto ma ti cally. If the screen does not appear, double-click
from the CD-ROM.
Minolta.exe
En-26
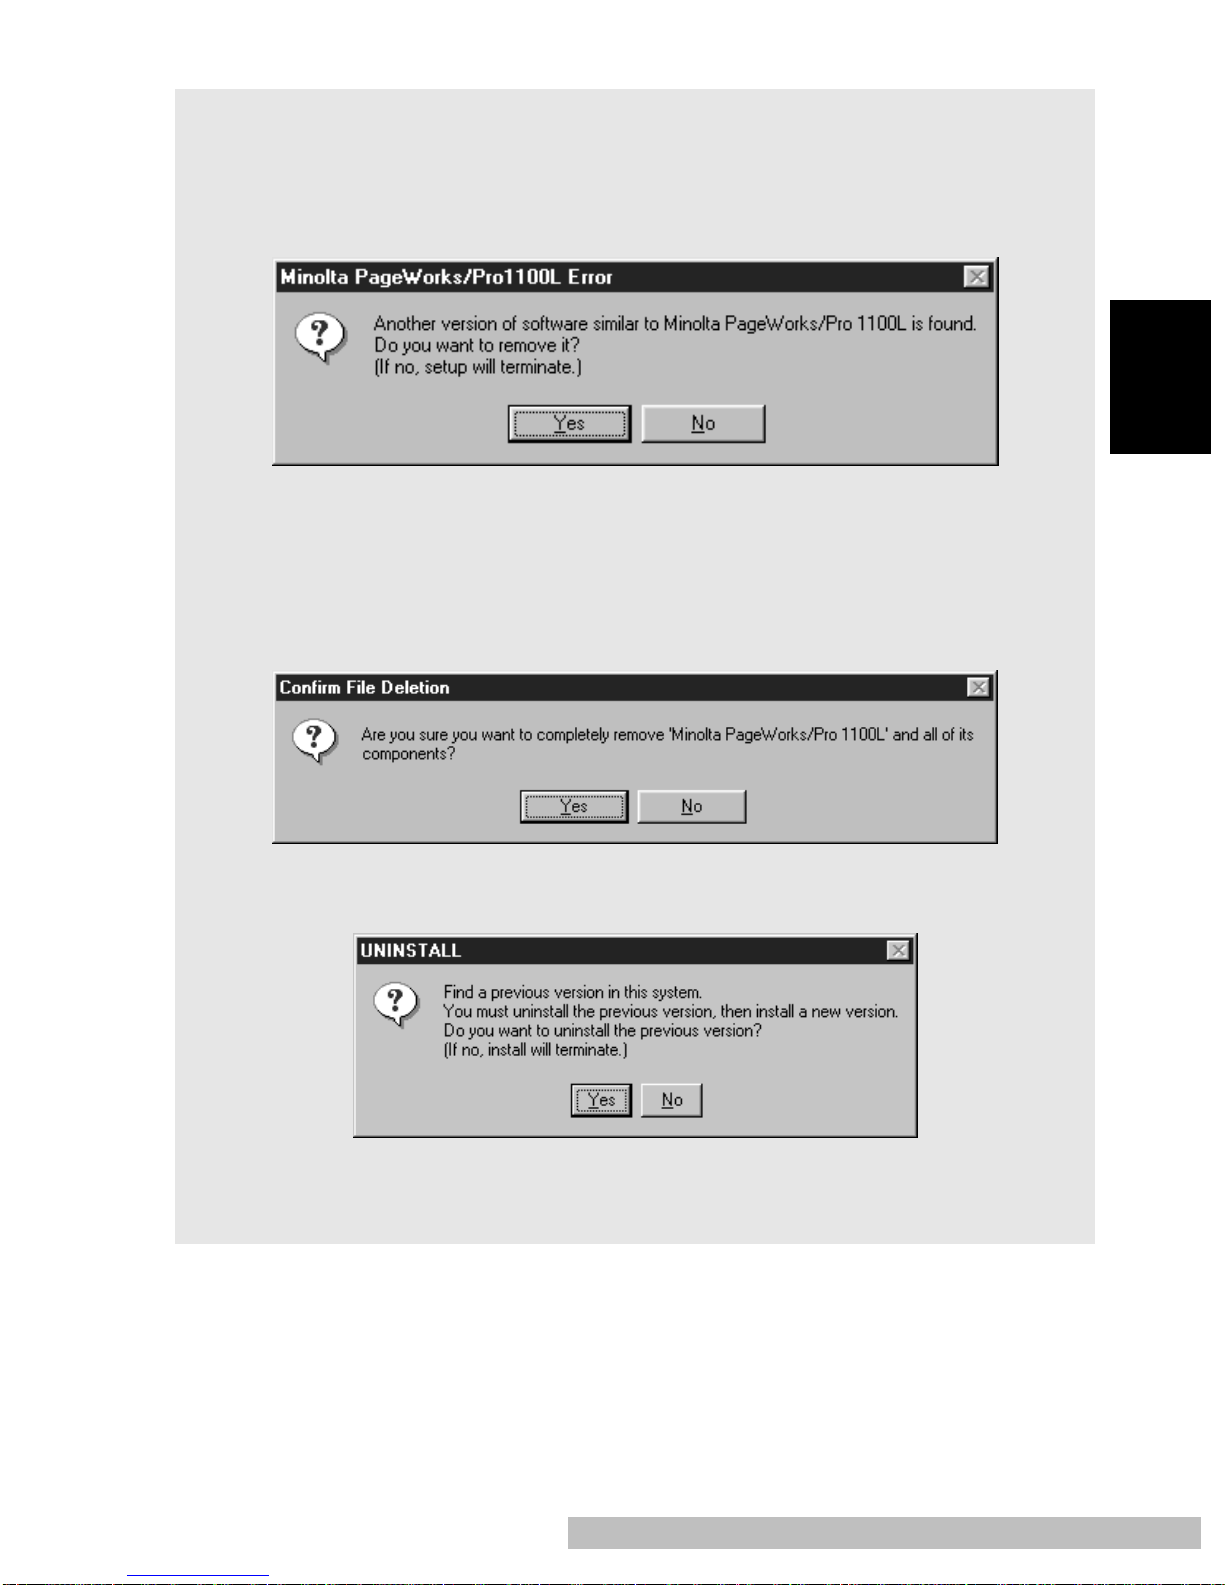
Note
• If you hav e older ve rsi on of the Pa gePro 1100L printer driver already installed on
your computer , the following dialog appears.
Under Windows 95/Windows 98
Click Yes to delete the old printer driver. (T o quit the setup progra m, click
1
No.)
When the following dialog appears, click Yes to start uninstalling the old
2
prin ter dr i v er.
English
Under Windows NT 4.0
Click Yes to delete the old printer driver. (T o quit the setup progra m, click
1
No.)
En-27
 Loading...