


®
Crown Document
Option Commands
1800216-001J

Trademarks
The following a re trade marks or regis tered tr ademark s of thei r resp ective o wners. Ot her
product names mentione d in this manual may also be trademarks or regist ered trademar ks of
their respecti ve o wner s. Reg ist ered tr ad ema rks are re gi ste red i n t he Unit ed S tate s P at ent a nd
Trademark Office; some trademarks may also be registered in other countries. The MINOLTAQMS logo, Crown, and the Cr own logo ar e register ed trademar ks of MINOLTA-QMS, Inc., and
PS Executive Seri es is a tr ad ema rk of MINO LTA-QMS, Inc. PostScript is a tradema rk of Ad ob e
Systems Incorpo rated fo r a pa ge descrip tion la nguage and may be reg istered i n certai n
jurisdictions. Th roughout t his manual, “Post Script Level 2” is used to refer to a set of
capabilities de fined b y Adobe S ystems f or its PostScr ipt Level 2 page descrip tion la nguage.
These capabilit ies, amo ng other s, are implemen ted in this prod uct thr ough a MI NOLTA-QMSdeveloped emulat ion th at is compa tible w ith Ado be's Pos tScrip t Level 2 languag e. Ado be/
Adobe Systems Incorporated. 3Com, 3+Open/3Com Corporation. Aldus, Aldus PageMaker,
Aldus FreeHand/ Aldus Co rporatio n. Appl e, Appl eTalk, EtherTalk, LaserWriter, LocalTalk,
Macintosh, TrueType/Apple Computer, Inc. VIN ES/Bany an. Comp uServe /H & R Block. DE C,
DECnet, VMS/Digi tal Equipm ent Corpora tion. Phone NET/Faral lon Computi ng, Inc. Hewle ttPackard, HP, PCL, HP-GL, LaserJet/Hewlett-Packard Co. IBM PC, Token-Ring/International
Business Machines Corporat ion. Inte l/Inte l Corporat ion. Micr osoft, MS -DOS/Micros oft
Corporation. Novel l and Ne tWare/Novell, Inc . Quark XPress/Quark , Inc. TOPS /Sun
Microsystems, Inc. UNIX/UNIX Systems La boratories.
Proprietary Statement
The digitally encoded sof tware included wit h your print system is Copyrighted © 2001 by
MINOLTA- QMS, In c. All R ights Res erved. This sof tware m ay not be repro duced, modi fied,
displayed, transfe rred, or copied in any form or in any mann er or on an y media, i n whole or in
part, without the ex press written permission of MI NOLTA -QMS, Inc.
Copyright Notice
This manual is Copyrighted © 2001 by MINOLTA-QMS, Inc., One Magnum Pass, Mobil e, AL
36618. All Rights Reserved. This ma nual may not be copied in whole or in part, nor transferred
to any other media or lang uage, without the exp ress writt en perm ission of MINOLTA-QMS, Inc.
Products Covered by this Manual
This manual desc ribes Doc ument Op tion C ommands(DOC s) th at are u sed on a variet y of
Crown printers. Therefo re, no t all Do cument Op tion Comm ands and not a ll printe r feat ures
discussed herein necessar ily apply to any one printer.
Refer to your printer document ation for a l ist of DOCs th at are sup ported on you r printer, then
use this manual for informat ion about the comman ds.

Contents
Document Option Commands ............................................................................5
Introduction 6
Printer Compatibility 6
Emulation Sensing Processor (ESP) 7
Using DOCs 7
DOC Statement Syntax 8
Accessing Printer Features 11
Sample DOC Prologue 13
Command Summary 15
Header and Trailer Pages ....................................................................................19
Introduction 20
Chapter Organization 20
DOC Statement Syntax 21
Printing Header Pages 22
Printing Trailer Pages 25
Header/Trailer Information Commands 27

Document Control Commands 30
Sample Prologue 32
Selecting Printer Features ...................................................................................35
Introduction 36
Printer Compatibility 36
Chapter Organization 37
DOC Statement Syntax 38
Printing Commands 39
Paper Handling Commands 43
Page Layout Commands 46
Sessions 72
Emulation Command 80
Printer Resolution, Quality, and Color Commands 80
Selecting Emulation Features .............................................................................83
Introduction 84
Chapter Organization 86
DOC Statement Syntax 87
HP-GL Emulation Commands 88
HP PCL4 Emulation Commands 91
HP PCL5 Emulation Commands 93
HP-PCL 5e or 5c Emulation 98
PostScript Emulation Commands 111
LN03 Plus Emulation Commands 111
PostScript Level Commands 113
Lineprinter Emulation Commands 114
CCITT Group 3 and 4 118
CALS 122
TIFF 123
Bin Assignments .................................................................................................125
Printer Bin Assignments 126
4

Document Option
Commands
1

Introduction
MINOLTA-QMS printers offer a wide range of features for designing and printing
documents. Applications and printer emulations (such as PostScript, HP-GL, HP PCL)
differ in their ability to access some of the printer’s features. The Document Option
Commands (DOC) provide a way to access pri nter f eature s that are not acc essib le by your
application or the printer emulation.
Document Option Commands provide a quick and convenient way to access printer
features. By using Document Option Commands instead of individual printer language
commands, one driver can support all languages or emulations used by the printer.
If you are a system administrator, use your host network software to create customized
queues for all users connected to the printer. Use Document Option Commands to
generate personalized header pages or to activate special printer features for each user.
Characteristics of DOCs
Job related
Document Option Commands are relevant to the formatting of documents.
Human readable
No special programming skills are necessary to use Document Option Commands.
Emulation transparent
Document Option Commands are recognized, interpreted, and stripped from the
data stream before the print job is interpreted by the emulation.
Printer Compatibility
Printer features vary on each printer. For example, some of our printers may have a
built-in stapler. Document Option Commands designed to access stapler features would
not work on a printer th at does not hav e a sta pler. The purpose of this manual is to provi de
an overall context for Document Option Commands used with any printer. Refer to your
printer documentation for a list of Document Option Commands supported and new
Document Option Commands designed to use the partic ular feature s of your printe r . Ref er
to this manual for general examples of how to use Document Option Commands.
Document Option Commands6

Emulation Sensing Processor (ESP)
Using a form of artificial intelligence, ESP technology analyzes incoming file data from
any of the printer’s interfaces. ESP technology selects the appropriate printer language
from those installed on the printer and processes the print job, freeing the user from the
need to change printer switch settings or send software commands to accommodate
different printe r emulations.
Using DOCs
When using Document Option Commands, the print job consists of a DOC prologue
attached to the emulation page descriptions. The prologue consists of text statements that
provide information for the header and trailer pages, and Document Option Commands
that specify how the job is to be processed and printed.
Examples
All DOC prologues begin with %! symbols on the first line. Each DOC statement begins
with two percent signs (%%) as the first characters on a line. Next, a unique keyword
follows with any optional arguments to the next line. Each line is limited to 255
characters. Spaces in the DOC statement are allowed only between keywords and
arguments.
DOC Statement Example
%%IncludeFeature: duplex(on)
Unique Keyword
Double Percent Signs
Argument Attribute
Argument
Document Option Commands 7
DOC Prologue Example
%!
%%Title: A Sample Document for the printer
%%For: Corporate Communications
%%Date: 08/21/00 12:30:00
%%IncludeFeature: duplex(on)
%%End Comments
Actual text of print job...
Note that alphabetic case is important for keywords. Use the following rules for all
keywords.
All keywords are lowercase except for the first letter of each “word.” For example:
%%Title; %%IncludeFeature.
All arguments are lowercase except where specified.
DOC Statement Syntax
Document Option Commands have the following syntax:
Syntax
Indicator
Keyword
Argument
Attributes
Indicator Keyword
An indicator that a Document Option Statement follows. Indicators are %%.
The command name. Typical examples of indicators and keywords are
%%Title:
%%CreationDate:
%%IncludeFeature:
%%EndComments
Lowercase command that causes action to occur with the print job or printer
function.
Attributes specify settings for the command. For example, the paper size
attribute of the
that is to be used for the print job:
%%IncludeFeature: input (letter)
parameters
%%IncludeFeature: input
command specifies the paper size
Mixed case commands must be typed exactly as shown.
Document Option Commands8
Syntax Conventions
(...) Parentheses are explicit separators that must be entered as shown in the com-
mand syntax. One space (hex 20) is recommended for separation before and
after the parentheses.
< ...> Attributes or values withi n < > brac kets are option al variabl es. Do no t inclu de the
brackets.
[...] Items within square brackets are optional variables.
{...} Parameters or values within curly braces may be repeated one or more times.
Do not include the braces.
::== logical equate symbol
| logical OR function
Spacing Spacing may be used to separate multiple commands and/or arguments on a
single line.
Example
%%IncludeFeature: orientation (<rotation>)
<rotation> ::== Portrait | Landscape | portrait | landscape
Unless noted, all parameters not shown in
or within < > or { }, must be typed
bold
exactly as shown in the syntax.
Mixed case commands must be typed exactly as shown.
About the DOC Prologue
The DOC prologue is attached to the beginning of a print job either by the person who is
sending the job to the printer, or by a host system print queue. The follo wing rul es apply to
DOC prologues:
Every DOC prologue must begin with a si ngle “comment li ne.” (Comment l ines begin
with %! and include all subsequent characters up to the first newline character
encountered.) If a comment line is not on line 1 of the prologue, the printer (or host
software) assumes that no pr ologue is in the cu rrent print job. (If you have subseque nt
lines containing valid Document Option Commands, the commands may be ignored
or cause unpredictable results.)
Document Option Commands 9

All DOC statements are s pecif ied by t wo p ercent si gns (%%) as t he fi rst c harac ters o n
a line. The statements consist of a unique keyword and any optional arguments up to
the next newline (linefeed). Use space characters only for the separation of keywords
and arguments. Do not use a space to separate the %% characters from the keywords
or at the beginning of a line . Keywords ar e case s ensit ive; t ype them exa ctly as shown
in this manual.
All Document Option Commands for a print job must appear in the prologue at the
beginning of the job and must follow one another. The prologue terminates when the
system recognizes a line that does not begin with %% or when it encounters the
%%EndComments
When a Document Option Command is used more than once in a pr int job, the first
command.
instance takes precedence. When multiple files, each beginning with their own Document Option Commands, are conc atenat ed tog eth er as a single p rint j ob, only t he commands listed first tak e effe ct unless a
job. Note that a
jobs can be delimited by the
minators. The
newlayout
newlayout
command can be used at the beginning of a subjob. Sub-
%%Session
command must be included with each set of Document
newlayout
command is also included in the print
command or by e mulation spec ific job ter-
Option Commands that you want t o be evaluated and used. For mor e i nfo rmat io n, se e
Chapter 3, “Selecting Printer Features” .
When different Document Option Commands set conflicting attributes for print jobs,
the first command takes precedence.
You may place comment lines (%!) anywhere in the prologue. The printer ignores all
comment lines.
Printing attributes that are not specified by Document Option Commands are determined
by printer default settings.
Unrecognized or unsuppor ted Documen t Option Commands are ignore d. Unrecogni zed or
invalid arguments to Document Option Commands are also ignored.
DOC Statement Line Constraints
The statement lines have constraints concerning line length and line endings:
Statements (on a single line) must be less than or equal to 255 characters in length,
excluding line termination characters.
Document Option Commands10

All lines must end with a carri age re turn c haract er (he x 0D), a l ine fe ed char acter (hex
0A), or a carriage return/lin e feed combination (hex 0D, hex 0A).
Continuation Lines
In some cases, you may want to use a DOC statement containing more than 255
characters. Continuation lines can be added by beginning each additional line with %%+.
For example, continuation lines might be used in the following manner:
%!
%%Title: A Sample Document for the printer
%%For: Corporate Department
%%Date: 12/25/00 12:35:00
%%IncludeFeature: duplex (on) collate (on)
%%+numcopies (10)
%%+inputbin (1)outputbin (2)input (letter)
%%EndComments
Actual text of print job...
Accessing Printer Features
The %%IncludeFeature keyword includes arguments for selecting printer features.
%%IncludeFeature: argument (attributes
argument
attributes
In this case, o ne of the Doc ument Optio n Comm ands that s elec t printe r fe atures .
Chapter 3, “Selecting Printer Features” tells you how to use Document Option
Commands to access printer features.
The variables for the s pe ci fied c ommand. Attributes includ e on , off, and alphanu-
meric names and values. The value must be enclosed in ( ).
More than one argument may be included in a
argument (attributes)...]
) [
%%IncludeFeature:
DOC statem ent, but
the statement must not exceed 255 characters per line. Use continuation lines that begin
with %%+ if your
%%IncludeFeature
statement exceeds the 2 55 characters-per-line
limit. For more information on accessing printer features through the
%%IncludeFeature:
DOC statement, see Chapter 3, “Selecting Printer Features” on
page 35.
Document Optio n Commands 11

%%IncludeFeature Command Example
This example specifies orientation, margins, input bin, output bin, copies, duplexing, and
collation:
%%IncludeFeature: orientation (portrait)
%%+margins (3600 7200 3600 3600) inputbin (Letter)
%%+outputbin (1) numcopies (5) duplex (on)
%%+collate (on)
DOC Prologue Terminator
The %%EndComments command terminates the DOC pro logue and signal s the beginning
of the print job's data. All data after the %%EndComments command is handled by the
selected emulation. The command syntax is
%%EndComments
This command should be used only to prevent further processing of Document Option
Commands. The DOC prologue is also terminat ed when a line is encounter ed that does not
begin with %% or %! characters.
Document Option Commands12

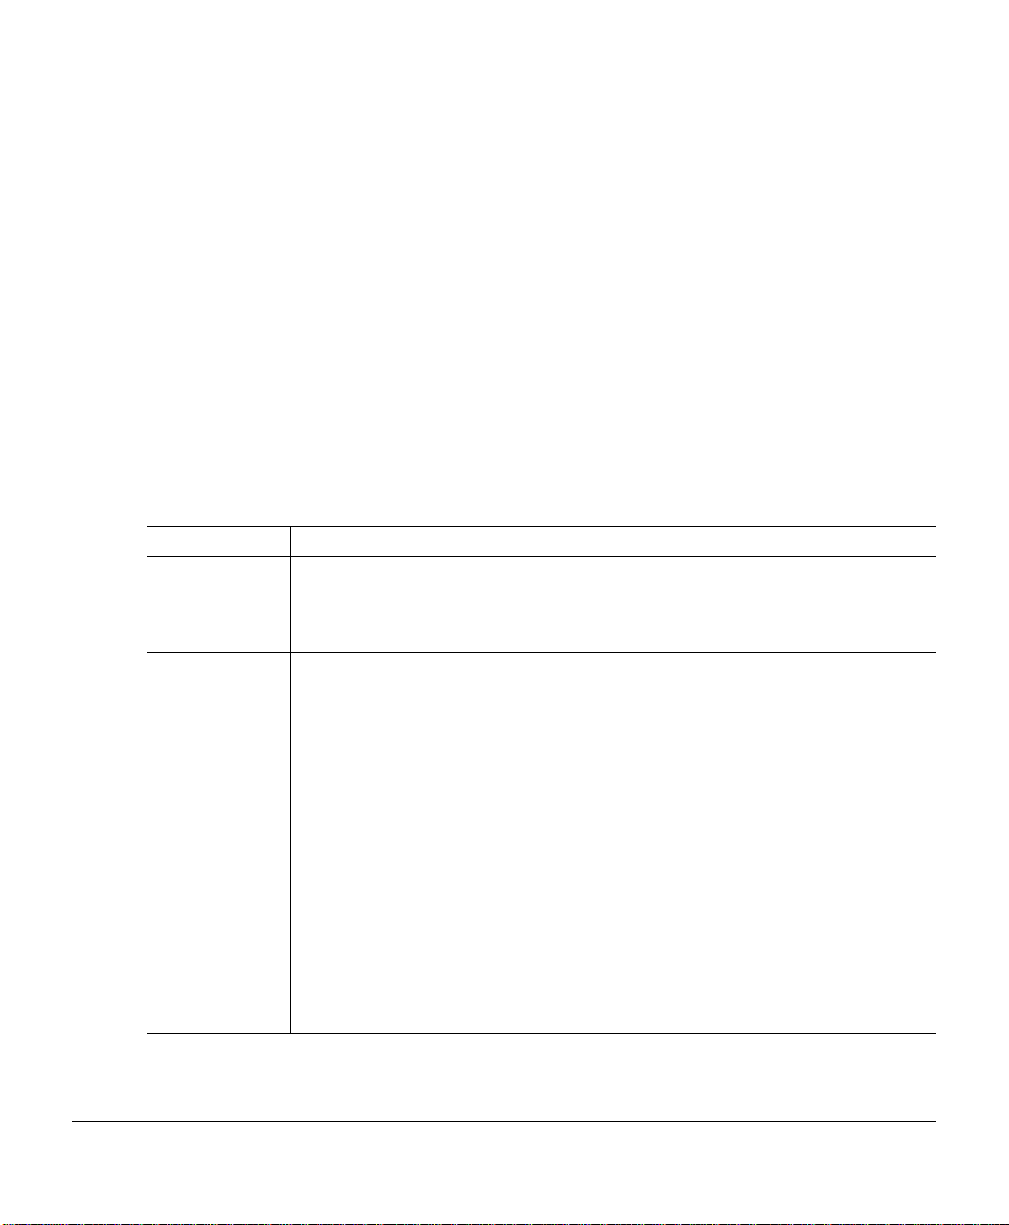
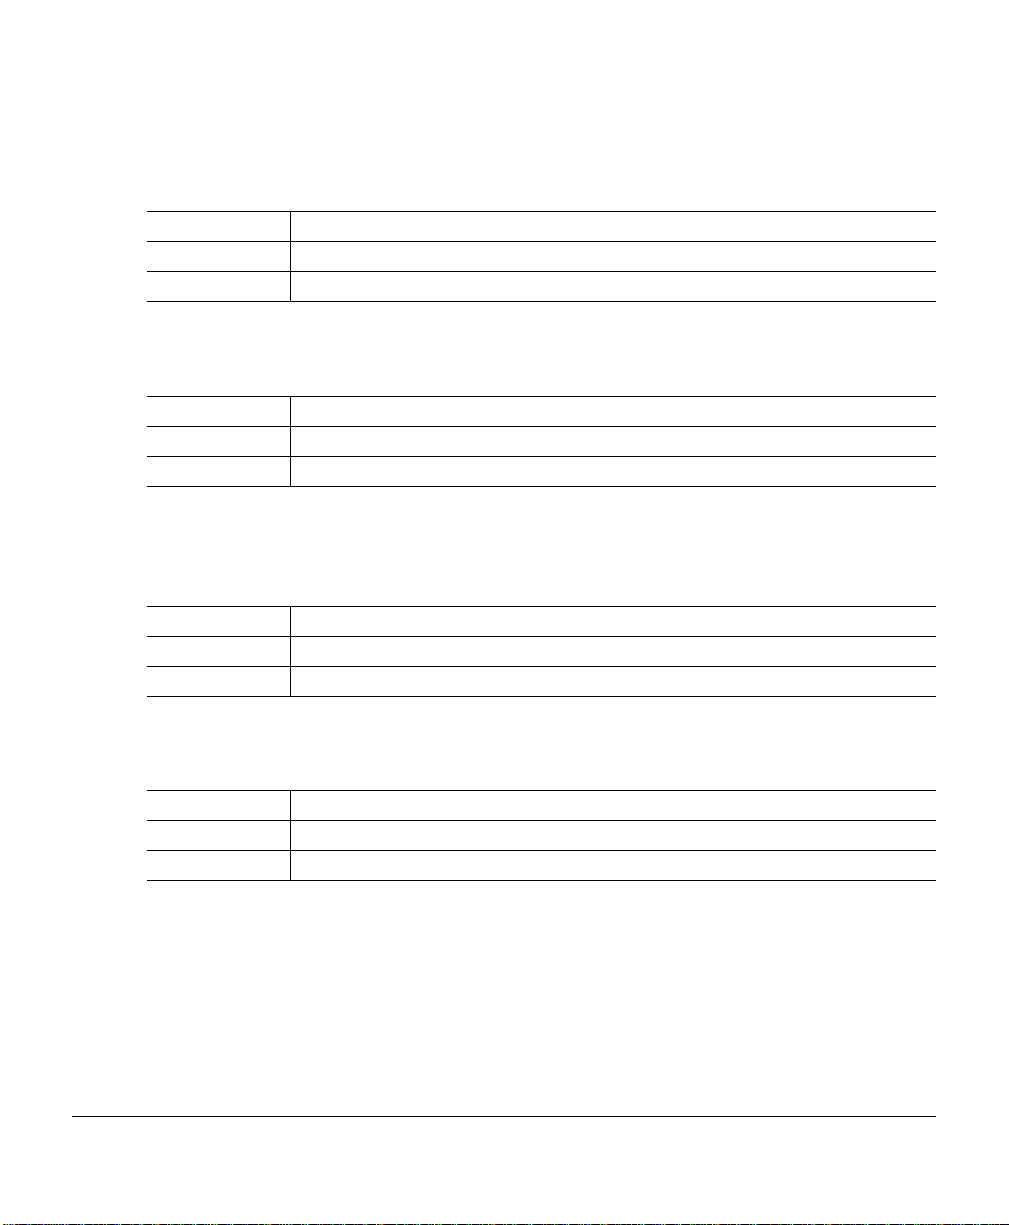
Sample DOC Prologue
The prologue shown below uses all the header and trailer page Document Option
Commands described in chapter 2 as well as the %%IncludeFeature command described
earlier in this cha p t er. The figure on the next page sho ws t h e hea der pa ge t ha t r es ult s fr om
this prologue. (The printer and product names shown on header and trailer pages vary
depending on the product.)
%!
%%Title: Little Boxes
%%For: Corporate Communications
%%Routing: Mail Stop 5440
%%Date: May 1, 2000
%%Creator: Line Editor
%%CreationDate: May 1, 2000
%%CopyRight: Copyright 2000
%%Version: Version 1.0
%%IncludeFeature: header (on) trailer (on)
%%+emulation (postscript) numcopies (2)
%%EndComments
/Times-Roman findfont 30 scalefont setfont
/square
{newpath
0 0 moveto
90 0 lineto
90 90 lineto
0 90 lineto
closepath fill
6 92 moveto
(A Box) show }def
Document Optio n Commands 13

postscript
JOB 2
Little Boxes
For:Corporate
Communications
Routing: Mail Stop 5440
Date:May 1, 2000
Creator:Line Editor
magicolor
6100 Print System
PrintQueue
Document Option Commands14

Command Summary
The following is a list of Document Option Commands
Header/Trailer Page Commands
Header page %%IncludeFeature: header
Trailer page %%IncludeFeature: trailer
Save job for reprinting %%Retain
Header/Trailer Information Commands
Accounting information %%ChargeNumber:
Copyright statement %%CopyRight:
Application used %%Creator:
Date and time created %%CreationDate:
Current date %%Date:
Owner %%For:
Host computer %%Host:
Routing information %%Routing:
Title %%Title:
Version and Revision %%Version:
Document Control Commands
Document formatting options %%IncludeFeature:
Page order command %%PageOrder:
Document number of pages %%Pages:
Ending the prologue %%EndComments:
Job boundery command %%EndOfDocument:
End of document command <ESC>%-12345x
Subjob boundery command %%Sessions
Job completion email notification %%Notify
Document Formatting
Print background images %%IncludeFeature: background
Booklet printing %%IncludeFeature: booklet
Print borders %%IncludeFeature: border
Collate prin t job %%IncludeFe ature: collate
Document Optio n Commands 15

Color separation command %%IncludeFeature: colorseparation
Color model command %%IncludeFeature: colormodel
Duplex print jobs %%IncludeFeature: duplex
Select emulation %%IncludeFeature: emulatio n
Select paper %%IncludeFeatu re: input
Logical margins %%IncludeFeature: margin
Media type command %%IncludeFeature: mediatype
New Layout command %%IncludeFeature: newlayout
Select number of copies %%IncludeFeature: numcopies
Stacker offset command %%IncludeFeature: offset
Select orientation %%IncludeFea tu re: orie nt ati on
Select output bins %%IncludeFeature: output
Number up printing %%IncludeFeature: pagegrid
Offset logical page %%IncludeFeature: pageoffsets
Logical page orientation %%IncludeFeature: pageorientation
Print page range %%IncludeFeature: pagerange
Scale logical page %%IncludeFeature: pagescaling
Logical page size %%IncludeFeature: pagesize
Select print mode %%IncludeFeature: quality
Set printer resolution %%IncludeFeature: resolution
Set staple mode %%IncludeFeature: st aple
HP-GL Emulation Commands
Select enhanced resolution %%IncludeFeature: enhanced
Expand plot %%IncludeFeature: expand
Select original paper size %%IncludeFeature: size
Select pen width and color %%IncludeFeature: pen
Select plotter %%IncludeFeature: plotte r
Scale the image %%IncludeFeature: scaling
HP PCL 4, 5e and 5c Emulation Commands
Enable scalable fonts %%IncludeFeature: scalablefonts
Install object %%IncludeFeature: install
Remove object %%IncludeFeature: remove
Remove resource %%IncludeFeature: removeresource
Select default font %%IncludeFeature: font
Document Option Commands16

Select default font ID %%IncludeFeature: fontid
Select symbol set %%IncludeFeature: symbolset
Set carriage return to CR+LF %%IncludeFeat ure: criscrlf
Set linefeed to CR+LF %%IncludeFeature: lfiscrlf
Set number of lines per inch %%IncludeFeature: linesperinch
Set point size %%IncludeFeature: pointsize
Resource %%IncludeFeature: resource
Lineprinter Emulation Commands
Select font for current job %%IncludeFeature: font
Set point size for current job %%IncludeFeature: pointsize
Specify character map type %%IncludeFeature: map
Number lines %%IncludeFeature: number
Set tabs %%IncludeFeature: tabs
Set linefeed to CR+LF %%IncludeFeature: lfiscrlf
Set carriage return to CR+LF %%IncludeFeat ure: criscrlf
Set formfeed to CR+FF %%IncludeFeature: ffiscrff
Wrap lines %%IncludeFeature: autowrap
Set number of lines per page %%IncludeFeature: linesperpage
Set margins %%IncludeFeature: lpmargins
Set orientation %%IncludeFeature: lporientation
PostScript Emulation Commands
SC 200 to set PostScript protocol %%IncludeFeature: parpsprotocol
CCITT Groups 3 and 4 Commands
Start decompression %%ImageData
Set encoded byte flag %%EBAMode
Set end of block %%BlockEnd
Set line end %%LineEnd
Eject page %%PageEnd
Set image position %%ImagePosition
Invert image %%InvertImage
Set dpi for image expansion %%DPI
Set data compression %%Compression
Reverse bits %%BitReverse
Document Optio n Commands 17

End print job %%JobEnd
Set image size %%ImageSize
Set image rotation %%Rotation
Set image location on page %%SourceImageOrigin
Set image location in source %%SourceImagePosition
LN03 Commands
Identify product %%IncludeFeature: product
Control line wrap %%IncludeFeature: autowrap
Specify default paper size %%IncludeFeature: paper_size
Control transformation poi nt %%IncludeFeature:
paper_size_override
Adjust image horizontally %%IncludeFeature: xorigin
Adjust image vertically %%IncludeFeature: yorigin
Set power-up configuration %%IncludeFeature: reset_override
CALS Commands
Automatic rot ation of image %%I ncludeFeature: autorotati on
Automatic scaling of image %%IncludeFeature: autoscaling
TIFF Commands
Automatic rot ation of image %%I ncludeFeature: autorotati on
Up or down scaling of i mage %%IncludeFeatur e: autoscaling
Automatic selection of paper size %%IncludeFeature: sheetsel
Annotation %%IncludeFeature: annotation
Reverse image control %%IncludeFeature: reverse
Control disk scratchfile size %%IncludeFeature: scratchfile
Set annotation tag number %%IncludeFeature: tag
Document Option Commands18

Header and Trailer Pages
2
Introduction
Header and trailer pages are separator pages that identify each print job and help users sort
out print jobs in the printers output bin. A “header” page prints before the first page of a
print job. A “trailer” page prints after the last page of a print job. Use the Document
Option Commands in this chapter to turn header/trailer pages on or off and to customize
the information displayed on them.
Chapter Organization
Use this table to go to the command or information included in this chapter.
For information on... Go to...
DOC statement syntax “DOC Statement Syntax” on page 21
Header pages “Printing Header Pages” on page 22
Trailer pages “Printing Trailer Pages” on page 25
Header/Trailer commands “Header/Trailer Information Commands” on page 27
Printing document title “Document Title” on page 27
Printing document host “Document Host” on page 27
Printing document owner “Document Owner” on page 28
Printing document routing “Routing Information” on page 28
Printing time of document “Printing Time” on page 28
Printing application used “Application Used” on page 28
Printing document copyright date “Copyright Date” on page 29
Printing document accounting “Charge Number” on page 29
Printing document version “Version Number” on page 29
Printing document creation date “Creation Date” on page 29
Controlling page order “PageOrder Command” on page 30
Controlling number of pages “Pages Command” on page 30
Selecting job options “IncludeFeature Command” on page 31
Ending the DOC prologue “EndComments Command” on page 31
Header prologue example “Sample Prologue” on pag e 32
Header and Trailer Pages20
DOC Statement Syntax
Document Option Commands have the following syntax:
Syntax
Indicator
Keyword
Argument
attributes
Indicator Keyword
An indicator that a Document Option Statement follows. Indicators are %%.
The command name. Typical examples of indicators and keywords are
%%Title:
%%CreationDate:
%%IncludeFeature:
%%EndComments
Lowercase command that causes action to occur with the print job or printer
function.
Attributes specify settings for the command. For example, the paper size
attribute of the %%IncludeFeature:input command specifies the paper size that
is to be used for the print job:
%%IncludeFeature: input (Letter)
parameters
Mixed case commands must be typed exactly as shown.
Syntax Conventions
(...) Parentheses are explicit separators that must be entered as shown in the com-
mand syntax. One space (hex 20) is recommended for separation before and
after the parentheses.
< ...> Attributes or values withi n < > br ackets are option al vari ables . Do not inc lude the
brackets.
[...] Items within square brackets are optional variables.
{...} Parameters or values within curly braces may be repeated one or more times.
Do not include the braces.
::== logical equate symbol
| logical OR function
Spacing Spacing may be used to separate multiple commands and/or arguments on a
single line.
Header and Trailer Pages 21
Example:
%%IncludeFeature: orientation (<rotation>)
<rotation> ::== Portrait | Landscape | portrait | landscape
Unless noted, all parameters not shown in
or { }, must be typed exactly as shown in the syntax.
Mixed case commands must be typed exactly as shown.
Printing Header Pages
Use the
or off and to specify the paper input bin for the header page.)
Syntax
<setting>
<source>
header
argument with the “%%Inc ludeFeature ” command to turn header page s on
%%IncludeFeature:
off (
disable document header page)
on (
enable document header page) |
file (
enable header page for current subjob only)
onfile (
enable document header page and header page for current subjob only)
<physical> <input_bin> |
<physical> <logical> |
<physical> |
<input_bin> |
<logical>
<physical> ::==
Letter | Legal | Ledger | Executive | A5 | A4 | A3 | B5 | B4
<input_bin>
1 | 2 | 3 | 4 | manualfeed | * |
depending on the maximum number of bins
0 may indic ate manual feed
* indicates current default input bin and other bins of the same size.
header
or within < >
bold
(<setting> [<source>] )
|
|
<logical>
upper | lower |
other defined name
Header and Trailer Pages22

Default
Notes
*
The paper sizes are dependen t on the printer. For information on the paper siz es
supported by your printer, see your printer documentation.
The number and names of paper input bins may vary on each printer. See
“Printer Bin Assignments” in appendix A for the names of input and output bins
on printers.
Examples
%%IncludeFeature: header (on Letter)
%%IncludeFeature: header (on Letter 1)
%%IncludeFeature: header (on 1)
%%IncludeFeature: header (on Letter upper)
%%IncludeFeature: header (on upper)
Use the optional
input
argument to select the input bin for the header page paper. See
“Printer Bin Assignments” in appendix A for input bin name assignments for your printer.
Information Included on the Header Page
The header page lists information specified in the Document Option Commands. The
values for %%For: and %%Title: are printed in large bold type at the top of the page, and
the rest are listed in smaller type in the bottom half. Here is a list of the information
provided by the header page:
printer name
selected interface
job identification
title (%%Title)
submitting computer (%%Host)
job owner (%%For)
routing message (%%Routing)
start time (%%Date)
application used (%%Creator)
creation time (%%CreationDate)
Header and Trailer Pages 23

copyright date (%%CopyRight)
accounting information (%%ChargeNumber)
version number (%%Version)
job submission time
job start time
number of sheets printed
printer product name/logo
Header page example
The following is an example of a DOC prologue for a header page:
%!
%%Title: Your Header Page
%%For: Marketing
%%Routing: MKTG-4032
%%Date: Today
%%Creator: Line Editor
%%CreationDate: Yesterday
%%CopyRight: Copyright 2000
%%Version: Version 3.9
%%IncludeFeature: header (on) trailer (on)
%%+emulation (postscript) numcopies (3)
%%EndComments
Header and Trailer Pages24
Printing Trailer Pages
Use the
trailer
page argument to tur n trailer pages on or off and to specif y the paper input
bin for the trailer page:)
Syntax
<setting>
<source>
%%IncludeFeature:
off (
disable document trailer page)
on (
enable document trailer page
onerror (
errorsonly (
lations and display only the errors information
file (
enable trailer page for current subjob only
onfile (
<physical> <input_bin> |
<physical> <logical> |
<physical> |
<input_bin> |
<logical>
<physical> ::==
Letter | Legal | Ledger | Executive | A5 | A4 | A3 | B5 | B4
<input_bin>
1 | 2 | 3 | 4 | manualfeed | * |
depending on the maximum number of bins
0 may indic ate manual feed
* indicates current default input bin and other bins of the same size.
trailer
(<setting> [<source>] )
|
) |
enable document trailer page when errors are reported by emulations)
enable document trailer/error page when errors are reported by emu-
) |
) |
enable document trailer page and header page for current subjob only)
|
<logical>
Default
Notes
upper | lower |
*
The paper sizes are dependen t on the printer. For information on the paper siz es
supported by your printer, see your printer documentation.
The number and names of paper input bins may vary on each printer. See
“Printer Bin Assignments” in appendix A for the names of input and output bins
on printers.
other defined name
Header and Trailer Pages 25

Information Included on the Trailer Page
The trailer page lists information specified in the Document Option Commands. The
values for %%For: and %%Title: are printed in large bold type at the top of the page, and
the rest are listed in smaller type in the bottom half. Here is a list of the information
provided by the trailer page.
printer name
selected interface
job identification
title (%%Title)
submitting computer (%%Host)
job owner (%%For)
routing message (%%Routing)
start time (%%Date)
application used (%%Creator)
creation time (%%CreationDate)
copyright date (%%CopyRight)
accounting information (%%ChargeNumber)
version number (%%Version)
job submission time
job start time
number of sheets printed
printer product name/logo
The trailer page also lists any errors generated by the printer while processing or printing
your document. Use the
generates an y errors. Use the
onerror
errorsonly
argument to print the trailer page only if the printer
argument to prin t an error list (no other trailer
page information) only if the printer generates any errors.
Header and Trailer Pages26
Use the optional
input
argument to select an input bin for the trailer page paper. See
“Printer Bin Assignments” in appendix A for input bin name assignments for your printer.
Trailer page example
Trailer page commands are used exactly like header page commands. Refer to the header
page example “Header page example” on page 3-6.
Retaining a Print Job
This statement can be used to save the print job for later printing. See the Crow nBook for
additional information about using the Proof-then-Print feature.
Syntax
<type>
<submitter>
Default
Retain:
%%
proof
Up to 16 alphanumeric characters that identify the submitter and/or job.
none
<
type> <submitter
>
Header/Trailer Information Commands
Document Title
This statement can be us ed to print the title of the document on header and trailer pages.
Syntax
<text>
Default
Document Host
This statement can be used to print the name of the host from which the document is
transmitted.
Syntax
<text>
Default
Title:
<
Host:
text>
<text>
%%
Any alphanumeric string up to 80 characters long. Anything longer is truncated.
none
%%
Any alphanumeric string up to 80 characters long. Anything longer is truncated.
none
Header and Trailer Pages 27
Document Owner
This statement can be used to print the name of the person or system account originating
the document.
Syntax
<text>
Default
For:
<
%%
Any alphanumeric string up to 80 characters long. Anything longer is truncated.
none
text>
Routing Information
This statement can be used to pr int the owner 's intero ffi ce mailing ad dress or other ro uting
information.
Syntax
<text>
Default
Routing:
%%
Any alphanumeric string up to 80 characters long. Anything longer is truncated.
none
<
text>
Printing Time
This statement can be used to print the current date.
Syntax
<text>
Default
Date:
<
%%
Any alphanumeric string up to 80 characters long. Anything longer is truncated.
none
text>
Application Used
This statement can be used to print the document creator. This is usually the name of the
document composition software.
Syntax
<text>
Default
Creator:
%%
Any alphanumeric string up to 80 characters long. Anything longer is truncated.
none
<
text>
Header and Trailer Pages28
Copyright Date
This statement can be used to print the document copyright statement.
Syntax
<text>
Default
CopyRight:
%%
Any alphanumeric string up to 80 characters long. Anything longer is truncated.
none
<
text>
Charge Number
This statement can be used to print the document accounting information for the job.
Syntax
<text>
Default
ChargeNumber:
%%
Any alphanumeric string up to 80 characters long. Anything longer is truncated.
none
<
text>
Version Number
This statement can be used to print the version and revision numbers of a document or
resource.
Syntax
<text>
Default
Version:
%%
Any alphanumeric string up to 80 characters long. Anything longer is truncated.
none
<
text>
Creation Date
This statement can be used to print the date and time the document was created.
Syntax
<text>
Default
CreationDate:
%%
Any alphanumeric string up to 80 characters long. Anything longer is truncated.
none
<
text>
Header and Trailer Pages 29
Document Control Commands
These commands can be used to output of the document and formatting characteristics of
the job.
PageOrder Command
This is used to control the order of pages in the document file or data stream which in turn
may be used by the pri nt system to reorde r the page s to take adv antage of special e ffe cts or
features.
Syntax
<setting>
Default
PageOrder:
%%
<setting> ::== Asend | Descend
Ascend — pages are in ascending order beginning with page on and increment-
ing to the highest page number.
Descend — pages are in descending order starting with the highest possible
page number and decrementing to page one.
no default
<
setting>
Pages Command
This statement defines the number of vir tual pa ges tha t the doc ument wil l image. Th is can
be different fr om the number of physica l p age s t he engine prints This i s u sed to determine
the odd or even boundary when duplexing.
Syntax
<numpages>
Notes
Pages:
<
%%
Any integer up to 7 digits
Any value greater than 7 digits will be truncated.
The value <numpages> must be set to the actual number of pages in the docu-
ment for descending job streams.
numpages>
Header and Trailer Pages30

IncludeFeature Command
This statement invokes t he st andard document formattin g options available on the pri nter.
See chapter 3, “Selecting Printer Features” for more information on these options.
Syntax
<feature>
<
option
Notes
>
IncludeFeature:
%%
duplex | collate | numcopies | input | output | header | trailer | oientation | emula-
tion | pagerange | margins | pagesize | pageorintation | pagegrid | pageoffsets |
staple | background | border | pagescaling | booklet | resolution | newlayout | off-
set | quality | colormodel | colorseparation | mediatype
text
The list of features available for this command can be extended with the addition
of software emulation options on your printer. See chapter 4, “Selecting Emula-
tion Features.”
{<
feature
>[(
option
)]}
EndComments Command
Use this statement at the end of the DOC prologue.
Syntax
Notes
EndComments
%%
Marks the end of the DOC prologue and the beginning of the print job’s data. All
data after the %%EndComments command is handled by the selected emula-
tion.
This comma nd should be used only to prevent further processi ng of document
option commands. The DOC prologue is terminated when a line is encountered
that does not begin with %% or %!.
Notify Command
Use this command to send notification of the print job completion to the specified email
address.
Syntax
<address>
Default
Notify:
%%
Any valid email address up to 80 characters in length.
None
(email <address>)
Header and Trailer Pages 31

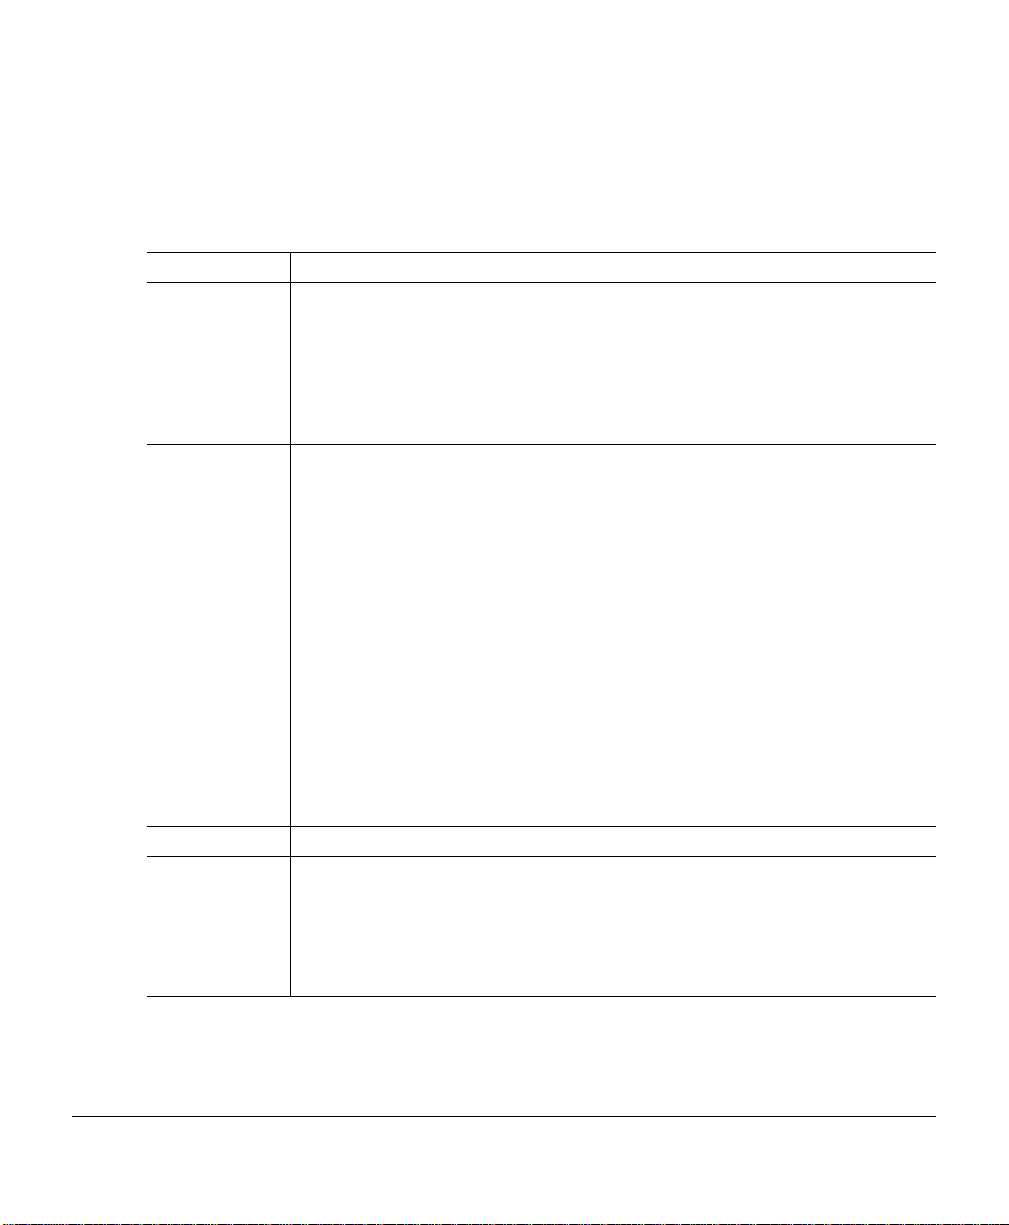
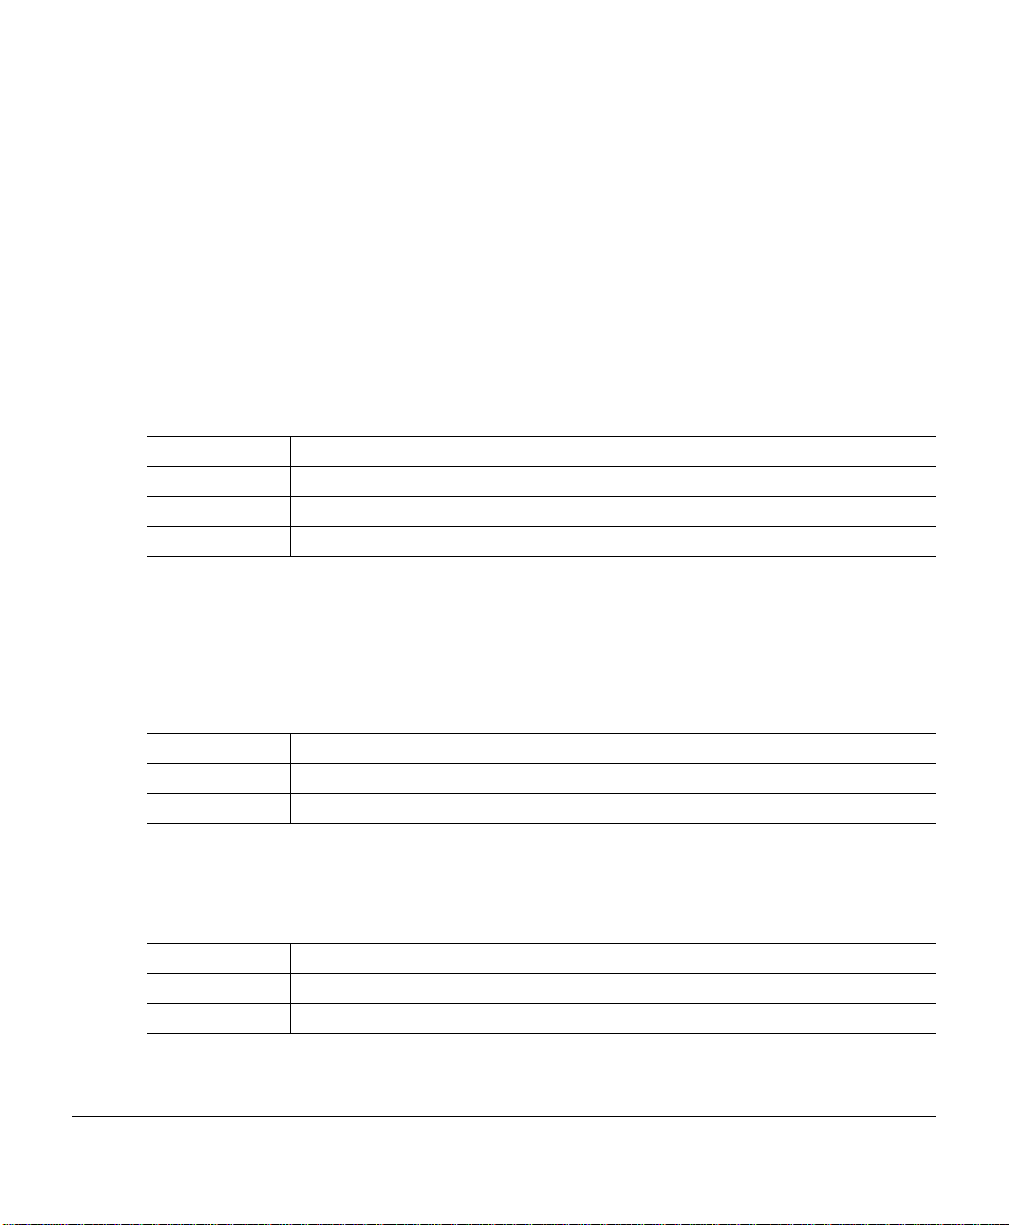
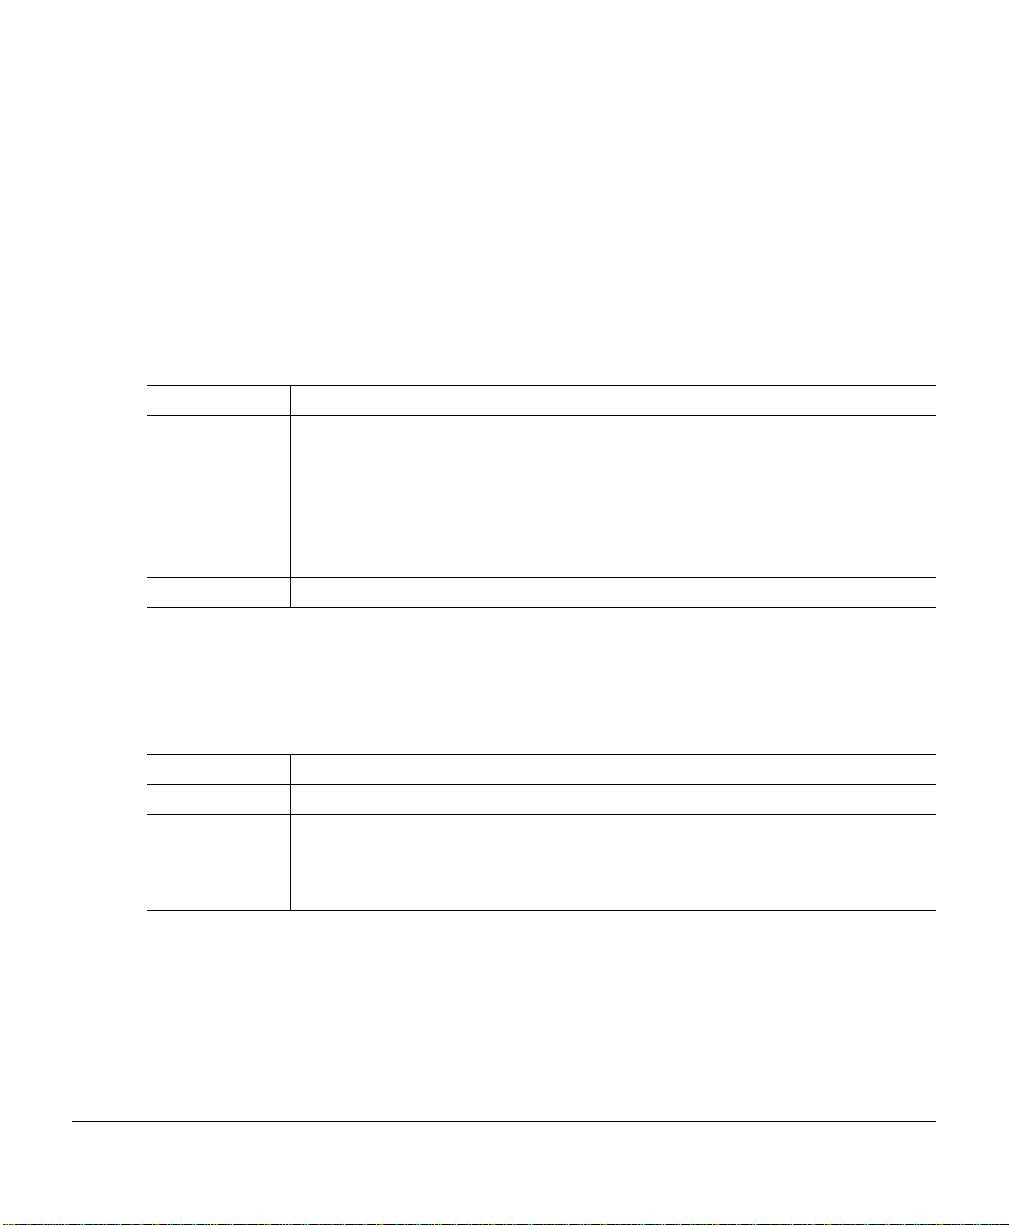
Sample Prologue
The prologue shown below uses many of the header and trailer page Document Option
Commands described in this chapter as well as the %%IncludeFeature command. The
figures on the following pages, show the header and trailer pages that result from this
prologue. (The printer and product names shown on header and trailer pages vary
depending on the product.)
%!
%%Title: Print Spec
%%For: Corporate Communications
%%Routing: Mail Stop 5440
%%Date: 9/09/2000
%%Creator: PSCRIPT.DRV Version 4.0
%%CreationDate: 08/14/2000
%%CopyRight: Copyright 2000
%%IncludeFeature: header (on) trailer (on)
%%+emulation (postscript) numcopies (1)
%%EndComments
/Times-Roman findfont 30 scalefont setfont
(continued text of PostScript job)
Header and Trailer Pages32

postscript
JOB 2
Print Spec
For:Corporate
Communications
Routing: Mail Stop 5440
Date:9/09/2000
Creator:PSCRIPT.DRV
magicolor
6100 Print System
PrintQueue
Header and Trailer Pages 33

END OF JOB
postscript
JOB 2
Print Spec
Errors:
For:Corporate
Communications
Routing: Mail Stop 5440
Date:9/09/2000
Creator:PSCRIPT.DRV
Version 4.0r
Creation Date: 08/14/2000
magicolor
6100 Print System
PrintQueue
Header and Trailer Pages34

Selecting Printer Features
3

Introduction
This chapter covers the Document Option Commands which allow you to access features
of Crown printers. These are included with the %%IncludeFeature keyword as arguments
used to select printer features. For accessing printer features the commands include
Printing Commands
Emulation Command
Paper Handling Commands
Resolution Command
Page Layout Commands
Language Level Command
This chapter describes these commands and explains their use.
Printer Compatibility
This manual descri bes Documen t Opti on Commands t hat ar e used on a var iety of pri nters .
New commands designed for some products may not apply to all models of printers.
Refer to your printer documentation for a list of Document Option Commands that are
supported on your printer, then use this manual for information about how to use the
commands.
Job commands encoded in the page description languages (PDL) can override some
document option commands. However, if the PDL contains no such command, and the
document option command is not used, the printer uses the configuration settings for
the printer.
Selecting Printer Features36

Chapter Organization
Use this table to go to the command or information included in this chapter.
For information on... Go to...
Command syntax “DOC Statement Syntax” on page 38
Printing commands “Printing Commands” on page 39
Paper selection “Selecting Paper” on page 40
Selecting output bin “Selecting Output Bins” on page 41
Page orientation “Selecting Orientation” on page 42
Setting number of copies “Selecting Copies” on page 42
Selecting pages “Selecting Pages to Print” on page 42
Paper handling commands “Paper Handling Commands” on page 43
Two-sided printing “Duplex Printing” on page 44
Collation “Collating Print Jobs” on page 45
Media type “Choosing the Media Type” on page 45
Stacker offsetting “Offsetting Print Jobs” on page 45
Stacker stapling “Stapling Print Jobs” on page 46
Page layout commands “Page Layout Commands” on page 46
Logical page size “Setting the Page Size” on page 46
Setting margins “Setting Margins” on page 47
Logical page orientation “Setting Page Orientation” on page 48
Logical page scaling “Scaling Pages” on page 48
Logical page offsets “Setting Page Offsets” on page 48
Setting a new layout “Newlayout” on page 49
Page-Up or N-Up printing “Number-Up Printing” on page 51
Printing booklets “Booklet Printing” on page 53
Printing page borders “Printing Borders” on page 55
Image backgrounds “Printing Background Images” on page 59
Using sessions “Sessions” on page 72
Job termination command “EndOfDocument Command” on page 79
Job terminator for HP “<ESC>%-12345x Command” on page 79
Setting the emulation “Emulation Command” on page 80
Selecting Printer Features 37

For information on... Go to...
Setting printer resolution “Resolution” on page 80
Setting print quality or intensity “Print Quality” on page 81
Changing the color model “Color Model” on page 81
Printing color separations “Color Separation” on page 81
DOC Statement Syntax
Document Option Commands have the following syntax:
Syntax
Indicator
Keyword
Argument
attributes
Indicator Keyword
An indicator that a Document Option Statement follows. Indicators are %%.
The command name. Typical examples of indicators and keywords are
%%Title:
%%CreationDate:
%%IncludeFeature:
%%EndComments
Lowercase command that causes action to occur with the print job or printer
function.
Attributes specify settings for the command. For example, the paper size
attribute of the %%IncludeFeature:input command specifies the paper size that
is to be used for the print job:
%%IncludeFeature: input (Letter)
parameters
Mixed case commands must be typed exactly as shown.
Selecting Printer Features38

Syntax Conventions:
(...) Parentheses are explicit separators that must be entered as shown in the com-
mand syntax. One space (hex 20) is recommended for separation before and
after the parentheses.
< ...> Attributes or values withi n < > brac kets are option al variabl es. Do no t inclu de the
brackets.
[...] Items within square brackets are optional variables.
{...} Parameters or values within curly braces may be repeated one or more times.
Do not include the braces.
::== logical equate symbol
| logical OR function
Spacing Spacing may be used to separate multiple commands and/or arguments on a
single line.
Example:
%%IncludeFeature: orientation (<rotation>)
<rotation> ::== Portrait | Landscape | portrait | landscape
Unless noted, all parameters not shown in
or within < > or { }, must be typed
bold
exactly as shown in the syntax.
Mixed case commands must be typed exactly as shown.
Printing Commands
The printing commands select input and output paper bins, page orientation, and specify
the number of copies and the range of pages to be printed.
%%IncludeFeature: input
%%IncludeFeature: numcopies
%%IncludeFeature: output
%%IncludeFeature: pagerange
%%IncludeFeature: orientation
Selecting Printer Features 39

Selecting Paper
input
The
command selects th e pape r typ e or i nput bi n to use fo r the body of t he pri nt job .
Syntax
<
source
Default
Examples
Note
%%IncludeFeature:
>
<physical> <input_bin> |
<physical> <logical> |
<physical> |
<input_bin> |
<logical>
<physical> ::==
Letter | Legal | Ledger | Executive | A5 | A4 | A3 | B5 | B4
<input_bin>
1 | 2 | 3 | 4 | manualfeed | * |
depending on the maximum number of bins
0 may indic ate manual feed
* indicates current default input bin and other bins of the same size.
<logical>
upper | lower |
%%IncludeFeature:
%%IncludeFeature: input (Letter)
%%IncludeFeature: input (Letter 2)
%%IncludeFeature: input (1)
%%IncludeFeature: input (Letter upper)
%%IncludeFeature: input (upper)
The paper sizes are dependen t on the printer. For information on the paper siz es
supported by your printer, see your printer documentation.
input
(<source>)
other defined name
input
( * )
Job commands encoded in the page description language (PDL) can override
this command. If there is no such command in the job and this command is not
present, the printer uses the configuration setting for the default input bin of the
printer (and the size of paper in that bin.)
The number and names of paper input bins may vary on each printer. See
“Printer Bin Assignments” in Appendix A for the names of input and output bins
on printers.
You can specify paper size by the size identifiers (Letter, A4, and so on) or by input bin
numbers (1 through maximum number of input bins), or both (Letter 2). If you request a
Selecting Printer Features40

specific input bin an d th e reques ted pap er size i s not in the spe cifie d (or de fault ) inpu t bin,
a warning message displays on the printer control panel and the job stops.
Using the logical name for the input bin indicates that whatever size paper is in the bin is
the size to be used to prin t the job. Logical na mes are se lected v ia the pr inter c ontrol pa nel,
or are factory default settings. If there is a conflict in input selections, the current “tray
size” or “input bin” selections are used.
Example
The following example specifies letter size paper and the upper input bin:
%%IncludeFeature: input (Letter upper)
Selecting Output Bins
output
The
command specifies the output bin in which the pages are to be placed.
Syntax
<
destination
Notes
Default
%%IncludeFeature:
>
<output_bin> | <logical>
<output_bin> ::==
1 | 2 | 3 | *
<logical>::==
<bin_name>
The number and names of paper input bins may vary on each printer. See
“Printer Bin Assignments” in appendix A for the names of input and output bins
on printers.
Job commands encoded in the page description language (PDL) can override
this command. If there is no such command in the job and this command is not
present, the printer uses the c onfigu ration se tting for th e default output bin of the
printer.
Determined by control panel settings
output
(<
destination
Example
The following example specifies the lower output bin:
%%IncludeFeature: output (2)
>)
Selecting Printer Features 41

Selecting Orientation
orientation
The
one or more logical pages are placed.
command specifies the default orientation of the document pages before
Syntax
<
rotation
Default
%%IncludeFeature:
>
Portrait |
Landscape |
portrait
landscape
%%IncludeFeature:
orientation
orientation
(
<rotation>
(portrait)
)
Portrait orientation has the y axis parallel to t he longest dimension of th e pa ge. La ndscape
orientation has the y axis parallel to the shortest dimension of the page.
Selecting Copies
numcopies
The
printed.
Syntax
<
count
Notes
Default
>
command specifies the number of copies of the current job that are to be
%%IncludeFeature:
Range:1 - 10000
If <count> exceeds 10000, it is truncated to 10000.
If <count> is blank, 1 copy or the keypad/console setting is assumed.
A value of zero will not print any copies, but the file will run through the emulation
and any errors that occur will print on the trailer/error page if it is enabled.
Configuration menu set ting
numcopies
(
<count>
)
Example
The following example specifies the number of copies of the current job that are to be
printed:
%%IncludeFeature: numcopies (4)
Selecting Pages to Print
pagerange
The
command specifies the range of logical pages to print. The range is
indicated by the first and last pages that are to be printed. Pages before the first one are
Selecting Printer Features42

compiled without being print ed and are then dis carded. Page s after the last one are flushed
without being compiled.
Syntax
<
>
first
>
<
last
Notes
Default
%%IncludeFeature:
The first page to be printed
Range: 1 to * (last page in job)
The last page to be printed
Range: 1 to * (last page in job)
This command takes effe ct on the job's original p age s b efore mu ltiple pages are
combined on a single sheet and before multiple copies are defined.
If
last page
%%IncludeFeature:
is less than
pagerange
pagerange
Example
The following example specifies the first and last pages to be printed out of the current
print job:
%%IncludeFeature: paperrange (8 27)
Paper Handling Commands
The paper handling commands control duplex printing and collation:
%%IncludeFeature: duplex
first page
(<
first> <last
, no pages are printed.
(1 *)
>)
%%IncludeFeature: collate
%%IncludeFeature: mediatype
%%IncludeFeature: offset
%%IncludeFeature: staple
Selecting Printer Features 43

Duplex Printing
duplex
The
command specifies whe ther pr inti ng is do ne on one or both sides of the page . .
Syntax
<
setting
Default
Notes
%%IncludeFeature:
>
on |
off |
tumble |
letterhead
%%IncludeFeature:
If the command is used but the value is omitted, “on” is assumed.
This command is ignored when printing booklets.
This command is supported only on printers which have duplex capability.
duplex
duplex
(
<setting>
(off)
)
Use <on> for two-sided printing, <off> for single-sided printing.
When <tumble> is specified, the image on the back fa ce of the page is rotat ed 180 degrees
for top-binding of the document
When <letterhead> is selected, the file is printed in simplex mode (one-sided), but
transformations are performed so that simplex and duplex sheets are oriented the same in
the output tray. The <letterhead> option is used to ensure that the paper orientation is
flipped the same way for simplex and duplex jobs . On some printers, this invo lves printing
all simplex jobs through the duplexer unit. This places images on the paper in the same
rotation and in the correct order for face-down output. Printing all simplex jobs through
the duplexer means tha t t he header and trailer pa ges are also printed through the duplexer.
Since simplex jobs are printed through the duplexer, print speed is that of duplex print
jobs.
To print your jobs correctly on letterhead paper, the paper must be loaded into the input
tray proper ly. Refer to your printer documentation for information o n loading paper when
using the <letterhead>, <duplex>, or <tumble> options.
Selecting Printer Features44

Collating Print Jobs
collate
The
“on,” all pages of a job are printed in a complete set before the next copy prints. When
collation is “off,” all copies of each page are printed before the next page prints.
command enables or disables collation of multiple copies. When collation is
Syntax
<
setting
Notes
Default
%%IncludeFeature:
>
on |
off
If the command is used but the value is omitted, “on” is assumed.
This command is supported only on printers which have collating capability.
Configuration menu set ting
collate
(<
setting>)
Use <on> to stack multiple copies of mult i-page jobs in col lat ed se ts . If you use <on>, the
printer prints a complete document before continuing to the next copy of the document.
Use <off> to stack multiple copies of a multi-page document in an uncollated set. If you
use <off>, the printer prints all copies of page 1 before continuing on to page 2, and all
copies of page 2 before continuing on to page 3, and so on.
Choosing the Media Type
mediatype
The
be used to control the imaging characteristics unique to your printer.
Syntax
<
>
type
Default
command is used to define the type of media the document needs. It may
%%IncludeFeature:
PlainPaper | LetterHead | 3Hole | 2Hole |
Transparency | ColorTransparency | ThickStock | LabelStock
Printer specific
mediatype
(<
type>)
Offsetting Print Jobs
offset
The
command is used to control an offset stacker on a selected output bin if your
printer supports this feature. Offset stacking allows you to physically separate different
jobs in the stacker.
Syntax
<
setting
%%IncludeFeature:
>
on |
off
offset
(<
setting>)
Selecting Printer Features 45

Notes
Default
In some environments where multiple documents are shipped by the host application to construct a single user document, the host application may try to override the default offset stacking feature to avoid print collation errors.
on
Stapling Print Jobs
staple
The
supports this option. The command will also determine the location of the staple if the
printer supports this capability. See your printer documentation for more information on
stapling.
command allows you to use the stapling option on a stacker if your printer
Syntax
<
setting
Notes
Default
>
%%IncludeFeature:
none | front | back | both | on | off
2425, 3260, and 4032 printer choices: front | back | center | on | off
When using this command it is recommended that the collation feature (collate)
is on or that the numb er o f c opi es (num c opi es ) is se t to a v al ue grea ter than one.
2425 printers: The “on” setting is equivalent to the “back” setting.
3260 and 4032 printers: The “on” setting is equivalent to the “front” setting.
Printer specific
Page Layout Commands
Page layout commands are used to contro l how logi cal pages are pla ced onto the physical
sheet. They control page size, margins, page orientation, page scaling, page offsets,
number-up, booklet, border and background printing.
Setting the Page Size
pagesize
The
physical sheet of paper used by the current print job.
Syntax
<
page
command sets the siz e of t he l ogi ca l pages mapped to the propo rt ions of the
%%IncludeFeature:
>
The <physical> paper sizes supported by the printer:
<physical> ::==
Letter | Legal | Ledger | Executive | A5 | A4 | A3 | B5 | B4
staple
(<
pagesize
setting>)
(
<page>
)
Selecting Printer Features46

Notes
Default
The <physical> siz es re fer t o the se t of p ape r w hich the printer can support. Th e
<physical> sizes may change for different printers.
* indicates current default input bin and other bins of the same size
Current default paper for the printer (product specific).
Use this command only if the page size has not been specified within the job itself. There
is no way to override a page size specified within the job.
Setting Margins
margins
The
can be placed. The margins e stablished b y this comman d take effect after the sheet has
been oriented by the
command defines the usable area of the physical sheet where logical pages
orientation
command.
Syntax
<
>
left
>
<
top
<
right
<
bottom
<
alternate
Notes
Default
%%IncludeFeature:
Distance in centipoints (1/7200") that the logical page spot is offset toward the
bottom from the top edge of the page.
Default: 0
Distance in centipoints (1/7200") that the logical page spot is offset toward the
bottom from the top edge of the page.
Default: 0
>
>
Distance in centipoints (1/7200") that the logical page spot is offset to the left
from the right edge of the page.
Distance in centipoints (1/7200") that the logical page spot is offset toward the
top from the right edge of the page.
>
off (do not exchange any margins) |
left (exchange left and right margins) |
top (exchange top and bottom margins)
The <alternate> parameter alternates the left and righ t, o r top and bottom, sheet
margins for every other sheet. The directions (<left>, <right>, <top>, <bottom>)
are applied to the sheet after is has been oriented. Alternating the left and right
margins may be useful for duplex printing on 3-hole punched paper. Alternating
top and bottom margins is useful for tumb le duplex printi ng. However, alternation
may be specified fo r single -sided pri nt jobs as well. For example , you may want a
single-sided master of a job that is to be copied double sided.
%%IncludeFeature:
margins
margins
(<
left> <top> <right> <bottom> <alternate>)
(0 0 0 0 off)
Selecting Printer Features 47

Example
The following example sets the left page margin at .5", the top margin at 1", the right
margin at .75", and the bottom margin at .5", and alternates the left and right margins:
%%IncludeFeature: margins (3600 7200 5400 3600 left top)
Setting Page Orientation
pageorientation
The
normally sets the orientation, this command should be used only to produce a special
layout.
command sets the orientation of the logical pages. Since the job
Syntax
<
rotation
Notes
Default
%%IncludeFeature:
>
portrait |
landscape |
Portrait |
Landscape
This command takes effect before the page offsets are applied
%%IncludeFeature:
pageorientation
pageorientation
(
<rotation>
(portrait)
)
Scaling Pages
pagescaling
The
command scales the logical page to fit within its page spot. The aspect
ratio of the page i s ma int ai ned dur ing scaling, reducing or expanding the page' s wi dt h and
height in the same proportions.
Syntax
<
setting
Default
Notes
%%IncludeFeature:
>
on
off
%%IncludeFeature:
If the printer language (for exam ple, HP PCL) cann ot scale the page , or if scaling
is disabled, the logical page is clipped to fit within its page spot
pagescaling
pagescaling
(
<setting>
(off)
)
Setting Page Offsets
Use the
pageoffset
command to offset the logical page within its page spot.
Syntax
<
>
left
%%IncludeFeature:
Distance in centipoints (1/7200") the logical page is offset to the right from the left
edge of the page’s page spot.
pageoffsets
(<
left> <top
>)
Selecting Printer Features48

<
>
top
Default
Distance in centip oints (1/7200 ") that t he logi ca l page is of fse t toward th e bottom
from the top of the page’s page spot.
%%IncludeFeature:
pageoffsets
(0 0)
pageoffsets
The
command takes effect af ter the sheet ha s been oriented by the
command and after the page grid has been defined by the
pagegrid
command.
orientation
Newlayout
%%IncludeFeature: newlayout
The
command is the mechanism that allows groups of
subjobs to use the same layout features. A layout may be specified once for an entire
document or altered for individual subjobs using the
%%IncludeFeature: newlayout
command.
Collation range
Collation range is a group of consecutively delivered pages to which the same settings of
collation and of fset para meters apply. When collation is On, the set of pages can match th e
collation range. But when collation is Off, collation range and set are not the same.
Set
If collate is on, the set is one copy of all pages in the document. If collate is off, the set
consists of all the copies of a single page in a document.
Syntax
%%IncludeFeature:
Used when a document has more than one subjob and you want to control
whether different subjobs have the same format.
%%IncludeFeature: newlayout
The
jobs to do one or both of the following:
Indicate to the printer that new document formatting options, such
as grids, booklets, borders, margins, pages sizes, page offsets, and
orientation, should apply from this point on.
newlayout
(<value>)
command is used at the beginning of sub-
Indicate that a new collation range is to take effect from this point
on. This command is intended for use when multiple small documents are combined into a single print job in order to control which
formatting or finishing command settings may be changed and
when they take effect.
<
value
>
<off> | <on> |<collate> | <on collate>
Selecting Printer Features 49

<off>
Ignores any changes to layout or collation properties specified at this subjob
boundary via DOC. The la yout a nd co llatio n pr opertie s in e ffe ct w ith the previ ous
subjob remain in effect. This command is equivalent to the absence of the
%%IncludeFeature: newlayout
command altogether.
<on>
<collate>
Any DOC settings for standard commands (such as layout, document finishing,
or document form atting) which are specifi ed in the curren t subj ob will repla ce the
previous values of these settings inherited from the previous subjobs. All other
settings inherited from the pre vious subjo bs in t he doc ument re main uncha nged.
This subjob will be considered part of the collation range established by the previous subjob. See the “Collation Range” definition earlie r in this section.
Create a new collation range, but retain the same layout and document formatting options that were in effect with the prior subjob, as in the following two subjob sessions:
Subjob A
%!
%%IncludeFeature:numcopies(10)
...
PCL 5e Data
...
Subjob B
%!
%%IncludeFeature: newlayout(collate)
%%IncludeFeature: numcopies(25)
...
PostScript Data
In this example, all of subjob A prints with its attributes
(numcopies and other layout, document format, and document
finishing commands). When that job is completed, subjob B
prints 25 copies with all other attributes unchanged).
Selecting Printer Features50

<on collate>
Notes %%IncludeFeature: newlayout (on collate)
Allows a change in both the layout properties and in the collation properties at
this subjob boun dary. Any DOC settings for standard comm ands (such as layou t,
document finishing, or document formatting) which are specified in the current
subjob will replace the previous values of these settings inherited from the previous subjobs. All other settings inherited from the previous subjobs in the document remain unchanged. Thi s setting is a combination of the on and collate
parameter values.
of the document for the first subjob regardless of the actual command specified
by the user.
subjobs when the command is not present.
%%IncludeFeature: newlayout (off)
Number-Up Printing
Use the
Pagegrid
logical pages are placed within the spots.
pagegrid
command to print up to 100 logical pages on each sheet of paper.
determines the number of logical page spots per sheet, and the order in which
is always issued at the b eginning
is assumed for subsequent
Syntax
<
columns
>
<
rows
<
column
>
space
<
row space
>
<
order
Default
%%IncludeFeature:
<
column space> <row space> <order
>
The number of columns placed across the sheet.
Range: 1-10
The number of rows placed down the sheet.
Range: 1-10
Distance in centipoints (1/7200") between two columns of page spots.
>
Distance in centipoints (1/7200") between two rows of page spots.
rightdown | leftdown | rightup | leftup | downright |
downleft | upright | upleft
This parameter has two part s, one for eac h direction of order. The first part (right,
left, up, or down) is the direct ion in whi ch the page s a re to b e ord ered firs t. Th en
the pages are ordered in the direction specified by the second part.
%%IncludeFeature:
pagegrid
pagegrid
(
<columns> <row
>)
(1 1 0 0 rightdown)
s>
Selecting Printer Features 51

Number-Up Printing Examples
%%IncludeFeature: margins (3600 3600 3600 3600 off)
%%IncludeFeature: orientation (landscape)
%%IncludeFeature: pagerange (1*)
%%IncludeFeature: border (on)
%%IncludeFeature: pagegrid (2 2 3600 3600 downright)
downright
specifies that the pages are ordered downward first and left to right second as
shown in this illustration:
1
2
3
4
%%IncludeFeature: margins (3600 3600 3600 3600 off)
%%IncludeFeature: orientation (portrait)
%%IncludeFeature: pagerange (2*)
%%IncludeFeature: border (on)
%%IncludeFeature: pagegrid (2 2 3600 3600 downleft)
downleft
orders the pa ges from top to bottom and then from right to left as shown in this
illustration:
3
1
4
2
Selecting Printer Features52

%%IncludeFeature: margins (0 0 0 0 off)
%%IncludeFeature: orientation (landscape)
%%IncludeFeature: pagerange (1*)
%%IncludeFeature: border (on)
%%IncludeFeature: pagegrid (3 1 0 0 downleft)
downleft
illustration:
orders the pages downward and then from right to left as shown in this
3
21
The PCL 5e emulation prints reliably only in exact resolutions of 300 or 600 dpi.
Because the size is changed in number -up pri nting, th e r e lati ve number of dot s per inch
is also changed, and PCL 5e jobs may produce unexpect ed results. When using PCL 5e
emulation, we recommend that you print a test page using the
pagegrid
command before using it for a major job.
Booklet Printing
booklet
The
produces a booklet when the paper is folded in the direction specified by the
parameter. The booklet can be read by turning pages from right to left or flipped from
bottom to top as if it were a note pad.
Multiple booklets are produced if there are more pages than will fit on the number of
pieces of paper specified by the
divide evenly into t he sheets of paper reque sted, t he fi nal bo oklet consis ts of only a s many
sheets as is necessary to fit the remaining pages. If the full number of pages is required,
you must create the necessary number of blank pages at the end to fill out the booklet.
command places two logical pages on each sheet (or face) in an order that
numpaper
parameter. If the number of pages does not
%%IncludeFeature:
fold
fold
The
after the
parameter specifies the direction in which the paper is folded, and takes effect
orientation
command.
Selecting Printer Features 53

innermargin
The
parameter specifi es t he dis tance betwe en the logi cal p age an d t he pa per's
fold. Together with the sheet's margins, this determines the size of the page spot.
Syntax
<
numpaper
<
>
fold
<
innermargin
<
thickness
Default
%%IncludeFeature:
>
The number of sheets of paper making up the booklet
Range: 0 - 128 (0 disables booklet printing)
The direction in which the paper will be folded, with a logical page on each side
of the fold. This parameter assumes that the sheet has been oriented according
to the orientation parameter.
<fold> ::=
horizontal | vertical
>
The distance in centipoints (1/7200") between the logical page spot and the
paper’s fold.
>
Thickness of sheet in 1/10 mils (1/10,000 inch). This parameter provides correction of the innermargin for sheets successively stacked farther from the first
sheet of the booklet.
Range: 1 to 400
%%Include
Feature
booklet
booklet
:
(<
numpaper> <fold> <innermargin> <thickness>)
(0 vertical 0 0)
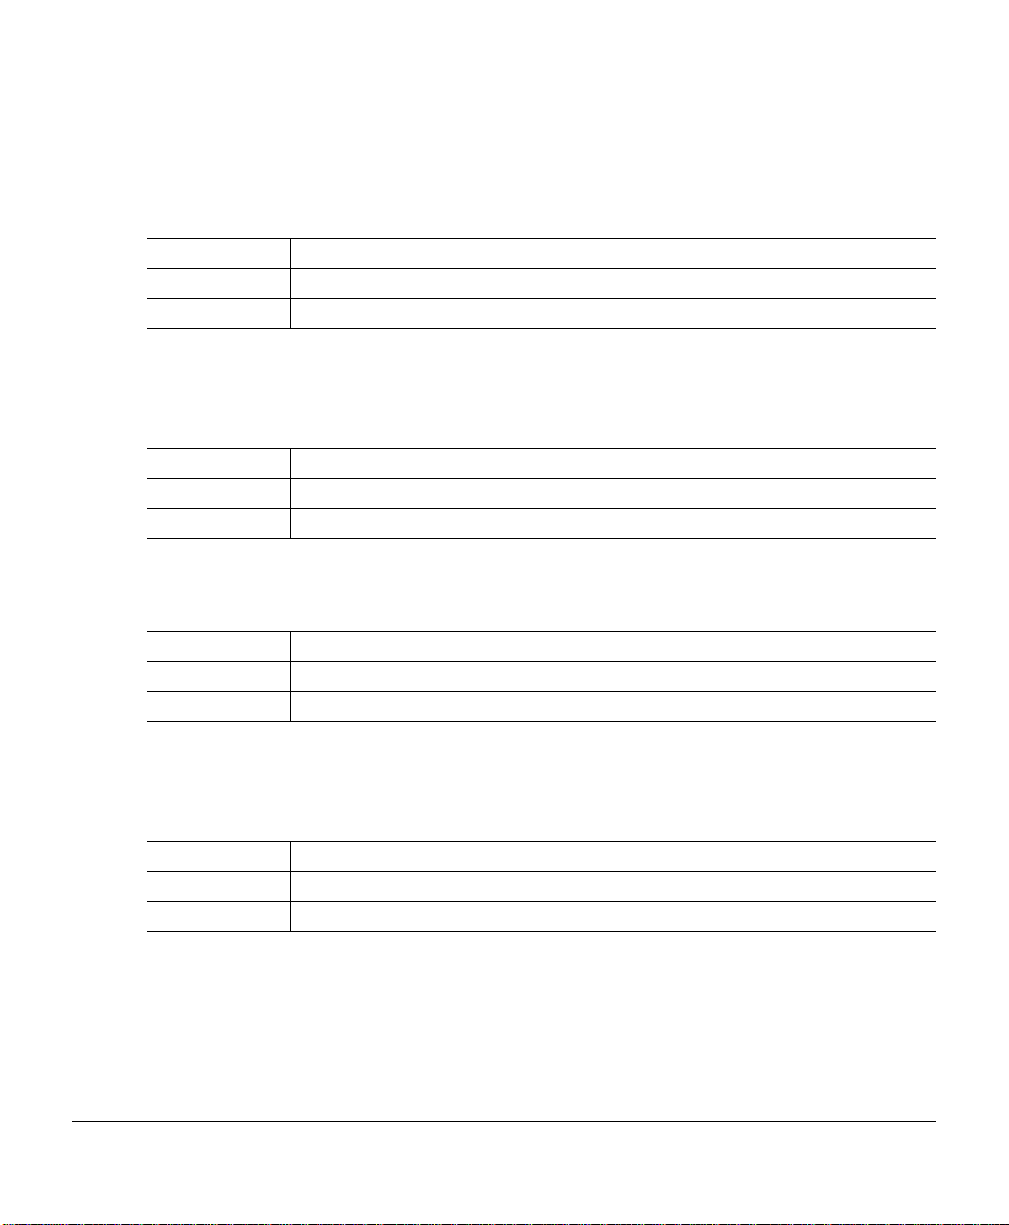
Booklet Printing Example
The following example produces a four-page booklet folded vertically:
Selecting Printer Features54

%%IncludeFeature: orientation (landscape)
%%IncludeFeature: booklet (2 vertical 3600 0)
Front
Face
Back
Face
First Sheet Second Sheet
4
6
5
38
2
7
1
Folded Sheets
2
18
4
3
Printing Borders
border
The
is useful for distinguishing logical pages when N-Up printing is enabled.
Syntax
<
value
Default
Notes
command prints a border around the page margins of each logical page. This
%%IncludeFeature:
>
Number of pixels of border width
Range: 0 to 7200
%%IncludeFeature:
The border is measured in centipoints (1/7200")
border
border
(<
(0)
value>
)
7
5
6
Terminology
Border —
margins, number of rows and columns, a nd the r ow and colu mn spa cing (i n that order) ar e
called logical page spots. When borders are selected, they are drawn at the logical page
spot.
Logical page
When no layout is selected, it corresponds to the physical page (the paper size or paper
type), but when a complex layout is selected, it is one of the images that gets mapped to a
physical page within the borders.
The rectangles formed after applying the physical sheet size, orientation,
— The image that is produced by the emulation (also called logical sheet).
Selecting Printer Features 55

Margins
imaging will take place.
— The portion of the physical page around the edges of the paper where no
Page grid
Page spot
layout is specified:
1
2
3
4
— The placement of logical pages as tiles on the physical page.
— Each of the resulting rectangles after applying the following steps when a
Choose a paper size.
Orient the paper size.
Obtain a smaller rectangle by carving out the margins.
Divide up the resulting rectangle according to the geometry specified by the
%%IncludeFeature: pagegrid
%%IncludeFeature: booklet
or
commands.
Selecting Printer Features56

Border Command
Function
Syntax
Variable
Notes
Draws a border at the page spot. The width of the
border (thickness of the stroke) i s given by the value
whose units are centipoints (1/7200"). The
outside of the border corresponds to the rectangle
defined by the page spot so the thickness of the
border is entirely within the page spot.
%%IncludeFeature: border(
value
Range
Default
1 centipoint = 1/7200" (.0001388 inch)
0 or no value indicates that borders are not drawn.
When scaling is specified, the logical page is guaranteed to fit inside the page
spot and border, preserving its proportions (or aspect ratio). When scaling is not
specified the logical image will most likely be larger than the page spot, so the
logical page will be clipped to the size of the page spot. In this case, the upper
left corner of the logical page will be visible (unless the DOC
ture: pageoffsets
page spot). This command is useful for separating logical pages when the
%%IncludeFeature: pagegrid
enabled.
is specified to displace the logical page with respect to the
)
value
0 to 7200 centipoints (0 to 1 inch)
0
%%IncludeFeature: booklet
or
%%IncludeFea-
command is
Border Command Examples
These examples show that by alterin g the margi n values and inne r spacing value s, you can
change the width, the height, and positioning of the borders. The resulting rectangles
(borders) i n these examples are
Not
the logical pages.
Also called page spots.
Selecting Printer Features 57

The borders in Example A are 72 centipoints wide (1/100 inch).
Example A
%!
%%Title: Border (72 centipoints)
%%IncludeFeature: emulation(postscript)
%%IncludeFeature: pagesize(letter)
%%IncludeFeature: border(72)
%%IncludeFeature: margins(1800 1800 1800 1800
off)
%%EndComments
The borders in Example B are 1800 centipoints wide (1/4 inch).
Example B
%!
%%Title: Border (1800 centipoints)
%%IncludeFeature: emulation(postscript)
%%border(1800)
%%IncludeFeature: margins(1800 1800 1800 1800
off)
%%EndComments
Selecting Printer Features58

The borders in Example C are 7200 centipoints wide (1 inch).
Example C
%!
%%Title: Border (7200 centipoints)
%%IncludeFeature: emulation(postscript)
%%border(7200)
%%IncludeFeature: margins(1800 1800 1800 1800
off)
%%EndComments
Printing Background Images
background
The
command prints the image in printer-resident
background of the job. There can be only one background image in the job; subsequent
images are ignored. The image can be printed on the first page only or repeated on each
page. The printer must have a hard disk to store background images. Refer to your printer
documentation for information on storing files to disk.
filename
as the
Background Terminology
A foreground file is the current print job, which may or may not specify a background
image to be included in the job. It can be anything from plain text to a very complex
document. A background is a printer-resident file containing a single image which can be
placed on any page before the foreground. A background can be an image, such as a
watermark, logo, custom form, or other complex document. Throughout this chapter the
term background refers to the background image or file, and the foreground refers to the
current print job.
Background Command System Requirements
background
The
more backgrounds. To fully utilize the
Enough memory to load all backgrounds for the document.
Document Option Command allows the foreground to specify one or
background
command on you need
Selecting Printer Features 59

For complex, multiple-page documents you may need to increase the Display List
memory client settings, or add more printer memory. See your printer documentation for information on adding printer memory.
An internal or external hard disk.
If the disk is an internal IDE drive, the device ID is DSK7 or SYS. If it is an external
SCSI disk, the device ID is a number (in the range of 0-6) assigned to the external
device, excluding 5 for the CrownCopy Convenience scanner.
This command allows you to inc lude a predef ined i mage(s) with a ny fo reground prin t jo b.
For example, a medical ta x for m coul d be a backg rou nd and the foreground could con ta in
the data to comp lete the form.
background
The
command can be placed in a DOC header with other DOCs like
pagegrid (used for n-up printing), duplexing, margins, and so on. Unlike other DOCs that
are restricted to their first occurrence in a DOC header, the foreground DOC header can
contain multiple background commands that will all be used in the print job.
Syntax
<
filename
%%IncludeFeature:
>
Use the absolute pathname SYS:/usr/
SYS or DSK
SYS:—represents any printer-att ached inte rna l ha rd di sk. Use upp ercas e le tte rs
only.
DSK
n:—
disk is an internal IDE, the device ID is DSK7 or SYS. If it is an external SCSI,
the device ID is a number (in the range of 0-6) assigned to the external disk
(excluding 5 for the CrownCopy scanner). Use uppercase lett ers only.
usr—is the subdirectory location of the backg rou nd.
filename
been stored on disk). This name could have an extension.
none
Disable background printing only for this
command.
n
represents any internal or external hard disk (n is a device ID). If the
—is a user-selected unique name for the background (that has already
background
(
<filename> <cycle><unit>
filename.
)
Selecting Printer Features60

<
cycle
<
unit
>
>
Defines where to position the background(s) on the document. Use the range to
specify common page positions.
<cardinal> | <*> | <even> | <odd> | <expres si on>
<cardinal>
(non-negative integer)
Apply background to the
“1” means the first unit and “3” means the third unit.
<*>
Apply background to every unit (page or sheet) of the document. For example,
pages 1, 2, 3, 4, and so on.
<even>
Apply background to even units (page or sheet) of the document. For example,
pages 2, 4, 6, and s o on until the docum ent ends or a
a subsequent subjob is encountered.
<odd>
Apply background to odd units (pag e o r s hee t) o f th e d ocu me nt. For example, 1,
3, 5, 7, and so on un til the docum ent en ds or a
sequent subjob is encountered.
<expression>
Apply background to any units (page or sheet) defined by evaluating an algorithmic expression. See “Bac kground Co mmand <Cy cle> Algorithm ” on page 62” for
details.
Defines whether the background should be mapped onto the physical sheet or
onto the logical page spot prior to processing the images for the print job.
th unit (page or sheet) of the document . For example,
n
newlayout on
newlayout on
command in
command in a su b-
<sheet> | <page>
<sheet> (background to a sheet face) - use formats specified by image file. The
background is positioned and sized ac co rding to the physical page size. A sheet
is a physica l page.
For example, if sheet is specified in an n-up (pagegrid) document, the background is positioned across the grids (or squares), it isn’t scaled or clipped to fit
inside any particular grid. The cycle counts the faces of sheets of paper (front
face, back face, and so on).
<page> (background to a logical page) - use formats specified by job. The background is formatted according to specifications in the data stream. A page is logical. A sheet can contain more than one logical page.
For example, if page is specified in an n-up (pagegrid) document, the background is scaled or clipped to fit inside the specified square(s) of the grid. The
cycle counts across the squares of the grid.
Selecting Printer Features 61

Default
Notes
%%IncludeFeature:
If the background us es a scal able em ulatio n, suc h as Pos tScript o r HP-GL , it wil l
be automatically scaled to fit the page or sheet.
background
(none * sheet)
Background Command <Cycle> Algorithm
The <cycle> defines which image s of the job are affe cted by the backg round. The <cycl e>
is specified either via shorthand notation (cardinal, *, even, and odd) or via an algorithm.
The shorthand notation examples are describ ed i n “Pr inting Background Images” on page
59, and the algorithm examples are described in the following sections.
An algorithm is a “pattern” the printer uses to determine where to position a background.
The following syntax is used in the algorithm:
Background
Command
<cycle>
(via an
algorithm)
Note
Example
%%IncludeFeature: background(<filename> <cycle> <unit>)
(product term)
product # i or i
The product represents a series going from
0 to n (infinity).
term
We recommend that the cycle algorithm be enclosed in parentheses.
+
#
(# represents a non-negative integer (i.e, >=0).
First number is the interval
(3i + 1)
Second number is the starting
Result
Prints on pages 1, 4, 7, 10, ...
Selecting Printer Features62

Background Command Examples
Example A
or
Example B
Example C
Example D
or
Example E
To print a background on the even pages of a document.
%%IncludeFeature: background(SYS:/usr/draft.ps even page)
%%IncludeFeature: background(SYS:/usr/draft.ps (2i) page)
Result draft.ps prints on pages 2, 4, 6, 8, 10, 12, ...
To print a background on the first page and every second page thereafter.
%%IncludeFeature: background(SYS:/usr/confid.ps (2i + 1)
page)
Result confid.ps prints on pages 1, 3, 5, 7, 9, ...
To print a unique ba ck ground on page 1 and 2, then print a an other background
on every page thereafter.
%%IncludeFeature: background(SYS:/usr/logo.ps (1) page)
%%IncludeFeature: background(SYS:/usr/logo.ps (2) page)
%%IncludeFeature: background(SYS:/usr/graybar.ps (i + 3)
page)
Result logo.ps prints on page 1
logo.ps prints on page 2
graybar.ps prints on page 3, 4, 5, 6, 7, 8, ...
To print a company logo background on both pages of a
two-page form.
%%IncludeFeature: background(SYS:/usr/logo.ps (i) page)
%%IncludeFeature: background(SYS:/usr/form1.ps (2i + 1)
page)
%%IncludeFeature: background(SYS:/usr/form2.ps (2i + 2)
page)
%%IncludeFeature: background(SYS:/usr/logo.ps (i) page)
%%IncludeFeature: background(SYS:/usr/form1.ps (odd) page)
%%IncludeFeature: background(SYS:/usr/form2.ps (even) page)
Result logo.ps prints on all pages
form1.ps prints on pages 1, 3, 5, 7, 9, 11, ...
form2.ps prints on pages 2, 4, 6, 8, 10, 12, ...
To print a three-page form.
Selecting Printer Features 63

%%IncludeFeature: background(SYS:/usr/form1.ps (3i + 1)
page)
%%IncludeFeature: background(SYS:/usr/form2.ps (3i + 2)
page)
%%IncludeFeature: background(SYS:/usr/form3.ps (3i + 3)
page)
Result form1.ps prints on pages 1, 4, 7, 10, ...
form2.ps prints on pages 2, 5, 8, 11, ...
form3.ps prints on pages 3, 6, 9, 12, ...
Downloading a Background to the Printer
You can download the background in one of the following ways:
Using file transfer protoc ol (ftp) on the host if a TCP/IP connect ion is available to the
printer.
Prepending a PostScript routine to the background.
Using the printer’s floppy disk drive to install option.
Using the File Transfer Protocol
Use the following procedure to download a background to your printer.
FTP works only when the printer is on line and the message window displays
1
Access the file transfer protocol program.
Type
ftp printer-name
its corresponding host name).
2
Login to ftp server.
When prompted for a user id, enter
password (
3
Change to the location where backgrounds are stored.
Type
4
Set the copy format to binary.
Type
5
Put the background on the printer’s hard disk.
cd usr
bin
pass
↵
↵
(where
).
printer-name
root
is either the IP address of the printer or
as the user name and give the default
Selecting Printer Features64
IDLE
.

Type
put filename [filename]
↵
Filename
is the name that the file is to be saved as. The second filename is required in order to
store the file on the printer’s hard disk. Without it, the printer would try to print the
file. The background must be saved using a filename.ex t ( 8.3 ch arac ters) Repeat the
put
6
Exit ftp.
Type
is the name of the back gr ound on your loc al machine. The seco nd filename
command for each background being downloaded.
↵
quit
Prepending PostScript File to Background File
This procedure can be used to download your background to the printer using the parallel
interface. You should use this only if FTP is not available.
1
Prepend the following information to your background.
%!
%%Title: 4032 PS Background Download Routine
%%IncludeFeature: emulation(postscript)
%%EndComments
(filename.ext)
/FILENAME exch def
/OutFile (%os%SYS:/usr/FILENAME) (w) file def
/tempbuff 1024 string def
{ currentfile tempbuff readstring
{ OutFile exch writestring }
{ dup length 0 gt
{ OutFile exch writestring }
{ pop }
ifelse
OutFile closefile exit
}
ifelse
} bind loop
%%%Remove this line and start actual download file here%%%
Selecting Printer Features 65

Although the example routine is a PostScript job, it can be used to download any
format background. However, each downloaded background must have a unique
filename.
In the example download file, filename has been isolated for easy editing. Just
search for filename.ext and replace it with your background’s filename and
extension, as necessary. The disk name (SYS) and the subdirectory name (/usr/) has
been hard-coded in this file.
2
Add a DOC header to the background.
Crown printers assume the same emulation for both the background and the foreground, unless instructed otherwise. To mix and match background and foreground
emulations, we recommend that you set the background emulation via its own DOC
header. Prepend the following or a similar DOC header to your background before
downloading:
%!
%IncludeFeature: emulation (language)
%%EndComments
Replace the word language with your background’s emulation. Also, other
informational DOCs, such as %%Title:, %%Creator:, and %%CopyRight:, can be
added to the background’s DOC header. This information will not appear on the
job’s header or trailer pages. Document handling commands, such as
input()
, and
pagegrid()
, should only appear in the foreground.
duplex()
,
If the background contains non-ASCII information, such as PCL, LN03, or CCITT,
you must first hex encode the background and then change the
(in the PostScript download routine) to
3
Copy the file to the print er.
See “Printing a Background” on page 71 for information on how to copy the file to
the printer and print the background.
readhexstring
.
readstring
Downloading Through the Floppy Disk
If your printer has a floppy disk drive downloading the background is very simple.
1
Copy the background file to a 1.44MB DOS formatted floppy to a subdirectory
named \USR\.
Selecting Printer Features66
operator

2
Place the disk in the printer’s floppy disk drive.
3
Access the “Install Option” in the “Disk Operations” menu on the printer configuration menu.
Testing Your Background
To test the background, first create a PostScript test file that prints the background on a
blank page. Then send the test file to the printer. If anything shows up on the page, it’s
from the background file.
1
Create the test file in any text editor.
2
Type the following test file.
%!
%%Title: Background Test Routine!
%%IncludeFeature: emulation(postscript)
%%IncludeFeature: background(SYS:/usr/filename.ext *
sheet) %%EndComments
showpage
%%EOF
3
Replace the
background.
4
Save the test file as text only.
5
Print the test file.
Use the instructions in “Printing a Background” on page 71.
filename.ext
with the actua l filename of your previously downloaded
Placing a Background Command in the Foreground
background
The
your document. A background file can contain only one background image. However,
there can be mu ltiple
Use any of the following ways to place a background command/s in your foreground:
Use a text editor or a word-p roces sing prog ra m (the file mu st be save d as text only ) to
place a DOC header in your foreground document.
command prints the image in a printer-resident file as a background on
background
commands in the DOC header of the foreground file.
Selecting Printer Features 67

a
Open the foreground file and manually type the DOC header in the file. See
“DOC Header Examples” on page 69.
Add the
background
command(s) to the top of your document by concatenating a
pre-written DOC header to a copy of the foreground.
a
Create a header as a separate file.
Create the file on your system and type the file information shown in step 1 of
“Prepending PostScript File to Background File” on page 65. You can use a text
editor or a word-processing program (the file must be saved as text only)
b
Concantenate files.
If you’re using a DOS system, use the commands in Step c to concantenate the files.
If you’re using a UNIX system, use the commands in Step d.
c
Copy header plus foreground in DOS.
You can use one of the following methods to copy the files:
Example A
Example B
d
Copy header plus background in UNIX
copy /b
copy /b
temp_file
Join the foreground file and header file by copying them to a temporary file.
Then copy the temporary file to the printer.
copy /b
header + foreground
Join the foreground file and header file then send them directly to the printer.
header
+
foreground temp_file
prn
prn
You can use the following method to copy the files:
Example A
Example B
Use the background selection from within the Windows driver when printing from
cat
header foreground > temp_file
lpr -Pqueue_name temp_file
Join the foreground file and header file by copying them to a temporary file.
Then copy the temporary file to the printer.
cat
header foreground
Join the foreground file and header file then send them directly to the printer.
lpr
|
-Pqueue_name
Windows.
Selecting Printer Features68

See the onli ne help file for details on h ow to print from the d river using th e background selection.
The next section shows a variety of DOC headers using the
DOC Header Examples
Example A
%!
%%Title: XYZ Company Technical Report
%%For: Office Administration
%%Date: 04/23/00 09:00:00
%%Creator: John Smith
%%IncludeFeature: header(on)
%%IncludeFeature: duplex(on)
%%IncludeFeature: background
%%EndComments
<Actual text of the print job>
Example B
account reconciliation chart on page 2 of a two-page form.
%!
%%Title: XYZ Company Account Worksheet
%%Date: 04/23/00 09:00:00
%%Creator: John Smith
%%IncludeFeature: header(on)
%%IncludeFeature: duplex(on)
%%IncludeFeature: background
%%IncludeFeature: background
%%IncludeFeature: background
%%EndComments
<Actual text of the print job>
Print a company confidential background on all pages of a document.
(SYS:/usr/
Print a company logo background on all pages, customer information on page 1, and
(SYS:/usr/
(SYS:/usr/
(SYS:/usr/
confid.ps (i) page)
logo.ps (i) page)
formpg1.ps (2i + 1) page)
formpg2.ps (2i + 2) page)
background
command.
Selecting Printer Features 69

Example C
%!
%%Title: XYZ Company Tracking Form
%%Date: 04/23/00 09:00:00
%%IncludeFeature: header(on)
%%IncludeFeature: pagegrid(2 2 3600 3600 downright)
%%IncludeFeature: pagescaling(on)
%%IncludeFeature: background
%%IncludeFeature: background
%%IncludeFeature: background
%%End Comments
Print a different background on the odd and even pages of a 4-up document.
(SYS:/usr/
(SYS:/usr/
(SYS:/usr/
bg_1.ps (i) page)
bg_2.ps (2i + 1) page)
bg_3.ps (2i + 2) page)
<Actual text of the print job>
Selecting Printer Features70

Printing a Background
Backgrounds must be residen t in the pri nter befo re they can b e printed on a document. See
“Downloading a Background to the Printer” on page 64 for information on how to
download the background to the printer. Then print the file in either of the following ways,
depending on your host system.
The interface por t use d to transfer must be se t to the emulation of t he foreground file or
be in ESP mode.
For a DOS system, use the DOS
copy /b filename.ext prn
For a Macintosh system, use the SENDPS utility that comes with the PS Executive
Utilities.
For a TCP/IP system, if a TCP/IP connection is available to the printer, use the file
transfer protocol (ftp) on the host to copy the files to the printer.
copy
command
FTP works only when the printer is on line and the message window displays
1
Access the file transfer protocol program.
Type
ftp printer-name
its corresponding host name).
2
Login to ftp server.
When prompted for a user id, enter
bin
pass
↵
password (
3
Set the copy format to binary.
Type
4
Send the foreground to the printer.
).
(where
printer-name
root
is either the IP address of the printer or
as the user name and give the default
IDLE
.
↵
background
↵
command(s).
5
Type
put filename
Filename
Exit ftp.
quit
Type
is the name of your foreground containing the
Selecting Printer Features 71

For a Microsoft network, use the
copy /b filename.ext \\host_name\queue_name↵
See your Microsoft documentation for more information on these commands.
copy
command
For a Novell network, use the
nprint filename.ext /q=queue_name /nff /nb
See your Novell documentation for more information on these commands.
Sessions
What is a Session?
A session is used to encapsulate a file. Sessions can be formed by different means: in
EtherTalk/LocalTalk sessions are built-in the communications protocol; in parallel, serial,
or network communicat ion s pr ot ocol s sessions are formed b y se parating jobs or files wit h
page description language specific terminators (for example, Ctrl-D for PostScript or
<ESC><DEL>0 for PCL.)
You can use the
files, including documents created in different emulations, to form one larger document
treated as a single entit y by Crown printers.
Despite their different printer description languages, subjobs can be combined using the
%%Session
document layout, and collation. This gives you the flexibility to override the major
document’s global printing attributes for one or more subjobs.
nprint
%%Session
command to maintain global features, such as duplex mode, copy count,
command as a means of grouping multiple documents or
command
↵
Some printer description languages support language-specific terminators which work
well when the complete document is composed of a single printer description language
(PDL) generated by a single application. However, language-specific terminators do not
work very well when you need to create a document from files using multiple printer
description languages. In such cases, high-level document manipulation applications find
it difficul t t o d eal with markers withou t t aki ng into account the l ang uage and semantics of
the language -specific delimiters.
%%Sessions
The
language-independent means of combining multiple subjobs.
command can help solve that difficulty by offering a
Selecting Printer Features72

Here are some examples of applications for which you might want to use the
%%Sessions
To print “wild card” file selections on UNIX or VMS computer systems.
To print the chapters of a technical manual, such as this one, as a single document.
To print a series of different monthly, weekly, or yearly reports as a batch process.
command:
Terminology
Subjob — what we would normally call a document; that is, a single print job in any
supported page description language (PDL.)
Document — a group of smaller jobs combined by means of the communication protocol or Document Option Commands which are intended to be printed with a common set of printing attributes.
Session — a term used t o re fe rence a single job from wi th in a document. Jobs are separated form on another by means of PDL-specific language terminators, or PDL-independent language terminators.
PDL-specific terminators — character sequences that when detected in a data stream
indicated the end of a small job to a PDL (for example, Ctrl-D for PostScript or
<ESC><DEL>0 for PCL.) See the appropriate PDL documentation for details of specific character sequences.
PDL-independent terminators — mechanisms used to separate jobs within a document
that are not defined by the PDL documentation. These mechanisms may include features of communication protocols, as well as Document Option Commands such as
%%Session
(available only through a network interface.) See “Job Boundary Commands” on page 79 for more information on terminators for serial and parallel protocols.
Using the %%Session Command
Use the DOC
separated by PDL-specific terminators. The
acceptable to an emulation, including 8-bit data, to be transferred to the printer without
terminating documents or subjobs early and out of context.
%%Session
command to separate jobs within the document that are not
%%Session
command allows any data
Selecting Printer Features 73

The %%Session command is supported only for the standard Ethernet and most other
optional network interfaces. It is not supported for jobs submitted through any other
interface—parallel, optional serial, or optional LocalTalk interface. Use of the
%%Session command in print jobs submitted over non-network communication
channels may lead to incorrect or erroneous output. See “Job Boundary Commands”
on page 79 for more information on terminators for serial and parallel protocols.
Session Command Location
%%Session
The
Be placed at the beginning of the data stream of a document to delimit the session
boundaries.
Precede all of the data that belongs to an individual subjob. This will ensure that the
command is not saved in the actual data stream that is passed to a language or emulation.
Some host applications add DOC co mmands a t the begi nning of a document’s data stream
before transmitting a job to the Crown printer. If you do not ensure that such features are
completely disabled, the processing of the
unexpected results may be printed.
Alternatively, if FTP is used to transmit a document to a Crown printer supporting the
%%Session
file to the printer:
command must
%%Session
command will be terminated, and
command, the following FTP command must be entered prior to sending a
cd no_doc_cmds
The default mode of the FTP protocol for the Crown printer adds network addressing
information, in the form of DOC commands, to the start of a job and this data would also
terminate the session.
Session Command
Since each subjob may use a different end-of-subjob argument, the
command sequence must be inserted at the beginning of each subjob to specify the
end-of-subjob argument for that particular subjob.
Function:
Syntax:
Signal the start of a subjob within a session.
%%Session:
mode argument terminator
%%Session: ...
Selecting Printer Features74

Notes:
Parameter:
Purpose:
Default:
Range:
Notes: End by Count
Parameter:
Default:
Range:
%%Session
The
end by count and end by delimiter strin g. Both methods may b e u sed w ith in on e
document, but each subjob may only use one method.
mode argument
Specify the argument of the
none (job does not consist of subjobs)
0
length
Specifies the byte count for the end of subjob. The maximum possible value is
2147483647. A length of 0 means ignore the byte count terminator. The
excludes the
2
delimiter string
Specifies the host-supplied
4
delimiter string
Specifies the host-supplied delimiter string for the subjob boundary. After detection of the string, all characters up to the next occurrence of a terminator, or up
to 256 characters for the line, are absorbed.
The delimiter string must consist of printable ASCII characters. It may not contain ASCII spaces, carriage return, or line feed. A delimiter of “null” means
ignore the delimiter string terminator. The maximum value of the delimiter string
is 32 bytes or characters.
You can specify how many bytes are contained in the current subjob. After the
printer reads the required number of bytes within the current document, the
printer knows that it has reached the end of the subjob. Any data which comes
after this point, within the same connection, is treated as the beginning of the
next subjob
End by Delimiter String
You can specify a delimiter string to detect the end of a subjob. Make sure that
the specified delimiter string does not exist in the actual content of the subjob,
however, because it will end the subjob and treat all remaining data as a new
subjob.
terminator
none
<CR> carriage return
<LF> line feed
<CR><LF> carriage return plus line feed
.
command provides two methods to signal the end of a subjob,
%%Session
%%Session
command
delimiter string
command.
for the subjob boundary.
length
Selecting Printer Features 75

Notes:
One or more ASCII space characters must be used to separate each item. Any
extra characters between the
argument
and the
terminator
are discarded.
Session Command Detection and Arguments
At the start of a document data stream, the printer examines the initial bytes of data to see
if it can mat ch the
%%Session:
... string. If the string is found, the
mode
and
argument
parameters are extracted to determine what kind of session matching is desired. If the
initial bytes fo r the document do no t match
mode
and
argument
parameters to the command, the printer will act as if the command is
%%Session: ...
or if there are errors in the
not present in the job and default to the use of language-specific terminators to end
subjobs for the remainder of the document.
If a valid
%%Session
command is encountered, the pri nt er p roc ess es all of the dat a up t o
the end of that subjob. Once the subjob terminates and more data arrives from the host
computer, the printer checks again to see if the subsequent data consists of a new
%%Session
subsequent subjob does not match
argument
command to start the next subjob. Again, if the tex t at the start of the
%%Session: ...
or if there are errors in the
mode
and
parameters to the co mmand, the prin ter wi ll act as if the com mand is not prese nt
in the job and default to th e use of langu age-sp ecifi c ter mina tors to e nd the s ubjobs for the
remainder of the document.
Examples
End by Count Example
For the end-by-count method of signaling the end of a subjob using a
count begins after the
terminator
following the
%%Session: ...
length
, the byte
sequence. For example,
counting starts with %! as the first 2 bytes in the following example:
%%Session: 0 65535
%!
%%IncludeFeature: emulation(postscript)
...
...
When using this method, include all white space and forms control characters inserted
by the host system in the byte count.
Selecting Printer Features76

End by Delimiter String Example
To group the three subjobs in the following example into a document using the
end-by-deli miter string method, the new c ombined data st ream may look like this:
Text in
Open connection: data comes into the printer
%%Session: 5 null
%!
%%IncludeFeature: emulation (postscript)
%%EndComments
...
PostScript data
%%EndSubJob
%%Session: 4%%End2ndSubJob
%!
%%IncludeFeature: emulation (pcl5)
%%EndComments
...
PCL 5e data
...
%%End2ndSubJob
%%Session: 4%%End3rdSubJob
%!
%%IncludeFeature: emulation (impress)
%%EndComments
...
imPRESS data
...
typeface is comment, not part of the data stream.
bold
Close connection
Subjob Terminator Example
To further clarify subjob terminators, let’s look at the following example. If you want to
group the three subjobs into a document using the %%
terminators, the new combined data stream may look like the following example.
Session
command with subjob
Selecting Printer Features 77

An “empty” subjob terminator (such as %%Session: 0 0 or %%Session: 2 null) will be
discarded as shown in the following example. This is what “ignore” means in the
definition of length described earlier in this section. Also, in the following example at
“define 2nd subjob boundary”, the %%Session: 0 7213 is the real
command being executed. The other %%
%%Session: 4) included in the text are part of the job. Also note that the
is used to signify comments that are not part of the job.
Open connection: data comes into the printer
%%Session: 0 0Ignore line
%%Session: 1 nullIgnore line
%%Session: 4 %%EndSubJobDefine 1st subjob boundary
%!
%%IncludeFeature: emulation (postscript)
%%EndComments
...
PostScript data
...
%%EndSubJob
%%Session: 0 7213Define 2nd subjob boundary
%%Session: 2 nullInclude in 2nd subjob
%%Session: 4 %%End2ndSubJobInclude in 2nd subjob
%!
%%IncludeFeature:emulation (pcl5)
EndComments
...
PCL 5e data
...
%%End2ndSubJob
%%Session: 0 0Ignore line
%%Session: 2%%End3rdSubJobDefine 3rd subjob boundary
%!
%%IncludeFeature:emulation (impress)
%%EndComments
...
imPRESS data
...
Close connection
Session
commands (%%Session: 2 null and
%%
Session
typeface
bold
Selecting Printer Features78

Job Boundary Commands
Some of the communication protocols supported by your printer do not provide “native
support” for distinguishing the end of a print job document. Your printer supports an
“end-of-document” (EOD) sequence for the serial and parallel communication protocols.
When the EOD character sequence is detected in the data stream, the printer infers that the
preceding job has c omple ted a nd a ne w job c an can begin with the t ext f ollowi ng the EOD
sequence.
When job boundary command pr ocessi ng is enabled for the serial or parall el interfaces,
you can send documents consisting of multiple subjobs to the printer. However, this
feature is limited to the use of PDL-specific delimiters to separate jobs. Otherwi se, the
advantages of using a session will apply.
Two types of EOD job terminator sequences are supported.
EndOfDocument Command
This sequence is the “end-of-document” character sequence.
Syntax %%EndOfDocument
Notes
If the characters carriage return and/or line feed are observed immediately following this character sequence, they will be absorbed.
Any characters after t he EOD seque nce will be treated a s the begin ning of a new
print job.
<ESC>%-12345x Command
This sequence is the Hewlett-Packard “end-of-document” character sequence.
Syntax <ESC>%-12345x
Notes
This is a nine character sequence where <ESC> stands for the ASCII escape
character.
No attempt is made to absorb characters before or after this EOD character
sequence.
Selecting Printer Features 79

Emulation Command
emulation
The
command overrides the default emulation selection for the interface and ESP (Emulation
Sensing Processor.)
command selects the language or emulation for the current print job. This
Syntax
<
language
Default
Notes
%%IncludeFeature:
>
The emulations are
hpgl
pcl4
pcl5
postscript
esp
postscript
Additional emulati ons may be availabl e depending on the printer and the op tional
features loaded on the printer. The following are examples of optional or additional emulations:
ccitt (not supported by ESP)
lineprinter
cals
tiff
ln03
If you choose <esp> the printer will use ESP even when the interface setting
specifies a specific emulation.
emulation
(<
language>
)
Printer Resolution, Quality, and Color Commands
Resolution
The resolution command sets the printer resolution (dot density) for the current print job.
Syntax
<
resolution
Default
Notes
%%IncludeFeature:
>
Printer dependent - see the printer documentation.
Printer dependent - see the printer documentation.
Job commands encode d in the pag e descri ption la nguag e can ove rride this com-
mand. If there is no such command in the job and this command is not present,
the printer uses the configuration setting for the resolution of the printer.
resolution
(<
resolution>
)
Selecting Printer Features80

This command depends on the capability of the printer to switch between different dot
densities under dynamic control. It is ignored if the printer does not support
multi-resolution.
Print Quality
This command allows you to set the intensity of your print output, choosing a normal,
light, or dark mode.
Syntax
<
value
Default
%%IncludeFeature:
>
<normal> | <dark> | <light>
<normal>
quality
(<
value>
)
Color Model
This command defines the color model or space used when processing the document as a
function of device color representation. This information can be used when interpreting
color space selections to determine the appropriate display characteristics of graphics.
Syntax
<
setting
Default
%%IncludeFeature:
>
<graymodel> | <cmy> | <cmyk> | <rgb>
Product specific
colormodel
(<
setting>
)
Color Separation
This command defines whether monochrome color separations should be generated. This
information can be used when interpretin g color space se lections to determine the
appropriate display characteristics of the output documents.
Syntax
<
setting
Default
%%IncludeFeature:
>
<on> | <off>
Product specific
colorseparation
(<
setting>
)
Selecting Printer Features 81


Selecting Emulation
Features
4

Introduction
This chapter lists the supported emulation Document Option Commands (DOCs)
available. For a specific list of supported DOCs, refer to your printer documentation.
Each command is preced ed by either a DOC statement (%%) or an IncludeFea ture
statement (%%IncludeFeature). The remainder of this chapter gives the complete syntax
of each command, lists possible parameter values, and gives the factory default value.
HP-GL Emulation Commands
Select enhanced resolution %%IncludeFeature: enhanced
Expand plot %%IncludeFeature: expand
Select original paper size %%IncludeFeature: size
Select pen width and color %%IncludeFeature: pen
Select plotter %%IncludeFeature: plotte r
Scale the image %%IncludeFeature: scaling
HP PCL 5e Emulation Commands
Enable scalable fonts %%IncludeFeature: scalablefonts
Install object %%IncludeFeature: install
Remove object %%IncludeFeature: remove
Remove resource %%IncludeFeature: removeresource
Select default font %%IncludeFeature: font
Select default font ID %%IncludeFeature: fontid
Select symbol set %%IncludeFeature: symbolset
Set carriage return to CR+LF %%IncludeFeat ure: criscrlf
Set linefeed to CR+LF %%IncludeFeature: lfiscrlf
Set number of lines per inch %%IncludeFeature: linesperinch
Set point size %%IncludeFeature: pointsize
Resource %%IncludeFeature: resource
Set monochrome GL/2 %%IncludeFeature: monochromegl
Lineprinter Emulation Commands
Select font for current job %%IncludeFeature: font
Set point size for current job %%IncludeFeature: pointsize
Selecting Emulation Featu r es84

Specify character map type %%IncludeFeature: map
Number lines %%IncludeFeature: number
Set tabs %%IncludeFeature: tabs
Set linefeed to CR+LF %%IncludeFeature: lfiscrlf
Set carriage return to CR+LF %%IncludeFeat ure: criscrlf
Set formfeed to CR+FF %%IncludeFeature: ffiscrff
Wrap lines %%IncludeFeature: autowrap
Set number of lines per page %%IncludeFeature: linesperpage
Set margins %%IncludeFeature: lpmargins
Set orientation %%IncludeFeature: lporientation
PostScript Emulation Commands
SC 200 to set PostScript protocol %%IncludeFeature: parpsprotocol
CCITT Groups 3 and 4 Commands
Start decompression %%ImageData
Set encoded byte flag %%EBAMode
Set end of block %%BlockEnd
Set line end %%LineEnd
Eject page %%PageEnd
Set image position %%ImagePosition
Invert image %%InvertImage
Set dpi for image expansion %%DPI
Set data compression %%Compression
Reverse bits %%BitReverse
End print job %%JobEnd
Set image size %%ImageSize
Set image rotation %%Rotation
Set image location on page %%SourceImageOrigin
Set image location in source %%SourceImagePosition
LN03 Commands
Identify product %%IncludeFeature: product
Control line wrap %%IncludeFeature: autowrap
Specify default paper size %%IncludeFeature: paper_size
Selecting Emulation Features 85

Control transformation poi nt %%IncludeFeature:
paper_size_override
Adjust image horizontally %%IncludeFeature: xorigin
Adjust image vertically %%IncludeFeature: yorigin
Set power-up configuration %%IncludeFeature: reset_override
CALS Commands
Automatic rot ation of image %%I ncludeFeature: autorotati on
Automatic scaling of image %%IncludeFeature: autoscaling
TIFF Commands
Automatic rot ation of image %%I ncludeFeature: autorotati on
Up or down scaling of i mage %%IncludeFeature: autoscaling
Automatic selection of paper size %%IncludeFeature: sheetsel
Annotation %%IncludeFeature: annotation
Reverse image control %%IncludeFeature: reverse
Control disk scratchfile size %%IncludeFeature: scratchfile
Set annotation tag number %%IncludeFeature: tag
Chapter Organization
Use this table to go to the command or information included in this chapter.
For information on... Go to...
Command syntax “DOC Statement Syntax” on page 87
HP-GL emulation commands “HP-GL Emulation Commands” on page 88
HP-PCL4 emulation commands “HP PCL4 Emulation Commands” on page 91
HP-PCL5 emulation commands “HP PCL5 Emulation Commands” on page 93
HP-PCL5e or 5c emulation commands “HP-PCL 5e or 5c Emulation” on page 98
PostScript Emulation commands “PostScript Emulation Commands” on page 111
LN03 Plus emulation commands “PostScript Emulation Commands” on page 111
Selecting Emulation Featu r es86

For information on... Go to...
PostScript commands “PostScript Level Commands” on page 113
LinePrinter emulation commands “Lineprinter Emulation Commands” on page 114
CCITT emulation commands “CCITT Group 3 and 4” on page 118
CALS emulation commands “CALS” on page 122
TIFF emulation commands “TIFF” on page 123
DOC Statement Syntax
Document Option Commands have the following syntax:
Syntax
Indicator
Keyword
Argument
attributes
Indicator Keyword
An indicator that a Document Option Statement follows. Indicators are %%.
The command name. Typical examples of indicators and keywords are
%%Title:
%%CreationDate:
%%IncludeFeature:
%%EndComments
Lowercase command that causes action to occur with the print job or printer
function.
Attributes specify settings for the command. For example, the paper size
attribute of the %%IncludeFeature:input command specifies the paper size that
is to be used for the print job:
%%IncludeFeature: input (Letter)
parameters
Mixed-case commands must be typed exactly as shown.
Selecting Emulation Features 87

Syntax Conventions
(...) Parentheses are explicit separators that must be entered as shown in the com-
mand syntax. One space (hex 20) is recommended for separation before and
after the parentheses.
< ...> Attributes or values withi n < > brac kets are option al variabl es. Do no t inclu de the
brackets.
[...] Items within square brackets are optional variables.
{...} Parameters or values within curly braces may be repeated one or more times.
Do not include the braces.
::== logical equate symbol
| logical OR function
Spacing Spacing may be used to separate multiple commands and/or arguments on a
single line.
Example:
%%IncludeFeature:
orientation (<rotation>)
<rotation> ::== Portrait | Landscape | portrait | landscape
Unless noted, all parameters not shown in
or { }, must be typed exactly as shown in the syntax.
Mixed case commands must be typed exactly as shown.
HP-GL Emulation Commands
The HP-GL emulation commands select the plotter type, paper size, reverse image,
enhanced mode, and pen widths and colors, and specify the origin position.
Plotter Selection
plotter
The
Syntax
<
value
Default
command selects the type of HP-GL plotter to emulate.
%%IncludeFeature:
>
7550 | 7470 | 7475 | Colorpro
Determined by control panel setting.
plotter
bold
or within < >
>)
(<
value
Selecting Emulation Featu r es88

Original Paper Size
size
The
determines the logical page size and thus determines where the image is placed on the
current page size.
command specifies the pap er si ze the host used in generating the document. This
Syntax
<
>
value
Default
Origin
origin
The
Syntax
<x>
>
<
y
Default
command shifts the entire plot upward and/or to the right.
Scaling Percent
scaling
The
Syntax
<
value
Default
command reduces or enlarges the HP-GL image size.
>
%%IncludeFeature:
Letter | A4 | Ledger | A3
Determined by printer control pane l setting.
%%IncludeFeature:
The distance the x origin point is to be moved in hundredths of an inch.
Range 0 - 11693
The distance the y origin point is to be moved in hundredths of an inch.
Range 0 - 17000
Determined by printer control pane l setting.
%%IncludeFeature:
A percentage of the original size.
Range: 0 - 150
100
size
origin
scaling
(<
value
> <y>)
(<
x
(<
>)
value
>)
For example
100 No scaling
50 x.25 size plot
150 x1.25 time larger in x and y
Selecting Emulation Features 89

Expand Mode
expand
The
and the maximum plotting area.
command expands the default scal ing points (p1 ,p2), hard-cli p plotting ran ge,
Syntax
<
value
Default
>
%%IncludeFeature:
on | off
Determined by printer control pane l setting.
Reverse Image
reverse
The
Syntax
<
value
Default
command turns reverse image (white image on black background) on or off.
%%IncludeFeature:
>
on
off
Determined by printer control pane l setting.
Enhanced Mode
enhanced
The
command selects enhanced resolution for download character sets for
7550A emulation.
Syntax
<
value
Default
>
%%IncludeFeature:
on
off
Determined by printer control pane l setting.
Pen Width and Color
pen
The
command selects pen width and color for a specific pen.
expand
reverse
enhanced
(<
(<
value
value
(<
value
>)
>)
>)
Syntax
<
number
<
width
%%IncludeFeature:
>
>
Pen number
Range: 1-8
Width of line
Range: 0 - 6- (0 is a single-pixel-wide line)
pen
(<
number
> <
width
> <
color
>
Selecting Emulation Featu r es90

<
color
Default
Note:
>
Pen color
Range: 1 - 8
Number Color
1Black
2Red
3Green
4 Yellow
5Blue
6 Magenta
7Cyan
8White
Determined by printer control pane l setting.
On monochrome printers, pen colors correspond to grey-scale settings.
HP PCL4 Emulation Commands
The HP PCL4 commands sel ect the current font and symbol set , specif y the li nes per page,
toggle reset on and off, and define the meaning of line feeds and carriage returns.
Fonts
font
The
command selec ts the font for the current prin t job.
Syntax
<
value
Default
%%IncludeFeature:
>
Courier10 courier12 |
Corier10bold courier12bold |
courier10italic courier12italic |
lineprinter
Determined by printer control pane l setting.
font
(<
value
>)
Font Storage
resource
The
Syntax
<
value
command stores the following font(s) to the designated hard disk.
%%IncludeFeature:
>
Available hard disks 0 - 4, 6, & 7
resource
(<
value
>)
Selecting Emulation Features 91

Symbol Sets
symbolset
The
command selects the symbol set for the current print job.
Syntax
<
value
Default
>
%%IncludeFeature:
roman-8 iso-10 iso-57
ecma-94 iso-11 iso-60
pc8-us iso-14 iso-61
pc8-dn iso-15 iso-69
pc8-50 iso-16 iso-84
iso-2 iso-17 iso-85
iso-4 iso-21 german
iso-6 iso-25 spanish
Determined by printer control pane l setting.
Lines Per Page
linesperpage
The
Syntax
<
value
Default
>
command sets the number of lines of text printed on the page.
%%IncludeFeature:
Number of lines per page
Range: 5 - 128 lines
Determined by printer control pane l setting.
Reset to Default
reset
The
job does not affect how the next job prints.
command resets PCL to its default state at the end of each PCL job so that one
symbolset (
linesperpage
<
value
(<
>)
value
>)
Syntax
<
>
value
Default
Line Feeds
lfiscrlf
The
linefeed combination.
Syntax
command translates each linefeed in the job's data stream to a carriage return/
%%IncludeFeature:
on | off
Determined by printer control pane l setting.
%%IncludeFeature:
reset
lfiscrlf
(<
value
(<
value
>)
>)
Selecting Emulation Featu r es92

<
value
Default
>
on | off
Determined by printer control pane l setting.
Carriage Returns
criscrlf
The
return/linefeed combination.
command translates each carr ia ge re turn in the job's data stream to a carriage
Syntax
<
value
Default
%%IncludeFeature:
>
on | off
Determined by printer control pane l setting.
criscrlf
(<
HP PCL5 Emulation Commands
The HP PCL5 emulation commands select the default font, the symbol set, the number of
lines per page, line termination methods, the point size of the default font, whether to
retain fonts, macros and patterns across job boundaries, whether to print bitmap or
scalable fonts, and whether to select the default font by id. Disk commands store or
remove fonts, macros, and patterns to or from the disk.
Default Font
font
The
Syntax
<
command selects the default font for the emulation.
font
(<
name
name
%%IncludeFeature:
>
courier10 | courier10bold | courier10italic | courier12 | courier12bold |
courier12itali c | linep rin ter | times * time s*i talic | times*bo ld | times*bl ditali c | un iv*
| univ*italic | univ*bold | univ*bolditalic | univcond* | univcond*italic | univ-
cond*bold | univcond*blditlc | selectbyid.
Font names with a * indicate that they are scalable and that pointsize will be
applied to them.
value
>)
>)
indicates that the default font id number is used for font selection.
Note
selectbyid
Selecting a font by fontid overrides the symbolset <value>.
Selecting Emulation Features 93

Font ID
fontid
The
only when the default font selected is
command selects the default font by its id number. This option is consulted
selectbyid
(see “Default Font” above).
Syntax
<id>
%%IncludeFeature:
Identification number of the default font.
Range: 0 - 32767
fontid
(<
>)
id
If a font with the specified id number is on an installed font cartridge or is currently
downloaded to memory or to a printer hard di sk, it is sele cted as the def ault fo nt. If n one of
these types of fonts exist, an internal font is selected.
Using this command to specify a font id as the default font and then using the
command to select selectbyid overrides the
symbolset
Symbol Set
symbolset
The
Syntax
<
>
name
This command specifies the default symbol set to use. Not all symbol sets are available
with certain internal fonts. the desktop, ps-math, math-8, microsoft-pub, pi-font, ps-text,
ventura-intl, ventura-math, ventura-us, and windows symbol sets cannot be used with the
internal bitmap fonts: courier10, courier10bold, courier10italic, courier12, courier12bold,
courier12italic, lineprinter.
command selects the default symbol set for the emulatio n.
%%IncludeFeature:
roman-8 | pc-850 | pc8-us | pc8-dn | ecma-94 | hpgerman | hpspanish | iso-2 |
iso-6 | iso-10 | iso-11 | iso-14 | iso-15 | iso-16 | iso-17 | iso-21 | iso-25 | iso-57 |
iso-60 | iso-61 | iso-69 | iso-84 | iso-85 | desktop | ps-math | math-8 |
microsoft-pub | pi-font | ps-text | ventura-intl | ven tura-math | ventura-us | win-
dows | ps-zapf-dingbats | ventura-dingbats | zapf-dingbats200 | zapf-ding-
bats300.
symbolset
(<
name
(below) setti ng.
>)
font
The five dingbat symbol sets (ps-zapf-dingbats, ventura-dingbats, zapf-dingbats100,
zapfdingbats200, zapf-dingbats300) can be used with all fonts. If a mismatch between
symbolset and font is delected, the standard PCL font selection mechanism is used to
locate a font that matches the desired sy mbolset . W ith the standard set of fonts dist ributed ,
this will match to the times* fo nt, but customer-installe d fonts can chan ge this result.
Selecting Emulation Featu r es94

Lines Per Page
linesperpage
The
emulation.
command selects the default number of lines per page for the
Syntax
<
number
%%IncludeFeature:
>
Range: 1 - 3000
linesperpage
(<
number
Line Termination
Line termination involves two Document Option Commands:
lfiscrlf
The
carriage return-line feed combination.
Syntax
<
boolean
criscrlf
The
return, or as a carriage return-line feed combination.
Syntax
<
boolean
command specifies whether a line feed is treated simply as a line feed or as a
%%IncludeFeature:
>
on | off | true | false
on or true
Line feed is treated as a carriage return-line feed combinat ion.
off or false
Line feed is treated as a line feed.
lfiscrlf
(<
boolean
>)
command specifies whether a carriage return is treated simply as a carriage
%%IncludeFeature:
>
on | off | true | false
on or true
Carriage return is treated as a carriage return-line feed combination.
criscrlf
(<
boolean
>)
>)
lfiscrlf
and
criscrlf
.
off or false
Carriage return is treated as a line feed.
Selecting Emulation Features 95

Point Size
pointsize
The
scalable, th is setting is ign ored.
command specifies the point size of the default font. If the font is not
Syntax
<
number
>
%%IncludeFeature:
Range: 0.25 to 999.75
This is a floating point number
Retain Temporary
retaintemporary
The
command specifies whether to retain the temporary fonts, macros,
and patterns in memory.
Syntax
<
boolean
>
%%IncludeFeature:
on | off | true | false
on
true
or
they can be used again without having to be downloaded again - unless the
printer is powered off or an <ESC>E is sent.
off
or
the emulation is exited.
keeps downloaded fonts, macros, and patterns in printer memory so
false
allows fonts, macros, and patterns to be erased from memory when
Install to Disk
install
The
it is prepen ded to) on the printer hard disk (in
/USER/FONTS/PCL).
Syntax
command stores any fonts, macros, or patterns used in the PCL print job (that
%%IncludeFeature:
pointsize
retainTemporary
install
(<
(<
disk
number
> <id>)
>)
(<
boolean
>)
Selecting Emulation Featu r es96

<
<
disk
>
id
>
The number of the disk that fonts, macros, or patterns are to be stored on.
Range: 0 - 6
This command is ignored, with no error message, if an incorrect disk number is
given.
Identification number of the font, macro, or pattern that is to be stored.
Range: 0 -32767
This ID can be used instead of t he usual PCL escape command to assign a font
ID. An ID from the PCL job stream overrides an ID assigned by this command.
Care must be taken to u se di stinct ID's. If an ID m atc he s an existing font, mac ro,
or pattern, the previous font, macro or pattern will be deleted and replaced with
the new font, macro, or pattern. HP printers have a default ID of 0.
A
remove
command (below) that precedes an
command prevents the
install
command from being recognized (they are mutually exclusive).
Remove From Disk
remove
The
which is located on the specified disk.
Syntax
<
disk
>
<
id
<
kind
An
command from being recognized (they are mutually exclusive).
This command is ignored, with no error message, if an incorrect disk number is given.
command removes the font, macro, or pattern which has the given id and
%%IncludeFeature:
>
>
install
The number of the disk that the font, macro, or pattern is stored on.
Range: 0 - 6
Identification number of the font, macro, or pattern that is to be removed.
Range: -1 - 32767
An ID of -1 acts as a wild card and deletes all
from the specified hard disk.
Either “font,” “macro,” “pat tern”, or “*.” If
with the given
are deleted.
id
command (above) that precedes a
remove
(<
> <id> <
disk
remove
>)
kind
fonts, macros, or patterns
kind
is “*,” all fonts, ma cros, and patterns
kind
command prevents the
install
remove
Selecting Emulation Features 97

HP-PCL 5e or 5c Emulation
Terminology
Font
A font is a unique set of objects that has an ID and attributes (symbol set, spacing, pitch,
height, style, weig ht, a nd t ypeface number). A font is accessed by specifyi ng a de si re d set
of attributes. The system selects the font that most closely matches these attributes from
the available set of fonts.
There are two types of fonts — bound and unbound. A bound font supports a single
symbol set. An unbound font supports multiple, but not all, symbol sets. With unbound
fonts, the symbol sets are organized into two groups — normal and Dingbats. All
downloaded fonts are bound, and all resident fonts (except Zapf Dingbats which supports
the Dingbats symbol set) support the group of normal symbol sets.
In the PCL 5e or 5c emulation, only fo nts located in the current re sour ce may be acc essed
by a PCL font ID using the normal <ESC>(#X sequence. All other fonts (resident,
cartridge, or other) including those stored on the additi onal reso urces can be accessed onl y
by attributes.
Also, only objects stored in the current resource may be deleted directly by the PCL
language. Thus, unless explicitly removed, external fonts are always available to all PCL
jobs.
Font Index Number
In addition to its ID, a downloaded font also has a unique index number which is
automatically assigned by the printer when the font is downloaded. This index number
may change if new resources are added, but in practice it usually remains fixed. All
currently availa ble PCL font s (r esiden t, ca rtri dge, t emporar y, permanent, and external) a re
listed with their font index numbers on the Advanced Status Page.
The font index number defi nes th e defaul t PCL font to be us ed if se lect byid is specif ied as
the default PCL font. Do not confuse the font index with the PCL font ID, a mechanism
used to identify downloaded fonts in the PCL language using the <ESC>(#X sequence.
There is no way to specify fonts by their font index numbers from within the PCL
language. Only the default PCL font is affected.
Selecting Emulation Featu r es98

Resource
A resource is a location where downloaded objects such as fonts, macros, or patterns are
stored. The printer has one default resource and one additional resource for each attached
disk. All downloaded objects are stored in file systems which reside on these resources.
The RAM1: resource may be used as the default , but systems wit h at least one di sk use the
system disk instead. So, for any disk-equipped printer, all downloaded objects except
palettes, which require special handling, are stored on disk. The default resource and one
of the additional resource s can re side on t he same di sk, but th ey will b e locate d in dif fer ent
directories of that resource’s file system.
Object
There are three types of PCL downloaded objects:
Temporary
Temporary objects reside on the current resource and are deleted at the beginning
and end of a job (unless Retain Temporary is set to On or On Compatibility) or when
the system is reset (<ESC>E or receipt of Printer Job Language).
Permanent
These objects reside on the current resource and are retained when the system is
reset (<ESC>E or receipt of Printer Job Language).
External
These objects reside on the additional resources.
All objects are temporary whe n first created. They can be made permanent obje cts through
PCL commands. Both temporary and permanent objects can become external objects
when the current res ource is changed ( for tempor ary obje cts Retai n Temporary must be set
to On, True, or On Compatibility). External objects become permanent objects when the
resource in which they reside becomes the current resource.
User-downloaded PCL objects, with the exception of palettes, are identified by an ID
when they are downloaded. The ID is usually set by the file performing the download. If
not, the system will provide a default value (usually 0, but this can be set using the
“install” DOC). If two object s of the same ty pe are provid ed with the same I D, the last one
received replaces the former. From that point on, downloaded objects are accessible by
their IDs.
Selecting Emulation Features 99

Install Object Command
Syntax
Purpose
Variables resource id
%%IncludeFeature:
Establishes the current resource and the default object ID value for the current
job to which it is attached. If it is attached to a job that downloads a font without
setting the current object ID using the PCL escape sequence <ESC>(#X, it has
the appearance of “storing” the font on disk.
Purpose
Range
Default
Format
Notes
object id
Purpose
Range
Default
Format
Notes
install
(
resource id object id
Identifies one of the possible locations for downloaded objects
0 to 6
Internal system disk
Integer
%%IncludeFeature: install
If no
default location is used; otherwise, this parameter, which mu st be
provided, specifies one of the alternate locations. For most printers, resource 6 is the system disk.
Assigns an ID to an object, such as a font, macro, or pattern
0-32767
0
Integer
The object ID can be used instead of the usual PCL command to
assign an ID. This ID is overwritten by any ID assigned from the
PCL print job, if present. If neither a Document Option Command
nor the PCL print job specify an ID, the default ID of 0 is used.
Identifiers must be unique. If the ID matches an ID for an existing
object, that object is deleted and replaced by the new object. If a
%%IncludeFeature: remove
Feature: install
two commands are mutually exclusive).
command, the
)
command is sent, the internal
command precedes a
install
command is ignored (the se
%%Include-
Selecting Emulation Featu r es100
 Loading...