

Page 1

4341-7704-02
User Manual
Pi4700e Printer Controller
Page 2

Contents
Contents
1 Before Using the Printer Driver
1.1 Features of the Controller ............................................................1-1
1.2 Configuration.................................................................................1-6
1.3 Connecting the Controller............................................................1-7
1.4 Settings Made on the Machine.....................................................1-8
Priority Device.................................................................................1-8
On Line / Ready ..............................................................................1-8
1.5 Installing the Printer Drivers........................................................1-9
2 Installing the Printer Driver
2.1 Windows 95/98/Me ........................................................................2-1
Operating Environment...................................................................2-1
Installing..........................................................................................2-2
Making General Settings Before Using the Printer .........................2-6
Displaying a Properties dialog box..................................................2-6
Displaying a Properties dialog box from the Printers window .........2-7
Displaying a Properties dialog box from an Application Menu........2-7
2.2 Windows 2000/XP..........................................................................2-8
Operating Environment...................................................................2-8
Installing..........................................................................................2-9
Making General Settings Before Using the Printer .......................2-13
Displaying a Properties dialog box................................................2-13
Displaying a Properties dialog box from the Printer Folder...........2-14
Displaying a Properties dialog box from an Application Menu......2-14
2.3 Windows NT 4.0...........................................................................2-15
Operating Environment.................................................................2-15
Installation.....................................................................................2-16
Making General Settings Before Using the Printer .......................2-20
Displaying a Properties dialog box................................................2-21
Displaying a Properties dialog box from the Printer Folder...........2-21
Displaying a Properties dialog box from an Application Menu......2-21
Pi4700e i
Page 3

3 Network Settings
3.1 Introduction................................................................................... 3-1
3.2 Specifying the IP Address From the Printer’s Touch Panel..... 3-2
Setting procedure ........................................................................... 3-2
3.3 Peer-to-Peer Printing with TCP/IP............................................... 3-5
Configuration Procedure (Windows 95/98/Me)............................... 3-5
Installing the printer (Windows 95/98/Me) ...................................... 3-6
Configuration Procedure (Windows NT 4.0)................................... 3-7
Installing the printer (Windows NT 4.0) .......................................... 3-7
3.4 Peer-to-Peer Printing Program (Windows)................................. 3-8
Installing the IP Peer-to-Peer Printing Program ............................. 3-8
Setting Up the Peer-to-Peer Printing Program ............................... 3-9
Adding a Printer Manually ............................................................ 3-10
3.5 Peer-to-Peer Printing with IPX/SPX .......................................... 3-12
Configuration Procedure............................................................... 3-12
To install the printer...................................................................... 3-12
3.6 IPX Peer-to-Peer Printing Program (Windows)........................ 3-14
Installing the IPX Peer-to-Peer Printing Program......................... 3-14
3.7 LPR Printing................................................................................ 3-17
Configuration Procedure (Windows NT 4.0)................................. 3-17
Installing the printer (Windows NT 4.0) ........................................ 3-18
Configuration Procedure (Windows 2000/XP).............................. 3-19
Installing the printer (Windows 2000/XP) ..................................... 3-19
3.8 IPP Printing ................................................................................. 3-21
Configuration Procedure............................................................... 3-21
Installing the printer ...................................................................... 3-21
3.9 Specifying network settings from PageScope Light............... 3-23
Access.......................................................................................... 3-23
Operation...................................................................................... 3-23
Logging In to the Admin Mode...................................................... 3-23
Network Tab ................................................................................. 3-24
Contents
ii Pi4700e
Page 4

Contents
4 Properties Settings
4.1 Description of each tab ................................................................4-1
4.2 Device Options Setting tab ..........................................................4-2
Mailbox Setting dialog box
<when Mailbin Finisher is installed> ...............................................4-4
4.3 Functions common to various tabs ............................................4-5
Functions of the Save Easy Set Name dialog box..........................4-6
4.4 Setup tab........................................................................................4-7
Functions of the Detail of Paper Source dialog box......................4-11
Functions of the Detail of Output Setting dialog box.....................4-13
4.5 Paper tab......................................................................................4-16
Functions of the Edit Custom Paper or Custom Paper dialog
box ................................................................................................4-19
4.6 Quality tab....................................................................................4-21
PCL6 version.................................................................................4-21
PS version.....................................................................................4-22
Functions of the Halftoning dialog box..........................................4-23
4.7 Job Management tab ..................................................................4-24
4.8 Overlay tab...................................................................................4-27
Functions of the Watermark dialog box.........................................4-28
4.9 PostScript tab..............................................................................4-31
Functions of the Font Substitution Table dialog box .....................4-33
Functions of the Send Fonts As dialog box...................................4-34
Functions of the Advanced PostScript dialog box.........................4-35
4.10 Conflicts dialog box....................................................................4-36
5 Printer Driver for Linux
5.1 Installing the printer driver...........................................................5-1
Operating environment....................................................................5-1
Installation.......................................................................................5-2
5.2 Printer setting with X window System ........................................5-4
Making general settings before using the printer ............................5-4
Redhat Linux...................................................................................5-4
Turbo Linux .....................................................................................5-7
Open Linux....................................................................................5-10
SuSE Linux ...................................................................................5-12
How to display Printer Utility dialog box........................................5-15
dipjl command...............................................................................5-16
Printing method (dilpr command)..................................................5-16
didialog command.........................................................................5-17
Pi4700e iii
Page 5

5.3 Properties settings..................................................................... 5-18
Description of each tab................................................................. 5-18
Device Options Setting tab........................................................... 5-19
Functions that are common to various tabs.................................. 5-21
Setup tab ...................................................................................... 5-23
Paper tab ...................................................................................... 5-31
Job Management tab.................................................................... 5-33
Conflicts dialog box ...................................................................... 5-35
6 Printer Driver for Macintosh
6.1 Installing the printer driver.......................................................... 6-1
Operating environment................................................................... 6-1
Installation (Macintosh OS 7/8/9) ................................................... 6-1
Installation (Mac OS X)................................................................... 6-9
6.2 Print options ............................................................................... 6-14
Print options (Macintosh OS 7/8/9)............................................... 6-14
Installable Options........................................................................ 6-15
Page Attributes............................................................................. 6-16
PostScript Options........................................................................ 6-17
General......................................................................................... 6-18
Background Printing ..................................................................... 6-19
Cover Page................................................................................... 6-20
Color Matching ............................................................................. 6-21
Layout........................................................................................... 6-22
Error Handling .............................................................................. 6-23
Save as File.................................................................................. 6-24
Printer Specific Options................................................................ 6-25
Conflicts dialog box ...................................................................... 6-32
Print options (Mac OS X).............................................................. 6-33
Paper & Quality Settings .............................................................. 6-34
Paper Source Settings..................................................................6-35
Job Management.......................................................................... 6-36
Finishing Settings ......................................................................... 6-37
Summary ...................................................................................... 6-39
Contents
iv Pi4700e
Page 6

Contents
7 Convenient Functions
7.1 Introduction...................................................................................7-1
7.2 Printing on both sides of the paper.............................................7-2
Overview .........................................................................................7-2
Procedure........................................................................................7-2
7.3 Printing more than one copy at a time........................................7-4
Overview .........................................................................................7-4
Procedure........................................................................................7-4
7.4 Specifying N-up printing ..............................................................7-6
Overview .........................................................................................7-6
Procedure........................................................................................7-6
7.5 Printing in reduced/enlarged size................................................7-8
Overview .........................................................................................7-8
Procedure........................................................................................7-8
7.6 Printing pages with watermarks................................................7-10
Overview .......................................................................................7-10
Procedure......................................................................................7-10
7.7 Specifying booklet printing........................................................7-12
Overview .......................................................................................7-12
Procedure......................................................................................7-12
7.8 Printing pages with a distribution number...............................7-14
Overview .......................................................................................7-14
Procedure......................................................................................7-14
7.9 Using the copy track function....................................................7-16
Overview .......................................................................................7-16
Procedure......................................................................................7-16
7.10 Printing on OHP transparencies................................................7-18
Overview .......................................................................................7-18
Procedure......................................................................................7-18
7.11 Adding a cover to each copy set...............................................7-20
Overview .......................................................................................7-20
Procedure......................................................................................7-20
7.12 Using the lock job (print PC confidential) function .................7-22
Overview .......................................................................................7-22
Procedure on the printer driver side..............................................7-22
Procedure on the machine side (Unlocking a job) ........................7-23
Procedure on the machine side (Deleting a job)...........................7-25
7.13 Using the folding function..........................................................7-27
Overview .......................................................................................7-27
Pi4700e v
Page 7

Procedure..................................................................................... 7-27
7.14 Using the settings function ....................................................... 7-29
Overview....................................................................................... 7-29
Procedure..................................................................................... 7-29
Using the settings stored for a current print job............................ 7-29
Storing settings............................................................................. 7-30
Deleting settings which have been stored.................................... 7-32
7.15 Confirming that the data has been transferred to the
machine....................................................................................... 7-34
Overview....................................................................................... 7-34
Procedure..................................................................................... 7-34
8 Network Interface Card
8.1 Outline ........................................................................................... 8-1
8.2 Getting ready ................................................................................ 8-1
Utility software (on the CD-ROM) ................................................... 8-2
System requirements...................................................................... 8-3
8.3 Setting up the network card ........................................................ 8-4
Connecting a network cable ........................................................... 8-4
Configuring the network card.......................................................... 8-4
8.4 Windows configuration................................................................ 8-5
8.5 NetWare configuration ................................................................. 8-5
Using NWSetup.............................................................................. 8-5
Using NetWare Client..................................................................... 8-5
NetWare 4.x Configuration Using Bindery Emulation..................... 8-5
Configuration Using Novell Directory Services............................... 8-8
Configuring NetWare Enterprise Print Services (NDPS).............. 8-16
8.6 Macintosh configuration............................................................ 8-27
Setting Up AppleTalk.................................................................... 8-27
Selecting and Setting Up the Printer ............................................ 8-27
Network Card Configuration ......................................................... 8-28
8.7 Using the utility software........................................................... 8-28
Management Access Program (Windows) ................................... 8-28
BOOTP (Windows)....................................................................... 8-32
NIManage for AppleTalk (Macintosh)........................................... 8-34
NWSetup (Windows) .................................................................... 8-38
8.8 Troubleshooting ......................................................................... 8-46
LED Status Indicators................................................................... 8-46
Troubleshooting............................................................................ 8-47
Resetting to Factory Defaults ....................................................... 8-49
Contents
vi Pi4700e
Page 8

Contents
8.9 Jumper switch setting ................................................................8-50
Network Card and Jumper Pin Positions ......................................8-50
Resetting to Factory Defaults........................................................8-50
Address Selection .........................................................................8-52
Bus Handshaking..........................................................................8-52
8.10 Specifications..............................................................................8-53
Network Card ................................................................................8-53
10/100BaseT Cable ......................................................................8-53
9 Scanner Mode
9.1 Outline............................................................................................9-1
E-Mail (Scan to E-mail) ...................................................................9-1
FTP (Scan to Server) ......................................................................9-2
URL.................................................................................................9-3
HDD (Scan to HDD)........................................................................9-4
Necessary Settings .........................................................................9-5
Necessary Devices (servers)..........................................................9-5
9.2 Network Setting.............................................................................9-6
Accessing to PageScope Light .......................................................9-6
Operation ........................................................................................9-6
Logging In to the Admin Mode ........................................................9-6
SMTP & FTP Configuration.............................................................9-7
HDD Configuration..........................................................................9-9
LDAP Setting.................................................................................9-10
9.3 E-mail Destinations.....................................................................9-12
Configuring an E-Mail destination .................................................9-13
Checking/changing registration (PageScope Light)......................9-14
Deleting registration (PageScope Light) .......................................9-14
New registration (touch panel of the digital copier).......................9-14
Checking/changing registration (touch panel of the digital
copier) ...........................................................................................9-16
Registering LDAP Search Criteria.................................................9-17
Deleting registration (touch panel of the digital copier).................9-19
9.4 File destinations..........................................................................9-21
Configuring a File Destination.......................................................9-22
New registration (touch panel of the digital copier).......................9-24
Checking/changing registration (touch panel of the digital
copier) ...........................................................................................9-25
Deleting registration (touch panel of the digital copier).................9-26
9.5 Mailbox Destinations ..................................................................9-28
New registration (touch panel of the digital copier).......................9-28
Checking/changing registration (touch panel of the digital
copier) ...........................................................................................9-29
Pi4700e vii
Page 9

Deleting registration (touch panel of the digital copier) ................ 9-30
Direct Input ................................................................................... 9-32
Scanning double-sided original: ................................................... 9-33
Scanning with size specified:........................................................ 9-34
Scanning with density changed:................................................... 9-35
Scanning with Image Type changed: ........................................... 9-36
Scanning with file format changed:............................................... 9-36
Scanning with resolution changed:............................................... 9-37
The operation of Capturing Images by TWAIN............................. 9-37
Installing the TWAIN Driver .......................................................... 9-37
Capturing Images by TWAIN........................................................ 9-38
9.6 How to input characters............................................................. 9-40
10 PageScope Light
10.1 System requirements................................................................. 10-1
10.2 Access ......................................................................................... 10-2
Operation...................................................................................... 10-2
Entering the password.................................................................. 10-2
10.3 Screen configuration..................................................................10-3
10.4 System tab .................................................................................. 10-5
➀ Summary .................................................................................. 10-5
➁ Details....................................................................................... 10-5
➂ Preference ................................................................................ 10-6
➃ Save Setting ............................................................................. 10-6
➄ Online Assistance..................................................................... 10-6
10.5 Job tab......................................................................................... 10-7
Print Job Management ................................................................. 10-7
File Download............................................................................... 10-7
10.6 Printer tab.................................................................................... 10-8
Settings......................................................................................... 10-8
Printer Front Panel ..................................................................... 10-11
Test Print .................................................................................... 10-12
Font Information ......................................................................... 10-13
Printer Reset............................................................................... 10-14
Maintenance............................................................................... 10-15
Local Interface............................................................................ 10-16
10.7 Scanner tab............................................................................... 10-17
10.8 Network tab............................................................................... 10-18
Contents
viii Pi4700e
Page 10

Contents
11 Troubleshooting
11.1 Unable to Print.............................................................................11-1
Unable to Make Correct Settings / Unable to Print Exactly as
Set.................................................................................................11-3
Poor Print Quality..........................................................................11-6
Error List........................................................................................11-6
12 Appendix
12.1 Function combination matrix (Windows)..................................12-1
12.2 Function combination matrix (Macintosh)................................12-4
12.3 Function combination matrix (Linux)........................................12-7
12.4 Number of registrations .............................................................12-9
Number of registrations/Usable range for Easy Set......................12-9
Number of registrations/Usable range for Watermark.................12-10
Number of registrations/Usable range for Custom Paper ...........12-11
12.5 Preview Listing..........................................................................12-12
[Page Layout]..............................................................................12-12
[Printer Figure] ............................................................................12-15
[Setting Preview] .........................................................................12-16
Specifications for the controller...................................................12-19
Accessories.................................................................................12-24
Glossary......................................................................................12-25
12.6 UNIX Configuration...................................................................12-29
Host-based lpd............................................................................12-29
Printer-based lpd.........................................................................12-30
Printer-based lpd Configuration ..................................................12-31
BSD System................................................................................12-32
AIX Version 2.5 ...........................................................................12-33
AIX 4.0 ........................................................................................12-34
HP-UX.........................................................................................12-34
AS/400 ........................................................................................12-35
DEC ULTRIX 4.3 RISC, OSF1/ALPHA.......................................12-36
SCO UNIX...................................................................................12-37
System V Release 4, Solaris 2.x.................................................12-38
LPSYSTEM Installation...............................................................12-38
Linux............................................................................................12-39
Configuring the Printer Using the printtool Command.................12-39
Configuring the Printer by Editing the printcap File.....................12-40
Host-based lpd Configuration......................................................12-41
Loading the Program...................................................................12-41
Selecting Filters...........................................................................12-42
Selecting a Filter Manually..........................................................12-42
Pi4700e ix
Page 11

Contents
Solaris Version 1, OSF1............................................................. 12-42
DEC ULTRIX 4.3 ........................................................................ 12-44
HP-UX System ........................................................................... 12-45
System V (Solaris Version 2), System V Release 4/386 Base
Machine ...................................................................................... 12-47
SCO UNIX .................................................................................. 12-49
AIX RISC System/6000 .............................................................. 12-51
Virtual Printer Commands .......................................................... 12-52
AIX Print Command.................................................................... 12-52
12.7 Setting Up IP Parameters......................................................... 12-53
Bundled Utility Programs............................................................ 12-53
Other Methods............................................................................ 12-53
Assigning IP Addresses Using ARP (For Windows)................... 12-54
Assigning IP Addresses Using ARP (For UNIX)......................... 12-56
Assigning IP Addresses Using the BOOTP Daemon
(For UNIX) .................................................................................. 12-57
Assigning IP Addresses Using the RARP Daemon
(For UNIX) .................................................................................. 12-59
Using the DHCP Daemon (For UNIX) ........................................ 12-60
12.8 Using Telnet to Make Settings ................................................ 12-61
Establishing a Telnet Connection............................................... 12-61
Menu Items................................................................................. 12-62
IP Parameters............................................................................. 12-62
LPD Printers ............................................................................... 12-62
Protocols..................................................................................... 12-62
Reset Unit................................................................................... 12-62
Restore Factory Defaults............................................................ 12-63
Change Password ...................................................................... 12-63
Exiting Telnet (Exit) .................................................................... 12-63
12.9 FTP Printing .............................................................................. 12-64
13 Index
x Pi4700e
Page 12

Foreword
Limited Software Warranty
For the USA and Canada Users
Limited Warranty
Minolta warrants that the software will perform in accordance with the accompanying written materials for a period of (90) ninety days from the date
of purchase. Minolta does not warrant that the operation of the program
will meet your requirements. This limited warranty gives you specific legal
rights. You may have others, which vary from state/jurisdiction to state/jurisdiction.
Purchase Remedies
Minolta’s entire liability and your exclusive remedy with respect to the software shall be at Minolta’s option either, repair or replacement of the software. The software must be returned to Minolta with a copy of your proof
of purchase. The Limited Warranty is void if failure of the software has resulted from accident, abuse, or misapplication. Any replacement software
will be warranted for the remainder of the original warranty period or (30)
thirty days, whichever is longer.
The remedies provided herein are customer’s sole and exclusive remedies. In no event shall Minolta Corporation be liable for any lost profits, direct, indirect, special, incidental, or consequential damages, whether
based on contract, tort, or any other legal theory.
Minolta Network Card Warranty
Warranty Term
Minolta Network Cards have a (1) One Year Warranty. The Network Card
must be returned to Minolta for repair or replacement at Minolta’s discretion.
Warranty Coverage
Minolta Corporation warrants this product to be free from defects in workmanship and materials for a period of one year from the date of receipt of
the unit. If the unit fails to function as written in the User’s manual, Minolta
will repair or replace the unit at no charge. Minolta will ship at their expense an exchange unit overnight to replace the defective unit.
The remedies provided herein are the customer’s sole and exclusive remedies. In no event shall Minolta Corporation be liable for any lost profits,
direct or indirect, special, incidental, or consequential damages, whether
based on contract, tort, or other legal history.
Pi4700e xi
Page 13
Foreword
User Instructions
For the U.S.A. Users
FCC Part 15-Radio Frequency Devices
This device complies with Part 15 of the FCC Rules. Operation is subject to the following two
conditions: (1) This device may not cause harmful interference, and (2) this device must accept any interference received, including interference that may cause undesired operation.
NOTE
This equipment has been tested and found to comply with the limits for a Class A digital device, pursuant to Part 15 of the FCC Rules. These limits are designed to provide reasonable
protection against harmful interference when the equipment is operated in a commercial environment. This equipment generates, uses, and radiate radio frequency energy and if not
installed and used in accordance with the instruction manual, may cause harmful interference to radio communications.
Operation of this equipment in a residential area is likely to cause harmful interference in
which case the user will be required to correct the interference at his own expense.
WARNING
The design and production of this unit conform to FCC Regulations, and any changes or
modifications must be registered with the FCC and are subject to FCC control. Any changes
made by purchaser or user without first contacting the manufacturer will be subject to penalty
under FCC regulations.
FCC-F02
This device must be used with shielded interface cables. The use of non-shielded cables is
likely to result in interference with radio communications and is prohibited under FCC rules.
For Canada Users
Interference-Causing Equipment Standard (ICES-003 Issue 3)
This Class A digital apparatus complied with Canadian ICES-003
Cet appareil numérique de la classe A est conforme à la norme NMB-003 du Canada.
IC-F03
For European Users
CE Marking (Declaration of Conformity)
This product complies with the following EU directives:
89/336/EEC, 73/23/EEC and 93/68/EEC directives.
This declaration is valid for the area of the European Union.
This device must be used with shielded interface cables. The use of non-shielded cables is
likely to result in interference with radio communications and is prohibited under EU directives.
xii Pi4700e
Page 14
Foreword
For Users of the Class B regulation’s countries
This device must be used with shielded interface cables. The use of non-shielded cables is
likely to result in interference with radio communications and is prohibited under CISPR 22
rules and local rules.
For Users except the Class B regulation’s countries
WARNING
This is a Class A product. In a domestic environment this product may cause radio interference in which case the user may be required to take adequate measures.
This device must be used with shielded interface cables. The use of non-shielded cables is
likely to result in interference with radio communications and is prohibited under CISPR 22
rules and local rules.
Pi4700e xiii
Page 15

Foreword
Welcome
Congratulations on your selection of Minolta Pi4700e printer controller
and Network Interface Card for Pi4700e.
This User Manual explains how to run print cycles on the machine, to which
the controller is connected. It also provides information about how to setup
the Network Interface Card and operate the Digital Copier in a network environment. First read this manual carefully and thoroughly; then, keep it
close at hand so you can refer to it whenever it becomes necessary.
Some of the screens shown in this manual may look different from what
you will view in actual applications.
Trademark Acknowledgements
Minolta is a registered trademark of MINOLTA CO., LTD. Page Scope is
a trademark of MINOLTA CO., LTD.
Apple, AppleTalk, and Macintosh are registered trademarks of Apple
Computer, Inc.
Ethernet is a registered trademark of Xerox Corporation.
PCL, HP LaserJet III, HP LaserJet IIISi, HP LaserJet 4Si, are registered
trademarks of Hewlett-Packard Company. HP UNIX is a trademark of
Hewlett-Packard Company.
Linux is a registered trademark of Linus Torvalds.
Microsoft, Windows, and Windows NT are registered trademarks of Microsoft Corporation.
Netscape Communications, the Netscape Communications logo,
Netscape Navigator, Netscape Communicator, and Netscape are trademarks of Netscape Communications Corporation.
Novell and NetWare are registered trademarks of Novell, Inc.
PostScript is a registered trademark of Adobe Systems, Inc.
Red Hat is a registered trademark of Red Hat, Inc.
Sun and Solaris are trademarks of Sun Microsystems, Inc.
All other product names are trademarks or registered trademarks of their
respective holders.
Copyright 2003 MINOLTA CO., LTD
The information contained in this manual is subject to change without notice.
xiv Pi4700e
Page 16

Features of the Controller
1 Before Using the Printer Driver
1.1 Features of the Controller
The controller is an image controller designed to use the machine as a
printer, allowing you to print documents directly to the machine from a
computer to which the controller is connected. The printer driver, which is
used during printing, is equipped with various functions that make the
most out of the features of the machine. They enable you to use the same
functions as those offered by the machine. When actually running a print
cycle, you can specify various functions of the machine on your computer
screen.
✎
Note
When using the controller, be sure to set the machine to the On Line
state.
Some functions offered by the machine cannot be combined, such as
Staple and Hole-Punch, and some others may not be used because of
a paper size involved. The functions that cannot be selected appear
dimmed.
1
Before Using the Printer Driver Chapter 1
Further, if functions that are incompatible with each other are specified, the Conflicts dialog box will appear, prompting you to change the
settings. When this dialog box appears, check the details and reselect
the functions to ensure function compatibility.
Some settings, which are defied by the machine for the restricted combinations of different functions, can at times be accepted by the printer
driver. If a print command is issued from the personal computer with
such settings made, the machine does not produce the output correctly or abandons the job to produce nothing. Make sure that you make
correct settings.
Pi4700e 1-1
Page 17
Before Using the Printer Driver Chapter 1
1
Features of the Controller
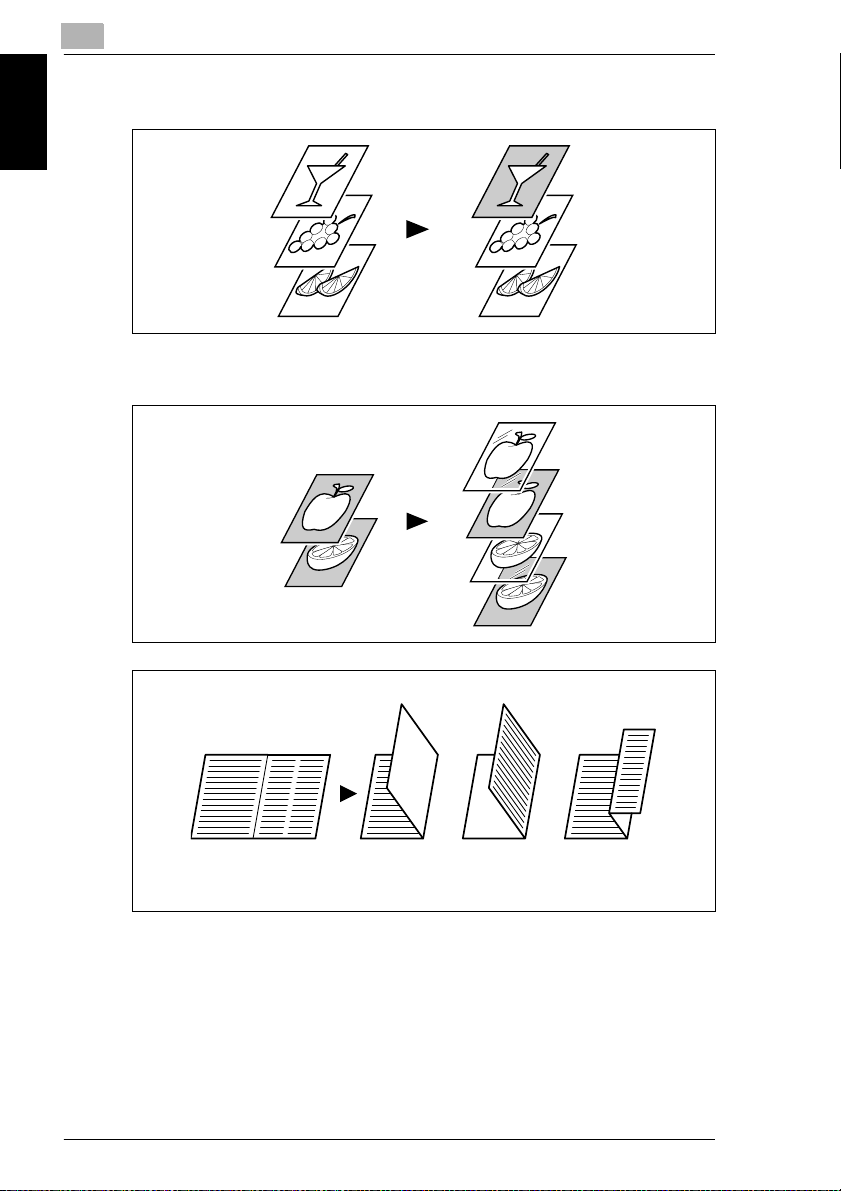
Various Printing Functions
Makes prints that are sorted into complete sets of the originals or
G
grouped into uncollated groups, each containing prints of one original.
(p. 7-4)
Prints two pages of originals on both front and back sides of a single
G
sheet of paper. (p. 7-2)
Long Edge Binding
Enlarges or reduces the image on the original. (p. 7-8)
G
Prints two pages or four pages of originals on a single sheet of paper.
G
Short Edge Binding
Maximum of 16 pages of originals can be printed on a single sheet of
paper. (p. 7-6)
2 up
4 up
1-2 Pi4700e
Page 18
Features of the Controller
Prints four pages of originals to both front and back sides of a single
G
sheet of paper. (p. 7-12)
Places text in the background. (p. 7-10)
G
Makes prints of complete sets of the originals, stapled together or
G
punched for filing. (p. 4-13)
1
Before Using the Printer Driver Chapter 1
By combining Collate with other finishing capabilities, you can make
complete sets of documents for immediate delivery without having to
do any further processing.
Adds a reference number (Distribution Number) to each document set
G
during printing. (p. 7-14)
Pi4700e 1-3
Page 19
Before Using the Printer Driver Chapter 1
1
Features of the Controller
Prints only the cover on a different type of paper (such as colored pa-
G
per). (p. 7-20)
Capable of printing on OHP transparencies. You can also insert inter-
G
leaves, either blank or printed with the same contents as those on the
OHP transparencies. (p. 7-18)
Folds copies during finishing. (p. 4-13)
G
Half Folding Z-FoldingCrease
1-4 Pi4700e
Page 20

Features of the Controller
Administrative Functions
Different accounts can be managed for printing records, just as when
G
using the machine as a copier.
Printing of confidential documents may be withheld until a legitimate
G
password is entered on the machine.
1
Before Using the Printer Driver Chapter 1
Pi4700e 1-5
Page 21
1
1.2 Configuration
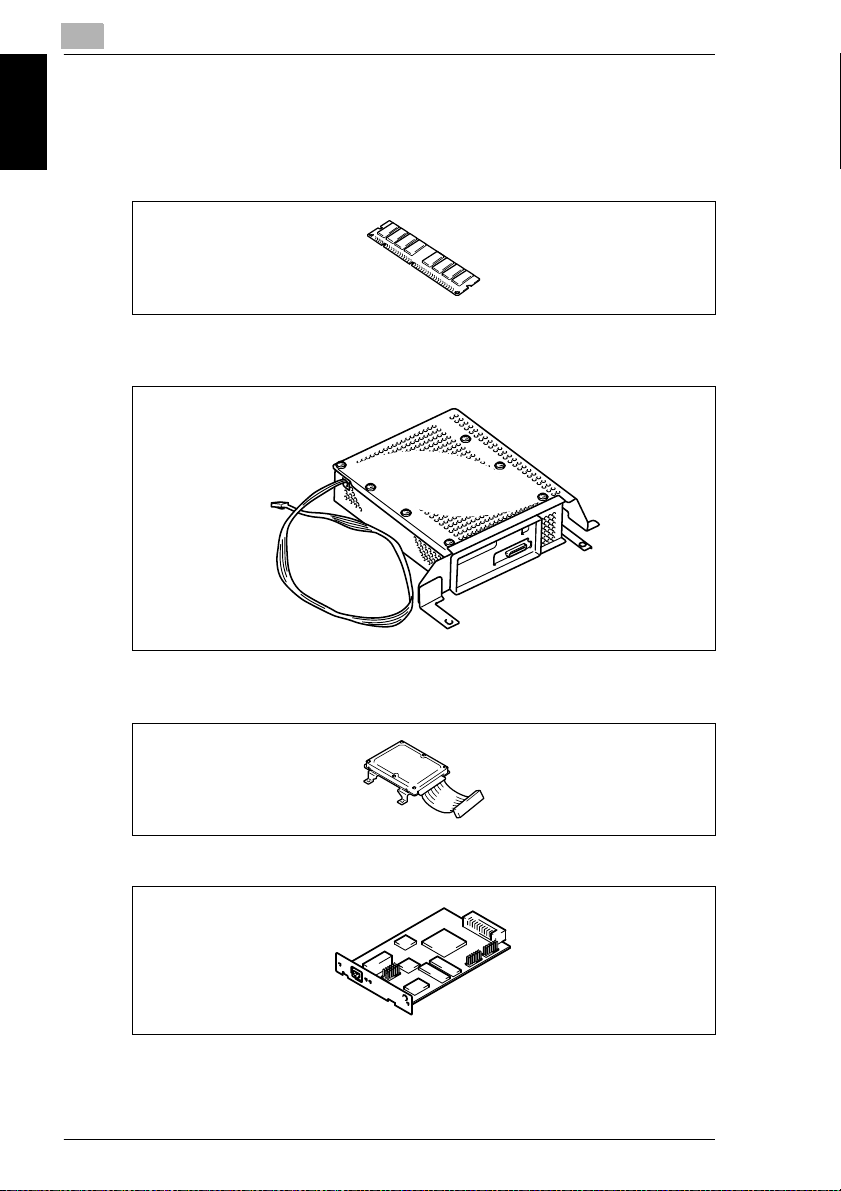
The controller may be configured with the following options.
Memory (64MB/128MB, Option)
G
Expands the memory capacity of Pi4700e.
Controller
G
Allows you to use the machine as a printer controlled by your personal
computer.
Before Using the Printer Driver Chapter 1
Configuration
Hard Disk Drive (Option)
G
For downloading Mac PS fonts and storing them. Stores the Scan to
HDD data.
NIC Board (Option)
G
Allows you to use the machine as a printer in a network environment.
1-6 Pi4700e
Page 22
Connecting the Controller
✎
Note
The NIC Board must be mounted to use the scanner functions.
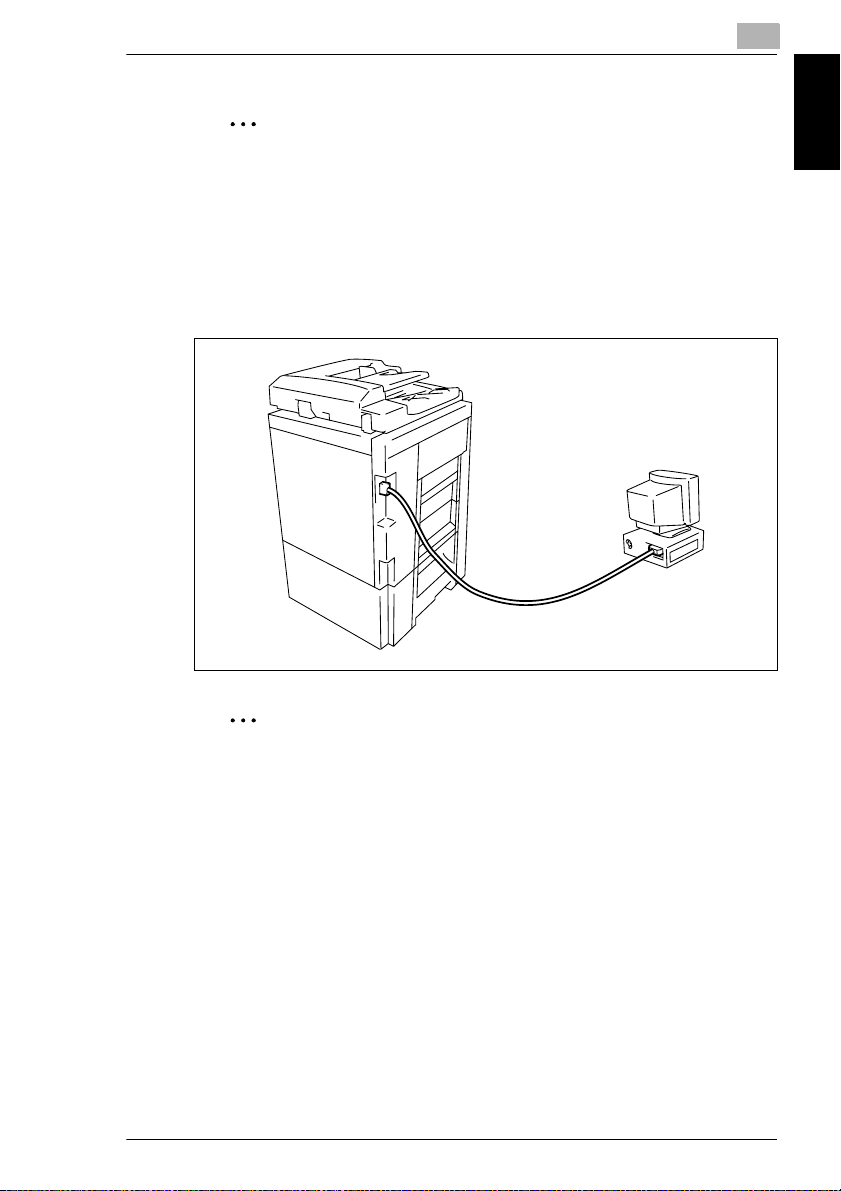
1.3 Connecting the Controller
The controller is installed inside the machine. The installation procedures
are to be performed by service personnel.
The controller is connected to the computer by a printer cable or network
cable. Power to the controller is supplied from the machine.
1
Before Using the Printer Driver Chapter 1
✎
Tip
If you cannot print from your computer, make sure that the printer cable or network cable is connected to the corresponding connectors.
Pi4700e 1-7
Page 23

1
1.4 Settings Made on the Machine
The following functions must be set on the machine using its Utility Mode,
as they relate to the controller.
Priority Device
Select the priority use of the machine, either as a copier or printer.
Copier: The machine is used as a copier.
G
The machine starts the print cycle only after it has received the entire
data of a particular print job.
The machine can be used for copying, since it starts printing only after
it has received the entire data of the job for printing. This means that
more time is available to you for copying, but you have to wait for a
longer time before a particular print job is done.
Printer: The machine is used as a printer.
G
Before Using the Printer Driver Chapter 1
The machine starts the print cycle before it completes receiving the entire data of a particular print job.
On receiving the data for one page, the machine starts printing, accepting no other job for copying. This means that less time is available
to you for copying, but you do not have to wait long before a particular
print job is done.
On Line / Ready
Settings Made on the Machine
On Line key
G
This function is the same as that available in ordinary printers as On
Line/Off Line.
Select On Line normally. A lit lamp indicates that the machine is in the
On Line mode.
Ready Lamp
G
Data can be transferred while this lamp stays lit up. The lamp remains
blinking while data is being transferred.
1-8 Pi4700e
Page 24

Installing the Printer Drivers
1.5 Installing the Printer Drivers
To make 100% use of the functions offered by the machine mounted with
the controller, install the attached printer drivers in your computer.
The controller is furnished with the following printer drivers:
PCL6 printer driver for Windows 95
G
PCL6 printer driver for Windows 98/Me
G
PCL6 printer drive for Windows NT 4.0
G
PCL6 printer driver for Windows 2000/XP
G
PS printer driver for Windows 95/98/Me
G
PS printer driver for Windows NT 4.0
G
PS printer driver for Windows 2000/XP
G
PPD file for Macintosh
G
PPD Plugin for Mac OS X
G
PS print utility for Linux (Redhat, SuSE, Turbo, Open)
G
Install the printer driver suitable for the operating system that runs on your
computer. For installation procedures, see the relevant page as detailed
below:
Installing the Windows printer driver:
G
Windows 95/98/Me (p. 2-1)
Windows 2000/XP (p. 2-8)
Windows NT 4.0 (p. 2-15)
Installing the Macintosh PPD file and PPD Plugin file:
G
See “6.1 Installing the printer driver” on page 6-1.
Installing the Linux print utility:
G
See “5.1 Installing the printer driver” on page 5-1.
1
Before Using the Printer Driver Chapter 1
Pi4700e 1-9
Page 25

Before Using the Printer Driver Chapter 1
1
Installing the Printer Drivers
1-10 Pi4700e
Page 26
Windows 95/98/Me
2 Installing the Printer Driver
This chapter describes the procedure for installing the printer driver on a
Windows operating system. For details on installation for Linux, refer to
chapter 5. For details on installation for a Macintosh, refer to chapter 6.
2.1 Windows 95/98/Me
Operating Environment
This section explains the required environment for the printer driver.
Before installing the printer driver, check that your computer meets the following requirements. If it doesn’t, the printer driver may not function properly.
2
Personal computer IBM PC or compatible with Pentium 200MHz or
Operating system Windows 95 (English), Windows 98 (English) or
Memory 64MB or more
I/O interface Parallel Centronics interface (Conforming to IEEE1284)
Network 10/100BaseT (UTP)
Free space on hard disk 10MB or more (PCL6)
Windows 2000/XP
G
higher CPU
Windows Me (English)
2MB or more (PS)
For the operating environment and installation procedure for the Windows 2000/XP printer driver, see page 2-8.
Windows NT 4.0
G
For the operating environment and installation procedure for the Windows NT 4.0 printer driver, see page 2-15.
Installing the Printer Driver Chapter 2
Pi4700e 2-1
Page 27
Installing the Printer Driver Chapter 2
2
Windows 95/98/Me
Installing
This section explains the installation procedure for the Windows 98 printer
driver.
✎
Note
Before starting to install the printer driver, be sure first to quit all other
applications.
✎
Tip
The following procedure assumes that the machine is a Digital Copier
and that the printer driver is PCL6: Read the specific proper names accordingly if the machine is a model other than the Digital Copier and if,
for example, the OS is Windows 95 and the printer driver is PS.
1
Click the
then click
2
The Printers window will appear. Double-click the
3
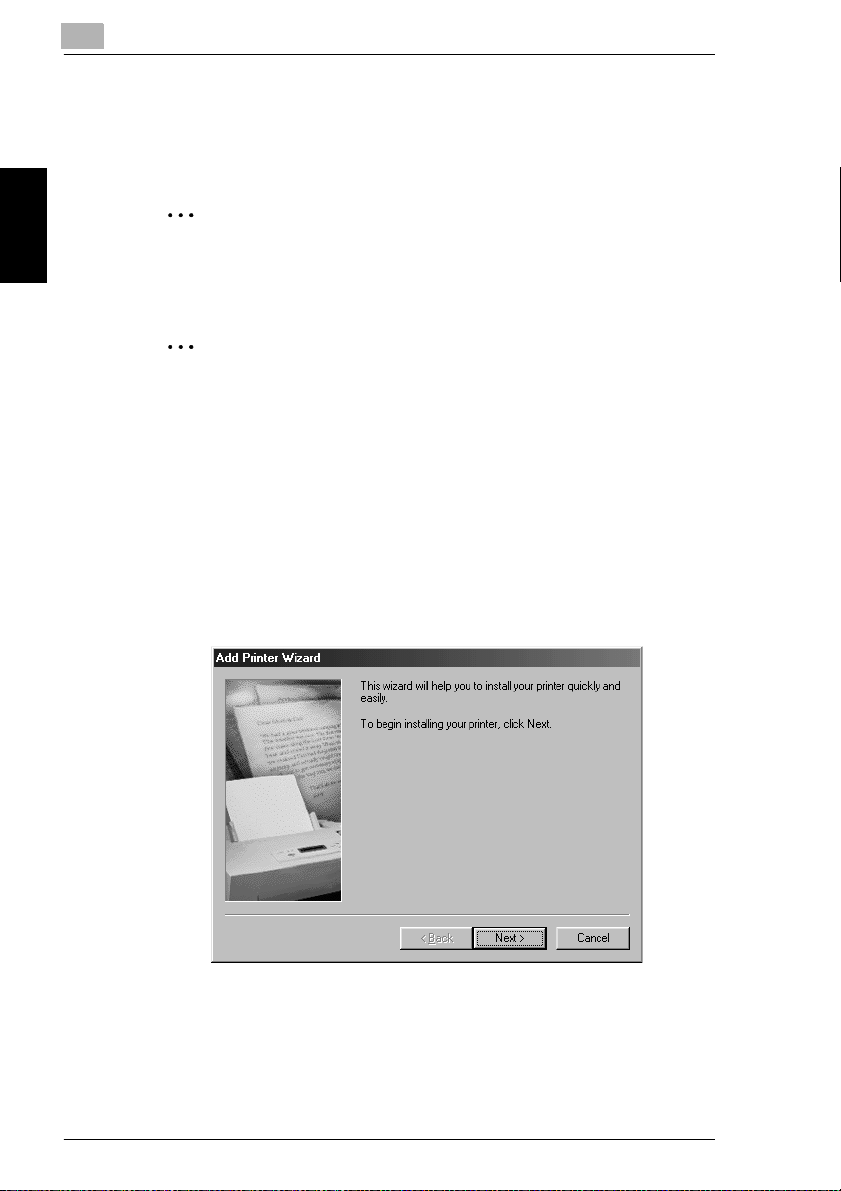
The Add Printer Wizard will appear. Click the
button. From the menu that appears, select
Start
Printers
.
Next>
Settings
Add Printer
button.
icon.
,
2-2 Pi4700e
Page 28
Windows 95/98/Me
4
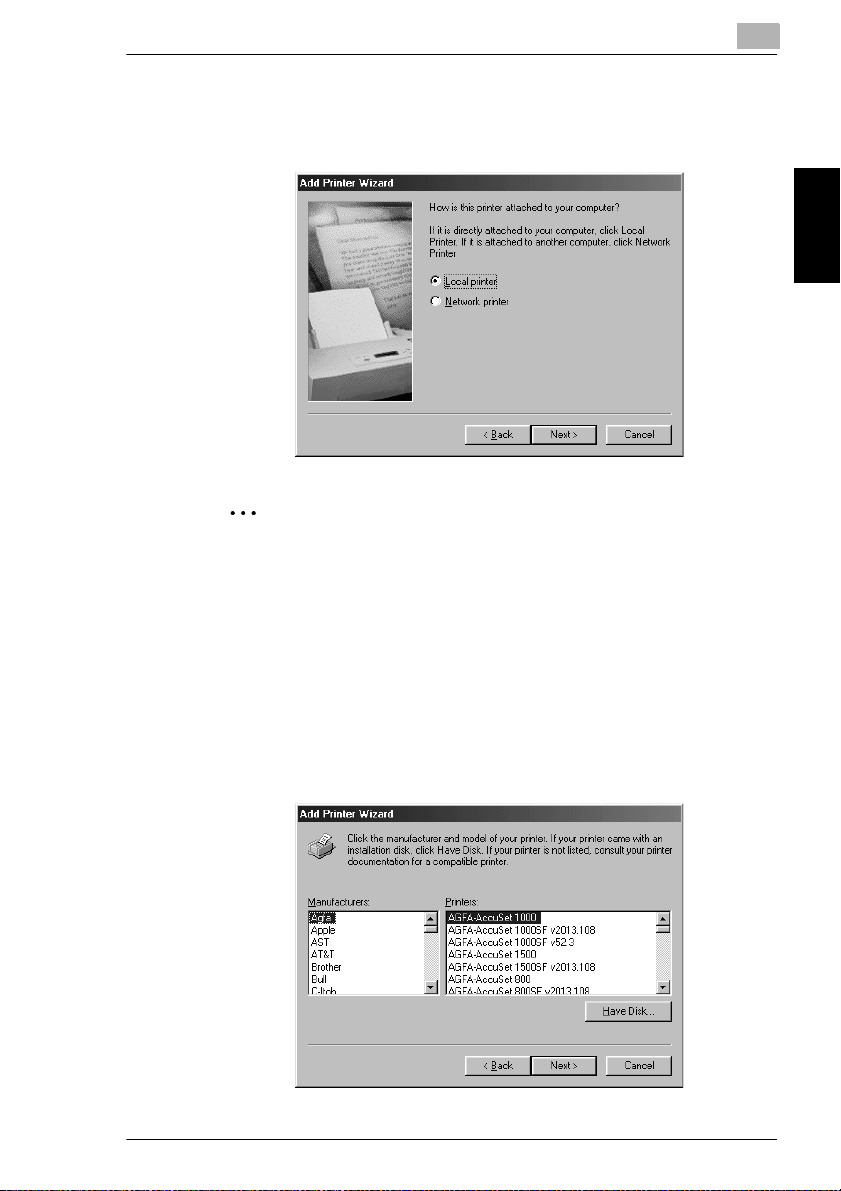
A window will appear, asking how the printer is to be connected. If your
computer is directly connected to the machine, select
and then click the
✎
Next>
button.
Local printer
2
Note
When installing the printer driver in a computer connected to the machine via a network, be sure to consult the network administrator.
This is a request to be made of the network administrator. To install
the printer driver in a computer connected to a network, select Net-
work printer and click the Next> button. Then, a window will appear
prompting you to enter the network path: Enter the path.
5
A window will appear, prompting you to select the manufacturer and
model of your printer. Click the
part of the screen.
Have Disk...
button on the lower right
Installing the Printer Driver Chapter 2
Pi4700e 2-3
Page 29
Installing the Printer Driver Chapter 2
2
Windows 95/98/Me
6
The Install From Disk dialog box will appear. Install the controller driver
CD-ROM that is included with the controller in the CD-ROM drive of
your computer.
7
Click the
printer driver to be installed and the operating system being used, and
then click the OK button.
8
A
Select the driver to be installed and click the
Browse
Printers
button, select the file corresponding to the type of
list appears.
button.
Next>
✎
Tip
PS driver is different for each model: Select according to model of the
machine used.
9
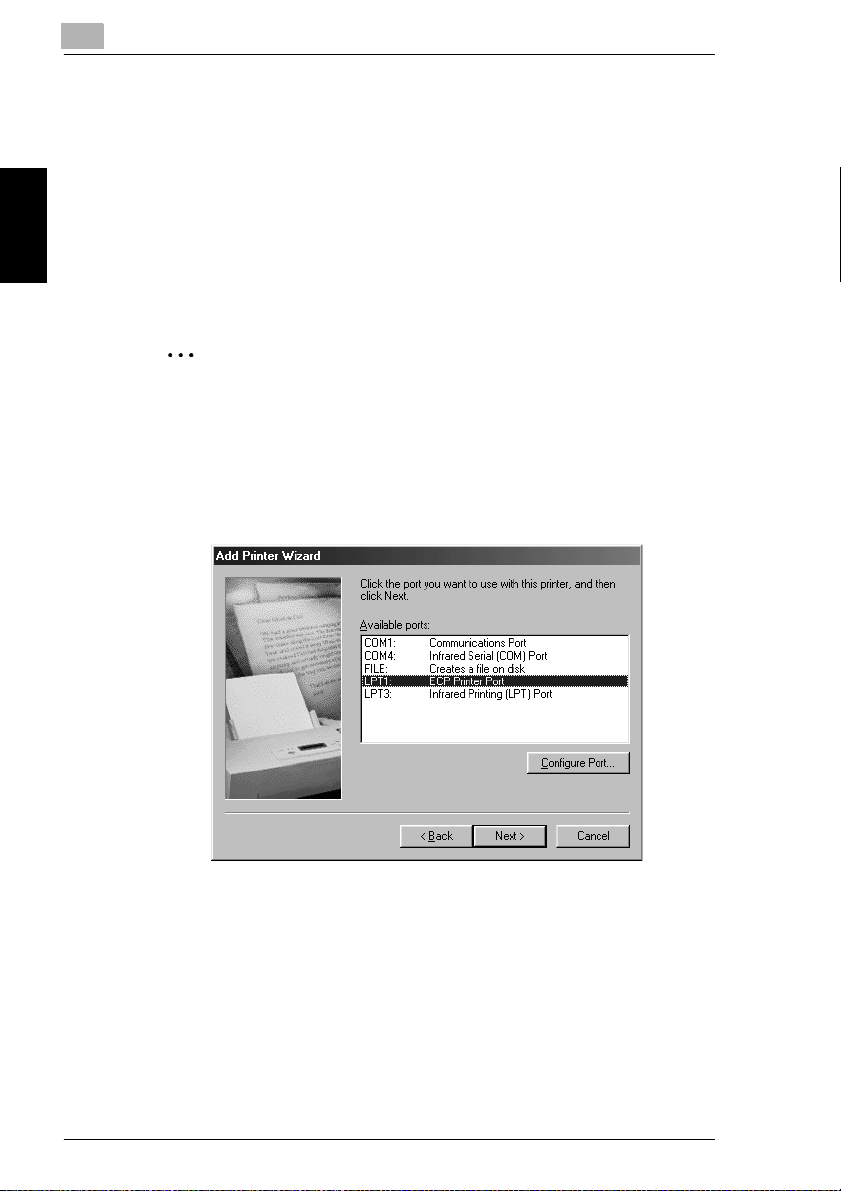
A window that prompts you to select the port will appear. Select the
port (normally
then click the
) to which the printer cable has been connected,
LPT:
button.
Next>
10
A window that asks you to confirm the printer name will appear. Check
the printer name. If you want to designate this printer as the default
printer, select
Click the
11
A screen that allows you to select printing of a test page will appear.
If you want to print a test page, select
elect not to, select No. It is recommended that a test page be printed
to ensure that the printer driver has been installed properly. Now, click
the
2-4 Pi4700e
Finish
Next>
button.
.
Yes
button.
Yes (recommended)
. If you
Page 30
Windows 95/98/Me
12
Installation will start.
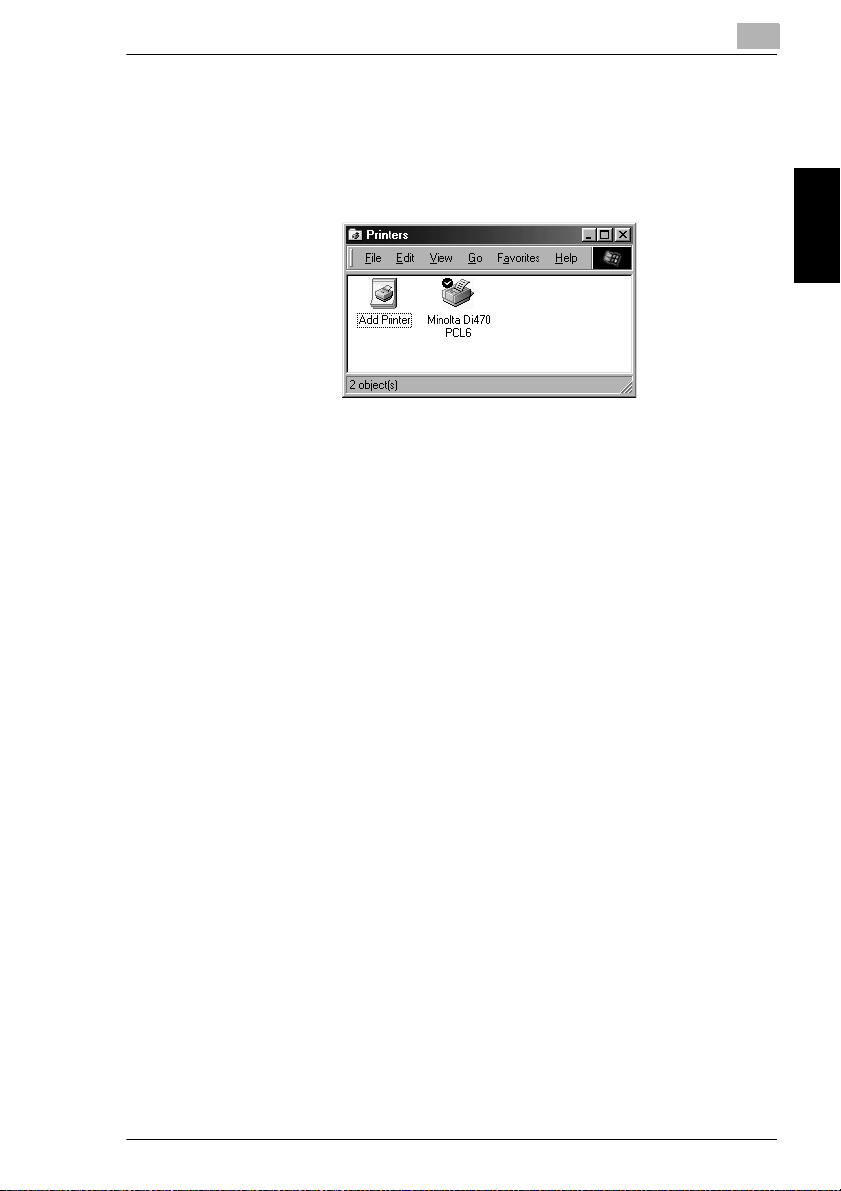
When all the files have been copied from the CD-ROM, the corresponding
icon will be added to the Printers window.
This completes the installation.
2
Installing the Printer Driver Chapter 2
Pi4700e 2-5
Page 31

Installing the Printer Driver Chapter 2
2
Windows 95/98/Me
Making General Settings Before Using the Printer
The printer driver requires setting of items that are common to all print
jobs, including the port to which the printer cable is connected and optional devices configured with the machine. These settings must be made using properties dialog box available from the Properties command after the
printer driver has been installed or whenever the operating environment is
changed.
The most common settings were made when the printer driver was installed, meaning that you do not usually bother to change them. Some
items must, however, be changed in the following cases.
Cases where changes are necessary Applicable property tab
You want to add a comment to distinguish the printer
from others
The computer’s connecting port has been changed
You want to change the conditions for the display of
a timeout error
You want to designate a port to which the machine is
connected via a network (this setting must be made
on a computer connected to the machine via a network)
This setting is not related to printing.
You want to share the machine with other computers
connected to the same network (this setting must be
made on the computer directly connected to the machine)
General
Details
Color Management
Sharing
For details of “Device Options Setting tab”, see page 4-2.
Displaying a Properties dialog box
There are two different steps to take to display a properties dialog box.
The contents of a particular properties dialog box slightly differ depending
on how you access it. Select the appropriate one according to your need.
(1) To display a properties dialog box from the Printers window
(2) To display a properties dialog box from an application menu
Below are the detailed procedures for each approach.
2-6 Pi4700e
Page 32

Windows 95/98/Me
Displaying a Properties dialog box from the Printers window
1
Click the
2
Right-click the appropriate printer icon (ex. Minolta Di470 PCL6).
3
Select
properties dialog box.
It allows you to set the environment in which you will use the printer. The
settings made through this method are valid in all applications.
Displaying a Properties dialog box from an Application Menu
As an example, the procedure for the PCL6 printer driver is described below.
1
Select
2
Make sure that the
nolta Di470 PCL6
then appear, select
3
Click the
This method allows you to set the number of copies and paper for each
document.
Note that the settings made on the properties dialog box accessed
through the application are valid only for that particular application.
button and select
Start
Properties
from the
Print...
Properties
Settings
from the menu that will appear. This shows the
menu of the application.
File
of the
Name
is not listed, click ▼ and, from the menu that will
Minolta Di470 PCL6
button. This shows the properties dialog box.
Printer
. Then, click
is
Minolta Di470 PCL6
.
Printers
.
: If
2
Mi-
Installing the Printer Driver Chapter 2
✎
Tip
To set the Device Options Setting, which need not be changed unless
device is changed, open it from the Printers window to set.
To show a properties dialog box other than Setup, click the corresponding tab located on the top part of the screen.
✎
Note
The steps to display a properties dialog box may be different depending on the application. Follow the correct procedure according to the
application. The procedure above is based on the application WordPad.
Pi4700e 2-7
Page 33

2
2.2 Windows 2000/XP
Operating Environment
This section explains the required environment for the printer driver.
Before installing the printer driver, check that your computer meets the following requirements. If it doesn’t, the printer driver may not function properly.
Windows 2000/XP
Installing the Printer Driver Chapter 2
Personal computer IBM PC or compatible with Pentium 200MHz or
Operating system Windows 2000 (English) or Windows XP (English)
Memory 64MB or more
I/O interface Parallel Centronics interface (Conforming to IEEE1284)
Network 10/100BaseT (UTP)
Free space on hard disk 10MB or more (PCL6)
Windows 95/98/Me
G
higher CPU
2MB or more (PS)
For the operating environment and installation procedure for the Windows 95/98/Me printer driver, see page 2-1.
Windows NT 4.0
G
For the operating environment and installation procedure for the Windows NT 4.0 printer driver, see page 2-15.
2-8 Pi4700e
Page 34

Windows 2000/XP
Installing
This section explains the installation procedure for the Windows 2000/XP
printer driver.
✎
Note
When starting up the operating system, log in with administrator privileges.
Before starting to install the printer driver, be sure first to quit all other
applications.
✎
Tip
The following procedure assumes that the machine is a Digital Copier
and that the printer driver is PCL6: Read the specific proper names accordingly if the machine is a model other than the Digital Copier and if,
for example, the OS is Windows XP and the printer driver is PS.
1
Click the
then click
button. From the menu that appears, select
Start
Printers
.
Settings
2
Installing the Printer Driver Chapter 2
,
2
The Printers window will appear. Double-click the
3
Start the Add Printer Wizard.
Click the
Pi4700e 2-9
Next>
button.
Add Printer
icon.
Page 35

Installing the Printer Driver Chapter 2
2
Windows 2000/XP
4
A screen that allows you to select the type of connection made of the
printer will appear. If the printer is directly connected to the computer,
select
Local Printer
and click the
Next>
button.
✎
Note
When installing the printer driver in a computer connected to the machine via a network, be sure to consult the network administrator.
5
A window the prompts you to select the port will appear. Select the
name of the port to be used and click the
2-10 Pi4700e
Next>
button.
Page 36

Windows 2000/XP
6
A window will appear, prompting you to select the manufacturer and
model of your printer. Click the
part of the screen.
7
The Install From Disk dialog box will appear. Install the controller driver
CD-ROM that is included with the controller in the CD-ROM drive of
your computer.
Have Disk...
2
button on the lower right
Installing the Printer Driver Chapter 2
8
Click the
printer driver to be installed and the operating system being used, and
then click the OK button.
9
A
Select the driver to be installed and click the
10
A window that asks you to confirm the printer name will appear. Check
the printer name. If you want to designate this printer as the default
printer, select
Click the
11
Follow the instructions that appears on your computer screen.
12
As the last step, click the
Pi4700e 2-11
Browse
Printers
Next>
button, select the file corresponding to the type of
list appears.
button.
Next>
.
Yes
button.
button.
Finish
Page 37

Installing the Printer Driver Chapter 2
2
Windows 2000/XP
13
Installation will start.
When all the files have been copied from the CD-ROM, the corresponding icon will be added to the Printers window. This completes the
installation.
2-12 Pi4700e
Page 38

Windows 2000/XP
Making General Settings Before Using the Printer
The printer driver requires setting of items that are common to all print
jobs, including the port to which the printer cable is connected and optional devices configured with the machine. These settings must be made using property sheets available from the Properties command after the
printer driver has been installed or whenever the operating environment is
changed.
The most common settings were made when the printer driver was installed, meaning that you do not usually bother to change them. Some
items must, however, be changed in the following cases.
Cases where changes are necessary Applicable property tab
You want to add a comment to distinguish the printer
from others
You want to share the machine with other computers
connected to the same network (this setting must be
made on the computer directly connected to the machine)
The computer’s connecting port has been changed
You want to change the conditions for the display of
a timeout error
You want to designate a port to which the machine is
connected via a network (this setting must be made
on a computer connected to the machine via a network)
You want to restrict use condition of printer.
You want to change settings in spool condition.
You want to change OS-dependent settings.
This setting is not related to printing.
You want to restrict access to the machine
You want to check the accounts of the machine users
This setting is not related to printing.
2
General
Sharing
Ports
Installing the Printer Driver Chapter 2
Advanced
Color Management
Security
Processing
For the details of “Device Options Setting tab”, see page 4-2.
Displaying a Properties dialog box
You have two different steps to take to display a properties dialog box.
The contents of a particular properties dialog box slightly differ depending
on how you access it. Select the appropriate one according to your need.
(1) To display a properties dialog box from the Printers window
(2) To display a properties dialog box from an application menu
Below are the detailed procedures for each approach.
Pi4700e 2-13
Page 39

2
Windows 2000/XP
Displaying a Properties dialog box from the Printer Folder
1
Click the
2
Click the appropriate printer icon (ex. Minolta Di470 PCL6).
3
<To display the General dialog box>
Click
Properties
4
<To display Printing Preferences dialog box>
Click
Printing Preferences…
It allows you to set the environment in which you will use the printer. The
settings made through this method are valid in all applications.
button and select
Start
from the
menu.
File
from the
Settings
File
. Then, click
menu.
Printers
.
Displaying a Properties dialog box from an Application Menu
As an example, the procedure for the PCL6 printer driver is described below.
1
Select
Print...
from the
menu of the application.
File
Installing the Printer Driver Chapter 2
2
Make sure that the
: If
PCL6
that will then appear, select
This method allows you to set the number of copies and paper for each
document.
Note that the settings made on the properties dialog box accessed
through the application are valid only for that particular application.
Minolta Di470 PCL6
Select Printer
of the
General
is not listed, click ▼ and, from the menu
Minolta Di470 PCL6
is
Minolta Di470
.
✎
Tip
To set the Device Options Setting, which need not be changed unless
device is changed, open it from the Printers window to set.
To show a properties dialog box other than Setup, click the corresponding tab located on the top part of the screen.
✎
Note
The steps to display a properties dialog box may be different depending
on the application. Follow the correct procedure according to the application. The procedure above is based on the application WordPad.
With PostScript printer driver, the contents are different between when
the properties dialog box is accessed from Print Manager and when it
is accessed from an application.
2-14 Pi4700e
Page 40

Windows NT 4.0
2.3 Windows NT 4.0
Operating Environment
This section explains the required environment for the printer driver.
Before installing the printer driver, make sure that your computer meets
the following requirements. If it doesn’t, the printer driver may not function
properly.
2
Personal computer IBM PC or compatible with Pentium
Operating system Windows NT 4.0 (English)
Memory 64MB or more
I/O interface Parallel Centronics interface (Conforming to IEEE1284)
Network 10/100BaseT (UTP)
Free space on hard disk 10MB or more (PCL6)
Windows 95/98/Me
G
200MHz or higher CPU
2MB or more (PS)
For the operating environment and installation procedure for the Windows 95/98/Me printer driver, see page 2-1.
Windows 2000/XP
G
For the operating environment and installation procedure for the Windows 2000/XP printer driver, see page 2-8.
Installing the Printer Driver Chapter 2
Pi4700e 2-15
Page 41

Installing the Printer Driver Chapter 2
2
Windows NT 4.0
Installation
This section explains the installation procedure for the Windows NT 4.0
printer driver.
✎
Note
When starting up the operating system, log in with administrator privileges.
Before starting to install the printer driver, be sure first to quit all other
applications.
✎
Tip
The following procedure assumes that the machine is a Digital Copier
and that the printer driver is PCL6: Read the specific proper names accordingly if the machine is a model other than the Digital Copier and if,
for example, the printer driver is PS.
1
Click the
then click
button. From the menu that appears, select
Start
Printers
.
Settings
,
2
The Printers window will appear. Double-click the
3
Start the Add Printer Wizard. If the printer is directly connected to the
computer, select
My Computer
and click the
Add Printer
Next>
button.
icon.
✎
Note
When installing the printer driver in a computer connected to the machine via a network, be sure to consult the network administrator.
2-16 Pi4700e
Page 42

Windows NT 4.0
4
A window that prompts you to select the port will appear. Select the
name of the port to be used and click the
Next>
2
button.
Installing the Printer Driver Chapter 2
Pi4700e 2-17
Page 43

Installing the Printer Driver Chapter 2
2
Windows NT 4.0
5
A window will appear, prompting you to select the manufacturer and
model of your printer. Click the
part of the screen.
6
The Install From Disk dialog box will appear. Install the controller driver
CD-ROM that is included with the controller in the CD-ROM drive of
your computer.
Have Disk...
button on the lower right
7
Click the
printer driver to be installed and the operating system being used, and
then click the OK button.
8
A
Select the driver to be installed and click the
9
A window that asks you to confirm the printer name will appear. Check
the printer name. If you want to designate this printer as the default
printer, select
Click the
10
Follow the instructions that appears on your computer screen.
11
As the last step, click the
2-18 Pi4700e
Browse
Printers
Next>
button, select the file corresponding to the type of
list appears.
button.
Next>
.
Yes
button.
button.
Finish
Page 44

Windows NT 4.0
12
Installation will start.
When all the files have been copied from the CD-ROM, the corresponding icon will be added to the Printers window. This completes the
installation.
2
Installing the Printer Driver Chapter 2
Pi4700e 2-19
Page 45

Installing the Printer Driver Chapter 2
2
Windows NT 4.0
Making General Settings Before Using the Printer
The printer driver requires setting of items that are common to all print
jobs, including the port to which the printer cable is connected and optional devices configured with the machine. These settings must be made using property dialog box available from the Properties command after the
printer driver has been installed or whenever the operating environment is
changed.
The most common settings were made when the printer driver was installed, meaning that you do not usually bother to change them. Some
items must, however, be changed in the following cases.
Cases where changes are necessary Applicable property tab
You want to add a comment to distinguish the printer
from others
The computer’s connecting port has been changed
You want to change the conditions for the display of
a timeout error
You want to designate a port to which the machine is
connected via a network (this setting must be made
on a computer connected to the machine via a network)
You want to specify a time frame for the machine operation
You want to share the machine with other computers
connected to the same network (this setting must be
made on the computer directly connected to the machine)
You want to restrict access to the machine
You want to check the accounts of the machine users
This setting is not related to printing.
General
Ports
Scheduling
Sharing
Security
Pressing
For the details of “Device Options Setting tab”, see page 4-2.
2-20 Pi4700e
Page 46

Windows NT 4.0
Displaying a Properties dialog box
There are two different steps to take to display a properties dialog box.
The contents of a particular properties dialog box slightly differ depending
on how you access it. Select the appropriate one according to your need.
(1) To display a properties dialog box from the Printers window
(2) To display a properties dialog box from an application menu
Below are the detailed procedures for each approach.
Displaying a Properties dialog box from the Printer Folder
1
Click the
2
Click the appropriate printer icon (ex. Minolta Di470 PCL6).
3
<To display the General tab>
Select
4
<To display Printing Preferences dialog box>
Click
It allows you to set the environment in which you will use the printer. The
settings made through this method are valid in all applications.
button and select
Start
Properties
Document Defaults…
from the
Settings
menu.
File
from the
. Then, click
menu.
File
Printers
2
.
Installing the Printer Driver Chapter 2
Displaying a Properties dialog box from an Application Menu
As an example, the procedure for the PCL6 printer driver is described below.
1
Select
2
Make sure that the
Di470 PCL6
pear, select
3
Click the
This method allows you to set the number of copies and paper for each
document.
Note that the settings made on the properties dialog box accessed
through the application are valid only for that particular application.
Pi4700e 2-21
from the
Print...
Name
is not listed, click ▼ and, from the menu that will then ap-
Minolta Di470 PCL6
Properties
menu of the application.
File
of
button. This shows the properties dialog box.
Printer
is
Minolta Di470 PCL6
.
: If
Minolta
Page 47

Installing the Printer Driver Chapter 2
2
Windows NT 4.0
✎
Tip
To set the Device Option Setting, which need not be changed unless
device is changed, open it from the Printers window to set.
To show a properties dialog box other than Setup, click the corresponding tab located on the top part of the screen.
✎
Note
The steps to display a properties dialog box may be different depending on the application. Follow the correct procedure according to the
application. The procedure above is based on the application WordPad.
With PostScript printer driver, the contents are different between when
the properties dialog box is accessed from Print Manager and when it
is accessed from an application.
2-22 Pi4700e
Page 48

Introduction
3 Network Settings
3.1 Introduction
Though this Network Card does not support NetBEUI protocol, it supports
TCP/IP and IPX/SPX, which provides plenty of connection flexibility for the
Windows computer.
This chapter consists of the sections listed below.
(1) Specifying the IP address from the printer’s touch panel
✎
Note
In order to specify the IP address in a TCP/IP environment, the BootP
and Map Utility are used in addition to entering the address from the
printer’s touch panel. For details, refer to “8.7 Using the utility software” on page 8-28.
3
(2) Using the printing functions
Windows 95/98/Me
G
Peer-to-peer printing with TCP/IP
See “3.3 Peer-to-Peer Printing with TCP/IP” on page 3-5.
G
Peer-to-peer printing with IPX/SPX
See “3.5 Peer-to-Peer Printing with IPX/SPX” on page 3-12.
Windows NT 4.0
G
Peer-to-peer printing with TCP/IP
See “3.3 Peer-to-Peer Printing with TCP/IP” on page 3-5.
G
LPR printing
See “3.7 LPR Printing” on page 3-17.
Windows 2000/XP
G
LPR printing
See “3.7 LPR Printing” on page 3-17.
G
IPP printing
See “3.8 IPP Printing” on page 3-21.
(3) Specifying network settings from PageScope Light
Network Settings Chapter 3
Pi4700e 3-1
Page 49

3
A Windows 95/98/Me network printer can be used by going through a Novell NetWare or Windows 2000/NT server. This Network Card, however,
can be configured with its bundled peer-to-peer printing programs for
peer-to-peer printing without a server. Peer-to-peer printing can be performed using TCP/IP or IPX/SPX.
There are two ways you can print from Windows NT 4.0 with TCP/IP: using the bundled IP Peer-to-Peer Printing Program, and using the Windows
NT standard LPR printing function.
There are two ways you can print from Windows 2000/XP with TCP/IP: using the Windows 2000/XP standard LPR printing function, and using the
Windows 2000/XP standard IPP printing function.
Specifying the IP Address From the Printer’s Touch Panel
3.2 Specifying the IP Address From the Printer’s Touch Panel
Setting procedure
1
Press the [Utility] key.
2
Network Settings Chapter 3
Touch [Administrator Mode] and input the Administrator code.
3
Touch [NetworkSet].
3-2 Pi4700e
Page 50

Specifying the IP Address From the Printer’s Touch Panel
4
Touch [IP Address].
5
With the keypad in the operation panel, type in the IP address, and
then touch [Enter].
3
Network Settings Chapter 3
6
With the keypad in the operation panel, type in the subnet mask, and
then touch [Enter].
Pi4700e 3-3
Page 51

Network Settings Chapter 3
3
Specifying the IP Address From the Printer’s Touch Panel
7
With the keypad in the operation panel, type in the default gateway,
and then touch [Enter].
8
In order to activate the address settings, turn the digital copier off, then
on again.
✎
Note
The specified IP address cannot be confirmed from the copier panel.
Confirm it from the network configuration sheet.
3-4 Pi4700e
Page 52

Peer-to-Peer Printing with TCP/IP
3.3 Peer-to-Peer Printing with TCP/IP
Use the bundled IP Peer-to-Peer Printing Program for TCP/IP peer-topeer printing under Windows.
Digital Copier
Network Card
TCP/IP
Windows TCP/IP
IP Peer to Peer Printing Program
3
Configuration Procedure (Windows 95/98/Me)
1
Install TCP/IP under Windows.
Refer to the applicable Windows documentation for more information.
2
Assign the IP parameters.
See “3.2 Specifying the IP Address From the Printer’s Touch Panel”
(p. 3-2) for more information.
3
Install the IP Peer-to-Peer Printing Program.
Use the IP Peer-to-Peer Printing Program for peer-to-peer printing.
See “3.4 Peer-to-Peer Printing Program (Windows)” (p. 3-8) for more
information.
4
Use the procedure below to install the printer.
Network Settings Chapter 3
Pi4700e 3-5
Page 53

Network Settings Chapter 3
3
Peer-to-Peer Printing with TCP/IP
Installing the printer (Windows 95/98/Me)
1
On the
2
Double-click
the default printer.
See “2 Installing the Printer Driver” (p. 2-1) for details about how to install it.
3
Right-click the new printer icon and select
4
Display the
5
Click the
ed by the IP Peer-to-Peer Printing Program.
6
Click the
7
Display the
8
If the test prints normally, complete the procedure by clicking OK to
close the Properties dialog box.
After you finish installing a printer with the above procedure, you can use
it just as you would any standard local printer. The printer can also be
used as a network printer by other Windows computers on your network
whose Windows 95/98/Me systems are configured the same way as described above.
menu, point to
Start
Add Printer
tab.
Details
Print to the following port
button of the Properties dialog box.
Apply
General
tab and print a test page.
Settings
and install the printer. Make the new printer
and then click
Properties
box and then select the port add-
Printers
.
from the menu.
3-6 Pi4700e
Page 54

Peer-to-Peer Printing with TCP/IP
Configuration Procedure (Windows NT 4.0)
1
Install TCP/IP under Windows NT 4.0.
Refer to the applicable Windows documentation for more information.
2
Assign the IP parameters.
See “3.2 Specifying the IP Address From the Printer’s Touch Panel”
(p. 3-2) for more information.
3
Install the IP Peer-to-Peer Printing Program.
Use the IP Peer-to-Peer Printing Program for peer-to-peer printing.
See “3.4 Peer-to-Peer Printing Program (Windows)” (p. 3-8) for more
information.
4
Use the procedure below to install the printer.
Installing the printer (Windows NT 4.0)
1
On the
2
Double-click
the default printer.
See “2 Installing the Printer Driver” (p. 2-1) for details about how to install it.
menu, point to
Start
Add Printer
3
Settings
and install the printer. Make the new printer
and then click
Printers
.
Network Settings Chapter 3
3
Right-click the new printer icon and select
4
Display the
5
From the
Digital Copier IP address is displayed.
6
Click the OK button of the Properties dialog box to close it.
7
Right-click the printer icon again to display its Properties dialog box,
display the
8
If the test prints normally, complete the procedure by clicking OK to
close the Properties dialog box.
After you finish installing a printer with the above procedure, you can use
it just as you would any standard local printer. The printer can also be
used as a network printer by other Windows computers on your network
whose Windows NT 4.0 systems are configured the same way as described above.
Pi4700e 3-7
Print to the following port(s)
tab.
Ports
General
tab, and then perform a Test Print operation.
Properties
list, select the port where the
from the menu.
Page 55

3
Peer-to-Peer Printing Program (Windows)
3.4 Peer-to-Peer Printing Program (Windows)
Peer-to-Peer Printing Program is a Windows utility that lets you output directly to a printer from a computer on a network, without going through a
server.
Use this program for peer-to-peer printing under TCP/IP.
Requirements
Computer must have TCP/IP installed and enabled.
G
Network Card must have valid IP parameters assigned.
G
✎
Note
Refer to the applicable Windows documentation for information about
installing TCP/IP under Windows.
Installing the IP Peer-to-Peer Printing Program
Use the following procedure to install the IP Peer-to-Peer Printing Program.
1
Network Settings Chapter 3
Load the CD-ROM into the CD-ROM drive of the computer you want
to use.
2
Start
Setup.exe
3
Follow the instructions that appear on the screen to complete the installation.
The default installation directory is
change this to any other directory during the installation procedure.
in the
folder on the CD-ROM.
lp-p2p
C:\Program Files\Ip-p2p
. You can
✎
Note
The message Use the Add Printer Wizard in the Printer Group to
add new Peer to Peer IP Printers. appears on the screen at the end
of the installation procedure. The installation procedure does everything required to install the program correctly, so simply click OK to
clear this message.
3-8 Pi4700e
Page 56

Peer-to-Peer Printing Program (Windows)
Setting Up the Peer-to-Peer Printing Program
1
On the
2
On the submenu that appears, click
Make the settings you want on the dialog box that appears.
❍
Max Hops for Search
Input a value for the maximum number of hops for the search. The
initial default value is 2. See the precautions under “Management
Access Program (Windows)” (p. 8-28) for more information about
the maximum number of hops.
❍
IP Port Base
Input the print server initial port number. The initial value is 10000
(TCP/IP port 10001), but you can change this setting if you need
to.
❍
Printer Names
Select the printer port name display format.
based on Serial Numbers
Select this option to use Network Card serial numbers to distinguish between printers. The serial number is displayed as follows:
MLT_<serial number>
When a Network Card serial number is SN991354, for example,
the printer port name becomes MLT_991354.
based on IP Address
Default display format. Select this option to use IP addresses to
distinguish between printers. When the IP address is
199.99.92.99, for example, the printer port name becomes
199.99.92.99.
menu, point to
Start
Programs
IP-P2P
and then
.
Ip-p2p
3
.
Network Settings Chapter 3
Pi4700e 3-9
Page 57

3
Peer-to-Peer Printing Program (Windows)
based on DNS Name
Select this option to use DNS names to distinguish between printers.
Example: PTR-MKTG.DOMAIN.COM
based on unit name
Select this option to use unit names to distinguish between printers.
3
After the settings are the way you want, click OK to close the dialog
box. Restart Windows to put your settings into effect.
Network Cards may be undetectable with certain routers and maximum
hops settings made with the above procedure. When this happens, you
must add printers manually using the procedure describe below.
Adding a Printer Manually
1
On the
2
On the submenu that appears, click
Peer IP Setup dialog box.
menu, point to
Start
Programs
IP-P2P
and then
Ip-p2p
to display the Peer-to-
.
Network Settings Chapter 3
3
Click the
Printers
button to display the dialog box shown below.
3-10 Pi4700e
Page 58

Peer-to-Peer Printing Program (Windows)
4
Input the required information for the printer you want to add into the
fields provided.
❍
IP Address
Input the IP address of the printer you want to add.
❍
Name
Input the name you want to assign to the printer. Use an easily understandable name.
❍
Port
Input the printer port number. The default port number is 10001.
❍
Descriptions
Input a description of the printer.
5
After making all the settings, click
6
After you are finished adding printers, click OK.
Printers you add using IP Peer-to-Peer printing are added to the
of the printer properties dialog box and can be selected for printing.
to close the dialog box.
Add
PORT
3
list
Network Settings Chapter 3
Pi4700e 3-11
Page 59

3
Peer-to-Peer Printing with IPX/SPX
3.5 Peer-to-Peer Printing with IPX/SPX
Use the bundled IPX Peer-to-Peer Printing Program for IPX/SPX peer-topeer printing under Windows.
With IPX Peer-to-Peer Printing Program, there is no need to run NetWare
Client.
Digital Copier
Network Card
IPX/SPX
Windows 95/98/Me
IPX/SPX-compatible Protocol
Network Settings Chapter 3
IPX Peer to Peer Printing Program
Configuration Procedure
1
Install IPX/SPX-compatible Protocol under Windows.
Refer to the applicable Windows documentation for more information.
2
Install the IPX Peer-to-Peer Printing Program.
Use the IPX Peer-to-Peer Printing Program for peer-to-peer printing.
See “3.6 IPX Peer-to-Peer Printing Program (Windows)” (p. 3-14) for
more information.
3
Use the procedure below to install the printer.
To install the printer
1
On the
2
Double-click
the default printer.
See “2 Installing the Printer Driver” (p. 2-1) for details about how to install it.
3-12 Pi4700e
menu, point to
Start
Add Printer
Settings
and install the printer. Make the new printer
and then click
Printers
.
Page 60

Peer-to-Peer Printing with IPX/SPX
3
Right-click the new printer icon and select
4
Display the
5
Click the
ed by the IPX Peer-to-Peer Printing Program.
6
Click the
7
Display the
8
If the test prints normally, complete the procedure by clicking OK to
close the Properties dialog box.
After you finish installing a printer with the above procedure, you can use
it just as you would any standard local printer. The printer can also be
used as a network printer by other Windows computers on your network
whose Windows 95/98/Me systems are configured the same way as described above.
Print to the following port
Apply
tab.
Details
button of the Properties dialog box.
General
tab and print a test page.
3
Properties
box and then select the port add-
from the menu.
Network Settings Chapter 3
Pi4700e 3-13
Page 61

3
IPX Peer-to-Peer Printing Program (Windows)
3.6 IPX Peer-to-Peer Printing Program (Windows)
Use this program for peer-to-peer printing under IPX/SPX. Just by installing this program, you can specify an IPX-based printer on the network as
a printer port.
Requirements
Computer must have IPX/SPX-compatible protocol installed.
G
✎
Note
Refer to the applicable Windows documentation for information about
installing IPX/SPX under Windows.
Installing the IPX Peer-to-Peer Printing Program
Use the following procedure to install the IPX Peer-to-Peer Printing Program.
1
Load the CD-ROM into the CD-ROM drive of the computer you want
to use.
Network Settings Chapter 3
2
Start
Setup.exe
3
Follow the instructions that appear on the screen to complete the installation.
The screen shown below appears automatically after installation is
complete.
in the
folder on the CD-ROM.
lp-p2p
3-14 Pi4700e
Page 62

IPX Peer-to-Peer Printing Program (Windows)
You can use this screen to configure the IPX Peer-to-Peer Printing program. If you do not want to change any settings, simply click OK to quit
the program. The following describes the contents of this screen.
G
OK
Clicking this button applies the changed settings and exits the program.
G
Cancel
Clicking this button exits the program without applying the changed
settings.
G
Clear
Clicking this button clears the contents of the
except for printers whose permanent flag is turned on.
G
Delete
Clicking this button deletes the currently selected printer from the
Available Printers
list. A deleted printer no longer appears in the
printer PORT list. A deleted printer can be re-added using the
Printers
G
Permanent
button.
Clicking this button toggles the permanent flag setting on and off for
the printer that is currently selected in the
printer whose permanent flag is turned on is not cleared from the
Available Printers
list by the
Clear
er is physically removed from the network.
G
Find Printers
Clicking this button searches for available printers on the network and
displays the corresponding print server names in the
list.
ers
G
Select
Clicking this button toggles the S flag setting on and off for the printer
that is currently selected in the
Available Printers
S flag is turned on appears in the
dialog box, where it can be selected. The initial start up default is S flag
on for all printers in the
Available Printers
be turned on at any one time.
G
Available Printers
This is a list of all the printers detected on the network. You can clear
this list by clicking the
clicking the
Find Printers
button. Then you can update the list by
Clear
button.
The following describes the three fields of the
Available Printers
or
Delete
list of the printer
PORT
Available Printers
list,
Find
list. A
button, even if the print-
Available Print-
list. A printer whose
Properties
list. Up to 30 S flags can
Available Printers
list.
3
Network Settings Chapter 3
Pi4700e 3-15
Page 63

Network Settings Chapter 3
3
IPX Peer-to-Peer Printing Program (Windows)
❍
Unit name
This field shows Network Card names. The format for the default name
of this Network Card is MLT_<serial number>.
❍
Description
This field displays a description of the printer. Normally, this field
shows the manufacturer name and printer model name.
❍
Flags
An S flag displayed here means the select flag is turned on, so the
printer is included in the
A P flag displayed here means the permanent flag is turned on, so the
printer cannot be deleted from the list by the
button.
lete
list of the printer Properties dialog box.
PORT
Clear List
button or
De-
3-16 Pi4700e
Page 64

LPR Printing
3.7 LPR Printing
This section explains how to use the Windows NT 4.0/2000/XP standard
LPR printing function.
Digital Copier
Network Card
3
TCP/IP
Windows NT 4.0/2000/XP
Microsoft TCP/IP Printing
Requirements
Computer must have TCP/IP installed and enabled.
G
Network Card must have valid IP parameters assigned.
G
TCP/IP
Configuration Procedure (Windows NT 4.0)
1
Install TCP/IP and Microsoft TCP/IP Printing service under Windows
NT.
Refer to the applicable Windows documentation for more information.
2
Assign the IP parameters.
See “3.2 Specifying the IP Address From the Printer’s Touch Panel”
(p. 3-2) for more information.
3
Use the procedure below to install the printer.
Network Settings Chapter 3
Pi4700e 3-17
Page 65

Network Settings Chapter 3
3
LPR Printing
Installing the printer (Windows NT 4.0)
1
On the
2
Double-click
the default printer.
See “2 Installing the Printer Driver” (p. 2-1) for details about how to install it.
3
Right-click the new printer icon and select
4
Display the
5
Click
This displays a list of enabled port types.
6
Select
7
On the Add LPR compatible printer dialog box, type the IP address of
the Network Card into the
box.
If the network you are on uses DNS (Domain Name Services), type in
the DNS name instead of the IP address.
menu, point to
Start
Add Printer
Ports
Add Port
LPR Port
and install the printer. Make the new printer
tab.
.
and then click
Name or address of server providing lpd
Settings
New Port
and then click
Properties
.
Printers
from the menu.
.
8
Type
PORT 1
box, and then click OK to close the dialog box.
9
Click the
the OK button of the
10
Right-click the printer icon again to display its Properties dialog box,
display the
11
If the test prints normally, complete the procedure by clicking OK to
close the Properties dialog box.
After you finish installing a printer with the above procedure, you can use
it just as you would any standard local printer. The printer can also be
used as a network printer by other Windows computers on your network
whose Windows NT 4.0 systems are configured the same way as described above.
3-18 Pi4700e
into the
Close
General
Name of printer or print queue on that server
button of the Printer Ports dialog box, and then click
Properties
tab, and then print a test page.
dialog box to close it.
Page 66

LPR Printing
Configuration Procedure (Windows 2000/XP)
1
2
3
Installing the printer (Windows 2000/XP)
1
2
3
4
5
3
Install TCP/IP under Windows 2000/XP.
Refer to the applicable Windows documentation for more information.
Assign the IP parameters.
See “3.2 Specifying the IP Address From the Printer’s Touch Panel”
(p. 3-2) for more information.
Use the procedure below to install the printer.
Install the printer driver following the instructions that come with the installer. Make the new printer the default printer.
Right-click the new printer icon and select
Display the
Click
Add Port
This displays a list of available port types.
Select
Standard TCP/IP Port
This starts
tab.
Ports
.
from the list, and then click
Add Standard TCP/IP Printer Port Wizard
Properties
from the menu.
New Port
.
Network Settings Chapter 3
.
6
Click
7
On the
the
If the network you are on uses DNS (Domain Name Services), type in
the DNS name instead of the IP address.
8
Type the name of the port you want into the
click
on the introduction page of the wizard.
Next
Add Port
Printer Name or IP Address
Next
page, type the IP address of the Network Card into
box.
.
Port Name
box, and then
✎
Note
When you type the IP address into the Printer Name or IP Address
box, the name of the port is automatically entered in the Port Name
box as IP_<IP address>, but you can change the port name as you
want.
Pi4700e 3-19
Page 67

Network Settings Chapter 3
3
LPR Printing
9
On the
Additional Port Information Required
and then click
10
On the Configure Standard TCP/IP Port Monitor dialog box, select
from the
LPR
11
Type
PORT1
box, and then check the
12
Click OK to return to the
page.
13
Click
Next
14
Click the
the
Apply
15
Display the
16
If the test prints normally, complete the procedure by clicking OK to
close the Properties dialog box.
After you finish installing a printer with the above procedure, you can use
it just as you would any standard local printer. The printer can also be
used as a network printer by other Windows computers on your network
whose Windows 2000/XP systems are configured the same way as described above.
Settings
LPR Settings
in the name of the queue you want into the
to display the next wizard page, and then click
button of the Printer Ports dialog box, and then click
Close
button of the Properties dialog box.
General
.
box.
LPR Byte Counting Enabled
Additional Port Information Required
tab, and then print a test page.
page, select
Queue Name
check box.
Custom
Finish
.
,
3-20 Pi4700e
Page 68

IPP Printing
3.8 IPP Printing
This section explains how to use the Windows 2000/XP standard IPP
printing function.
Digital Copier
Network Card
3
IPP
Windows 2000/XP
TCP/IP
IPP Client
Requirements
Computer must have TCP/IP installed and enabled.
G
Network Card must have valid IP parameters assigned.
G
Configuration Procedure
1
Install TCP/IP under Windows 2000/XP.
Refer to the applicable Windows documentation for more information.
2
Assign the IP parameters.
See “3.2 Specifying the IP Address From the Printer’s Touch Panel”
(p. 3-2) for more information.
3
Use the procedure below to install the printer.
Installing the printer
1
For Windows 2000, on the
click
Printers
For Windows XP, on the
2
For Windows 2000, double-click the
Printer Wizard.
For Windows XP, click the
Wizard.
.
menu, point to
Start
menu, click
Start
Add Printer
Settings
Printers and Faxes
Add Printer
icon to start the Add Printer
icon to start the Add
and then
Network Settings Chapter 3
.
Pi4700e 3-21
Page 69

Network Settings Chapter 3
3
IPP Printing
3
Click
4
On the
option, and then click
5
On the
the Internet or your intranet
6
Type the IPP printer’s URL into the
then click
http://<IP address of the printer>:631/nic/Print
(Example) When the IP address of the Digital Copier is 192.9.200.200:
http://192.9.200.200:631/nic/Print
7
Click OK on the confirmation dialog box that appears.
8
In the
use, and then click OK.
If the name of the printer you want to use does not appear in the lists,
load the Printer Drivers CD-ROM that comes with your Digital Copier
into your computer’s CD-ROM drive and then click the Have Disk button. Next, specify the location of the printer’s INF file on the CD-ROM.
on the introduction page of the wizard.
Next
Local or Network Printer
Next
Locate Your Printer
.
Next
Manufacturers
and
page, select the
.
page, select the
option.
URL
Printers
lists, select the printer you want to
Network printer
Connect to a printer on
field as shown below, and
9
Select whether you use this printer as the default printer or not, and
then click
10
Click
Finish
11
Click the icon of the newly added printer to select it, and then click
Properties
12
Display the
13
If the test prints normally, complete the procedure by clicking OK to
close the
After you finish installing a printer with the above procedure, you can use
it just as you would any standard local printer. The printer can also be
used as a network printer by other Windows computers on your network
whose Windows 2000/XP systems are configured the same way as described above.
3-22 Pi4700e
.
Next
to exit the wizard.
on the
General
Properties
menu.
File
tab and then print a test page.
dialog box.
Page 70

Specifying network settings from PageScope Light
3
3.9 Specifying network settings from PageScope Light
Access
PageScope Light for Pi4700e can be accessed directly from a Web browser.
1
Start the Web browser.
2
In the URL field, enter the IP address of the printer controller as shown
below.
http://<IP address of printer controller>/
(Example) When the IP address of the printer controller is
192.9.200.200:
http://192.9.200.200/
3
This causes PageScope Light for Pi4700e screen to appear.
Operation
PageScope Light for Pi4700e operation is identical to that for Internet Web
pages. Clicking a hot link jumps to the link destination, and the
Forward
buttons scroll through pages backwards and forward.
Back
and
Network Settings Chapter 3
Logging In to the Admin Mode
After you log in to PageScope Light in the Admin Mode, you can change
the configuration of the Digital Copier settings.
1
Type the administrator password into the
initial default administrator password is sysadm. See “Preference” for
information about how to change the password.
2
Click the
3
When you want to log out, click the
button to log in to the Admin Mode.
Log-in
Admin Password
Log-out
button.
box. The
✎
Note
Log out is performed automatically if no operation is performed for
more than 10 minutes.
On the Network tab, a password input text box appears on each setting screen. You must be able to input the correct password in order to
change Network tab settings. The password you should input here is
the same as the Admin Password you input on other tabs.
Pi4700e 3-23
Page 71

3
Specifying network settings from PageScope Light
Network Tab
Network Settings Chapter 3
Use the
Network
tab for configuring the Pi4700e network interface.
✎
Note
On the Network tab, you must type the password into the Password
box that appears on the setting screen you select on the menu. Note,
however, that you need to input the password on the Network tab only
once per session. After you input the password, the Password box
does not appear any more on other Network tab setting screens during the current session.
Summary
This screen appears when you click the
tab. Use this screen to view a summery of the network interface card.
Summary
menu on the
Network
ROM Version Network interface card firmware version
IP Address IP address assigned to the current network interface card
Hardware Address MAC address of network interface card
Serial Number Serial number of network interface card
3-24 Pi4700e
Page 72

Specifying network settings from PageScope Light
TCP/IP Configuration
This screen appears when you click the
the
Network
tab. It lets you change a number of network interface card
TCP/IP settings.
TCP/IP Configuration
3
menu on
Network Settings Chapter 3
Password Input the password assigned to the network interface card. The
IP A ddress Input the IP address you want to assign to the net work interface
Subnet Mask Input the network subnet mask.
Default Gateway If the network has a router, input the IP address of the router.
Base Port Number Type in the base port number for RAW port printing. A port
DHCP Checking this option sends a DHCP (Dynamic Host Configura-
IP Address in NVRAM When this option is checked, the network interface card uses
Apply button Click this button to apply any settings you have input up to this
Clear button Click this button to cancel any settings you have input up to this
initial factory default is
inputting the wrong password displays a password error message without changing the settings.
card.
number that in one greater than the base port number you
specify here is used for actual printing.
Example: Specifying a base port number of 10000 results in an
actual port number of 10001.
tion Protocol) request whenever the network interface card is
powered up. When there is a DHCP server on the network, the
network interface card can obtain IP parameters automatically
from the server at power up.
the IP address stored in NVRAM when the card is powered up.
point.
point.
sysadm
. Clicking the
Apply
button after
Pi4700e 3-25
Page 73

Network Settings Chapter 3
3
Specifying network settings from PageScope Light
✎
Note
Use only IP parameters that have been specified or approved by your
network administrator.
The network interface card does not send DHCP requests when
DHCP is disabled. If there is no IP address assigned to the network
interface card or if IP Address in NVRAM is turned off, the network
interface card sends a BOOTP request.
A DHCP request is sent when the network interface card is reset or
powered up (while DHCP is enabled and no IP address assigned to
the network interface card or if IP Address in NVRAM is turned off).
When DHCP is enabled, an IP address is assigned to the network interface card, and IP Address in NVRAM is turned on, the network interface card uses the IP address stored in NVRAM. In this case, the
network interface card does not send a DHCP request.
In a DHCP environment, it is necessary to specify an unlimited lease
period for the IP address assigned to the network interface card or the
IP address must be reset a fixed address within a range that is not
leased.
3-26 Pi4700e
Page 74

Specifying network settings from PageScope Light
NetWare Configuration
Sub-menus appear when you click the
the
Network
tab. Use the sub-menus to display and configure the network
NetWare Configuration
interface card settings for NetWare printing.
3
menu on
Network Settings Chapter 3
NetWare Setting
This screen appears when you click the
der the
NetWare Configuration
menu. It lets you change a number of
NetWare Setting
sub-menu un-
NetWare environment settings.
Password Input the password assigned to the network interface card. The
Enable NetWare Check this option to enable IPX/SPX on the network interface
Print Server Name Input the print server name you want. The default print server
Print Server Password When you want to use a password for logging into the network
initial factory default is
inputting the wrong password displays a password error message without changing the settings.
card. The NetWare environment is disabled while this option is
unchecked.
name when this field is left blank is: MLT_<
Card serial number
interface card, type the password you want to specify into the
field. Type the same password into the
for confirmation. The password you specify must be the same
as the bindery and NDS-based print server password.
>.
sysadm
. Clicking the
Password Retype
Apply
button after
Network Interface
field
Pi4700e 3-27
Page 75

3
Specifying network settings from PageScope Light
Network Settings Chapter 3
Preferred File Server Type in the name of the preferred file server when setting up
Preferred NDS Context Input the print server for NDS operation. In this case, always in-
Preferred NDS Tree Input the print server for NDS operation. If you do not know
Print Queue Scan Rate Specify the print server’s queue scan interval in seconds. The
Ethernet Frame Type Specify the frame type being used by Ethernet. Normally, the
Disable Bindery Check this option to disable bindery when only the NDS mode
Apply button Click this button to apply any settings you have input up to this
Clear button Click this button to cancel any settings you have input up to this
for bindery and bindery emulation. See
Card”
for more information about the preferred file server.
The print server must always be configured on a preferred file
server. Failure to properly configure the preferred file server
can cause incorrect printing results.
put the entire context, without inputting a period at the beginning of the path.
Example: ou=standard.ou=organization_1
what the tree is, input
default scan rate is 1 second.
frame type being u sed by NetWare is determined by mon itoring
the network interface card. When the frame type is determined,
it is assumed that the network interface card is the same frame
type. Once you select a frame type, network interface card operation supports that NetWare frame type only.
Frame type monitoring normally starts from IEEE 802.3, and
then moves to Ethernet II and then 802.3 SNAP. When the network you are on uses multiple Ethernet frame types, use the
pull-down menu to select the frame type to be recognized.
is used. When bindery is disabled, the network interface card
no longer supports the print server on the bindery file server.
point.
point.
whoami
“8 Network Interface
at the DOS command line.
The settings you make on this screen do not become valid until you reset
the network interface card or power it down and then back up again. See
“Reset” (p. 3-34) for more information on resetting the network interface
card.
3-28 Pi4700e
Page 76

Specifying network settings from PageScope Light
NetWare Status
This screen appears when you click the
the
NetWare Configuration
menu. Use this screen to check the status of
NetWare Status
the file server and queue to which the network interface card is attached.
3
sub-menu under
Network Settings Chapter 3
File Server Name of the NetWare server to which the printer is currently at-
File Server Status Status of connection to NetWare server
Queue Name Name of NetWare print queue to which the printer is currently
Queue Status NetWare print queue status
tached
allocated
Pi4700e 3-29
Page 77

Network Settings Chapter 3
3
Specifying network settings from PageScope Light
AppleTalk Configuration
This screen appears when you click the
on the
Network
tab. It lets you change a number of AppleTalk environ-
ment settings.
AppleTalk Configuration
menu
Password Input the password assigned to the network interface card. The
Enable AppleTalk Check this option to enable AppleTalk on the network interface
Printer Name Input the printer name you want.
Zone Name Input the name of AppleTalk zone in which you want to locate
Apply button Click this button to apply any settings you have input up to this
Clear button Click this button to cancel any settings you have input up to this
initial factory default is
inputting the wrong password displays a password error message without changing the settings.
card.
the printer.
point.
point.
sysadm
. Clicking the
Apply
button after
3-30 Pi4700e
Page 78

Specifying network settings from PageScope Light
IPP Configuration
This screen appears when you click the
Network
tab. It lets you change Internet Printing Protocol (IPP) settings.
You can configure the printer functions that are controlled by IPP and the
printer information that can be seen from IPP clients.
IPP Configuration
3
menu on the
Network Settings Chapter 3
✎
Note
Standard access for IPP printing is:
http://<IP Address>:631/nic/Print
For details about IPP printing, see “8 Network Interface Card”.
Password Input the password assigned to the network interface card. The
Enable IPP Check this option to enable IPP on the network interface card.
initial factory default is
inputting the wrong password displays a password error message without changing the settings.
You cannot use IPP print unless this option is checked.
Pi4700e 3-31
sysadm
. Clicking the
Apply
button after
Page 79

Network Settings Chapter 3
3
Specifying network settings from PageScope Light
The following items are returned when attributes are requested from an
IPP client.
Printer Name Type in a name to identify the printer during IPP printing.
Printer Location Type in the location of the printer.
Printer Information Type in a description of the printer.
More Printer Information Specify a URL where detailed information about this particular
Printer Driver Installer Specify a URL where the printer driver installer can be found.
Printer Make and Model Type in the printer manufacturer name and model name.
More Printer Information
Manufacturer
Operations Supported Use these settings to specify the IPP printing operations sup-
Document Format Supported
Document Format Select the default document data format. The uses this data
Message from Operator Type in a message from the printer administrator to users.
job-k-octets-supported Specify, in kilo-octet units, the upper limit and lower limit of the
Apply button Click this button to apply any settings you have input up to this
Clear button Click this button to cancel any settings you have input up to this
printer can be found.
Specify a URL where detailed information about the printer
manufacturer particular printer can be found.
ported by the printer. Unchecking an item means that it is not
supported for IPP printing.
Put a check mark next to the document data formats that the
printer supports for IPP printing.
format for IPP printing when no data format is specified by the
client.
total job size that the printer can receive.
point.
point.
3-32 Pi4700e
Page 80

Specifying network settings from PageScope Light
WINS Configuration
This screen appears when you click the
the
Network
tab. It lets you change WINS settings. WINS (Windows Internet Name Service) makes it possible for a device, such as your network
interface card, to register a NetBIOS name (like MLT_995243) along with
its current IP address (like 192.9.200.200). A client wanting to contact the
printer uses the WINS server to match the NetBIOS name with an IP address. Most users will find it easier to remember the NetBIOS name for the
printer rather than its IP address.
WINS Configuration
3
menu on
Network Settings Chapter 3
Password Input the password assigned to the network interface card. The
NetBIOS Name The NetBIOS name for the network interface card is shown on
Primary WINS Server If you previously configured a DHCP server to provide the net-
Secondary WINS Server You may also enter the IP address of a secondary NetBIOS
initial factory default is
inputting the wrong password displays a password error message without changing the settings.
this screen. The default NetBIOS name is the Network Interface Card’s serial number (for example, MLT_995243), unless
you previously configured a name for the network interface
card with DHCP.
You may change the NetBIOS name here, by entering a new
name. The name can be up to 15 characters long.
work interface card with the IP address of the primary WINS
server, this item shows the address. Otherwise, enter the IP
address of the primary NetBIOS name server here.
name server, if you want. If you configured your DHCP server
to provide the address of a secondary WINS server to the network interface card, the address fields are filled in with the appropriate information automatically.
sysadm
. Clicking the
Apply
button after
Pi4700e 3-33
Page 81

3
Specifying network settings from PageScope Light
Network Settings Chapter 3
Primary Server Logged in Name of the Primary WINS Server to which the printer is cur-
Secondary Server Logged inName of the Secondary WINS Server to which the printer is
Apply button Click this button to apply any settings you have input up to this
Clear button Click this button to cancel any settings you have input up to this
rently logged in.
currently logged in.
point.
point.
After you configure the NetBIOS (WINS) settings, restart the printer.
The network interface card’s status page should now show that the network interface card is successfully registered with the WINS server. The
items labeled
Logged
in on the
Primary Server Logged
WINS Configuration
in and
Secondary Server
screen now indicate which WINS
server(s) the network interface card is registered with.
Under normal circumstances, your network interface card automatically
renews its registration with the WINS server before its lease expires.
Reset
This screen appears when you click the
Reset
menu on the
Network
tab.
Use this screen to reset the network interface card so new settings can
take effect.
Password Input the password assigned to the network interface card. The
Reset button Click this button to reset the network interface card.
initial factory default is
inputting the wrong password displays a password error message without changing the settings.
sysadm
. Clicking the
Apply
button after
3-34 Pi4700e
Page 82

Specifying network settings from PageScope Light
Maintenance
This screen appears when you click the
tab. Use this screen to restore the network interface card to its initial
work
factory default settings.
Maintenance
menu on the
3
Net-
Network Settings Chapter 3
Password Input the password assigned to the network interface card. The
Restore Factory Defaults Click the
initial factory default is
inputting the wrong password displays a password error message without changing the settings.
Restore
to its initial factory defaults.
sysadm
. Clicking the
button to restore the network interface card
Apply
button after
✎
Note
After performing a Reset or Maintenance, turn the digital copier off,
then on again.
Pi4700e 3-35
Page 83

Network Settings Chapter 3
3
Specifying network settings from PageScope Light
3-36 Pi4700e
Page 84

Description of each tab
4 Properties Settings
4.1 Description of each tab
Each tab enables you to change the settings indicated below. For a detailed description of each function, see the corresponding reference page.
4
Property tab Outline of settings that can be changed
Setup
Paper
Quality
Device Options
Setting
Job Management
PostScript
driver only
– Allows you to save and read the contents of the settings
(PS
Allows you to set the paper take-up tray and paper exit
tray. Also allows you to set high level printing functions
such as two-sided printing, booklet creation, N-up printing, OHP interleaving, Watermark, Cover Mode, Staple,
Punch, and Folding.
Allows you to set basic printing items such as number of
copies, paper size, print orientation and print zoom ratio.
Also allows you to set functions related to sorting.
Allows you to set general items related to graphics, such
as resolution, halftone processing and image processing method.
Also allows you to set TrueType fonts.
Allows you to set option equipment installed on the machine.
Sets the copy track function.
Allows you to lock a printing job.
Also allows you to print the distribution number.
Allows you to make detailed settings related to PostScript.
Setup, Paper, Quality, Job Management, Device
on a
Options Setting
PostScript
or
tab.
✎
Note
Refer to Chapter 2 for the procedure for displaying Properties.
Reference
page
p. 4-7
p. 4-16
p. 4-21
p. 4-2
p. 4-24
p. 4-31
p. 4-5
Properties Settings Chapter 4
Note that different settings must be made for each driver.
The differences between each driver are indicated based on the PCL6
version driver for Windows 98.
Details of OS-dependent functions are not given.
Pi4700e 4-1
Page 85

4
4.2 Device Options Setting tab
This tab allows you to set the options installed on the machine. Make sure
you select the options correctly. Otherwise, some functions may be unusable or printing errors may occur. The settings must match the machine
configuration.
PCL6 version
(1)
Device Options Setting tab
(3)
PS version
Properties Settings Chapter 4
(1)
4-2 Pi4700e
(2)
(3)
Page 86

Device Options Setting tab
Device Options
(1)
Set the options installed in the machine.
• Installable Options This is a list of installable options. Select the desired
• Add Pressing this button adds the selected option.
• Remove Pressing this button removes the selected option.
• Installed Options This is a list of currently installed options. Select it when
• Mailbox Setting <when Mailbin Finisher is installed>
User Name
(2)
The user name set in the printer driver is displayed as the job user name on the machine’s touch panel.
Setting range: 8 characters max.
About…
(3)
Click to display the manufacturer and version number of the printer driver.
✎
Note
If the Dup+2way Tray, Duplex Cabinet, and Dup+LCC are not correctly selected, it may not be possible to select the Finisher correctly.
options from this list.
Available settings:
Dup+2way Tray, Dup+LCC, Duplex Cabinet, LCT,
Mailbin Finisher, Multi-staple Finisher, Single-staple
Finisher, Folding Finisher, Hard Disk Drive in Copier
you wish to remove an option.
You can add a name to each mailbin of Mailbin Finisher.
For details, see page 4-4.
4
Pi4700e 4-3
Properties Settings Chapter 4
Page 87

Properties Settings Chapter 4
4
Device Options Setting tab
Mailbox Setting dialog box <when Mailbin Finisher is installed>
Allows you to set the names of the mailbins in Mailbin Finisher.
MailBox
(1)
This is the bin name editing box.
Setting range: max. 20 characters (PCL6)
Apply
(2)
Press to finalize a changed name.
Bin list
(3)
Displays a list of names of currently set bins.
To change the name of a bin, select the name you wish to change.
max. 32 characters (PS)
(1)
(2)
(3)
4-4 Pi4700e
Page 88

Functions common to various tabs
4.3 Functions common to various tabs
4
These functions are common to tabs from the
agement
tab and also the
Overlay
tab or the
tab to the
Setup
PostScript
(1)
(2)
Easy Set
(1)
Allows you to call and use the settings stored in each tab.
• Easy Set Name Allows you to call the settings stored in each tab.
• Save (Delete) Used to save/delete the settings of tabs.When you
Paper preview/Machine preview
(2)
Allows you to display/change over the paper preview and machine preview.
• Page Layout The layout of the printed data on a single page is dis-
• Printer Figure When the paper take-up tray and the paper exit tray are
touch the
Save Easy Set Name dialog box appears. For details,
see page 4-6.
When you touch
leted.
played as an image. This allows you to check the status
for N-up printing and two-sided printing, for example.
See page 12-12 for the
set, the paper take-up tray and paper exit tray are displayed in green.
See page 12-15 for the
Save
button to save the contents of a tab, the
Delete
, the stored set contents are de-
Page Layout
Printer Figure
Job Man-
tab.
Properties Settings Chapter 4
list.
list.
Pi4700e 4-5
Page 89

4
Functions common to various tabs
✎
Note for (1)
Depending on environment used, contents of Save/Delete will be different: Refer to Appendix A for details. (p. 12-9).
Watermark, Custom Paper, Mailbox Name, and Font Substitution Table are not set.
✎
Tips for (1)
If the set contents have changed, the Save button will appear.
If the set contents are the Easy Name contents, the Delete button will
appear.
Functions of the Save Easy Set Name dialog box
Use to save print setting data.
Before pressing the
button, be sure to set the contents of each tab.
Save
(1)
Properties Settings Chapter 4
Easy Set Name
(1)
Add a name to the stored contents.
Number of registrations Depending on environment used, number of registra-
Number of characters max. 10 characters
4-6 Pi4700e
tions will be different: Refer to Appendix A for details
(p. 12-9).
Page 90

Setup tab
4.4 Setup tab
This tab allows you to set the paper take-up tray, paper exit tray and various high grade printing functions.
PCL6 version
4
(1)
(2)
PS version
(1)
(3)
(4)
Properties Settings Chapter 4
(3)
(4)
(2)
Pi4700e 4-7
Page 91

4
✎
Note
With the PS driver, the Watermark option is included on the Setup tab.
For details, refer to “Overlay tab” on page 4-27.
N-up
(1)
Outputs multiple originals on one sheet of paper.
• N-up Set the N-up number.
• Border line Sets the layout border
• N-up Style Sets the printing layout
Available settings: Off, 2up, 4up, 6up, 9up, 16up
Setup tab
Properties Settings Chapter 4
Horiz.
Ascending
Duplex / Booklet
(2)
stalled>
Specifies two-sided printing and Booklet printing.
• Off Not set
• Short Edge Binding Two-sided printing takes place so that the short edge is
• Long Edge Binding Two-sided printing takes place so that the long edge is
• Booklet Left Binding Four pages are printed on both sides of a single sheet
• Booklet Right Binding Four pages are printed on both sides of a single sheet
Paper Source
(3)
Selects the machine tray to be used.
Sets the cover page function and the OHP interleaving function.
• Paper Source Select the machine tray to be used.
• Detail of Paper Source Set the cover page function and OHP interleaving func-
Horiz.
Descending
<when Dup + 2way Tray, Dup + LCC or Duplex Cabinet is in-
bound.
bound.
of paper so that when the sheet is folded in the middle
it forms a booklet (left bound).
of paper so that when the sheet is folded in the middle
it forms a booklet (right bound).
The selectable paper sizes are limited by the types of
paper take-up trays installed in the machine.
Available settings:
Auto, Manual Feed, Tray1 to 4, LCC, LCT
tion. For details, see page 4-11.
Vert.
Ascending
Vert.
Descending
4-8 Pi4700e
Page 92

Setup tab
Output Setting
(4)
This function selects the tray in the machine to which the paper is to be distributed.
Settings can also be made for finishing functions including stapling, hole punching,
and folding.
• Paper exit destination Select the machine tray to which you wish to distribute
• Mailbin paper exit desti-
nation
• Detail of Output Setting Set stapling, punching or folding. For details, see
the prints. The selectable paper exit trays are limited by
the type of finisher installed in the machine.
Mailbin Finisher
Except Mailbin Finisher
If Mailbin is selected as the paper exit destination, set
the mailbin to which you wish to distribute the paper.
page 4-13.
✎
Note for (1)
If you print a document that contains pages of different sizes and/or
different directions in the same job, the image may be partially cut or
images may overlap each other.
✎
Tip for (1)
The printing layout is displayed on the Page Layout.
✎
4
Notes for (2)
If you print a document that contains pages of different sizes and/or
different directions in the same job, the image may be partially cut or
images may overlap each other.
Two-sided printing and OHP interleaving cannot be set simultaneously.
✎
Tips for (2)
The sizes for which you can perform two-sided printing are from 140 ×
182 mm to 297 × 432 mm.
Short Edge Binding, Long Edge Biding, Booklet Left Binding and
Booklet Right Binding are displayed on the Page Layout.
✎
Note for (3)
Some paper sizes cannot be selected. For details, refer to the User
Manual of the machine.
Pi4700e 4-9
Properties Settings Chapter 4
Page 93

4
Setup tab
✎
Tips for (3)
Set the paper take-up tray using Device Options Setting.
The paper take-up tray used is displayed in green on the Printer Figure.
✎
Note for (4)
Some paper sizes cannot be selected. For details, refer to the User
Manual of the machine.
✎
Tips for (4)
Set the type of finisher using Device Options Setting.
The paper take-up tray used is displayed in green on the Printer Figure.
Properties Settings Chapter 4
4-10 Pi4700e
Page 94

Setup tab
4
Functions of the Detail of Paper Source dialog box
This function sets the cover page function and the OHP interleaving function.
(1)
Cover Page
(1)
This function is used to print a document with front and back cover pages. You can
print on the front cover, or leave it blank.
• Front Cover Page Activates the front cover function.
• with Image (Front Cover
Page)
• Back Cover Page Adds a back cover.
• with Image (Back Cover
Page)
• Cover Paper Source Select the tray for the front cover and back cover pa-
Interleaving Paper
(2)
This function inserts sheets (interleaving sheets) between sheets of OHP film when
printing on OHP film. You can either leave these sheets blank or print the same image
as that printed on the OHP film.
• OHP Interleaving Activates the OHP interleaving function.
• with Image Prints an image on the interleaving sheet.
• Interleaving Paper
Source
Prints on the front cover.
Prints on the back cover.
pers.
Available settings: Manual Feed, Tray1 to Tray4, LCC,
LCT
Select the tray for the interleaving paper.
Available settings: Tray1 toTray4, LCC, LCT
(2)
Properties Settings Chapter 4
✎
Notes for (1)
When using special paper, such as thick paper, the paper sometimes
fails to be distributed to the selected paper exit destination.
You can set Manual Feed, Tray1 to Tray4, LCC and LCT using Paper
Source.
Pi4700e 4-11
Page 95

4
Setup tab
✎
Tip for (1)
The tray containing the paper on which the body of the document is to
be printed is displayed in green on the Printer Figure.
✎
Notes for (2)
When using the OHP interleaving function, set the number of sets of
prints to “1”.
You cannot select the same paper take-up port for both Paper Source
and Interleaving Paper Source.
You can set Manual Feed only using Paper Source.
OHP interleaving and two-sided printing cannot be set simultaneously.
✎
Tip for (2)
The OHP film tray is displayed in green on the Printer Figure.
Properties Settings Chapter 4
4-12 Pi4700e
Page 96

Setup tab
4
Functions of the Detail of Output Setting dialog box
Settings can be made for finishing functions including stapling, hole
punching, and folding.
(1)
(2)
Staple
(1)
(2)
(3)
<when Mailbin Finisher, Single-staple Finisher, Multi-staple Finisher or Folding Finisher is installed>
This function allows you to staple one set of printed documents at a time.
• Off Printed documents are not stapled.
• Corner staple Printed documents are stapled at their corners.
• Long Edge <when Multi-staple Finisher or Folding Finisher is in-
• Short edge <when Multi-staple Finisher or Folding Finisher is in-
• Center <when Folding Finisher is installed>
Punch
<when Mailbin Finisher, Multi-staple Finisher or Folding Finisher is installed>
This function allows you to punch holes in the printed document.
• Off The document is not punched.
• Short Edge The document is punched along the short edge.
• Long Edge The document is punched along the long edge
• Punch Holes
<Inch area only>
Folding
<when Folding Finisher is installed>
Select the desired paper folding function.
• Off Printed pages are not folded.
• Just Output Size [Z-
Fold]
• Half Folding Printed pages are folded in two at their center.
• Crease A crease is made in printed pages.
stalled>
The documents are stapled along the long edge.
stalled>
The documents are stapled along the short edge.
The documents are stapled at the center.
Set the number of holes to be punched.
Printed pages are folded into three parts.
(3)
Properties Settings Chapter 4
Pi4700e 4-13
Page 97

4
Setup tab
✎
Notes for (1)
If Staple is set, printed pages are fed out into the Elevator Tray.
The stapling position is either the top left corner or the top right corner
depending upon the direction of the paper and the printing direction.
If the capacity of Mailbin Finisher, Single-staple Finisher, Multi-staple
Finisher or Folding Finisher is exceeded, the stapling operation may
be canceled. Refer to the User Manual of the machine.
If you print a document consisting of pages of different sizes in the
same printing job, stapling may be canceled.
Take care when printing a document consisting of pages facing different directions, since the stapling position will be determined by the direction of the first page.
You cannot set certain sizes or kinds of paper. For details, refer to the
User Manual of the machine.
Only Center Staple can be set with Booklet.
✎
Tip for (1)
You can check the stapling positions using the icons in the dialog box.
Properties Settings Chapter 4
4-14 Pi4700e
✎
Notes for (2)
Number of punch holes can be specified only when Multi-staple Finisher is installed.
Punch Holes is not displayed for Metric area.
You cannot punch certain sizes of paper. Also, you may be unable to
punch the paper at certain positions. For details, refer to the User Manual of the machine.
If you select Long Edge in the manual bypass take-up mode, the paper
may sometimes fail to be punched.
Punch and OHP interleaving cannot be set simultaneously.
Punch and Booklet cannot be set simultaneously.
Page 98

Setup tab
4
✎
Tip for (2)
The punching positions are displayed on the icons in the dialog box.
✎
Note for (3)
If Folding is combined with Hole-Punch or Staple, the Hole-Punch or
Staple function to be used is restricted depending on the specific type
of the Folding function combined. For details, see Appendix A
(page 12-1) for details.
Pi4700e 4-15
Properties Settings Chapter 4
Page 99

4
4.5 Paper tab
Paper tab
Properties Settings Chapter 4
The
tab allows you to make basic printer settings.
Paper
(1)
(2)
Original Document Size
(1)
Sets the original size.
• Paper size Select the original size.
• Edit Custom Used to set a special size. For details, see page 4-19.
Output Paper Size
(2)
Sets the size of the paper on which prints are to be made.
• Output Paper Size Activates the specification of the size of printing paper.
• Paper size Select the size of the printing paper.
• Fit to Paper The prints are output at a zoom ratio that matches the
• Scaling Specify the print zoom ratio.
Copies
(3)
Specify the number of sets of prints to be made. Enter the value either directly or by
▲▲▲▲
pressing
Setting range: 1 to 999 sets
or
▼▼▼▼
.
Available settings:
Letter, Legal, Executive, A3, A4, A5, A6, JIS B4, JIS
B5, JIS B6, Invoice, 11
FLS3, FLS4, Special sizes
(Displayed only with the PS driver)
Available settings:
Letter, Legal, Executive, A3, A4, A5, A6, JIS B4, JIS
B5, JIS B6, Invoice, 11
FLS4, Special size
size of the printing paper.
Setting range: 25 to 400%
×
17, 11 × 14, FLS1, FLS2,
×
17, 11 × 14, FLS2, FLS3,
(3)
(4)
(5)
(6)
4-16 Pi4700e
Page 100

Paper tab
Collate
(4)
Use this function when making multiple sets of prints of the same document, to specify whether or not to print one set at a time.
• Uncollated All of the pages are printed one after the other. For ex-
• Collated Prints are output one set at a time. For example, if you
Sorting
(5)
Select the sorting method.
• Unsorted Prints are not sorted.
• Sorted Prints are sorted.
Orientation
(6)
Select the orientation of the image. You can check the selected direction using Page
Layout.
• Portrait Printing takes place lengthwise.
• Landscape Printing takes place crosswise.
ample, if you make five sets of prints, each page is
printed in sequence five copies at a time.
make five sets of prints of a 10-page document, the
prints will be output one set at a time.
✎
Note for (1)
Depending on environment used, contents of Save/Delete will be different: Refer to Appendix A (p. 12-11) for details.
✎
Notes for (2)
If you select a size of paper not loaded in the machine or Manual Feed,
the machine will give a message prompting you to add paper to Tray1,
Tray2, or the manual bypass port and enter into a standby state.
If the setting made in Original Document Size does not match the
size specified in the application with Fit to Paper selected, the machine takes the paper size set in the application.
4
Properties Settings Chapter 4
Fit to Paper cannot be selected if Custom Paper is selected in Orig-
inal Document Size.
✎
Note for (3)
When using the OHP interleaving function, set the number of sets of
prints to 1.
✎
Note for (4)
Keep Collate (Sort) on the application side set to “OFF” at all times.
Pi4700e 4-17
 Loading...