

Page 1

User Manual
PCL6 Printer Driver
for Pi8500Pro
for Microsoft Windows 98
for Microsoft Windows Me
for Microsoft Windows 2000
for Microsoft Windows NT 4.0
for Microsoft Windows XP
Page 2

Page 3

Welcome
Welcome
Thank you for purchasing the controller.
This User Manual explains how to run print cycles on the machine to which the
controller is connected. It also gives precautions that you should review before
attempting to use the controller. Therefore, first read this manual carefully and
thoroughly , and then keep it close at hand so you can refer to it whene ver it becomes
necessary .
When operating the controller and machine, follow the instructions given in this
manual and in the one for the machine. Do not attempt to touch any part that is not
covered in these manuals. To prevent possible hazardous conditions, never attempt
to disassemble or alter any pieces of equipment.
Some of the screens shown in this manual may look different from what you will
see in actual applications.
Trademark acknowledgments
Minolta is a registered trademark of MINOLTA CO., LTD.
Windows and Windows NT are either registered trademarks or trademarks of
Microsoft Corporation in the United States and/or other countries.
IBM and PC/AT are registered trademarks of International Business Machines
Corporation.
PCL is a registered trademark of Hewlett-Packard Company.
All other products or brand names are trademarks or registered trademarks of their
respective companies or organizations.
i
Page 4

ii
Contents
Contents
Chapter 1 Before Using the Printer Driver
1. Features of the printer driver .............................................. 1-2
Features of the printer driver .............................................. 1-2
Various printing functions.................................................. 1-2
Administrative functions........................ ..... ...... .................. 1-6
2. Installing the printer drivers................................................ 1-8
Installing various printer drivers......................................... 1-8
Chapter 2 Installing the Printer Driver
1. Windows 98/Me.................................................................. 2-2
Operating environment....................................................... 2-2
Installation .......................................................................... 2-3
Making general settings before using the printer................ 2-7
Displaying a Properties dialog box..................................... 2-8
2. Windows NT 4.0/2000/XP ................................................. 2-9
Operating environment....................................................... 2-9
Installation ........................................................................ 2-10
Making general settings before using the printer.............. 2-14
Displaying a Properties dialog box................................... 2-16
Chapter 3 Properties Settings
1. Properties settings........................................................ ...... . 3-2
Description of each Properties tab...................................... 3-2
2. Device Options Setting tab................................................. 3-3
Functions of the Device Options Setting tab...................... 3-3
3. Functions common to various Properties tabs .................... 3-4
Functions common to various Properties tabs .................... 3-4
Functions of the Save Easy Set Name dialog box.............. 3-5
4. Setup tab ................................................ ..... ........................ 3-6
Functions of the Setup tab .................................................. 3-6
Functions of the Detail of Paper Source dialog box......... 3-10
Functions of the Detail Of Output Setting dialog box...... 3-12
5. Paper tab ........................................................................... 3-14
Functions of the Paper tab ................................................ 3-14
Functions of the Custom Paper dialog box....................... 3-17
6. Quality tab........................................ ................................. 3-19
Functions of the Quality tab.............................................. 3-19
Page 5

7. Job Management tab........................................................ 3-20
Functions of the Job Management tab.............................. 3-20
8. Overlay tab........................................................................ 3-23
Functions of the Overlay tab............................................. 3-23
Functions of the Watermark dialog box........................... 3-24
9. Conflicts dialog box.......................................................... 3-27
Functions of the Conflicts dialog box............................... 3-27
Chapter 4 Troubleshooting
1. Troubleshooting.................................................................. 4-2
Unable to print.................................................................... 4-2
Unable to make correct settings /
Unable to print exactly as set.............................................. 4-4
Appendix
1. Function combination matrix............................................. A-2
2. Number of registrations..................................................... A-5
Number of registrations/Usable range for Easy Set........... A-5
Number of registrations/Usable range for Watermark ...... A-6
Number of registrations/Usable range for Custom Paper .. A-7
3. E.C.M. (E.K.C.)................................................................. A-8
Account Code .................................................................... A-8
4. Index .......................... ..... ................................................. A-17
iii
Contents
Page 6
iv
Naming of equipment and functions
Naming of equipment and functions
Different names are used by the printer driver and the machine to identify the same
piece of equipment or the same function. Note the following.
Equipment names
Printer driver Machine
Finisher Finisher FN-115
Booklet Finisher Finisher FN-7
Punch Unit Punch kit PK-3
Punch & Z-Fold Unit Z-Fold kit ZK-2
Cover Inserter Cover Inserter C
Trimmer Unit Trimming unit TMG-2
Manual Feed Multi-sheet Bypass Tray
LCC Large Capacity Cassette C-403
Large Capacity Cassette C-404
Function names
Printer driver Machine
N-up N in 1
Booklet Left Binding Left Binding
Booklet Right Binding Right Binding
Page 7

Chapter 1
Before Using the Printer Driver
1-1
Chapter 1
Before Using the Printer Driver
Page 8

1-2
1. Features of the printer driver
1. Features of the printer driver
Chapter 1
Features of the printer driver
This controller is an image controller designed to use the machine as a printer,
allowing you to print documents directly to the machine from a computer to which
the controller is connected. The printer driver, which is used during printing, is
equipped with various functions that make the most out of the features of the
machine and enable you to use the same functions as those offered by the machine.
When actually running a print cycle, you can specify various functions of the
machine on your computer screen.
NOTES
• Some functions offered by the machine cannot be combined, such as Cover
Before Using the Printer Driver
Page and OHP Interleaving, and some others may not be possible because of
the paper size involved. The functions that cannot be selected appear dimmed.
Furthermore, if functions that are incompatible with each other are specified,
the Conflicts dialog box will appear, prompting you to change the settings.
When this dialog box appears, check the details and reselect the functions to
ensure function compatibility.
• Some settings that are refused by the machine because of restricted
combinations of different functions can at times be accepted by the printer
driver. If a print command is issued from the personal computer with such
settings made, the machine will not produce the output correctly: Be sure to
make correct settings.
Various printing functions
• Makes copies that are sorted into complete sets of the original document or
grouped into uncollected groups, each containing copies of one page of the
original document. ☞
p. 3-16
4608O006AA
4608O007AA
Page 9
1-3
1. Features of the printer driver
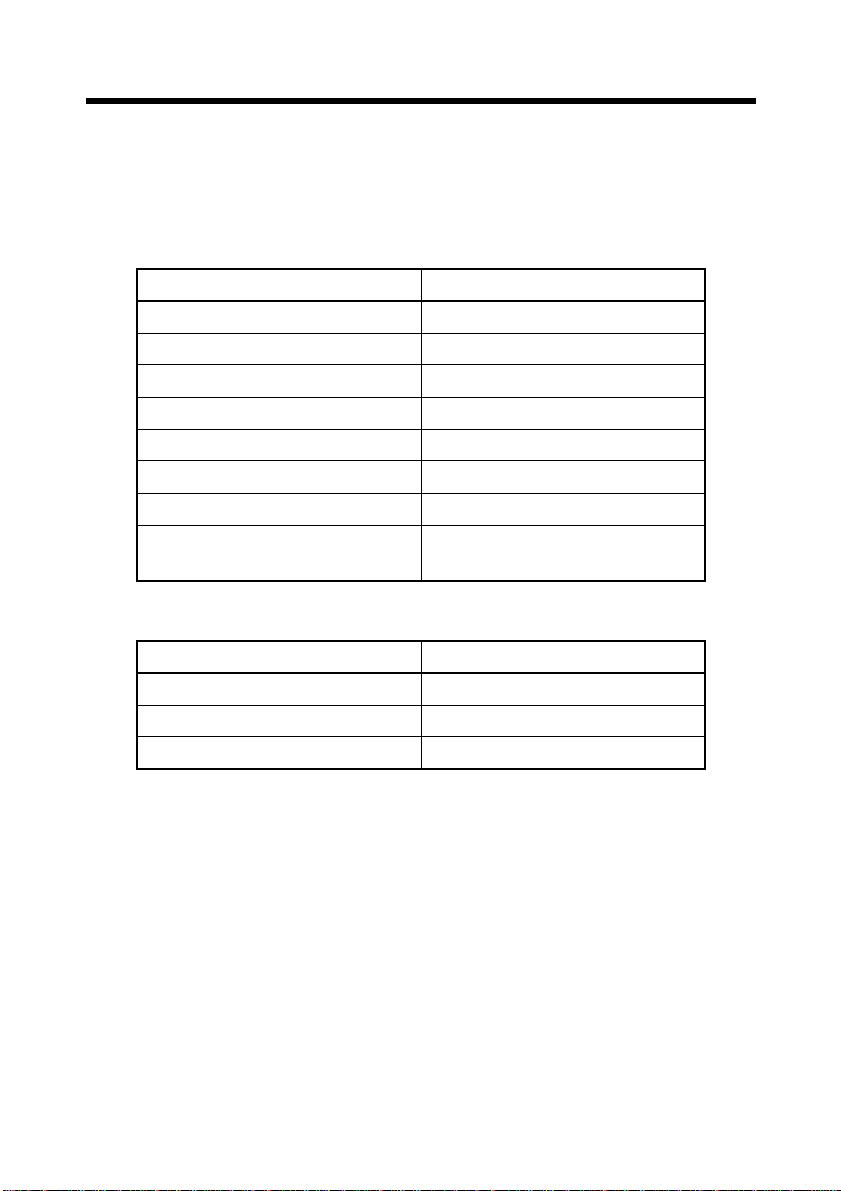
• Prints two pages of the original document on both the front and back sides of a
single sheet of paper. ☞
p. 3-7
Chapter 1
4608O008AA
Long Edge Binding
• Enlarges or reduces the original. ☞
p. 3-15
Short Edge Binding
1149O004AA
4608O009AA
• Prints two pages or four pages of the original document on a single sheet of
paper.
A maximum of 16 pages of the original document can be printed on a single
sheet of pape r. ☞
p. 3-6
2 up
1155O007AA
4668O001AA
4 up
Before Using the Printer Driver
• Prints four pages of the original document on both the front and back sides of a
single sheet of paper, which can be folded into a booklet. ☞
p. 3-7
4608O011AB
Page 10
1-4
1. Features of the printer driver
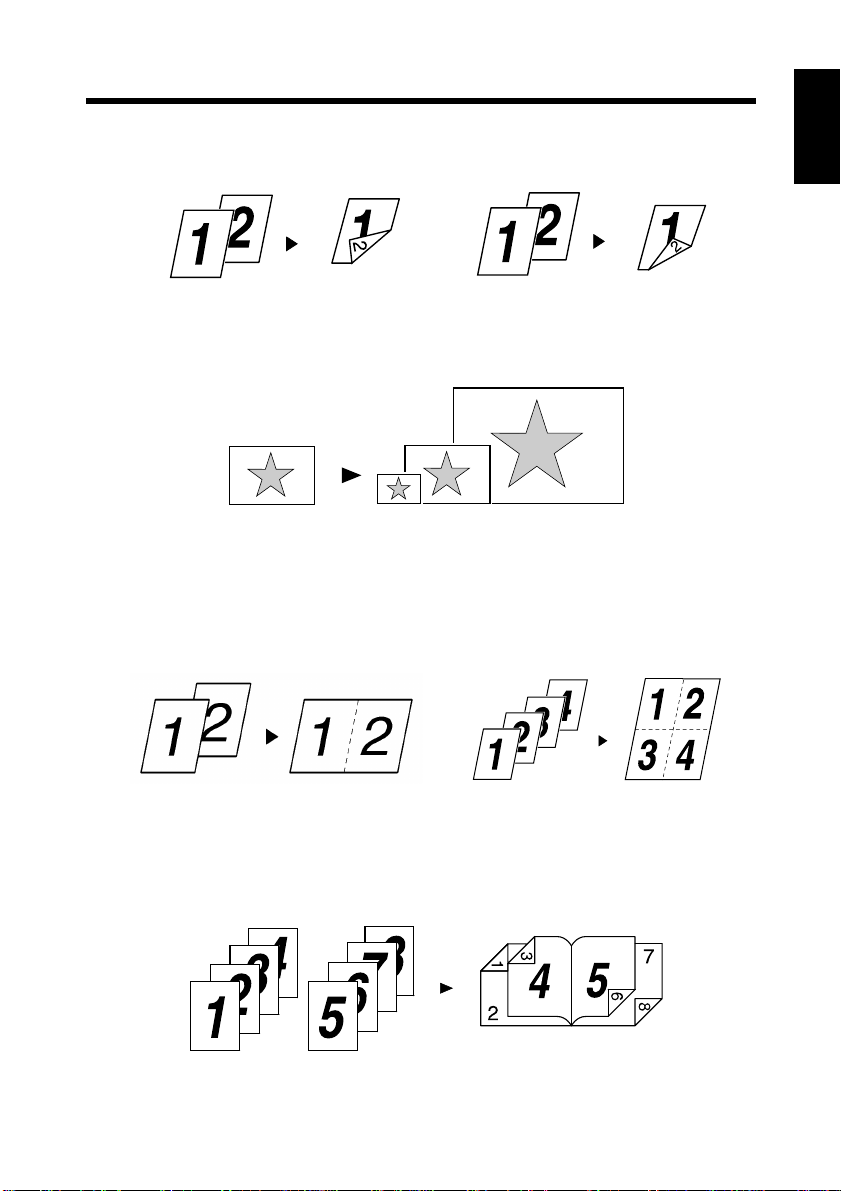
• Places text (a watermark) in the background. ☞ p. 3-23
Chapter 1
4608O001AA
• Prints complete sets of the original document, stapled together. ☞
Before Using the Printer Driver
4668O002AA
By using sorting, you can make complete sets of documents fo r immediate
delivery without having to do any further process ing.
4668O003AA
p. 3-12
Page 11
1. Features of the printer driver
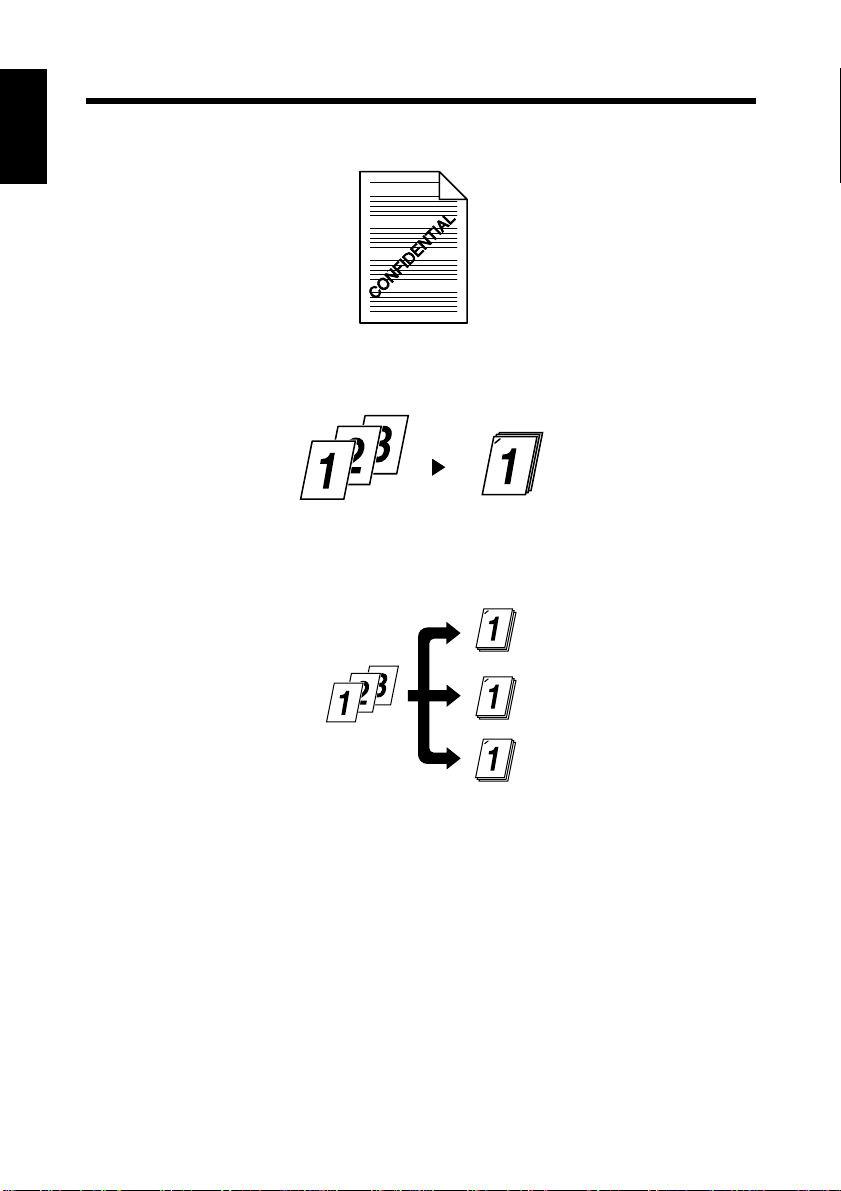
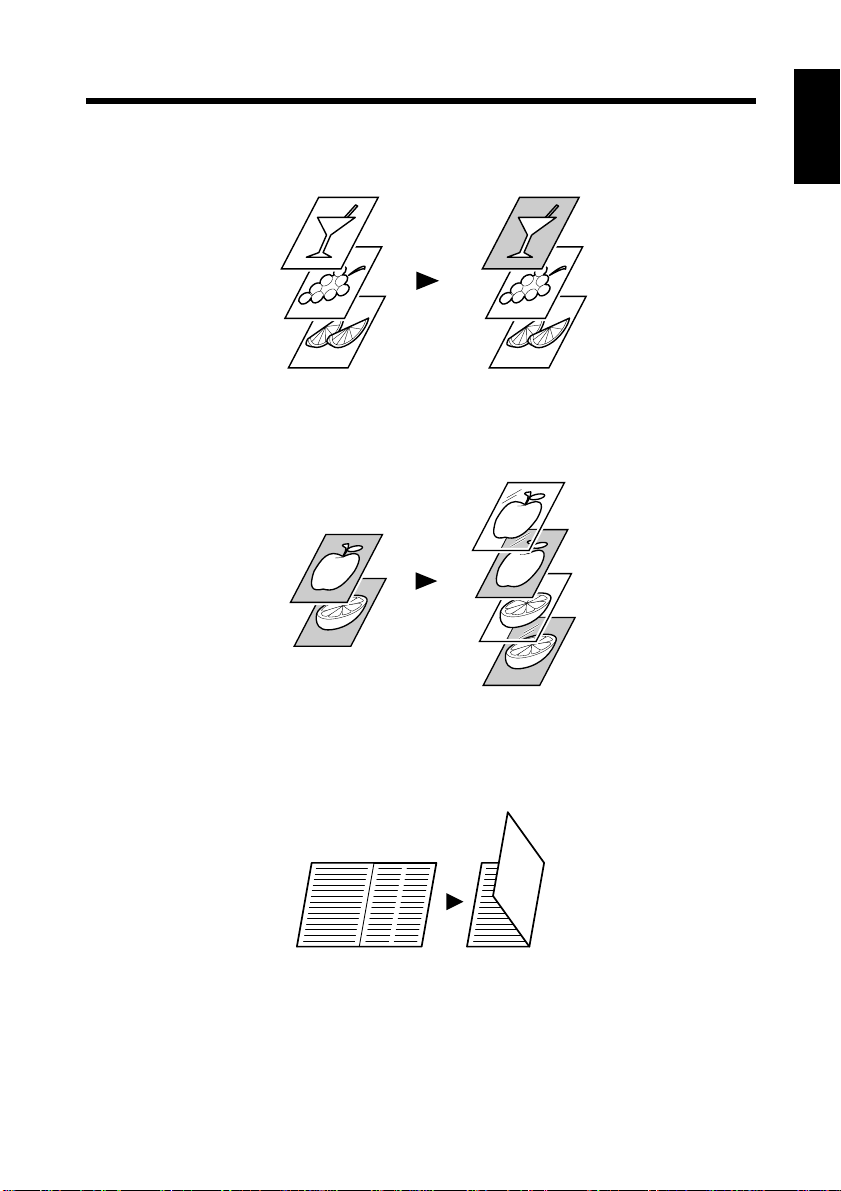
• Prints the cover on a different type of paper (such as colored paper).
☞
p. 3-10
1149O013AA
• Prints on OHP transparencies. You can also insert interleaves, either blank or
printed with the same contents as those on the OHP transparencies. ☞
p. 3-11
1-5
Chapter 1
Before Using the Printer Driver
• Folds copies during finishing. ☞
p. 3-13
1149O017AA
4014O001AA
Page 12
1-6
1. Features of the printer driver
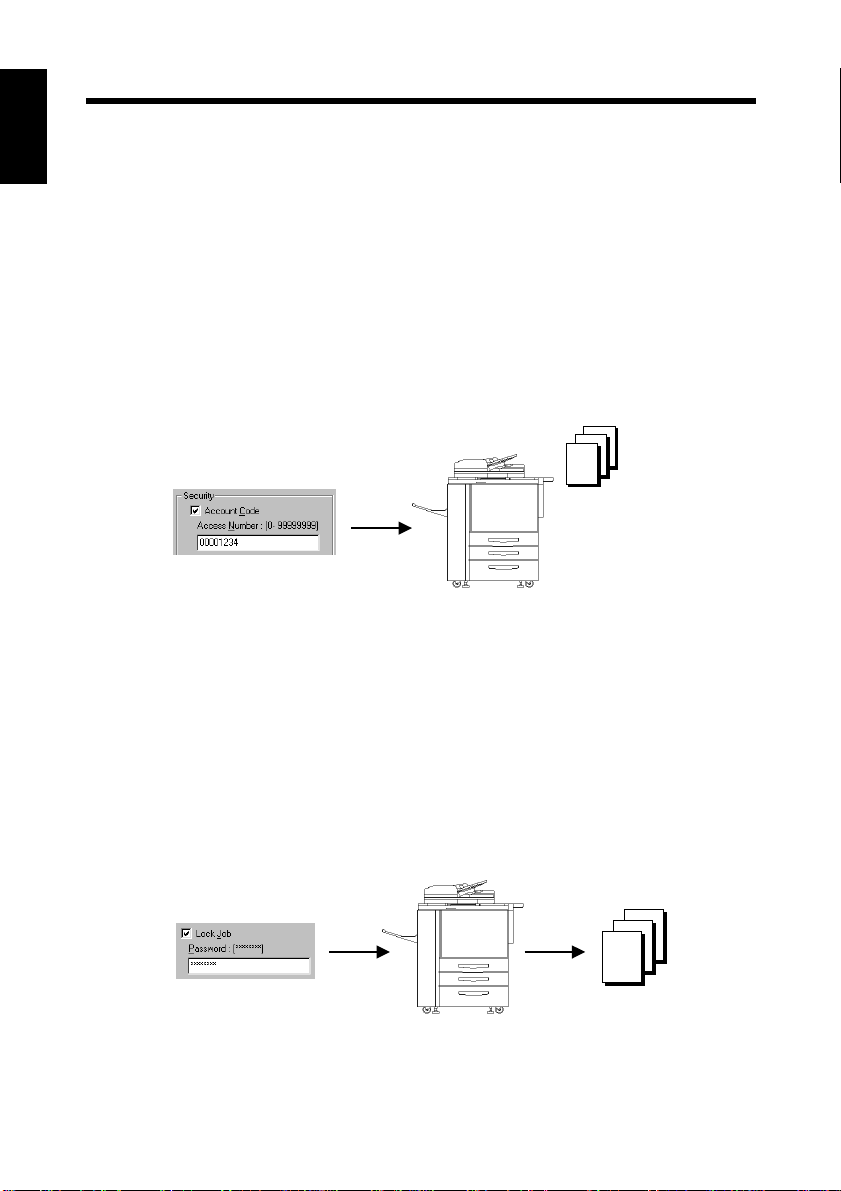
Administrative functions
Chapter 1
Account Code
• The E.C.M. (E.K.C.) function can be used as if the machine was used as a
copier. ☞
1. Select the Account Code check box on the Job Management tab of the printer
driver.
2. Type the appropriate number in the Access Number box.
The job will be printed, and the number of prints will be counted for the
specified account.
Before Using the Printer Driver
p. 3-20
C4027O204CA
Lock Job
• Printing of confidential documents may be withheld until a legitimate password
is entered on the machine. ☞
p. 3-21
1. Select the Lock Job check box on the Job Management tab of the printer driver.
2. Type the password in the Password box.
3. From the control panel of the copier, type the password.
The job will be printed.
C4027O203CA
Page 13
1. Features of the printer driver
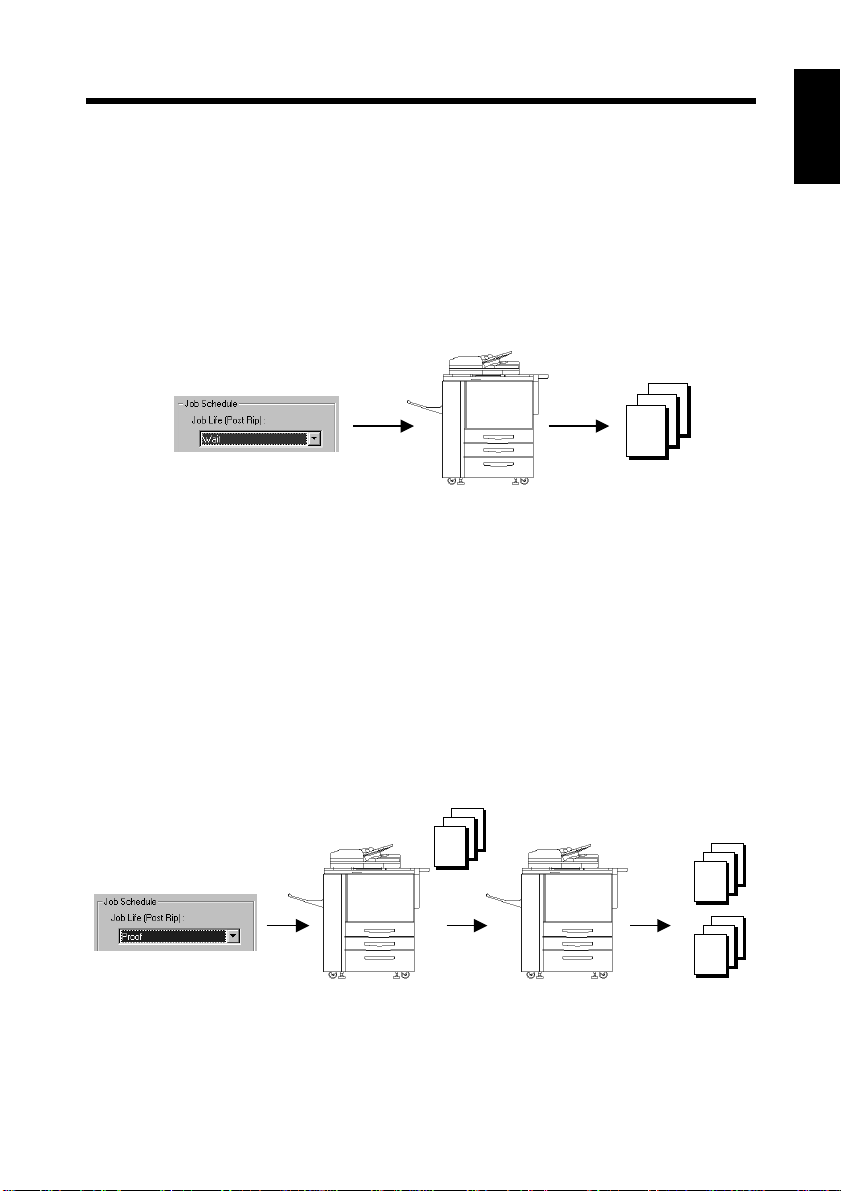
Wait
• The copier stops automatically before it prints the received image. ☞
p. 3-22
1. Select “Wait” from the Job Life list on the Job Management tab of the printer
driver.
2. On the control panel of the copier, the PRINTER CHECK MODE screen
appears. Press the [Start] key.
The job will be printed.
C4027O205CA
Proof
• The copier stops automatically after printing a set of images of a job.
☞
p. 3-22
1-7
Chapter 1
Before Using the Printer Driver
1. Select “Proof” from the Job Life list on the Job Management tab of the printer
driver.
Only a copy of the job will be printed.
2. On the control panel of the copier, press the [Start] key.
All jobs will be printed.
C4027O206CA
Page 14

1-8
2. Installing the printer drivers
2. Installing the printer drivers
Chapter 1
Installing various printer drivers
To make 100% use of the functions offered by the machine to which the controller
was added, install the attached printer drivers on your computer. The controller is
furnished with the follow ing pri nte r drivers:
• PCL6 printer driver for Windows 98/Me
• PCL6 printer driver for Windows NT 4.0
• PCL6 printer driver for Windows 2000/XP
Install the printer driver suitable for the operating system that runs on your
computer. For installation procedures, see the relevant page as detailed below:
Before Using the Printer Driver
Installing the Windows printer driver:
Windows 98/Me ☞ p. 2 -2
Windows NT 4.0/2000/XP ☞ p. 2-9
Page 15

2-1
Chapter 2
Chapter 2
Installing the Printer Driver
Installing the Printer Driver
Page 16

Chapter 2
2-2
1. Windows 98/Me
1. Windows 98/Me
Operating environment
This section explains the required environment for the printer driver.
Before installing the printer driver, make sure that your computer meets the
following requirements. If it doesn’t, the printer driver may not function properly.
Personal computer IBM PC or compatible with an 80486, AMD, or
Pentium processor
Operating system Windows 98 (English)
Windows Me (English)
Memory 32 MB or more
I/O interface Network 10/100BaseT (UTP)
Installing the Printer Driver
• Windows NT 4.0/2000/XP
For the operating environment and installation procedure for the Windows NT
4.0/2000/XP printer driver, see p. 2-9.
Page 17
2-3
1. Windows 98/Me
Installation
This section explains the installation procedure for the Windows 98 printer driver.
NOTES
• Before starting to install the printer driver, be sure first to quit all other
applications.
• When installing the printer driver for Windows Me, read “Windows 98” as
“Windows Me”.
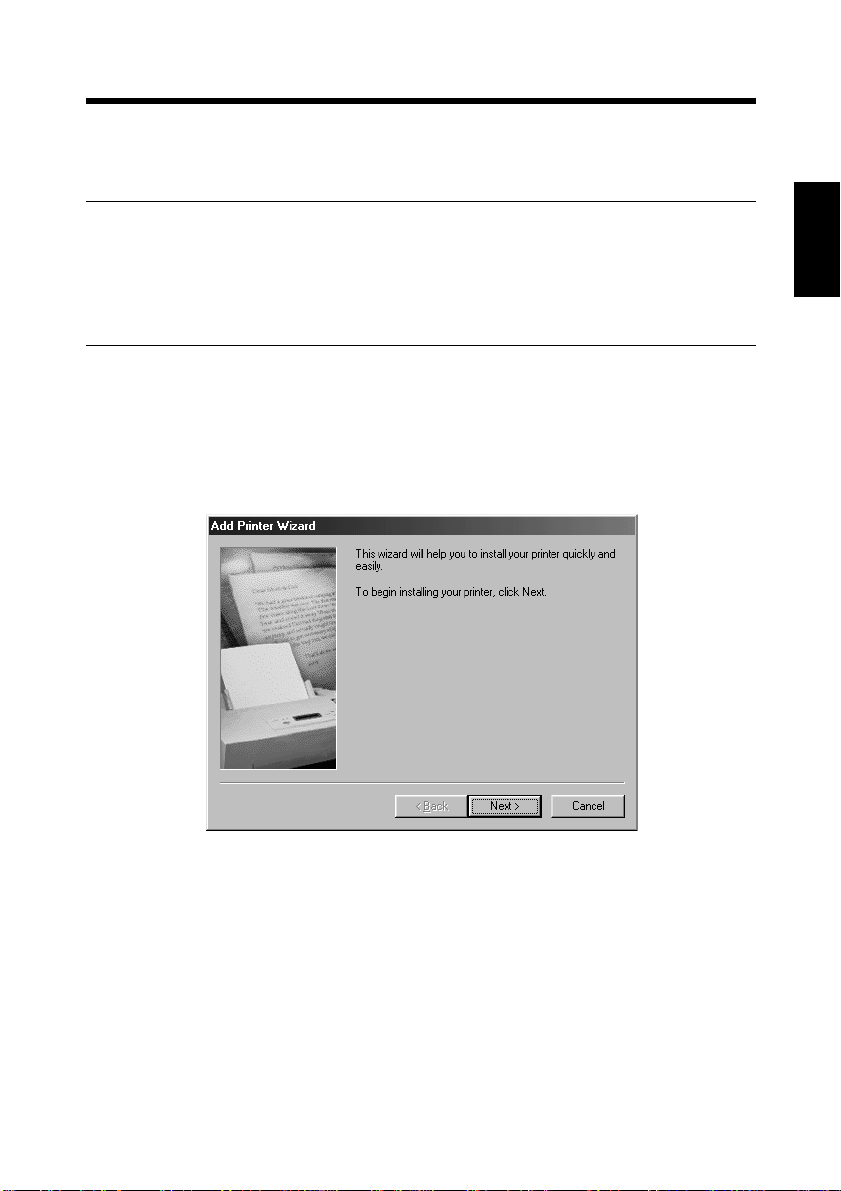
1. Click the [Start] button. In the menu that appears, point to “Settings”, and then
click “Printers”.
2. The Printers window will appear. Double-click the Add Printer icon.
3. Click the [Next>] button to start the Add Printer Wizard.
Chapter 2
Installing the Printer Driver
4668P003CA
Page 18
Chapter 2
Installing the Printer Driver
2-4
1. Windows 98/Me
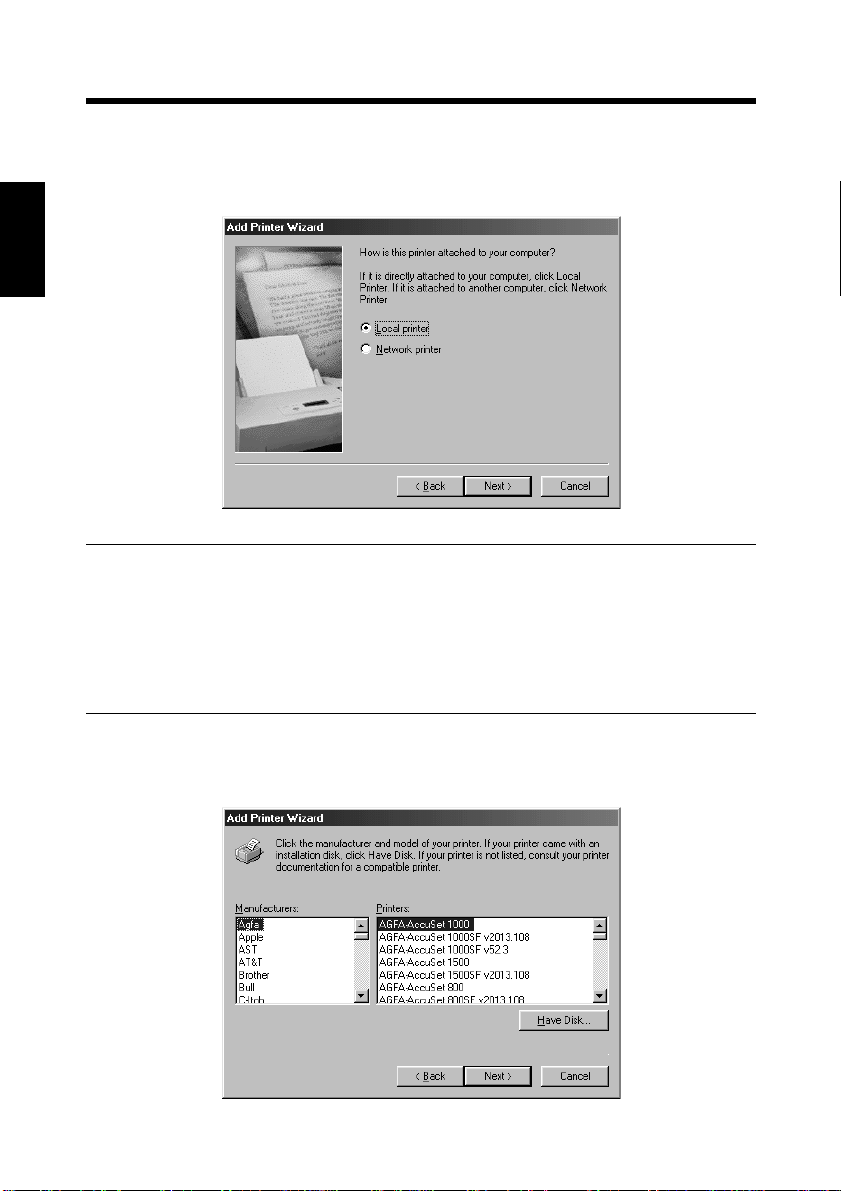
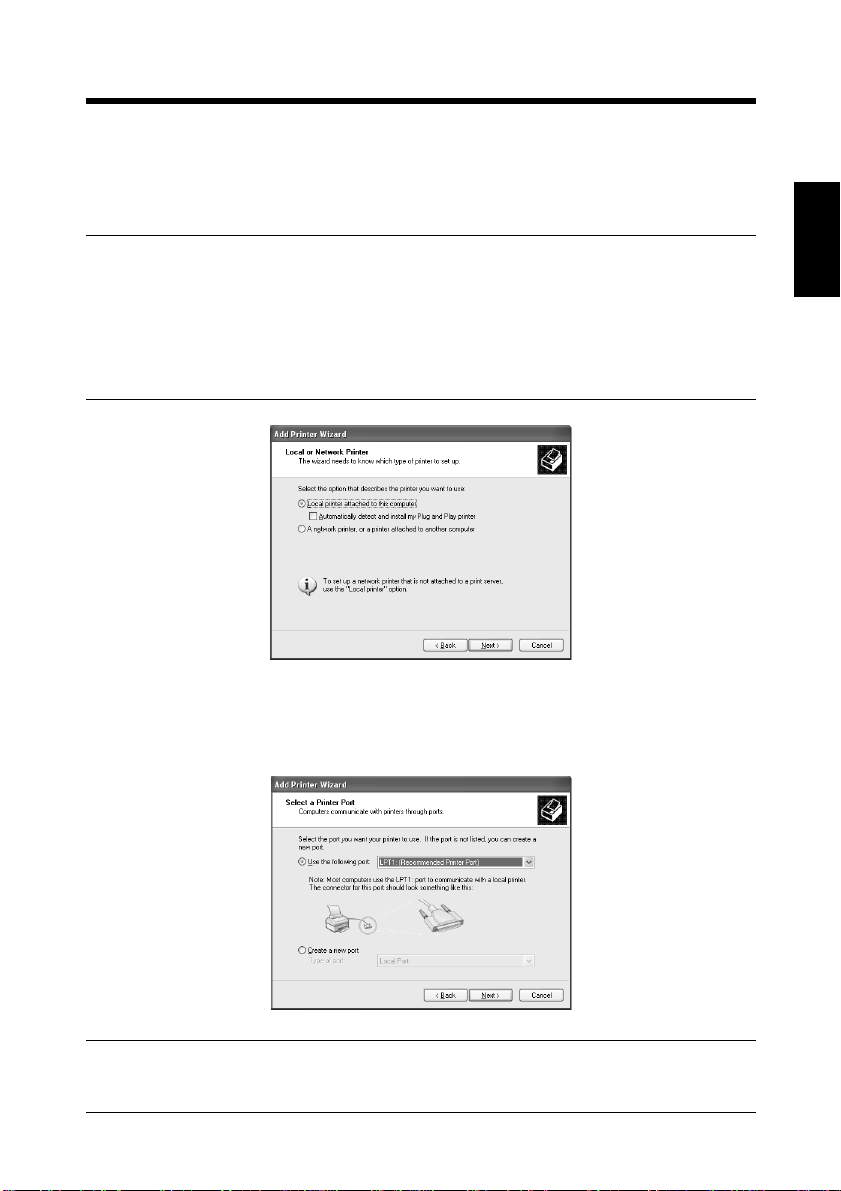
4. A dialog box that allows you to select the type of connection for the printer will
appear.
Select “Local printer”, and then click the [Next>] button.
4668P004CA
NOTES
• The printer is actually connected to the network. However, since other network
settings are required, the printer driver is temporarily installed as for a local
connection.
• To make settings for using the network, it is recommended that you read the
Pi8500Pro Getting Started manual, which comes with the controller.
5. A dialog box will appear, prompting you to select the manufacturer and model of
your printer. Click the [Have Disk...] button in the lower right part of the d ialog box.
4668P005CA
Page 19
1. Windows 98/Me
6. The Install From Disk dialog box will appear. Insert the controller driver CDROM, included with the controller, in the CD-ROM drive of your computer.
7. In the Copy manufacturer’s files from box, type the path of the driver to be
installed. (In the example, the letter of the CD-ROM drive is I.)
To install the driver for Windows 98/Me, type “I:\PrinterDriver\PCL6\W98Me”.
C4027P216CA
8. The Printers list will appear.
Select the driver to be installed, and then click the [Next>] button.
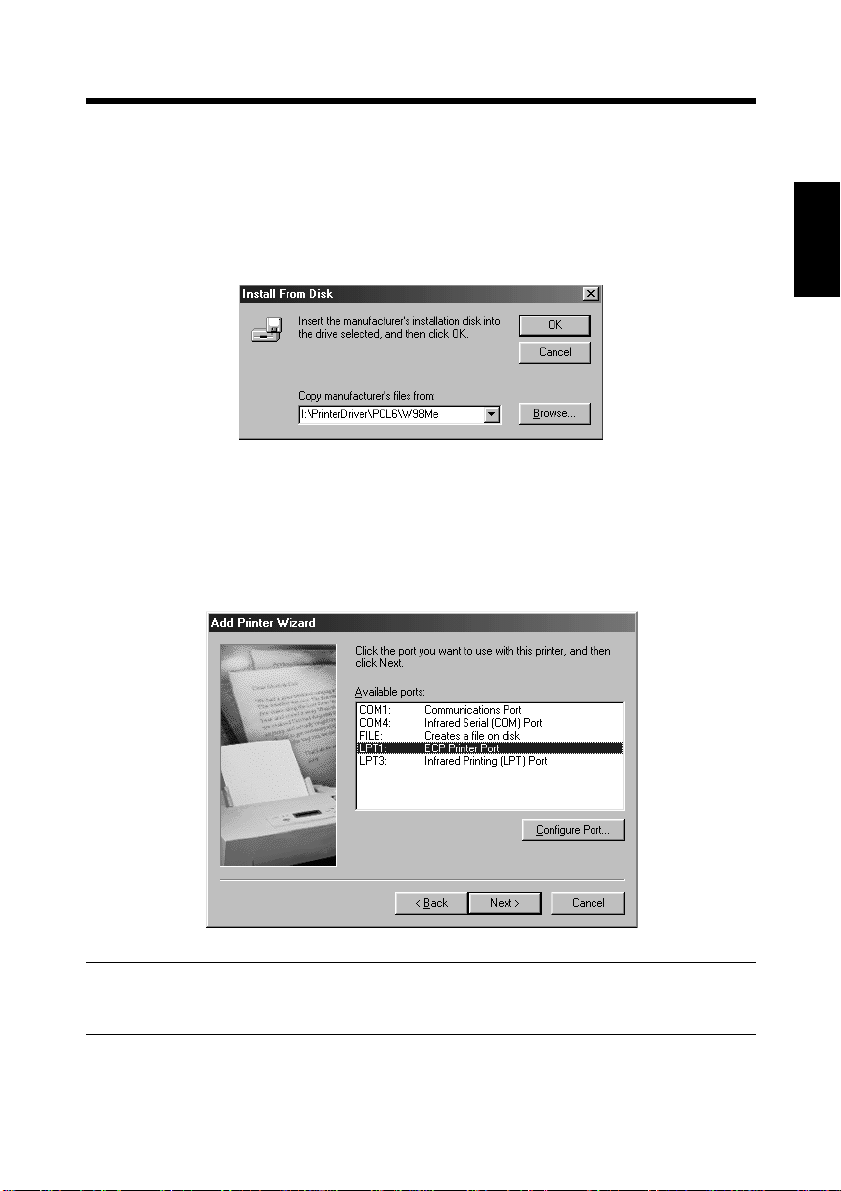
9. A dialog box that prompts you to select the port will appear. Select a port, and
then click the [Next>] button.
2-5
Chapter 2
Installing the Printer Driver
NOTES
• The selected port will be changed later.
4668P009CA
Page 20
Chapter 2
Installing the Printer Driver
2-6
1. Windows 98/Me
10.A dialog box that asks you to confirm the printer name will appear. Check the
printer name. If you want to designate this printer as the default printer, select
“Yes”.
Click the [Next>] button.
11.A dialog box that allows you to select printing of a test page will appear.
Select “No”, and then click the [Finish] button.
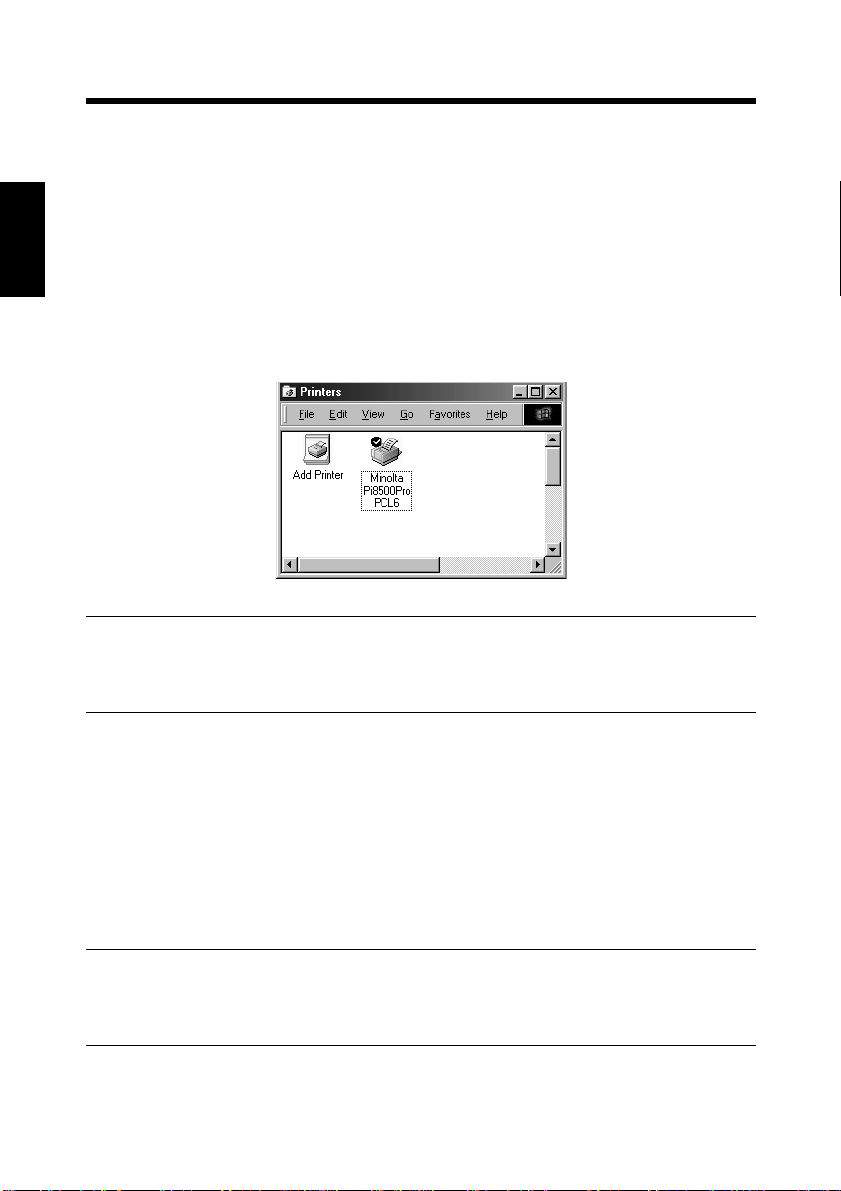
12.Installation will start.
When the installation is completed, the corresponding icon will be added to the
“Printers” window.
C4027P217CA
NOTES
• You cannot print with the local port setting. Use the following procedure to
make the settings for the printer driver.
13.Right-click the new printer icon and select “Properties” from the menu.
14.Click the “Details” tab in the dialog box that appeared.
15.Click the [Add Port] button.
The Add Port dialog box appears.
16.Select “Network”, and then click the [Browse] button.
17.Select the printer on the network, and then click the [OK] button.
NOTES
• If the desired printer does not appear on your network, refer to the
Pi8500Pro Getting Started manual or consult the network administrator.
18.Click the [OK] button twice.
Page 21

2-7
1. Windows 98/Me
Making general settings before using the printer
The printer driver requires setting items that are common to all print jobs, including
the port to which the printer is connected and any optional devices configured with
the machine. These settings must be made using tabs available in a Properties dialog
box after the printer driver has been installed or whenever the operating
environment changes.
The most common settings were made when the printer driver was installed, so you
do not usually need to change them. Some items must, however, be changed in the
following cases.
Cases where changes are necessary Applicable tabs
•
You want to add a comment to distinguish the printer
from others.
•
The connection port has be en changed on the
computer.
•
You want to change the conditions for the display of a
timeout error.
•
You want to designate a port to which the machine is
connected via a network. (This setting must be made
on a computer that is connected to the controller via a
network.)
General
Details
Chapter 2
Installing the Printer Driver
•
The setting is not related to printing. Color Management
•
You want to share the machine with other computers
connected to the same network. (Th is setting m ust be
made on the computer directly connected to the
controller.)
•
You want to change the setting in the Minolta
Pi8500Pro PCL 6 Properties dialog box. For details,
see Chapter 3.
Sharing
Setup
Paper
Quality
Device Options Setting
Job Management
Overlay
Page 22

Chapter 2
Installing the Printer Driver
2-8
1. Windows 98/Me
Displaying a Properties dialog box
There are two different ways to display a Properties dialog box. The contents of a
particular dialog box differ slightly depending on how you access it. Select the
appropriate one according to your need.
(1) To display a Properties dialog box from the Printers folder
(2) To display a Properties dialog box from an application menu
Below are the detailed procedures for each approach.
Displaying a Properties dialog box from the Printer folder
1. Click the [Start] button, point to “Settings”, and then click “Printers”.
2. Right-click the Minolta Pi8500Pro PCL6 icon.
3. Click “Properties” on the menu that will appear. This will display the Properties
dialog box.
This method allows you to set the environment in which you will use the printer.
The settings made through this method are valid in all applications.
Displaying a Prop ertie s dial og bo x from an application menu
1. Click “Print...” on the File menu of the application.
2. Make sure that “Minolta Pi8500Pro PCL6” is the listed printer name. Otherwise,
click [
▼
], and then select “Minolta Pi8500Pro PCL6” from the list that will appear.
3. Click the [Properties] button. This will display the Properties dialog box.
This method allows you to set the number of copies and type of paper for each
document.
Note that the settings made in the Properties dialog box accessed through the
application are valid only for that particular application.
TIPS
• To make settings in the Device Options Setting tab, display the Properties
dialog box from the Printers folder.
NOTE
The steps to display a Properties dialog box may differ depending on the
application. Follow the correct procedure according to the application. The
procedure above is based on the WordPad application.
Page 23
2. Windows NT 4.0/2000/ X P
2. Windows NT 4.0/2000/XP
Operating environment
This section explains the required environment for the printer driver.
Before installing the printer driver, make sure that your computer meets the
following requirements. If it doesn’t, the printer driver may not function properly.
Personal computer IBM PC or compatible with an 80486, AMD, or
Pentium processor
Operating system Windows NT 4.0 (English)
Windows 2000 (English)
Windows XP (English)
Memory 32 MB or more (Windows NT 4.0/2000)
64 MB or more (Windows XP)
I/O interface Network 10/100BaseT (UTP)
• Windows 98/Me
For the operating environment and installation procedure for the Windows 98/Me
printer driver, see p. 2-2.
2-9
Chapter 2
Installing the Printer Driver
Page 24
Chapter 2
Installing the Printer Driver
2-10
2. Windows NT 4.0/200 0/XP
Installation
This section explains the installation procedure for the Windows XP printer driver.
NOTES
• Before starting to install the printer driver, be sure first to quit all other
applications.
• Before starting to install the printer driver, log in as Administrator.
• The installation screens differ between Windows XP and Windows NT 4.0/
2000.
• When installing the pri nt er dr i ver for Windows NT 4.0 or Windows 2000, read
“Windows XP” as “Windows NT 4.0/2000”. Three function or item name s are
given as applicable if they differ between the three operating systems.
1. Click the [start] button. On the menu that appears, click “Printers and Faxes”.
* For Windows NT 4.0/2000, click the “Start” button, point to “Setting s”, and
then click “Printers”.
2. The Printers and Faxes window will appear. Click the “Add a printer” icon.
* For Windows NT 4.0/2000, double-click t he “Add Print er” icon in the Pr inter s
window.
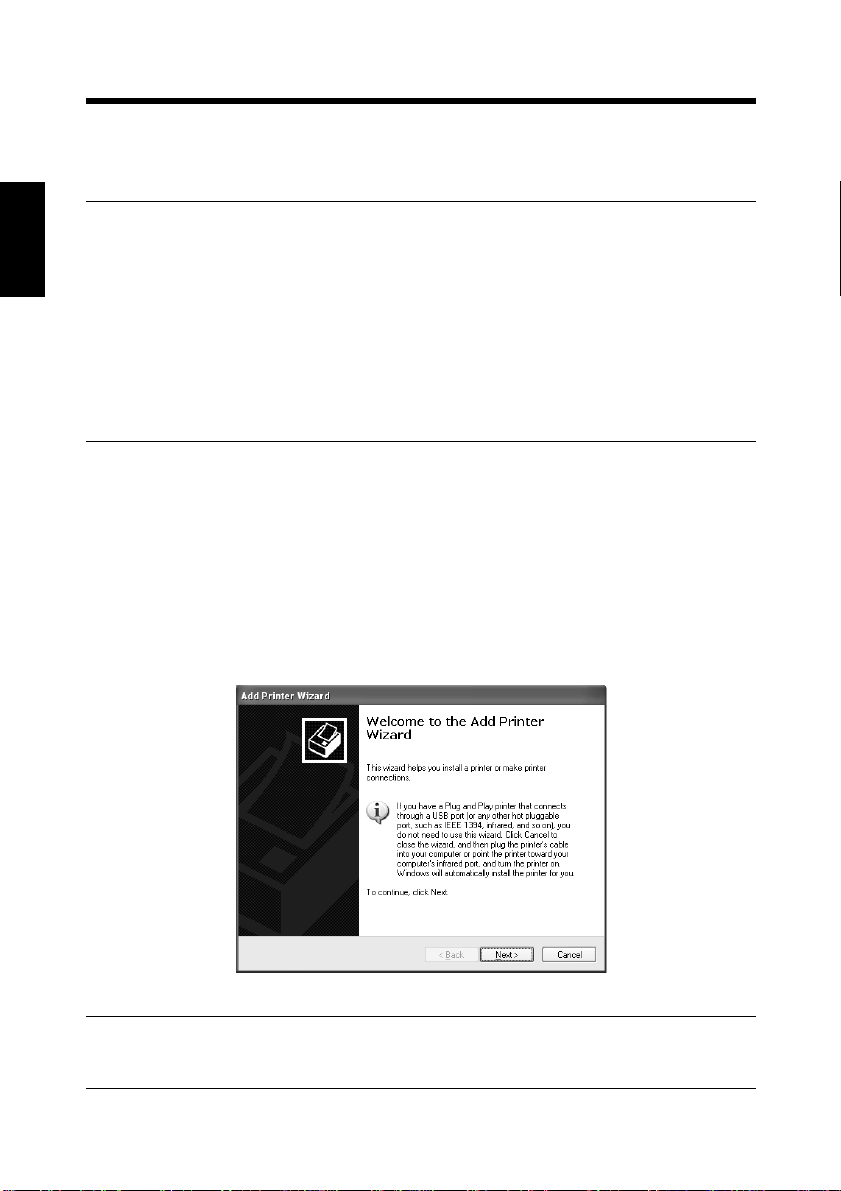
3. Click the [Next>] button to start the Add Printer Wizard.
NOTE
This step is skipped in Windows NT 4.0.
C4027P201CA
Page 25
2-11
2. Windows NT 4.0/2000/ X P
4. A dialog box that allows you to select the type of connection for the printer will
appear. Select “Local printer attached to this computer”.
* For Windows NT 4.0, select “My Computer”.
For Windows 2000, select “Local printer”.
NOTES
• The printer is actually connected to the network. However, since other network
settings are required, the printer driver is temporarily installed as for a local
connection.
• To make settings for using the network, it is recommended that your read the
Pi8500Pro Getting Started manual, which comes with the controller.
Chapter 2
Installing the Printer Driver
C4027P202CA
5. Click the [Next>] button.
6. A dialog box that prompts you to select the port will appear. Select a port, and
then click the [Next>] button.
C4027P203CA
NOTES
• The selected port will be changed later.
Page 26
Chapter 2
2-12
2. Windows NT 4.0/200 0/XP
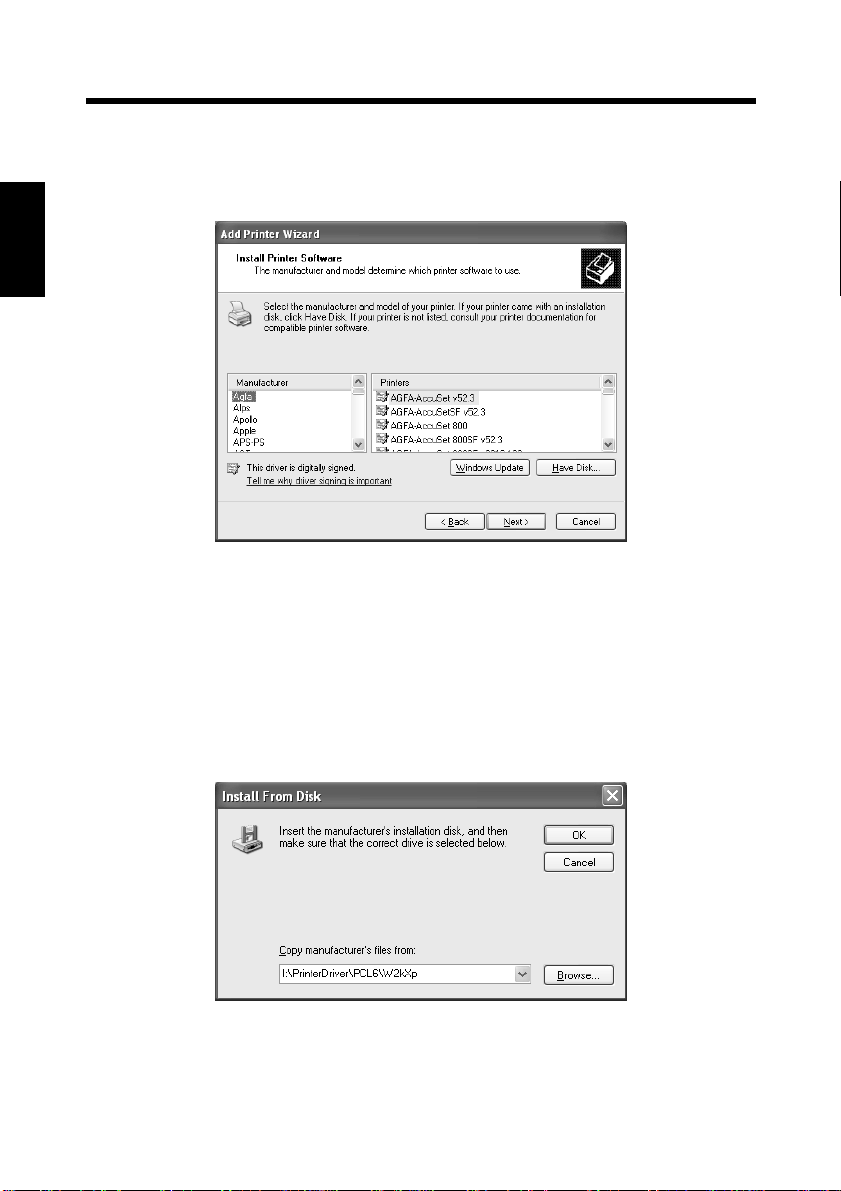
7. A dialog box will appear, prompting you to select the manufacturer and model
of your printer. Click the [Have Disk...] button in the lower right part of the
dialog box.
Installing the Printer Driver
C4027P204CA
8. The Install From Disk dialog box will appear. Insert the controller driver CDROM, included with the interface kit, in the CD-ROM drive of your computer.
9. In the Copy manufacturer’s files from box, type the path of the driver to be
installed. (In an example, the letter of the CD-ROM drive is I.)
To install the driver for Windows 2000/XP, type “I:\PrinterDriver\PCL6\
W2kXp”.
To install the driver for Windows NT 4.0, type “I:\PrinterDriver\PCL6\Nt4”.
C4027P205CA
10.Click the [OK] button.
11.The Printers list will appear.
Select the driver to be installed, and then click the [Next>] button.
Page 27
2. Windows NT 4.0/2000/ X P
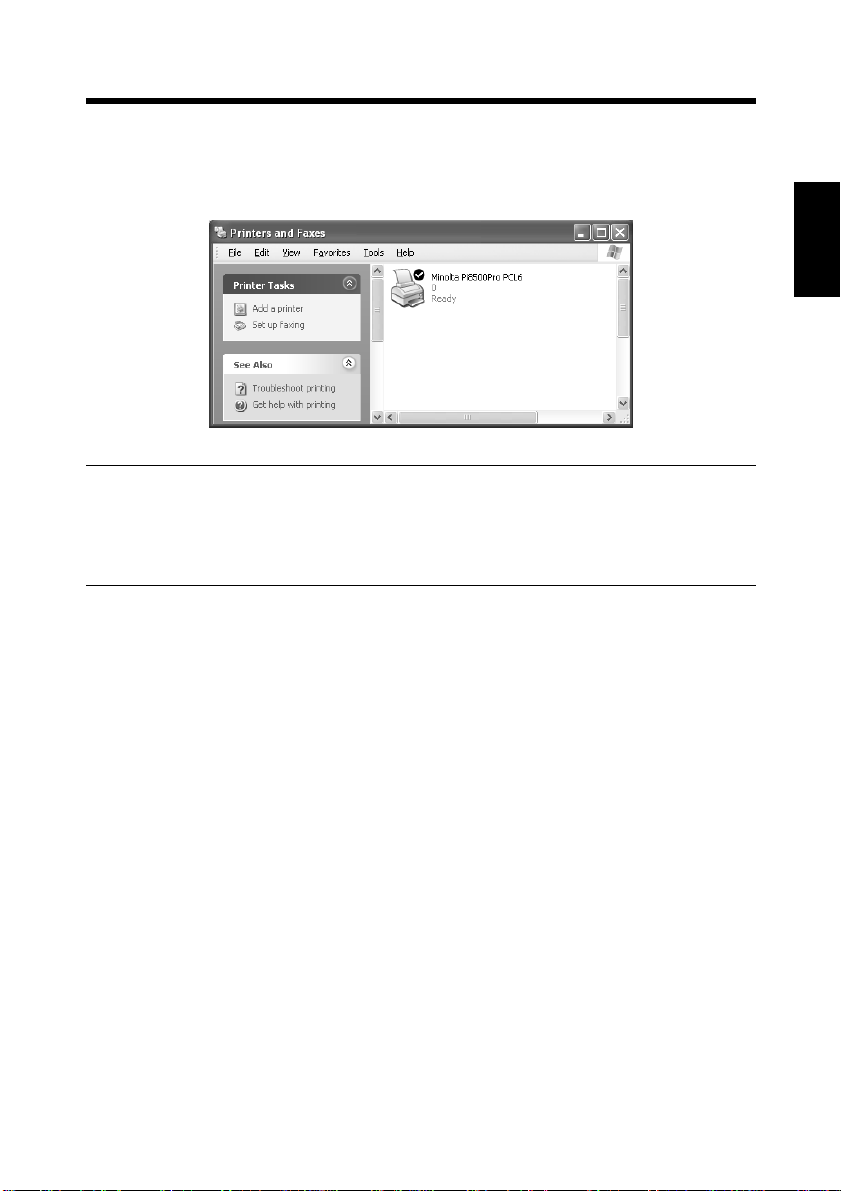
12.Follow the instructions that appear on the screen to complete the installation.
When the installation is completed, the corresponding icon will be added to the
“Printers and Faxes” window.
C4027P207CA
NOTES
• You cannot print from this printer with the local port setting.
Make network port settings according to instructions in the Pi8500Pro Getting
Started manual or from the network administrator.
2-13
Chapter 2
Installing the Printer Driver
Page 28

Chapter 2
Installing the Printer Driver
2-14
2. Windows NT 4.0/200 0/XP
Making general settings before using the printer
The printer driver requires setting items that are common to all print jobs, including
the port to which the printer is connected and any optional devices configured with
the machine. These settings must be made using tabs available in a Properties dialog
box after the printer driver has been installed or whenever the operating
environment changes.
The most common settings were made when the printer driver was installed, so you
do not usually need to change them. Some items must, however, be changed in the
following cases.
Cases where changes are necessary Applicable tabs Remarks
•
You want to add a comment to distinguish the
printer from others.
•
You want to share the machine with other
computers connected to th e same network.
(This setting must be made on the computer
that is directly connected to the controller.)
•
The connection port has be en changed on the
computer.
•
You want to change the condition s for the
display of a timeout error.
•
You want to designate a port to which the
machine is connected via a network. (This
setting must be made on a computer that is
connected to the controll er via a network.)
General
Sharing
Ports
•
You want to restrict conditions under which
the printer can be used.
•
You want to change spool condition settings.
•
You want to change OS-dependent settings.
•
This setting is not related to printing.
•
You want to sp e cify a time frame for machine
operation .
Advanced
Color
Management
Scheduling
Function avail-
able only in
Wind ows 2000/
XP
Function avail-
able only in
Wind ows 2000/
XP
Function avail-
able only in
Windows NT
4.0
Page 29

2. Windows NT 4.0/2000/ X P
Cases where changes are necessary Applicable tabs Remarks
2-15
• You want to restrict access to the machine.
• You want to check the machine users’
accounts.
• You want to make settings for optional
equipment installed on the machine.
Security
Device Options
Setting
Function avail-
able only in
Windows NT
4.0
Chapter 2
Installing the Printer Driver
Page 30

Chapter 2
Installing the Printer Driver
2-16
2. Windows NT 4.0/200 0/XP
Displaying a Properties dialog box
There are two different ways to display a Properties dialog box. The contents of a
particular dialog box differ slightly depending on how you access it. Select the
appropriate one according to your need.
(1) To display a Properties dialog box from the Printers folder
(2) To display a Properties dialog box from an application menu
Below are the detailed procedures for each approach.
Displaying a Properties dialog box from the Printer folder
1. Click the [Start] button, and then click “Printers and Faxes”.
2. Click the Minolta Pi8500Pro PCL6 icon.
To display the General tab:
3. Click “Properties” on the File menu.
To display the Printing Preferences dialog box:
3. Click “Printing Preferences…” on the File menu. This opens the Minolta
Pi8500Pro PCL6 Printing Preferences dialog box.
This method allows you to set the environment in which you will use the printer.
The settings made through this method are valid in all applications.
NOTE
Since different function and item names are used for Windows NT 4.0, read
“Printing Preferences” as “Document Defaults”.
Displaying a Prop ertie s dial og bo x from an application menu
For Windows XP
1. Click “Print...” on the File menu of the application.
2. Make sure that “Minolta Pi8500Pro PCL6” is the listed printer name on the
General tab.
For Windows 2000
1. Click “Print...” on the File menu of the application.
2. Make sure that “Minolta Pi8500Pro PCL6” is the listed printer name on the
General tab. Otherwise, click [▼], and then select “Minolta Pi8500Pro PCL6”
from the list that will appear.
Page 31

2-17
2. Windows NT 4.0/2000/ X P
For Windows NT 4.0
1. Click “Print...” on the File menu of the application.
2. Make sure that “Minolta Pi8500Pro PCL6” is the listed printer name. Otherwise,
click [▼], and then select “Minolta Pi8500Pro PCL6” from the list that will
appear.
3. Click the [Properties] button. This will display the Properties dialog box.
This method allows you to set the number of copies and type of paper for each
document.
Note that the settings made in Properties dialog box accessed through the
application are valid only for that particular application.
TIPS
To make settings in the Device Options Setting tab, display the Properties dialog
box from the Printers folder.
NOTE
The steps to display a Properties dialog box may differ depending on the
application. Follow the correct procedure according to the application. The
procedure above is based on the WordPad application.
Chapter 2
Installing the Printer Driver
Page 32

Chapter 2
Installing the Printer Driver
2-18
2. Windows NT 4.0/200 0/XP
Page 33

Chapter 3
3-1
Chapter 3
Properties Settings
Properti es Settings
Page 34

3-2
1. Properties settings
1. Properties settings
Description of each Properties tab
The tabs in the Properties dialog box allow you to make the following settings. For a
detailed description of each tab, see the corresponding reference page.
Properties tab Outline of settings that can be made Reference page
Chapter 3
Properti es Settings
Setup Allows you to select the paper take-up tra y
and the paper exit tray.
Also allows you to set high-level printing
functions, such as two-sided printin g, booklet creation, N-up printing, OHP interleaving, Cover Mode, Staple, and Folding.
Paper Allows you to set basic printing cond itio ns,
such as number of copies, paper size, print
orientation and print zoom ratio.
Also allows you to set functions related to
sorting.
Quality Allows you to set the resolution.
Device Options
Setting
Job Management Sets the E.C.M. (E.K.C.) function.
Overlay Allows you to make watermark setting s.
Allows you to make setting s for optional
equipment installed to the machine.
Allows you to lock a print job.
☞
p. 3-6
☞
p. 3-14
☞
p. 3-19
☞
p. 3-3
☞
p. 3-20
☞
p. 3-23
Page 35

3-3
2. Device Options Setting tab
2. Device Options Setting tab
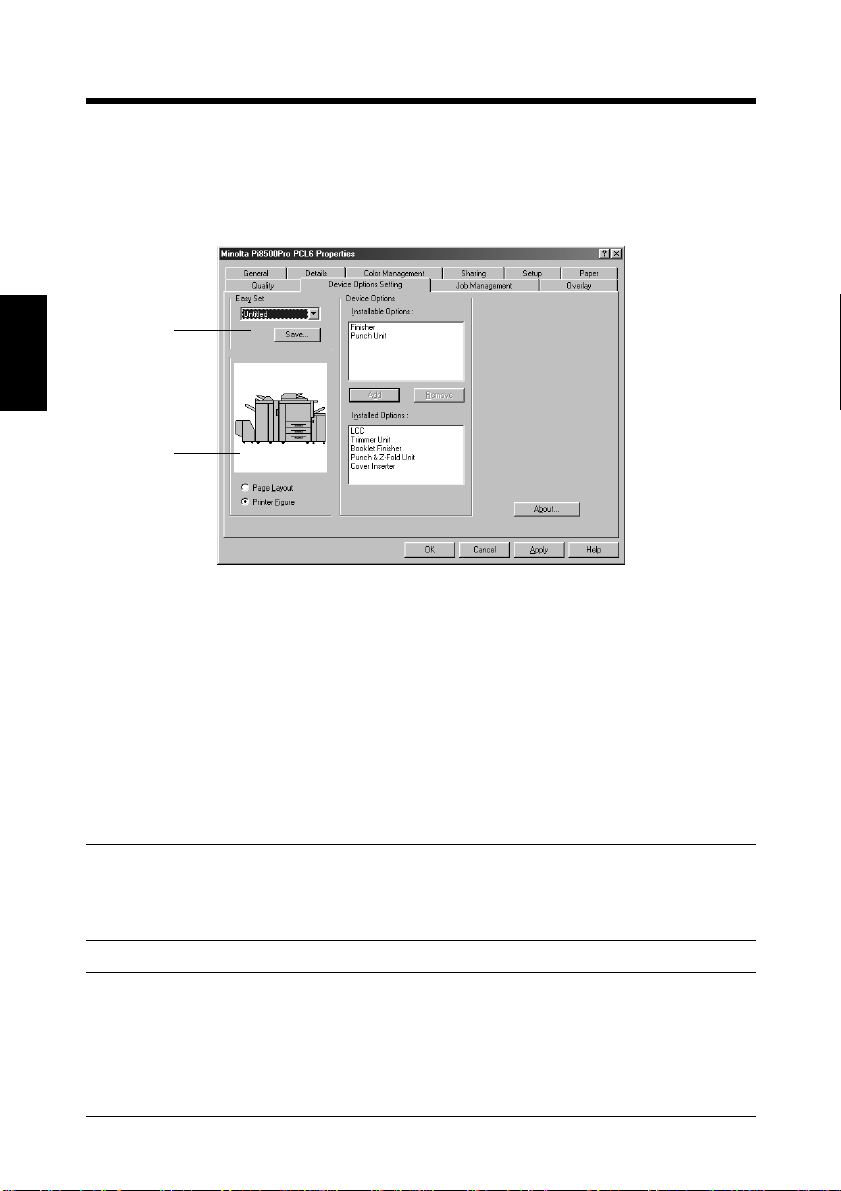
Functions of the Device Options Setting tab
This Properties tab allows you to make settings for the options installed to the
machine. Be sure to select the options correctly. Otherwise, some functions may be
unusable or printing errors may occur. The settings must match the machine
configuration.
There is no need to make settings for any options that are fitted to your machine b ut
that are not mentioned in the Installable Options list.
(1)
Chapter 3
Properti es Settings
C4027P208CA
(1) Device Options
Select the options installed to the machine.
• Installable Options This is a list of options that can be installed. Select the
desired options from this list.
Available settings: LCC, Trimmer Unit, Booklet
Finisher, Finisher, Punch & ZFold Unit, Punch Unit, Cover
Inserter
• Add Pressing this button adds the selected option.
• Remove Pressing this button removes the selected option.
• Installed Options This is a list of options that are currently installed.
Select it when you wish to remove an option.
(2) About…
Click to display the manufacturer and version number of the printer driver.
(2)
Page 36
3-4
3. Functions common to various Properties tabs
3. Functions common to various Properties tabs
Functions common to various Properties tabs
These functions are common to various Properties tabs, from Setup to Overlay.
(1)
Chapter 3
(2)
Properti es Settings
C4027P208CA
(1) Easy Set
Allows you to recall and use settings stored in the Properties tab.
• Easy Set list Allows you to sel ect a gr oup of s e tt ings st o red for the
Properties tab.
• Save (Delete) Allows you to save (or delete) the settings in the
Properties tab. When you click the [Save] button, the
settings in the Properties tab are saved and the Save
Easy Set Name dialog box will appear. ☞
p. 3-5
When you click the [Delete] button, the current gro up
of stored settings is deleted.
NOTES
• Depending on the environment used, contents of Save/Delete will be differ ent.
☞
p. A-5
TIPS
• If any setting of the current group has been changed, the [Save] button will
appear.
• If the settings currently displayed are those of a stored group, the [Delete]
button will appear.
Page 37

3. Functions common to various Properties tabs
(2) Paper preview/Machine preview
Allows you to display and change the paper preview and machine preview.
• Page Layout The layout of the print data of a single page is
displayed as an image. This allows you to check the
status for N-up printing and two-sided printing, for
example.
• Printer Figure When the paper take-up tray and paper exit tray have
been selected, the trays are displayed in green.
Functions of the Save Easy Set Name dialog box
Used to save print settings.
Before clicking the [Save] button, check all settings for the Properties tab.
(1)
4668P049CA
3-5
Chapter 3
Properti es Settings
(1) Easy Set Name
Add a name to the group of stored settings.
• Number of registrations Different depending on the environment used
☞
p. A-5
• Number of characters Max. 10 characters
Page 38

3-6
4. Setup tab
4. Setup tab
Functions of the Setup tab
Allows you to make settings for the paper take-up tray, paper exit tray and various
high-level printing functions.
Chapter 3
Properti es Settings
(1)
(2)
(3)
(1) N-up
Outputs multiple pages of the original document on one sheet of paper.
• N-up Select an N-up number.
Available settings: Off, 2 up, 4 up, 6 up, 9 up, 16 up
• Border Line Adds a border to the layout.
• N-up Style Allows you to select a printing layout.
(4)
(5)
C4027P209CA
Horiz.
Ascending
☞
See p. 1-3 for an illustration.
Horiz.
Descending
Vert.
Ascending
Ver t.
Descending
4668P051CA
Page 39

4. Setup tab
NOTES
• If the original document fo r a pri nt job contai ns pa g es of di ff erent sizes and/or
different orientations, pages may be partially cut or overlap each other.
• This setting is not available if Custom Paper is used.
TIP
The print layout is displayed in the Page Layout area.
3-7
(2) Duplex / Booklet
Specifies two-sided printing and booklet printing.
• Off No setting
• Short Edge Binding Two-sided printing that allows for the short edge to
be bound
• Long Edge Binding Two-sided printing that allows for the long edge to
be bound
• Booklet Left Binding Four pages are printed on both sides of a single
sheet of paper so that when the sheet is fold ed in the
middle it forms a left-bound booklet.
• Booklet Right Binding Four pages are printed on both sides of a single
sheet of paper so that when the sheet is fold ed in the
middle it forms a right-bound bookl et .
☞
See p. 1-3 for an illustration.
NOTES
• If the original document fo r a pri nt job contai ns pa g es of di ff erent sizes and/or
different orientations, pages may be partially cut or overlap each other.
• Two-sided printing and OHP Interleaving a re not available simultaneously.
TIPS
• Two-sided printing ca n be performed on paper of the following sizes: Letter,
Letter-R, Legal, A3, A4, A4-R, A5, B4, B5, B5-R, Invoice, 11
×
17, F4-1, F4-2,
F4-3, and F4-4.
• Short Edge Binding, Long Edge Biding, Booklet Left Binding and Booklet
Right Binding will be displayed in the Page Layout area.
Chapter 3
Properti es Settings
Page 40

3-8
4. Setup tab
(3) Image Repea t
(4) Paper Source
Chapter 3
Properti es Settings
Prints two copies of the same page on one sheet.
• Off Default setting
• 2-Repeat Image Repeat is on.
Selects the machine’s paper take-up tray to be used.
Allows you to set t he Cover Page function and the OHP Interleaving functi on.
• Paper Source Select the paper take-up tray to be used.
The available paper sizes are determined by the types
of paper take-up trays installed in the machine.
Available settings: Auto, Manual Feed, Tray1 to
Tray3, LCC
• Media Type Select the type of paper.
Setting values: Plain, Transparency (OHP),
Thick, Thin, Tab, Trace, and User
Define
• Detail of Paper Source
Make settings for the Cover Page function and OHP
interleaving function. ☞
p. 3-10
NOTE
Some paper sizes cannot be select ed. For detai ls, refer to the User Manual of the
machine.
TIPS
• Set the paper take-up tray in the Device Options Setting tab.
• The paper take-up tray used is displayed in green in the Printer Figure area.
Page 41

4. Setup tab
(5) Output Setting
Allows you to select the machine’s exit tray to which the paper is to be
distributed.
Settings can also be made for finishing functions, including stapling and
folding.
• Paper exit destination Select the machine tray to which you wish to
distribute the prints.
Not Installed Primary Tray
Finisher or Booklet Finisher
Primary Tray, Secondary Tray
• Detail of Output Setting
Make stapling or folding settings. For details, see
p. 3-12.
NOTE
Some paper sizes cannot be select ed. For detai ls, refer to the User Manual of the
machine.
TIPS
• Set the type of finisher in the Device Options Setting tab.
• The paper take-up tray used is displayed in green in the Printer Figure area.
3-9
Chapter 3
Properti es Settings
Page 42

3-10
4. Setup tab
Functions of the Detail of Paper Source dialog box
Allows you to make settings for the Cover Page function and the OHP Interleaving
function.
Chapter 3
Properti es Settings
(1)
(2)
C4027P210CA
(1) Cover Page
Used to print a document with front and b ack cov er pages. You can print on the
front cover or leave it blank.
• Front Cover Page Adds a front cover page.
• with Image (Front Cover Page )
Prints on the front cover paper.
• Back Cover Page Adds a back cover.
• with Image (Back Cover Page)
Prints on the back cover paper.
• Cover Paper Source/B ack Cover Paper Source
Select the tray for the front and back cover papers.
Available settings: Manual Feed, Tray1 to Tray3,
LCC
NOTES
• When using special paper, such as thic k pap er, the paper sometimes may not to
be distributed to the selected paper exit tray.
• Select the paper source for the body of the document from the Paper Source list.
• You can select Manual Feed, Tray 1 to Tray 3, or LCC for the body of the
document.
TIP
The tray containing t he paper o n whi ch th e body of the docu ment is to be pri nted
is displayed in green in the Printer Figure area.
Page 43

4. Setup tab
(2) Interleaving Paper
Inserts sheets (interleaving sheets) between sheets of OHP film when printing
on OHP film. You can either leave these sheets blank or print the same image as
that printed on the OHP film.
• OHP Interleaving Inserts OHP interleaving sheets.
• with Image Prints on the interleaving sheet.
NOTES
• When using the OHP I nte rleaving function, set the number of pri n t sets t o “1”.
• Select paper source for OHP interleaves in the Paper Source list.
• “Manual Feed” cannot be selected as the paper source for interleaves.
• Only “Manual Feed” is available as the paper source for the OHP film. No
other paper sources can be selected.
• OHP interleaving and two-sided printing are not available simultaneously.
TIP
The OHP interleaving tray is displayed in green in the Printer Figure area.
3-11
Chapter 3
Properti es Settings
Page 44

3-12
4. Setup tab
Functions of the Detail Of Output Setting dialog box
Allows you to make settings for the finishing functions, including stapling and
folding.
(1)
(2)
Chapter 3
(1) Staple (when the Finisher or Booklet Finisher is installed)
Allows you to staple one set of printed documents at a time.
Properti es Settings
• Right Corner Printed documents are stapled in the upper right
corner.
• Upper 2-point Pr inted do cumen ts are stap led at two points along the
top edge.
• Left Corner Printed documents are stapled in the upper left corner.
• Left 2-point Printed do cumen ts are s tapled at two points along the
left edge.
• Right 2-point Printed documents are stapled at two points along the
right edge.
☞
See p. 1-4 for an illustration.
(3)
(4)
(5)
C4027P211CA
NOTES
• If a Staple setting has been made, printed pages are fed out into the Primary Tray .
• If the capacity of the Finisher or Booklet Finisher is exceeded, the stapling
operation may be canceled. Refer to the User Manual of the machine.
• If the original document fo r a print job consists of pages of different sizes,
stapling may be canceled.
• Take care when printing a document consisting of pages facing different
directions, since the stapling position will be determined by the direction of the
first page.
• Certain sizes or kinds of paper cannot be selected. For details, refer to the
User Manual of the machine.
Page 45

4. Setup tab
(2) Punch (when the Punch Unit is installed to the Finisher/Booklet Finisher)
Allows you to punch holes in the printed document.
• Off The document is not punched.
• Upper The document is punched along the upper side.
• Left The document is punched along the left side.
• Right The document is punched along the right side.
(3) Folding (when FN-7 and ZK-2 are installed)
Allows you to select the desired paper folding f unction.
• Off Printed pag es ar e not folded.
• Z-folding Printed pages are folded into three parts with the
printed surface inside.
• Fold Printed pages are folded once with printed surface
inside.
• Center Staple + Fold Printed pages are stapled at the center and creased
with printed surface inside.
(4) Cover Sheet Mode (when Cover Inserter C is installed)
• Off Cover sheets are not inserted.
• Front Cover sheets are inserted in front of your job.
• Back Cover sheets are inserted in the back of your job.
• Front and Back Cover sheets are inserted at bo th the front and back of
your job.
3-13
Chapter 3
Properti es Settings
(5) Trimming (when the Trimmer Unit is installed to the Booklet Finisher)
Specify if you want to trim the pages of your booklet.
• Off The document is not trimmed.
• On The document is trimmed.
Page 46

3-14
5. Paper tab
5. Paper tab
Functions of the Paper tab
Allows you to make basic printer settings.
(1)
(2)
Chapter 3
(3)
(4)
Properti es Settings
(1) Original Document Size
Allows you to set the size of the original.
• Paper size Select the size of the original.
• Edit Custom Used for special sizes. ☞
NOTES
• When using custom size paper, first load the s heet s int o the Man ual Feed Tray,
and then select the paper size on the Touch Panel of the machine.
• When custom size paper is used, only one page can be printed on one sheet.
• Depending on the environment used, the number of registrations will be
different.
• The paper size setting made in the application may have priority over the
paper size setting made in the printer driver.
If the pages are not printed correctly, confirm the paper size setting for the
application.
☞
p. A-7
(5)
(6)
(7)
(8)
C4027P212CA
Available settings: Letter, Letter-R, Legal, A3, A4,
A4-R, A5, A5-R, A6, B4, B5, B5R, Invoice, Invoice-R, 11×17, F41, F4-2, F4-3, F4-4
p. 3-17
Page 47

5. Paper tab
(2) Output Paper Size
Allows you to set the size of the paper on which prints are to be made.
• Output Paper Size Allows you to specify the size of the printing paper.
• Paper size Select the size of the printing paper.
Available settings: Letter, Letter-R, Legal, A3, A4,
A4-R, A5, A5-R, A6, B4, B5, B5R, Invoice, Invoice-R, 11×17, F41, F4-2, F4-3, F4-4
• Fit to Paper The original is printed at a zoom ratio that matches
the size of the printing paper.
• Scaling Specify the print zoom ratio.
Setting range: 25 to 400%
☞
See p. 1-3 for an illustration.
NOTES
• If you select a paper size not loaded in the machine, the machine will display a
message informing you of this.
• If you specify a paper source and paper size that do not match the specified
tray, the machine will displa y messag es showi ng that the s pecif ied paper si ze is
not correct and asking if printing should be executed forcibly.
• If the Original Document Size setting does not match the size specified in the
application with “Fit to Paper” selected, the machine will use the paper size
set in the application.
3-15
Chapter 3
Properti es Settings
(3) Full Bleed
Specify if you want to print the pages with a full bleed.
• Off The document is not printed with a full bleed.
• On The document is printed with a full bleed.
(4) Wide Paper
Specify if you want to use wide paper.
• Off Wide paper is not used.
• On S elect the size of wide paper used.
Page 48

Chapter 3
Properti es Settings
3-16
5. Paper tab
(5) Copies
Specify the number of sets of prints to be made. Either type the value directly
or press [▲] or [▼].
Setting range: 1 to 9999 sets
NOTE
When using the OHP Interleaving function, set the number of sets of prints to
“1”.
(6) Collate
This function is not available.
(7) Sorting
Select the sorting method.
• Unsorted Multiple copies of each page are printed.
For example, when five sets of copies are to be
printed, five copies are printed for each page. Prints
are not sorted.
• Sorted Copies are printed in document sets. For e xam ple,
when five sets of a 10-page document are to be m ade,
prints are sorted and arranged in five sets consisting
of the 10 document pages.)
• Group Multiple copies of each page are printed. Prints are
sorted by pa ge.
(8) Orientation
Select the orientation of the printout. You can check the selected direction in
the Page Layout area.
• Portrait Printing is done lengthwise.
• Landscape Printing is done crosswise.
TIP
A Portrait or Landscape print appears in the Page Layout area.
Page 49

Functions of the Custom Paper dialog box
Used to set special paper sizes.
4668P057CA
(1) Paper Name
Select the name of the paper from the Paper Name list.
(2) New
This function allows you to set a special size of paper. When it is selected, the
dialog box changes to the Custom Paper settings dialog box.
Number of registrations: Different depending on the environment used
☞
p. A-7
3-17
5. Paper tab
(1)
(2)
(3)
(4)
Chapter 3
Properti es Settings
(3) Edit
Edits the Custom Paper selection made in (1). When this is selected, the dialog
box changes to the Custom Paper settings dialog box.
(4) Delete
Deletes the Custom Paper selection made in (1).
Page 50

3-18
5. Paper tab
Custom Paper settings dialog box
(5)
(6)
(7)
Chapter 3
Properti es Settings
C4027P218CA
(5) Name
Enter a name for the custom paper .
Setting range: Max. 20 characters
(6) Size
Set the paper size.
Setting range:
Width 3 15/16 inch to 12 5/16 inch (Unit set to “inch”)
100 mm to 314 mm (Unit set to “mm”)
Height 5 13/16 inch to 18 0/16 inch (Unit = inch)
148 mm to 459 mm (Unit set to “mm”)
(7) Unit
Allows you to switch between “inch” and “mm” for the paper size.
Page 51

6. Quality tab
Functions of the Quality tab
(1)
3-19
6. Quality tab
Chapter 3
(1) Resolution
Select the printing resolution.
Setting range: 600 × 600 dpi
C4027P213CA
Properti es Settings
Page 52

3-20
7. Job Management tab
7. Job Management tab
Functions of the Job Management tab
Chapter 3
Properti es Settings
(1) Account Code
(1)
(3)
C4027P214CA
(2)
(4)
Select this check box when using the copy track function. An account code is
attached to each printing job, enabling you to carry out management at the
machine. In order to use this function, copy track function must be set at the
machine.
When the copy track function is set at the machine, printing may sometimes fail
to take place until the access number designated at the machine is correctly set.
• Account Code Enable the Account function.
• Access Number Enter the password number set in the machine.
Setting range: 0 to 99999999 (8 digits)
(2) Default User Name
The default user name set in the printer driver is displayed with Fiery LCD and
Web Spooler .
Setting range: Max. 8 characters
Page 53

7. Job Management tab
(3) Lock Job
Select this check box to lock a print job.
When using Lock Job, set a password in the Password box.
A locked printing job will be printed when it is unlocked using the Job List
display on the machine panel. In this case, a password is necessary.
• Lock Job Enable the lock job function.
• Password Enter the password of the locked job.
Setting range: 0 to 99999999 (8 digits)
• Unlocking a job
When the Lock Job function is set from the printer driver, printing can only take
place when the password is input from the machine.
After sending data, print from the machine.
1. Press the mode key on the control panel to enter Printer mode.
C4027O236AA
3-21
Chapter 3
Properti es Settings
2. Touch the [Num] button.
3. Type the numeric password.
C4027P235CA
NOTES
• All jobs for which the original password and the input password match are
unlocked.
4. The job is unlocked and printing will start.
Page 54

3-22
7. Job Management tab
(4) Job Schedule
Allows you to confirm and change any setting for a job after the print engine
stops.
• Off Default sett ing
• Wait The copier stops automatically befor e it prints the
received image.
• Proof The copier stops after printing a set of images of a
job.
• Job Schedul e
If you print with “Wait” or “Proof” selected under “Job Schedule” in the printer
driver, the following screen will appear on the machine panel.
Chapter 3
Properti es Settings
C4027P234CA
Make the settings you want, and then press the [Print] button to start printing.
Page 55

8. Overlay tab
8. Overlay tab
Functions of the Overlay tab
(1)
C4027P215CA
(1) Watermark
Prints a specific word in the background as a watermark.
• Text From the list, select the word to be entered as the watermark.
Available settings: NONE, CONFIDENTIAL, TOP SECRET,
COPY, DO NOT COPY, DRAFT, FINAL,
PROOF, or a word set by the user
• 1st Page Only Select whether to insert a watermark on only the first page
or on all pages.
• Edit Waterm ark Make format, position, and other settings for the watermark
characters. ☞
☞
See p. 1-4 for an illustration.
p. 3-24
3-23
Chapter 3
Properti es Settings
NOTES
• When using the Cover P ag e function together with this function set to “NONE”
and the watermark set to print on only the first page, the watermark will be
printed on the second page.
• This function may not work with some appl ications.
• Depending on the environment used, contents of Save/Delete will be differ ent.
TIP
A view of the watermark will be displayed in the Page Layout area.
Page 56

3-24
8. Overlay tab
Functions of the Watermark dialog box
Allows you to set the text to be inserted with the Watermark function, and also the
text style.
(1)
Chapter 3
(2)
(3)
(4)
(5)
Properti es Settings
4668P052CA
(1) Pre view
Allows you to preview the watermark.
(2) Name
Select a watermark from the list.
Available settings: <NONE>, CONFIDENTIAL, TOP SECRET, COPY,
DO NOT COPY, DRAFT, FINAL, PROOF, user
settings
(3) New
Allows you to create new watermark text.
When you select this item, a dialog box for making detailed settings appears.
(4) Edit
Allows you to edit text selected in (2).
When you select this item, a dialog box for making detailed settings appears.
(5) Delete
Deletes text selected in (2).
Page 57

Watermark detailed dialog box
3-25
8. Overlay tab
(1)
4668P053CB
(6) Name
Enter the name under which you wish to register the watermark.
Number of registrations Different depending on the environment used
☞
p. A-6
Number of characters Max. 20 characters
(7) String
Enter the text to be printed as a watermark.
Number of characters Max. 63 characters
(6)
(7)
(8)
(9)
(10)
(11)
(12)
(13)
Chapter 3
Properti es Settings
(8) Type Face
Specify a font for text to be printed as a watermark.
Specify a font from the fonts installed on your PC.
(9) Size
Specify the font size of the characters.
Setting range 8 to 200 points (in 1-point steps)
(10)Style
Specify the font style of the characters.
• Bold Prints bold characters.
• Italic Prints italic characters.
Page 58

Chapter 3
Properti es Settings
3-26
8. Overlay tab
(11)Shading
Specify the density of the characters.
Setting range: 5% to 100%
(12)Angle
Specify the angle of the characters with respect to the paper.
• Angle Default angle fixed by the driver.
Available settings: Horizontal, Diagonal, Vertical,
User Setting
• User Setting If you select “User Setting” from the Angle list, you
can set any desired angle.
Setting range: -18 0° to +180° (A – (minus)
value rotates the characters
clockwise, 0 leaves the character s
parallel to the paper, and a +
(plus) value rotates the characters
counterclockwise.)
(13)Position
Specify the position at which you wish to print a watermark.
• Center The watermark is printed in the center of the paper.
• User Setting Y ou can specify a position by entering numbers in the
Horizontal and Vertical boxes.
Setting values:
Horizontal -999 to 999 points (in 1-point
steps)
Vertical -999 to 999 points (in 1-point
steps)
(72 points = 1 inch)
TIPS
• Specify the position from the center. The Horizontal positive direction is to the
right, and the Vertical positive direction is upward.
• You can view your settings in the Preview area (1).
Page 59

3-27
9. Conflicts dialog box
9. Conflicts dialog box
Functions of the Conflicts dialog box
A Conflicts dialog box like the one shown below appears when a setting that
conflicts with another made previously is made in a Properties tab.
When the follo wing di alo g b ox, the c urre ntly sel ecte d s etti ngs confl i ct with ea ch ot her.
Chapter 3
Properti es Settings
4014P010CA
When the Conflicts dialog box appears, it shows the settings that cannot be
combined with each other . Check the details, and then click the [ Resolv e] b utton, or
the [Cancel] button to quit.
NOTE
Some settings, which are defined by the machine for restricted combinations of
different functions, can at times be accepted by the printer driver. If a print
command is issued from the personal computer with such settings made, the
machine will not produce the output correctly. Make sure that you choose correct
settings.
Tip
The dialog box looks slightly different from this one when the Device Options
Setting tab is being used.
Page 60

3-28
9. Conflict s dialog box
Chapter 3
Properti es Settings
Page 61

Chapter 4
Troubleshooting
4-1
Chapter 4
Troubleshooting
Page 62

4-2
1. Troubleshooting
1. Troubleshooting
Unable to print
This chapter explains the troubleshooting procedures for possible malfunctions.
Perform the troubleshooting procedures given below in the order listed when the
machine is unable to print even when you execute a print command from your
computer.
Symptom Possible cause Action
Chapter 4
Troubleshooting
The message “P rin ter
Error” appears on the
computer screen.
Printing does not start
despite completion of
the printing setup on
the comput e r.
Continued from the
previous page (Printing does not start
despite completion of
the printing setup on
the comput e r.)
An error is present in the
machine.
The network cable is disconnected.
An error is present in the
machine.
The network cable is disconnected.
The printer driver selected
for printing is not for the
Pi8500Pro PCL6.
A print job yet to be processed is loaded in the
machine, causing the
printer to wait.
The print job is locked. Select “Printer” using the Mode
The connection from the
controller to the network
has not been established.
Check the control panel of the
machine.
Make sure that the netw ork cable
is connected properly t o the
computer and controller.
Check the control panel of the
machine.
Make sure that the netw ork cable
is connected properl y t o the controller.
Check the printer name selected
in the Print dialog box.
Check the job us ing Web
Spooler of Fiery WebTools.
button on th e contro l panel of t he
machine. Enter the correct password.
Consult the network administrator.
When E.C.M. (E.K.C.) is
used, an incorrect password
may have been typed.
Use the correct password.
Page 63

1. Troubleshooting
Symptom Possible cause Action
4-3
Multiple copy sets are
mistakenly sorted and
stapled together as a
single large set.
A large number of
copies are mistakenly printed.
The settings in certain
applications may conflict
with the printer driver settings.
The settings in certain
applications may conflict
with the printer driver settings.
In the application, turn of f Collate and set the copy count to
“1”. In the printer driver, make
the desired Sorting and copy
count settings.
In the application, turn of f
Collate and set the copy count to
“1”. In the printer driver, make
the desired Sorting and copy
count settings.
If the problem persists even after these checks have been made, refer to the
documentation for the machine.
Chapter 4
Troubleshooting
Page 64

4-4
1. Troubleshooting
Unable to make correct settings / Unable to print exactly as set
Perform the troubleshooting procedures given below in the order listed when you
cannot make proper settings in the printer driver or when the print results do not
represent what has been set.
Symptom Possible cause Action
Chapter 4
Troubleshooting
Unable to select an
item in the printer
driver.
The Conflicts dialog
box is displayed on
the computer screen.
Unable to print
exactly as set.
The waterm ark cannot be printed.
Unable to specify
Staple.
Some functions cannot be
combined.
An illegal combination of
functions has been made.
Incorrect settings are made. Check the setting for each item
The combination of func -
tions, though valid on the
printer driver, is invalid on
the machine.
The watermark was not
correctly set.
The Shading setting of the
watermark is low.
Staple can be specif ied only
when the type of Finisher
you are using is selected in
the Device Options Setting
tab and “Primary Tray” is
selected as the Output Setting in the Setup tab .
Do not select items which are
dimmed.
Check the combinations and
make a correct combination of
functions.
of the printer driver.
Check the watermark setting.
Check the Shading setting of the
watermark.
Select the type of Finisher you
are using on the Device Options
Setting property sheet, and select
“Primary Tray” as the Output
Setting in the Setup tab.
No stapling can be performed in the following
cases: The specified is
Invoice-R, A5-R, A6, B5R, or Custom Size, an Output Setting other than “Primary Tray” is selected,
Booklet is specified, OHP
Interleaving is specified.
Check the paper size, Output
Setting, Booklet, and OHP Interleaving settings.
Page 65

1. Troubleshooting
Symptom Possible cause Action
4-5
Unable to staple
properly.
The stapling position
is opposite to what is
expected.
Folding cannot be
specified.
No stapling can be performed on thick paper or
OHP transparencies.
When the Finisher is
installed, no stapling can be
performed if the number of
prints to be made exceed s
50.
No stapling can be per-
formed if the number of
pages to be printed is 50 or
more when a Booklet Fi nisher is mounted.
No stapling can be performed if the original document contains pages of
different sizes.
The paper direction and Nup do not match the setting
made for Orientation.
The optional Booklet Finisher is necessary for you to
specify Folding. “Booklet
Finisher” must be selected
in the Device Options Setting tab.
Check the type of paper.
Check the number of prints to be
made.
Chapter 4
Change the Orientation setting.
Troubleshooting
Select “Booklet Finisher” in the
Device Options Setting tab.
Folding is not performed.
Unable to print an
image properly.
Folding may be disabled
when Staple is specified.
Folding cannot be performed if tab paper or OHP
transparencies are used.
The machine’s available
memory space is not sufficient.
Check the settings made. (See
“Function combination matrix”
on p. A-2.)
Check the type of paper.
Add memory to expand the
machine’s memory space or simplify the image to reduce the
amount of data handled.
Page 66

4-6
1. Troubleshooting
Symptom Possible cause Action
Chapter 4
Unable to specify the
exit port
Paper is not fed from
the specified paper
source.
No watermark is
printed.
Unable to print
exactly as set.
No exit port can be specified if the paper size is A6
or Custom Size is specified.
Paper will not be fed from
the specified paper source
if that paper source is
loaded with pap er of a different size and orie ntation.
A watermark may not be
printed in gra phics applications.
The paper size, p ap e r orie n tation, and other settings
made in the application
take precedence over those
made in the driver.
Check the setting of the paper
size.
Load the paper source with paper
of the appropriate size and in the
appropriate direction.
No watermark can be printed in
this case.
Make correct settings in the
application.
If the problem persists even after these checks have been made, refer to the
documentation for the machine.
Troubleshooting
Page 67

Appendix
A-1
Appendix
Page 68

A-2
1. Function combination matrix
1. Function combination matrix
Paper
Source
Auto Select
Tray1, 2, 3
Paper
Auto Select
Source
Tray1, 2, 3
LCC
Manual Feed
Media
Plain Paper
Type
Thick
Thin
Transparency
Tab
Trace
User Define
Output
11×17
Paper
Legal
Size
Letter
Letter-R
Invoice
Invoice-R
A3
A4
A4-R
Appendix
A5
A5-R
A6
B4
B5
B5-R
F4
Custom size
Output
Primary Tray
Setting
Secondary Tray
Sorter
Unsorted
Mode
Sorted
Group
Copies (2-9999)
Duplex
Booklet
Image Repeat
N-up
Watermark
Fit to Paper
Scaling (Not 100)
Full Bleed
Wide Paper
Fold
Staple
Trimming
OHP Interleaving
Cover
Fro nt Cove r
Page
Back Cover
Front
Tray1, 2, 3
Cover
LCC
Tray
Manual Feed
Lock Job
Account Number
LCC
ЧЧЧ❍ЧЧЧЧЧЧ
ЧЧЧ
ЧЧ Ч
ЧЧЧ
❍❍❍❍
×
❍❍❍
×
❍❍❍
×××❍××× ×××
×
❍❍❍
ЧЧЧ❍ЧЧЧЧЧ Ч
Ч
❍❍❍
❍❍❍❍❍❍❍❍❍❍❍
❍❍❍❍❍❍❍❍×❍❍
❍❍❍❍❍❍❍❍❍❍❍
❍❍❍❍❍❍❍❍×❍❍
❍❍×❍❍❍❍❍×❍❍
××
❍
❍❍❍❍❍❍❍❍❍❍❍
❍❍❍❍❍❍❍❍❍❍❍
❍❍❍❍❍❍❍❍×❍❍
❍❍×❍❍❍❍❍×❍❍
××
❍
××
❍
❍❍❍❍❍❍❍❍❍❍❍
❍❍❍❍❍❍❍❍❍❍❍
❍❍×❍❍❍❍❍×❍❍
❍❍❍❍❍❍❍❍×❍❍
×
❍❍❍❍❍❍❍×❍❍
❍❍❍❍❍❍❍❍❍❍❍❍❍❍❍❍❍❍❍❍❍❍×❍❍❍❍
❍❍❍❍❍❍❍❍❍❍❍❍❍❍❍❍❍❍❍❍❍❍❍❍❍❍❍❍
❍❍❍❍❍❍❍❍❍❍❍❍❍❍❍❍❍❍❍❍❍❍❍❍❍❍❍❍
❍❍❍❍❍❍❍❍❍❍❍❍❍❍❍❍❍❍❍❍❍❍×❍❍❍❍
❍❍❍❍❍❍❍❍❍❍❍❍❍❍❍❍❍❍❍❍❍❍❍❍❍❍❍❍
❍❍❍❍❍❍❍❍❍❍❍❍❍❍❍❍❍❍❍❍❍❍❍❍❍❍❍❍
❍❍❍❍❍❍❍××❍❍❍❍❍❍❍×❍❍❍❍××❍❍❍❍
❍❍❍❍❍❍❍××❍❍❍❍❍❍❍×❍❍❍❍××❍❍❍❍
❍❍❍❍❍❍❍❍❍❍❍❍❍❍❍❍❍❍❍❍❍❍❍❍❍❍❍❍
❍❍❍❍❍❍❍❍❍❍❍❍❍❍❍❍❍❍❍❍❍❍❍❍❍❍❍❍
❍❍❍❍❍❍❍❍❍❍❍❍❍❍❍❍❍❍❍❍❍❍❍❍❍❍❍❍
❍❍❍❍❍❍❍❍❍❍❍❍❍❍❍❍❍❍❍❍❍❍❍❍❍❍❍❍
❍❍❍❍❍❍❍❍❍❍❍❍❍❍❍❍❍❍❍❍❍❍❍❍❍
❍❍❍❍❍❍❍❍❍❍❍❍❍❍❍❍❍❍❍❍❍❍❍❍❍❍❍❍
❍❍❍❍❍❍❍❍❍❍❍❍❍❍❍❍❍❍❍❍❍❍×❍❍❍
❍❍❍❍❍❍❍❍❍❍❍❍❍❍❍❍❍❍❍❍❍××❍×❍❍❍
❍❍❍❍❍❍❍×❍❍❍❍❍❍❍❍×❍❍❍❍××❍❍❍❍❍
❍❍❍❍❍❍❍❍❍❍❍❍❍❍❍❍❍❍❍❍❍❍❍❍❍❍❍❍
×
❍❍×❍❍❍❍❍❍❍❍❍❍❍❍×❍❍❍❍××❍❍×❍
❍❍❍❍❍❍❍❍❍❍❍❍❍❍❍❍❍❍❍❍❍❍❍❍❍❍❍❍
❍❍❍❍❍❍❍❍❍❍❍❍❍❍❍❍❍❍❍❍❍❍❍❍❍❍❍❍
❍❍❍❍❍❍❍❍❍❍❍❍❍❍❍❍×❍❍❍❍××❍❍❍❍
❍❍❍❍❍❍❍❍❍❍❍❍❍❍❍××❍❍❍
❍❍❍❍❍❍❍❍❍❍❍❍❍❍❍❍❍❍❍❍❍❍❍❍❍❍❍❍
❍❍❍❍❍❍❍❍❍❍❍❍❍❍❍❍❍❍❍❍❍❍❍❍❍❍❍❍
❍❍❍❍❍❍❍❍❍❍❍❍❍❍❍❍❍❍❍❍❍❍❍❍❍❍❍❍
Media Type Output Paper Size
Manual Feed
Plain Paper
Thick
❍❍❍×❍×❍❍❍❍❍❍×❍❍❍❍××❍❍❍❍❍
❍❍❍×❍×❍❍❍❍❍××❍❍❍
❍❍❍❍❍❍❍❍❍❍❍❍❍❍❍❍❍❍❍❍❍❍❍❍
ЧЧЧЧЧЧ
Ч ЧЧЧЧЧ
ЧЧ ЧЧЧЧ
×××× ××❍×❍×××❍❍××××❍❍×××
ЧЧЧЧЧЧ
❍❍❍❍❍×❍❍
❍❍❍❍❍×❍❍
❍❍❍❍❍×❍❍
Thin
Transparency
Tab
Tra c e
Define
11×17
Legal
Letter
Letter-R
Invoice
Invoice-RA3A4
❍❍❍❍❍❍❍❍❍❍❍❍❍❍❍❍
A4-RA5A5-RA6B4B5B5-RF4Custom size
×××❍❍×
❍❍❍❍❍❍❍❍❍❍❍❍❍❍❍❍❍
❍❍❍❍❍❍❍❍❍❍❍❍❍❍❍❍❍
❍❍❍❍❍❍❍❍❍❍❍❍❍❍❍❍❍
❍❍❍❍❍❍❍❍❍❍❍❍❍❍❍❍❍
❍❍❍❍❍❍❍❍❍❍❍❍❍❍❍❍❍
❍❍❍❍❍❍❍❍❍❍❍❍❍❍❍❍❍
ЧЧЧЧЧЧЧЧЧЧЧЧЧЧЧЧ
Ч ЧЧЧЧЧЧЧЧЧЧЧЧЧЧЧ
ЧЧ ЧЧЧЧЧЧЧЧЧЧЧЧЧЧ
ЧЧЧ ЧЧЧЧЧЧЧЧЧЧЧЧЧ
ЧЧЧЧ ЧЧЧЧЧЧЧЧЧЧЧЧ
ЧЧЧЧЧ ЧЧЧЧЧЧЧЧЧЧЧ
ЧЧЧЧЧЧ ЧЧЧЧЧЧЧЧЧЧ
ЧЧЧЧЧЧЧ ЧЧЧЧЧЧЧЧЧ
ЧЧЧЧЧЧЧЧ ЧЧЧЧЧЧЧЧ
ЧЧЧЧЧЧЧЧЧ ЧЧЧЧЧЧЧ
ЧЧЧЧЧЧЧЧЧЧ ЧЧЧЧЧЧ
ЧЧЧЧЧЧЧЧЧЧЧ ЧЧЧЧЧ
ЧЧЧЧЧЧЧЧЧЧЧЧ ЧЧЧЧ
ЧЧЧЧЧЧЧЧЧЧЧЧЧ ЧЧЧ
ЧЧЧЧЧЧЧЧЧЧЧЧЧЧ ЧЧ
ЧЧЧЧЧЧЧЧЧЧЧЧЧЧЧ Ч
ЧЧЧЧЧЧЧЧЧЧЧЧЧЧЧЧ
×
❍❍
×
×
×
×
×××
××
×
×××❍❍×❍×
×
Page 69

Paper
Auto Select
Source
Tray1, 2, 3
LCC
Manual Feed
Media
Plain Paper
Type
Thick
Thin
Transpa rency
Tab
Trace
User Define
Output
11×17
Paper
Legal
Size
Letter
Letter-R
Invoice
Invoice-R
A3
A4
A4-R
A5
A5-R
A6
B4
B5
B5-R
F4
Custom size
Output
Primary Tray
Setting
Secondary Tray
Sorter
Unsorted
Mode
Sorted
Group
Copies (2-9999)
Duplex
Booklet
Image Repeat
N-up
Watermark
Fit to Paper
Scaling (Not 100)
Full Bleed
Wide Paper
Fold
Staple
Trimming
OHP Interleaving
Cover
Fro nt Cove r
Page
Back Cover
Front
Tray1, 2, 3
Cover
LCC
Tray
Manual Feed
Lock Job
Account Number
1. Function combination matrix
Output
Sorter
Setting
Mode
Copies (2-9999)
Duplex
Booklet
Image Repeat
N-up
Watermark
Fit to Paper
Scaling (Not 100)
Full Bleed
Wide Paper
Primary Tray
Secondary Tray
Unsorted
Sorted
❍❍❍❍❍❍❍❍❍❍❍❍❍❍❍❍❍❍×❍❍❍❍❍❍❍
❍❍❍❍❍❍❍❍❍❍❍❍❍❍❍❍❍❍❍❍❍❍❍❍❍❍
Group
Fold
❍❍❍❍❍❍❍❍❍❍❍❍❍❍❍❍❍❍❍❍❍❍❍❍❍❍
❍❍❍❍❍❍❍❍❍❍❍❍❍❍❍❍❍❍×❍❍❍❍❍❍❍
❍❍❍❍❍❍❍❍❍❍❍❍❍❍❍❍❍❍❍❍❍❍❍❍❍❍
❍❍❍❍❍❍❍❍❍❍❍❍❍❍❍❍❍❍❍❍❍❍❍❍❍❍
❍❍❍❍❍❍❍❍❍❍❍❍❍❍❍❍❍❍❍❍❍❍❍❍❍❍
❍❍❍❍❍❍××❍❍❍❍❍❍❍××❍❍❍❍❍❍❍❍❍
❍❍❍❍❍❍××❍❍❍❍❍❍❍×❍❍❍❍❍❍❍❍❍❍
❍❍❍❍❍❍❍❍❍❍❍❍❍❍❍❍❍❍❍❍❍❍❍❍❍❍
❍❍❍❍❍❍❍❍❍❍❍❍❍❍❍❍❍❍❍❍❍❍❍❍❍❍
❍❍❍❍❍❍❍❍❍❍❍❍❍❍❍❍❍❍❍❍❍❍❍❍❍❍
❍❍❍❍❍❍❍❍❍❍❍❍❍❍❍❍❍❍❍❍❍❍❍❍❍❍
❍❍❍❍❍❍❍❍❍❍❍❍❍❍❍×❍❍❍❍❍❍❍❍❍❍
❍❍❍❍❍❍❍❍❍❍❍❍❍❍❍❍❍❍❍❍❍❍❍❍❍❍
❍❍❍❍❍❍❍❍❍❍❍❍❍❍❍×❍❍❍❍❍❍×❍❍❍
❍❍❍❍❍❍××❍❍❍❍❍❍❍××❍×❍❍❍×❍❍❍
❍❍❍❍❍❍❍❍❍❍❍❍❍❍❍❍❍❍❍❍❍❍❍❍❍❍
❍❍❍❍❍❍❍❍❍❍❍❍❍❍❍×❍❍❍❍❍❍❍❍❍❍
❍❍❍❍❍❍❍❍❍❍❍❍❍❍❍❍❍❍❍❍❍❍❍❍❍❍
❍❍❍❍❍❍❍❍❍❍❍❍❍❍❍×❍❍❍❍❍❍×❍❍❍
❍❍❍❍❍❍××❍❍❍❍❍❍❍××❍×❍❍❍×❍❍❍
×
❍❍×❍❍××❍❍❍❍❍❍❍××❍×❍❍❍×❍❍❍
❍❍❍❍❍❍❍❍❍❍❍❍❍❍❍❍❍❍❍❍❍❍❍❍❍❍
❍❍❍❍❍❍❍❍❍❍❍❍❍❍❍×❍❍❍❍❍❍❍❍❍❍
❍❍❍❍❍❍❍❍❍❍❍❍❍❍❍××❍❍❍❍❍×❍❍❍
❍❍❍❍❍❍❍❍❍❍❍❍❍❍❍×❍❍❍❍❍❍❍❍❍❍
×
❍❍×❍❍××❍×❍❍❍❍❍××❍×❍❍××❍❍❍
×
❍❍❍❍❍❍❍❍❍❍❍❍❍❍❍❍❍❍❍❍❍❍❍❍
×
❍×❍❍❍❍❍❍❍❍❍❍❍××❍❍❍❍❍❍❍❍❍
××
❍❍
×× ×
❍
❍❍
❍❍❍❍❍ ❍❍❍❍❍❍❍❍❍❍❍❍×❍❍❍❍❍❍❍
❍❍❍❍❍❍×❍❍❍❍❍❍❍❍❍❍×❍❍❍❍❍❍❍
❍❍❍❍×❍
❍❍❍❍❍❍❍❍ ❍❍❍❍❍❍❍❍❍❍❍❍❍❍❍❍❍
❍❍❍❍❍❍❍×❍❍××❍❍❍❍❍❍❍❍❍❍❍❍❍
❍❍❍❍❍❍❍❍❍❍ ❍❍❍❍❍❍❍❍❍❍❍❍❍❍❍
❍❍❍❍❍❍❍×❍×❍
❍❍❍❍❍❍❍×❍×❍
❍❍❍❍❍❍❍❍❍❍❍❍❍❍❍❍❍❍❍❍❍
❍❍❍❍❍❍❍❍❍❍×❍❍×❍❍❍❍❍❍❍
××
❍❍×❍❍❍❍❍❍❍×❍❍
×
❍×❍
××
❍❍❍×❍×❍×❍❍❍❍❍
×
❍❍❍❍❍❍❍❍❍❍❍❍❍
×
❍❍❍❍❍❍❍❍❍❍❍❍❍
❍❍❍❍❍❍❍❍❍❍❍❍❍ ❍❍❍❍❍❍❍❍❍❍❍❍
❍❍❍❍❍❍❍❍❍❍❍❍❍❍ ❍❍❍❍❍❍❍❍❍❍❍
××
❍×❍
❍❍❍❍❍❍❍❍❍❍×❍×❍❍❍❍❍❍❍
❍×❍❍❍❍❍×❍❍❍❍❍❍❍×❍×❍❍❍❍❍❍❍
❍❍❍❍❍❍❍❍❍❍❍❍❍❍❍❍❍ ❍❍❍❍❍❍❍❍
ЧЧЧЧЧ
❍❍❍
❍❍❍❍❍❍❍××❍
❍❍❍❍×❍❍❍❍❍❍❍❍❍❍❍❍❍×❍❍❍❍❍❍
❍❍❍❍×❍❍×❍❍❍❍❍❍❍❍❍❍×❍ ❍❍❍❍❍
❍❍❍❍❍❍❍❍❍❍❍❍❍❍❍❍❍❍❍❍❍
❍❍❍❍❍❍❍❍❍❍❍❍❍❍❍❍❍❍❍❍❍
❍❍❍❍❍❍❍❍❍❍❍❍❍❍❍❍❍❍❍❍❍
❍❍❍❍❍❍❍❍❍❍❍❍❍❍❍❍❍❍❍❍❍❍❍❍ ❍
❍❍❍❍❍❍❍❍❍❍❍❍❍❍❍❍❍❍❍❍❍❍❍❍❍
Staple
Trimming
OHP Interleaving
×××
Cover
Front
Page
Cover
Front Cover
Back Cover
❍❍❍❍❍
××
❍❍❍❍❍
Tray1, 2, 3
LCC
Manual Feed
××
❍❍
××
❍❍
××
❍❍
Lock Job
A-3
Account Number
Appendix
Page 70

A-4
1. Function combination matrix
❍ The combination is possible.
× T he co mbination is impossible.
(The settings made will be rejected.)
NOTE
• When the check box under Output Paper Size is not selected, the paper size
selected in the Original Document Size list will also become the Output Paper
Size setting.
• Cannot be used if the LCC rejects paper loaded in the portrait orientation.
Appendix
Page 71

2. Number of registrations
2. Number of registrations
Number of registrations/Usable range for Easy Set
Windows 98/Me Windows NT4.0/2000/XP
Registration Use Registration Use
Printer icon – – • 16/1 driver ❍
Administrator
Application – – × ❍
Printer icon – – × ❍
Power Users
Application – – × ❍
A-5
Appendix
Printer icon • 16/1 dri ver ❍ × ❍
Users
Application
•
16/1 dri ver ❍ × ❍
Page 72

A-6
2. Number of registrations
Number of registrations/Usable range for Watermark
Windows 98/Me Windows NT4.0/2000/XP
Registration Use Registration Use
Printer icon – – • Total: 15
Administrator
Application – – ×
Printer icon – – ×
• Common
• Personal
• [All users]
Personal
•
Common
• Personal
• [All users]
Personal
• Personal
•
[Administrator]
Common
Application – – ×
Appendix
Printer icon • Total: 22 ❍ ×
Users
Application
• Total: 22 ❍ ×
•
[Administrator]
Common
• Personal
•
[Administrator]
Common
• Personal
•
[Administrator]
Common
Power Users
• Personal
Page 73

2. Number of registrations
Number of registrations/Usable range for Custom Paper
Windows 98/Me Windows NT4.0/2000/XP
Registration Use Registration Use
• Common
Printer icon – – • Common: 16
Administrator
Application – – ×
Printer icon – – ×
• Personal
• [All users]
•
• Personal
• [All users]
• Personal
•
A-7
Personal
Common
Personal
[Administrator]
Common
Power Users
Application – – ×
Printer icon • 32/1 dri ver ❍ ×
Users
Application
• 32/1 driver ❍ ×
• Personal
•
[Administrator]
Common
• Personal
•
[Administrator]
Common
• Personal
•
[Administrator]
Common
Appendix
Page 74

A-8
3. E.C.M. (E.K.C.)
3. E.C.M. (E.K.C.)
Account Code
This function can only be accessed by the “key operator” after an 8-digit E.C.M.
master key code is entered. The E.C.M. allows you to monitor all copying activity
by controlling E.C.M. password accounts.
This feature can track copier usage for individual users and/or accounts as well as
limit access to the copier to authorized users. Copy quantity limits for specific
accounts can also be set. Use the E.C.M. Key Operator F o rm provided at the end of
this section to record E.C.M. password information.
The E.C.M. stores up to 1,000 E.C.M. passwords, each of which represents a
separate account that can be used for billing and recordkeeping. The number of
users assigned to each account may depend upon the billing system in operation and
the number of individuals and departments using the copier. When the E.C.M. is
activated, copying can be performed only after a valid E.C.M. password is entered.
Copy quantity and copy limit for each account can be visually confirmed on the
screen.
If E.C.M. needs to be activated on your machine, contact your service
representative.
Appendix
The following E.C.M. settings can be made:
[1] E.C.M. data edit:
Change, add, or delete E.C.M. data and reset the copy count of the individual
account.
[2] E.C.M. all count reset:
Clear the copy count for all accounts.
[3] E.C.M. function setting:
Activate the desired E.C.M. functions and set the machine condition when the copy
limit is reached to stop either immediately or after a job is completed or to only
display a warning message.
Page 75

3. E.C.M. (E.K.C.)
How to access the ECM setting mode
Key Operator Mode Screen ECM Master Key Code Screen
C4027P219CA C4027P220CA
ECM Setting Menu Screen
C4027P221CA
Procedure
1. Touch “[4] E.C.M. function setting” on the Key operator mode menu screen.
The Enter E.C.M. master code screen is displayed if a code is required.
A-9
Appendix
2. Use the keypad on the touch screen to enter your 8-digit E.C.M. master key
code, and then touch [OK] to display the E.C.M. setting menu screen. (See
note.)
3. Select the desired E.C.M. function, and then make settings as required.
4. To exit the E.C.M. mode, touch [PREVIOUS SCREEN] on the E.C.M. setting
menu screen, and then touch [ PREV IOU S SC REEN ] on t h e Key operator mode
menu screen to restore the basic screen.
NOTE
If an invalid E.C.M. master key code is entered, continue by entering the valid 8digit code. The E.C.M. master key code can be set to less than 8 digits with the
Memory switch setting of the Key Operator function.
Page 76

A-10
3. E.C.M. (E.K.C.)
[1] E.C.M. data edit
Use this function to display the list of copy cou nt and copy limit fo r each account, to
change, add, or delete the E.C.M. data, and to res et the co p y coun t for each acco unt.
• E.C.M. No. Designated by key operator
• E.C.M. Password
Unique 8-digit numeric code programmed by the k ey operator
for user
• User Name Max. 8 characters
• Copy Limit 0 to 999,999 copies
ECM Setting Menu Screen ECM Data Edit Screen
C4027P221CA C4027P223CA
ECM Data Change Screen
ECM Data Add Screen
Appendix
C4027P224CA C4027P225CA
Name Duplication ScreenPassword Duplicati on Screen
C4027P226CA C4027P227CA
Page 77

A-11
3. E.C.M. (E.K.C.)
Procedure
1. Touch [4] E.C.M. function setting on the Key operator mode screen. Enter an 8digit E.C.M. master key code, and then touch [OK] to display the E.C.M. setting
menu screen.
NOTE:
If an invalid E.C.M. master key code is entered, continue by entering the valid
8-digit code.
2. Touch [1] E.C.M. data edit. The E.C.M. data Edit screen will be displayed.
3. To change, add, or delete the E.C.M. data, and to reset the copy count of an
account, follow the procedure described below for each account.
To change E.C.M. data:
(1) Touch the arrow keys on the right side of the list to highlight the E.C.M. data to
be changed, and then touch [Change]. The E.C.M. data Change screen will be
displayed.
(2) Touch the desired item key to highlight it, and then enter new data by using the
touch screen keypad.
Password Max. 8 digits (See note 1.)
Name Max. 8 characters (See note 2.)
Limit Max. 999,999 copies
Appendix
NOTES:
1 We recommend that you make a list of all E.C.M. passwords and account
numbers.
2 If an invalid user name is entered, continue by entering the valid name.
(3) Touch [OK] to complete the setting and to verify whether the same password or
name has already been used for another account number.
When a password is duplicated:
The duplicate password screen will be displayed. Touch [YES] to enter a new
password or [NO] to create a duplicate password.
NOTE:
If a duplicate password is created, the number of copies will be counted only
for the E.C.M. password with the smallest number. We recommend you do not
use duplicate E.C.M. passwords.
When a name is duplicated:
The duplicate name screen will be displayed. Touch [OK] to re-enter new
name.
Page 78

A-12
3. E.C.M. (E.K.C.)
To add E.C.M. data:
(1) Touch [Add] on the E.C.M. data Edit screen. The E.C.M. data Add screen will
be displayed.
(2) Touch the desired item key to highlight it, and then enter the data by using the
touch screen keypad.
Password Max. 8 digits (See note 1.)
Name Max. 8 characters (See note 2.)
Limit Max. 999,999 copies
NOTES:
1 We recommend that you make a list of all E.C.M. passwords and account
numbers.
2 If an invalid user name is entered, continue by entering the valid name.
(3) Touch [OK] to complete the setting and to verify whether the same password or
name has already been used for another account number.
When a password is duplicated:
The duplicate password screen will be displayed. Touch [YES] to enter a new
Appendix
password, or [NO] to create a duplicate password.
NOTE:
If a duplicate password is created, the number of copies will be counted only
for the E.C.M. password with the smallest number. We recommend you do not
use duplicate E.C.M. passwords.
When a name is duplicated:
The duplicate name screen will be displayed. Touch [OK] to enter a new name.
To delete E.C.M. data:
(1) Touch the arrow keys on the right side of the list to highlight the E.C.M. data to
be deleted, and then touch [Delete]. The delete confirmation screen will be
displayed.
(2) Touch [YES] to delete or [NO] to cancel.
Page 79

A-13
3. E.C.M. (E.K.C.)
To clear the E.C.M. count:
(1) Touch the arrow keys on the right s ide of the li st to highligh t the desired E. C.M.
data, and then touch [COUNT RESET]. The reset confirmation screen will be
displayed.
(2) Touch [YES] to clear the copy count of the selected E.C.M. data or [NO] to
cancel.
Delete Confirmation Screen Reset Confirmation Screen
C4027P228CA C4027P 229CA
4. If other E.C.M. setting changes are required, touch [PREVIOUS SCREEN] on
the E.C.M. data Edit screen to return to the E.C.M. setting menu screen. Touch
the desired key from [1] to [3].
5. Touch [PREVIOUS SCREEN] to restore the Key operator mode menu screen.
6. If no further changes are required, touch [PREVIOUS SCREEN] to restore the
basic scree n for performi ng copy operatio ns.
Appendix
Page 80

A-14
3. E.C.M. (E.K.C.)
[2] E.C.M. all count reset
Use this function to reset the count for all E.C.M. counters.
ECM Setting Menu Screen ECM All Count Reset Screen
C4027P221CA C4027P231CA
Procedure
1. Touch [4] E.C.M. function s etting o n the K e y op erator mode menu scr een. Enter
an 8-digit E.C.M. master key code, and then touch [OK] to display the E.C.M.
setting menu screen.
NOTE:
If an invalid E.C.M. master key code is entered, continue by entering the valid
8-digit code.
Appendix
2. Touch [2] E.C.M. all count reset. The Reset all E.C.M. counters screen will be
displayed.
3. Touch [YES] to reset all counters to zero and to return to the E.C.M. setting
menu screen.
Or touch [NO] to cancel. Touching [PREVIOUS SCREEN] will also cancel this
function and return to the E.C.M. setting menu screen.
4. If other E.C.M. setting changes are required, touch the desired key from [1] to
[3].
5. Touch [PREVIOUS SCREEN] to restore the Key operator mode menu screen.
6. If no further changes are required, touch [PREVIOUS SCREEN] to restore the
basic scree n for performi ng copy operatio ns.
Page 81

A-15
3. E.C.M. (E.K.C.)
[3] E.C.M. function setting
Use this function to turn E.C.M. on or off and to select whether the machine will
stop when the count limit is reached or the copier will complete the copy job before
stopping when reaching the maximum copy count.
ECM Setting Menu Screen ECM Function Setting Screen
C4027P221CA C4027P233CA
Procedure
1. Touch [4] E.C.M. function s etting o n the K e y op erator mode menu scr een. Enter
an 8-digit E.C.M. master key code, and then touch [OK] to display the E.C.M.
setting menu screen.
NOTE:
If an invalid E.C.M. master key code is entered, continue by entering the valid
8-digit code.
Appendix
2. Touch [3] E.C.M. function setting. The E.C.M. function setting screen will be
displayed.
3. Touch [E.C.M. On] to activate E.C.M. or touch [E.C.M. Off] to deactivate
E.C.M.
The selected key will be highlighted.
4. Touch [Immediately] to stop the machine at once when the copy limit is reached.
In this case, copy conditions selected for the current job will be cleared. To
continue the job using the same user password, change the copy limit of the
password or clear the copy count.
Touch [After job] to stop the machine after the current job is completed when
the copy limit is reached.
Touch [Warning] to only display a warning message when the copy limit is
reached.
The selected key will be highlighted.
5. Touch [OK] to complete the setting and return to the E.C.M. setting menu
screen.
6. If other E.C.M. setting changes are required, touch the desired key from [1] to
[3].
Page 82

A-16
3. E.C.M. (E.K.C.)
7. Touch [PREVIOUS SCREEN] to restore the Key operator mode menu screen.
8. If no further changes are required, touch [PREVIOUS SCREEN] to restore the
basic scree n for performi ng copy operatio ns.
Appendix
Page 83

A-17
4. Index
4. Index
A
About… ................................................................................................................3-3
Account Code
Administrat i ve Functions
Angle
...................................................................................................................3-26
............................................................................................ 3-20, A-8
......................................................................................1-6
B
Booklet ..................................................................................................................3-7
C
Collate .................................................................................................................3-16
Conflicts dialog box
Copies
Cover Page
Cover Sheet Mode
Custom Paper setting dialog box
.................................................................................................................3-16
..........................................................................................................3-10
............................................................................................3-27
..............................................................................................3-13
........................................................................3-18
Appendix
D
Default User Name .............................................................................................3-20
Delete
Description of each Properties tab
Device Options
Device Options Setting tab
Displaying a Properties dialog box
Displaying a Properties dialog box from an application menu
Displaying a Properties dialog box from the Printer folder
Duplex
Duplex/Booklet
........................................................................................................ 3-17, 3-24
........................................................................3-2
.....................................................................................................3-3
...................................................................................3-3
............................................................. 2-8, 2-16
...................2-8, 2-16
........................2-8, 2-16
...................................................................................................................3-7
.....................................................................................................3-7
E
E.C.M. ..................................................................................................................A-8
Page 84

A-18
4. Index
E.K.C. ..................................................................................................................A-8
Easy Set
Easy Set Name
Edit
................................................................................................................3-4
......................................................................................................3-5
............................................................................................................ 3-17, 3-24
F
Features of the printer driver ................................................................................1-2
Folding
Full Bleed
Function combination matrix
Functions common to various Properties tabs
Functions of the Conflicts dialog box
Functions of the Custom P aper dialog box
Functions of the Detail Of Output Setting dialog box
Functions of the Detail of Paper Source dialog box
Functions of the Device Options Setting tab
Appendix
Functions of the Job Management tab
Functions of the Paper tab
Functions of the Quality tab
Functions of the Save Easy Set Name dialog box
Functions of the Setup tab
Functions of the Watermark dialog box
................................................................................................................3-13
............................................................................................................3-15
...............................................................................A-2
......................................................3-4
.................................................................3-27
.........................................................3-17
........................................3-12
...........................................3-10
........................................................3-3
................................................................3-20
..................................................................................3-14
...............................................................................3-19
................................................3-5
....................................................................................3-6
.............................................................3-24
I
Image Repeat ........................................................................................................3-8
Installation
Installing various printer drivers
Interleaving Paper
.................................................................................................. 2-3, 2-10
...........................................................................1-8
...............................................................................................3-11
J
Job Management tab ...........................................................................................3-20
Job Schedule
.......................................................................................................3-22
Page 85

A-19
4. Index
L
Lock Job ..............................................................................................................3-21
M
Machine preview ..................................................................................................3-5
Making general settings before using the printer
....................................... 2-7, 2-14
N
Name ................................................................................................3-18, 3-24, 3-25
New
........................................................................................................... 3-17, 3-24
Number of re gistrations
Number of registrations/Us able range for Custom Paper
Number of registrations/Us able range for Easy Set
Number of r egistrations/ Usable range f or Watermark
N-up
......................................................................................................................3-6
....................................................................................... A-5
.................................... A-7
............................................ A-5
........................................ A-6
O
Operating environment .................................................................................2-2, 2-9
Orientation
Original Document Size
Output Paper Size
Output Setting
Overlay tab
..........................................................................................................3-16
.....................................................................................3-14
...............................................................................................3-15
.......................................................................................................3-9
..........................................................................................................3-23
P
Paper Name .........................................................................................................3-17
Paper preview
Paper Source
Paper tab
Position
Preview
Punch
..................................................................................................................3-13
.......................................................................................................3-5
.........................................................................................................3-8
.............................................................................................................3-14
...............................................................................................................3-26
...............................................................................................................3-24
Appendix
Page 86

A-20
4. Index
Q
Quality tab ..........................................................................................................3-19
R
Resolution ...........................................................................................................3-19
S
Setup tab ...............................................................................................................3-6
Shading
Size
Sorting
Staple
String
Style
...............................................................................................................3-26
........................................................................................................... 3-18, 3-25
.................................................................................................................3-16
..................................................................................................................3-12
...................................................................................................................3-25
....................................................................................................................3-25
T
Appendix
Trimming ............................................................................................................3-13
Type Face
............................................................................................................3-25
U
Unable to make correct settings / Unable to print exactly as set ..........................4-4
Unable to pr int
Unit
.....................................................................................................................3-18
Unlocking a job
......................................................................................................4-2
...................................................................................................3-21
V
Various pr i nting functi ons ....................................................................................1-2
W
Watermark ..........................................................................................................3-23
Wide Paper
..........................................................................................................3-15
Page 87

Page 88

2002 MINOLTA CO., LTD.
The information contained in this manual
is subject to change without notice to
incorporate improvements made on the
product or products the manual covers.
Copyright
2002. 7
3-13, 2-chome, Azuchi-Machi, Chuo-ku, Osaka. 541-8556, Japan
MINOLTA CO., LTD.
 Loading...