

Page 1

+ Documentation ++ Documentation ++ Documentation ++ Documentation ++ Documentation ++
User Manual
PagePro 4100W
Page 2

Table of Contents
1 Introduction
1.1 Features .........................................................................................1-1
1.2 Printer Part s and Accessories.................................................... .1-2
1.3 Co n tr o l P a nel. ............................................... ................................. 1 -4
Indicator Lights................................................................................1-5
Action K ey............ ... .. ....................................... ...............................1 -5
When th e Re a dy LE D is on...... .. .......... ....................................... ....1 -6
When th e E rr o r LED is on ..... ......................... .................................1 -9
2Setting-up
2.1 Installation Precautions................................................................2-1
Selec ti ng a Lo ca ti o n fo r the Pr in te r.... .. ................. ..........................2-1
Power S o ur c e ................. ....................................... ..........................2-2
Grounding .......................................................................................2-2
Spac e Re qu i re m e n ts . .......... ....................................... .....................2-3
2.2 Operational Precautions...............................................................2-4
Operating Environment ...................................................................2-4
Printer..............................................................................................2-4
Printe r S u p pl ie s.. .. ......................... ....................................... ...........2-6
2.3 Setting-up ......................................................................................2-7
Instal lin g th e F a ce-Down T ra y . .. ....................................... ..............2-7
Installing Tray 1...............................................................................2-8
Connecting the Power Cord.................. .. ........... .. .......................... .2-9
Loading Paper...............................................................................2-10
Turning On the Printer...................................................................2-12
Connecting to a Computer..................................... .. ........... ..........2-13
2.4 Options.........................................................................................2-14
SIMM (Single In-line Memory Module)..........................................2-14
Instal lin g th e Op tional SIM M ...... ... ........................ ........................2 -1 5
2.5 Duplex Unit ..................................................................................2-20
Instal lin g th e D u p le x Un it .. .. .. ................................ ........................2 -2 0
2.6 Second/Third Pape r Cassette Unit............ ........................ .. ......2-23
Installing the Optional Second/Third Paper Cassette Unit............2-23
2.7 Ne t w o rk In te r fa c e C a rd (NIC) .. ... ................................................ 2 -2 6
Instal lin g th e Op tional Ne tw o rk In te rf a ce C ar d . ........................ .....2-26
PagePro 4100W -1
Page 3

3 Using the Printer
3.1 Paper.............................................................................................. 3-1
Type................................................................................................ 3-1
Size................................................................................................. 3-2
Envelopes (Tray 1 and Manual Feed Tray)....................................3-2
3.2 Loading Paper............................................................................... 3-4
Loading Paper onto Tray 1.......... ........................ ........... ............ .. ..3-4
Loading Paper onto Tray 2/Tr ay 3................ ............ ............ ..........3-6
Loading Paper onto Manual Feed Tray........................................3-10
Printing on Envelopes...................................................................3-12
Duplex Printing ............................................................................. 3-14
4 Printer Driver and Status Display
4.1 Sy s te m R e q u ir ements........................ .......................................... 4-1
4.2 Installing the Printer Driver Under Windows 95/98 ................... 4-3
To Install the Printer Driver from the CD-ROM............................... 4-3
To Uninstall the Printer Driver ...................................................... 4-12
4.3 Installing the Printer Driver Under Windows NT 4.0 ............... 4-16
To Install the Printer Driver from the CD-ROM............................. 4-16
To Uninstall the Printer Driver ...................................................... 4-26
4.4 Registering the Status Display.................................................. 4-30
Registering the Stat us Display Under Windows 95/98.......... .......4-30
Registering the Stat us Display Under Windows NT 4.0.......... .. ...4-34
4.5 Displaying the Driver Setup Dialog
(Windows 95/98/NT 4.0)4-37
To Display the Driver Setup Dialog Under Windows 95/98..........4-37
To Display the Driver Setup Dialog Under Windows NT 4.0........4-38
4.6 Using the Printe r Driver Under
Windows 95/98/NT4.04- 40
Comm on B ut to n s.............................................. ............................ 4-40
Paper............................................................................................4-41
Paper Size....................................................................................4-41
Page Layout ................. ................................. ............ .. ............ .. ...4-43
Image............................................................................................4-47
Device Option............................................................................... 4-49
About............................................................................................4-49
4.7 Using the Printer Status Display............................................... 4-50
Opening the Printer Status Display .......... .. .. ................................4-50
Using th e Pri nt e r S ta tu s Di sp la y...... .. ................. .......................... 4 -5 1
Controlling Pop Up Messages ......................................................4-52
Switching Between the Expanded and Reduced Views...............4-52
-2 PagePro 4100W
Page 4

On-line Help ..................................................................................4-53
Displaying Printer Information.......................................................4-53
5 Maintenance
5.1 Replacing the Imaging Cartridge.................................................5-1
To Replace the Imaging Cartridge..................................................5-2
5.2 Cl ea n i ng th e Prin ter........ .. .. ....................................... ...................5-5
Cleaning the Outside of the Printer.................................................5-5
Cleaning the Paper Transport Roller...............................................5-5
6 Troubleshooting
6.1 Clearing a Paper Misfeed .............................................................6-1
Inside th e Pri n te r..... .. ................. ....................................... ..............6-1
Paper Output Misfeed.....................................................................6-4
Paper Input Misfeed (from Tray 1)..................................................6-4
Paper Input Misfeed (from Manual Feed Tray)...............................6-4
Paper Input Misfeed (from Second/Third Paper Cassette Unit)...... 6-5
6.2 Pa p e r Mis feed in th e Du p le x Unit ..... .. .......... ...............................6 -6
Upper Misfeed.................................................................................6-6
Lower M is fe e d. .......... ....................................... ...............................6 -6
6.3 Print Quality Problems .................................................................6-7
Blank pages............. .. ............ ........... ............ .. ............ .. ..................6-7
Black pages......... ............ ............ .............................................. ......6-7
Printo u t to o lig ht ...... ................. ....................................... ................6-8
Printo u t to o dark...... ................. .............................................. .........6-8
Blurred background.........................................................................6-8
Uneven pr in t de ns it y .......................... ............................... ..............6-9
Irregularities ....................................................................................6-9
White or black line...........................................................................6-9
Toner smudges............... ............ ............ .................................. ....6-10
6.4 No output ......................... ...................................... ......................6-1 0
Are you us i ng th e co rr ec t ty p e of prin ter cable ? .. ........................ ..6 -1 0
Are your computer’s communications port settings correct?........6-10
6.5 Messages.....................................................................................6-11
When th e Re a dy LE D is on ..... ........................ .............................6-1 2
When th e E rr o r LED is on .. .. ................................ ........................6 -1 6
7 Specifications
7.1 PagePro 4100W Printer................................................................. 7-1
7.2 Second Paper Cassette Unit (Option).........................................7-2
PagePro 4100W -3
Page 5

7.3 Third Paper Cassette Unit (Option)............................................. 7-3
7.4 Du p le x Uni t (O p t io n )........................... .......................................... 7-3
7.5 Interface Connector and Cable ................................................... 7-4
7.6 SIMM (Option) ............................................................................... 7-4
8 Quick Reference
8.1 The LED Display ........................................................................... 8-1
Indicator Lights ............................................................................... 8-1
Actio n K e y .. ... ....................................... .......................................... 8-1
When th e Re a dy LE D is on ..................................... ....................... 8-2
When th e Err o r LED is on.... .. .......... ....................................... ........ 8-4
When the Error LED is on (Fatal Error) .......................................... 8-6
9 Glossary
10 Index
-4 PagePro 4100W
Page 6

Introduction
1 Introduction
1.1 Features
The Minolta/QMS PagePr o 4100W is a laser pr inter developed ex clusively
for use with Windows 95, Windows 98, and Windows NT 4.0 operating
systems.
The various features l isted below make the Minolta /QMS PagePro 4100W
the perfect printer for any size office.
l
Fast 18-page per minute print speed
l
Powerful Windows printing technology for fast output
l
Real 1200 × 600 dpi resolution
l
Optional 10/100BaseT Ethernet NIC
l
Windows host based PostScript level 2 standard for expanded
software compatibility
l
250-sheet paper capacity
m
1,250-sheet maximum paper-holding capac ity with optional
second and third cassette units installed
1
PagePro 4100W 1-1
Page 7
1
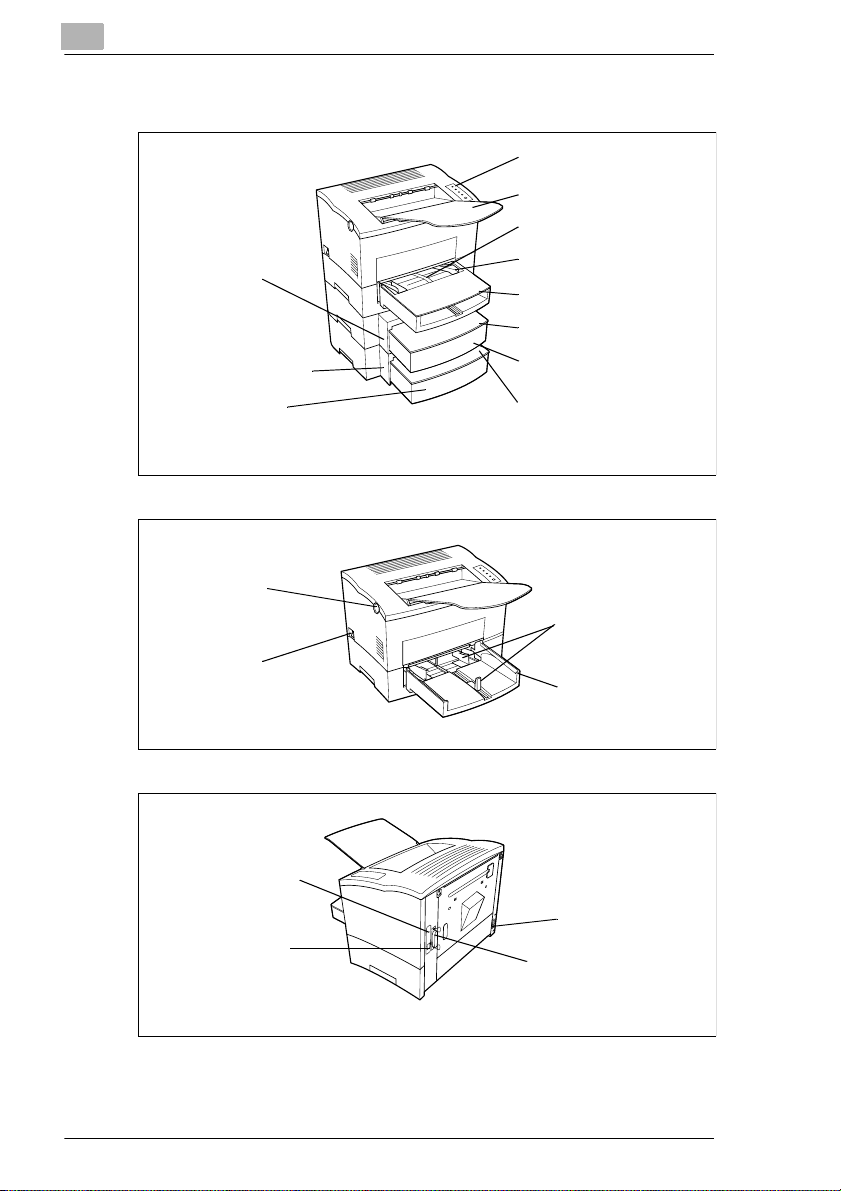
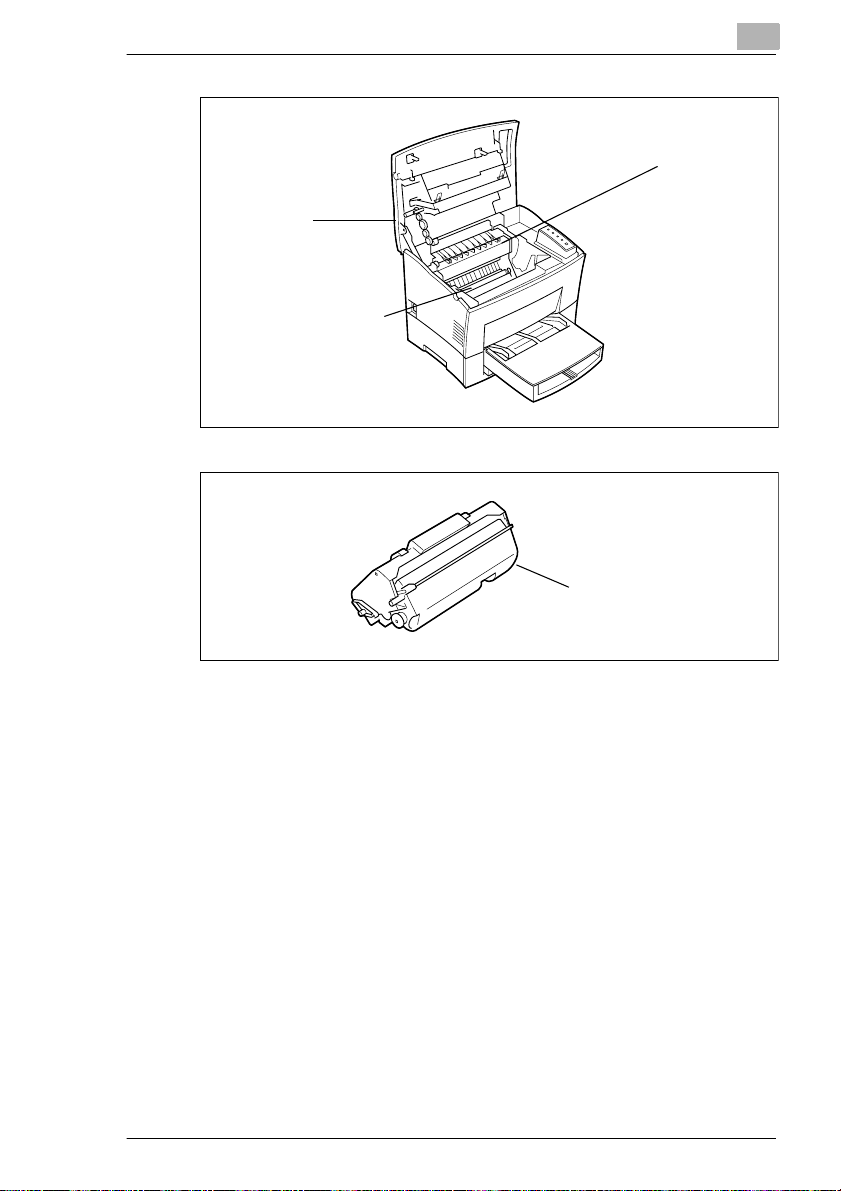
1.2 Printer Parts and Accessories
Introduction
Control panel
Face-down tray
Manual feed tray
Secon d paper
cassette unit
(option)
Third pa per
cassette unit (option)
Tray 3 (500-sheet
third cassette)
(option)
Top cover
release button
Power
switch
Paper size guide
Tray cover
Cassett e cover (opt ion)
Tray 2 (500-sheet
second cassette) (option)
Cassette cover
(option)
Paper size guide
Tray 1
(multipurpos e tray)
Network Int erf ac e
Card (NIC) (option)
Power cord socket
Ethernet interface
connector
(10/100BaseT)
(option)
Parall el interfac e
connector
1-2 PagePro 4100W
Page 8
Introduction
1
Fusing unit
Top cover
Image transfer r oller
Imagin g cartridge
PagePro 4100W 1-3
Page 9

1
1.3 Control Panel
The control panel has four indicator lights and one button.
LED Status
Error LED
ON: A Fatal Error has occurred
BLINKING: A recoverable error has occurred
OFF: Normal
Toner Empty LED
ON: The imaging cartridge is empty
BLINKING: The imaging cartridge is almost empty
OFF: Normal
Paper Empty LED
ON: The selected paper tray is empty
OFF: Normal
Ready LED
ON: The printer can receive print jobs
BLINKING: The printer is warming up
OFF: The printer is off line
Action Key
Press this key if an error should occur in order to have the current condition
of the printer displayed through the LED.
Introduction
Error (amber)
Toner empty (amber)
Paper empty (amber)
Ready (green)
Action key
1-4 PagePro 4100W
Page 10

Introduction
Indicator Lights
The four indi cator light s turn on, off, or bl ink in combi nation t o let you k now
the current status of the printer. You can find out details of the printer’s
status by check in g the i nformat ion th at a ppears on your computer screen.
Action Key
Examples of the messages that can be displayed by the LED are
presented on the following page.
1
BlinkingOffOn
The LED display will change as you press the Action key.
The appearance of th is icon throughout this manual indicat es
when you need to press the Action key.
PagePro 4100W 1-5
Page 11

1
Introduction
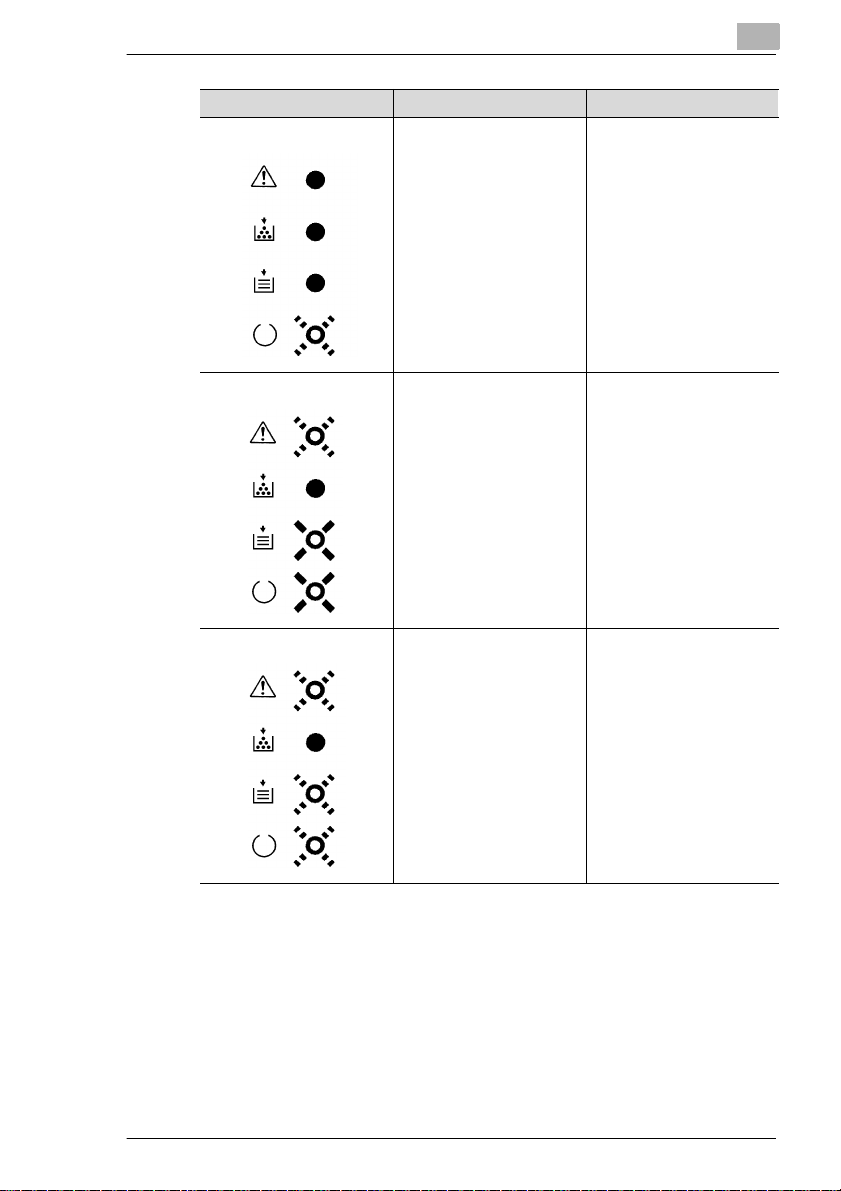
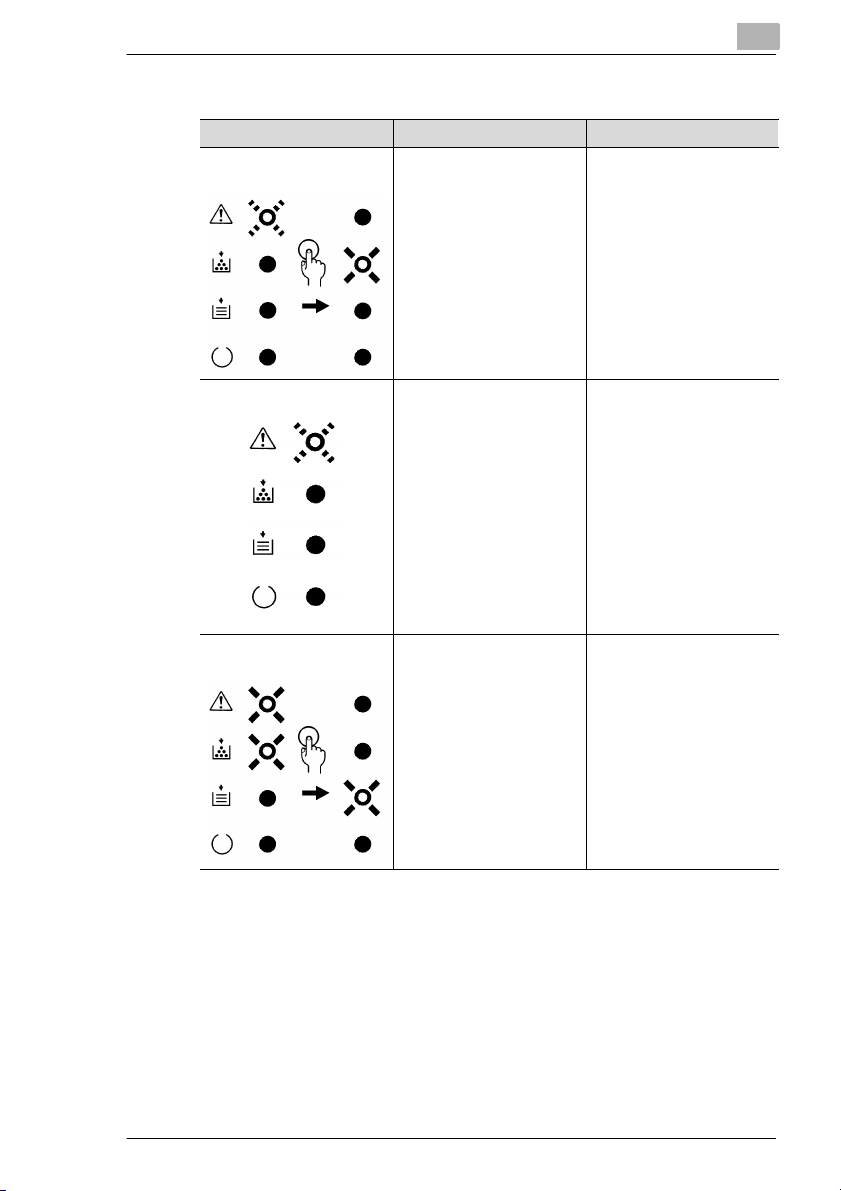
When the Ready LED is on
LED Display Description Response Required
Initializing Power on, initializing.
Warming Up Printer is warming up.
Ready Printer is ready and able to
print.
1-6 PagePro 4100W
Page 12
Introduction
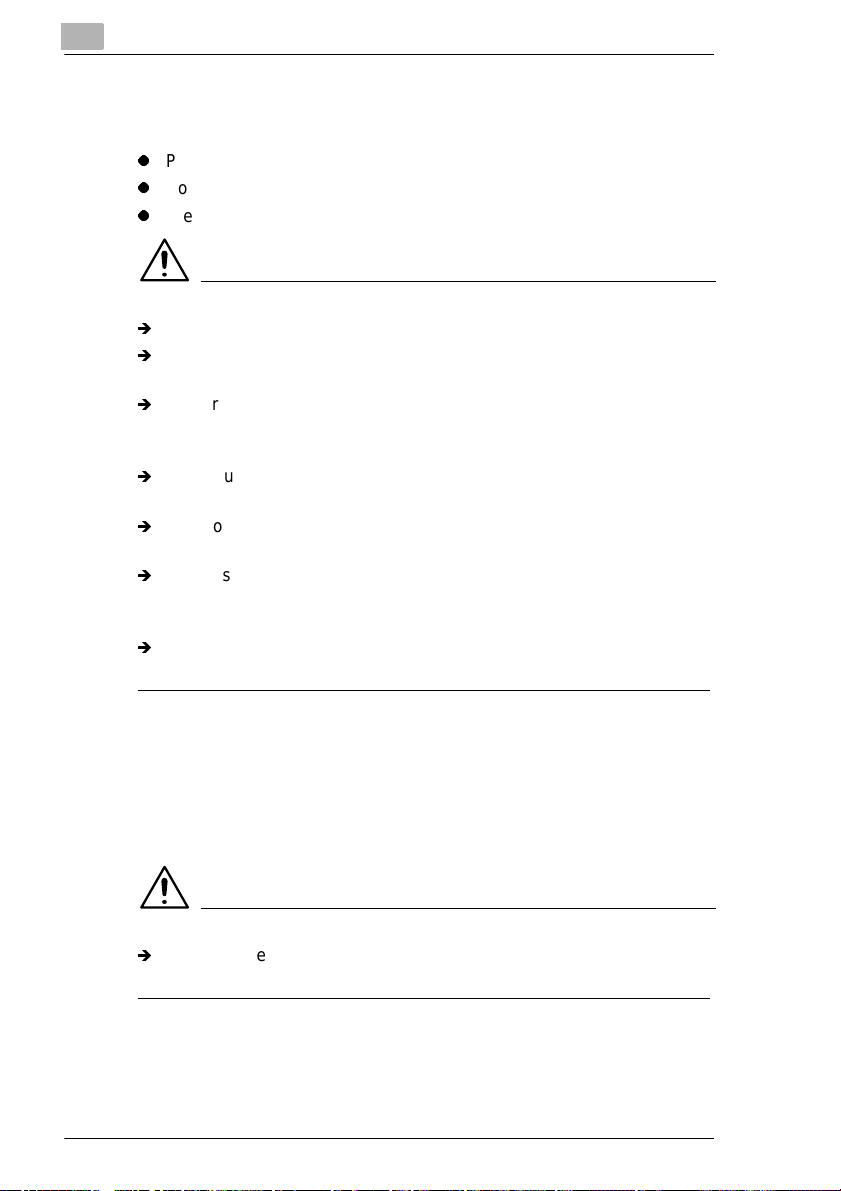
LED Display Description Response Requi red
Power Save Printer has entered the
Power Save Mode.
1
Paper Empty The paper supply of one of
Size Mismatch The wrong size of paper has
the trays is empty.
been detected in Tray 1,
Tray 2 or Tray 3.
Press the Action key to see
which tray is out of paper.
For details, see page 6-12.
Load the specified size of
paper into the appropriate
tray or press and hold the
Action key for about 10
seconds until all of the LED’s
are on to cancel the print job,
see page 3-4.
PagePro 4100W 1-7
Page 13
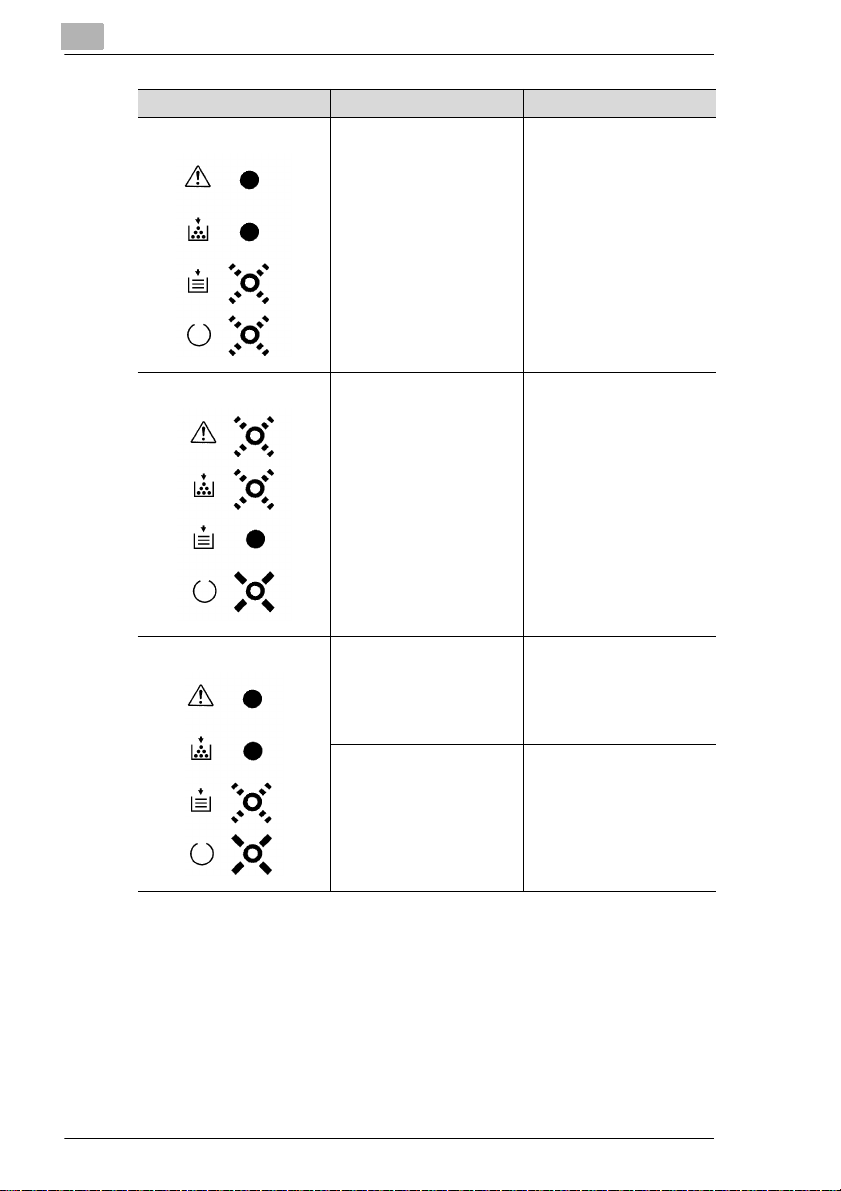
1
Introduction
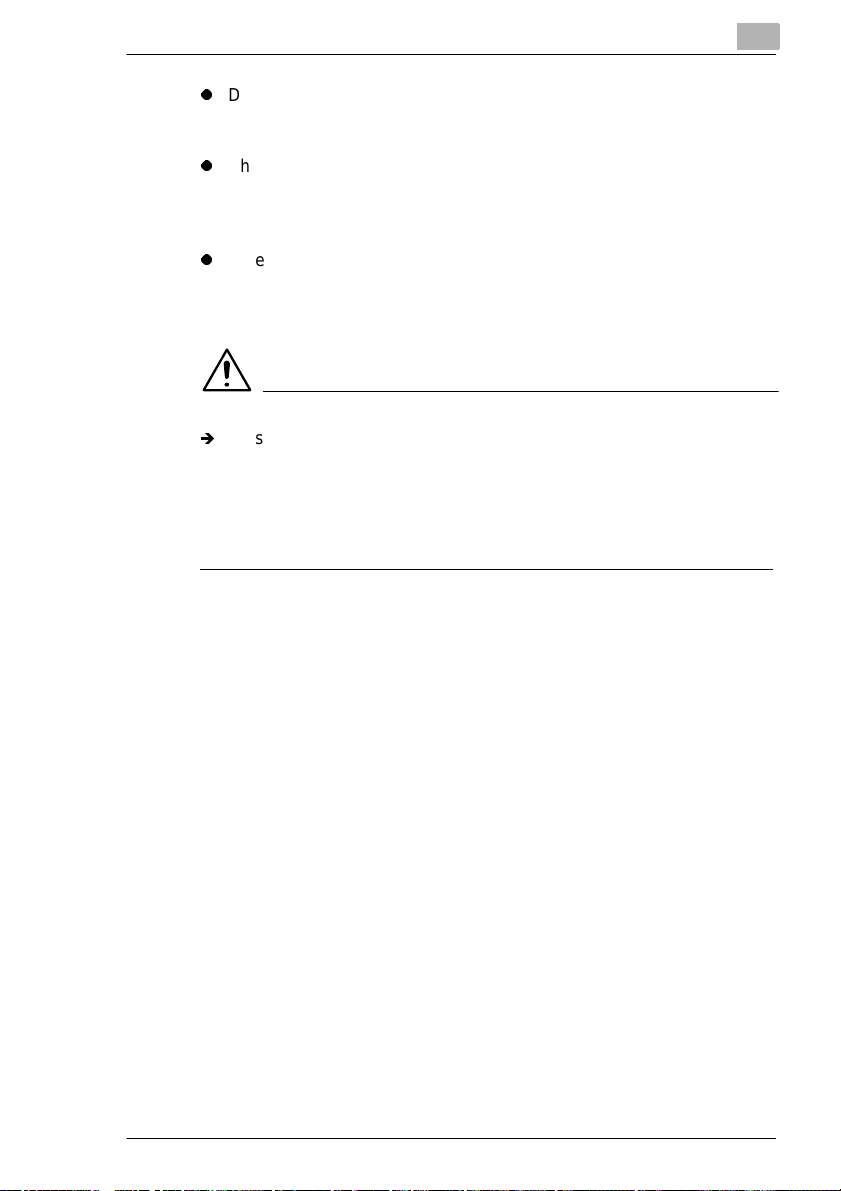
LED Display Description Response Required
Wait Action Press the Action key in the
event of a paper size error or
when operating in the
manual mode.
Press the Action key.
Printing will begin.
Toner Low The imaging cartridge is low
No Cassette/No Tray No Cassette:
on toner but printing is still
possible.
The casstte for Tray 2 or
Tray 3 is not in place.
No Tray:
A print job was sent using the
Tray 2 or Tr ay 3 s ett ing i n t he
printer driver, even though
Tray 2 or Tray 3 is not
installed on the printer.
Ready a new imaging
cartridge. For details, see
page 5-1.
Press the Action key to see
which cassette is not in place
(see page 6-12).
Press the Action key to see
which tray is not in place
(see page 6-12).
1-8 PagePro 4100W
Page 14
Introduction
When the Error LED is on
LED Display Description Response Requi red
Paper Size Error The paper-size setting of the
printer driver does not match
the size of paper that has
been detected in the tray.
Load the correct size of
paper or cancel the print job
(by pressing the Action key)
and change the paper-size
setting in the driver
(see page 3-4 and see page
6-16).
1
Paper Misfeed A paper misfeed occurred
Replace Imaging Cartridge The imaging cartridge is out
near the Multipurpose tray,
Tray 2, Tray 3, Manual
feeding tray, Lower-duplex
unit, Drum unit, Fuser or
Upper-duplex unit.
of toner.
Press the Action key to see
where the paper misfeed
occurred. For details, see
page 6-16.
Replace the imaging
cartridge. For details, see
page 5-1.
PagePro 4100W 1-9
Page 15

1
Introduction
1-10 PagePro 4100W
Page 16

Setting-up
2 Setting-up
2.1 Installation Precautions
Note the fol lowin g import ant pr eca utions when sel ecti ng a locat ion f or th e
printer and when conne cti ng it to a power source.
Selecting a Location for the Printer
A proper location helps to ensure that your printer provides you with the
long service lif e for which it is design ed. Double-check to make sure that
the location you select has the following characteristics.
Choose a location that is well-ventilated.
á
Make sure there is no chance of ammonia or other organic gases
á
being generated in the area.
The power outlet you plan to connect to should be nearby and
á
unobstructed.
Make sure that the pri nter is not exposed to direct sunlight.
á
Avoid areas in the direct airflow of air conditioners, heaters, or
á
ventilators, and areas subjected to tem perature and humidity
extremes.
Choose a sturdy, leve l surface whe re the pri nter will not be exposed to
á
strong vibration.
Keep the print er away f rom an y object s that mig ht blo ck its heat ven ts.
á
Do not locate the printe r near curtains or other combust ible objects.
á
Choose an area where there is no possibility of the print er bei ng
á
splashed with water or other liquids.
Make sure that the surrounding area is clean, dry, and free of dust.
á
2
PagePro 4100W 2-1
Page 17
2
Setting-up
Power Source
The following are the power source requirements for this printer.
l
Power source: 220 - 240 V at 50 - 60 Hz
l
Voltage fluctuation: Within 220 - 240 V ±10%
l
Frequency fluctuation: Within ±0.3%
NOTE
Í
Use a power source with minimal vol tage and frequency fluctuation.
Í
Only use an outlet that is rated for the voltage capacity specified for
this pr inter.
Í
Be sure to plug the power cord all the way i nto the outlet. The outlet
should be locat ed near the print er and be ea sily acces sible so you can
unplug the power cord immedi ately if necessary.
Í
Make sure the outlet you use is vi sible, and not hidden behind the
printer or any other object.
Í
If any other electr ical equipm ent is plugged in to the same outl et, make
sure that the capacity of the outlet is not exceeded.
Í
If you use an e xtension c ord, make sure its capacity is great er than th e
power consumption of the pri nter. Using an extension cord with a
lower capacity creates the danger of fire.
Í
Never use a multiple socket to connect other appliances or m achines
to the same outlet being used to power the printer.
Grounding
Always ground the print er to gu ard agai nst th e dange r of el ectri cal sh ock.
To ground the printer, connect the grounding wire to the ground terminal
of the electrical outle t you are pluggi ng into or to a groundi ng contac t that
complies with local electrical standa rds in your area.
NOTE
Í
Never connect th e grounding wi re to a gas pipe, the gro unding wire for
a telephone, or to a water pipe.
2-2 PagePro 4100W
Page 18

Setting-up
2
Space Requirements
Be sure to pro vide sp ace a round t he pr inte r as i ndicat ed belo w, to e nsur e
easier printer operation, paper and toner replacement, and mainten ance.
24-3/4" (632mm)
or more
* 29-1/2" (746mm )
or more
** 34-1/4" (867mm)
or more
6
" (150 mm)
or more
*** 11-3/4"
(300mm)
or more
40-1/2"
(1,028mm) or more
*** 46-1/2"
(1,178mm) or more
11-3/4" (300mm)
or more
4"
(100mm)
23-1/2"
(600 mm)
or more
* When equipped with an optional second cassette unit.
** When equipped with an optional third cass ette uni t.
*** When equipped with an optional duplex unit.
11-3/4"
(300 mm)
or more
or more
33" (836mm)
or more
PagePro 4100W 2-3
Page 19

2
2.2 Operational Precautions
Note the following important precautions whenever using the printer.
Operating Environment
The following descri bes the operating environment required when using
the printer.
l
Temperature: 10°C to 35°C (50°F to 95°F) with fluctuation of 10°C
(18°F) per hour
l
Humidity: 15% to 85% with fluctuation of 20% per hour
Printer
The following descri bes precautions for using the printer.
l
Never turn the printer off o r open any of its covers during a print
operation.
l
Never place flammabl e gasses, liquids or object s that generate
magnetic forces nea r the printer.
l
When unplugging the power cor d, always grasp the plug and never
pull on the cord. A damaged cord creates the danger of fire or
electrical shock.
l
Never touch the power cord when your hands are wet. Doing so
creates the danger of electrical shock.
l
Always unplug t he power cor d befor e moving the print er. Failure t o d o
so can damage the power cord, creating the danger of fir e or electrica l
shock.
l
Always unplug the power cord if you do not plan to use the printer for
a long time.
l
Never try to remove any secured panel or cover. The interior of the
printer contains high-voltage circuitry which creates the danger of
electrical shock when exposed.
l
Never try to modify the printer. Doing so creates the dang er of fire or
electrical shock.
l
Never place any hea vy ob jects on the powe r co rd, pul l on i t or be nd it.
Doing so creates the dang er of fire or electrical shock.
l
Always make sure the pri nter is not pl aced on the electri cal cord or the
communications cables of any other electrical equipment. Al so m ake
sure that cords and cables do not get into the printer’s mechanism.
Any of these conditions create the danger of malfunction and fire.
l
Always take care so that paper clips, staples, or ot her small pieces of
metal do not get into the printer through its vents or other openings.
Such objects creat e the danger of fire or electric al shock.
Setting-up
2-4 PagePro 4100W
Page 20
Setting-up
l
Do not allow water or other liquids to spill on or near the printer. Fir e
or electrical shock can occu r should water or liquid come into cont act
with th e p rinter.
l
Should liquid or any pie ce of metal accidently get ins ide the printer,
immediately turn it off, unplug the power cord, and contact your dealer.
Failure to take this immediate action creates the danger of fire or
electrical shock.
l
Whenever the printer emits unusually high amounts of heat, smoke,
an unusual odor, or noise, immediately t urn it off, unplug it , and contact
your dealer. Failur e to take this immediate acti on creates the danger
of fire or electrical shock.
NOTE
Í
Be sure to locate the printer in a well-ventilated l ocation. A minimal
amount of ozone is generated during normal operation of this printer.
Because of this, an unpleasant odor may result when the printer is
used for e xtensive printi ng in a poorly ventil ated area . For c omfortabl e,
and safe operation , be sur e to locate the printer in a well- ventilated
area.
2
PagePro 4100W 2-5
Page 21
2
Setting-up
Printer Supplies
Note the followin g precautions when h andling pri nter suppli es such as the
imaging cartridge, and paper.
l
Avoid storing print er supplies in the following locations:
m
Areas subjected to direct sunlight. Additionally, the imaging
cartridge must be protected from fluorescent light.
m
Areas exposed to open flame.
m
Areas subjected to high humidity.
m
Areas subjected to large amounts of dust.
l
Keep paper that has been removed from its wrapper, but not yet
loaded onto the printer tray, in a sealed plastic bag and store it in a
cool, dark location.
l
Only use imaging cart ri dges that are expressly specified for this
printer.
l
Keep supplies out of the reach of children.
l
Should your hands bec ome soi led wi th toner , immedi atel y wash them
with soap and water.
NOTE
Í
Whenever you remove the imaging cartridge from the printer,
immediately wr ap it wit h a cl oth t o pr otect it from o ver exposure to l ight.
2-6 PagePro 4100W
Page 22
Setting-up
2.3 Setting-up
See the Quick Guide for Installation and Reference printer before
unpacking.
Set-up the printer according to the following instructions.
NOTE
Í
Always use a shi elded in terface c able. Use o f an unshi elded cabl e can
result in radio interference with data.
Í
Keep all the boxes and pack ing mater ials t hat the print er com es in for
later use when transport ing the printer
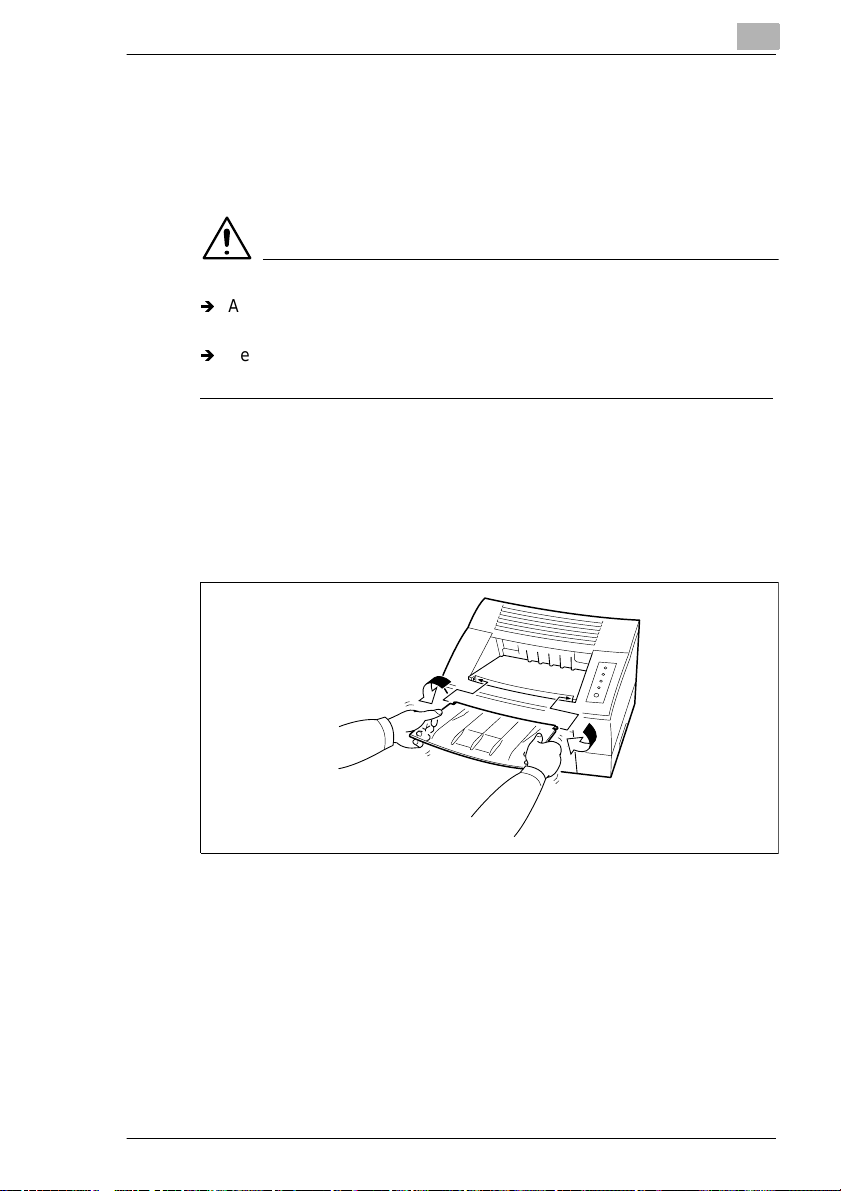
Installing the Face-Down Tray
With both hands, gent ly bend the face-down tray inward s and insert one
of its tabs into its holder on the upper portion of the printer. Continue to
bend the face-down tray so that it curves enough fo r t he second tab to fit
into its holder and re lease the tray into position.
2
PagePro 4100W 2-7
Page 23
2
Setting-up
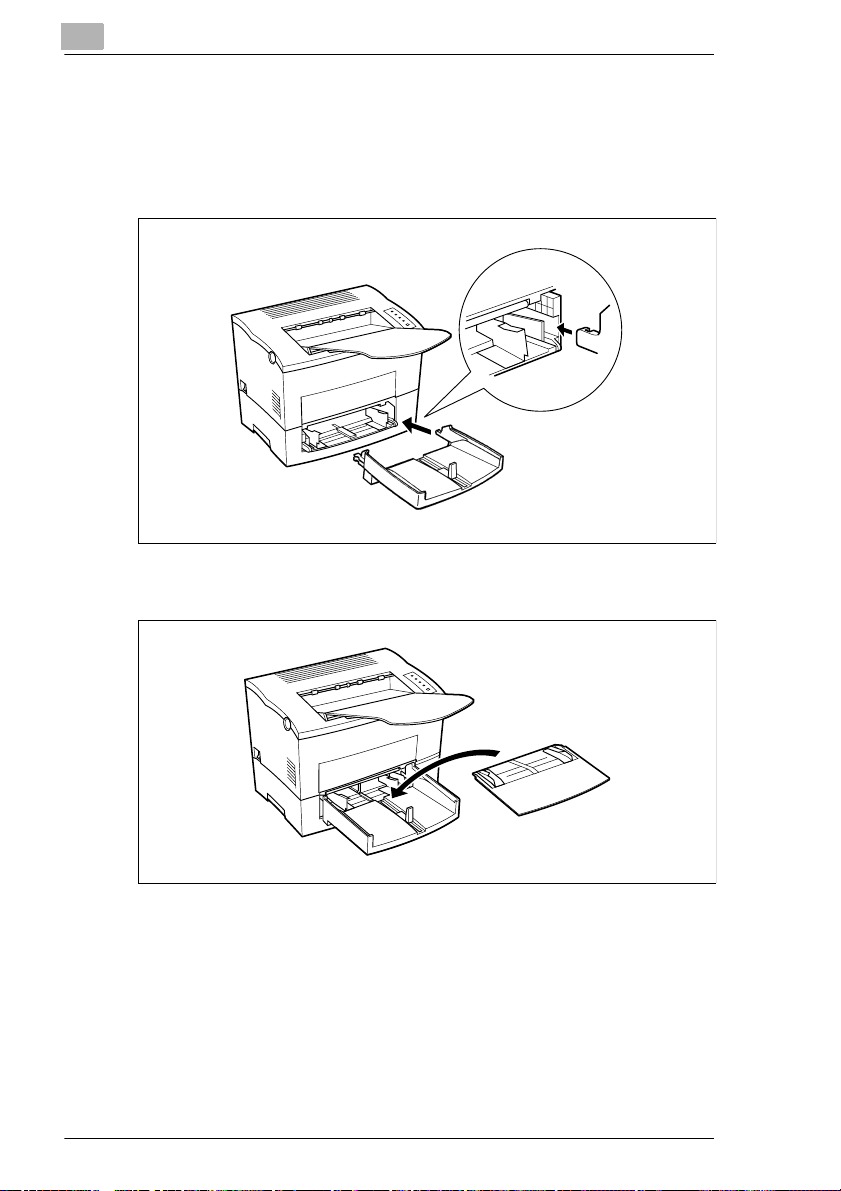
Installing Tray 1
1 Using the left and right slots in the printer as guides, gently push
Tray 1 until it cannot be inser ted any further (as shown in the
illustration).
2 Attach the tray cover ont o Tray 1.
2-8 PagePro 4100W
Page 24
Setting-up
2
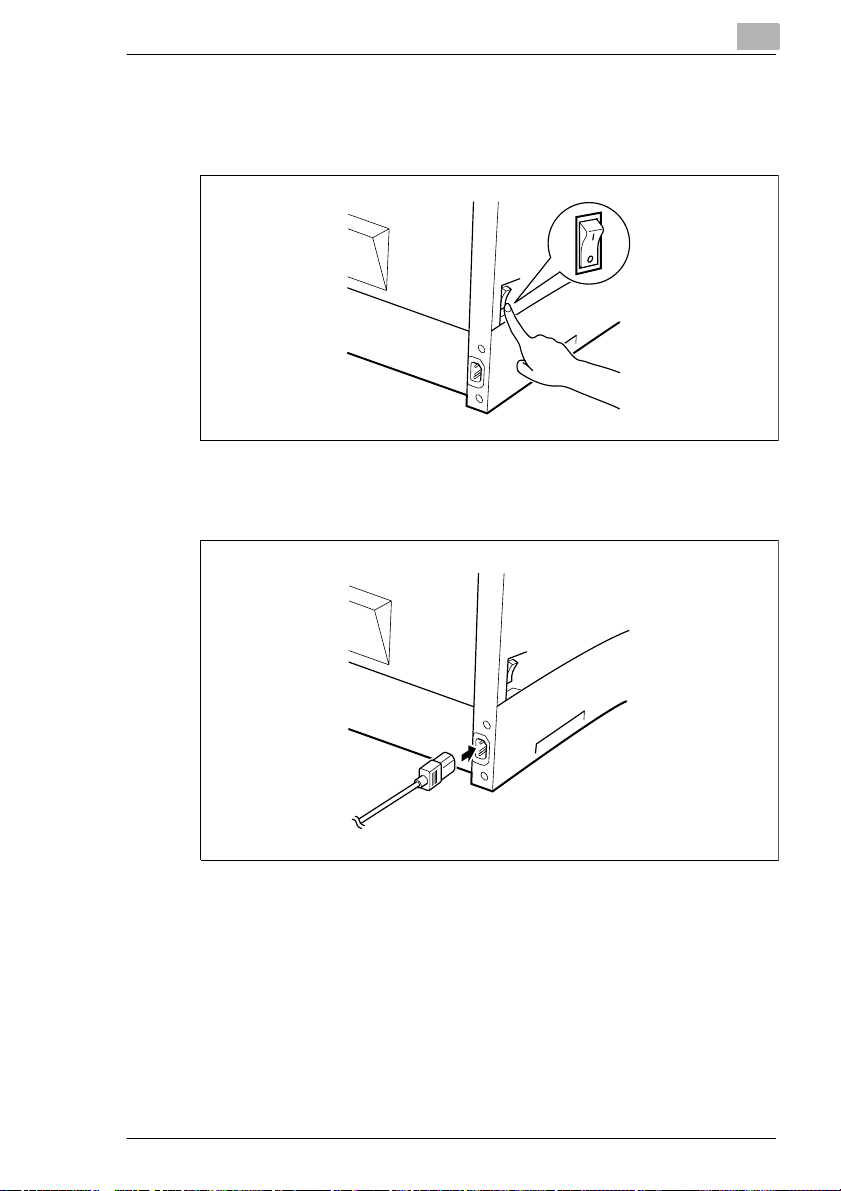
Connecting the Power Cord
1 Make sur e th at the printer’s power swit ch is in the O (Off) position.
2 Connect one end of the po wer cord that comes with the printer to the
power cord socket. Plug th e other end into a power outlet.
PagePro 4100W 2-9
Page 25
2
Setting-up
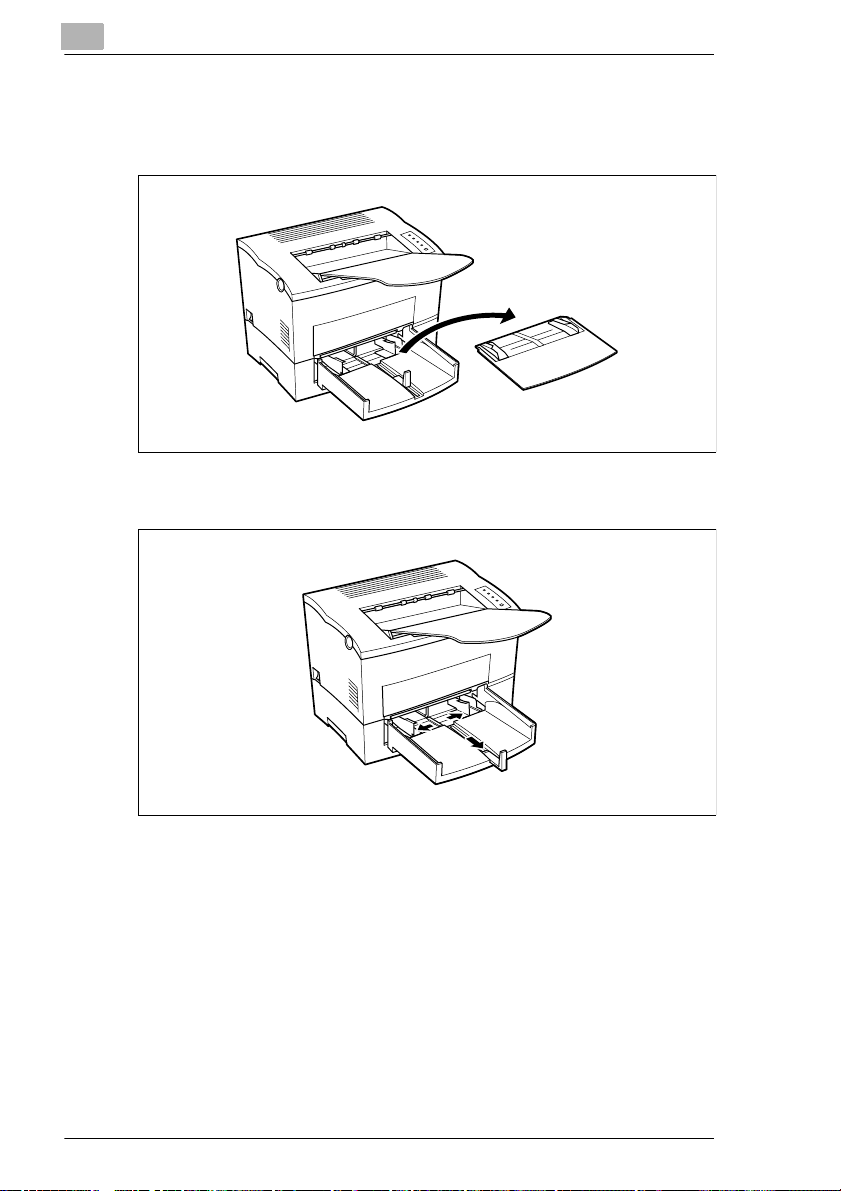
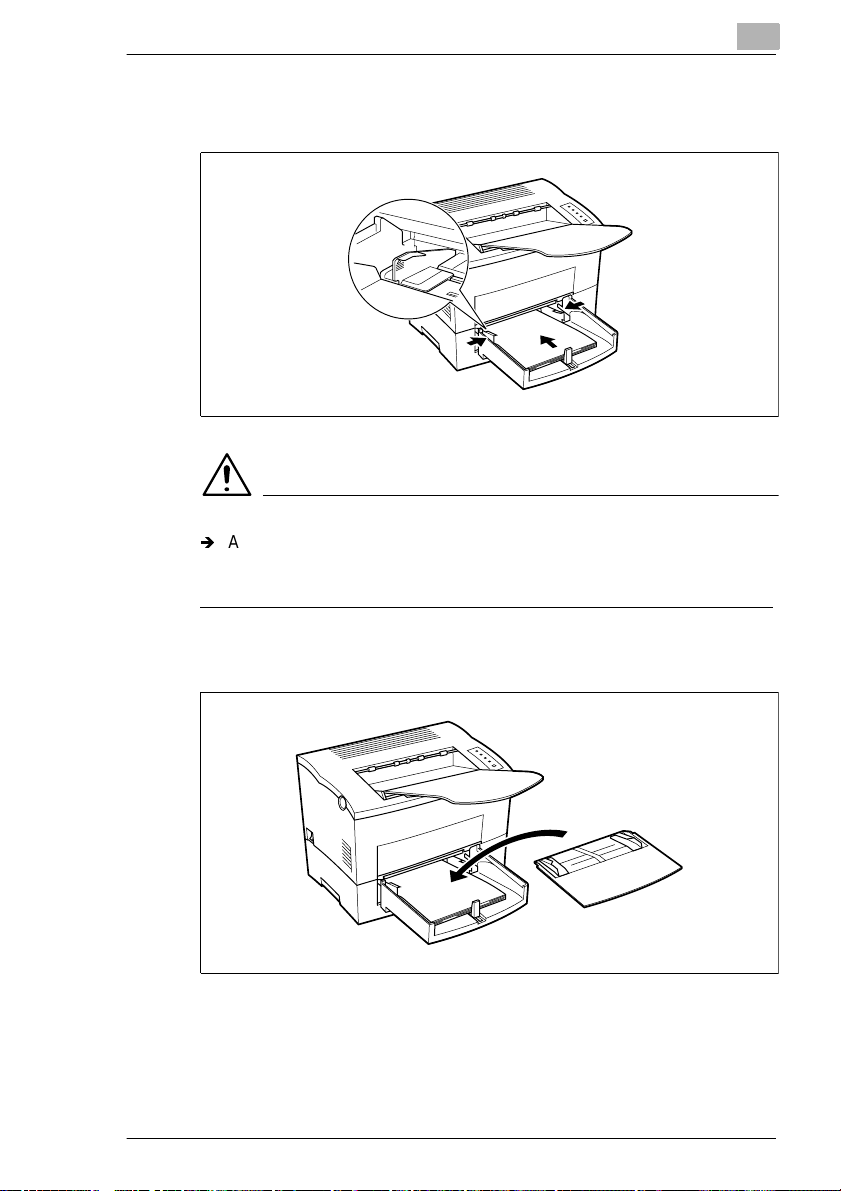
Loading Paper
1 Remove the tray cover from Tray 1.
2 Open all three of the paper si ze guides.
2-10 PagePro 4100W
Page 26
Setting-up
2
3 Place the paper stack o nto the tr ay, pr int- side up . Sec ure the stack b y
adjusting the paper size guides.
NOTE
Í
A maximum level mark on the paper size guide shows how high you
can stack paper on Tray 1. Make sure that pap er is st acked no high er
than thi s mark.
4 Replace the tray cove r ont o T ray 1.
PagePro 4100W 2-11
Page 27

2
Setting-up
Turning On the Printer
After connecting the printer to a power outlet, press the power switch to
turn it on.
Turning on the print er causes all the indi cators on the control panel to light,
which indicates that the printer is warming up. In about 23 seconds only
the ready indicator remains lit, indicating that the printer is ready to print.
Initializing Warming Up Ready
NOTE
Í
The printer autom atic ally enter s a powe r savin g mode if i t receive s no
print commands for about 15 minutes. Whe never the printer receives
a print command while in the power saving mode, i t starts to war m up
again and takes about 23 seconds before it is ready to print.
2-12 PagePro 4100W
Page 28
Setting-up
2
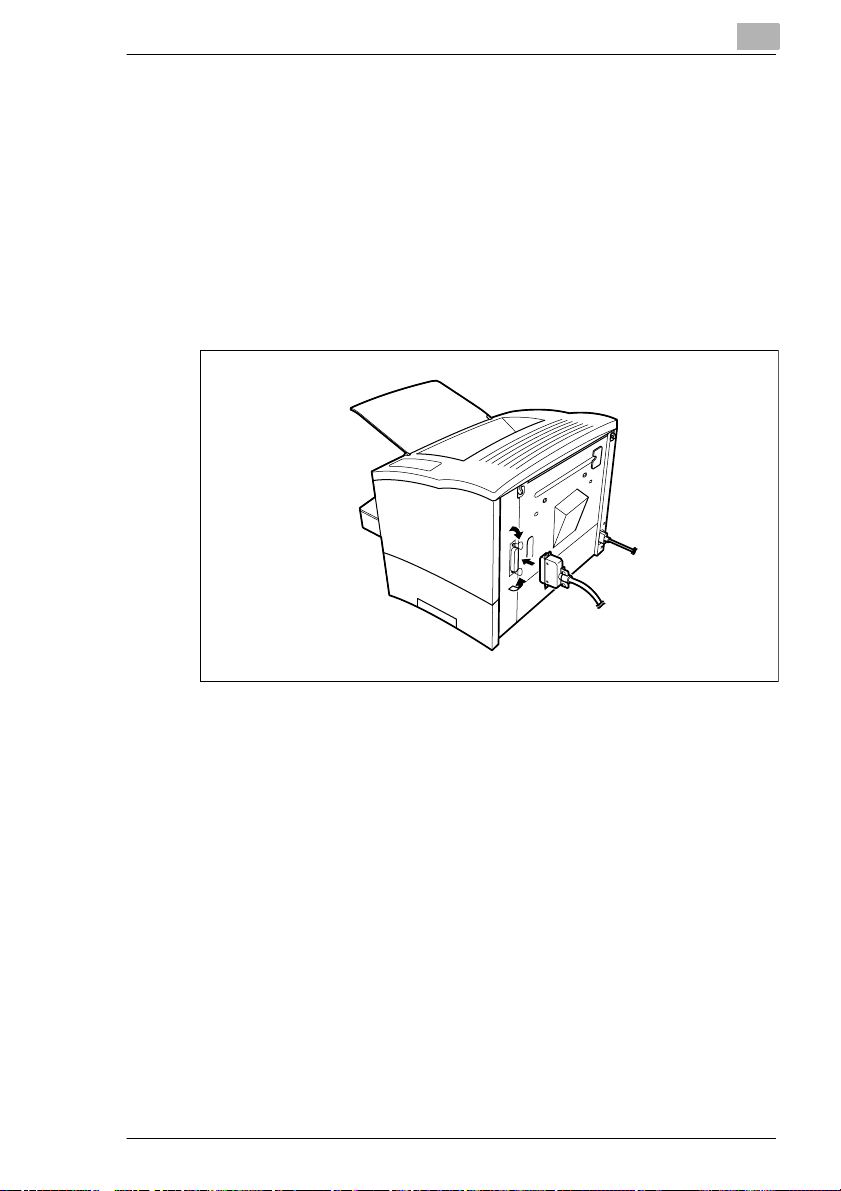
Connecting to a Computer
1 Make sure that the printer and the computer you are conne cting it to
are b oth tur ned of f.
2 Connect one end of the interf ace cable to the parallel port of the
computer.
3 Connect the other end of the cabl e to the parallel connector on the
back of the printer. Secure the cable using t he two clips on the parallel
connector.
For cable specifications and pin assignments, see page 7-4 of this
User’s Manual.
PagePro 4100W 2-13
Page 29
2
2.4 Options
This section desc ribes the opti onal items tha t are availabl e for this printer :
Memory SIMM(s), Dup lex Uni t, Sec ond Paper Cass ette Un it, Third Paper
Cassette Unit, and the Network Interface Card.
SIMM (Single In-line Memory Module)
Many errors caused by data overload can be avoided by installing
additional memor y int o the printer.
This printer comes with 2 MB of memory. You can increase memory
capacity to up to 16 MB by installing an opt ional 8 or 16 MB SIMM into the
memory connector located inside of the printer.
NOTE
Í
Memory capacity can be increased to 16 MB by installing a 16 MB
SIMM into the printer. The successful installation of the expansion
memory can be confirmed by displaying the Printer Infor mation in the
Printer Status Display. For details, see page 4-53 “D isplaying Printe r
Information...”.
Í
Installatio n of an opt ional SIMM will increase the memory capacity of
your printer. However , the memory of the optional SIMM will not be
combined with the init ial 2 MB that came with the printer.
Setting-up
2-14 PagePro 4100W
Page 30

Setting-up
Installing the Optional SIMM
WARNING
Electric shock hazard!
Í
Do not remove any cover of the pr inter that i s not dir ectl y specif ied f or
remova l in th e Us er ’s Manual.
1 Turn off the printer and unplug the power cord.
2 Disconnect the parall el cable from the printer .
3 Press the top cover release button and open the top cover.
4 Using a screwdriver, loosen and remove the two screws that secure
the exterior side cover to the printer.
2
PagePro 4100W 2-15
Page 31

2
Setting-up
5 Clips secure the exterior side cover from the inside of the printer.
Gently maneuver the exterior side cover until the clips release (see
illustration).
CAUTION
Í
Do not touch any part of the main circuit inside of the printer.
6 With the exterior side cover removed, the internal side cover of the
printer is exposed. With the screwdriver, loosen and remove the four
screws that secure the internal side cover.
2-16 PagePro 4100W
Page 32

Setting-up
2
7 Remove the internal side cover to expose the main circuit.
SIMM socket
8 Being careful no t to touch th e conne ction points al ong the ed ge of the
SIMM, insert the SIMM into the socket on the main circuit.
m
Insert the SIMM at an angle as shown and gently swing it into the
socket.
m
Apply pressure unt il the SIMM locks into place.
PagePro 4100W 2-17
Page 33

2
Setting-up
9 Make sure both clips on th e socket are pushed through the holes on
the SIMM.
10Replace the internal side cover using the four screws.
11Replace the externa l si de cover using the two screws.
2-18 PagePro 4100W
Page 34

Setting-up
2
12Select the Printer Information in the Printer Status Display and check
to make sure that the “Printer Memory” item correctly shows the
increase in memory capacity. If it does not, repeat the above steps
making sure that the SIMM is installed correctly.
For details, see page 4-53 “Displayi ng Pri nter Information...”.
NOTE
Í
To release the SIMM from the socket, push out on the metal taps on
each side of the socket.
Í
Installatio n of an optional SIMM will increase the memory capacity of
your printer. However , t he me mo ry of the opt ional SIMM will not be
combined with the init ial 2 MB that came with the printer
PagePro 4100W 2-19
Page 35

2
2.5 Duplex Unit
Your printer supports double-sided print ing if the optional duplex unit is
installed. Doubl e-sided documents can be generated for binding along
either the short or long edges of the paper through the pri nter software.
For more information, see page 3-14.
l
Take the duplex unit out of t he shipping box.
l
Remove the plastic bag and all shipping materials.
l
Turn the printer off and then discon nect the power cord and interface
cable from the printer .
Installing the Duplex Unit
1 With a screwdriver or similar instrument, remove the flat clip that is
attached to the back of the main unit of the printer.
Setting-up
2-20 PagePro 4100W
Page 36

Setting-up
2
2 Align the “L” shaped duplex unit to the back of the main unit of the
printer so that the bottom of the “L” is inside of the opening at the
bottom of the printer .
NOTE
Í
Make sure that the connect or of the unit is inserte d into the printer
securely.
PagePro 4100W 2-21
Page 37

2
Setting-up
3 With one hand holding the duplex unit in position, use a Phillips
screwdriver to t ighte n the sc rews t hat ar e perma nently att ached to t he
back of the duplex unit.
NOTE
Í
Hold up the duplex unit with your hand during installation until it is
secured to the printer with the screws.
4 Connect the power cord to the printer and then turn the printer on.
“Connecting the Power Cord”, see page 2-9,
“Turning On the Printer”, see page 2- 12.
5 Select the Printer Inf ormation in the Printer Status Display to verify that
duplex unit is displ ayed in the Printer Information dialog. For details,
see page 4-53 “Displaying Printer Information...”.
2-22 PagePro 4100W
Page 38

Setting-up
2.6 Second/Third Paper Cassette Unit
You can increase the paper -holding capacity o f your printer by installing
an optional second/t hird pap er casset te un it. Each p aper c assette u nit can
hold up to 500 sheets of paper. The second and third paper ca ssette units
are interchange able and can increase paper- holding capacity to 1,000
sheets when installed together.
Installing the Optional Second/Third Paper Cassette Unit
l
Take the paper cassette unit out of the shipping box.
l
Remove the plastic bag and all shipping materials.
l
Turn the printer off and then discon nect the power cord and interface
cable from the printer .
1 Place the paper cassette unit in the location you have chosen (see
page 2-1 “Selecting a Location for the Printer”).
Pull out the paper tray.
2
2 Set the printer onto t he paper cass ette uni t using the coupli ng pins as
a guide.
NOTE
Í
The printer weighs approximately 18 kg (39.7 lbs.) with the optional
second paper cassett e unit installed . Two people are recommended to
lift it when necessary.
PagePro 4100W 2-23
Page 39

2
Setting-up
Second paper cassette unit Third paper cassette unit
3 Insert Tray 2 or Tray 3 into the paper cassette unit.
Tray 2
Tray 3
2-24 PagePro 4100W
Page 40

Setting-up
2
NOTE
Í
Be sure to use both hands whenever Tray 2 or Tray 3 is being
removed from or inser ted i nto the paper cassette unit
4 Connect the power cord to the printer and then turn the printer on.
“Connecting the Power Cord”, see page 2-9,
“Turning O n th e Printer”, see page 2-12.
5 Select the Printer Inf ormation in the Printer Statu s Display to verify that
Tray 2 or Tray 3 is displayed in the Printer Information dia log. For
details, see page 4-53 “Displaying Printer Information...”.
PagePro 4100W 2-25
Page 41

2
2.7 Network Interface Card (NIC)
There is an optional 10/100Bas eT net work interf ace card that i s support ed
by this printer. For details, please see the User’s Manua l f or the Network
Interface Card.
Installing the Optional Network Interface Card
1 Turn the printer off and unplug the power cord from the printer.
Disconnect the cable from the interface connector.
Setting-up
2-26 PagePro 4100W
Page 42

Setting-up
2 Remove the screw that secures the cover panel to the back of the
printer. Remove the cover panel.
NOTE
Í
Make sure that you do not misplace the cover panel or screws when
you remove them. The screws will be used after the optional NIC is
installed.
2
3 Take the NIC out of its carton.
NOTE
Í
When the NIC is taken out of its cond uctive bag or off its mat, hold it
by its edges to avoid t ouching the terminals or t he patterned surfaces.
4 Insert the NIC as shown in the diagram.
PagePro 4100W 2-27
Page 43

2
Setting-up
5 Secure the NIC into place using the same screws that were used to
hold the cover panel.
NOTE
Í
Follow the NIC’s installation proc edure in reverse to remove the NIC.
6 Connect the power cord to the printer and then turn the printer on.
“Connecting the Power Cord”, see page 2-9,
“Turning On the Printer”, see page 2- 12.
2-28 PagePro 4100W
Page 44

Using the Printer
3 Using the Printer
3.1 Paper
CAUTION
Í
This printer is designed to print on only the followi ng types of paper.
Type
Special Paper
16 to 24 lbs.
2
3
Paper Feeding Port
Tray 1
Tray 2
Tray 3
Manual
Feed
Tray
Plain Paper weighing:
60 to 90 g/m
Recycled Paper weighing:
60 to 90 g/m216 to 24 lbs.
Transparency Sheet
mmmmmmmm
mm
mm
mmmmmmmm
None None None None None None
None None None None None None
Labels
Letterhead
Envelopes
J-Post (Postcard ) size:
100 × 148 mm
4" × 5-3/4"
Thick Paper weighing:
90 to 163 g/m224 to 43 lbs.
PagePro 4100W 3-1
Page 45

3-2 PagePro 4100W
* Specialty paper is not supported for duplex printing.
Tray 1
Manual Feed Tray
Paper Feeding
Port
mmmm
mmmm
Env. Com10
105 x 24 1 mm
4-1/8"× 9-1/2"
Env. DL
110 × 220mm
4-5/16" × 8-11/16"
Env. C5
162 × 229 mm
6-3/8" × 9"
Env. Monarch
98 × 190mm
3-7/8" × 7-1/2"
3
Size
* Each of the five cassettes of Tray 2/Tray 3 support one of the five types of paper that are
Envelopes (Tray 1 and Manual Feed Tray)
Manual Feed Tray
compatible with this printer.
mmmmmmm
Tray 1
Tray 2*
Tray 3*
mm
None
mm
ONone
Paper Feeding
Port
mmmmmmm
mm
A4
210 × 297 mm
8-1/4" × 11-3/4"
JIS B5
182 × 257 mm
7-1/4" × 10"
None
A5
148 × 210 mm
5-3/4" × 8-1/4"
mmm
Legal
216 × 356 mm
8-1/2" × 14"
Letter
216 x 279 mm
8-1/2" × 11"
Executive
8
4 × 267 mm
1
7-1/4" × 10-1/2"
None
Invoice
140 × 216 mm
5-1/2" × 8-1/2"
Standard size
Using the Printer
Page 46

Using the Printer
NOTE
Í
Do not use the following types of paper to avoid r educed print quality,
a misfeed or a print failure.
m
m
m
m
m
m
m
m
m
m
m
Í
Envelopes should meet the following requirements:
m
m
m
m
Í
Generally, enve lopes perform well, but some type s ma y wrinkle. We
strongly recommend testing any type of envelope before buying it in
large amounts.
Í
For more in fo rmation , re fe r to “Loading Paper”.
3
Paper already used in a thermal transfer printe r or ink jet printer.
Paper that is too thin or too thick.
Paper folded, curled or torn.
Paper having binding holes or perforations.
Paper with surfaces that are too smooth or too rough or with
varying surfac es.
Paper having special coatings on their surfaces such as carbon
paper, heat-sens it ive paper and pressure- sensitive paper.
Sheets of various sizes.
Paper not cut on right angle s.
Paper bound by glue, staples or clips.
Paper affixed with labels which are easy to peel.
Post cards that are warped or bent.
Sharp folds and edges.
General mailing envelopes without seals on the glu ed portion.
Having flaps the full widt h of the envelope (unaccept able if the flap
is glued).
Wrinkle-free, no fasteners.
PagePro 4100W 3-3
Page 47

3
3.2 Loading Paper
There are two primary sources that can be used to feed paper int o the
printer: Tray 1 and the manual feed tray.
Tray 1 is the standard source for supplying paper to the printer. Various
types and sizes of paper can be fed from this tray.
Tray 2/Tray 3 are avail able as optional paper source s. See the secti on of
this U s er’s Manual entit led “Loading Paper onto Tray 2/Tray 3” for details
on using these trays .
Always remember that paper storage condition s greatly affect print
quality. Store paper in its original package . Keep paper out of areas
subject to extreme temperatures or humidity.
Loading Paper onto Tray 1
You can load up to 25 0 shee ts of st andard paper onto Tr ay 1. For detail s,
see page 3-1.
1 Remove the tray cover from Tray 1.
Using the Printer
2 Open all three of the paper si ze guides.
3-4 PagePro 4100W
Page 48

Using the Printer
3 Place a stack of paper in the cent er of Tray 1. Adjust the paper size
guides so that both the lef t and the right sides of the paper stack are
secure.
NOTE
Í
A maximum level mark on the paper size guide shows how high you
can stack paper on Tray 1. Make sure that pap er is st acked no high er
than thi s mark.
Í
Do not load additional paper until the paper currently loaded onto
Tray 1 is complete ly use d .
3
4 Replace the tray cove r ont o T ray 1.
PagePro 4100W 3-5
Page 49

3
Using the Printer
Loading Paper onto Tray 2/Tray 3
NOTE
Í
Make sure that the Tr ay 2/Tr ay 3 cas sette for the p roper si ze of pape r
to be used for printing has been installed into the second/third paper
cassette unit. For i nstructions on inse rting (and removing) the Tray 2/
Tray 3 cassette into (and from) the second/third paper cassette unit,
refer to Chapter “Setting-up”.
1 Slide Tray 2/Tray 3 out of the second/third paper cassette unit as
illustrated.
Tray 3Tray 2
NOTE
Í
The cassette is designed to remain in the unit during the normal
loading and operation of the printer. To remove Tray 2/Tray 3 from the
unit, pull it out as far as it will go wit hout force. Then gently raise the
forward-end up, and remove Tray 2/Tray 3 from the unit.
Í
Tray 2 and Tray 3 are available as an opti on for this printer. Contact
your dealer to find out how you can acquire this tray to increase the
capabilities of your printer.
3-6 PagePro 4100W
Page 50

Using the Printer
2 Remove the cassette cover from Tray 2/Tray 3.
3 Press down on the paper lift ing plate located inside of Tray 2/Tr ay3
until it locks.
3
4 Place a stack of up to 500 sheets of paper into Tray 2/Tray 3 so that
the side that was facing up when the paper was unwrapped is still
facing up.
PagePro 4100W 3-7
Page 51

3
Using the Printer
NOTE
Í
A maximum level mark inside the inlet of Tray 2/Tray 3 shows how
high you can stack paper. Ma ke sure that paper is stacked no higher
than this mark
Maximum level mark
Í
Tray 2/Tray 3 does not suppo rt landscape-oriented paper-feeding.
Í
Do not load additional paper until all the paper current ly on Tray 2/
Tray 3 is completel y used up.
3-8 PagePro 4100W
Page 52

Using the Printer
5 Replace the cassette cover and insert Tray 2/Tray 3 in to the
second/third paper cassette unit.
3
Tray 2
Tray 3
PagePro 4100W 3-9
Page 53

3
Using the Printer
Loading Paper onto Manual Feed Tray
1 Make sure that the tray cover is properly attached to Tray 1.
2 Open the paper size guides .
3 Insert the she et of paper into the manual feed tray with the side to be
printed facing up.
3-10 PagePro 4100W
Page 54

Using the Printer
4 Adjust the paper size guides so that both sides of the paper are
secure.
NOTE
Í
Insert onl y one s heet of p aper or o ne e nvelope at a ti me wh en feed ing
manually.
3
PagePro 4100W 3-11
Page 55

3
Using the Printer
Printing on Envelopes
The manual feed tray supports fe eds of Commercial 10, Monarch, DL and
C5 envelopes.
Manually feed envelopes one by one into the manual feed tray.
1 Place the envelope with th e side to be printed facing up on the tray.
The flap of the envelope shoul d be facing down and to the left.
2 Make sure that the e nvelope is pl aced in the c enter of the tr ay and that
it is secured by the paper size guides.
NOTE
Í
Because there is great variation in the quality of paper used for
envelopes, we suggest that you produce test prints of various types
before purchasi ng any envelope in large quantit ies for use with this
printer.
3-12 PagePro 4100W
Page 56

Using the Printer
Note the following points whenever printing on envelopes:
l
Make sure that all edge s are creased sharply and that all fl aps are
folded correctly.
l
Do not use envelope s t hat are s elf-adhes iv e. Use onl y envel opes that
have standard seali ng that sticks after it is moistened.
l
Use envelopes of which flaps run the entire length of the envelope.
Envelopes that seal at one end will not feed properly.
l
Do not use envelopes that have a window. Such envelopes can
seriously damage the printer.
l
Do not use envelopes that are wrinkled.
l
Never use envelopes that have clasps or any other type of fastener
that can damage the printer.
l
Do not store envelopes in an are a that is subject to high humidity.
3
PagePro 4100W 3-13
Page 57

3
Using the Printer
Duplex Printing
This feature print s docum ent data on both sides of a sheet of pape r.
Installation of the optional duplex unit is required to perform duplex
printing.
You can choose either Long Edge Bindi ng or Short Edge Binding when
generating duplex documents.
1. Long Edge Binding
A
A
A
A
Portrait
2. Short Edge Binding
Landscape
A
A
A
Portrait
3-14 PagePro 4100W
Landscape
A
Page 58

Using the Printer
The supported paper ty pes and sizes for duplex printing are as follows.
l
Paper Type
Plain paper: 64 to 90 g/m
Recycled paper: 64 to 90 g/m
NOTE
Í
Do not use special paper (transparencies, labels, envelopes,
letterhead, J-Post and thick paper) for duplex printing.
l
Paper Size
A4, A5, JIS B5, Letter, Legal, Executive, Invoice.
Remember the following points when generating duplex documents:
l
The size of both original documents that will be use d to make one
duplex document must be the same.
l
The original docume nt that is loaded first into the duplex unit will be
output face down.
2
(17 to 24 lb)
2
(17 to 24 lb)
3
PagePro 4100W 3-15
Page 59

3
Using the Printer
3-16 PagePro 4100W
Page 60

Printer Driver and Stat us Display
4 Printer Driver and Status Display
This printer driver was especially designed to provide true Windowsbased printing for your Minolta/QMS printer. The driver consists of three
programs: the printer status display, Masquerade and the driver it self.
IMPORTANT
Í
This printer driver i s loc ated on the CD-ROM that comes with your
printer. If your computer does not have a CD-ROM drive or you wish
to download the updated print er driver, please cont act a Mi nolta /QMS
dealer.
4.1 System Requirements
The following descr ibes the minimum syst em requirements for running the
Minolta/QMS PagePro 4100 W print er driver.
Operating System: Microsoft Windows 95, Windows 98 or Windows NT
4.0
Personal Computer: IBM-compatible PC with at least a 486DX 66MHz
CPU (Pentium processor recommended)
Disk Drive: One, CD-ROM drive is required for ins tallation
I/O Interface: IEEE 1284/ ECP/ EPP/ compatible
4
Memory
Windows 95/98 At least 16 MB of PC RAM
Windows NT 4.0 At least 32 MB of PC RAM
Free Hard Disk Space: At least 20 MB for files
PagePro 4100W 4-1
(32 MB recommended)
(64 MB recommended)
Page 61

4
Printer Driver and Status Display
NOTE
Í
Use of a poor quality paral lel cable may adversely affect input.
Í
In order to achieve the best results for your pri nted documents, your
computer should be equipped wi th at lea st 16 MB (Windows 95/98), or
32 MB (Windows NT 4.0) of RAM. Additional RAM beyond the
recommended 32 MB (Windows 95/98), or 64 MB (Windows NT 4.0),
will allow your print er to provide you with the high standards of
performance for which it was designed. If your comput er’s current
memory capacity is l ess than 16 MB (Windows 95/98), or 32 MB
(Windows NT 4.0), the inst all a tion of additional memor y is highly
recommended.
4-2 PagePro 4100W
Page 62

Printer Driver and Stat us Display
4.2 Installing the Printer Driver Under Windows 95/98
This section provides information on installing the printer driver under
Windows 95/98. It also tells you how to uninstall the printer driver when
necessary.
The printer driver mus t be in stalled using the CD-ROM’s setup.exe.
To Install the Printer Driver from the CD-ROM
1 Turn on your computer and start up Windows 95 or Windows 98.
2 Inser t the Prin ter Drive r CD-ROM i nto your co mputer ’s CD-ROM drive.
In this example, we will assume that D: is the name of the CD-ROM
drive.
3 Open the Windows Explorer , browse to the CD-ROM drive and
navigate to: D:\DRIVER\WIN95 NT\GB.
4 Double-click setup.exe to start up the inst aller.
NOTE
Í
The printer driv er must be installe d using the CD-ROM’s setup. exe. Do
not use the Add Printer wizard fr om the Printers folder. Inst allation
through the Add Printer wizard will prevent the printer from performing
properly.
4
5 Click [OK].
PagePro 4100W 4-3
Page 63

4
Printer Driver and Status Display
6 Select Local printer i f the printer is connec ted dire ctly to your comput er
or Network printer if the printer is connected t hrough a network, and
click [OK].
7 Select an installation option, and click [OK].
4-4 PagePro 4100W
Page 64

Printer Driver and Stat us Display
NOTE
Í
We strongly recommend that you select PostScript Support. This
option allows the pr inter driver to switch automatically t o a PostScript
Driver (ZScript) when the GDI Printer Driver is unable to produce a
satisfacto ry printout o f an image. Thou gh this happen s very rarel y, it is
a good idea to select this opti on to ensure optimum printing results.
Í
Instructions for installing the PostScript Driver (ZScript ) ar e provided
after the instal lat ion instructions for the GDI Printer Driver (Ste ps 15
through 20, see pag e 4-3 ff ). If Post Scr ipt Supp ort has b een selec ted ,
be sure to install the PostScript Driver (ZScript ) usi ng M asquerade.
Í
For a detailed description of ZScript, see the Zenographic’s ZScript
User’s Guide (file name: ZScript.pdf) from the Manual f older in the CDROM.
Displaying Zenog raphic’s ZScr i p t User’s Guide File
1. After you complete inst allation of the GDI Printer Driver, insert the
Printer Driver CD-ROM into your comput er’s CD-ROM dri ve. If you
have just instal led the print er driver, t he CD-ROM should al ready be in
the drive.
2. Open the Windows Explorer , browse to the CD-ROM drive and
navigate to: D\Acrob at\WIN95NT\GB. Double-cli ck ar32x301.exe.
This starts insta ll ation of Adobe Acrobat Reader. Fol low the
instructions that appear on the screen. If your system already has
Adobe Acrobat Reader installed, skip this step (Step 2) and jump
directly to Step 3.
3. Double-click ZScri pt.pdf from the Manual fold er i n the CD-ROM.
This displays Zeno graphic’s ZScript User’s Guid
4
e.
PagePro 4100W 4-5
Page 65

4
Printer Driver and Status Display
8 Select the appropriate port.
9 Check Set as default printer if you want to use the printer as this
default printer or leave this option unchecked if you do not want it as
the default.
10Click the [OK] button to display the next dialog.
11Rename the printer if you want and then click [OK]. To proceed witho ut
renaming the printer, just click [OK].
4-6 PagePro 4100W
Page 66

Printer Driver and Stat us Display
12Change the directory nam e if you want or leave the default directory
name. Next, click [Install] to start actual GDI Printer Driver installation.
13Click [Yes] (recommended) to print a test page or [No] if you want to
proceed without prin ti ng a test page.
4
PagePro 4100W 4-7
Page 67

4
Printer Driver and Status Display
14The Minolta/QMS Printer Utilities dialog on your com puter screen
contains icons for Minolta/QMS PagePro 4100W Help, Minolta/QMS
PagePro 4100W Status, and Uni nstall. If you selected the Post Script
Support option in Step 6 of this procedure, it also has a Masquer ade
icon.
NOTE
Í
The Masquerade icon is not displayed if you did not select the
PostScript Support option in Step 6.
Í
If you selected the PostSc ri pt Support option in Step 6, make sur e to
continue from step 15 to install PostScript Driver (ZScript).
Í
If you did not selec t the Pos tScri pt Suppor t opti on, Step 14 compl etes
your installat ion of the GDI Printer Driver.
15On the Installer screen, click the [Quit] button.
16To start install ati on of PostScript Driver (ZScript), double-click the
Masquerade icon in the Mi nolta/QMS Printer Utilities dialog.
4-8 PagePro 4100W
Page 68

Printer Driver and Stat us Display
17In the Non-PostScript Printers area, select Minolta/QMS PagePro
4100W on LPT1: and then click t he [I nstall] button.
18After a few moments, the Minolta/QMS PagePro (PSCRIPT)
Properties dialog appears.
4
19Click [OK] to display the next dialog.
PagePro 4100W 4-9
Page 69

4
Printer Driver and Status Display
20Confirm that Minolta/QMS PagePro (PSCRIPT) is in the Installed
ZScript Printers area of the Masquerade dialog.
21Click the [Exit] button to complete installation of PostScript Driver
(ZScript).
22On the taskbar, click Start, point to Settings , and then click Printers.
23Confirm that two icons named Minolta/QMS PagePro 4100W and
Minolta/QMS PagePro (PSCRIPT) are shown i n the Printers dialog.
4-10 PagePro 4100W
Page 70

Printer Driver and Stat us Display
NOTE
Í
The Minolta/QMS PagePro (PSCRIPT) icon does not appear in the
Printers dialog if you do not perform Steps 15 through 20 to install
PostScript Driver (ZScript).
Print Test Page: Example
An example of the test page is shown bel ow. Make sure that “Minolta/
QMS PagePro 4100W ” is indicated as the printer m odel on the test page.
This confirms that the printer driver has been correctly installed.
4
PagePro 4100W 4-11
Page 71

4
Printer Driver and Status Display
To Unins ta ll the Printer Driver
NOTE
Í
Skip steps 1 through 6 of the following procedure if you do not have
PostScript Driver (ZScript) installed on your computer.
1 Turn on your computer and sta rt up Windows 95 or Windows 98.
2 To start unin stallation of Post Script Driver (ZScr ipt), click Start on the
taskbar, point to Programs, point to Minolta/QMS Printer Utilities, and
then click Masquerade.
3 In the Installed ZScript Printers area, click Minolta/QMS PagePro
(PSCRIPT) and then click Remove.
4-12 PagePro 4100W
Page 72

Printer Driver and Stat us Display
4 Click [Exit].
5 On the taskbar, click Start, point to Settings, and then click Printers.
6 Confirm that the Minolta/QMS PagePro (PSCRIPT) icon is no longer
displayed in the Printers dialog.
4
PagePro 4100W 4-13
Page 73

4
Printer Driver and Status Display
7 To st art uni nstal l a t ion of the G DI Prin ter Dr i v er, cli c k Star t on the
taskbar, point to Programs, point to Minolta/QMS Printer Utilities, and
then clic k U nin s ta ll.
8 Select [Minolta/ QMS Page Pro 4100W]
9 Click [Uninstal l] to proceed with the uninstall oper ation or [Cancel] to
abort.
4-14 PagePro 4100W
Page 74

Printer Driver and Stat us Display
10In the next dialog that appears, click [Yes] to restart the computer.
11On the taskbar, click Start, point to Settings, and then click Printers.
12Confirm that the Minolta/QMS PagePro 4100W icon is no longer
shown in the Printers dialog.
4
PagePro 4100W 4-15
Page 75

4
Printer Driver and Status Display
4.3 Installing the Printer Driver Under Windows NT 4.0
This section provides information on installing the printer driver on a
computer running Windows NT 4.0. It also tells you how to uninstall the
printer driver when necessary.
To Install the Printer Driver from the CD-ROM
1 Turn on your computer and sta rt up Windows NT 4.0.
2 Insert the Pr inter Dri ver CD-ROM i nto your computer’s CD- ROM drive.
In this example we will assume that D: is the name of the CD-ROM
drive.
3 Open the Windows Explorer , Brows e to th e CD-ROM driv e and
navigate to: D:\DRIVER\Win9 5NT\GB
4 Double-click setup.exe to start up the inst aller.
NOTE
Í
The printer driv er must be installe d using the CD-ROM’s setup. exe. Do
not use the Add Printer wizard from the Printers folder. Installation
through the Add Printer wizar d will prevent th e printer from perfor ming
properly.
4-16 PagePro 4100W
Page 76

Printer Driver and Stat us Display
5 Follow the instructions that appear on your computer screen to
complete the installation.
6 Select L oca l P rin t er .
4
7 Click the [OK] button to display the next dialog.
8 Select installation options.
PagePro 4100W 4-17
Page 77

4
Printer Driver and Status Display
NOTE
Í
We strongly recomme nd that you select PostScript Support. This
option allows the pr inter driver to switch automatically t o a PostScript
Driver (ZScript) when the GDI Printer Driver is unable to produce a
satisfactory pr intout o f an image. Thou gh this happen s very rarely, it is
a good idea to select this option to ensure optimum printi ng results.
Í
Instructions for installing the PostSc ript Driver (ZScript) ar e provided
after the installation instructions for the GDI Printer Driver (Steps 19
through 24 on see page 4-16 ff). If PostScript Support has been
selected, be sure to install the PostScript Driver (ZScript) using
Masquerade.
Í
For a detailed description of ZScript, see the Zenographic’s ZScript
User’s Guide (file name: ZScript.pdf) from the Manual fol der in the CDROM.
Displaying Zenographic’s ZScript User’s Guide File
1. After you complete installation of the GDI Printer Driver, insert the
Printer Driver CD-ROM into your computer’s CD-ROM dri ve. If you
have just instal led the print er driver , the CD-ROM shoul d already be in
the drive.
2. Open the Windows Explorer , bro w se to t he CD-ROM dri ve and
navigate to: D\Acroba t\WIN95NT\GB. Double-cli ck ar32x301.exe.
This starts install ation of Adobe Acrobat Reader. Follow the
instructions that appear on the screen. If your system already has
Adobe Acrobat Reader installed, skip this step (Step 2) and jump
directly to Step 3.
3. Double-click ZScri pt.pdf from the Manual fold er i n the CD-ROM.
This displays Zeno graphic’s ZScr ipt User’s Guid
e.
4-18 PagePro 4100W
Page 78

Printer Driver and Stat us Display
9 If the comput er onto whi ch you ar e instal ling th e driver i s a print server,
check the Server Install checkbox.
NOTE
Í
If your printer is connected to a network, we recommend consulting
your network adminis trator and referring to the Network Interface Card
Manuals.
10If you plan to use the printer as a network printer, type in a name for
Share Name.
Example: PP4100W
4
NOTE
Í
Skip Step 7 if you do not check the Server I nstall option in Step 8.
11Click [OK] to display the next dialog.
12Select the appropriate port.
PagePro 4100W 4-19
Page 79

4
Printer Driver and Status Display
13Check Set as default printer if you want to use the printer as this
default printer or leave this option unchecked if you do not want it as
the default.
14Click the [OK] button to display the next dialog.
15Rename the printer if you want and then click [OK]. To proceed witho ut
renaming the printer, just click [OK].
16Change the directory nam e if you want or leave the default directory
name. Next, click [Instal l] to start actual GDI Printer Driver installation.
4-20 PagePro 4100W
Page 80

Printer Driver and Stat us Display
17Click [Yes] (recommended) to print a test page or [No] if you want to
proceed without prin ti ng a test page.
18The Minolta/QMS Printer Utilities dialog on you r computer screen
contains icons for Min olta/QMS PagePro 4100W Help, Minolta/ Q M S
PagePro 4100W Status, and Uni nstall. If you selected the PostScript
Support option in Step 7 of this procedure, it also has a Masquer ade
icon.
4
NOTE
Í
The Masquerade icon is not displayed if you did not selec t the
PostScript Support option in Step 7.
Í
If you selected the PostScript Support option in Step 7, make sure to
continue from Step 19 to ins tal l PostScript Driver (ZScript).
Í
If you did not sele ct the Pos tScri pt Suppor t opti on, Step 18 complet es
your installation of the GDI Printer Driver.
PagePro 4100W 4-21
Page 81

4
Printer Driver and Status Display
19On the Installer screen, click the [Quit] button.
20To start install ati on of PostScript Driver (ZScript), double-click the
Masquerade icon in the Mi nolta/QMS Printer Utilities dialog.
21In the Non-PostScript Pri nters area, select Minolta/QMS PagePro
4100W on LPT1: and then click the [Install] button.
4-22 PagePro 4100W
Page 82

Printer Driver and Stat us Display
22After a few moments, the Minolta/QMS PagePro (PSCRIPT)
Properties dialog appears.
4
23Click [OK] to display the next dialog.
24Confirm that Minolta/QMS PagePro (PSCRIPT) is in the Installed
ZScript Printers area of the Masquerade dialog.
PagePro 4100W 4-23
Page 83

4
Printer Driver and Status Display
25Click the [Exit] button to complete installation of PostScript Driver
(ZScript).
26On the taskbar, click Start, point to Settings , and then click Printers.
27Confirm that two icons named Minolta/QMS PagePro 4100W and
Minolta/QMS PagePro (PSCRIPT) are shown i n the Printers dialog.
NOTE
Í
The Minolta/QMS PagePro (PSCRIPT) icon does not appear in the
Printers dialog if you do not perform Steps 19 through 24 to install
PostScript Driver (ZScript).
Í
The printer drive r must be installed usi ng the CD-ROM’s installer. Do
not use the Add Printer wizard from the Printers folder.
4-24 PagePro 4100W
Page 84

Printer Driver and Stat us Display
Print Test Page: Example
An example of the test page is shown bel ow. Make sure that “Minolta/
QMS PagePro 4100W ” is indicated as the printer m odel on the test page.
This confirms that the printer driver has been correctly installed.
4
PagePro 4100W 4-25
Page 85

4
Printer Driver and Status Display
To Unins ta ll the Printer Driver
NOTE
Í
Skip steps 1 through 6 of the following procedure if you do not have
PostScript Driver (ZScript) installed on your computer.
1 Turn on your computer and sta rt up Windows NT 4.0.
2 To start unin stallation of Post Script Driver (ZScr ipt), click Start on the
taskbar, point to Programs, point to Minolta/QMS Printer Utilities, and
then click Masquerade.
3 In the Installed Zscr ipt Printers area, clic k Minolta/QMS PagePro
(PSCRIPT) and then click [Remov e].
4-26 PagePro 4100W
Page 86

Printer Driver and Stat us Display
4 Click [Exit].
5 On the taskbar, cl ick [ Start ], poi nt to Set tings , and then c lick [ Print ers].
4
6 Confirm that the Minolta/QMS PagePro (PSCRIPT) icon is no longer
displayed in the Printers dialog.
PagePro 4100W 4-27
Page 87

4
Printer Driver and Status Display
7 To st art uni nstal l a t ion of the G DI Prin ter Dr i v er, cli c k Star t on the
taskbar, point to Programs, point to Minolta/QMS Printer Utilities, and
then click U n insta ll
8 Select [Minolta/ QMS Page Pro 4100W]
9 Click [Uninstal l] to proceed with the uninstall oper ation or [Cancel] to
abort.
4-28 PagePro 4100W
Page 88

Printer Driver and Stat us Display
10In the next dialog that appears, click [Yes] to restart the computer.
11On the taskbar, click Start, point to Settings, and then click Printers.
12Confirm that the Minolta/QMS PagePro 4100W icon is no longer
shown in the Printers dialog.
4
PagePro 4100W 4-29
Page 89

4
Printer Driver and Status Display
4.4 Registering the Status Display
The Status Display provi des you with a variety of useful informat ion about
the current status of your printer.
It is installed automatically when you install the printer driver.
Optional regist rati on in th e Start Up direc tory of Windo ws 95, Windo ws 98
or Windows NT 4.0 allows the Status Display to automatically res ide on
your desktop.
Follow the instruct ions provided for registering the Status Disp lay
according to your operat ing environment. For further details, please refer
to the documentation that came with your version of Windows.
NOTE
Í
The Status Display all ows you to monitor the operating st atus of the
printer only when the printer is loca ll y (directly) connected to the host
computer via a parallel interface cable.
Registering the Status Display Under Windows 95/98
The screen images that appear in this section are examples of Status
Display registr ation under Windows 95. Act ual screen images may appe ar
differently under Windows 98, however, the registration procedure is the
same.
This procedure must be f oll owed only after the successful installati on of
the printer driver.
1 Click on the Start button, go to the Settings menu and click on the
Taskbar... item.
4-30 PagePro 4100W
Page 90

Printer Driver and Stat us Display
2 Click on the Start Menu Programs tab in t he Taskbar Pro perties dial og
that appears.
3 Click the [Add] but ton that is located in the Cust omize Sta rt Menu box
to open the Create Shortcut dialog.
4
4 Use the Browse butt on to search for t he Zjst402w f ile (for t his example
it is assumed that the file is installed under
C:\Windows\Zjst402w.exe).
5 Click the Windows file and then click the [Open] button.
PagePro 4100W 4-31
Page 91

4
Printer Driver and Status Display
6 Click the Zjst402w file and then click [Open] to return to the Create
Shortcut dialog.
7 Click the [Next>] button in the Create Shortcut dialog to open the
Select Program Folder dialog.
8 Select the StartUp folder from the “Select folder to place sho rtcut in”
box and then click [Nex t>].
9 Enter a name for the shortcut to the Stat us Display into the Select a
Title for the Program dialog and click [Finish].
10Click the [OK] button in the Taskbar Properties.
11Restart the comp uter.
4-32 PagePro 4100W
Page 92

Printer Driver and Stat us Display
12Make sure that the Minolta/QMS PagePro 4100W Status Display
appears on your desktop and that the Status Display i con appears on
the Windows taskbar.
4
PagePro 4100W 4-33
Page 93

4
Printer Driver and Status Display
Registering the Status Displa y Under Windows NT 4.0
This procedure must be f oll owed only after the successful installati on of
the printer driver.
1 Click on the Start button, go to the Settings menu and click on the
Taskbar... item.
2 Click on the Start Menu Programs tab in t he Taskbar Prop erties dial og
that appears.
3 Click the [Add] button t hat is located in the Cust omize Sta rt Men u box
to open the Create Shortcut dialog.
4-34 PagePro 4100W
Page 94

Printer Driver and Stat us Display
4 Use the [Browse] button to search for the Zjst402w file (for this
example it is assumed t hat t he file is installed under
C:\Winnt\Zjst402w.exe)
5 Click the Winnt file and then click the [Open] button .
6 Click the Zjst402w file and then click [Open] to return to the Create
Shortcut dialog.
4
7 Click the [Next>] button in the Create Shortcut dialog to open th e
Select Program Folder dialog.
8 Select the Startup folder from the “Select folder to place shortcut in”
box and then click [Nex t>].
PagePro 4100W 4-35
Page 95

4
Printer Driver and Status Display
9 Enter a name for the shortcut to the Stat us Display into the Select a
Title for the Program dialog and click [Finish].
10Click the [OK] button in the Taskbar Properties.
11Restart the comp uter.
12Make sure that the Minolta/QMS PagePro 4100W Status Display
appears on your desktop and that the Status Display i con appears on
the Windows taskbar.
4-36 PagePro 4100W
Page 96

Printer Driver and Stat us Display
4.5 Displaying the Driver Setup Dialog (Windows 95/98/NT 4.0)
Use the following procedure to display the driver setup dialog under
Windows 95, Windows 98 or Windows NT 4.0.
To Display the Driver Setup Dialog Under Windows 95/98
1 Click Start, point to Settings, and then click Printers to display the
Printers dialog.
2 In the Printers dialog, cli ck the Minolta/QMS PagePro 4100W icon.
4
3 In the Printers dialog, select Properties from the File menu.
4 On the
PagePro 4100W 4-37
Å
32-bit SuperDriver Setup tab of the Properties dialog, the
following dialo g appears.
Page 97

4
Printer Driver and Status Display
To Display the Driver Setup Dialog Under Windows NT 4.0
1 Click Start, point to Setti ngs, and then click Print ers to display the
Printers dialog.
2 In the Printers dialog, cli ck the Minolta/QMS PagePro 4100 W icon.
4-38 PagePro 4100W
Page 98

Printer Driver and Stat us Display
3 In the Printer s dialog, select Doc ument Def aults … from the Fi le menu.
4 The following dialo g appears.
4
PagePro 4100W 4-39
Page 99

4
Printer Driver and Status Display
4.6 Using the Printer Driver Under Windows 95/98/NT4.0
The features of the printer driver allow you to control a wide variety of
printer parameter s from your comput er. The followi ng sections pr ovide an
overview of the print er driver’s properties.
The settings that are specified in the Properti es dialog will become the
default settings for the printer driver . The di alog is opened from the
Windows 95/98/NT 4.0 Print ers folder.
NOTE
Í
The screen images that appear in this sectio n show the printer driver
operating in a Windows 95-based environment.
Common Buttons
The following button s appear at the bottom of each tab.
l
[OK]
Click to exit the properties dialog, saving any changes made.
l
[Cancel]
Click to exit the properties dialog without saving any changes made.
l
[Apply]
Click to save all changes without exiting the properties dialog.
l
[Help]
Click to view online help.
4-40 PagePro 4100W
Page 100

Printer Driver and Stat us Display
Paper
The Paper tab cont ains f uncti ons t hat ef fect t he for mat and out put of your
printed documents.
Paper Size
The various sizes of paper that are supported by your pri nter are
displayed in the drop-down list. Select the appropriate size.
l
Paper
m
Letter 8 1/2 × 11 inches
m
Legal 8 1/2 × 14 inches
m
Invoic e 5 1/2 × 8 1/2 inches
m
Executive 7 1/4 × 10 1/2 inches
m
A4 210 × 297 mm
m
A5 148 × 210 mm
m
JIS B5 182 × 257 mm
m
J-Post 100 × 148 mm
4
l
Envelopes
m
COM10 4 1/8 × 9 1/2 inches
m
DL 110 × 220 mm
m
C5 162 × 229 mm
m
Monarch 3 7/8 × 7 1/2 inches
PagePro 4100W 4-41
 Loading...