

Page 1

Network Interface Card
User’s Manual
PagePro 4100E users:
Your printer does not come with a
Network Interface Card. A card is,
however, available as an option.
PagePro 4100GN users:
Your printer has network interface
functions built into its controller board.
4110-7722-01
for PagePro 4100E/4100GN
Page 2

F oreword
Softwar e Lic en se Agreemen t an d Warranty
Software License Agr eem ent
Important:
Before installing the software please carefully read this License Agreement. The installation of this software indicates your acceptance of the
terms and condi tions of this Licens e. If you do not agre e with the terms and
conditions, you should return the software to Minolta Co., Ltd. for a full
refund.
1. SOFTWARE
Software means the computer program contained in this package (which
may include digitally encoded, ma chine readable, scalable outline font data
as encoded in a special format), together with all codes, techniques, software tools, format, design, concepts, methods and ideas associated with the
computer program and all doc umentation related thereto.
2. LICENSE AGREEMENT
This is a License A g reement a nd no t a n ag r ee m e n t fo r s a l e. M i no l ta ow n s,
or has been licensed from othe r owners, copyrights in t he Software. Except
as stated in this Agreement, you are not granted any right s to patents, copyrights, trade na mes , trademarks (whether registered or unregistered), or any
other rights, franchises or license in respect of the Software. Title to the
Software and any copy made from it is retained by Minolta or such other
owne rs .
3. LICENSE
Minolta, hereby grants to you, and you agree to accept a non-exclusive, non
transferable and limited license and you may:
(1) install and use the Software on a single computer and one asso cia ted
printer.
(2) use the Software only for your own customary business or personal
purposes.
(3) make a copy of the Software for backup or installation purposes only in
support of the normal and intended use of the Software.
i
Page 3

Foreword
(4) transfer possess ion of co pies of the Software to another party by
transferri ng a cop y of this Agreement and all other documentat ion along
with at least one complete unaltered copy of the Software, provided that
(i) you either transfer Software to such other party or destroy all your
other copies of the Software (ii) such transfer of procession termin ates
your license from Minolta, and (iii) such other party shall accept and be
bound by these license terms by its initial use of the Software.
4. RESTRICTIONS
(1) You shall not without the written consent of Minolta :
(i) use, copy, modify, merge or transfer copies of the Software except as
provided herein.
(ii) reverse assemble or reverse compile the Software except as permitted by
law; or
(iii)sublicense, rent, lease or distribute the Software or any c opy thereof.
(2) You shall not expo rt or re-export the Software in any form unde r
violation of e xport restrictions by the government of your country.
5. LIMITED WARRANTY
Minolta warrants the media on which the Software is recorded to be free
from defects in materials and workmanship under normal use. Warranty
details and limitations for the Software are described in the Statement of
Limited Warranty which was supplied with the hardware. With the exception of the foregoing express warranties applicable to hardware and media
only , the Software is not warranted but provided.
SUCH WARRANTIES ARE IN L IEU OF ALL OTHER WARRANTIES,
EXPRESSED OR IMPLIED, INCLUDING, BUT NOT LIMITED TO,
THE IMPLIED WARRANTIES OF MERCHANTABILITY AND FITNESS FOR A PARTICULAR PURPOSE.
6. LIMITATION OF R EMEDIES
IN NO EVENT WILL MINOLTA BE LIABLE FO R ANY L OST PROFITS, LOST DATA, OR ANY OTHER INCIDENTAL OR CONSEQUENTIAL DAMAGES THAT RESULT FROM USE OR INABILITY TO USE
THE SOFTWARE, EVEN IF MINOLTA OR ITS AUTHORIZED
REMARKETERS HAVE BEEN ADVISED TO THE POSSIBILITY OF
SUCH DAMAGES OR FOR ANY CLAIM BY YOU BASED ON A
THIRD PARTY CLAIM.
ii
Page 4

F oreword
7. TERMINATION
You may terminate your license at any time by destroying the Softw are and
all your copies of it or as otherwise described in these terms. Minolta may
terminate your license if you fail to comply with these terms. Upon such
termination, you agr ee to destroy all copies of the Software in your possession.
8. GOVERNING LAW
This Agreement shall be governed by the laws of the country where the
delive ry is m a d e to th e or i g in al cust omer.
9. GOVERNMENT END USERS
If you are acquiring the Software on behalf of any unit or agency of the
United States Government, the following provisions apply. Use, duplication or dis closure by the Government is subject to restriction s as set forth in
the Rights in Technical Data and Computer Software clause at FAR
252.227-7013, subdivision(b)(3)(ii) or subparagraph (c)(1)(ii), as appropriate. Further use, duplication or disclosure is subject to restrictions applicable to restricted rights software as set forth in FAR 52.227-19(c)(2).
YOU ACKNOWLEDGE THAT YOU HAVE READ THIS AGREEMENT,
UNDERSTAND IT, AND AGREE TO BE BOUND BY ITS TERMS
AND CONDITIONS. NEITHER PARTY SHALL BE BOUND BY ANY
STATEMENT OR REPRESENTATION NOT CONTAINED IN THIS
AGREEMENT. NO CHANGE IN THIS AGREEMENT IS EFFECTIVE
UNLESS WRITTEN AND SIGNED BY PROPERLY AUTHORIZED
REPRESENTATIVES OF EACH PAR TY. BY INSTALLING THIS SOFTWARE, YOU AGREE TO ACCEPT THE TERMS OF THIS AGREEMENT.
iii
Page 5

Foreword
USER INSTRUCTIONS (FOR U.S .A.)
FCC PART 15- RADIO FREQUENCY DEVICES WARNING
FCC: Declaration of Conformity
Product Type Network Interface Card
Product Name 4179-255
This device complies with Part 15 of the FCC Rules.
Operation is subject to the following two conditions:
(1) this devi ce may not cause harmful interference, an d
(2) this device must accept any interference received,
including interference that may cause undesired operation.
MINOLTA
4179-255
T ested To Comply
With FCC Standards
FOR HOME OR OFFICE USE
This equipment has been tested and found to comply with the limits for a
Class B digital device, pursuant to Part 15 of the FCC Rules. These limits
are designed to provide reasonable protection against harmful interference
in a residential installation. This equipment generat es , uses, and can radiate
radio frequenc y energy and, if not installed and used in ac cordance with the
instructions, may cause harmful interference to radio communications.
However, there is no guarantee that interference will not occur in a particular installation. If this equipment does cause harmful interference to radio
or television reception, which can be determined by turning the equipment
off and on, the user is encouraged to try to correct the interference by one
or more of the following measures:
●
Reorient or relocate the receiving antenna.
●
Increase the sepa ra t io n b et ween the eq u ip m ent and the receiver.
●
Conne ct the equipm ent to an outle t on a circuit different from
that to wh ich the receiver is conne ct ed.
●
Consult the dealer or an experienced radio/TV technician for
help.
iv
Page 6

F oreword
The design and production of this unit conform to FCC regulations, and
any changes or modi fications must be reg istered with the FCC and are subject to FCC control. Any changes made by the purchaser or user without
first contacting the manufacturer will be subject to penalty under FCC regulations.
This device mus t be used with shielded network (10/100BASE-T) cable.
The use of non-shielded cables is likely to result in interference with radio
communications and is prohibited under FCC rules.
USER INSTRUCTIONS (For Canada)
INTERFERENCE-CAUSING EQUIPMENT STANDARD
(ICES-003 ISSUE 3) WARNING
This Class B digital apparatus complies with Canadian ICES-003.
Cet appareil numérique de la classe B est conforme à la norme NMB-003
du Canada.
v
Page 7

Foreword
USER INSTRUCTIONS (FOR Europe)
CE Marking (Declaration of Conformity)
We declare under our sole responsibility that the Network Interface Card
for use with Minolta/QMS PagePro 4100 printer, to which this declaration
rela te s ar e in co n f or mity wi th th e s p ec ifi cation s be low.
This declaration is valid for the area of the European Union (EU) only.
Product Type Network Interface Card
Product Name 4179-255
Standard EMC: EN55 022 (Class B)/1998
:Limits an d method fo r mea su remen t of rad io di st urbance
characteristic of informatio n technology equipment (ITE )
EN61000-3-2 (Class A)/1995 (A13)
:Electromagnetic compatibil ity (EMC) - Part 3:Limits
Section 2:Limits for harmonic currents emissions
(equipment input current≤16A per phase )
EN61000-3-3/1995
:Electromagnetic compatibil ity (EMC) - Part 3:Limits
Section 3:Limitation of voltage fluctuations and flicker in
low-voltage supply systems for equipment with rated
current≤16A
EN55024/1998
Information technology equipment - Immunity
characteristics - Li mits and methods of me asurement
IEC61000-4-2/1995 A1
Electromagn e ti c co m p atibility (EMC)
Part 4: Testing and measurement techniques
Section 2: Electrostatic discharge immunity test
IEC61000-4-3/1995
Electromagn e ti c co m p atibility (EMC)
Part 4: Testing and measurement techniques
Section 3: Radiated, radio-frequency electromagnetic fi eld
immunity test
IEC61000-4-4/1995
Electromagn e ti c co m p atibility (EMC)
Part 4: Testing and measurement techniques
Section 4: Electrical fast transient/burst immunity test
vi
Page 8

F oreword
IEC61000-4-5/1995
Electromagn e ti c co m p atibility (EMC)
Part 4: Testing and measurement techniques
Section 5: Surge immunity test
IEC61000-4-6/1996
Electromagn e ti c co m p atibility (EMC)
Part 4: Testing and measurement techniques
Section 6: Conducted disturbances inducted by radiofrequency fields - Immunity test
IEC61000-4-8/1993
Electromagn e ti c co m p atibility (EMC)
Part 4: Testing and measurement techniques
Section 8: Power-frequency magnetic field immunity test
IEC61000-4-11/1994
Electromagn e ti c co m p atibility (EMC)
Part 4: Testing and measurement techniques
Section 11: Voltage dips, short interruptions and voltage
variations immu n ity test
EC Directive EMC: 89/336/EEC and 93/68/EEC
This device mus t be used with shielded network (10/100BASE-T) cable.
The use of non-shielded cables is likely to result in interference with radio
communications and is prohibited under 89/336/EEC rules.
vii
Page 9

Foreword
Welcome
Congratulations on your selection of this quality Minolta/QMS
Network Interface Card for PagePro 4100.
This User’s Manual provides information about how to set up the Network Interface Card and operate the printer in a network environment.
Trademark Acknowledgements
PagePro is a trademark of MINOLTA CO., LTD.
Minolta i s a registere d trad em ark of MINOLTA CO . , LTD.
QMS and the QMS logo are registered trademarks of QMS, Inc.
Apple, AppleTalk, and Macintosh are registered trademarks of Apple
Comput er, Inc.
Ethernet is a register ed trademark of Xerox Corporation.
HP LaserJ et III, HP Las er Je t IIISi , HP L as erJet 4 Si, are regist er ed
trademarks of Hewlett-Packard Company. HP UNIX is a trademark of
Hewlett-Pack ard Co m p any.
Microsoft is a registere d trademark of Microsoft Corporation. Wi ndows, Windows NT, and Internet Explorer are trademarks of Micr osoft
Corporation.
Netscape Communications, the Netscape Communications logo,
Netscap e Naviga tor, Netscap e Co m m uni ca tor, and Netscape are trademarks of Netscape Communications Corporation.
Novell, NetWare, and UNIX are registered trademar k s of Novell, Inc.
PostScript is a registe red trademark of Adobe Systems, Inc.
SCO UNIX is a trad em ark of The Sa nta Cr u z Ope rat i on, Inc .
SUN and Solar is are t rademarks of SUN Mi cros y ste ms , Inc.
ULTRIX is a trademark of Digital Equipment Corporati on.
All other product names are trademarks or registered trademarks of
their respec tive holde rs.
Copyright 2000 MINOLTA CO., LTD
The information contained in this manual is subject to change without notice.
viii
Page 10
About This Manual
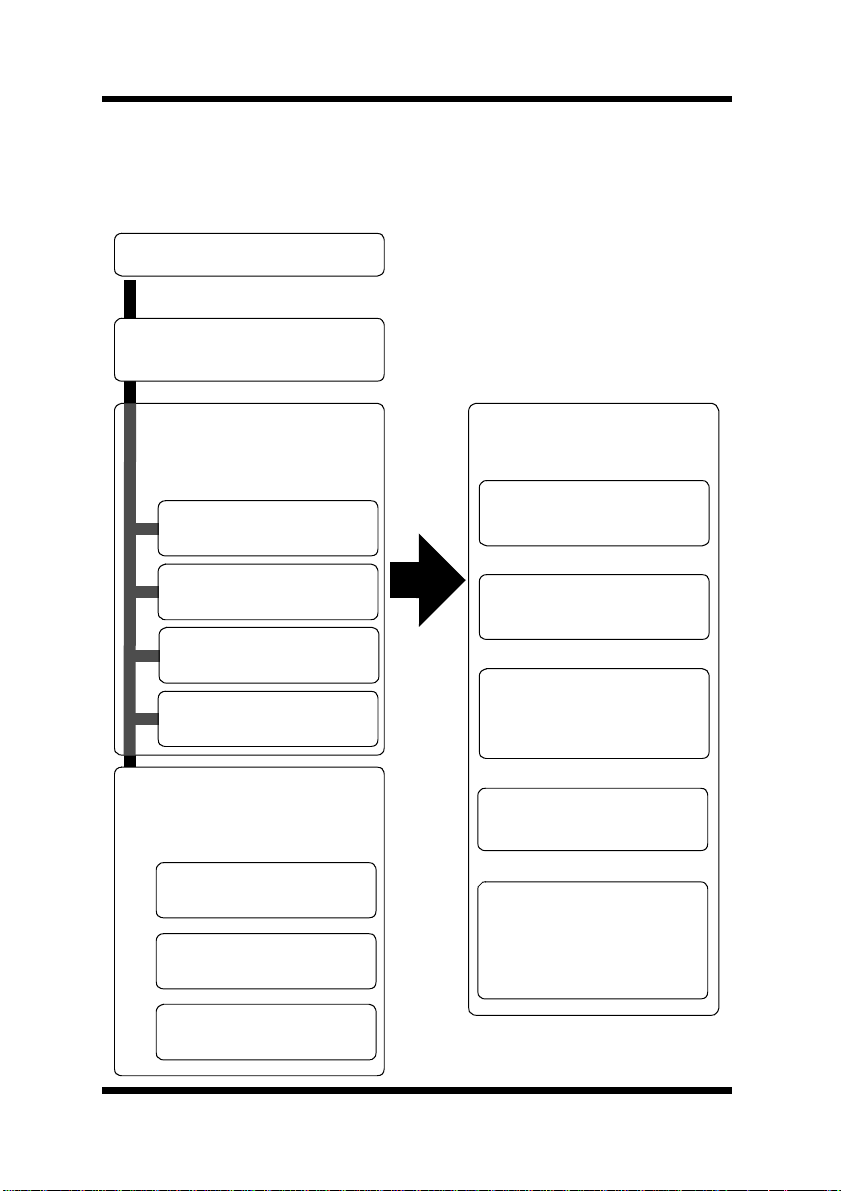
The following sho ws the general outline of this manual.
Chapter 1 - Getting Ready
Chapter 2 - Installing the
Network Card
F oreword
Read the section for
yo ur particular
network environment.
Chapter 3 - Windows
Configurat ion
Chapter 4 - NetWare
Configuration
Chapter 5 - Macintosh
Configurat ion
Chapter 6 - UNIX
Configurat ion
Read the following
chapters when
necessary.
Chapter 11 - Troubleshooting
Chapter 12 - Jumper
Switch Settings
Reference these
chapters as required.
Chapter 7 - S etting Up IP
Parameters
Chapter 8 - Using the
Utility Software
Chapter 9 - Using a W e b
Browser to Make Settings
Chapter 10 - Using Telnet to Make Settings
Appendix A - Installing
and Setting Up Network Protocol (Windows)
Chapter 13 - Specifications
ix
Page 11

Contents
CONTENTS
Chapter 1: Getting Ready
1-1 Bundled Items.................................................. 1-2
1-2 System Requirements..................................... 1-4
Chapter 2: Installing the Network Card
2-1 Preparing the Printer....................................... 2-1
2-2 Connecting a Network Cable.......................... 2-2
2-3 Setting Up the Network Card .......................... 2-3
Chapter 3: Window s Configur ati on
3-1 Windows 95/98................................................. 3-1
3-1-1 Peer-to-Peer Printing with TCP/IP ........... 3-2
3-1-2 Peer-to-Peer Printing with IPX/SPX......... 3-4
3-2 Windows NT ..................................................... 3-5
3-2-1 Peer-to-Peer Printing with TCP/IP ........... 3-5
3-2-2 LPR Printing ............................................ 3-7
3-3 Windows 2000.................................................. 3-9
3-3-1 Peer-to-Peer Printing with TCP/IP ........... 3-9
3-3-2 LPR Printing .......................................... 3-11
Chapter 4: NetWare Configuration
4-1 NetWare 3.x Configuration.............................. 4-2
4-1-1 Starting up PCONSOLE and Selecting the
File Server............................................... 4-3
4-1-2 Creating a Print Queue............................ 4-4
4-1-3 Specifying the Print Server Name ........... 4-4
4-1-4 Configuring the Print Server....................4-5
x
Page 12

Contents
4-1-5 Assigning Print Queues to the Printer ..... 4-6
4-1-6 Setting Up the Printer NOTIFY Options
(Optional).................................................4-7
4-1-7 Installing the Print Server on Multiple File
Servers .................................................... 4-8
4-1-8 Primary File Server.................................. 4-9
4-1-9 Prefer red File Server ........................ .......4-9
4-2 NetWare 4.x Configuration Using Bindery
Emulation........................................................ 4-10
4-2-1 Confirming the Bindery Context............. 4-10
4-2-2 Configuring in the Bindery Mode........... 4-11
4-3 Configuration Using Novell D irect ory
Services.......................................................... 4-13
4-3-1 Creating a Printer Object....................... 4-15
4-3-2 Creating a Print Server Object............... 4-16
4-3-3 Creating a Print Queue Object ..............4-16
4-3-4 Assigning a Printer Object..................... 4-18
4-3-5 Assigning a Print Server Object............. 4-19
4-3-6 Checking Assignments .......................... 4-20
4-3-7 Printer Configuration and Reset ............ 4-21
Chapter 5: Macintosh Configuration
5-1 Setting Up AppleTalk....................................... 5-1
5-2 Selecting and Setting Up the Printer.............. 5-1
5-3 Network Card Configuration........................... 5-2
Chapter 6: UNIX Configu rat ion
6-1 Printer-based lpd Configuration..................... 6-3
6-1-1 BSD System ............................................ 6-4
6-1-2 AIX Version 2.5........................................ 6-5
6-1-3 AIX 4.0.....................................................6-6
xi
Page 13

Contents
6-1-4 HP-UX...................................................... 6-6
6-1-5 AS/400.....................................................6-7
6-1-6 DEC ULTRIX 4.3 RISC, OSF1/ALPHA.... 6-8
6-1-7 SCO UNIX ............................................... 6-9
6-1-8 System V Release 4, Solaris 2.x ........... 6-10
6-2 Host-based lpd Configuration...................... 6-11
6-2-1 Loading the Program............................. 6-12
6-2-2 Selecting Filters..................................... 6-13
6-2-2-1Selecting a Filter Manually .............. 6-13
6-2-3 Solaris Version 1, OSF1 ........................ 6-14
6-2-4 DEC ULTRIX 4.3.................................... 6-16
6-2-5 HP-UX System....................................... 6-17
6-2-6 System V (Solaris Version 2), System V
Release 4/386 Base Machine................ 6-19
6-2-7 SCO UNIX ............................................. 6-21
6-2-8 AIX RISC System/6000......................... 6-23
6-2-8-1Virtual Printer Commands ............... 6-25
6-2-8-2AIX Print Command......................... 6-25
Chapter 7: Setting Up IP Parameters
7-1 Assigning IP Addresses Using ARP
(For Windows).................................................. 7-2
7-2 Assigning IP Addresses Using ARP
(For UNIX)......................................................... 7-4
7-3 Assigning IP Addresses Using the BOOTP
Daemon (For UNIX).......................................... 7-6
7-4 Assigning IP Addresses Using the RARP
Daemon (For UNIX).......................................... 7-7
7-5 Using the DHCP Daemon (For UNIX) ............. 7-9
xii
Page 14

Contents
Chapter 8: Using the Utility Software
8-1 Management Access Program (Windows) .... 8-1
8-1-1 Installing MAP.......................................... 8-2
8-1-2 Using MAP...................... ......... ......... ....... 8-3
8-2 Peer-to-Peer Printing Program (Windows).... 8-5
8-2-1 IP Peer-to-Peer Printing Program
(Windows)................................................ 8-5
8-2-1-1Installing the IP Peer-to-Peer Printing
Program............................................. 8-5
8-2-1-2Using the IP Peer-to-Peer Printing
Program............................................. 8-7
8-2-2 IPX Peer-to-Peer Printing Program
(Windows).............................................. 8-10
8-2-2-1 Installing the IPX Peer-to-Peer
Printing Program ............................. 8-10
8-3 BOOTP (Windows)......................................... 8-13
8-3-1 Using BOOTP........................................ 8-14
8-4 NIManage for AppleTalk (Macintosh)........... 8-15
8-4-1 Using NIManage.................................... 8-15
8-4-1-1Configuration................................... 8-17
8-4-1-2Error Log .........................................8-17
8-4-1-3Setting Up the Protocol ................... 8-18
8-4-1-4Setting Up the Status Page............. 8-19
8-5 NWSetup (Windows)...................................... 8-19
8-5-1 Installing NWSetup................................ 8-20
8-5-2 Using NWSetup....................... ......... ..... 8-21
8-5-2-1Selecting a Print Server................... 8-21
8-5-2-2Novell NetWare Settings................. 8-22
8-5-2-3Print Server Settings....................... 8-24
8-5-2-4Setting Up Notification..................... 8-27
xiii
Page 15

Contents
Chapter 9: Using a Web Browser to Make Settings
9-1 Operating Conditions...................................... 9-1
9-1-1 Supported Web Browsers........................ 9-1
9-2 Access Methods............................................... 9-2
9-3 Printer Monitor................................................. 9-3
9-3-1 Printer Status........................................... 9-4
9-3-2 Summary ................................................. 9-4
9-3-2-1Input Tray ..........................................9-5
9-3-2-2Output Bin .........................................9-6
9-3-2-3Others................................................ 9-6
9-3-2-4System .............................................. 9-7
9-3-3 Network.................................................... 9-8
9-3-4 Operational P an el............................. ....... 9-9
9-3-5 About ....................................... ................ 9-9
9-3-6 Network Card Setting............................. 9-10
9-4 Network Card Settings .................................. 9-10
9-4-1 TCP/IP Configuration............................. 9-12
9-4-2 NetWare Configuration.......................... 9-15
9-4-3 AppleTalk Configuration......................... 9-18
9-4-4 Print Option............................................ 9-19
9-4-5 IPP Printer Configuration....................... 9-21
9-4-6 Change Password.................................. 9-23
9-4-7 Reset ..................................................... 9-24
9-4-8 Network Information ............................... 9-25
9-4-9 Languages............................................. 9-25
xiv
Page 16

Contents
Chapter 10: Using Telnet to Make Settings
10-1 Establishing a Telnet Connection............... 10-2
10-2 Menu Items.................................................... 10-3
10-2-1 IP Parameters........................................ 10-3
10-2-2 LPD Printers.......................................... 10-3
10-2-3 Protocols................................................10-3
10-2-4 Reset Unit.............................................. 10-3
10-2-5 Restore Factory Defaults....................... 10-4
10-2-6 Change Password.................................. 10-4
10-2-7 Exiting Telnet (Exit)................................10-5
Chapter 11: Troubleshooting
11-1 LED Status Indicators.................................. 11-1
11-2 Troubleshooting ........................................... 11-3
11-2-1 General Troubleshooting Procedure...... 11-3
11-2-2 NetWare Troubleshooting Procedure..... 11-4
11-3 Resetting to Factory Defaults ..................... 11-6
Chapter 12: Jumper Switch Settings
12-1 Network Card and Jumper Pin Positions... 12-2
12-2 Resetting to Factory Defaults ..................... 12-2
12-3 Bus Handshaking......................................... 12-3
Chapter 13: Specifications
13-1 Network Card................................................ 13-1
13-2 10/100BaseT Cable....................................... 13-1
xv
Page 17

Contents
Appendix A: Installing and Setting Up Network
A-1 Installing and Setting Up TCP/IP
(Windows 95/98)...............................................A-1
A-2 Installing and Setting Up IPX/SPX-compatible
Protocol (Windows 95/98) ...............................A-2
A-3 Installing and Setting Up TCP/IP and TCP/IP
Printing (Windows NT 4.0) ..............................A-3
A-3-1 Installing and Setting Up the
TCP/IP Protocol.......................................A-3
A-3-2 Installing and Setting Up the Microsoft
TCP/IP Printing Service...........................A-4
A-4 Installing and Setting Up TCP/IP
(Windows 2000)................................................A-5
Appendix B: Index
xvi
Page 18

Chapter
Chapter 1
Getting Ready
Getting Ready
1
Page 19

Chapter 1
Getting Ready
Page 20

Introduction
This Network Interfac e Card is a multi-protocol network card that
provides Ethernet connection for the Minolta/QMS PagePro 4100 and
offers the foll owing features.
• Automatic Ethernet type det ection (10BaseT , 100BaseT)
• Fully transparent AppleTalk printing support for the Macintosh,
including support for binary PostScript printing.
• Peer-to- peer printing program allows printin g on a network without going through a server
- Peer-to-Peer Printing with TCP/IP (Windows 95/98/2000/NT
4.0)
- Peer-to-Peer Printing with IPX/SPX (Windo ws 95/98)
• Novell NetWare PSERVER support unde r bindery base or Novell
Directory Services (NDS)
• lpr/lpd functions unde r TCP/IP
• SNMP control using MIB-II and private MIB
SNMP support using standard MIB on a compatible printer or
printer-specific MIB
• Onboard HTTP server allowing network function settings using a
Web browser
• Direct printing fro m a Web browser or other FTP cli ent
• Direct printing from an IPP client
Chapter 1
Getting Ready
1-1
Page 21

1-1 Bundled Items
1-1 Bundled Items
For PagePro 4100E users
Chapter 1
Getting Ready
This Network Card comes with the follo wing items.
•Network Card
•Quick Guide
For PagePro 4100GN users
The PagePro 4100GN printer has a network inte rface device on its
controller board, so the above items are not bundled.
Utility software (on the CD-ROM)
The following items are con tained in the
CD-ROM that comes with the print er.
nicutlty
Network Interface Card User’s Manual (this manual)
Discovery Program
– IPX/IP Management Access Program (MAP)
Peer-to- Peer Printing Programs
– IP Peer-to-Peer Print ing Program
– IPX Peer-to-Peer Print ing Program
BOOTP Progra m
– BootPL32.exe
folder on the
NetWare Setup Utility Program
–NWSetup
Macintosh Utility Progr am
– NIManage (AppleTalk Utility)
UNIX TCP/IP Utility Programs
MIB Setting File
1-2
Page 22

1-1 Bundled Items
The ReadMe file on the CD-R OM cont ains th e lat est inf ormati on about
each of the netw ork software applications. Be sure to read the ReadMe
file before using the net work software.
The program for updating the flash R OM and documentation
explaining how to perform the update is not provided with this
package. The update and program are available as an update package.
Chapter 1
Getting Ready
1-3
Page 23

1-2 System Requirements
1-2 System Requirements
The Netwo rk Interface Card hard wa re and soft ware req u ire t he
following:
Chapter 1
Getting Ready
Ve rsion of
Protocol or NOS
Software
Novell NetWare Version 3.x, 4.x, or 5
Macintosh System 7.x, 8.x, or 9.x
UNIX, Windows, or LAN Server systems
supporting lpr ov er TCP/IP
DEC ULTRIX 4.3 or 4.4, DEC OSF/1 2.0 or
3.0, Solaris 1.1.3 or 2.3, (SUN OS 4.1.3 or
5.3), System V Release 4, HP-UX 9.01, IBM
AIX 3.2.5, or SCO UNIX 2 for DPI TCP/IP
port 10001
Novell NetWare printing requires NetWare
Capture, NPRINT and PCONSOLE (later
than 1.0) utilities. m
NWSetup requires Windows 95/98/2000 or
Windows NT4.0, and the Novell 32-bit client.
The IP Peer-to-Peer utility requires Windows
NT 4.0; Windows 95/98/2000.
The IPX Peer-to-Peer utility requires
Windows 95/98.
The MAP utility requires Windows NT 4.0;
Windo ws 95/98/2000. MAP also requires a
browser such as Microsoft Internet Explorer
or Netscape.
TCP/IP setup and maintenance may be done
with T elnet. Monitoring and maint enance with
HTTP requires a suitable Internet Web
browser program supporting HTML.
AppleTalk printing requires printer PPD
appropriate to the printer. AppleTalk
NIManage Utility Program is provided for
setup and maintenance.
1-4
Page 24

Hardware
1-2 System Requirements
Support for 10 or 100 me gabit Et hernet ne tworks:
10/100BaseT (twisted pair cables) and hardware
CD-ROM drive
Chapter 1
Getting Ready
1-5
Page 25

MEMO
Chapter 1
Getting Ready
Page 26

Chapter
Installing th e N e twork
Card
Chapter 2
Installing the Network Card
2
Page 27

Chapter 2
Installing the Network Card
Page 28

2-1 Preparing the Printer
2-1 Preparing the Pr inter
Important!
• The Network Card MAC address (network address) and serial numb er
are marked on labe ls above the port on the Network Ca rd. These numbers are required when making Network Card settings, so be sure to
write t hem down somewhere befor e installing th e card.
Note
• If you are using the PagePro 4100E printer, install the optional Network Card following to the procedure described in this section.
If you are using the PagePro 4100GN printer, you don’t need to install
the Network Card, because the printer comes with a network interface
device on its controller board. Skip to the next section.
1. Confirm that the printer is operating normally.
2. Power down the printer and unplug its power cord from the power
outlet.
3. Install the Netwo rk Card into the inter face con nector of the printer
controller board .
See the Quick Guide (Installing the Network Car d) that comes with the
Network Card for full details about installation.
Important!
• Special care is required when handling the Network Card. The Network Card is designe d to protect components from electrostatic discharge during normal operation. Be sure to take proper electrostatic
protection m ea sures whenever handli ng the Network Card.
Chapter 2
Installing the Network Card
2-1
Page 29
Chapter 2
2-2 Connecting a Network Cable
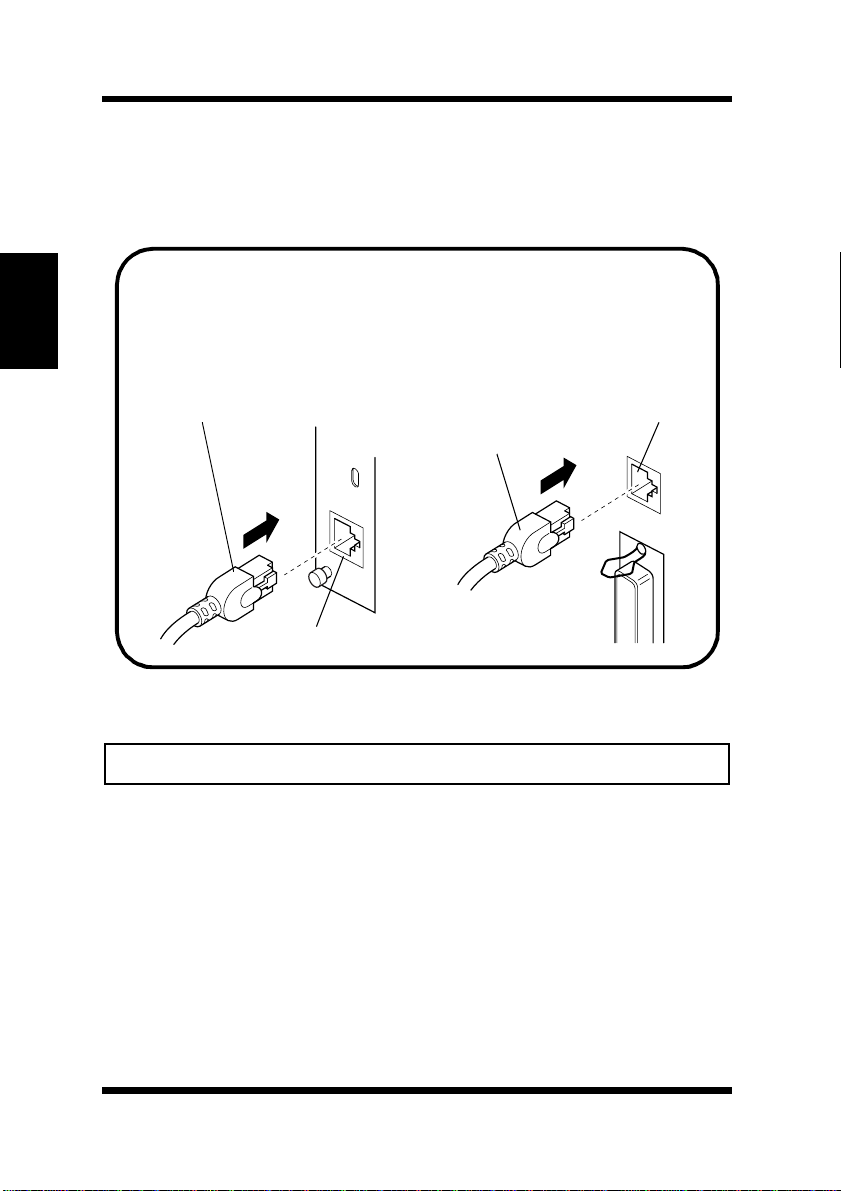
2-2 Connecting a Network Cable
1. Make sure that printer power is turned off.
2. Connect the network cabl e to the Network Card.
Insert the plug into the 10/100Base T port on the rear pa nel of
the Network Card and press it in until you hear it click securely
into place.
PagePro 4100E PagePro 4100GN
Installing the Network Card
Network Cable
Network Cable
10/100BaseT Port
3. Power up the printer and check for abnormalities.
10/100BaseT Port
Important!
• Use only Category 5 shielded 10/100BaseT cable.
2-2
Page 30

2-3 Setting Up the Network Card
2-3 Setting Up the Network Card
You must first configure the Network Card and your computer before
you can print using the Network Card. The setti ngs you need to make
depend on the configuration of your network environment. Chapte rs 3
through 6 of this manual describe configurations for the environments
listed below. Follow the configurations procedure for the oper ating
system you are using.
Chapter 3 - Windows Configuration
Network printing in a W indows 95/98/2000/NT environment
Chapter 4 - NetWare Configuration
Network printing in a NetWare environment
Chapter 5 - Macintosh Configuration
Network printing in a Macintosh environment
Chapter 6 - UNIX Configuration
Network printing in a UNIX environment
Chapter 2
Installing the Network Card
2-3
Page 31

Chapter 2
Installing the Network Card
MEMO
Page 32

Chapter
Chapter 3
Windows Configuration
3
Windows Configuration
Page 33

Chapter 3
Windows Configuration
Page 34

3-1 Windo ws 95/98
This chapter describes ho w to perform network printing in a Windows
environment.
Though this Network Card does not support NetBEUI protocol, it
supports TCP/IP and IPX/SPX, which pro vide s plenty of connection
flexibility for the Windows computer.
This chapter consists of the sections listed below.
Windows 95/98
• Peer-to-peer printing with TCP/IP
See 3-1-1 Peer-to-Peer Printing with TCP/IP.
• Peer-to-pe er print i ng with IPX/SPX
See 3-1-2 Peer-to-Peer Printing with IPX/SPX.
Windows NT
• Peer-to-peer printing with TCP/IP
See 3-2-1 Peer-to-Peer Printing with TCP/IP.
• LPR printing
See 3-2-2 LPR Printing.
Windows 2000
• Peer-to-peer printing with TCP/IP
See 3-3-1 Peer-to-Peer Printing with TCP/IP.
• LPR printing
See 3-3-2 LPR Printing.
3-1 Windows 95/98
A Windows 95/98 network printer can be used by going through a
Novell NetWare or Windows 2000/NT server. This Network Card,
however, can be configure d with its bundled peer-to-peer pri nting
programs for peer-to-peer printing without a server. Peer-to-peer
printing can be performed using TCP/IP or IPX/SPX.
Chapter 3
Windows Configuration
3-1
Page 35

Chapter 3
Windows Configuration
3-1 W indows 95/98
3-1-1 Peer-to-Peer Printing with TCP/IP
Use the bundled IP Peer-to-Peer Printing Program for TCP/IP peer-topeer printing under Windows.
Printer
Network Card
TCP/IP
Windows 95/98
IP Peer to Peer Printing Program
Configuration Pro cedure
1. Install TCP/IP under W indows.
See A- 1 Installing and Setting Up TCP/IP (Windows 95/98) and
the applicable Windows documentation for more information.
2. Assign the IP parameters.
See Chapter 7 - Setting Up IP Parameters for more information.
3. Install the IP Peer- to-Peer Printing Program.
Use the IP Peer-to- Peer Printing Progr am for peer- to-peer print ing.
See 8-2-1 IP Peer-to-Peer Printing Program (Windows) for more
information.
4. Use the procedure belo w to install the printer.
TCP/IP
3-2
Page 36

3-1 Windows 95/9 8
To install the printer
1. Load the CD-ROM that comes with your printer into your com-
puter’s CD-ROM drive.
2. Click the
3. Click the
printer the default printer.
See the User’ s Manual of the printer for details about how to
install it.
4. Right-click the new printer icon and select
menu.
5. Display the
6. Click the
added by the IP Peer-to-Peer Printing Program.
7. Click the
8. Display the
9. If the test prints normall y, complete the procedure by clicking OK
to close the
After you finish installing a printer with the above procedure, you c an
use it just as you would any standard local printer. The printer can also
be used as a network printer by other Windows computers on your
network whose Windows 95/98 systems are configured the same way
as described above.
Insta ll Printer Drive r
PCL Driver
Details
Print to the following port
Apply
General
Properties
menu and install the printer. Make the new
tab.
button of the
tab and print a test page.
dialog box.
menu on the opening screen.
Properties
Properties
from the
box and then select the port
dialog box.
Chapter 3
Windows Configuration
3-3
Page 37

Chapter 3
Windows Configuration
3-1 W indows 95/98
3-1-2 Peer-to-Peer Printing with IPX/SPX
Use the bundled IPX Peer- to-Peer Printing Program for IPX/SPX peerto-peer printing under Windows.
With IPX Peer-to-Peer Pri nti ng Prog ram , the re is no n eed to run
NetWare Client.
Printer
Network Card
IPX/SPX
Windows 95/98
IPX/SPX-compatible Protocol
IPX Peer to Peer Printing Program
Configuration Pro cedure
1. Install IPX/SPX-compa tible Protocol under Windows.
See A- 2 Installing and Setting Up IPX/SPX-compatible Protocol
(Windows 95/98) and the applicable Windows documentation for
more information.
2. Install the IPX Peer-to-Peer Printing Program.
Use the IPX Peer-to-Pe er Printing Program for peer-to-peer pri nting. See 8-2-2 IPX Peer-to-Peer Printing Program (Windows) for
more information.
3. Use the procedure belo w to install the printer.
To install the printer
1. Load the CD-ROM that comes with your printer into your com-
puter’s CD-ROM drive.
2. Click the
3. Click the
Insta ll Printer Drive r
PCL Driver
menu and install the printer. Mak e the new
menu on the opening screen.
printer the default printer.
See the User’ s Manual of the printer for details about how to install it.
4. Right-click the ne w pr int er ic on and sele ct
Properties
from the menu.
3-4
Page 38

3-2 W indows N T
5. Display the
6. Click the
Details
Print to the following port
tab.
box and then select the port
added by the IPX Peer- to-Peer Printing Program.
7. Click the
Apply
8. Display the
button of the
General
tab and print a test page.
Properties
dialog box.
9. If the test prints normall y, complete the procedure by clicking OK
to close the
Properties
dialog box.
After you finish installing a printer with the above procedure, you c an
use it just as you would any standard local printer. The printer can also
be used as a network printer by other Windows computers on your
network whose Windows 95/98 systems are configured the same way
as described above.
3-2 Windows NT
There are two ways you can pr int from Windows NT 4.0 with TCP/IP:
using the bundled IP Peer -to-Peer Printing Program, and using the
Windo ws NT standard LPR printing function.
3-2-1 Peer-to-Peer Printing with TCP/IP
Use the bundled IP Peer-to-Peer Printing Program for TCP/IP peer-topeer printing under Windows NT.
Printer
Chapter 3
Windows Configuration
Network Card
TCP/IP
Windows NT 4.0
IP Peer to Peer Printing Program
TCP/IP
3-5
Page 39

Chapter 3
Windows Configuration
3-2 W in dows NT
Configuration Pro cedure
1. Install TCP/IP under W indows NT.
See A-3-1 Installing and Setting Up the TCP/IP Protocol and the
applicable W indows documentation for more information.
2. Assign the IP parameters.
See Chapter 7 - Setting Up IP Parameters for more information.
3. Install the IP Peer- to-Peer Printing Program.
Use the IP Peer-to- Peer Printing Progr am for peer- to-peer print ing.
See 8-2-1 IP Peer-to-Peer Printing Program (Windows) for more
information.
4. Use the procedure belo w to install the printer.
To install the printer
1. Load the CD-ROM that comes with your printer into your com-
puter’s CD-ROM drive.
2. Click the
3. Click the
printer the default printer.
See the User’ s Manual of the printer for details about how to
install it.
4. Right-click the new printer icon and select
menu.
5. Display the
6. From the
the printer IP address is displayed.
7. Click the
8. Right-click the printer icon again to display its
box, display the
9. If the test prints normall y, complete the procedure by clicking OK
to close the
Insta ll Printer Drive r
PCL Driver
Ports
Print to the following port(s)
OK
button of the
Properties
menu and install the printer. Make the new
tab.
General
dialog box.
menu on the opening screen.
Properties
tab, and then print a test page.
Properties
from the
list, select the port where
dialog box to close it.
Properties
dialog
After you finish installing a printer with the above procedure, you c an
use it just as you would any standard local printer. The printer can also
be used as a network printer by other Windows computers on your
network whose Windows NT 4.0 systems are configured the same way
as described above.
3-6
Page 40

3-2 Win dows N T
3-2-2 LPR Printing
This section explains how to use the Windows NT 4.0 standard LPR
printing function.
Printer
Network Card
TCP/IP
Windows NT 4.0
TCP/IP
Microsoft TCP/IP Printing
Configuration Pro cedure
1. Install TCP/IP and Microsoft TCP/IP Printing service under Win-
dows NT.
See A-3 Installing and Setting Up TCP/IP and TCP/IP Printing
(Windows NT 4.0) and the applicable Windows documentation for
more information.
2. Assign the IP parameters.
See Chapter 7 - Setting Up IP Parameters for more information.
3. Use the procedure belo w to install the printer.
Chapter 3
Windows Configuration
To install the printer
1. Load the CD-ROM that comes with your printer into your com-
puter’s CD-ROM drive.
2. Click the
3. Click the
insta ll Printer Drive r
PCL Driver
menu and install the printer. Make the new
menu on the opening screen.
printer the default printer.
See the User’ s Manual of the printer for details about how to
install it.
4. Right-click the new printer icon and select
Properties
from the
menu.
3-7
Page 41

3-2 Windows NT
Chapter 3
Windows Configuration
5. Display the
6. Click
Ports
Add Port
tab.
.
This displays a list of enabled port types.
7. Select
8. On the
LPR Port
Add LPR compatible printer
and then click
address of th e Network Card into the
providing l pd
box.
New Port
.
dialog box, type the IP
Name or address of server
If the network you are on uses DNS (Domain Name Services),
type in the DNS name instead of the IP address.
9. Type the name of the port you want into the
print queue on that server
box, and then click OK to close the
Name of print er or
dialog box.
10. Click the
Close
button of the
click the OK button of the
11. Right-click the printer icon again to display its
box, display the
General
Printer Ports
Properties
dialog box, and then
dialog box to close it.
Properties
tab, and then print a test page.
dialog
12. If the test prints normally, complete the procedure by clicking OK
to close the
Properties
dialog box.
After you finish installing a printer with the above procedure, you c an
use it just as you would any standard local printer. The printer can also
be used as a network printer by other Windows computers on your
network whose Windows NT 4.0 systems are configured the same way
as described above.
3-8
Page 42

3-3 Windo ws 2000
3-3 Windows 2000
There are two ways you can print from Windows 2000 with TCP/IP:
using the bundled IP Peer -to-Peer Printing Program, and using the
Windo ws 2000 standard LPR printing function.
3-3-1 Peer-to-Peer Printing with TCP/IP
Use the bundled IP Peer-to-Peer Printing Program for TCP/IP peer-topeer printing under Windows 2000.
Printer
Network Card
TCP/IP
Chapter 3
Windows 2000
IP Peer to Peer Printing Program
Configuration Pro cedure
TCP/IP
1. Install TCP/IP under W indows 2000.
See A-4 Installing and Setting Up TCP/I P (Windows 2000) and the
applicable W indows documentation for more information.
2. Assign the IP parameters.
See Chapter 7 - Setting Up IP Parameters for more information.
3. Install the IP Peer- to-Peer Printing Program.
Use the IP Peer-to- Peer Printing Progr am for peer- to-peer print ing.
See 8-2-1 IP Peer-to-Peer Printing Program (Windows) for more
information.
4. Use the procedure belo w to install the printer.
Windows Configuration
3-9
Page 43

Chapter 3
3-3 Windows 2000
To install the printer
1. Install the printer driver for Windows 2000 following the instruc-
tions that c ome with the installer. Make the new printer the default
printer.
2. Right-click the new printer icon and select
menu.
3. Display the
4. From the
Ports
tab.
Print to the following port(s)
the printer IP address is displayed.
5. Click the
Apply
6. Display the
button of the
General
tab and then print a test page.
Properties
7. If the test prints normall y, complete the procedure by clicking OK
to close the
Properties
dialog box.
After you finish installing a printer with the above procedure, you c an
use it just as you would any standard local printer. The printer can also
be used as a network printer by other Windows computers on your
network whose W in do ws 2000 syst ems a re con fig ured t he sa me way as
described above .
Properties
from the
list, select the port where
dialog box.
Windows Configuration
3-10
Page 44

3-3 Windo ws 2000
3-3-2 LPR Printing
This section explains how to use the Windows 2000 standard LPR
printing function.
Printer
Network Card
TCP/IP
Windows 2000
TCP/IP
Configuration Pro cedure
1. Install TCP/IP under W indows 2000.
See A-4 Installing and Setting Up TCP/I P (Windows 2000) and the
applicable W indows documentation for more information.
2. Assign the IP parameters.
See Chapter 7 - Setting Up IP Parameters for more information.
3. Use the procedure belo w to install the printer.
Chapter 3
Windows Configuration
To install the printer
1. Install the printer driver followin g the instructions that come with
the installer. Make the new printer the def ault printer.
2. Right-click the new printer icon and select
Properties
from the
menu.
3. Display the
4. Click
Add Port
Ports
.
tab.
This displays a list of available port types.
5. Select
.
Port
This st a rts
6. Click
Standard TCP/IP Port
Add Standard TCP/IP Printer Port Wizard
on the introduction page of the wizar d.
Next
from the list, and then click
.
New
3-11
Page 45

3-3 Windows 2000
Chapter 3
Windows Configuration
7. On the
into the
Add Port
Printer Name or IP Address
page, type the IP address of the Network Card
box.
If the network you are on uses DNS (Domain Name Services),
type in the DNS name instead of the IP address.
8. Type the name of the port you want into the
then click
Next
.
Port Name
box, and
Note
• When you type the IP address
Address
Port Name
name as you want.
9. On the
tom
, and then click
10. On the
select
LPR
, the name of the por t is automatically entered in
box
box as
IP_
Additiona l Po rt In fo rm at i on Req ui red
Settings
Configure Standard TC P / IP Po rt Mo ni t or
from the
LPR Settings
into the
<IP address>
.
11. Type the name of the queue you want into the
and then check t he
12. Click
OK
to return to the
LPR Byte Counting Enabled
Additional Port Information Required
page.
13. Click
14. Click the
15. Display the
Next
click the
to display the next wizard page, and then click
Close
button of the
Apply
button of the
General
tab, and then print a test page.
16. If the test prints normally, complete the procedure by clicking
to close the
Properties
dialog box.
Prin t e r N a m e o r IP
, but you c an change the port
box.
Printer Ports
Properties
dialog box.
the
page, select
Cus-
dialog box,
Queue Name
box,
check box.
Finish
dialog box, and then
OK
.
After you finish installing a printer with the above procedure, you c an
use it just as you would any standard local printer. The printer can also
be used as a network printer by other Windows computers on your
network whose W in do ws 2000 syst ems a re con fig ured t he sa me way as
described above .
3-12
Page 46

Chapter
Chapter 4
NetWare Configuration
4
NetWare Configuration
Page 47

Chapter 4
NetWare Configuration
Page 48

This chapter provides details on how to configure a Novel l NetWare
server in order to print fro m a NetWare client. Follow the procedures
listed below to conf igure the NetWare server from a NetWare client.
Using NWSetup
NWSetup is a utility program that comes bundled with the Network
Card that simplifies Ne tWare file server and Network Card
configurati on. See 8-5 NWSetup (Windows).
Using NetWare Client
NetWare 3.x configuration
•
This section describes how to configure the Network Card with
PCONSOLE in order to use it under NetWare 3.x. See 4-1 Net-
Ware 3.x Configuration.
NetWare 4.x configuration in bindery services emula tion
•
This section describes how to configure the Network Card with
NetWare 4.x bindery services emulation. See 4-2 NetWare 4.x
Configuration Using Bindery Emulation.
Novell Directory Services configuration
•
This section describes how to configure the Network Card with
NetWare 4.x directory services. See 4-3 Configuration Using Nov-
ell Directory Services.
Chapter 4
4-1
NetWare Configuration
Page 49

Chapter 4
4-1 NetWare 3.x Configuration
4-1 NetWare 3.x Configuration
Before configuri ng NetWare, make sure that the Network Card is
assigned the name you want. You can use MAP or a Web browser to
change the Network Card name. See 8-1 Manage ment Access Program
(Window s) and 9-4-2 NetWare Configuration for more information.
The following sho ws the basic steps f or conf iguring the Network Card.
Note that this procedure requires supervisor privileges. For a detailed
description of the configuration procedure, see sections 4-1- 1 to 4-1-9
below.
1. Run PCONSOLE and select the file server you want to use.
2. Create p rint queues.
3. Define the Networ k Card as a print server.
4. Configure the print server and printer.
5. Assign print queues to the printer.
6. If necessary, configure the NOTIFY options.
7. If necessary, perform the same steps for other file servers.
After making the Network Card settings you want, power down and
then back up ag ain .
Note
• Be sure to use PCONSOLE version 1.0 or later.
NetWare Configuration
4-2
Page 50

4-1 NetWare 3.x Configuration
4-1-1 Starting up PCONSOLE and Selecting
the File Server
Use the following procedure to start up PCONSOLE.
1. On the NetWare server where you want to install the print server,
log in as supervisor or a user with equivalent rights.
2. Input the command
3. On the
Server
Available Options
and then press to display a list of file serve rs.
PCONSOLE
Enter
4. Select the fil e server on which you want to install the print server
and press .
Enter
to start up PCONSOLE.
menu, select
Change Current File
Chapter 4
To change to a different file server or if the file serve r you want
does not appear on the display, press the key. In the file
Insert
server list that appears, select the file server you want and then
Enter
press to log in.
5. Press to return to the
Esc
Availabl e op tions
menu.
NetWare Configuration
4-3
Page 51

4-1 NetWare 3.x Configuration
4-1-2 Creating a Print Queue
Be sure to assign the print server to at least one of the print queues on
the file sever.
If there is already a print queu e that can be ser viced by the Network
Card and you know the name of that print queue, advance to 4-1-3
Specifying the Print Server Name.
Perform the follo wing procedure when you do not know the name of
the print queue or when there is no print queue .
1. On the
tion
Available Options
, and then press to display a list of existing print queues.
2. To create a new print queue, press the key. Type in the name
you want to assign to the print queue and then press .
3. Press to return to the
Esc
menu, select
Enter
Available Options
Print Queue Informa-
Insert
Enter
menu.
Chapter 4
NetWare Configuration
4-1-3 Specifying the Print Server Name
The print server gets print jobs from the queue and sends them to the
printer. Use the following procedur e to specify the print server name.
1. On the
and then press to display a list of current print servers.
2. Press the key to display the
3. At the
Avail a bl e Opt i ons
Enter
Insert
New pri nt se r ver nam e
to give the print server.
You can use the MAP or a Web browser to check print server
names on a Web page format. See 8-1 Manag ement Access Pro-
gram (Windows) and 9-4-2 NetWare Configuration for more infor-
mation.
The initial default pr int server name is:
Example:
New print server name: ML1_160150
4. Press to add the new print server name to the list.
Enter
4-4
menu, select
Print Server Infor matio n
New print server name
prompt, type in the name you want
<serial number>
MLx_
box.
.
Page 52

4-1 NetWare 3.x Configuration
Enter
4-1-4 Configuring the Print Server
Use the following proce dure to configure the print server.
1. On the
Print Server
ure and then press to display the
menu.
2. On the menu, select
Enter
to display the
3. Select
Printer Configuration
Configured Printers
4. Choose the printer and press to display the
uration
scree n shown below.
list, select the print server you wa nt to config-
Enter
Print Server Con f iguration
Print Server Configuration Menu
and then press to display the
Print Server Information
and then press
Enter
list.
Enter
Printer 0 config-
.
Chapter 4
5. You can change the default printer name to something else that is
easier to remember, like LASER_PRINTER. The print server uses
this name when it returns a message to the user on the NOTIFY
list.
Select the
Enter
.
6. Select the
printer types. Select
Enter
.
field, type in the name you want, and then press
Name
field and then press to display a list of
Type
Remote Other/Unknown
and then press
This inputs default v alue s for the remaini ng fi elds. Nor mally these
default sett ings provided optimal performance, and so you should
not change them.
4-5
NetWare Configuration
Page 53

4-1 NetWare 3.x Configuration
Chapter 4
7. Press . At the prompt, specify that you want to save your set-
Esc
tings.
8. Press again to return to the
Menu
Esc
.
Print Server Configuration
4-1-5 Assigning Print Queues to the Printer
Assigning print queues to the printer authorizes the print server to
service the queues.
Note
• Do not assign the same queue to multiple print servers. Doing so creates
the possibility that the print job will be sent to the wrong printers.
1. On the
viced by Printer
Print Server Configuration Menu
.
, select
Queues Ser-
NetWare Configuration
2. From the list of defined printers, select the printer name you want
Insert
Enter
Available Queues
for the
then press .
3. Press the key to display a list of
printer .
4. Select the queue you want, and then assign a priority in the range
of 1 (highest) to 10 (lowes t).
The default priori ty le v el 1 is recommended. Press to displ ay
Enter
the queue in the list.
4-6
Page 54

4-1 NetWare 3.x Configuration
* Use the following steps to change the priority level of a
queue. While the
the screen, press to display the priority setting screen.
File Server/Queue/Priority
Enter
window is on
Press to delete the current setting. Nex t, type a va lue from
1 to 10 and then press . If there are other queues you
Enter
want to assign to the printer, repeat steps 3 through 5.
5. After you assign the priority level, press and then save your
Esc
changes.
6. Continue to press until you return to the
figuration
Menu
Esc
.
Print Server Con-
7. If you want to configure th e NOTIFY option, see 4-1-6 Setting Up the Printer NOT IFY Options (Optional). If you are finished, con-
tinue to press and then save your changes.
Esc
4-1-6 Setting Up the Printer NOTIFY Options
(Optional)
Configure the print er NOTIFY option when you want the print server
to notify users or user groups about printe r problems. The print server
supports enhanced NOTI FY options for printers, including notif ic ation
of a user whenever any of the following events occur on the printer.
Chapter 4
• Printer off line, paper jam, cover open, out of paper
• Manual paper feed for form change required
• Engine failure
1. On the
Printer
2. On the
want to change. Press to display the
Print Server Configuration Menu
.
Defined Printers
list, select the printer whose setting you
Enter
, select
Notify Candidates
3. Select the user or user group and then press to display the
Notification Interval
4. Set the
First
and
window.
Next
intervals f or notifying users when printer
problems occur. After making these settings, press .
First
The
interval is the amount of time (in seconds) the network
Notify List for
list.
Enter
Enter
should wait until notifying the user about a print job problem.
NetWare Configuration
4-7
Page 55

4-1 NetWare 3.x Configuration
Chapter 4
NetWare Configuration
5. The
6. Press and then s elect
7. Press at each screen until you reach the
8. If you are f inished with the configurat ion, press and save the
Next
uration
interval is how often in seconds notification is sent.
Esc
Esc
Menu
.
Save Changes
.
Print Server Config-
Esc
changes.
4-1-7 Installing the Print Server on Multiple
File Servers
When installing the print serv er on multiple file servers, perf orm the
procedures in sections 4-1-1 through 4-1-6 for each file server. Be sure
to use the same print server name and password for all of the file
servers.
You can define a pas sword using a Web browser or Telnet. When using
a password, select
Print Server Information
Change Password
menu, and then set the password for each
file server.
The Network Card automatically se arc hes for and attaches to file
servers within four hops and with propagation delays within eight
ticks. In the case of a very large and complex network, this allows a
bounded search time on startup. When the print server needs to attach
to file server s outside the above range or when you want to speed up
start up by searching for only some of the file servers within the range
described above , you can en ter the file servers with which the print
server is to operate into the
Print Server Configuration
file server.
from the PCONSOLE utility
of a primary
You can make any file server within the range described above a
primary file serv er, but ideall y it shoul d be a file server t hat is as ne ar as
possible to the print server. Once a primary file server and the list of
file servers to be serviced are located, auto search is terminated the
print server directly accesses the listed file server. No other file servers
are access ed.
4-8
Page 56

4-1 NetWare 3.x Configuration
4-1-8 Primary File Server
The following procedure describes how to use the primary file server
function on a file serve r close to the printer.
1. On the
be Serviced
Print Server Configuration Menu
for a list of file ser vers to be serviced by the primary
, select
File Servers to
file serv er.
2. Press the key to display the
Insert
Available File Servers
list.
3. Select the name of each file server to be serviced, and then press
Enter
to add it to the
File Servers to be Serviced
list .
4. After adding all the file servers you want to be serviced, press
Esc
to re tu r n to the
Print Server Configuration Menu
.
5. Install the Network Card on each of the primary file servers.
4-1-9 Preferred File Server
You can use a Web browser to specify a preferred file server you want
recognized by the Network Card. Once you list a preferred file server,
the Network Card attaches to it inst ead of per forming the automatic
search operation.
Chapter 4
The Network Card connects directly to any preferred file server that is
also a primary serve r.
Note
• The preferred file server is only applicable to bindery-based queues.
Specifying it does not affect the NDS queue.
4-9
NetWare Configuration
Page 57

Chapter 4
4-2 NetWare 4.x Configuration Using Bindery Emulation
4-2 NetWare 4.x Configuration Using
Bindery Emula t ion
Novel NetWare 4.x supports two operation modes: NDS and bindery
services emulation. This chapter explains how to configure NetWa re
4.x using bindery emulation. For information about NDS, see 4-3
Configuration Using Novell Directory Services.
These two services run simultaneously and transparently to each other.
The Network Card can be configur ed to operate in the bindery servic es
mode only or under NDS. Under NDS, the Network Card will also
service older file servers operating in bindery mode.
Note
• The Network Ca rd will not be able to find its f ile servers if it is not correctly configured for NDS operation and the bindery services mode is
not running. You can use MAP or a Web browser to check the configurati on of th e Network Car d. See
(Windows)
and
9-4-2 NetWare Configuration
8-1 Management Access Program
for more information.
4-2-1 Confirmin g th e Bi nd er y Cont ex t
Before installing the Network Card under Novell NetWare 4.x in the
bindery emulation mode, you should first confirm whether the server
has a bindery context (name assigned to the server by the bindery
services mode). If it doesn’t, install in the NDS mode.
NetWare Configuration
Bindery context is r equired to install the Network Card in the bindery
emulation mode. Use the followin g proced ure to confir m whether your
server has bindery c ontext.
1. On the NetWar e 4.x server, type:
load in st al l
2. Select
3. On the
Maintenance/Selective Install
Installation Options
4. From the menu of available NCF file options, select
AUTOEXEC.NCF
Enter
from the menu.
menu, select
NCF File Options
Edit
.
.
4-10
Page 58

4-2 NetWare 4.x Configuration Using Bindery Emulation
5. Search the file and check to see if it contains a statement similar to
the one shown below.
SET BIND ER Y CO NT EX T=O U= EN G
OU=ENG
server context in place of
6. At the console prompt, type the
is an example file server context. Use your own file
OU=ENG
.
SET BINDER CONTEXT
state-
ment exactly as you entered it in your AUTOEXEC.NCF file.
Note
• The command you t ype at the c onsol e pr ompt t akes e f fect immedia tely.
The c o n tents defined in the AUTOEXEC.NCF file take e ffect when the
server is shut down an d then restarted.
4-2-2 Configuring in the Bindery Mode
After you confirm that your server has a bindery context, use the
following proce dure to configure the Network Card.
1. Log into the server where you want to install the print server as
supervisor or as a user with equivalent rights.
2. Type
3. Press to enter the bindery mode.
PCONSOLE
Options
and press to display the
screen.
F4
Note
• If a message appears t elling you to log in with bindery connection, it
means that the attached server does not have bindery mode enabled.
Either perf orm the procedure under
or log onto a server with bindery services enabled.
text
Enter
4-2-1 Conf irming the Bindery Con-
Available
Chapter 4
NetWare Configuration
4-11
Page 59

4-2 NetWare 4.x Configuration Using Bindery Emulation
F3
Enter
Chapter 4
4. On the
press .
Available Options
Enter
screen, select
Quick Setup
and then
Use Quick Setup to connect the print server, print queue, and
printer you want to use. You will be able to change this settings
later if you want.
5. Select
Print Server
and then press to modify the entry.
6. Type the name of the print server you want to use into the
print server
field, and t hen press .
Note
• You can use MAP or a W eb browser to change the print ser ver name.
See
8-1 Management Acces s Program (Windows)
Configuration
for more information.
• The initial default print s erver name is:
MLx_
and
9-4-2 NetWare
<serial number>
.
New
NetWare Configuration
7. Press the to move the cursor to
name, and then press .
Enter
8. Press the to move the cursor to
print queue name, and then press .
9. Press the to move the cursor to
Enter
. From the printer type list, select
Enter
press .
New printer
, type the printer
New print queue
Enter
Printer type
and then press
Other/Unknown
, type the
and then
4-12
Page 60

4-3 Configuration Using Novell Director y Services
10. After all the settings are the way you want, press to save the
configuration.
Repeat steps 5 through 10 for each file server that the print server
services.
After you are finish ed, sel ect
Availabl e Opt i ons
the
edit print server or queue settings.
Print Queues
screen when you want to view, delete, or
F10
Print Servers
or
on
4-3 Configuration Using Novell Directory
Services
Novell Directo ry Services (NDS) provides a more advanced approa ch
to network management than previous versions of NetWare. It stores
and tracks all network objects. A Ve rsion 4.x server must have NDS
installed in order to function.
This means ev ery NetWare 4.x server is a director y se rver, because it
services printers, print se rver s, print queues, an d other named dire ctory
objects. With appropr ia te privileges , you can cre at e a print server
object and assign them network-wide contexts (or locations), which
eliminates the need to perform troublesome setup of print servers on
each individual network server.
Chapter 4
NDS provides true enterprise networking based not on individually
defined physical sites, but rather on a shared network database . The
result is vastly improved print server setup and management.
The Directory Information Base (DIB) is used to store information
about server s and se rvi ces , us ers, p rin ters , gateways, etc. It is a
distributed database that allows access to data anywhere on the
network, regardless of where it is stored. Pre-4.x NetWare versions
provide the same data as DIB, but the dat a is stored in the NetWare
bindery.
4-13
NetWare Configuration
Page 61

Chapter 4
4-3 Configuration Using Novell Director y Services
DIB is design e d for mo re flexibl e acc es s, mo re specific secur ity, and,
because it is distributed, a design that allows partiti oning. Unlike
bindery’s flat file structure, the DIB directory uses an object-oriented
structure, enabling network-oriented access as opposed to bindery’s
server-oriented access.
The bindery emulation mode provide s the directory with downward
compatibility with NetWare bindery. This section (4.3) explains
operation of the print serv er with a 4.x NetWare system in bindery
emulation mode. Once bindery emulation is enabled, NDS receives
bindery requests and responds just as if a bindery existed on the
NetWare server being accessed.
It should be noted he re that information obtained f rom a bindery query
may not be stored on the server because the directory is a partitioned
and distributed dat abase. Though a NetWare 4.x server is not operating
from a bindery, applications making bindery requests do not know the
difference.
NWADM IN can be used to configure the printer in NDS. Before
printing, you must use the procedures below to configure NDS, and to
set up the Network Card with NDS context and tree.
The procedures for us ing NWADMIN to create the printe r , pr int ser ver,
and other print queue objects are provided below. After you create
these objects you must then associate them with each other. Under
NetWare 4.x you can keep binder y resources on any server if you want
SET
by declaring a
NetWare Configuration
If you want, you can also use PCONSOLE instead of NWADMIN.
PCONSOLE can also be used to set up static print server information,
statement in your AUTOEXEC.NCF file.
such as which queues to service and whom to notify in case of
problems. See the Novell NetWare documentation for details about
using PCONSOLE for NDS.
Note
• Some NetWare servers require that bindery context be configured on
the file server, ev en when using the NDS mode.
4-14
Page 62

4-3 Configuration Using Novell Director y Services
4-3-1 Creating a P rinter Object
1. Click the
NWADMIN
dows. This displays the
icon in the
NetWare Administrator
NetWare Tools
group in Win dialog box. To
access your dir ectory tree, open a browser window by clicking the
menu item and then the
Tools
Browse
item.
2. Highlight the or ganizational unit or organization where you want
to create the prin t servi ce in the dire ct ory tree , sele ct
then on the pop up menu select
Create
.
Object
, and
Note
• If you want, you c an also create objects in NWADMIN by selecting an
organi za tional unit, right-cli cking to display a pop-up menu, and left clicking
continue with the steps below.
Create
3. When the
Printer
icon on the
to display the
New Object
Class of New Object
New Object
window. Then you would
window sho wn below appears, select the
list and then click OK.
Chapter 4
4. On the
you want into the
button.
Create Printer
Printer Name
window th at appears, type the printer name
field and then click the
Create
4-15
NetWare Configuration
Page 63

4-3 Configuration Using Novell Director y Services
4-3-2 Creating a Print Server Object
Chapter 4
1. Highlight
2. Select
Object
Organizational Unit
from the main menu, and then select
again.
Create
pop up menu that appears.
3. On the
on the
4. On the
New Object
Class of New Object
Create Print Server
server name you want int o the
click the
Create
window, select the
window that appears, type the print
button.
Print Server Name
list, and then click OK.
Print Server Name
field and then
4-3-3 Creating a Print Queue Object
1. Highlight
2. Select
Organizational Unit
Object
from the main menu, and then select
pop up menu that appears.
3. On the
New Object
icon on the
4. Click the
want into the
and then click
Class of New Object
Directory Services Queue
Print Queue Name
window that appea rs , sele ct the
Create
.
If you do not know the print queue v olume name (the name of the
hard disk you will be accessing) , cl ic k the icon to the right of the
Print Queue Volume
shown below.
Objects
field to display the
lists volumes that you can choose.
again.
list, and then click OK.
button, type the names you
and
Print Queue Volume
Select Object
Create
Print Q ueue
on the
icon
on the
fields,
window
NetWare Configuration
4-16
Page 64

4-3 Configuration Using Novell Director y Services
If you cannot find the volume you wa nt in the list, click
Context
items until you find the v olume where you want the
Directory
queue to reside.
5. Click the object (hard drive) you want and it appears in the
Selected Object
6. Click OK and the full volume appears in the
field. Finally, click
field.
Create
Print Queue Volume
.
Chapter 4
4-17
NetWare Configuration
Page 65

4-3 Configuration Using Novell Director y Services
4-3-4 Assigning a Printer Object
1. Navigate to the directory tree, and double-click a printer object
you just created. This displays the
Printer
window.
Chapter 4
NetWare Configuration
2. Click the
Select Object
3. From the
Assignments
window.
Objects
button, and then click
list, select a print queue you just crea ted and
then click OK to add the print queue to the
the
Printer
window.
to display the
Add
Print Queues
box in
4-18
Page 66

4-3 Configuration Using Novell Director y Services
4. Click OK again.
4-3-5 Assigning a Print Server Object
1. At the directory tree, double-click a print server object you just
created. This displays the
Print Server
window.
Chapter 4
4-19
NetWare Configuration
Page 67

4-3 Configuration Using Novell Director y Services
Chapter 4
2. Click the
Select Object
3. From the
then click
Print Server
in the
Assignments
button, and then click
window.
Objects
OK
list, select the printer object you just created and
to add the printe r (with it s c ontext ) to the
wind ow.
Add
to display the
Prints
box
4. Click OK again.
4-3-6 Checking Assignments
1. At the directory tree, double-click a print queue object you just
created. This displays the
Print Q ueue
window.
NetWare Configuration
2. Click the
Assignments
button.
The print queue and printer will appear in the proper boxes of the
Printer Queue
window if they are properly configured.
4-20
Page 68

4-3 Configuration Using Novell Director y Services
3. Check the contents of the windo w and then click
Cancel
.
4-3-7 Printer Configuration and Reset
After you fin ish making the NWADMIN settings des cribed above, you
must configure and reset the printer (by powering it down and then
back up again) before you can start printing.
Chapter 4
4-21
NetWare Configuration
Page 69

Chapter 4
MEMO
NetWare Configuration
Page 70

Chapter
Macintosh C onfigurat ion
5
Chapter 5
Macintosh Configuration
Page 71

Chapter 5
Macintosh Configuration
Page 72

5-1 Setting Up AppleTalk
This chapter describes ho w to configure for network printing in a
Macintosh env ironment.
5-1 Setting Up AppleTal k
Note
• If your printer is PagePro 4100E, the optional PostScript ROM-SIMM
is required before installing the PostScript printer driver.
See the
Use the following proce dure to make AppleTalk se ttings.
1. On the Apple menu, point to
AppleTalk
2. Select
3. Close the
User’s Manual
.
Ethernet
AppleTalk
of the printer for details.
Control Pa ne l
.
dialog box.
and then select
5-2 Selecting and Setting Up the Printer
You must use the following procedure to configure the driv er before
printing for the first time.
1. Install the PostScript printer driver and the PPD file for the
PagePro 4100 printer.
• See the documentation that comes with the printer for infor-
mation about how to instal l it.
2. Select
3. Use the fiel d in the upper left of the dialog box to select the appro-
4. Use the field in the lower left of the dialog box to select the zone
Chooser
priate printer driver for the PagePro 4100.
where the printer is connect ed .
• Y ou do not ne ed to se lect a zone if your network is c onf igure d
without using zones.
from the Apple menu.
5-1
Chapter 5
Macintosh Configuration
Page 73

5-3 Network Card Configuration
5. In the printer list on the right side of the dia log box, select your
printer. The default name of this pr inter is MLx_<serial number>.
Create
Create
. (If the dialog box on your screen does not have a
button, click the
Chooser
.
Chooser
Setup
button instead.)
and click
Setup
again once you
6. Click
7. Close the
This completes confi guration of the network and printer . The printer
can now be use d for printing from different applications. Note that you
do not need to open the
complet e the above proc edu re.
5-3 Network Card Configuration
The Network Card comes with NIManage for AppleTalk, which is a
Macintosh utility progra m for configuring the Network Card.
See 8-4 NIManage for AppleTalk (Macintosh) for information about
installing NIManage for AppleTalk and using its various features and
functions.
Chapter 5
Macintosh Configuration
5-2
Page 74

Chapter
UNIX Configuration
6
Chapter 6
UNIX Configuration
Page 75

Chapter 6
UNIX Configuration
Page 76

This Network Card supports the foll owing UNIX systems.
• All UNIX systems supporting lpd/lpr
• System V Rel.4 (386 Platform)
• DEC ULTRIX RISC Versions 4.3, 4.4
• DEC OSF/ Versions 2.0, 3.0
•Solaris
Ve rsion 1.1.3 (SunOS 4.1.3)
Ve rsion 2.3 (SunOS 5.3)
Ve rsions 2.4, 2.5
• HP-UX 700, 800 Series
Ve rsions 9.01, 10.0
• IBM AIX Version 3.2.5
• SCO UNIX Version 3.2
• AS/400
Either of the two connection configurations described below can be
used.
Host-based lpd
In this configuration, a supplied line printer daemon is run on one or
more workstations and print dat a is sent to the Network Card via a
TCP/IP port.
Printer
Network Card
TCP/IP
LPD
TCP/IP
UNIX
6-1
Chapter 6
UNIX Configuration
Page 77

Printer-based lpd
In this configur ation, the printe r appears as a hos t running a line printe r
daemon.
Printer
UNIX
Chapter 6
LPD
Network Card
TCP/IP
UNIX
TCP/IP
UNIX
Generally, printer-based lpd is easiest to use on BSD UNIX systems
that require an entry in the printcap file once the Network Card has its
IP information. Some UNIX System V systems place restrictions on
support of remote lpr/lpd pri nters, requiring that the host-based lpr/lpd
approach be used.
On many UNIX systems, you can choose between host-resident
printing or print server-regident printing. The following shows the
differenc es between the two types of printing.
Item Host-resident
• User name and file
Banne r Page
name are printed on
the banner page.
• lpd must be installed
lpd In s t a llati o n
on every host computer used for printing.
Print server-
resident
• Host name
printed on the
banner page.
• Single installation of lpd when
print server is
installed.
UNIX Configuration
6-2
Page 78

6-1 Printer-based lpd Configuration
Note
• The Network Card also operates with other host-resident print supervisor/spooler programs that provide a print image to the printer over a
TCP/IP port. The base TCP/IP port number can be changed using Telnet, MAP, or a Web brow ser. The actual port is always one higher than
the base port number. The status page indicates the actual port number.
With both the host-based and printer-based lpd, you must assign IP
par a meter s to the Netwo r k C a rd. Se e Chapter 7 - Setting Up IP
Parameters for more information.
6-1 Printer-based lpd Configuration
lpd/lpr is an implementation of the standard UNIX line printer daemon.
It lets you print across a TCP/IP network without needing to install
software on your workstation. All filtering and banners are done by the
Network Card. Remote p rinting uses the same c ommands (lpr, lpq, lpc)
as local printing.
An lpr reque st from a workstation refer en ces the remot e (rm ) en tr y in
the
/etc /prin tcap
opens a connection with the network lpd/lpr process on the remote
system, and sends the data file to the remote printer. The printer-based
lpd then filters the dat a and prints the job in accordance with
information contained in the control file and its own printcap file.
file, where it finds the printer on a remote system. lpr
The Network Card lpd recognizes the format of certain printer
emulations and filters the data, if possible, so it can be printed on the
printer type you specify. Either of the follo wing two methods can be
used to inform the Network Card lpd of what type of printer is
connected.
1. Using the default port se tting (PCL, PostScript, etc.)
2. Using Te lnet or the Network Card HTML settings page to change
the listed emu lation t ypes ( Network C ard HTML se ttings pa ge c an
be accessed using MAP or a Web browser.)
6-3
Chapter 6
UNIX Configuration
Page 79

6-1 Printer-based lpd Configuration
The following secti ons describe how to give specific lpd/lpr setup
instructions for various systems.
6-1-1 BSD System
This section describes ho w to set up a remote printer on the host that
sends jobs to the Network Card using printer reside nt lpd. This is
accomplished by adding an entry to the host’s
/etc/printcap
each printer you use.
1. Use an editor to open
/etc/printcap
.
2. Make entries that name the Network Card name as the remote
host, and assign any name to the remote printer.
The following is an examp le of typica l pri n tcap en trie s.
file for
Chapter 6
UNIX Configuration
<printer name>
:\
(Example: “lprprinter”)
:lp=:\
<remote host>
:rm=
(Host name from
:rp=
<remote printer name>
:\
/etc/hosts
)
:\
(Any n ame)
:sd=/usr/spool/lpd/
<printer name>
(Specifies sp ool dire ct o ry for wher e the s ystem
can spool data and perform other spool control.)
This entry sends jobs spoole d in /usr/s pool/ lpd/<printe r name>
to the printer specified by <printer name> for printing by the
Network Card specified by <remote host>.
3. Create the spooling dire ctory.
mkdir /usr/spool/lpd/
<printer name>
4. Use the lpr command to print something.
lpr -P
<printer name> <file name>
Installation is complete if the file you specify prints correctly.
:
6-4
Page 80

6-1 Printer-based lpd Configuration
6-1-2 AIX V ersion 2.5
This section describes ho w to set up a remote printer on the host that
sends jobs to the Network Card using the Networ k Card’s lpd.
1. At the prompt, type:
#smit spooler
2. On the window that appear s, se lect
3. On the menu, select
4. On the next menu, select
5. On the next menu, select
Client Service s
Remote Printer Queues
Add a Remote Queue
Manage Remote Printers
.
.
.
.
6. Change the value s on the window that appears to the settings for
the Network Card.
The va lues that first appear on the windo w are initial def aults. You
must replace the short and long form filter values with the values
shown below.
Item Example
Name of queue to add print1 Local printer name
queue Destination
Host
Short Form Filter /usr/lpd/bsdshort Required value
Long Form Filter /usr/lpd/bsdlong Required value
Name of remote
printer queue
Queue Name of
device to add
printfast Network Card IP
PORT1 Network Card
print1 Local queue name
Input Data
Description
address
queue (You can use
any name you want
here.)
Chapter 6
7. After inputting al l the v alues you want, press to complete the
Enter
configura tion.
6-5
UNIX Configuration
Page 81

6-1 Printer-based lpd Configuration
6-1-3 AIX 4.0
Use the following proce dure to install a Network Card on an AIX 4.0
system.
1. Run SMIT Printer.
2. Select
3. Select
4. Select
5. Use
Print Spooling
Add a Print Queue
Remote
Standard Processing
.
6. Assign the queue name.
7. Use the Network Card host address for Remote System.
8. Assign an appropriate name (li ke
remote system.
9. Type in a description of the printer. This information is optional.
10. Press to apply what you hav e input and create the queue.
Enter
11. Execute the following command to produce a test print.
.
.
.
PORT1
) for the queue on the
Chapter 6
UNIX Configuration
lp -d
<queue name> <file name>
Configuration complete if the test prints without any problems.
6-1-4 HP-UX
Use the following procedure to set up a remote computer on the host
that sends jobs to a Network Card using Network Card lpd.
1. At the prompt, type:
sam
2. On the window that appear s, se lect
3. On the menu, select
4. On the list that appears, select
select
Add Remote Printer
List printer and plotters
Actions
on the menu that appears.
6-6
Printer/Plotter Manager
.
from the title bar and then
.
Page 82

6-1 Printer-based lpd Configuration
5. Type the appropriate Network Card values on the window that
appears.
The followin g table shows some sample settings.
Item Example Input Data Description
Printer Name myprinter Name used in the lp command
Remote System
Name
Remote printer Name PORT1 lpd quene name (You can use
6. From the three settings at the bot tom of the window, select
Remote Printer is on BSD System
7. Click OK.
8. Ping the Network Card to check the connec tion.
fastprint Network Card host name
recorded in
any name you want here.)
/etc/hosts
.
ping
<Network Card IP address>
When ping causes the message shown be low to return, it means
the IP address is setup correctly.
<Network Card IP address>
is alive.
6-1-5 AS/400
When working with the output queue descrip tion (WORKOUTQD),
you must provide information f or a number of fields in order to allow
the Network Card to function properly a s a remote printer device.
1. When prompted for the remote system, type
AS/400 system recognizes the device as an IP device.
2. Input an appropriate name (like
PORT1
queue name.
Connection type
3.
Internet address
4.
Destination Type
5.
must be IP.
must be the Network Card IP address.
must be
OTHER
.
INTNETADR
so the
) for the remote printer
Chapter 6
UNIX Configuration
6-7
Page 83

6-1 Printer-based lpd Configuration
Enter
6. In response to the message asking if you want to convert SCS to
ASCII, type
YES
.
This tells the AS/400 system to convert text.
7. For
Manufacturer type and model
, specify the printer driver that
comes with the printer.
6-1-6 DEC ULTRIX 4.3 RISC, OSF1/ALPHA
Use the following proce dure to set up a remote printer on the host that
sends jobs to a Network Card.
1. At the prompt, type:
lprsetup
Chapter 6
UNIX Configuration
2. Select
add
.
3. Type a printer name and then press .
4. When the following message appears, press .
Enter
“Do you want more information on specific printer types?”
5. This displays a list of printers supported by ULTRIX. Type the following:
remote
6. Type the printer synonym (alia s) and then press .
7. Specify the spooler direc tory and then press .
Enter
Enter
Enter
If you want to use the default spooler directory shown on the
screen, press without inputting anything.
8. Specify the remote system name and then press .
9. Type an appropriate name (like
printer, and then press .
Enter
Enter
PORT1
Enter
) for the remote system
10. From the list that appear s on the display, select the printcap symbol name. Next, type the following.
Enter
Q
6-8
Page 84

6-1 Printer-based lpd Configuration
11. This displays the conf iguratio n. If it is correct, type Y. If something
is wrong, type N.
The followin g table shows some sample settings.
Item Type Input Data Description
lp (line pr in t er )
rm (remote host) STR Network Card host name
rp (remote printer) STR PORT1 (You can use any name
sd (spooler directory) STR /usr/spool/lpd7
STR
you want here.)
12. Add any comments you want to the print cap f il e. F or e xa mple, you
could type something lik e the following.
Dick’s printer is down the hall.
13. Select
exit
to save your settings and then press to complete
Enter
the procedure.
6-1-7 SCO UNIX
Use the following proce dure to set up a remote printer on the host that
sends jobs to a Network Card using lpd.
1. At the prompt, type:
mkdev rlp
Note
• You cannot run mkdev rlp twice. To add a nother printer, use the
rlpconf command.
2. Type the responses shown below for the questions that appear.
Do you want to install or remov e a remote printer?
I
Type:
3. Do you want to change printer description file /etc/printcap?
Y
Type:
4. Write a printer name.
Type the name of the printer.
Example:
lprprinter1
Chapter 6
UNIX Configuration
6-9
Page 85

Chapter 6
6-1 Printer-based lpd Configuration
5. Is lprprinter1 a remote printer or a local printer?
R
Type:
6. Enter remote host name.
Type the Network Card host name recorded in the printcap file.
Example:
7. Confirm the information you have entered.
Type:
8. Confirm the preceding connection as your system default.
Type:
9. Enter another printer name or quit setup.
Type:
10. Do you want to start the remote daemon now?
Type:
11. Use a line editor to ope n the
entry with the appropriate remo te queue name. The following
shows an exampl e of how this is done when the remote port is
named PORT1.
lprprinter
Y
Y
Q
Y
printer1:\
:lp=:\
(This field is used for specification of the local
printer devi ce name. This field must be left
empty.)
:rm=lprpriter:\
(Network Card host name recorded in
:rp=PORT1:\
(Any remote queue name you want)
:sd=/usr/spool/lpd/printer1:
(Name of spool directory on client)
/etc/printcap
file and replace the
/etc/hosts
:rp=
)
6-1-8 System V Release 4, Solaris 2.x
You can use lpd/lpr if your system recognizes the LPSYSTEM
command is av aila ble. Set ting s can als o be made using admint ool if t he
UNIX Configuration
system supports it.
6-10
Page 86

6-2 Host-based lpd Configuration
LPSYSTEM Installation
Note
• The following procedure must be performed from the Bourne Shell.
1. At the prompt, type:
lpsystem -t bsd
recorded in /etc/hosts>
<Network Card host name
Some systems require input of the remot e host IP address instead
of the remote host name.
2. Type the following command:
lpadmin -p
Card host name>
<local printer name>
!
<remote queue name>
-s
<Network
Note
• Do not input a space after the remote host name.
Enable
Accept
<local printer name>
<local printer name>
6-2 Host-based lpd Configuration
You need the CD-ROM that comes bundled with the Network Card to
use host-based lpd. It contains inst all scripts for v arious types of UNIX.
This section describes ho w to install TCP/IP printing to the Network
Card on any of the operating systems listed below.
Chapter 6
6-11
UNIX Configuration
Page 87

Chapter 6
6-2 Host-based lpd Configuration
• DEC ULTRIX 4.3 RISC
• System V Release 4
• Solaris (Version 1.x, 2.x)
• SCO UNIX
•OSF1/ALPHA
•IBM/AIX
•HP-UX
Once the Network Card ha s its I P para meters l oaded, you mu st perform
the following steps to en able host-bases TCP/IP printing.
1. Load the print serve r software on your workstation. This software
is provided as a tar file in the TCP/IP directory.
2. Run the appropriate installation script, if one is available.
3. Complete the configuration of your operating system.
6-2-1 Loading the Program
The following procedur es are necessary only when using the supplied
host-based lpr. You do not need to load the software if you are using
printer-based lpr.
1. Log in as superuser to the system that spools dir e ctly to the print
server.
2. Load the CD-ROM that comes with the printer into the CD-ROM
drive of the computer you want to use.
3. Create a program installa tion direc tory and copy the prog ram to it.
For example, type the following
mkdir /usr/MLT_install
Note
• If you already have a Network Card printer at your site and you are
now installing another one, delete the files in the installation directory
(not
/usr/nic
UNIX Configuration
subsequent print server .
). If the se f i le s re main, t hey c an pre ve nt the ins talla ti on o f a
6-12
Page 88

6-2 Host-based lpd Configuration
4. Use the tar co mm an d to load the software from the CD-ROM. At
this time the sy stem di splays a list o f Netw ork Car d f iles c opied b y
tar.
5. Run the installation script for your system in accordance with
appropriate procedure below.
6-2-2 Sel ect in g Fil ters
There are a number of options available when executing the script for
each type of system.
When you run an installation script, it first asks if the printer is a
PostScript printer. If you reply
uses an input filter (i nfilter) that performs CR/LF translat ion for
printing of ASCII file s on a PCL printer. If you repl y
file references psfilter, which provides easy ASCII-to-PostScript
conversion.
Normal PostScript format files are not affected. Proprietary and public
domain filte rs are also av ailable for more v ersatile filtering c apabilities.
to this question, the install script
no
, the printcap
yes
6-2-2-1 Selecting a Filter Manually
The Network Card comes with an input filte r named psfilter, and an
output filter named psbanner for printing of PostScript banner s. To use
these filters, you must change the infilter (
entries in
/etc/printcap
. The following shows an example of how this
) and outfilte r (
:if=
:of=
)
is done.
<printer name>
| Printer Server Card printer:\
:lp=/dev/nic/
:if=/usr/nic/psfilter:\
:of=/usr/nic/psbanner:\
:sd=/usr/spool/
<printer name>
<printer name>
:\
:
6-13
Chapter 6
UNIX Configuration
Page 89

Chapter 6
6-2 Host-based lpd Configuration
6-2-3 Solaris Version 1, OSF1
1. Type the following to run the inst al lation script:
nicinst
The script a utomatically downloads the appropriate Network Card
utilities for your system and displays questions to prompt you for
the information it needs.
2. What is the node name of the Print Server Unit?
Input the host name recorded in
printfast
and then press .
/etc/hosts
Enter
3. What is the printer name?
Type the printer name and press .
Enter
4. Here, the script displays the information you have input up to this
point.
Node name of the Printer Server Card:
printfast
Printer name to be used:
The printer is attached on: PORT 1
Check these settings and make sure they are correct. If they are
correct, type
Enter
.
and press . Otherwise, type no and press
yes
Enter
5. Is this printer PostScr ipt?
Type
and press if the printer is a PostScript printer. Oth-
yes
erwise type no and press .
Enter
Enter
6. The printcap entries you ha ve made up to this point appear on the
display and the script confirms whether you want the entries written into the
/etc/printcap
added to printcap and then press . If you do not want them
added, type no, press and then manually make the required
file. Type
Enter
Enter
changes to the entries .
. For example, type
<printer name>
if you want the entries
yes
Do not change the device name in the
/etc/printcap
file, w hich
was give n to the Network Card in step 3. The lp command line
UNIX Configuration
must reference the
lowing shows an example entry.
entry recorded in the print cap file. Th e fol-
:lp
6-14
Page 90

6-2 Host-based lpd Configuration
<printer name>
:lp=/dev/
:if=/usr/nic/infilter:\
:sd=/usr/spool/
| Print Server Card printer:\
<printer name>
<printer name>
:\
:
* All printcap entries start with a tab except for the first.
7. The script creates a spool directory in
/usr/spool
and starts a daemon for the newly configured printer. At this time, the script displays the path you should use if you e ver need to restart the
daemon.
Example:
/usr/nic/lpr_print /dev/nic/
printfast 10001 &
<printer name>
8. Run the ps command to view all your lpd/lpr proce sses.
ps -ax | grep lpd
9. Next, input the following to kill all your lpd/lpr processes .
kill -9
<Process ID>
This stops all printin g.
10. Next, typ e the following to restart the daemon.
/usr/lib/lpd
11. This completes installation. In response to the message about
whether you want to install another printer, input
then press .
Enter
yes
or no and
Ping the Network Card to test communication.
Chapter 6
UNIX Configuration
6-15
Page 91

Chapter 6
6-2 Host-based lpd Configuration
6-2-4 DEC ULTRIX 4.3
1. Type the following to run the inst al lation script:
nicinst
The script a utomatically downloads the appropriate Network Card
utilities for your system and displays questions to prompt you for
the information it needs.
2. What is the node name of the Print Server Unit?
Input the host name recorded in
printfast
and then press .
/etc/hosts
Enter
3. What is the printer name?
Type the printer name and press .
Enter
4. Here, the script displays the information you have input up to this
point.
Node name of the Printer Server Card:
printfast
Printer name to be used:
The printer is attached on: PORT 1
Check these settings and make sure they are correct. If they are
correct, type
Enter
.
and press . Otherwise, type no and press
yes
Enter
5. Is this printer PostScr ipt?
Type
and press is the printer is a PostScript printer. Oth-
yes
erwise type no and press .
Enter
Enter
6. The printcap entries you ha ve made up to this point appear on the
display and the script confirms whether you want the entries written into the
/etc/printcap
added to printcap and then press . If you do not want them
added, type no, press and then manually make the required
file. Type
Enter
Enter
changes to the entries .
. For example, type
<printer name>
if you want the entries
yes
<printer name>
:lp=/dev/
UNIX Configuration
:if=/usr/nic/infilter:\
:sd=/usr/spool/
| Print Server Card printer:\
<printer name>
<printer name>
:\
:
6-16
Page 92

6-2 Host-based lpd Configuration
7. This completes the installation. In response to the message about
whether you want to install another printer, input
then press .
Enter
yes
or no and
Like all BSD systems, UL TRIX uses the
/etc/printcap
file t o conf igur e
a printer. The interface to the installation script is the same for all BSD
systems, but the printcap entry is different.
6-2-5 HP-U X S yst em
1. Type the following command to run the installation script.
nicinst
The script a utomatically downloads the appropriate Network Card
utilities for your system and displays questions to prompt you for
the information it needs.
2. What is the node name of the Print Server Unit?
Enter
/etc/hosts
Enter
. For example, type
Enter
<printer name>
Type the host name recorded in
printfast
and then press .
3. What is the printer name?
Type the printer name and press .
4. Here, the script displays the information you have input up to this
point.
Node name of the Printer Server Card:
printfast
Printer name to be used:
The printer is attached on: PORT 1
Check these settings and make sure they are correct. If they are
correct, type
Enter
.
yes
and press . Otherwise, type no and press
5. The script automatically starts the daemon for the newly config-
ured printer. At this time, the script displays the path you should
use if you eve r need to restart the daemon.
Chapter 6
Example:
/usr/nic/lpr_print /dev/nic/
printfast 10001 &
<printer name>
6-17
UNIX Configuration
Page 93

6-2 Host-based lpd Configuration
The above example reflects the name supplied to the script earlier.
After the installation script is complete, you must then configure the
printer and make it known to the lp system. The HP-UX lp system uses
the lpadmin command used to configure a printer. There is no
printcap
file. The following are the commands used for printer
configuration.
/etc/
Chapter 6
lpadmin -p
<printer name>
enable
accept
<printer name>
<printer name>
<printer name>
-v /dev/nic/
You can also use other options in the lpadmin command. See your
system documentation for detai ls.
Note
• The printer name must be the same as the one you specified during
Network Card installation. HP also provides the sa m pro gram, which
can be used to configure the printer.
If you use sam, make all specifications just as if the printer were
connected directly to /dev/lprinter/<printer name>.
The software installed with your HP system should be sufficient to
satisfy most printing needs. HP supplies ASCII-to-PostScript filters
that are invoked automatically whenever PostScript is specified as the
content type. The HP-UX lp system also supplies interface scripts that
generate PostScript banners. When necessary, you can use the lpfilter
command to define ne w filters and content types. The installation
provides you with the full power and flexibility of the lp print service,
and the fact that you are printing across the network is totally
transparent.
UNIX Configuration
6-18
Page 94

6-2 Host-based lpd Configuration
6-2-6 System V (Solaris Version 2), System V
Release 4/386 Base Machine
System V Solaris and SVR4 i386 base machines use a network direct
filter called nicfilter. The system invokes nicfilter direct ly from the
printer interfac e file. To load the software, create a
/usr/nic
and then tar the TCP/IP software into it.
1. Type the following to navigate to the
cd /usr/nic
/usr/nic
directory.
2. Next, type the following command to run the installation script:
nicinst
Once the operating system is identified, the script downl oads the
applicable files to the
/usr/nic
directory and displays questions to
prompt you for the information it needs.
3. Type:
cd /usr/spool/lp/model/standard/usr/nic/
port1_interface
Note
• The default interface is genera lly sufficient for most PostScript, PCL,
and ASCII f iles. To use a printer- specific interface other than the
default interface script (named
printer interface edited and installed in the
standar d
), you must have a copy of that
/usr/nic
directory.
directory
4. Next you must edit the printer interface program you created in
step 3. Type:
cd /usr/nic
5. Use a text editor to open and edit the port1_interface file.
6. Search for the expression
above or below the section
FILTER=“/usr/nic/infilter | /usr/nic/
<nicfilter printer server name>
FILTER=0
#FILTER-0${LPCAT}
, and insert the following line
.
10001”
6-19
Chapter 6
UNIX Configuration
Page 95

6-2 Host-based lpd Configuration
Enter
Enter
Note
•For
<printer serve name>
etc/hosts
before th e tra iling
${files}
Manual
. Optional arguments inserted between the
0
. For details, see the
.
7. Save the file and quit the editor.
8. Y ou ne ed to use lpadmi n to configur e the host pri nter. T ype the following:
must be th e same as the one recor d ed in
10001
are
${banner}, ${user_name}, ${request_ID}
System 5 Release 4 System Administration
/
entry and
, and
Chapter 6
lpadmin -p
<printer name>
-v /dev/null -i
/usr/nic/port1_interface
Note
•
lpadmin
device and printer interface program. There is no
involved with this method of configuration.
9. Next, initialize the printer. Type the following commands:
configures the printer name and associates it with a given
/etc/printcap
accept
enable
<printer name>
<printer name>
Note
• After each entry lpadmin acknowledges the invoked command.
10. Next, type the following command:
lp -d
<printer name>
/etc/hosts
11. Check for output or type the following:
lpstat
<printer name>
Or:
Enter
file
lpstat -t
UNIX Configuration
6-20
Page 96

6-2 Host-based lpd Configuration
6-2-7 SCO UNIX
The installation pr ocedure f or SCO UNI X is simil ar to that for HP-UX.
The Network Card solution uses a networ k direct filter named nicfilter.
The system invokes nicfilter directly from the printer interface file.
After performing the procedure under 6-2-1 Loading the Program, you
must configure the printe r and make it known to the lp system.
1. Type the following to run the inst al lation script:
nicinst
The script a utomatically downloads the appropriate Network Card
utilities for your system and displays questions to prompt you for
the information it needs.
2. Select your system you are using from the li st of options that
appears and then press .
1) AT&T/SVR4; 386
2) SCO UNIX System V
3) None of the above
3. What is the node name of the Network Card?
Enter
Input the host name recorded in
For example, type
printfast
.
/etc/hosts
and then press .
Enter
4. What is the printer name for this Networ k Card-linked printer?
Type the printer name and press .
Enter
5. Here, the script displays the information you have input up to this
point.
Node name of the Printer Server Card:
printfast
Printer name to be used:
The printer is attached on: PORT 1
<printer name>
Check these settings and make sure they are correct. If they are
correct, type
Enter
.
and press . Otherwise, type no and press
yes
Enter
6-21
Chapter 6
UNIX Configuration
Page 97

6-2 Host-based lpd Configuration
6. Is this printer PostScr ipt?
yes
Type
and press if the printer is a PostScript printer. Oth-
erwise type no and press .
Enter
Enter
7. The script automatically starts the daemon for the newly configured printer. At this time, the script displays the path you should
use if you eve r need to restart the daemon.
/usr/nic/lpr_print /dev/nic/
printfast 10001 &
<printer name>
The above example reflects the name supplied to the script earlier.
After the installa tion script is complete, you must configure the printer
and make it kno wn to the lp s ystem. The SCO UNIX lp sys tem uses t he
lpadmin command used to configure a printer. There is no
/etc/printcap
file. The following are the commands used for printer
configurati on.
lpadmin -p
<printer name>
<printer name>
-v /dev/nic/
Note
• Your host may require you to use the -i command to specify the model.
enable
accept
<printer name>
<printer name>
Chapter 6
UNIX Configuration
You can use other options in the lpadmin command. See your system
documentation for full details.
Note
•
The printer name must be the same as the one you specified during Network Card install ation. SCO also provides the
sam
pro-
gram, which can be used to configure the printer.
If you use sam, make all specifications just as if the printer were
connected directly to /dev/lprinter/<printer name>.
6-22
Page 98

6-2 Host-based lpd Configuration
The software installed with your SCO system should be sufficient to
satisfy most printing needs. SCO supplies ASCII-to-PostScript filt ers
that are invoked automatically whenever PostScript is specified as the
content type. The SCO UNIX lp system also supplies interface scripts
that generate PostScript banners. When necessary, you can use the
lpfilter command to define new filters and content types. The
installation provides you with the full power and flexibility of the lp
print service, and the fact that you are printing across the network is
totally transparent.
6-2-8 AIX RISC System/6000
The AIX printing subsystem is drive n by the qdaemon program, which
uses data in the
to the proper devices. This information includes entries for each
physical virtual printe r and physical device known to the syst em.
Simply stated, an AIX virtual printer is a high-level software view of a
data stream, queue, and device that controls how a given job is to be
processed. A different virtual printer should be defined for each data
stream that is supported by a real printer. Even when PostScript and
PCL jobs are destined for the same printer, for example, each job uses a
different vir tual printer.
/usr/lpd/qconfig
file to manage queues and route jobs
Configuring a Network Card printer on an AIX system approximates
configurati on of a local printer as nearly as possible. The one point
where it differs is that the physical device only difference is that the
physical devic e associated with the Network Card printer must be a
named pipe used by the print daemon to route data to the Network
Card.
The following sho ws the most straightforward way to add a printer to
the system .
1. Type the following to run the inst al lation script:
nicinst
6-23
Chapter 6
UNIX Configuration
Page 99

6-2 Host-based lpd Configuration
2. What is the node name of the Print Server Unit?
Input the host name recorded in
printfast
and then press .
Enter
/etc/hosts
. For example, type
3. What is the printer name?
Type the printer name and press .
Enter
4. Here, the script displays the information you have input up to this
point. The following shows example information .
Node name of the Printer Server Card:
printfast
Printer name to be used:
The printer is attached on: PORT 1
<printer name>
Check these settings and make sure they are correct. If they are
correct, type
Enter
.
yes
and press . Otherwise, type no and press
Enter
5. Configure a virtual printer using <printer name> as the physical
device. F or <printer name>, use the same printer name that you
specifie d when installing the printer .
6. Use the following c ommand to shut down qdaemon.
stopsrc -s qdaemon
7. Edit
/usr/lpd/qconfig
name from
/dev/
<printer name>
to change the speci al file for device pri nte r-
/dev/nic/
to
<printer name>
.
8. Use the following c ommand to restart the daemon.
Chapter 6
UNIX Configuration
startsrc -s daemon
After this, the installation script creates a named pipe and starts up a
print daemon based on the pr inter na me and Networ k Card inf ormation
you supplied. The AIX System Management Interface Tool (SMIT)
does not accept the named pipe as a printer device, so the install script
/dev/
also creat es a null ch ara ct er device in
<pr i nter name>
.
6-24
Page 100

6-2 Host-based lpd Configuration
6-2-8-1 Virtual Printer Commands
Vi rtual printers can be added using SMIT or by using the mkvirprt
command. The device name printer name is entered for confirmation
purposes. During this process, you a lso select a particular printer type
for the new printer, which inherits the set of predefined attributes for
that printer type. The set of attributes is suffic ient for most cases, but
settings can be changed using SMIT or the chvirprt command. See the
AIX RISC System/6000 documentation in cases where a printer
requires even more extensive settings.
After adding a virtual pr inter, a stanza that looks lik e the following will
be in /usr/opf/qconfig for device printer name.
Edit
<printer name>
file=/dev/
backend=/usr/lpd/piobe
file=/dev/<
printer name
:
<printer name>
to
>
file=/dev/nic/
<printer name>
.
Output spooled on the pre viously specified virtua l printer is sent to the
named pipe, and routed to the Network Card. Before editing the files
named above, make sure the following daemon is running.
/usr/nic/lpr_print /dev/nic/
printfast 10001 &
<printer name>
6-2-8-2 AIX Print Command
The AIX lp com mand works sligh tly differen t ly from oth er Syst em V
Release 4 lp comm an ds . Th e followi n g lp com ma n ds can b e used to
print files.
lp -d
Or:
lp -d
<queue name> <file name>
<queue name>:<device name> <file name>
Chapter 6
UNIX Configuration
6-25
 Loading...