

Page 1

®
magicolor 7300
User’s Guide
1800698-001A
Page 2

Thank You
Thank you for p urchasing a magicolo r 7300. You have mad e an excellent choice. Your
magicolor 7300 is s pecial ly de signed for optimal performance i n Windows, Mac intosh,
and other environments.
Trademarks
The following are registered trademarks of MINOLTA-QMS, Inc .: QMS, the
MINOLTA-QMS logo, and magicolor.
Minolta is a t rademark of Minolta Co., Ltd. Other product names mentioned in this
guide may also be t rad emarks or registered trade marks of their respective owners.
This product uses Software Developer Kit of Peerless Systems Corpo ration.
Copyright © 2 001 Peerless Syst ems Corporation. All rights reserved.
This product uses NEST Office SDK of N ovell, Inc. Copyrigh t © 1999 Nov ell, Inc.
NEST is a trademark of Novell, I nc. in the United States and other countries.
Proprietary Statement
The digitally encoded software included with your printer is Copyrighted
© 2003 b y MINOLTA-QMS, Inc. All Ri ghts Reserved. This software may not be
reproduced, modifi ed, displayed, transferr ed, or copied in any form or in any manner
or on any media, in wh ole or in par t, without the express written permission of
MINOLTA-QMS, Inc.
Copyright Notice
This guide is C opyr ighted © 2003 by MINOLTA-QMS, Inc., One M agnum Pass,
Mobile, A L 36618. All R ights Reserved. This document may not be copied, in whole or
part, nor t ransfer red to any o ther media or language, without written permis sion of
MINOLTA-QMS, Inc.
Notice
MINOLTA-QMS, Inc. reserves the right to make changes to th is guide and to the
equipment describe d herein without notice. Considerable effort has been made to
ensure that this guide is f ree of inaccuracies and omi ssions. However,
MINOLTA-QMS, Inc. makes no warranty of any kind including, but not lim ited to, any
implied warranties of merchantabili ty and fitness for a particular pu rpose with regard
to this guide. MINOLTA-QMS, Inc . assumes no responsib ility f or, or liability fo r, errors
contained in this guide or for incid ental, special, or consequential damages arising
out of the furnishing of this guide, or the use of this guide in operating the eq uipment,
or in connection with the performance of the equipment when so operated.
Registering the Printer
Mail—Americas only : Fill out and send in the reg istration card enclosed in your
shipment or downloaded from www.onlineregister.com/minolta-q ms/
Internet—Follow the instructions on www.minolta-qms.com/r egister
or
Software Utilities CD-ROM—Follow the instructions on the CD -ROM.
Page 3

Contents
1. Software Installation .........................................................................1
Software Utilities CD-ROM 2
Drivers and PPDs 2
Utilities 3
Installing Printer Drivers and Utilities,
Windows Environments—Auto-loading Installation 4
Installing Printer Drivers and Utilities, Windows Environments—Manual Installation 5
Installing Printer Drivers and Utilities, Macintosh Environments 5
Some Notes to Consider 5
Macintosh OS 9—PPDs and Utilities I nstallation 6
NetWare and NDPS 7
Linux 8
2. Using Media ....................................................................................... 9
Introduction 10
Media Specifications 11
Media Types 15
General Considerations about Media 15
Unsupported Media 15
Page 4

Plain or RecycledPaper, Letterhead, Memo Media 17
Envelopes 18
Labels 19
Postcards 20
Thick Stock (Also Known as Cardstock) 21
Transparencies 22
Loading Media 23
Tray 1 (Universal Media Tray) 24
Trays 2–4 28
Manual Feed Tray 31
Custom-size Media 33
Duplexing 33
Manual Duplexing 34
Autoduplexing 34
Output Tray 36
Media Storage 37
Additional Assistance 37
3. Working with the Printer .................................................................39
About the Control Panel 40
Control Panel LED Indicators 40
Control Panel Keys 42
Canceling Print Jobs 44
Printer Menu Overview 44
Menu O verview 44
Main Menu 46
Selecting a Message Window Language 46
Print Menu 47
Paper Menu 48
Quality M enu 49
Interface Menu 50
Sys Default Menu 51
Service Menu 55
More Information 55
4. Working with the Printer Driver .....................................................57
About Printer Drivers 58
Using PostScript Drivers in Windows
XP/2000 59
Displaying the Tabs 59
Using the PrintSetting Tabs 59
Using PostScript Drivers in Windows Me/98 61
Displaying the Tabs 61
Using the PrintSetting Tabs 61
Using PostScript Drivers in Windows NT 64
Displaying the Tabs 64
Contentsii
Page 5

Using the Print Setting Tabs 64
Using Macintosh PPDs 65
Displaying the Printer Options 65
5. Working with Color .........................................................................67
About Color Printing 68
Printer Resolutions 68
Selecting a Resolution 68
Automatic Image Density Control (AIDC) 69
Color Matching 69
Quick Color Configuration 70
Color Options 70
Halftone Scr eens 70
Color Profiles 70
Profiles for Host-based Color Management 71
Gray Treatment 72
Troubleshooting Color Problems 72
6. Working with the Status Monitor ...................................................75
Working with the Status Monitor 76
Introduction 76
Environment 76
Opening the Status Monitor and Showing Supplies Status 76
Altering the Size of the Status Monitor Window 76
Using the Status Monitor 76
Recognizing Status Monitor Alerts 77
Recovering from a Status Monitor Alert 77
Closing the Status Monitor 78
7. Replacing Consumables ................................................................ 79
Introduction 80
Consumable Life Expectancies 81
Replacing a Toner Cartridge 84
Toner Cartridge Life 84
Replacing a Toner Cartridge 85
Refilled Toner Cartridges 89
Replacing the Waste Toner Box 90
Waste Toner Box Life 90
Replacing a Waste Toner Box 90
Replacing a Print Unit Assembly 93
PrintUnitLife93
Installing a Print Unit 94
Replacing the Fuser Unit 105
Fuser Life 105
Removing a Used Fuser 105
Installing a New Fuser Unit 106
Contents
iii
Page 6

Replacing Media Pickup and Separator Rollers 109
Kit Contents 109
Media Pickup Roller for Trays 1 109
Media Pickup Roller for Trays 2 112
Ordering Consumables 117
8. Maintaining the Printer .................................................................119
Introduction 120
Internal Cleaning 122
External Cleaning 123
9. Installing Accessories ..................................................................125
Introduction 126
Antistatic Protection 127
BuzzBox 127
What's in the Kit? 128
Installing BuzzBox 128
Using BuzzBox 129
Dual In-Line Memory Module (DIMM) 129
Duplex Unit Kit 132
Kit Contents 132
Installing the Duplex Unit 133
Installing the Manual Feed Tray 137
Uninstalling Duplex Unit Kit 139
Internal IDE H ard Disk Drive 144
Installing the Internal Hard Disk 144
Lower Feeder Units (Trays 3 and 4) 147
Kit Contents for Each Unit 147
Installing the Lower Feeder Unit(s) 147
Printer Cabinet 163
Printer Caster Base 163
10. Troubleshooting ............................................................................165
Introduction 166
Printing a Configuration Page 166
Warmup and Calibration Time167
Preventing Media Jams 168
Understanding the Media Path 169
Simplex Printing 169
Duplex Printing (Trays 1–4 Only) 169
Clearing Media Jams 170
Understanding Media Jam Status Messages 170
Clearing Internal Jams 171
Clearing Media InputJams 177
Clearing Media Jams Inside the Duplex Unit 185
Contentsiv
Page 7

Solving Problems 187
Jams and Misfeeds 187
Other Problems 190
Solving Problems—Printing Quality 195
Control Panel Messages 202
Standard Status Messages 202
Warning St atus Messages 203
Service Call Messages 208
Default PostScript Error Report 208
Additional Assistance 209
A. Technical Specifications ..............................................................211
Requirements 212
General 212
Controller 213
Electrical 214
Power Requirements 215
ENERGY STAR Compliance 216
Hazardous Chemical Substance Reporting 218
Physical 218
Space Requirements 219
Location Requirements 219
Engine and Controller Specifications 221
Print Speed 221
Consumable Life Expectancies 222
Regulatory Compliance 224
Safety Information 227
Warning and Pr ecaution Symbols 232
Meaning of Symbols 232
Working Safely with Your Laser Printer 235
Index ...............................................................................................237
Contents
v
Page 8

Contentsvi
Page 9

Software
Installation
1
Page 10
Software Utilities CD-ROM
If you followed all the steps in the Installation Guide that came with your
printer, then the printer is properly set up, connected to your computer,
plugged in, turned on, and ready to r eceive t he system software, drivers,
and utilities on the Software Ut ilities CD-ROM.
Put the CD-ROM in your computer’s CD-ROM drive, and click on the
MINOLTA-QMS AutoInstaller.
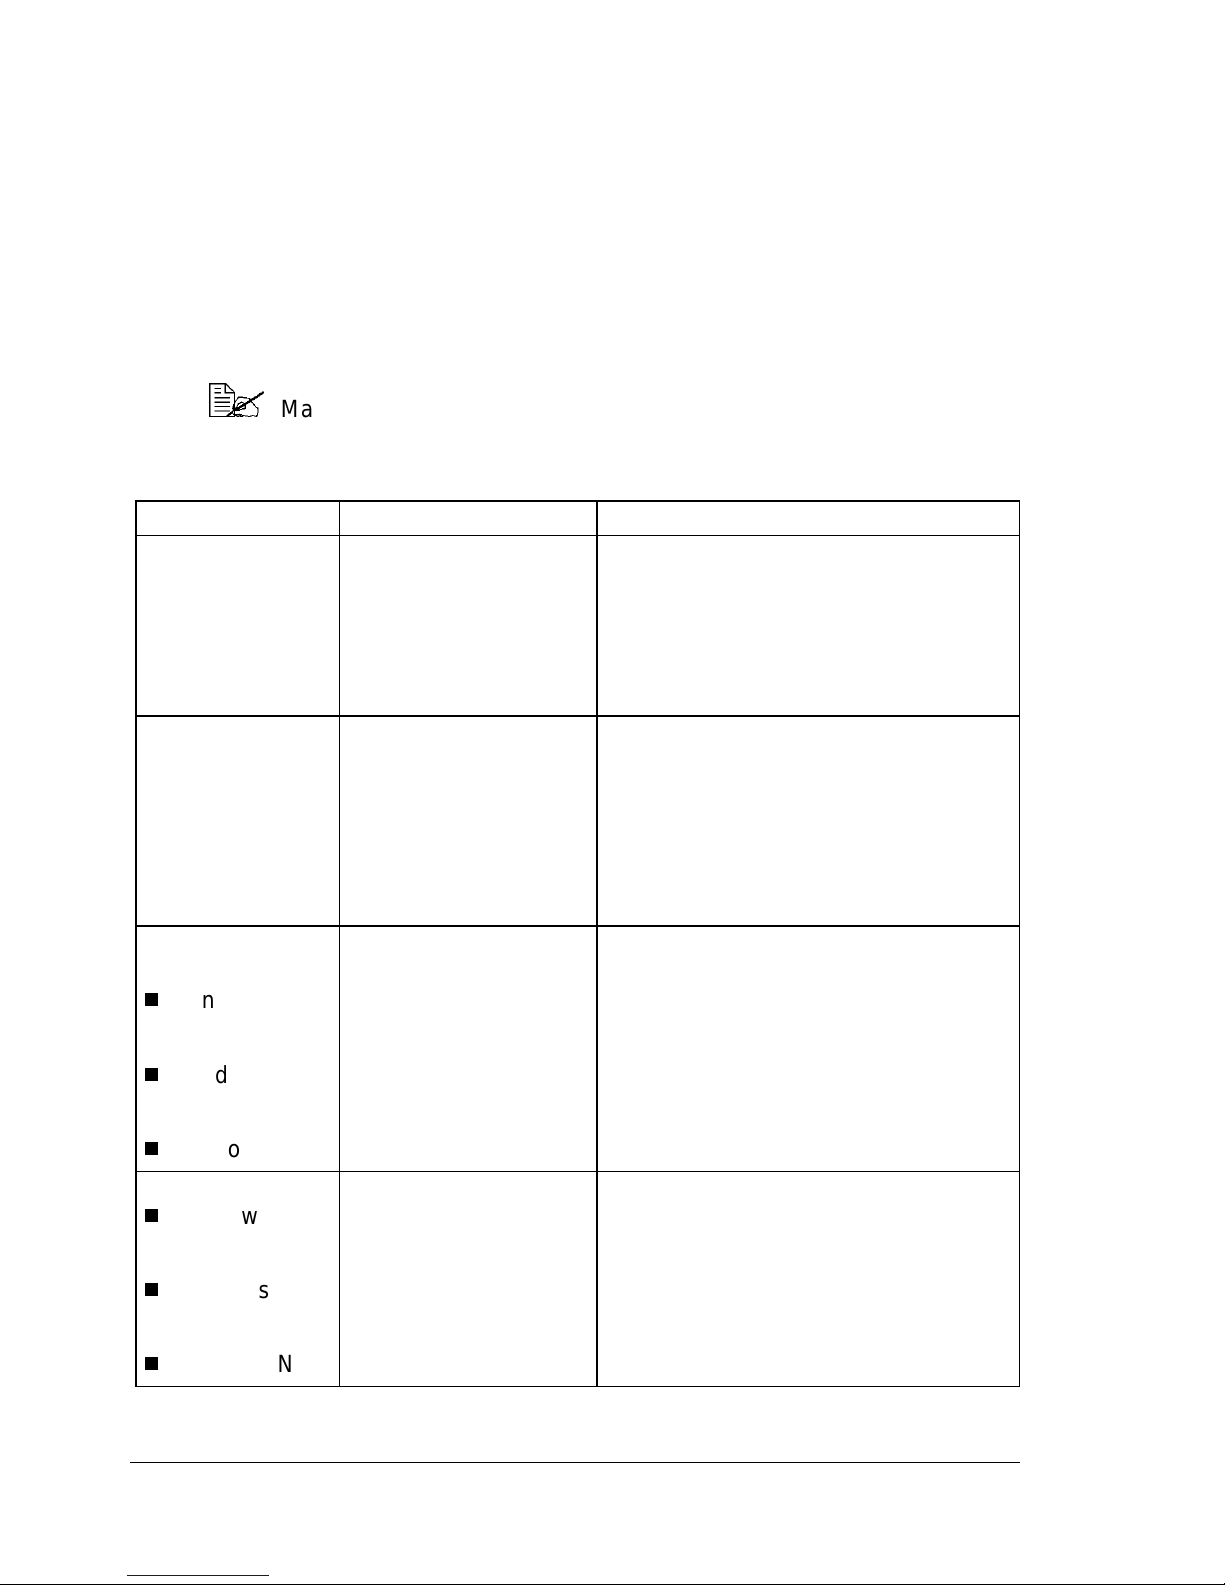
Drivers and PPDs
Drivers Use/Benefit Installation Instructions
Linux PPDs These PostScript
Macintosh PPDs These PPD files allow
PostScript 3
Drivers
Windows XP/
2000
Manualinstallation instructionsand additional information are included
in the magicolor 7300 Reference Guide on the Documentation
CD-ROM in case you need them.
Readme on the Software Utilities
Printer Description
(PPDs) files can be
used with third-party
Linux print filters that
use PPDs.
you to configure
options such as
memoryandinformthe
computer what options
and features are
available.
These drivers give you
access to all of the
printer features and
advanced layout
CD-ROM
Readme on the Software Utilities
CD-ROM
“Installing Printer Drivers and Utilities,
Windows Environments—Auto-loading
Installation” on page 4
Windows
Me/98
Windows NT4
Windows PPDs
Windows XP/
2000
Windows
Me/98/95
Windows NT4
These PPD files allow
youtoinstalltheprinter
for a variety of
platforms, drivers, and
applications.
Readme on the Software Utilities
CD-ROM; magicolor 7300 Reference
Guide on the Documentation CD-ROM
Software Utilities CD-ROM2
Page 11

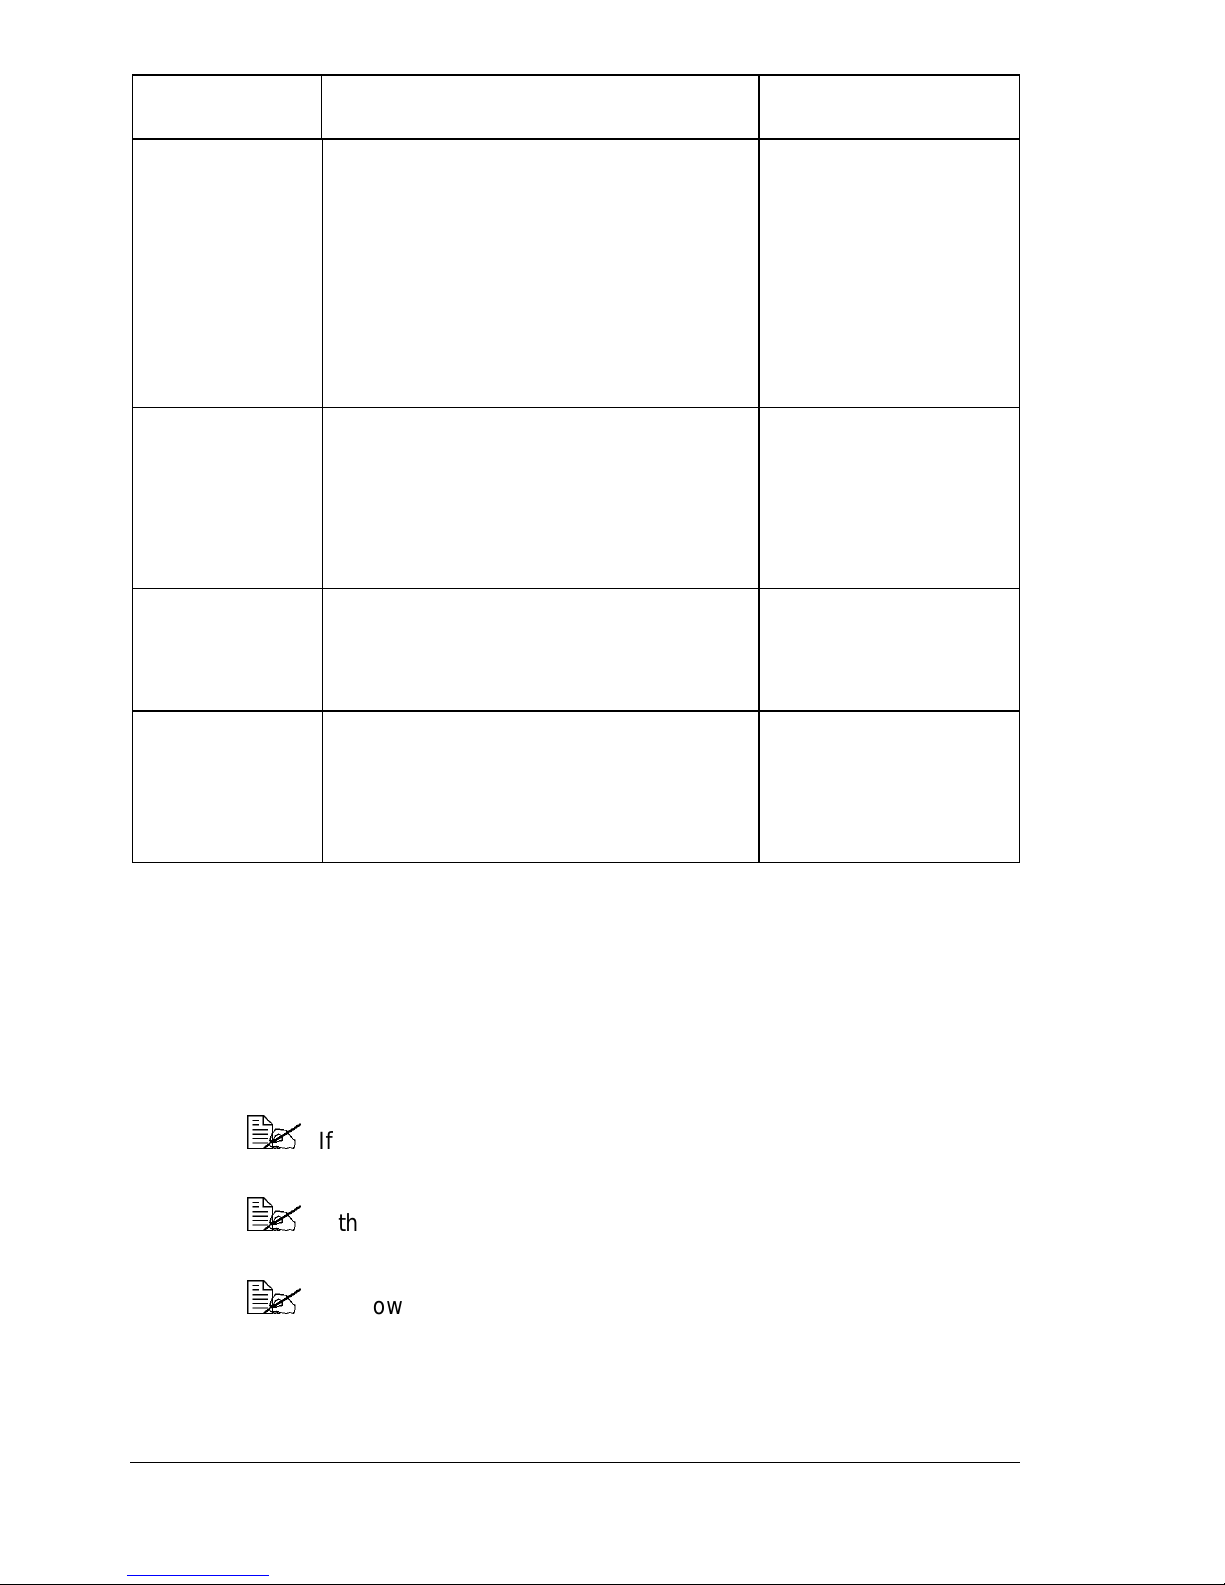
Utilities
Utilities Use/Benefit Installation
Instructions
Crown Print
Monitor+ for
Windows
MINOLTA-QMS
Download
Manager
ICC/ICM
Profiles
Macintosh
Installer
ThisWindowsutility provides an efficient
method for transporting print jobs
directly to a MINOLTA-QMS printer via
the TCP/IP protocol.
This utility provides the ability to
download fonts and overlays to the
printer’s hard disk. It also allows you to
download fonts to printer memory.
These color profiles provide s upport f or
host-based color management systems
including Microsoft ICM 2 f or Windows,
Apple ColorSync, CorelDRAW, Kodak
KCMS, Adobe Photoshop 5, and others.
This installer automatically places all
needed print-related components, such
as a PostScript Printer Description
(PPD) file, color profiles, screen fonts,
and registration information, in the
correctlocations on your system and
allows you to use your printer with
Macintosh OS 9, or X (version 10.1 or
higher).
Readme on the
Software Utilities
CD-ROM
Readme on the
Software Utilities
CD-ROM
Readme on the
Software Utilities
CD-ROM
Readme on the
Software Utilities
CD-ROM
NDPS Gateway The NetWare interface allows Netware
users to manage printers from a central
location.
PageScope
Light
PageScope
NDPS Gateway
2.0
Using your printer’s built-in web pages
and your Internet web browser,
PageScopeLight givesyou access to all
of your printer settings via TCP/IP
Ethernet connections.
PageScopeLightis builtinto your printer
and is not on the Software Utilities
CD-ROM.
This utility supports our printers as well
as MINOLTA’s digital copiers.
magicolor 7300
Reference Guide on
the Documentation
CD-ROM
In chapter 5.3 in the
magicolor 7300
Reference Guide on
the Documentation
CD-ROM.
In chapter 3.6 in the
magicolor 7300
Reference Guide on
the Documentation
CD-ROM
Software Utilities CD-ROM
3
Page 12
Utilities Use/Benefit Installation
Instructions
PageScope Net
Care
PageScope
Network Setup
Utility
Pantone Tables These tables allow you to match printed
Status Monitor
for W indows
This utility, available for the Windows
platform and designed with
administrators in mind, i s a powerful tool
allowing centralized management of
network printers. Refer to the
PageScope Net Care chapter in the
Reference Guide or PageScope Net
Care Administrator’s Manual,bothin
PDF on the Software Utilities CD-ROM.
This utility provides basic configuration
functions for network printers using
TCP/IP and IPX protocols.
colorsto screen colors.Provided foruse
with PostScript High resolution printing
(600 x 600 dpi with contone imaging).
This Windows utility provides
information on the status of print jobs
and alerts you if the printer is not
functioning correctly. It works with
printers connected via TCP/IP.
Readme on the
Software Utilities
CD-ROM; PageScope
Net Care Guide in the
magicolor 7300
Reference Guide on
the Documentation
CD-ROM
Readme on the
Software Utilities
CD-ROM; magicolor
7300 Reference Guide
on the Documentation
CD-ROM
Readme on the
Software Utilities
CD-ROM
Readme on the
Software Utilities
CD-ROM
Installing Pri nter Drivers and Utilities,
Windows Environments—Auto-loading
Installation
Insert the Software Utilities CD-ROM in your CD-ROM drive.
1
If the CD-ROM does not automatically start up, double-click
setup.exe in the root directory.
If the installation cannot be performed, even after the CD-ROM is
specified, specify the location of the installer.
Windows NT does not support Plug & Play.
When you see the pop-up menu to install the driver from, select
“Specify a Location”.
Do not select “from CD-ROM” for the driver location.
Installing Printer Drivers and Utilities, Windows4
Page 13

2 In the first window, click Printer Setup.
3 Choose the method by which the PC and printer are connected.
4 Follow the instructions on the screen.
5 On the Printer Options screen, use the check boxes t o print a test page,
make the new printer your default, set printer properties and printing
preferences.
6 On the last screen, choose Finish.
This returns you to the Main Menu screen where you can register your
printer, reviewdriver or utility documentation, or purchase suppliesonline.
When you are finished, exit f rom the Installer.
7 When the system software installation is complete, remove the CD-ROM
from your CD-ROM drive and store it in a safe place.
Installing Printer Drivers and Utilities,
Windows Environments—Manual
Installation
Manual i nstallationinstructions are i ncluded in the magicolor 7300 Reference
Guide on the Documentation CD-ROM . Refer t o Section 2, “Installing Printer
Software, Drivers, and PPDs” for complete instructions.
Arabic and Hebrew versions of the drivers and utilities must be
installed manually.
Installing Printer Drivers and Utilities,
Macintosh Environments
Some Notes to Consider
In the following sections, we assume that you are installing the software
for the first time.
The current version of Macintosh OS X has limited support for PPD
(PostScriptPrinter Description)files. Although MINOLTA- QMSprinters can be
used with Macintosh OS X, not all advanced printing features are av ailabl e.
Advanced printing features are still available under Macintosh OS 9.
You can connect to your printer by
A crossover Ethernet cable
Ethernet patch cables and an Ethernet hub
Installing Printer Drivers and Utilities, Windows
5
Page 14

Macintosh—PPDs
MINOLTA-QMS developed a PostScript Printer Description (PPD) file for the
magicolor 7300. This PPD works with the Macintosh Operating System’s
PostScript printer driver (LaserWriter) to provide support for the features on
the magicolor 7300, such as print resolution and media sizes, and optional
features such as duplexing.
Macintosh OS 9—PPDs and Utilities Installation
OS 9 Step 1. Software Installation
Insert the Software Utilities CD-ROM in your Macintosh’s CD-ROM
a
drive.
If the CD-ROM window d oes not appear, double-click the
MINOLTA-QMS CD-ROM icon on your Macintosh desktop.
b Double-click the Install icon.
c Follow the instructions on the screen to install the magicolor 7300
PPD and ut ilities.
d After the PPD and utilities i nstallation is complete, choose Quit.
e When the system software installation is complete, remove the
CD-ROM f rom your CD-ROM drive and store it in a safe place.
OS 9 Step 2. Creating a Desktop Printer
EtherTalk Connection
a
You can connect via Ethernet in either of two ways:
Plug one end ofa crossover Et hernet cable into the Macintoshand
the other i nto the printer’s Ethernet port.
Use Ethernet patch cables and an Ethernet hub. Pl ug one end of
each patch cable into the hub, then plug the other end of one into
the Macintosh and the other end of the second into the printer’s
Ethernet port.
b Open the Chooser and select LaserWriter.
c When your printer boots up, it finds a default zone.
Installing Printer Drivers and Utilities, Macintosh6
Page 15

d Choose Create and then Set-Up.
LPR Connection
You can connect via Ethernet i n either of two ways:
a
Plug one end of a crossover Ethernet cable into the Macintoshand
the other i nto the printer’s Ethernet port.
Use Ethernet patch cables and an Ethernet hub. Plug one end of
each patch cable into the hub, then plug the other end of one into
the Macintosh and the other end of the second into the printer ’s
Ethernet port.
b Locate the Desktop Pr inter Utility.
If you cannotlocate i t on your Macintosh hard disk, it can be found on
your Macintosh’s system CD-ROM.
c Select Printer (LPR), and choose OK.
d Type in the IP address and use the same address for the Queue
name. Click
OK.
e Choose Create.
f Name the printer with the IP address or a descriptive name.
NetWare and NDPS
For NetWare 5, NetWare 6, and NDPS installation, refer to the magicolor
7300 Reference Guide on the Documentation CD-ROM. Section 2 of the
Reference Guide, “Installing Printer Software, Drivers, & PPDs,” i ncludes
basic information about these interfaces as well as instruction for installation.
For information about connecting using earlier versions of NetWare,
check the “24-Hour Online Help” at www.minolta-qms.com.
NetWare and NDPS
7
Page 16

Linux
For Linux PPD and PDQ installation, refer to the magicolor 7300 Reference
Guide on the Documentation CD-ROM. Section 2 of the Reference Guide,
“Installing Pr inter Software, Drivers, & PPDs,” i ncludes basic information
about PDQ, XPDQ, CUPS, and XPP connections and instructions for
installing them.
Linux8
Page 17

Using Media
2
Page 18
Introduction
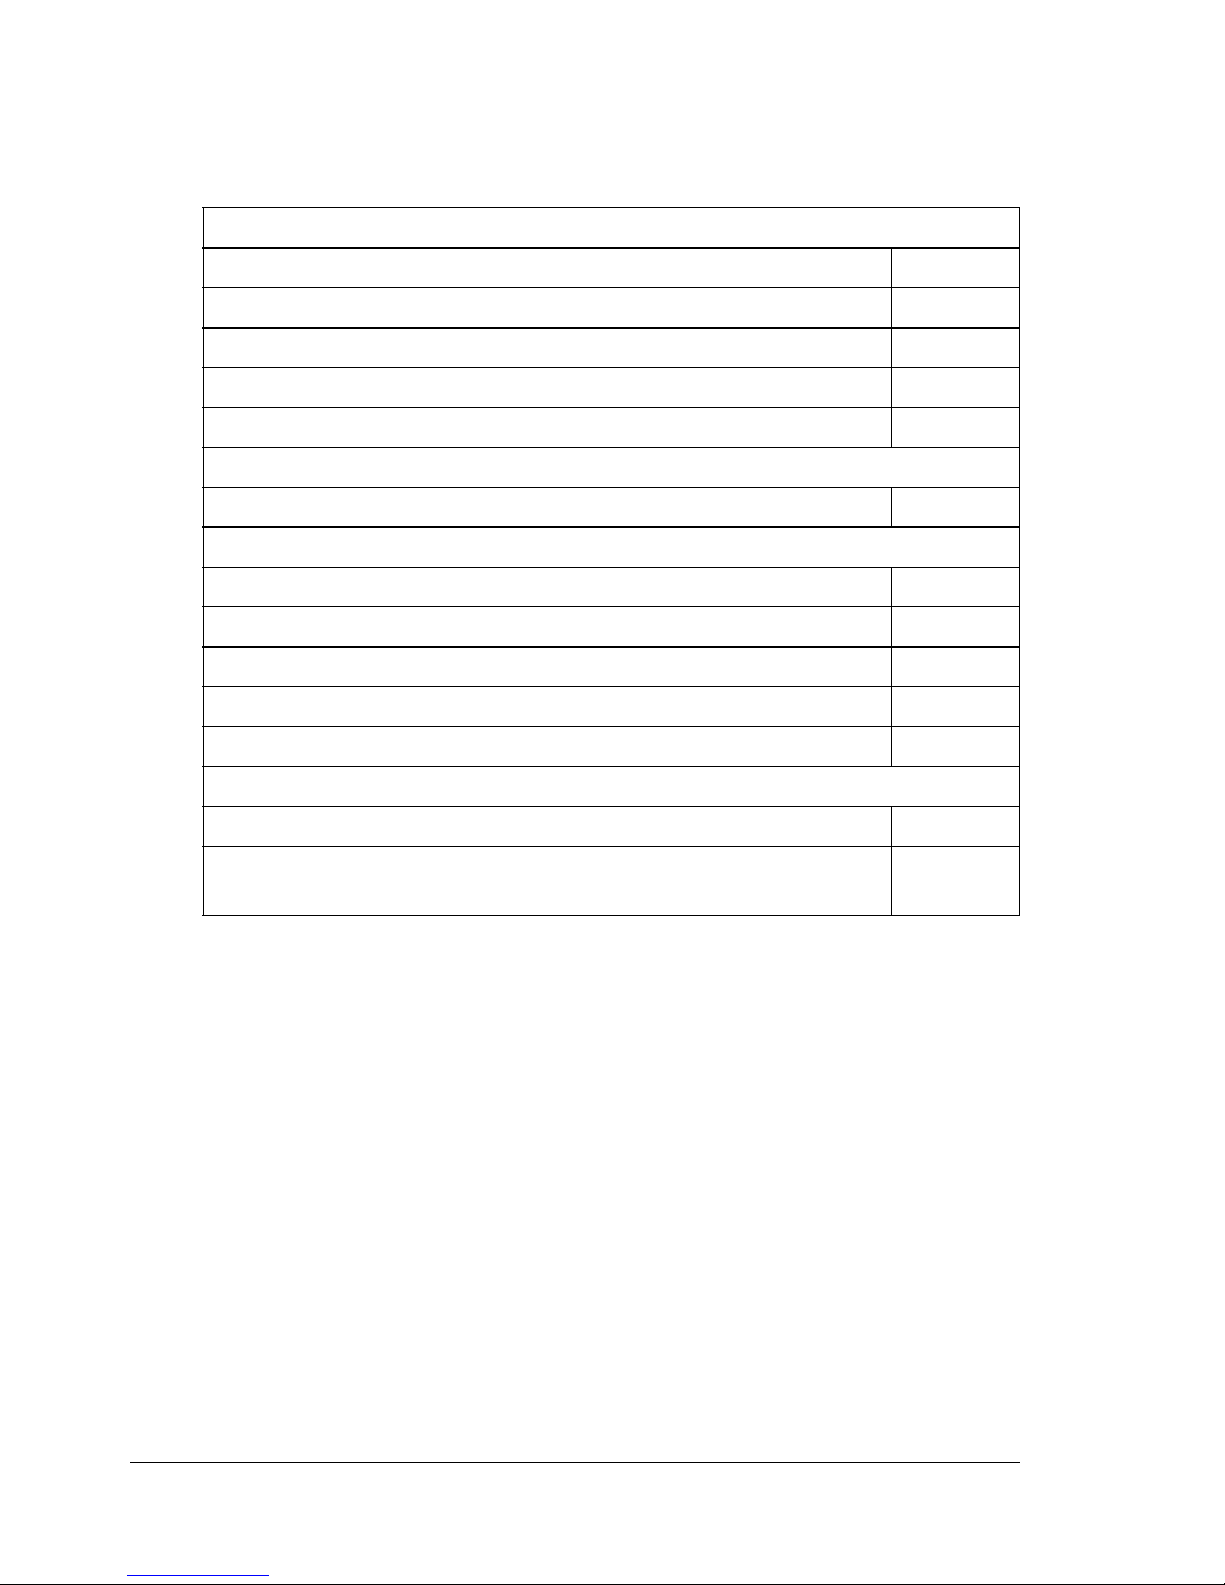
This chapter provides information on handling, selecting,loading, and storing
media.
Media Specifications
What sizes/types/weights of media can I use? page 11
What amount of media can I use? page 13
What is the guaranteed imageable (printable) area? page 13
How do I s et page margins? page 14
How can I change the image alignment? page 14
Media Types
How do I select the media type? page 16
Printing
Tray 1 page 24
Trays 2–4 page 28
Manual feed tray page 31
Custom-size media page 33
Duplexing page 33
Other Information
How do I store media? page 37
Where can I orderMINOLTA-QMS-approved media or get more
information?
page 37
Introduction10
Page 19
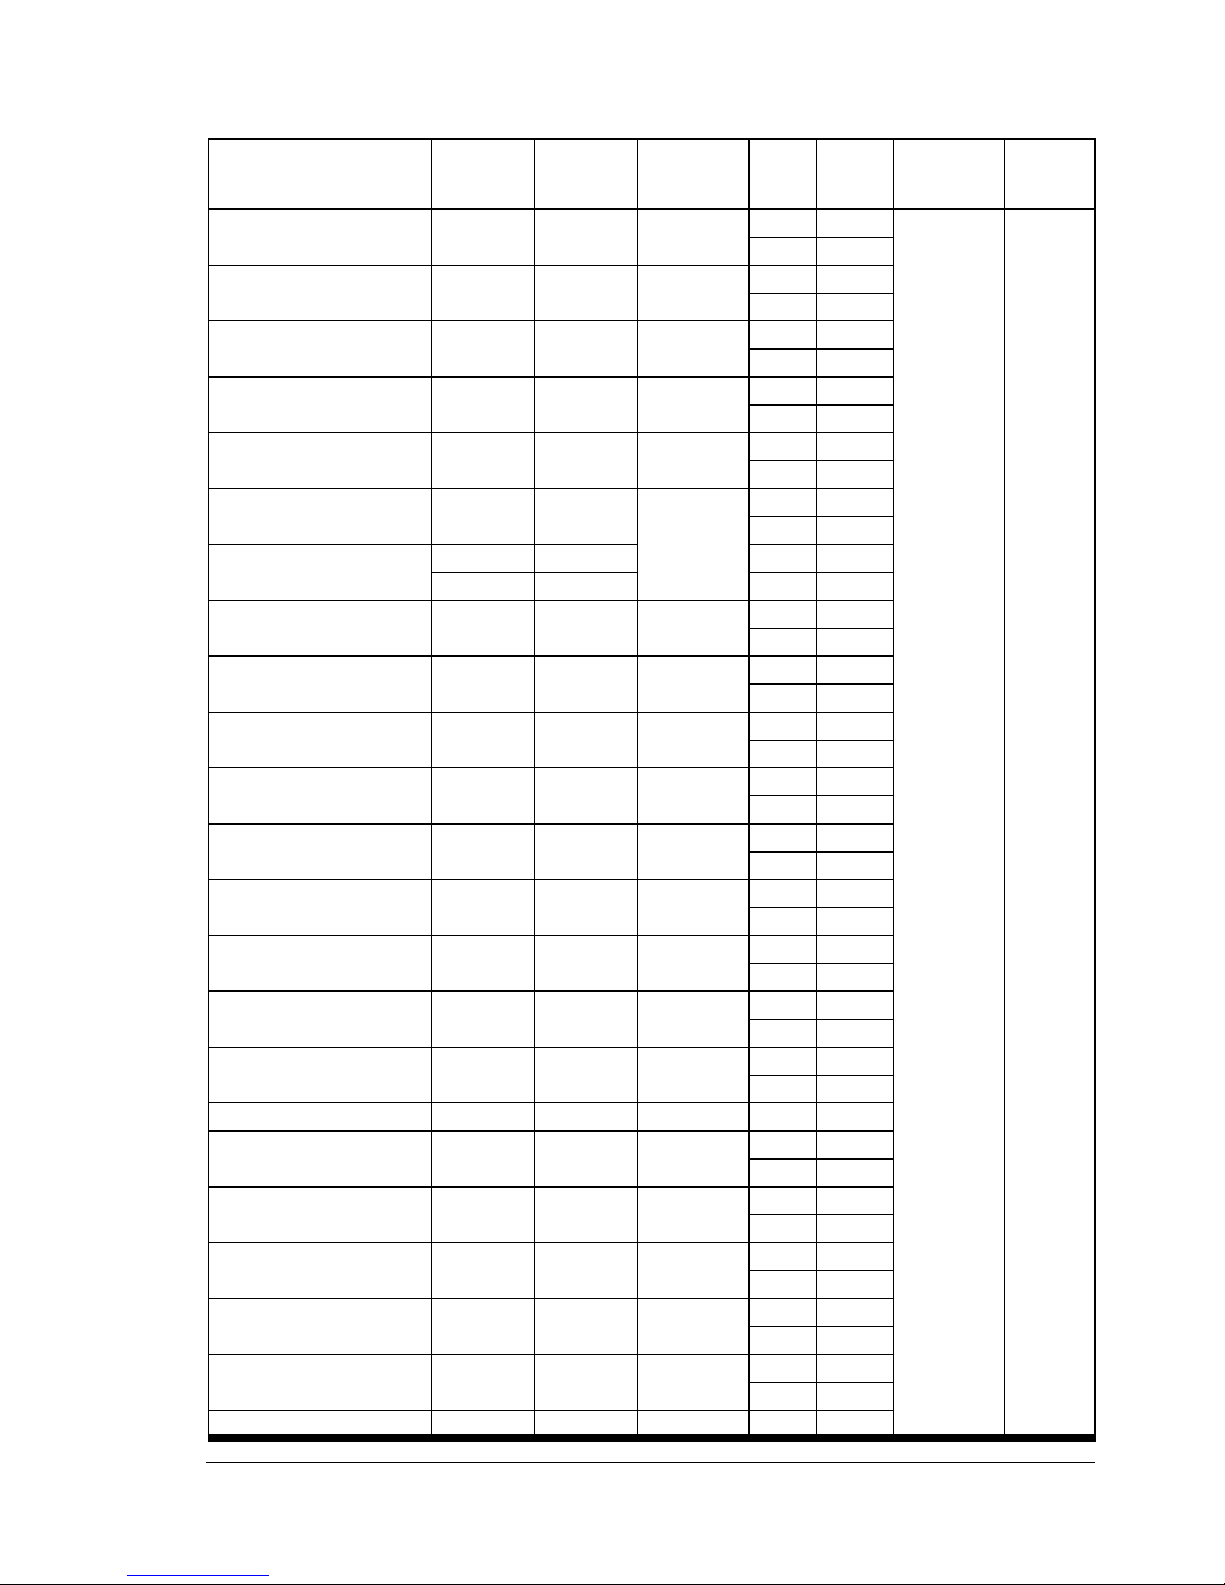
Media Specifications
Media Size Inches Milli-
meters
A3 11.7 x 16.5 297 x 420 SEF 1–4 Yes Plain Paper
A4 8.2 x 11.7 210 x 297 LEF 1–4 Yes
A5 5.9 x 8.3 148 x 210 LEF 1 Yes
B4 10.10 x
14.3
B5 (JIS) 7.2 x 10.1 182 x 257 LEF 1–4 Yes
Custom Sizes,Minimum 3.5 x 5.8 90 x 1 48 SEF or LEF
Custom Sizes, Maximum 12.2 x 18.0 311x 457 1 No
11.6 x 35.4 297 x 900 M No
Executive 7.25 x 10.5 184 x 267 LEF 1 Yes
Folio (A4 Plus) 8.27 x 13.0 210 x 330 SEF 1 Yes
Government Letter 8.0 x 10.5 203 x 267 LEF 1 Yes
Government Legal 8.5 x 13 216 x 330 SEF 1 Yes
Kai 8 (Chinese 8K) 12.24 x
14.57
Kai16(Chinese16K) 7.28x
10.24
Kai 32 (Chinese 32K) 5.12 x 7.28 130 x 185 SEF 1 Yes
Legal 8.5 x 14 216 x 356 SEF 1–4 Yes
Letter 8.5 x 11.0 216 x 279 LEF 1–4 Yes
Oversized 12.25 x 18 311 x 457 SEF 1 No
SP Folio 8.5 x 12.69 216 x 322 SEF 1 Yes
Statement 5.5 x 8.5 140 x 216 SEF 1 Yes
8 x 10 8 x 10 203 x 254 LEF 1 Yes
Foolscap 8 x 13 203 x 330 SEF 1 Yes
11x 17 11 x 17 279 x 432 SEF 1–4 Yes
12 x 18 12 x 18 305 x 457 SEF 1 No
364 x 257 SEF 1–4 Yes
260 x 370 SEF 1 Yes
185 x 260 SEF 1 Yes
Feed
Direction
(depending
on dimensions)
Tray* Auto-
duplex
****
MNo
MNo
MNo
MNo
MNo
1**
MNo
MNo
MNo
MNo
MNo
MNo
MNo
MNo
MNo
MNo
MNo
MNo
MNo
MNo
MNo
Driver
Mode
(includes
recycled
paper and
letterhead
and memo
paper)
Weight
64–
90 g/m
2
Media Specifications
11
Page 20
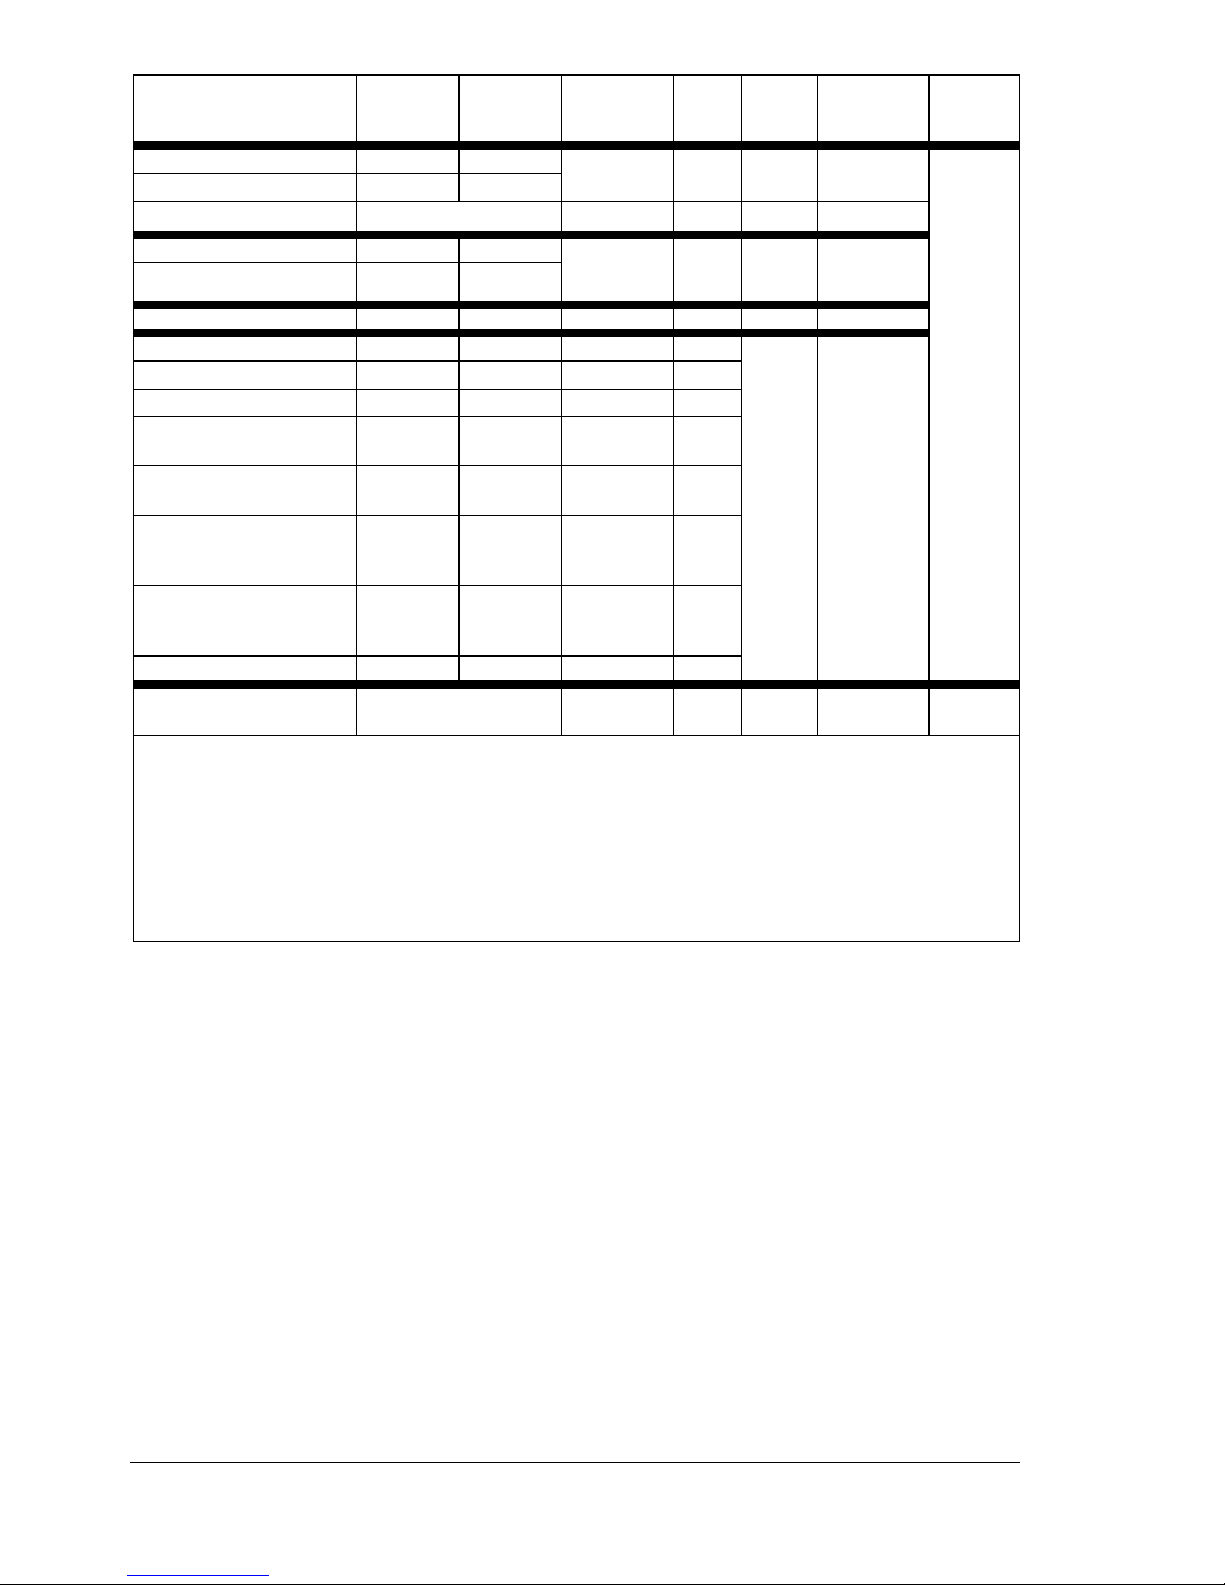
Media Size Inches Milli-
meters
Feed
Direction
Tray* Auto-
duplex
Driver
Mode
Weight
****
Label (A4) 8.2 x 11.7 210 x 297 LEF 1, M No Label Use only
Label (Letter) 8.5 x 11.0 216 x 279
Label (other) Varies
approved
media
Transparency (A4) 8.2 x 11.7 210 x 297 LEF 1, M No TransTransparency (Letter ) 8.5 x 11.0 216 x 279
parency
(OHP)
Postcard 3.94 x 5.83 100 x 148 SEF 1, M No Postcard
Envelope B5 (ISO) 6.93 x 9.8 176 x 250 SEF 1, M No Envelope
Envelope C5 6.37 x 9 162 x 229 SEF 1, M
Envelope C6 4.49 x 6.38 114 x 162 SEF 1, M
Envelope Commercial
4.13 x 9.5 105 x 241 SEF 1, M
#10
Envelope InternationalDL4.33 x 8.66 110 x 220 SEF 1, M
Japanese Envelope
4.72 x 9.25 120 x 235 SEF 1, M
Chokei #3
(Chou 3)
Japanese Envelope
3.54 x 8.07 90 x 205 SEF 1, M
Chokei #4
(Chou 4)
Envelope Monarch 3.88 x 7.5 98 x 191 SEF 1, M
Thick Stock Varies Varies 1, M *** Thick Stock 91–
210 g/m
Notes: LEF = Long-edge feed; SEF = Short-edge feed
* Trays: 1 = Universal; 2 = Standard; 3 and 4 = Optional lower feeder units; M = Optional manual
feed (with duplex feed unit installed)
** Only supported for plain paper with a length equalor less than 17 inch (432 mm) and a width less than
11.7 inch (297 mm).
*** Do not autoduplex thick stock 91–210 g/m
2
**** Autoduplexing plain paper up to 17-24 lb (64-90 g/m2) supported only from Trays 1–4 with optional
duplex unit and manual feed tray installed and enabled. Autoduplexing is not supported from the
manual feed tray.
2
Media Specifications12
Page 21
What amount of media can I use?
Attention
Do not allow media to go above the fill limit mark inside the tray or the
media may not be fed correctly.
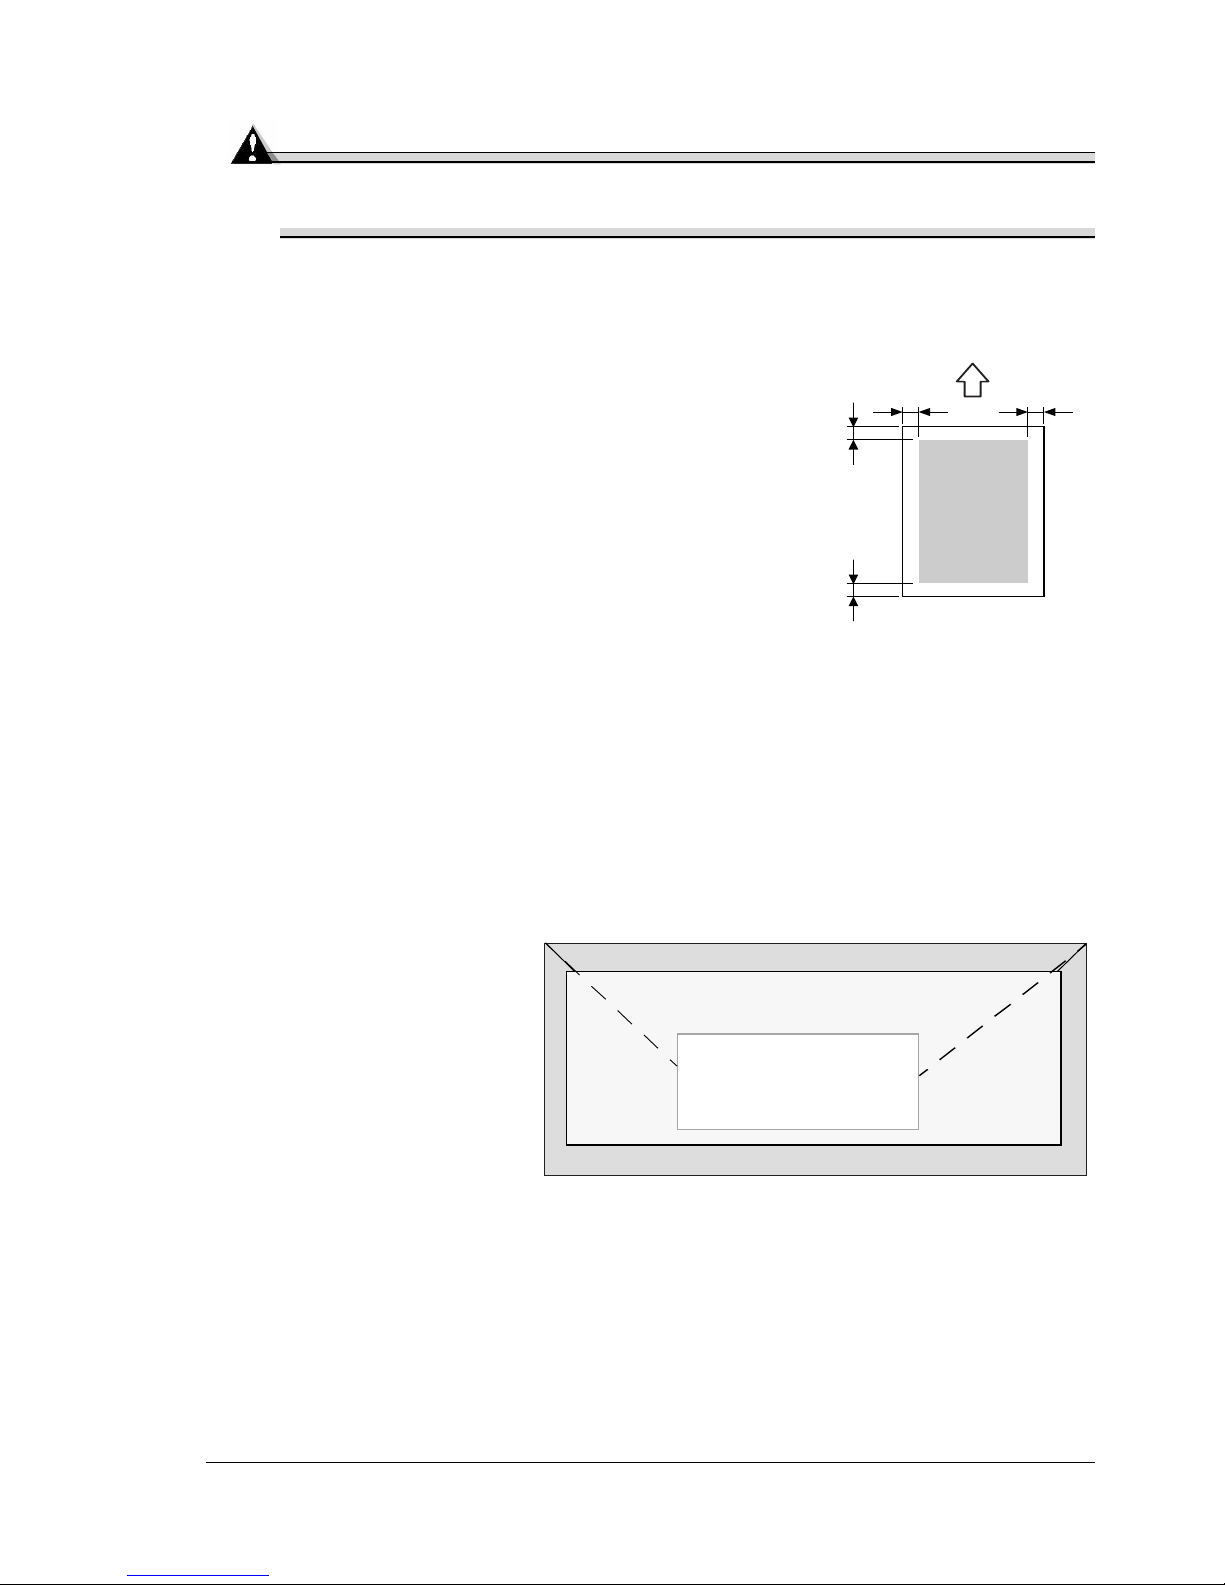
What Is the guaranteed imageable (printable) area?
Each media size has a specific imageable area,
the maximum area on which t he printer can print
clearly and without distortion.
a
a
Printable
Area
a
a = 0.197 inch (5 mm)
a
This area is subject to both hardware limits (the physical media size and the
margins required by the printer) and software constraints (the amount of
memory available for the full-page frame buffer). The guaranteed i mageable
(printable) area for all media sizes is the page size minus 0.197 i nch (5 mm)
from all edges of t he media, except for media (such as custom media) with a
width of 12.25 inch (311 mm), which is 0.275 inch (7 mm).
Envelopes also have a nonguaranteed flap area that varies with envelope
type.
Nonimageable area 0.197 inch (5 mm)
Nonguaranteed area
Guaranteed
area
Media Specifications
13
Page 22

How do I set page margins?
Margins are setthrough your application. Some applications allow you to set
custom page sizes and margins while others have only standard page sizes
and margins f rom whichto choose. If you choose a standard format, you may
lose part of your image (due t o imageable area constraints). If you can
custom-size your page in your application, use those sizes given for the
imageable area for optimum results.
How can I change t he image alignment?
If, for any reason,you need to change the image alignment, you can do so in
two different ways.
Adjust the margins or page size t hrough your application (recommended
method).
Use the printer’s control panel (Quality/Tray Alignment menu).
Media Specifications14
Page 23

Media Types
General Considerations about Media
For best results, use media that is
Suitable for plain-paper laser printers, such as standard or recycled office
paper
Stored on a flat, level surface in i ts original wrapper
Before purchasing a large quantity or s pecial media, perform a trial print with
the same media and check the pr int quality.
Attention
Use only MINOLTA-QMS-approved media. Using unsupported media
such as inkjet paper will result in damaging the printer and in voiding
your warranty.
Check www.minolta-qms.com (click on “24-Hour Online Help”) for
currentlyapproved media. Toorder approved t ransparencymedia, go to
www.q-shop.com.
Unsupported Media
Do not use m e dia that is
Dusty
Coated with a processed surface (such as digitally gloss-coated media or
colored paper that has been treated)
Iron-on transfer (heat-sensitive paper, heat-pressure paper or heat-press
transfer paper)
Cold water transfer
Pressure-sensitive
Carbon-backed
Designed specifically for inkjet printers (such as superfine paper, glossy
paper, glossy film, and inkjet postcards)
Already printed on with one of the following:
– An inkjet printer
– A heat-transfer printer
– Another printer or fax machine
Unapproved iron-on transfer material
Media Types
15
Page 24

Wet (or damp)
Layered
Adhesive-coated
Folded, creased, curled, embossed, warped or wrinkled
Perforated, three-hole-punched or torn
Too slick,too coarse or excessively textured
Of different textures (roughness) on the front and back
Too thin or too thick
Stuck t ogether with static el ectricity
Composed of foil or gilt or that is t oo luminous
Heat-sensitive or cannot withstand t he fusing temperature ( 392° F/
200° C)
Irregularly shaped (not rectangular or not cut at right angles)
Bound with glue, tape,paper clips, staples, ribbons, hooks or buttons
Acidic
Keep media between 35% and 85% relative humidity. Toner does
not adhere well to moist or wet paper.
Not approved
How do I select the media type?
Control Panel Menu—In the printer’s Paper/Input Tray/Tray1 Con-
trol menu, select the appropriate m edia type.
Printer Driver (Recommended)—The driver setting overrides any printer
setting.
Media Types16
Page 25

Plain or Recycled Paper, Letterhead, Memo Media
Capacity Tray 1
(universal
tray)
Tray 2
(standard
Up t o 250 sheets of 22 lb bond ( 80 g/m
paper (letter/A4); capacity for other weights
and sizes varies accordingly
Up t o 500 sheets of 22 lb bond (80 g/m
paper (letter/A4 only)
tray)
Trays 3–4
(optional
Up t o 500 sheets of 22 lb bond (80 g/m
paper (letter/A4 only) each
lowerfeeder
unit trays)
Manual
1sheetatatime
Feed Tray*
Orientation**Trays 1–4 Face up
Manual
Face down
Feed Tray
Type Check www.minolta-qms.com (click on “24-Hour Online
Help”) for currently approved media.
Driver
Plain paper
Mode
2
)
2
)
2
)
Weight 17–24 lb bond (64–90 g/m²)
Auto-
duplexing
Trays 1–4 See page 11 for supported sizes
Manual
Not supported
Feed Tray
Notes: * Opt ional manualfeed tray supported only with duplex
option attached.
**Letterhead toward the printer.
Media Types
17
Page 26
Envelopes
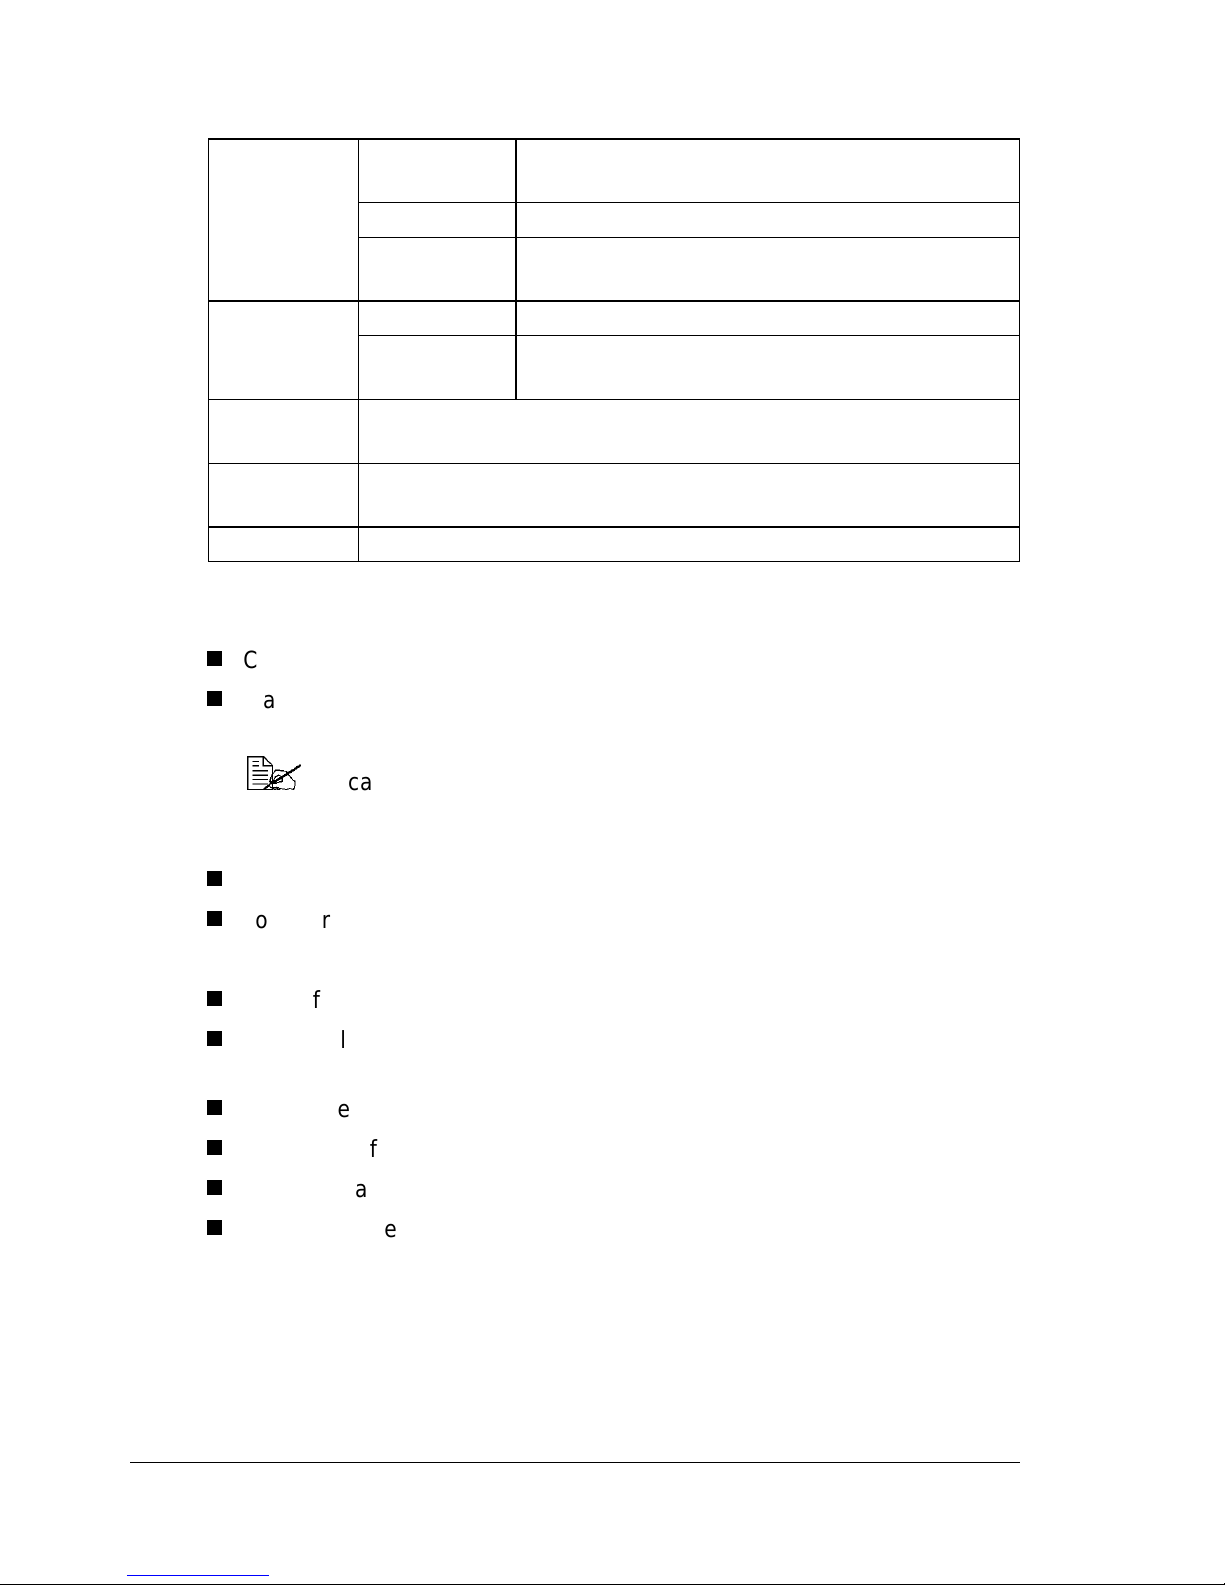
Capacity Tray 1 Up to 50 envelopes, depending on their
thickness
Trays 2–4 Not supported
Manual
Feed Tray
Orientation Tray 1 Face up
Manual
Feed Tray
Type Check www.m inolta-qms.com (click on “24-Hour Online
Help”) for currently approved media.
Driver
Mode
Duplexing Not supported
Use envelopes that are
Common office envelopes approved f or laser printing
Made with diagonal joints, sharp folds and edges, and ordinary gummed
flaps
Envelope
Because the envelopes pass through heated rollers, the gummed
area on the flaps may seal. Using envelopes with emulsion-based
glue avoids this problem.
1 envelope at a time
Face down
Dry
To be printed on the front address side only
Do not use envelopes that have
Sticky flaps
Tape seals, metal clasps, paper clips, fasteners, or peel-off strips
for sealing
Transparent windows
Too rough of a surface
Material that will melt,vaporize, offset discolor, or emit dangerous fumes
Been presealed
Media Types18
Page 27
Labels
A sheet of labelsconsists of a face sheet (the printingsurface),adhesive, and
a carrier sheet:
The face sheet must follow the pl ain paper specification.
The face sheet surface must cover the entire carrier sheet, and no
adhesive should come through on the surface.
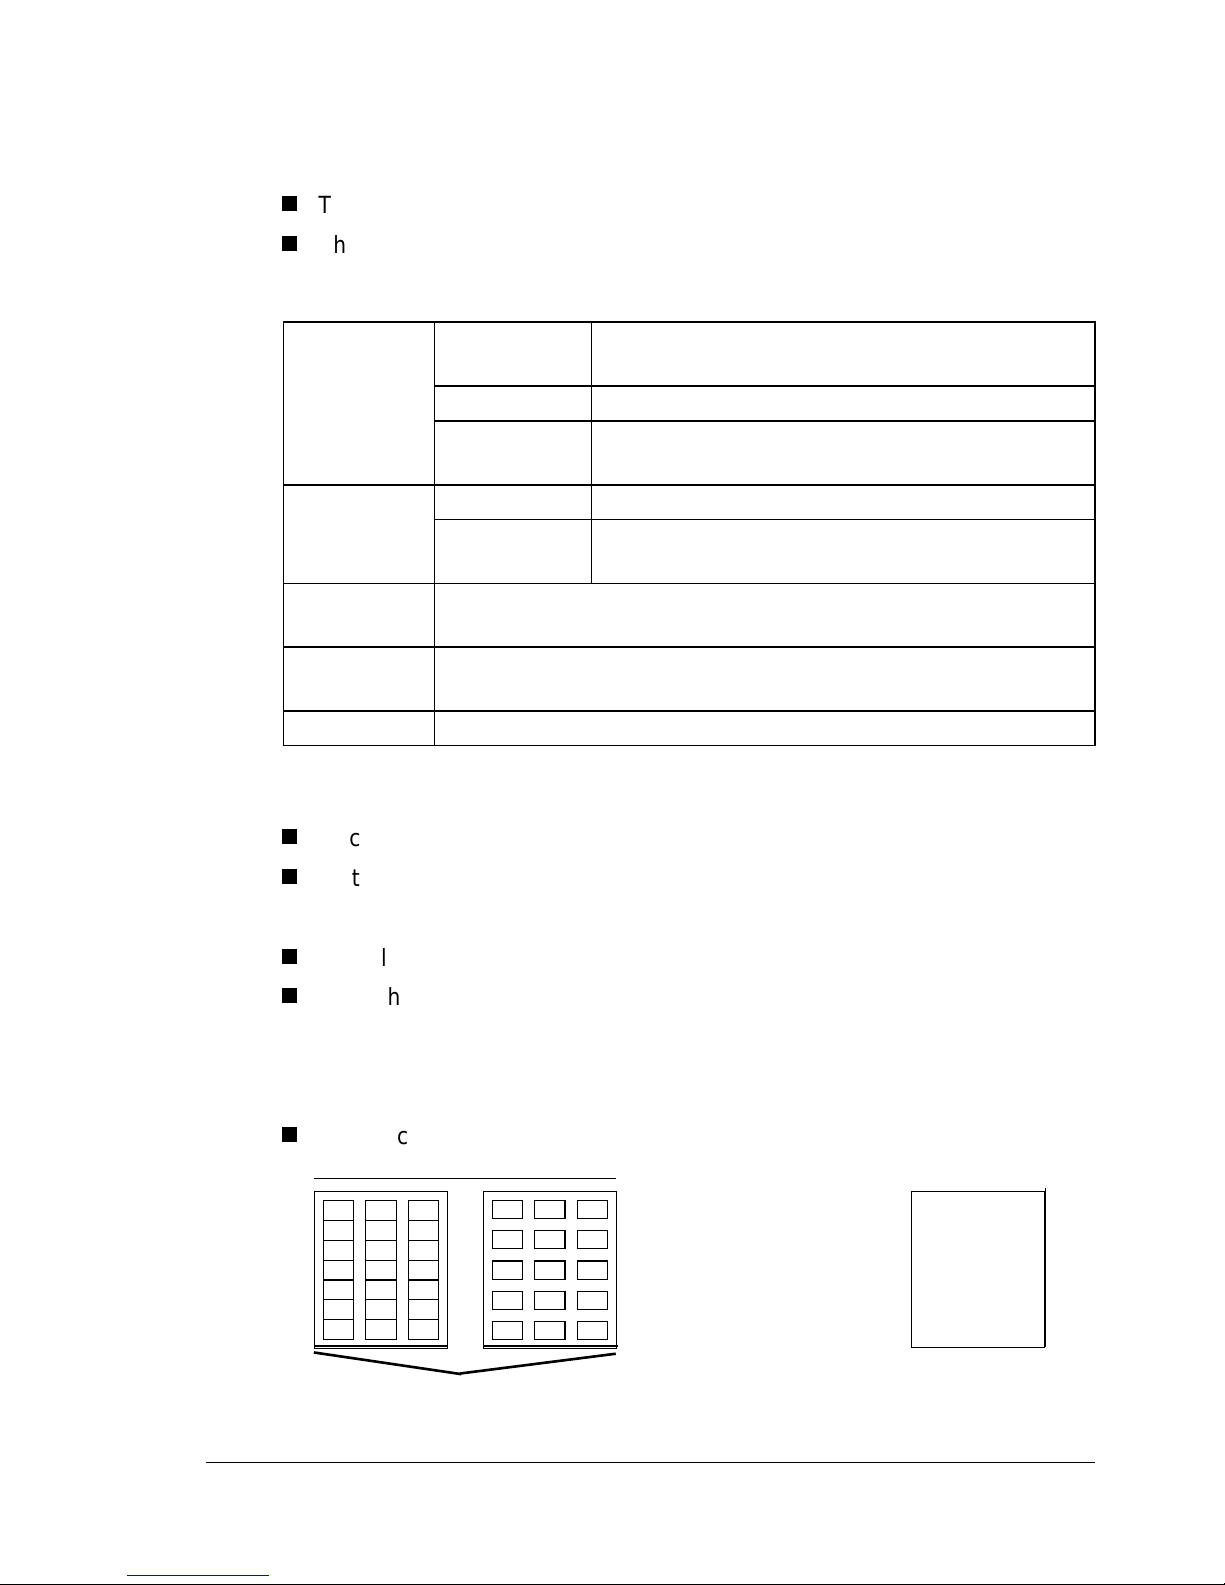
Capacity Tray 1 Up t o 50 label sheets, depending on their
thickness
Trays 2–4 Not supported
Manual
Feed Tray
Orientation Trays 1–4 Face up
Manual
Feed Tray
Type Check www.minolta-qms.com (click on “24-Hour Online
Help”) for currently approved media.
Driver
Mode
Duplexing Not supported
Use l abel sheets that are
Recommended for laser printers
Letter or A4 size (adhesive label stock)
Do not use label sheets that
Have labels that easily peel off
Have the backing sheets that have peeled away or have exposed
adhesive.
Labels
One sheet at a time
Face down
Labels may stick to the fuser, causing them to peel off and media jams to
occur.
Are precut or perforated
Do Not Use
Shiny backed paper
Media Types
OK to Use
Full-page labels (uncut)
19
Page 28
Postcards
Capacity Tray 1 Up to 50 postcards, depending on their
thickness
Trays 2–4 Not supported
Manual
Feed Tray
Orientation Tray 1 Face up
Manual
Feed Tray
Type Check www.m inolta-qms.com (click on “24-Hour Online
Help”) for currently approved media.
Driver
Mode
Weight 17–43 lb ( 64–163 g/m²)
Duplexing Autoduplexing not supported. Manually duplexing supported
Use postcards that are
Recommended for laser printers
Postcard side1
Postcard side2
only Manual Feed Tray. To manually duplex, print the front
side of the postcard in driver mode Postcard side1, flip it
over, and print the back side (address side of postcard) in
driver mode Postcard side2.
One sheet at a time
Face down
Do not use postcards that are
Coated
Designed for inkjet printers
Precut or perforated
Warped or bent
Preprinted o r multicolored (may result in media jams)
Media Types20
Page 29
Thick Stock (Also Known as Cardstock)
Capacity Tray 1 Up to 50 sheets, depending on their thickness
Trays 2–4 Not supported
Manual
Feed Tray*
Orientation Tray 1 Face up
Manual
Feed Tray*
Type Check www.minolta-qms.com (click on “24-Hour Online
Help”) for currently approved media.
Driver
Mode
Weight 25–42 lb bond (91–210 g/m²)
Duplexing Not supported
Notes 42 lb (210 g/m²) bond is also referred to as 90 lb index paper.
Do not use thick stock that is
Mixed with any other media in the media trays. This will cause media
jams.
Thick stock
*Optional manual feed tray s upported only with duplex option
attached even though duplexing thick stock is not approved.
1sheetatatime
Face down
Media Types
21
Page 30
Transparencies
Attention
Using unsupported transparency media may damage the printer and
void your warranty. Check www.minolta-qms.com for currently
approved media. To order approved transparency media, go to
www.q-shop.com.
Capacity Tray 1 Up to 50 transparencies, depending on their
thickness
Trays 2–4 Not supported
Manual
Feed Tray
Orientation Tray 1 Face up
Manual
Feed Tray
Type Check www.m inolta-qms.com (click on “24-Hour Online
Help”) for currently approved media. To order approved
transparency media, go to www.q-shop.com.
Driver
Mode
Duplexing Not supported
Use t ransparencies that are
Approved by MINOLTA-QMS for color laser printers
Have as little static electricity as possible
Do not use transparencies that
Are designed for inkjet printers
Transparency
1 transparency at a time
Face down
Are for oil-fixing
Media Types22
Page 31
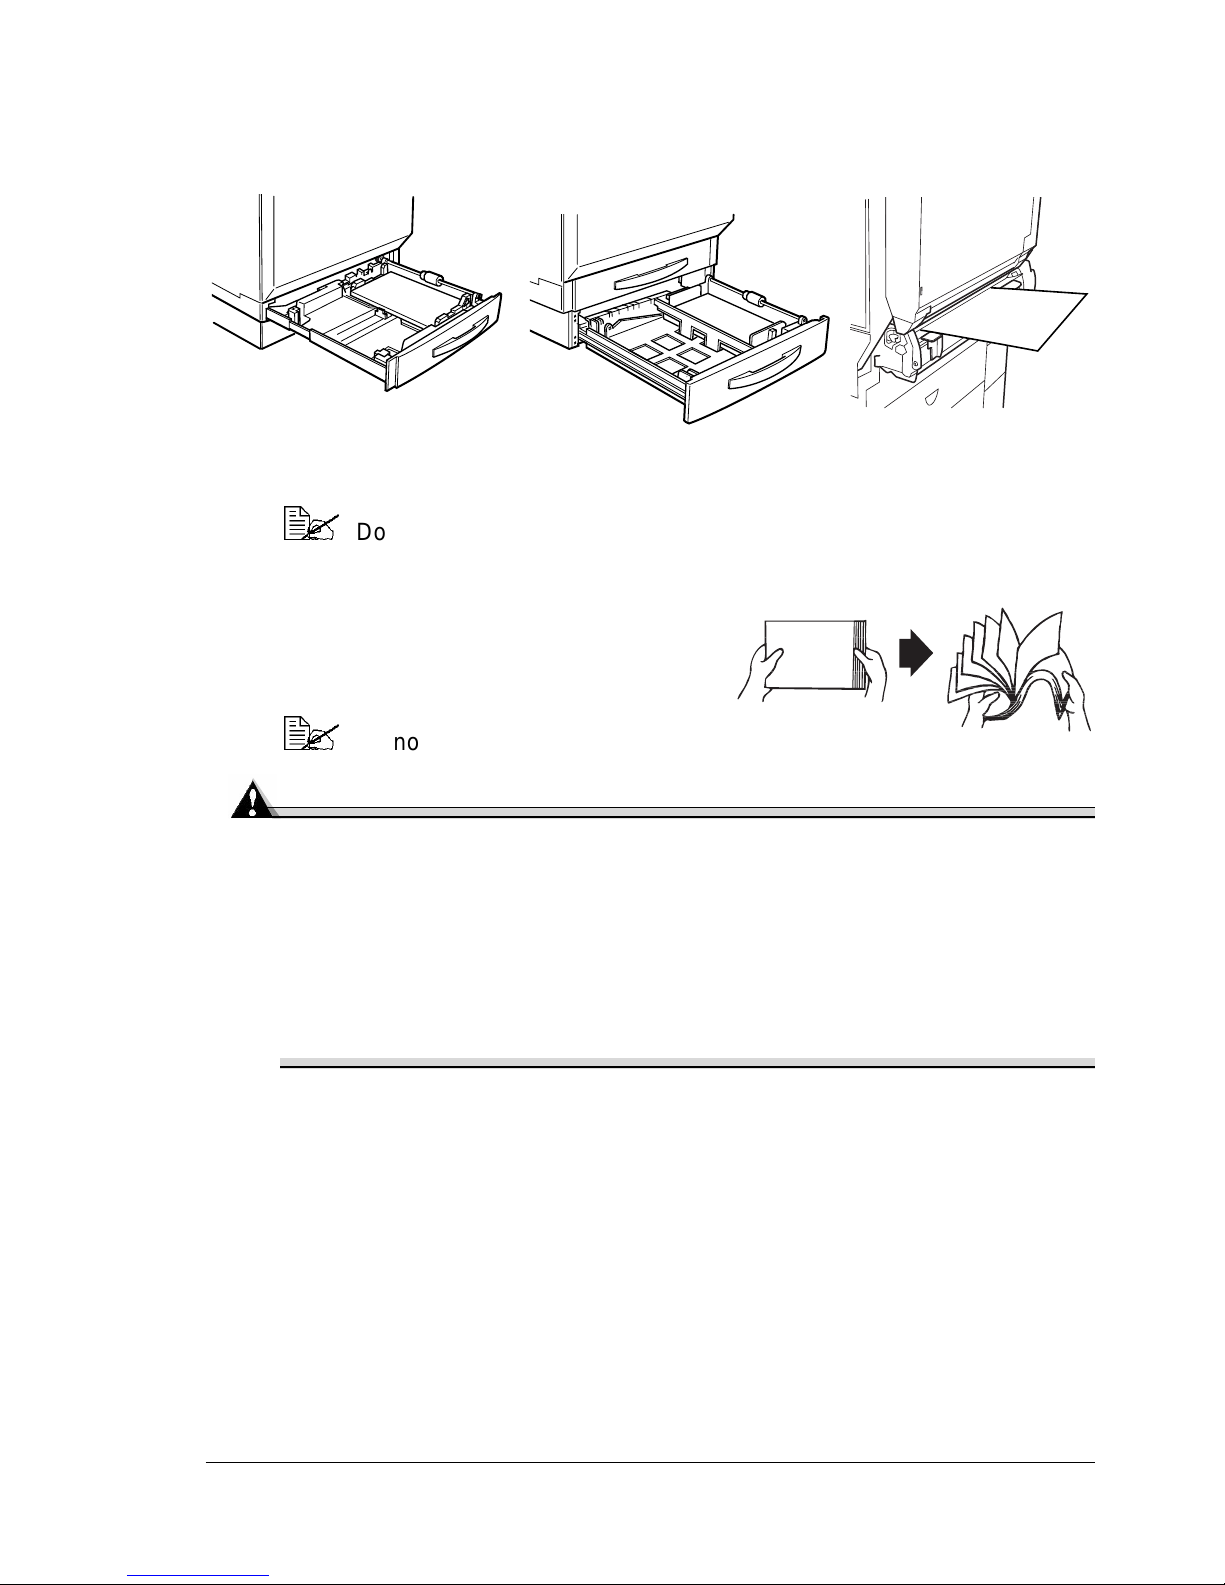
Loading Media
Tray 1: Universal media tray Trays 2–4: Standard Manual feed tray
media trays
How do I prepare media?
If you are using paper, remove the t op
and bottom sheets of a ream of paper.
Fan the stack of media to prevent static
buildup before inserting it in trays 1–4.
Do not unwrap paper on top of the printer, as this might cause paper
particles to fall into the printer.
Do not fan transparencies.
Attention
Although this printer was designed for printing on a wide range of
media types, it is not intended to print exclusively on a single media
type except plain paper. Continuous printing on media other than plain
paper ( such as envelopes, labels, thick stock, or transparencies) may
adversely affect print quality or reduce engine life.
Do not mix media of different sizes, types, and/or weights, as this will
cause media jams.
When loading additional media or refilling media, remove any media
remaining in the tray, place it on top of the new media of the same size and
type, and then align the media in the stack before loading it into the tray. We
recommend refilling the media only after allof the media in the tray has been
used; otherwise, a media jam may occur.
Loading Media
23
Page 32
Tray 1 (Universal Media Tray)
All supported media sizes and types except media over 18 inch (457.2 mm)
long can be printed from Tray 1. For information about media or ientation,
refer to “Media Specifications” on page 11.
Plain and Recycled Paper, Letterhead, and Memo Media
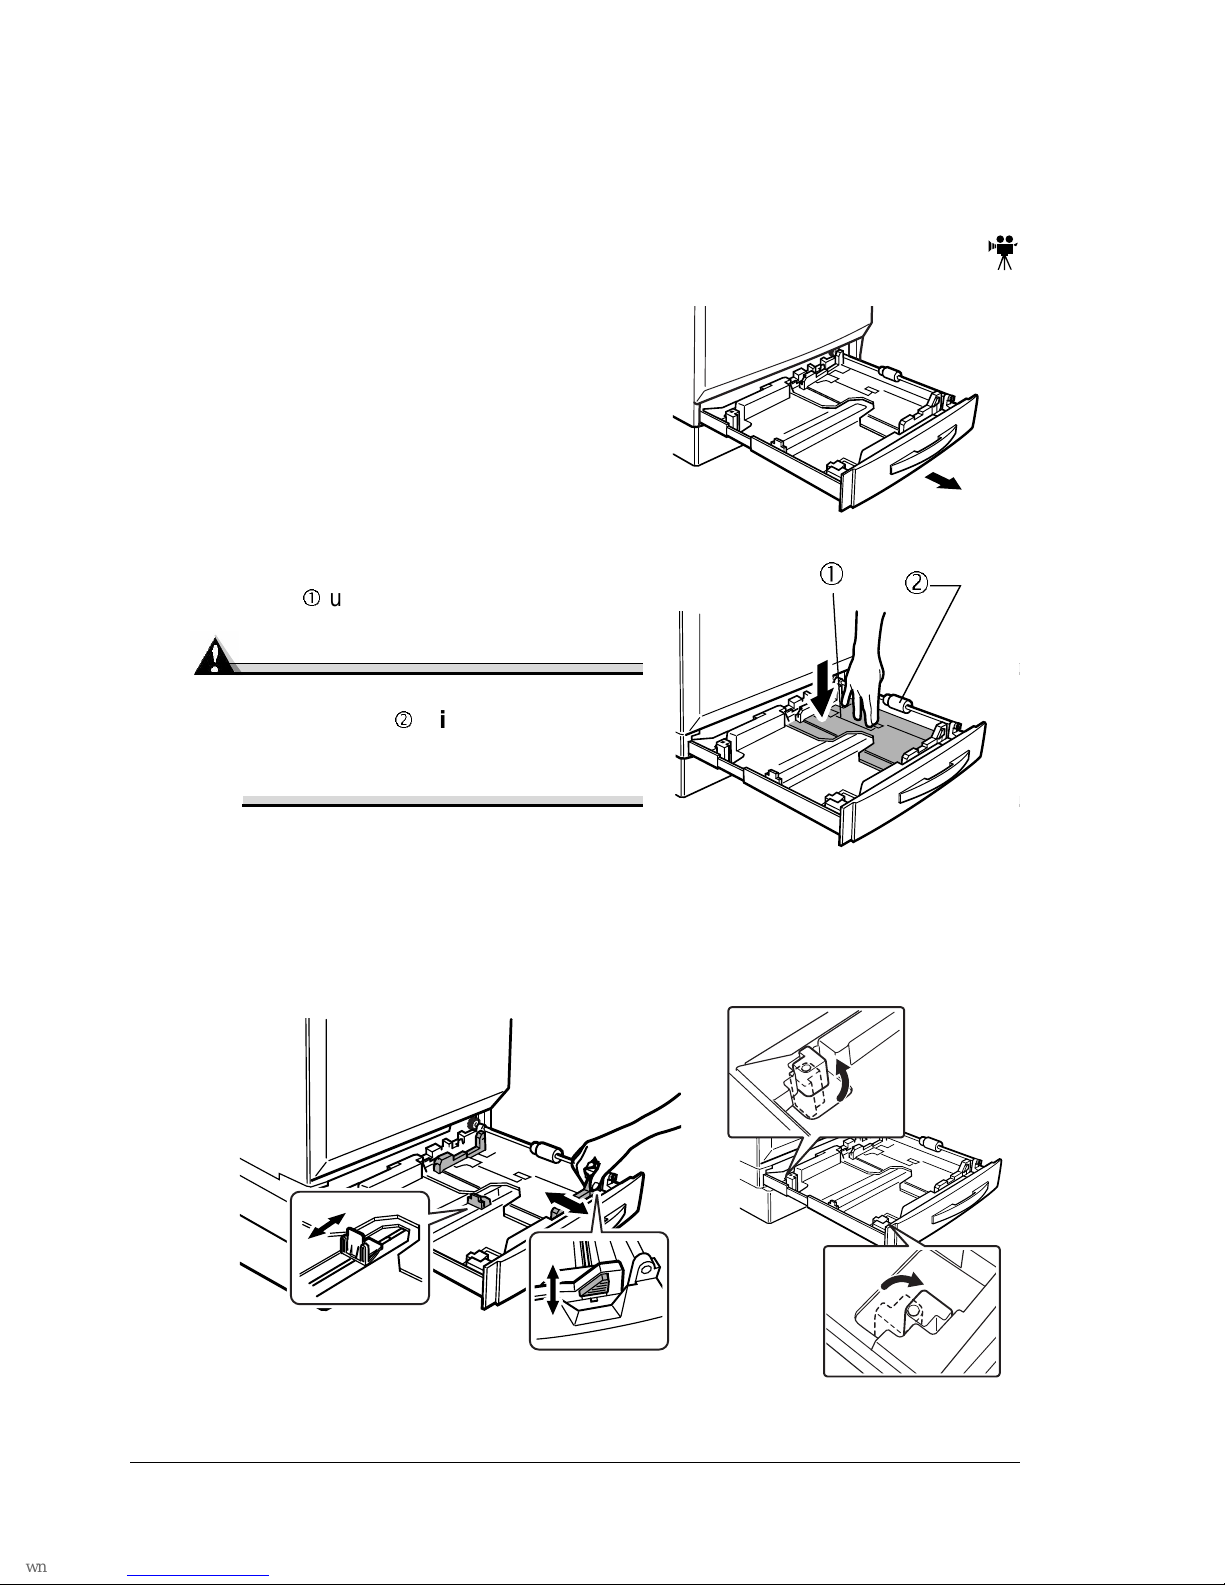
1 Slide out Tray 1.
If you already have media in Tray 1
and want to change i t, remove the
media from Tray 1.
2 Press down on the media-lifting
plate
until it locks.
Attention
Be careful not t o touch the media
pickup roller
If the roller has been touched,
wipe it with a dry cloth.
with your hands.
3 Squeeze both media guides to slide
them to fit the media size to be
loaded.
For 12.25 x 18 inch (311 x457 mm) media, adjust the trailing-edge media
guides.
Loading Media24
Page 33
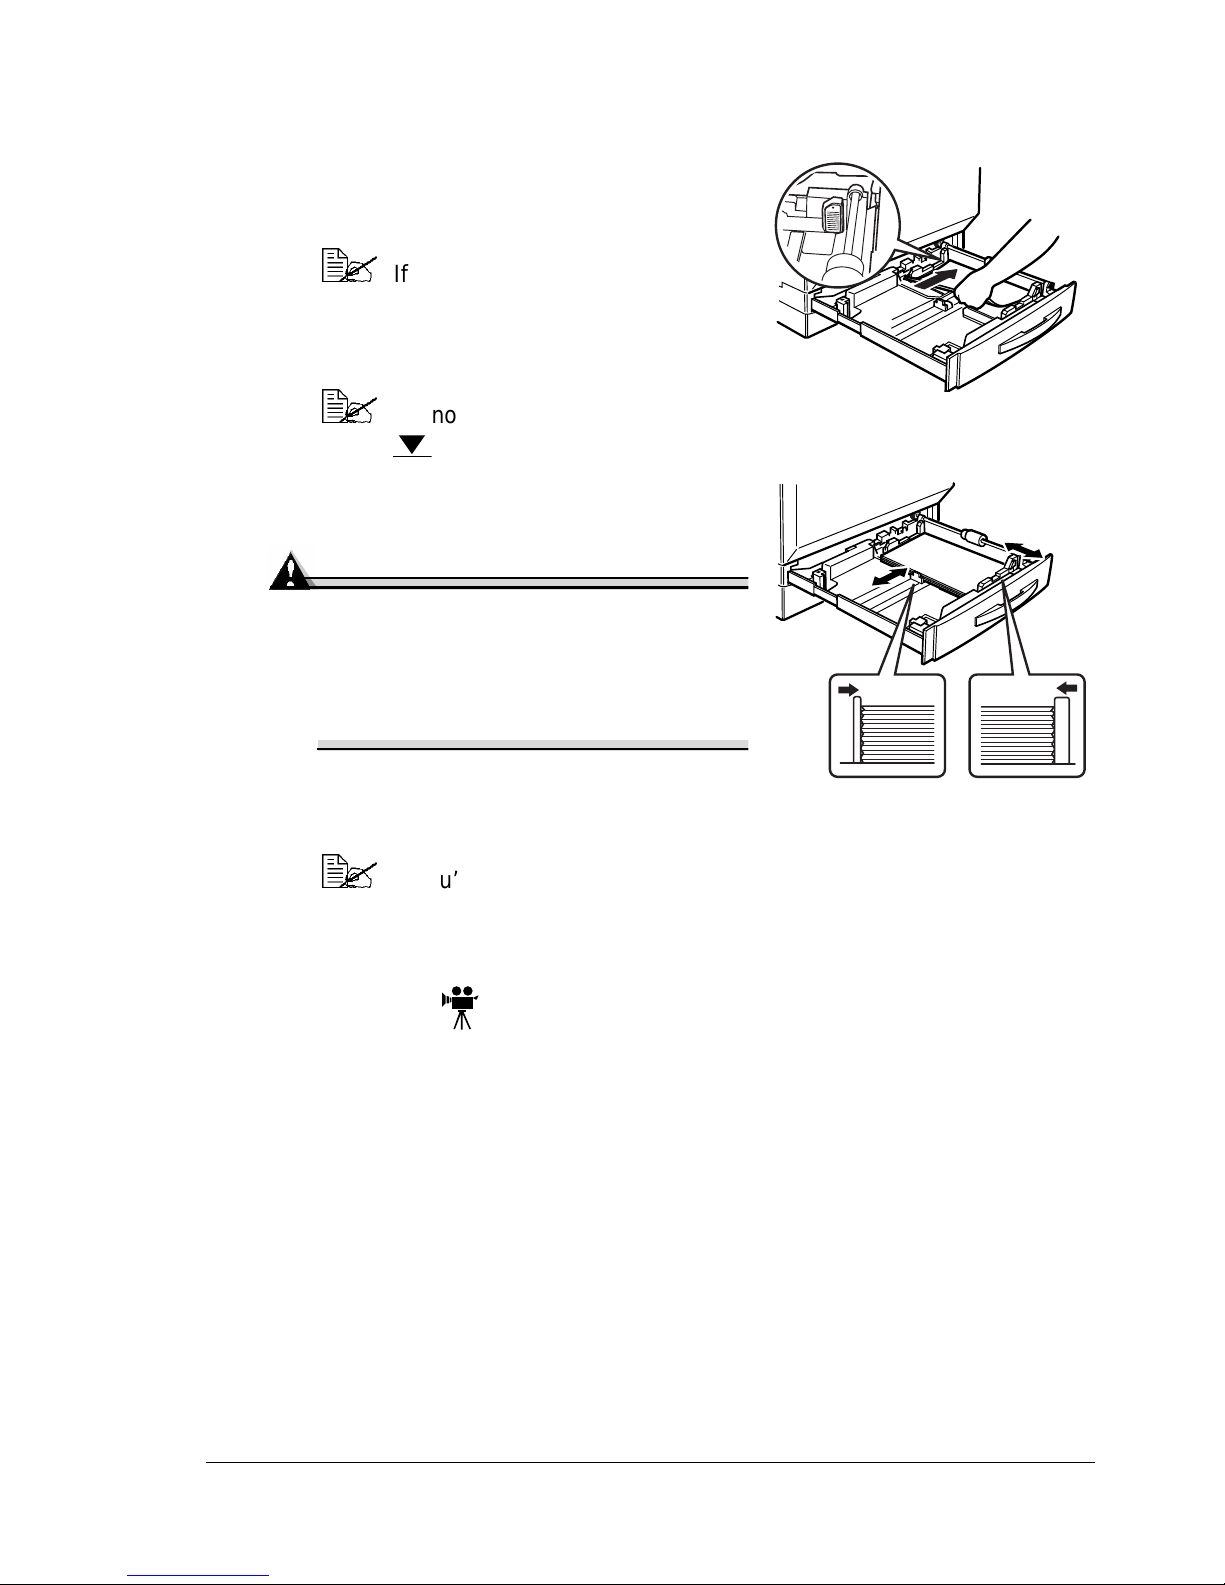
4 Align the edges of up to 250 sheets of paper, and then load it face up.
If the media is curled, f latten it before loading it.
Often, an arrow on the media package
label indicates the face-up (print) side
of the media.
If you’re loading letterhead,load
the letterhead or logo side
oriented toward the backside of
the tray.
Do not load media above the
media limit mark.
5 Slide the media guides against the
edges of the media.
Attention
Always adjust the media guides
after inserting media. Guides that
are not pr operly adjusted can cause
poor print quality, media jams, or
printer damage.
6 Close Tray 1.
7 In the printer driver, select Plain Paper and the appropriate media size.
If you’re using custom-size media, set the printerfor custom-sized
media in the printer driver.
8 Print the job.
Envelopes
Print on the envelope front (address side) only. Some parts of the envelope
consist of three layers of paper—the front, back, and flap. Anything printed in
these layered regions may be lostor faded.
1 Flex a stack (including t he edges) of up to 50 envelopes to remove any
stiffness.
2 Correct any bent corners, and then tap the envelopes on a flat surface to
align them.
3 Place the envelopes on a flat surface, and press them down to flatten
them and make sure that all air is removed.
Make sure that the folds of the flaps ar e firmly pressed; otherwise, the
envelopes may become wrinkled or a media jam may occur.
Loading Media
25
Page 34
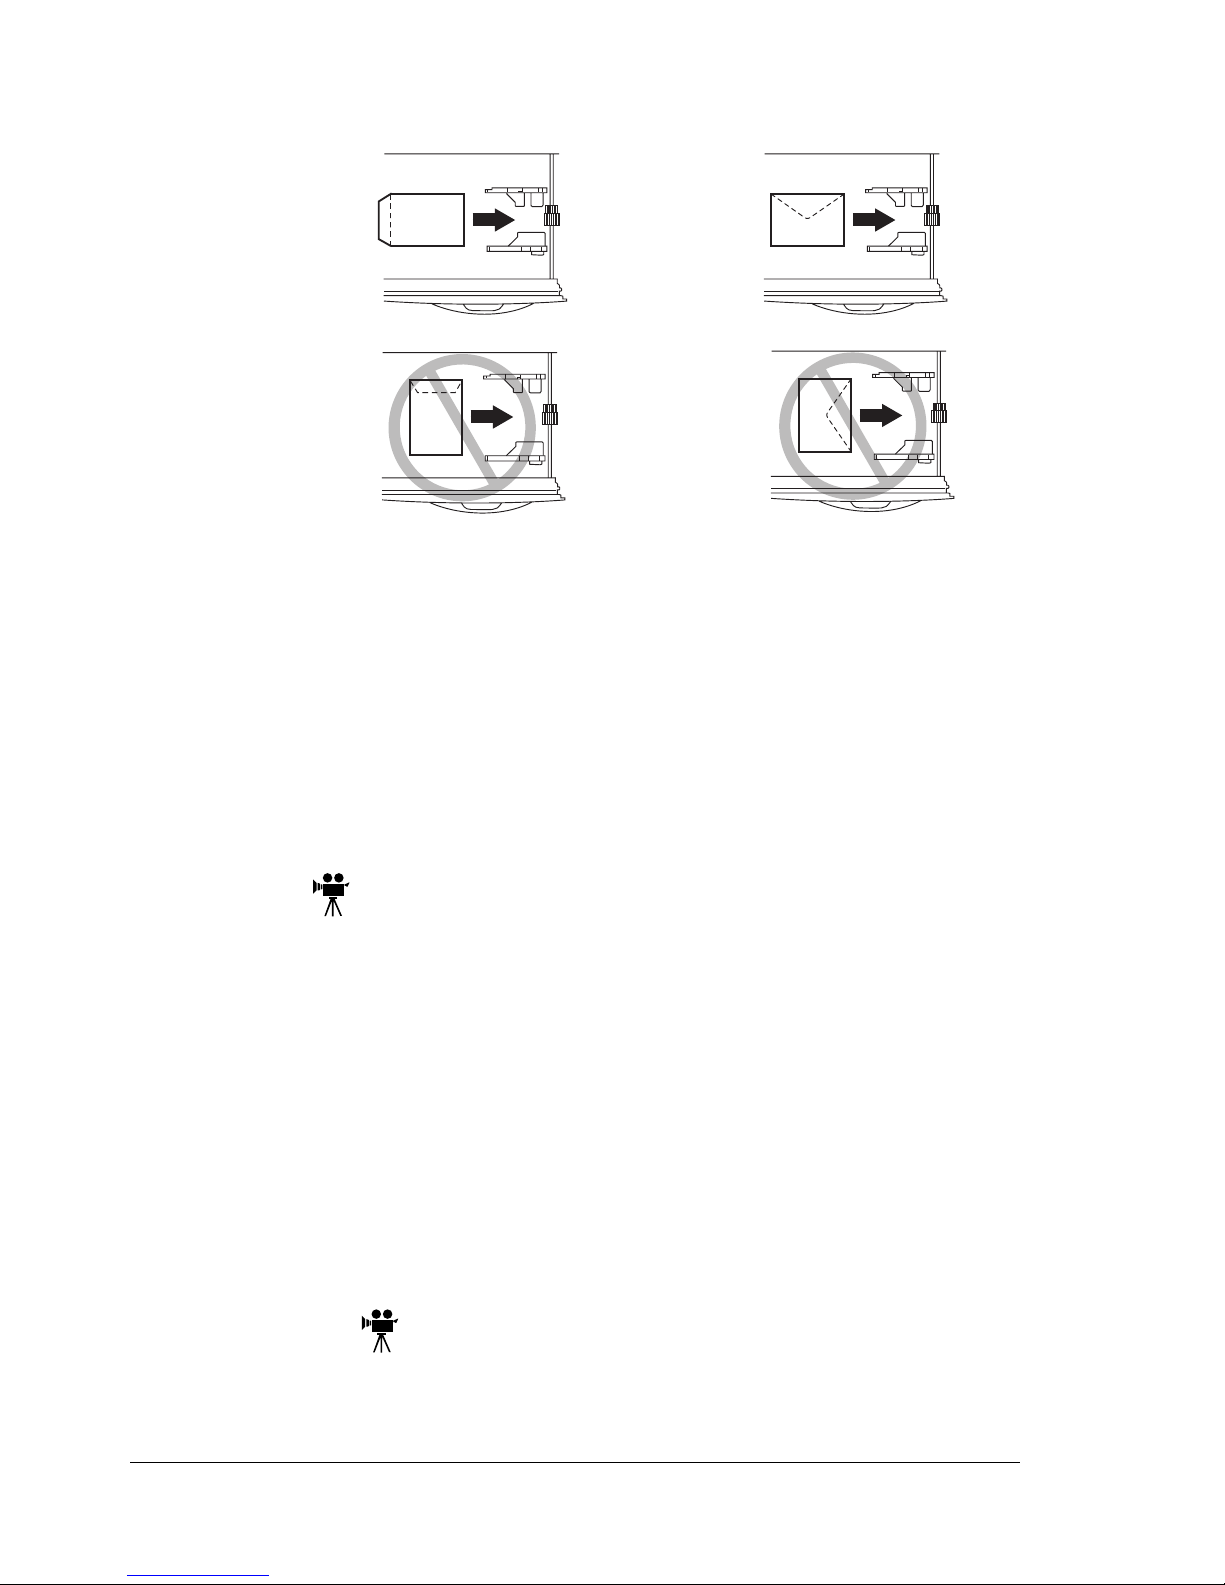
4 In Tray 1, load up to 50 envelopes face up (flap side down), short
edge first.
5 Adjust the media guides.
Make sure the guides are snug enough to keep the envelopes straight,
but not so tight t hat they buckle the envelopes.
6 In the printer driver, select Envelope and the appropriate size.
7 Print t he job.
Print a single envelope to check the orientation before printing multiple
copies.
8 Open the flap of each envelope immediately (before it cools) after the
envelope is delivered to the output tray.
Labels
You can print continuously with label paper. However, t his could affect the
media feed, depending on the media quality and printing environment. If
problems occur, stop the continuous printing and print one sheet at a time.
Format label data within your application.Try printing your data on a plain
sheet of paper first to check placement. Check your application
documentation for other information on printing labels.
1 Load up to 50 label sheets face up, long edge first.
2 Adjust the media guides.
3 In the printer driver, select Label and the appropriate si ze.
4 Print t he job.
Postcards
Format postcarddata within your application.Try printingyour data on a plain
sheet of paper first to check placement.
Loading Media26
Page 35
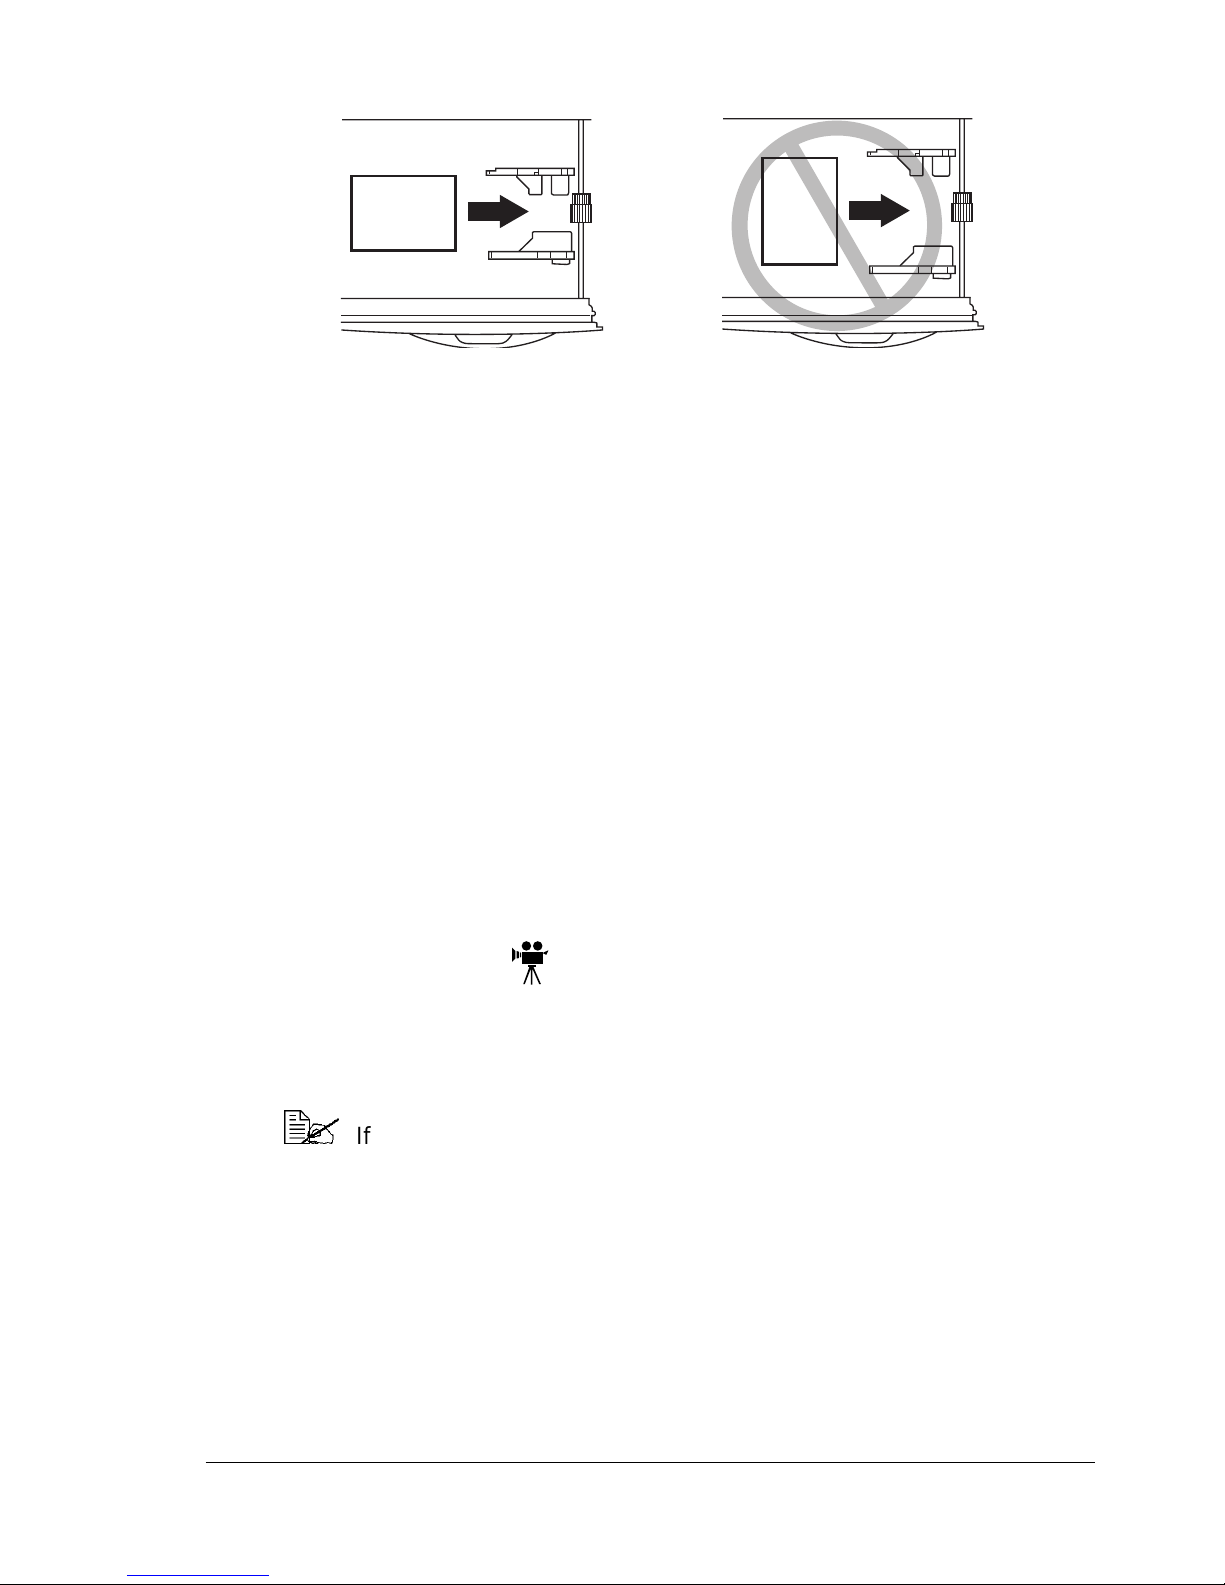
1 Load up to 50 postcards face up with the short edge first.
2 Adjust the media guides.
3 In the printer driver, select Postcard side1 and the appropriate size.
4 Print the postcards.
5 You cannot autoduplex postcards.If you want to manually duplex, load
the postcards blank side down i n Manual feed t ray. In the driver, select
Postcard side2.
6 Print the second side.
Thick Stock
Test all thick stock to ensure acceptable performance and to ensure that the
image does not shift.
1 Load up to 50 thick stock sheets face up.
2 Adjust the media guides.
3 In the printer driver, selectThick Stock and the appropriate size.
4 Print the job.
Transparencies
Format the information to be printed on the transparencies within your
application. Try printing your data on a plain sheet of paper first to check
placement.
You can print transparencies continuously. However, this could affect the
media feed, depending on the media quality, static buildup, and printing
environment. If you have problems loading a large number of transparencies
at a time, try loading only 1–10 sheets (Tray 1) or only 1 sheet at a time
(manual feed tray).
If you touch the face of the t ransparencies with your bare hands, print
qualitymay be affected. Do not fan transparency media before loading
it. Resulting static electricity may cause printing errors.
Loading Media
27
Page 36
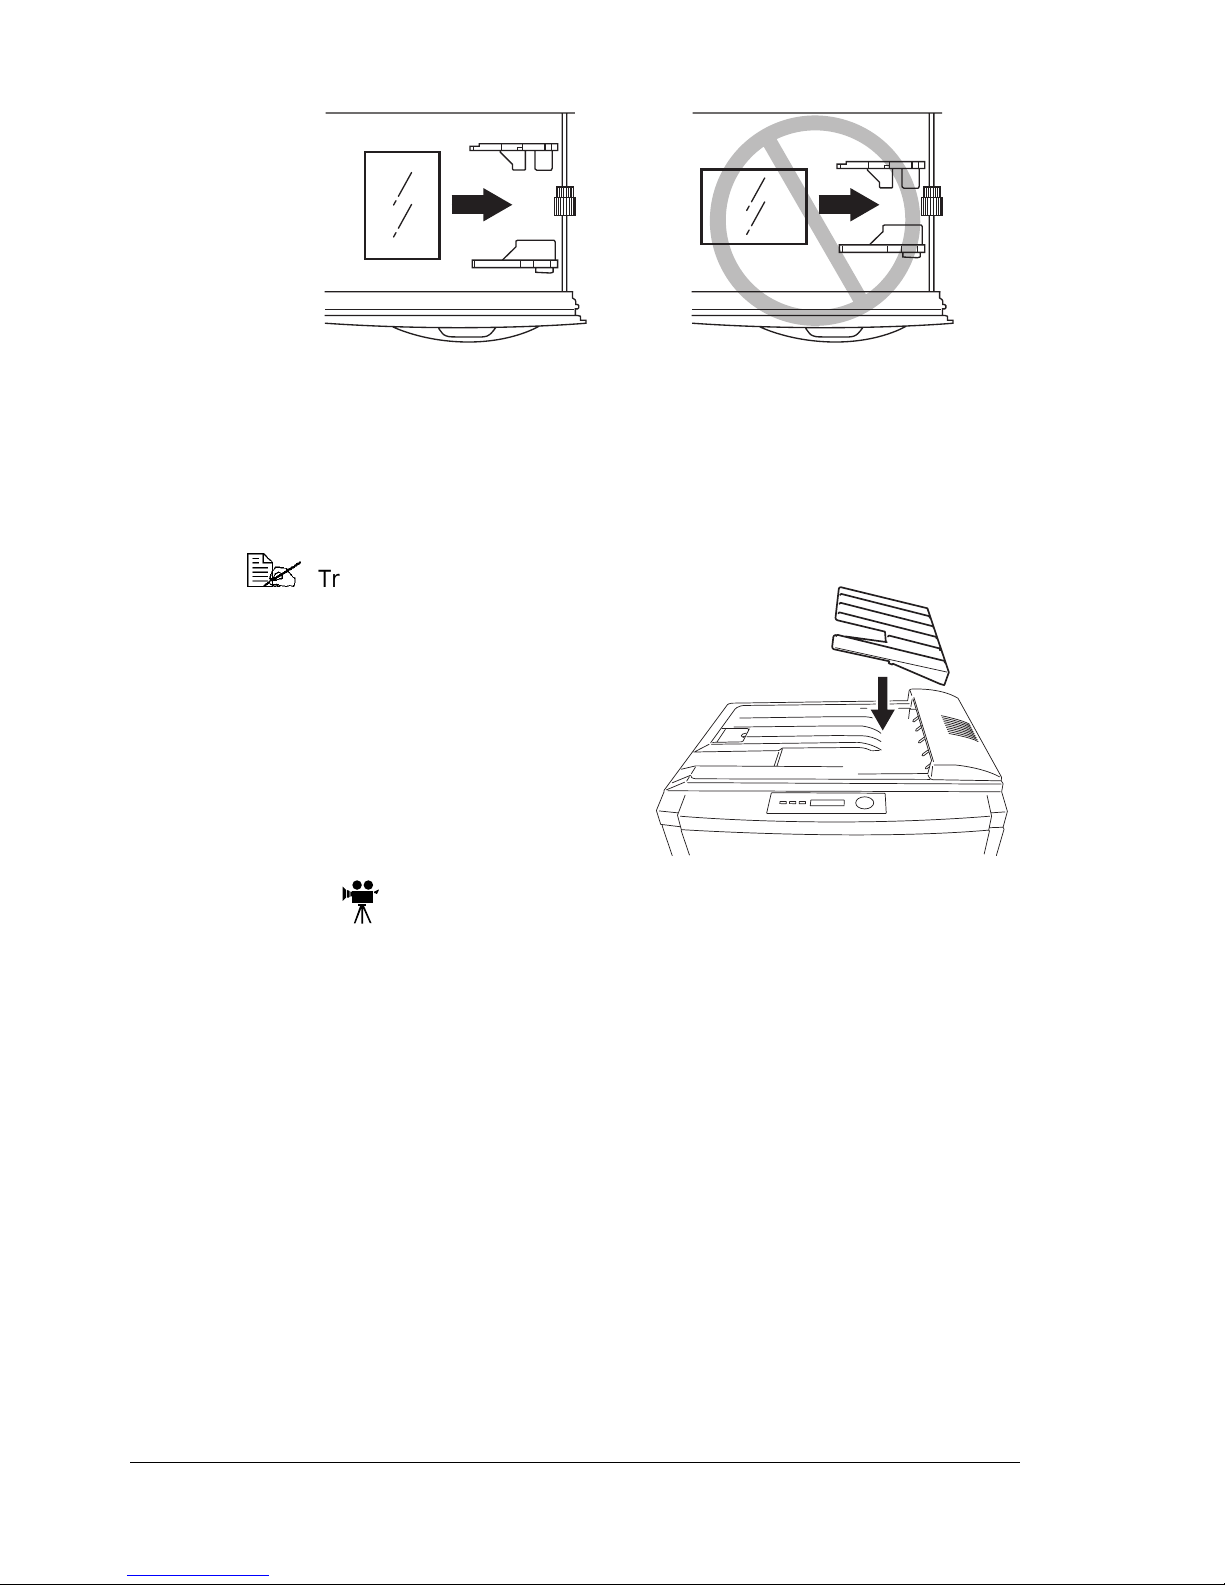
1 Load up to 50 transparencies face up, long edge first.
2 Adjust the media guides t o the width of the transparency.
3 In the printer driver, select OHP (Transparency) and the appropriate size.
4 Print t he job.
Remove transparencies as soon as possible from t he outputtray to avoid
static buildup.
Transparencies m ay be bent
in the output tray, depending
on the type of transparency
and the operating
environment. To improve
stacking of transparencies,
put the media output tray
extension in place before
printing.
Trays 2–4
Only plain, r ecycled, letterhead, or memo paper in sizes A3, A4, B4, B5 (JIS),
11 x 17, legal, and letter can be printed from Trays 2–4. If you want to use
media other than plain paper, use Tray 1or the manual feed t ray.
We recommend replenishing the media only after all of the media in t he tray
has been used; otherwise, a media jam may occur.
Follow the instructions below to load Tray 2. Trays 3 and 4 are loaded the
same way.
1 In the printer driver,choose t he tray you want to print from, or choose
Automatically Select.
Loading Media28
Page 37
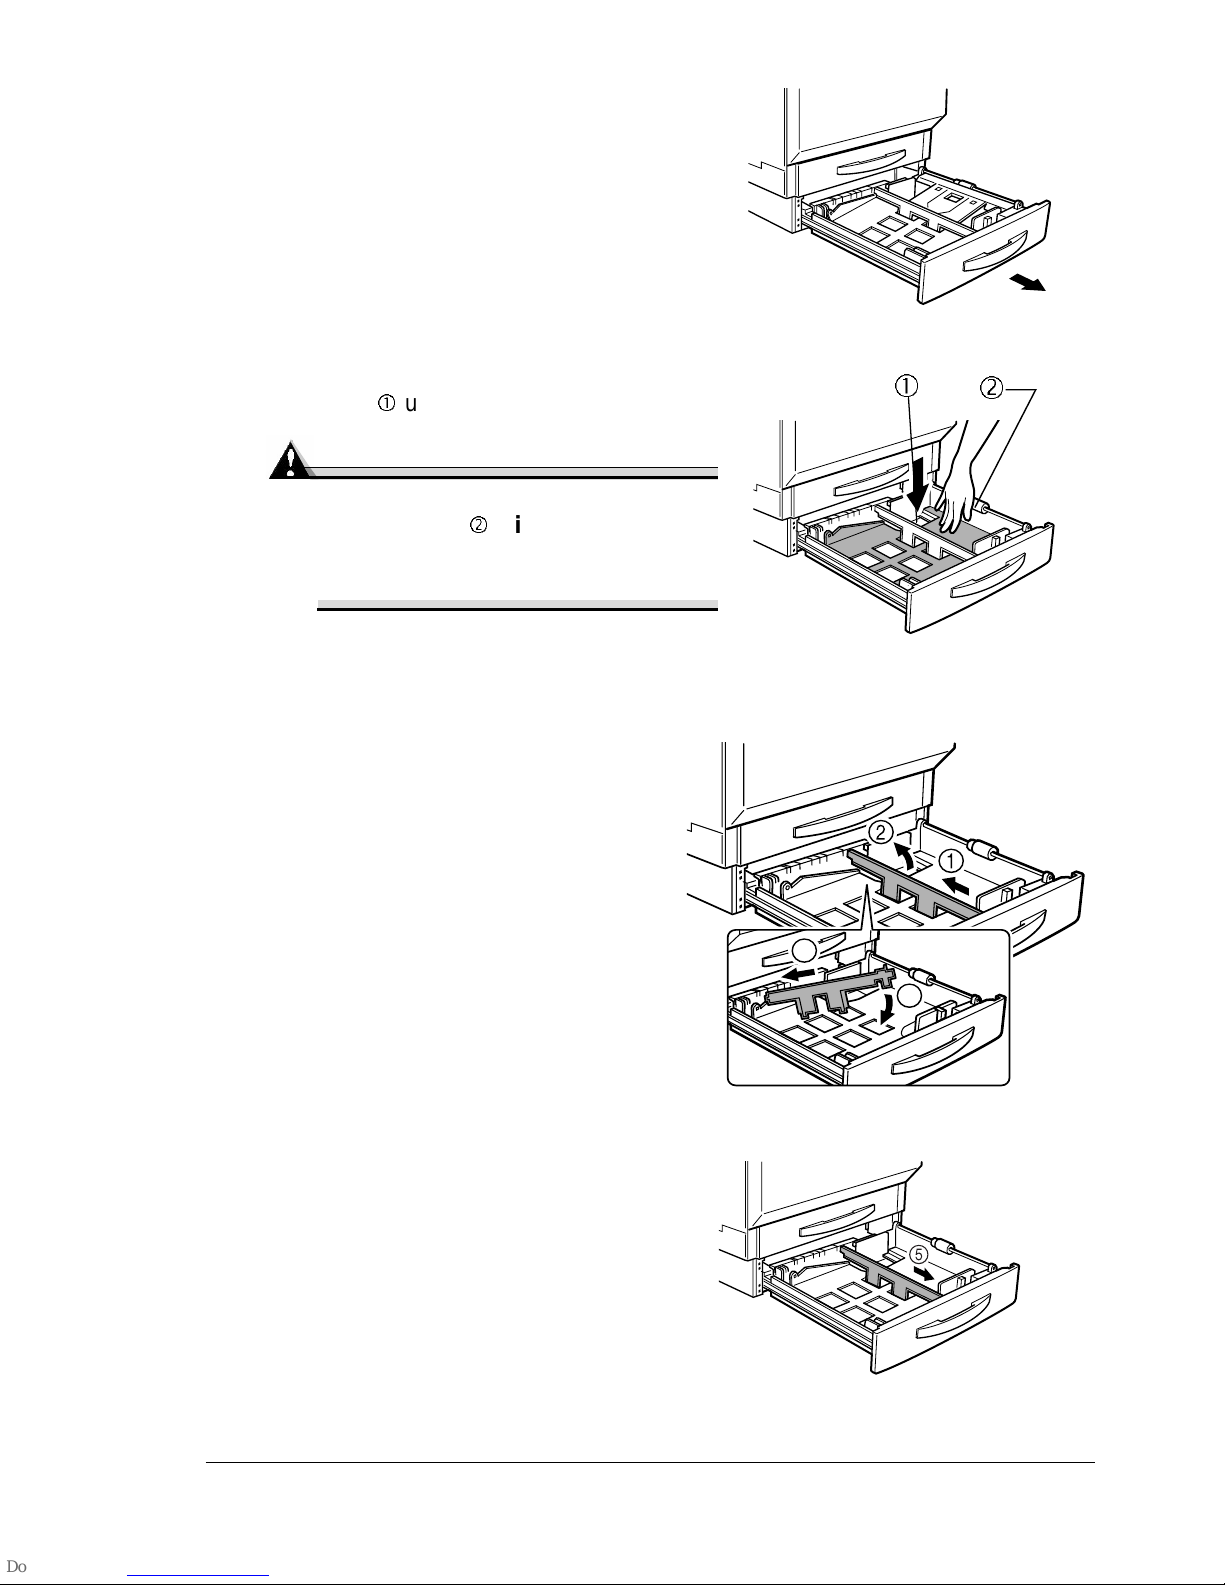
2 Slideoutthetray.
When loading additional media,
remove any media remaining in the
tray, place iton top of the new media
of the same size and type, and t hen
alignthe media in the stackcarefully
before loading it into the t ray.
3 Press down on the media-lifting
plate
until it locks.
Attention
Be careful not t o touch the media
pickup roller
If the roller has been touched,
wipe it with a dry cloth.
For information about media
orientation, refer to “Media
Specifications” on page 11.
with your hands.
4 Remove the long media guide,
if necessary,and then reinstall it
for the media size to be loaded.
3
Loading Media
4
29
Page 38
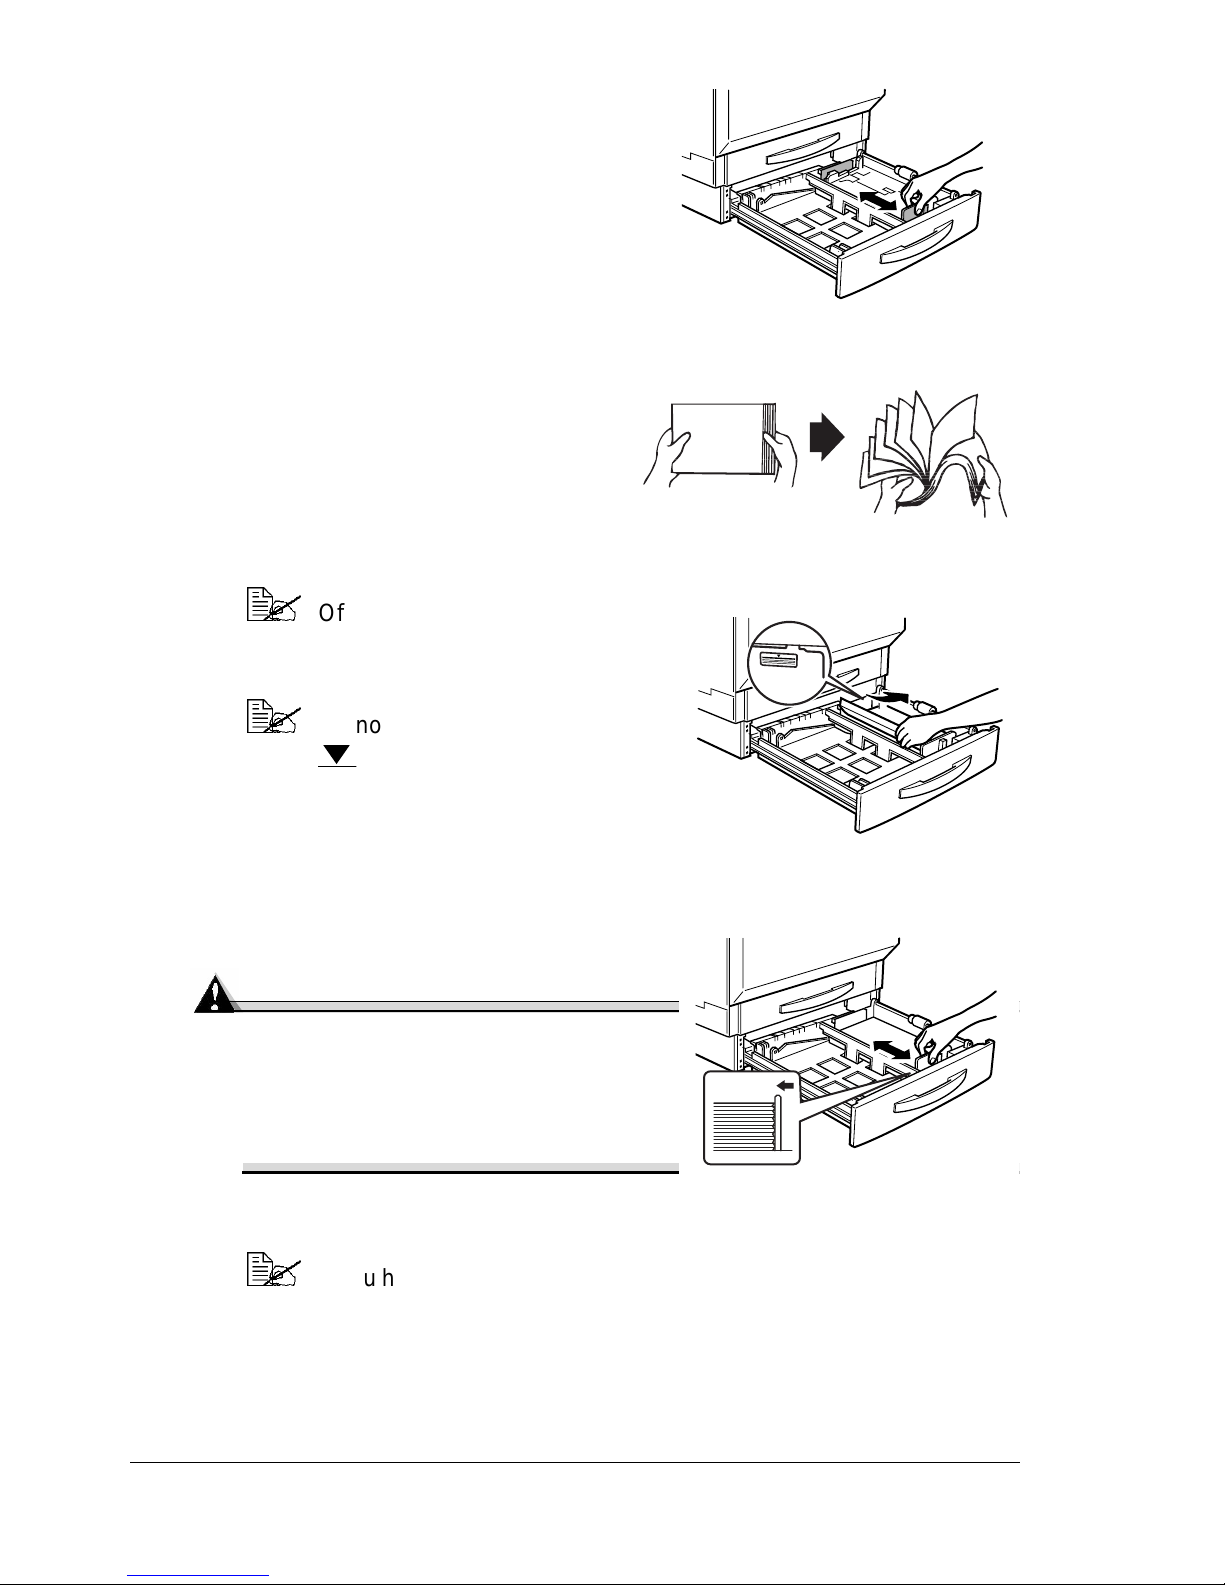
5 Squeeze t he front media guide to
slideittofitthemediasizetobe
loaded.
6 Fan a stack of approximately 500
sheets of media.
If the media is curled, f latten it
before loading it.
7 Align the edges of the media, and
then load it face up.
Often, an arrow on the package
labelindicatestheface-up(print)
side.
Do not load media above the
media limit mark.
8 Slide the media guides againstthe
edges of the loaded m edia.
Attention
Always adjust the media guide after
inserting the media. A guide that is
not properly adjusted can cause
poor print quality, media jams, or
printer damage.
9 Close the tray.
If you have removedthe tray from the printer,slightlytilt up the tray
to insert it into the rails to slide it back in.
10 In the printer driver, select Plain Paper and the appropriate size.
11 Print the job.
Loading Media30
Page 39
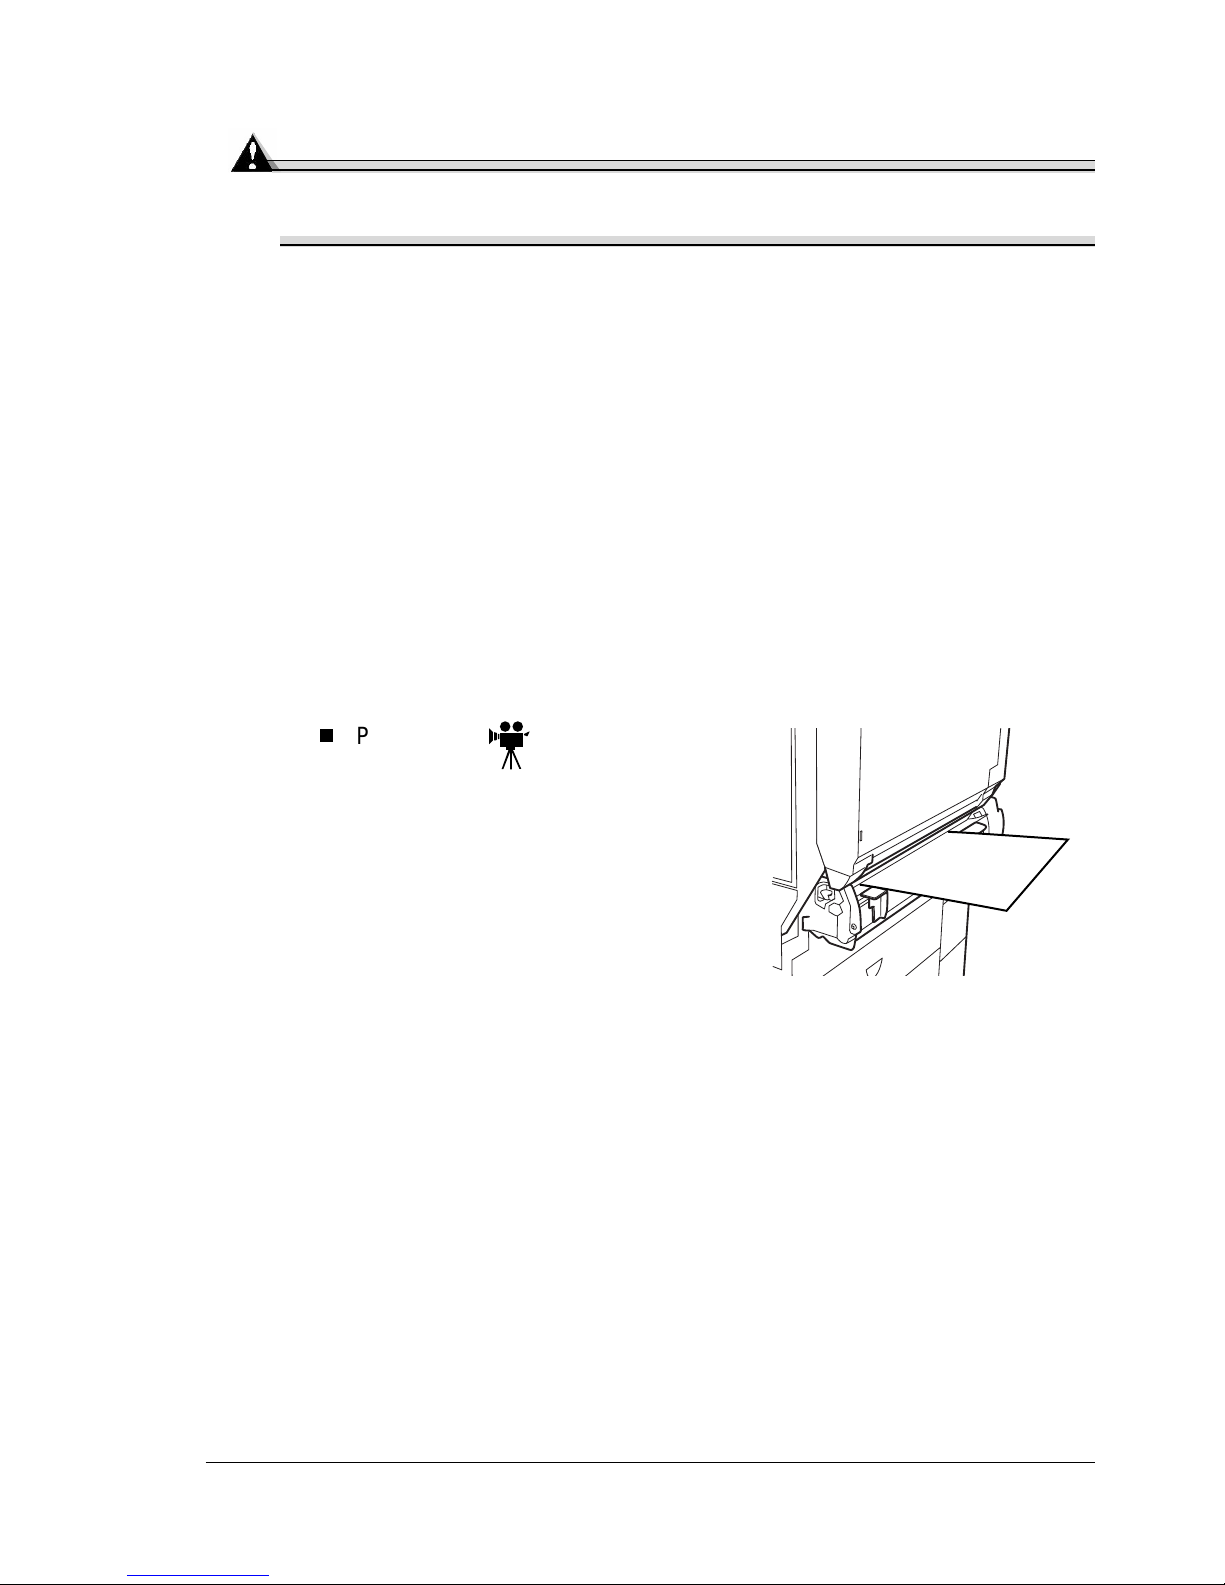
Manual Feed Tray
Attention
The manual feed tray is part of the duplex unit. You must have the
duplex unit installed, whether or not you are duplexing your page.
All supported media sizes and types up to 35.4 inch (900 mm) long can be
printed from the manual feed tray. Use the manual feed tray if you want to
print on special media, or if you want t o print on media not currently loaded
into Trays 1–4.
When printingusing the manual feed tray, insert only one sheet at a time. The
side facing down wi ll be printed.
1 Adjust the media guides for the type of media you are using.
2 In the printer driver, choose t he Manual Feed Tray, and the appropriate
mediatypeandsize.
3 Print the job.
For information about media orientation, refer to “Media Specifications” .
If you don’t add media in the manualfeed tray within the job timeout
period, the job is taken out of the queue and does not print.
Plain paper
Loading Media
31
Page 40
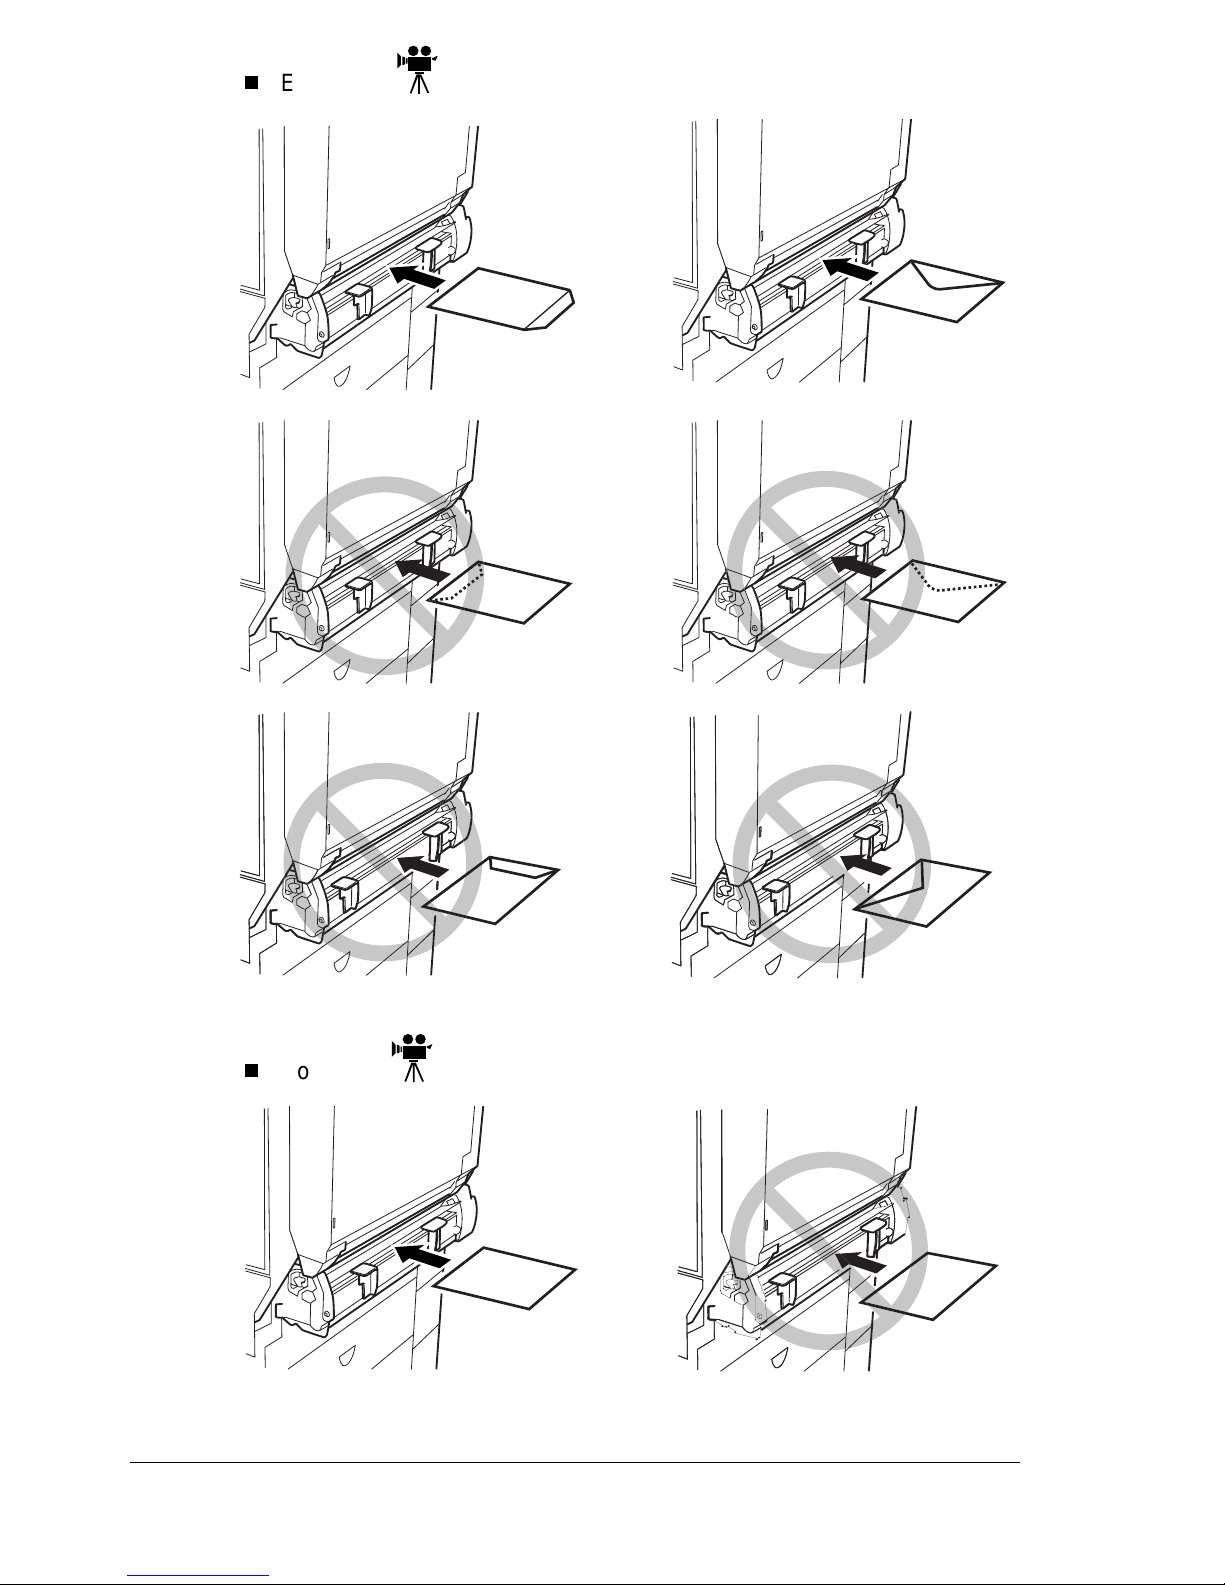
Envelopes
Postcards
Loading Media32
Page 41
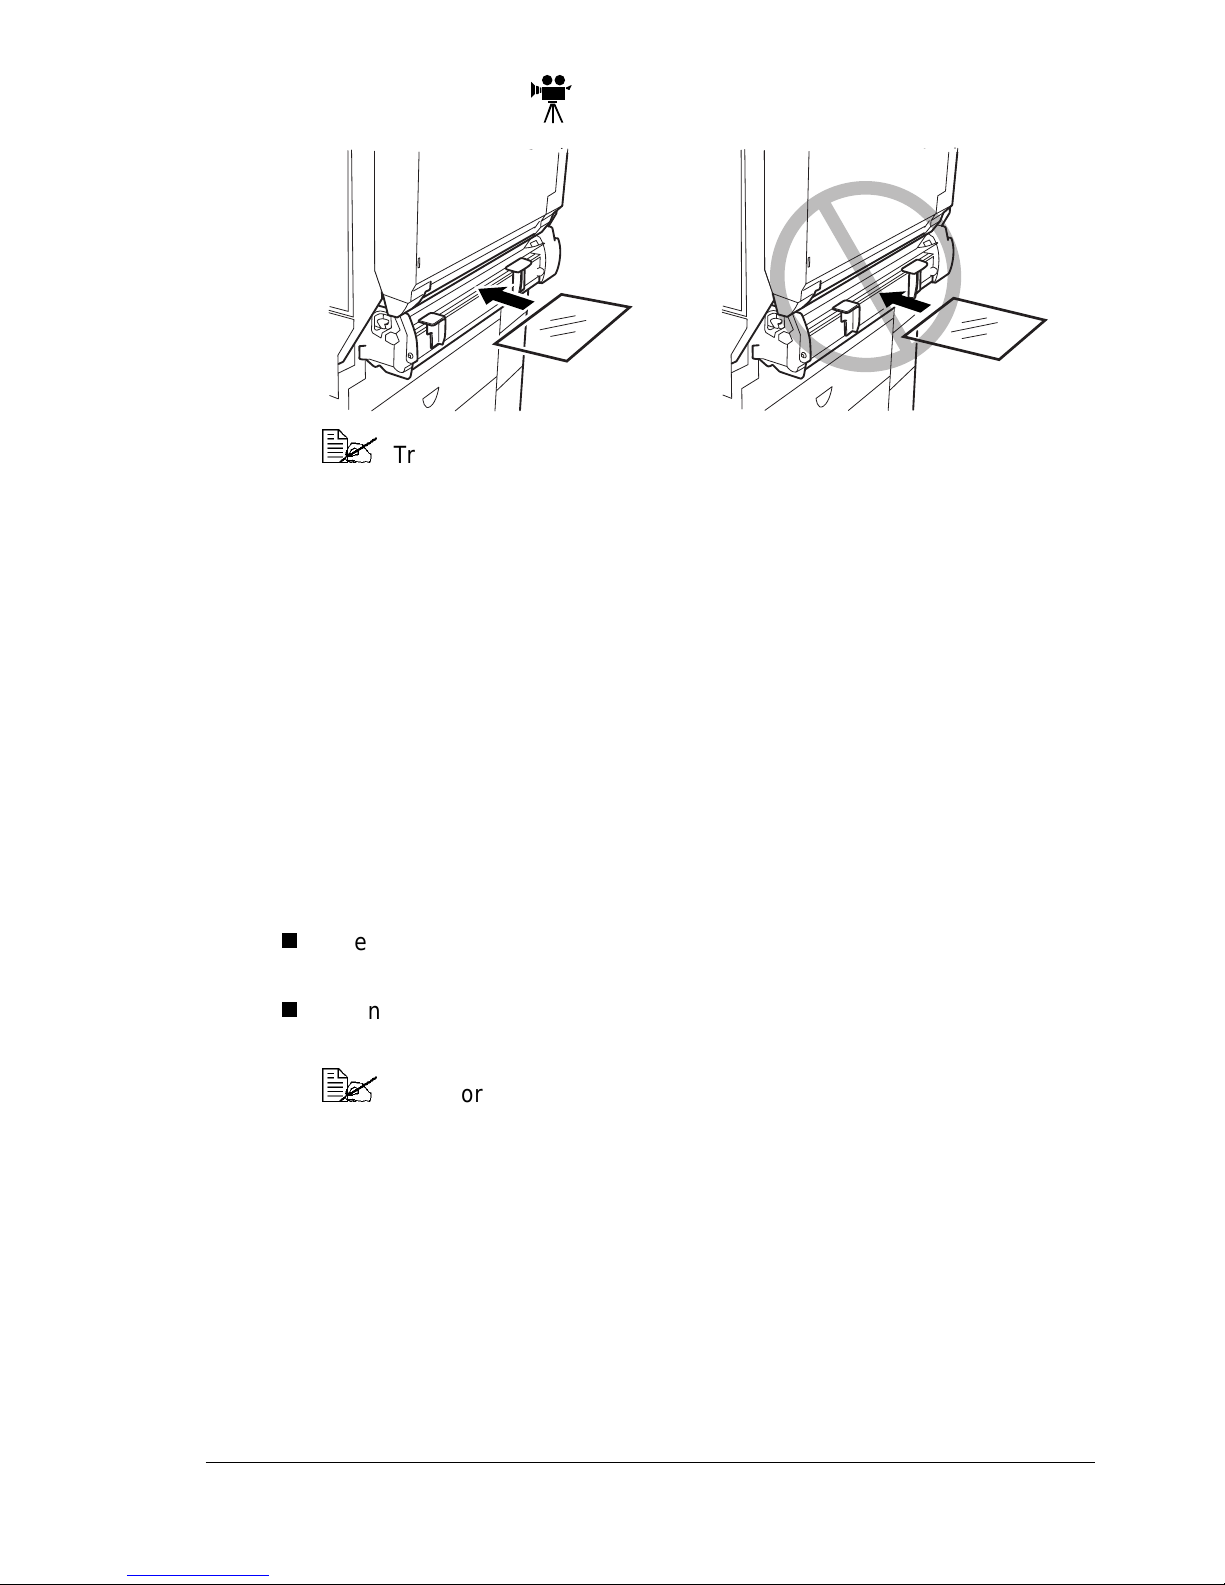
Transparencies
Transparencies m ay be bent in the outputtray, depending on the
type of transparency and the operating environment. To improve
stacking of transparencies, put the media output tray extension in
place before printing
Custom-size Media
When you use media t hat is not a standard size (see “Media Specifications”
on page 11), you need to configure the printer driver for the custom size.
Otherwise,your print job may be cut short or misaligned on the page.
To make custom page sizes work correctly, you need to change the printer’s
settings in the MINOLTA-QMS printer driver.
Default page sizes are set in inches on 110V printers and in millimeters on
220V printers.
When you set custom page sizes in 110V printers, the two digits on t he
right are always decimal places. For example, set 8.5 inches as 850.
When you set custom page sizes in 220V printers, there are no decimal
places. For example, set 78.2 millimeters as 78.
The more accurate your measurements,the better your print job i s
aligned.
Duplexing
Duplex (2-sided) printing can be done manually or, if you have the duplex
option installed and selected, it can be done automatically.
Select paper that is opaque enough to block out what’s printed on one side
from being seen on the other side. For best results, print a small quantity to
make sure the paper and print quality are acceptable.
Custom-size Media
33
Page 42

Manual Duplexing
Media jams may occur if the printed sheet(s) are not reinserted entirely flat.
If you do not have a duplex option installed, the Booklet setting should
always be turned off.
Manual Duplexing Postcard from the Manual Feed Tray
1 In the printer driver, select Postcard side 1 to print the front side of the
postcard.
2 Remove the postcard f rom the output tray and place it back into Manual
Feed Tray, blank side down.
3 In the printer driver, selectPostcard side 2 to print the back side (address
side) of the postcard.
Autoduplexing
Attention
Only plain paper up to 17-24 lb (64-90 g/m²), with a length equal or less
than 17 inch (432 mm), and with a width less t han 11.7 inch (297 mm)
can be autoduplexed.
Memory Requirements
Your printer comes configured with 128 MB of RAM. Duplex printing can be
done automatically with a duplex unit and manual feed tray and enough
memory installed, and with t he duplex option selected in t he printer. Most
print jobs wi ll print with 128 MB of RAM, but may not print at the desired
resolution.
You need at least 256 (128 MB optional memory i s installed) MB of RAM
to print colorduplex jobs at the PostScript H igh resolution. You may be
able to duplex low-coverage business documents without graphics with
128 MB of RAM.
You may need extra RAM to duplex print j obs that have:
– Very high coverage of text and images
– Large graphics
Additional memory can be added up to a total of 512 MB.
Duplexing34
Page 43

Autoduplexing from Trays 1–4
To autoduplex, the duplexer must be physically installed on the printer and
identified as an installed option in the printer driver. Otherwise,the print job
will print as simplex even if you select duplex.
The duplex layout Long Edge creates a document that flips horizontally as in
a loose-leaf notebook; Short Edge creates a document that flips vertically, as
on a clipboard. Simplex (or None) prints only o n the front face of the page.
Windows
Use t he printer driver to configure the printer for duplex printing.
In autoduplexing, the back side is printed f irst and the front side is
printed last.
1 In the printer driver ’s Settings tab, select Optional Duplexer in the
Available Options box.
2 Click Add.
The Optional Duplexer appears in the Installed Options box and duplex
printing options are available in the printer driver and in your application’s
printdialog box.
3 Load the media print-side up.
4 Set the duplex layout in the driver.
5 Click OK.
Macintosh
You can configure the duplex option when you first set up your printer, or you
can add it later t o your desktop printer configuration:
1 Select your desktop printer.
2 From the Printing menu, select Change Setup...
3 Select the Optional Duplexer from the Change drop-down list.
4 Select Installed from t he To drop-down list.
5 Click OK.
6 Load the media print-side up.
7 Set the duplex layout in the driver.
8 Click OK.
When you select File/Print,the Print on Both Sides option is now available
in the Layout dialog box.
Duplexing
35
Page 44
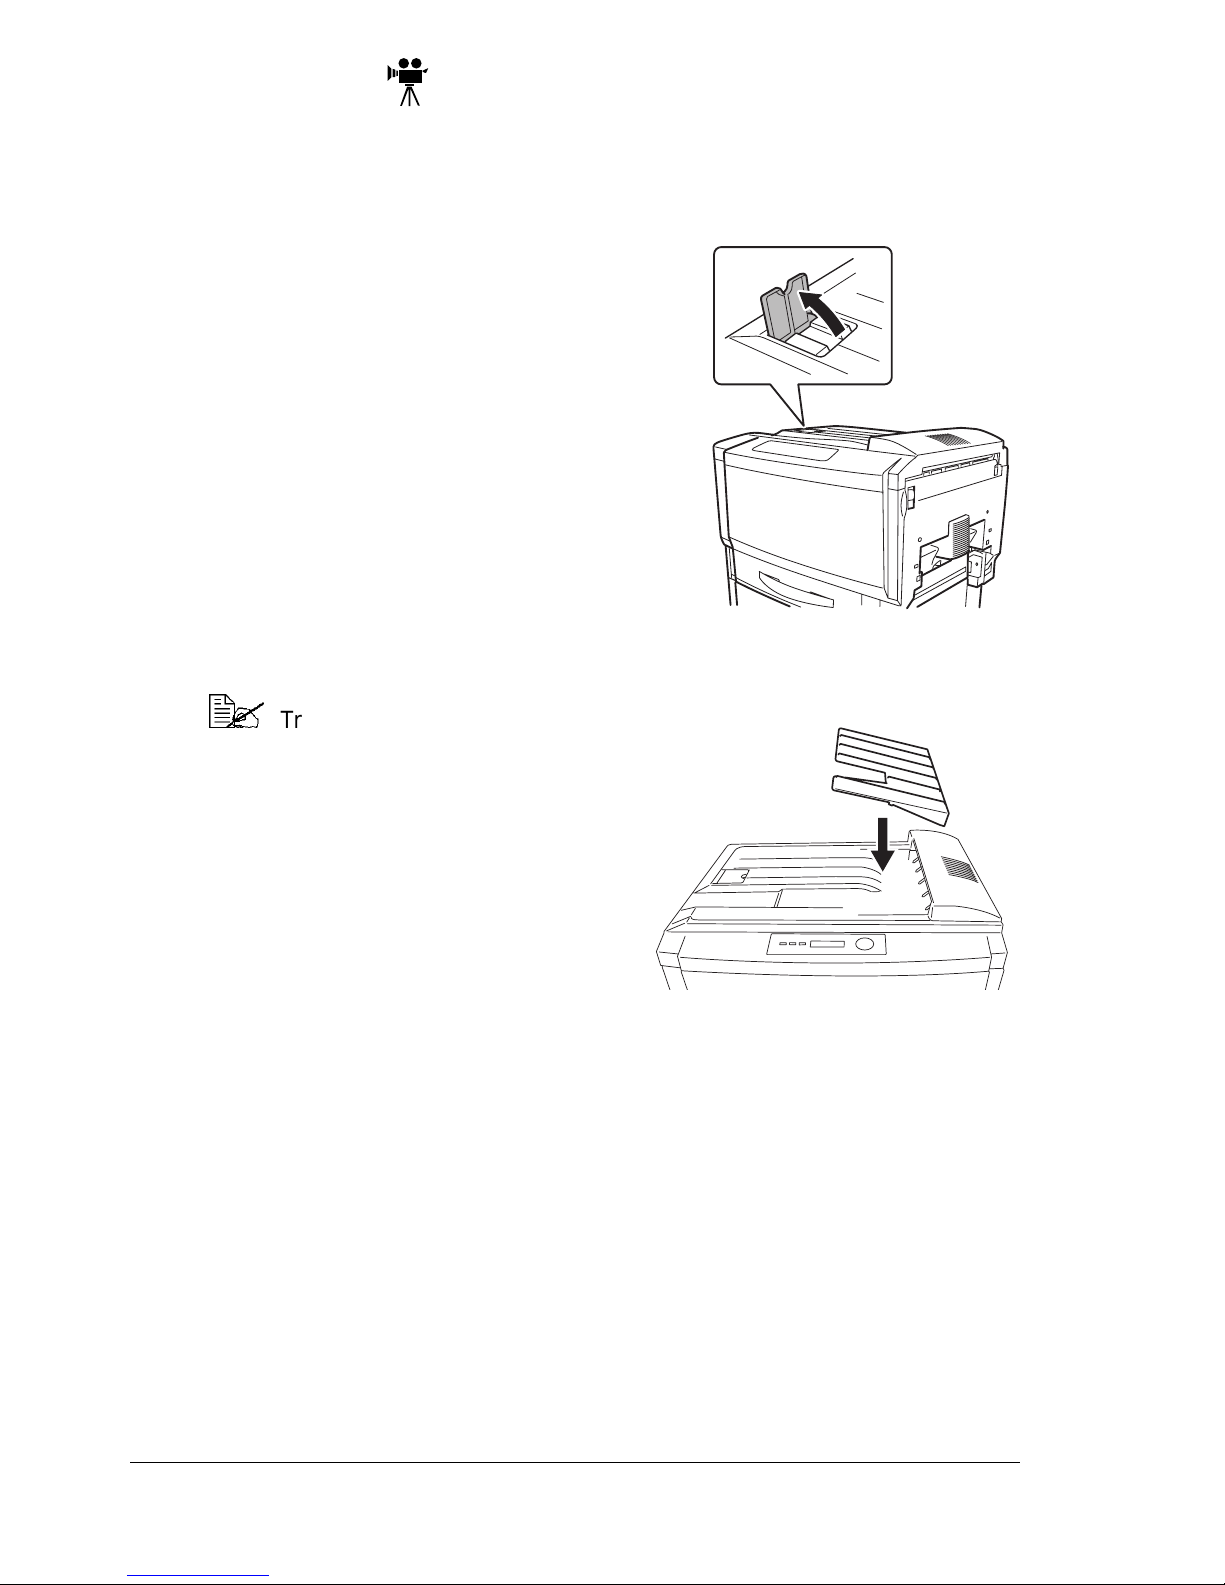
Output Tray
All media is output to the output tray on top of the printer. An OUTPUT FULL/
REMOVE MEDIA message appears in the message window when the
face-down output tray has reached its capacity.
Depending on the media type and the
conditions of the operating environment,
media may fall out of the output tray. If this
occurs, use the media stopper.
Remove transparencies as soon as possible from the output tray to avoid
static buildup.
Transparencies may be bent in
theoutputtray,depending onthe
type of transparency and the
operating environment. To
improve stacking of
transparencies, put the media
output tray extension in place
before printing.
Output Tray36
Page 45

Media Storage
How do I store media?
Keep media on a flat, l evel surface in its original wrapper until it is time to
load it.
If m edia has been removed from its original wrapper, place it in a plastic
bag and store in a cool, dark place.
Avoid moisture, excess humidity, direct sunlight, excess heat, and dust.
Avoid leaning it against other objects or placing it in an upright position.
Before using stored media, do a trial printing and check print quality.
Additional Assistance
Where can I order MINOLTA-QMS-approved media or get
more information?
Check Check www.minolta-qms.com (click on “24-Hour Online Help”)for
currently approved media.for currently approved media. To order approved
transparency media, go to www.q-shop.com or your local retailer.
See the Service &Support Guide on t he Documentation CD-ROM for a list of
sources of service and support in many areas of the world. The most
up-to-date information globally can be found at www.minolta-qms.com.
Media Storage
37
Page 46

Page 47

Working with the
Printer
3
Page 48
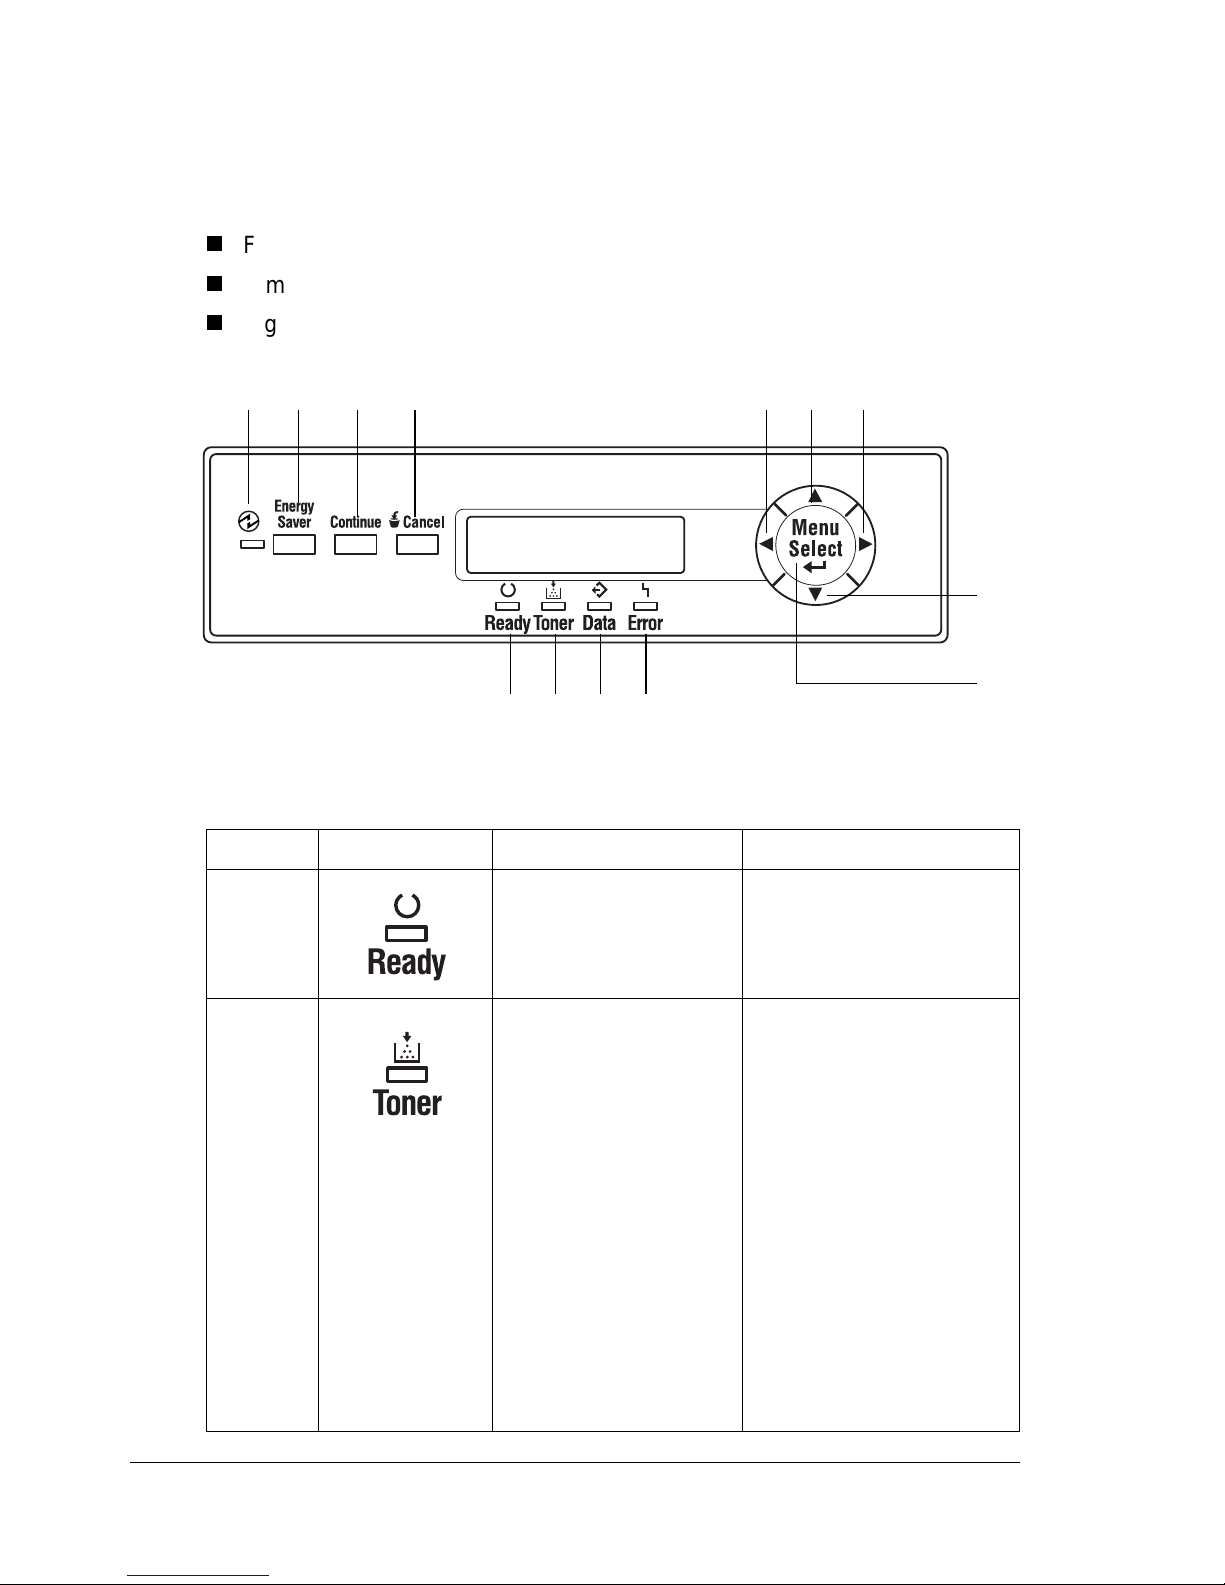
About the Control Panel
The control panel, located on the top of the printer, allows you to direct the
printer’s operation. In addition, it displays the current status of the printer,
including any condition t hat needs your attention.
Five indicators (LEDs) provide printer status information.
A m essage window displays status and configuration information.
Eight keys allow you to control the printer configuration through access to
frequently used printer functions.
5 6
7 9 10 118
2
1
4
3
Control Panel LED Indicators
Number LED Indicator Off On
1
The printer i s not
ready to accept data.
12
13
The printer is ready to
accept data.
2
No problem. Solid: The toner
cartridge is near empty
or the print unit is
nearingthe end of its life.
Flashing: The t oner
cartridge is empty, or the
print unit has reached
the end of its life.
Replace the toner
cartridge with a new one
ofthesametype.
(Accompanied by a
status message in the
message window.)
About the Control Panel40
Page 49
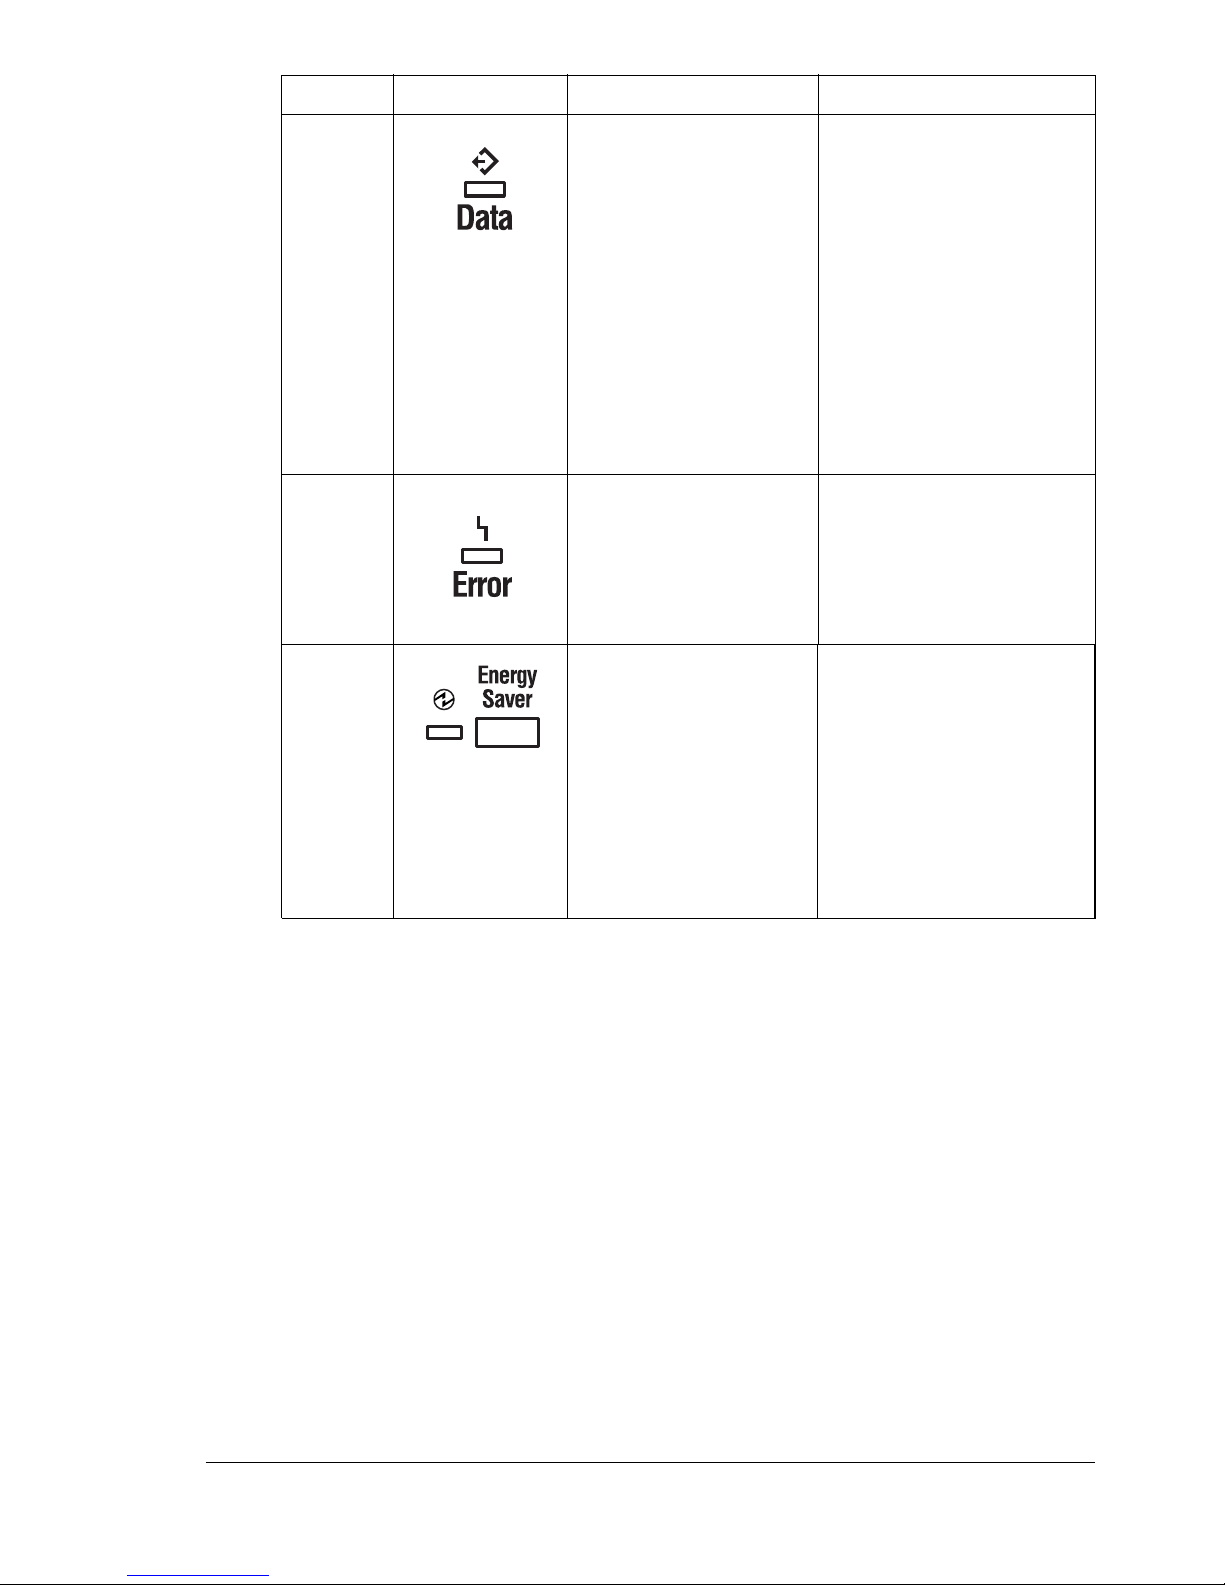
Number LED Indicator Off On
3
4
5(seealso
6 below)
5 6
The printer i s not
receiving data.
Flashing: Indicates that
the printer is receiving
data or is printing.
Lit: Indicates thatprint
data remains in the
printer, for example,
after printing was
stopped due t o an error.
(Accompanied by a
status message in the
message window.)
No problem. The printer requires the
operator’s attention.
(Accompanied by a
status message in the
message window.)
The printer i s in
normal mode.
The printer is in Sleep
mode. In stand-by, light
sleep or deep sleep
mode,theindicatorl ights
up. In deep sleep m ode,
the indicators and keys
(except the Energy
Saver key) of the control
panel are disabled.
About the Control Panel
41
Page 50
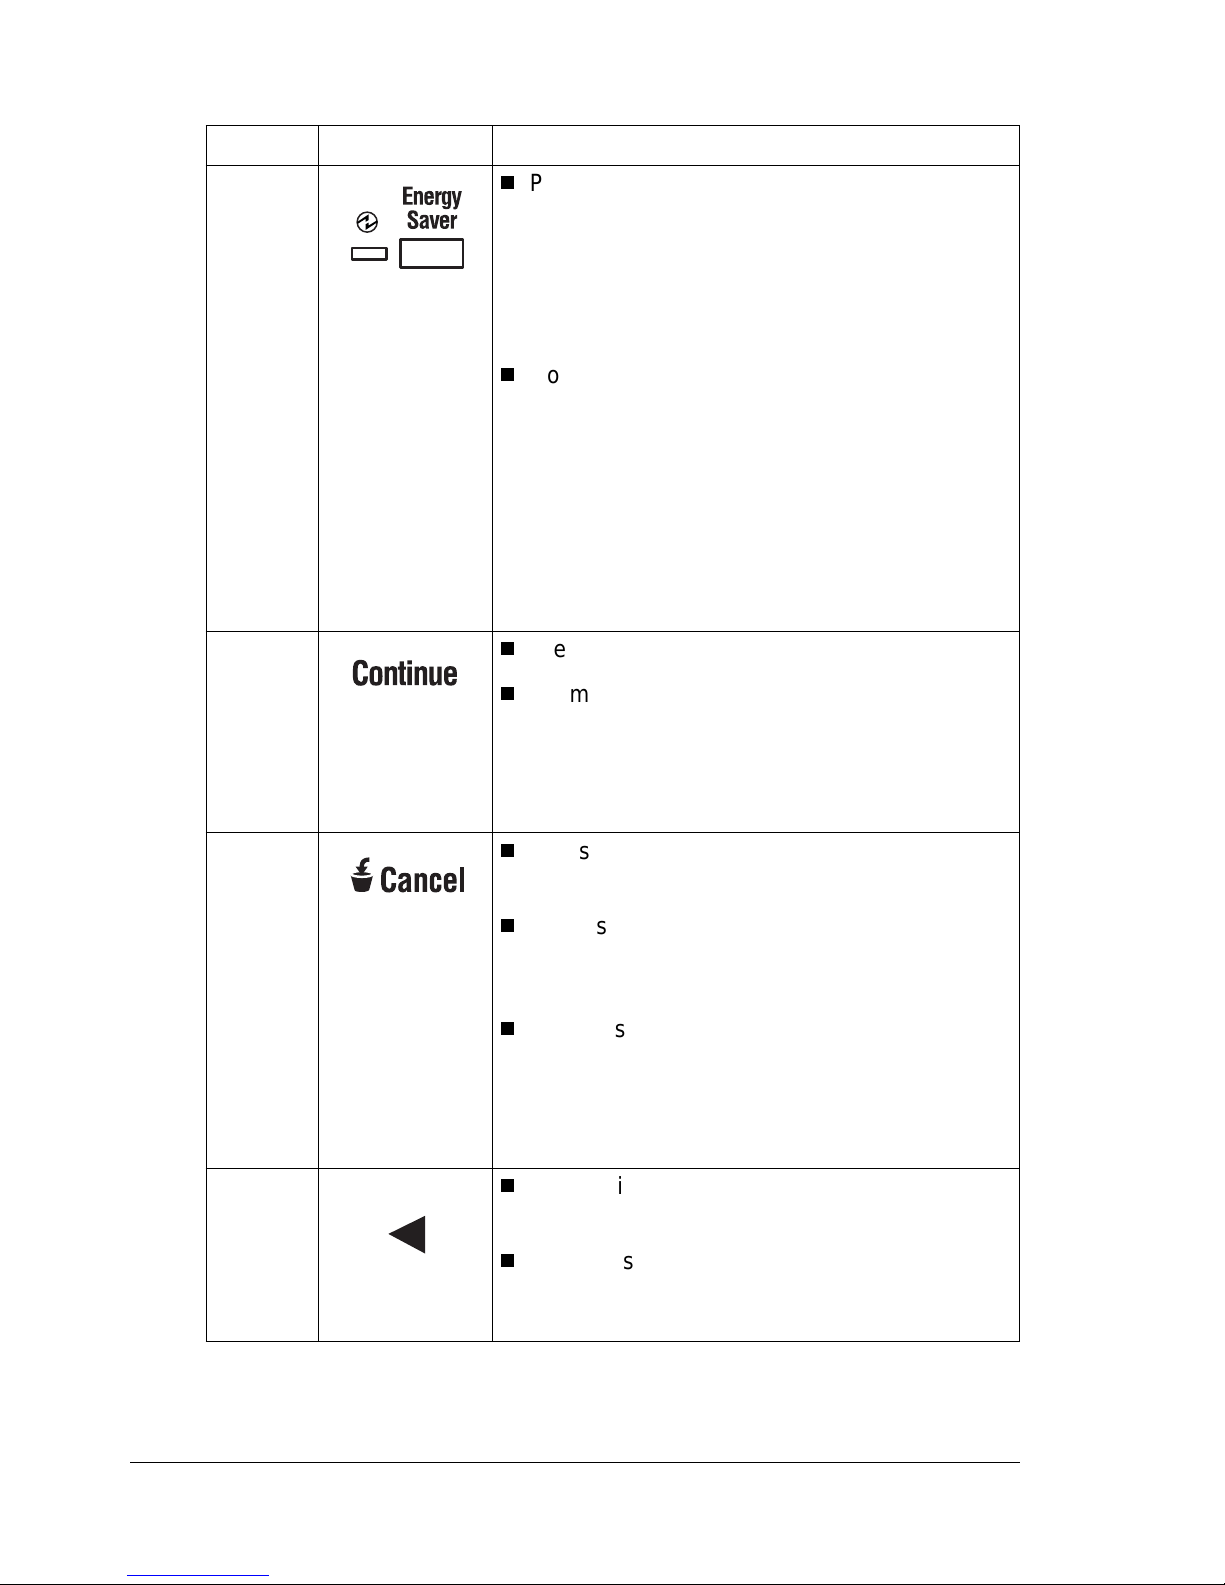
Control Panel Keys
Number Key Function
6(seealso
5 above)
7
5 6
Press this key when the printer is in stand-by
mode,light sleepmode or deep sleepmode to
start warming up the printer and return it to
normal mode. I f the printer was in deep sleep
mode, the printer also wakes up the control
panel.
Hold down this key for two seconds while the
printeris in itnormal operatingm ode t o switch
the printer to deep sleep mode, regardless of
the current mode. However, the printer can
only enter deep sleep mode if the printer status is Ready. If the Data indicatoris lit or flashing or if the menu is displayed, the printer
cannot be set to deep sleep mode when this
key is pressed.
Press this key t o exit the configuration menu.
If a message appears asking for confirmation
(YES/NO) to perform some operations, press
this key to cancel the operation (to select
“NO”). (The instructions for using this key
appear in the message window.)
8
Pressthis key to allow you to cancel your print
job.
While specifying settings, press this key to
quit entering numbers or letters (such as the
IP address).
If a message appears asking for confirmation
(YES/NO) to perform some operations, press
this key to perform the operation ( to select
“YES”). (The instructions for using this key
appear in the message window.)
9
Press this key t o move left in the m enu
structure.
Press this key t o move left through the
scrollable menu selections when the
selections are whole words, not characters.
About the Control Panel42
Page 51
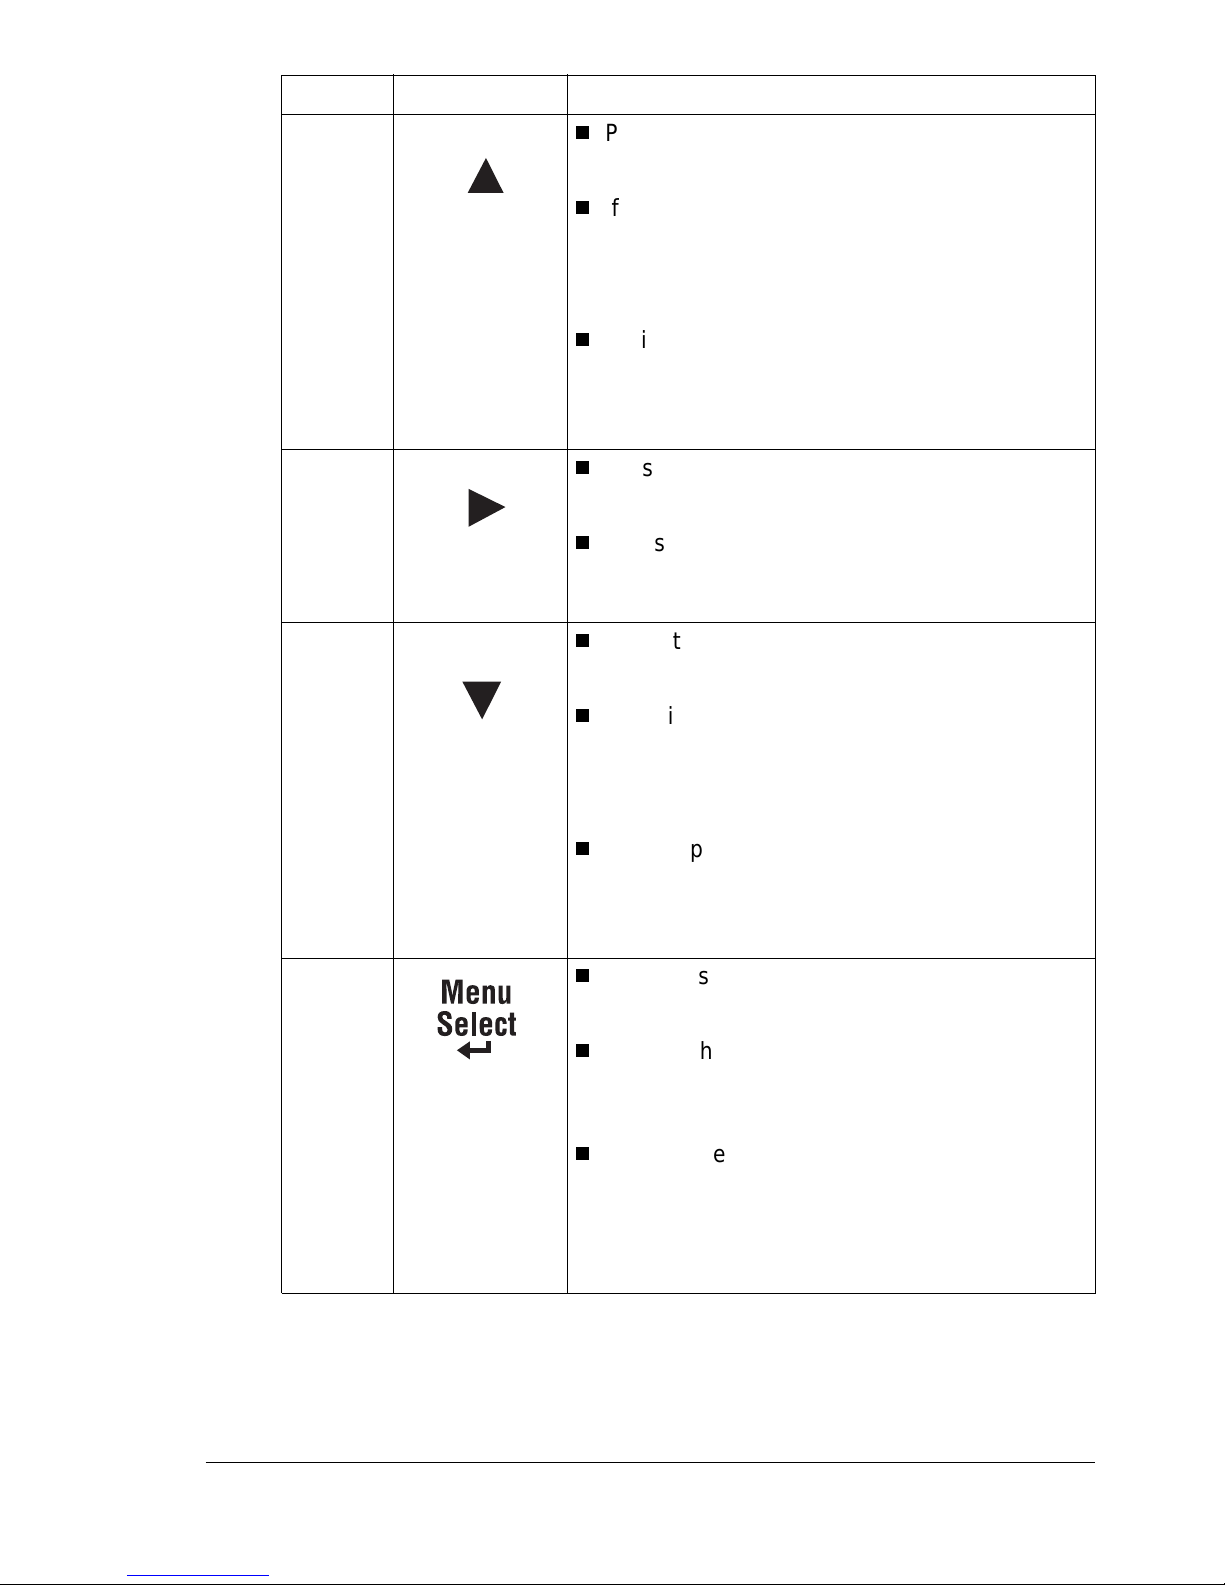
Number Key Function
10
11
12
Press this key t o move up in the menu
structure.
If within a selectable menu choice that can be
changed character by character,press this
key to scroll upward through the available
characters.
While typing in characters (IP address) to
specify settings, hold down this key t o quickly
scanthrough thecharactersin incrementsof a
specified number of characters.
Press this key to move right in the menu
structure.
Press this key t o move right t hrough the
scrollable menu selections when selections
are whole words,not characters.
Press this key t o move down in the menu
structure.
13
If within a selectable menu choice that can be
changed character by character,press this
key to scroll downward through the available
characters.
While typing in characters (IP address) to
specify settings, hold down this key t o quickly
scanthrough thecharactersin incrementsof a
specified number of characters.
Press this key t o initially enter the menu
structure.
If within the menu structure and on a menu
level, press this key to move down in the
menu structure.
If within the menu structure and on a
selectable i tem, press this key to select the
displayed choice ( no matter what position t he
cursor is in). When this is done, the selected
choice is written to the non-volatile memory.
About the Control Panel
43
Page 52

How do I re turn to READY from the configuration menu?
There are three ways:
Press the Continue key.
Press the Up arrow twice from the main menu.
The printer automatically returns to READY if no key is pressed for two
minutes.
Canceling Print Jobs
You can cancel the print job that is currently being processed or printed.
1 Press the Cancel key. The following message window displays:
YES: PRESS CANCEL
NO: PRESS CONT.
2 Press the Cancel key t o cancel the job. The message window displays:
CANCELING J OB
Printer Menu Overview
Menu Overview
Your printer has a comprehensive but easy-to-use m enu system that allows
you to change settings so they meet your printjob’s requirements. Al l routine
printingtasks can be handledat the printer control panel through the printer’s
configuration menu. The printer can also be configured through PageScope,
PageScope Light, and SNMP.
Complete information on the printer’s configuration menu is included in the
magicolor 7300 Reference Guide on the Documentation CD-ROM.
When the printer is ready to accept print j obs, the control panel message
window shows:
READY
MAGICOLOR 7300
Canceling Print Jobs44
Page 53
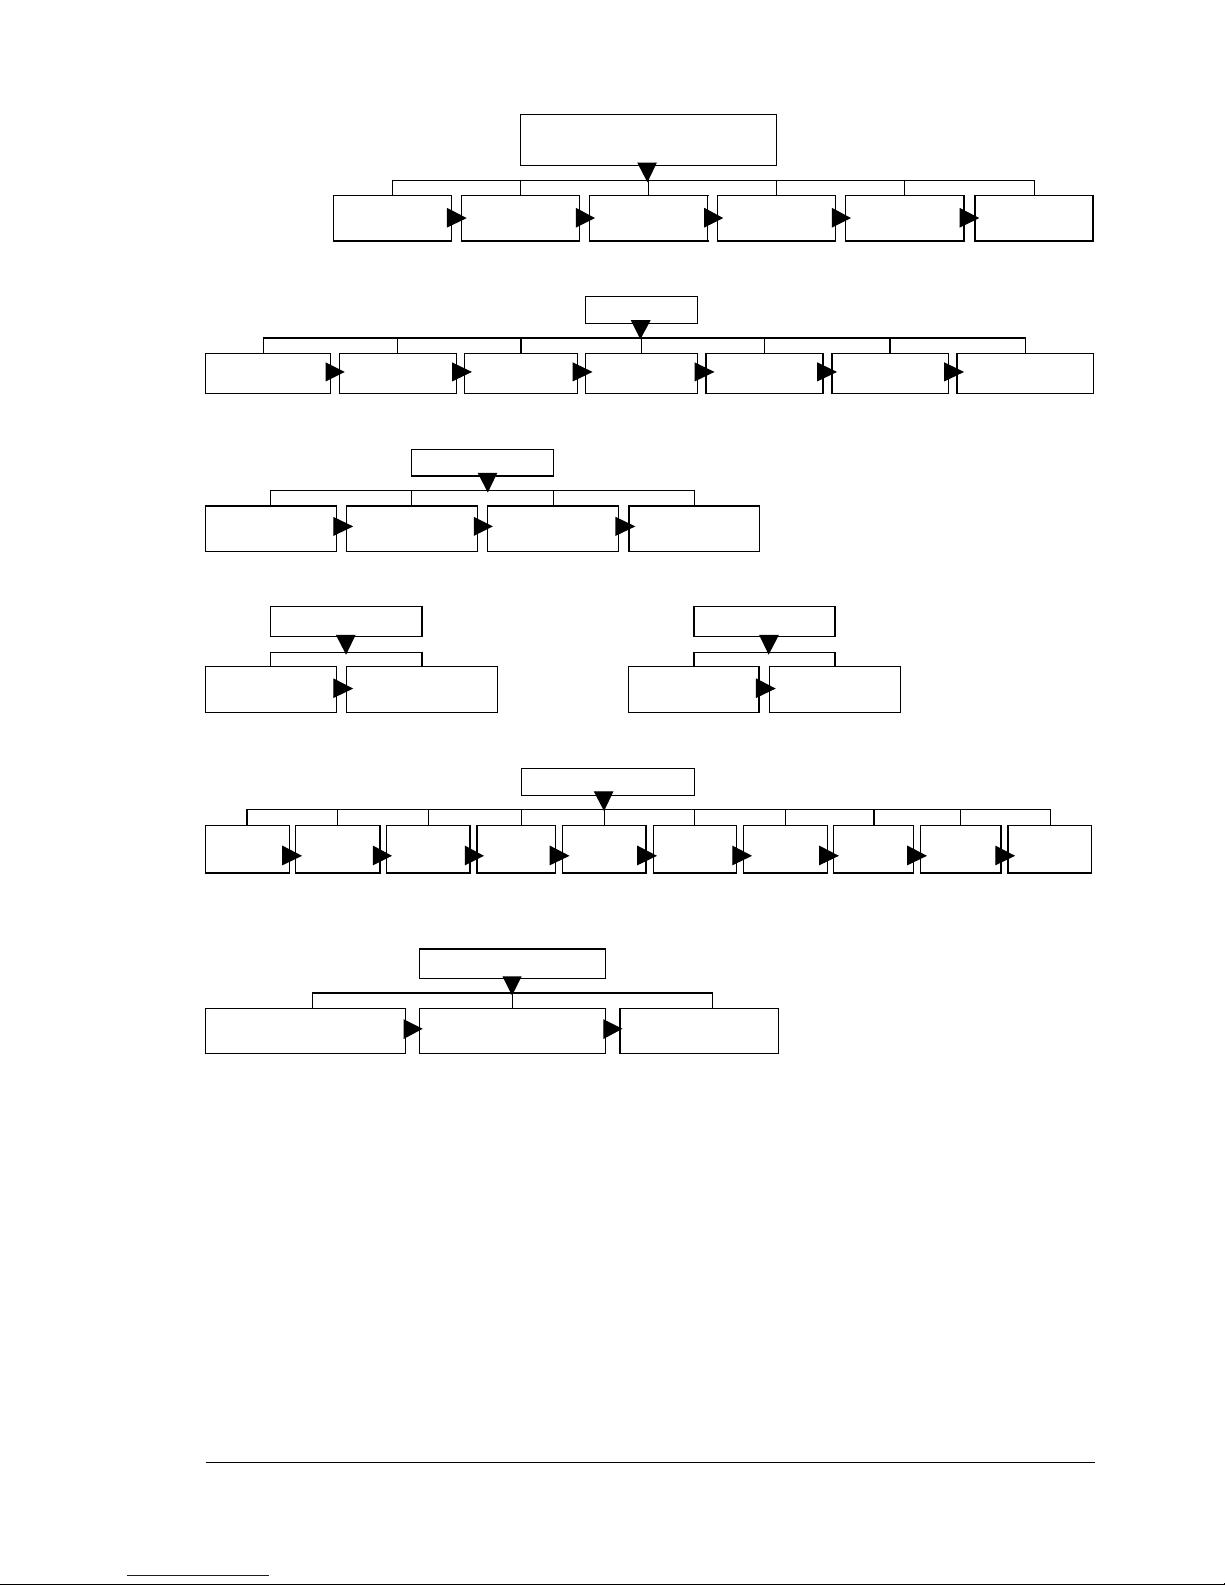
READY
MAGICOLOR 7300
PRINT MENU
STATISTICS PAGE
PAPER
INPUT TRAY
QUALITY
AIDC
MAIN MENU
PRINTMENU
PRINT MENU
CONFIGURATION
PAPER
DUPLEX
QUALITY
QUALITY
TRAY ALIGNMENT
1
MAIN MENU
PAPER
PRINT MENU
FONT LIST
PAPER
PAPER
COPIES
MAIN MENU
QUALITY
PRINT MENU
PRINT MENU
DEMO PAGE
SYS DEFAULT
PAPER
COLLATE
INTERFACE
ETHERNET
3
MAIN MENU
INTERFACE
PRINT MENU
REGISTRATION
2
INTERFACE
INTERFACE
PARALLEL
3
MAIN MENU
SYSDEFAULT
PRINT MENU
MENU MAP
MAIN MENU
SERVICE
PRINT MENU
DIRECTORY LIST
2
SYS DEFAULT
LANGUAGE
SERVICE
FIRMWARE VERSION
SYS DEFAULT
ENERGY
SAVER
SYS DEFAULT
BUZZER
CONTROL
SERVICE
PAGE COUNT
SYS
DEFAULT
POSTSCRIPT
SERVICE
SYS DEFAULT
CHANGE
PASSWORD
4
SYS DEFAULT
HDD FORMAT
SERVICE
FACTORY SETTING
Notes: (1) Displays only when an optional duplex unit is installed.
(2) Displays only when an optional hard disk is installed.
(3) If a password has been set, the password must be entered in order
to access this menu. For details on setting a password, refer to the
Reference Guide on the Documentation CD-ROM.
(4) This menu is used by service personnel.
SYS DEFAULT
2
CLOCK
SYS DEFAULT
AUTO
CONTINUE
SYS DEFAULT
START
PAGE
SYSDEFAULT
RESTORE
DEFAULT
Printer Menu Overview
45
Page 54
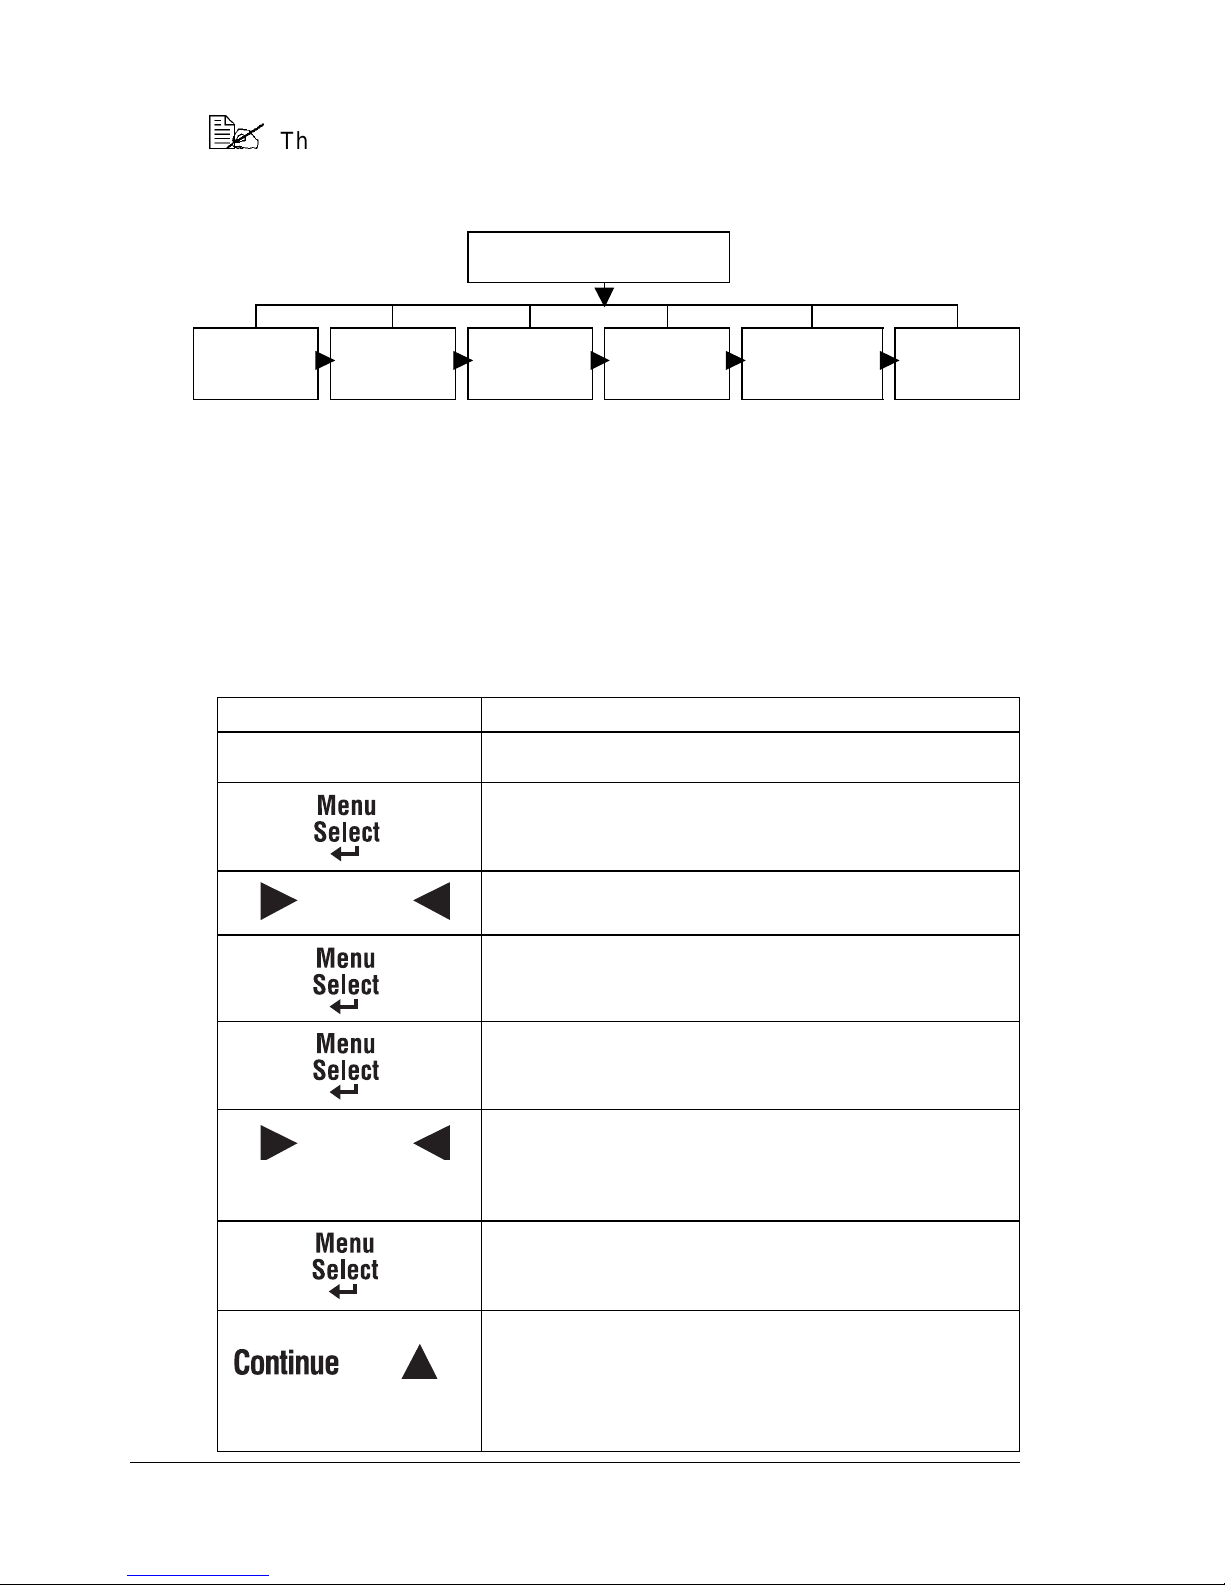
Main Menu
The main menu provides access to all the printer’s submenus. Each
submenu is briefly described in the following sections of this manual.
Default settings are in bold type.
READY
MAGICOLOR 7300
MAIN MENU
PRINT
MENU
MAIN MENU
PAPER
MAIN MENU
QUALITY
MAIN MENU
INTERFACE
MAIN MENU
SYS DEFAULT
MAIN MENU
SERVICE
Selecting a Message Window Language
When you receive your printer, the message window language is set to
English. However, status messages and configuration menus can be
displayed in the message window in English, Czech,French, German, Italian,
Japanese, Portuguese, and Spanish.
If you want to change the message window language,use the following
control panel sequence:
Press Key (Until) Display Reads
READY
MAGICOLOR 7300 (and Ready indicator is on)
MAIN MENU
PRINT MENU
Or
Or
Or
MAIN MENU
SYS DEFAULT
SYS DEFAULT
LANGUAGE
LANGUAGE
*ENGLISH
Press the Right or Left key until the appropriate language is displayed.
example: French
LANGUAGE SET
FRENCH
example: French
LANGUAGE SET
*FRENCH
Press the continue or Up arrow three times to return to
example: French
PRET
MAGICOLOR 7300
<*LANGUAGE > is selected.
Printer Menu Overview46
Page 55
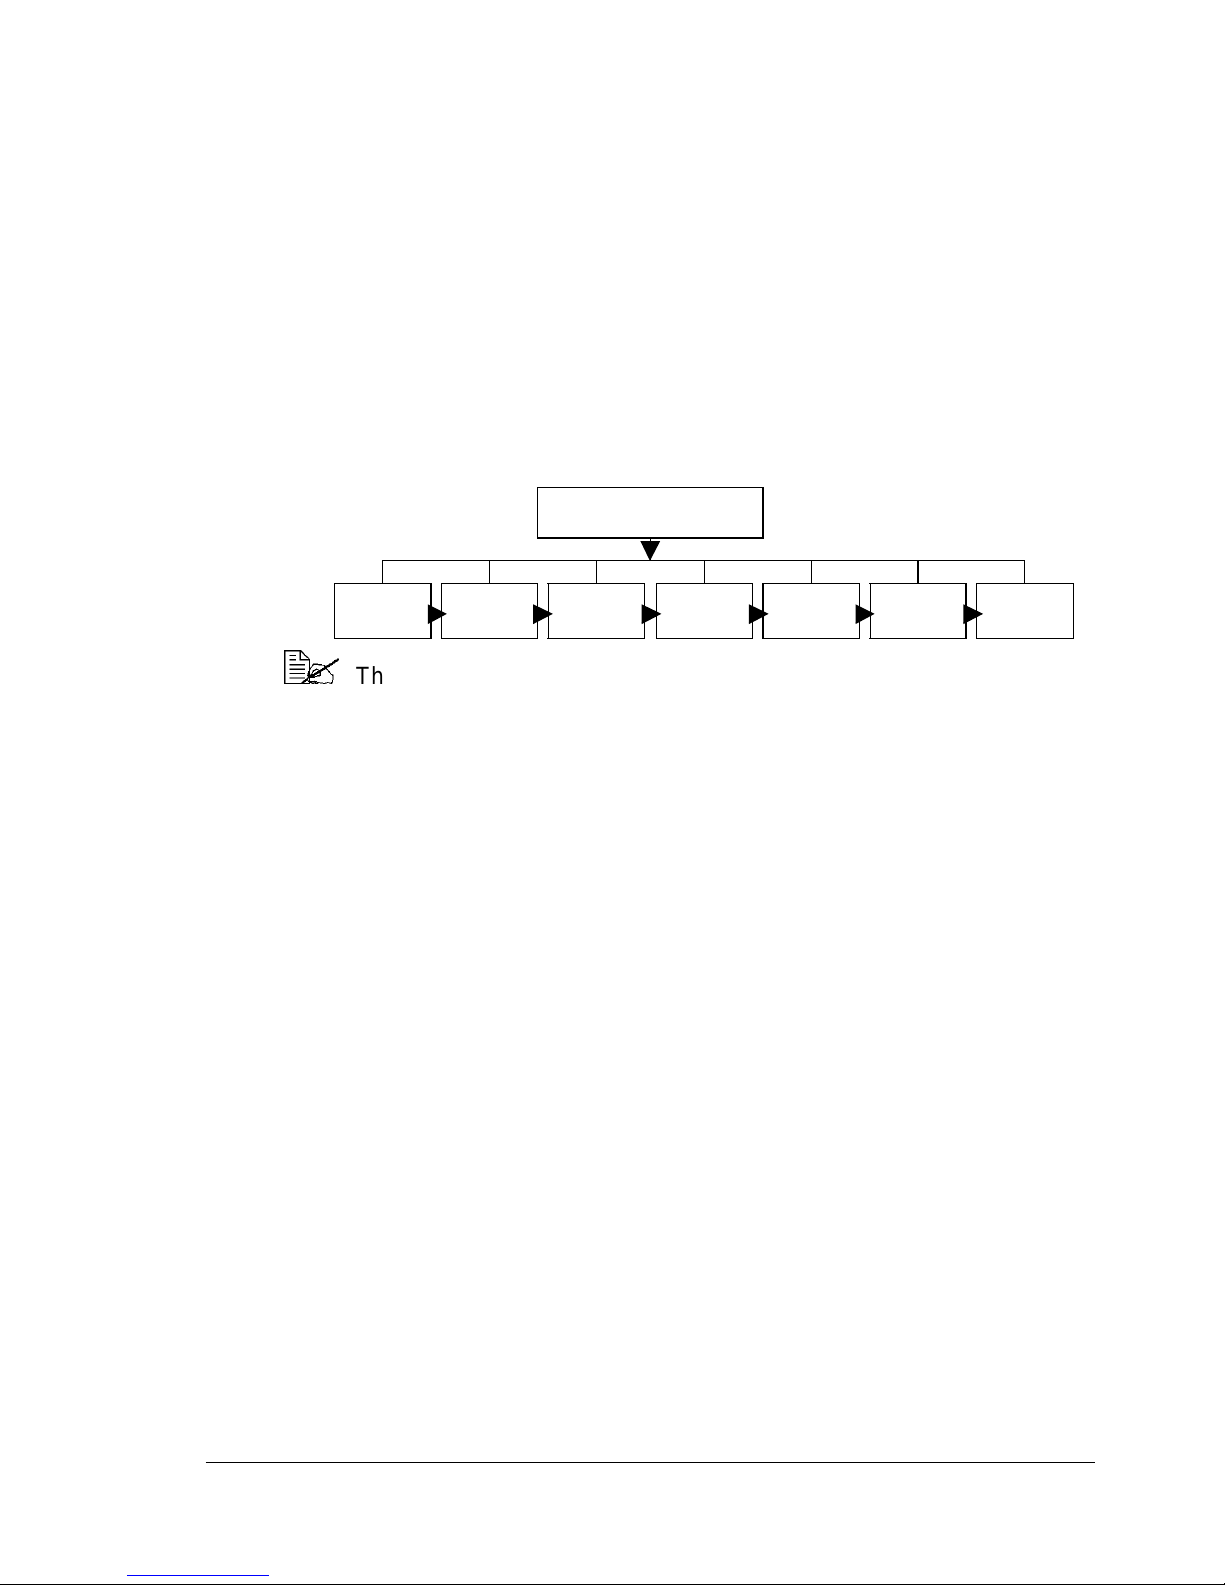
Print Menu
The Print menu allows you to print informationabout the printer.For example,
if you select Menu Map and then select Menu Select, the pr inter prints an
overview of the entire menu structure. If you select Font List and then Menu
Select, the printer prints a list of installed fonts with a sample of each. When
printing any of the information available from the Print menu, paper from the
tray specifiedwith Default Tray is used.(The manufacturer’sdefaultsettingis
Tray1.) Printing is generally possible on any size paper that is loaded;
however, all of the information may not fit on some sizes of paper. In that
case, print on A4- or Letter-size paper loaded i nto the tray specified with
Default Tray.
PRINT MENU
STAT ISTICS
PAGE
CONFIGU-
RATION
FONT LIST DEMO PAGE REGISTRA-
TION
MENU MAP DIRECTORY
LIST
The Directory List submenu appears only if an optional hard disk is
installed. Youmust install an i nternal hard disk todirect print PDF files.
Printer Menu Overview
47
Page 56
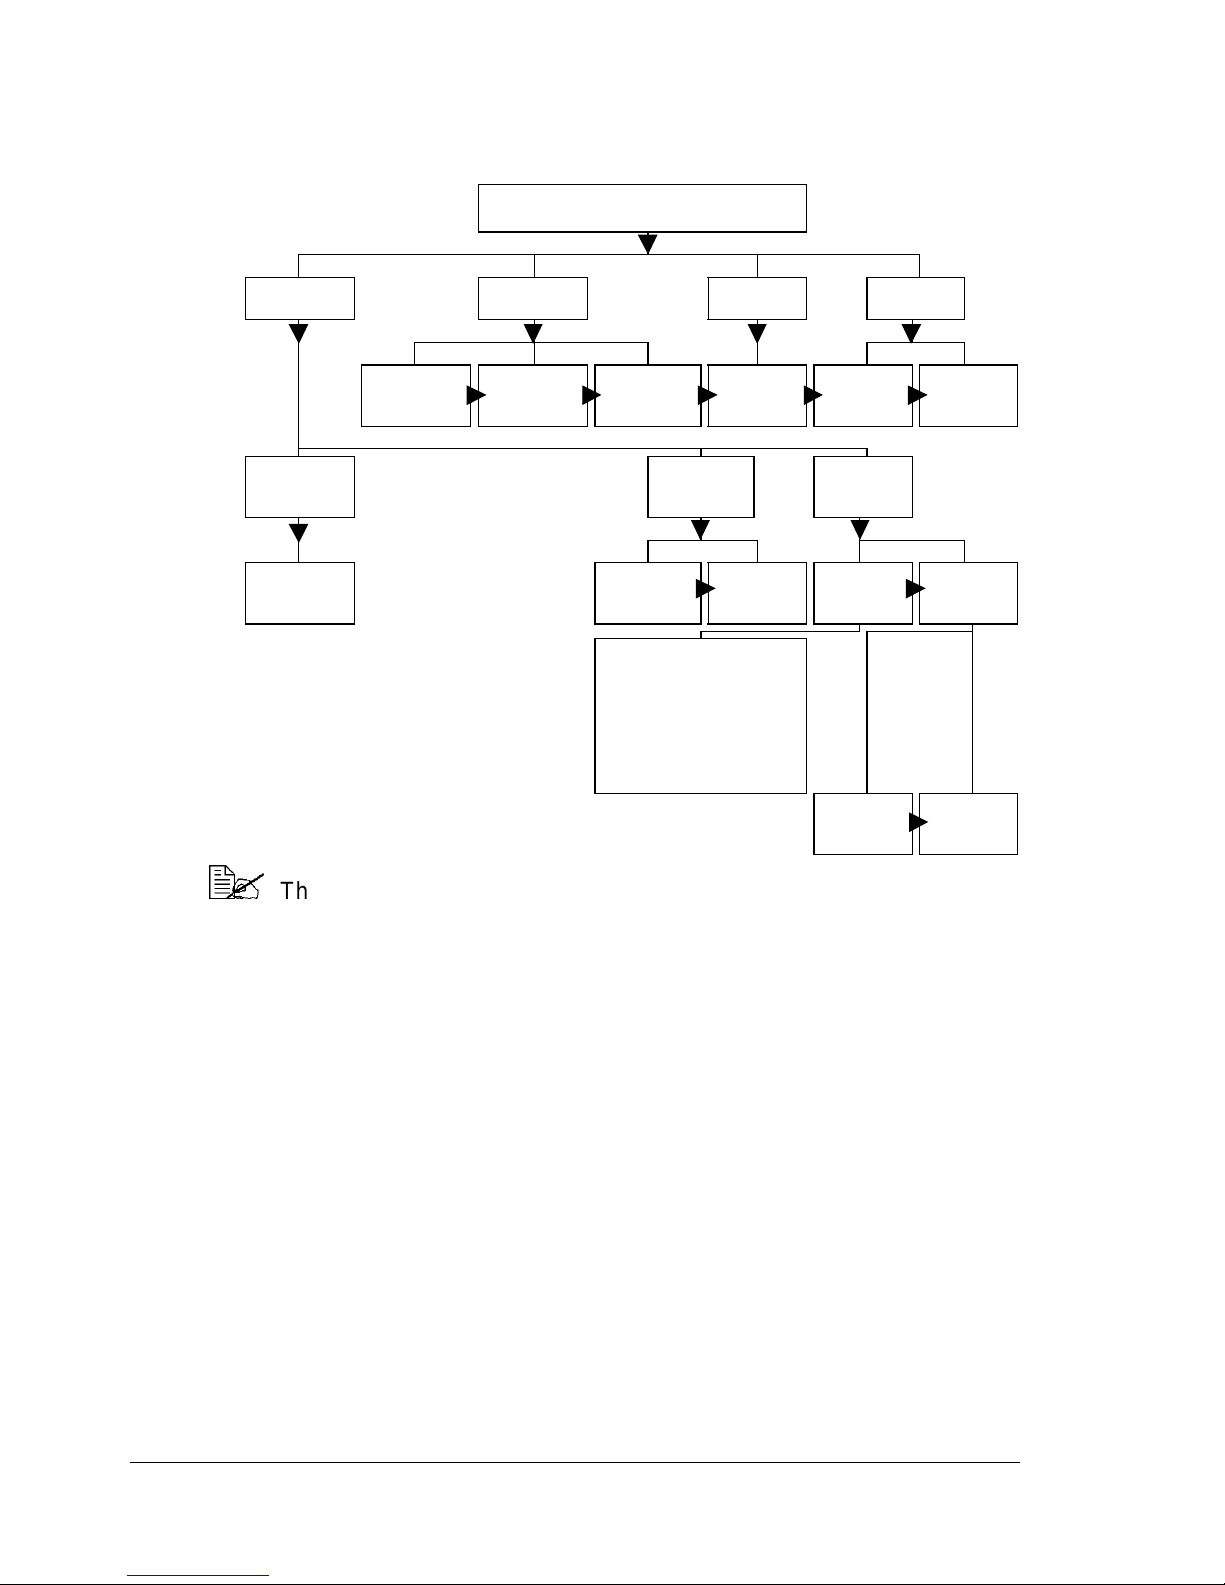
Paper Menu
The Paper menu allows you to control the media source for your print job.
PAPER
INPUT TRAY DUPLEX COPIES COLLATE
OFF SHORT
EDGE
DEFAULT
TRAY
1-4 ON OFF DEFAULT
LONG EDGE 1–999 OFF ON
TRAY
CHAIN
PLAIN PAPER
TRANSPARENCY
THICK STOCK
LABEL
ENVELOPE
POSTCARD SIDE1
POSTCARD SIDE2
TRAY1
CONTROL
MEDIA
INCLUDE
TRAY1
CHAIN
CONTROL
EXCLUDE
TRAY1
The Duplex submenu appears only if a duplex option is installed.
The Collate submenu appears onlyif an optional hard disk is installed.
Tray Chaining does not include the Manual Feed Tray.
Tray selection may be overridden by the printer driver.
Printer Menu Overview48
Page 57
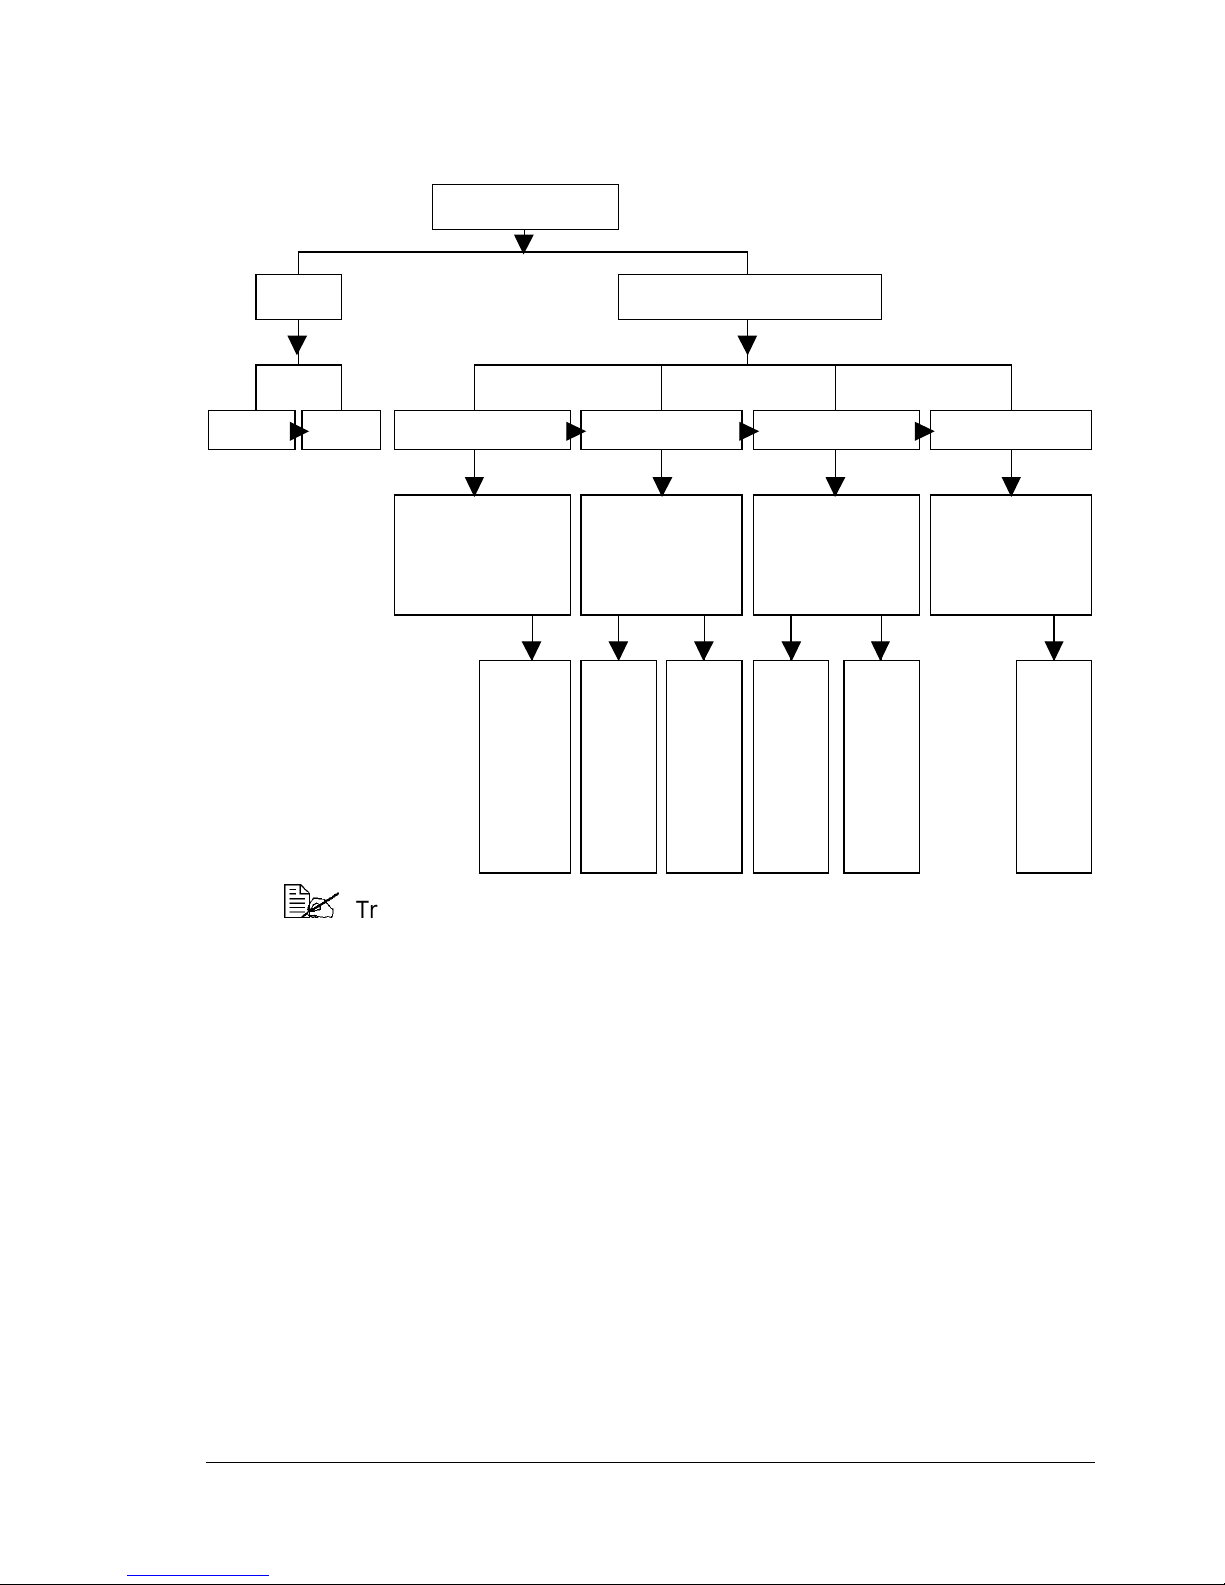
Quality Menu
The Quality menu gives you access to items affecting print quality.
QUALITY
AIDC TRAYALIGNMENT
ENABLE DISABLE TOP ADJ NORMAL TOP ADJ THICK LEFTADJUST LEFT ADJ DUPLEX
TRAY1
TRAY2
TRAY3
TRAY4
DUPLEX 2PASS
MANUAL FEED
-1.6 MM
-0.4 MM
-0.2 MM
0.0 MM
+0.2 MM
+1.4 MM
.
.
TRAY1
MANUAL FEED
(TRAY1)
-1.6 MM
.
-0.4 MM
-0.2 MM
0.0 MM
+0.2 MM
+0.4 MM
.
+1.4 MM
(MANUAL
FEED)
-1.6 MM
.
-0.4 MM
-0.2 MM
0.0 MM
+0.2 MM
+0.4 MM
.
+1.4 MM
TRAY1
TRAY2
TRAY3
TRAY4
MANUAL FEED
(TRAY1)
-2.4 MM
.
-0.6 MM
-0.3 MM
0.0 MM
+0.3 MM
+0.6 MM
.
+2.1 MM
(TRAY2–4,
MANUAL
FEED)
-2.4 MM
.
-0.6 MM
-0.3 MM
0.0 MM
+0.3 MM
+0.6 MM
.
+2.1 MM
TRAY1
TRAY2
TRAY3
TRAY4
-2.4 MM
.
-0.3 MM
0.0 MM
+0.3 MM
.
+2.1 MM
Tray3 and Tray4 submenus appear only if those optional lower feeder
units are installed. The Manual Feed and Left Adj Duplex submenus
appear only if t he duplex option and manual feed tray are installed.
Printer Menu Overview
49
Page 58
Interface Menu
The Interface Menu allows you t o configure t he printer’s interfaces. The
printerautomaticallyreboots after you make a changein one of these menus.
Each of the Interface submenus is shown below.
(The printer reboots only if a change is made in t he Ethernet menu. In order
to apply the new DHCP/ BOOTP setting, the printer must be turned off, then
on again to be rebooted.)
INTERFACE
ETHERNET PARALLEL
Ethernet Submenu
H/W Address only displays information; the setting cannot be changed.
INTERFACE
ETHERNET
IP ADDRESS SUBNET MASK GATEWAY DHCP/BOOTP H/W ADDRESS
192.168.001.002 255.255.255.000 192.168.001.001 ON OFF 00206Bxxxxxx
Parallel Submenu
INTERFACE
PARALLEL
IO TIMEOUT
10
11
.
15
.
300
Printer Menu Overview50
Page 59
Sys Default Menu
The Sys Default menu allows you to control the way in which the printer
responds to various situations. For example, Start Page allows you to decide
whether the printer automatically prints a start page when you turn it on.
SYS DEFAULT
LAN-
GUAGE
ENGLISH
FRENCH
GERMAN
ITALIAN
PORTUGUESE
SPANISH
CZECH
JAPANESE
ENERGY
SAVER
SLEEP
MODE
SLEEP
TIMER
DEEP
SLEEP
MENU
BUZZER
CONTROL
ERROR
BEEP
KEY
CLICK
SCRIPT
TIMEOUT
TIMEOUT
REPORT
Notes: *0000 = Disable Password.
**HDD (hard disk drive) format only appears if optional hard disk is installed.
***Date conventions set at the factory:
220 volt: DD.MM.YYYY
100 volt: YYYY.MM.DD
110 volt: MM.DD.YYYY
Y = Year, M = Month, D = Day.
Energy Saver Submenu
To save energy and extend the life of the fuser, the printer goes into an
Energy Saver mode. Printer awakens only after pressing the Energy Saver
button or when printer receives a job.
POST-
JOB
WAIT
ERROR
CHANGE
PASS-
WORD
0000*
1000
2000
.
.
.
ZZZZ
HDD
FORMAT**
USER
AREA
ONLY
ALL
CLOCK AUTO-
DATE***
(XX.XX.XX
)
TIME
CON-
TINUE
YES
NO
START
PAGE
ON
OFF
RESTORE
DEFAULT
RESTORE
NETWORK
RESTORE
PRINTER
RESTORE
ALL
Energy
When How Long
Saver
Mode
Standby
Mode
Light
Sleep
After X
minutes
After X
minutes
Printer Menu Overview
Does It Take to
to “Wake Up”?
30 seconds
99.9 seconds
Comments
This preheating mode keeps the
fuser roller warm and ready t o
print
Control panel fully functional
Printer may receive and process
data
51
Page 60
Energy
Saver
Mode
When How Long
Does It Take to
to “Wake Up”?
Comments
Deep
Sleep
At a
pre-
defined
hour*
99.9 seconds
Printer disabled
However, the interfaces remain
active, even during deep sleep.
The automatically awakenswhen
print data is received.
Control panel disabled, except
control panel Energy Saver LED
lit and Energy Saver button active
Notes: *The deep sleep menu is available only when you select Deep Sleep from the
SysDefault/Energy Saver/Sleep Mode menu. Otherwise, the printer can be
put into deep sleep if the Energy Saver button is held down for two seconds while
theprinterissettoREADY.
SYS DEFAULT
ENERGY SAVER
SLEEP MODE SLEEP TIMER DEEP SLEEP MENU
DEEP SLEEP
LIGHT SLEEP
STANDBY MODE
OFF
15 MINUTES
30 MINUTES
1HOUR
3 HOURS
00:00-24:00
18:00-06:00
20:00-06:00
22:00-06:00
24:00-06:00
Printer Menu Overview52
Page 61
Buzzer Control Submenu
The buzzer control alerts you to activity on your printer’s control panel:
The error beep setting makes audible beeps when an error message is
displayed on the control panel
The key click setting makes audible clicks when each key is pressed on
the control panel
SYS DEFAULT
BUZZER CO NTROL
ERROR BEEP KEY CLICK
YES NO YES NO
PostScript Submenu
The PostScript submenu allows you to configure timeouts and error reports:
Job timeout specifies the job time for determining if a job timeout (PostScript error) has occurred.
Wait timeout specifies the wait time for determining if a wait timeout has
occurred.
Error report specifies whether t o print a PostScript error report.
SYS DEFAULT
POSTSCRIPT
JOB TIMEOUT WAITTIMEOUT ERROR REPORT
0SEC0ND
1 SECOND
2 SECONDS
.
.
300 SECONDS
0 SECOND
1 SECOND
2 SECONDS
.
.
300 SECONDS
YES
NO
Printer Menu Overview
53
Page 62
Clock Submenu
The Clock submenu allows you to set the date and time.
SYS DEFAULT
CLOCK
DATE(YYYY.MM.DD)* TIME
(YEAR)
:01.01
2000
:01.01
2001
2002
:01.01
.
.
.
2099:01.01
(MONTH)
2000:01.01
.01
2000:02
2000:03
.01
.
.
.
2000:12.01
NG Good
.
.
(DAY)
2000:01.01
2000:01.02
2000:01.03
.
.
.
2000:01.31
(HOUR)
00:00
:00
01
02
:00
.
.
.
23:00
(MINUTE)
00:00
00:01
00:02
.
.
.
00:59
Notes: *Date conventions set at the factory:
220 volt: DD.MM.YYYY
100 volt: YYYY.MM.DD
1 10 volt: MM.DD.YYYY
Y = Year, M = Month, D = Day.
Change Password Submenu
If a password has been set, the password must be entered in order toaccess
thismenu. The Interface and Sys Def ault menus are locked by this password.
With the default password “0000”, the screen requesting t hat the password
be entered does not appear. However, if any other password is specified, the
screen requesting that the password be entered appears after the Interface
and Sys Default menusare selected. For details on setting a password,refer
to the Reference Guide on the Documentation CD-ROM.
*In addition to numbers, uppercase letters can also be used.
SYS DEFAULT
CHANGE PASSWORD
0000 TO 9999*
Printer Menu Overview54
Page 63

Service Menu
The Service Menu allows a service technician to handle maintenance and
service procedures. A special password is required to use t he Service menu.
More Information
For more information about menus,refer to the magicolor 7300 Reference
Guide on the Documentation CD-ROM .
Printer Menu Overview
55
Page 64

Page 65

Working with the
Printer Driver
4
Page 66
About Printer Drivers
The last chapter explained how to control printer features when you are
standing at the printer by using the printer’s control panel. This chapter
explains ways to control the same features without leaving your computer by
using printer drivers.
On Windows PCs, you can access the driver in the Start/Settings/Printers
path and use a series of tabs i n the driver to control printer features. The
General and Details tabs are set automatically by your PC’s operating
system. When you load the driver for the magicolor 7300, the settings f or its
specific f eatures are displayed on additional tabs in the same series. This
manual tells how to access those tabs and what each tab controls.
On Macintosh and Li nux systems, printer features are controlled by PPDs.
The PPDs are integrated seamlessly into the operating system’sownprinter
driver. Feature settings are accessed in the s ame manner, no matter what
printer you use. This manual includes an introduction to the Macintosh
settings. Detailed information for Macintosh and Linux systems is included in
the magicolor 7300 Reference Guide on the Documentation CD-ROM .
In addition t o the control panel and printer drivers, you can use
PageScope Light, a web-based utility that is embedded in your printer,
to manage many of the same printer features. For information on
PageScope Light, see the magicolor 7300 Reference Guide on t he
Documentation CD-ROM t hat came with your printer.
Which print quality is best?
Print
Quality
Standard* 600 x 600 If getting your jobs printed with good
High** 600 x 600 x 4 If getting your jobs printed w ith best
Resolution: Dots
per I nch (dpi)
Comment
qualityis mostimportant.Thisis typically
used for text and business forms.
Printingis possiblewith less available
memory.
Printing can be performed at high
speed.
qualityis mostimportant.Thisis typically
used for graphics and photographs.
Notes: *If you don’t have enough memory to print a file using high print
quality (for example, with large and complicated graphics).
**If not much memory is available with t he High setting, print
using Print Quality set to Standard. Otherwise, add more
memory.
About Printer Drivers58
Page 67

Using PostScript Drivers in W indows
XP/2000
Displaying the Tabs
1 From the Start menu, choose Settings and then Pr inters to display the
Printers directory.
2 Select the MINOLTA-QMS magicolor 7300 printer icon.
3 From the Fi le menu choose Properties.
Using the Print Setting Tabs
General printer controls are located on tabs of the main printer driver dialog
box. These controls l et you check t he status of consumables and set access
to optional features, including the lower feeder unit, the duplex option, and
the internal hard disk.
There are two ways t o access the specialized print setting tabs:
Through your application. This selects printer settings for the specific job
you are sending.Choose Print, and then choose Setup button, and then
select the printer, and then choose Properties.
Through the printer driver dialog box. This changes printer settings for all
subsequent print jobs until you change the settings again through the
printer driver. Choose Start/Settings/Printers, selectthe magicolor 7300
icon, and then choose Properties from theFile menu. On the General tab,
click the Printing Pr eferences button.
The tabs that appear in the new dialog box are described here.
Refer to the printer driver’s online help for information on all of these
functions.
Layout Tab
This tab allows you to:
Set the orientation for a print job
Set the page order
Set the number of pages per sheet
By clicking the Advanced button, you have access to controls for setting:
Media size
Number of copies
Graphic preferences including color management, scaling, and font
substitution
Using PostScript Drivers in Windows XP/2000
59
Page 68

Advanced printing features
PostScript options
Features such as auto continue and header and trailer pages
Paper/Quality Tab
This tab allows you to:
Select the paper source
Select the type of media
Select color or black-and-white printing
The Paper/Quality Tab also includes the Advanced button described in the
Layout Tab section above.
This Paper/Quality taballowsyouto:
Select an original document size
Set up custom paper sizes
Select the output paper size
Scale (enlarge/reduce) documents upon printout
Specify the number of copies
Select/deselect collation
Substitute the TrueType fonts with Device Font or download as Softfont
Switch between color and monochrome printing
Specify color matching (Graphics, Pictures, Proof, and Match)
Select print resolution (quality)
Control the tones of an image (Contrast)
Control the darkness of an image (Brightness)
Control the color purity of an image (Saturation)
Control the clarity of an image (Sharpness)
Features Tab
This tab allows you to:
Select print resolution (quality)
Set advanced gr aphic controls, such as toner saving mode, smoothing,
mirror image, and rotation
Set color controls and advanced color options and access the
MINOLTA-QMS Download Manager
Set PostScript features, such as job timeout
Using PostScript Drivers in Windows XP/200060
Page 69

Selectdocument optionssuch as collation, number of copies,scaling, and
email notification
Specify custom document settings
Overlays Tab
This tab allows you to:
Place a watermark on one or more pages
Place an overlay on any page or pages, allowing you to reproduce forms,
stationery, and similar repetitive page layouts (hard disk required)
Edit/create an overlay
Access the MQ Download Manager
About Tab
This tab allows you to:
Restore printer driver default settings
Contact the MINOLTA-QMS web page
Contact www.q-shop.com to order consumables
Using PostScript Drivers in Windows M e/98
Displaying the Tabs
1 From the Start menu, choose Settings and then Pr inters to display the
Printers directory.
2 Select the MINOLTA-QMS magicolor 7300 printer icon.
3 To display the printer driver settings, from the File menu choose
Properties, then choose the Details tab.
4 Choose the Setup button.
Using the Print Setting Tabs
General printer controls are located i n tabs of t he main printer driver dialog
box. These controls l et you check t he status of consumables and set access
to optional f eatures including the lower feeder tray, the duplex option, and the
internal hard drive.
Using PostScript Drivers in Windows Me/98
61
Page 70

There are two ways t o access the specialized print setting tabs:
Through your application. This selects printer settings for the specific job
you are sending. Choose Print, Select the printer, and then choose
Properties.
Through the printer driver dialog box.This changes printer settings for all
subsequent print jobs until you change the settings again through the
printer driver. Choose Start/Settings/Printers, select t he magicolor 7300
icon and then choose the Properties menu.
The tabs thatappear in the new dialog box are described here.
Refer to the printer driver’sonlinehelpforinformationonallofthese
functions.
Layout Tab
This tab allows you to:
Set the orientation for a print job
Set duplex options, if the optional duplexer is installed
Specify the number of pages per sheet
Paper Tab
This tab allows you to:
Selectamediasize
Select the media source
Select the type of media
By choosing the AdvancedPaper Handlingbutton, selecta differentpaper
source for the first page, header and trailer pages and enable/disable
auto-continue pr inting
Features Tab
This tab allows you to:
Select print resolution (quality)
Set advanced gr aphic options, s uch as toner saving mode, smoothing,
mirror image, and rotation
Set color controls and advanced color options and access the
MINOLTA-QMS Download Manager
Set color control options, such as halftone handling
Set PostScript features, such as job timeout
Using PostScript Drivers in Windows Me/9862
Page 71

Selectdocument optionssuch as collation, number of copies,scaling, and
email notification
Specify custom document settings
Overlay Tab
This tab allows you to:
Place a watermark on one or more pages
Place an overlay on any page or pages, allowing you to reproduce forms,
stationery, and similar repetitive page layouts
Create, add, and delete watermarks
Access the Download Manager
Fonts Tab
This tab allows you to:
Set handling options for TrueType fonts
Set font substitution standards
Access the Download Manager
Settings Tab
This tab allows you to:
Indicate which printer options are installed
Selecting installed options makes the related f eatures available in the
printer driver.
Set accounting information
About Tab
This tab allows you to:
Restore printer driver default settings
Contact the MINOLTA-QMS web page
Contact www.q-shop.com to order consumables
Using PostScript Drivers in Windows Me/98
63
Page 72

Using PostScript Drivers in W indows NT
Displaying the Tabs
1 From the Start menu, choose Settings and then Printers to display the
Printers directory.
2 Right-click t he MINOLTA-QMS magicolor 7300 printer icon.
3 Choose Pr operties.
4 Choose t he Settings tab.
Using the Print Setting Tabs
General printer controls are located in tabs of the main printer driver dialog
box. These controls let you check the status of consumables and set access
to optional f eatures including the lower feeder tray, the duplex option, and the
internal hard drive.
There are two ways t o access the specialized print setting tabs:
Through your application. This selects printer settings for the specific job
you are sending. Choose Print and then choose Properties.
Through the printer driver dialog box.This changes printer settings for all
subsequent print jobs until you change the settings again through the
printer driver. Choose Start/Settings/Printers, select t he magicolor 7300
icon and then choose the Document Defaults menu. The tabs in the new
Document Default dialog box are described here.
Refer to the printer driver’sonlinehelpforinformationonallofthese
functions.
Page Setup Tab
This tab allows you to:
Set the media size
Select the media source
Set the orientation for a print job
Set the numberof copies
Select black-and-white or color printing
Print several pages of a document on the same print page
Provide printouts with a watermark
Using PostScript Drivers in Windows NT64
Page 73

Design custom watermarks
Specify duplex and booklet printing
Refer to the printer driver’sonlinehelpforinformationonallofthese
functions.
Advanced Tab
This tab give you analternate access to all the choices available on the Page
Setup Tab. It also allows you to:
Select graphic options such as scaling and font substitution
Select document options such as numberof pages per sheet, header and
trailer pages, and automatic t ray switching
Features Tab
This tab allows you to:
Select print resolution (quality)
Configure color controls
Set PostScript options
Check a proof before printing m ultiple copies or set a password to hold a
print job until you are at the printer, if an optional hard disk is instal led
Overlays T ab
This tab allows you to:
Place an overlay on any page or pages, allowing you to reproduce forms,
stationery, and similar repetitive page layouts
Place a watermark on one or more pages
Access the MQ Download Manager
Using Macintosh PPDs
Displaying the Printer Options
1 When you are ready to print, open the print dialog box by choosing the
Print option within the application y ou are using.
2 In the Printer drop-down l ist, select the magicolor 7300.
Using Macintosh PPDs
65
Page 74

3 Set your configuration choices by accessing the dialog boxes from the
drop-down list that starts with General. The dialog boxes are different in
different applications.
Most printer features are controlled by the Apple LaserWriter driver or
configured within t he application you are using. In addition to those
standard choices,the MINOLTA-QMS PPDs also allow you to configure:
Paper sources
Duplexing options
Watermarks and overlays
Color matching
Color options
Print quality
For detailed information about Macintosh PPDs, see the magicolor 7300
Reference Guide on the Documentation CD-ROM.
Using Macintosh PPDs66
Page 75

Working with
Color
5
Page 76

About Color Printing
This chapter introduces the colorfeatures available on your printer,including
printer resolutions,Automatic Image Density Control (AIDC), and color
matching. In addition, it includes a brief troubleshooting section to help you
deal with any color problems that might arise.
Color printing is based on the pr inciples of subtractive colors, using pigment
to absorblight and reflectthe appropriatecolors back to theviewer ’seye.The
magicolor7300 Reference Guide on the Documentation CD-ROM includes a
chapter on c olor basics, if you want to learn more about the theory behind
color printing. The Reference Guide alsoincludes a chapteron color profiles,
which explains how monitor colors are translated into printed colors and tells
you how to download specialized color profiles if you need them.
Printer Resolutions
Your printer offers a choice of print resolutions, depending on which driver
you select.
PostScript Name Description
Monochrome
printer driver
Color printer
driver
Standard 600x600 dpi black only
High 600x600x4 black only
Standard 600x600 dpi color
High 600x600x4 color
Selecting a Resolution
Select the print resolution from your application’s print dialog box or from the
printer driver. The best option depends on what you’re printing.
Standard is the fastest choice for printing. Standard prints crisp type, so
it’s also a good choice for documents t hat don’t include graphics.
High is the best choice f or print jobs with graphics. Pages take slightly
longer to printbut produce the best graphics. High resolution provides
600x600x4 dpi printing with contone imaging. Contone uses increased bit
depth to produce clear images. Pantone tables, which are included on the
Software Utilities CD-ROM and on the Internet (www.minolta-qms.com),
can help with color matching at this resolution.
About Color Printing68
Page 77

Automatic Image Density Control (AI DC)
The printer’s color calibration procedure, known as the Automatic Image
Density Control (AIDC) cycle,i s performed automatically based on the
number of pages printed, environmentalchanges, and consumable changes.
During an AIDC cycle, the printer performs an internal check of its color
output and automatically readjusts itself to optimum settings t hat account for
the age of t oner cartridges and changes to the printer’s environment, such as
increases or decreases in humidity or temperature.This cycle checks both
the 100% saturated colors and the halftoned colors.
The length of the AIDC cycle depends on several factors.
Light Calibration—Light calibration is performed when you turn the
printerpower on, when the printer wakes from a deep sleep Energy Saver
mode, Light sleep Energy Saver mode, and when the fuser unit is
replaced. This cycle l asts 73–99 seconds.
Heavy Calibration—Heavy calibration is performed when you replace
one or more print units ortoner cartridges. This cycle l asts 197 seconds
when one printunit or toner cartridge isreplaced, or 240 seconds when al l
four print units and/or toner cartridges are replaced.
IntermittentPrinting—A 26-second cycle i s performed immediately after
page 200 or just before page 201 of intermittent printing, and whenever
the engine detects a specified inside temperature change.
Continuous Printing—A 26-secondcycle is performed every 11 minutes
of continuous printing, and whenever theengine detectsa specified i nside
temperature change.
In most cases, it’s best to l eave the automatic AIDC function enabled all t he
time, but you can use the printer’sQuality/AIDC/Disable menu to
disable it i f you are using linearization or calibration software.
Color Matching
Your printer’s color management system is adjusted for best results with the
most commonly used application software, including the Microsoft Office
products. If you are using these commonapplications,you maynever need to
adjust the color matching on your printer.
If you do need to make adjustments, however, the printer offers you a wide
variety of color matching options.
Color controls are located in the Features tab of the printer driver.
Automatic Image Density Control (AIDC)
69
Page 78

Quick Color Configuration
The simplest way to control colors i s with the Quick Color Configuration
optionin the printer driver.Quick Color Configuration offers 6 choices that are
applied to the entire print job. You can select the setting that’smost
appropriate for your entire printjob and apply it uniformly to all text and
graphics.
Color Options
When your print jobs are more complicated, Color Options is the best choice.
Color Options lets you apply one color matching standard to graphics and
another to images.
Halftone Screens
Continuous tone images have to be converted to dotpattern images on a
laser printer. Because of the limited r esolving power of the eye, halftones
appear as continuous tone images. Halftones are defined by three characteristics—screen frequency (or lines per inch, the number oflines of dots that
compose each inch of a halftone screen), screen angle (the angle at which a
halftone screen pr ints), and spot function (the shape of the dots).
Three halftones screens are available for this printer. In the Detailed Color
Settingsdialog box inthe W indows drivers,you can choose separatehalftone
screens for Characters/Graphics and for Images:
Low—Best for photographs and scanned images
General—Optimized for performance and quality
High—Best for text and line art
Color Profiles
Color profiles use the International Color Consortium (ICC) standards to
translate monitor colors into printer colors. Color pr ofiles are more flexible
than color rendering dictionaries,so you can make the closest color matches
for your particular job, but t hey may require more skill t o manipulate so that
you get the results you want.
You can set the RGB source profile t o match thecharacteristics of the source
of the print job, the simulationprofile to match a specific press, and the output
profile t o indicate the characteristics of your printing device. Several source
and simulation profiles are included wi th your printer or you can download
additional profiles. Instructions for downloading profiles are included i n the
magicolor 7300 Reference Guide on the Documentation CD-ROM.
Color Matching70
Page 79

RGB Source Profiles
RGB Source profiles are used for color conversion fromRG B devices, such
as monitors, to CMYK devices, such asprinters. Use RGB Sourceto indicate
the source in which the job was created. Five choices are available in the
printer driver.
Contrast—ThesameassRGBbutwithalowergamma(1.8),which
results i n slightly lighter output. This profile is a good choice when printing
photographs.
None—No color conversion is applied.
sRGB—A standard color space based on the average performance of PC
monitors. This is the default setting for your printer. This profile provides a
verygood r epresentationof monitorcolorsand is especially usefulif you’re
printing documents from the web or from Microsoft Officeapplications.
sRGB Saturation—The same as Vivid but wi th a higher gamma, which
results in slightly darker output. This profile is a good choice for presentations, colored text, and business graphics.
Vivid—Provides the most vivid colors possible by mapping RGB solid
colors to the printer’s CMYK solid colors. This profile is an excellent
choice for transparencies and business graphics.
Simulation Profiles
These profiles are used to convert information about one CMYK device into
data for another CMYK device. That i s, you can use them t o make your
magicolor7300 printer create colors like those produced on a different printer
or a printing press. Custom profiles are added through the Printer Profile
Management dialog box.
Destination Profiles
Custom destination profiles are added through the Printer Profile
Management dialog box.
Profiles for Host-based Color Management
Somesoftware applicationsuse host-based color management and work best
with color profiles tailored specifically for that purpose. Such profiles are
available in the Windows/Utilities/Color directory on the Software Utilities
CD-ROM that came with your printer.(Readme filesprovide directionson how
touseandwheretoloadeachprofile.)MINOLTA-QMSrecommendsthatyou
use t hese specialized host profiles for CMYK print jobs to manage the amount
of toner put on the page. They are useful when working with Microsoft ICM2
for Windows,Apple ColorSync, CorelDRAW, Kodak KCMS, Adobe
PageMaker,Adobe Illustrator, Adobe Photoshop, and other applications.
Color Matching
71
Page 80

Gray Treatment
Process gray can be turned on or off for each element of the job:
Black & White printing—prints 100% black with black toner only.
Colorprinting/Black& Gray—prints all 100% black and intermediategrays
with black toner only.
Color printing/Composite Black—prints 100% black and intermediate
grays with a composite of all four toners.
Troubleshooting Color Problems
The magicolor 7300 color matching system is optimized for t he sRGB
Standard, which is the standard used with many common applications such
as Microsoft Office.In most cases, you donot need to make any adjustments
to the default color settings to achieve the best results.
If you have trouble with color, however, there ar e several things to check.
1Mechanical Problems. Print quality problemsthat are caused by
mechanical problems are usually drastic—colors that change from page
to page; colors thatare off-register; colors that aren’t anything like you
expect.
Are all four toner cartridges installed properly?
Do al l four toner cartridges have toner?
Are the print units installed properly?
Are the printer doors closed?
Instructions for checking all these mechanical issues are included in
chapter 10, “Troubleshooting.”
2 Resolution. If images look grainy or if your page i s printed with black
toner only, the Color Options may be set for Black & White printing orthe
resolution may be set wrong.
If Color Options is set to Black & White, all text and graphics print in
100% black.
If the resolution is set to Standard, text prints well, but i mages may
look grainy or unclear. It’s a good choice for text documents.
If the resolution is set to High, images are sharp and clear. Printing
takes somewhat longer at High resolution, but it’s the best choice for
the delivery copy of a document containing images.
3 Registration Page. The registration page (Print Menu/
Registration) prints color test patterns so you can see whether all of
the colors are registered (lined up) properly. The registration page always
prints at 600x600 dpi resolution.
Troubleshooting Color Problems72
Page 81

4 Vivid Setting. This setting is optimized f or transparencies, mapping the
monitor’s solid colors to the printer’s solid colors so the intensity matches.
If graphics don’t match monitor colors, turn Vivid on.
This setting may not work wellfor images, s o experiment with it to find
the best setting for your print job.
5 RGB Source. This setting needs to match the profile for the document
being printed.
Some applications tell the RGB source. If your document or
application lists the RGB source,set the printer to match. If it does not,
you can experimentwith this setting to find the best option for your
print job.
If dots of cyan or magenta appear in what should be solid yellow
blocks, such as the highlighter feature in Microsoft Word or the table
and spreadsheet cell fills in Microsoft Word or Excel, set the RGB
Source to None.
6 Color Matching. If you see spots of toner around t he edges of text, if
colors are too dark or too saturated, orif toner is so thick that it flakes off
the finished page, check whether Quick Color Configuration (on the
Featurestab in your printer driver) is set to None. If it is, choose one of the
other options from the drop-down list. All of t he other color configuration
options regulate the amount of toner that goes on the page, making sure
that the total amount i s within the range that the printer can fuse to t he
media.
7 Other Color Problems. Most other color printing problems arise from
color management issues in the application that was used to create the
job or from which you are printing the job.
Check the application documentation for advice on color
management.
Check the color notes on the MINOLTA-QMS web site at
www.minolta-qms.com for information on color issues
with popular publishing software.
Troubleshooting Color P roblems
73
Page 82

Page 83

Working with the
Status Monitor
6
Page 84

Working with the Status Monitor
Introduction
The Status Monitor shows information about the current status of the
computer’s local printer.
You can install the Status Monitor via the Software Utilities CD-ROM.
Environment
The Status Monitor can be used with Windows XP, 2000, NT4, Me, 98, and
95, connected via Ethernet in Windows TCP/IP.
To install Status Monitor on Windows, you must f irst install Windows
Media Player,which is available on the Microsoft website.
Opening the S tatus Monitor and Showing Supplies
Status
Use one of the following steps t o open the Status Monitor.
Windows XP—Choose Star t, All Programs, then MINOLTA-QMS
magicolor 7300 Utilities, and then MINOLTA-QMS magicolor 7300 Status.
Windows Me/2000/98/95/NT 4.0—From t he Start menu, choose
Programs, then MINOLTA-QMS magicolor 7300 Utilities, and then
MINOLTA-QMS magicolor 7300 Status.
Altering the Size of the Status Monitor Window
From the Display menu, choose Status (Reduce) to decrease the size of
the window, or
From the Display menu, choose Status (Expand) to increase the size of
the window.
Using the Status Monitor
When the background of the right-hand printer graphic is green, the
printer is in standby mode or a job is printing normally.
When the background of the right-hand printer graphic is r ed, there is an
error and the job has been interrupted. The s tatus of the printer and the
error message are shown in the dialog boxes on the left.
The function areas include:
Printer status—Displays text messages that describe the current
operational status of the printer.
Working with the Status Monitor76
Page 85

How to recover—Provides you with explanations of what you need to do
in order to correct problems and recover from error conditions.
Warning status—Displays textmessages that warn you of such
conditions as low toner.
Printer status figure—Shows a graphic representationof theprinter and
indicates where there is a problem.
Printing status—Displays the status of the current print job.
Select popup message—Allows you to choose which message(s) you
want brought to the foreground when that particular condition occurs on
the printer.
Supplies status—Displays consumables usage statuses (percentage
remaining) f or toner cartridges and print units.
Refer to the Status Monitor’s online help for information on all of its functions.
Recognizing Status Monitor Alerts
When the Status Monitor detects a printing pr oblem, several actions occur at
once, depending on your settings. First, the icon changes from green to
yellow, orange, or red, depending on the severity of the printerproblem. Next,
the icon flashes, if you have set it to flash in the advanced options. In
addition, the Status Monitor sends you an email to alert you to the problem.
You can set the i nterval between the time Status Monitor detects a problem
and the time it sends an email.
Refer to online help for further information on these settings.
Recovering from a Statu s Monitor Alert
When the StatusMonitor notifiesyou of a printing problem, double-click on its
icon to open the Status Monitor. The Status Monitor i dentifies which printer
has an error and what type of error has occurred.
Finally, the Status Monitor includes Quick Time vi deo clips that illustrate how
to solve the print problem.
Refer to online help for further information on these settings.
Recognizing Status Monitor Alerts
77
Page 86

Closing the Status M onitor
When you have completed the actions necessary to correct the printer
problem, the icon turns green again.
Select Close from the Status or Consumable menu. The Status Monitor
window closes, but the Status Monitor continues to operate in the
background.To close the Status Monitor f rom the File menu, choose Exit.
If you click the X button in the upper-right corner of the Status Monitor
window to close the window, the Status Monitor r emains available at
the bottom right of the taskbar. Double-click the icon to open it again.
Closing the Status Monitor78
Page 87

Replacing
Consumables
7
Page 88
Introduction
Attention
Failure to follow instructions as outlined in this manual could void your
warranty.
Use of consumables or media not approved by MINOLTA-QMS may
damage your printer and void your warranty. In this case, standard time
and material charges will be applied to service your printer f or that
particular failure or damage.
Item Page
What is a consumable? page 80
What is a “face”? page 81
What is the life expectancy of consumables? page 81
How do I replace a toner cartridge? page 84
How do I replace the waste toner box? page 90
How do I replace a print unit assembly? page 93
How do I replace a fuser unit? page 105
How do I replace a media pickup roller? page 109
How do I replace a media separator roller? page 115
How do I order consumables? page 117
Where can I get more information? page 117
What is a consumable?
A consumable is an item that needs to be replaced at regular intervals. For
the magicolor 7300, user-replaceable consumables include:
Fuser unit
Mediapickuprollers
Media separator rollers
Print units (4)
Toner cartridges (4)
Waste toner box
Introduction80
Page 89

Attention
Although the printer was designed f or occasional printing on a wide
range of media types, it is not intended for printing exclusively on a
single media type, except plain paper. Continuous printing on media
other than plain paper (such as envelopes, labels, thick stock, or
transparencies) may adversely affect print quality or reduce engine life.
Antistatic Protection
Attention
It’s extremely important to protect the printer from electrostatic damage
while all operations are being performed.
If you don’t have an antistatic wrist strap, discharge your body’sstatic
electric charge by touching a grounded surface before per forming any
servicing operation. Also, avoid walking around after grounding
yourself.
What is a “face”?
A “face” is a single pass of media past the transfer belt unit. A two-sided
(duplex) page (also called a “sheet”) consists of two faces.
Consumable Life Expectancies
Attention
Consumable life is expressed in simplex letter/A4-size pages with
normal (5%) coverage in continuous printing. A duplex page is
equivalent to two simplex pages.
The stated life expectancy of each consumable is based on standard
mode, normal single-sided page coverage (usually 5% of letter/A4-size
media), and on whether printing is continuous (for optimal consumable
life, such as 500 pages), average ( three pages), or intermittent (one
page) job size, and on specific operating conditions such as media
type, number of color faces, and page size.
The actual life expectancy will vary based on printing under these
specific operating conditions and other printing variables, such as
ambient temperature, humidity, and content of material printed ( for
example, text or graphics).
Consumable Life Expectancies
81
Page 90

The following messages in the control panel’s message windowindicate that
a consumable needs to be replaced.
Item: Message This item needs replacing by the user af ter typical
usage of these pages...
Toner Cartridge(s):
TONER EMPTY
REPLACE KCMY
Intermittent
(1 page per job)
5% Coverage:
Black: 3,800;
Cyan, magenta,
and yellow, each:
3,300
Average
(3 pages per job)
5% Coverage:
Black: 6,000;
Cyan, magenta,
and yellow, each:
5,000
Continuous
5% Coverage:
All colors: 7,500
Item: Message This item needs replacing by the user af ter typical
usage of these pages...
Waste Toner Box
(1)
Intermittent
(1 page per job)
1,500 3, 500 8,000
:
Average
(3 pages per job)
Continuous
WASTE TONER FULL
REPLACE BOX
Notes: (1) The printer stops approximately 450 pages after the
WASTE TONER NEAR FULL message displays. For
heavier coverages, the approximate maximum waste
toner box capacities willdecrease.
Item: Message This item needs replacing by the user af ter typical
usage of these pages...
Intermittent
(1 page per job)
Print Unit
Assemblies
(2)
:
7,600–9,300 15,900–19,500 26,000–32,500
PRINT UNIT END
REPLACE KCMY
Notes: (2) For heavier coverages, the approximate maximum
Average
Continuous
(3 pages per job)
capacities wi ll decrease. To determine your
average percent coverage, print a consumables
statistics page (Print Menu/Statistics Page).
Consumable Life Expectancies82
Page 91
Item: Message This item needs replacing by the user after typical
usage of these pages...
Intermittent
(1 page per job)
Fuser Unit:
Average
(3 pages per job)
120,000+
Continuous
FUSER LOW
Item: Message This item needs replacing by the user after typical
usage of these pages...
Intermittent
(1 page per job)
Media Pickup and
Average
(3 pages per job)
200,000+
Continuous
Separator Roller Kit
for Tray 1and
Trays 2-4
(3)
:
(No message appears.)
Notes: (3) The manual feed tray does not have media pickup
or separator rollers.
Several consumables need t o be replaced simultaneously.
When You Replace This... Also Replace This
Media pickup roller Media separating roller
Media separating roller Media pickup roller
Print unit The same-color toner cartridge
Consumable Life Expectancies
83
Page 92

Replacing a Toner Cartridge
Toner Cartridge Life
Attention
Do not remove a toner cartridge until TONER EMPTY displays in the
control panel message window or you are replacing the print unit;
otherwise, the amount of toner may not be detected correctly.
When a toner cartridge runs low, TONER LOW KCMY (KCMY =color) appears
in the message window, indicating that t here is approximately 5% toner
remaining. Printing continues even though the warning appears.
Approximately 450 pages (A4/Letter) can be printed af ter TONER LOW KCMY
appears in the message window.
When the toner cartridge is empty, TONER EMPTY/REPLACE KCMY appears
in the message window.
You can print a monochrome (black) job even when any of the color toner
cartridges is empty and the job does not use that color.
For example, when the message window displays READY/TONER EMPTY Y
(Y foryellow), and you are printing only black text, the job prints.If the job you
are printing contains even a small amount of yellow, TONER EMPTY/
REPLACE Y appears in the m essage window, and the printer stops operating
until the yellow toner cartridge is replaced.
You can also access the toner cartridge supplies status using the Status
Monitor, PageScope Light, and the drivers (via TCP/IP) for Windows XP/
2000/Me/98/NT4 and PPDs (refer to “Working with the Status Monitor” on
page 76).
Keep toner cartridges:
Toners combine to create colors. For example, magenta and yellow
toners combine to create the color orange.
In their packaging until you’re ready to install them.
In a cool, dry location away from sunlight (due to heat).
The maximum storage temperature is 95° F(35° C) and the maximum
storage humidity is 85% (noncondensing). If the toner cartridge i s moved
from a cold place to a warm, humid place, condensation may occur,
degrading print quality. Allow the toner to adapt t o the environment for
about one hour before use.
Replacing a Toner Cartridge84
Page 93

Level during storage.
Do not stand or store cartridges on their ends or turn them upside down;
the toner inside the cartridges may become caked or unequally
distributed.
Away from salty air and corrosive gases such as aerosols.
Away from fire.
WARNING!
Dispose of the used toner cartridge according to your local regulations.
Do not dispose of it by burning. Toner expelled from the f ire may cause
burns.
If toner gets in your eyes, immediately flush them with water, and then
seek medical attention. Material Safety Data Sheet (MSDS) information
can be found at www.minolta-qms.com (click on “24-Hour Online
Help”).
The toner is nontoxic. If you get toner on your hands, wash them in
cool water or a neutral detergent. If you get toner on your clothes,
lightly dust them off as much as possible. If some toner remains on
your clothes, use cool, not hot water, to rinse the toner off.
Replacing a Toner Cartridge
1 Check the message window to see which color toner is empty (Y = Yellow,
M = Magenta, C = Cyan, and K = Black). In this example, we’ll assume
that the yellow toner cartridge needs to be replaced.
2 Open the printer’s front door.
3 Place an old newspaper over the door in case any toner spills.
If you are replacing just the t oner cartridge, continue wi th “Removing an
Empty Toner Cartridge” on page 86. If you are replacingthe toner cartridgeas
a part of the entire print unit assembly, skip t o “Installing a New Toner
Cartridge” on page 87.
Replacing a Toner Cartridge
85
Page 94
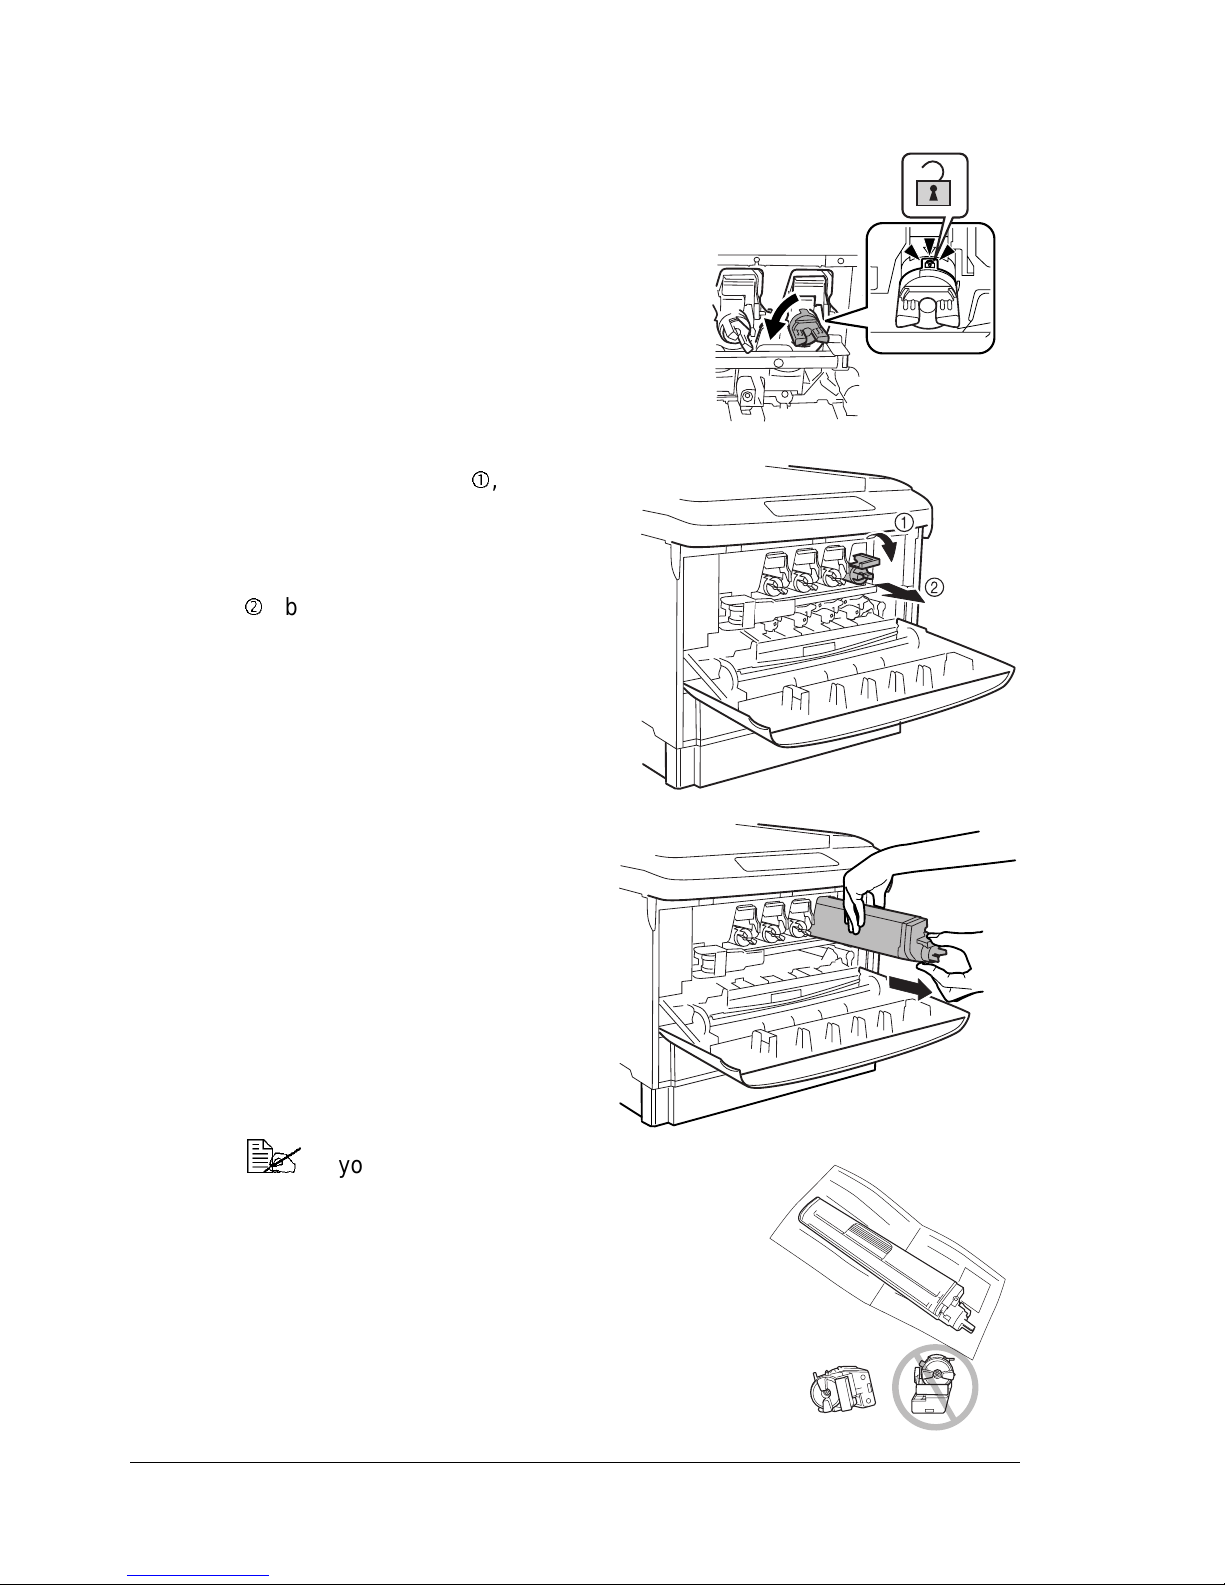
Removing an Empty Toner Cartridge
1 Turn the knob of the empty toner
cartridge counterclockwise.
The unlock icon should be visible in the
notch of the knob.
2 Press down on the lever at the t op
of the toner cartridge
grab the lever and knob with your
right hand.
, and then
3 Slowly pull the toner cartridge out
about 6 i nch (15 cm).
4 Placeyour left hand on top of the
used toner cartridge, and then
fully pull out the toner cartridge.
If you need to set the
removed toner cartridge down, place i t
sideways on a surface covered with an
old newspaper. Do not shake the used
toner cartridge; otherwise, toner
attached to it may spill.
Replacing a Toner Cartridge86
Page 95
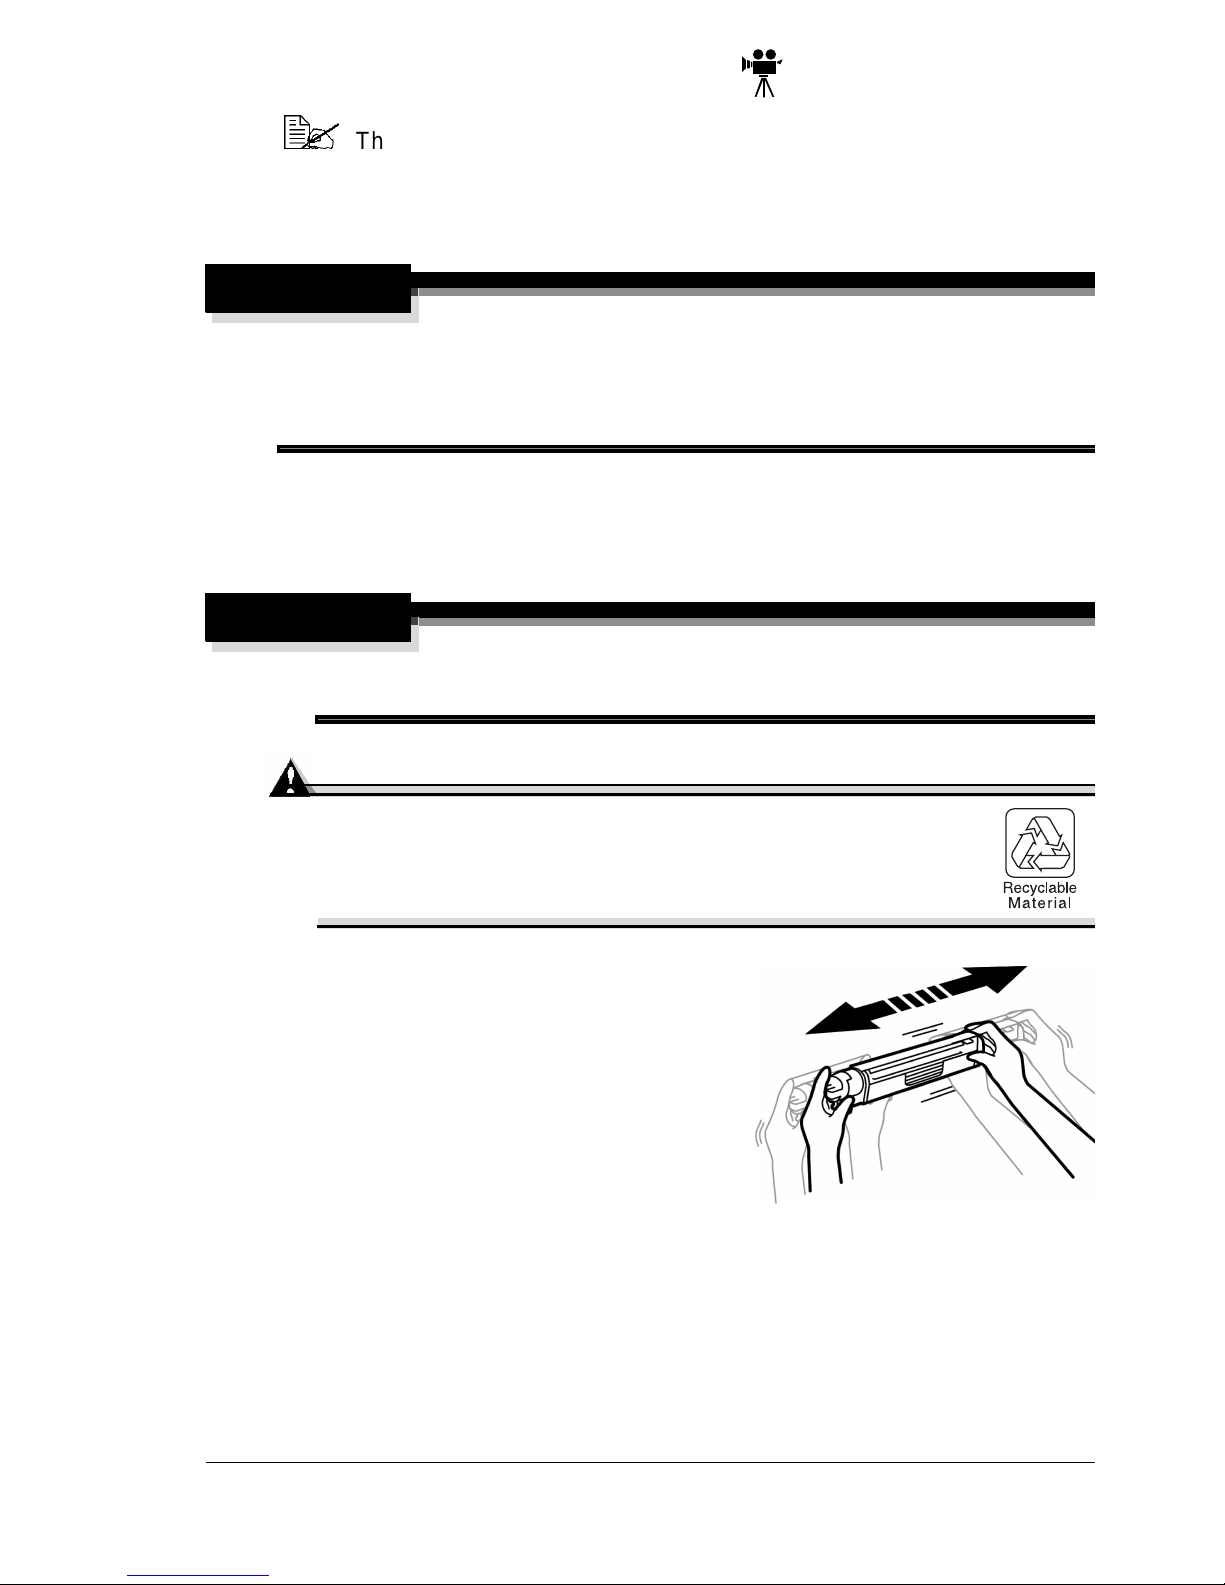
Installing a New Toner Cartridge
The toner is nontoxic. If you get toner on your hands, wash them in
cool water with a neutral detergent. If you get toner on your clothes,
lightly dust them off as much as possible. If some toner remains on
your clothes, use cool, not hot water, to rinse the toner off.
WARNING!
If toner gets in your eyes, immediately flush them with water, and then
seek medical attention. Material Safety Data Sheet (MSDS) information
can be found at www.minolta-qms.com (click on “24-Hour Online
Help”).
1 Remove the new toner cartridge f rom its packaging.
2 Place the used toner c artridge in the packaging from the new toner
cartridge.
WARNING!
Do not throw it into a fire. Toner expelled from the fire may cause
burns.
Attention
[email protected] for recyclingor
disposal information.
3 To loosen the toner inside the
cartridge, vigorously shake the toner
cartridgehorizontally 10 or more times.
Replacing a Toner Cartridge
87
Page 96
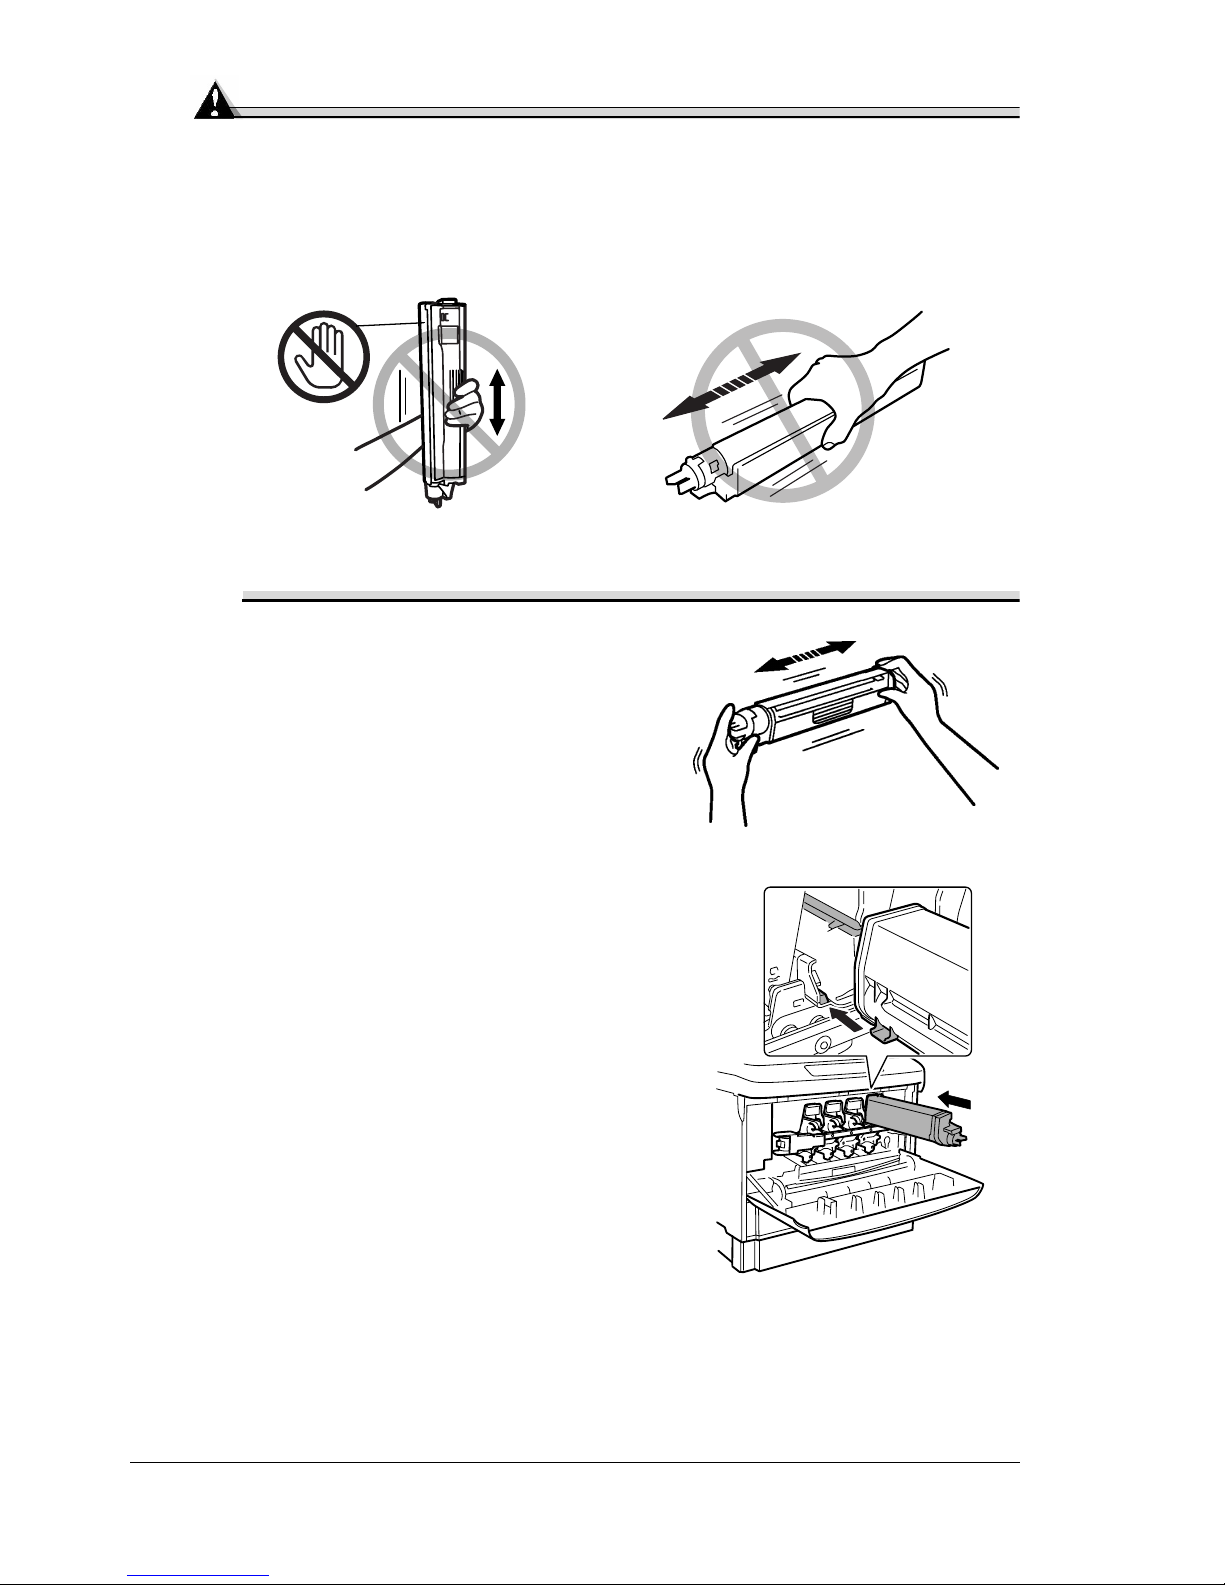
Attention
Do not shake the toner cartridge vertically.
Be careful not to hold the toner cartridge by its shutter.
Do not touch the toner roller surface. This could lower image quality.
4 Next, to distribute the toner evenly
inside the cartridge, gently shake the
toner cartridge horizontally a few more
times.
5 Check the color of the label on the
printer, and then slowly and fully insert
the toner cartridge of the same color
into the compartment.
The arrow at the end of the t oner
cartridge indicates the direction to
insert it.
Replacing a Toner Cartridge88
Page 97
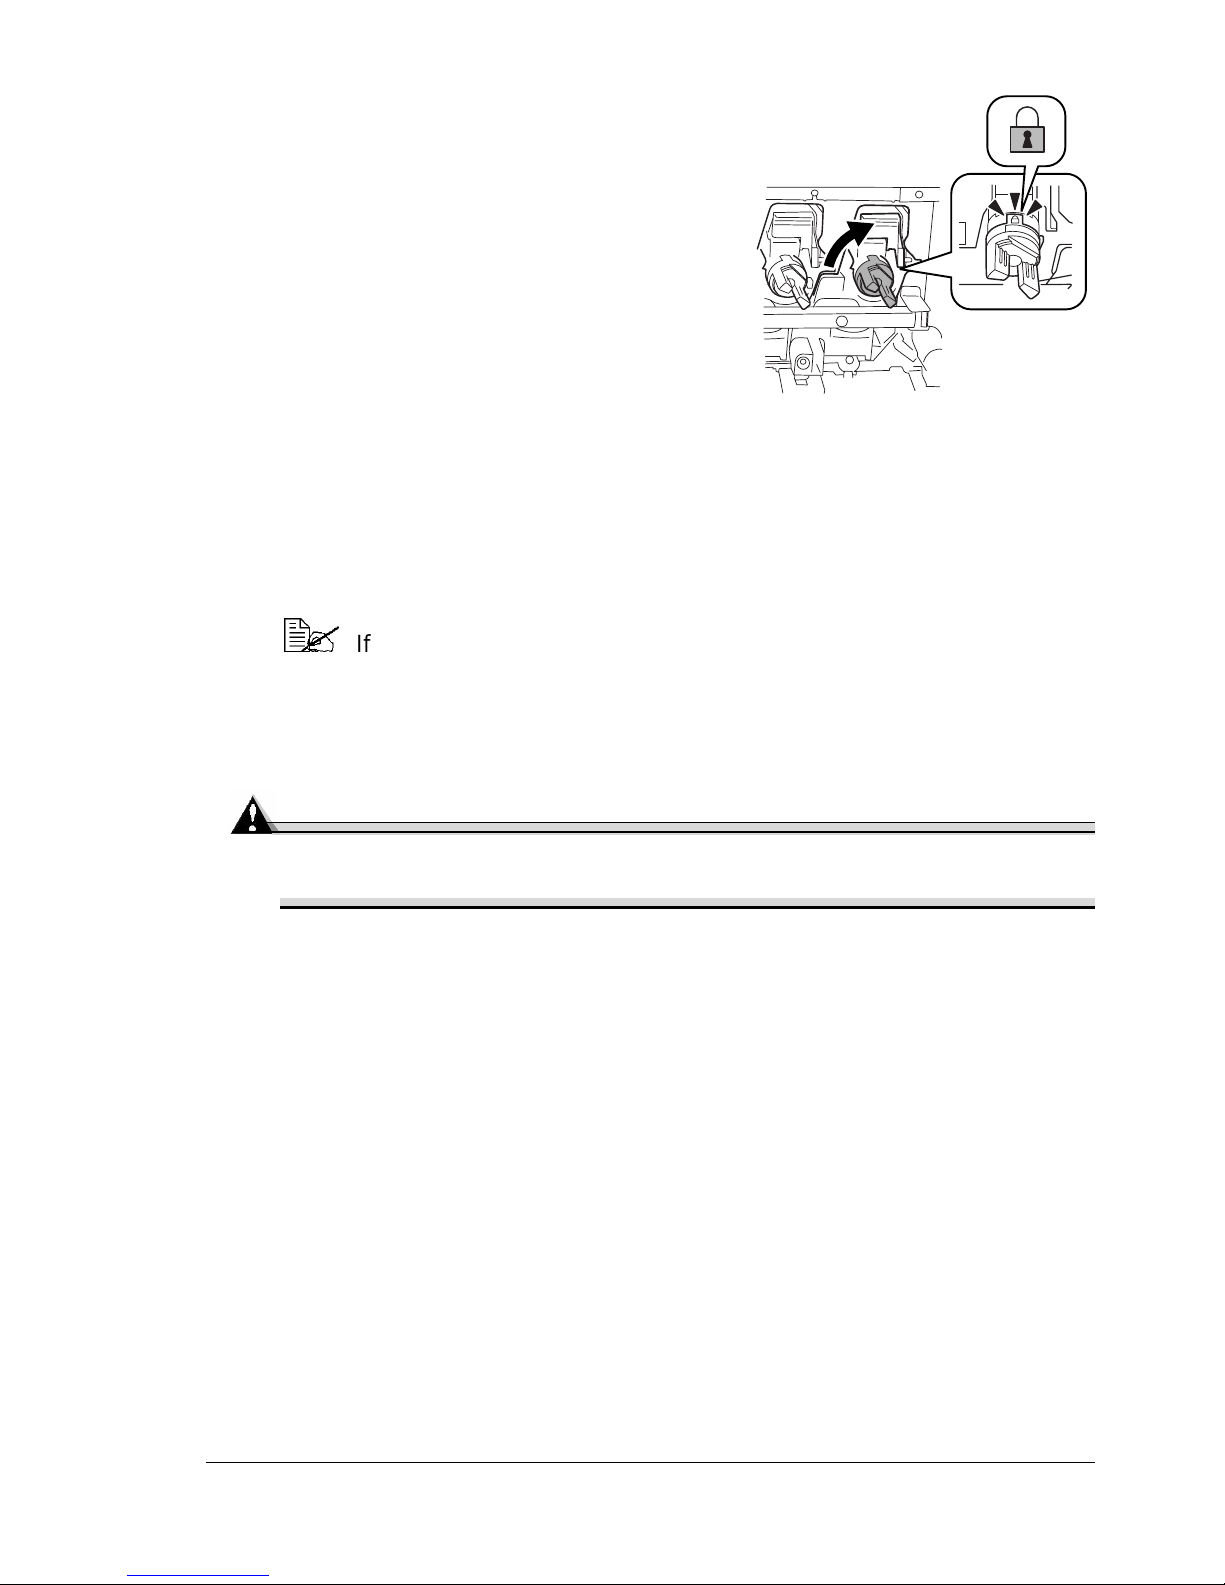
6 While pushing in the knob on the toner
cartridge, turn the knob clockwise.
Check that the lock mark can be seen
in the window of the knob.
If the knob is not positioned correctly,
the front door cannot be closed.
7 Slowly close the front door.
Auto-Image Density Control (AIDC)
The printer automatically pauses for an Auto-Image Density Control (AIDC)
calibration cycle (minimum 198 seconds, maximum 241seconds) after the
installation of a new print unit. This process is provided to ensure reliable
printer operation with optimum output quality.
If you open the door before READY appears in the message window,
the printer stops and repeats the calibration cycle.
Refilled Toner Cartridges
Attention
Do not use refilled toner cartridges. Any damage to the printer or quality
problems caused by a refilled t oner cartridge will void your warranty.
Replacing a Toner Cartridge
89
Page 98
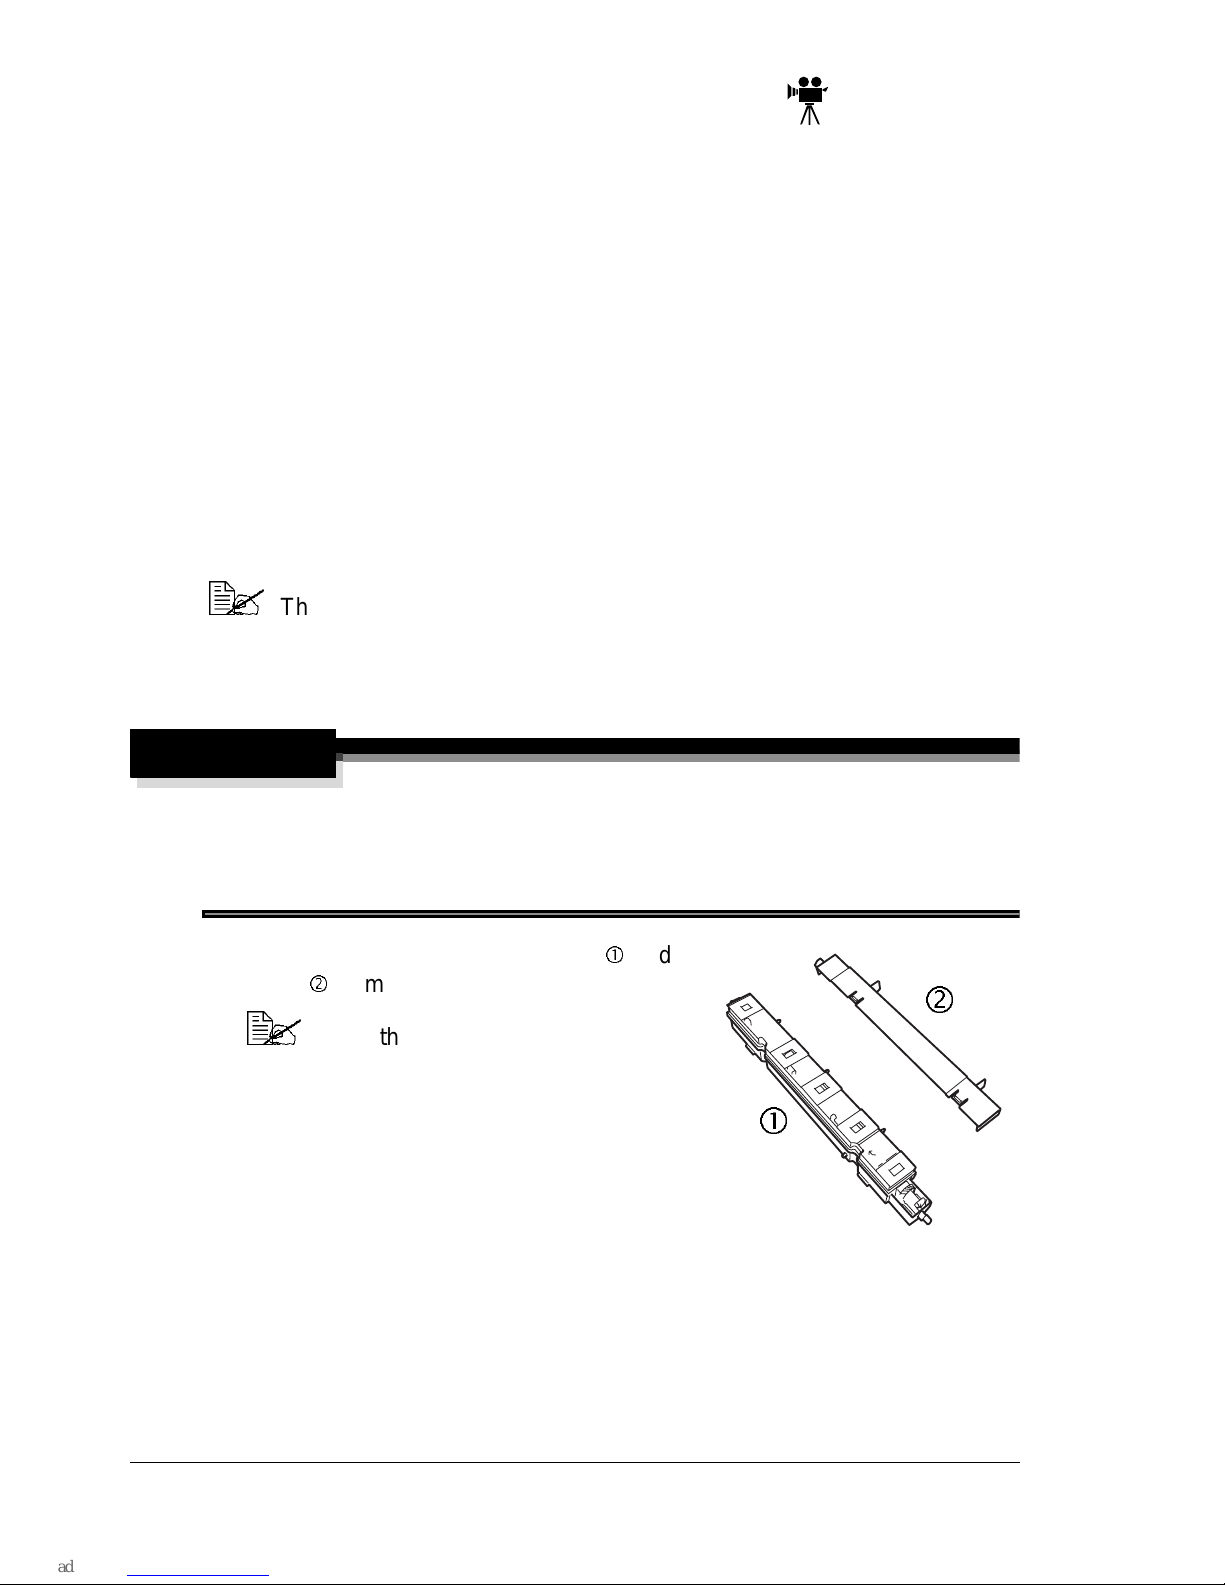
Replacing the Waste Toner Box
WasteTonerBoxLife
When the waste toner box becomes near full, the message WASTE NEAR
FULL appears in the control panel’s message window.
When the waste toner box becomesfull, the message WASTE TONER FULL/
REPLACE BOX appears i n the control panel’s message window. The printer
will stop and wi ll not start again until the waste toner box is replaced.
Follow the instructions below to replace the waste toner box. After the waste
toner box has been replaced, approximately8,000 pages can be printed. The
actualnumber of pages that can be printed depends on the imageand media
size being printed in addition to other printing conditions.
Replacing a Waste Toner Box
The toner is nontoxic. If you get toner on your hands, wash them in
cool water or a neutral detergent. If you get toner on your clothes,
lightly dust them off as much as possible. I f some toner remains on
your clothes, use cool, not hot water, to rinse the toner off.
WARNING!
If toner gets in your eyes, immediately flush them with water, and then
seek medical attention. Material Safety Data Sheet (MSDS) information
can be found at www.minolta-qms.com (click on “24-Hour Online
Help”).
1 Remove the new waste tonerbox
cover
and
from their packaging.
Save the packaging from the new
waste toner box to pack the used
waste toner box.
Replacing the Waste Toner Box90
Page 99
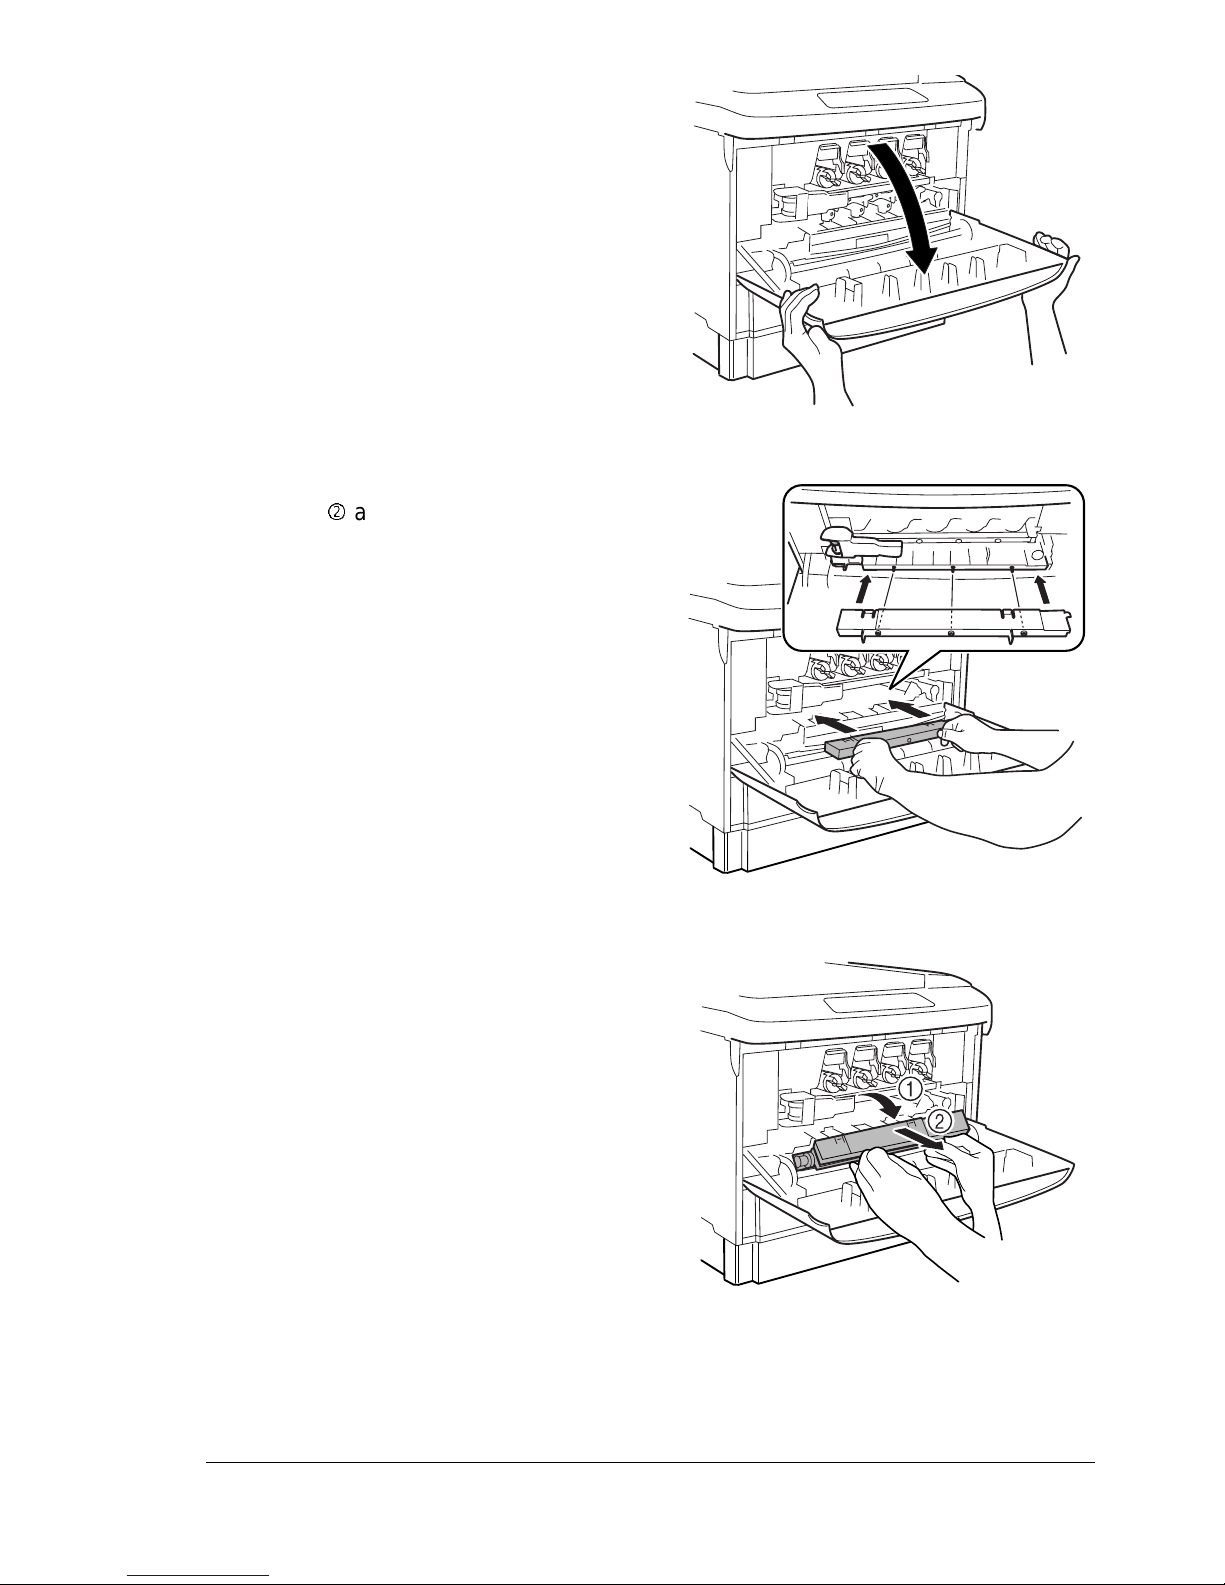
2 Open the printer’s front door.
3 Grab the handle of the cover
(
above), and then attach it to
the top of the used waste toner
box.
4 Holding the handle of the cover,
tilt the used waste toner box
toward you to remove both the
box and the cover.
5 Place the used waste toner box
and cover in the packaging from
the new waste toner box so that
the waste toner will not spill.
Replacing the Waste Toner Box
91
Page 100
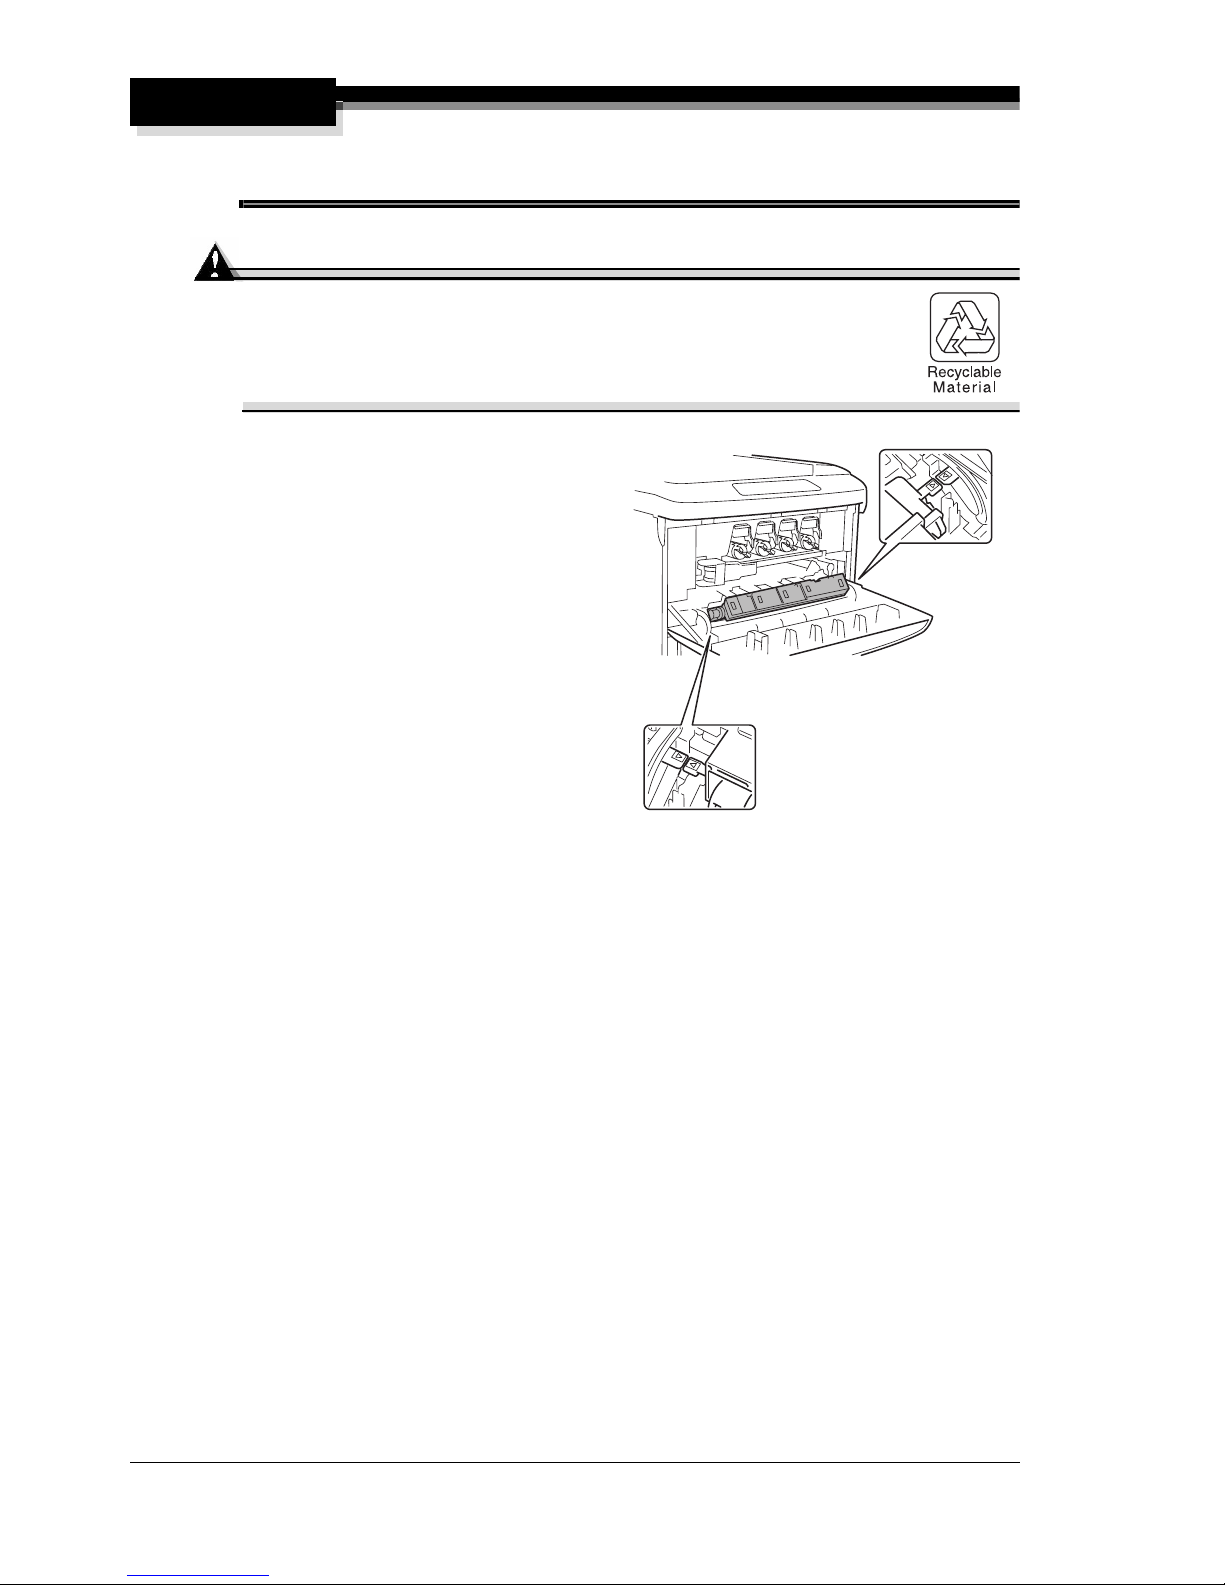
WARNING!
Do not throw it into a fire. Toner expelled from the fire may cause
burns.
Attention
[email protected] for recycling or
disposal information.
6 Place the new waste toner box
on the front door with the arrow
mark on the waste toner box
aligned with the arrow mark on
the inside of the front door.
7 Hold both sides of t he front door
and slowly close it.
The new waste toner box will
move into position.
Replacing the Waste Toner Box92
 Loading...