

Page 1

®
EDNord - Istedgade 37A - 9000 Aalborg - Telefon 9633 3500
magicolor 2300W
User’s Guide
1800727-001A
Page 2

Thank You
EDNord - Istedgade 37A - 9000 Aalborg - Telefon 9633 3500
Thank you for purchasing a KONICA MINOLTA printer.
Trademarks
The KONICA MINOLTA and KONICA MINOLTA logo are trademarks or registered
trademarks of KONICA MINOLTA HOLDINGS, INC. magicolor is a trademarks or
registered trademarks of KONICA MINOLTA PRINTING SOLUTIONS U.S.A., INC.
Other tr ademar ks and registered trademar ks are t he propery of their respective
owners.
Acrobat
reserved. Adobe, the A dobelogo , Acrobat, and the Acrobat logo are tra demarks of
Adobe Sy stem s Incorporated.
Microsoft
Microsoft
Microsoft
Corporation in the U.S.A. and/ or other regions and/or countries.
This p roduct uses NEST Office SDK of N ovell, Inc. Copyrigh t © 1999 Novell, Inc.
NEST is a tradema rk of Novell, I nc. in the U nited States and other countr ies.
This p roduct uses Softwar e Developer Kit of Pee rless Systems Corpo ration.
Copyright © 2001 Peerles s Systems Corporatio n. All rights reser ved.
Quick Time and the QuickTime logo are tr ademarks used under licens e.The
QuickTime logo is register ed in the U.S.and other countries.
®
Reader Copyright © 1 987-200 2 Adobe S ystems Incorpor ated. All rights
®
, Windows®, Window s NT®, Window s 2000, Microsoft®Windows®95,
®
Windows®98,Microsoft®Windows®Me, Microsoft®Windows®2000, and
®
Windows®XP ar e either registered tradem arks or trademarks of Microsof t
Proprietary Statement
The dig itally encoded software included with your printer is Copyrighted
© 2003 by KO NICA MINOLTA BUSINESS TECHNOLOGIES, INC. All R ights
Reserved.
This s oftware may not be reproduced, modified, displaye d, transferred, or copied in
any fo rm or in any manne r or on any media, in whole or in part, without the express
written permission of KONICA MINOLTA BUSINESS TECH NOLOGIES, INC.
Copyright Notice
Copyrighted © 2003 by KO NICA MINOLTA BUSINESS TECHNOLO GIES, INC. ,
Marunouchi C enter Building, 1-6-1 M arunou chi, Ch iyoda-ku , Tokyo, 100-0005, Japan.
All Rights Reserved . Th is documen t may n ot be copied, in whole o r par t, stored in a
retrieval system, nor transferred or transmit ted to any other med ia or language,
without written permission of KONICA MINOLTA BUSINESS TECHNOLOGIES, INC.
Manual Notice
KONICA MINOLTA BUSINESS TECHNOLOGIES, INC. reserves the right to m ake
changes to th is guide and t o the e quipment descr ibed herein without notice.
Considerable effort has been made to ensure tha t this guid e is free of ina ccuracies
and omissions. However, KONICA MINOLTA BUSINESS TECHNOLOGIES, INC.
makes no warr anty of any kind including, but not limited to, a ny implied warranties of
merchantability an d fitness for a particular purpos e with regard to this guide. K ONICA
MINOLTA BUSINESS TE CHNOLO GIES, INC. assumes no res ponsibility for, or
liability for, errors contained in this gui de or for incide ntal, special, or consequentia l
damages a rising out of t he furnishin g of this guide, or the use of t his guide in
operating the equi pmen t, or in connec tion with the pe rformance o f th e equipment
when so oper ated.
Page 3

Registering the Printer
EDNord - Istedgade 37A - 9000 Aalborg - Telefon 9633 3500
Mail (Americas only)—Fill out and send in the registration card enclosed in your
shipment.
Internet—Go to http://printer.konicaminolta.net/register and foll ow the instructions.
CD-ROM—Follow the instruct ions on the C D-RO M.
Page 4

EDNord - Istedgade 37A - 9000 Aalborg - Telefon 9633 3500
Page 5

Contents
EDNord - Istedgade 37A - 9000 Aalborg - Telefon 9633 3500
1 Software Installation ............................................................................ 1
Utilities and Documentation CD-ROM ................................................................. 2
Drivers and Utilities .......................................................................................2
Installing the Printer Drivers and Software ..........................................................3
System Requirements ...................................................................................3
For a Lo c al Connection .................................................................................3
For a Shared Network Printer ........................................................................5
Selecting Driver Options/Defaults .......................................................................6
Uninstalling the Printer Driver ............................................................................. 8
2 Using Media ..........................................................................................9
Introduction .......................................................................................................10
Media Specifications ......................................................................................... 11
Media Types ......................................................................................................12
Plain Paper .................................................................................................. 12
Thick Stock .................................................................................................. 13
Envelopes ....................................................................................................14
Labels ..........................................................................................................15
Letterhead and Memo Media ......................................................................16
Postcards ....................................................................................................16
Page 6

Transparencies ............................................................................................17
EDNord - Istedgade 37A - 9000 Aalborg - Telefon 9633 3500
What Is the Guaranteed Imageable (Printable) Area? .................................18
Page Margins ..............................................................................................19
Loadin g Media ...................................................................................................20
Tray 1 (Multipurpose Tray) ..........................................................................20
Duplexing ..........................................................................................................23
Output Tray .......................................................................................................24
Media Storage ...................................................................................................24
Additional Assistance ........................................................................................24
3 Working with the Printer ....................................................................25
About the Control Panel ....................................................................................26
Control Panel Key ........................................................................................26
Indicator Lights ............................................................................................27
4 Working with the Printer Driver ........................................................29
Introduction ........................................................................................................30
Displaying Printer Driver Settings ......................................................................30
Displaying Settings in Windows 2000/XP ....................................................30
Displaying Settings in Windows Me/98 ........................................................30
Common Settings on All Tabs .....................................................................31
Common Buttons .........................................................................................32
Setup Tab ..........................................................................................................33
Paper Tab ..........................................................................................................34
Quality Tab ........................................................................................................35
Color Matching .............................................................................................36
Device Options Setting Tab ...............................................................................38
5 Working with the Status Display ...................................................... 39
Workin g with the Status Display ........................................................................40
Environment .................................................................................................40
Opening the Status Display and Showing Supplies Status .........................40
Using the Status Display ...................................................................................41
Workin g with the Display Menu ...................................................................41
Workin g with the Print Menu ........................................................................42
Closing the Status Display ................................................................................44
6 Replacing Consumables ...................................................................45
Consumable Life Expectancies .........................................................................46
Plain Paper ..................................................................................................46
Specia l Media ..............................................................................................47
Auto-Image Density Control (AIDC) .............................................................47
Toner Cartridge Life .....................................................................................48
Contentsii
Page 7

Replacing Consumables ...................................................................................48
EDNord - Istedgade 37A - 9000 Aalborg - Telefon 9633 3500
Refilled Toner Cartridges ............................................................................49
Replacing a Toner Cartridge .......................................................................49
Replacing the Waste Toner Bottle ...............................................................55
Replacing the OPC Drum Cartridge ............................................................56
Ordering Consumables .....................................................................................59
7 Maintaining the Printer ......................................................................61
Mainta ining the Printer ......................................................................................62
Cleaning the Printer ..........................................................................................64
Exterior ......................................................................................................64
Interior .........................................................................................................65
Media Rollers ..............................................................................................66
Printer Interior and Laser Lens Cover ......................................................... 67
8 Troubleshooting .................................................................................7 1
Introduction .......................................................................................................72
Preventing Media Jams .....................................................................................73
Understanding the Media Path ..........................................................................74
Tray 1 (Multipurpose Tray) ..........................................................................74
Duplex Option .............................................................................................. 74
Clearing Media Jams .......................................................................................75
Handling Media Jams by Location ..............................................................75
Tray 1 (Multipurpose Tray) ..........................................................................76
Inside the Printer .........................................................................................77
Duplex Option .............................................................................................. 79
Output Tray ................................................................................................. 80
Solving Problems with Media Jams ..................................................................81
Solving Other Problems ...................................................................................83
Solving Problems with Printing Quality .............................................................89
Status, Error, and Service Messages ................................................................96
Standard Status Messages .........................................................................96
Error Messages ...........................................................................................96
Service Messages ..................................................................................... 100
Additional Assistance ......................................................................................101
9 Installing Accessories ..................................................................... 103
Introduction .....................................................................................................104
Duplex Option .................................................................................................104
10 Repacking the Printer ...................................................................... 109
Storing the Printer ...........................................................................................110
Relocating Your Printer ...................................................................................110
Contents iii
Page 8

Repacking the Printer ......................................................................................111
EDNord - Istedgade 37A - 9000 Aalborg - Telefon 9633 3500
A. Turn off t he Printer, Unplug the Power Cord,
and Remove the Interface Cables ............................................................112
B. Remove the Media and the Tray 1 Media Support ................................113
C. Remove the Options (if Attached) .........................................................113
D. Remove the Waste Toner Bottle, Plug the Openings,
and Dispose of It According to Your Local Regulations .............................114
E. Remove the OPC Drum Cartridge .........................................................115
F. Remove the Transfer Belt ......................................................................116
G. Repack the Printer for Shipment ...........................................................117
H. Repack the OPC Drum and Transfer Belt Unit for Shipment ................118
Reinstalling the Printer ....................................................................................119
Reinstalling a Transfer Belt Unit ................................................................120
A Technical Specifications .................................................................121
Requirements ..................................................................................................122
Space Requirements .................................................................................122
Location Requirements ..............................................................................124
Interface Panel ...............................................................................................125
Power Requirements .................................................................................126
ENERGY STAR Compliance .....................................................................127
Engine and Controller Specifications ...............................................................128
Engine ........................................................................................................128
Print Speed—Simplex ................................................................................128
Print Speed—Autoduplex . .........................................................................128
General ......................................................................................................129
Contro ller .................................................................................................129
Electrical ....................................................................................................130
Hazardous Chemical Substance Reporting ..............................................132
Physical ....................................................................................................132
Consumable Life Expectancies ......................................................................133
Plain Paper ...............................................................................................133
Specia l Media ............................................................................................134
Regulatory Compliance ...................................................................................135
Safety Information ...........................................................................................137
Warning and Precaution Symbols .............................................................140
Meaning of Symbols ..................................................................................140
Workin g Safely with Your Laser Printer ...........................................................143
Index ..................................................................................................145
Contentsiv
Page 9

Software
EDNord - Istedgade 37A - 9000 Aalborg - Telefon 9633 3500
Installation
1
Page 10

Utilities and Documentation CD-ROM
EDNord - Istedgade 37A - 9000 Aalborg - Telefon 9633 3500
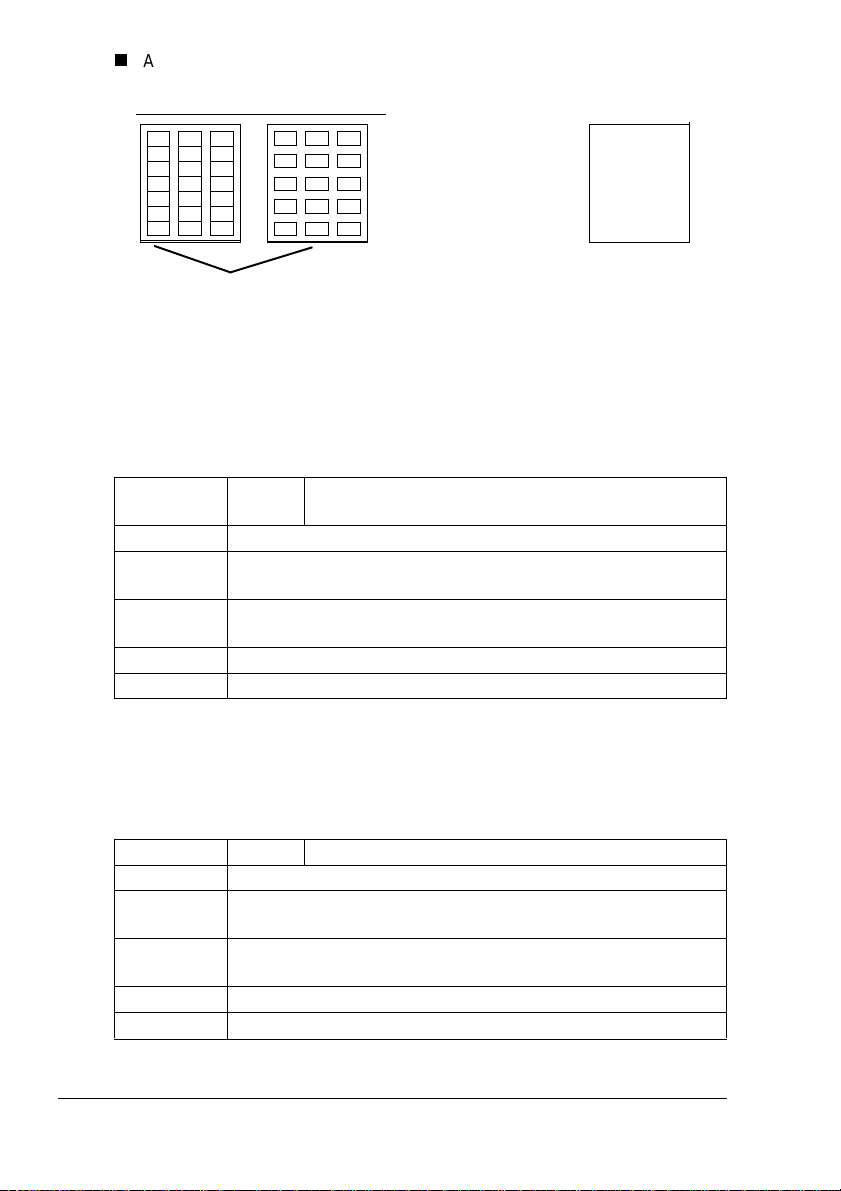
Drivers and Utilities
Drivers
Drivers/OperatingSystem Use/Benefit
Printer Driver for Windows Me/98 These dr ivers give you accessto all of
Printer Driver for Windows XP/2000
Utilities
Utilities Use/Benefit
Status Display This utility allows you to monitor the
the printerfeatures, includingfinishing
and advanced layout. See also
“Workingwith the Printer Driver” on
page 29.
printer’s status and perform various
printer functions.See “Working with
the Status Display” on page 39.
Utilities and Documentation CD-ROM2
Page 11

Installing the Printer Drivers a nd Software
EDNord - Istedgade 37A - 9000 Aalborg - Telefon 9633 3500
System Requirements
PC with a clock speed of 300 MHz or more Intel Pentium/Celeron series,
AMD K6/Athlon/Duron family, or compatible processor
Microsoft Windows98 SE, Windows Me, Windows 2000 Professional,
Windows XP Home Edition/Professional
Free hard disk space
– Approximately 128 MB of free hard disk space for printer driver and
Status Display
– Approximately 128 MB of free hard disk space for image processing
Memory capacity
– Windows 98 SE:
Atleast16MBofRAM
– Windows Me:
Atleast32MBofRAM
– Windows 2000 Professional:
Atleast64MBofRAM
– Windows XP Home Edition/Professional:
At least 128 M B of RAM
CD-ROM drive
IEEE 1284 compliant type B parallel port, or USB Revision 1.1 compliant
port
For a Local Connection
1 Insert the magicolor2300W Utilities and Documentation CD-ROM in your
PC’s CD-ROM drive. The CD- ROM installer pr ogram starts automatically
(if not, browse with the Windows Explorer to the CD -ROM location and
double-clickon setup.exe).
2 Select the language, and click OK.
3 Click .
4 ClickPrinter Setup.
5 ClickAccept.
6 ClickOK .
7 Select Local Printer, and then click OK.
Installing the Printer Drivers and Software
3
Page 12

8 If the computer onto which you are installing the driver is a print server,
EDNord - Istedgade 37A - 9000 Aalborg - Telefon 9633 3500
check the Server Install checkbox, and then type in a name for Share
Name.
9 Click OK.
10 From the Select Port list, select the port to which the printer is connected.
11 If the printer is to be used as the default printer,select the Set as default
printer? check box.
12 Click OK.
13 Check and, if desired, change the description that appears in the Pr inter
Name box, and t hen click OK.
14 After the message “Congratulations, installation complete.”appears, click
OK.
The printer icon is added to the Printers folder and “magicolor2300W
Utilities” is added to Pr ograms in the Start menu.
15 Click to quit the installer program.
16 Remove the magicolor2300W Utilities and Documentation CD-ROM from
your PC’s CD-ROM drive and store it in a safe place.
Installing the Printer Drivers and Software4
Page 13

For a Shared N etwork Printer
EDNord - Istedgade 37A - 9000 Aalborg - Telefon 9633 3500
1 Insert the magicolor2300W Utilities and Documentation CD-ROM in your
PC’s CD-ROM drive. The CD- ROM installer pr ogram starts automatically
(if not, browse with the Windows Explorer to the CD -ROM location and
double-clickon setup.exe).
2 Select the language, and click OK.
3 Click .
4 ClickPrinter Setup.
5 ClickAccept.
6 ClickOK .
7 Select Network Printer, and then click OK.
8 Type \\server_name\shared_printer_name where
server_nameis the name of the shared server and shared_printer_name
is the name of the printer you are sharing.
In Windows 2000 and XP, you can click Browse, and then select the
shared printer.
9 ClickOK .
10 Ifthe printer i s to be used as the default printer,select Yes. Otherwise,
select No.
11 Cl ick OK.
12 After the message “Congratulations,installation complete.” appears, click
OK.
The printer icon is added to the Printers folder.
13 Click t o quit the installer program.
14 Remove the magicolor2300W Utilities and Documentation CD-ROM from
your PC’s CD-ROM drive and store it in a safe place.
Installing the Printer Drivers and Software
5
Page 14
Selecting Driver Options/Defaults
EDNord - Istedgade 37A - 9000 Aalborg - Telefon 9633 3500
Before you start working with your printer, you are advised to verify and, if
necessary, change the default driver settings. Also, if you have any options
installedon the printer, you should configure the driver for these options.
1 Choose the driver’s properties as follows:
– (WindowsMe/98)
From the Start menu, choose Settings and then Pr inters to display
the Printers dialog box. Right-click the magicolor2300W printer i con
and choose Properties. Choose the Printer Properties tab.
– (Windows 2000/XP)
From the Start menu, choose Settings and then Pr inters to display
the Printers dialog box. Right-click the magicolor2300W printer i con
and choose Printing Preferences...
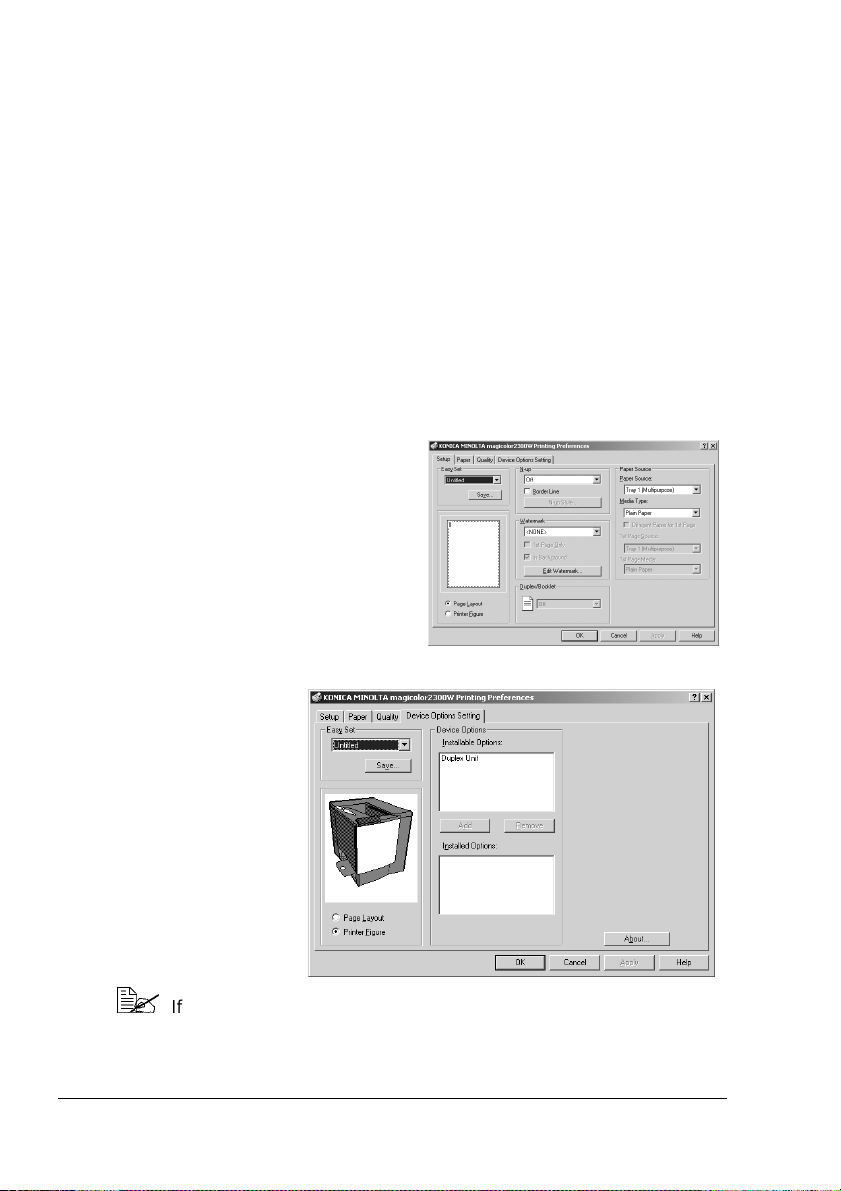
2 Choose the Papertab. Selectthe
default settings f or your printer,
such as the default media format
you use.
3 Click Apply.
4 If you have installed any options
on the printer, pr oceed wi th the
next step. Otherwise, skip to
step 8.
5 Select the
Device Options
Setting tab.
6 Select an option
(one at a t ime)
and click Add.
The option
moves to the
Installed
Options list.
If you accidentally add an option that is not installed on the printer,
selecttheoptionintheInstalled Options list and then click Remove.
Selecting Driver Options/Defaults6
Page 15

7 ClickApply.
EDNord - Istedgade 37A - 9000 Aalborg - Telefon 9633 3500
Depending on the version of the operating system, Apply may not
appear.If t his is the case, continue with the next step.
8 ClickOK to save your changes and exit from the Printing Preferences
dialog box.
Selecting Driver Options/Defaults
7
Page 16
Uninstalling the Printer Driver
EDNord - Istedgade 37A - 9000 Aalborg - Telefon 9633 3500
This section describes how to uninstall the magicolor2300W printer driver if
necessary.
1 From the Startmenu choose Programs, m agicolor2300W Utilities, and
then magicolor2300W Uninstall.
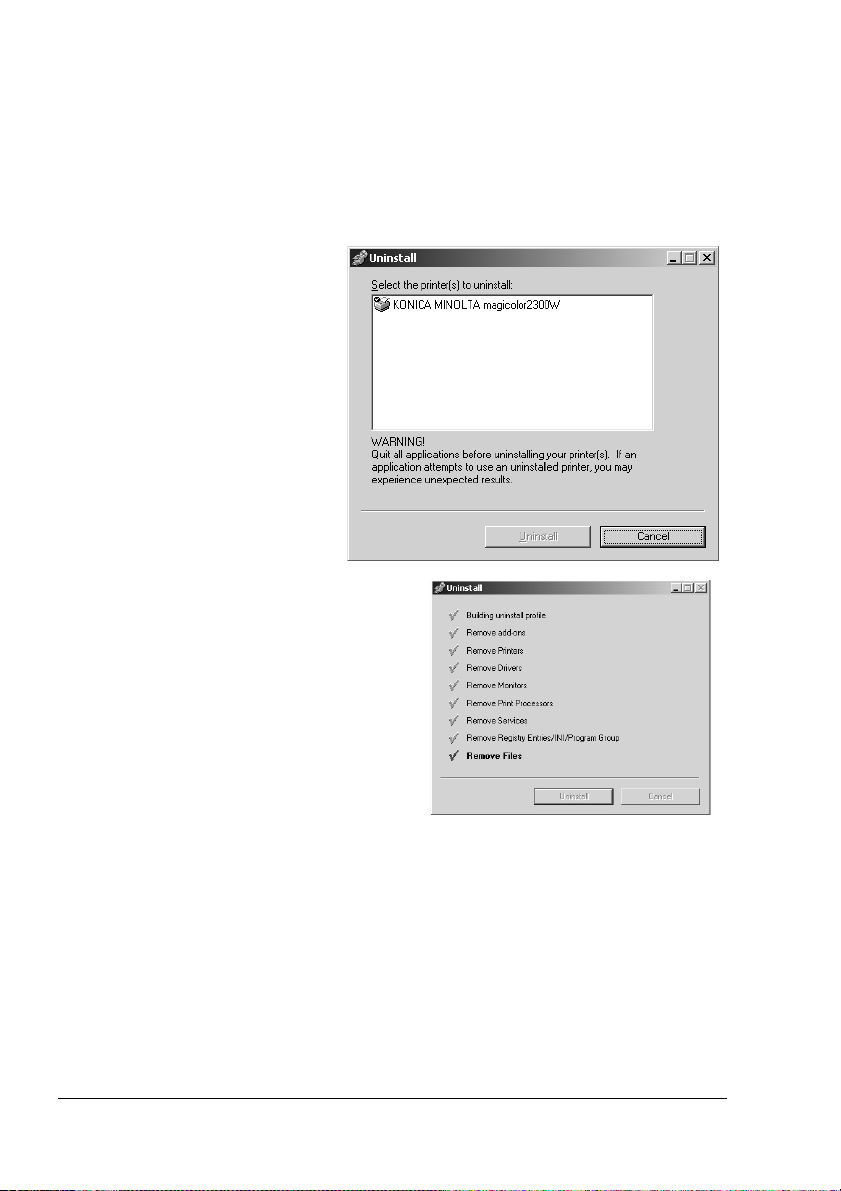
2 In the Uninstall
window,select the
magicolor2300W.
Then click Uninstall.
The magicolor2300W
driver is uninstalledfrom your
computer.
3 Restart your computer.
Uninstalling the Printer Driver8
Page 17

Using Media
EDNord - Istedgade 37A - 9000 Aalborg - Telefon 9633 3500
2
Page 18
Introduction
EDNord - Istedgade 37A - 9000 Aalborg - Telefon 9633 3500
This chapter provides information on handling, selecting, loading, and storing
media.
Getting Started
What types and sizes of media can I load? page 11
What Is the guaranteed imageable (printable)area? page 18
Other Information
How do I load media? page 20
How do I duplex? page 23
How do I store media? page 24
Where can I order KONICA MINOLTA-approved media or get
more information?
All media is fed short edge first, face up.
There is a 0.157" (4 mm) non-print border for all edges on all media
types. Refer to page 18 for paper longer than 11.7" (297 mm).
See your application documentation for specific information on formatting
data and printing.
Try printingyour data on a plain sheet of paper first to check placement.
Only plain paper, 16–24 lb (60–90 g/m2) can be autoduplexed. See
“Media Specifications” for supported sizes.
page 24
Attention
Use only KONICA MINOLTA-approved media. Using unsupported media
such as inkjet paper will result in damaging the printer and i n voiding
your warranty.
Introduction10
Page 19
Media Specifications
EDNord - Istedgade 37A - 9000 Aalborg - Telefon 9633 3500
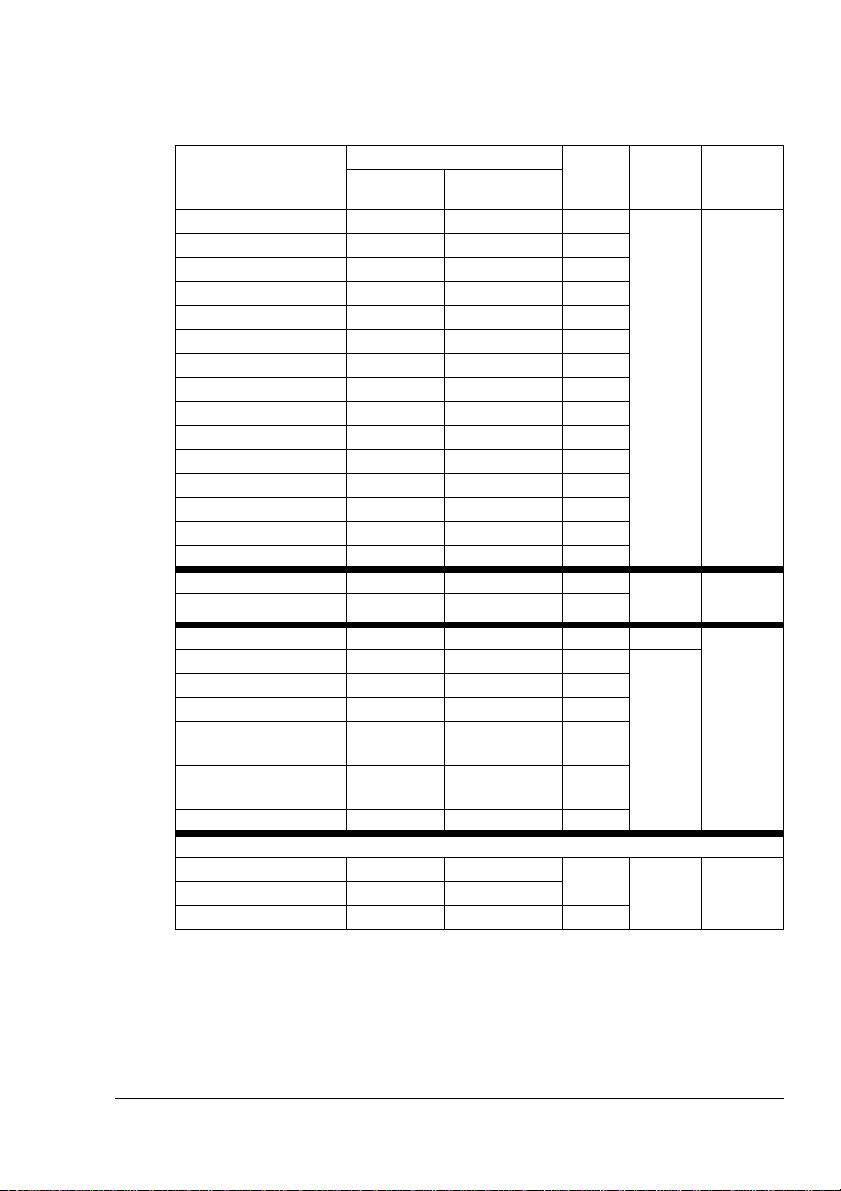
What types and sizes of media can I load?
Media MediaSize Duplex Driver
Inches Millimeters
A4 8.2 × 11.7 210.0 × 297.0 Yes Plain
A5 5.9 × 8.3 148.0 × 210.0 No
B5 (JIS) 7.2 × 10.1 182.0 × 257.0 No
Custom, Minimum 3.6 × 5.8 92.0 × 148.0 No
Custom, Maximum 8.5 × 14.0 216.0 × 356.0 No
Executive 7.25 × 10.5 184.0 × 267.0 No
Folio 8.3 × 13.0 210.0 × 330.0 Yes
Foolscap 8.0 × 13.0 203.2 × 330.2 Yes
Government Legal 8.5 × 13.0 216.0 × 330.0 Yes
Kai 16 7.3 × 10.2 185.0 × 260.0 No
Legal 8.5 × 14.0 215.9 × 355.6 Yes
Letter 8.5 × 11.0 215.9 × 279.4 Yes
LetterPlus 8.5 × 12.7 215.9 × 322.3 Yes
Statement 5.5 × 8.5 140.0 × 216.0 No
UK Quarto 8.0 × 10.0 203.2 × 254.0 No
A4 Transparency 8.2 × 11.7 210.0 × 297.0 No TransLetterTransparency 8.5× 11.0 215.9 × 279.4 No
Japanese Postcard 3.9 × 5.8 100.0 × 148.0 No
EnvelopeB5 (ISO) 6.9 × 9.8 176.0 × 250.0 No
Envelope C5 6.4 × 9.0 162.0 × 229.0 No
Envelope C6 4.5 × 6.4 114.0 × 162.0 No
EnvelopeCommercial
#10
Envelope
InternationalDL
EnvelopeMonarch 3.9 × 7.5 99.0 × 190.5 No
ThickStock—Only supported for letter, A4, or smaller media.
Custom, Minimum 3.6 × 5.8 92.0 × 148.0 No Thick
Custom, Maximum 8.5 × 11.7 216.0 × 297.0
Kai 32 5.1 × 7.3 130.0 × 185.0 No
4.1 × 9.5 104.1 × 241.3 No
4.3 × 8.7 110.0 × 220.0 No
media
Type
Paper
parency
Postcard
Envelope
Stock
Weight
16–24 lb
bond
(60–90
g/m²)
Use only
approved
media
Use only
approved
media
25–90lbs
(91–163
g/m²)
Media Specifications
11
Page 20
Media Types
EDNord - Istedgade 37A - 9000 Aalborg - Telefon 9633 3500
Before purchasing a large quantity of special media, do a trial printing
with the same media and check print quality.Check our web site
www.konicaminolta.net/printer/ for a list of currently approved media.
Keep media on a flat, level surface in its original wrapper until it is time to
load it.
Plain Paper
Capacity Tray 1
(multipurpose
tray)
Orientation Face up
Type Check http://printer.konicaminolta.net/support (click on
"Answer Base") for currently approved media.
Driver
Media Type
Weight 16–24 lb bond (60–90 g/m²)
Duplexing See page 11 for supported sizes.
Use media that is
Suitable for plain-paperlaser printers, such as standard or recycled office
paper.
Plain paper
200 sheets of 22 lb bond (80 g/m
capacityfor other weights varies accordingly.
2
) paper;
Attention
Do not use the media types listed below. These could cause poor print
quality, media jams, or damage to the printer.
Do not use media that is
Coated with a processed surface (such as carbon paper, digitally glosscoated media, colored paper that has been treated)
Carbon backed
Unapproved iron-on t ransfer media (heat-sensitive paper, heat-pressure
paper, heat-press transfer paper)
Cold-water-transfer paper
Pressure sensitive
Designed specifically for inkjet printers (superfinepaper, glossy paper,
glossy film, postcards, etc.)
Already been printed on by another printer, copier, or fax machine
Media Types12
Page 21
EDNord - Istedgade 37A - 9000 Aalborg - Telefon 9633 3500
Dusty
Wet (or damp)
Keep media between 35% to 85% relative humidity.Tonerdoes
not adhere well to moist or wet paper .
Layered
Adhesive
Folded, creased, curled, embossed, warped, or wrinkled
Perforated, three-holepunched, or torn
Tooslick,toocoarse,tootextured
Differentin texture (roughness) on the front and back
Too thin or too thick
Stuck t ogether with static electricity
Composed of foil or gilt; too luminous
Heat sensitive or cannot withstand the fusing temperature (356°F/180°C)
Irregularlyshaped (not rectangularor not cut at right angles)
Attached with glue, tape, paper clips, staples, ribbons, hooks, or buttons
Acidic
Any other media that is not approved
Thick Stock
Paper thicker than 24 lb (90 g/m2) bond is r eferred to as thick stock. Test all
thick stock to ensure acceptable performanceand to ensure that the i mage
does not shift.
Capacity Tray 1 Up to 50 thick stock sheets, depending on their
thickness.Thick stock is supported only in letter,
A4, or smaller media sizes.
Orientation Face up
Type Check http://printer.konicaminolta.net/support (click on
"Answer Base") for currently approved media.
Driver
Media Type
Weight 25–43 lb bond (91–163 g/m²)
Duplexing Not supported
Notes 43 lb (163 g/m²) bond is also referred to as 90 lb index stock.
Thick stock
Media Types
13
Page 22
Do not use thick stock that is
EDNord - Istedgade 37A - 9000 Aalborg - Telefon 9633 3500
Mixed with any other media in the media trays (as this will cause media
jams)
Envelopes
Print on the front (address) side only. Some parts of the envelope consist of
three layers of paper—the front, back, and flap. Anything printed in these
layered regions may be lost or faded.
Capacity Tray 1 Up to 10 envelopes, depending on their thickness
Orientation Face up
Type Check http://printer.konicaminolta.net/support (click on
"Answer Base") for currently approved media.
Driver
Media Type
Weight 25–43 lb bond (91–163 g/m²)
Duplexing Not supported
Use envelopes that are
Common officeenvelopes approved for laser printing with diagonal joints,
sharp folds and edges, and ordinary gummed flaps
Dry
Printed on the front address side only
Do not use envelopes that have
Self-sticking flaps
Tape seals, metal clasps, paper clips, fasteners, or peel-off strips for
sealing
Transparent windows
Too rough of a surface
Material that will melt, vaporize, offset discolor, or emit dangerous fumes
Been presealed
Envelope
Because the envelopes pass through heated rollers, the gummed
area on the flaps may seal. Using envelopes with emulsion-based
glue avoids this problem.
Media Types14
Page 23
Labels
EDNord - Istedgade 37A - 9000 Aalborg - Telefon 9633 3500
A sheet oflabels consistsof a face sheet(the printing surface), adhesive,and
a carrier sheet:
The face sheet must follow the plain paper specification.
The face sheet surface must cover the entire carrier sheet, and no
adhesive should come through on the surface.
You can pr int continuouslywith l abel paper. However, this could affect the
media feed, depending on the media quality and printing environment. If
problems occur, stop the continuous printing and print one sheet at a time.
Format label data within your application. Try printing your data on a plain
sheet of paper first to check placement. Check your application
documentation for other information on printing labels.
Capacity Tray 1 Up to 50 label sheets, depending on their thickness
Orientation Face up
Type Check http://printer.konicaminolta.net/support (click on
"Answer Base") for currently approved media.
Driver
Media Type
Weight 16–90 lb (60–163 g/m²)
Duplexing Not supported
Use label sheets that are
Recommended for laser printers
Letter or A4 size (adhesive label stock)
Do not use label sheets that
Have labels that easily peel off
Have backing sheets that have peeled away or have exposed adhesive
Labels
Attention
Labels that easily peel off their backing sheetsand labels with
exposed adhesive may stick to the fuser and cause media jams.
Media Types
15
Page 24
EDNord - Istedgade 37A - 9000 Aalborg - Telefon 9633 3500
Are precut or perforated
Do not use
Shiny backed paper
OK to use
Full-page labels
(uncut)
Letterhead and Memo Media
Format letterhead or memo data within your application. Try printing your
data on a plain sheet of paper first to check placement.
Capacity Tray 1 Up to 200 sheets, depending on their size and
thickness
Orientation Face up
Type Check http://printer.konicaminolta.net/support (click on
"Answer Base") for currently approved media.
Driver
Media Type
Weight 16–24 lb bond (60–90 g/m²)
Duplexing See page 11 for supported sizes (face up—top of page first).
Plain paper
Postcards
Format postcarddata withinyour application. Tryprinting your dataon a plain
sheet of paper first to check placement.
Capacity Tray 1 Up to 50 postcards, depending on their thickness
Orientation Face up
Type Check http://printer.konicaminolta.net/support (click on
"Answer Base") for currently approved media.
Driver
Media Type
Weight 16–90 lb (60–163 g/m²)
Duplexing Not supported
Postcard
Media Types16
Page 25
Use postcards that are
EDNord - Istedgade 37A - 9000 Aalborg - Telefon 9633 3500
Recommended for laser printers
Do not use postcards that are
Coated
Designed for inkjet printers
Precut or perforated
Warped
If postcards are warped, press on the warped
area before puttingthem in Tray 1. Preprinted
or multicolored postcards may cause media
jams.
Transparencies
Attention
Use only the KONICA MINOLTA-approved media. Using unsupported
transparencies will result in damaging your printer and in voiding your
warranty. Check www.konicaminolta.net/printer/ for currently approved
media. To order approved transparency media, go to www.q-shop.com.
Do not fan t ransparencies before loading them. Resulting static
electricitymay cause printing er rors.
Do not handle transparencies too much. If you touch the face of the
transparencies with your bare hands, print quality may be affected.
Keep the media pathclean. Transparenciesare especially sensitiveto
a dirty media path. If there are shadows on eitherthe top or the bottom
of the sheets, see chapter 7, “Maintaining the Printer”.
Remove transparencies as soon as possible from the output tray to
avoid static buildup.
You can print continuously with transparencies.However,this could affectthe
media feed, depending on the media quality, static buildup, and printing
environment.
Format the information to be printed on the transparencieswithin your
application.Try printing your data on a plain sheet of paper first to check
placement.
Media Types
17
Page 26
EDNord - Istedgade 37A - 9000 Aalborg - Telefon 9633 3500
If you have problems feeding 50 sheets, try loading only 1–10 sheets
at a time. Loading a large number of transparencies at a time may
cause static buildup, t hus causing feeding problems.
Capacity Tray 1 Up to 50 transparencies, depending on their
thickness
Orientation Face up
Type Check http://printer.konicaminolta.net/support (click on
"Answer Base") for currently approved media. To order
approved transparency media, go to www.q-shop.com.
Driver
Media Type
Duplexing Not supported
Use transparencies that are
Approved by KONICA MINOLTA
Do not use transparencies that
Have static electricity that will cause them to stick together
Transparency
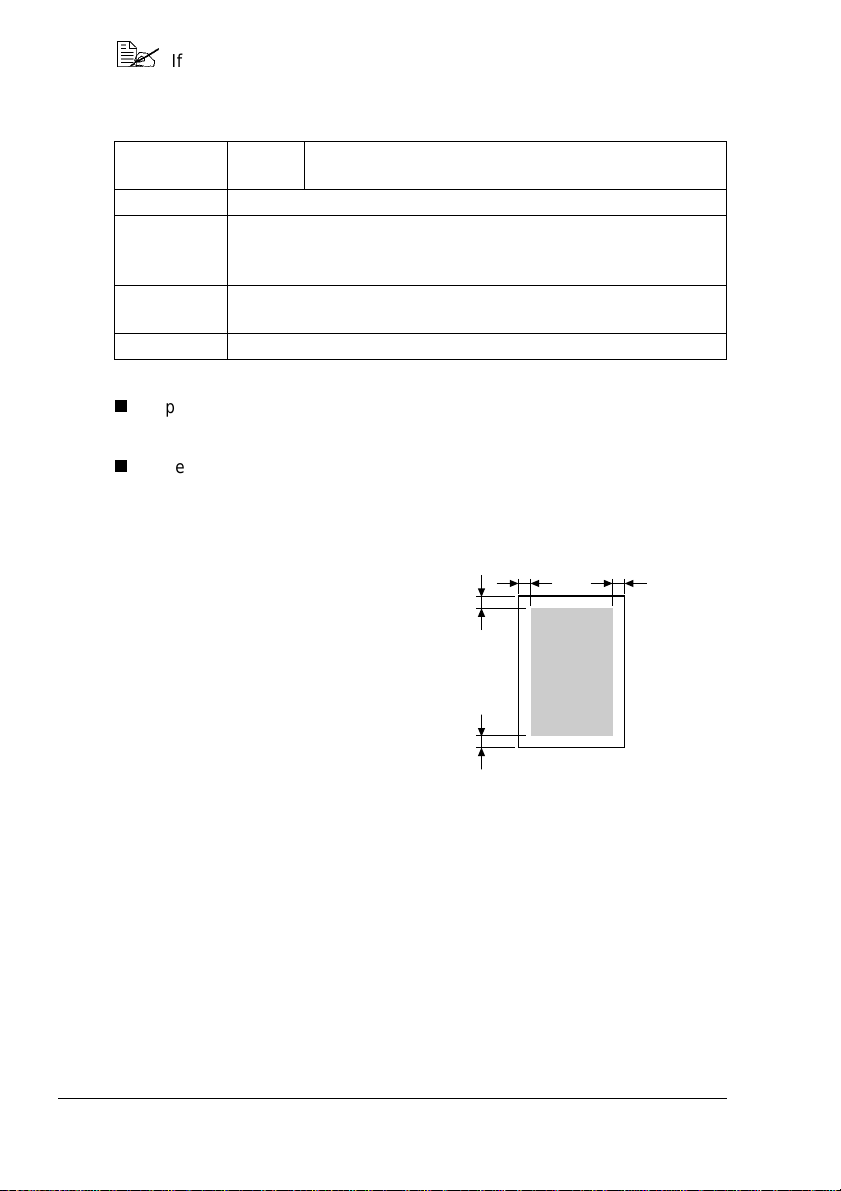
What Is the Guaranteed Imageable (Printable) Ar ea?
Theprintableareaonallmediasizesis
up to 0.157" (4 mm) from the edges of
the media.
Each media size has a specific
imageable area, t he maximum area on
which the printer can print clearly and
without distortion.
This area is subject to both hardware
limits ( the physical media size and the
margins required by the printer) and
software constraints (the amount of
memory available for the full-page frame buffer). The guaranteed imageable
(printable) area for all media sizes is the page size minus 0.157" (4 mm) from
all edges of the media.
a
a
Printable
a
a = 0.157" (4 mm)
a
Area
Nonguaranteed Are a—Me dia Longer Tha n 1 1.7" (297 m m )
Any media longerthan 11.7" (297 mm) has an additionalnonguaranteed area
of 0.236" (6 mm) on the bottom of each page.
Media Types18
Page 27
Color printing starts 0.157" (4 mm) from the top of the page and extends as
EDNord - Istedgade 37A - 9000 Aalborg - Telefon 9633 3500
far as 13.4" (341.6 mm). Monochrome printing starts 0.157" (4 mm) from the
top of the page and extends as far as 13.7" (347.6 mm).
a = nonprintable area
(0.157"/4 m m)
b = color guaranteed
printable area =
up to 13.4"/
341.6 mm
c = monochrome
guaranteed
printablearea =
up to 13.7"/
347.6 mm
aa
aa
m
m
6
.
1
4
3
/
"
4
.
3
1
=
b
aa
aa
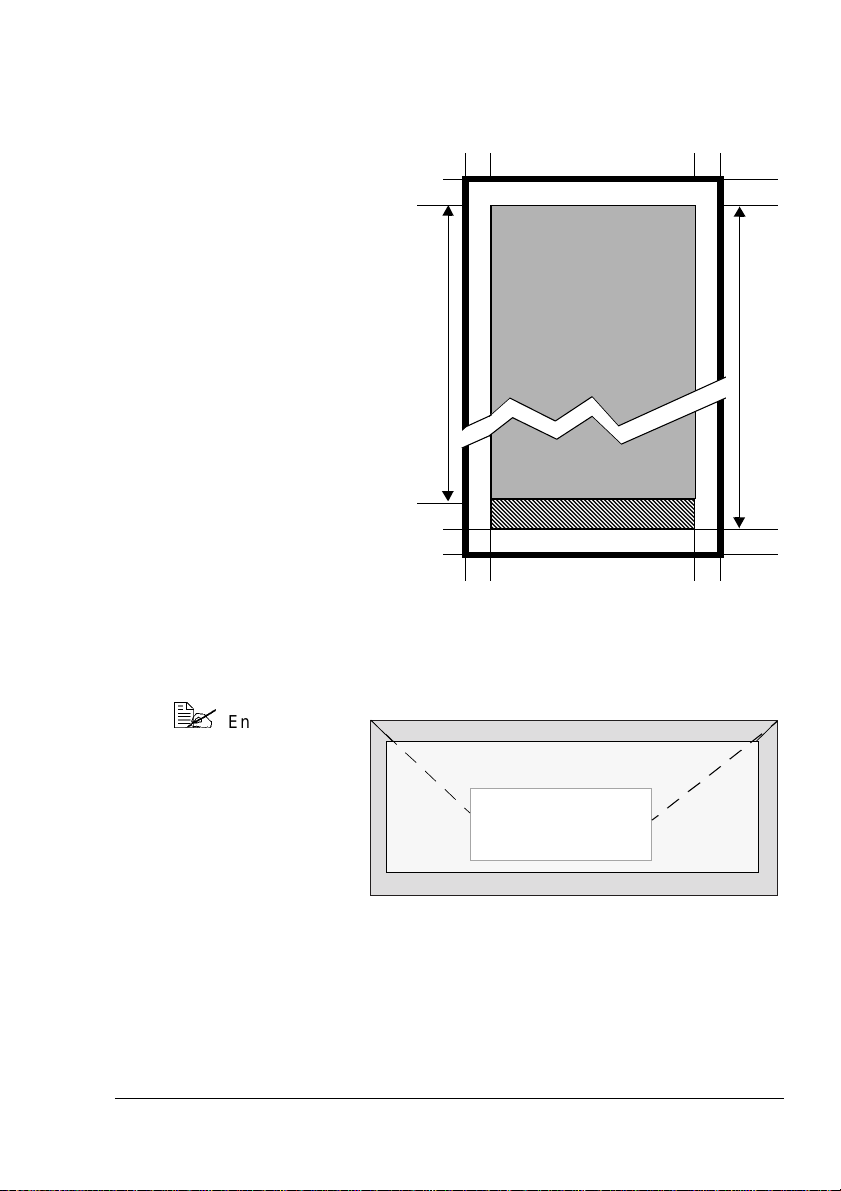
Imageable Area—Envelopes
Envelopes have a nonguaranteed flap area that varies with envelope type.
Envelope print
orientationis
determined
by your
application.
Nonimageable area 0.157" (4 mm)
Nonguaranteed area
Guaranteed
area
m
m
6
.
7
4
3
/
"
7
.
3
1
=
c
Page Margins
Margins are set through your application. Some applications allow you to set
custom page sizes and margins while others have only standard page sizes
and margins fromwhich to choose. If you choosea standard format, you may
lose part of your image (due t o imageable area constraints). If you can
custom-sizeyour page in your application, use those sizes given for the
imageable area for optimum results.
Media Types
19
Page 28
Loading Media
EDNord - Istedgade 37A - 9000 Aalborg - Telefon 9633 3500
How do I load media?
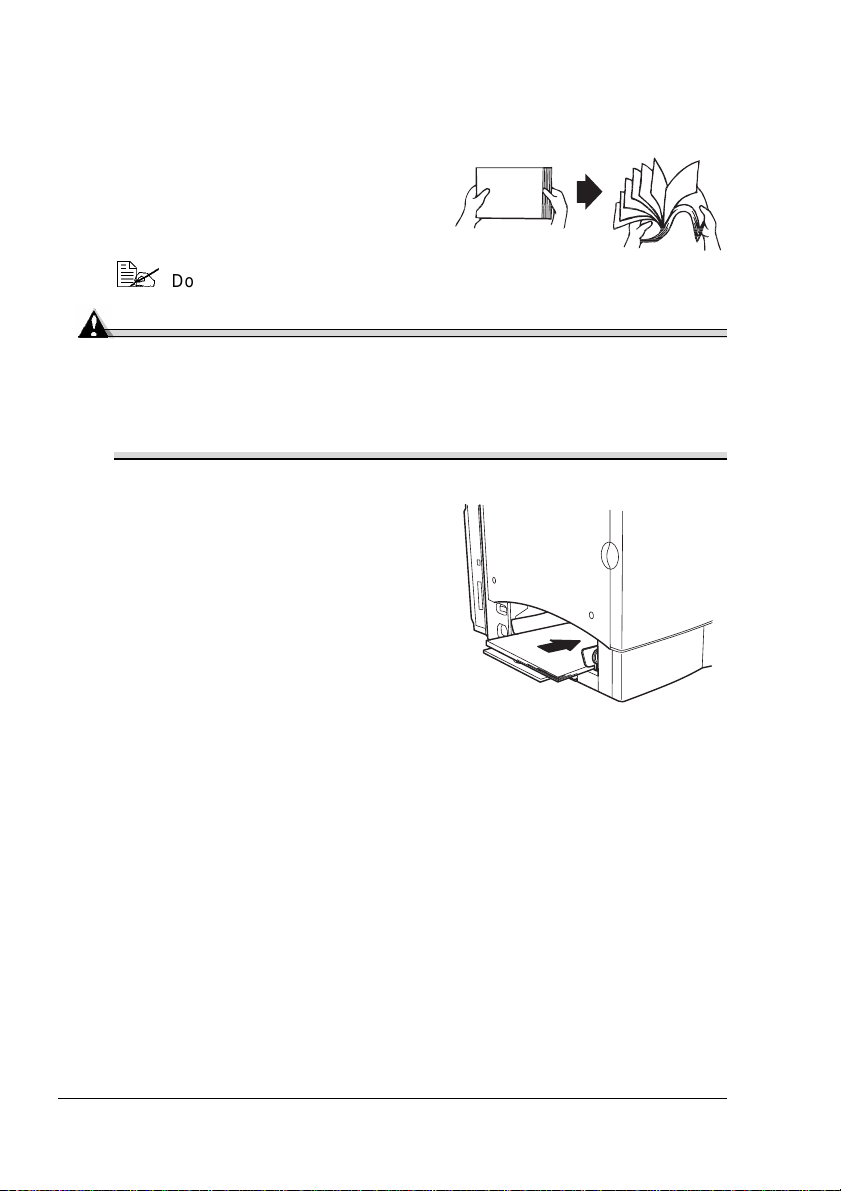
Take off the top and bottom sheets of a
ream of paper.Holding a stack of
approximately 200 sheets at a time, fan
the stackto prevent staticbuildup for the
paper before inserting it in a tray.
Do not fan t ransparencies.
Attention
Although this printer was designed for printing on a wi de range of
media types, it is not intended to print exclusively on a single media
type except plain paper. Continuous printing on media other than plain
paper ( envelopes, labels, thick stock, postcard, letterhead, or
transparencies) may adversely affect print quality or reduce engine life.
When refilling media, first remove any
media remainingin the tray. Stack it with
the new media, even the edges, then
reload it.
Tray 1 (Multipurpose Tray)
All supported media sizes and types can be printed from Tray 1.
See “Media Specifications” on page 11for more information about media.
Plain Paper
1 If you already have media in Tray 1 and want to change it, remove the
media from Tray 1.
Loading Media20
Page 29
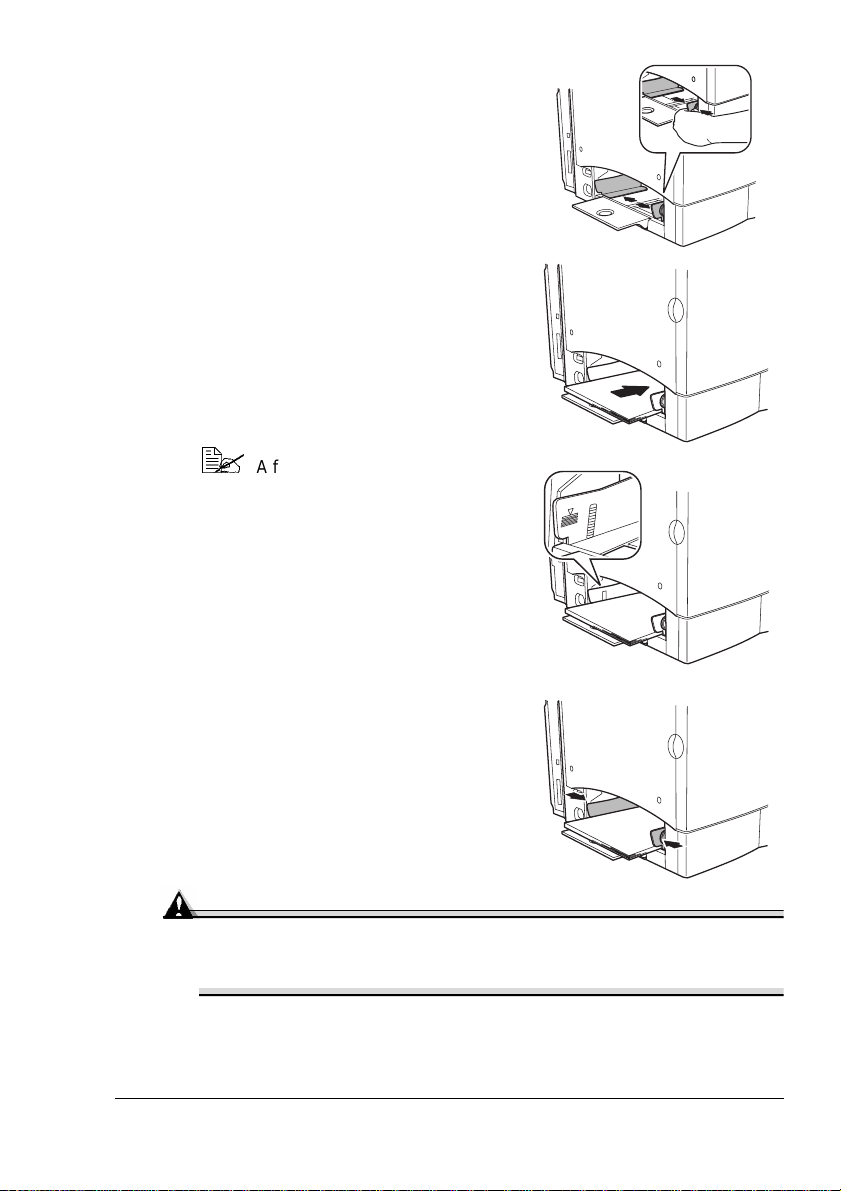
2 Adjust the media guides to fit the
EDNord - Istedgade 37A - 9000 Aalborg - Telefon 9633 3500
appropriate media s izes.
3 Loadthe media face up, short edge (or
letterhead) first.
Often, an arrow on the paper package
label indicates the face-up (printing)
side of the paper.
A fill limitmark is provided on the
inside of the media guides on
Tray 1 (the multipurpose tray).
Tray 1 holds 200 sheets of 22 lb
bond (80 g/m²) paper.
4 Slide the media guides up against the
edge of the media.
Attention
Always adjust the media guides after inserting the media. Media
guides that are not properly adjusted can result in poor print quality,
media jams, or printer damage.
5 In the printer driver, select the appropriate media mode. Then print
the job.
Loading Media
21
Page 30
Other Media
EDNord - Istedgade 37A - 9000 Aalborg - Telefon 9633 3500
When loading media other than plain paper, set the media mode (Envelope,
Label, Thick Stock,Postcard, Letterhead, or Transparency) in the driver.
For optimum printing resultsit’s important t o specify the type of media
loaded into Tray1.
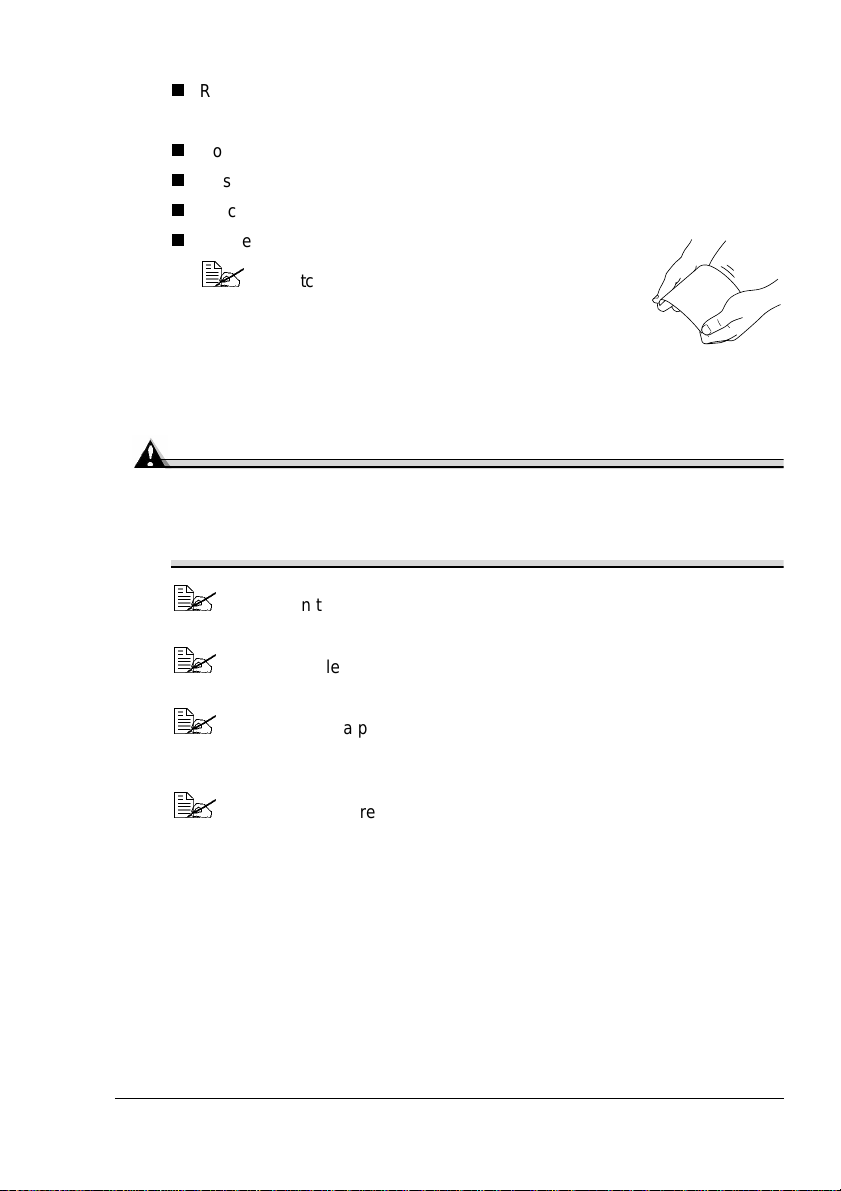
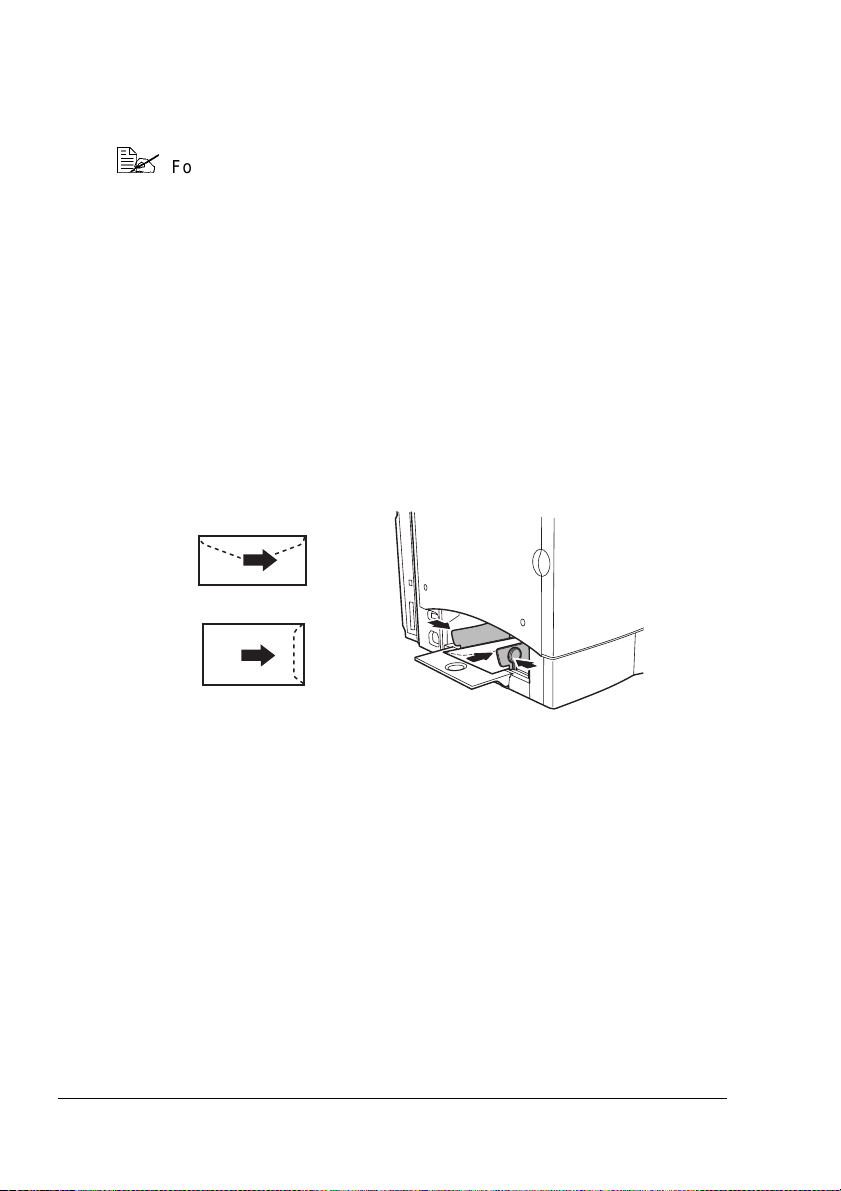
Envelopes
1 Flex the envelope stack (including the edges) to remove any stiffness.
2 Place t he envelopes on a flat surface, and flatten them by pressing down
the corners.
3 Correct any bent corners, and then tap the envelopes on a flat surface to
align them.
4 Place t he envelope stack into Tray 1 with the flap-side underneath. If the
flap is on the short end of the envelope, insert it into the printer first.
Print a single envelope to check t he orientation before printing
multiple copies.
5 Adjust the media guides to the width of the envelopes.
Make sure the guides are snug enough to keep the envelopes straight,
but not so tight t hat they buckle the envelopes.
6 In the printer driver, s elect Envelope mode. Then print the job.
7 Openthe flap of each envelope immediately (before it cools) after the
envelope is delivered to the output tray.
Loading Media22
Page 31

Duplexing
EDNord - Istedgade 37A - 9000 Aalborg - Telefon 9633 3500
How do I print back-to-back (duplex)?
Select paper with high opacity for duplex (2-sided) printing. Opacityrefers to
how effectivelypaper blocks out what is written on the opposite side of the
page. If the paper has low opacity (high translucency), then the printed data
from one side of the page will show through to the other side. Check your
application for margin information. For best results, print a small quantity to
make sure the opacity is acceptable.
Duplex (2-sided)printing can be done manually or can be done automatically
with the duplex option installed and selected.
Attention
Only plain paper, 16–24 lb (60–90 g/m2) can be autoduplexed. See
“Media Specifications” for supported sizes.
Duplexing custom-sized media, envelopes, labels, postcards, thick
stock, or transparencies is not supported.
How do I autoduplex?
Verify that the duplex option is installed on the printer, and check your
application to determine how to set your m argins for duplex
printing.
1 To print duplex (both sides of the sheet), load the media printing-side up
with the top of the media toward the back of the tray.
In autoduplexing,the back side is printed first and the front side is
printed last.
2 Set the driver for the duplex layout you prefer.
Long Edge creates a document that flips horizontally as in a loose-leaf
notebook; Short Edge creates a document that flips vertically, as on a
clipboard.
3 ClickOK .
Duplexing
23
Page 32

Output Tray
EDNord - Istedgade 37A - 9000 Aalborg - Telefon 9633 3500
All media is output to the output tray on top of the printer. The face-down
output tray has a capacity of 150 sheets (legal-size) or 200 sheets (letter/A4)
of 22 lb ( 80 g/m
If the media is stacked too high, your printer may experience media
jams, excessive media curl, or static buildup.
Remove transparencies as soon as possible from the out put tray to
avoid static buildup.
2
) bond paper.
Media Stora ge
How do I store media?
Keep media on a flat, level surface in its original wrapper until it is time to
load it.
Media that has been stored for a long time outside of i ts packagingmay
dry up too much and cause jamming.
If media has been removed from its wrapper,place it in its original
packaging and store in a cool, dark place on a level surface.
Avoid moisture, excess humidity,direct sunlight, excess heat (above
95°F/35°C), and dust
Avoid leaning against other objects or placed in an upright position
Before using stored media, do a trial printing and check print quality.
Additional Assistance
Where can I order KONICA MINOLTA-approved me dia or
get more information?
Check http://printer.konicaminolta.net/support (click on "Answer Base") for
currently approved media. To order approved transparencymedia, go to
www.q-shop.com.
See the Service & Support Guide for a list of sources of service and support
for many areas of the world. The most current worldwide information can be
found at www.konicaminolta.net/printer/.
Output Tray24
Page 33

Working with the
EDNord - Istedgade 37A - 9000 Aalborg - Telefon 9633 3500
Printer
3
Page 34

About the Control Panel
EDNord - Istedgade 37A - 9000 Aalborg - Telefon 9633 3500
The control panel, located on the top of the printer, allows you to direct the
printer’s operation.In addition, it displays the current status of the printer,
including any condition that needs your attention.
One key allows you to control the printer configuration through access to
frequently used printer functions.
Four indicator lights (LEDs) provide printer status information.
Control Panel Key
Key Function
Cancels printing when held down for at least 5 seconds.
Overrides a media size/type mismatch when held down for
less than 5 seconds.
Resets the printer to factory defaults when held down for at
least 20 seconds while the printer’s front door is open.
About the Control Panel26
Page 35

Indicator Lights
EDNord - Istedgade 37A - 9000 Aalborg - Telefon 9633 3500
Green LED Orange LED
Off Off Power off
Blinking slowly* Off Energy Saver mode
On Off Printer idle
Blinking
normally**
Blinking normally** Communication error
Blinking
rapidly***
Off On Cover open
Off Binkingslowly* No paper in Tray 1
Off Blinking
Off Blinking
On Blinking slowly* Waste toner bottle is nearly full
On Blinking
Blinkingrapidly*** Insertmedia
*Blinking s l owly 1 blink every 2.4 seconds
**Blinkingnormally 1 blink every 1.2 seconds
***Blinking rapidly 2 blinks every 1.2 seconds
Off Processingdata
Printing
Off Warming up
Calibrating
Media jam
normally**
rapidly***
normally**
Waste toner bottle is full
Fatal error
Service Call
Drum cartridge life has nearly expired
OPC drum cartridge life has expired
Mediasizemismatch
Printer Status****
****For details, check theStatus Display utility.
Refer to “Working with the Status Display”on page 40.
About the Control Panel
27
Page 36

Black Toner
EDNord - Istedgade 37A - 9000 Aalborg - Telefon 9633 3500
Orange LED
Blinking normally** Black t oner low
On Black toner empty
Blinking rapidly*** Ready to change black toner cartridge
Refer to “Replacing a Toner Cartridge”on page 49.
*Blinking slowly 1 blink every 2.4 seconds
***Blinking rapidly 2 blinks every 1.2 seconds
Condition
Color Toner
Orange LED
Blinking normally** Color toner low
On Color toner empty
Blinking rapidly*** Ready to change color toner cartridge
Refer to “Replacing a Toner Cartridge”on page 49.
*Blinking slowly 1 blink every 2.4 seconds
***Blinking rapidly 2 blinks every 1.2 seconds
Condition
About the Control Panel28
Page 37

Working with the
EDNord - Istedgade 37A - 9000 Aalborg - Telefon 9633 3500
Printer Driver
4
Page 38

Introduction
EDNord - Istedgade 37A - 9000 Aalborg - Telefon 9633 3500
The printer dr iver functions are summarized in this chapter.
For informationo n connecting the printer to the computer, refer to “Connect
the InterfaceCable” in the Installation Guide.For information on installingthe
printer driver, refer to chapter 1, “Software Installation”, in this manual.
Displaying Printer Driver Setting s
In addition to the printer driver tabs described in this section, the
Windows operating system also uses tabs. The General and Details
tabs are automatically determined by the operating system and are
therefore not described in this manual.
Refer to the printer driver’s online help for complete information on all driver
features.
Displaying Settings in Windows 2000/XP
1 From the Start menu, choose Settings and then Printers to display the
Printers dialog box.
2 Right-click the magicolor2300W printer icon and choose Printing
Preferences....
Displaying Settings in Windows Me/98
1 From the Start menu, choose Settings and then Printers to display the
Printers dialog box.
2 Right-click the magicolor2300W printer icon and choose Properties.
3 Choose the Printer Properties tab.
Introduction30
Page 39

Common Settings on All Tabs
EDNord - Istedgade 37A - 9000 Aalborg - Telefon 9633 3500
Save [Easy Set]
1 To save the current settings, click Save....
Multiple settings can be saved. Select your preferredsettings, and
type a title in the dropdown list box. The saved settings can later
be selected from the dropdown list.
2 Select Default from the dropdown list to reset the functions of the tab to
their original values.
Page Layout
Click this radio button to display a sample of the page layout in the figure
area. This figure shows the following:
Imaging area
Paper size
Orientation
N-up
Watermark
Duplex/Booklet
Refer to the printer driver’s online help for complete information on all of
these features.
Displaying Printer Driver Settings
31
Page 40

Printer Figure
EDNord - Istedgade 37A - 9000 Aalborg - Telefon 9633 3500
Click this radio button to display an image of the printer in the figure area.
Common Buttons
OK
Click this button to exit the Properties dialog box, saving any changes made.
Cancel
Click this button to exit the Properties dialog box without saving any changes
made.
Apply
Click this button to save all changes without exiting the Properties dialog box.
Apply is displayed when the Propertiesdialog box is opened from the
Printer folder.Apply i s not displayed if the Properties dialog box is
opened from the application.
Help
Click this button to view online help.
Help on a Specific Item
Click andthen click on a feature in the driver to see more information
about that feature.
Close
Click toclose the Properties dialog box without saving any changes
made.
Displaying Printer Driver Settings32
Page 41

Setup Tab
EDNord - Istedgade 37A - 9000 Aalborg - Telefon 9633 3500
This tab allows you to:
Print several pages of a document on the same print page (N-up)
Provide printouts with a watermark
Design and edit custom watermarks
Specify duplex and booklet printing
Specify paper source
Define the type of media
Refer to the printer driver’s online help for complete information on all of
these features.
Setup Tab
33
Page 42

Paper Tab
EDNord - Istedgade 37A - 9000 Aalborg - Telefon 9633 3500
This tab allows you to:
Select an original document size
Set up custom paper sizes
Select the output paper size
Scale (enlarge/reduce) documents upon printout
Specify the orientationof the paper
Specify the number of copies
Select uncollated/collated
Print using a form overlay
Add and edit form overlays
Refer to the printer driver’s online help for complete information on all of
these features.
Paper Tab34
Page 43

Quality Tab
EDNord - Istedgade 37A - 9000 Aalborg - Telefon 9633 3500
This tab allows you to:
Switch between color and monochrome printing
Specify color matching (Images, Graphics and Text)
Specify the resolution for the printout
Control the tones of an image (Contrast)
Control the darkness of an image (Brightness)
Control the color purity of an image (Saturation)
Control the clarity of an image (Sharpness)
Refer to the printer driver’s online help for complete information on all of
these features.
Quality Tab
35
Page 44

Color Matching
EDNord - Istedgade 37A - 9000 Aalborg - Telefon 9633 3500
You can specify whether or not to use the Color Matching function, which
adjuststhe printer’s colortones to accuratelyreproduce the color tones of the
monitor.
Choices Off Does not use color matching.
With certain applications, such as desktop
publishing applications, data is color-matched to
be the most suitable for the printer. If this type of
output setting is used in the application, Color
Matching should be turned off.
On Uses color matching.
If On is selected, Images (bitmap image data
such as photos), Graphics (graphic data such as
drawings) and Text (text data such as written
documents) can be set to one of the three color
conversionmethods
Perceptual: This method is most suitable for
photographic images. With this method, the
data is smoothly reproduced with minimal
brightnessvariations.
Saturation: This method is most suitable for
business presentations and other similar applications. W ith this method, the data is reproduced with more vivid tones.
*
:
Colorimetric:This method can be used for
any t ype of application.The data is reproduced
with the tones of the original image. However,
when data is reproduced on the monitor and
the color of some areas cannot be expressed
accurately or with the printer colors, those colors are replaced with the closest printer color,
so that the difference in the color of those
areas is not noticeable.
Quality Tab36
Page 45

Notes The ICM color profile, which is automatically defined when the
EDNord - Istedgade 37A - 9000 Aalborg - Telefon 9633 3500
driveris installed,is used and acolor conversionis made in the
driver so that sRGB colors can be output. sRGB is a general
Windows color space with the color space international
standard (IEC61966-2-1)defined by the IEC (International
Electrotechnical Commission).
There are also additional ICM profiles available on the Utilities
and DocumentationCD-ROM for specificapplications, such a s
Photoshop. Refer to the readme on the CD-ROM for more
information.
* Colors that can normally be displayed on the monitor
include many vivid or bright colors that cannot be reproduced by with the printer. In this case, the colors are compressed with the perceptual, saturation, or colorimetric
method to convert them to colors that can be reproducedby
the printer.
Quality Tab
37
Page 46

Device Options Setting Tab
EDNord - Istedgade 37A - 9000 Aalborg - Telefon 9633 3500
This tab allows you to:
Activate t he duplex option
View information about the printer driver
Refer to the printer driver’s online help for information on all of these
functions.
Device Options Setting Tab38
Page 47

Working with the
EDNord - Istedgade 37A - 9000 Aalborg - Telefon 9633 3500
Status Display
5
Page 48

Working with the Status Display
EDNord - Istedgade 37A - 9000 Aalborg - Telefon 9633 3500
The StatusDisplay displays information about the current status of the
computer’slocal printer.Ifyou used the CD-ROM Installerto installthe printer
driver, the Status Display was also installed. However,if you used Add Printer
to manually install t he printer driver, Status Display is not installed.
Environment
The StatusDisplay functions over parallel and USB connections on all
supported Windows operating systems,but only for the default printer.
Opening the Status Display and S howing Supplies Status
1 Double-click the Status Display icon in the taskbar. (If the Status Dis-
play icon does not appear in the taskbar, point to Programs in the Start
menu, and then point to KONICA MINOLTA m agicolor2300W Utilities
and clickKONICA MINOLTA magicolor2300W Status.)
2 From the Display menu, choose Supplies Status to view remaining
consumables life.
Working with the Status Display40
Page 49

Using the Status Display
EDNord - Istedgade 37A - 9000 Aalborg - Telefon 9633 3500
When the background of the r ight-hand printer graphic is green, the
printer is in standby mode or a job is printing normally.
When the background of the r ight-hand printer graphic is red, there is an
error and the job has been interrupted. The status of the printer and the
error message are shown in the dialog boxes on the left.
The function areas include:
Printer Status—Displays text messages that describe the current
operational status of t he printer.
How to Recover—Providesyou with instructions to correct problems and
recover from error conditions.
Warning Status—Displaystext messages that warn you of s uch
conditions as low toner.
Printer Status Figure—Shows a graphic representation of the printer
and indicates where there is a problem.
Printing Status—Displays the statusof the current print job.
Working with the Display Menu
Popup Setting—Allows you to choose which message(s) you want to
bring to the foreground when that particular condition occurs on the
printer.
Reduce—Decreases t he size of the Status Display window.
Expand—Increases the size of the Status Display window.
Using the Status Display
41
Page 50

EDNord - Istedgade 37A - 9000 Aalborg - Telefon 9633 3500
Printer Information—Displays the total print count, the list of installed
options and the memory size.
Supplies status—Displays consumables usage (percentage remaining)
for the toner cartridges and OPC drum cartridge.
Refer to the Status Display’s online help f or information on all of its functions.
WorkingwiththePrintMenu
Power On Test—Performs an AIDC (Auto Image Density Control)
calibrationcycle. Wait until the test is finished, the Ready indicator on the
control panel lights up,and the Error indicator goes off (less than 150
seconds).
Mode Setting
Duplex Density
Adjusts the density of the second side of the paper when duplex
printing.
Energy Saver
Sets the length of time until the printer enters Energy Saver mode
after it no longer receives print jobs or is not operated. If a print job is
received while the printer is in Energy Saver mode, the printer warms
up, then returns to normal print mode before starting to print.
Auto Continue
When set to On, causes the printer to continue printing even if the
specified t ray is not loaded with paper of the correct size. If the Auto
Continue setting is changed during printing, the setting remains valid
for future print jobs.
Toner Empty Mode
Function that automaticallyrepositions the carousel so that the appropriate toner cartridge can be removed when it is empty.
Stop mode:
Select the Toner Empty Mode check box to have the carousel automatically r eposition so that the empty toner cartridge can be removed
when the Black Toner or Color Toner LED is lit. While a toner LED is
lit, print jobs cannot be received. (Any print jobs sent to the printer will
be cancelled.)
Continue mode:
Clear the Toner Empty Mode check box to have the carousel automatically repositionto the neutral position* when t he Bl ack Toneror Color
Toner LED is lit.
*Neutral position: The carousel is in the position where the cyan toner
cartridge can be removed.
Using the Status Display42
Page 51

EDNord - Istedgade 37A - 9000 Aalborg - Telefon 9633 3500
Toner Replace...
Replacing Toner
Allows you to replace a toner cartridge.
1. From the list, select the color of the toner cartridge to be replaced.
2. Click OK.
3. Open the front door, and then replace the toner cartridge.
Refer to “Replacing a TonerCartridge” on page 49 for complete details.
Changing Capacity
Allows you to replace a toner cartridge capacity setting.
1. Select the Change Capacity only check box.
2. From the list, select the color of the toner cartridge to be change
capacity.
3. Select the capacity of the toner cartridge (1500
4. Click OK.
*1 Standard-Capacity Toner Cartridge.
*2 High-Capacity Toner Cartridge.
Print Status Sheet
Prints an LED status Sheet, which lists all LED combinations and their
related printer status and error conditions.
Print Config Page
Prints the detailed informationof the configuration page.
*1
or 4500*2)
Using the Status Display
43
Page 52

Closing the Status Display
EDNord - Istedgade 37A - 9000 Aalborg - Telefon 9633 3500
To close the Status Display from the File menu, choose Exit.
If you click the X button in the upper-right corner of the Status Display
window to close the window, the Status Display remains available at
the right end of t he taskbar.Double-click the icon to open it again.
Closing the Status Display44
Page 53

Replacing
EDNord - Istedgade 37A - 9000 Aalborg - Telefon 9633 3500
Consumables
6
Page 54

Consumable Life Expectancies
EDNord - Istedgade 37A - 9000 Aalborg - Telefon 9633 3500
Plain Paper
The stated life expectancy of each consumable is based on printing under
specific operating conditions such as media type, number of color planes,
page size, and page coverage (at normal 5% coverage of letter-/A4-size
media). The actual life expectancy will vary depending on these and other
printing variables, including continuous or intermittent printing,ambient
temperature, and humidity. For current information about consumable life
expectancies, refer to http://printer.konicaminolta.net/support, then click on
“Answer Base.”
The following messages in the Status Display’s message window i ndicate
that a consumable needs to be replaced.
Message This item needs replacing by
user after...
Drum Cartridge
End of
Life
COLOR
Toner Low
or
COLOR
Toner
Empty
or
Alert
COLOR
Toner
Cartridge
Waste
Toner Box
Full
Up to 45,000 continuous
monochromeor 11,250 continuous
four-color pages, or 10,000
intermittent (one-page jobs)
monochrome or 7,500 intermittent
color pages.
Standardcapacity:Approximately
1,500 single-sidedpages per
cartridge—yellow, magenta, cyan
at 5% coverage of each color.
High capacity: Approximately
4,500 single-sidedpages per
cartridge—black, yellow, magenta,
cyan at 5% coverage of each color.
Approximately 6,000 single-sided
pages per cartridge. The toner
cartridgemust be replaced to print.
(Any print jobs sent to the printer
will be cancelled.)
Approximately 25,000 continuous
monochromeor 21,600intermittent
(one-page jobs) monochrome, or
6,250 continuous or intermittent
color pages (based on the
standard mode with 5% toner
coverage of letter/A4 media).
Comment
See “Replacing the OPC
Drum Cartridge” on page
56.
See “Replacing a Toner
Cartridge” on page 49.
See “Replacing the
Waste Toner Bottle” on
page 55.
Consumable Life Expectancies46
Page 55

Special Media
EDNord - Istedgade 37A - 9000 Aalborg - Telefon 9633 3500
The stated life expectancy of each consumable on page 46 i s based on
letter-/A4-size plain paper. If you are using special media such thick stock or
transparencies, the life expectancywill vary depending on those printing
variables and the print speed automatically determined by the thick stock or
transparency selection on the driver’s Setup Tab.
Consumables
(Special Media)
OPC Drum
Cartridge
Toner Cartridge
(pages per
cartridge at 5%
coverage of
each color)
Waste Toner
Box
This item needs replacing by user after...
Up to 15,000 continuous monochrome or 7,500
continuous four-color pages, or 5,000 intermittent
(one-page jobs) monochrome or 4,100 intermittent color
pages.
Standard capacity (black): Approximately1,500
continuous single-sided pages or 1,000 intermittent
single-sidedpages (if monochrome black printing only).
Standard capacity (yellow, magenta, cyan):
Approximately 1,500 continuousor intermittent
single-sidedpages.
High capacity (black): Approximately 4,500 continuous
single-sidedpages or 3,200 intermittent single-sided
pages (if monochrome black printing only).
High capacity (yellow, magenta, cyan): Approximately
4,500 continuous or intermittentsingle-sided pages.
Approximately 25,000 continuous or 14,400 intermittent
(one-page jobs) monochrome pages or 6,250 continuous
or intermittent color pages.
For current information about consumable life expectancies, refer to http://
printer.konicaminolta.net/support, then click on “Answer Base.”
Auto-Image Density Control (AIDC)
The printer periodicallypauses f or the color calibration procedure (also
known as the Auto-Image Density Control [AIDC] cycle). This process is
provided to make sure reliable printer operation with optimum output quality.
This 150-secondcalibrationcycle automaticallyoccurs afterthe installationof
a new toner cartridge or OPC drum cartridge.
If you open the door before the Ready indicator on the control panel
lights up and the Error indicator goes off, the printer stops and repeats
the calibration cycle.
Consumable Life Expectancies
47
Page 56

EDNord - Istedgade 37A - 9000 Aalborg - Telefon 9633 3500
The printer also pauses to do a 90-second AIDC cycle after 200
1-sidedpages of a continuousprint run, and a 150-secondAIDC cycle
when waking up from ENERGY SAVER with more than 1,000 pages
since the last AIDC cycle or when there has been an environmental
change such as in temperature or humidity.
Toner Cartridge Life
A high-capacity toner cartridge contains enough toner (yellow, magenta,
cyan, or black) to print a maximum of 4,500 (at normal 5% page coverage)
simplex letter/A4-size pages of continuous print. The standard-capacity toner
cartridge contains enough toner to print a maximum of 1,500 (at normal 5%
page coverage) simplex l etter/A4-size pages of continuous print.
With heavier coverages, the approximatemaximum capacities will decrease:
How do I know if I need to replace the toner?
When it’s time to replace the t oner, COLOR Toner Low displaysin the
Status Display. Printingcan continue even though the warning appears.
However,the colorgradually fades out, so replacethe toner cartridgeas soon
as possible.
You can also access the toner cartridge supplies status using the Status
Display (refer to “Working with the Status Display” on page 40).
How can I tell if a toner cartridge is standard or
high capacity?
Refer to the label on the toner cartridge.
Replacing Consumables
Attention
Failure to follow instructions as outlined in this manual could result in
voiding your warranty.
Replacing Consumables48
Page 57

Refilled Toner Cartridges
EDNord - Istedgade 37A - 9000 Aalborg - Telefon 9633 3500
Attention
Do not use refilled toner cartridges. Any damage to the printer or quality
problems caused by a refilled toner cartridge will void your warranty.
Replacing a Toner Cartridge
Characters and images are created in your laser printer t hrough a
photosensitive process that applies toner to the O
(OPC) drum cartridge (which functions like photographic film). Your printer
uses four toner cartridges: black, yellow, magenta, and cyan. Handle t he
toner cartridges carefully to avoid spilling toner inside the printer or on
yourself.
The toner is nontoxic. If you get toner on your hands, wash them in
cool water or a neutral detergent. If you get toner on your clothes,
lightly dust them off as much as possible. If some toner remains on
your clothes, use cool, not hot water, to rinse the toner off.
ptical Photo Conductor
WARNING!
If you get toner in your eyes, w ash i t out immediately and consult a
doctor.Material Safety Data Sheets (MSDS) information can be found at
www.konicaminolta.net/printer/ (click on “Answer Base”).
Attention
Do not hold a toner cartridge vertically.
Do not touch t he toner roller surface. This could
lower image quality.
Keep toner cartridges:
In their packaging until you’re ready to install them.
In a cool, dry location away from sunlight (due to the heat it generates).
The maximum storage temperature is 95°F(35°C) and the maximum
storage humidity i s 85% (noncondensing). If the toner cartridge is moved
from a cold place to a warm, humid place, condensation may occur,
degrading print quality. Allow the toner to adapt to the environment for
about one hour before use.
Replacing Consumables
49
Page 58

EDNord - Istedgade 37A - 9000 Aalborg - Telefon 9633 3500
Level during storage.
Do not stand or store cartridges on their ends or turn them upside down;
the toner inside the cartridges may become caked or unequally
distributed.
Away from salty air and corrosive gases such as ammonia.
Procedure
You can use this procedure to replace either an empty t oner cartridge or one
that is not empty.
You may want to replace a toner cartridge that is not empty if the consumable
monitor in your printer driver or the Status Display indicates that a particular
colorcartridge is runninglow and you need to printa lengthy job whenno one
will be available to change the cartridge.
Attention
Be careful not to spill toner while replacing a toner cartridge. If toner
spills, immediately wipe it off with a soft, dry cloth.
1 Open the Status Display, and t hen check which toner color is empty.
2 From the Print tab choose Toner Replace...
3 Makesure that t he Change Capacity only check box is cleared.
4 In the Color list box, select the color of the toner cartridge to be replaced
(CYAN, MAGENTA, YELLOW,orBLACK).
5 Click OK.
6 Whenthe toner indicator on the con-
trol panel starts flashing, open the
printer’s front door.
The carousel is automatically
repositioned so that the appropriate
toner cartridge can be removed.
Replacing Consumables50
Page 59

7 Insert you thumb and index finger
EDNord - Istedgade 37A - 9000 Aalborg - Telefon 9633 3500
into the two holes in the front of the
toner cartridge, and then pull the
cartridge straight out about 6"
(15 cm).
8 Support the middle of the cartridge
with your left hand, and then pullout
the cartridge.
WARNING!
Contact toner_recycle@bpus.konicaminolta.us for t oner
recyclingavailability, or dispose of the used toner car tridge
according to your local regulations. Do not dispose of it by
burning.
9 Removethe new toner cartridge
from its shipping carton.
Check the color, size (volume) and
logo written on the box of the toner
cartridge t o be installed.
C/Cyan, M/Magenta, Y/Yellow,
K/Black
H/High-Capacity (4500),
S/Standard-Capacity (1500)
KONICA MINOLTA,
MINOLTA-QMS.
Replacing Consumables
K
H
S
51
Page 60

10 Check the color and size (volume)
EDNord - Istedgade 37A - 9000 Aalborg - Telefon 9633 3500
written on the toner cartridge to be
installed.
Color: C/Cyan, M/Magenta,
Y/Yellow, K/Black
Standard-Capacity Toner cartridge:
Standard-capacity t oner cartridge (1500)
High-CapacityTonerCartridge:
High-capacity toner cartridge
(4500)
11 Holding both ends of the toner car-
tridge, shake it side-to-side a few
times to distribute the toner evenly.
12 Remove the yellow protective cover
marked “Remove.”
K
Each toner cartridge has a
coloredendthat corresponds
to a colorinside the cartridge
slots.Always installthe toner
cartridge i n the slot of the
same color.
Attention
Do not touch the toner roller surface.
This could lower image quality.
Do not hold t he toner cartridge
vertically.
Replacing Consumables52
Page 61

13 Verify t hat the color of the l abel in
EDNord - Istedgade 37A - 9000 Aalborg - Telefon 9633 3500
the toner compartment is the same
as the color of the toner in the
cartridge.
K
Attention
Installing a cartridge with toner of a different color than the label in the
compartment may damage the printer.
14 Supporting the middle of the
cartridge wi th your left hand, place
the thumb and index finger of your
right hand into the two holes in the
front of t he toner cartridge, and then
insert the cartridge so that the
guides on the cartridge fit into the
rails in the cartridgecompartment in
the carousel.
15 Gently push the new t oner cartridge
into the printer.
16 Close the printer’s front door.
17 After about 150-seconds “Printer
Idle” appears in the Status Display.
The printer must complete a
150-second calibration cycle
after any consumable has
been replaced. If you open
the door before the Ready
indicator on the controlpanel
lights up and the Error indicator turn s off, the printer
stops and repeats the calibration cycle.
18 Ifthe logo written on the box of the toner cartridge to be installed is
KONICA MINOLTA, proceed to st ep 24. If the logo is MINOLTA-QMS,
continue to step 19 to set the capacity of the toner cartridge.
19 From the Printer menu choose Toner Replace...
Replacing Consumables
53
Page 62

20 Select the Change Capacity Only check box.
EDNord - Istedgade 37A - 9000 Aalborg - Telefon 9633 3500
21 In the Color list box, select the color of the toner cartridge to be replaced
(CYAN, MAGENTA, YELLOW,orBLACK).
22 Click the Capacity option (1500 or 4500).
23 Click OK.
24 From the Display menu, choose Supplies Statusto display the Supplies
Status dialog box.
Check the capacity of the installed toner cartridge.
25 Place the used toner cartridge in the box that the new toner cartridgewas
packed in.
Attention
For toner recycling availability, contact
toner_recycle@bpus.konicaminolta.us,
or dispose of the used toner cartridge
according to your local regulations. Do
not dispose of it by burning.
Replacing Consumables54
Page 63

Replacing the Waste Toner Bottle
EDNord - Istedgade 37A - 9000 Aalborg - Telefon 9633 3500
When the waste toner bottle becomes full,the message Waste Toner Box
Full appearsin the Status Di splay.The printer stops and will not start again
until the waste toner bottle is r eplaced.
Removing the Used Waste Toner Bottle
1 Turn off the printer,then open the printer’s front door.
2 Grasp the waste toner bottle’s
handle and then lift the bottle out
and up to remove it.
Keep the waste toner bottle upright
so the toner does not spill.
3 Remove the two caps by turning
them counterclockwise.
4 Secure t he two caps onto the tw o
holes by turning them clockwise.
5 Dispose of the used waste toner
bottle.
WARNING!
Dispose of the used waste toner bottle properly according to your local
regulations (do not dispose of i t by burning).
Replacing Consumables
55
Page 64

Installing a N ew Waste Toner Bottle
EDNord - Istedgade 37A - 9000 Aalborg - Telefon 9633 3500
1 Remove the new waste toner bottle from its carton.
2 Insert the bottom of the waste toner
bottle
into its installation position
in the printer.
3 Pushthe t op of the waste toner
bottle
into position until it is firmly
seated.
4 Close t he printer’s front door.
If the waste toner bottle is not
correctlyinstalledor thetransferbelt
releaselever is atits top position (11
o’clock), the front door cannot be
closed.
The pr inter must completea 150-secondcalibrationcycle after any
consumable has been replaced. If you open the door before the
Ready indicator on the control panel lights up and the Error indicator goes off, the printer stops and repeatsthe calibration cycle.
Replacing the OPC Drum Cartridge
When the OPC drum cartridge is worn out, the message Drum Cartridge
EndofLifeappears in the Status Display. Printing cancontinue even after
thism essage appears; however, sinceprint quality is reduced,the OPC drum
cartridge should be replaced immediately.
The OPC drum cartridge life is directly related to the number of
rotations of the drum. Longest drum life is achieved with continuous
printing. Intermittent printing with small job sizes requires cleaning
rotationsbefore and after each job, and subsequently will impactOPC
life.
You can also access the OPC drum cartridge life status using the StatusDisplay (refer to “Working with the Status Display”on page 40).
Replacing Consumables56
Page 65

Removing the Used OPC Drum Cartridge
EDNord - Istedgade 37A - 9000 Aalborg - Telefon 9633 3500
1 With the front door open and the
used waste toner bottle removed
(see page 55), rotate the transfer
belt unit release lever clockwise to
the top (11 o’clock)position.
This releases t he pressure on the
transfer belt unit.
2 Grasp the release lever for the OPC
drum cartridge, and then pull the
cartridgestraight out about 6 inches
(15 cm).
3 Support the bottom of the drum with
your hand, then carefully pull the
cartridge toward you and remove it.
Dispose of the cartridge
properly according to your
local regulations.
Replacing Consumables
57
Page 66

Installing a New OPC Drum Cartridge
EDNord - Istedgade 37A - 9000 Aalborg - Telefon 9633 3500
Attention
The OPC drum is extremely sensitive to bright light and direct sunlight.
Always leave it in its protective bag until you’re ready to install it. Any
exposure to light should be avoided, or permanent damage could
result.
Any damage resulting from m ishandling of the OPC drum will void the
warranty of the OPC drum cartridge. Handle the cartridge carefully by
its sides so you don’t t ouch the surface (the green part) of the drum.
The drum is also extremely sensitive to hand oils and scratches,both of
which reduce print quality.
1 Remove the new OPC drum cartridge from its
carton.
Attention
Keep the protective sheet on the cartridge. Do not touch the
protectivesheet on thephotosensitive (green) surface or scratch the
surface. This could lower image quality.
Make sure the transfer belt release lever is still set to its top position
(11 o’clock ).
2 Holding the OPC drum cartridge level,
place the front end of the OPC drum
cartridge guide into the rail.
3 Carefully push the OPC drum
cartridgein.
When installing the OPC drum cartridge,
be sure not to press on therelease lever.
If the lever is pressed during installation,
the lock is released, and the cartridge is
not installed correctly.
Attention
The cartridge should slide easily into the printer. Don’t force it.
Replacing Consumables58
Page 67

4 Press on the front handle of the
EDNord - Istedgade 37A - 9000 Aalborg - Telefon 9633 3500
OPC drum cartridge with one hand
and hold the handle of the OPC
protectivecover with the other hand.
5 Peelthe protective cover straight
towardyou.
Dispose of it properly
according to your local
regulations.
6 Rotate thetransfer belt releaselever
counterclockwise to its correct
position (7 o’clock).
This lowers the transfer belt.
Attention
If the transfer belt release lever is not at its correct position
(7 o’clock), the waste toner bot tle cannot be installed.
7 Reinstall the waste toner bottle you removed (see page 56).
8 Close t he printer’s front door.
The pr inter must complete a 150-secondcalibrationcycle after any
consumable has been replaced. If you open the door before the
Ready indicator on the control panel lights up and the Error indicator turns off, the printer stops and repeats the calibration cycle.
Ordering Consumables
Choosing the right consumables for your printer not only increases its
reliabilityand performance, but also minimizes the risk of damage. For
example, only KONICA MINOLTA toner cartridges are designed to meet the
exact specifications of your KONICA MINOLTA printer, giving maximum
performance, efficiency, and l ong life.Toner cartridgesand other
consumablesfor your printer are available from yourlocal vendor or Q-SHOP
(www.q-shop.com).
See the Service & Support Guide for a list of sources of service and support
in many areas of the world. The most current worldwide information can be
found at www.konicaminolta.net/printer/.
Ordering Consumables
59
Page 68

EDNord - Istedgade 37A - 9000 Aalborg - Telefon 9633 3500
Ordering Consumables60
Page 69

Maintaining the
EDNord - Istedgade 37A - 9000 Aalborg - Telefon 9633 3500
Printer
7
Page 70

Maintaining the Printer
EDNord - Istedgade 37A - 9000 Aalborg - Telefon 9633 3500
Attention
Read all caution and warning labels carefully, making sure to follow any
instructions contained in them. These labelsare located on the inside of
the printer’s doors and the interior of the printer body.
Handle the printer with care to preserve its life. Abuse may cause damage
and void your warranty.If dust and paper scraps remain on the inside or
outside of the printer,printer performance and print quality will suffer, so the
printer should be cleaned periodically. Keep the following guidelines in mind.
WARNING!
Turn off the pr inter, unplug the power cord, and disconnect all interface
cables before cleaning. Do not spill water or detergent into the printer;
otherwise the printer will be damaged and an electric shock may occur.
Either clean the printer before use, or allow time after unplugging it to
allow the fuser unit to cool down.
Attention
The fuser unit is hot. When the right door is opened, the
fuser unit temperature drops gradually ( one hour wait time).
Be careful when cleaning the inside or removing paper jams, as
the fuser unit and other internal parts m ay become very hot.
Do not place anything on the top of the printer.
Use a soft c loth to clean the printer.
Never spray cleaning solution directly on the printer’s surface; the spray
could penetrate through the air vents of the printer and damage the
internal circuits. Avoid using abrasive or corrosive solutions or solutions
that contain solvents, ( such as alcohol and benzene) to clean the printer.
Alwaystest any cleaningsolution (suchas mild detergent)on a small area
of your printer to check the solution’sperformance.
Never use sharp or rough implements,such as wire or plastic cleaning
pads.
Always close the printer doors gently.Never expose the printer to
vibrations.
Do not cover the printer immediately afterusing it. Turn i t off and wait until
it cools down.
Do not leave the printer’s covers and doors open for any length of time,
especially in well-lit places; light may damage the OPC.
Maintaining the Printer62
Page 71

EDNord - Istedgade 37A - 9000 Aalborg - Telefon 9633 3500
Do not open the printer during printing.
Do not tap paper stacks on the printer.
Do not tilt, lubricate, or disassemble the printer.
Do not touch the electrical contacts, gears, or laser beam devices. Doing
so may damage the printer and cause the print quality to deteriorate.
Keep media in the output tray at minimum level. If the media stacks too
high, your printer may experience media jams and excessive media curl.
Make sure two people are available to
lift the printer when moving it.
When moving the printer, keep the
printer level to avoid toner spillage.
When lifting the printer, grasp the
handles at the top of the Tray 1 and at
the bottom-right side of the printer (or
the handles at the bottom of the duplex
unit if it is installed).
If you get toner on your skin, wash it off with cool water and neutral
detergent.
Front
WARNING!
If you get toner in your eyes, w ash i t out immediately with cool water
and consult a doctor. Material Safety Data Sheets (MSDS) information
can be found at www.konicaminolta.net/printer/ (click on “Answer
Base”).
Make sure any parts removed during cleaning are replaced before you
plug in the printer.
Maintaining the Printer
63
Page 72

Cleaning the Printer
EDNord - Istedgade 37A - 9000 Aalborg - Telefon 9633 3500
Always test any cleaning solution (such as a mild detergent) on a small area
of your printer to check the solution’sperformance.
Exterior
This item needs
cleaning...
Control panel Every 30,000
Exhaust duct Cotton swab
Printer exterior A soft, damp
After... Use Avoid
Asoft,dry cloth Sharp or rough
single-sided
pages or
every 12
months,
whichever
comes first.
cloth (mild
detergent)
implements (such as
wire or plastic cleaning
pads)
Any liquid
Sharp or rough
implements (such as
wire or plastic cleaning
pads)
Abrasive or corrosive
solutions that contain
solvents (such as
alcohol or benzene)
Control P anel Exhaust Duc t
Printer Exterior
Cleaning the Printer64
Page 73

Interior
EDNord - Istedgade 37A - 9000 Aalborg - Telefon 9633 3500
Attention
Be sure to turn off the printer and unplug the power cord before
cleaning inside.
This item needs
cleaning...
Duplex option
feed rollers
Tray 1 interior feed
rollers
Laser lens cover Removing t he waste toner
Printer interior
(such as the inside
of the door, around
the waste toner
bottle)
After... Use Avoid
Media misfeeds occur
frequentlyor the printout is
dirty.
Every 30,000 single-sided
pages, every 12 months, or
as needed, whichever
comes first.
bottle to clean around it.
Every 30,000 single-sided
pages, every 12 months, or
as needed, whichever
comes first.
Every 30,000 single-sided
pages, every 12 months, or
as needed, whichever
comes first.
A damp
cloth that
has been
wrung out
well
Asoft,dry
cloth
Abrasives or
detergents
Liquids,
abrasives, or
detergents
Cleaning the Printer
65
Page 74

Media Rollers
EDNord - Istedgade 37A - 9000 Aalborg - Telefon 9633 3500
The accumulationof paper dust and other debrison the paper transport roller
can cause media-feeding problems.
Tray 1 (Multipurpose Tray) Interior Feed Rollers
1 Remove all media f rom Tray 1.
2 Pulltheright-sidedoor
release
the right-side door
, and then open
.
3 While pressing down the media
guide with one hand, clean the
mediafeed rollerby wiping itwith a
soft, dry cloth.
4 Close t he media guide.
5 Close t he right door.
6 Loadthe media into the tray again.
Media guide
Media feed roller
Cleaning the Printer66
Page 75

Duplex Option Feed Rollers
EDNord - Istedgade 37A - 9000 Aalborg - Telefon 9633 3500
1 Open the duplex option door.
2 Clean t he feed rollers by wiping
them with a soft, damp cloth that
has been wrung out well.
3 Close t he duplex option door.
Printer Interior and Laser Lens Cover
1 Open the front door.
2 Removethe waste toner bottle.
The waste toner bottle
contains waste toner. Be
careful not to tilt the bottle
while removing it.
3 Hold the waste toner bottle verti-
cally, and then plug the two openings with the caps.
Place theremoved waste toner bottle, with the openingsfacing up,
on a stablesurface (not the printer).
Cleaning the Printer
67
Page 76

4 Pull out the laser lens cover.
EDNord - Istedgade 37A - 9000 Aalborg - Telefon 9633 3500
The laser lens cover cannot
be removed from the printer.
Do not pull it with too much
force.
5 Wipethe surface of the laser lens
cover with a soft, dry cloth.
6 Reinsert the l aser lens cover.
7 Wipe the inside of the printer with a
soft, dry cloth.
Cleaning the Printer68
Page 77

8 Hold the waste toner bottle
EDNord - Istedgade 37A - 9000 Aalborg - Telefon 9633 3500
vertically, and then move the two
capsfrom the openings ontothe cap
holders. Turn the caps clockwise to
secure them.
9 Set the bottom of the waste toner
bottleinto i ts compartment,andthen
push the top of the bottle into place.
10 Wipetheinside of the front door with
asoft,drycloth.
11 W ipe the outside of the waste toner
bottlewithasoft,drycloth.
12 Close t he front door.
Cleaning the Printer
69
Page 78

EDNord - Istedgade 37A - 9000 Aalborg - Telefon 9633 3500
Page 79

Troubleshooting
EDNord - Istedgade 37A - 9000 Aalborg - Telefon 9633 3500
8
Page 80

Introduction
EDNord - Istedgade 37A - 9000 Aalborg - Telefon 9633 3500
This chapterprovides informationto aid you in resolvingprinter problems you
may encounter,or at least guide you to the proper sources for help.
Preventing media jams page 73
Understanding the media path page 74
Clearing media jams page 75
Solving problems with media jams page 81
Solving other problems page 83
Solving problems with printing quality page 89
Status, error, and service messages page 96
Additional information page 101
Introduction72
Page 81

Preventing Media Jams
EDNord - Istedgade 37A - 9000 Aalborg - Telefon 9633 3500
Make sure that...
Media matches the printer specifications.
Media is flat, especially on the leading edge.
The printer is on a hard, flat, level surface.
You store media in a dry location away from moisture and humidity.
You remove transparencies from the output tray immediately to avoid static
buildup.
You always adjust the media guides in Tray 1 after inserting the media (a
guide that is not properly adjusted can cause poor print quality, media jams,
or printer damage).
You load the media ( for single-sidedpages) printing-side up in Tray 1 (many
manufacturersplace an arrow on the end of the wrapper to indicate the
printing side).
Avoid...
Media that is folded, wrinkled, or excessively curled.
Double feeding ( remove the media and fan the sheets—they may be sticking
together).
Fanning transparenciessince this causes static.
Loading more than one type/size/weight of media in a tray at the same time.
Overfillingthe media input trays.
Allowing t he output tray to overfill (the face-downoutput tray has a 200-sheet
capacity—jamming may occur if you allow media to accumulate more than
200 sheets at a time).
Allowing the output tray to fill with more than a few transparencies.
Preventing Media Jams
73
Page 82

Understanding the Media Path
EDNord - Istedgade 37A - 9000 Aalborg - Telefon 9633 3500
Understanding the printer’s media path will help you locate media jams.
1 Media exit
2 Output tray
3 Transfer belt
4 OPC drum cartridge
5 Tray 1 ( multipurpose tray)
6 Fuser unit
7 Duplex option
8 Transfer roller
9 Registration rollers
10 Pickup rollers
Tray 1 (Multipurpose Tray)
Tray 1 is located at the left of the printer. The media is picked from Tray 1,
passed between the transfer belt and the transfer roller, passed through the
fuser, and delivered via the paper exit unit to the output tray on top of the
printer.
Duplex Option
The media is picked from a media tray, passed between the transfer belt and
the transfer roller, passed through the fuser, fed into the duplex option where
the media undergoes a change in direction, cycles throughthe transfer belt
and fuser again, and is delivered via the paper exit unit to the output tray,
whichisatthetopoftheprinter.
Since several sheets cycle through the printer/duplex unit at the same
time, recovering from a media jam may require the removal of more
than one sheet.
Understandingthe Media Path74
Page 83

Clearing Media Jams
EDNord - Istedgade 37A - 9000 Aalborg - Telefon 9633 3500
To avoid damage, always remove jammed media gently, without tearing it.
Any pieces of media left in the printer, whether large or small, can obstruct
the media path and cause further jams. Do not reload media that has
jammed.
Attention
The image is not fixed on the media before the fusing process. If you
touch the printed surface, the toner may stick to your hands, so be
careful not to touch t he print face when removing the jammed media.
Make sure not to spill any toner inside the printer.
Unfused toner can dirty your hands, clothes, or anything else it gets on.
If you accidentally get toner on your clothes, lightly dust them off as
much as possible. If some toner remains on your clothes, use cool, not
hot water, to rinse the toner off. If toner gets on your skin, wash it off
with water or a neutral detergent.
WARNING!
If you get toner in your eyes, w ash i t out immediately and consult a
doctor.Material Safety Data Sheets (MSDS) information can be found at
www.konicaminolta.net/printer/ (click on “Answer Base”).
If, after clearing the media jam, the jam message in the Status Display
persists,open and close the printer’s doors. This should clear the jam
message.
Handling Media Jams by Location
Location of Jam Page Reference
Tray 1 page 76
Inside the printer page 77
Near the duplex option page 79
In the output tray page 80
Clearing Media Jams
75
Page 84

Tray 1 (Multipurpose Tray)
EDNord - Istedgade 37A - 9000 Aalborg - Telefon 9633 3500
1 Remove the media from Tray 1.
2 Carefully remove the jammed
media.
3 Fanthe r emoved media to prevent
static buildup and even up the f ront
edges.
Do not fan t ransparencies
before loading them. Resulting static electricity may
cause printing errors.
4 Reinsert the m edia printing face up.
Make surethe media is lying flat and doesn’t exceedthe media l imit mark.
Check to see if the media width guides are correct.
5 Openthe right-side door, then close it.
The media jam message is no longer displayed in the Status Display
message window.
Clearing Media Jams76
Page 85

Inside the Printer
EDNord - Istedgade 37A - 9000 Aalborg - Telefon 9633 3500
Media Path Jam
1 Pull the right door release lever , and
then carefully open the right door.
Attention
Do not pull jammed media from the top
of the printer through the fuser unit
because unfused toner may
contaminate the fuser rollers.
If it is difficult to remove the jammed
media,turn themisfeed-clearing dial
counterclockwise to feed the media
downward.
2 Ifa misfeed occurs in the vertical
transportarea,open theinner media
guide, and then pull the misfed
mediadowntoremoveit.
3 Close t he inner media guide.
Clearing Media Jams
77
Page 86

Fuser Jams
EDNord - Istedgade 37A - 9000 Aalborg - Telefon 9633 3500
1 Lift up the two fuser unit levers.
When removing the jammed media,
be careful not to touch the transfer
belt. Touching the transfer belt may
result in poor print quality.
2 Openthe misfeed-clearingguide for
the fuser unit, and then, while
checking the misfeed, pull the
jammed media down to remove it.
3 Close the misfeed-clearing guide for
the fuser unit.
4 Lowerthe two fuser unit levers.
Attention
Be sure to lower the two fuser unit
levers before closing the right door.
If the levers are not lowered,the right
door cannot be closed.
Clearing Media Jams78
Page 87

5 Close t he right-side door securely.
EDNord - Istedgade 37A - 9000 Aalborg - Telefon 9633 3500
The media jam message is no
longer displayed in the Status
Display message window.
Duplex Option
1 Pull off the top of the duplex option
to open the duplex option cover.
2 Removethe jammed media in the directions shown in the illustration.
Clearing Media Jams
79
Page 88

3 Openthe right-side door, then close it.
EDNord - Istedgade 37A - 9000 Aalborg - Telefon 9633 3500
The media jam message is no longer displayed in the Status Display.
Output Tray
Remove jammed media from the output tray by gently pulling it to the left
away from the media exit area.
Clearing Media Jams80
Page 89

Solving Problems with Media Jams
EDNord - Istedgade 37A - 9000 Aalborg - Telefon 9633 3500
Frequent jams in any area indicate that area should be checked,
repaired, or cleaned. Repeated jams may also happen i f you’re using
unsupported print media.
Symptom Cause Solution
Several
sheets go
through the
printer
together.
Media jam
message
continues to
displayinthe
Status
Display.
Duplex
option jams.
The front edges of
the media are not
even.
The media is moist
from humidity.
Toomuchstatic
electricity is present.
Right-side door
needs to be opened
and closed again to
reset the printer.
Some media remains
jammed in the printer.
Thewrongmediais
being used.
Media may still be
jammed.
Remove the media and even up the
front edges, then reload it.
Removethe moist media and replaceit
with new, dry media.
Do not fan t ransparency media.
Open and close the right-side door of
the printer again.
Recheck the media path and make
sure you have removed all of the
media jams.
Use only supportedmedia. See“Media
Specifications” on page 11.
Only plain paper, 16–24 lb (60–90
2
g/m
) can be autoduplexed if the
optionalduplex unit is installedand the
media t ype is set properly in the driver.
See “MediaSpecifications” onpage 11
for supported sizes.
Make sure that you have not mixed
media types in Tray 1.
Do not duplex custom-sized media,
envelopes, labels,thick stock, or
transparencies.
Recheck the media path inside the
duplex unit and make sure that you
have removed all of the jammed
media.
Solving Problems with Media Jams
81
Page 90

Symptom Cause Solution
EDNord - Istedgade 37A - 9000 Aalborg - Telefon 9633 3500
Media is
jamming.
The media is not
correctly positionedin
the tray.
The numberofsheets
in the tray exceeds
the maximum
allowed.
Themedia guidesare
not correctly adjusted
to the media size.
Warped or wrinkled
mediais loadedin the
tray.
The media is moist
from humidity.
The recommended
transparency (OHP)
or label paper is
facing the wrong way
in Tray 1.
Envelopes are facing
the wrong way in
Tray 1.
Multiple sheets of
transparency (OHP)
media are collecting
static electricity inthe
tray.
Unsupported media
(wrong size,
thickness, type, etc.)
is being used.
Media supply roller is
dirty.
Remove the jammed media and
reposition the media properly in the
tray.
Remove the excess media and reload
the correct number of sheets in the
tray.
Adjust the regulation guides in t he tray
to match the size of the media.
Remove the media, smooth it out, and
reload it. If it still jams, do notuse that
media.
Removethe moist media and replaceit
with new, dry media.
Load the transparencies or labels
according to the manufacturer’s
instructions.
Load the envelopes in Tray 1 so the
flaps are facing down.
If the flaps are on the short edge, set
the envelopes in Tray 1 so that the
flaps are on the printer side.
Remove the OHP media and load it in
the tray one sheet at a time. Do not fan
transparenciesbefore loading them.
Use media that is covered by the
printer warranty.
Clean the media supply roller.
For more details, refer to “Media
Rollers” on page 66.
Solving Problems with Media Jams82
Page 91

Solving Other Problems
EDNord - Istedgade 37A - 9000 Aalborg - Telefon 9633 3500
Symptom Cause Solution
Printer
power is not
on.
Data was
sent to the
printer, but it
doesn’tprint.
The Status
Display
displays
Toner
Low
much
sooner than
expected
The power cord is not
correctlyplugged i nto
the outlet.
Something is wrong
with the outlet
connected t o the
printer.
The power switch is
not correctly turned
on (I position).
The printer is
connectedtoan
outlet with a voltage
or frequency that
does not match the
printer specifications.
An error message is
displayed in the
Status Display.
A high-capacity toner
cartridgewas loaded,
butthe tonersize was
set at standard
capacity.
The toner cartridgeis
defective.
Turn the power switch off (O position),
then remove the power cord from the
outlet and plug it back in.
Plug another electrical appliance into
the outlet and see whether it operates
properly.
Set the power switch to the off (O)
position, then set it back to the on (I)
position.
Use a power source with the
specifications listed in appendix A,
“Technical Specifications.”
Handle according to the message
displayed.
In the Status Display’s Print menu,
choose Toner Replace... and then
select the capacity listed on the toner
cartridge label.
In the Status Display’s Print menu,
choose Toner Replace..., remove the
toner cartridge,and check for damage.
If it is damaged, replace it.
Solving Other Problems
83
Page 92

Symptom Cause Solution
EDNord - Istedgade 37A - 9000 Aalborg - Telefon 9633 3500
Printing
takes too
much time.
Blank pages
come out
duringaprint
job.
Notallpages
print.
The printer is set to a
slow printing mode
(for example, thick
stock or
transparency).
The printer is set to
power saving mode.
The job is very
complex.
Oneormoreofthe
toner cartridges are
defective or empty.
The wrong media is
being used.
The printer has the
wrong kind of cable,
or the printer is not
configuredfor the
correct cable and
port.
The Cancel key was
pressed.
Themediatrayis
empty.
Adocument isprinted
with an overlay file
which has been
created by a
non-magicolor2300W
driver.
It takes more time to print with special
media. When using regular paper,
make sure that the media type is set
properly in the driver.
It takes time for printing to start in
power saving mode. If you do not want
to use this mode, disable it (Status
Display’s Print/Maintenance... menu).
Wait. No action needed.
Check the toner cartridges. The image
does not print if the cartridges are
empty.
Check that the media type set in the
driver matches the m edia loaded in the
printer.
Check your cable.
Make sure no one pressed the Cancel
key while your job was printing.
Check that the media trays are loaded
with media, in place, and secure.
Print the overlay file using a magicolor
2300W printer driver.
Solving Other Problems84
Page 93

Symptom Cause Solution
EDNord - Istedgade 37A - 9000 Aalborg - Telefon 9633 3500
Printer
resets or
turns off
frequently.
You are
experiencing
problems
duplexing.
WithN-up on
multiple
copies, the
output is
incorrect.
The power cord is not
properlyconnectedto
the AC outlet.
A system error
occurred.
Media or settings are
not correct.
Both the driver and
the application have
been set for collation.
Turn offthe unit, confirmthat the power
cord is properly connected to the AC
outlet, and turn the unit back on.
Contact Technical Support with the
error information. See the Service &
Support Guide for a list of sources of
service and support in many areas of
the world. The most current worldwide
information can be found at
www.konicaminolta.net/printer/.
For autoduplexing, make sure that you
have a duplex option installed.
Make sure that you are using correct
media.
Seethetableonpage11for
supported media.
Do not duplex custom-sized media,
envelopes, labels,postcards, thick
stock, or transparencies.
Make sure that you have not mixed
media types in Tray 1.
Make sure that your document has
more than one page.
Use the printerdriver to make sure t hat
the duplex unit is in the “Installed
Options” list on t he Device Options
Setting.
In the printer driver (Properties/Setup/
Duplex/Booklet), choose “Short Edge
Binding” (flipped as on a clipboard) or
“Long Edge Binding” (flipped as in a
loose-leaf notebook).
For N-up on duplexed pages, c hoose
Collate only in the driver’s Paper Tab.
Do not set c ollation in the application.
For N-up on multiple copies, choose
Collate only in the driver’s Paper Tab.
Do not set c ollation in the application.
Solving Other Problems
85
Page 94

Symptom Cause Solution
EDNord - Istedgade 37A - 9000 Aalborg - Telefon 9633 3500
Booklet Left
and Right
Binding
output is
incorrect.
The printer
pauses
approximately 90
seconds.
Both the driver and
the application have
been set for collation.
The printer pauses
for the color
calibrationprocedure
(also known as the
Auto-Image Density
Control [AIDC] cycle).
This process is
provided to make
sure reliable printer
operation with
optimum output
quality. If you open
the door before the
Ready indicator on
the control panel
lights up and the
Error indicator turns
off, the printer stops
and repeats the
calibrationcycle.
For Booklet Left Binding and Booklet
Right Binding, choose Collate only in
the driver’s Paper Tab. Do not set
collation in the application.
Wait while your printer automatically
pauses to do an AIDC calibration cycle
after 200 1-sided pages of a
continuousprint run.
Solving Other Problems86
Page 95

Symptom Cause Solution
EDNord - Istedgade 37A - 9000 Aalborg - Telefon 9633 3500
The printer
pauses
approximately 150
seconds.
You hear
unusual
noises.
The printer pauses
for the color
calibrationprocedure
(also known as the
Auto-Image Density
Control [AIDC] cycle).
This process is
provided to make
sure reliable printer
operation with
optimum output
quality. If you open
the door before the
Ready indicator on
the control panel
lights up and the
Error indicator turns
off,the printer stops
and repeats the
calibrationcycle.
The printer is not
level.
The media tray is not
installed correctly.
There is a foreign
object stuck inside
the printer.
Wait while your printer automatically
pauses to do an AIDC calibration cycle
after rebooting your printer when there
has been an environmental change
such as in temperature or humidity.
Wait while your printer automatically
pauses to do an AIDC calibration cycle
after “waking up” from Energy Saver
mode with more than 1,000 pages
since the last AIDC cycle.
Wait while your printer automatically
pauses to do an AIDC calibration cycle
after the installation of a new toner
cartridge or OPC drum cartridge.
Put the printer on a flat, hard, level
surface not to exceed ±1° slant in any
direction.
Remove the media tray that you are
printing from and reinsert it completely
into the printer.
Turn off the printer and remove the
object. If you cannot remove it, contact
Technical Support.
Solving Other Problems
87
Page 96

Symptom Cause Solution
EDNord - Istedgade 37A - 9000 Aalborg - Telefon 9633 3500
Media is
wrinkled.
The media is moist
from humidity or
having water spilled
on the paper supply.
Thetransferrolleror
fuser unit may be
defective.
Unsupported media
is being used.
Removethe moist media and replace it
with new, dry media.
Check them for damage. If necessary,
contact Technical Supportwith t he
error information. Go to http://
printer.konicaminolta.net/support or
see the Service & Support Guide for
support telephone numbers.
Use KONICA MINOLTA-approved
media.Refer to “Media Types”on page
12. Check http://
printer.konicaminolta.net/support (click
on “Answer Base”) for currently
approved media.
Solving Other Problems88
Page 97

Solving Problems with Printing Quality
EDNord - Istedgade 37A - 9000 Aalborg - Telefon 9633 3500
Symptom Cause Solution
Nothing is
printed, or
there are
blank spots
on the
printed page.
Oneormoreofthe
toner cartridgesare
damaged.
The printer driver is
not set correctly.
The OPC drum
cartridge i s damaged.
The media is moist
from humidity.
The media set in the
printer driver
mismatches the
media loaded in the
printer.
The power source
does not match the
printer specifications.
Several sheets are
beingfed at thesame
time.
Media is not set
properly in the media
tray.
The printer is not
sitting on a level
surface.
Remove the toner cartridge and check
for damage. If it is damaged, replace it
(Status Display’s Print/Toner
Replace... menu).
Select the proper setting in the printer
driver to switch from transparency
(OHP) film to p lain paper.
Remove the OPC drum cartridge and
check for damage. If it is damaged,
replace it.
Adjust the humidity for paper storage.
Removethe moist media and replaceit
with new, dry media.
Load the correct media in the printer.
Use a power source with the proper
specifications.
Remove the media from t he tray and
check for static electricity. Fan plain
paper or other media (but not
transparencies), and replace it
in the tray.
Remove the media, tap it to straighten
it out, return it to the media tray, and
realign the media guides.
Relocate the printer on a flat, hard,
stable, level surface that is large
enough to hold the printer.
Solving Problems with Printing Quality
89
Page 98

Symptom Cause Solution
EDNord - Istedgade 37A - 9000 Aalborg - Telefon 9633 3500
Entire sheet
is printed in
black or
color.
One or more of the
toner cartridges are
defective.
The OPC drum
cartridge i s damaged.
Remove the toner cartridge and check
for damage. If it is damaged, replace it
(Status Display’s Print/Toner
Replace... menu).
Remove the OPC drum cartridge and
check for damage. If it is damaged,
replace it.
Image is too
light;thereis
low image
density.
Image is too
dark.
Laser lens cover is
dirty.
The media is moist
from humidity.
There is not much
toner left in the
cartridge.
One or more of the
toner cartridgesare
defective.
Media type may be
set incorrectly.
One or more of the
toner cartridgesare
defective.
The OPC drum
cartridge i s damaged.
Clean thelaser lens coverand perform
an AIDC calibration cycle(Status
Display’s Pr int/Power On Test menu).
Wait until the test is f inished, the
Ready indicator on the control panel
lights up, and the Error i ndicator turns
off.
Remove the moist media and replace
with new, dry media.
Replace the toner cartridge (Status
Display’s Print/Toner Replace...
menu). If the new cartridge capacity is
different,select the toner cartridge
capacity(Status Display’s Print/Toner
Replace... menu).
Remove the toner cartridge and check
for damage. If it is damaged, replace it
(Status Display’s Print/Toner
Replace... menu).
When printing envelopes, labels,
postcards,thick stock, or
transparencies specify the appropriate
mediatypeintheprinterdriver.
Remove the toner cartridge and check
for damage. If it is damaged, replace it
(Status Display’s Print/Toner
Replace... menu).
Remove the OPC drum cartridge and
check for damage. If it is damaged,
replace it.
Solving Problems with Printing Quality90
Page 99

Symptom Cause Solution
EDNord - Istedgade 37A - 9000 Aalborg - Telefon 9633 3500
Image is
blurred;
backgro undis
lightlystained;
thereis
insufficient
glossof the
printed
image.
Oneormoreofthe
toner cartridgesare
defective.
The OPC drum may
be misinstalled or
defective.
Remove the toner cartridge and check
for damage. If it is damaged, replace it
(Status Display’s Pr int/Toner
Replace... menu).
Reinstall the OPC drum cartridge. If it
is damaged, replace it.
The print or
color density
may be
uneven.
Irregular
print or
mottled
image
appears.
Oneormoreofthe
toner cartridges may
be near empty or
damaged.
The OPC drum
cartridge may have
been misinstalled or
is defective.
The printer is noton a
level enough surface.
The media is moist
from humidity.
Humidity may be too
high.
Media with
specifications not
coveredbythe printer
warranty is being
used.
Oneormoreofthe
toner cartridgesare
defective.
The OPC drum
cartridge i s damaged.
Install new toner cartridges (Status
Display’s Print/Toner Replace...
menu).
Reinstall the OPC drum cartridge. If it
is damaged, replace it.
Level the printer (not exceeding ±1°
slant at any point around the machine).
Removethe moist media and replaceit
with new, dry media.
Adjust the humidity in the paper
storage area.
Use media that is covered by the
printer warranty.
Remove the toner cartridge and check
for damage. If it is damaged, replace it
(Status Display’s Pr int/Toner
Replace... menu).
Remove the OPC drum cartridge and
check for damage. If it is damaged,
replace it.
Solving Problems with Printing Quality
91
Page 100

Symptom Cause Solution
EDNord - Istedgade 37A - 9000 Aalborg - Telefon 9633 3500
There is
insufficient
fusing or the
image comes
off when
rubbed.
There are
toner
smudges or
residual
images.
The media is moist
from humidity.
Media with
specifications not
coveredby the printer
warranty is being
used.
The media type may
be incorrectly set.
One or more of the
toner cartridgesare
misinstalledor
defective.
Removethe moist media and replaceit
with new, dry media.
Use media that is covered by the
printer warranty.
When printing envelopes, labels,
postcards,thick stock, or
transparenciesthe appropriatemedia
type must be specified in the printer
driver.
If the toner smudges are on only the
front of the page:
Remove the toner cartridge and check
for damage. If it is damaged, replace it
(Status Display’s Print/Toner
Replace... menu).
Solving Problems with Printing Quality92
 Loading...