

Page 1
FrameMaker Ver5.5E(PC) Di152/Di183 SWITCHES ON PWBs/TECH. REP. SETTINGS
01.07.26
2. UTILITY MODE
• Utility Mode is used to make various settings according to the user’s need.
2-1. Settings in the Utility Mode
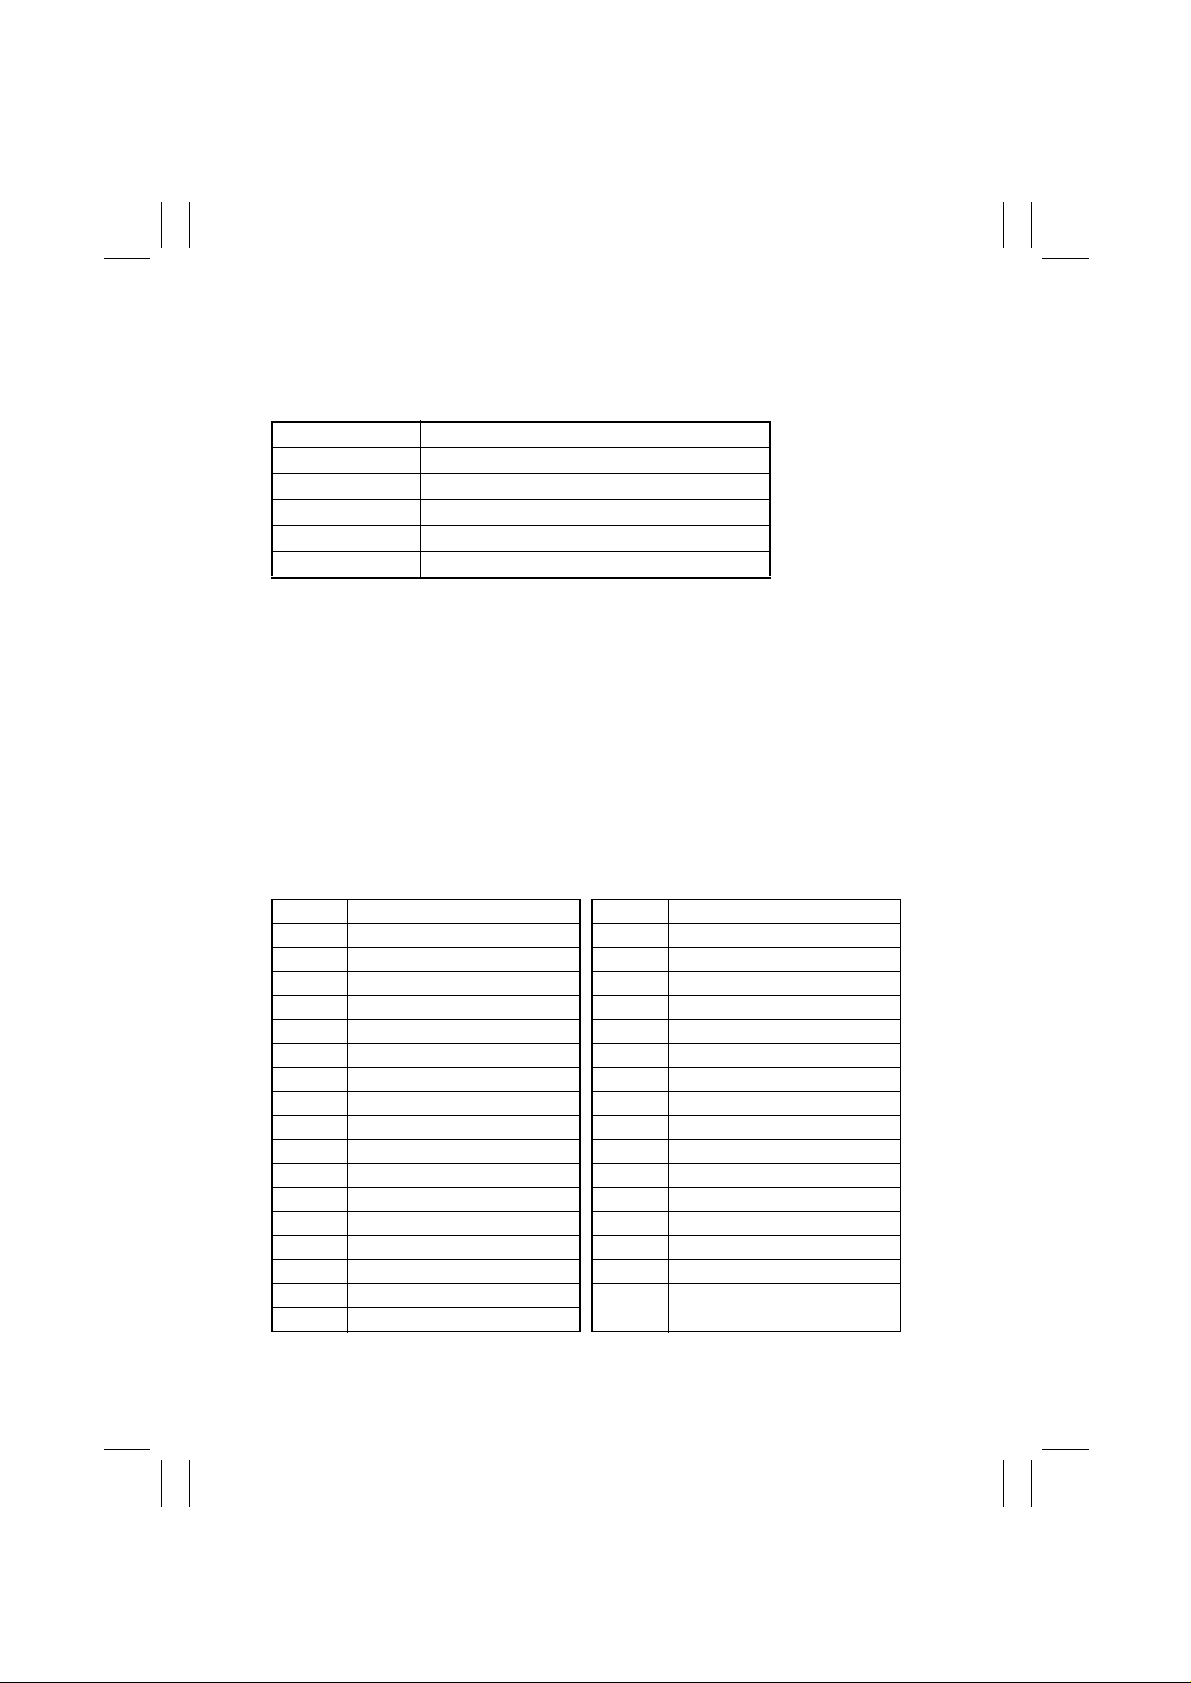
Code No. Description
U-1 User’s Choice Mode
U-2 Drum Dehumidify Mode
U-3 Toner Replenisher Mode
U-4 Custom Size Input Mode
U-5 Administrator Mode
2-2. Utility Mode Setting Procedure
<Procedure>
1. Hold down the Panel Reset key f or 3 seconds.
2. Using the 10-Key Pad, enter the code corresponding to the desired subfunction.
Code No.: 1 to 5
3. Press the Start key.
<Exiting the Mode>
• Press the Panel Reset key.
(1) User’s Choice Mode (Display: U-1)
• User’s Choice is used to make various settings according to the user’s need.
1. Settings in the User’s Choice Mode
Code No. Function Code No. Function
C-1 Mixed Orig. C18 Density (ADF)
C-2 Paper Priority C19 Print Density
C-3 Copy Priority C20 Paper Auto Detection (1st Tray)
C-4 Density Priority C21 Paper Auto Detection (2nd Tray)
C-5 Density Level (Auto) C22 Paper Auto Detection (3rd Tray)
C-6 Density Level (Manual) C23 Paper Auto Detection (4th Tray)
C-7 Output Priority C24 Paper Auto Detection (5th Tray)
C-8 Crisscross Mode C25 Paper Size Detection (1st Tray)
C-9 4in1 Copy Order C26 Paper Type (1st Tray)
C10 Book Binding Position C27 Paper Type (Bypass Tray)
C11 Margin Setting C28 Special Paper Setting (1st Tray)
C12 Erase Setting (Left) C29 Special Paper Setting (2nd Tray)
C13 Erase Setting (Upper) C30 Special Paper Setting (3rd Tray)
C14 Erase Setting (Frame) C31 Special Paper Setting (4th Tray)
C15 Auto Panel Reset C32 Special Paper Setting (5th Tray)
C16 Energy Saver C33 Special Paper Setting
C17 Auto Shut OFF
(Multiple Bypass Tray)
S-4
Page 2

FrameMaker Ver5.5E(PC) Di152/Di183 SWITCHES ON PWBs/TECH. REP. SETTINGS
Highlighted
01.07.26
2. User’s Choice Mode Setting Procedure
<Procedure>
1. Hold down the Panel Reset key for 3 seconds.
2. Enter “1” from the 10-Key Pad. (Display: U-1)
3. Press the Start key.
4. Enter the corresponding code number from the 10-Key Pad.
5. Press the Start key . Then, the Display will show the current setting value.
6. Press the Clear key to reset the current setting value.
7. Enter the new setting value from the 10-Key Pad.
8. Press the Start key. This will validate the new setting value just entered.
If any value outside the available setting range is entered, the Display shows “Err”
rejecting the entry . (The old setting value will reappear on the Display 1 sec. later.)
<Exiting the Mode>
• Press the Panel Reset key until t he initial screen reappears.
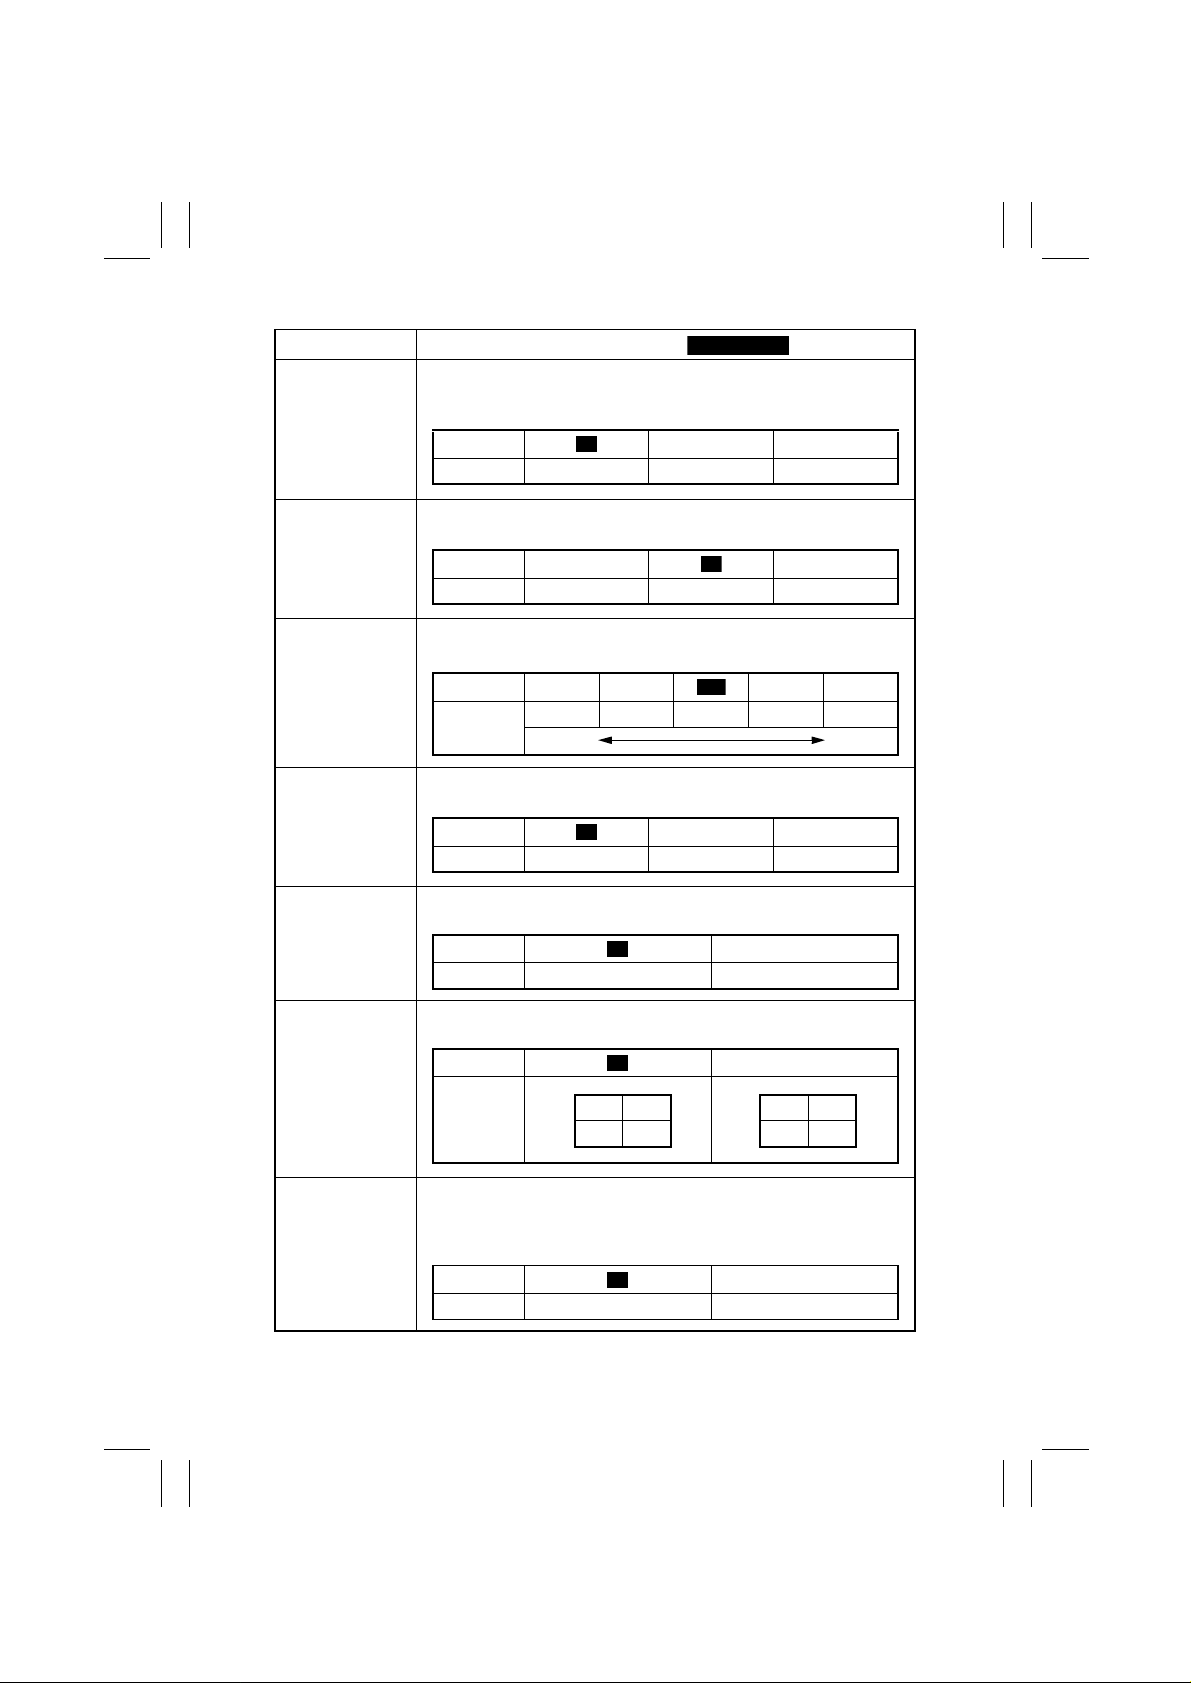
3. Setting in the User’s Choice Mode
Code No.
C-1
C-2
C-3
Setting (The default is ).
Select the priority Mixed Original Detection mode that is automatically
selected when the Power Switch is turned ON or Panel Reset key
pressed.
Setting 0
Description Mixed Orig. enabled Mixed Orig. disabled
Select the priority paper size or paper source that is automatically
selected when the copier is set into the Auto Size or Manual mode.
Setting Description Setting Description
0
A3 (L)
1
B4 (L)
2
A4 (L)
3
B5 (L)
4
A5 (L)
5
FLS (L)
A4 (C)
6
B5 (C)
7
A5 (C)
8
Ledger (L)
10
11×14 (L)
11
Initial setting: Metric area “6”/Inch area “15”
Select the priority Auto mode (Auto Paper or Auto Size) selected
when the Power Switch is turned ON or Panel Reset key pressed.
Setting 1 2
Description Auto paper Auto Size Manual
<Mixed Orig.>
<Paper Priority>
<Copy Priority>
0
12
Legal (L)
13
Letter (L)
14
Invoice (L)
Letter (C)
15
Invoice (C)
16
1st Tray
20
2nd Tray
21
3rd Tray
22
4th Tray
23
5th Tray
24
Multiple Bypass Tray
25
1
S-5
Page 3
FrameMaker Ver5.5E(PC) Di152/Di183 SWITCHES ON PWBs/TECH. REP. SETTINGS
Highlighted
0
0
0
01.07.26
Code No.
C-4
C-5
C-6
C-7
C-8
Setting (The default is ).
Select the priority exposure mode selected when the Power Switch is
turned ON or Panel Reset key pressed.
Setting 1 2
Description Auto Manual Photo Manual
Select the priority exposure level in the Auto Exposure mode.
Setting 0 2
Description Lighter Normal Darker
Select the priority exposure level in the Manual Exposure mode.
Setting 1 2 4 5
Description
Select the priority finishing type.
Setting 1 2
Description Non-Sort Sort Group
Select whether to enable or disable crisscross sorting automatically
Setting 1
Description Enabled Disabled
Step 1 Step 2 Step 3 Step 4 Step 5
Lighter Darker
<Density Priority>
0
<Density Level (Auto)>
1
<Density Level (Manual)>
3
<Output Priority>
0
<Crisscross Mode>
C-9
C10
Specify the default copying order in the 4in1 mode.
Setting 1
Description
Select whether to the copier scan the left-hand-side page (Leftbound) or the right-hand-side page (Right-bound) first when it scans
an open book.
Setting 1
Description Left-bound Right-bound
<4in1 Copy Order>
12
34
<Book Binding Position>
13
24
S-6
Page 4

FrameMaker Ver5.5E(PC) Di152/Di183 SWITCHES ON PWBs/TECH. REP. SETTINGS
Highlighted
01.07.26
Code No.
C11
C12
C13
C14
C15
Setting (The default is ).
Adjust the margin width for the File Margin copy.
Setting
Description (mm)
Adjust the erase width for the Left Erase copy.
Setting
Description (mm) 5 20
Adjust the erase width for the Upper Erase copy.
Setting
Description (mm) 5 20
Adjust the erase width for the Frame Erase copy.
Setting
Description (mm)
Select the time it takes the Auto Panel Reset function, which resets
the panel settings when the set period of time elapses after a copy
cycle has been completed or the last key operated, to be activated.
Setting 0
Description 30 sec. 1 min. to 5 min. Disable
<Margin Setting>
0................................. .......................... 20
020
<Erase Setting (Left)>
5................................. .......................... 20
<Erase Setting (Upper)>
5................................. .......................... 20
<Erase Setting (Frame)>
5................................. .......................... 20
520
<Auto Panel Reset>
1
to 5
10
10
10
10
6
C16
C17
Select the time it takes the copier to enter the Energy Saver mode
after a copy cycle has been completed or the last key operated.
Setting
Description
Select the time it takes the Auto Shut Off function, which shuts down
the copier when the set period of time elapses after a copy cycle has
been completed or the last key operated, to be activated.
Note:
• The option of “0” can be set if “Yes” is selected for “Disable Auto
Shut OFF” of the “Administrator Mode” function.
Setting 0
Description Disabled
1 ................................... ................................240
1 min. 240 min.
<Energy Saver>
15
<Auto Shut OFF>
1........................... .......................240
1 min. 240 min.
30
S-7
Page 5

FrameMaker Ver5.5E(PC) Di152/Di183 SWITCHES ON PWBs/TECH. REP. SETTINGS
Highlighted
0
01.07.26
Code No.
C18
C19
C20 to 24
C25
Setting (The default is ).
Adjust the copy image density level when the ADF is being used.
Setting Description
When the standard original (text, etc.) is used.
0
1 To give better reproduction of faint original.
Set the image density level for printing
Setting
Description
Select the system of measurement of the paper for automatic paper
size detection.
Setting 0 1
Description Inch Metric
Initial setting: Metric area “1”/Inch area “0”
C20: 1st Tray C21: 2nd Tray C22: 3rd Tray
C23: 4th Tray C25: 5th Tray
Select the paper size detection method for the 1st Tray. If paper of a
nonstandard size is to be used, select “1.” Size input is made using
“U-4.”
Setting 1
Description Automatic detection Size input
0 1 3 4
Lighter. Darker
<Density ADF>
<Priority Density>
2
<Paper Auto Detection>
<Paper Size Detection>
C26
C27
Select the type of paper loaded in the 1st Tray.
Setting 1 2
Description Plain Paper Cards O HP
Select the type of paper loaded in the Bypass Tray.
Setting 1 2
Description Plain Paper Cards O HP
<Paper Type (1st Tray)>
0
<Paper Type (Bypass Tray)>
0
S-8
Page 6

FrameMaker Ver5.5E(PC) Di152/Di183 SWITCHES ON PWBs/TECH. REP. SETTINGS
Highlighted
01.07.26
Code No.
Allow Paper of same type t o be f ed from another tra y when paper from
one source is empty.
Setting Description
C28 to 33
C20: 1st Tray C21: 2nd Tray C22: 3rd Tray
C23: 4th Tray C25: 5th Tray C23: Multiple Bypass Tray
(2) Drum Dehumidify Mode (Display: U-2)
• Removes dewdrops that have formed on the surface of the PC Drum.
<Procedure>
1. Hold down the Panel Reset key for 3 seconds.
2. Enter “2” from the 10-Key Pad. (Display: U-2)
3. Press the Start key. The Drum Dry sequenc e will be stopped after a given period of
time.
(3) Toner Replenisher Mode (Display: U-3)
• Supply of toner is replenished. The replenishing sequence is stopped after a given
period of time or when a required level of toner-to-carrier ratio is recovered.
<Procedure>
1. Hold down the Panel Reset key for 3 seconds.
2. Enter “3” from the 10-Key Pad. (Display: U-3)
3. Press the Start Key.
Setting (The default is ).
<Special Paper Setting>
Enables Auto Paper (selection). Enables Auto Tray
0
Switching.
1 Disables Auto Paper. Enables Auto Tray Switching.
2 Disables Auto Paper. Disables Auto Tray Switching.
(4) Custom Size Input Mode (Display: U-4)
• Input the size of the paper loaded in the 1st Tray. (This is necessary when paper of a
nonstandard size is to be used.)
<Procedure>
1. Hold down the Panel Reset key for 3 seconds.
2. Enter “4” from the 10-Key Pad. (Display: U-4)
3. Press the Start key. Then, the Display will show the currently set value (in the FD direc-
tion).
4. Press the Clear key to reset the currently set value.
5. Enter the new value from the 10-Key Pad.
6. Press the Start key. Then, the Display will show the currently set value (in the CD direc-
tion).
7. Press the Clear key to reset the currently set value.
8. Enter the new value from the 10-Key Pad.
9. Press the Start key to validate the values entered.
✽
If a value entered f alls outside the specified range (paper size), that entry is rejected and
the old value is restored.
<Exiting the Mode>
• Press the Panel Reset key.
S-9
Page 7

FrameMaker Ver5.5E(PC) Di152/Di183 SWITCHES ON PWBs/TECH. REP. SETTINGS
01.07.26
(5) Admin is trator Mod e (D is play: U-5)
• The entry on the “Administrator No. Input” set using the Tech. Rep. Mode permits the settings of the following functions.
1. Administrator Mode Function Setting Procedure
<Procedure>
1. Hold down the Panel Reset key for 3 seconds.
2. Enter “5” from the 10-Key Pad. (Display: U-5)
3. Press the Start Key.
4. Enter the Administrator number from the 10-Key pad.
5. Press the Start Key. (Display: Ad )
✽
If a mismatch is detected of the administrator number, the Display shows “---.”
6. Enter the code assigned to the desired subfunction from the 10-Key Pad. (1 or 2)
7. Press the Start Key.
<Exiting the Mode>
• Press the Panel Reset key until t he initial screen reappears.
2. Administrator Mode Function Tree
A-1: Copy Track
A-2: Input Account
U-5: Administrator
Mode
Ad1: Copy Track
A-3: Disable Account
A-4: Change Account
A-5: Total Counter Display
by Account
A-6: Total Counter Clear
for All Accounts
Ad2: Disable Auto
Shut OFF
S-10
Page 8

FrameMaker Ver5.5E(PC) Di152/Di183 SWITCHES ON PWBs/TECH. REP. SETTINGS
Highlighted
01.07.26
3. Setting in the Administrator Mode
Code No.
U-5
Ad1
Ad2
A-1
A-2
Setting (The default is ).
<Administrator Mode>
Allows for setting two functions, “Copy Track” and “Disable Auto Shut
OFF.”
<Copy Track>
Allows for making the six different subfuncti ons.
Select whether to allow the option “0” to be select in User’s choice
function no.17.
Setting 0
Description Authorized Not authorized
<Procedure>
1. Enter “2” from the 10-Key Pad.
2. Press the Start key to show the current setting value.
3. Press the Clear key to reset the current setting value.
4. Enter the new setting value from the 10-Key Pad.
5. Press the Start key to validate the new setting value just entered.
Select whether to enable or disable Copy Track. (Up to 20 different
accounts can be controlled under Copy Track.)
Setting 0
Description Copy Track enabled Copy Track disabled
<Procedure>
1. Enter “1” from the 10-Key Pad. (Display: A-1)
2. Press the Start key to show the current setting value.
3. Press the Clear key to reset the current setting value.
4. Enter the new setting value from the 10-Key Pad.
5. Press the Start key to validate the new setting value just entered.
Using the 10-Key Pad, enter a 3-digit access number that can range
from 001 to 999. The access number corresponds to the account
number.
<Procedure>
1. Enter “2” from the 10-Key Pad. (Display: A-2)
2. Press the Start key. This will blank out the Display .
✽
If 20 accounts have already been programmed, the contents of the
Display alternate between “A-2” and “blank.”
3. Enter the access number from the 10-Key Pad.
4. Press the Start key to validate the access number just entered.
✽
If the access number just entered already exists, “Err” appears on
the Display and then the Display blanks out.
In this case, perform steps 3 and 4 again.
<Disable Auto Shut OFF>
1
<Copy Track>
1
<Input Account>
S-11
Page 9

FrameMaker Ver5.5E(PC) Di152/Di183 SWITCHES ON PWBs/TECH. REP. SETTINGS
Highlighted
01.07.26
Code No.
A-3
A-4
A-5
A-6
Setting (The default is ).
Delete an account (access number) which has previously been
stored.
<Procedure>
1. Enter “3” from the 10-Key Pad. (Display: A-3)
2. Press the Start key. This will blank out the Display .
✽
If no accounts are yet to be programmed, the contents of the Display alternate between “A-3” and “blank.”
3. Press the Zoom key to display the account to be delet ed.
4. Press the Start key to delete the account.
Change an access number which has previously been programmed.
<Procedure>
1. Enter “4” from the 10-Key Pad. (Display: A-4)
2. Press the Start key. This will blank out the Display .
✽
If no accounts are yet to be programmed, the contents of the Display alternate between “A-4” and “blank.”
3. Press the Zoom key to display the access number to be changed.
4. Press the Start key to validate the access number displayed.
5. Enter a new access number from the 10-Key Pad.
6. Press the Start key to validate the new access number just
entered.
✽
If the new access number just entered already exists, “Err” appears
on the Display and then the Display blanks out.
In this case, perform steps 5 and 6 again.
<Total Counter Display by Account>
Display the count of the Total Counter for each account.
<Procedure>
1. Enter “5” from the 10-Key Pad. (Display: A-5)
2. Press the Start key. This will blank out the Display .
✽
If no accounts are yet to be programmed, the contents of the Display alternate between “A-5” and “blank.”
3. Press the Zoom key to display the access number.
4. Press the Start key to validate the access number displayed.
5. Press the Start key. This will allow the Total Counter value to be
displayed.
E.g.: “123” and “456” alternate if the count is 123,456.
6. Press the Clear key to clear the count.
If the count is mistakenly cleared, press the Interrupt key, which
will restore the count just cleared.
<Total Counter Clear for All Accounts>
Clear the Total Counter counts for all accounts.
<Procedure>
1. Enter “6” from the 10-Key Pad. (Display: A-6)
2. Press the Start key. Then, “CLr” appears on the Display.
3. Press the Start key again to clear all counts.
<Delete Account>
<Change Account>
S-12
 Loading...