

Page 1
Instruction Manual
pg. 1
Page 2

MINLEON MULTIFUNCTION
Minleon Australia & New Zealand
Minleon USA
Minleon International
MINI CONTROLLER SYSTEM
INSTRUCTION MANUAL
MINLEON LIGHTING
2nd Release – January 2014
Important Notice
It is the sole responsibility of the reader to ensure that all safety precautions are taken, Minleon and/or any involved parties
relinquishes any responsibility and liabilities for any content within this manual that may cause the reader any injury or loss of property
due to incorrect use. By reading this manual you take sole responsibility for all actions taken.
Ensure all local and state electrical laws are taken into consideration when using this product. Minleon do not take responsibility for
any use outside of state and local laws and regulations.
Any misuse, abuse, tampering or modification of the product will void any and all warranties
Minleon reserve the right to change product features to help improve the product, these changes may not be represented in the
manual or may slightly vary from described. Minleon will make every effort to ensure that the information is correct as possible within
the manual.
This document is owned by Minleon USA and any use of the information and drawings within this manual must have permission by the
owner before using.
© Copyright 2013 Minleon USA
http://www.minleonUSA.com
[email protected]
http://www.minleonausnz.com
[email protected]
http://www.minleon.com
pg. 2
Page 3

TABLE OF CONTENTS
Controlling the Mini Controller from a Computer 18
Precautions and Installation Requirements 5
Introduction 6
Features 6
Uses 6
Parts and Connection 7
Outdoor Installation 8
Using the Controllers Functions 9
Multifunction Mini Controller 9
Multifunction Mini Controller Remote 10
Remote Controller Functions 10
Turning lights on and off 10
Setting the number of lights connected to the controller 10
Selecting Effects Colors 10
Replacing Batteries on the Remote 11
Connecting Additional Lights 12
Connecting Lights 12
Power Considerations 12
Methods of Connecting Addition Power 12
How to Connect Additional Minleon RGB Lights 13
Connecting Lights Using the One Power Supply 13
Connecting Lights Using Additional Power Supplies 13
Fault Diagnosis 14
Connection Options 15
1: Single String 15
2: Second String 15
3: Multiple Strings & Power 15
4: Multiple Strings 16
5: Connecting thousands of Lights using the Optional T-Way 16
6: Strings Connected Through the Data Extenders 17
7: Strings Connected Through the 16 Port Signal Amplifier 17
Introduction 18
Connecting to a Computer 18
Installing the Mini Controllers Drivers 19
Specifications 19
Minleon Accessories 20
Minleon RGB Lights 23
pg. 3
Page 4

VERY IMPORTANT INFORMATION
BEFORE STARTING
WHEN CONNECTING AND
DISCONNECTING LIGHTS TO THE
CONTROLLER THE USER MUST ENSURE
THAT POWER IS DISCONNECTED
FROM THE CONTROLLER OR
PERMANENT DAMAGE MAY OCCUR
TO THE LIGHTS AND/OR CONTROLLER
THAT MAY NOT BE COVERED BY
WARRANTY
pg. 4
Page 5

PRECAUTIONS & INSTALLATION
REQUIREMENTS
IMPORTANT - READ BEFORE USE
1. If using outside then ensure that the controller is mounted from the mounting eye
piece with the power and USB sockets facing downwards and caps in place on the
USB port if not used.
2. The controller must not be located no more than 20 feet away from the first light
unless using the Minleon sender and receiver unit (Minleon additional accessory)
which will allow up to 300 feet of distance between the controller and first light.
3. Never disconnect and connect lights when the controller is powered up as this may
cause permanent damage to the lights and/or controller.
4. Do not place lights or controller in areas where there is extreme heat or cold.
5. Do not strain the cables of the lights as damage may occur to the wiring.
6. Always keep the plug cap on at the end of the light string when not used.
7. Firmly tighten all plugs, do not over tighten
8. Do not drop controller, remote or lighting on hard surfaces
9. Do not use if there is any damage to the controller, wiring or lighting
10. Do not use detergents on the controller, remote or lights as this may cause
permanent damage. Use a soft clean rag to clean the controller, remote and lights.
11. The Minleon Multifunction Mini Controller is supplied with a standard 1.5 amp
12VDC power supply that is rated to work with the number of lights supplied in this
Kit. If connecting more lights then always ensure that the correct type of power
supply is connected (12 Volt DC) and ensure that the power supply is rated for the
number of lights connected. The power supply must be able to supply about 30ma
per attached light. So for 100 Minleon RGB LED lights (0.03 amps x 100 Minleon RGB
lights) you would require a minimum rated 3 amp 12VDC power supply (Minleon
additional accessory)
12. The power input jack does not have reverse-polarity protection. Connecting power
backwards will instantly and permanently damage the lights and controller. The
CENTER pin is POSITIVE, the OUTER ring is NEGATIVE
pg. 5
Page 6

INTRODUCTION
The Minleon Multifunction Mini Controller is a simple to use powerful RGB light controller
used for displaying effects on a single string of Minleon RGB Lights (up to 500 lights
maximum). It can also control multiple strings of lights using Minleon accessories that allow
for thousands of lights to be connected. The Mini Controller has a number of built-in
effects, a remote control that allows different controls including a memory recall and a USB
port that allows live control via a PC using Minleons LightShow Pro software.
Features
Controls all the Minleon RGB Light series (refer to a Minleon RGB section)
Connect up to 500 individually controlled lights to one controller or thousands of
lights if grouping lights using additional Minleon accessories.
Full remote control functions with memory recall buttons
Over 20 different amazing colorful effects with multiple variations per effect.
Easy setup and use – Plug and Play
Low voltage (12VDC)
Select your own favourite colors using the remote control with Effects
Remembers the last effect used after powering off the controller
Can be connected to Minleons LightShow Pro sequencing software to gain full control
of your lights via the computer
Easy setup of number of lights connected to the controller
Uses
Seasonal celebrations (Christmas, Easter, Valentine, Independence day, St Patricks
day, Halloween, Thanks Giving, and any other seasonal occasion)
Take your Christmas tree to the next level with amazing colourful effects.
Special events (Birthdays, 21
st
, Weddings, Engagements, Anniversaries, etc.)
Scenery Lighting (Gardens, Trees, Parks, Buildings, Halls, Rooms, etc.)
Sporting Events, select your teams favourite colours
Can be used for Shops, Restaurants, Cafes, Bistros, Event centres, Hotels etc. to
create any effect and ambience.
Mobile installations (Cars, Trucks, Caravans, Boats, Bikes, Clothing, etc.)
Bring attention to your business by using the great inbuilt light effects.
Any other use or occasion that you can think of. The uses are unlimited
pg. 6
Page 7
PARTS AND CONNECTION
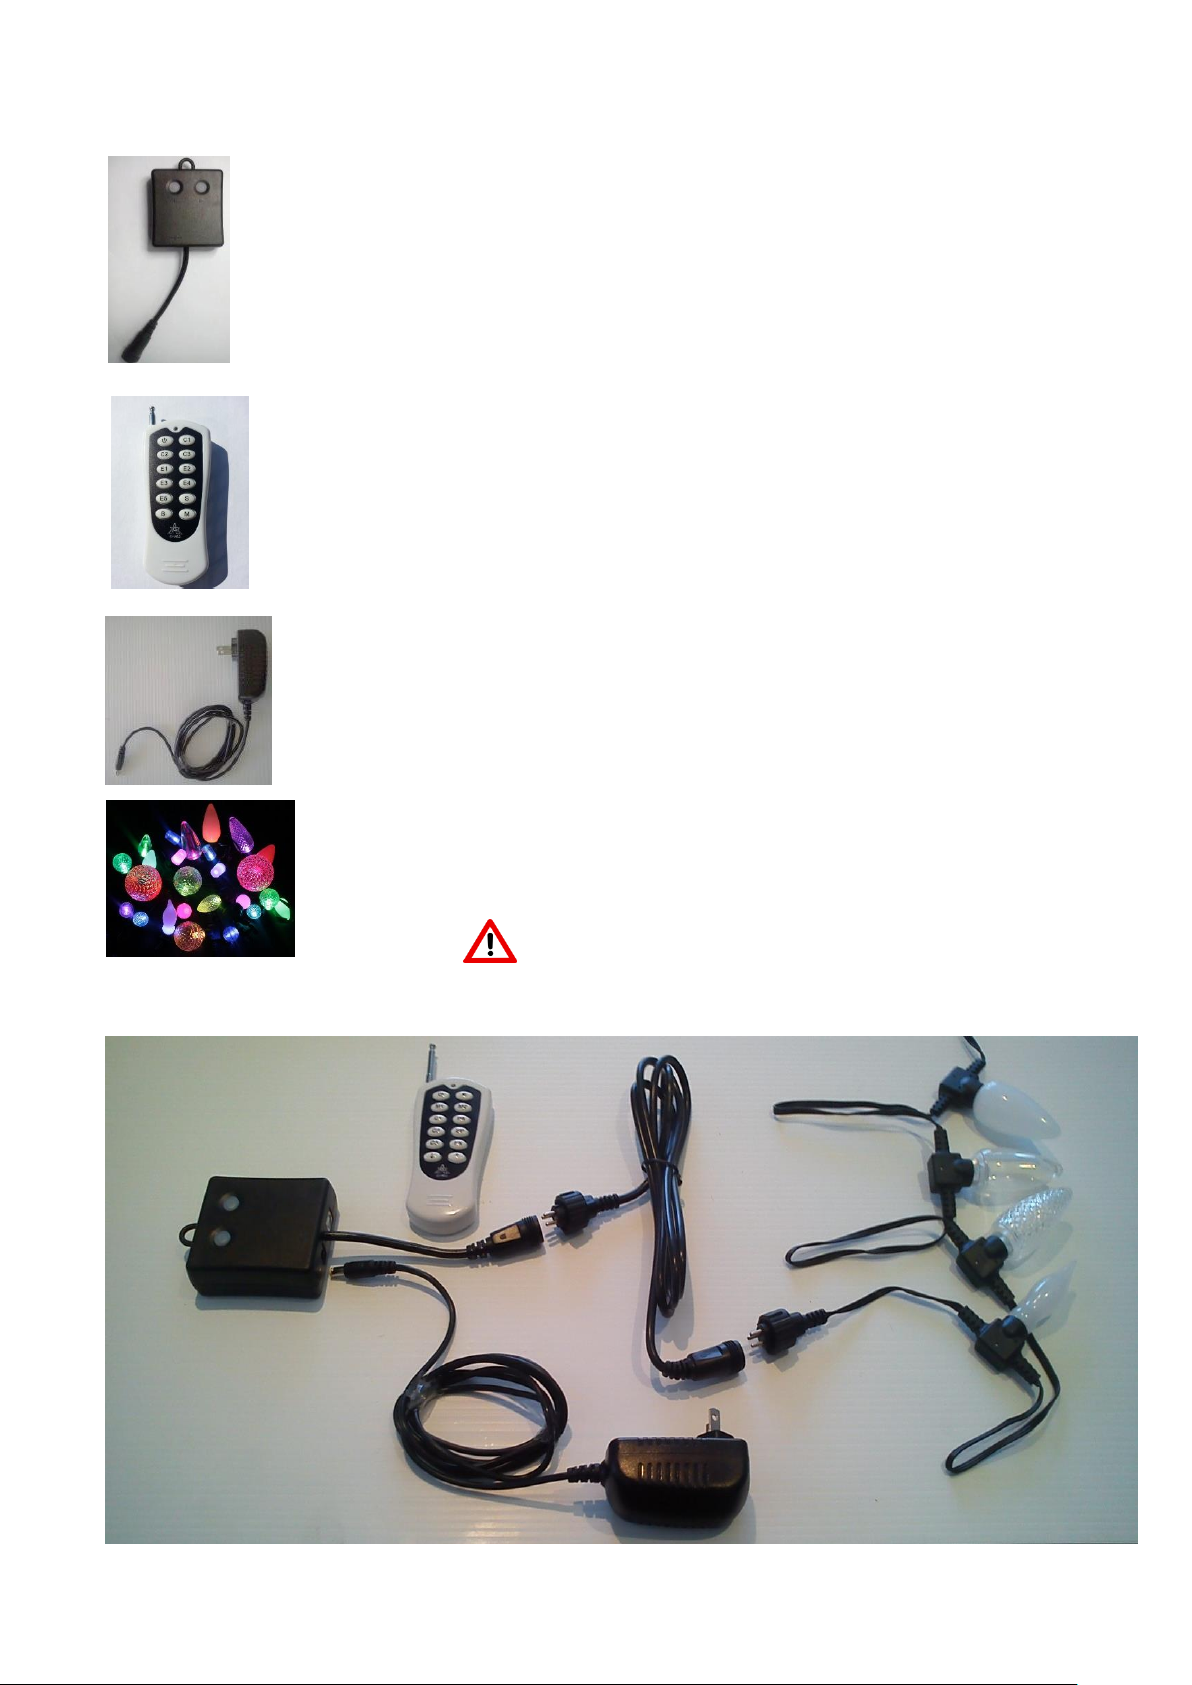
1: Multifunction Mini Controller
The Minleon Multifunction Mini Controller has many inbuilt functions
and is very powerful for a small package
2: Mini Controller Remote
The Minleon Multifunction Mini Controller Remote is a 12 key remote
that allows you to take control of the lights connected to the
multifunction mini controller in many ways
3: Mini Controller 12VDC Power Supply
12VDC 1.5 Amp power supply that can power up to 50 Minleon RGB
lights and the controller. (Some kits may come with an outdoor power supply)
4: Minleon RGB Lights
A variety of different lights, tubes and strip Lighting are available from
Minleon Always power off the controller before connecting and disconnecting lights
1
2
3
4
Diagram for connecting the power supply and lights
*Optional Extension/spacer shown (may come with an outdoor power supply)
pg. 7
Page 8
OUTDOOR INSTALLATION
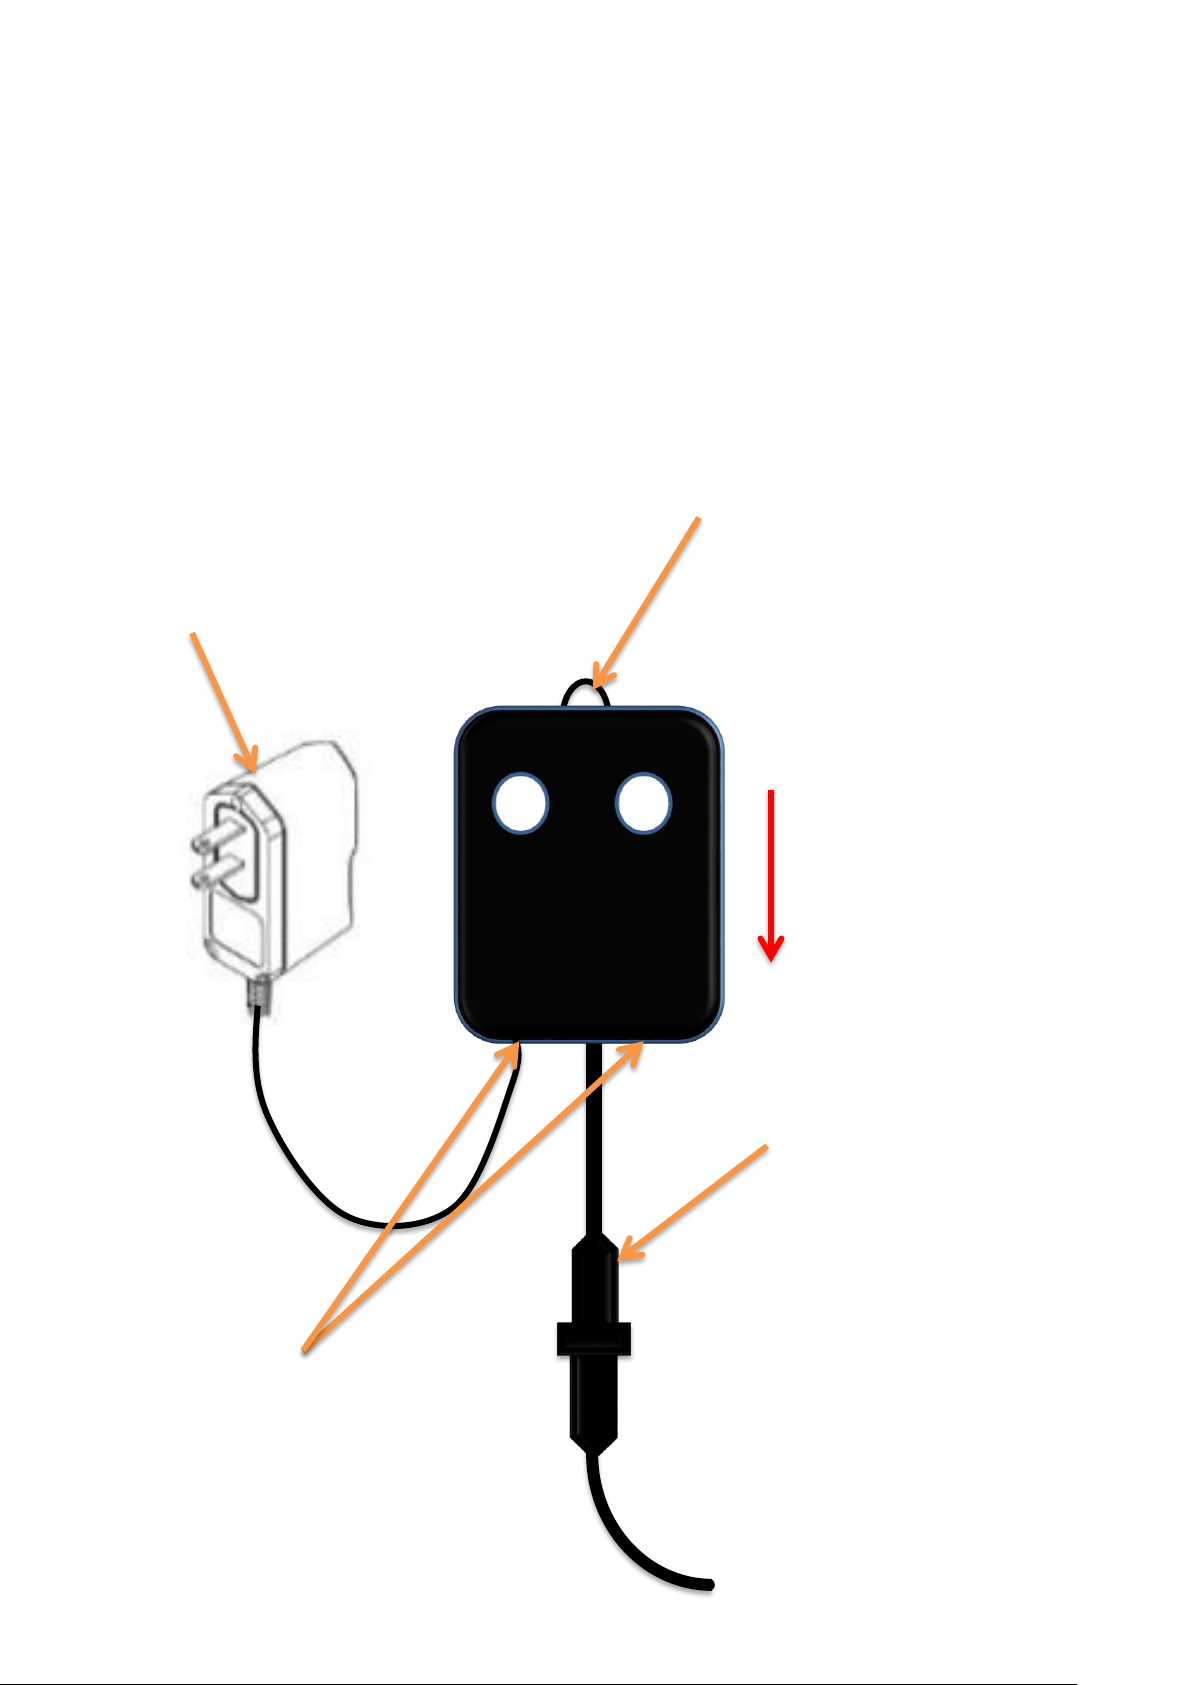
When mounting the controller outside then ensure the controller is mounted from the hook
eye with the power socket and USB port facing downward and the cap in place on the USB
port if this is not being used.
The 12Vdc power supply MUST be
plugged into a safe weatherproof
location. DO NOT connect the power
supply to mains outlets that are
exposed to the elements.
Note: Some units may be shipped with
a 1.5amp all weather power supply
Hook Eye – Use the hook eye to
hang the for best installation.
The power socket and USB port
must be pointing down when
installed outdoors and the USB cap
in place if not being used.
Ensure the light output cable
does not pull the controller to
the side and allow the power
socket and USB port to be
exposed to water.
The controller should be facing
downwards as shown here
Top
Bottom
pg. 8
Page 9
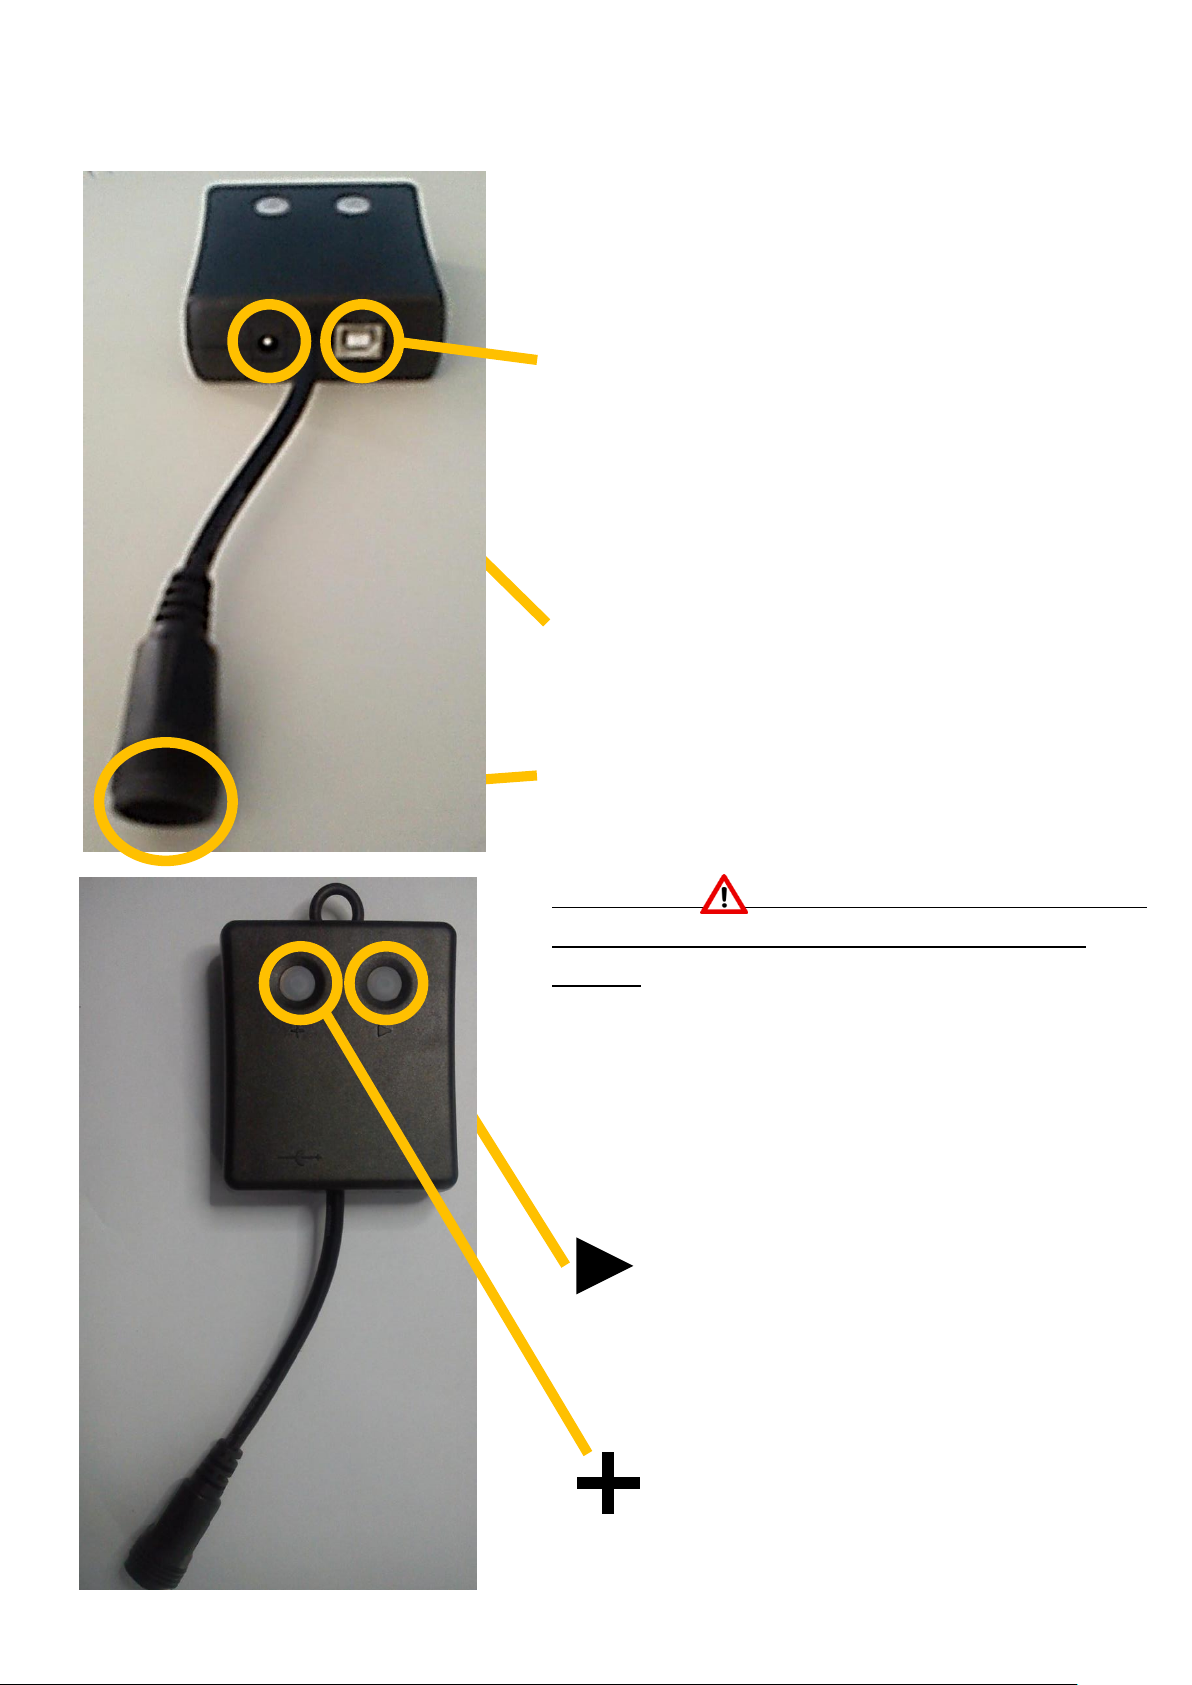
Play Button
Plays next effect. If held down, turns
power off and saves effect for next
power up. Press to turn lights back on.
12Volt DC Power Socket
Connect the 12VDC power supply here
Light Plug
Connect the lights to this 3 pin plug. Ensure the pins
line up and do not force in the plug.
IMPORTANT - DO NOT CONNECT & DISCONNECT
LIGHTS WHEN CONTROLLER IS PLUGGED INTO
POWER
Speed Button
Adjusts speed of effects through 10
levels
Mini Controller Control
The multifunction mini controller can have basic
control from the controller by using the below
function buttons.
Multifunction Mini Controller
The Minleon Multifunction mini controller has
several basic and advanced functions that allow the
user to take full control of the lights connected
USB Port
The USB port allows the mini controller to be
connected to a computer for direct control via
Minleons LightShow Pro Software or to modify the
controllers effects. Ensure the supplied USB cover is
in place if not being used.
USING THE CONTROLLER FUNCTIONS
pg. 9
Page 10
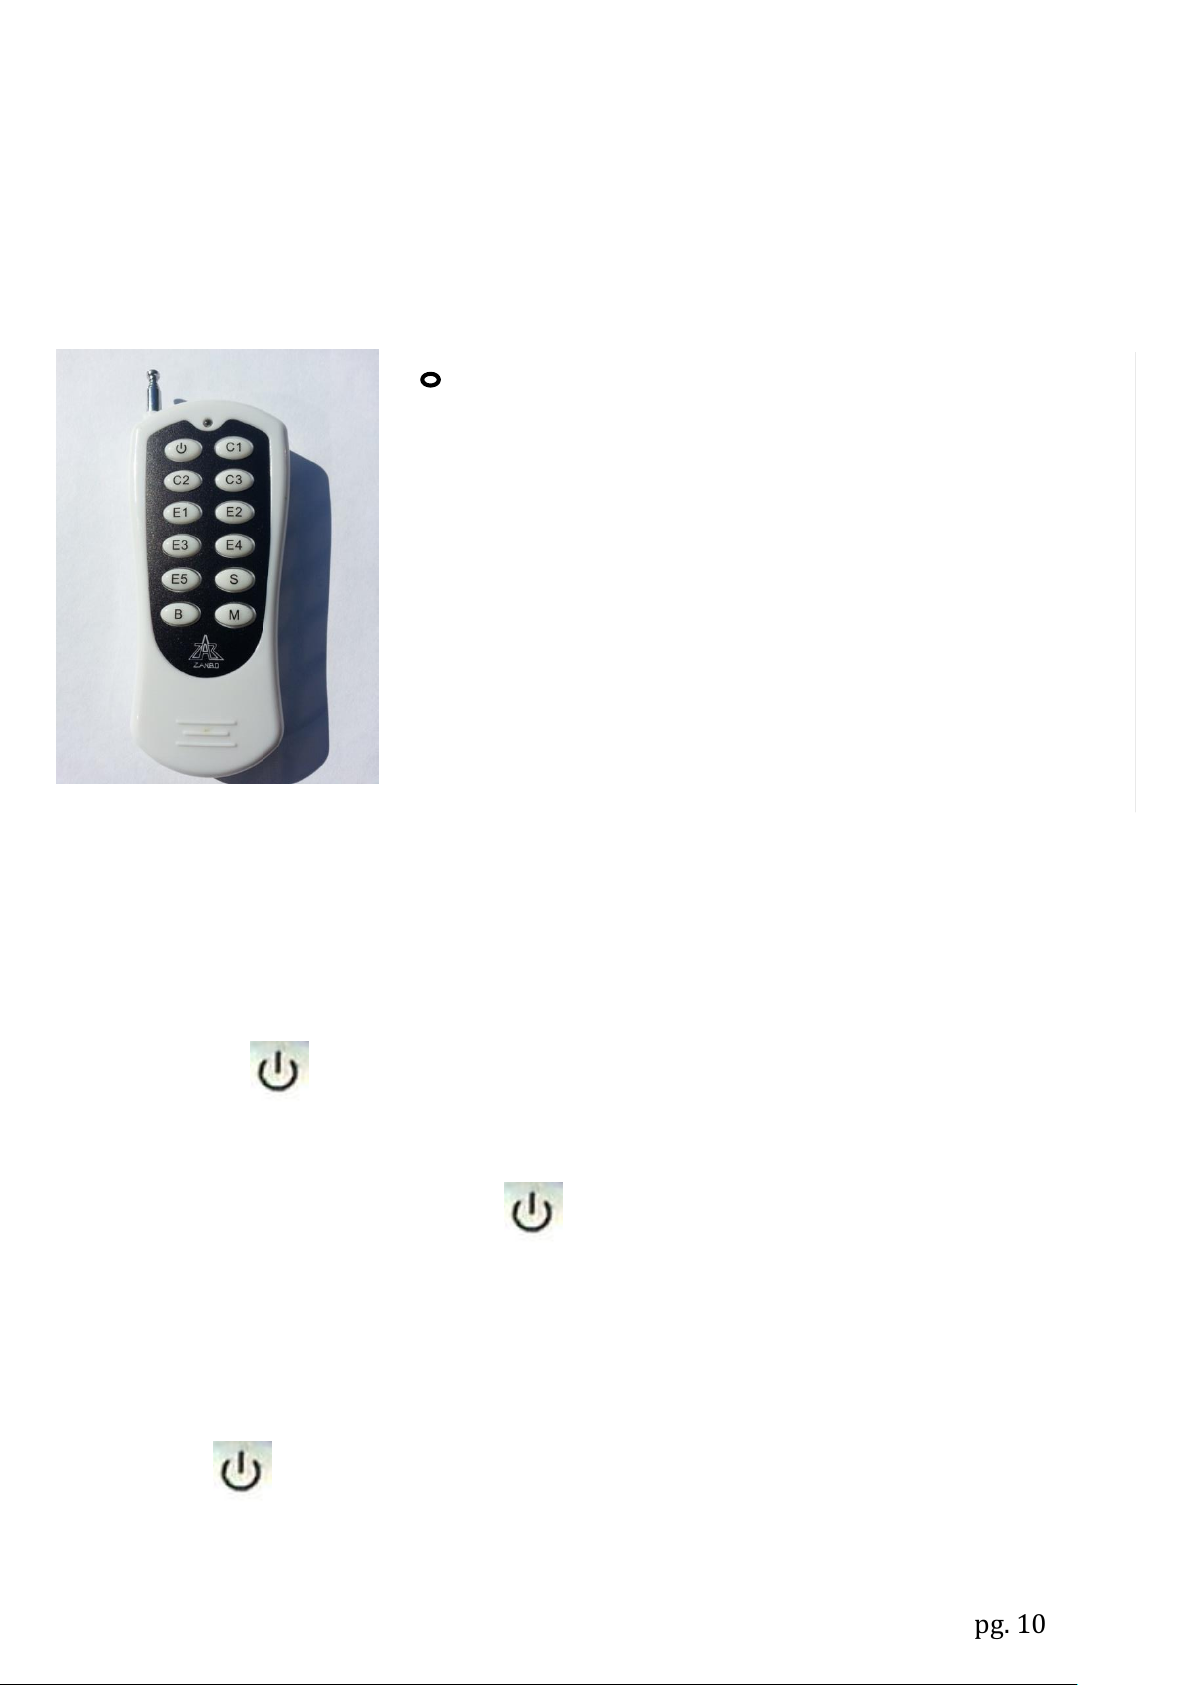
Multifunction Mini Controller Remote
The Minleon Multifunction Mini Controller Remote is a 12 key remote that has several basic and
advanced features that allow you to take full control of your lights for any occasion by just using
the Multifunction Mini Controller Remote.
Remote Controller Functions
Turning lights on and off
Setting the number of lights connected to the Controller
! - on/off
C1 - select color #1 (press-and-hold to scroll thru the color wheel)
C2 - select color #2 (press-and-hold to scroll thru the color wheel)
C3 - select color #3 (press-and-hold to scroll thru the color wheel)
E1 - select effect #1 (solid)
E2 - select effect #2 (twinkle)
E3 - select effect #3 (fading-in-and-out)
E4 - select effect #4 (chasing)
E5 - select effect #5 ('lightshow', using all the colors (this selection
overrides the above color selections)
S - select speed (slow, medium, fast)
B - select brightness (bright, dim, dimmer)
M - save to memory favourite sequence (long hold retains/short press
recalls)
Press the button
Turn the lights on then hold the button for more than 1 second. All active lights
will turn on Red with the last active light flashing blue.
Press B to decrease the number of lights connected.
Press M to increase the number of lights connected.
Press to return to normal operation
pg. 10
Page 11
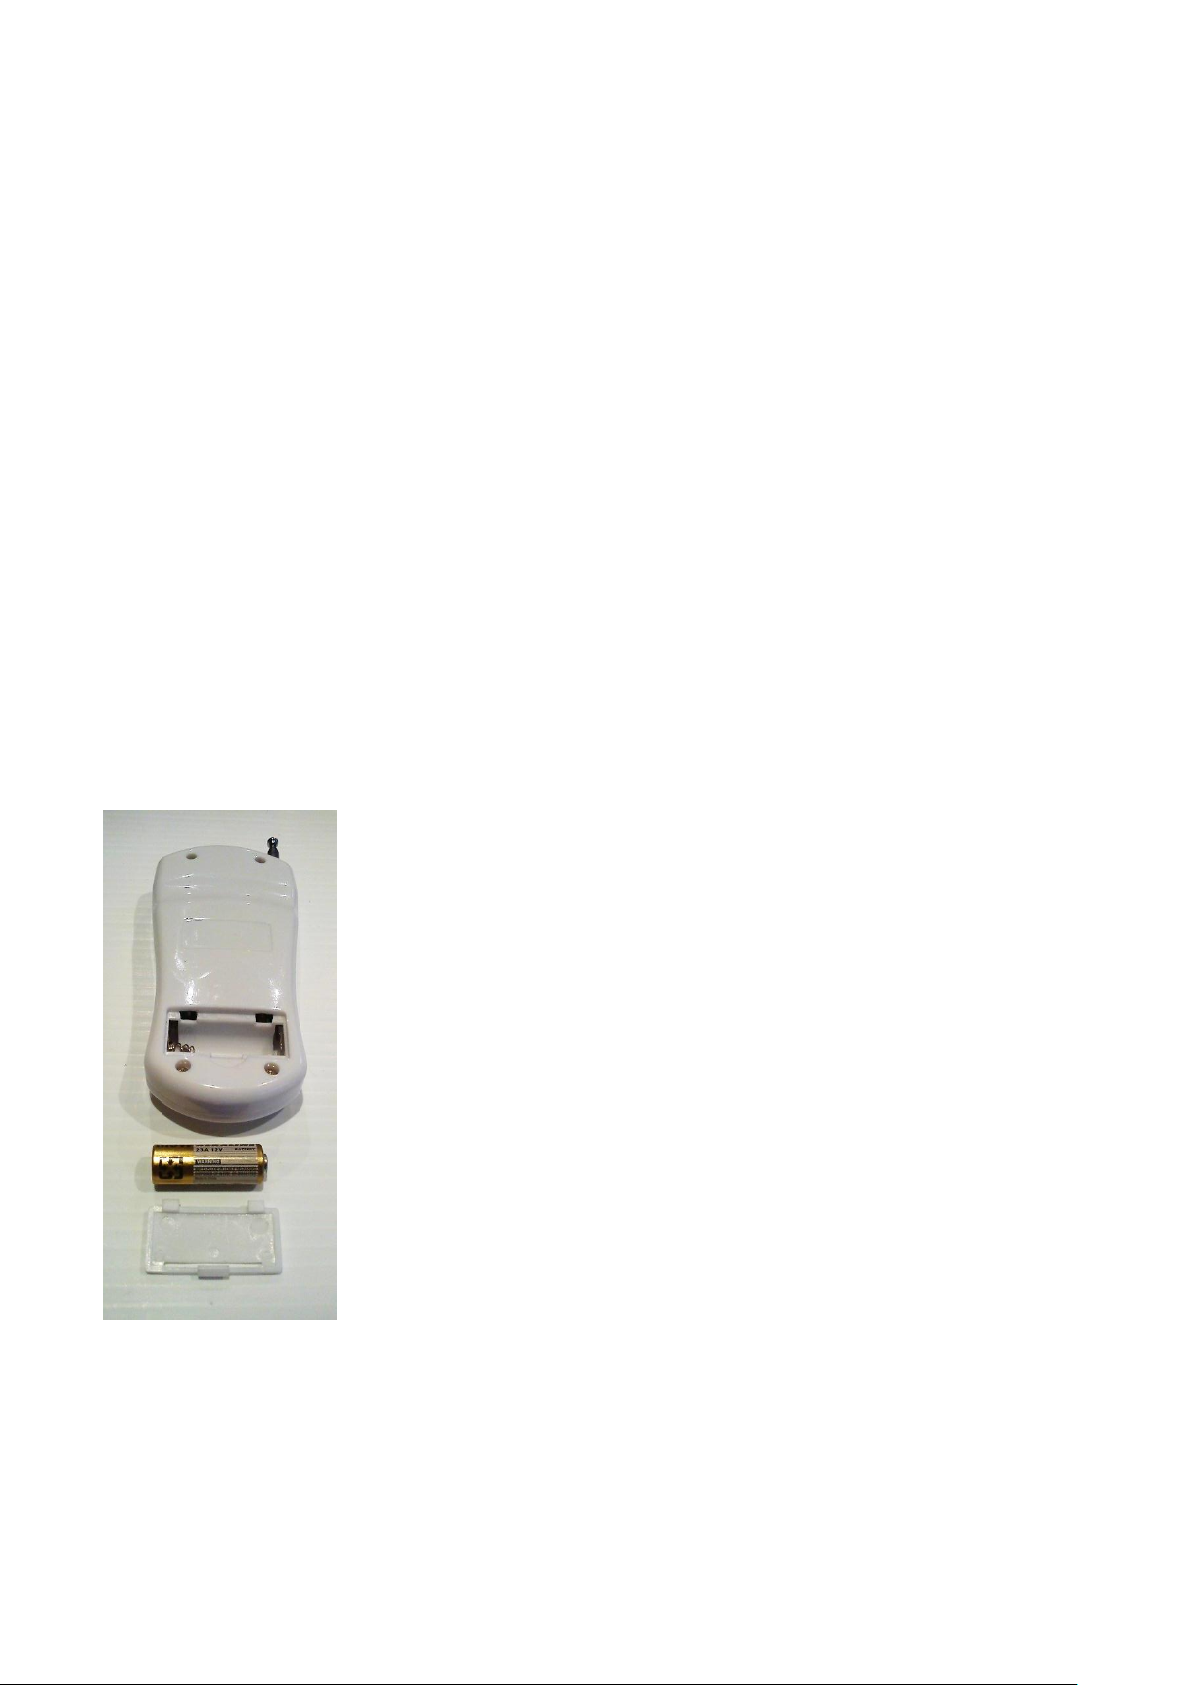
Replacing Batteries on the Remote
1: Remove the battery cover gently from the back of the Mini
Controller Remote
2: Insert battery with the + on the battery facing the right side
3: Refit cover
Battery Type: 12VDC Alkaline, Type: 23A
SELECTING EFFECT COLORS
[a] select up to 3 alternating colors (for example, red-white-blue)
Press and hold key ‘C1’, then release when you see red in bulb #1 as you scroll thru the color wheel, repeat for
keys ‘C2’ (bulb #2) for white, and ‘C3’ (bulb #3) for blue, when done the light string with be alternating red,
white, and blue. Select from near limitless combinations of colors.
if only a single color is needed then select the ‘bulb off’ position as you scroll thru the color wheel for the 2nd
(C2 key) and 3rd (C3 key) bulb
If only two colors are need, then select the ‘bulb off’ position as you scroll thru the color wheel for
the 3rd bulb
[b] Selecting the additional built in controller effects
If you want a larger variety of effects, instead of using the remotes 5 color programmed effects (E1-E5), then
use the play button on the mini controller to access 20 more additional effects.
To save one of the 20 built in effects to memory, press the play button on the mini controller to
select your desired effect and then press and hold the M button (memory) on the remote for more
than 1 second.
pg. 11
Page 12
CONNECTING ADDITIONAL LIGHTS
Connecting Lights
The Minleon Multifunction Mini Controller can connect and control up to 500 Minleon RGB
lights or thousands of lights if grouped together using additional Minleon accessories.
Minleon RGB lights have a female plug at the end so additional RGB lights can be connected.
These can be any type of compatible Minleon RGB lights, for example you could have a string
of C9 RGB lights and then connect a string of C7 RGB lights to have two different types of
lights connected to the one Multifunction Mini Controller.
Always disconnect power before adding or removing lights
Power Considerations
The Minleon Multifunction Mini Controller will allow up to 125 Minleon RGB lights to be
connected and controlled using the Minleon 5 amp power supply. The controller is shipped
with a 1.5 amp power supply that can run a load of approximately 50 Minleon RGB lights.
When adding additional Minleon RGB lights then the power supply load must be taken into
consideration.
For every additional Minleon RGB light added then 0.03 amps of load must be added
You can buy additional power supplies and power injectors from local your Minleon
Distributor in a range of sizes (refer to accessories section for available types)
Methods of Connecting Additional Power
There are 2 main ways to add additional power to control additional Minleon RGB Lights.
1. Replace the current power supply with a larger power supply.
2. Add additional power supplies using the power injector lead.(refer to accessories
section)
Note: It is important that the Minleon Power injector cable is used for supplying power.
The +12VDC must never be connected between different power supplies.
pg. 12
Page 13
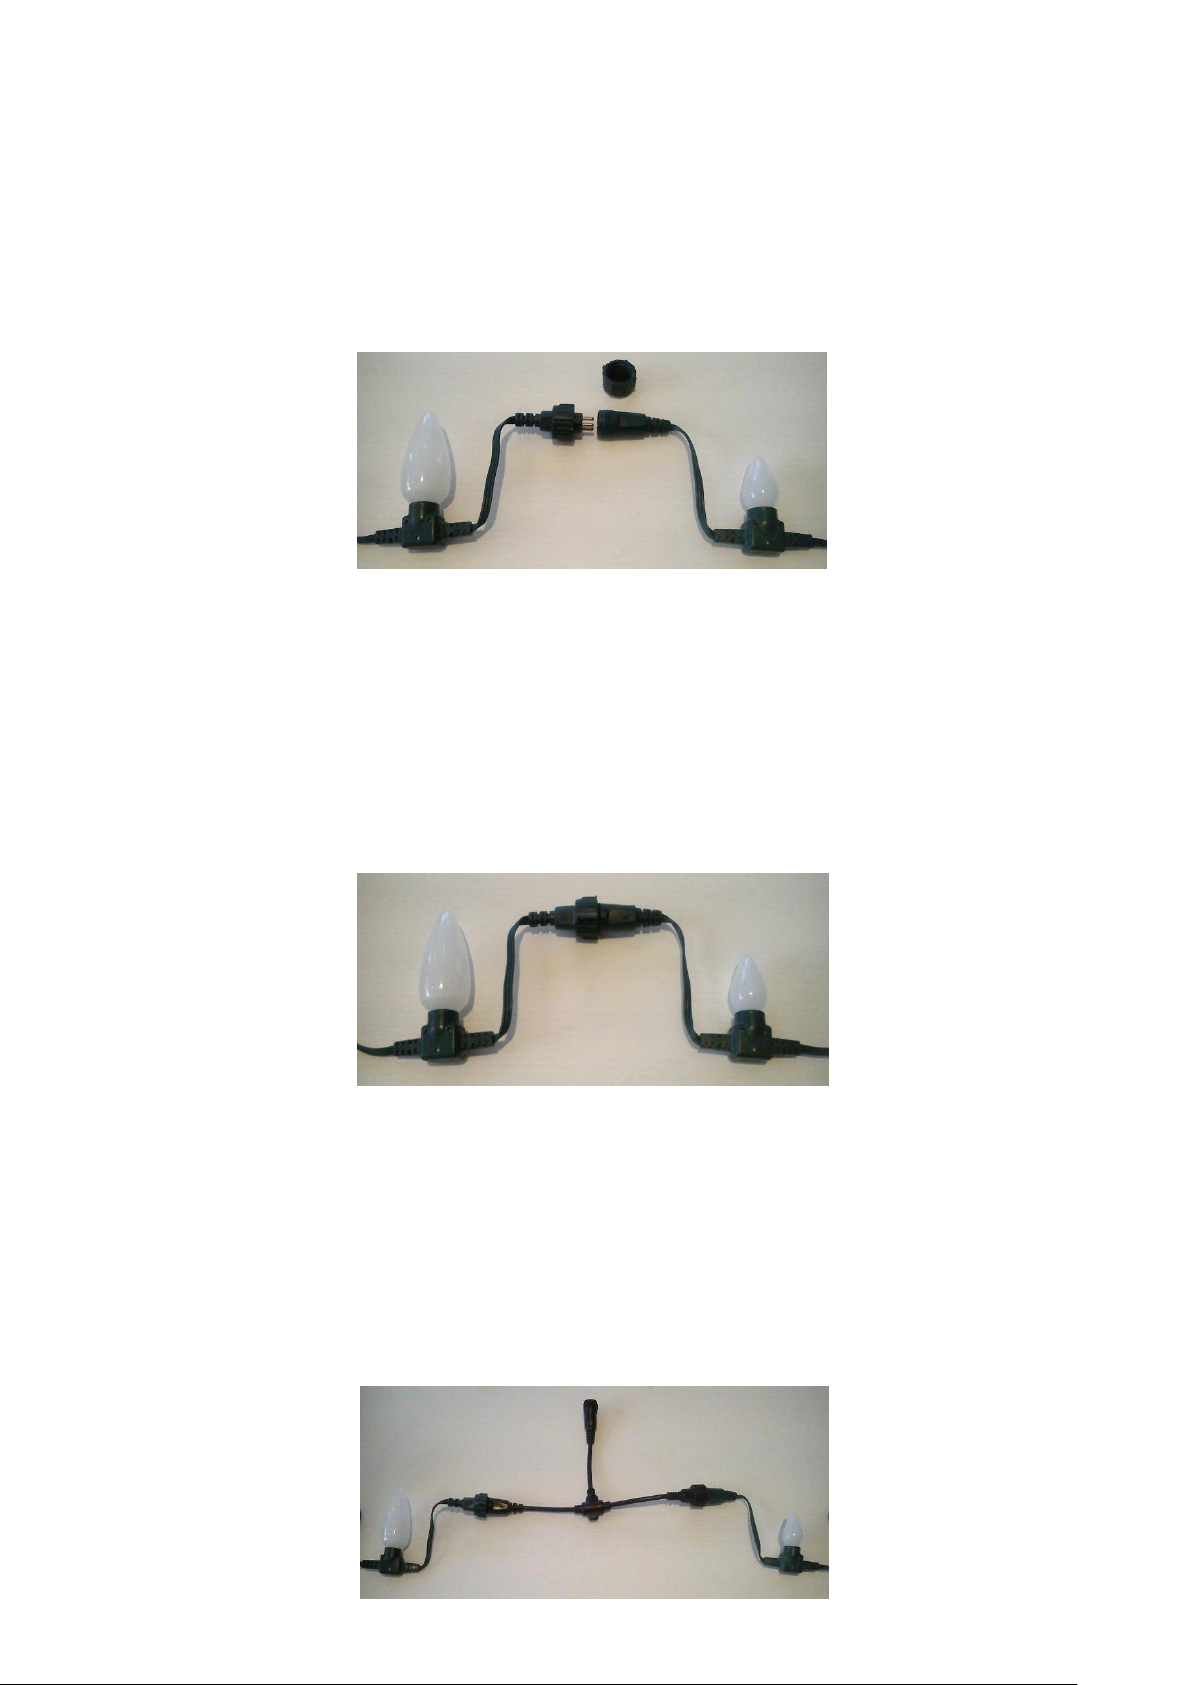
Connecting Lights Using the One Power Supply
If the power supply connected to the Minleon Standard Multifunction Mini Controller is
capable of supplying the power to all the lights connected then it is just a matter of
connecting the two Minleon RGB lights together and then setting the correct channel number
in the controller.
How to Connect Additional Minleon RGB Lights
Each string of Minleon RGB Lights has both a male and a female plug, the male is the input
side and the female is the output side. To connect, remove the weatherproof plug from the
female plug at the end of the string and then connect the male input plug for the second
string to the female plug of the first string. Ensure that the plug is firmly tightened but not
over tightened.
Connecting Lights Using Additional Power Supplies
Additional Minleon RGB lights can be connected using the additional Minleon accessory. This
is achieved by using the Minleon Power-T Injector cable and a suitable rated Minleon power
supply. Connect the Power-T Injector cable between the two strings and then connect the
power supply to the adaptor.
pg. 13
Page 14
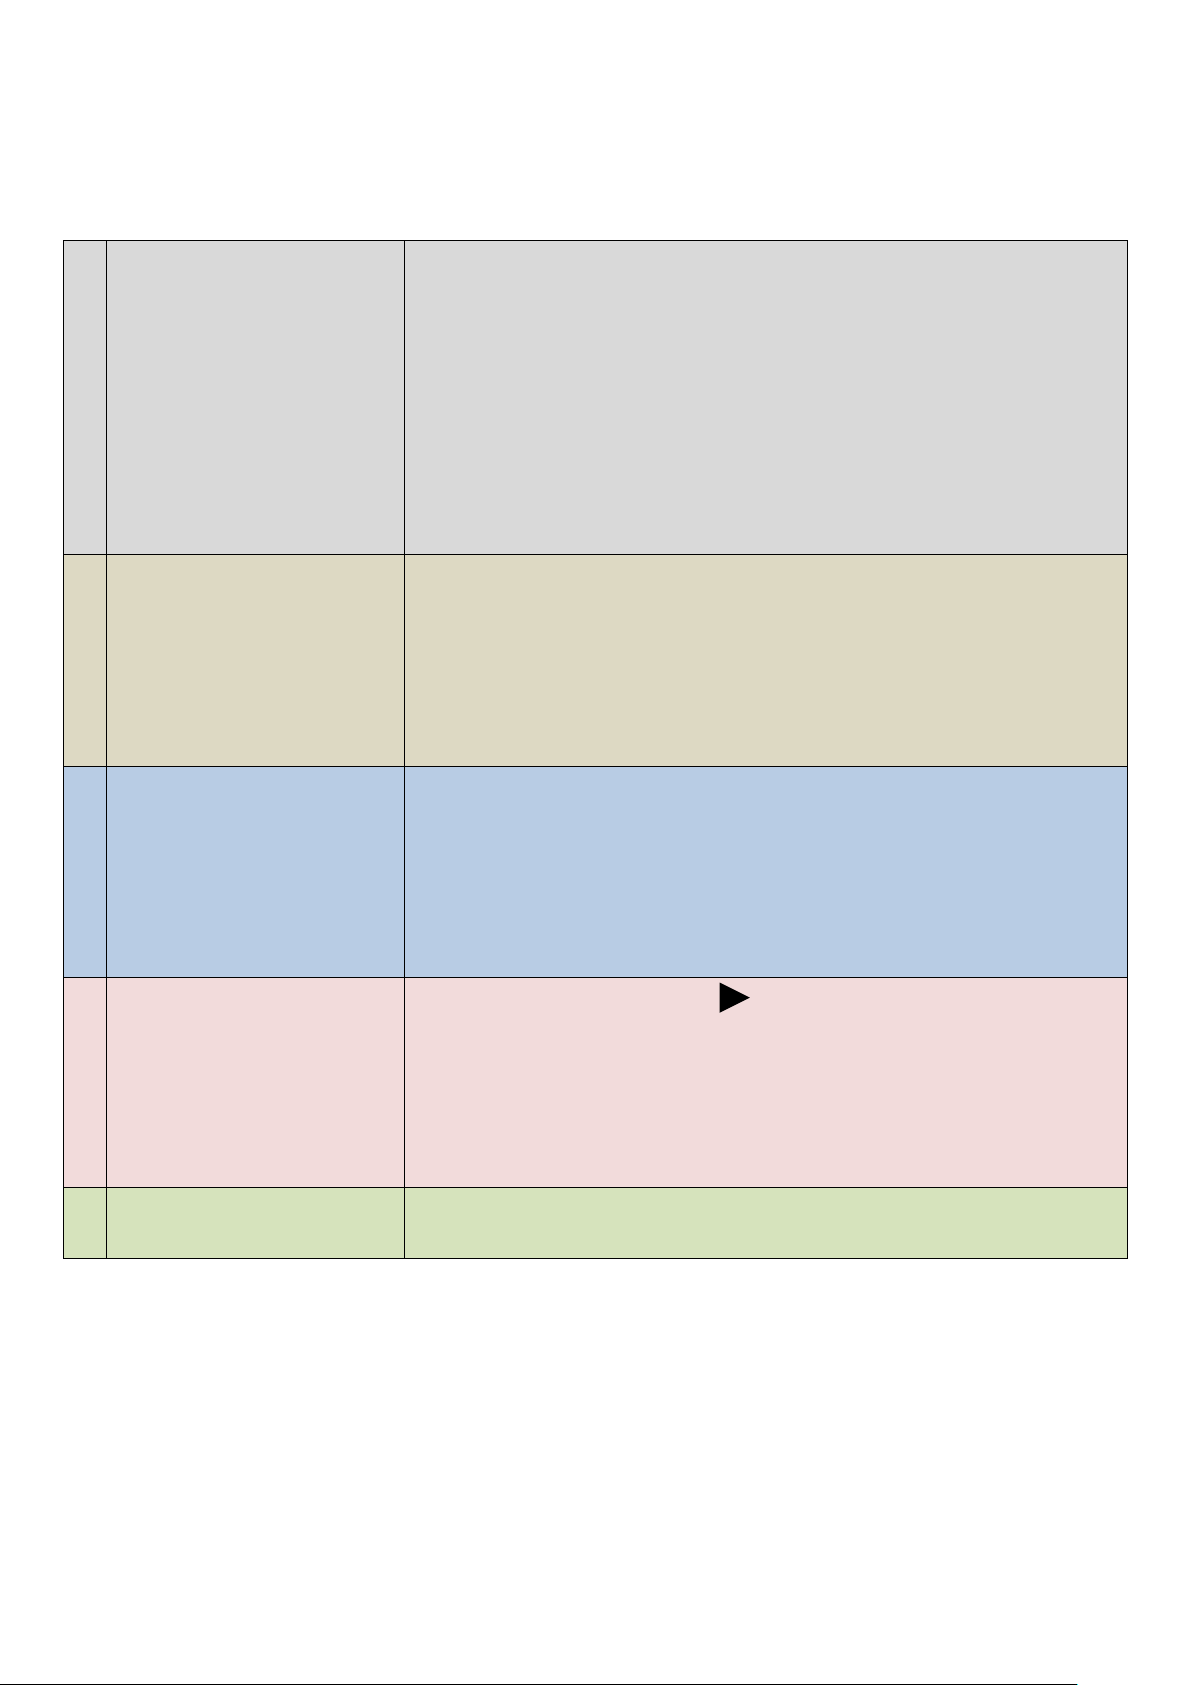
1
No Lights are Working
Check that the 12VDC power supply is connected to
the controller and that the power supply is plugged
into the power outlet and turned on.
Check that the remote is functional, try turning the
controller on at the controller itself.
Disconnect power and then check to ensure the lights
are connected correctly and all plugs are secure. Then
reconnect power and check.
Check that there is no damage to the light wiring.
2
Not all the Lights are
Working
Check that the controller has been set up for the
correct number of lights connected.
Ensure that if you have connected additional strings
that the power supply is capable of handling the load
Check that there is no damage to the light wiring.
Select a different controller effect.
3
Controller Remote does
not function
Check that the battery is charged and that the red
indicator light on the remote is functioning when the
button is pressed.
Ensure you are within range of the controller
Ensure there are no solid obstructions between the
remote and the controller.
4
Lights do not Function
with the Correct Effect
Ensure that the Play Button on the controller is
being pressed
If using the remote then try changing effects using the
play button on the controller in case the remote
batteries are getting low.
Turn off controller and turn back on
5
Controller will not Store
My Favourite Effect
Ensure you hold Button M on the mini controller
remote for at least 1 second.
FAULT DIAGNOSIS
Many faults can be easily diagnosed by following the appropriate instructions in the table
below.
pg. 14
Page 15
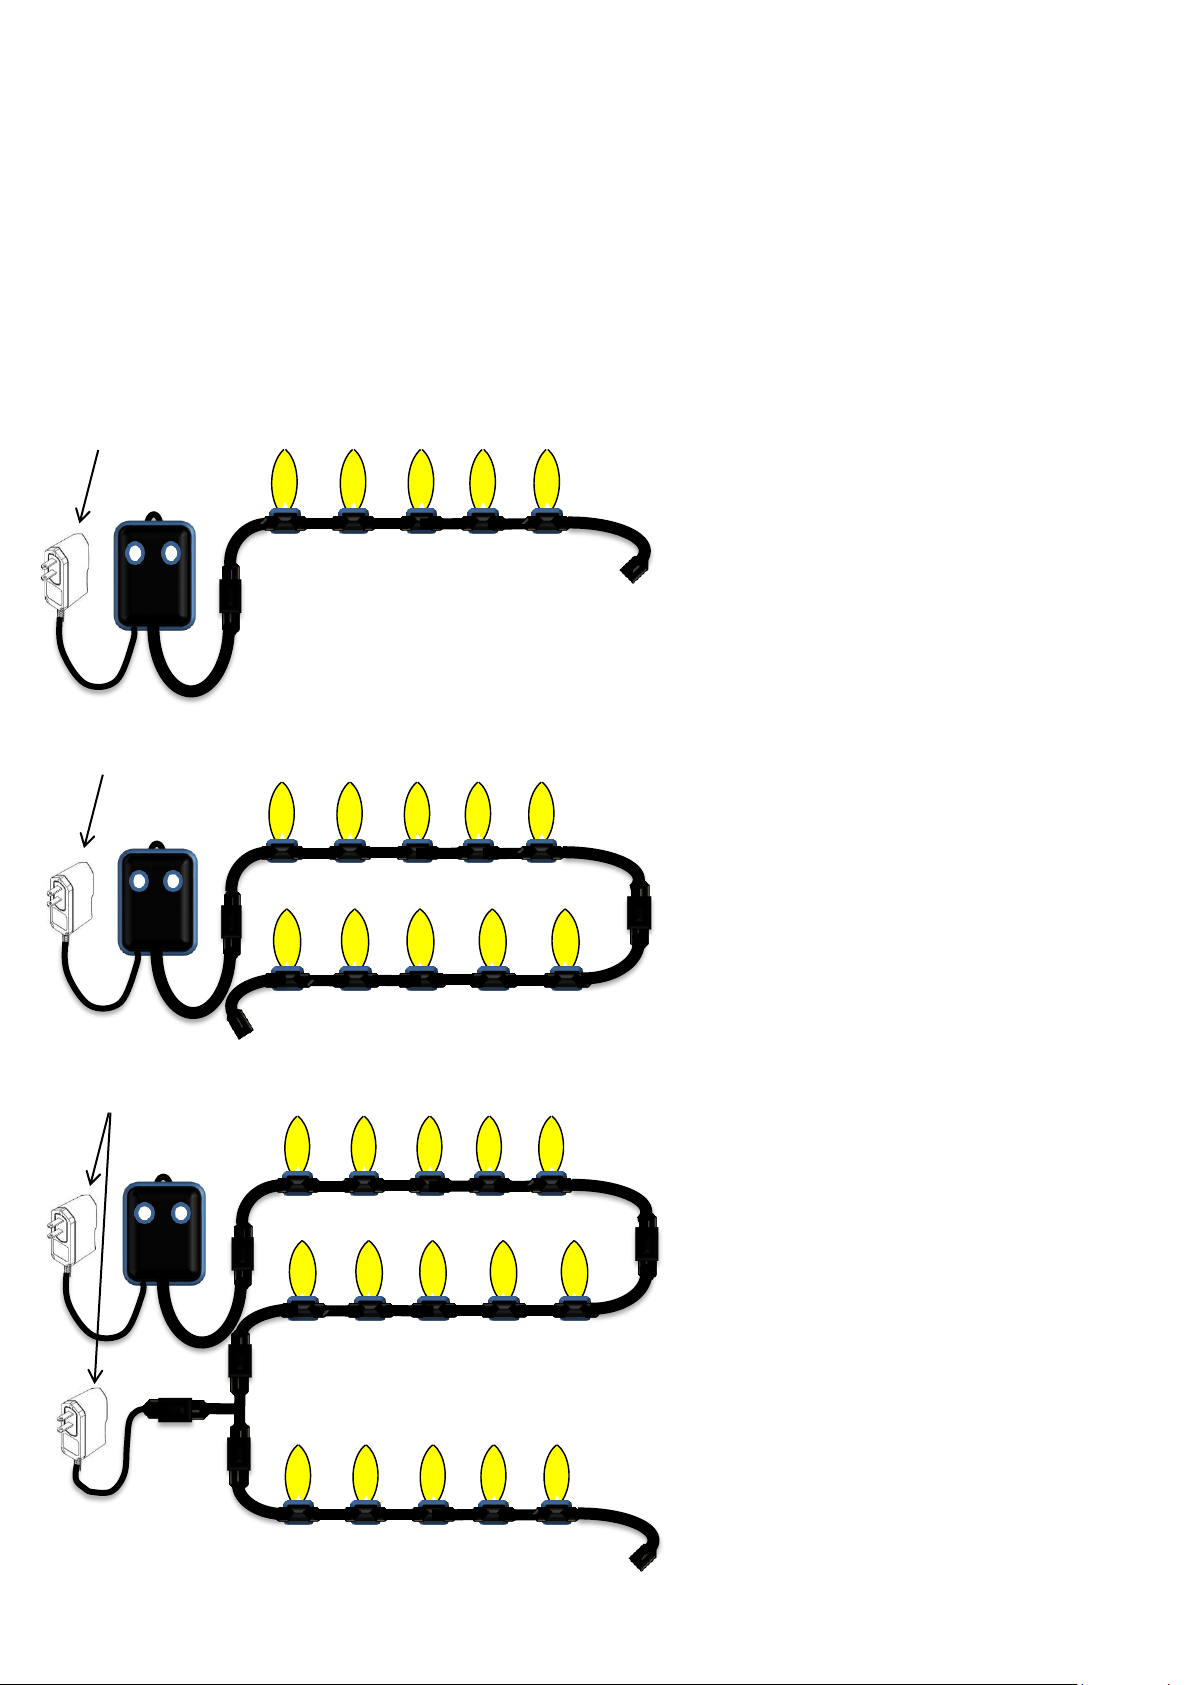
CONNECTION OPTIONS
The below section gives some basic layout examples of how lighting can be connected and
controlled from a Minleon Multifunction Mini Controller. Any of the Minleon RGB Light range
can be used including, RGB light strings, Triklits, Modules, Strip and RGB Tubes. Any of the
Minleon RGB light series can be combined for any situation, from a single string for a
Christmas tree all the way up to lighting buildings, and interior accent lighting.
1: Single String
A single string connected to the controller
with lights supplied by a 1.5 amp power
supply. (Starter kit)
Maximum of 50 lights connected to a 2 amp
power supply
2: Second String
The starter kit comes with 25 Minleon
RGB lights and a 1.5 amp power supply,
the power supply can power an additional
25 Minleon RGB lights connected to the
first string
Maximum of 50 lights connected to a 1.5 amp
power supply
3: Multiple Strings & Power
Adding additional strings using the
Minleon 1.5 amp power kit. This will allow
100 Minleon RGB lights to be connected
using the Minleon additional 1.5 amp
power supply with included Minleon
Power T
Maximum of 100 lights connected, additional
power supplies can be connected to make a string
of 500
1.5 amp
power supply
1.5 amp
power supply
Maximum of 50 Minleon RGB Lights
25 Minleon RGB Lights
25 Minleon RGB Lights
Maximum of 50 Minleon RGB Lights
1.5 amp
power supply
25 Minleon RGB Lights
25 Minleon RGB Lights
Power T
pg. 15
Page 16
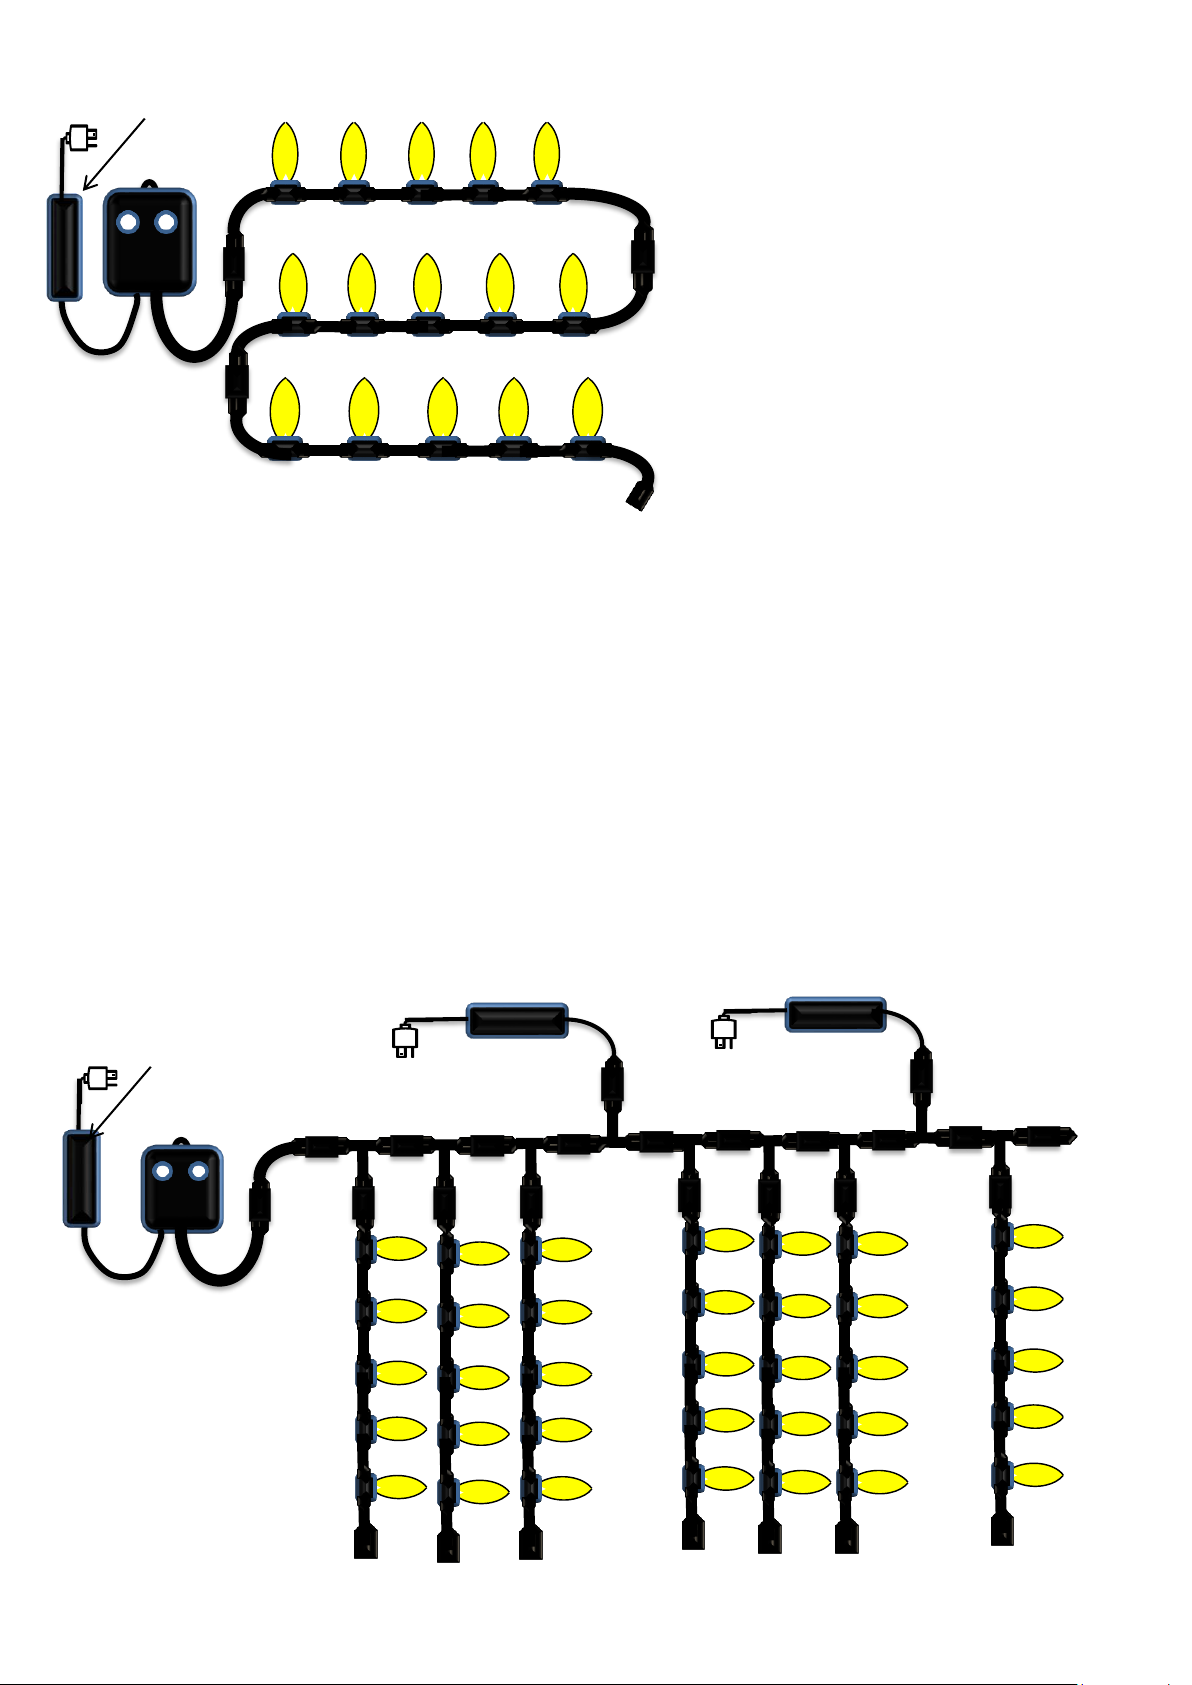
4: Multiple Strings.
Adding additional strings using the
Minleon 5 amp power kit. This will allow
125 Minleon RGB lights to be connected
and powered through the Minleon
Multifunction Mini Controller
Maximum of 125 lights connected per 5 amp
power supply to a maximum of 500 lights
5: Connecting Thousands of Lights using the Optional T-Way
Thousands of lights can be connected and controlled from a single Minleon Multifunction Mini
Controller using the Minleon T-Way and additional Power supply with a Power-T
Each string on each T-Way will mimic each other so all strings connected will do the same thing. This
is useful for using the Minleon Multifunction Mini Controller for accent, building or garden lighting
or for extending the lighting connected using the one control
Maximum of 500 lights connected per T-Way
5 amp
power supply
5 amp
power supply
5 amp
power supply
5 amp
power supply
Maximum of 125 Minleon RGB Lights
T-Way
T-Way
T-Way
T-Way
T-Way
T-Way
T-Way
Power-T
Power-T
Maximum of 125 lights per 5 Amp Power Supply
pg. 16
Page 17
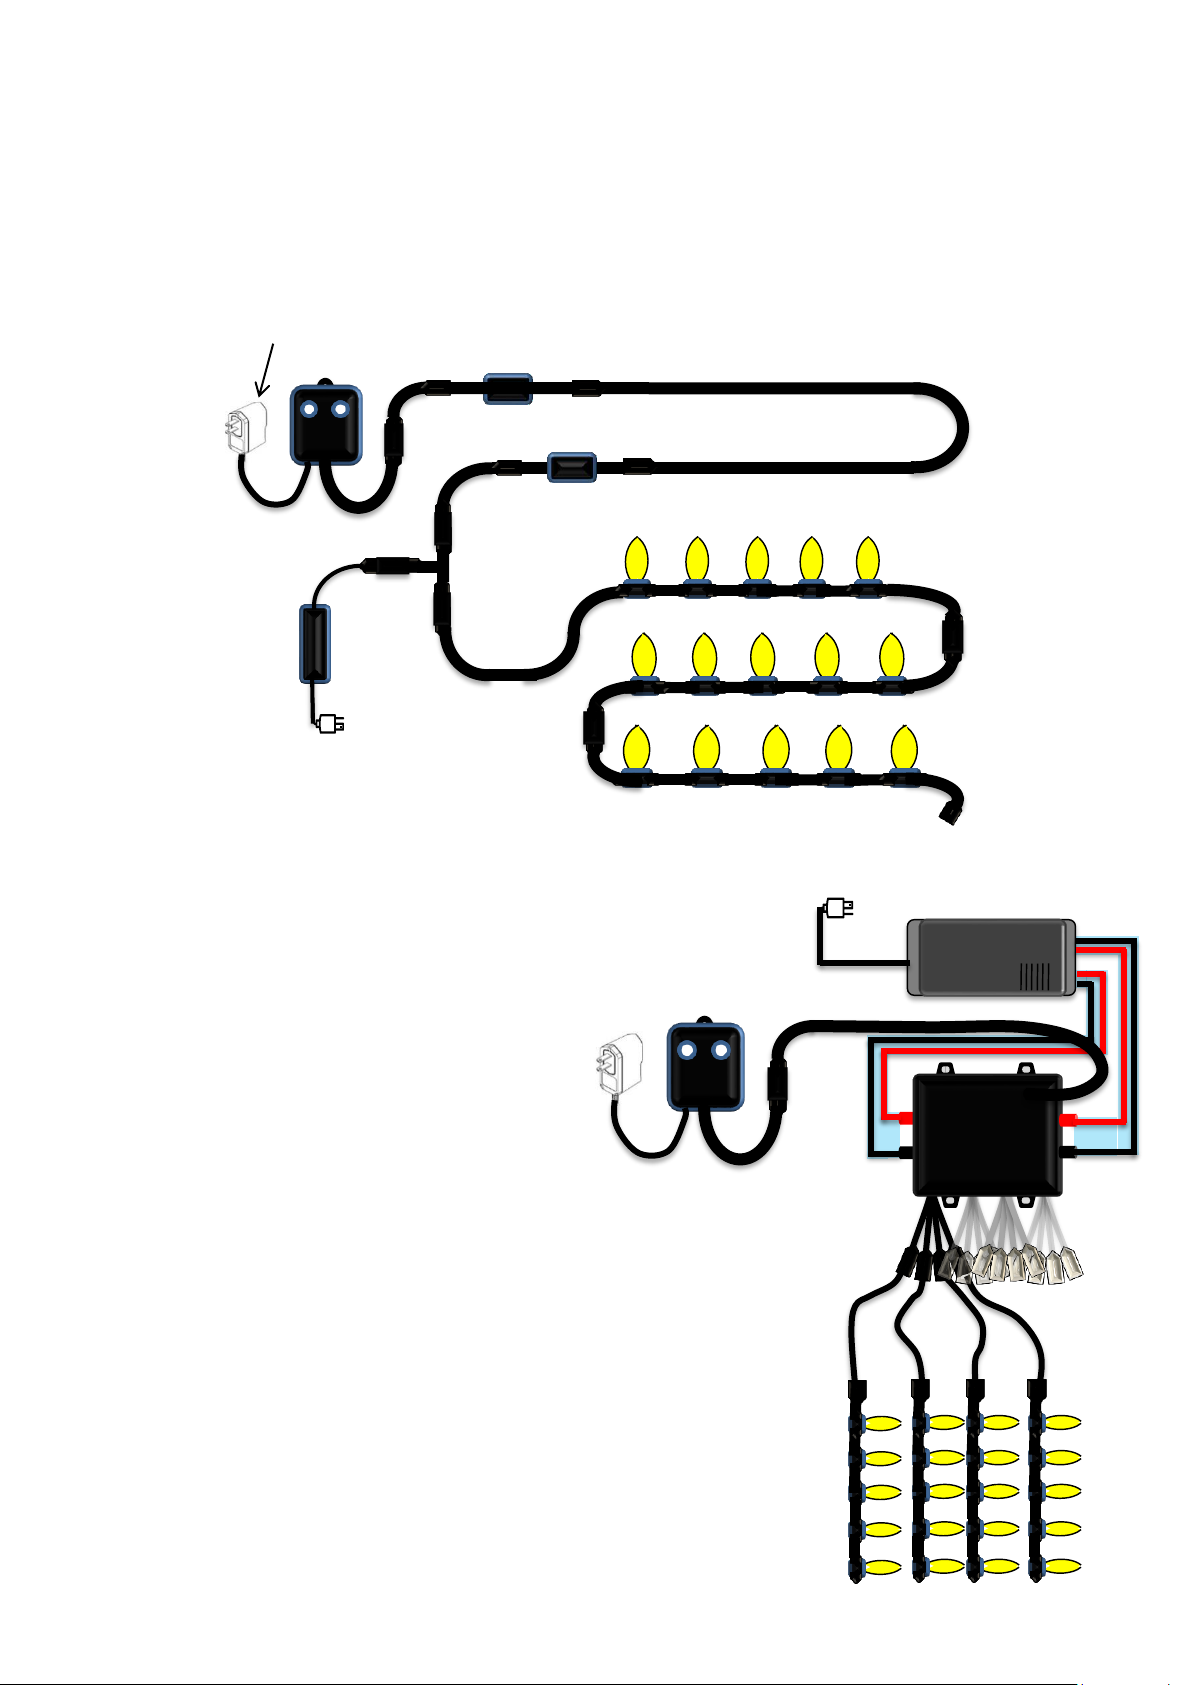
6: Strings Connected through the Data Extender
Lights can be connected up to 300 feet away from the Minleon Multifunction Mini Controller
using the optional Minleon Data Extender, Minleon Power Supply and Power-T
Supplied 1.5 amp
power supply
5 amp
supply
Maximum of 125 lights per 5 Amp Power Supply
Data Extender
Sender Unit
Data Extender
Receiver Unit
4 Core Data Extender
Power T
7: Strings Connected through
the 16 Port Signal Amplifier
The Minleon Multifunction Controller can be
connected to the optional Minleon 16 Port
Signal Amplifier to extend the amount of
lights connected to a total of 16 strings with
a total current draw of 40 Amps which is
approximately 16 strings of 75 Minleon RGB
lights.
The effects on each string will be identical
and mimic each other.
12VDC power supply
16 Port Signal
Amplifier
16 Outputs
power
pg. 17
Page 18
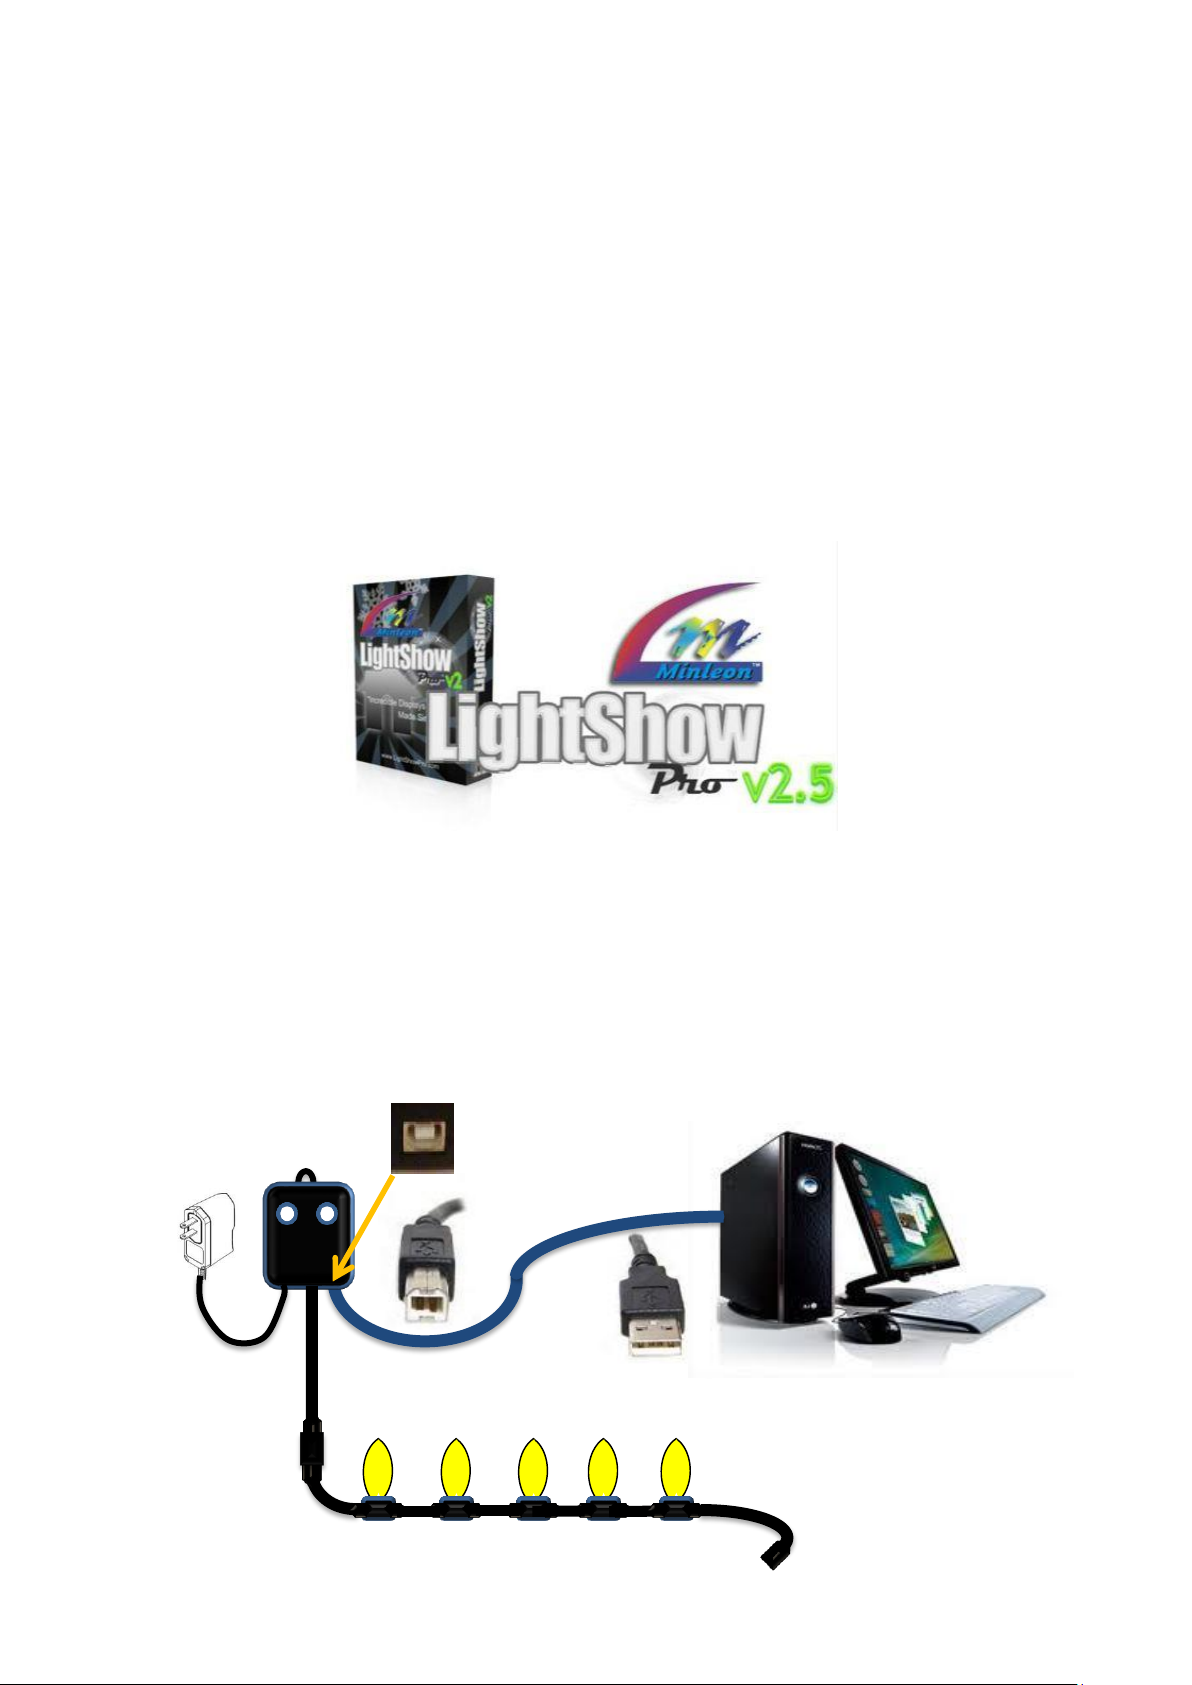
CONTROLLING THE MINI CONTROLLER
FROM A COMPUTER USING LIGHTSHOW PRO
Introduction
The Minleon Advanced Multifunction Mini Controller can be connected to and controlled by a
computer using sequencing software so you can have full control of your lights. The software
allows you to create synchronised musical shows using Minleons LightShow Pro sequencing
software. Imagine your Christmas tree or even your house dancing to the music using amazing
effects and control, the possibilities are endless.
Connecting to a Computer
To connect the Minleon Multifunction Mini Controller to a computer, a standard USB Printer
cable is required to connect between the computer and the controller for direct control via a
computer as shown below.
USB Cable (not supplied)
pg. 18
Page 19

Name
Minleon Multifunction Mini Controller
Maximum Number of Lights
500
Supply Voltage
12 Volts DC
Dimming Steps
12 Bit per color, 4096 dimming steps per color (1)
Operating Environment
Controller – IP65
Lights – IP 67
Operating Temperature
-4 Deg F to 140 Deg F
Power Adaptor (supplied)
100 – 240VAC input
12Vdc 1.5 amps output
Remote control
12 button multifunction remote
Remote Battery Type
12VDC Alkaline, Type: 23A
Controller Dimensions
3” L x 2 ½” W x 1” H
SPECIFICATIONS
(1) 12 Bit dimming with controller only. 8 bit dimming when connected to the computer due to DMX network restrictions
Installing the Mini Controller Drivers
The Minleon Advanced Multifunction Mini Controller requires drivers to be installed to be able
to be used with Minleons LightShow Pro sequencing and control software. This will enable the
advanced controller to work as a Enttec DMX Pro USB device.
1. Connect up the Advanced Mini Controller to your computer you will be prompted to
install the device driver.
2. Follow the windows prompts and choose to browse my computer for driver software
3. The Advanced Mini Controller driver is found in the default LSP installed folder under
C:\Program Files (x86)\Minleon\Common\triklits.inf
4. Once the drivers are installed you can then connect to Minleons LightShow Pro
Sequencing and control software and select the Minleon Mini Controller v2 (500ch) to
start to create your own sequence and effects.
5. Refer to the Lightshow Pro Documentation for further information on using Minleons
LightShow Pro Sequencing and Control software.
pg. 19
Page 20
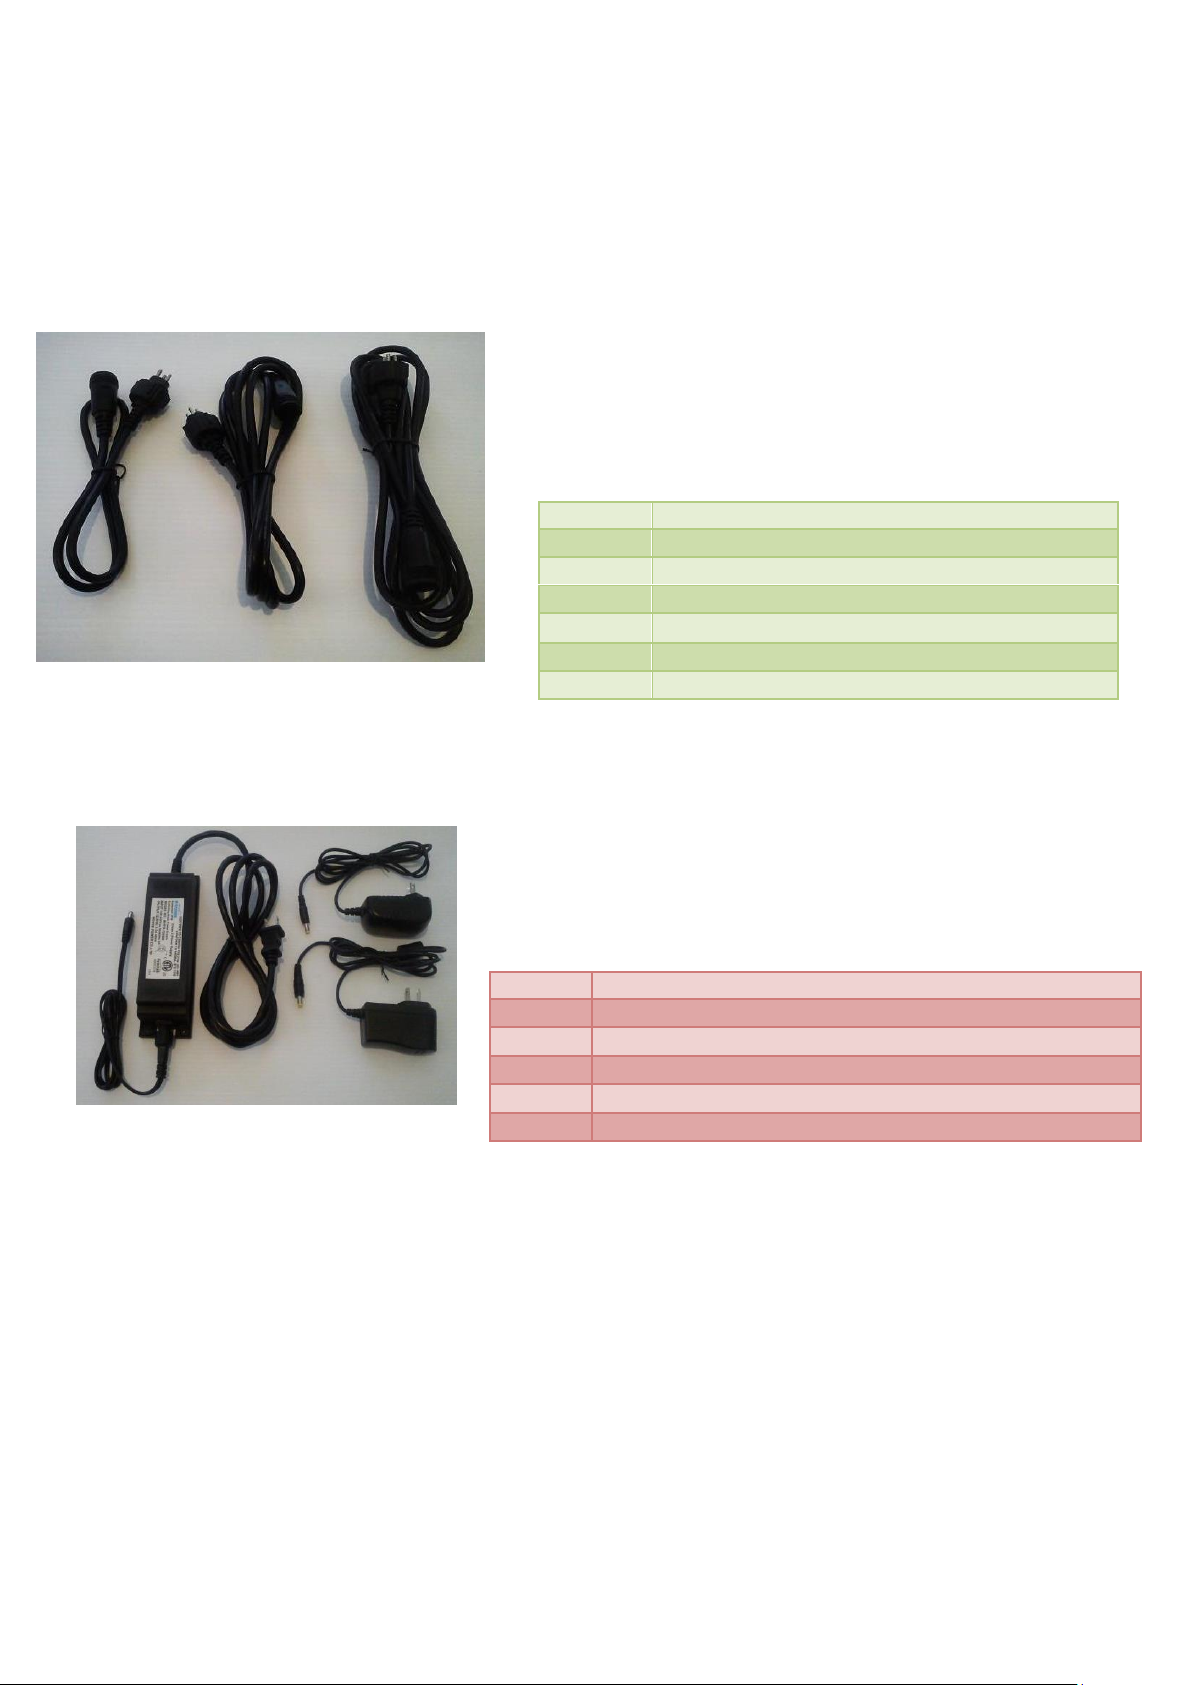
MINLEON ACCESSORIES
Spacer Cords
A range of extension cords for either extending the
distance from the controller to the first light or for
linking lights together.
RGBS01
1' Spacer (9 Amps) #20awg x 3C wire
RGBS02
2' Spacer (9 Amps) #20awg x 3C wire
RGBS03
5' Spacer (9 Amps) #20awg x 3C wire
RGBS04
10' Spacer (9 Amps) #20awg x 3C wire
RGBS05
20' Spacer (9 Amps) #20awg x 3C wire
RGBS06
25' Spacer (9 Amps) #20awg x 3C wire
RGBS07
50' Spacer (9 Amps) #20awg x 3C wire
Power Supplies
A variety of Approved power supplies available to suit
your different current requirements
RGB2A
12 VDC Power Supply – 1.5 Amps
RGB5A
12 VDC Power Supply – 5 Amps
RGB10A
12 VDC Power Supply – 8 Amps
RCB20A
12 VDC Power Supply – 20 Amps
RGB25A
12 VDC Power Supply – 25 Amps
RGB40A
12 VDC Power Supply – 40 Amps
Minleon have a number of accessories to allow various installation options which increases
the flexibility of the Minleon Multifunction Mini Controller and Lights.
pg. 20
Page 21
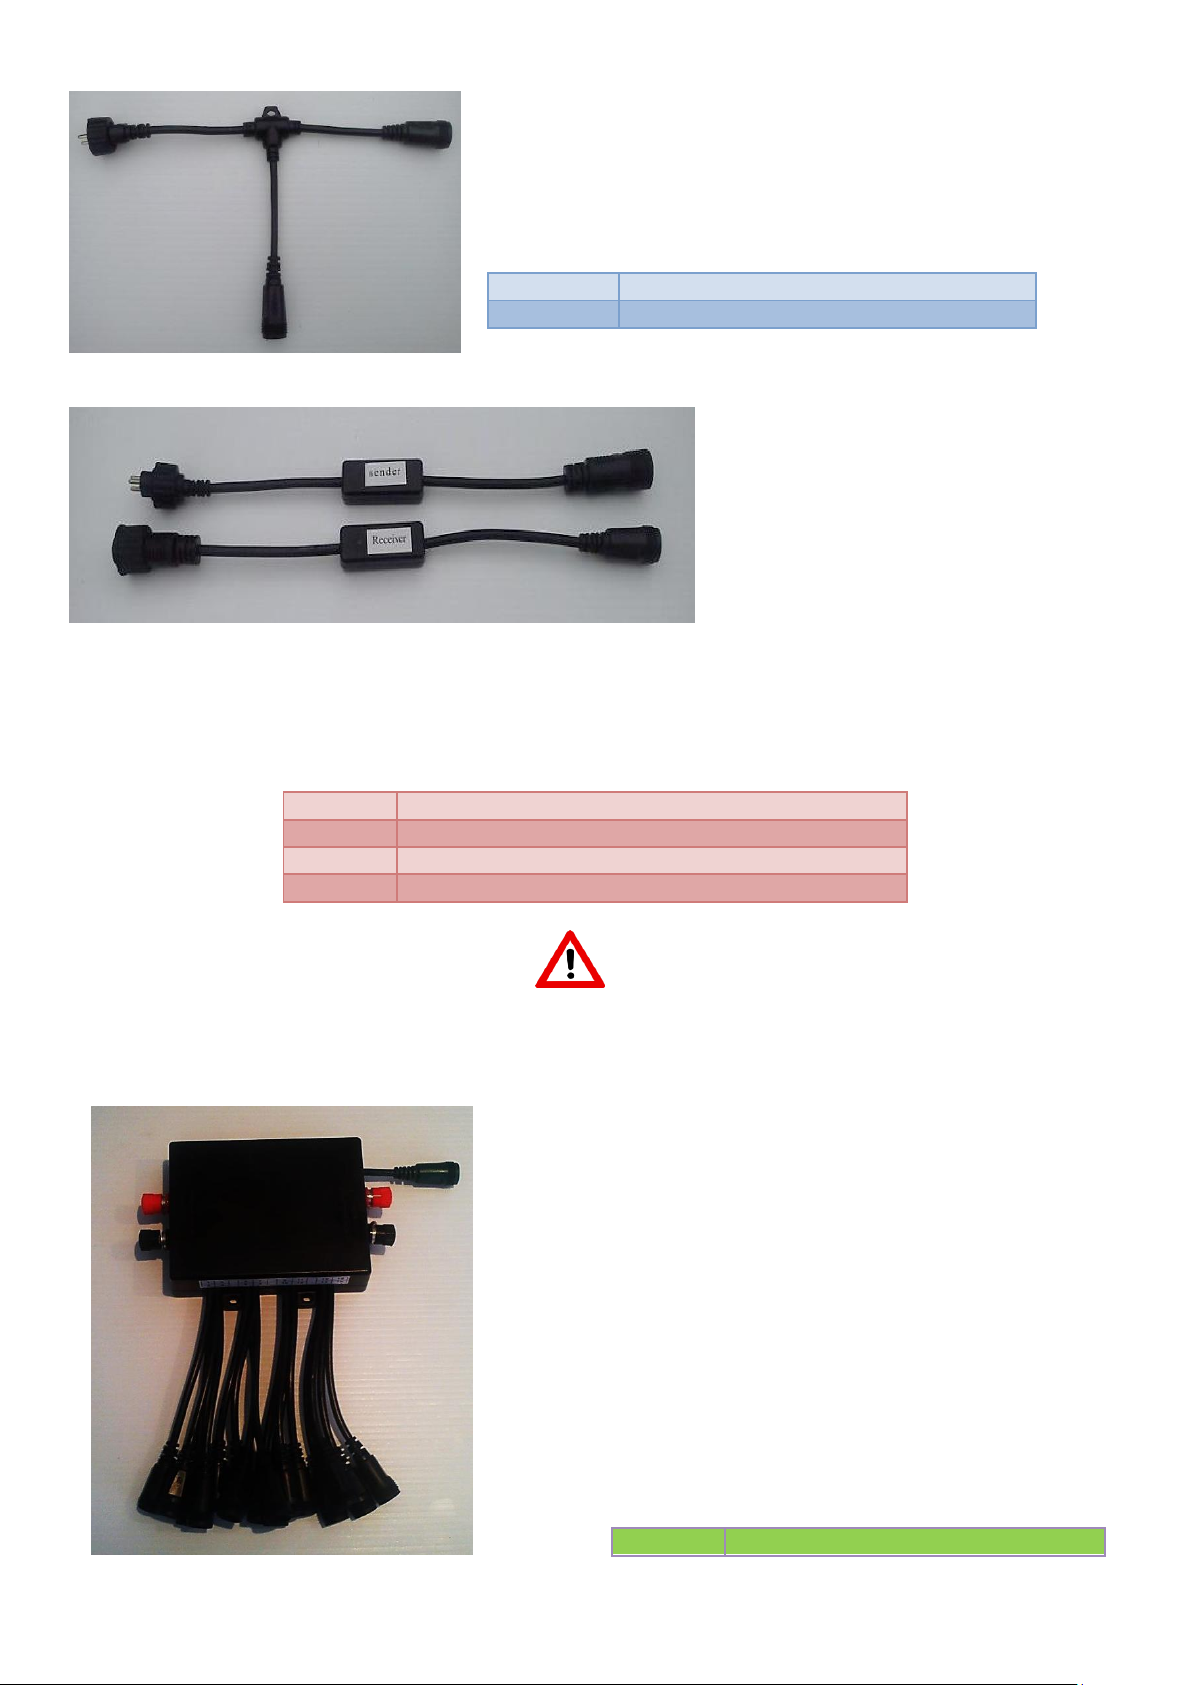
RGBA01
Signal sender/receiver card (per set)
RGBA02
25ft 4 core Spacer/Extension
RGBA03
50ft 4 core Spacer/Extension
RGBA04
100ft 4 core Spacer/Extension
Smart Extenders
The Smart Extender can be used to
extend the range of data to over
300 feet from the controller to the
first light or extend the range
Due to voltage drop over long distances it is recommended to use a Power-T Injector Adaptor
after the receiver unit so that enough voltage can be supplied to the Minleon RGB lights
Power-T Injector
Used for adding power between Minleon RGB Lights to
allow additional lights to be connected
RGBTW05
12 Inch Power-T – 3 Core
RGBTW06
24 Inch Power-T – 3 Core
between different light strings. The smart Extender sender unit changes the data so it can be
transferred over a greater distance. The Smart Extender Receiver then converts this data back
for use with Minleon RGB Lights.
16 Port Signal Amplifier
The Minleon 16 Port Signal Amplifier allows you to
extend the number of lights connected the Minleon
Advanced Multifunction Mini Controller. This can
allow up to 40 amps of lighting which is
approximately equivalent to 16 strings of 75 Minleon
RGB lights from the one 40 amp power supply.
Each string will mimic each other and a total of 125
lights can be connected to each output
RGBSA
16 Port Signal Amplifier
pg. 21
Page 22
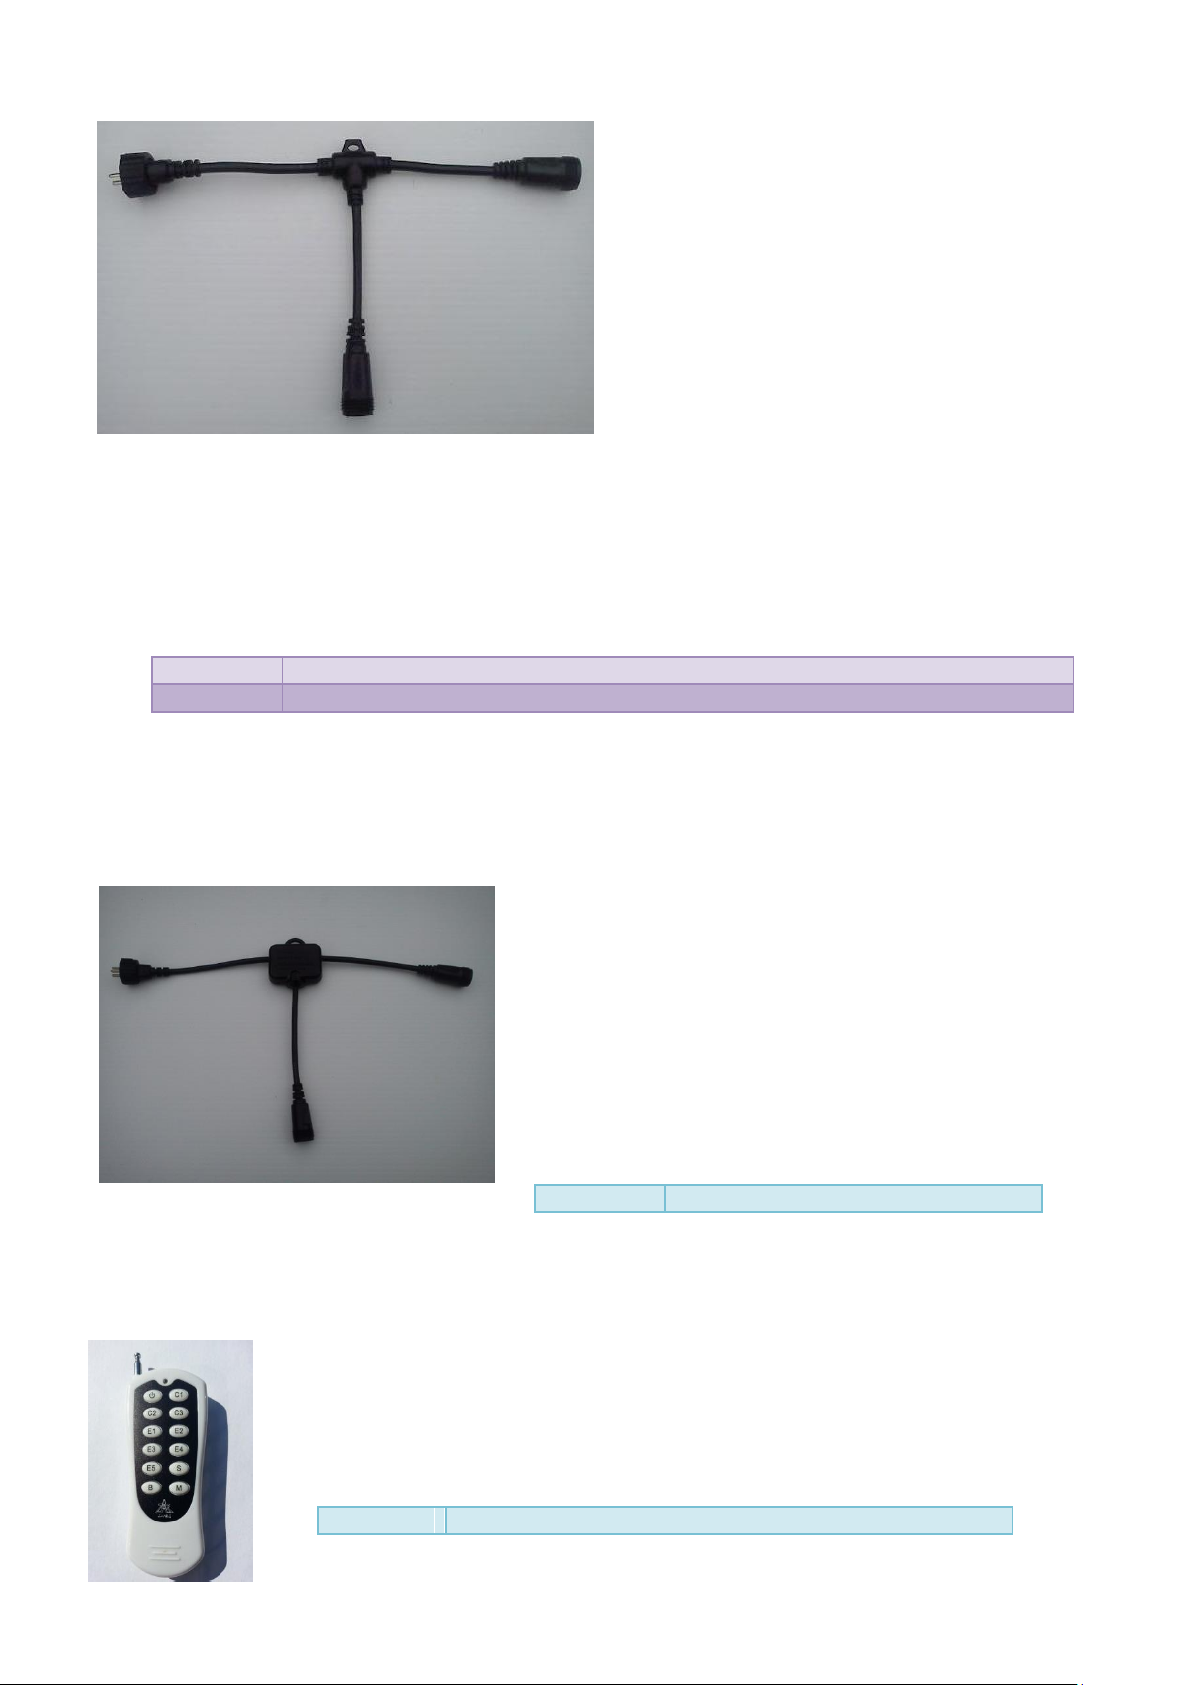
T-Way
This can extend the possibilities even further
with the NDB Controller. The T-Way allows
addition Minleon RGB lights to be connected
in parallel. For example you can have 10
Strings of Minleon RGB lights each
connected through a T-Way, each string will
then mimic each other. This allows for
thousands of lights to be connected to a
single Minleon NDB. This can be a big advantage for covering large areas with one controller.
Of course power considerations need to be taken into account.
RGBTW01
12" T-way connector (9 amps for the main cord, 6 amps for the drops)
RGBTW02
24" T-way connector (9 amps for the main cord, 6 amps for the drops)
Additional Remote Control
Additional 12 key remote controls can be ordered or replaced if lost
RGBRM02
Remote control Device (battery not included)
Copy Ts
The Minleon Copy-T’s are unique to Minleon, They
copy the data that is sent out from the controller
allowing infinite repeated sections of controlled light.
Each light connected to a Copy T will imitate the data
being sent out from the controller
RGBTWC
12 Inch Copy T – 3 Core
pg. 22
Page 23
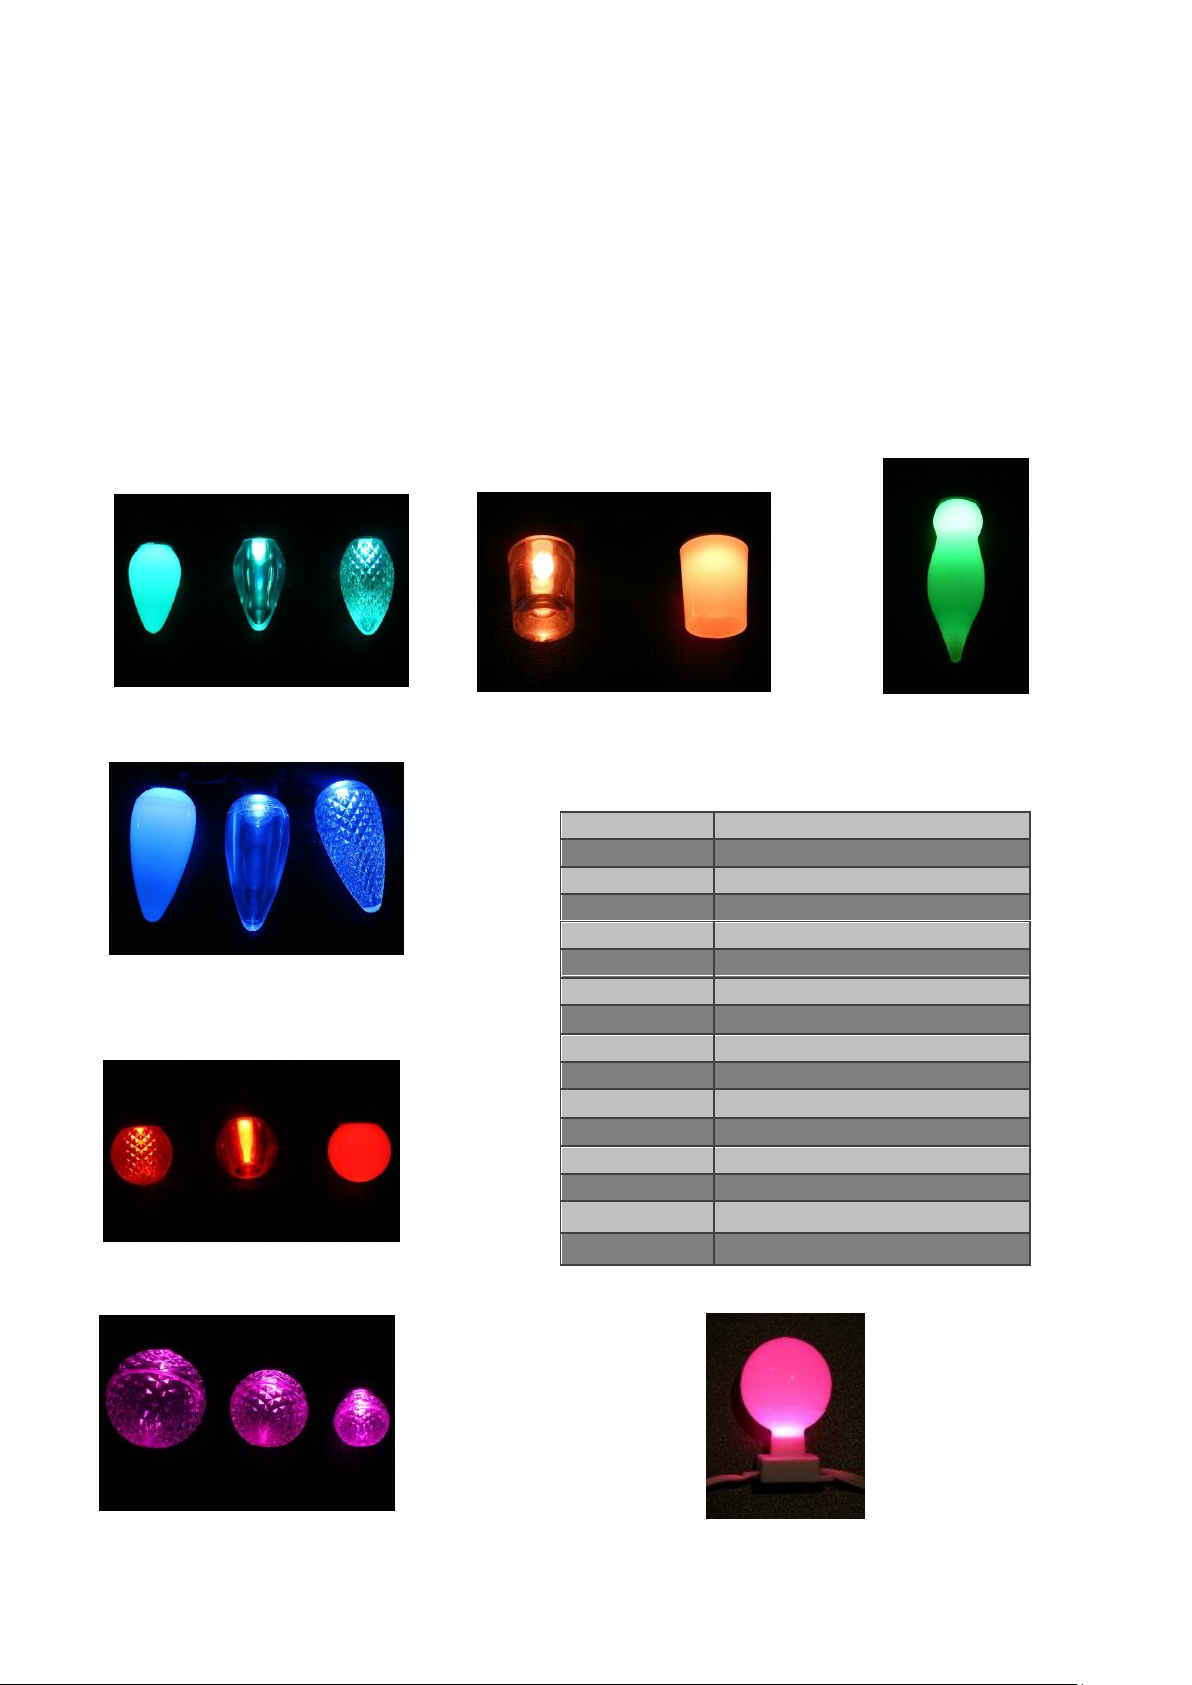
MINLEON RGB LIGHTS
Minleon RGB lights come in a wide variety of types that can be mixed and matched. All
Minleon RGB lights are 36bit RGB color* (12 bit per color) and are available as standard
with 12 inch spacing 25 to a string in green, black and white string colour. Each string is
also inter-connectable with each other and other Minleon RGB lights
C9 – Opaque, Clear, Faceted
C7 – Opaque, Clear, Faceted
M10 – Clear, Opaque
G30, G40, G50 – Faceted
G20 – Opaque, Clear, Faceted
F7 – Opaque
RGB String Light Series
RGBC7F
C7 Faceted
RGBC7O
C7 Opaque (Frosted)
RGBC7C
C7 Clear
RGBC9F
C9 Faceted
RGBC9O
C9 Opaque (Frosted)
RGBC9C
C9 Clear
RGBG20F
G20 Faceted
RGBG20O
G20 Opaque (Frosted)
RGBG20C
G20 Clear
RGBG30F
G30 Faceted
RGBG40F
G40 Faceted
RGBG50F
G50 Faceted
RGBM10O
M10 Opaque (Frosted)
RGBM10C
M10 Clear
RGBF7O
F7 Opaque (Frosted)
RGBG40O
G40 Opaque (Frosted)
G40 – Opaque
* 8 bit dimming when connected to the computer due to ART-Net network restrictions
pg. 23
Page 24
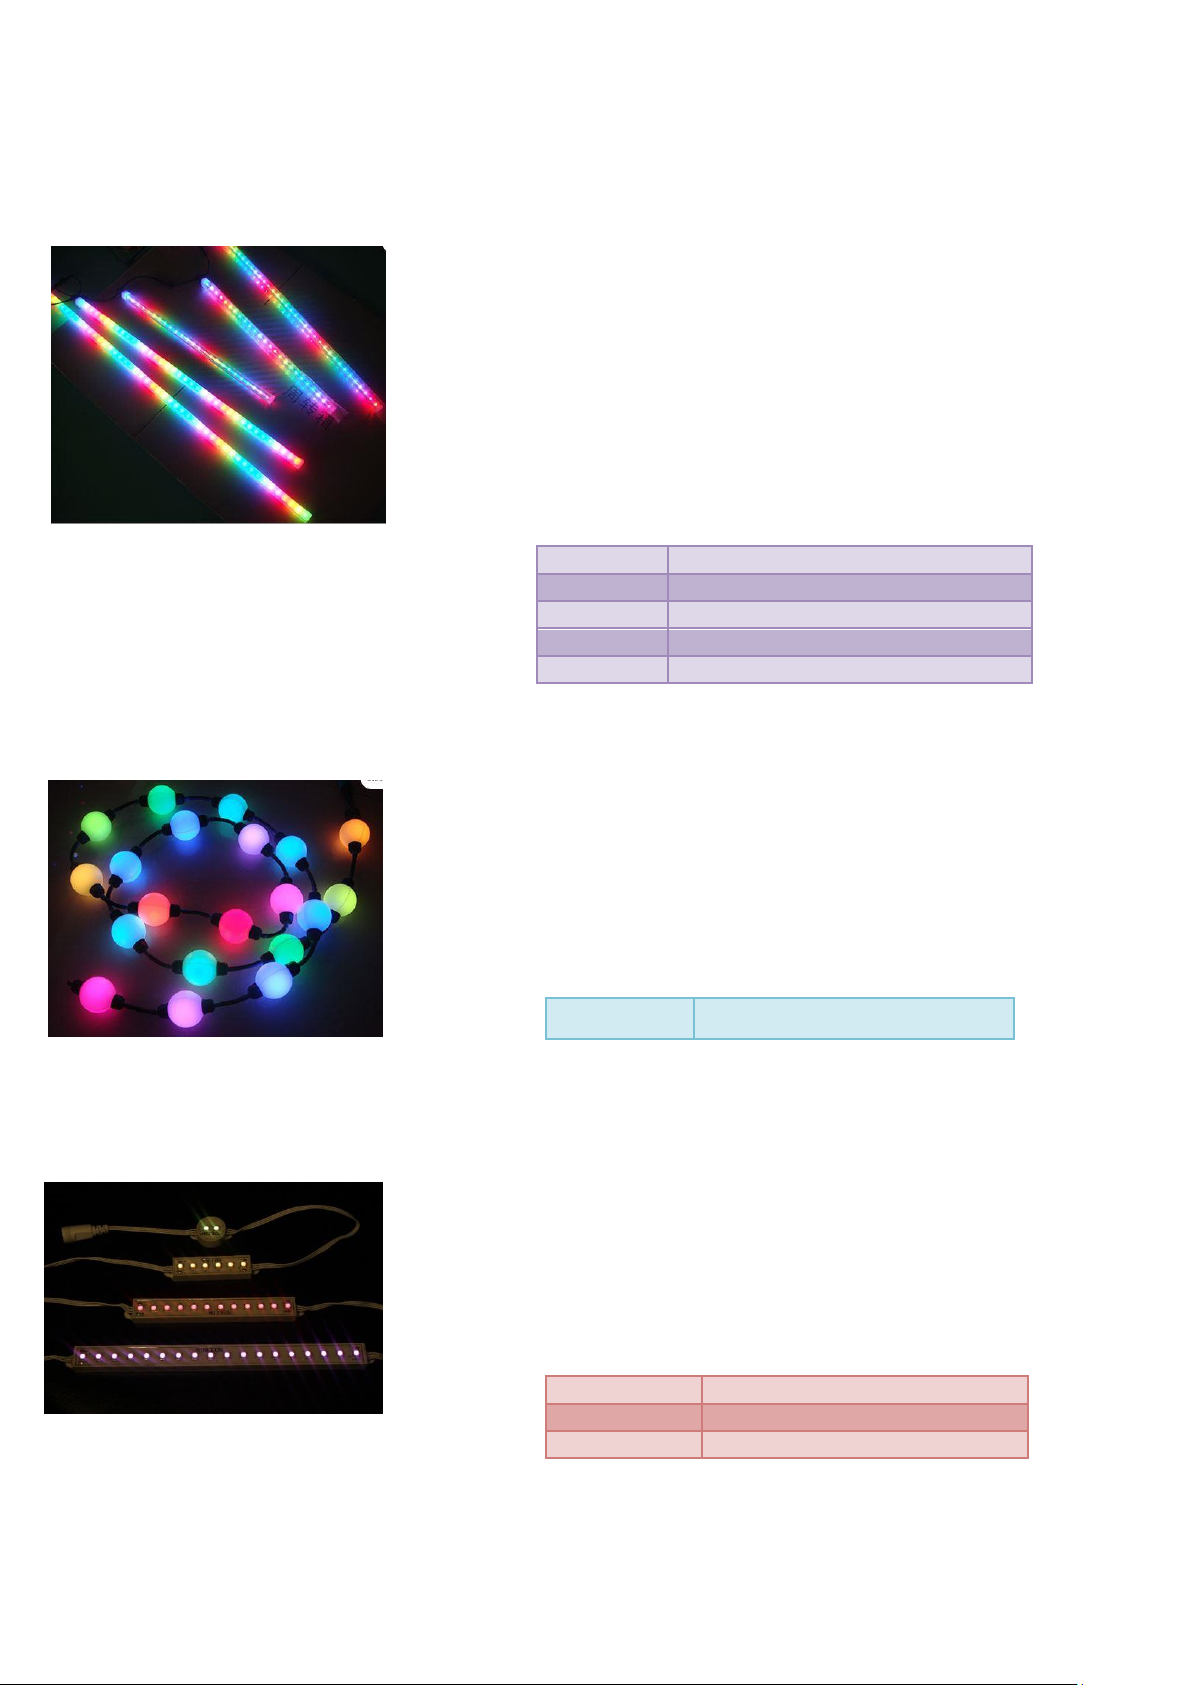
Light Bars
TrikLits
Double Sided RGB
Snow Tubes
Minleon also have a range of fantastic RGB lights that will work with the Minleon Multifunction
Mini Controller to allow you to mix and match for any occasion or area.
TrikLits G40 Frosted 360° Bulb
The Minleon Triklits are a 360° G40 Frosted RGB globe that
allows many possibilities, these can be hung from just about
anything to create an amazing effect.
RGBTrik
G40 Frosted [triklits]
RGB Light Bars
The Minleon Light bars are perfect for mounting to anything or
for using as wall washers. Each Light bar is a single RGB fixture.
Double Sided RGB Snow Tubes
The Minleon double sided snow tubes are perfect for hanging
from trees, shrubs, eves, or anywhere else that you want a
high impact colourful strip light RGB snow tube effect, also
fantastic for using as a hanging RGB chandelier. These come in
a variety of lengths. Available in clear or frosted.
RGBLT81
T8 Tube – 1ft length
RGBLT82
T8 Tube – 2ft length
RGBLT83
T8 Tube – 3ft length
RGBLT84
T8 Tube – 4ft length
RGBLT85
T8 Tube – 5ft length
RGBLB81
One foot length
RGBLB82
Two foot length
RGBLB83
Three foot length
NOTE: Custom Light Bar modules are also available to suit
customer’s needs. Please enquire for further details
pg. 24
Page 25

NOTES
Minleon Australia & New Zealand
Minleon USA
Minleon International
Important Notice
It is the sole responsibility of the reader to ensure that all safety precautions are taken, Minleon and/or any involved parties
relinquishes any responsibility and liabilities for any content within this manual that may cause the reader any injury or loss of property
due to incorrect use. By reading this manual you take sole responsibility for all actions taken.
Ensure all local and state electrical laws are taken into consideration when using this product. Minleon do not take responsibility for
any use outside of state and local laws and regulations.
Any misuse, abuse, tampering or modification of the product will void any and all warranties
Minleon reserve the right to change product features to help improve the product, these changes may not be represented in the
manual or may slightly vary from described. Minleon will make every effort to ensure that the information is correct as possible within
the manual.
This document is owned by Minleon USA and any use of the information and drawings within this manual must have permission by the
owner before using.
© Copyright 2013 Minleon USA
http://www.minleonUSA.com
[email protected]
http://www.minleonausnz.com
[email protected]
http://www.minleon.com
pg. 25
 Loading...