


NEO X7
Quad Core Media Hub
16GB
Setup Guide
Android™ is a trademark of Google Inc.


Thank you for purchasing MINIX NEO X7.
Follow this guide to setup your device.
MINI
X NEO X7 is a revolutionary smart media hub based on a Quadcore ARM Cortex-A9 processor with Quad-core Mali-400MP4 GPU and
the latest Android™ OS. Sign into Google Play Store to download the
favorite applications and install them directly into MINIX NEO X7.
YouTube™, Internet radio and lots of other applications are all readily
available on Google Play Store. Alternatively, you could also download
the applications through other third-party stores or to install the .apk les
directly with the preloaded ApkInstaller.
MINIX NEO X7 comes with Ethernet, Bluetooth and Wi-Fi connection;
you could connect to many of your devices within the same network and
share the contents amongst them, such as videos, music and photos.

Content
Chapter 1: Connect .......................................................5
What's in the box .............................
MINIX NEO X7 at a glance ....................................................................7
What you need ......................................................................................11
Setting up MINIX NEO X7 .....................................................................12
Chapter 2: Basic Setup ..................
Language setup ....................................................................................14
Time zone setup ...................................................................................14
Wi-Fi setup (basic) ..........................
Chapter 3: Google Play Store ......................................15
Chapter 4: Control .......................................................17
Different control methods ......................................................................18
Using your MINIX remote ......................................................................18
To
use the GridShow launcher ..............................................................18
Functions of the MINIX remote ..............................................................19
.......................................................6
..............................13
.....................................................14

Chapter 1
Connect.
- 5 -

What’s in the box
- MINIX NEO X7 x 1
-
MINIX NEO X7 Antenna x 1
- 5V Power adapter x 1
- MINIX Remote x 1
- Micro-USB cable x 1 (connecting to a PC)
- OTG cable x 1 (extend one more USB port)
- HDMI cable x 1
- Setup guide x 1
- 6 -
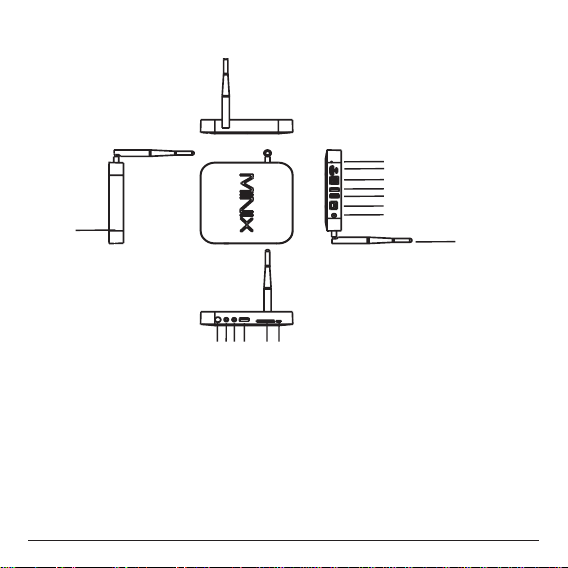
MINIX NEO X7 at a glance
1
2
3
5 6 7
4
1. Power LED
2. Power button
3. Earphone jack
4. Microphone jack
5. USB port 1
6. SD/MMC card slot
7. OTG port (serves as
USB port 2 also)
- 7 -
8
9
10
11
12
13
14
15
8. Recover button (for
service and upgrade)
9. HDMI port
10. Optical audio port
11. USB 2.0 port 3
12. USB 2.0 port 4
13. Ethernet jack
14. DC 5V Power-in jack
15. Dual Band Antenna

Power LED
The LED glows when the MINIX NEO X7 is on.
Power button
T
o power on MI
seconds until the power LED glows. To power off MINIX NEO X7,
press and hold the power button and the display will prompt out the
conrmation dialogue for power off, select OK to conrm; OR hold the
power button for 8 seconds to force power off, the LED will be off.
Earphone jack
Connect to an external audio output device such as earphone or speaker.
Microphone jack
Connect to a microphone for voice input.
SD/MMC card slot
Increase the storage size or read files directly from a SD/MMC card,
support up to 32GB max.
NIX NEO
X7, press and hold the power button for 2-3
OTG port
Connect the micro
end to the computer for synchronization and upgrade purpose. This port
also serves as an extra USB port while used with the Micro-USB OTG
cable bundled in the package.
end of
the Micro-USB cable to this port and the other
- 8 -

Recover button
This button is to be used together with the OTG
to
a computer for service/upgrade purpose. To upgrade manually, rstly
connect the micro USB cable to a PC, then press and hold this button
AND power up NEO X7 at the same time. Release this button once the
PC detects NEO X7.
HDMI port
Connect MINIX NEO X7 to the HDMI port of a high-denition TV or PC
monitor using an HDMI cable.
Optical audio port (S/PDIF Out)
Connect to the optical audio input of an external sound processing unit,
such as an amplier.
USB 2.0 ports
Connect an external USB device to MINIX NEO X7 such as USB ash
drive, receiver of wireless keyboard and mouse, USB mouse, receiver
of wireless headset…etc. (You may need connecting to 2 ports to get
enough power for some external hard drives.)
- 9 -
port when
connecting

Ethernet jack
Connect to the Ethernet cable for Internet access. I
setting such as PPPoE dial-up, go into the setting page at: Settings ->More…
While connec
as a router and also a Wi-Fi hotspot; if you need to use the Wi-Fi
hotspot feature, please make sure that the Wi-Fi feature is OFF before
you enable the Wi-Fi hotspot service at:
Settings ->More…->Portable hotspot
DC 5V Power-in jack
Connect the 5V power adapter supplied in the package to this port.
MINIX NEO X7 requires less than 1A to operate however we have
supplied a 5V 3A adapter with consideration that you need to connect to
other power-drawing external devices such as an external hard drive.
ted with the Ethernet cable, MINIX NEO X7 can be used
- 10 -
f you need advanced

What you need
To start using MINIX NEO X7, you need the following:
High-denition TV/ PC monitor
A high-denition
with at least one HDMI input.
Cable
An HDMI cable to connect MINIX NEO X7 to your TV.
Wireless network
A wired network cable or an 802.1
(wireless video streaming requires 802.11g or n), your wireless network
name and password.
Software and accounts
To play
MINIX NEO X7, you need:
A UPnP™/DLNA® software pre-loaded in your smartphone or
PC. (e.g. iMediashare™)
- A Google account
the corresponding applications (e.g. iMediaShare™,
eHomeMediacenter) necessary for streaming the content
from a smartphone or PC.
Other accounts may be required for full access to some
Internet contents.
TV or PC monitor that can display 720p or 1080p video
1 b/g/n, or n Wi-Fi wireless network
content (videos, photos, music) from a smartphone or PC on
to sign-in to Google Play Store to download
- 11 -

Setting up MINIX NEO X7
MINIX NEO X7 conn
port that delivers both audio and video. Before you set up MINIX NEO
X7, look at the ports on the side/back of your TV or PC monitor to make
sure you have the right cable:
An HDMI cable: You can connect MINIX NEO X7 to an HDTV
or home theater receiver that has an HDMI port, using an
HDMI cable for both video and audio.
Step 1: Connecting the cable
1. Connect one end of the HDMI cable to the HDMI port of your TV/ PC
monitor.
2. Connect the other end of the cable to the HDMI port of MINIX NEO
X7.
Step 2: Connecting the power
Connect the 5V power adapter supplied in the package to this port.
Press and hold the power button for 2-3 seconds to power on MINIX
NEO X7 and the blue power LED glows when done.
ects to your TV or PC monitor through an HDMI
Step 3: T
Simply turn on your TV or PC monitor and select the corresponding
HDMI port connected to MINIX NEO X7.
urn on your TV/ PC monitor and select the input
- 12 -

Chapter 2
Basic Setup.
- 13 -

Language setup
You may choose the desired system language by the following steps:
Launcher Home Screen > Settings > Language & input > Language
The default language is English, you may choose your desired language
and click to conrm.
Time zone setup
You should
the following steps:
Launcher Home Screen > Settings > Date & time > Select time zone
Choose your time zone and click to conrm.
adjust the time zone according to your current location by
Wi-Fi setup (basic)
Connect to your wireless network so that you could access to the
Internet by the following steps:
L
auncher Home Screen > Settings > Wi-Fi > Check the option “To
see available networks, turn Wi-Fi on.”
Wi-Fi will turn on and automatically scan the wireless networks
available, then select the wireless network that you want to connect to
and conrm, key-in the password of the Wi-Fi network when the virtual
keyboard prompts, nally, hit the “Connect” button.
- 14 -

Chapter 3
Google Play Store.
- 15 -

Sign-in to your Google Account
Launch the Google Play Store by the following steps:
Launcher Home Screen -> Google Play Store, hit and conrm.
To
use Google Play Store you need a Google Account. If you already
had a Google Account, select “Sign in” and login with your Google
Account. If you don’t have a Google Account yet, select “Get a Google
Account” and complete the rest of the process.
Upon completion of the sign-in process will bring you into the Google
Play Store which allows you to download and install the applications you
need.
Alternatively, if you cannot find the applications you need on Google
Play Store because of language restriction, location restriction or some
other reasons; you may look for and download the application les in the
form of “.apk” from the Internet and install them through the “ApkInstaller"
which is pre-loaded in the system.
- 16 -

Chapter 4
Control.
- 17 -

Different control methods
You may control your MINIX NEO X7 with the following input devices:
1.) RKRemoteControl App. (for
2.) Wired mouse;
3.) 2.4GHz USB wireless keyboard and mouse set;
4.) 2.4GHz USB wireless AirMouse remote control (MINIX NEO A1+,
MINIX NEO A2, to be sold separately);
5.) MINIX infrared remote control(included).
Android Smartphone or tablet PC)
Using your MINIX remote
Read on to learn about using your MINIX remote with MINIX NEO X7.
This remote will
user interface - the GridShow launcher
Note: The MINIX remote will still function if you are not using the
GridShow launcher, however, some keys might become useless, e.g the
STOP button.
be 100% functional when working with our customized
To use the GridShow launcher:
Home -> Select “GridShow” launcher
Use the MINIX
your content. Make sure there are no obstructions between the MINIX
remote and MINIX NEO X7.
remote to
control MINIX
- 18 -
NEO X7 settings and navigate

Functions of the MINIX remote
OK
- Show menu options
MENU
- Return to Home Screen
HOME
POWER
BACK
Enter/Exit sleep mode
-
- Return to previous screen/cancel action
- 19 -

VOLUME DOWN -
Adjust the system volume down
VOLUME UP -
UP - Move upward
LEFT - Move left
RIGHT - Move right
DOWN - Move downward
OK -
To conrm a particular action, and as an “Enter” key
Adjust the system volume up
- 20 -

Copyright © 2013 MINIX Tech.
No part of this guide, including the products and software described
in it, may be reproduced, transmitted, transcribed, stored in a retrieval
system, or translated into any language in any form or by any means,
except documentation kept by the purchaser for backup purposes,
without the express written permission of MINIX. This clause does
not apply to such software which is licensed under the General Public
License (“GPL”) or other Free Open Source Licenses. Copies of the
respective license terms, and where required an offer to provide the
respective source code, are included in the product.
Google, Android, Gmail, Google Maps, Chrome, Google Play, YouTube,
Google+, and other trademarks are property of Google Inc. A list of
Google trademarks is available at http://www.google.com/permissions/
guidelines.html. MINIX and the MINIX logo are trademarks of MINIX
Tech. All other marks and trademarks are properties of their respective
owners.
The content of this guide may differ in some details from the product or
its software. All information in this document is subject to change without
notice.
For online help and support, please visit www.minix.com.hk, or join our
facebook fanpage at: www.facebook.com/minixtech
All rights reserved.
- 21 -

Note:
This equipment has been tested and found to comply with the
limits for a Class B digital device, pursuant to part 15 of the FCC
Rules. These limits are designed to provide reasonable protection
against harmful interference in a residential installation. This equipment
generates, uses and can radiate radio frequency energy and, if not
installed and used in accordance with the instructions, may cause
harmful interference to radio communications. However, there is no
guarantee that interference will not occur in a particular installation. If
this equipment does cause harmful interference to radio or television
reception, which can be determined by turning the equipment off and
on, the user is encouraged to try to correct the interference by one or
more of the following measures:
• Reorient or relocate the receiving antenna.
• Increase the separation between the equipment and receiver.
• Connect the equipment into an outlet on a circuit different from
that to which the receiver is connected.
• Consult the dealer or an experienced radio/TV technician for help.
Modications not expressly approved by the manufacturer could
void the user's authority to operate the equipment under
FCC rules.
FCC IDENTIFIER: WMFNEOX7


NEO X7
Quad Core Media Hub
16GB
用户指南


感谢您选购
遵循此指南设置您的设备。
MINIX NEO X7.
MINIX NEO X7
Corte
x-A9
统,连接液晶电视或电脑显示器,即可成为一台功能完整的电脑、智能
电视盒、高清播放机、网络机顶盒或者游戏机。登录任何安卓应用市场
(如:百度应用等)即可下载喜欢的应用程序并直接安装到
X7.
MINIX NEO X7
多个设备并在他们之间共享视频,音乐,图片等内容。
是一款革命性的迷你电脑,基于瑞芯微
处理器和四核
支持以太网,蓝牙及
i-400MP4 GPU
Mal
Wi-Fi
以及最新的
连接;您可以用同一网络连接
RK3188
Android™
MINIX NEO
四
核
ARM
操作系

目录
第一章:安装连接
包装及附件
MINIX
您需要准备的
安装连接
第二章
语言设置
时区设置
无线网络设置(基础)
第三章
第四章:操控
不同的操控方法
使用
使用
MINIX
....................................................................................6
NEO
X7一览
......................................................................................11
MINIX NEO X7 ........................................................12
:基础设置
.................................................................................14
...
...................................................................................14
............................................................................14
:安卓应用市场
.......................................................17
......................................................................18
MINIX遥控器
GridShow
遥控器功能
..
桌面启动器
............................................................19
.......................................................5
.................................................................7
................................................13
......................................15
................................................................18
..
.............................................................18

第一章
安装连接
- 5 -

包装及附件
- MINIX NEO X7 x 1
-
MINIX NEO X7天线 x 1
- MINIX
- 5V
- Micro-USB OTG 排线 x 1
- Micro-USB
-
-
遥控器
电源适配器
数据线
HDMI 排线 x 1
使用指南
x 1
x 1
x 1
x 1
- 6 -

MINIX NEO X7
1
1.
电源指示灯
2.
电源键
3.
耳机接口
4.
麦克风接口
5. USB接口1
6. SD/MMC
7. OTG接口(
8.
复位键 (服务或更新时使用)
一览
卡接口
也可作为
2
3 4
5 6 7
USB接口2)
- 7 -
8
9
10
11
12
13
14
9. HDMI
10.
接口
音频光纤接口
11. USB 2.0 接口 3
12. USB 2.0 接口 4
13.
以太网接口
14. DC 5V
15.
充电接口
双频天线
15

电源指示灯
MINIX NEO X7
电源键
X NEO X7
MINI
时按住电源键,显示器会提示出确认关闭对话框,选择OK确认关闭,或
者长按电源键8秒强制关机,电源指示灯灭掉。
耳机接口
连接到一个外部音频输出设备如耳机或喇叭
麦克风接口
连接麦克风输出声音。
开机状态下指示灯亮。
开机时按住电源键保持
2-3
秒直到电源指示灯亮起。关机
。
SD/MMC
可增大存储容量或直接从
为
32GB
卡接口
。
SD/MMC
卡读取文件,支持扩充到的最大容量
- 8 -

OTG
接口
Micro-USB
级。当与包装中的
USB
的
线较小的一端连接此接口,另一端连接电脑用于同步数据或升
接口。
Micro-USB OTG
线配合使用时,此接口也可作为额外
复位键
当连接电脑服务或升级时,此按键与
USB接口之前按住此按键并保持,当
HDMI
接口
HDMI
用一根
口。
音频光纤接口
连接到外部声音处理单元(如扬声器)的音频光纤输入接口。
USB 2.0
连接外部
标、无线耳机接收器等到
接口
USB
MINIX NEO X7
线连接
设备,如USB闪存驱动器、无线键盘鼠标接收器、
MINIX NEO X7.
OTG
接口配合使用。在连接到电脑
MINIX NEO X7
到高清电视或电脑显示器的
- 9 -
启动时释放按键。
HDMI
USB
接
鼠

以太网接口
连接网线接入互联网。如果您想做进一步设置如
面:
设置→ 更多…
当连接网线时,
您需要使用
Wi-Fi
启动
DC 5V
充电接口
将包装内提
电流低于1A,但是考虑到您需要连接其他牵引功率的外部设备(如外接硬
盘),故我们提供一个5V 3A的电源适配器。
MINIX NEO X7
Wi-Fi
接入点功能,请确保在您通过:设置→ 更多
接入点服务之前,
5V
供的
电源适配器连接到此端口。
可作为路由器和
Wi-Fi
功能是关闭状态。
- 10 -
PPPoE
拨号,请进入设置页
Wi-Fi
接入点使用;如果
MINIX NEO X7
…
操作所需

您需要准备的
MINIX NEO X7,
要使用
高清电视/电脑显示器
一个高清电视或电脑显示器,可以显示
HDMI
输入接口。
排线
HDMI
一根
排线用于
以下是您需要准备的:
MINIX NEO X7
与电视连接。
720p 或1080p
视频和至少一个
无线网络
1 b/g/n, 或者 n Wi-Fi
802.1
一个
您的无线网络名称和密码。
软件和账户
MINI
X NEO X7
在
上应用智
音乐),您需要:
-
-
-
UPnP™/DLNA®
一个
登录某个安卓应用市场下载您想使用的应用程序或游戏。
全面访问一些网站内容,可能还需要其他账户。
无线网络(无线视频流需要
802.1
1g or n)
能手机或电脑上的内容(视频,图片,
软件预装在您的智能手机或电脑上。
- 11 -

安装连接
MINIX NEO X7
HDMI
通过
频、视频。在设置
面/背面的端口,确保您有合适的排线:
- HDMI 排线:
的高清电视或家庭影院接收器相连接传输视频或音频。
MINIX NEO X7
端口将
MINIX NEO X7
用一根
与电视或电脑显示器相连接,传输音
之前,查看您的电视或电脑显示器侧
HDMI
MINIX NEO X7与有HDMI
排线将
步骤1:连接排线
1. 将HDMI
2.
排线的一端与电视/电脑显示器的
将排线的另一端与
MINIX NEO X7的HDMI
HDMI
端口相连接。
端口相连接。
步骤2:连接电源
将包装中提供的5V电源适配器与此端口相连,按住电源键
指示灯变亮时
MINIX NEO X7
开机完成。
步骤3:打开电视/电脑显示器并选择输入
打开电视或电脑显示器,选择对应的
- 12 -
HDMI
端口连接到
MINIX NEO X7.
2-3
秒,当电源
端口

第二章
基础设置
- 13 -

语言设置
您可以通过以下步骤选择所需的系统语言:
开启主屏幕> 设置> 语言&输入>语言
默认语言是英语,您可以选择您想要的语言并确认。
时区设置
您可以根据您的当前位置通过以下步骤调整时区:
开启主屏幕> 设置> 日期 & 时间 > 选择时区
选择您的时区并确认。
无线网络设置(基础)
通过以下步骤连接到无线网络,您就可以访问互联网:
开启主屏幕 >
启Wi-Fi ”
wi -
将打开并自动扫描可用的无线网络,然后选择你想要的无线网络连接
并确认,当虚拟键盘提示时输入
设置 > Wi-Fi 选中该选项“发现可用的网络开
>
wi –
密码,最后,点击“连接”按键。
- 14 -

第三章
安卓应用市场
- 15 -

遵循以下步骤安装应用程序或游戏:
登录浏览器
搜索“安卓市场”
下载、安装您喜欢的“安卓市场”
打开“安卓市场”
搜索您想要安装的应用程序或游戏
下载并安装应用程序或游戏
打开并使用应用程序
MINIX
(注:
推荐使用正版软件)
- 16 -

第四章
操控
- 17 -

不同的操控方法
您可以通过以下输入设备操控
1.)
使用这个功能,需要打开X7上的
2.)
3.) 2.4GHz USB
4.) MINIX
5.) 2.4GHz USB
NEO A2
使用
请继续阅读,学习使用
的用户界面
注意: 如果您没有使用
功能,但是一些按键可能无作用, 例如
RKRemoteControl App,
下载
有线鼠标;
MINIX
无线键盘和鼠标设备;
红外遥控 (包含);
无线飞鼠,可以购买
.在开机之前,请将飞鼠的USB接头插在X7上。
遥控器
-GridShow
MINIX NEO X7:
将其安装在智能手机或平板上,第一次
MINIX
遥控器和
桌面启动器时,遥控功能将达到
GridShow
桌面启动器
eHomeMediaCenter
MINIX NEO A1+和MINIX
MINIX NEO X7
MINIX
STOP
按键。
软件;
.当使用我们定制
100%.
遥控器仍然可以发挥
GridShow
使用
主页→ 选择
MINIX
使用
MINIX NEO X7
控器与
桌面启动器
“GridShow”
遥控器控制
:
桌面启动器
MINIX NEO X7
之间没有障碍物。
- 18 -
的设置并操控内容。确保
MINIX
遥

MINIX
遥控器功能
OK
菜单 - 为当前的屏幕或运行的应用程序调出选项菜单
主页 - 回到主屏幕 (选择需要的桌面启动器)
电源 - 使
MINIX NEO X7
开启或进入睡眠模式
返回 - 返回上一界面或取消一个操作
OK -
确认一个特定的操作,相当于
- 19 -- 19 -
“Enter”
按键

上 - 向上移动
下 - 向下移动
左 - 向左移动
右 - 向右移动
音量减小 - 系统音量调小
音量增大 - 系统音量调大
- 20 -- 20 -

©2013 MINIX
版权
MINIX
没有
任何部分包括产品和软件描述,复制、传播、转录、存储进检索系统或
翻译成任何语言;购买者以备份的目的保存文档除外。此条款不适用于
获得通用公共许可证(
可条款副本及需要时提供的源代码都包含在产品中。
Android, Gmail, Google Maps, Chrome, Google Play, YouTube,
Google,
Google+,
http://www.google.com/permissions/guidelines.html
在
MINIX
的标识是
有者的财产。
此指南内容在一些细节上可能与产品或它的软件不同。本文件中的所有
信息可做更改,不另行通知。
.保留所有权利。
明确的书面许可,禁止以任何形式或通过任何途径将此指南的
“GPL”
)许可或其他免费开放资源许可的软件。许
和一些其他商标均为谷歌公司的财产。谷歌商标的列表可以
MINIX
科技的商标。所有其他标志或商标均为它们各自所
中找到。
MINIX
和
在线帮助和支持请访问
www.minix.com.hk
- 21 -


MINIX NEO X7
1
im Überblick
2
345
1. Power LED
2. Ein/AUS Schalter
3. Kopfhörer
4. Mikrofon
Anschluss
Anschluss
5. USB Port 1
6. SD/MMC Karten Steckplatz
7. OTG Port (dient auch als USB
Port 2)
8
9
10
11
12
13
14
6 7
8. Recover / Wiederherstellungs taste (für Service & Upgrade)
9. HDMI
0. Optischer
1 Audio
Anschluss
11. USB 2.0 Anschluss 3
12. USB 2.0 Anschluss 4
13. Ethernet
Anschluss
14. Eingang Netzteilkabel 5V
15. Dual Band Antenna
- 1 -
15
Auschluss

LED
Power
Die LED leuchtet bei eingeschaltetem MINIX NEO
EIN/AUS Schalter
Um den MINIX NEO einzuschalten, drücken Sie für 2-3 Sekunden den
EIN/AUS Schalter, bis die Power LED leuchtet. Um den MINIX NEO
auszuschalten, drücken Sie den EIN/AUS Schalter, bis Sie über das
Display aufgefordert werden, dies zu bestätigen. Bestätigen Sie dies nun
ODER halten Sie den EIN/AUS Schalter für 8 Sekunden gedrückt, um das
Ausschalten zu erzwingen, bis die LED erlischt.
Kopfhörer Anschluss
Verbinden Sie ein externes Audiogerät, z.B. Kopfhörer oder Lautsprecher.
Mikrofon Anschluss
Verbinden Sie ein Mikrofon an diesem Eingang, z.B. für Spracheingabe.
SD/MMC Karten Steckplatz
Erweitern Sie den Speicherplatz oder greifen Sie auf Dateien auf einer
SD/MMC Speicherkarte zu, unterstützt werden Karten bis max. 32GB.
X7
- 2 -
X7.
X7

OTG Port
Verbinden Sie den Micro-USB Stecker des Micro-USB Kabels mit dem
OTG Port des NEO und das andere Ende mit dem USB Anschluss
Ihres Computers für die Synchronisation und zum Zweck von Upgrades.
Dieser Port dient auch als weiterer USB Port in Verbindung mit dem
mitgelieferten Micro-USB OTG Kabel.
Recover / Wiederherstellungstaste
Diese Taste wird zusammen mit dem OTG Port für Service/Upgradezwecke benutzt. Schalten Sie den über den OTG Port mit dem PC
verbundenen NEO X7 ein, während Sie die "RECOVER"
halten, bis der NEO startet.
HDMI Anschluss
Verbinden Sie den MINIX NEO mit dem HDMI Port eines HD-fähigen
TV Geräts oder Monitors mittels eines HDMI Kabels.
Optischer Audio Anschluss
Verbinden Sie diesen Ausgang mit dem optischen Audio Eingang eines
externen Wiedergabegerätes, z.B. eines Verstärkers.
USB 2.0 Ports
Verbinden Sie externe USB Geräte mit dem MINIX NEO wie USBSpeichersticks, Empfänger für kabellose Tastatur und Maus, USB Maus,
Empfänger von kabellosen Kopfhörern, etc ...
X7
Taste gedrückt
X7
X7
X7,
- 3 -

Ethernet Anschluss
Alternativ zum Wi-Fi Anschluss können Sie diesen LAN Anschluss mit
Ihrem Netzwerk per LAN-Kabel für den Zugang zum Internet verbinden.
Für erweiterte Einstellungen, wie etwa PPPoE Einwahl, navigieren Sie zu
den Einstellungen bei Einstellungen -> Mehr...
Während der MINIX NEO X7 per LAN Kabel mit dem Internet verbunden
ist, kann der NEO X7 als Router und als Wi-Fi Hotspot genutzt werden.
Wenn Sie die Wi-Fi Hotspot Eigenschaft nutzen möchten, muss der Wi-Fi
Empfang des NEO X7 AUSGESCHALTET sein, bevor Sie den Wi-Fi
Hotspot bei Einstellungen -> Mehr... einrichten.
Eingang Netzteilkabel
Verbinden Sie das im Lieferumfang enthaltene 5V Netzteil mit diesem
Eingang. Der MINIX NEO X7 benötigt selbst weniger als 1A, dennoch
haben wir ein bis 3A ausgelegtes 5 Volt Netzteil beigefügt, um auch
externe stromhungrige Geräte, wie z.B. Festplatten, mit genügend Power
zu versorgen.
- 4 -

Was benötigt wird
Um den MINIX NEO X7 zu benutzen, brauchen Sie Folgendes:
High Definition TV / PC Monitor
Ein HD-fähiges TV Gerät oder PC Monitor, welches 720p oder 1080p
Video wiedergeben kann mit einem freien HDMI Eingang.
Kabel
Ein HDMI Kabel, um den MINIX NEO X7 mit Ihrem TV zu verbinden.
Netzwerk
Netzwerkkabel
Ein
Wi-Fi Netzwerk (Wireless Video Streaming benötigt 802.11 g oder n), den
Namen und das Passwort Ihres WLANs.
Software und Nutzerkonten
Um Inhalte (Videos, Fotos, Musik) von einem Smartphone oder PC
wiederzugeben, brauchen Sie:
- Installierte UPnP /DLNA Software installiert auf Smartphone oder PC
- Einen Google Account für die Anmeldung im Google Play Store, um
die entsprechenden Apps herunterzuladen (z.B. iMediaShare,
eHomeMediaCenter), die für das Streaming des Inhalts von
Smartphone / PC benötigt werden.
- Ggf. werden weitere Nutzerkonten für den vollen Zugang zu weiteren
Webinhalten benötigt.
als Verbindung zu Ihrem Router oder ein 802.11 a, b, g, n
TM ®
- 5 -

Einrichten des MINIX NEO X
Der MINIX NEO X7 wird über den HDMI Port mit Ihrem HDMI-fähigen TV
oder PC Monitor verbunden, wobei sowohl Bild als auch Ton mittels eines
HDMI Kabels übertragen werden. Bevor Sie den MINIX NEO X7
einrichten, prüfen Sie bitte die seitlichen/hinteren Anschlüsse Ihres TV /
PC Monitors, um sicher zu gehen, dass Sie das richtige Kabel haben:
- HDMI Kabel: Sie können den MINIX NEO X7 damit mit
einem
Anschluss verbinden, das HDMI Kabel überträgt sowohl
Bild als auch Ton.
Schritt 1: Verbinden der Kabel
1. Verbinden Sie ein Ende des HDMI Kabels mit dem HDMI Anschluss
Ihres TV/PC Monitors.
2. Verbinden Sie das andere Ende des HDMI Kabels mit dem HDMI
Anschluss des MINIX NEO X7.
Schritt 2: Anschließen der Stromquelle
Verbinden Sie das mitgelieferte 5V Netzteil mit dem MINIX NEO X7.
Drücken Sie für 2-3 Sekunden den EIN/AUS Schalter, um den MINIX NEO
X7 zu starten, bis die blaue Power LED leuchtet, .
Schritt 3: Anschalten des TV / Monitors und Wahl des Eingangs
Schalten Sie einfach Ihr TV Gerät oder Ihren PC Monitor an und wählen
Sie den entsprechenden HDMI Port aus, an dem Ihr MINIX NEO X7
angeschlossen ist.
Gerät oder Home Theater Receiver mit HDMI
HDTV
- 6 -

Einstellung der Sprachversion
Sie können das Betriebssystem auf die gewünschte Systemsprache
einstellen wie folgt:
Launcher Home Screen > Settings > Language & input > Language
Die voreingestellte Sprache ist Englisch, hier können Sie die gewünschte
Sprache auswählen und bestätigen.
Einstellung der Zeitzone
Stellen Sie die Zeitzone Ihres Standorts ein wie folgt:
Übersicht Launcher Home Screen > Einstellungen > Datum & Uhrzeit
> Zeitzone auswählen
Wählen Sie Ihre entsprechende Zeitzone aus.
Wi-Fi Einrichtung Grundeinstellungen
Verbinden Sie Ihren MINIX NEO X7 mit Ihrem WLAN für die Verbindung
mit
dem Internet wie folgt:
Übersicht Launcher Home Screen > Einstellungen > WLAN >
WLAN aktivieren, um verfügbare Netze abzurufen
IIIII
Der MINIX NEO X7 scannt nun die verfügbaren WLAN Netzwerke.
Wählen Sie das entsprechende Netzwerk aus und bestätigen Sie die
Auswahl, geben Sie das Passwort für Ihr WLAN Netzwerk ein, wenn die
virtuelle Tastatur erscheint. Abschließend betätigen Sie die Schaltfläche
„Verbinden“.
- 7 -

Verbinden mit Ihrem Google Account
Aktivieren Sie den Zugang zum Google Play Store wie folgt:
Übersicht Launcher Home Screen > Google Play Store > anklicken
Um den Google Play Store nutzen zu können, brauchen Sie ein Google
Nutzerkonto. Wenn Sie bereits einen Google Account haben, wählen Sie
“Anmelden“ und loggen Sie sich mit Ihren Zugangsdaten ein. Wenn Sie
noch kein Google Nutzerkonto haben, wählen Sie “Google Konto
einrichten“ und folgen Sie den Anweisungen.
Nach erfolgreicher Anmeldung werden Sie zum Google Play Store weiter
geleitet, wo Sie die gewünschten Apps aussuchen und installieren
können.
Falls Sie die gewünschte App im Google Play Store nicht finden, können
Sie alternativ auch “.apk“ Apps aus dem Internet herunterladen und mit
dem vorinstallierten “ApkInstaller“ installieren.
- 8 -

Diverse Möglichkeiten der Bedienung
Sie können Ihren MINIX NEO X7 mit folgenden Eingabegeräten
bedienen:
1.) RKRemoteControl App (für Android Smartphone oder Tablet PC)
2.) USB Kabelmaus
3.) 2,4GHz USB Funktastatur- und -maus Set
4.) 2,4GHz USB kabellose AirMouse Fernbedienung / Keyboard
(MINIX NEO A1+, MINIX NEO A2, separat erhältlich)
5.) MINIX Infrarot Fernbedienung (wird mitgeliefert)
Die MINIX Fernbedienung
Die mitgelieferte Fernbedienung arbeitet perfekt mit unserer angepassten
Bedienungsoberfläche Grid Show launcher zusammen.
Anm.: Die MINIX Fernbedienung funktioniert auch, wenn Sie den
GridShow launcher nicht benutzen, dann sind allerdings einige Tasten mit
keiner Funktion belegt, z.B. die STOP Taste.
Bedienung des MINIX NEO X7 mit dem GridShow launcher
Home -> Übersicht „GridShow“ launcher auswählen
Nutzen Sie Ihre MINIX Fernbedienung, um Einstellungen vorzunehmen
und zu navigieren. Stellen Sie sicher, dass keine Hindernisse den
Empfang zwischen Fernbedienung und MINIX NEO X7 beeinträchtigen.
- 9 -

Funktionen der MINIX Fernbedienung
OK
MENU - Aufrufen des Optionsmenüs des aktuellen Screens oder
der laufenden App
HOME - Zurück zum Home Screen mit Auswahl des Launchers
POWER - Hiermit wird der Sleep Mode/Schlafmodus des MINIX
NEO X7 aktiviert bzw. deaktiviert
ZURÜCK - Zurück zum vorigen aktiven Screen oder Beenden einer
Aktivität
- 10 -

Absenken der Lautstärke
Erhöhen der Lautstärke
HOCH - Nach oben bewegen
LINKS - Nach links bewegen
RECHTS - Nach rechts bewegen
UNTEN - Nach unten bewegen
OK - Bestätigen eines Dialogs, und „Enter/Eingabe“ Taste
- 11 -

Copyright © 2013 MINIX Tech. Alle Rechte vorbehalten.
Kein Teil dieses Handbuchs, einschließlich der darin beschriebenen
Produkte und Software, darf in irgendeiner Form oder mit irgendwelchen
Mitteln vervielfältigt, übertragen, überschrieben, in einem Datenabfragesystem gespeichert oder in irgendeine Sprache übersetzt werden,
ohne die ausdrückliche schriftliche Genehmigung von Minix, außer durch
den Käufer zum Zweck der Datensicherung. Diese Klausel gilt nicht für
solche Software, die unter der General Public License ("GPL") oder
anderen Free Open-Source-Lizenzen lizenziert ist. Kopien der jeweiligen
Lizenzbedingungen, und, wo erforderlich, ein Angebot, um den jeweiligen
Quellcode zu liefern, sind im Produkt enthalten.
Google, Android, Gmail, Google Maps, Chrome, Google Play, YouTube,
Google+ und andere Warenzeichen sind Eigentum der Google Inc. Eine
Liste der Google-Marken finden Sie unter http://www.google.com/
permissions/guidelines.html. MINIX und das MINIX Logo sind
Warenzeichen von MINIX Tech. Alle anderen Marken- und Warenzeichen
sind Eigentum ihrer jeweiligen Inhaber.
Der Inhalt dieser Anleitung kann sich in einigen Details von dem Produkt
oder seiner Software unterscheiden. Alle Informationen in diesem
Dokument können sich ohne vorherige Ankündigung ändern.
Für Online Hilfe und Support besuchen Sie bitte www.minix.com.hk
- 12 -

 Loading...