

Page 1
14938/14939
14951/14953
14954/14955
14956/14957
14981/14983
Weichen • Turnout • Aiguille • Wissel • Desvíos • Deviatoi
Page 2

Geltungsbereich
diese Anleitung gilt für:
• die 15°-Weichen 14954 und 14955
• die 15°-Weichen mit polarisiertem Herzstück 14938 und
14939
• die 24/30°-Weichen 14951 und 14953
• die Bogenweichen 14956, 14957, 14981 und 14983
Die o.g. Weichen werden als „Handweichen“ ausgeliefert,
d.h. sie müssen von Hand bedient werden. Um die Weichenstellung zu wechseln, legen Sie den seitlichen roten
Hebel um. Dabei wechselt die Weiche in die jeweils andere
Stellung.
Die Weiche als Handweiche benötigt keinen elektrischen
Anschluss, da sie den Fahrstrom von den angeschlossenen
Gleisen übernimmt.
Weichenantriebe 14934 und 14935
Die Weichen können mit den elektromagnetischen Anrtrieben
14934 oder 14935 ergänzt werden.
2
Stoppweiche
Die Weichen können als Stopp-Weichen eingesetzt werden.
D.h., dass dann jeweils nur das Gleis mit Fahrstrom versorgt
wird, auf das die Weiche eingestellt ist. So kann zum Beispiel verhindert werden, dass ein auf dem „falschen“ Gleis
ankommender Zug in die Weiche einfährt und evtl. entgleist.
Beachten Sie, dass z.B. ein Ausweichgleis an 2 Gleisen angeschlossen ist, und somit von beiden Seiten mit Fahrstrom
versorgt wird bzw. an beiden Seiten eine entsprechend
gestellte Stoppweiche benötigt.
Um diese Funktion zu erreichen, sind die beiden Kontaktklammern mit einer Pinzette aus der Weiche auszubauen
(Abb. 2).
Beachten Sie, dass bei Oberleitungsbetrieb der Fahrstrom
in der Oberleitung nicht durch die Weiche gestellt werden
kann.
Page 3

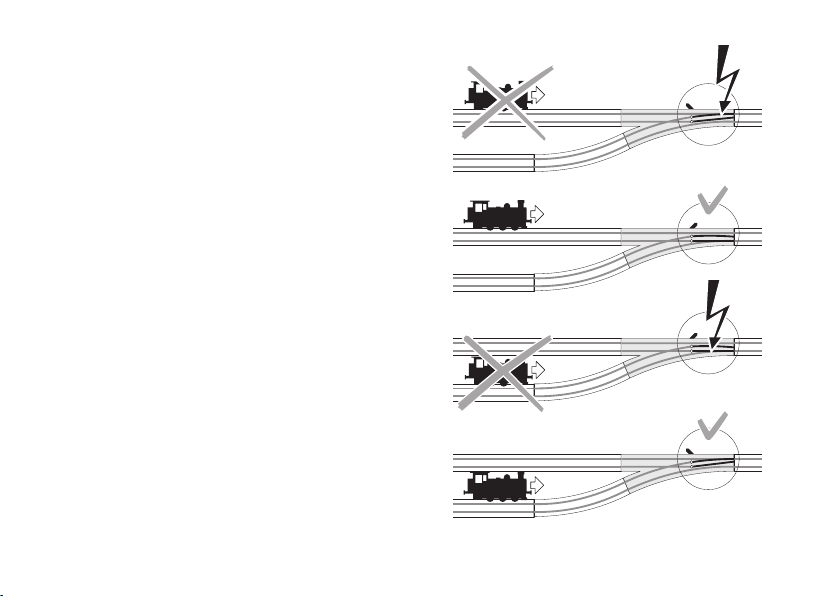
Weichen mit polarisiertem Herzstück 14938/14939
Die 15°-Weichen sind mit einem polarisierten Herzstück
ausgestattet. Das verbessert die Stromversorgung der
Lokomotive beim Überfahren der Weichen. Diese Weichen
dürfen allerdings niemals in der falschen Richtung befahren
werden (Abb. 1), da dabei ein Kurzschluss entsteht, der die
Weiche zerstört.
24/30°-Weiche 14951/14953
Der 24°-Weiche liegt ein kurzes Gleisstück bei. Durch
Verwendung dieses Gleisstückes können Sie diese Weiche
in eine 30°-Weiche umbauen (Abb. 3).
Bogenweichen 14957/14956/14981/14983
Um Platz zu sparen, können an Stelle der normalen geraden
Weichen auch Bogenweichen eingesetzt werden. Diese
werden im Kreisbogen eingebaut und verbinden jeweils
2 Bögen mit unterschiedlichen Radien (Abb. 5). Darüber
hinaus ist die Funktionsweise der Bogenweichen gleich wie
bei den geraden Weichen.
Bild 1
3
Page 4

Area of Application
These instructions apply to:
• the 14954 and 14955 15° turnouts
• the 14938 and 14939 15° turnouts with polarized frogs
• the 14951 and 14953 24/30° turnouts
• the 14956, 14957, 14981, and 14983 curved turnouts
The turnouts listed above come from the factory as manual
turnouts, i.e. they must be operated manually or by hand.
You have to move the red lever over on the side in order
to change the turnout setting. In the process the turnout
changes to the other setting.
As a manual turnout, this turnout does not require electrical
connections, since it takes track current from the tracks
connected to it.
14934 and 14935 Turnout Mechanisms
The 14934 or 14935 electro-magnetic mechanisms can be
added to the turnouts.
4
Stop Turnout
These turnouts can be used as stop turnouts. This means
that power is only present in the track, for which the turnout
is aligned. For example, a train coming on the „wrong“
track is prevented from entering the turnout and possibly
derailing.
Note that a passing siding connected to 2 tracks and thus
supplied for track current from both ends requires a stop
turnout at both ends that is appropriately set.
The two contact clips on the turnout must be removed with
a tweezers in order to achieve this function (Fig. 2).
Note that when you are operating electric locomotives from
catenary the track current in the latter cannot be set with
the turnout.
Page 5

Turnout with a Polarized Frog 14938/14939
The 15° turnouts are equipped with a polarized frog. This
improves the power supply for locomotives when they are
traversing the turnouts. However, these turnouts may never
be traversed in the wrong direction (Fig. 1),
since a short circuit will result and destroy the turnout.
24/30° Turnout 14951/14953
A short section of track is included with the 24° turnout.
You can convert this turnout to a 30° turnout by using this
section of track (Abb. 3).
Curved Turnouts 14957/14956/14981/14983
Curved turnouts can be used in place of standard turnouts
in order to save space. Curved turnouts are installed in the
curve and connect 2 curves with different radii (Fig. 5). Other
than that the way these turnouts work is the same as the
standard straight turnouts.
Fig. 1
5
Page 6

Domaine d’application
Cette notice est valable pour :
• Les aiguilles de 15° réf. 14954 et 14955
• Les aiguilles de 15° avec cœur polarisé réf. 14938 et 14939
• Les aiguilles de 24/30° réf. 14951 et 14953
• Les aiguilles enroulées réf.14956, 14957, 14981 et 14983
Les aiguilles susmentionnées sont livrées comme «aiguilles
manuelles» : elles doivent être actionnées à la main. Pour
changer la position de l’aiguille, actionnez le levier rouge
situé sur le côté. L’aiguille passe alors dans l’autre position.
L‘aiguille manuelle ne nécessite aucune connexion électrique puisque le courant traction lui est fourni par la voie
raccordée.
Moteurs d’aiguille 14934 et 14935
Les aiguilles peuvent être complétées par les moteurs
électromagnétiques réf. 14934 ou 14935.
6
Aiguille «stop»
Les aiguilles peuvent être utilisées comme aiguilles «stop» :
Seule la voie dont la direction est donnée par l’aiguille est
alimentée en courant traction. Ceci permet par exemple
d’éviter qu’un train arrivant sur la «mauvaise» voie s’engage
sur l‘aiguille et déraille.
Tenez compte du fait qu’une voie d’évitement, par exemple,
est reliée à deux voies et qu’elle est donc alimentée en courant traction des deux côtés : une aiguille «stop» correctement positionnée sera donc nécessaire de chaque côté.
Pour exploiter cette fonction, retirez les deux pinces de
contact de l’aiguille à l’aide de pinces (fig. 2).
Tenez compte du fait que pour une exploitation sous
caténaire, le courant traction ne peut pas être contrôlé par
l’aiguille.
Page 7
Aiguilles avec cœur polarisé 14938/14939
Les aiguilles de 15° sont dotées d’un cœur polarisé. Ceci
permet d’améliorer l’alimentation en courant de la locomotive lors de son passage sur l’aiguille. Toutefois, ces aiguilles
ne doivent en aucun cas être empruntées dans le mauvais
sens (fig.1) au risque d’engendrer un court-circuit qui serait
fatal à l’aiguille.
Aiguilles de 24/30° 14951/14953
L’aiguille de 24° est livrée avec un élément de voie court.
L’utilisation de cet élément de voie vous permet de transformer l‘aiguille en une aiguille de 30° (fig.3).
Aiguille enroulée 14957/14956/14981/14983
Pour gagner de la place, vous pouvez remplacer les aiguilles
droites normales par des aiguilles enroulées. Ces dernières
sont insérées dans les courbes et relient respectivement
deux éléments de voie courbes de rayons différents (fig. 5).
Le fonctionnement des aiguilles enroulées est identique à
celui des aiguilles droites.
Fig. 1
7
Page 8

Geldigheid
Deze gebruiksaanwijzing geldt voor:
• de 15° -wissels 14954 en 14955
• de 15° -wissels met gepolariseerd hartstuk 14938 en 14939
• de 24/30° -wissels 14951 en 14953
• de meegebogen wissels 14956, 14957,14981 en 14983
De bovenstaande wissels worden als handwissel geleverd.
Dit betekent dat ze handmatig bedient kunnen worden. Om
de stand van het wissel te veranderen verschuift u het rode
hendeltje aan de zijkant van het wissel. Hierdoor verandert
de desbetreffende stand van het wissel. De wissels hebben
als handwissel geen elektrische aansluiting nodig, aangezien ze de rijstroom van de aangesloten rails overnemen.
Wisselaandrijving 14934 en 14935
De wissels kunnen met een elektromagnetische aandrijving
14934 of 14935 uitgebreid worden.
8
Stopwissel
de wissels kunnen als stopwissels ingezet worden. Dit
betekent dat alleen dan de rijstroom naar het aangesloten
spoor wordt doorgegeven, als het wissel in die stand staat.
Hierdoor kan bijv. voorkomen worden dat een op het verkeerde spoor aankomende trein, het wissel “open” rijdt en
eventueel ontspoort. Bedenk wel dat bijv. een uitwijkspoor
op twee plaatsen aangesloten is op het hoofdspoor en
zodoende van beide zijden van rijspanning wordt voorzien
en daarom, aan beide zijden, een in de juiste stand gesteld
stopwissel nodig heeft. Om van deze functionaliteit gebruik
te kunnen maken, moet met een pincet de beide contactbeugels uit het wissel genomen worden (afb. 2).
Let er op dat bij bovenleidingsbedrijf de rijstroom in de
bovenleiding niet door de wissel beïnvloed kan worden.
Page 9

Wissel met gepolariseerd hartstuk 14938/14939
De 15 0 -wissels zijn uitgerust met een gepolariseerd hartstuk. Dit verbetert de stroomopname van de locomotieven
bij het passeren van het wissel. Deze wissels mogen echter
nooit in de verkeerde richting bereden worden (afb. 1)
omdat er dan een kortsluiting ontstaat waardoor het wissel
beschadigd raakt.
24/30 0 -wissel 14951/14953
Bij het 24 0 -wissel wordt een kort railstuk meegeleverd.
Door dit railstuk te gebruiken kunt u dit wissel in een 30 0
-wissel ombouwen (afb. 3).
Meegebogen-wissels 14957/14956/14981/14983
Om ruimte te besparen kunnen in plaats van rechte wissels
ook meegebogen-wissels gebruikt worden. Deze worden
in de cirkelbogen ingebouwd en verbinden telkens twee
opeenvolgende radiussen (afb. 5). Daarnaast is de werking
van de meegebogen-wissels gelijk aan de rechte wissels.
Afbeelding 1
9
Page 10

Ámbito de validez
Estas instrucciones son válidas para:
• los desvíos de 15° 14954 y 14955
• los desvíos de 15° con cruzamiento polarizado 14938 y
14939
• los desvíos de 24°/30° 14951 y 14953
• los desvíos en curva 14956, 14957, 14981 y 14983
Los desvíos arriba mencionados se entregan en forma de
„desvíos manuales“, es decir, deben maniobrarse manualmente. Para cambiar la posición de las agujas, invierta
la posición de la palanca roja lateral. Al hacerlo, el desvío
cambia a la otra posición en cuestión.
El desvío como desvío manual no necesita conexión
eléctrica ya que absorbe la corriente de tracción de las vías
conectadas.
Accionamientos de desvío 14934 y 14935
Los desvíos pueden complementarse con los accionamientos electromagnéticos 14934 o 14935.
10
Desvío de parada
Los desvíos pueden utilizarse como desvíos de parada, es
decir, se alimenta corriente de tracción únicamente a la vía
para la cual está posicionado el desvío. Así, por ejemplo,
puede evitarse que un tren que llegue por la vía „falsa“
tome el desvío y posiblemente descarrile.
Tenga presente que, p. ej., una vía desviada está conectada
a dos vías y, por tanto, recibe corriente de tracción desde
ambos extremos o bien necesita en ambos extremos un
desvío de parada posicionado de manera adecuada.
Para lograr esta función, las dos grapas de contacto deben
retirarse del desvío utilizando unas pinzas. (Fig.2).
Tenga presente que en el funcionamiento desde catenaria
no es posible conmutar mediante el desvío la corriente de
tracción disponible en la catenaria.
Page 11

Desvíos con cruzamiento polarizado 14938/14939
Los desvíos de 15° están equipados con un cruzamiento
polarizado. Esto mejora la alimentación eléctrica de la locomotora al pasar por los desvíos. Sin embargo, nunca debe
recorrerse un desvío en la dirección incorrecta (Fig. 1), ya
que se produce un cortocircuito que provoca la destrucción
del desvío.
Desvío de 24/30° 14951/14953
El desvío de 24° se entrega con un tramo de vía corto. Este
tramo de vía permite convertir este desvío en un desvío de
30° (Fig.3).
Desvíos en curva 14957/14956/14981/14983
Para ahorrar espacio, en lugar de los desvíos rectos
normales, pueden utilizarse también desvíos en curva. Éstos
se montan en arcos circulares y cada uno de ellos impide
que existan dos curvas con radios diferentes (Fig. 5K). Por
lo demás, el funcionamiento de los desvíos en curva es el
mismo que en los desvíos rectos.
Figura1
11
Page 12

Campo di applicazione
Queste istruzioni sono valevoli per:
• i deviatoi da 15° 14954 e 14955
• i deviatoi da 15° con elemento del cuore polarizzato 14938
e 14939
• i deviatoi da 24/30° 14951 e 14953
• i deviatoi curvi 14956, 14957, 14981 e 14983
I suddetti deviatoi vengono consegnati come „deviatoi a
mano“, ossia
essi devono venire azionati a mano. Per commutare la
disposizione del deviatoio, spostate la levetta laterale
rossa. Facendo ciò, il deviatoio si commuta rispettivamente
nell’altra posizione.
Tale deviatoio come deviatoio manuale non ha bisogno di
alcun collegamento elettrico, poiché esso riceve la corrente
di marcia dai binari collegati.
Azionamenti per deviatoi 14934 e 14935
Tali deviatoi possono venire completati con gli azionamenti
elettromagnetici 14934 oppure 14935.
12
Deviatoi di arresto
Tali deviatoi possono venire impiegati quali deviatoi di
arresto.
Ciò signica che allora viene alimentato con la corrente
di marcia soltanto rispettivamente il binario per il quale il
deviatoio è impostato. Così ad esempio può venire impedito
il fatto che un treno sopraggiungente sul binario „sbagliato“
entri in tale deviatoio ed eventualmente svii dal binario.
Prestate attenzione al fatto che ad es. un binario di precedenza è collegato a 2 binari, e viene pertanto alimentato
con la corrente di trazione da entrambi i lati e abbisogna
rispettivamente da entrambi i lati di un deviatoio di arresto
disposto in modo corrispondente.
Per conseguire questa funzionalità, si devono rimuovere con
una pinzetta dal deviatoio entrambe le linguette di contatto
(Fig. 2).
Prestate attenzione al fatto che in caso di esercizio con
linea aerea la corrente di trazione nella linea aerea non può
venire predisposta tramite il deviatoio.
Page 13

Deviatoi con elemento del cuore polarizzato 14938/14939
Tali deviatoi da 15° sono equipaggiati con un elemento del
cuore polarizzato.
Questo migliora l’alimentazione di corrente della locomotiva
durante il transito sopra tali deviatoi. Questi deviatoi non
devono comunque mai venire percorsi nella direzione sbagliata (Fig. 1), poiché in tal caso si verica un corto circuito,
che danneggia il deviatoio.
Deviatoi da 24/30° 14951/14953
A tale deviatoio da 24° è accluso un corto elemento di
binario. Mediante l’impiego di questo elemento di binario
Voi potete trasformare questo deviatoio in un deviatoio da
30° (Fig. 3).
Deviatoi curvi 14957/14956/14981/14983
Per risparmiare spazio, in luogo di normali deviatoi diritti
possono anche venire impiegati dei deviatoi curvi. Questi
vengono inseriti negli archi di cerchio e collegano rispettivamente 2 curve con differenti raggi (Fig. 5). A parte questo,
il modo di funzionamento dei deviatoi curvi è uguale come
nel caso dei deviatoi diritti.
Fig. 1
13
Page 14

14951/..953
E15064300
14938/..9939/..954/..955/ ..956/..957/..981/..983
E15061300
6°
24°
104,2
Bild 2, Fig. 2, Fig. 2, Afbeelding 2, Figura 2
14
Bild 3, Fig. 3, Fig. 3, Afbeelding 3, Figura 3
Page 15
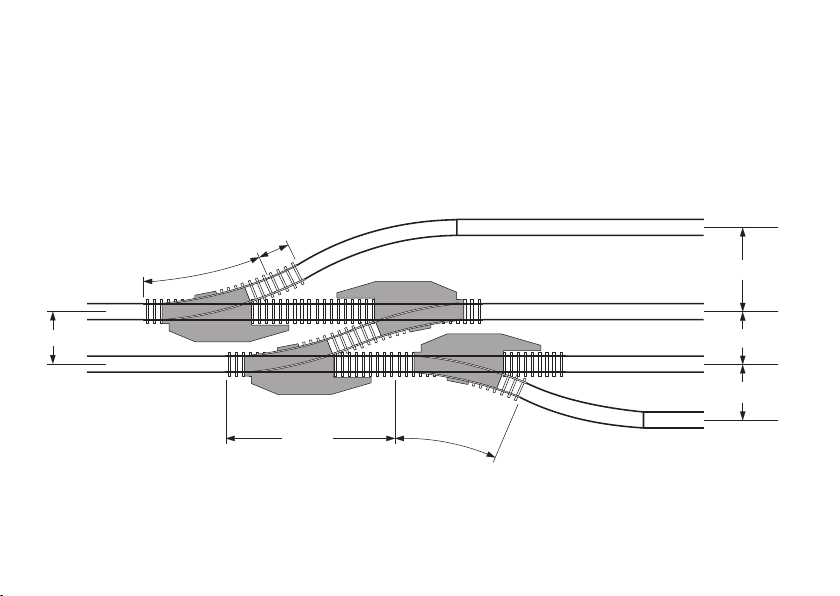
Weichenkombinationen mit Standard-Weichen
Turnout Combinations with Standard Turnouts
Combinaison d’aiguilles standard
Wisselcombinatie met standaardwissels
Combinaciones de desvíos con desvíos estándar
Combinazioni di deviatoi con deviatoi normali
6°/R1
24°/R1
30°
33,6
16
24°
Bild 4, Fig. 4, Fig. 4, Afbeelding 4, Figura 4
104,2
12
52,1
33,6
24°/R1
14
33,6
15
Page 16
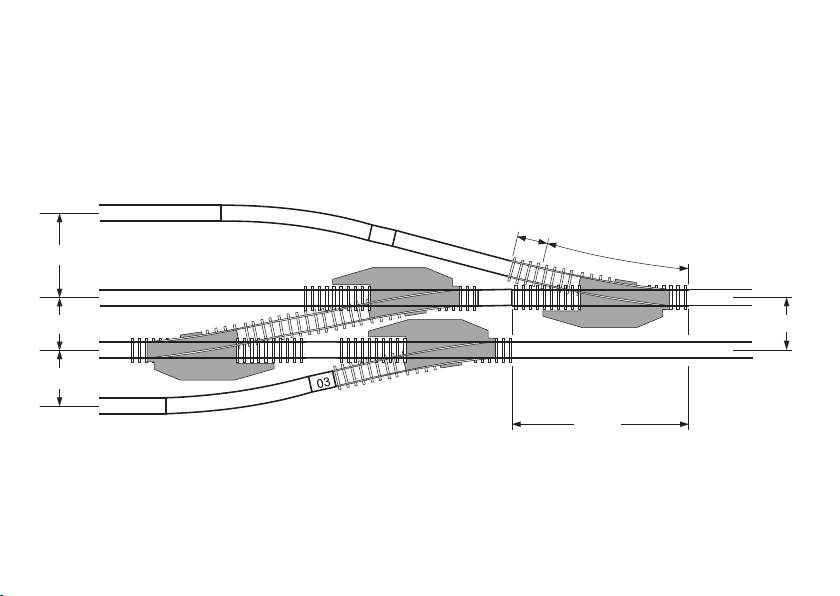
Weichenkombinationen mit Standard-Weichen
Turnout Combinations with Standard Turnouts
Combinaison d’aiguilles standard
Wisselcombinatie met standaardwissels
Combinaciones de desvíos con desvíos estándar
Combinazioni di deviatoi con deviatoi normali
52,1
33,6
33,6
27
Bild 5, Fig. 5, Fig. 5, Afbeelding 5, Figura 5
16
27
03
05
17,2
15°/R4
03
33,6
112,6
15°
Page 17

17
Page 18

R1/R2
228,2
33,6
90°
Weichenkombinationen mit Bogenweichen
Turnout Combinations with Curved Turnouts
Combinaison d’aiguilles enroulées
Wisselcombinatie met meegebogenwissels
Combinaciones de desvíos con desvíos en curva
Combinazioni di deviatoi con deviatoi curvi
67
18
Bild 5, Fig. 5, Fig. 5, Afbeelding 5, Figura 5
24
24
R1/R2
228,2
24
24
33,6
228,2
90°
Page 19

33,6
228,2
24
24
26
14
R1/R2
90°
228,2
14
67
33,6
19
Page 20

Gebr. Märklin & Cie. GmbH
Stuttgarter Str. 55 - 57
73033 Göppingen
Germany
www.trix.de
309131/0215/Ha6Ef
Änderungen vorbehalten
© Gebr. Märklin & Cie. GmbH
 Loading...