

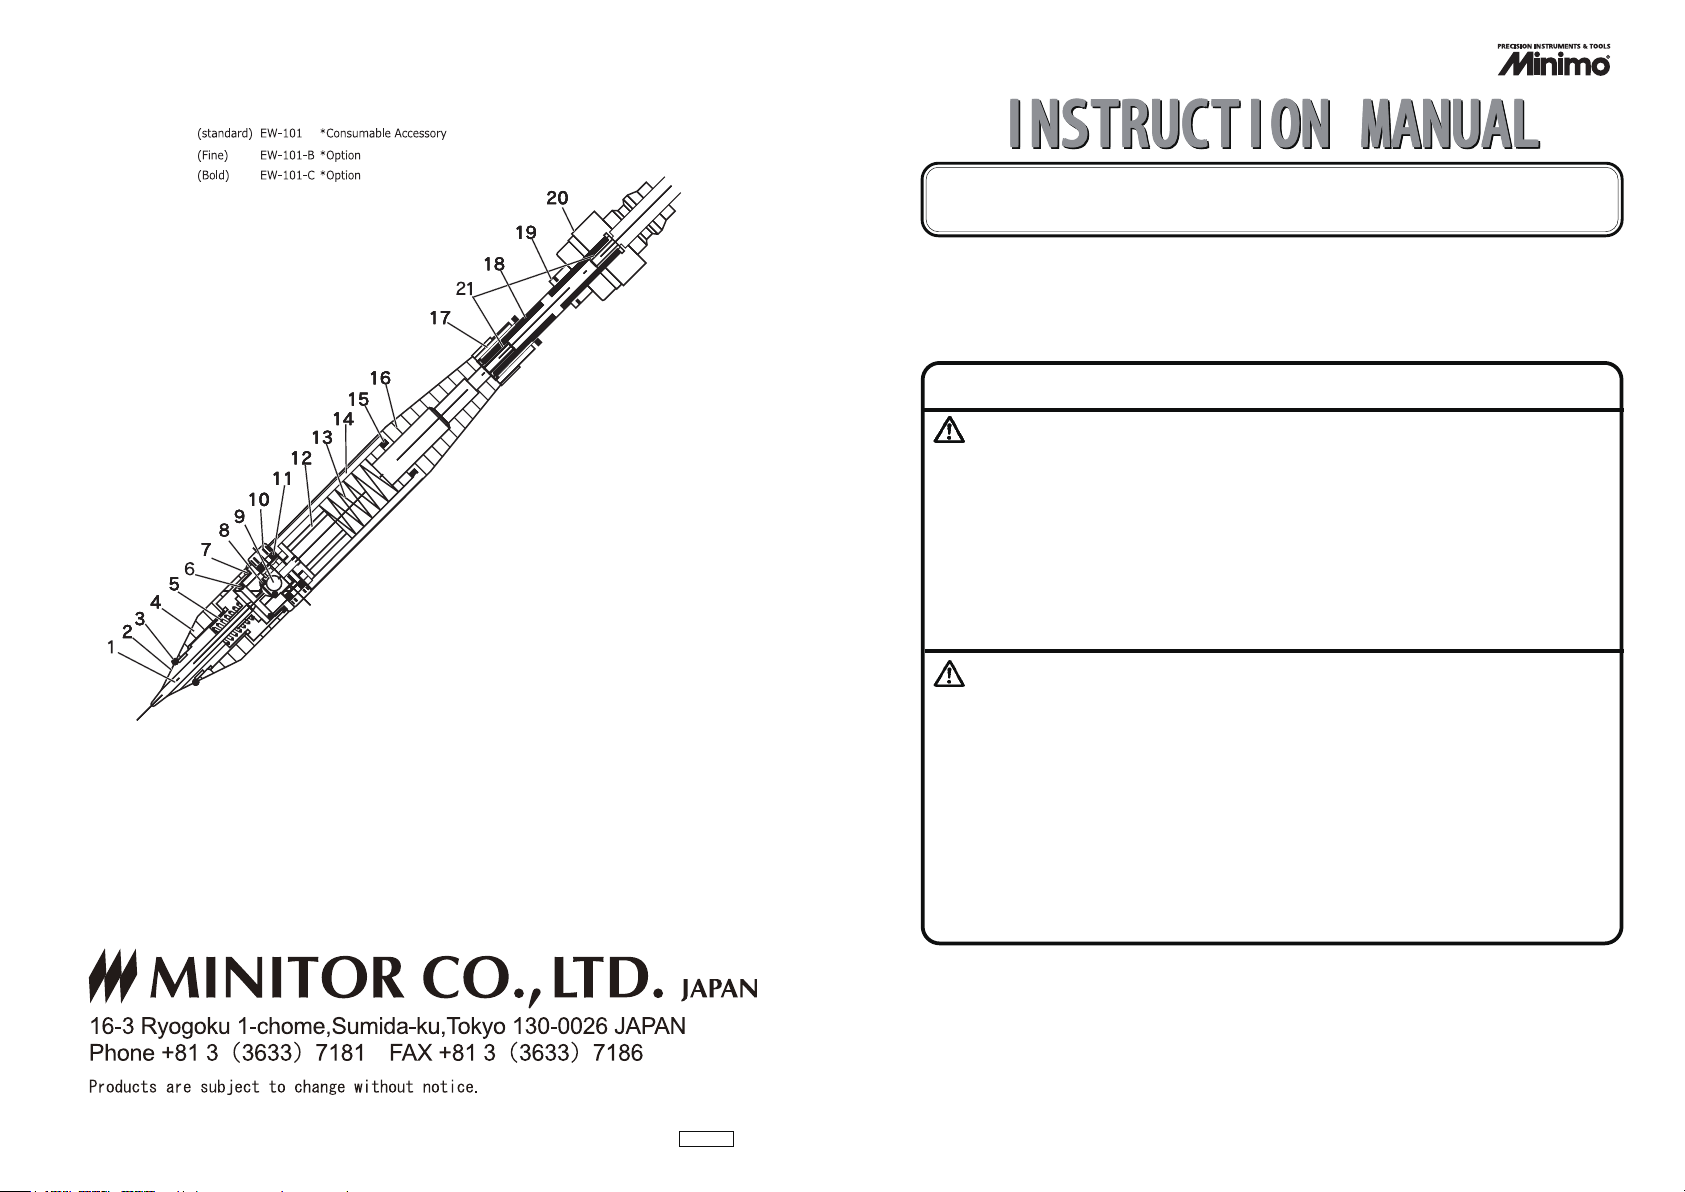
6. PARTS LIST
1.Point Tool
2.Bush
3.O-Ring
4.Front Housing
5.Front Spring
6.O-Ring (7.66×1.78)
7.O-Ring (12.1×1.6)
8.O-Ring (2.5×1.8)
9.Valve Ball
EW-102
EW-103
EW-104
EW-105
EW-106
EW-107
EW-108
EW-109
10.Switch Valve
11.O-Ring (3.1×1.6)
12.Ball Guide
13.Rear Spring
14.Housing
15.O-Ring (11.1×1.6)
16.Rear Housing
17.Hose Connector M7
18.Air Hose Black 2.5m
19.Hose Connector 1/4
20.Coupler
21.Bronze Bush
EW-110
EW-111
EW-112
EW-113
EW-114
EW-115
EW-116
EW-117
EW-118
EW-119
EW-120
EW-121
EW-01 WORK MARKER
Read following instructions before attempting to use.
Keep this manual always in the vicinity of use for your reference.
Before using the unit, check if there are any damages on the unit due to
transport conditions. If any damages are found, contact our Minimo dealer.
SAFETY PRECAUTIONS
WARNING
WARNING
(Indicates that incorrect operations presents significant danger of
(Indicates that incorrect operations presents significant danger of
accident resulting in death or serious injury to the user.)
accident resulting in death or serious injury to the user.)
Wear an appropriate eye protection and a respiratory protective equipment
○
when using the handpiece.
Use compressed air with the pressure 4
○
Do not attempt to disassemble and remodel the unit.
○
Do not touch the point tool when vibrating.
○
~
7 kgf / ㎠ (56~99psi)
CAUTION
(Indicates that incorrect operation presents possibility of injury to the
user or damage to the unit.)
○
Never push the point tool hard onto the workpiece.
Excessive force on the tool will cause damage to the tool and also reduce the
cutting power.
Use air filter and/or dryer to eliminate water, water vapor and any other dust
○
particle in compressed air.
Avoid any heavy impact to the unit. Do not drop it!
○
Keep the unit away from children.
○
2019.08.16 IME-EW-01
-1--4-

1. PACKING LIST
◇
WORK MARKER (EW-01) with air hose
◇
Instruction Manual
・・・・・・・・・・・・・・・・・
・・・・・・・・・・・・・・・・・
1 PC.
1 PC.
2. FEATURE
*To engrave on hardened metals with hardness less than 50 by HRC, glass,
plastic, etc.
*The point tool is made of tungsten carbide, and easy to replace.
Fine type and bold type are also available as options.
3. SETTING
1)Make sure that the switch valve is off.
2)Connect the coupler to air compressor while the switch valve is in off
position.
※Caution : Never connect the coupler to an air compressor while the switch
valve is “ON” .
It may cause an unexpected accident.
“OFF”
“ON”
5. MAINTENANCE
5-1. Lubrication
Lubricate with supplying air from the end of hose once a day or more
depending on frequency in use.
5-2. Replacing the point tool
1)Hold the center part of the housing,
and turn the front housing to loosen.
If it is too hard to turn, clamp the
housing softly by a small vise and
try to turn it loose.
*Do not clamp the housing too hard.
The housing may be broken.
2)Pull out the point tool from the front
housing.
Mount the O-ring and the front
spring on the new point tool as in the
right figure
3)Put the new point tool into the front
housing and tighten the front housing
back to the housing.
Loosen
Tighten
Point Tool
Housing
O-Ring
Front Spring
Front Housing
EW-104
EW-114
EW-106
EW-105
4. HOW TO USE
1)Push the switch valve on to start.
2)Hold the handpiece as close to the point as possible and engrave in
condition of handpiece close to vertical position.
3)Push the switch valve off to stop.
*Replace to our genuine parts for right
characteristics and dimensions.
*Prevent from entering foreign substances into the housing
when replacing the tool and/or other parts.
-3--2-
 Loading...