

MINISTRY OF SOUND MOSCA029, MOSCA029/A User Manual
User Guide
MOSCA029/A IC Series CD car
stereo with PLL tuner
02
2

03
3
Contents
IntroductionIntroduction
IntroductionIntroduction
Introduction
..................................................
..................................................
.........................
44
44
4
What is RDSWhat is RDS
What is RDSWhat is RDS
What is RDS
..................................................
..................................................
.........................
55
55
5
Getting startedGetting started
Getting startedGetting started
Getting started
........................................
........................................
....................
77
77
7
InstallationInstallation
InstallationInstallation
Installation
......................................................
......................................................
...........................
88
88
8
Quick viewQuick view
Quick viewQuick view
Quick view
......................................................
......................................................
...........................
1212
1212
12
Using the radioUsing the radio
Using the radioUsing the radio
Using the radio
......................................
......................................
...................
1414
1414
14
RDS optionsRDS options
RDS optionsRDS options
RDS options
..................................................
..................................................
.........................
1818
1818
18
Using RDSUsing RDS
Using RDSUsing RDS
Using RDS
........................................................
........................................................
............................
2121
2121
21
Using the CD playerUsing the CD player
Using the CD playerUsing the CD player
Using the CD player
......................
......................
...........
2525
2525
25
Care and maintenanceCare and maintenance
Care and maintenanceCare and maintenance
Care and maintenance
..........
..........
.....
2727
2727
27
Help and adviceHelp and advice
Help and adviceHelp and advice
Help and advice
..................................
..................................
.................
2828
2828
28
Safety instructionsSafety instructions
Safety instructionsSafety instructions
Safety instructions
............................
............................
..............
3030
3030
30
GuaranteeGuarantee
GuaranteeGuarantee
Guarantee
......................................................
......................................................
...........................
3131
3131
31
TT
TT
T
echnical specificationechnical specification
echnical specificationechnical specification
echnical specification
..............
..............
.......
3232
3232
32

04
4
Thank you for buying the MOSCA029/A stereo
radio with CD player. This unit is designed to
give you many years of trouble-free service.
You may already be familiar with using a
similar product but do please take time to read
these instructions. They are designed to
familiarise you with the many features of this
unit and to ensure you get the very best from
your purchase.
Safety is importantSafety is important
Safety is importantSafety is important
Safety is important
Your safety and the safety of others is
important. Please therefore, ensure you read
the Safety Instructions
beforebefore
beforebefore
before you operate this
unit.
Keep this information in a safe place forKeep this information in a safe place for
Keep this information in a safe place forKeep this information in a safe place for
Keep this information in a safe place for
future reference.future reference.
future reference.future reference.
future reference.
Introduction

05
5
What is RDS ?
Radio Data SystemRadio Data System
Radio Data SystemRadio Data System
Radio Data System
RDS (Radio Data System) allows FM radio
stations to transmit additional information
alongside their regular programmes. This
information may include the station name and
the type of program being broadcast, i.e. rock,
classic, news.
Enhanced Other Networks (EON)Enhanced Other Networks (EON)
Enhanced Other Networks (EON)Enhanced Other Networks (EON)
Enhanced Other Networks (EON)
Another feature of RDS is called EON
(Enhanced Other Networks) which offers local
stations the ability to ‘break into’ a national
station’s broadcast for the duration of a traffic
announcement .
The EON feature will work even if a CD is being
played.
PI (Program Identification Code)PI (Program Identification Code)
PI (Program Identification Code)PI (Program Identification Code)
PI (Program Identification Code)
Code for identifying programs.
AF (Alternative Frequency)AF (Alternative Frequency)
AF (Alternative Frequency)AF (Alternative Frequency)
AF (Alternative Frequency)
The EON data sent to the unit will contain
information about other frequencies the station
can be heard on. This radio will retune to a
different frequency when the current signal
becomes weak, assuming an alternative
frequency is available for the station. For this to
happen, the AF function must be switched on.
Sometimes the radio will keep trying to find a
stronger signal which can become distracting.
This can be overcome by switching the AF
function off.
In theory, if travelling around the country, it
should be possible to listen to all the national
stations without having to manually retune.
(CT) Clock T(CT) Clock T
(CT) Clock T(CT) Clock T
(CT) Clock T
imeime
imeime
ime
Some stations broadcast the time within the
RDS signal. The time signal is automatically
adjusted for BST.

06
6
(T(T
(T(T
(T
A) TA) T
A) TA) T
A) T
rafraf
rafraf
raf
fic Announcementfic Announcement
fic Announcementfic Announcement
fic Announcement
The T raffic Announcement (TA) feature allows
interruption of a CD when there is a travel
report from the selected radio station.
Programme TProgramme T
Programme TProgramme T
Programme T
ype (PTY)ype (PTY)
ype (PTY)ype (PTY)
ype (PTY)
A function that enables the car radio to select
radio stations by their programming type (i.e.
news, rock, pop, sport, etc.).
Regional Links (REG On/OfRegional Links (REG On/Of
Regional Links (REG On/OfRegional Links (REG On/Of
Regional Links (REG On/Of
f)f)
f)f)
f)
Many local radio stations have limited
coverage and may be linked together
according to their region. If the signal from one
local radio station becomes weak, the RDS
radio can switch to another local station in the
same region. If you wish the radio to stay
tuned to the same station regardless of the
signal strength or quality, then you should turn
the Regional facility off.

07
7
Remove your Ministry of Sound MOSCA029/A
carefully from the box. You may wish to store
the packaging for future use.
In the boxIn the box
In the boxIn the box
In the box
Inside this package you should have:
MOSCA029/A stereo car radio with CD
player
DIN front mounting fixing accessories
2 x release keys
User guide
If any items are missing call the Helpline on
0870 010 5676.
WEB: www.ministryofsoundaudio.co.uk
Getting started
FeaturesFeatures
FeaturesFeatures
Features
3 band radio: FM, MW, L W with RDS/EON
CD Player - plays CD/CD-R/CD-RW.
Clock.
4 x 40W outputs.
Auto memory store.
30 preset channels.
Auto tuning (seek).
Auto FM stereo control.
Display.
Display illumination control (dimmer).
Electronic volume, bass, treble, fader and
balance controls.
Precision PLL tuning circuitry.
Loudness control (bass boost).
Pre-amp line out.
The unit can memorise stations in order of
their strength.
Detachable panel.
08
8
RecommendationsRecommendations
RecommendationsRecommendations
Recommendations
Choose the mounting location where the
unit will not interfere with the normal
driving function of the driver.
Before finally installing the unit, connect
the wiring temporarily and make sure it is
all connected up properly and the unit
works properly.
Use only the parts included with the unit.
The use of unauthorized parts can cause
malfunctions.
Consult with your dealer if installation
requires the drilling of holes or other
modifications to the vehicle.
If the installation angle exceeds 30
degrees from the horizontal, the unit may
not give its optimum performance.
Avoid installing the unit where it would be
subject to high temperature, such as from
direct sunlight, or from hot air, from the
heater, or where it would be subject to
dust, dirt or excessive vibration.
Installation
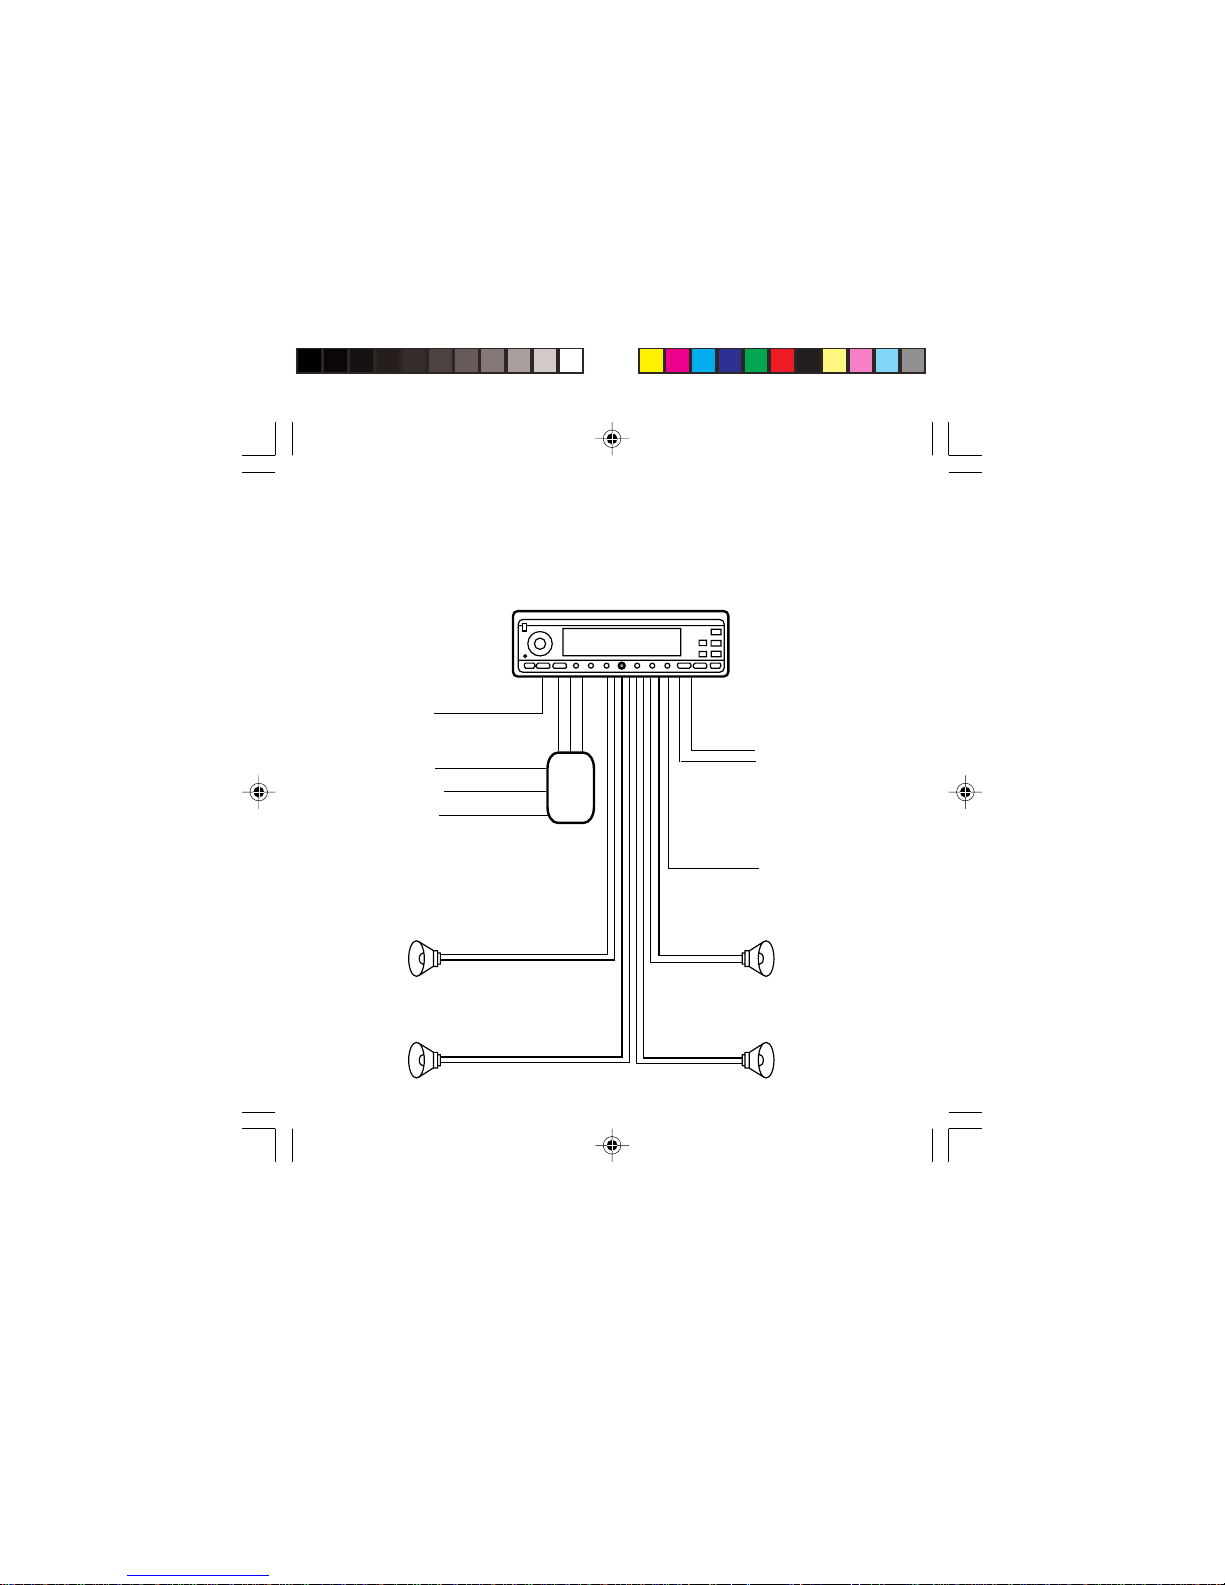
Connection diagramConnection diagram
Connection diagramConnection diagram
Connection diagram
The diagram showing the connection of the
unit to the car is shown on the next page.
Most modern cars are fitted with an ISO
connector that is ready-wired to all of these
items fitted in the car, (except the aerial input
lead). The unit is fitted with an ISO connector
that will join with the ISO connector in the car.
Some older cars will not have an ISO
connector. In these cases you will need to
obtain a “patch cable assembly” that connects
to the connector that is fitted. The other end of
this cable has an ISO connector to mate with
that from the unit. This patch cable should be
obtained for the model of car to be fitted with
the unit and should be available from good car
accessory shops.
This unit is suitable for use in vehicles which have a negative earth system.
e.g.: the negative terminal of the battery is connected to the chassis.
09
9
L and R
line outputs
(to amplifier)
Choke
and
fuses
Screened
Red (power)
Red
Yellow (memory)
Black (earth)
White
White
Green
White & Black
Green & Black
Green
Gray
Gray & Black
Violet & Black
Violet
MOSCA029/A
Ignition
Car aerial
Battery +ve
Battery -ve
Front L
speaker
Rear L
speaker
Front R
speaker
Subwoofer
Rear R
speaker
AUDIO
ADJUST
TUNE/SKIP/SEARCH
SEL
MUTE
M BASS
1
PAU2 SCN3 RPT
ILL/PWR
4
SHF
56
PTY
TA
REG
AFAMS
DISPMODE
EJECT
V
V
BND
Connection diagramConnection diagram
Connection diagramConnection diagram
Connection diagram
010
10
Fitting the unitFitting the unit
Fitting the unitFitting the unit
Fitting the unit
Insert the holder into the aperture
provided in the dashboard where the unit
is to be fitted.
Bend a sufficient number of the tabs in the
holder (sleeve) towards the outer so that
they hold the sleeve securely to the
dashboard.
Ensure you use the strap to support the
back of the unit.
Bend the strap (by hand) to the desired
angle to reach the surrounding structure.
Fit to the car structure using the fixings
provided.
Slide the unit into the holder and secure
the strap to the stud on the rear of the unit
using the plain washer and nut supplied.
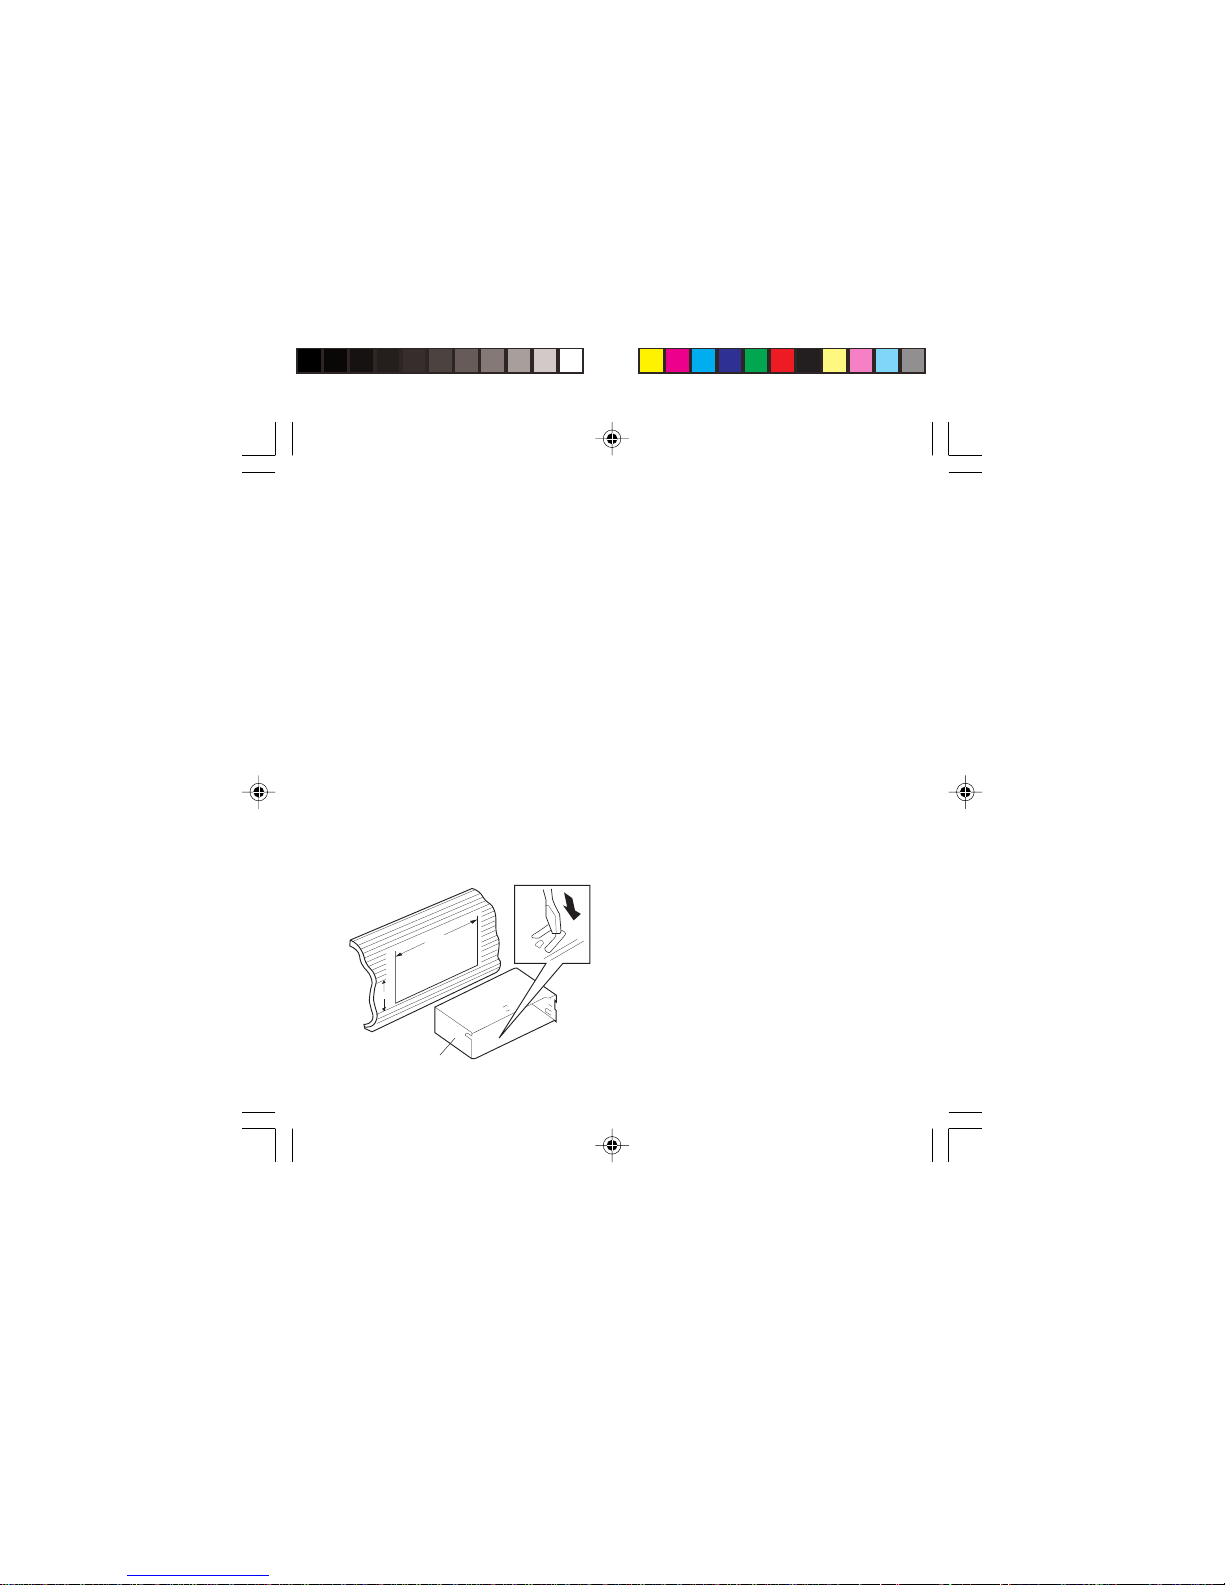
MountingMounting
MountingMounting
Mounting
Ensure that you remove the transit screws
before attempting to install the unit. These are
on the top of the unit and screw through
labels.
DIN front-mountingDIN front-mounting
DIN front-mountingDIN front-mounting
DIN front-mounting
This unit can be properly installed using the
DIN front-mounting method. Do not connect
the unit to any wiring at this stage.
The fixing hardware supplied is for the front
mounting method. This method also uses a
stabilising strap that fits on a threaded stud
fitted to the rear face of the unit for connection
to a suitable structure behind the dashboard.
182
53
Holder
Bend tabs
Dashboard
aperature

011
11
Release
frame key
Release
unit key
Frame
Dashboard
Removing the unitRemoving the unit
Removing the unitRemoving the unit
Removing the unit
Insert the release key into the groove on
the right side (or left side) of the facia
frame and then pull it out with it slightly
tilted up, to extract the frame with it .
After releasing the frame, insert the levers
supplied into the grooves on each side of
the unit until they click. Pull the levers out
with the unit to remove it from the holder
in the dashboard.
 Loading...