

Page 1
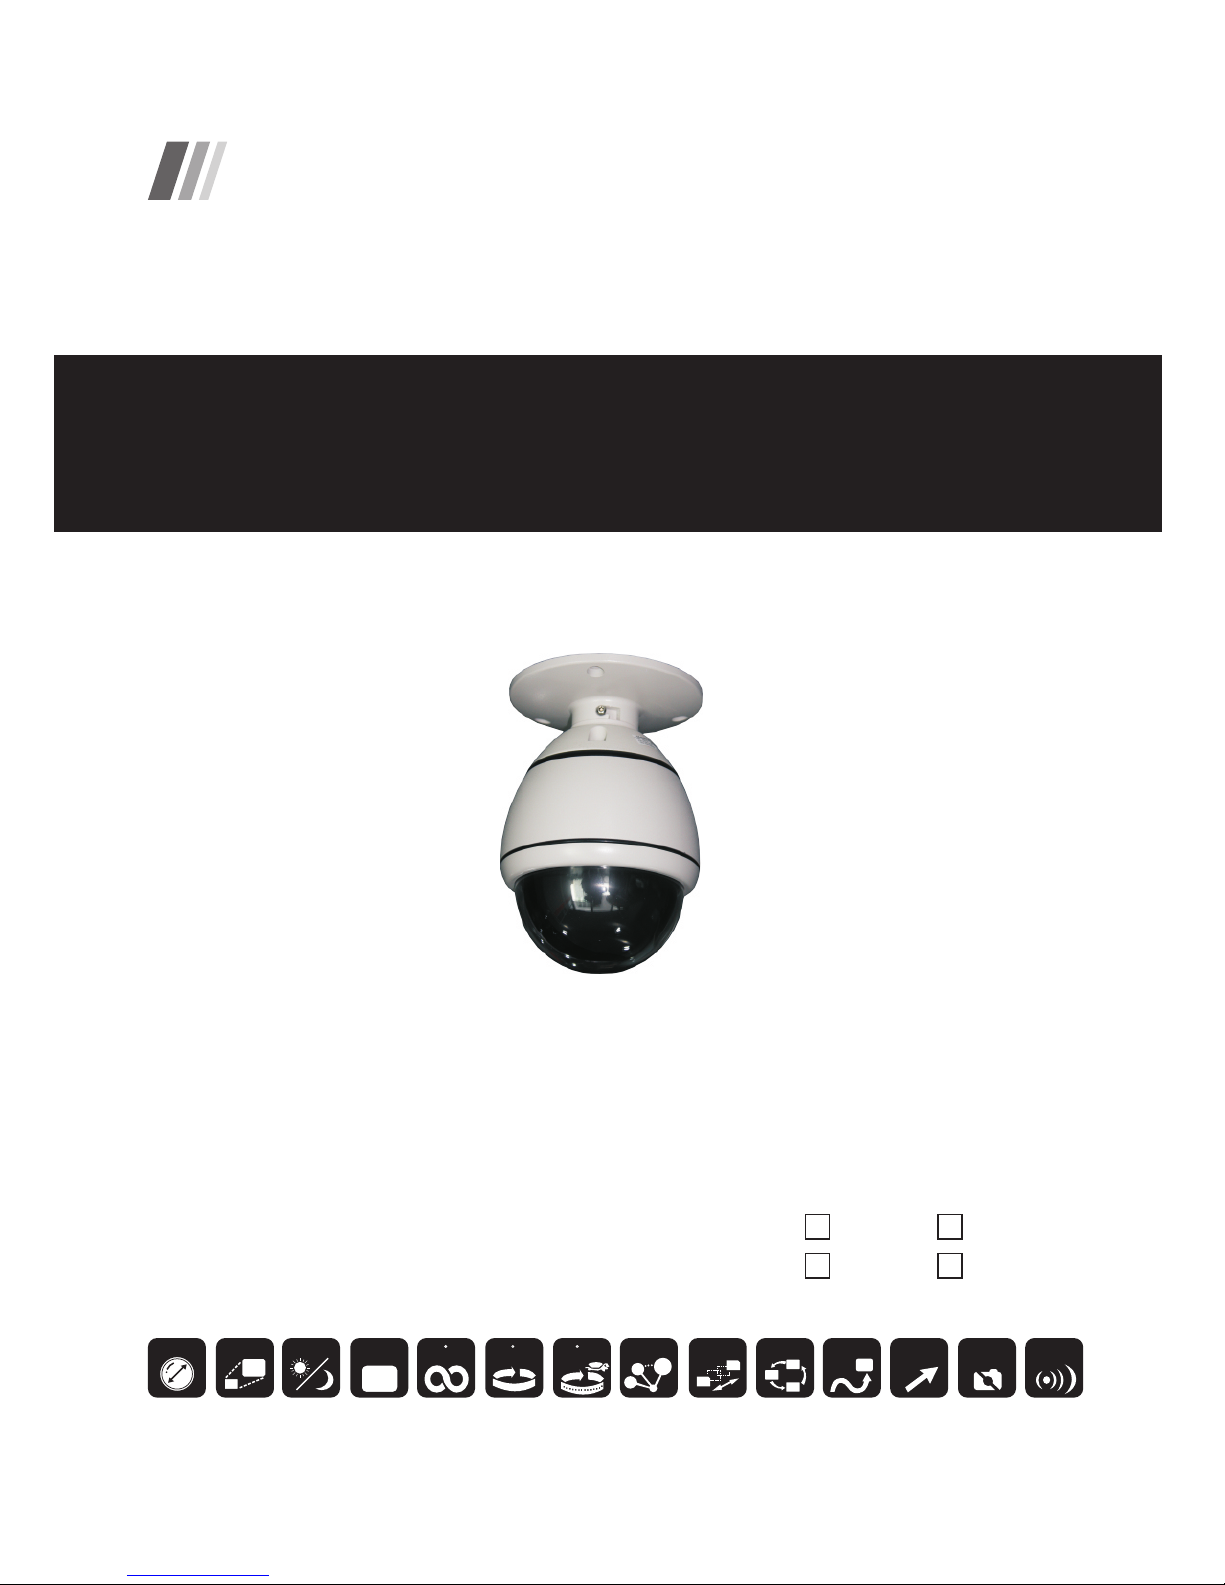
INSTRUCTION MANUAL
PAL DC12V
NTSC AC24V
Mini Speed Dome Camera
DOM E 4.5"
100X ZOOM
DAY & NIG HI
★
ON SCREEN
DISOLAY
123
CONTINUOUS
360 360 /sec
SPEED
0.05 /sec
LOW SPEED
PRESET 128
1
2
128
SWING 8
GROUP 8
1
2
3
PAITERN 4
VECTOR
MOTION
PROVACY
ZONE
AL ARM 4IN
Page 2
CAUTl0N
CAUTl0N:
TO REDUCE THE RISK OF ELECTRICAL SHOCK,DO NOT OPEN COVERS.
N0 USER SERVICEABLE PARTS INSlDE.
REFER SERVICING TO QUALIFIE D SERVICE PERSONAL.
WARNING:
TO PREVENT THE RISK OF FIRE OR ELECTRIC SHOCK HAZARD DO NOT EXPOSE
THIS CAMERATO RAIN OR MOISTURE.
This lightning flash with arrowhead symbol is intended to alert the user to the
presence of un-insulated "dangerous voltage" within the product's enclosure that
may be of sufficient magnitude to constitute a risk of electric shock to persons.
This exclamatlon po int sym bol is inte nded to a lert th e user to t he pres ence of
impor tant operating and maintenance (servicing) instructions in the 1iterature
accompanying the appliance.
RISK OF ELECTRIC
SHOCK DO NOT OPEN
1
Spee d Dome Cam era Instruction Manual
Page 3
NOTICE
Read Instructions
Read all of the safety and operating instructions before using the product.
Retain Instructions
Save these instructions for future reference.
Attachments/A ccessori es
Do not use attachments or accessories unless recommended by the appliance manufacturer as they may
cause hazards,damage product and void warranty.
Water and M oisture
Do not use this product near water or moisture.
Installation
Do not pl ace or moun t this prod uct in or o n an unstab le or imp ro perly sup ported lo cation. Improper ly
installed product may fall,causing serious injury to a child or adult,and damage to the product. Use only
with a mounting device recommended by the manu facturer,or sold with the produc t. To insure proper
mounting,follow the manufacturer’s instructions and use only mounting accessories recommended by
manufacturer.
Power source
This product should be operated only from the type of power source indicated on the marking label.
Important Safeguard
1.
2.
3.
4.
5.
Precautions
Operating
Handling
Installation and Storage
Before using, make sure power supply and others are prop erly connected.
While operating,if an y ab normal condition or malfunct ion is observed, stop using the camera
imme diat ely and then contact your local dealer.
Do not di sass emble or tam per with parts inside the ca mera.
Do not dr op or subject the came ra to shock and vibration as this can dama ge camera.
Care must be taken when y ou clean the cl ear dom e cover. Especially,scratch and dust will ruin your
qual ity of ca mera.
Do not install the camera in areas of extreme tempe rat ure, which exc eed the allowable ran ge.
Avoi d install ing in humid or dusty places .
Avoi d installing in places wh ere radiation is present.
Avoi d installing in places wh ere there are strong magn etic fiel ds and electric signals.
Avoi d installing in places wh ere the came ra would be subject to stron g vibr ations.
Neve r expo se the ca mera to rain and water.
6.
2
Spee d Dome Cam era Instruction Manual
Page 4

CONTENTS
1
4
6
Introduction
Features
Pro duct&Ac cessories
2
7
9
Insta llation
DIP Switch Setup
Cabli ng
3
11
11
12
12
13
13
14
15
16
17
Opera tion
Checking Before Operation
Preset and Pattern Function Pre-Check
Start OSD Menu
Reserved Preset
Preset
Swing
Pattern
Group
Other Functions
OSD Display of Main Screen
5
Specifications
Dimension
32
33
4
18
18
19
20
21
23
25
27
28
29
31
H o w t o u s e 0SD M en u
General Rules of Menu Operation
Main Menu
Display Menu for Main Screen
Privacy Zone Mask Setup
Camera Module Setup
Motio n Setup
Preset Setup
Swing Setup
Pattern Setup
Group Setup
System Initialize
3
Spee d Dome Cam era Instruction Manual
Page 5
DAY & N IGHI
★
100X ZOOM
CONTINUOUS
360 360 /sec
SPEED
0.05 /sec
LOW SPEED
VECTOR
MOTION
INTRODUCTION
Features
Camera Sp eci fications
Powerful Pan/Tilt Functions
Pres et,Patt ern,Swing ,Group,Pr ivacy Mas k and More...
PTZ(Pan/Tilt/Zoom)Control
CCD Sensor :1/4"Interline Transfer CCD
Zoom Magnification :×10 Optical Zoom,×10 Digital Zoom(Max×100 Zoom)
Day & Night Function
Various Focus Mode : Auto-Focus / Manual Focus / Semi-Auto Focus.
Independent&Simultaneous Camera Characteristic Setup in Preset operation
Max. 360 /sec high speed Pan/Tilt Motion
Using Vector Drive Technology, Pan/Tilt motions are accomphshed in a shortest path. As a resuIt,
time to target view is reduced dramatically and the video on the monitor is very natural to watch.
For jog operation using a controller, since ultra slow speed 0.05 /sec can be reached, it is very easy
to locate camera to desired target view. Additionally it is easy to move camera to a desired position
with zoom-proportional pan/tilt movement.
MAX. 255 Presets are assignable and characteristics of each preset can be set up independently,
such asWhite Balance,Auto Exposure,Label and so on.
Max. 8 set of Swing action can be stored. This enables to move camera repetitively between two
preset positions with designated speed.
Max .4 of Patterns can be re corded and played back.This enables to move camera to follow any
trajectory operated by joystick as closely as possible.
Max- 8 set of Group action can be stored. This enables to move camera repetitively with
combination of Preset or Pattern or Swing. A Group is composed of max. 20 entities of
Preset/Pattern/Swings.
Privacy Masks are assignable, not to intrude on other's privacy. (4 Privacy Zones)
With RS-485 communication,max. 255 of cameras can be controlled at the same time.
Pelco-D or Pelco-P protocol can be selected as a control protocol in the current version of firmware.
1
4
Spee d Dome Cam era Instruction Manual
Page 6
AL ARM 41N
INTRODUCTION
OSD(On Screen Display)Menu
I/O Functions
Reserved Presets for Special Purpose
OSD menu is provided to display the status of camera and to configuie the functions interactively.
The information such as Camera ID, Pan/Tilt Angle,Alarm Input and Preset can be displayed on
screen.
To reject external electric noise and shock perfectly, alarm sensor Input is decoupled with photo
coupler.
The signal range of sensor input is from DC 11.5 to 14.0 volts to adopt various applications.
If an external sensor is activated,camera can be set to move to the corresponding Preset position.
Most camera characteristics can be set up easily and directly with reserved preset,not entering
into OSD menu. For more information, refer to“Re served Preset”in this manual.
1
5
Spee d Dome Cam era Instruction Manual
Page 7
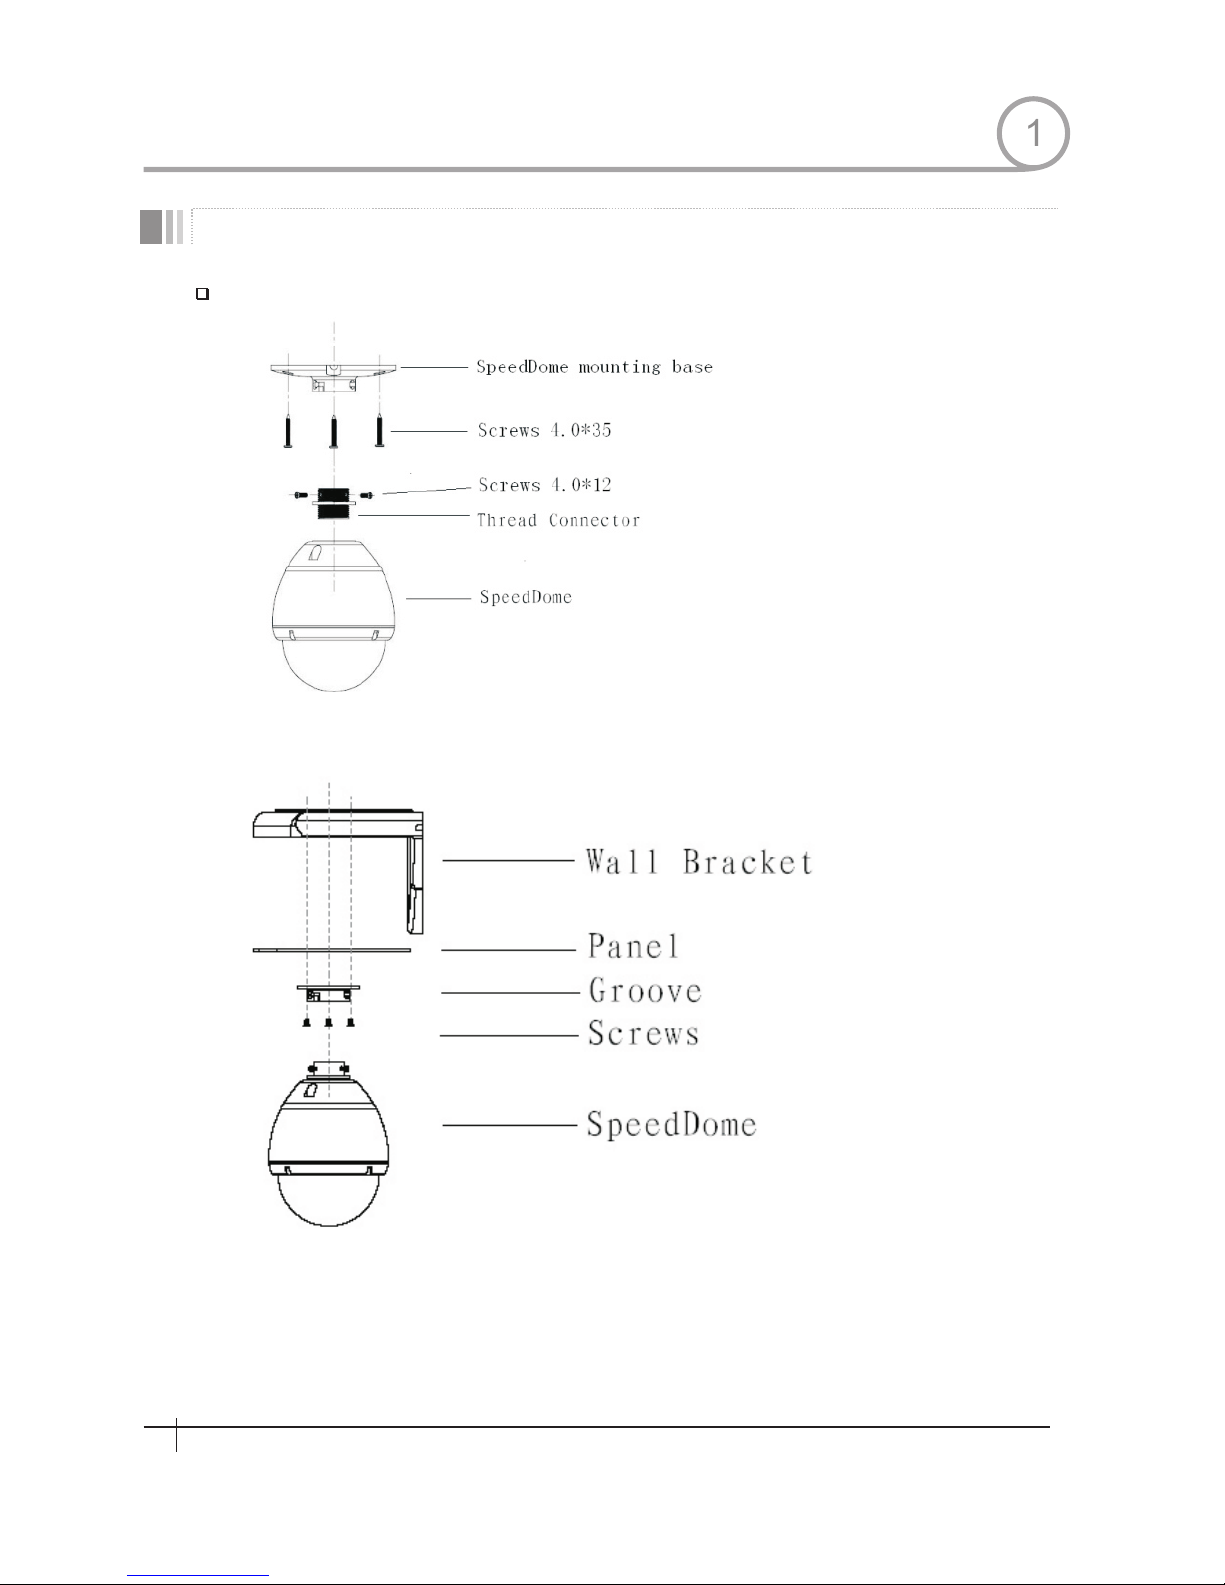
INTRODUCTION
Product & Acc essories
1
6
Spee d Dome Cam era Instruction Manual
Product & Accessories
Page 8
INSTALLATION
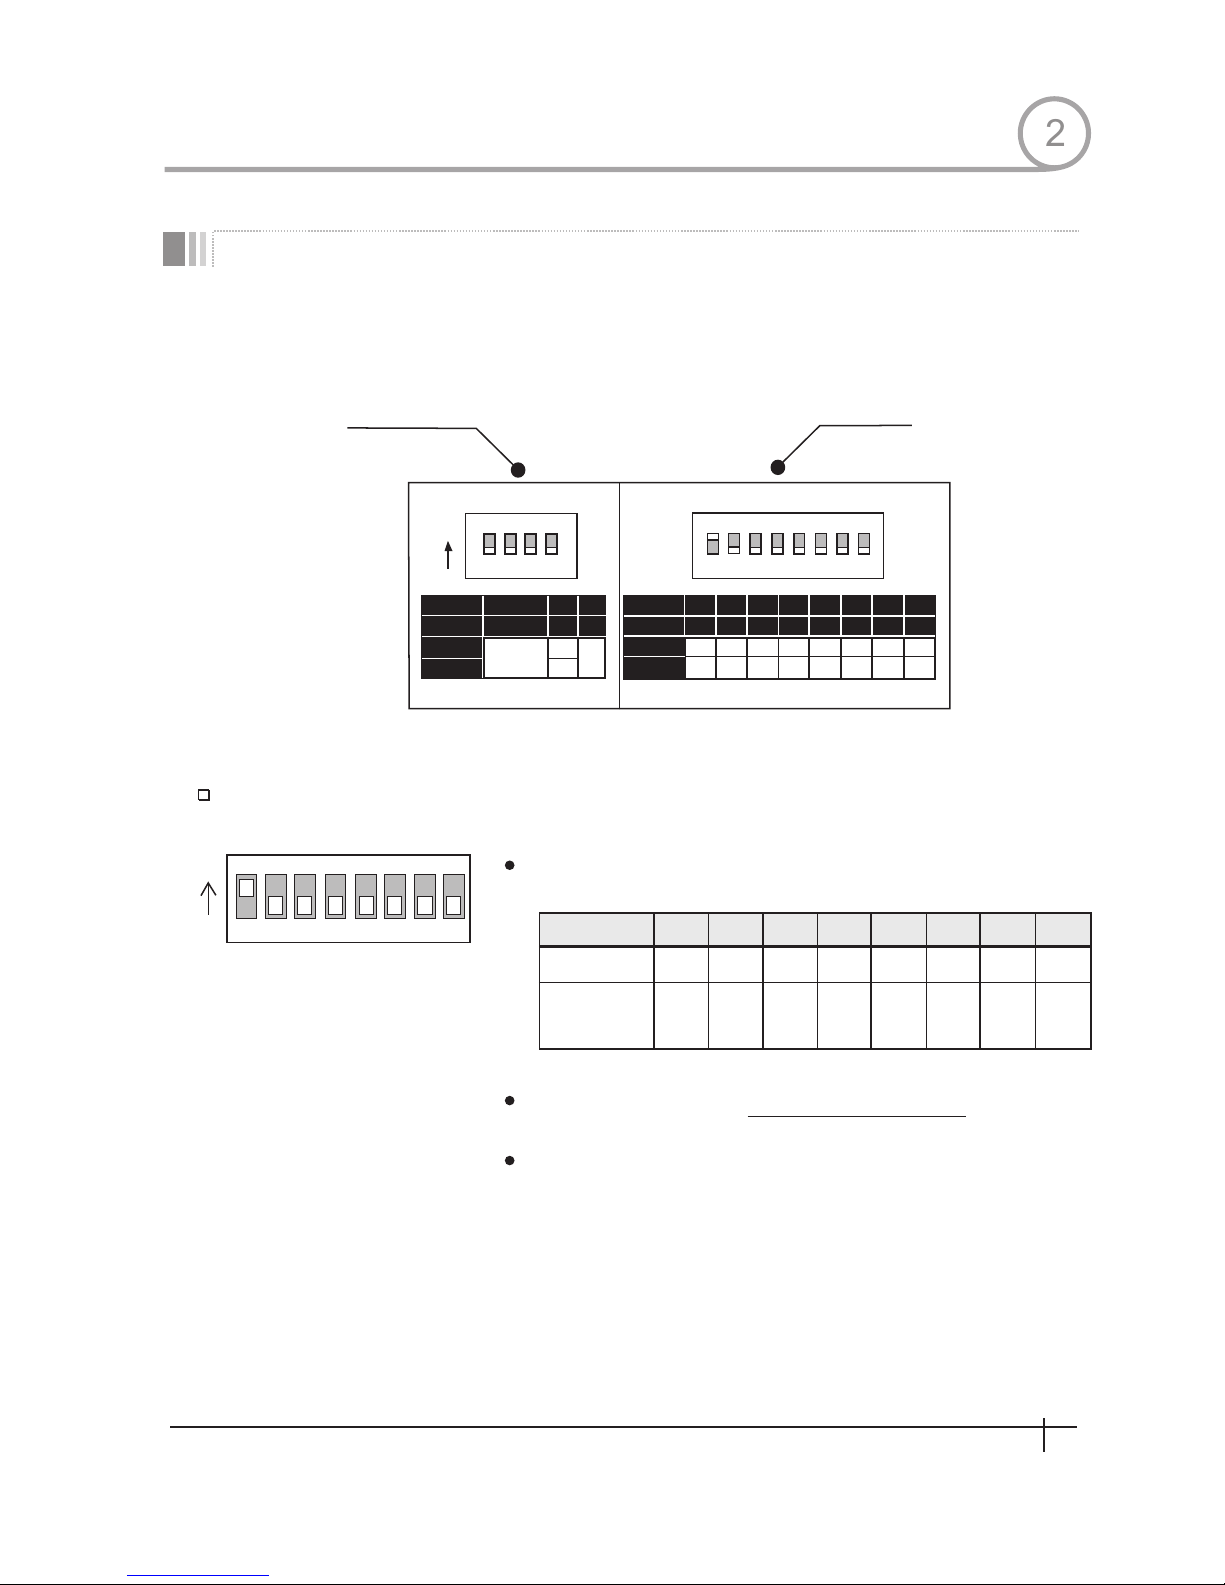
DIP S w i t c h S e t u p
Camera ID Setup
8
128
0ff
0ff
7
64
0ff
0ff
6
32
0ff
0ff
5
16
0ff
0ff
5
8
0ff
0ff
3
4
0ff
0ff
2
2
0ff
0ff
1
1
0ff
0ff
Pin
ID Value
e x) ID=5
ex ID=10
Before you install the calera ,you should set the DIP switcjes to comfigu re the camera ID, communication
protocol.
ID nu mbe r of camer a is set using binary number .The example is
shown bellow.
Th e r ang e o f I D i s 1~2 5 5. Fa c tor y
default of Camera ID is 1.
Do no t u se 0 a s cam e ra ID .
If you want to control a cartain camera,you must match the camera
ID with Cam ID se tting of DVR or Controller.
1 2 3 4 5 6 7 8
ON
ON
1 2 3 4 5 6 7 8
PIN
FUNC.
ON
OFF
A0 A1 A2 A3 A4 A5 A6 A7
102 4
12 8
64
32
16
8
0 0 0 0 0 0
ADDRESS (ID)
Communication
Protocol
Camera ID
2
7
Spee d Dome Cam era Instruction Manual
0
1 2 3 4 5 6 7 8
OPTIONS
ON
1 2 3 4
PIN
FUNC.
ON
OFF
PROTOCOL
N/P
Refer to
the Manual
P A L
NTSC
1 2 3 4
UPGRAD E
Page 9
INSTALLATION
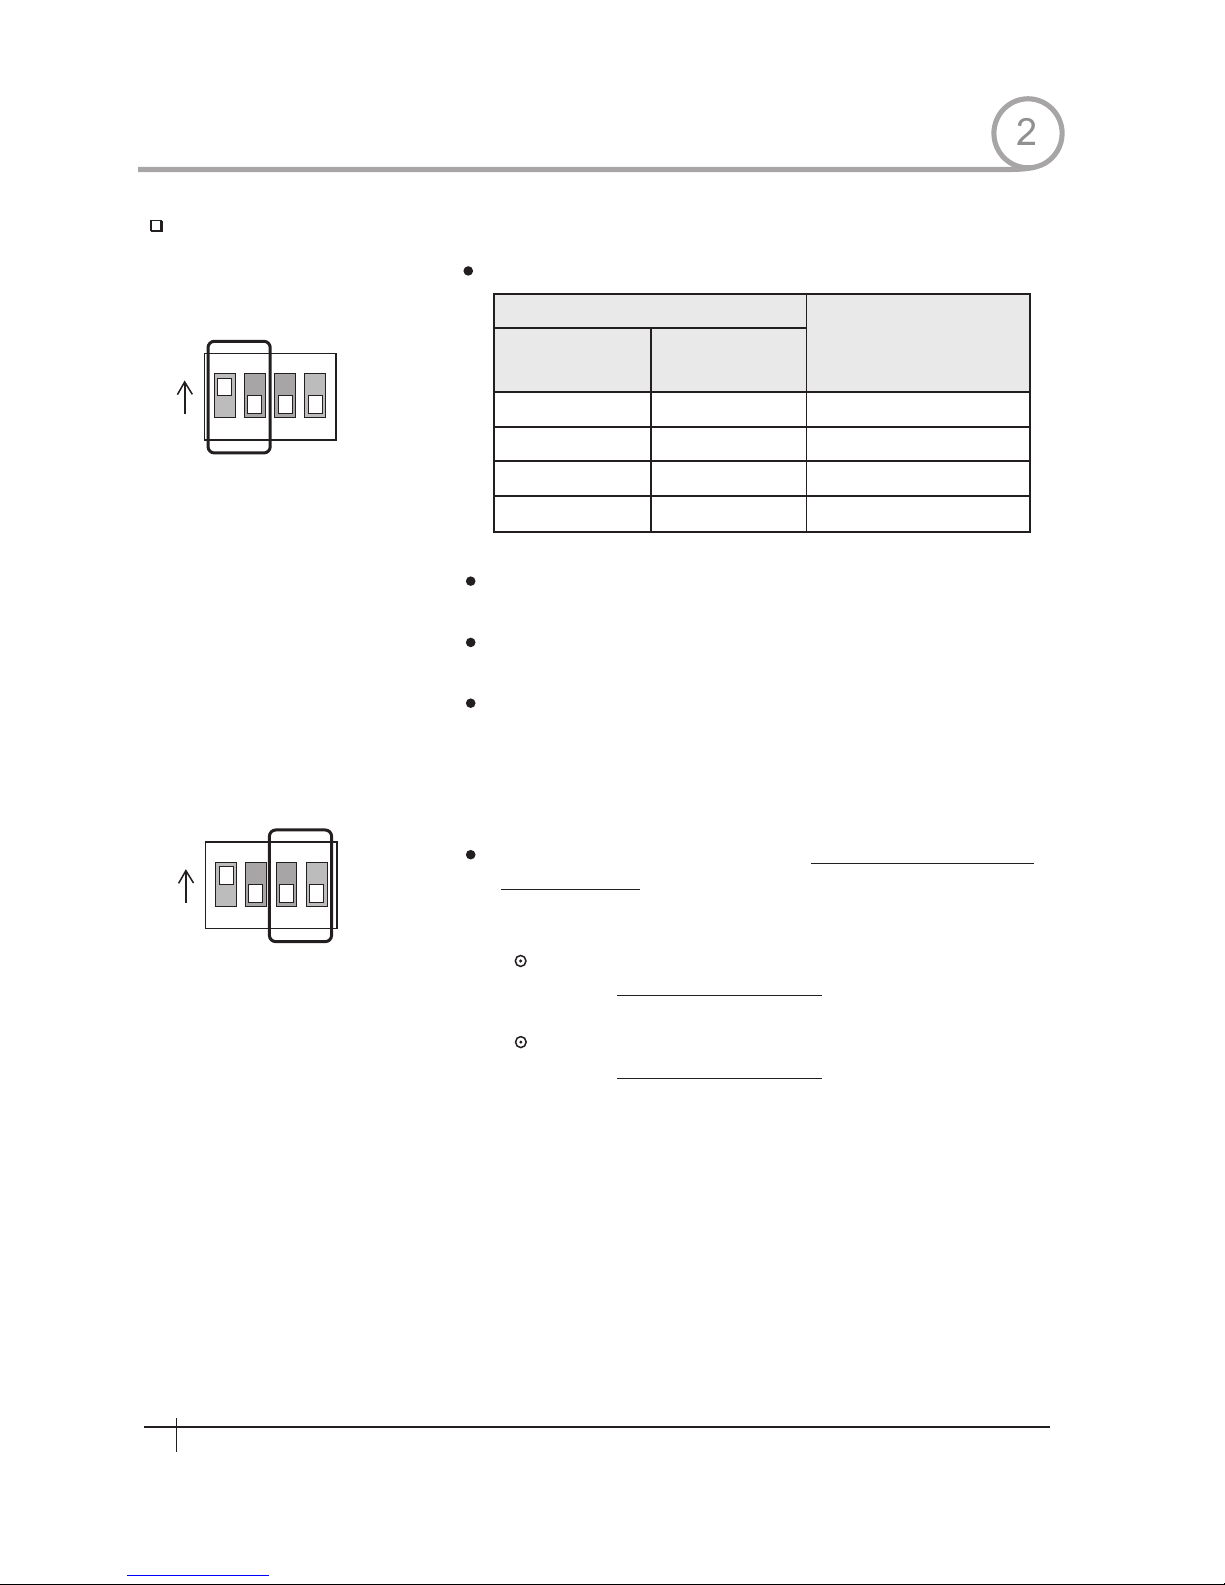
Communication Protocol Setup
Select the appropriate Prptoco l with DIP switch combination.
Switch State
P0 P1
Protocol
(Pin 1)
(Pin 2)
OFF
ON
OFF
ON
OFF
OFF
ON
ON
PELCO-D,2400 bps
PELCO-D,9600 bps
PELCO-P,4800 bps
PELCO-P,9600 bps
If you want to control using DVR or P/T controller, their protocol must
be identical to camera. Otherwise, you can not control the camera.
If you changed camera protocol by changing DIP S/W,the change
will be effective after you reboot the camera.
Factory default of protocol is“Pelco-D, 2400 bps”
2
8
Spee d Dome Cam era Instruction Manual
ON
ON
ON
ON
1 2 3 4
1 2 3 4
Since Pin 3~Pin 4 is only for supplier,
ORIGINAL STATE. If you change one of these, proper operation can
not be achieved.
Pin 3
Pin 4
PAL / NTSC system selection of Camera.
Factory default value is on, the switch for the systems upgrade
DO NOT CHANGE THESE ITS
DO NOT CHANGE THIS PIN.
DO NOT CHANGE THIS PIN.
Page 10
INSTALLATION
Roated Power
DC 12V
In pu t Vo lt ag e Ra ng e
DC 1 1V ~1 8 V
Cu rr en t Co ns um pt io n
0. 8A
Please,check the voltage and current capacity of rated power carefully.Rated power is indicated in the
back of main unit.
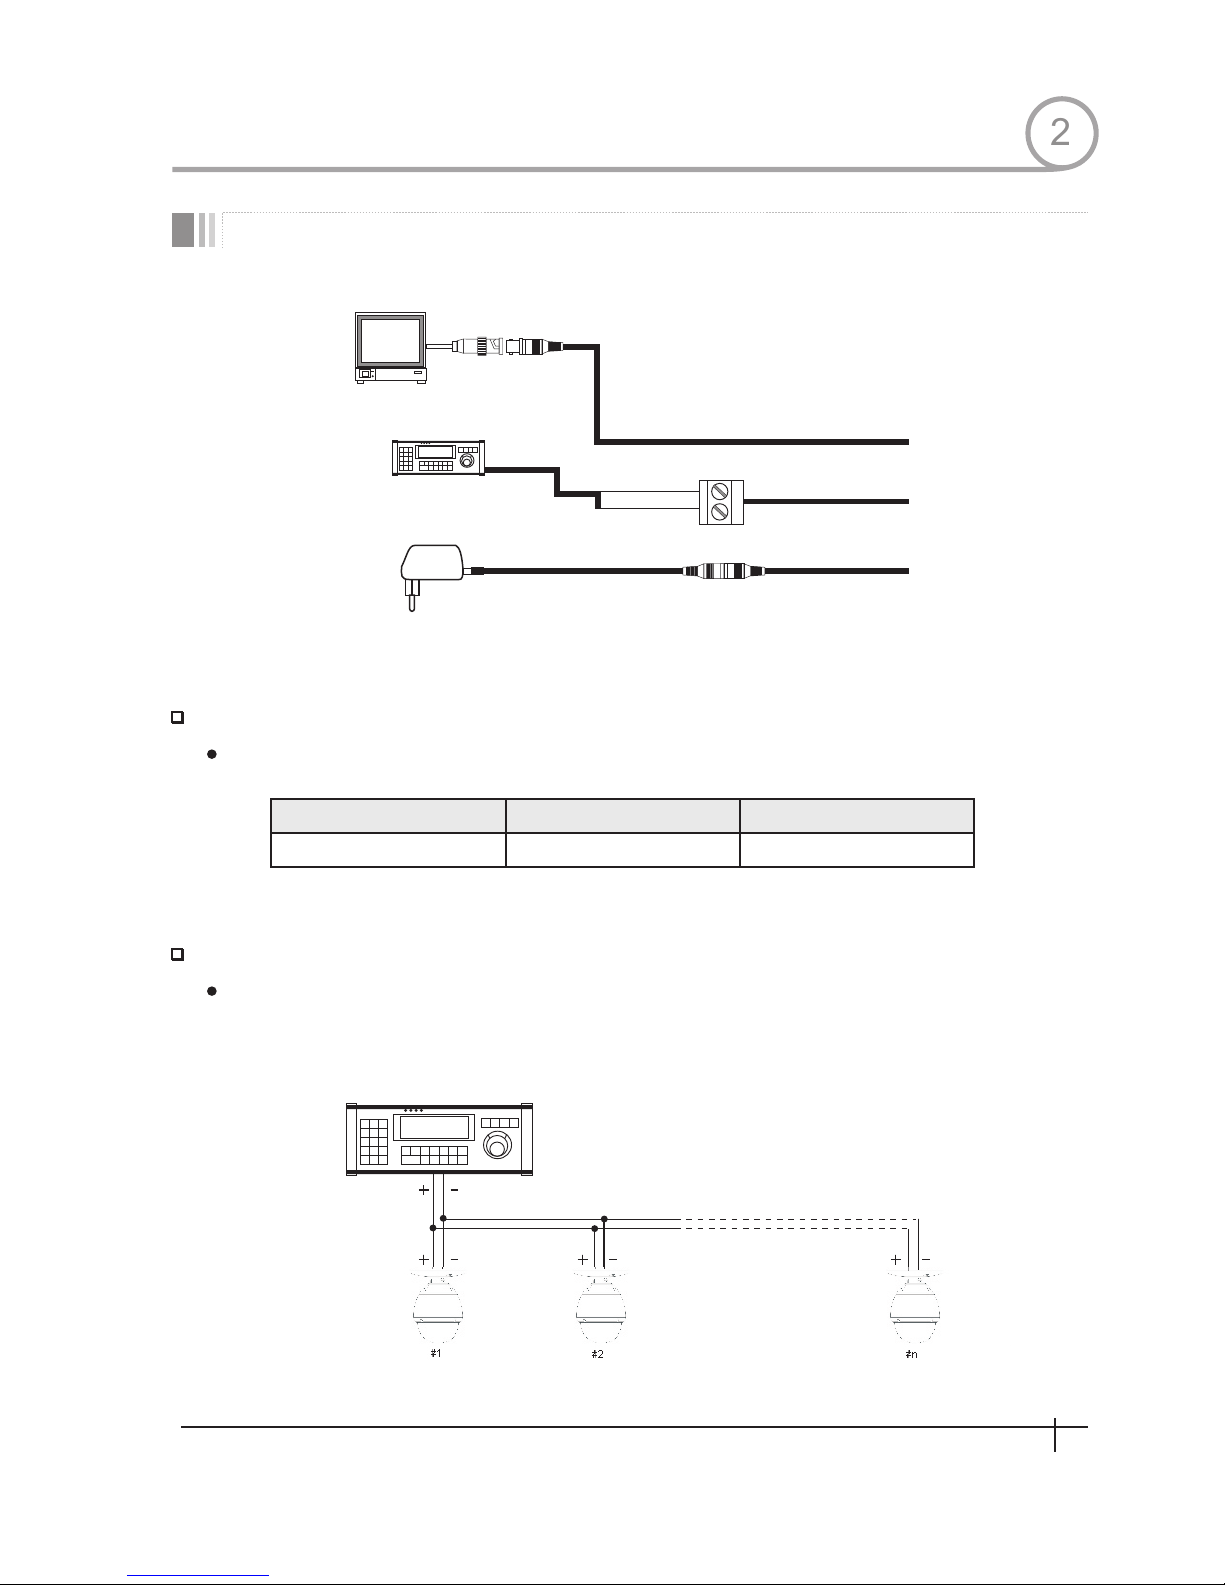
Power Connection
RS-485 Communication
For PTZ control,connect this line to keyboard and DVR. To control multiple cameras at the same time,
RS-485 communication lines of them is cibbected in parallel as shown balow.
2
9
Spee d Dome Cam era Instruction Manual
RS-4
8
5
(
-
)
R
S
-48
5
(+)
Power
Cabl i n g
BNC
Moini tor
Controller/DVR
Cabli ng Te rm ina l Block
Keyboard Co nt roller/ DV R
RS-485
#1 #2 #n
Page 11
INSTALLATION
AL ARM 41N
Video Connection.
Connect with BNC coaxial cable.
2
10
Spee d Dome Cam era Instruction Manual
Page 12
Check points before operation
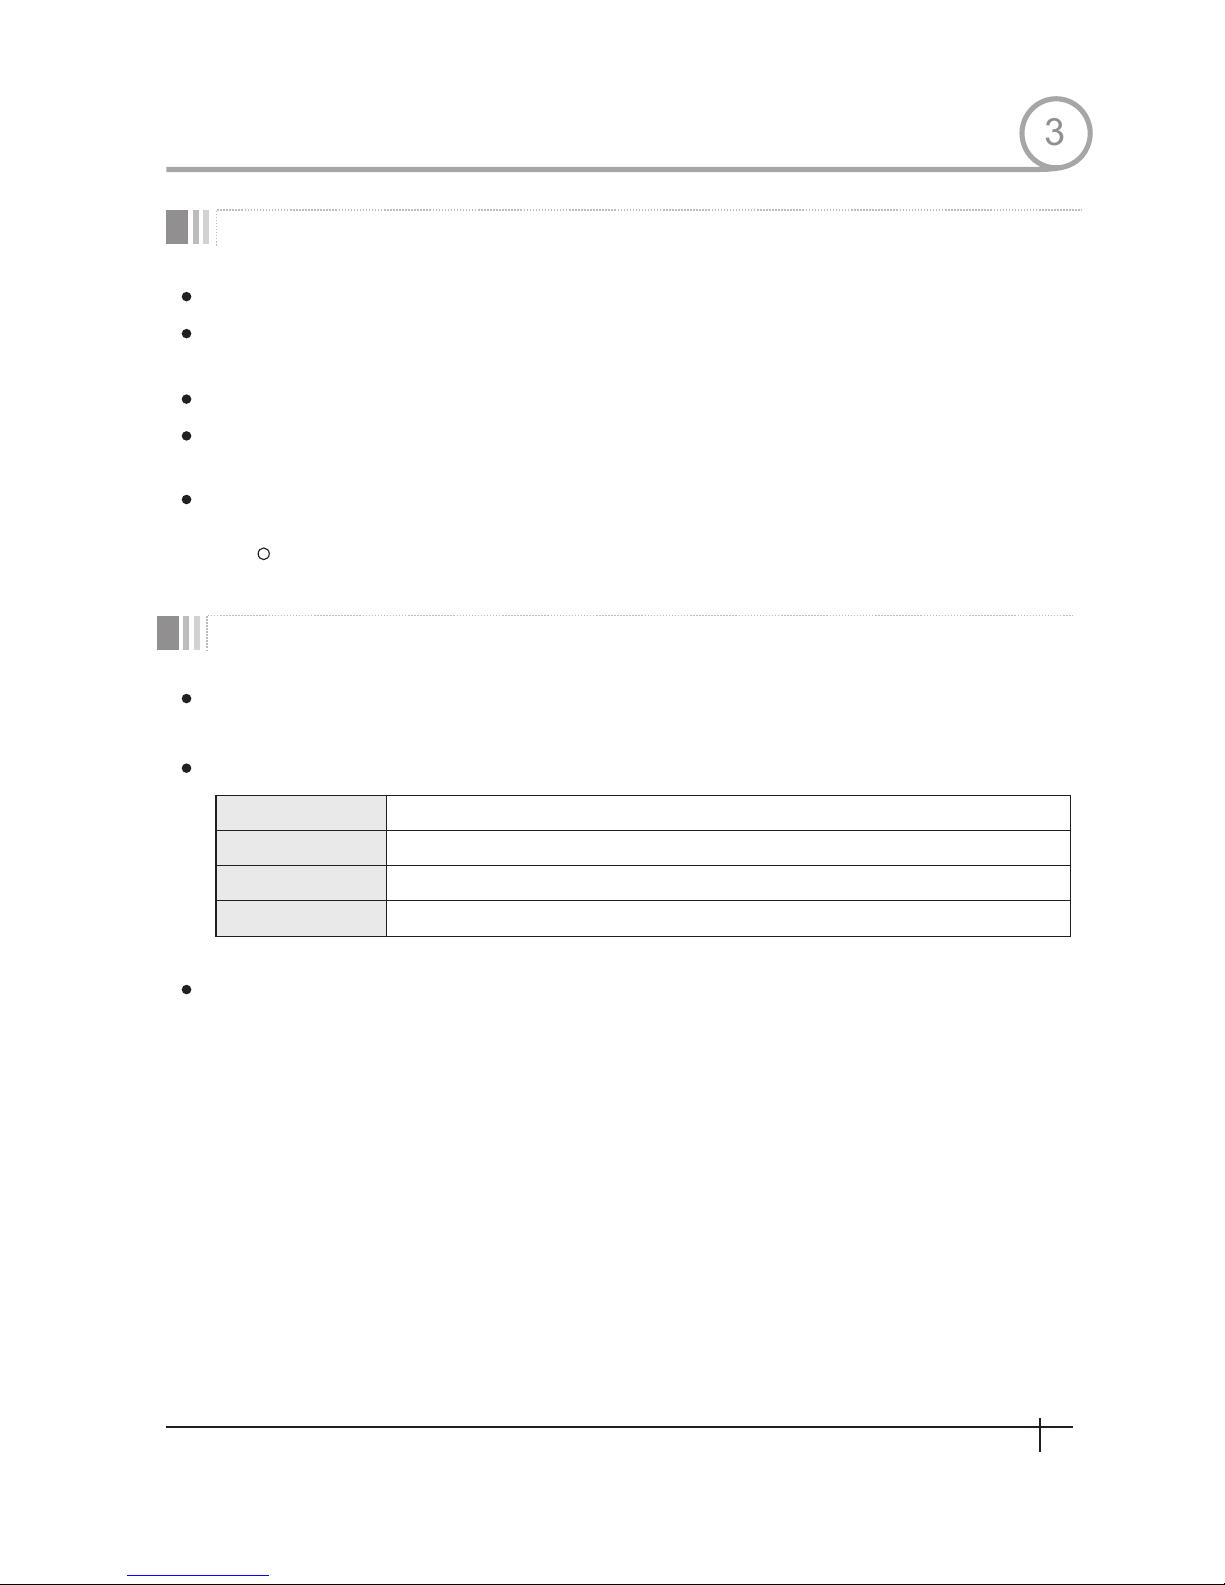
Preset and pattern Function Pre-Check
<Go Preset>
<Set Preset>
<Run Pattern>
<Set Pattern>
Input[Preset Number] and press [Preset] button shortly.
button] Preset[and press ] Preset Number[Input for more than 2 seconds.
P[Inputattern button] Preset[and press ] Number shortly.
button] Preset[and press ] Pattern Number[Input seconds٢ for more than .
OPERATON
Before power is applied, please check the cables carefully.
The camera ID of the controller must be identical to that of the target camera. The camera ID can be checked
by reading DIP switch of the camera.
If your controller supports multi-protocols, the protocol must be changed to match to that of the camera.
If you changed camera protocol by changing DIP switch,the change will be ef fective after you reboot the
camera
Since the operation method can be different for each controller available,refer to the manual for your
controller if camera can not be controlled pr operly. The operation of this manu al is based on the standa rd
Pe l co Controller.
R
Check how to oper at e pr eset and pattern function with controller or DVR in advance to op er at e camera
functlon tulIy when using controller or DVR.
Refer to the following table when using standard Pelco protocol controller.
If controller or DVR has no paflern button or function, use shortcut keys with preset nurnbers. For more
information,refer to“Reserved Preset”in this manual
3
11
Spee d Dome Cam era Instruction Manual
Page 13
ON SCREEN
DISOLAY
123
Starting OSD Menu
Reserved Preset
Function
Enter Menu
Description
Function
OPERATON
Using the OSD menu, Preset, Pattern,Swing,Group and Alarm Input function can be
configured for each application.
<Go Preset>[9 5]
Some Preset numbers are reserved to special functions.
3
12
Spee d Dome Cam era Instruction Manual
<Go Preset>[9 5]
<Go Preset>[1 31 ~1 34]
<Go Preset>[1 41 ~1 48]
<Go Preset>[1 51 ~1 58]
<Go Preset>[1 61 ~1 62]
<Set Preset>[ 16 1~ 162]
<Go Preset>[1 70 ]
<Go Preset>[1 71 ]
<Go Preset>[1 74 ]
<Go Preset>[1 75 ]
<Go Preset>[1 76 ]
<Go Preset>[1 77 ]
<Go Preset>[1 78 ]
<Go Preset>[1 79 ]
<Go Preset>[1 90 ]
<Go Preset>[1 91 ]
<Go Preset>[1 92 ]
<Go Preset>[1 93 ]
<Go Preset>[1 94 ]
:Enters into OS D me nu
:Runs Pattern F un ct ion 1~4
:Runs Swing Fun ct io n 1~8
:Runs Group Fun ct io n 1~8
:Sets Relay Out pu t 1~ 2 to OFF
:Sets Relay Out pu t 1~ 2 to ON
:Sets Camera BL C Mo de t o OFF
:Sets Camera BL C Mo de t o ON
:Sets Camera Fo cu s Mo de to AUTO
:Sets Camera Fo cu s Mo de to Manual
:Sets Camera Fo cu s Mo de to SEMI-AUTO
:Sets Day&Nig ht M od e to AUTO
:Sets Day&Nig ht M od e to NIGHT
:Sets Day&Nig ht M od e to DAY
:Sets OSD Displ ay M od e to AUTO(Except Pr iv ac y Mask)
:Sets OSD Displ ay M od e to OFF(Except Pri va cy M ask)
:Sets OSD Displ ay M od e to ON(Except Priv ac y Ma sk)
:Sets all Priva cy M as k Display to OFF
:Sets all Priva cy M as k Display to ON
Page 14
PRESET 128
1
2
128
SWING 8
Swing
Preset
2
1
C
W
D
ire cti
o
n
C
C
W D
ire c
ti
on
2nd Pre se t
1st Pre se t
Function
Set Preset
Run Preset
Delete Preset
Function
Set Preset
Run Swing
Delete Swing
OPERATON
Max 255 positions can be stored as Preset position.The Preset number can be assigned
from 1 to 255, but 95 is reserved for starting OSD menu.
Camera characteristics(Le.White Balance, Auto Exposure)can be set up independently
for each preset. Label should be blank and”Camera Adjust”should be set to”GLOBAL”as
default. All ch ar ac teristics can be se t up i n OS D menu
<Set Preset>[ 1~ 25 5]
<Go Preset>[1 ~2 55 ]
To delete Preset, use OSD menu.
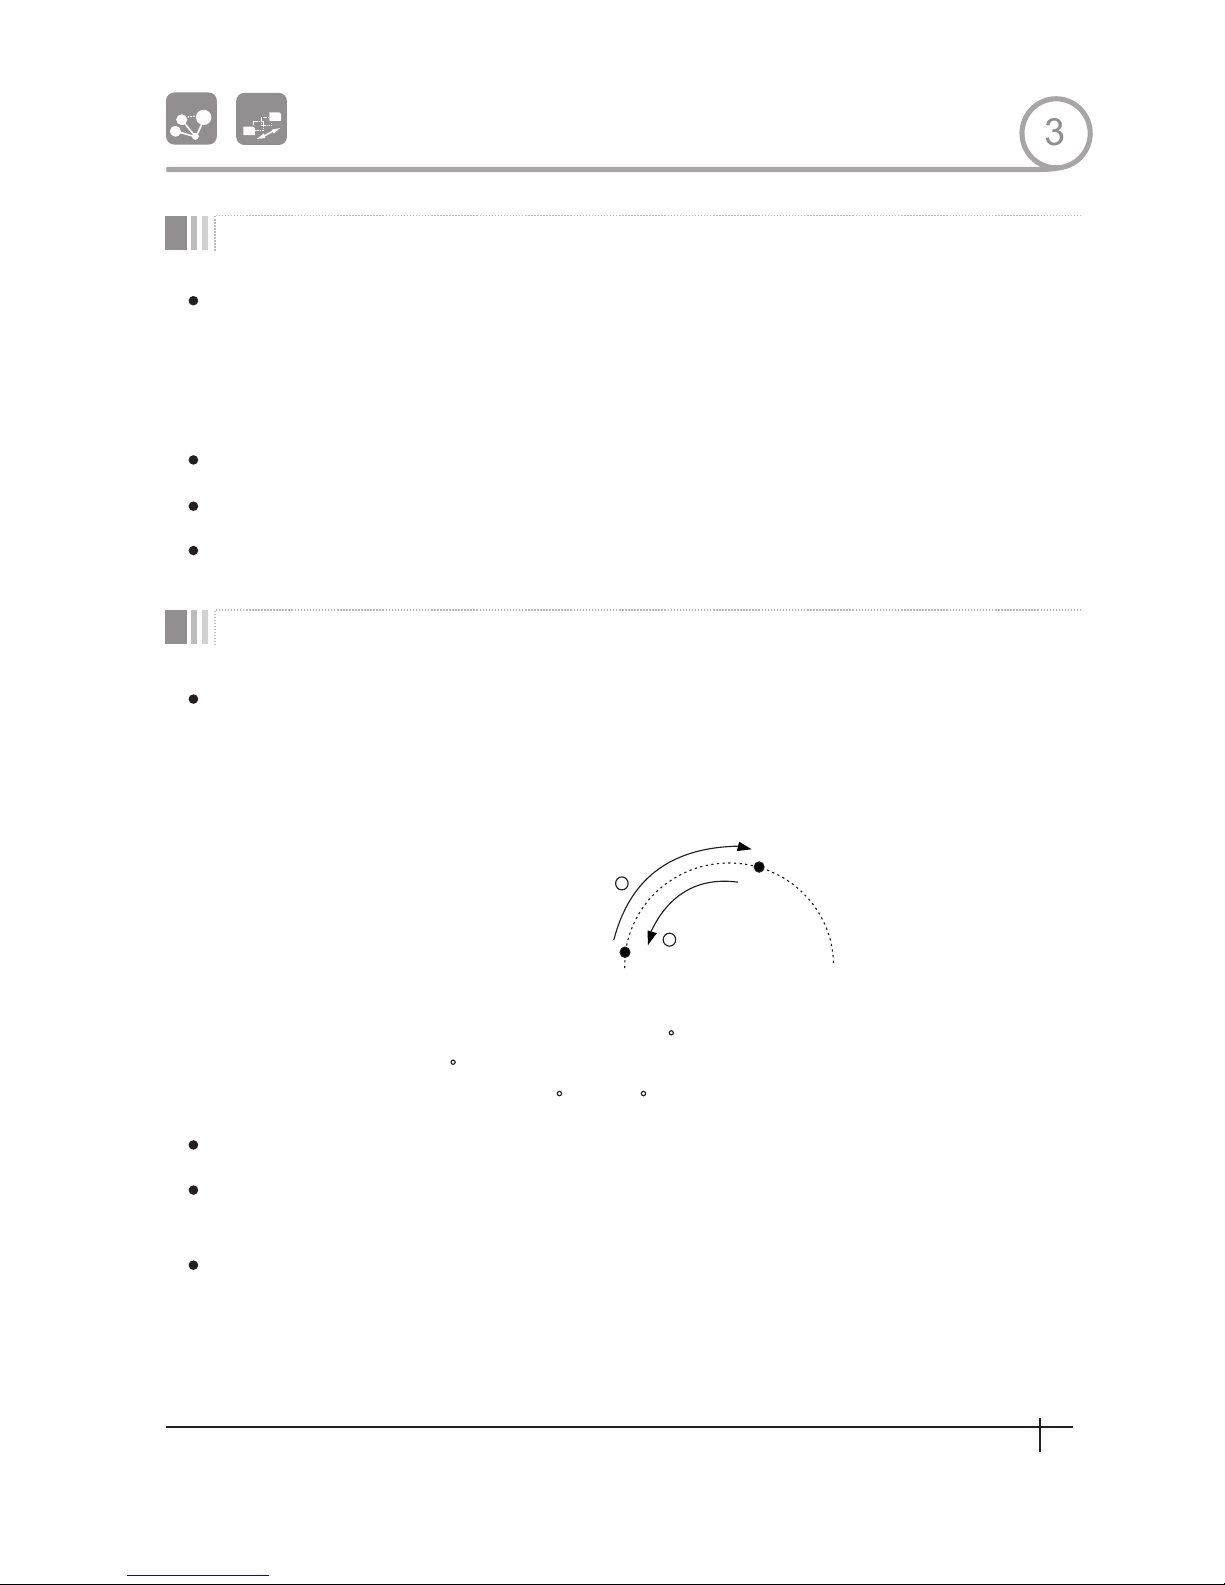
By using Swing function, you can ma ke came ra to move bet ween 2 Pr eset positio ns
repeatedly. When swing function runs, camera moves from the preset assigned as the 1st
point to the pres et a ss igned as the 2nd poin t ln C W( Clockwise)dir ec ti on. Then camera
moves from the preset assigned as the 2nd point to the preset assigned as the 1st point in
CCW (Counterclockwise)direction.
point, camera turns on its axis by 360 in CW(Clockwise)direction and then it turns on its
axisb y 360 i nCCW(Counterclockwise) direction.
Speed can be set up from 1 /sec to 180 /sec.
To set Swing,use OSD menu
Method 1) <Run Pattern>[Swing NO .+lO]
Method 2) <Go Pre se t> [Swing NO.+140]
To delete Swing,use OSD menu.
ex) Run Swing 3:
<Run Pattern>[13]
<Go Pre set>[ 143]
ex) Run Swing 3:
In case that the preset assigned as th e 1st po int is same as the pr ese t assigned as the 2nd
3
13
Spee d Dome Cam era Instruction Manual
Page 15
Pattern
ED IT PA TT ER N 1
[NEAR:SAVE /FAR:DELETE]
0/0/×1/N
Function
Set Pattern
Run Pattern
Delete Pattern
OPERATON
PAITERN 4
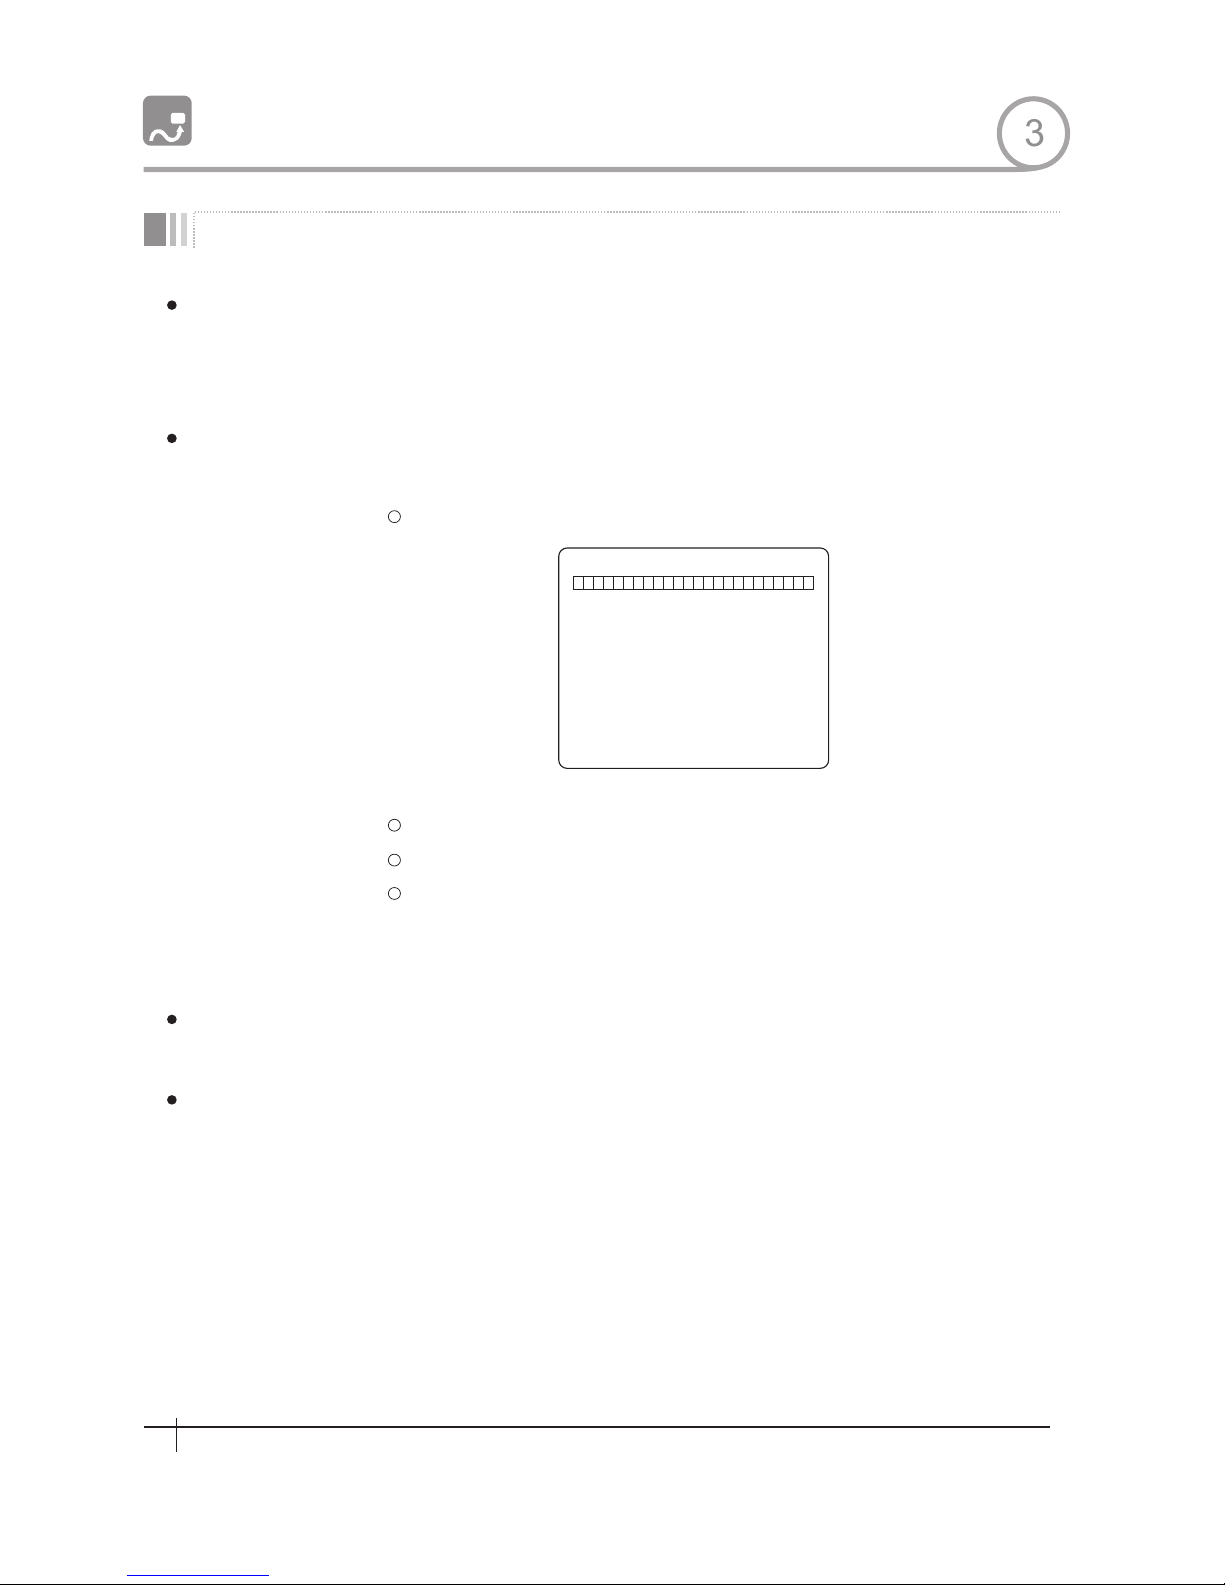
Pattern Function is that a camera memorizes the path (mostly curve path) by joystick of
controller for assigned time and revives the path exactly as it memorized.
4 Patterns are available and Maximum 1200 communication commands can be stored in
a pattern.
Pattern can be created by one of following two methods.
Method 1) <Set Pattern> [Pattern NO .]
Pattern editing screen is displayed as bellow.
Movement by Joystick and preset movement can be memorized in a pattern.
The rest memory size is displayed in progress bar.
To save the recording, press NEAR key and to cancel, press FAR key.
Method 2)OS D Using OSD Menu: See the section“How to use OSD Menu".
Method 1) <Run Pattern>[Pattern NO .]
Method 2) <Go Preset> [Pattern NO .+130]
Use OSD menu to delete a Pattern
ex)Run Pattern 2:<Run Pattern>[2]
ex)Run Pattern 2:<Go Preset>[132]
3
14
Spee d Dome Cam era Instruction Manual
Page 16
Group
Function
Set Group
Run Gtoup
Delete Group
Preset 1
Pattern 1
Dwell Time
Max 20 Entities
Swing 1
OPERATON
GROUP 8
1
2
3
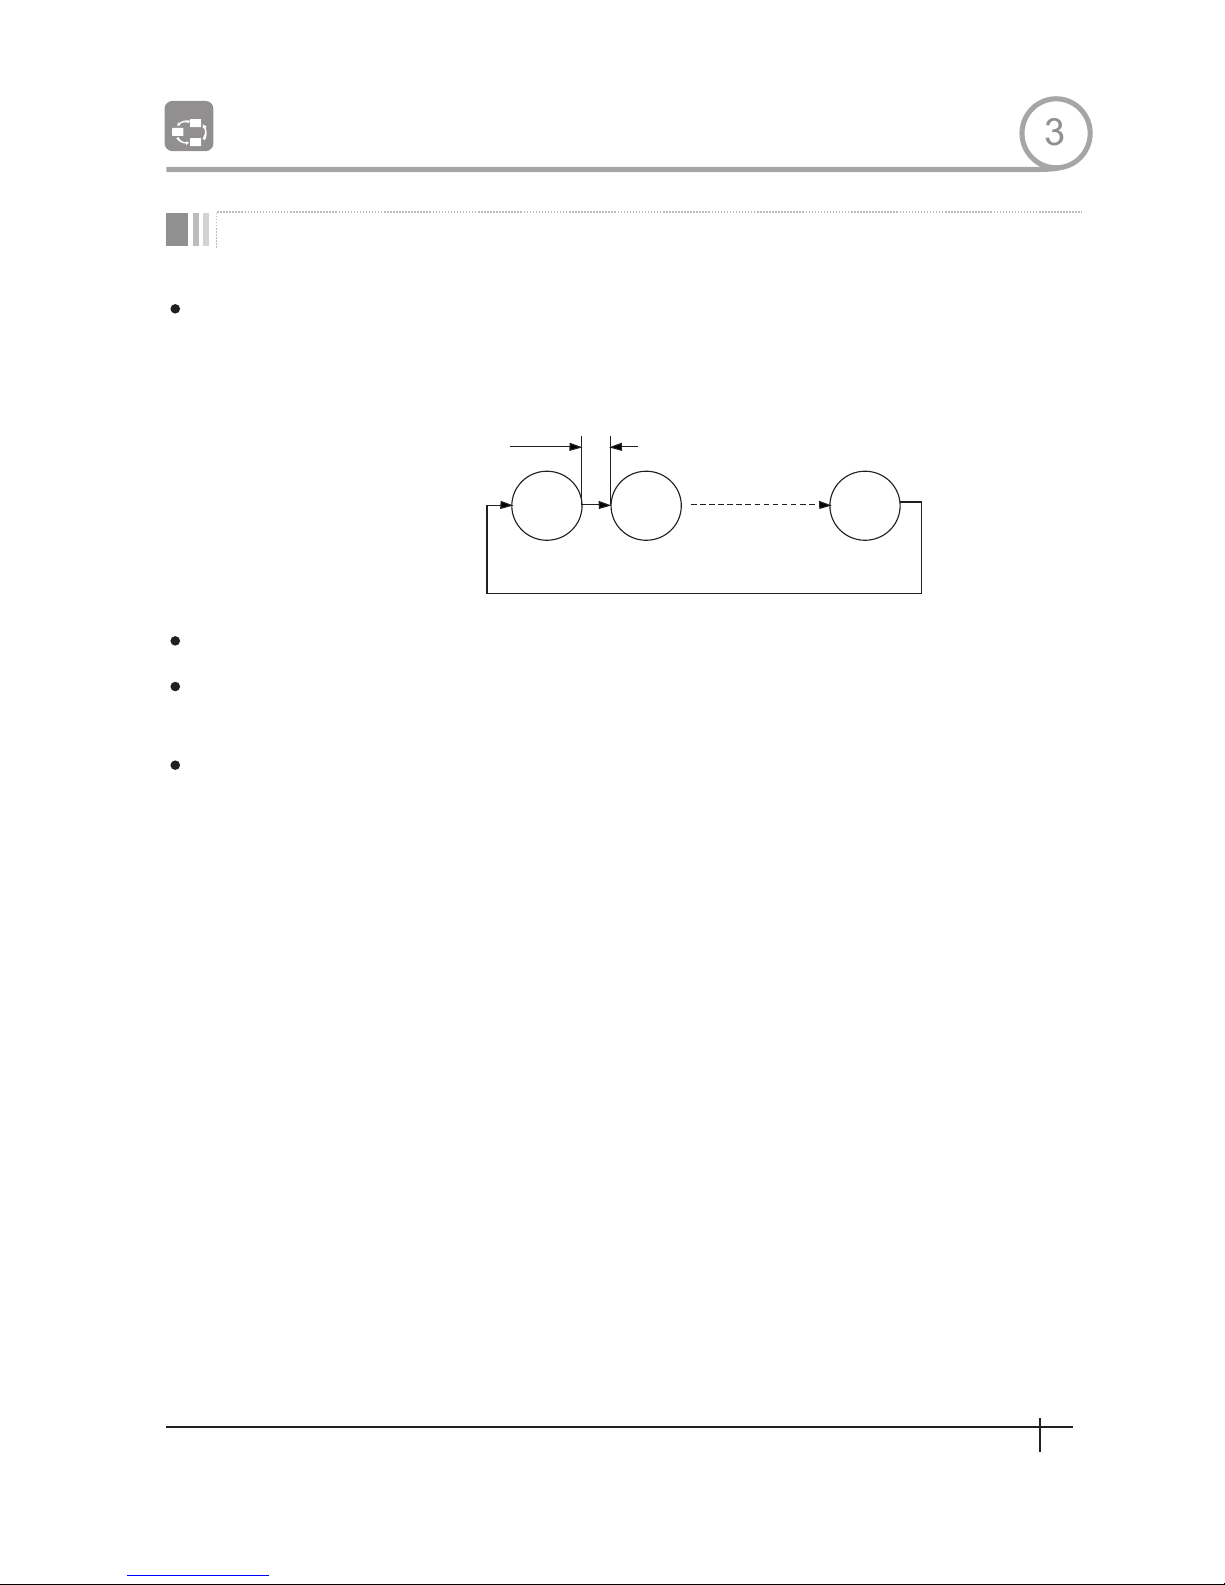
The group function allows runmng sequence of Presets, Pattern and/or Swings Max 8
group can be stored. Each group can have max 20 action entities which can be preset,
pattern or swing Preset speed can be set up and the repeat number of Pattern&Swing
can be set up in Group setup.Dwell time between actions can be set up also.
Use OSD Menu to cre at e a Gr oup
Method 1)<Run Pattern>[Group NO+20] ex)Run Group 7:<Run Pattern>[27]
Method 2)<G o Preset>]Group NO.++150] e x)Run Group 7:<Go P re se t>[157]
Use OSD Menu to del et e
3
15
Spee d Dome Cam era Instruction Manual
Page 17

Other Functions
Power Up Action
Auto Flip
Parking Action
Privacy Zone Mask
GLOBAL/LOCAL
Image Setup
SemiAuto Focus
OPERATON
PROVACY
ZONE
AL ARM 41N
This function enables to resume the last action executed before power down. Most of
actions such as Preset, Pattern, Swing and Group are available for this functlon but jog
actions are not available to resume.
In case that tilt angle arrives at the top of tilt orbit (90 ), zoom module camera keep
moving to opposite tilt direction (180 ) to keep tracing targets. As soon as zoom module
camera passes through the top of tilt direction(90 ),images should be reversed
antomatically and F appears in screen. If this function is set to OFF,tilt movement range
is 0~95 .
This function enables to locate the camera to specific position automatically if operator
doesn't opera!e the controller for a while. The Park Time can be defined as an interval
from 1 minute to 4 hours.
To protect privacy, MAX. 4 Privacy Masks can be created on the arbitrary position to
hide objects such as windows,shops or private house. With Spherical Coordinates
system, powerful Privacy Zone Mask function is possible
WB(White Balance) and AE (Auto Exposure) can be set up independently for each
preset. There are 2 modes, "Global" mode & "Local" mode. The Global mode means that
WB or AE can be set up totally and simultaneously for all presets in "ZOOM CAMERA
SETUP" menu. The Local mode means that WB or AE can be set up independently or
separately for each preset in each preset setup menu. Each Local WB/AE value sho山d
activate correspondingly when camera arrives at each preset location.
During jog operation, Global WB/AE value should be applied. All Local WB/AE value
do not change although Global WB/AE value changes.
This mode exchanges focus mode automatically between Manual Focus mode and Auto
Focus mode by operation.Manual Focus mode activates in preset operation and Auto
Focus mode activates during jog operation With Manual mode at presets, Focus data is
memonred in each preset in advance and camera calls focus data in correspondence
Focus mode changes to Auto Focus mode automatically when jog operation starts.
with presets as soon as camera arrives at a preset.It should shorten time to get focuses
3
16
Spee d Dome Cam era Instruction Manual
Page 18
OPERATON
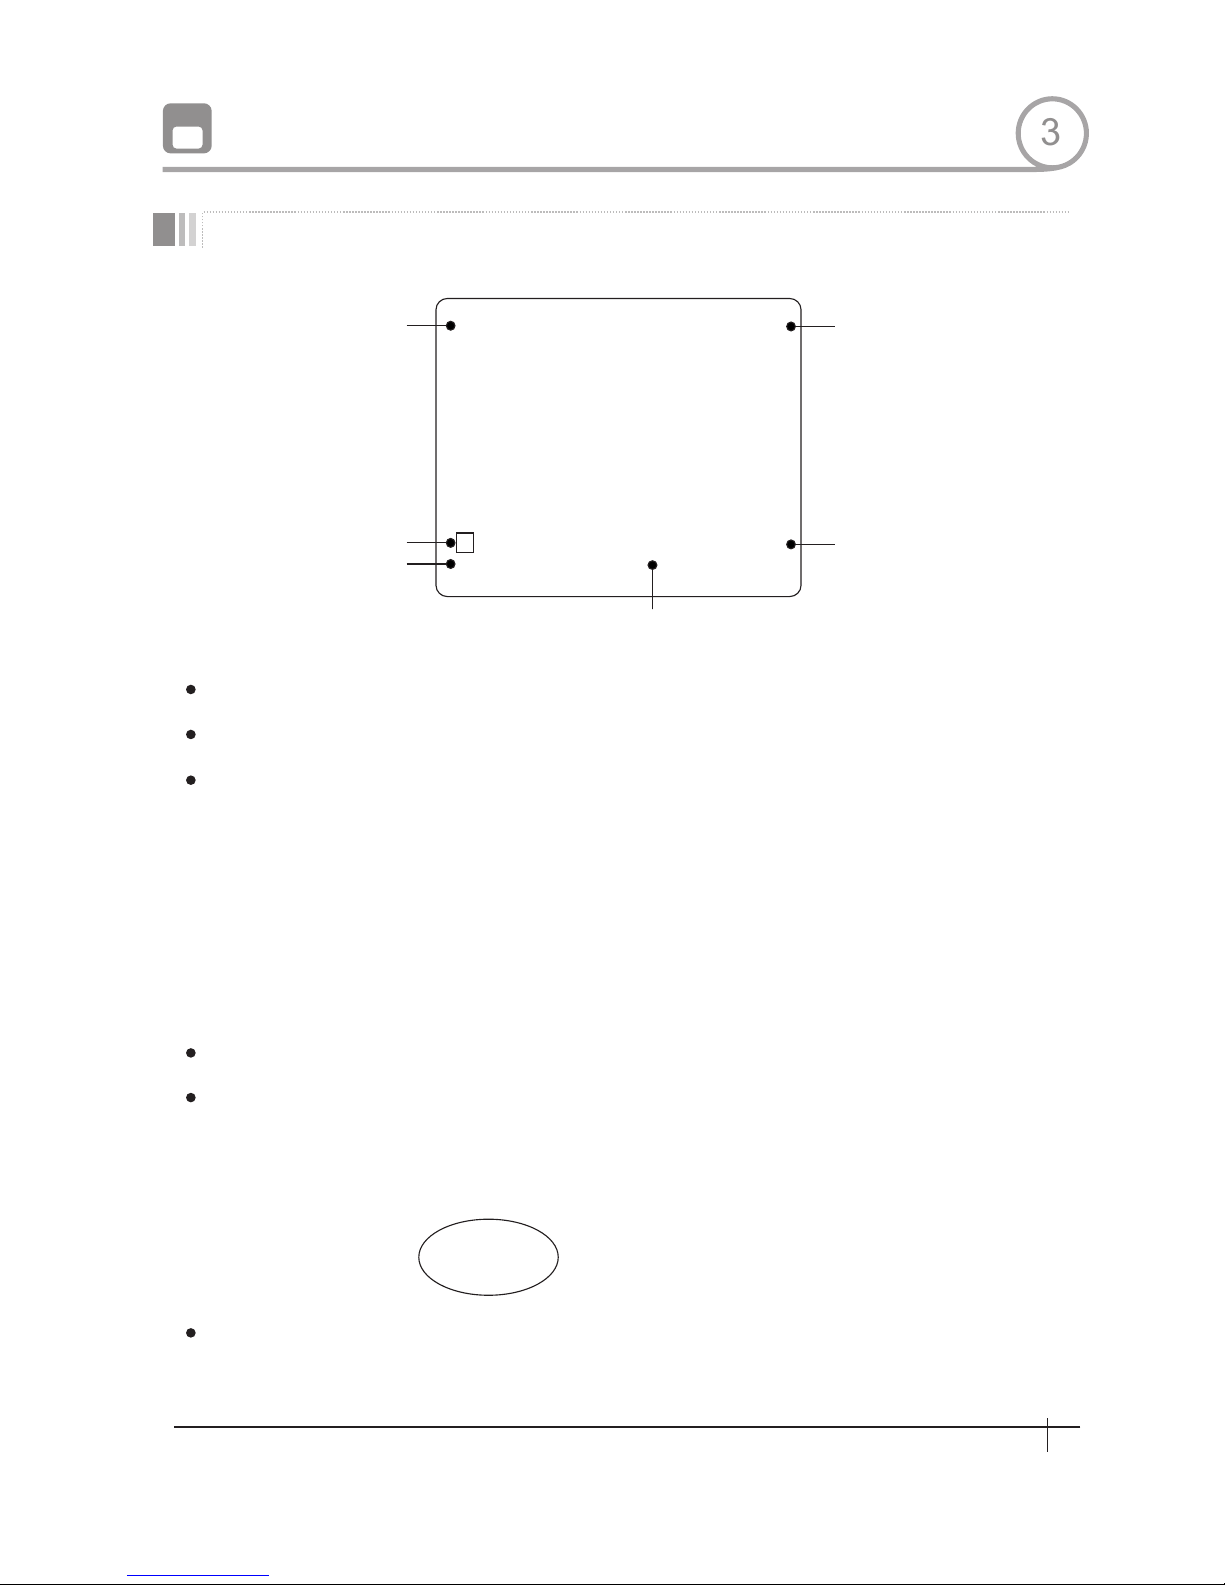
OSD Display of Main Screen
LA BEL 1234 5
PRESET1
I : 1 - - 4
15/4/×1/N
CAM 1
F
Preset Label
Image Flip
Camera ID
Action Title
Alarm Intormation
P/T/Z Information
I : - 2 3 -
P/T/Z Information
Camera ID
Action Title
Preset Label
Alarm Input
Image Flip
ON SCREEN
DISOLAY
123
Current Pan/Tilt angle in degree, zoom magnification and a compass direction.
Current Camera ID(Address).
Follovangs are possible Action-Titles and their meaning.
"SET PRESET ×××"
"PRESET×××"
"PATTERN ×"
“ SWG×/PRESE T× ×× ”
"UNDEFINE D"
When Preset× is stored××
When camera reach to Preset ×××
When undefined function is called to run
The Label stored for specific Preset.
This information shows current state of Alarm Input. If an Input point is ON state it will
show a number corresponding to each point If an Input point is OFF state, ' - ' will be
displayed
Ex)Point 2&3 of inputs are ON, OSD will show as below
Shows that images are currently reversed by Auto nip Function.
When Swing×is in action
When Pattern × is in action
3
17
Spee d Dome Cam era Instruction Manual
Page 19
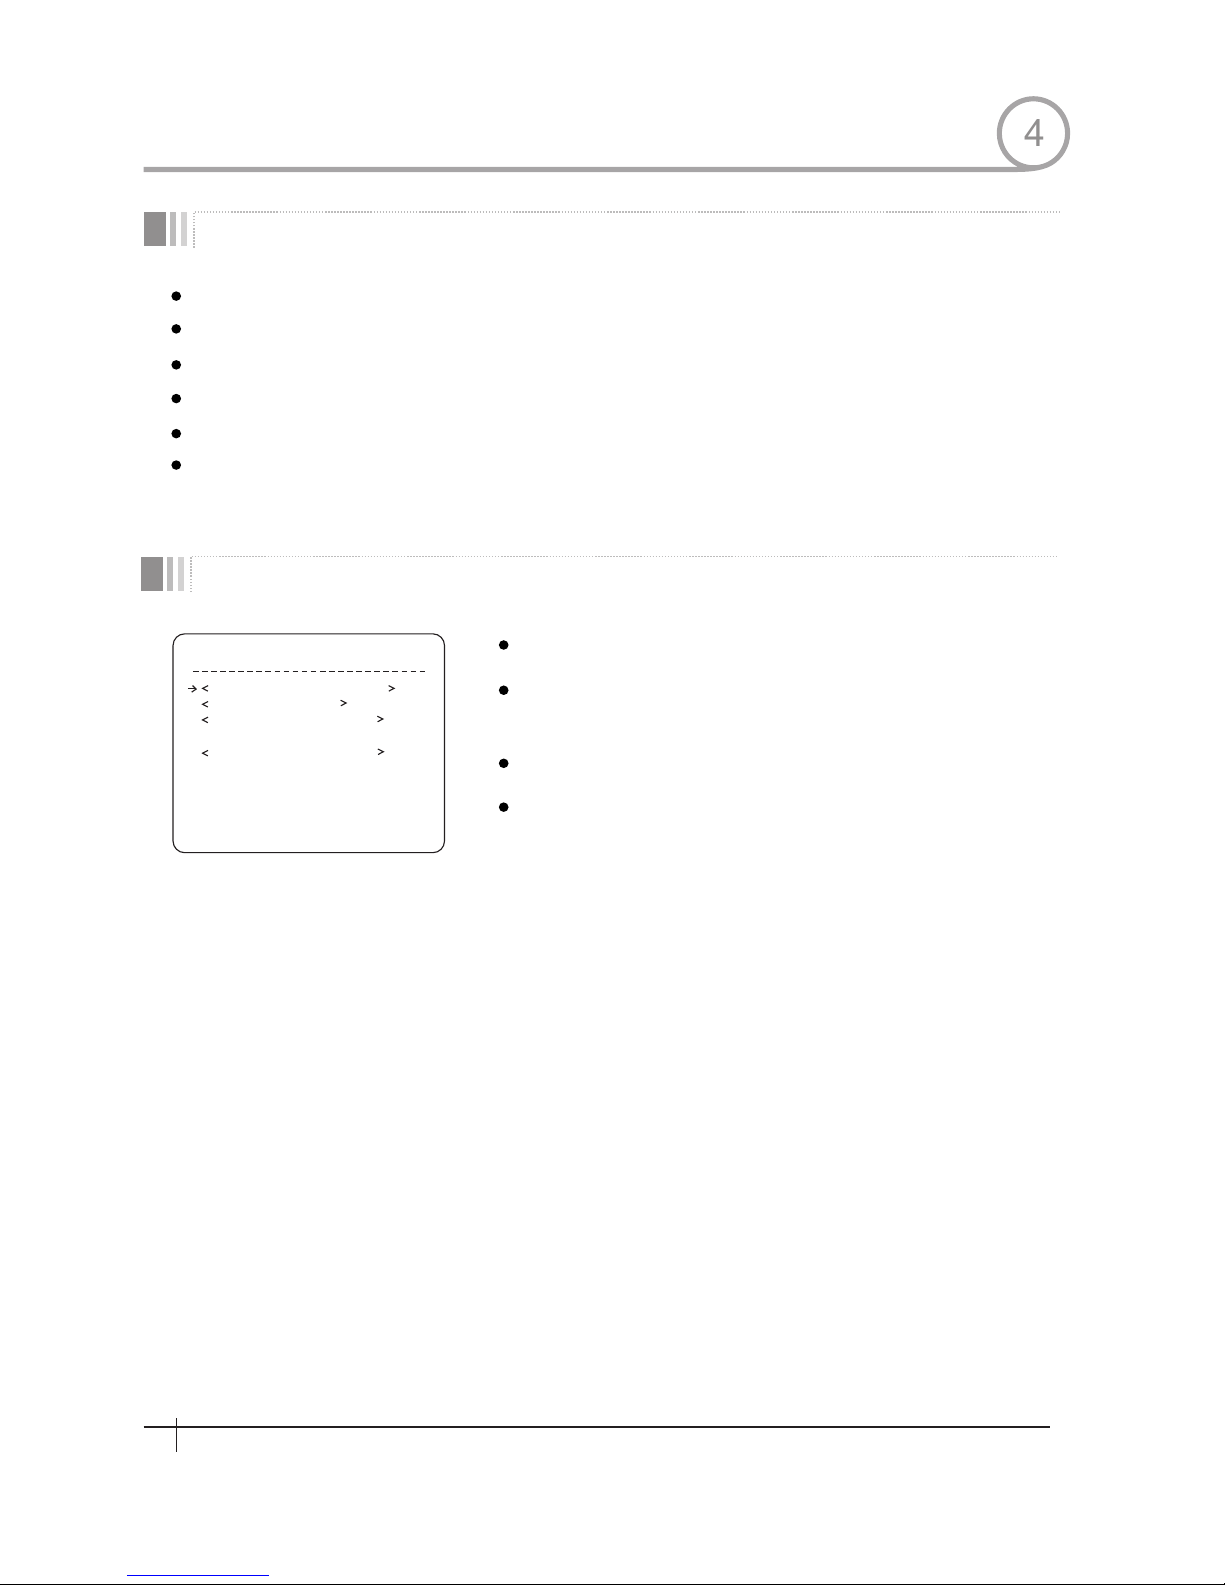
General Rules of Key Operation for Menu
HOW TO USE OSD MENU
Main Menu
SPE ED D OM E C A ME RA
SY STE M IN FOR MA TI ON
D I S P L A Y S E T U P
DO ME CA ME RA S ETUP
S Y ST E M I N I T IA L I Z E
E X IT
The menu items surrounded with ( ) always has its sub menu.
For aIl menu level, to go into sub menu, press NEAR key.
To go to up-one-level menu, press FAR key.
T0 mave from items to item in the menu,use joystick in the Up/Down or Left/Right.
To change a value of an item, use Up/Down of the joystick in the controller.
Press NEAR key to save values and Press FAR key to cancel Values.
System Information Displays system information and configuration.
Display Setup
Enable/Disable of OSD display on Main
Screen.
Dome Camera Setup Configure various functions of thls camera.
System Initialize
Imtlalizes system configuration and sets all
data to factory default configuration
4
18
Spee d Dome Cam era Instruction Manual
Page 20
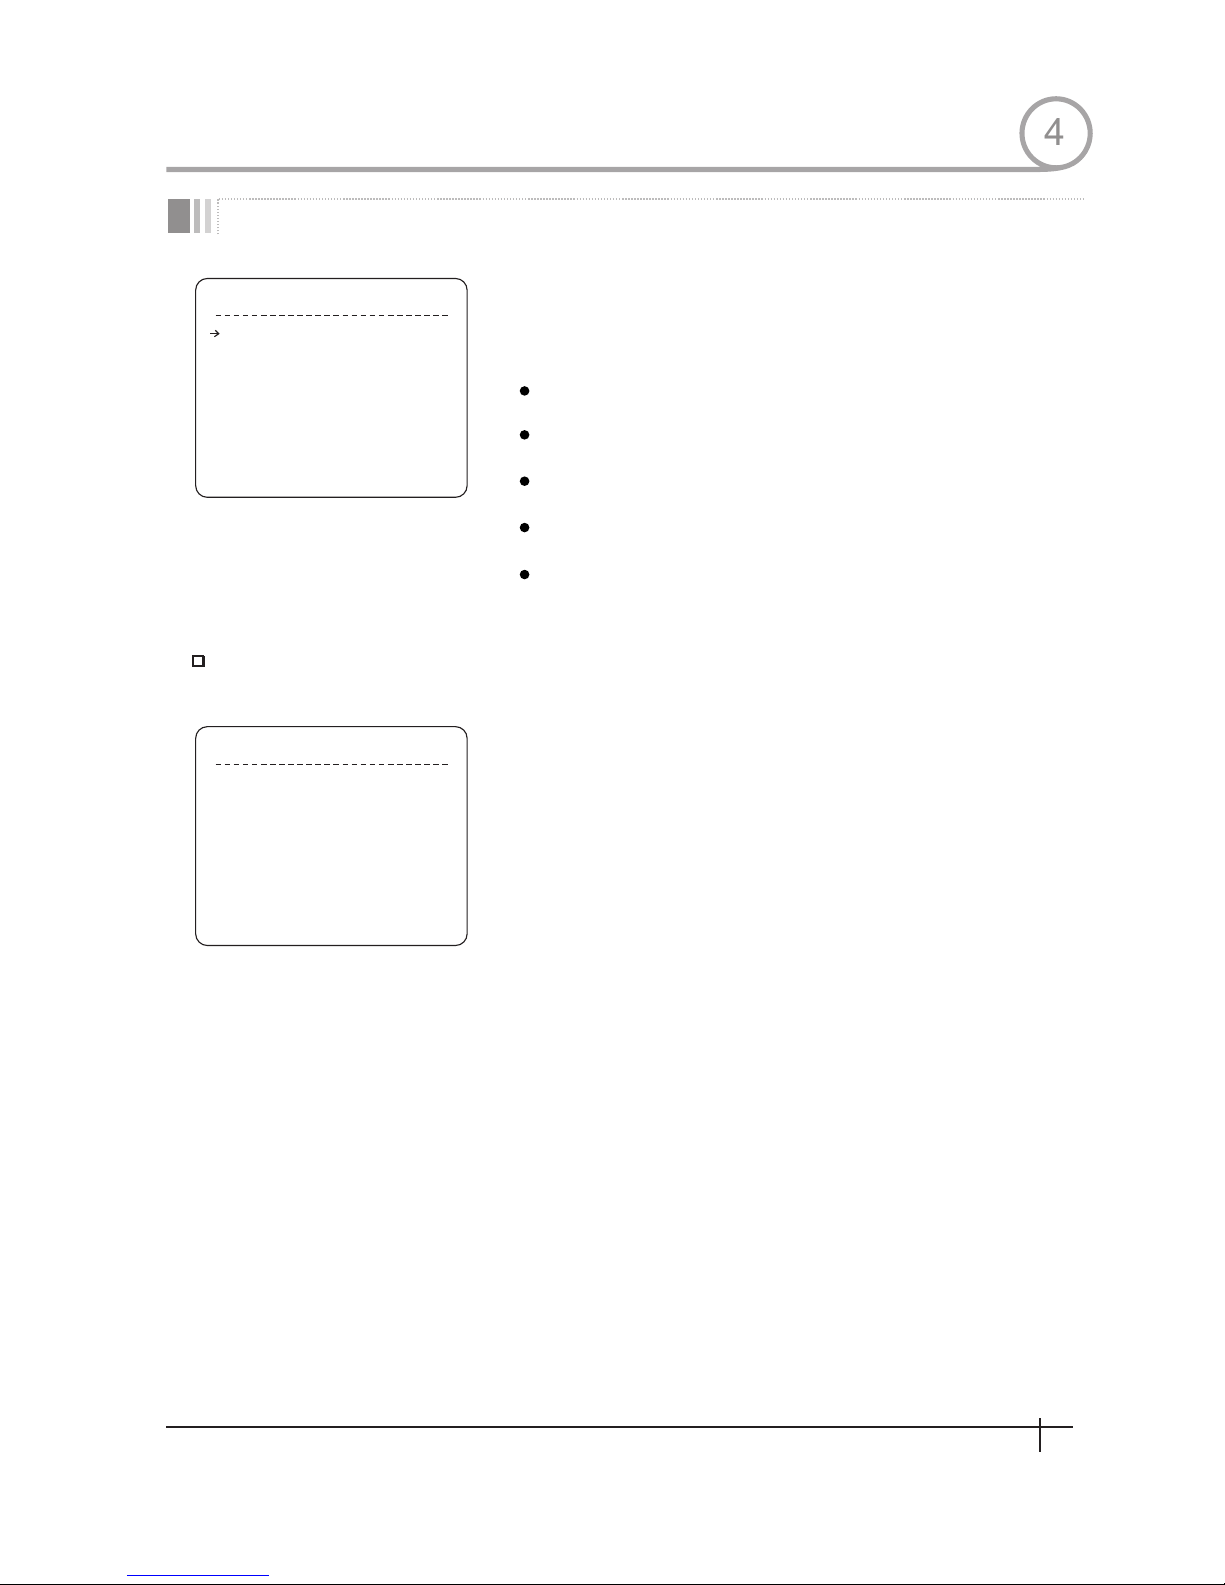
D IS P LA Y S ET U P
BA CK
E XI T
CAMER A ID
P T Z I NF OR MA TI ON
A C T IO N T IT LE
P RE S E T L AB E L
AL AR M INP UT
<SET NORTH DIRECTION>
<P RIV ACY ZO N E>
O N
A UTO
A UTO
A UTO
A UTO
S E T N ORTH D IR EC TION
MO VE T O T A R G E T P O S I T I O N
[ N E A R : S A V E / F A R : C A N C E L ]
Compass Direction Setup
Display Setup
HOW TO USE OSD MENU
This menu defines Enable/Disable of OSD display on Main Screen. If an
item is set to be AUTO,the item is displayed only when the value of it is
changed.
Camera ID
[ON/OFF]
PTZ Information
Action Title
Preset Label
Alarm Input
[ON/OFF/AUTO]
[ON/OFF/AUTO]
[ON/OFF/AUTO]
Set North to assign compass direction as criteria. Move camera and
press NEAR button to save.
[ON/OFF/AUTO]
4
19
Spee d Dome Cam era Instruction Manual
Page 21
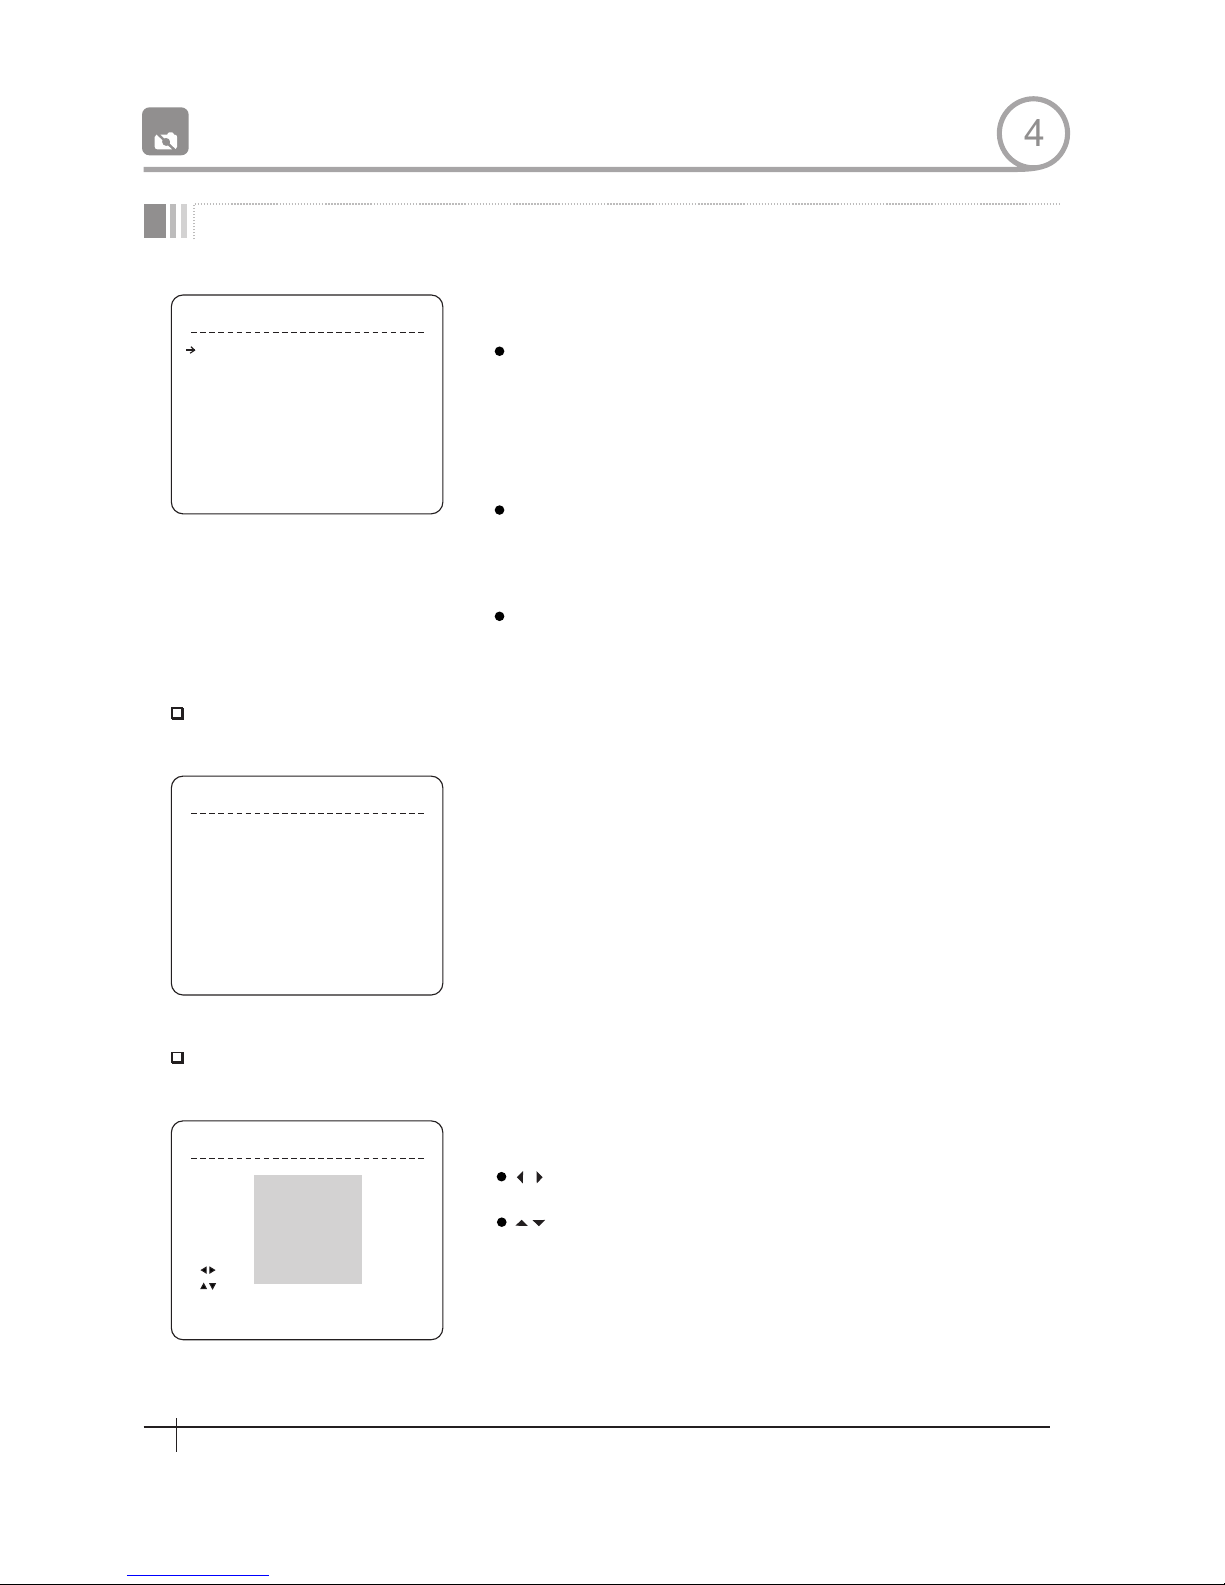
PRIVACY ZONE MASK Setup
HOW TO USE OSD MENU
PROVACY
ZONE
PR IV ACY Z ON E
MA SK NO 1
D I S P L A Y
U N D E F I N E D
C L E AR M AS K
O F F
C A N CE L
< ED I T M A SK >
E X IT
BA CK
E D I T M AS K 1
M OV E T O T A RG E T P OS I TI O N
[ N EA R : S EL E C T /F A R : CA N C EL ]
E D I T M AS K 1
[ N EA R : S AV E / F A R: C A N CE L ]
[ : AD JU ST M A S K W ID TH ]
[ : AD JU ST M A S K H EI GH T]
Privacy Zone Area Setup
Select area in image to mask.
Mask No
Display
Clear Mask
Privacy Zone Size Adjustment
[1~4]
Select Mask number. If the selected mask has
already data,camera moves as it was set.
Otherwise,“UNDEFINED” will be displayed
under“Mask No”.
[ON/OFE]
Sets if camera ma ke s ma sk shows or not on
images
[CANCEL/OK]
Deletes data in the selected mask NO .
Move camera to area to mask. Then the menu to adjust mask size will be
displayed.
Adjust mask size. Use joystick or arrow buttons to adjust mask size.
(Left/Right)
(Up/Down)
Adinsts mask width.
Adjusts mask height.
4
20
Spee d Dome Cam era Instruction Manual
Page 22
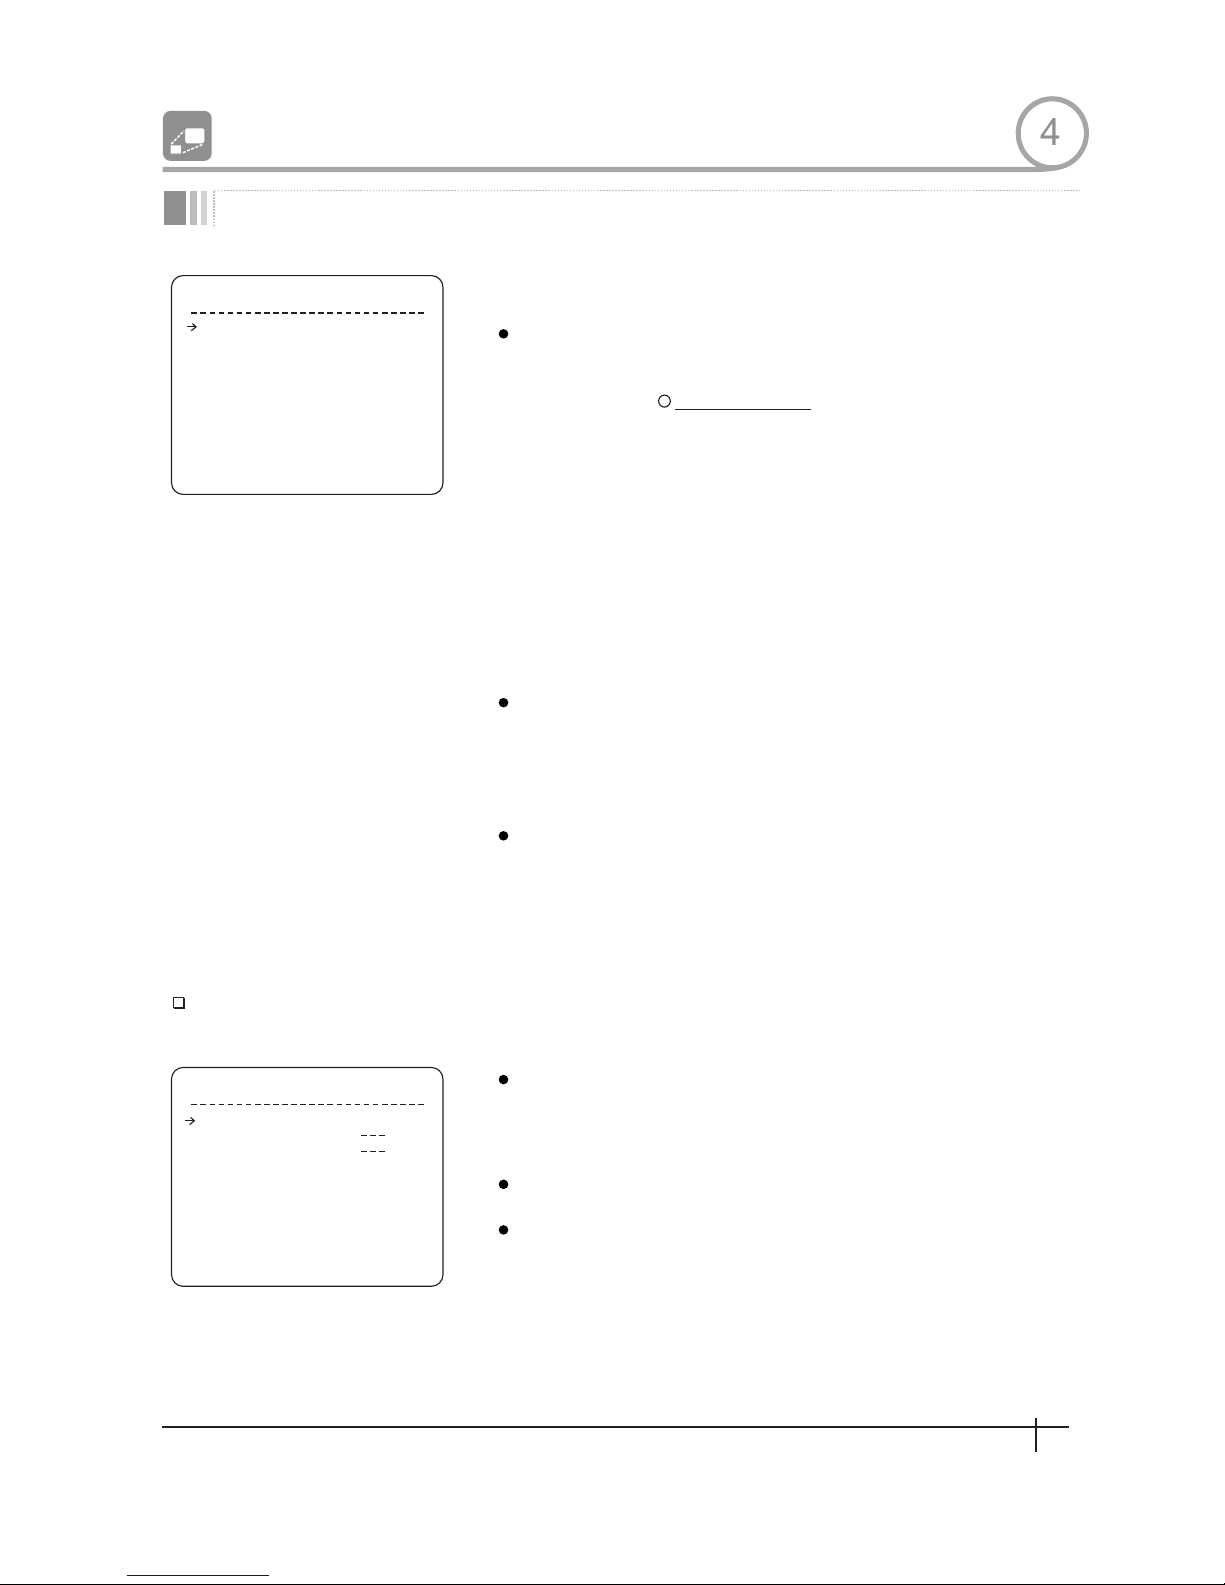
100X ZOOM
CANERA SETUP
HOW TO USE OSD MENU
ZO OM CA ME RA SE TU P
FOC US M OD E S EM IA UTO
D I G I T A L Z O O M O N
L I N E L O C K O F F
< W H ITE B AL AN C E S ET UP >
B AC K
E S IT
< A U TO E XP OS UR E S ETUP >
WB MO DE A UT O
R ED AD J U ST
BL UE A DJU ST
W B S ET UP - G L O B A L
BA CK
E X I T
Focus Mode
Digital Zoom
Line Lock
WB Mode
Red Adjust
Blue Adjust
White Balance Setup
Setup the general functions of zoom camera module
[AUTO/MANUAL/SEMIAUTO]
SEMIAUTO Mode
Sets camera focus mode.
This mode exchanges focus mode automatically
between Manual Focus mode and Auto Focus mode
Manual Focus mode activates in preset operation
and Auto Focus mode activates when jog operation
Starts.
With Manual mode at presets, Focus data is
memorized in each preset in advance and camera
calls focus data in correspondence wlfh presets as
soon as camera arrives at a preset
[ON/OFF]
Sets digital zoom function to ON/OFF.If this is set to
OFF,optical zoom function runs but zoom function
stops at the end of optical zoom magnification.
[ON/OFF]
If Line lock sync is ON,video signal is synchronized
wi th A C pow er . Video c an b e fluctuated after
setting is changed.
[AUTO/MANUAL]
In Manual mode, Red and Blue level can be set
up manually
[10~60]
[10~60]
4
21
Spee d Dome Cam era Instruction Manual
Page 23
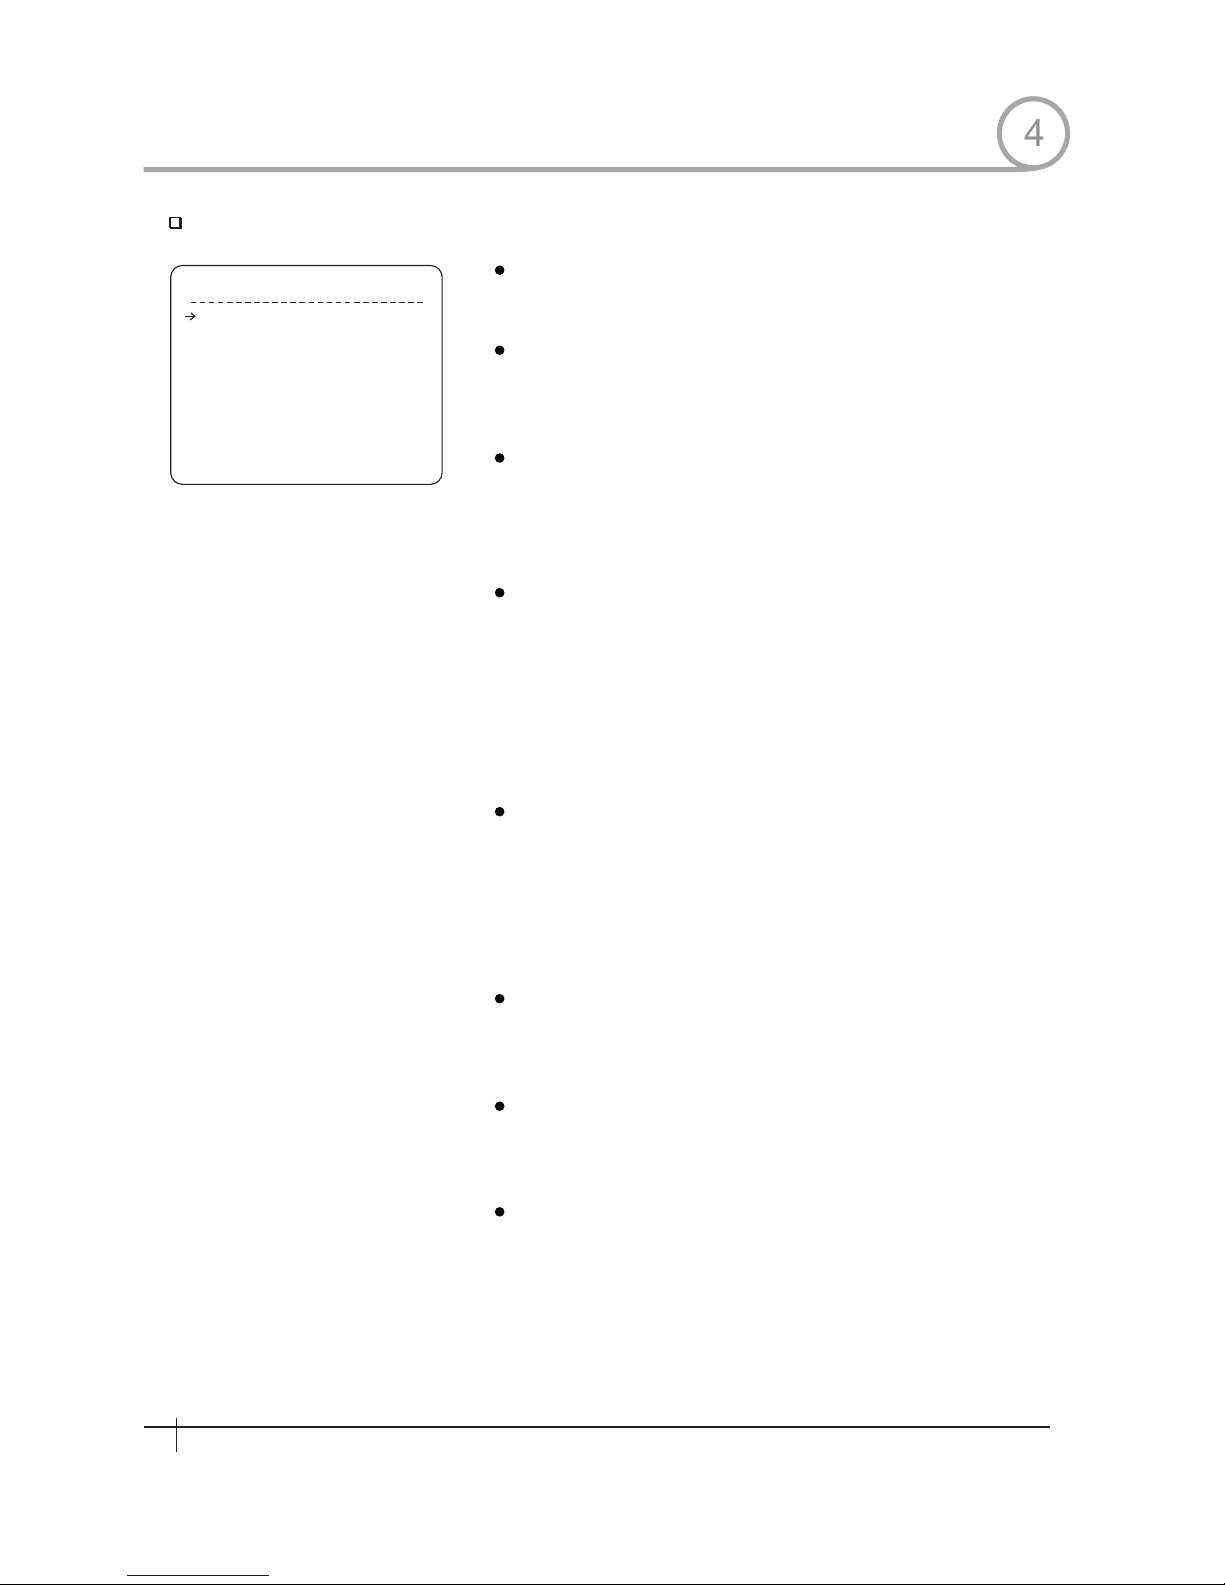
HOW TO USE OSD MENU
AE SET UP - GL O BA L
OFF
AUTOI
25
AUTO
ESC
NORMAL
MIDDLE
<AUTO>
BAC KL IG HT
DAY /N IG HT
BRI GH TN ES S
IRI S
SHU TT ER
AGC
SSN R
SEN G- UP
BAC K
EXI T
Auto Exposure Setup
Backlight
Day/Night
Brightness
IRIS
Shutter Speed
AGC
SSNR
SENS-UP
[ON/OFF]
Sets Bacldight Compensation
[AUTO1/AUT02DAY/NIGHT]
AUT01 exch anges Day/ Night mode faster than
AUT02.
[0~100]
Adjusts brightness of images. Iris,Shutter Speed
and Gain are adj ust ed automatically in
correspondence with this value
[AUTO/MANUAL(0~100)]
if Iris is set to Auto,Iris should have highest
priority in adjusting AE and Shutter Speed should
be fixed .
If Iris is set to Manual,Iris should be fiXed and Iris
has lower priority in aajusting AE,in comparison
with others.
[ESC/A. Flicker/Manual(x128~1/120000 se c )]
If Iris is set to Manual and Shutter Speed is set to
ESC,Shutter Speed should have highest prioriry. If
Shutter Speed is set to A. Flicker, to remove
F1icker, Shutter Speed should be set to 1/100 secretary.
for NTSC and 1/120 for PAL.
[OFF/NORMAL/HIGH]
Enhances image brightness automatically in case
that luminance level of image signal is too low.
[OFF/LOW/MIDDLE/HIGH]
Enhances images by deducting noises when gain
level of images is too high.
[AUTO(2~128)/OFF]
Activates Slow Shutter function when lununance of
Ima ge( signal)is too dark
It is possibl e to set up the maximum number of
frames piled up one on another by Slow Shutter
function.
4
22
Spee d Dome Cam era Instruction Manual
Page 24
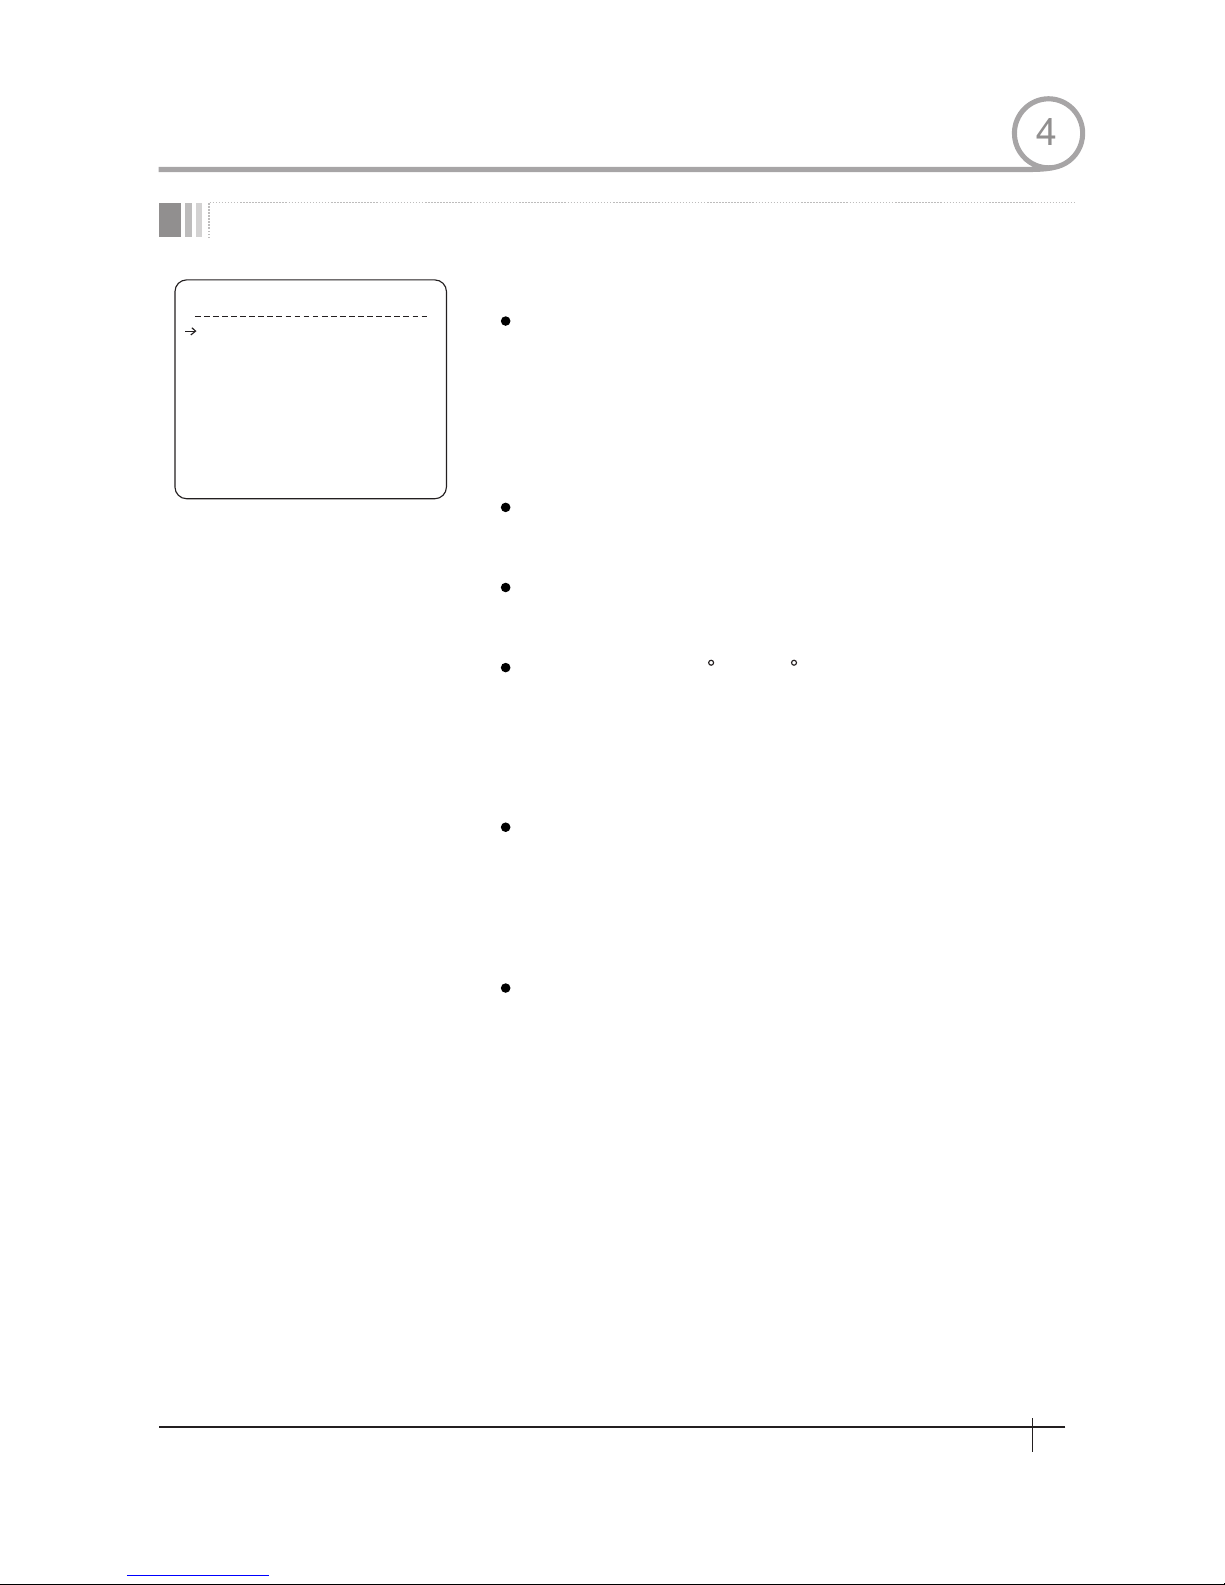
Motion Setup
HOW TO USE OSD MENU
MOT I ON SE TU P
OF F
ON
ON
12 0/SEC
IN VERSE
OF F
MOTION LOCK
PWR UP ACTION
AUTO FLIP
JOG MAX SPEED
JOG DIRECTION
FRZ IN PRESET
<PARKING ACTION SETUP>
<ALARM INPUT SETUP>
BACK
EXIT
Setup the general functions of Pan/Tilt motions.
Motion Lock
Power Up Action
Auto Flip
Jog Max Speed
Jog Direction
Freeze in Preset
If Motion Lock is set to ON, it is imp ossible to
set up and delete Preset, Swing, Pattern and
Group.It is possible only to run those functions.
To set up and delete those functions, enter into
OSDmenu.
[ON/OFF]
Refer to "Other Functions"section.
Refer to"0the r Pu nc tions"section.
Sets maximum jo g sp ee d. Jog speed is
inversely proportional to zoom magnification.
As zoom magmfication goes up, pan/tilt speed
goes down
[INVERSE/NORMAL]
If you set this to‘In ve rse’,the view in the
sc re en i s mo ving same direction w it h jo g
tilting . If 'Normal' i s selecte d, the view in
the screen is moving reversely.
[ON/O FF]
At st art p oin t o f pre set mo vem ent.c ame ra
starts freezing the image of start point. Camera
keeps display in g the image of start poin t
during preset m ov em ent and does not disp la y
the images whic h ca me ra gets during pres et
movemen t As soon as ca mera stop s at preset
end point, camera starts displaying live images
which it gets at preset end point.
This function availability should be different by
models.
[ON/OFF]
[ON/OFF]
[1 /sec~360 /sec]
4
23
Spee d Dome Cam era Instruction Manual
Page 25
AL ARM 41N
HOW TO USE OSD MENU
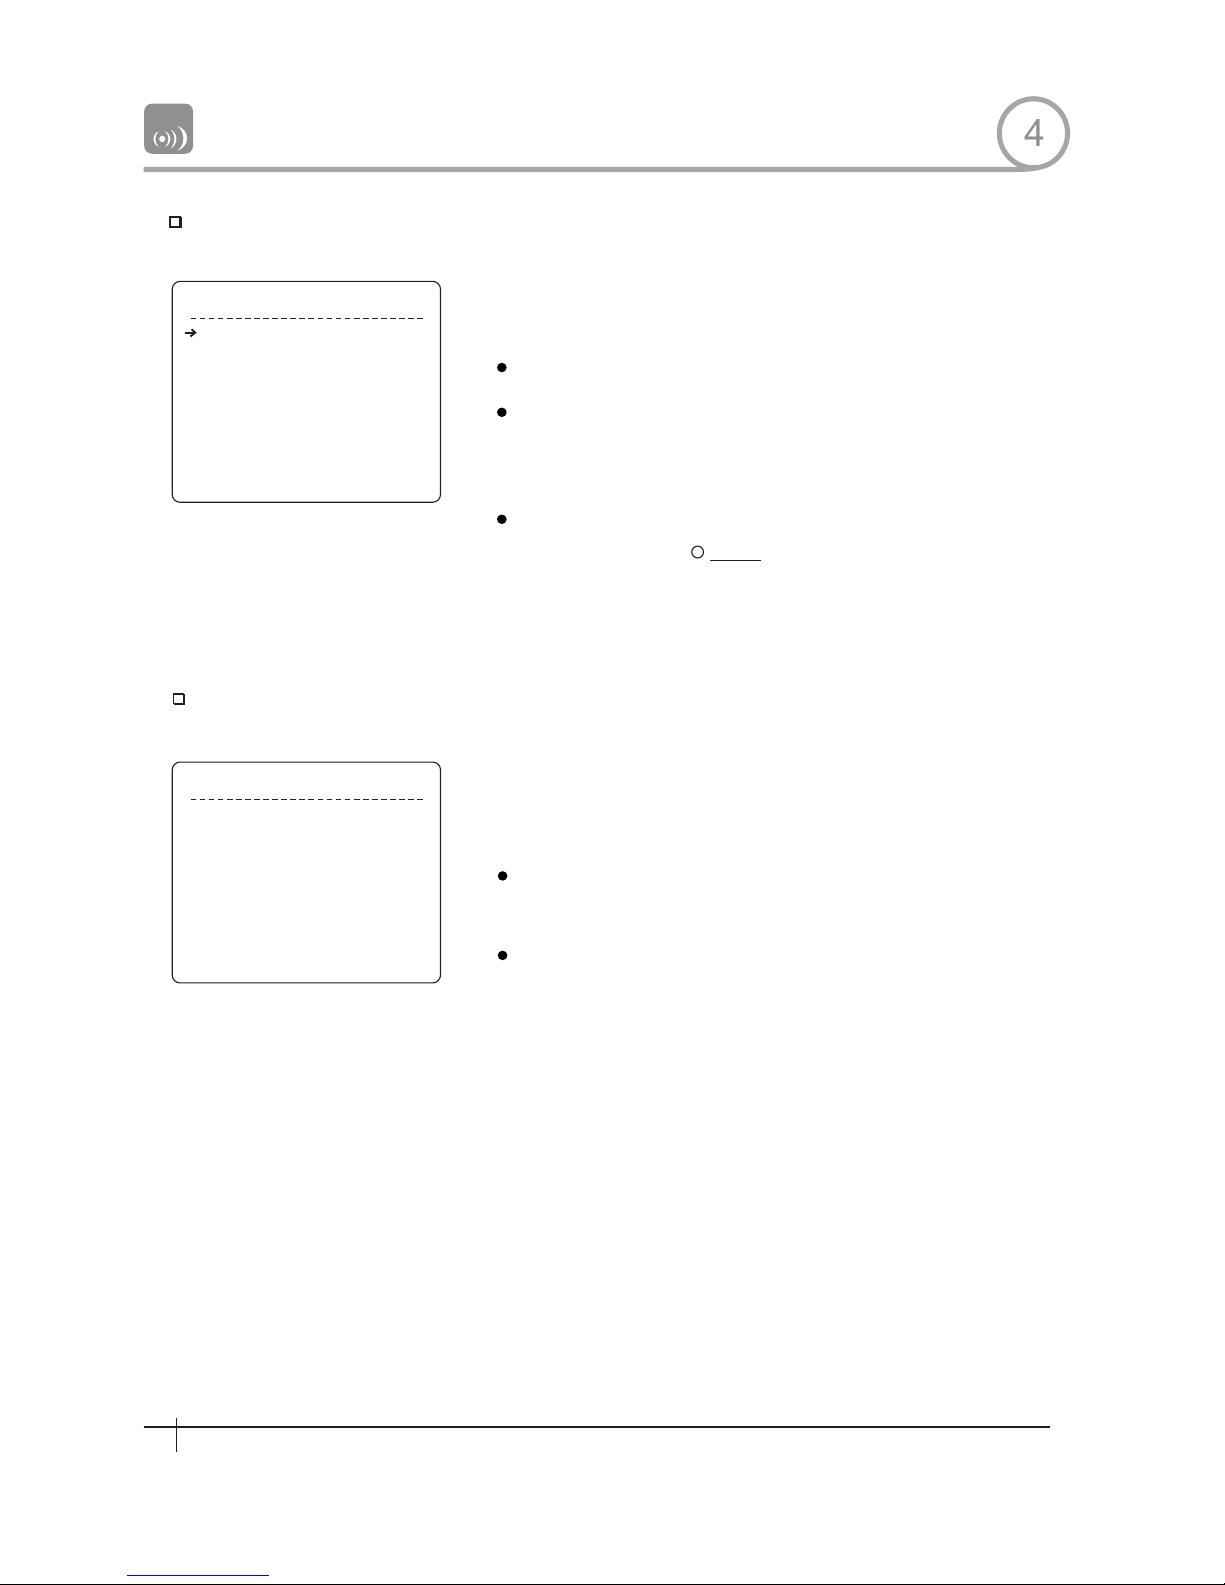
Parking Action Setup
P A R K I NG A C T IO N S E TU P
P A RK EN A B LE OF F
W A I T T IM E 0 0: 1 0 :0 0
P AR K A CTI ON HO ME
B AC K
E X I T
A LAR M1
A LAR M2
A LAR M3
A LAR M4
A LAR M1
A LAR M2
A LAR M3
A LAR M4
B ACK
E XIT
T Y P E
T YPE
T YPE
T YPE
A CT
A CT
A CT
A CT
N. OPEN
N. OPEN
N. OPEN
N. OPEN
NO T US ED
NO T US ED
NO T US ED
NO T US ED
Park Enable
Wait Time
Park Action
Al arm×Type
Alarm Action×
Alarm Input Setup
If Park Enable is set to ON,camera runs assigned function automatically
if there is no PTZ command during assigned ''Wait Time''.
[ON/OFF]
[1 minute~4 hour]
The time is displayed with "hh:mm:ss" format
and you can change this by 1 min unit.
[HOME/PRESET/PATTERN/SWING/GROUP]
Cam era moves to hom e position if there is no
PTZ command during assigned "Wait Time".
Match the Alarm sensor input to one of Preset positions. If an external
sensor is activated,camera will move to corresponding preset position
when this item is predefined.
[Normal OPEN/Normal CLOSE]
Sets sensor input type.
INOT USED/PRESET 1~255]
Assign counteraction Preset position to each
Alarm input.
HOME
4
A LAR M I NPU T S ETU P
24
Spee d Dome Cam era Instruction Manual
24
Spee d Dome Cam era Instruction Manual
Page 26
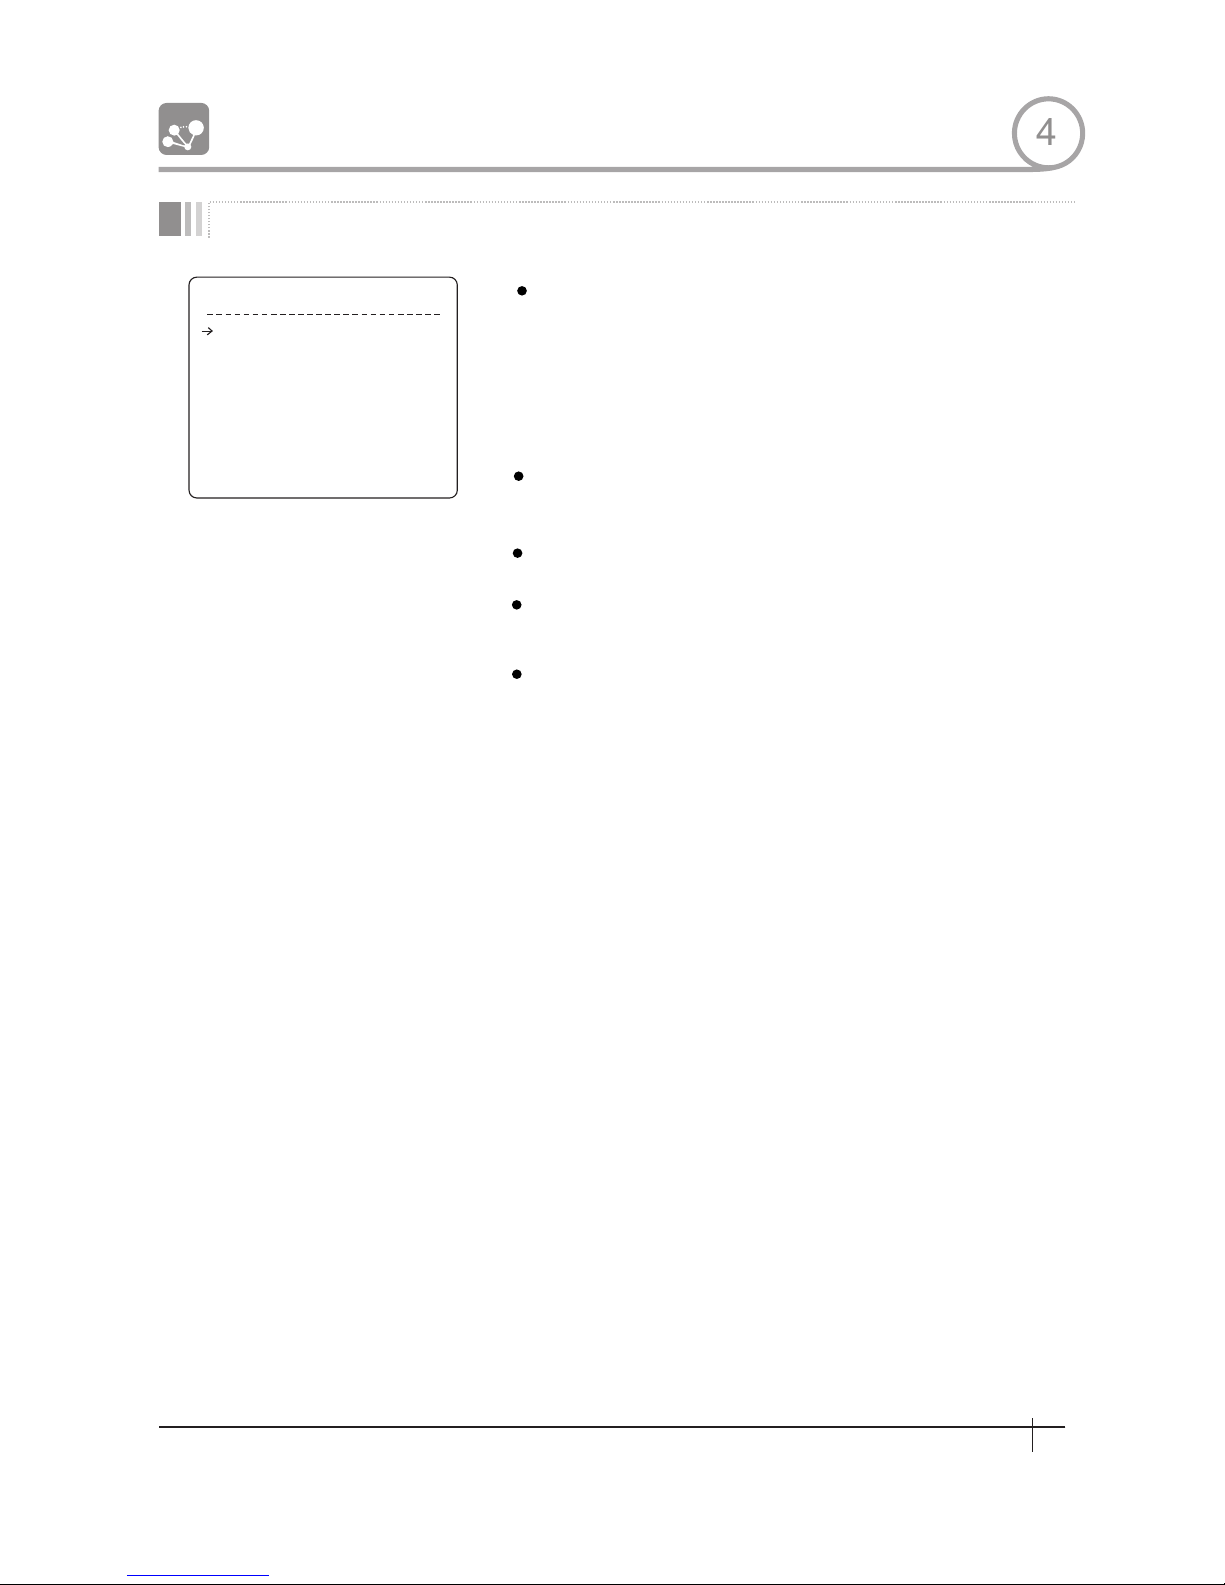
PRESET Setup
HOW TO USE OSD MENU
Preset Number
Clear Preset
Edit Preset Scene
Edit Precet Label
CAM Adjust
P R E SE T S E T U P
P R E SE T N O . 1
C L R P RE S E T C A N C E L
< E D IT S C E N E >
< E D IT L A B E L > L A B EL 1 2 3
C A M A DJ U S T G L O B A L
B A C K
E X I T
[1~255]
If a selected preset is already defined,camera
moves to pre- defined position and preset
characteristics such as Label and Relay Outputs
show on monitor. If a selected preset is not
defined. "UNDEFINED" shows on monitor.
[CANCEL/OK]
Delete current Preset data
Redefine current Preset scene position(1.e PTZ)
Edits Label to show on monitor when preset runs
MAX. 10 alphabets are allowed
[GLOBAL/LOCAL]
WB (White Balance) and AE(Auto Exposure) can
be set up independently for each preset. There
are 2 modes, "Global" mode & "Local" mode. The
Global modemeanst thatWB or AE can be set up
totally and simultaneously for all presets in
"Z 00M CAMERA SETUP" menu.
The Local mode means that WB or AE can be set
up independently or separately for each preset
in each preset setup menu. Each Local WB/AE
value should activate correspondingIy when
camera arrives at each preset location. During
jog operation,Global WB/AE value should be
applied.
All Local WB/AE value should not change
although Global WB/AE value changes. If“Local”
is selected, Menu to set WB/AE shows on
Monitor.
4
25
Spee d Dome Cam era Instruction Manual
25
Spee d Dome Cam era Instruction Manual
PRESET 128
1
2
128
Page 27
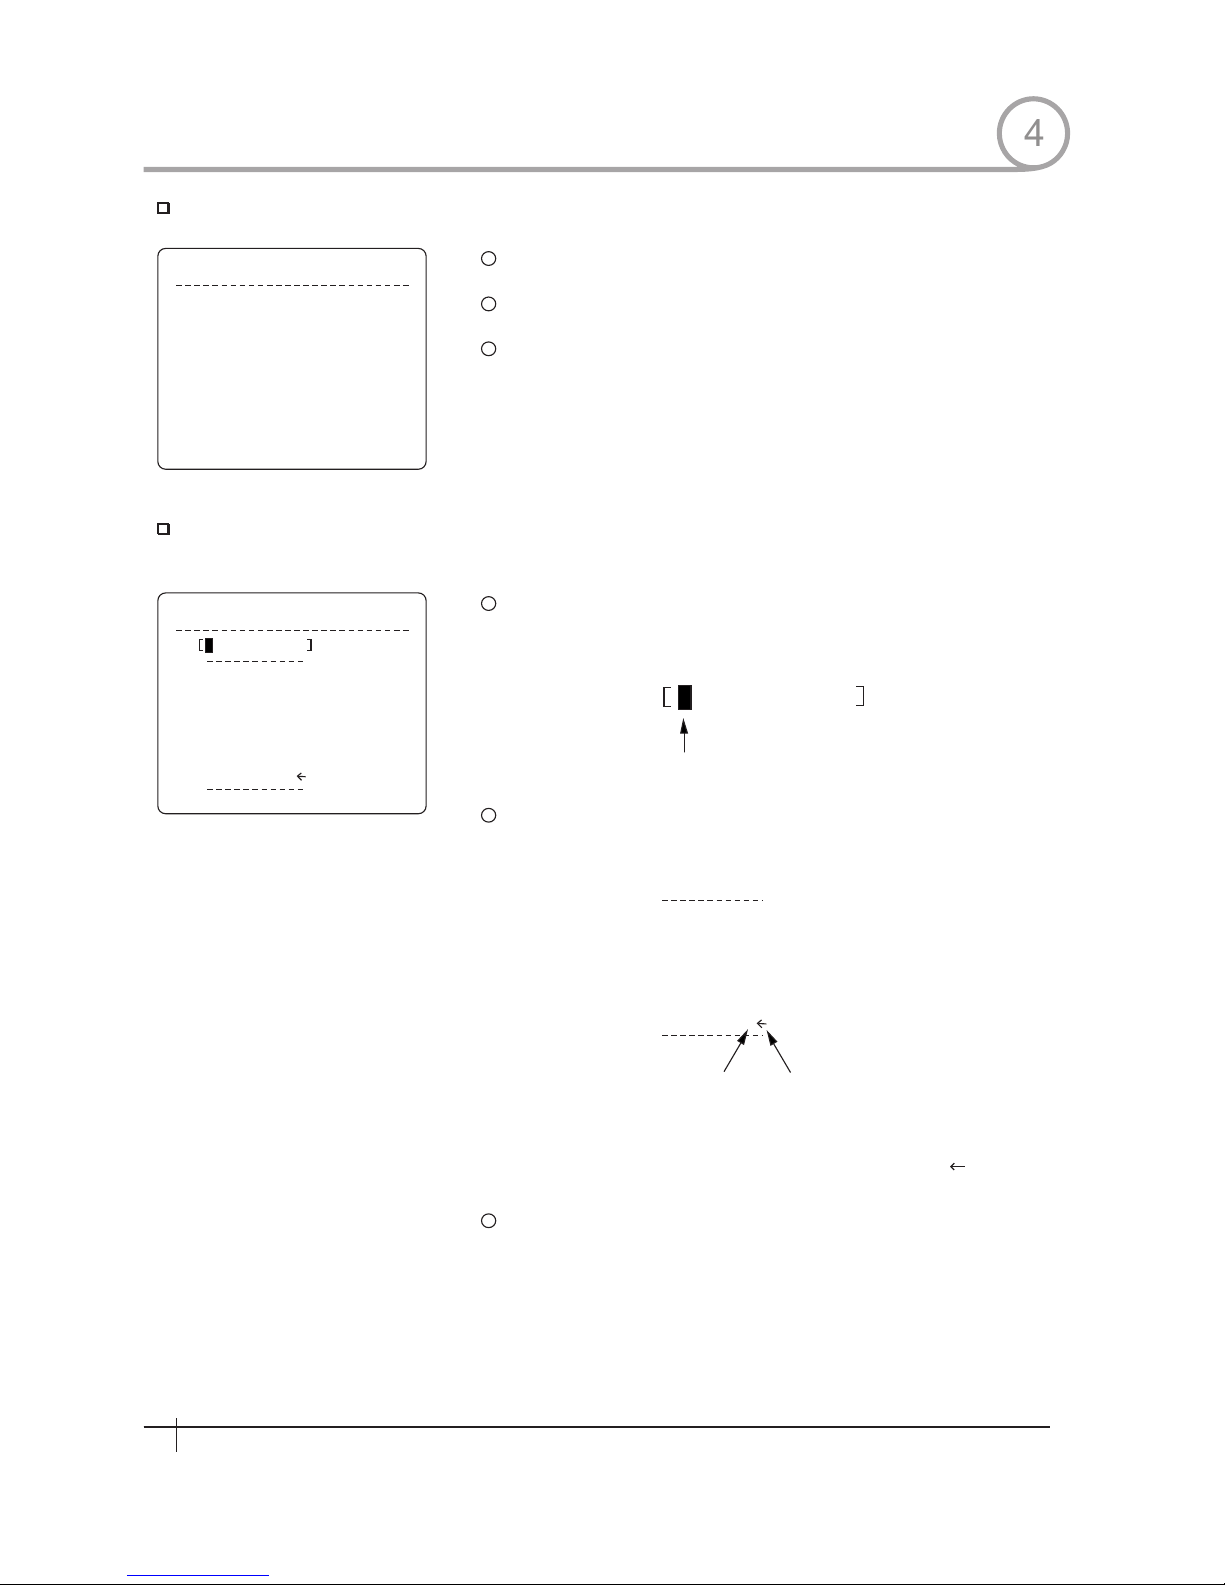
Edit Preset Scene
E D I T S C E N E - P R E S E T 1
MOV E TO T AR GE T P OS I TI ON
[NE AR : S AV E /FA R : C A NC EL ]
Edit Preset Label
E D I T L A B E L - P R E S E T 1
1 23 4 56 7 89 0
A B CD EF G H I J
KL MNO PQ RST
U V W X Y Z abcd
e f g h i j k l m n
o q r s t u v w x
y z < > - / : .
O K
CA NCE L
1
2
3
1
2
Current Cursor Position
1 23 4 56 7 8 9 0
A B CD E F G H IJ
KL M NO PQR ST
U V W X Y Z a b c d
e f g h i j k l m n
o q r s t u v w x
y z < > - / : .
3
HOW TO USE OSD MENU
Using Joystick, move camera to desired position.
By pressing key,save current PTZ data.NEAR
Press key to cancel.FAR
Edits label to show 0n monitor when camera arrives at presets.In
Edit Label menu,a reverse rectangular is cursor As soon as
finishing selecting alphabet,cllrsor moves to the next digit
Using Left/Right/Up/Down of joystick,move to an appropriate
character from the Character set. To choose that character, press
the NEAR key.
Space Char.Back Space Char
If you want to use blank,choose Space character (" ").If you want to
delete a character before, use back space character (" ").
If you complete the Label editing, move cursor to "OK" and press
NEAR key to save completed label. To abort cuxrent change, move
cursor to "Cancel" and press NEAR key.
4
26
Spee d Dome Cam era Instruction Manual
26
Spee d Dome Cam era Instruction Manual
Page 28
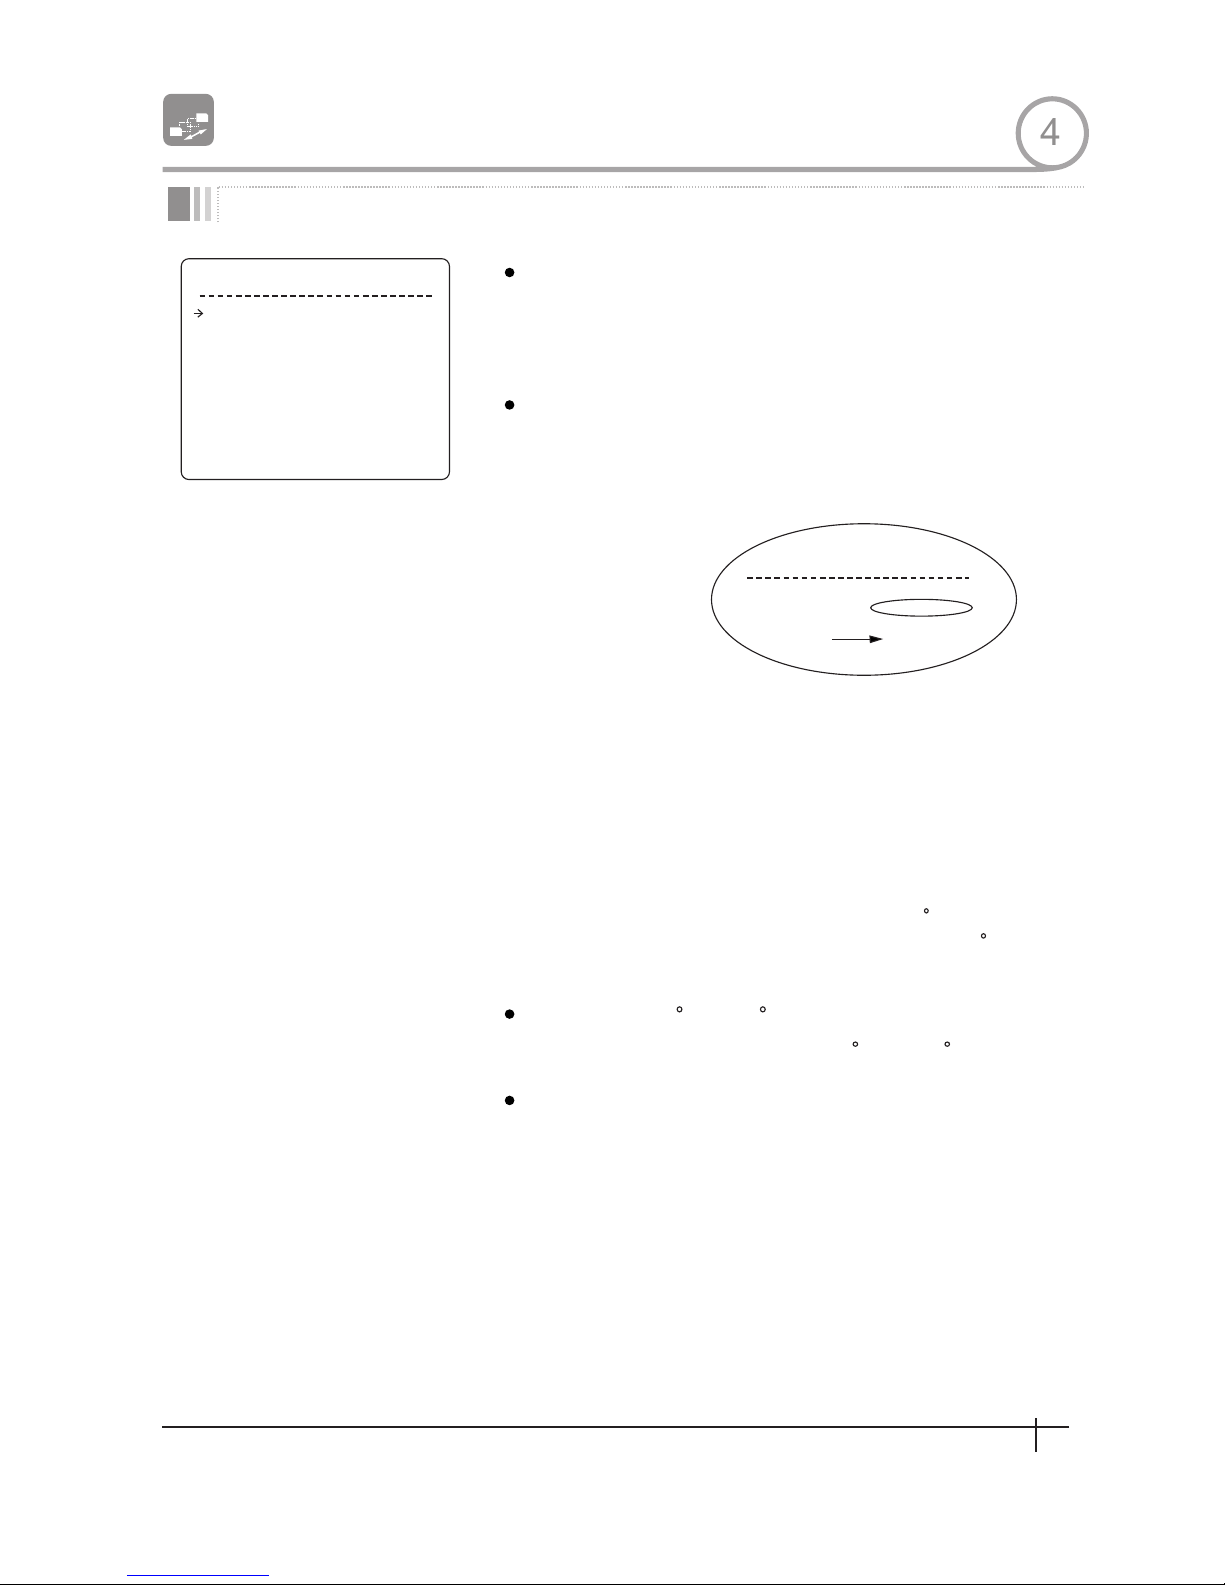
SWING 8
S W I N G S E T U P
S W ING N O .
B A C K
E X I T
1 S T PO S.
2N D POS .
S W IN G S PE E D
C LE A R SW IN G
1
N OT U SE D
N OT U SE D
3 0 / S E C
C ANC EL
Swing Number
Ist Position
2nd Position
Swing Speed
Clear Swing
SWI N G S ETU P
SWI NG NO .
I S T P OS .
2ND PO S .
P RE S E T 5
1
NO T US ED
U ND EF IN ED
HOW TO USE OSD MENU
Swing Setup
[1~8]
Selects Swing number to edit. If a selected Swing
has not defined, "NOT USED" is displayed in 1st
Position and 2nd Position
[PRESET 1~255]
Set up the 2 position for Swing function If a
sel ect ed preset is not defined,"UNDEFINED"will
be displayed as shown below.
When swmg function runs, camera moves from the
preset assigned as the 1st point to the preset
assigned as the 2nd point in CW(Clockwise)
direction.Then camera moves from the preset
assigned as the 2nd point to the preset assigned as
the 1st point in CCW(Counterclockwise) direction.
In case that the preset assigned as the 1st point is
same as the preset assigned as the 2nd point,
camera turns on its axis by 360 in CW direction
and then it turns on its axis by 360 in CCW
direction
[1 /sec~180 /sec]
Sets Swing speed from I /sec to 180 /sec.
[CANCEL/OK]
Deletes current Swing data
4
27
Spee d Dome Cam era Instruction Manual
27
Spee d Dome Cam era Instruction Manual
Page 29
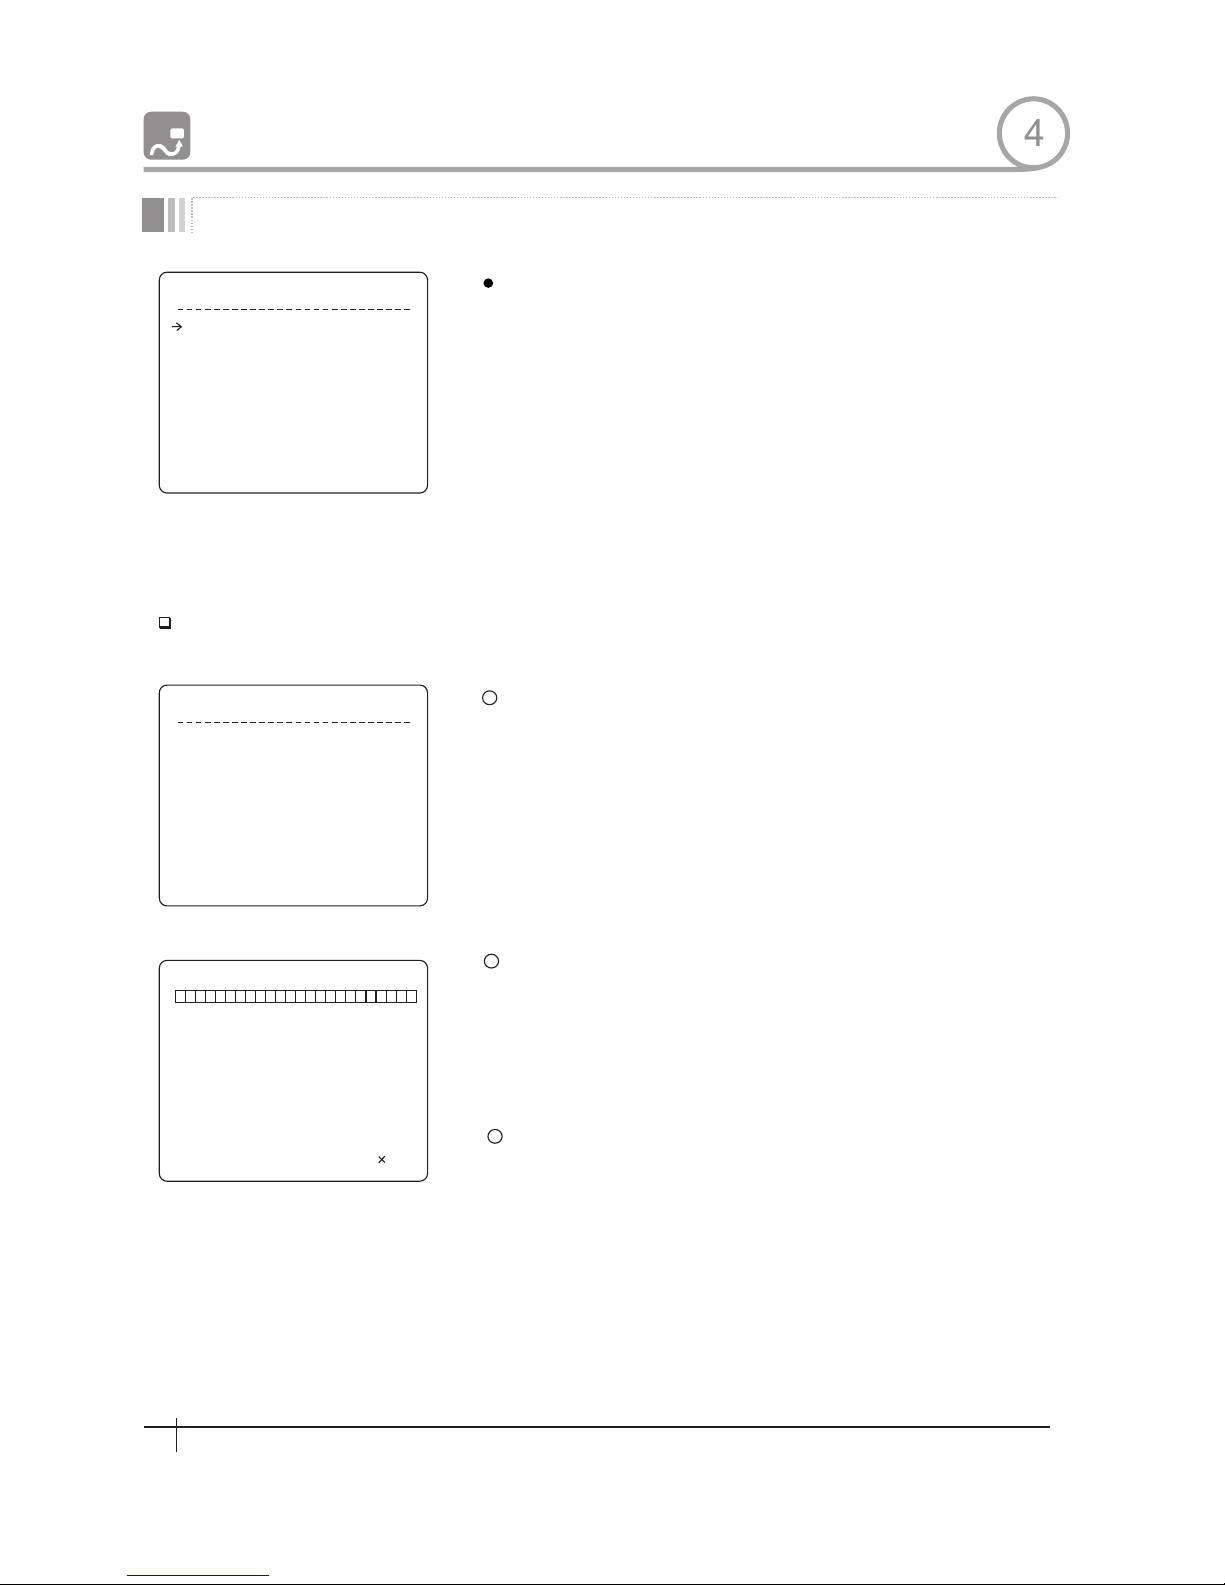
P AT T ER N S ET U P
P AT T ER B N O .
C LR P A T T ERN
<EDIT PATTERN >
1
UNDEFINED
CANCEL
B A C K
E X I T
E DI T P AT T ER N 1
MOV E TO S TA RT PO SI T IO N
[N EAR :ST AR T / FA R :C AN CEL ]
E DI T P AT T ER N 1
[ NE AR :S A V E / F A R: DE LE T E]
0 /0 / 1 / N
Pattern Number
Clear Pattern
Edit Patternk
1
2
3
Edit Pattern
PAITERN 4
HOW TO USE OSD MENU
[1~4]
Selects Pattern number to edit.
If a s elected pattern number is not defined,
"UNDEFINED" will be displayed under
selected pattern nuraber.
[CANCEL/OK]
Deletes data in current pattern
Starts editing pattern.
By using Joystick, move to start position with appropriate zoom. To
start pattern recording, press NFAR key. To exit this menu, press
FAR key.
Move camera with joystick of controller or run preset function to
memorize the path(mostly curve path)ln a selected pattern. The
total memory size and the rest memory size is displayed m the
form of bar. Maximum 1200 communication commands ca n be
stored in a pattern
To save data and exit, press NEAR key .To cancel recording and
delete record data, press FAR key.
4
Pattern Setup
28
Spee d Dome Cam era Instruction Manual
Page 30
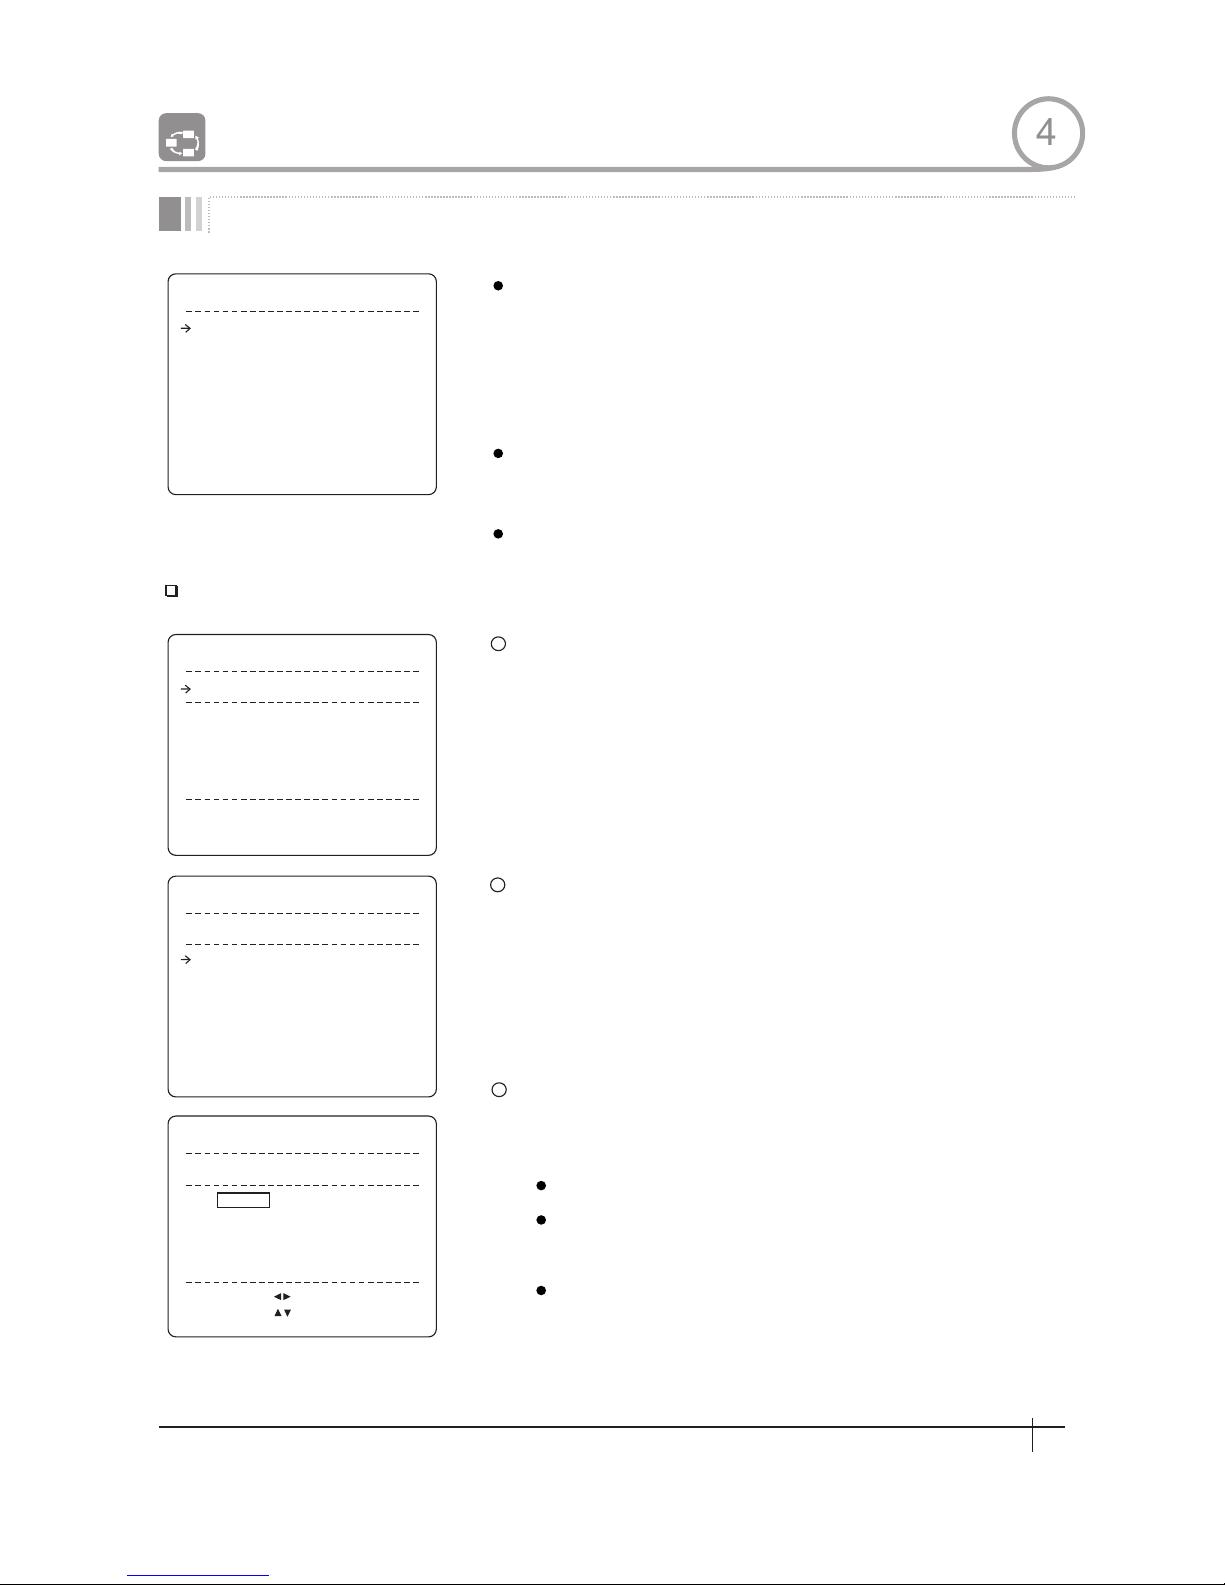
G ROU P S E TUP
GR OU P NO .
CL EAR GROUP
<EDIT G RO UP>
1
UNDEFINED
CANCEL
B A C K
E X I T
E DI T G R OU P 1
NO ACTION ### DWELL OPT
S AVE
C ANC EL
[N EA R: EDI T]
1 N ON E
2 N ON E
3 N ON E
4 N ON E
5 N ON E
E DI T G R OU P 1
1 N ON E
2 N ON E
3 N ON E
4 N ON E
5 N ON E
NO ACTION ### DWELL OPT
S AVE
C ANC EL
[ F AR : ED I T : E ND ]
[ NE AR : E DI T ACT ]
E DI T G R OU P 1
NO ACTION ### DWELL OPT
1 N ON E
2 N ON E
3 N ON E
4 N ON E
5 N ON E
S AVE
C ANC EL
[ :MOVE CURS OR]
[ : CH AN GE VAL . ]
1
2
3
Croup Number
Clear Group
Edit Group
Action ###
DWELL
OPT
Edit Group
Group Setup
GROUP 8
1
2
3
HOW TO USE OSD MENU
[1~8]
Selects Group number to edit.
If a selected Group number is not defined,
"UNDEFINED" will be displayed under selected
Group number.
[CANCEL/OK]
Deletes data in current Group
Starts editing Group.
Press Near key in "NO" list to start Group setup.
Note that MAX.20 Functions are allowed in a Group. Move cursor
up/down and press Near key to set up.
Set up Action, Dwell time and Option. Note that selected item is
displayed in reverse. Move cursor Left/Right to select items and
move cursor Up/Down to change each value.
[NONE/PRESET/SWING/PATTERN]
[0 second~4 minutes]
Sets Dwell Time between functions
Option. It should be preset speed when
preset is set in Action It should be the
number of repeat when Pattern or Swing is
selected ln Action
4
29
Spee d Dome Cam era Instruction Manual
Page 31
HOW TO USE OSD MENU
4
5
6
ED IT GROUP 1
NO A CTION # ## D WE LL OP T
1 PR ESET
2 NO NE
3 NO NE
4 NO NE
5 NO NE
00 : 0 3 36 0
1
SAVE
CANCEL
MO VE CU RS OR
CH ANG E V A L .
▲
▲
▲
▲
:
:
ED IT GROUP 1
NO A CTION # ## D WE LL OP T
1 PR ESET
2 NO NE
3 NO NE
4 NO NE
5 NO NE
00 : 0 3 36 0
1
SAVE
CANCEL
N E A R : E D I T A C T
F A R : E D I T E N D
[ [
[ [
ED IT GROUP 1
NO A CTION # ## D WE LL OP T
1 PR ESET
2 NO NE
3 NO NE
4 NO NE
5 NO NE
00 : 0 3 36 0
1
SAVE
CANCEL
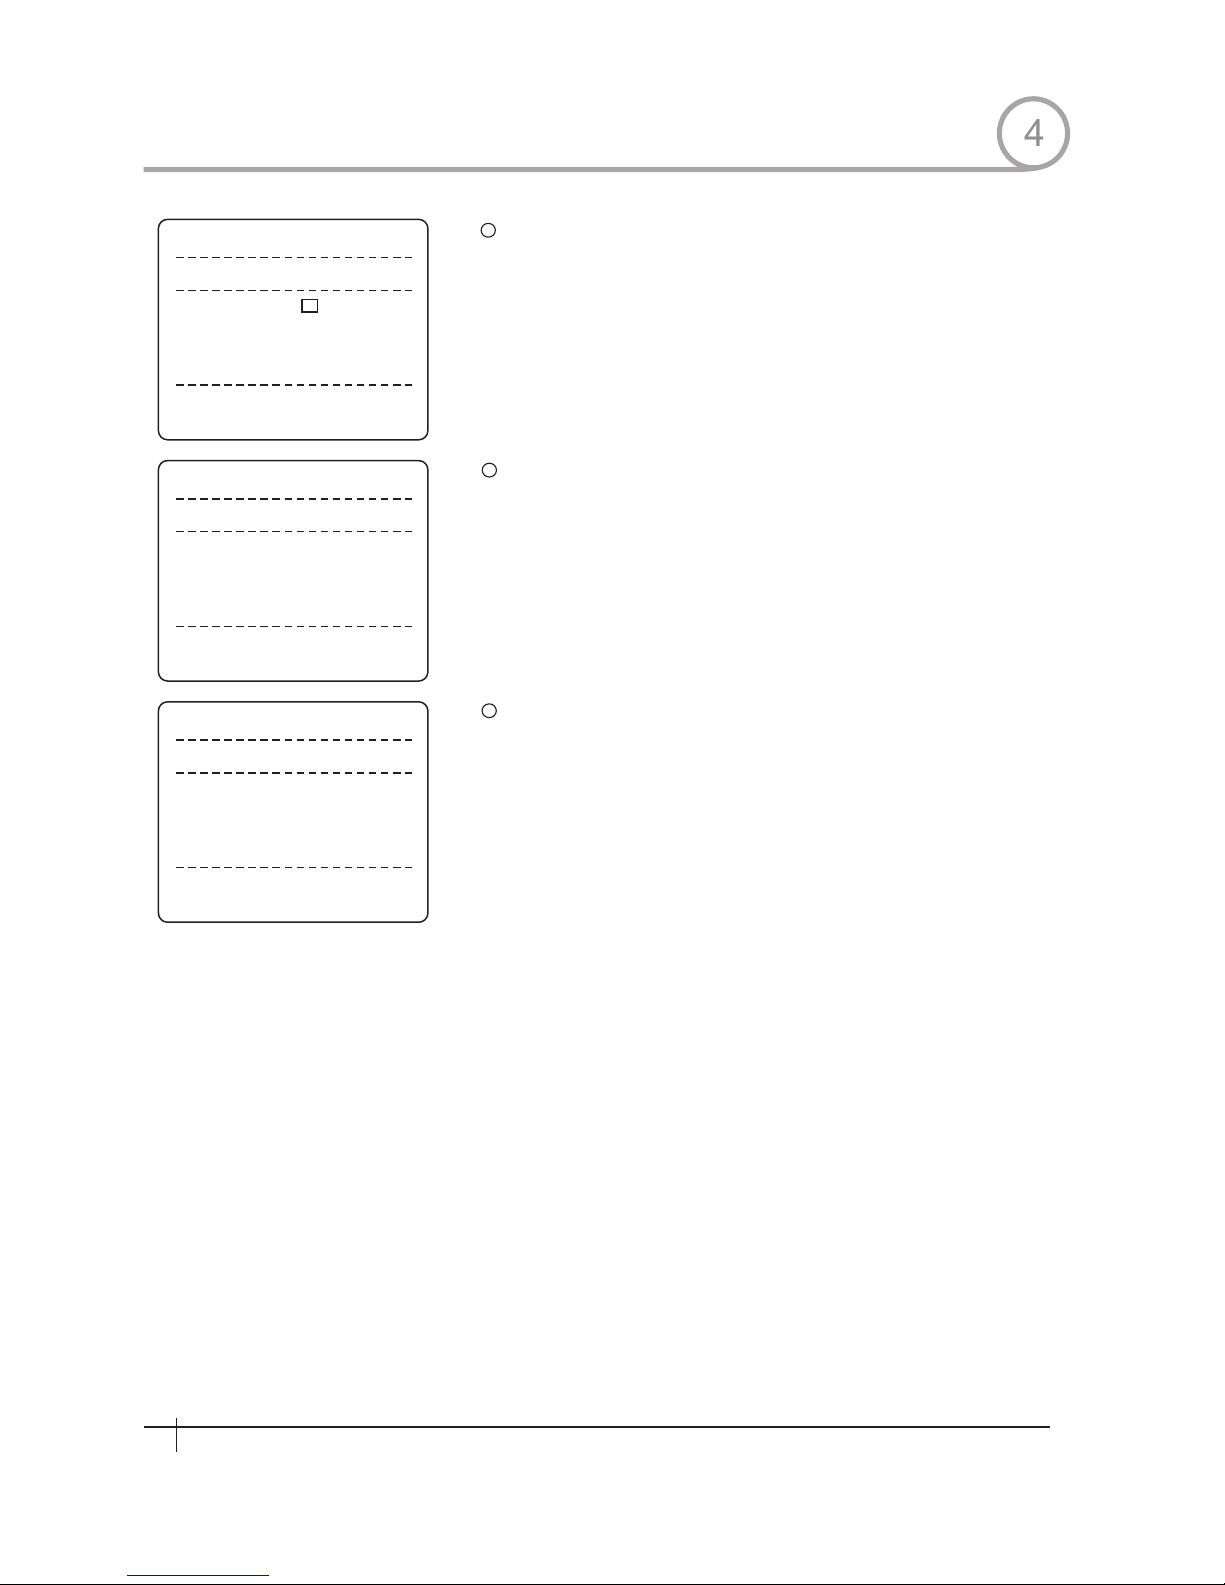
Set up i t em s such as A ct ion, ## #, D wel l an d OP T.
Af ter f i ni shi ng s et ting up a Act i on , Pr es s Near k ey t o on e- up pe r-
lev el m enu( St ep ②) . M ov e cur sor Up/ Down t o s el ec t Act ion
mum be r an d rep ea t St ep ②~St ep ④ to ed it s el ec ted G r ou p.
Af ter f i ni shi ng s et ting up al l Act i on , Pr es s FAR key to ex it . The n
cur s or s ho ul d be mov ed t o" SAVE " , Pr es s Near k ey t o sav e da ta.
4
30
Spee d Dome Cam era Instruction Manual
→
→
Page 32
System Initialize
HOW TO USE OSD MENU
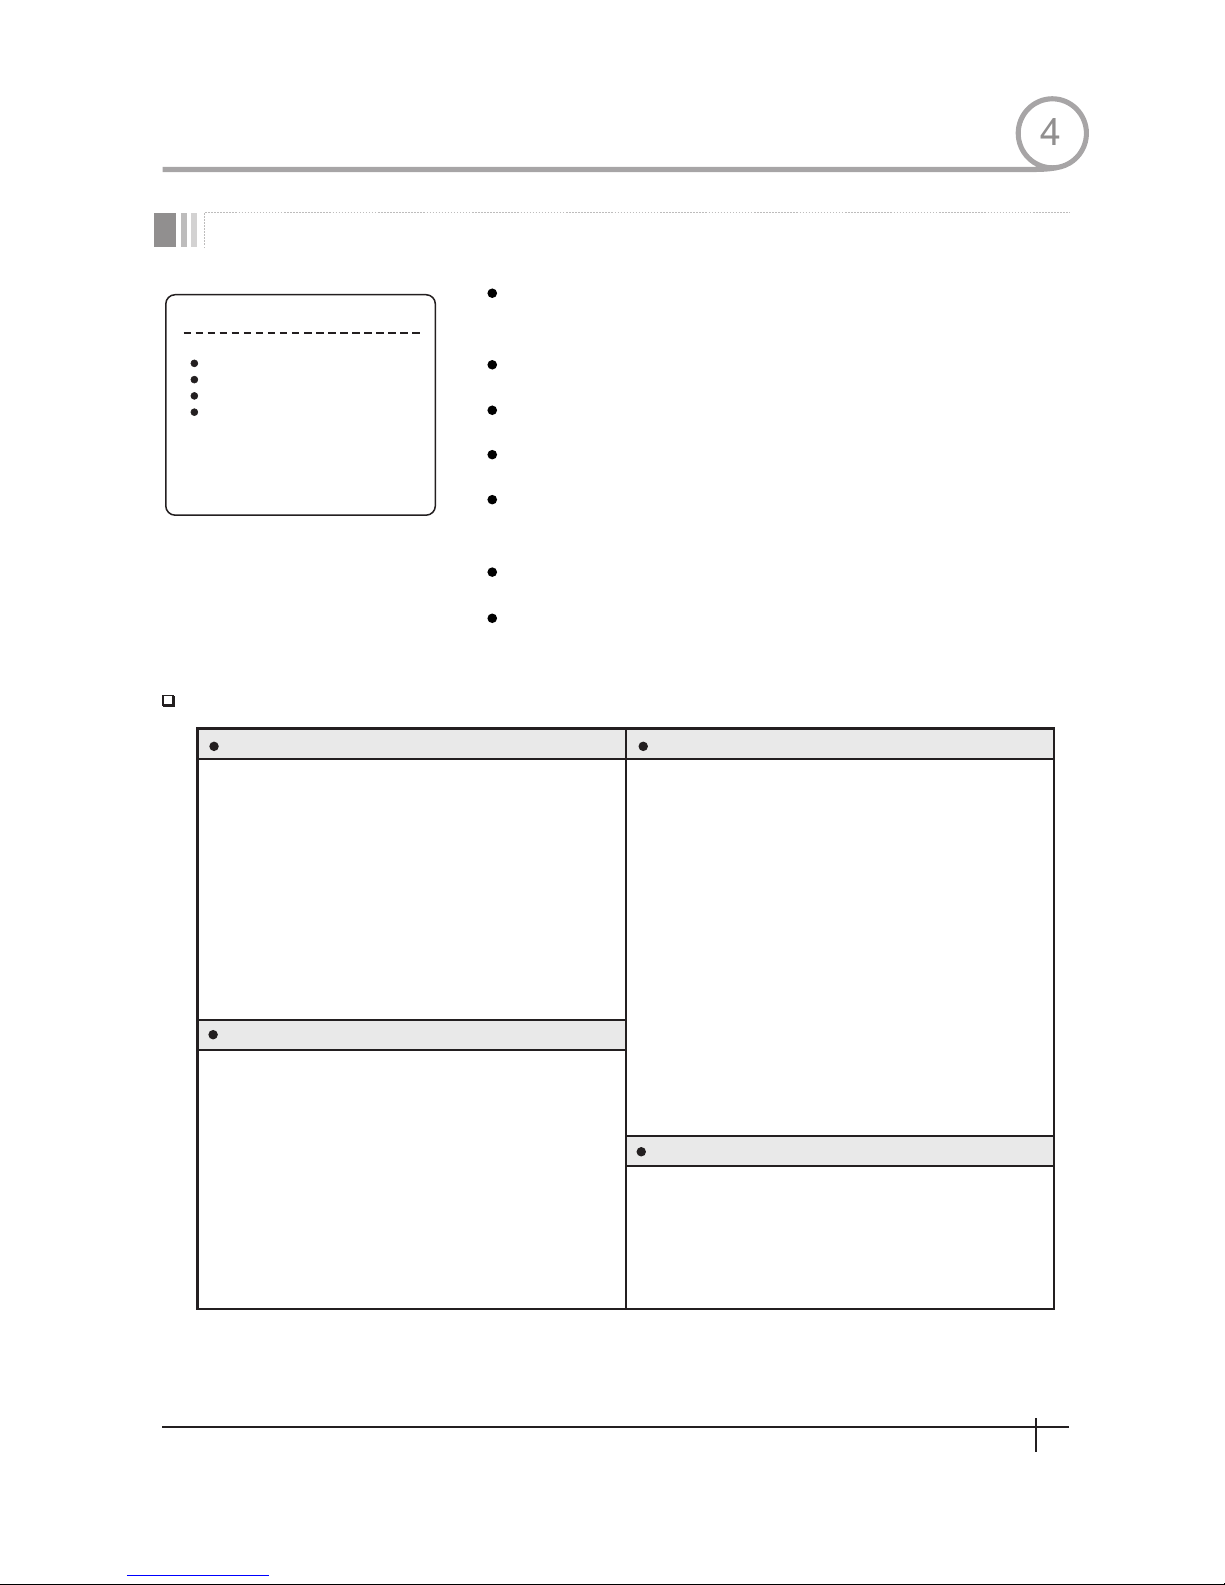
Clear All Data
Clear Display Set
Clear Camera Set
Clear Motion Set
Clear Edit Data
Reboot Camera
Reboot System
Initial Configuration Table
SYSTE M IN IT IAL IZ E
CLE AR AL L DATA
CL R DI SPLAY S ET
CL R CAMERA SET
CL R MO TION SE T
CL R ED IT D ATA
SAVE
CANCEL
REBOO T CA MERA
REBOO T S YS TE M
NO
NO
NO
NO
NO
NO
NO
→
Display Config uration
Camera ID
PTZ Information
Action Title
Preset Label
Alarm Input
North Direction
Privacy Zone
ON
AUTO
AUTO
AUTO
AUTO
o
Pan 0
Undefined
Camera Config uration
Focus Mode
Digital Zoom
Line Lock
White Balance
Backlig ht
Day&Night
Brightness
Iris
Shutter
AGC
SSNR
SENS-UP
SemiAuto
ON
OFF
AUTO
OFF
AUTO1
25
AUTO
ESC
NORMAL
MIDDLE
AUTO(4 Frame)
Motio n Config uration
User Edit Data
OFF
ON
ON
o
120 /sec
INVERSE
OFF
OFF
OFF
Motion Lock
Power Up Action
Auto Flip
Jog Max Speed
Jog Direction
Freeze In Preset
Park Action
Alarm Actio n
Undefine d
Undefine d
Undefine d
Undefine d
Preset 1~255
Swing 1~8
Pattern 1~4
Group 1~8
4
Deletes all configuration data such as display.
camera,motion setup and so on.
Initializes Display Configuration
Initializes Camera Configuration
Initializes Motion Configuration
Deletes Preset Date,Swing Data,Pattern Data and
Group Data
Reboots Zoom Camera module
Reboots Speed Dome Camera
31
Spee d Dome Cam era Instruction Manual
Page 33
DAY & NIG HI
★
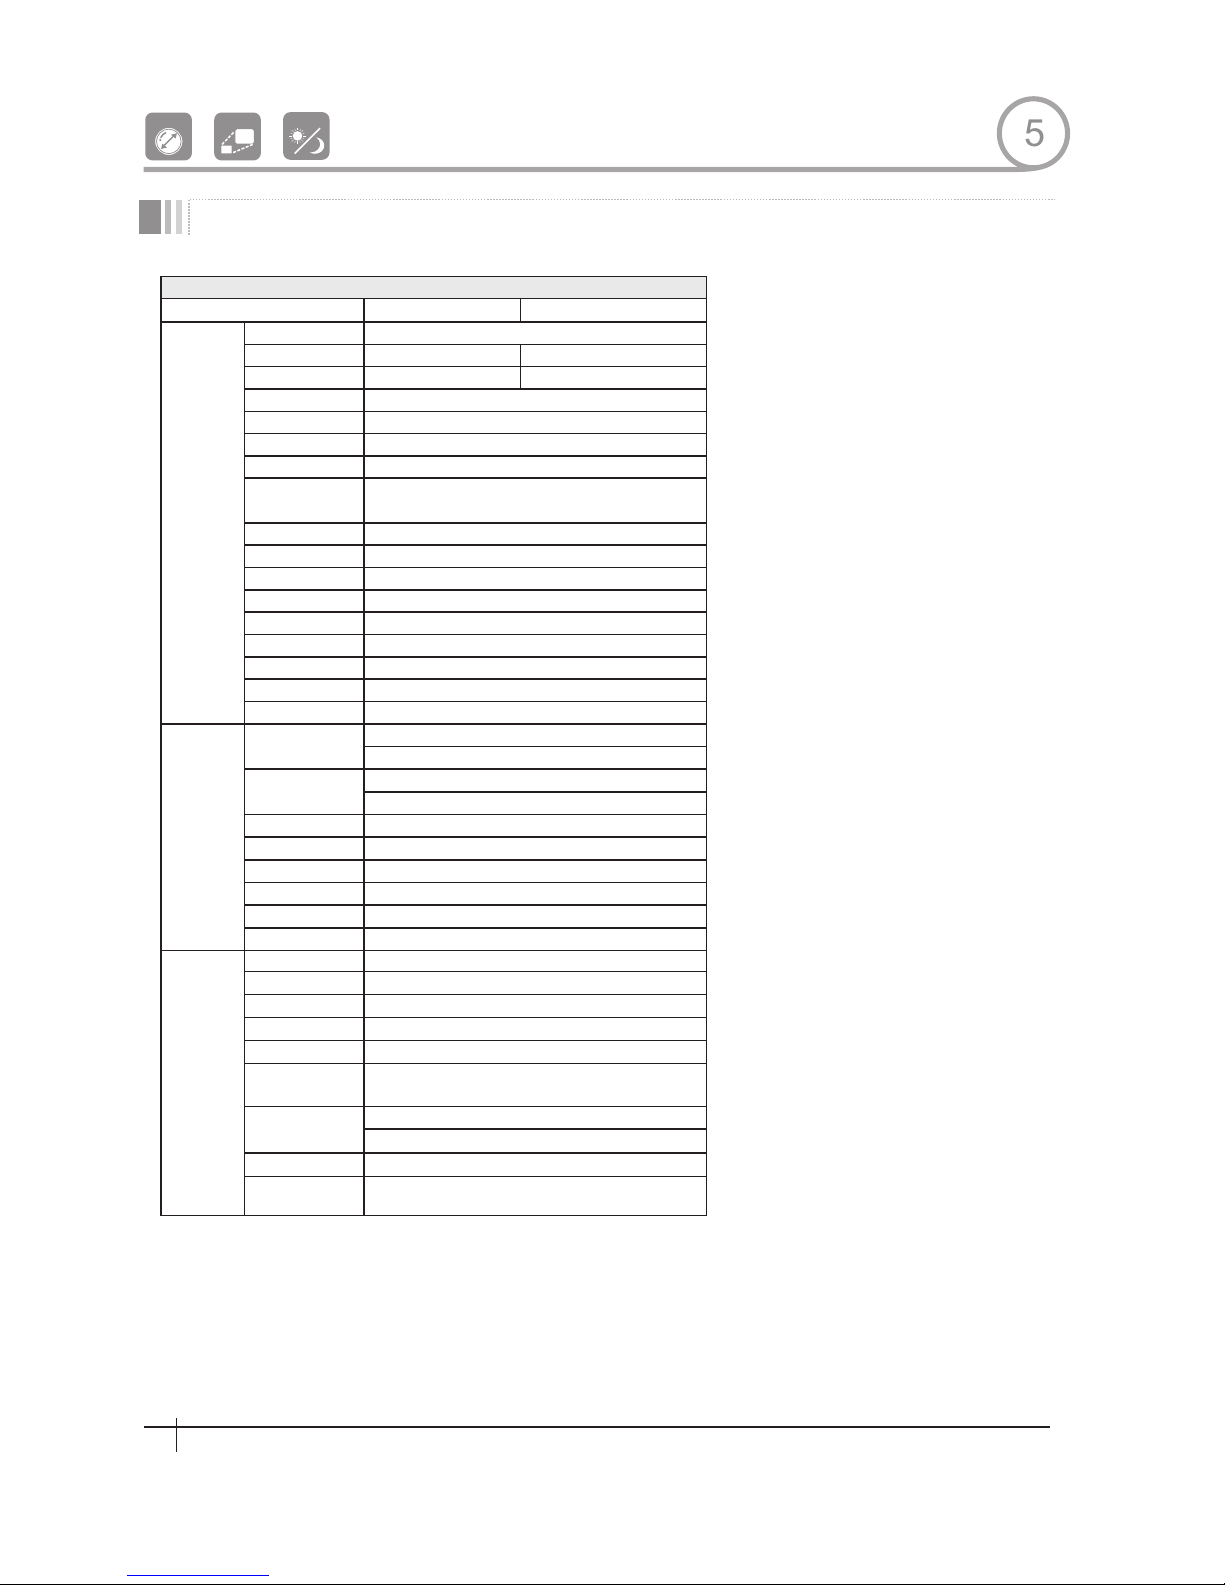
SPECIFICATIONS
DOME 4 .5"
100X ZOOM
Video Signal System NTSC PAL
CCD
Max. Pixels
Effective Pixels
Horizontal Res.
S/N Ration
Zoom
Focal length
Min.
Illumination
Day & Ninht
Focus
Iris
Shutter Speed
AGC
White Balance
BLC
Filckerless
SSNR
Range
Pan/Tilt Speed
Preset
Pattern
Swing
Group
Other Functions
Communication
Protocol
Privacy Zone
Alarm Input
OSD
Dimension
Rated Power
Weight
Operating
Temp.
Camera
Pan/Tilt
General
* Spe cific ati ons of this pr odu ct ca n be su bject ed to c han ge wi thout n oti ce.
1/4"Interline Transfer CCD
500 TV Line(Color),570 TV Line(B/W)
50 dB (AGC Off)
×10 Optical zoom, ×10 Digital Zoom
F1.8,f=3.8~38mm
0.7 Lux(Color) / 0.02 Lux (B/W), 50 IRE
Auto / Day / Night(ICR)
Auto / Manual / SemiAuto
Auto / Manual
X128 ~ 1/120000 se c
Normal / High / Off
Auto / Manual(Red, Blue Gain Adjustable)
Low / Middle / High / Off
Selectable
Low / Middle / High / Off
o
Pan : 360 (Endless)
o o
Tilt : 180 (Auto-Flip), 95 (Normal)
o
Preset : 360 /sec
o
Manual : 0.05~360 /sec(propo rtional to zoom)
o
Swing : 1~180 /sec
255 Preset(Label, Camera Image Setting)
4 Patterrn,1200 commands(aboutp 5 minute)/pattern
8 Swing
8 Group (20 action entities per Group)
Auto flip, Auto Parkong, Power Up Action etc.
RS-485
Pelco-D, Pelco-P selectable
4 Zone
NO
Menu / PTZ information etc
DC 12V / 0.8A
Dome : Φ107.7mm
Housing : Φ145×187(H)mm
about 1.2 Kg
o
0 C ~ 40℃
811(H)×508(V)410K
768(H)×494(V)380K
795(H)×596(V)470K
752(H)×582(V)440K
5
32
Spee d Dome Cam era Instruction Manual
Page 34
SPECIFICATIONS
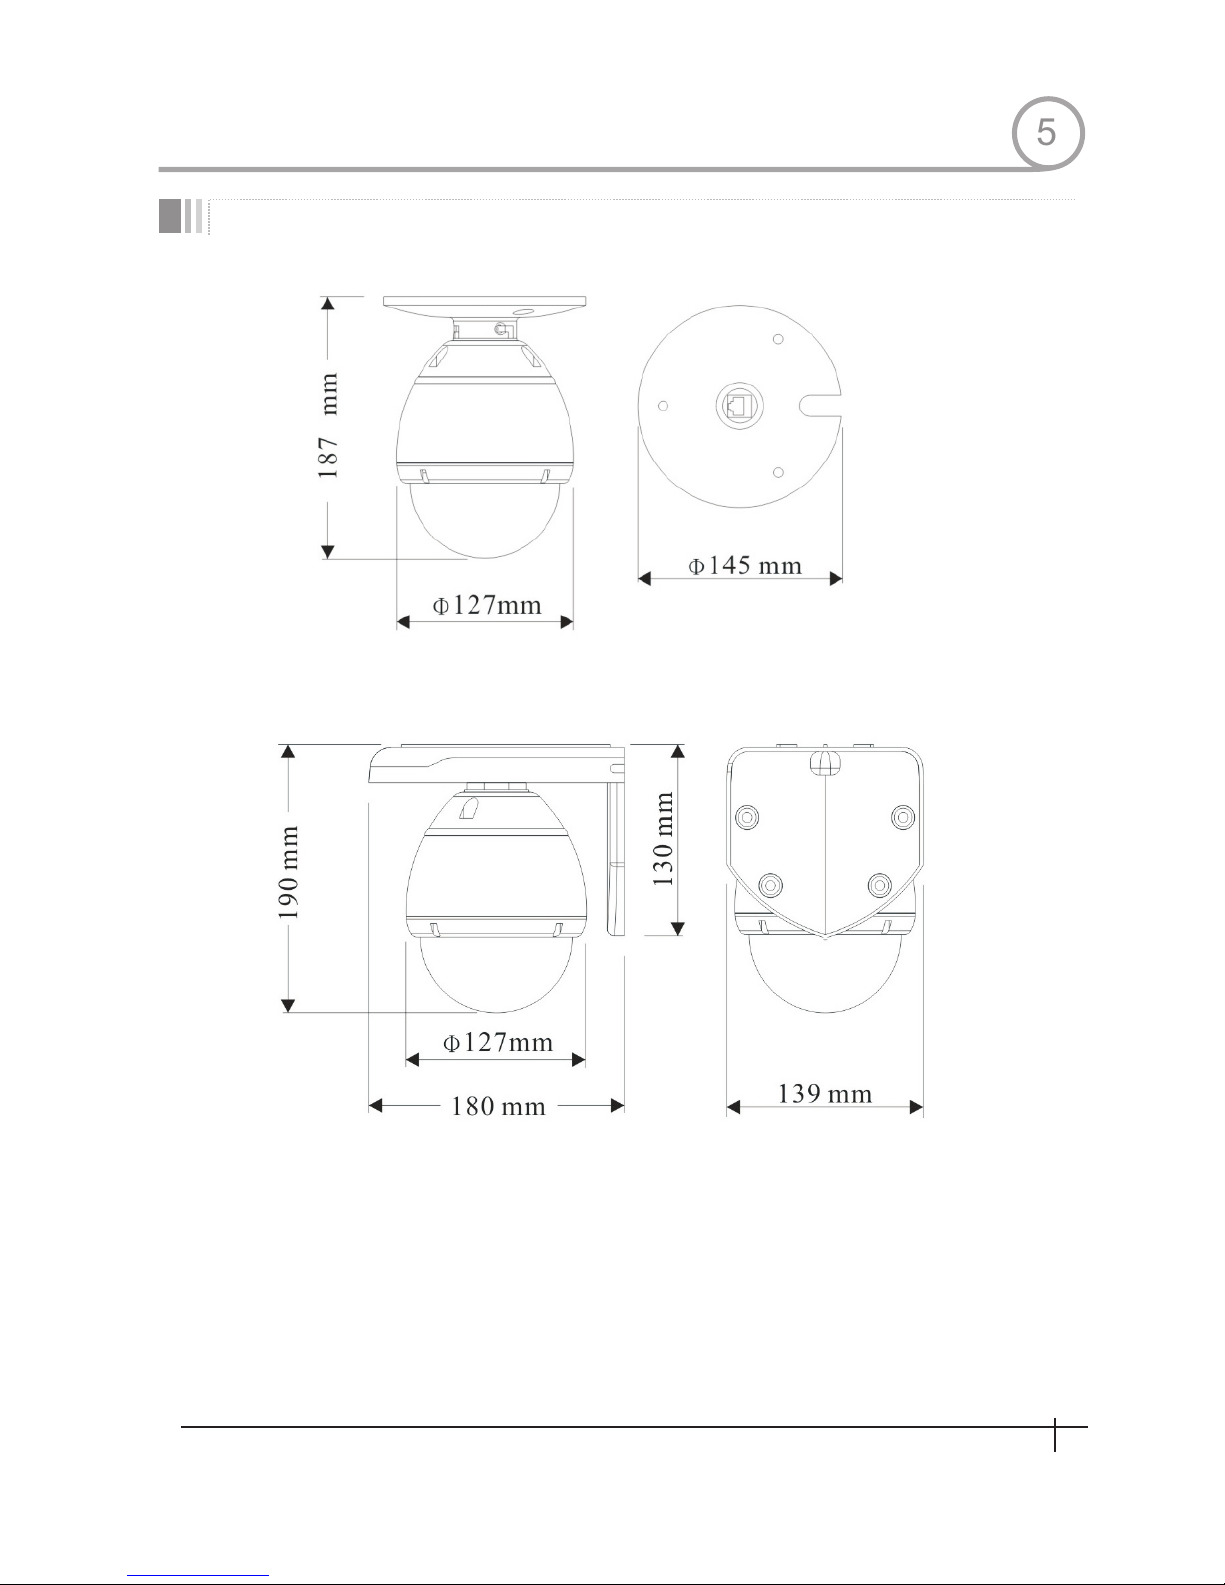
Dimension
Unit(mm)
5
33
Spee d Dome Cam era Instruction Manual
 Loading...