

MINIMOTO Hybrid Owner's Manual

MINIMOTO™ HYBRID
1
Contents Page
Introduction
2
MINIMOTO™ HYBRID
Owner’s manual and safety information
3
War nings
4 - 5
Electrical hazard
6
Vehicle assembly and set up
7 - 8
Installing the main fuse
9
Brake adjustment
9
Battery charging information
10
Storage carry area
9
Steps to charge battery
11
Battery care
12
Riding rules
13
Pre-ride checklist
14
How to ride your MINIMOTO™ HYBRID Bike
15
Special safety warnings
15
Tire inflation procedure
16
Periodic brake adjustment
16
Tire repair
17
Replacing the main fuse
17
If you lose the keys
18
Replacing the battery
19
Replacing the chain if it “Pops off”
20 - 21
Troubleshooting
23 - 24
Limited warranty and registration
25
Battery disposal
22
Registration card/Vin number
26
Appendix — spare part list
27 - 28

MINIMOTO™ HYBRID
Introduction:
Congratulations of your purchase of the MINIMOTO™ HYBRID bicycle. The unique Hybrid mechanism
inside the drive train allows a “power assist” of the normal peddling of the bike. You can use it to
stretch out your coasting or even to help to make an incline easier to accomplish. The pedalling allows
you the freedom to go anywhere a bicycle can go without worrying if the batteries run down. The sys-
tem includes a quick charging system that will give the batteries up to 80% of their charge in as little
as 5 hours.
Please read the instructions in the booklet carefully and keep them in a safe place.
2

MINIMOTO™ HYBRID
MINIMOTO™ HYBRID
Owner’s manual and safety instructions
Carefully read this manual completely before
operating your electric MINIMOTO™ HYBRID
bike. Keep this manual in a safe place for
future reference. Be sure you thoroughly
understand how to operate the components
of your MINIMOTO™ HYBRID bike.
Note: throughout this manual there are
many “warnings”. Be sure to read and
understand all of these “warnings”. Please
play extremely close attention to these
areas as serious injury or even death may
result in failing to do so.
WARNING: This vehicle is a serious
machine and should be treated with respect
when riding. It can obtain speeds that only
qualified riders of the proper age and maturi-
ty should attempt.
This vehicle can obtain speeds that only
qualified riders of the proper age, size, and
maturity should attempt. That decision
rests entirely on the observation and discre-
tion of the direct supervising adult.
IMPORTANT!!! Before we begin:
Like any two wheeled vehicle, riding the
MINIMOTO™ HYBRID bike can be extremely
hazardous. It is your responsibility to follow
this manual for the proper set up, inspection,
riding procedure, protective gear required, and
rules of the road to reduce the risk of serious
injury.
The age recommendation is only an estimate.
If the rider is too small, too large, or too old
to comfortably fit on the MINIMOTO™ HYBRID
bike, he/she should not attempt to ride it.
The MINIMOTO™ HYBRID bike is not designed
for or intended to be used by of anyone under
the age of 8.
Keep away from small children.
3
F
OR WEBSITE INFORMATION OR REGISTRATION AND CUSTOMER
SERVICE GO TO
www.teamminimoto.com

MINIMOTO™ HYBRID
WARNINGS:
This product is meant for outdoor use only
and only on private property. Never ride your
MINIMOTO™ HYBRID bike on public streets,
alleys, or other public roads or thoroughfares.
IT MUST NEVER BE RIDDEN IN ANY AREA
THAT COULD POTENTIALLY DO HARM TO
HUMANS, ANIMALS, OR PROPERTY DAMAGE.
NEVER RIDE AROUND THE VICINITY OF SMALL
CHILDREN WHO MAY ENTER YOUR PATH.
Special notes for supervising adults of the
rider:
1) The decision to allow a rider to ride the
MINIMOTO™ HYBRID must be done with the
permission of a directly supervising adult.
The directly supervising adult must read and
follow all of the contents of the owners manu-
al before making this decision.
2) The rider must have previous experience in
riding electric powered vehicles before
attempting to ride the MINIMOTO™ HYBRID.
It is the responsibility of the supervising adult
to ensure the rider has the specific talent,
physical ability, and training before allowing
them to attempt to ride the Hybrid.
3) The MINIMOTO™ HYBRID is never to be rid-
den indoors. Indoor flooring and carpets can
be damaged from abrasive contact with the
tires. The manufacturer will not be responsi-
ble for any indoor damage if the MINIMOTO™
HYBRID is used in this manner.
4) The MINIMOTO™ HYBRID is designed to
run on clean, flat, dry, and generally hard sur-
faces by persons over 8 years of age. It
should not be used on gravel or grass.
5) The rider of a MINIMOTO™ HYBRID should
always wear appropriate footwear. Open-toed
shoes should never be allowed. Keep shoe
laces and pant legs away and clear of the
wheels.
6) The rider must wear a safety helmet, elbow
and kneepads to avoid injury if falling. Failure
to wear a standard approved helmet may
result in serious personal injury or death.
7) The MINIMOTO™ HYBRID is never to be rid-
den by more than one person at a time. In
addition, it is not designed to pull or tow any-
thing behind it as it may result in serious
damage to the motor or internal parts. Do not
exceed the maximum capacity of 175 lbs (80
kg).
8) The MINIMOTO™ HYBRID cannot be used
on wet surfaces or in wet weather. Never
immerse any part of the MINIMOTO™ HYBRID
in water. Moisture can damage the motor,
switches, and drive components.
9) The MINIMOTO™ HYBRID should never be
ridden in mud, puddles, water, ice, slick or
bumpy surfaces. It is not designed to go over
curbs or extreme terrain changes in the road-
way.
10) The electric motor can become hot when
in use. Do not touch it at anytime and handle
it carefully.
11) Never use your MINIMOTO™ HYBRID
while using personal radios or headphones.
12) Do not use your MINIMOTO™ HYBRID for
stunt riding, ramp jumping, acrobatics or simi-
lar activities.
4
MINIMOTO™ HYBRID
WARNINGS: (Cond’t)
13) Never inflate the tires beyond 45PSI.
The recommended tire pressure is 40 PSI.
Inflation of the tires should be by adults only.
Serious injury or death may result in over
inflation of the tires occurs. Avoid filling the
tires at a gas station. The greater pressure
of a gas station air pump makes a blowout
of the tire possible. This may result in seri-
ous injury or death. Never use non-MINIMO-
TO™ replacement parts.
14) If there is any problem or question with
the MINIMOTO™ HYBRID , please contact the
Minimoto Service Center by calling the toll
free number:
1-800-434-6178
between the hours of 8 am to 4 pm EST, Monday
through Friday (excluding holidays).
or by email:
customerservice@teamminimoto.com
Do not return the product to
the store. Contact the
Minimoto Service Center.
Authorized service is only available through the official
Minimoto Service Center.
Spare tires, inner tubes, battery, and replacement parts
can be obtained through the
Minimoto Service Center.
15) SB 1918 (CALIFORNIA) declaration:
Your insurance policies may not provide cover-
age for accidents involving the use of this
product. To determine if coverage is provid-
ed, contact your insurance company or agent.
5
Toy Quest
c/o Minimoto Service Center
1800 N. 9th Street
Indianola, Iowa 50125
Service Center Address:
Warnings
Warning: Over tightening the stem bolt or headset
assembly may cause damage to the bicycle and/or injury
to the rider.
Ensure all bearings are lubricated, run freely and display
no excess movement, grinding or rattling.
Check headset, wheel bearings, pedal bearings and
bottom bracket bearings.
Periodically inspect the seat clamp lever for tightness.
Ensure the seat post is properly tightened before each use.
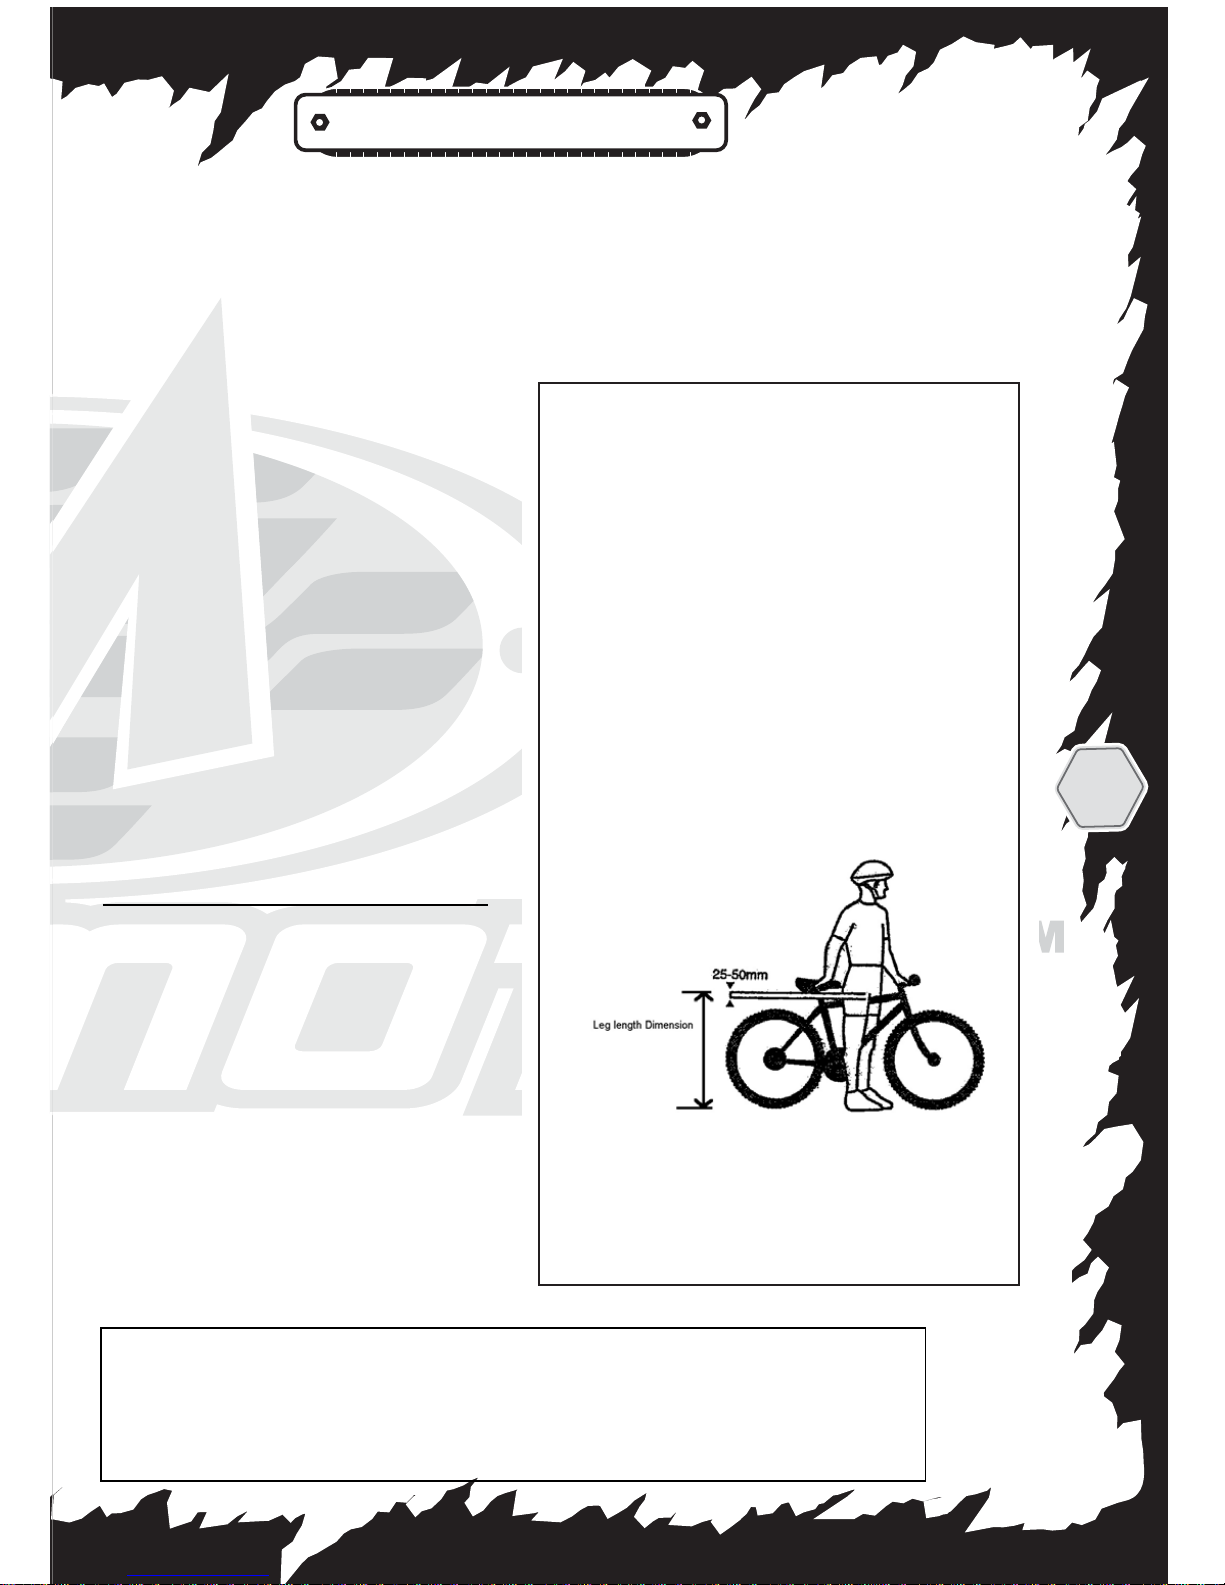
The minimum leg length dimension is 64 cm / 25 inches.
This drawing illustrating the leg length dimension of rider
and method of measurement of this dimension.
For safe and comfortable riding there should be a
clearance of between 25mm and 50mm between the
groin area of the intended rider and the top tube of the
bicycle frame, while the rider straddles the bicycle with
both feet flat on the ground.

MINIMOTO™ HYBRID
ELECTRICAL HAZARD:
WARNING
CAUTION!
THIS IS AN ELECTRICALLY OPERATED PROD-
UCT AND SHOULD BE OPERATED WITH CARE.
KEEP AWAY FROM SMALL CHILDREN.
BEFORE RIDING, ALWAYS MAKE SURE THAT
THE BATTERY RETAINER IS FIRMLY IN PLACE
AND HOLDING THE BATTERY SECURELY.
PREVENTING A FIRE:
a) Never modify the electrical system or bat-
tery charger. Modifications of these systems
can result in fire, serious injury and damage
to the electrical components.
b) To avoid damaging the battery, do not use
the charger if it has been struck, dropped or
damaged in any way.
c) Do not expose the battery to high tempera-
tures as this may cause the battery to
explode.
d) Never allow the battery charger to become
wet, and never place it in water.
e) Use of the wrong type of battery or charger
could cause a fire or explosion resulting in
serious injury.
f) Never use Minimoto™ parts, battery, or
components in any other products or vehicles
other than the MINIMOTO™ HYBRID.
Replacing or substituting parts with other
vehicles can result in overheating, fire, or
explosion. Only use MINIMOTO™ parts, bat-
tery or components in the MINIMOTO™
HYBRID because using or substituting other
parts can result in overheating, fire, explosion
or mechanical breakdown.
g) The battery is to be handled by ADULTS
ONLY. The battery is heavy and contains a
lead-acid electrolyte. Dropping the battery
can result in serious injury.
h) Never allow children to recharge the bat-
tery. Charging the battery must be done by
ADULTS ONLY. A child could be injured when
involved in the operations of battery charging
or use of electrical devices.
i) Make sure that all battery contacts or con-
nectors are clean and free of excessive wear
or damage whenever the battery is charged.
If ANY damage is detected, DO NOT USE the
charger or battery until you have replaced the
worn or damaged part.
j) Always remove the Key when your MINIMO-
TO™ is not in use to ensure the power is off.
Prevent any unauthorized riders from attempt-
ing to ride the bike.
6
MINIMOTO™ HYBRID
VEHICLE ASSEMBLY
AND SET UP:
CAUTION: The
included tools to
set up and charge
the Minimoto™
Hybrid should be
used by an ADULT
ONLY. The pack-
age contains
some small parts.
Keep away from
small children.
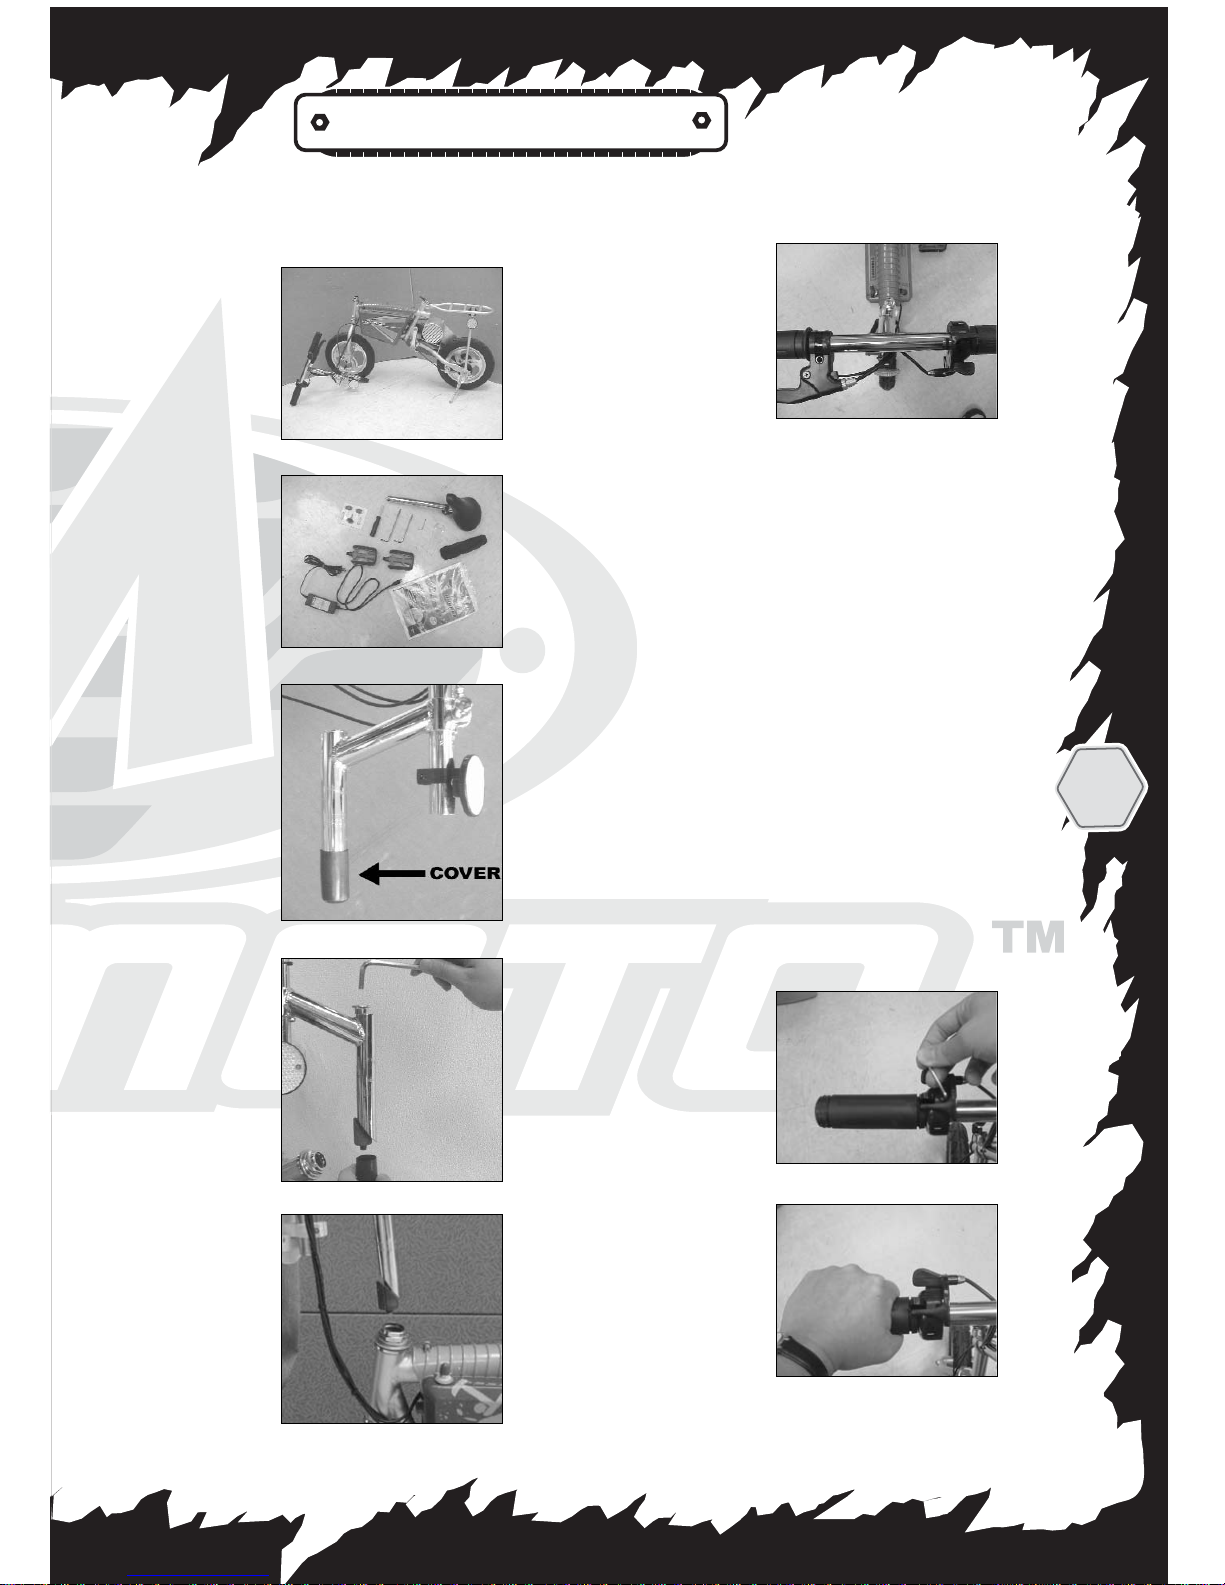
1) Completely
remove the
Minimoto™ Hybrid
from the package
and support it
with the use of
the kickstand
(Fig. 1).
2) Locate all of
the parts before
discarding the
package (Fig. 2).
3) The first step
is to remove a
protective plastic
cover from the end
of the steering col-
umn. Do to this,
first unscrew and
loosen the bolt
using an one of
the Allen head
keys (Fig. 3A &
Fig. 3B).
4) After a few turns of the
Allen Key, the plastic cover
should slide
off. Throw the
plastic cover
away.
5) Slide the
steering col-
umn into the
front fork
(Fig. 4).
6) Use the
Allen key to
tighten the
steering col-
umn firmly so
it won’t move.
7) Adjust the handlebars so
they are square with the body
(Fig. 5).
FIRMLY
tighten the
lever clamp
until the
bars do not
move.
WARNING: The handlebars
must not be able to move
while riding!. ALWAYS test
the handlebars before riding
to make sure they will not
slip, rotate, or are able to be
forced from their desired posi-
tion. If the handlebars move
while riding, it is very possi-
ble to loose control and fall.
Adjust or tighten the handle-
bars as necessary.
8) You may need to adjust the
position of the throttle. This
is done by using a small Allen
key to
release the
screw (Fig.
6). Next,
rotate the
throttle
control into
the best
position
(Fig. 7)
and retight-
en FIRMLY
with the
small Allen
key.
7
Fig 2
Fig 3A
Fig 4
Fig 5
Fig 7
Fig 1
Fig 3B
Fig 6
MINIMOTO™ HYBRID
VEHICLE ASSEMBLY AND SET UP: (Cond’t)
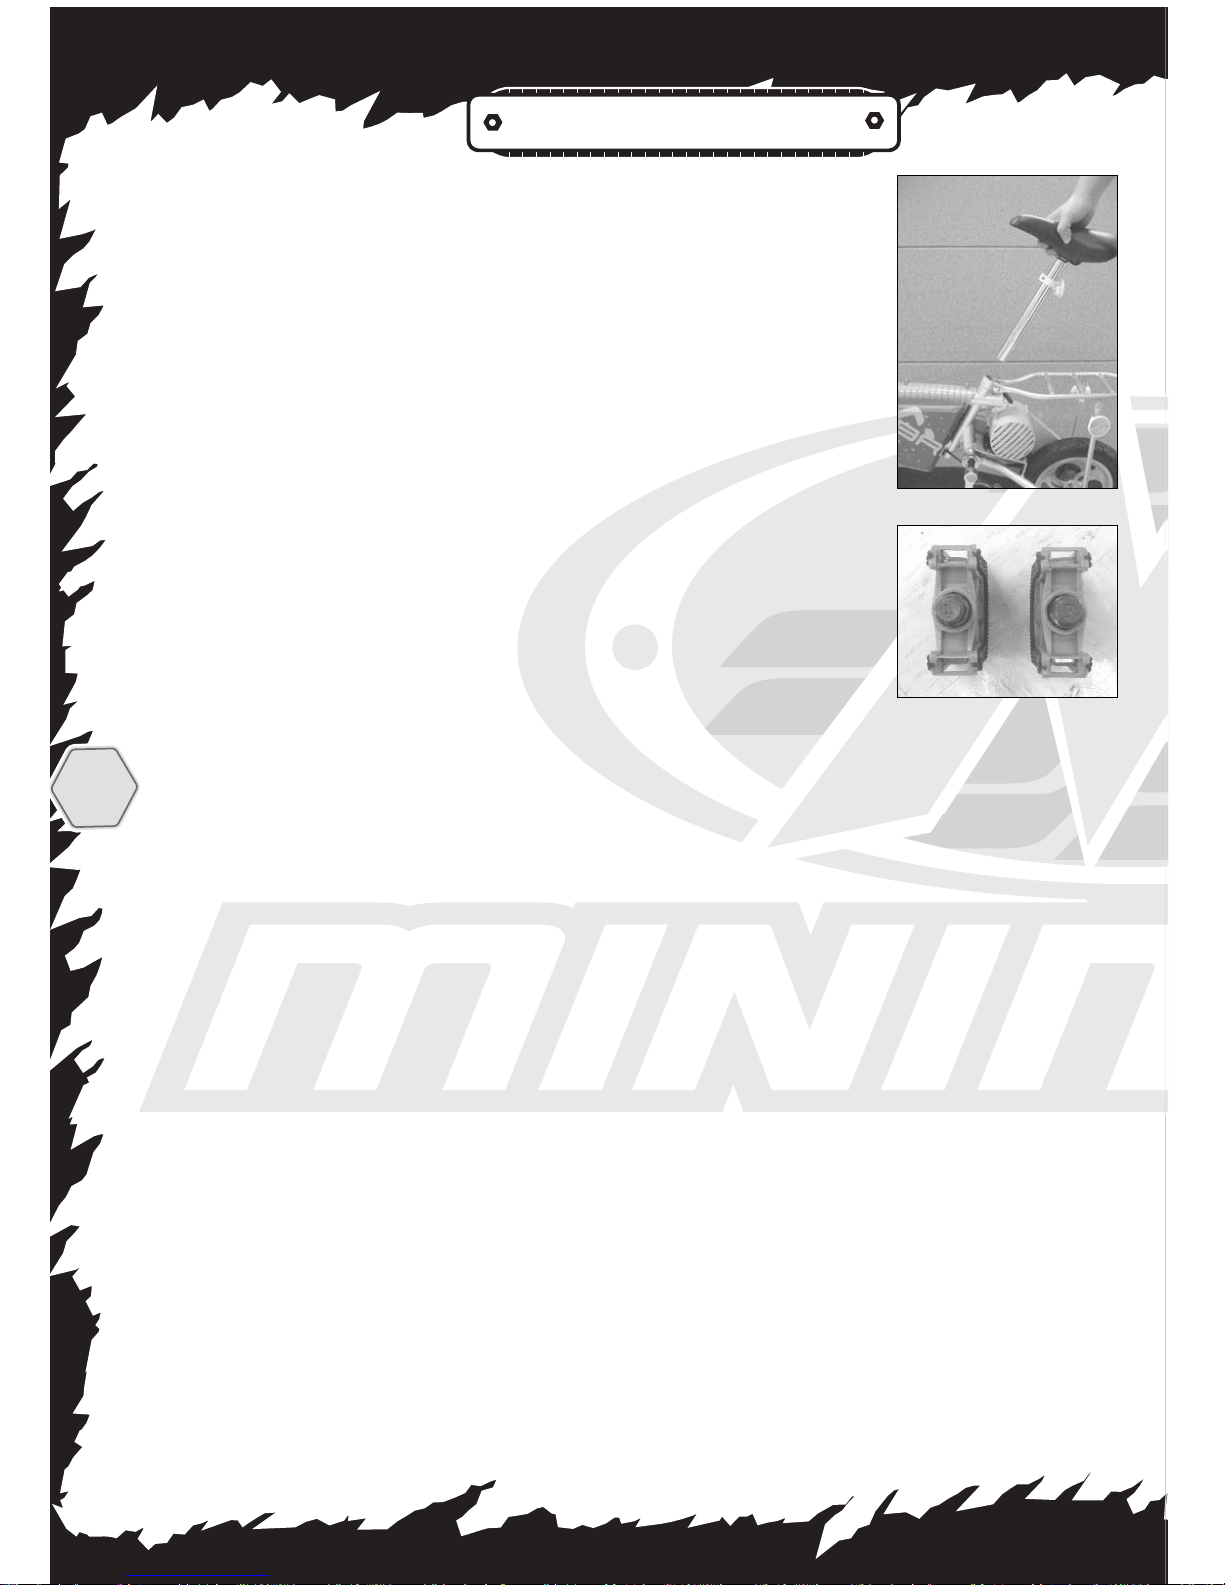
9) Slide the seat into the frame (Fig. 8). Make sure that the
indentation marks on the tube are NOT VISIBLE when tightening. If
you can see these marks, the bike seat is UNSAFE to be ridden.
Slide the seat further down and retighten.
10) Locate the RIGHT and LEFT markings on the Foot Pedals (Fig.
9). Screw them by hand into the right and left side of the bike
pedal arms. Tighten them firmly using the included wrench.
8
Fig 8
Fig 9
L
R
MINIMOTO™ HYBRID
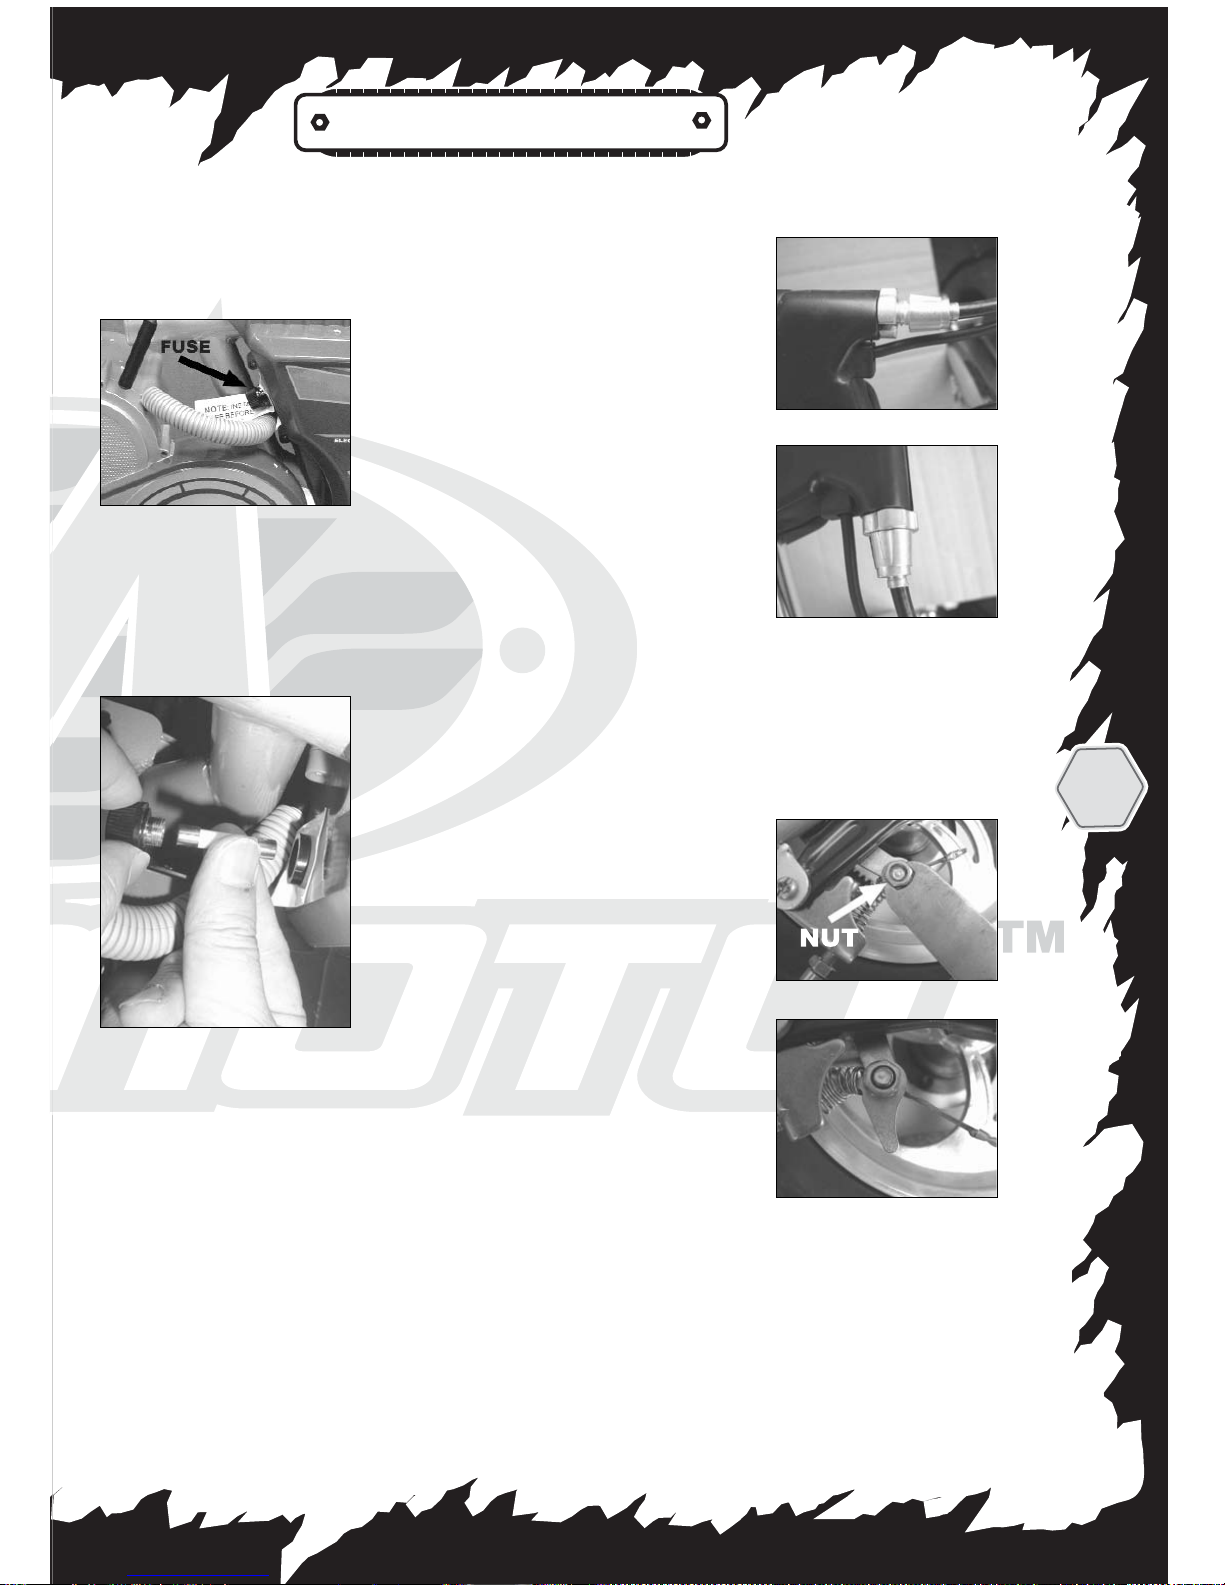
INSTALLING THE MAIN FUSE:
The MAIN FUSE MUST be installed before
charging or the bike will not charge.
Locate the Main
Fuse near the
flexible cable
between the
plastic body
and the motor.
(Fig. 18A)
[
NOTE: There
is a tag to help you locate this. Remove the
tag after you have found the Main Fuse loca-
tion].
Unscrew the
Fuse Cap and
place the Fuse
in the holder.
(Fig. 18B)
Tighten the
Fuse cap until
secure.
IMPORTANT!
In the event of extraordinary heat or tempo-
rary malfunction of the brake after a pro-
longed or aggressive use, stop riding the bike
immediately. Call the Minimoto Customer
Service Center at the Toll-free number before
further use.
BRAKE ADJUSTMENT:
IMPORTANT! Yo u must
inspect the adjustment of
the hand brake before
attempting to ride on your
MINIMOTO™ HYBRID bike.
The brakes will need to be
adjusted over time.
Tightening or loosening the
brake adjustment knob can
obtain minor brake adjust-
ments. This knob is locat-
ed next to the hand brake.
To do this adjustment,
loosen the nut and turn the conical shaped
knob to adjust the brake (Fig. 10). Retighten
the knob with the nut when the appropriate
feel of the brake is found (Fig. 11).
If the brakes need a more
drastic adjustment, use the
wrench to loosen the nut
that connects the cable to
the rear wheel (Fig. 12).
When the nut is loosened,
pull the brake cable tight
until there is no slack in
the cable. Retighten the
nut securely (Fig. 13) and
check the brakes again
before riding.
STORAGE CARRY AREA:
Behind the rear seat is a storage carry area
for you to carry small items (such as school
books). Hold your items down by using
bungee cords or rubber bands (not included).
9
Fig 11
Fig 12
Fig 13
Fig 10
Fig 18B
Fig 18A
 Loading...