

MINIMOTO HONDA Instruction Manual
Please read this manual and save it with your original sales receipt.
SKU#015319
INSTRUCTION
MANUAL
IMPORTANT!
Read completely before
attempting to ride
Owners Manual Provided Courtesy of ElectricScooterParts.com
MINIMOTO
™
MAXII BIKE
1
Contents Page
MINIMOTO™ Maxii Bike
Owner’s manual and safety information
2
Warnings
3 - 4
Electrical hazard
5
Vehicle assembly and set up
6
Brake adjustment / Storage box compartment
7
Battery charging information
8
Steps to charge battery
9
Battery care
10
Riding rules
11
Pre-ride checklist
12
How to ride your MINIMOTO™ Maxii Bike
13
Special safety warnings
14
Tire inflation procedure
15
Tire repair
16
Circuit breaker
17
If you lose the keys
17
Replacing the Chain if it "pops off":
18
Chain Drive belt adjustment and replacement:
19
How to replace the battery
20 - 21
Battery disposal
22
Trouble shooting
23 - 24
Limited warranty and registration policy
25
Registration card / VIN number
26
Appendix — spare part list
27 - 28
MINIMOTO
™
MAXII BIKE
MINIMOTO SPORT RACER™
Owner’s manual and safety instructions
Carefully read this manual completely
before operating your electric MINIMOTO
TM
MAXII BIKE. Keep this manual in a safe
place for future reference. Be sure you
thoroughly understand how to operate the
components of your MINIMOTO
TM
MAXII
BIKE.
NOTE: Throughout this manual there
are many “warnings”. Be sure to read
and understand all of these “warnings”.
Please play extremely close attention to
these areas as serious injury or even
death may result in failing to do so.
Warning: This vehicle is a serious
machine and should be treated with
respect when riding it, working on it, or
simply being near it.
This vehicle can obtain speeds that only
qualified riders of the proper age, size,
and maturity should attempt. That decsion rests entirely on the observation and
discretion of the direct supervising adult.
IMPORTANT!!! Before we begin:
Like any two wheeled vehicle, riding the
MINIMOTO
TM
MAXII BIKE can be extremely
hazardous. It is your responsibility to fol-
low this manual for the proper set up,
inspection, riding procedure, protective
gear required, and rules of the road to
reduce the risk of serious injury.
The age recommendation is only an esti-
mate. If the rider is too small, too large,
or too old to comfortably fit on the MINI-
MOTOTMMAXII BIKE, he/she should not
attempt to ride it. The MINIMOTOTMMAXII
BIKE is not designed for or intended to be
used by of anyone under the age of 10.
Keep away from small children.
2
FOR WEBSITE INFORMATION
OR REGISTRATION AND CUSTOMER
SERVICE GO TO
www.teamminimoto.com
For Parts and Accessories
Go To
www.ElectricScooterParts.com
MINIMOTO
™
MAXII BIKE
WARNINGS:
This product is meant for outdoor use only
and only on private property. Never ride
your MINIMOTOTMMAXII BIKE on public
streets, alleys, or other public roads or
thoroughfares. It must never be ridden in
any area that could potentially do harm to
humans, animals, or property damage.
Never ride around the vicinity of small chil-
dren who may enter your path.
Special notes for supervising adults of
the rider:
1) The decision to allow a rider to ride the
MINIMOTOTMMAXII BIKE must be done with
the permission of a directly supervising
adult. The directly supervising adult must
read and follow all of the contents of the
owners manual before making this decision.
2) The rider must have previous experience
in riding two wheeled vehicles without training wheels before attempting to ride the
MINIMOTOTMMAXII BIKE. It is the responsibility of the supervising adult to ensure the
rider has the specific talent, physical ability,
and training before allowing them to
attempt to ride the bike.
3) The MINIMOTOTMMAXII BIKE is never to
be ridden indoors. Indoor flooring and carpets can be damaged from abrasive contact
with the tires. The manufacturer will not be
responsible for any indoor damage if the
MINIMOTOTMMAXII BIKE is used in this
manner.
4) The MINIMOTOTMMAXII BIKE is designed
to run on clean, flat, dry, and generally hard
surfaces by children over 10 years of age.
It should not be used on gravel or grass.
5) The rider of a MINIMOTOTMMAXII BIKE
should always wear appropriate footwear.
Open-toed shoes should never be allowed.
Keep shoe laces and pant legs away and
clear of the wheels.
6) The rider must wear a safety helmet,
elbow and kneepads to avoid injury if
falling. Failure to wear a standard
approved helmet may result in serious personal injury or death. It is also highly recommended to wear eye protection while
riding.
7) The MINIMOTOTMMAXII BIKE is never to
be ridden by more than one person at a
time. In addition, it is not designed to pull
or tow anything behind it as it may result in
serious damage to the motor or internal
parts. Do not exceed the maximum capacity of 200 lbs (90 kg).
8) The MINIMOTOTMMAXII BIKE cannot be
used on wet surfaces or in wet weather.
never immerse any part of the MINIMOTO
TM
MAXII BIKE in water. Moisture can damage
the motor, switches, and drive components.
9) The MINIMOTOTMMAXII BIKE should
never be ridden in mud, puddles, water, ice,
or slick surfaces.
10) The electric motor can become hot
when in use. Do not touch it at anytime and
handle it carefully.
11) Never use your MINIMOTO
TM
MAXII BIKE
while using personal radios or headphones.
12) Do not use your MINIMOTO
TM
MAXII
BIKE for stunt riding, ramp jumping, running
over curbs, acrobatics or similar activities.
13) Never inflate the tires beyond 35 psi.
Recommended tire pressure is 30 psi.
3
MINIMOTO
™
MAXII BIKE
Inflation of the tires should be by adults
only. Serious injury or death may result in
over inflation of the tires occurs. Avoid filling the tires at a gas station. The greater
pressure of a gas station air pump makes a
blowout of the tire possible. This may
result in serious injury or death. Never use
NON-MINIMOTOTMreplacement parts.
14) If there is any problem or question with
the MINIMOTOTMMAXII BIKE, please contact
the Minimoto Service Center by calling the
toll free number:
1-800-434-6178
Between the hours of 8 to 4 EST, Monday
through Friday (excluding holidays)
or by email:
customer ser vice@teamminimoto.com
Do not return the product to the
store. Contact the Minimoto
Service Center. Authorized service is only available through the
official Minimoto Service Center.
Spare tires, inner tubes, batteries, and replacement parts can
be obtained through the
Minimoto Service Center.
15) SB 1918 (CALIFORNIA) DECLARATION:
YOUR INSURANCE POLICIES MAY NOT
PROVIDE COVERAGE FOR ACCIDENTS
INVOLVING THE USE OF THIS PRODUCT.
TO DETERMINE IF COVERAGE IS PROVID-
ED, CONTACT YOUR INSURANCE COMPANY
OR AGENT.
4
Toy Quest
c/o Minimoto Service Center
1800 N. 9th Street
Indianola, Iowa 50125
Service Center Address:

MINIMOTO
™
MAXII BIKE
ELECTRICAL HAZARD:
WARNING
CAUTION!
THIS IS AN ELECTRICALLY OPERATED
PRODUCT AND SHOULD BE OPERATED
WITH CARE. KEEP AWAY FROM SMALL
CHILDREN.
BEFORE RIDING, ALWAYS MAKE SURE
THAT THE BATTERY RETAINER IS FIRMLY IN
PLACE AND HOLDING THE BATTERY
SECURELY.
PREVENTING A FIRE:
a) Never modify the electrical system or
battery charger. Modifications of these
systems can result in fire, serious injury
and damage to the electrical components.
b) To avoid damaging the battery, do not
use the charger if it has been struck,
dropped or damaged in any way.
c) Do not expose the battery to high tem-
peratures as this may cause a battery to
explode.
d) Never allow the battery charger to
become wet or placed in water.
e) Use of the wrong type of battery or
charger could cause a fire or explosion
resulting in serious injury.
f) Never use MINIMOTO
TM
parts, battery, or
components in any other products or vehi-
cles other than those of MINIMOTOTMMAXII
BIKE. Replacing or substituting parts with
other vehicles can result in overheating,
fire, or explosion.
g) The battery is to be handled by ADULTS
ONLY. The battery is heavy and contains a
lead-acid electrolyte. Dropping the battery
can result in serious injury.
h) Never allow children to recharge the
battery. Charging the battery must be
done by ADULTS ONLY. A child could be
injured when involved in the operations of
battery charging or use of electrical
devices.
i) Make sure that all battery contacts or
connectors are clean and free of excessive
wear or damage whenever the battery is
charged. If ANY damage is detected, DO
NOT USE the charger or battery until you
have replaced the worn or damaged part.
j) Always remove the Key when not in use
to ensure the power is off and prevent any
unauthorized riders from attempting to ride
the bike.
5
MINIMOTO
™
MAXII BIKE
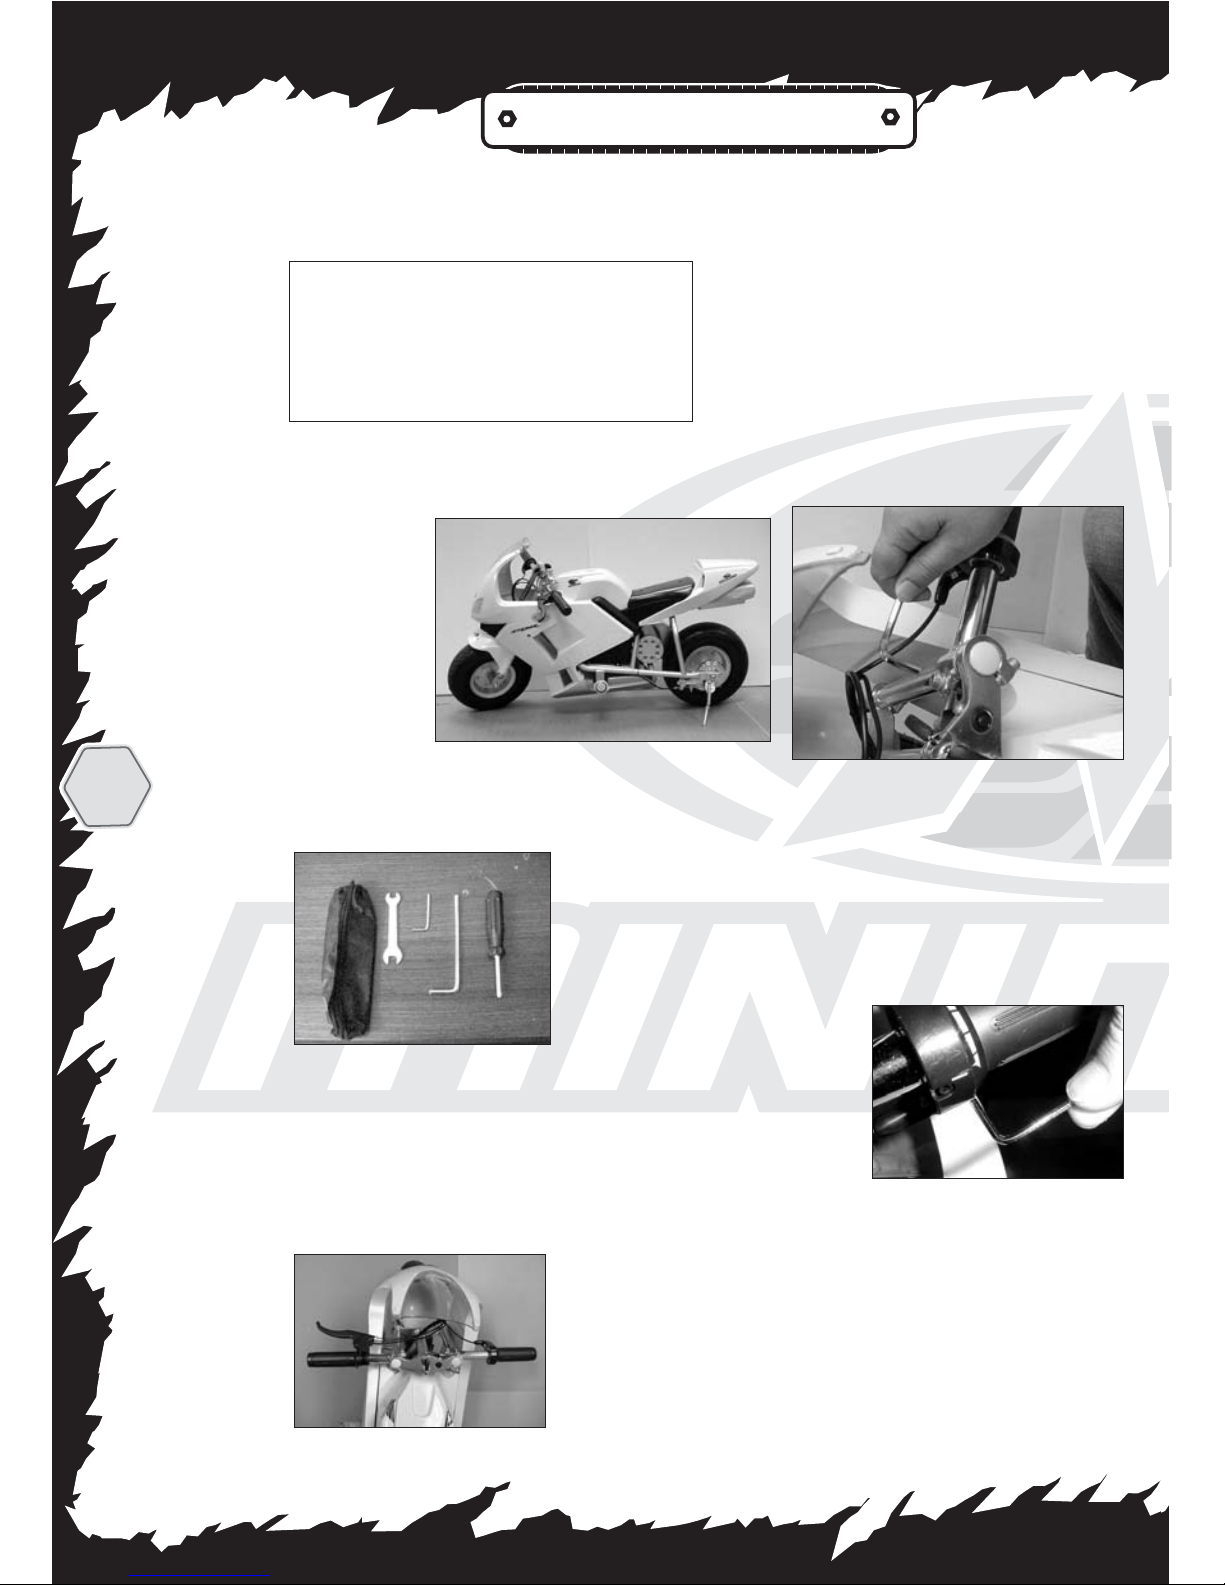
VEHICLE ASSEMBLY AND SET
UP:
CAUTION: The included tools to set up
and charge the MINIMOTOTMMAXII BIKE
should be used by an ADULT ONLY. The
package contains some small parts.
Keep away from small children.
1) Completely remove the MINIMOTO
TM
MAXII BIKE
from the
package.
Position it
upright and
support it by
moving the
kick stand to
the lower
position (Fig 1).
2) Find and
identify the
following tools
(Fig 2)
3) Rotate the two handlebars into position
(Fig 3). NOTE: Depending on the size and
driving position, rotate the handlebars
inward or outward. Moving them outward
will give you
more room
between your
knees and
your hands.
4) FIRMLY TIGHTEN the handlebars using
the tool as shown (Fig 4). WARNING: The
handlebars must not be able to move
when riding! ALWAYS test the handlebars
before riding to make sure they will not
slip, rotate, or be forced from their desired
position. If the handlebars move when rid-
ing, it is possible to loose control and fall.
Adjust or tighten the handlebars as neces-
sary.
5) Adjust the throttle by rotating the han-
dle grip into a comfortable position. Use
the Allen Key to release the screw (Fig 5).
Once the throttle is correctly adjusted, fas-
ten the screw back on using the Allen key.
Make sure the
throttle is firm-
ly in place
when finished.
6
Fig 1
Fig 2
Fig 3
Fig 4
Fig 5

MINIMOTO
™
MAXII BIKE
7
BRAKE ADJUSTMENT:
IMPORTANT! You must inspect the
adjustment of the hand brake before
attempting to ride on your Minimoto™
Maxii Bike.
The brakes will
need to be adjusted over time.
Tightening or loosening the brake
adjustment knob
can obtain minor
brake adjustments. This knob
is located next to
the hand brake.
To do this adjustment, loosen the
nut and turn the
conical shaped
knob to adjust the
brake (FIG 6).
Retighten the
knob with the nut
when the appropriate feel of the brake is
found (FIG 7).
If the brakes need a more drastic adjustment, use the wrench to loosen the nut
that connects the cable to the rear wheel
(FIG 8). When the nut is loosened, pull
the brake cable
tight until there is
no slack in the
cable. Retighten
the nut securely
(FIG 9) and check
the brakes again
before riding.
STORAGE BOX
COMPARTMENT:
Under the rear seat is a storage area for
you to carry small items. Press the button
on the rear of the compartment (Fig 10)
and pull down the bin. Snap it back into
position before riding.
Fig 10
Fig 6
Fig 7
Fig 8
Fig 9
NUT
MINIMOTO
™
MAXII BIKE
BATTERY CHARGING
INFORMATION:
IMPORTANT: The new battery provided in
the MINIMOTOTMMAXII BIKE MUST BE
charged for at least 12 hours before
using for the first time.
The charger MUST be used only in a clean,
dry area. In addition:
.
Battery charging must be done by
ADULTS only.
.
The battery must be upright when
charging.
.
The charger is not a toy.
.
Do not short-circuit the battery.
.
Do not charge the battery on any deli-
cate surfaces (such as a counter top).
.
Only use the provided charger to charge
the battery.
.
Only use a MINIMOTOTMMAXII BIKE bat-
tery or batteries when operating.
.
Remove old or dead battery from the
MINIMOTOTMMAXII BIKE if they do not
accept a charge.
.
Never use the charger in an enclosed
space. Always ensure adequate venti-
lation.
.
Never cover the electric mini bike or the
charger during charging.
.
Should anything abnormal happen to
the electric mini bike or charger, switch
off the mains supply immediately and
contact your dealer
IMPORTANT:
Under normal conditions, the battery will
reach full charge in 8 to 20 hours of charg-
ing time. The difference in time depends
on the local power output in your area, the
type of outlet you use, and the condition of
the battery.
NOTE: Do not connect the charger to a
surge protector. You should only plug the
charger directly into a standard electric
wall outlet. Surge protectors can slow
down the charging process.
8
MINIMOTO
™
MAXII BIKE
9
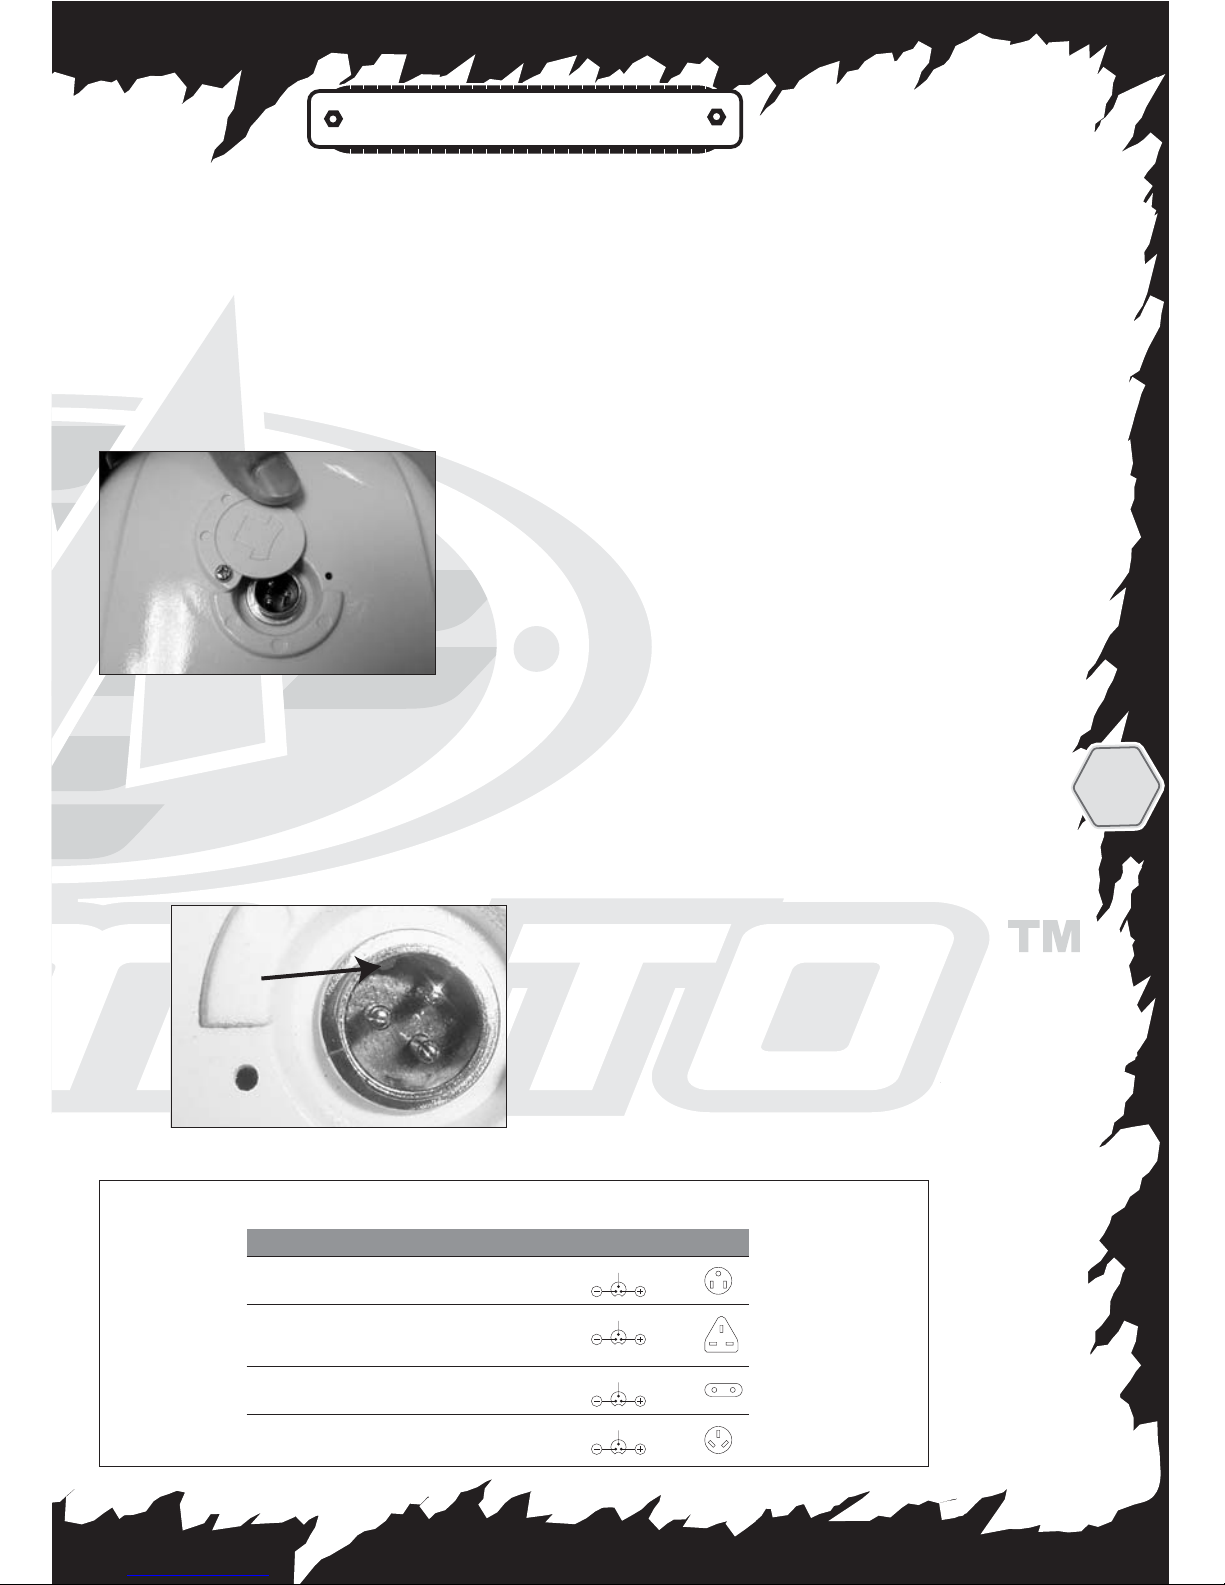
STEPS TO CHARGE BATTERY:
The port for the charger is located on the
upper body. It resembles a
simulated”FUEL CAP”.
1) Slide the protective cover over to
expose the charger port (Fig 11).
2) Note that the plug has a “groove”
inside (Fig 12). This allows the plug to be
inserted in the proper orientation to the
wires. Plug the charger into the port.
3) Plug in the charger into a standard 120
Volt electrical outlet.
4) When properly charging, THE Green light
flash on and off on the charger will be ON.
MAKE SURE THE ANY SWITCHES CON-
NECTING THE ELECTRICAL OUTLET ARE
SET TO THE ON POSITION.
5) Before using the MINIMOTO
TM
MAXII
BIKE for the first time, charge the battery
for at least 12 hours. Never charge the
battery for more than 30 hours.
6) When the battery is fully charged. The
Green light on the charger will come on. It
is recommended that you always recharge
the battery for a period of 8 hours.
However, 80% of the power will be charged
into the battery in 4 hours. It is possible
to use the MINIMOTOTMMAXII BIKE after
this period but the total running time will
be reduced.
Fig 11
Fig 12
GROOVE
Country Input Output Polarity Shape
A.C. 100-120V
60Hz
d.c. 36V 2000mA
U.S./Canada
Taiwan/Japan
A.C. 220-240V
50Hz
d.c. 36V 2000mA
U.K./Hong Kong/
Singapore/Malaysia/
Africa
A.C. 220-230V
50Hz
d.c. 36V 2000mA
Europe/Germany/
Israel
A.C. 240V 50Hz d.c. 36V 2000mA
Australia/
New Zealand/China
Bare
Bare
Bare
Bare
Battery Charger specifications for world-wide standard:
 Loading...