


VOLVO MODELS
• VNL SERIES 2004-2018 • VT SERIES 2006-2010
21. Move the accelerator, brake, and clutch
pedals through their full range of motion to
confirm there is no interference with the
Minimizer floor mat.
22. Prior to operating the vehicle, read the Safety
Instructions for Vehicle Operation.
23.
FAILURE TO CORRECTLY INSTALL AND USE
YOUR MINIMIZER FLOOR MATS ACCORDING TO
THE INSTRUCTIONS ABOVE COULD PREVENT
PROPER FUNCTIONING OF THE VEHICLE’S
PEDALS, POTENTIALLY RESULTING IN LOSS OF
CONTROL OF THE VEHICLE AND SERIOUS INJURY
OR DEATH.
WARRANTY
Minimizer Floor Mats are backed by a
Lifetime Manufacturer’s Warranty and are
guaranteed against flaws due to faulty
materials and/or unintended production
variations. This warranty extends only to
the original purchaser and excludes damage caused by abnormal use or conditions,
including but not limited to extreme abrasive conditions and/or excessive exposure
to chemicals such as bleach, gasoline and
other fuels.
Safety Instructions for Installation
• Use only with the specified vehicle make, model and year.
• Do not install on top of other floor mats.
• Install each floor mat with the Minimizer logo facing up.
• Use each floor mat only in its proper location in the vehicle.
• Install and use a retention hook for the driver side floor mat.
• Make sure that the floor mats fit properly in your vehicle floor space.
• Do not place additional floor mats on top of the Minimizer floor mats.
• Carefully follow each of the Installation Instructions for Minimizer Floor Mats on the following pages.
Safety Instructions for Vehicle Operation
• Before starting or operating the vehicle, verify that the Minimizer floor mats are installed
correctly, that the driver side mat is secured by a retention hook, and that the driver side
mat does not interfere with the accelerator, brake, or clutch pedal.
• Make sure there are no loose objects in the vehicle that could possibly interfere with the
operation of the accelerator, brake, or clutch pedal.
• If your Minimizer floor mat becomes loose, stop the vehicle at the next safe location.
Re-install the floor mat properly and securely. If that is not possible, remove the floor mat
and place it in a location where it will not interfere with safe operation of the vehicle.
• Inform all drivers of these warnings before allowing them to operate a vehicle equipped with
Minimizer floor mats.
If you have questions about these instructions or proper installation of your Minimizer floor mats,
please contact Minimizer at (800) 248-3855.
IMPORTANT SAFETY INFORMATION
READ BEFORE INSTALLING OR USING MINIMIZER FLOOR MATS
November 2017Item # 103546
Manufactured by Spray Control Systems, Inc. (SCSI)
500 Minimizer Way, Blooming Prairie, MN 55917
800.248.3855 • Fax: 888.583.7540
www.minimizer.com
MINIMIZER PRODUCTS
• TESTED AND TORTURED
TM
•
DAILY BY TRUCKERS FOR TRUCKERS
Minimizer is your aftermarket solution for quality and dependable Truck Parts, including everything
from Poly Truck Fenders, Toolboxes, Custom Floor Mats, Mud Flaps, Truck Maintenance Products and
other Truck Accessories. Minimizer uses durable materials and robotic production technology to create an industry standard that allows us to offer the longest guarantee in the industry. Use Minimizer’s
innovative products to make your truck stand out from the rest. Minimizer manufactures its products
in the heart of the USA, and has been an American family owned and operated company for three
generations. Minimizer takes pride in being known for the toughest products in the toughest industry.
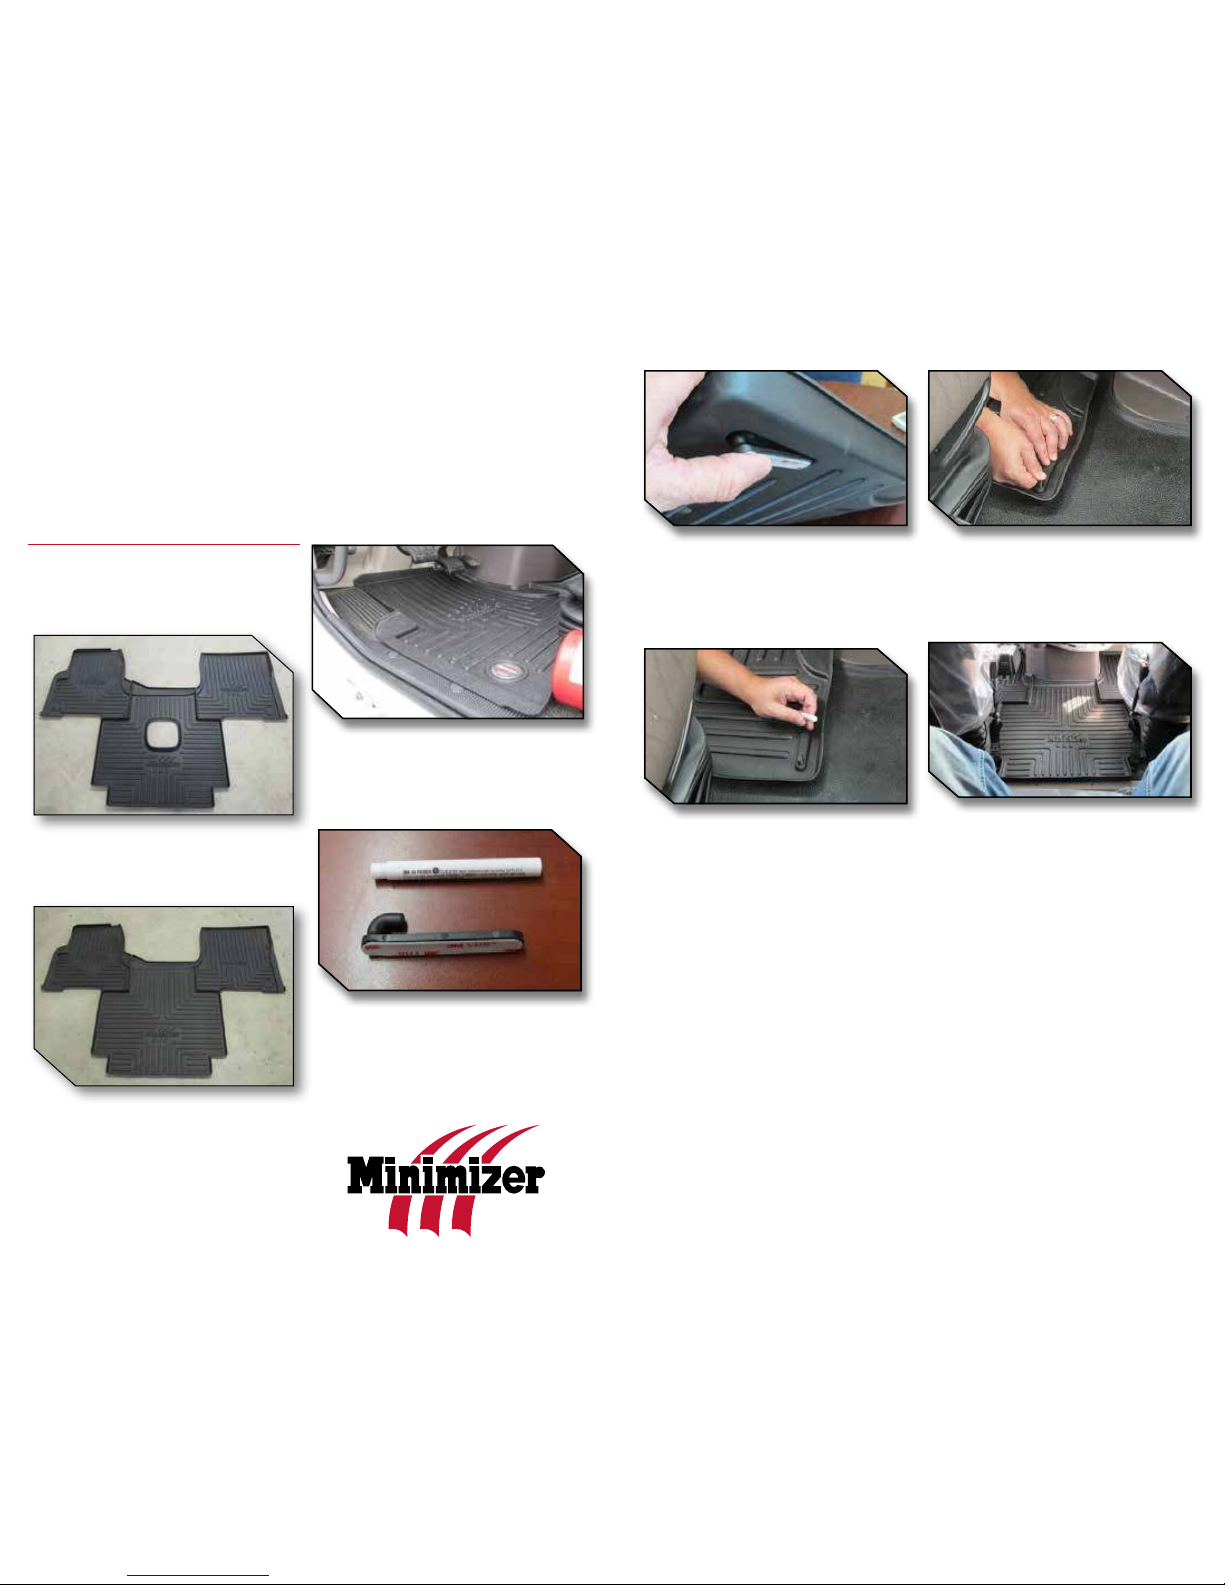
8. Once the hook is in place, let the mat and hook
rest on the floor as shown in Figure 6. Next,
confirm that the mat is not interfering with foot
pedals and verify it is making proper contact with
the surfaces surrounding the floor.
9. Mark the approximate position where the hook
will need to be attached to the floor with a finger.
Once the position is located, remove the driver
mat from the truck.
10. Unpack the tube of Primer 94 and read the
safety precautions printed on the tube.
11. Activate the tube of Primer 94 by crushing the
tube at the black dot.
12. Clean all dirt or debris off the truck floor and
apply Primer 94 to the truck floor area where the
hook will be attached.
13. Allow the Primer 94 to dry on the truck floor
for five minutes.
14. Install the driver mat in the truck with the
hook inserted. Next, peel away the paper backing
from the hook.
15. While holding onto the neck of the hook, lower
the driver mat into position and stick the hook
to the floor. Apply firm pressure to the hook as
shown in Figure 7 for 30 seconds to ensure a
proper bond to the rubber floor.
16. For optimal adhesion do not disturb the hook
for a period of 20 minutes after installation.
17. Install the center mat as shown in Figure 8
below.
18. Install the passenger mat and driver mat.
Note: the passenger side floor mat is designed to
accommodate both fixed seats and suspension
seats. For trucks equipped with a fixed passenger
seat, there will be a gap of approximately 1.5
inches between the base of the seat and the back
edge of the passenger floor mat.
19. Pull the driver mat toward the front of the
truck to confirm that the hook is fully engaged
into the mat and that the hook is adhered to the
floor. If the hook is not functioning properly or
the mat cannot be securely installed, do not use
a Minimizer floor mat on the driver side of the
vehicle.
20. FAILURE TO PROPERLY INSTALL THE RETENTION
HOOK FOR THE DRIVER SIDE FLOOR MAT MAY ALLOW
THE MAT TO SHIFT, WHICH MAY INTERFERE WITH
PROPER FUNCTIONING OF THE VEHICLE’S PEDALS,
POTENTIALLY RESULTING IN LOSS OF CONTROL OF
THE VEHICLE AND SERIOUS INJURY OR DEATH.
Minimizer floor mats are specifically designed
for certain vehicles and may be used safely
only with those vehicles. VERIFY THAT THE
MAKE, MODEL, AND YEAR OF THE VEHICLE IN
WHICH YOU ARE INSTALLING THE FLOOR MATS IS
IDENTIFIED ON PAGE 1 AS BEING COMPATIBLE
WITH THE MINIMIZER FLOOR MATS YOU HAVE
SELECTED.
VOLVO FLOOR MAT MODELS ARE AVAILABLE FOR BOTH
MANUAL AND AUTOMATIC TRANSMISSIONS:
• Kit # FKVOLVO1MB shown below in Figure 1 is
compatible with Volvo trucks equipped with a
manual transmission.
• Kit # FKVOLVO1AB shown below in Figure 2 is
compatible with Volvo trucks equipped with an
automatic transmission.
INSTALLATION INSTRUCTIONS
1. Remove other floor mats from the vehicle
before installing Minimizer floor mats.
2. Install the Minimizer floor mats right side up,
with the Minimizer logo visible.
3. Each Minimizer floor mat is contoured to fit
a particular location in the vehicle and may be
used safely only in that location.
4. The Minimizer floor mat package contains
one driver mat, one passenger mat, and one
center mat that fits in between the seats.
5 . Position the driver mat in the truck as
shown in Figure 3.
6. Inside the package with the installation
instructions, locate the black plastic retention
hook as well as a white tube of Primer 94 as
shown in Figure 4.
7. Insert the hook up through the hole at the
right rear corner of the driver side floor mat as
shown in Figure 5. The hook should fit flush with
the underside of the floor mat.
Figure 5 - Hook Insertion
Figure 4 - Hook and Primer 94
Figure 1 - Kit FKVOLVO1MB
Figure 6 - Confirm Location Driver Mat and Hook
Figure 2 - Kit FKVOLVO1AB
Figure 7 - Apply Pressure to Hook
Figure 8 - Center Mat Installed
Figure 3 - Driver Mat in Position
 Loading...