

Page 1
1
MINIMED® 670G SYSTEM | CHANGING THE QUICK-SET INFUSION SET QUICK REFERENCE GUIDE
START HERE
1
5
2
1 2 3 4
6
3 4
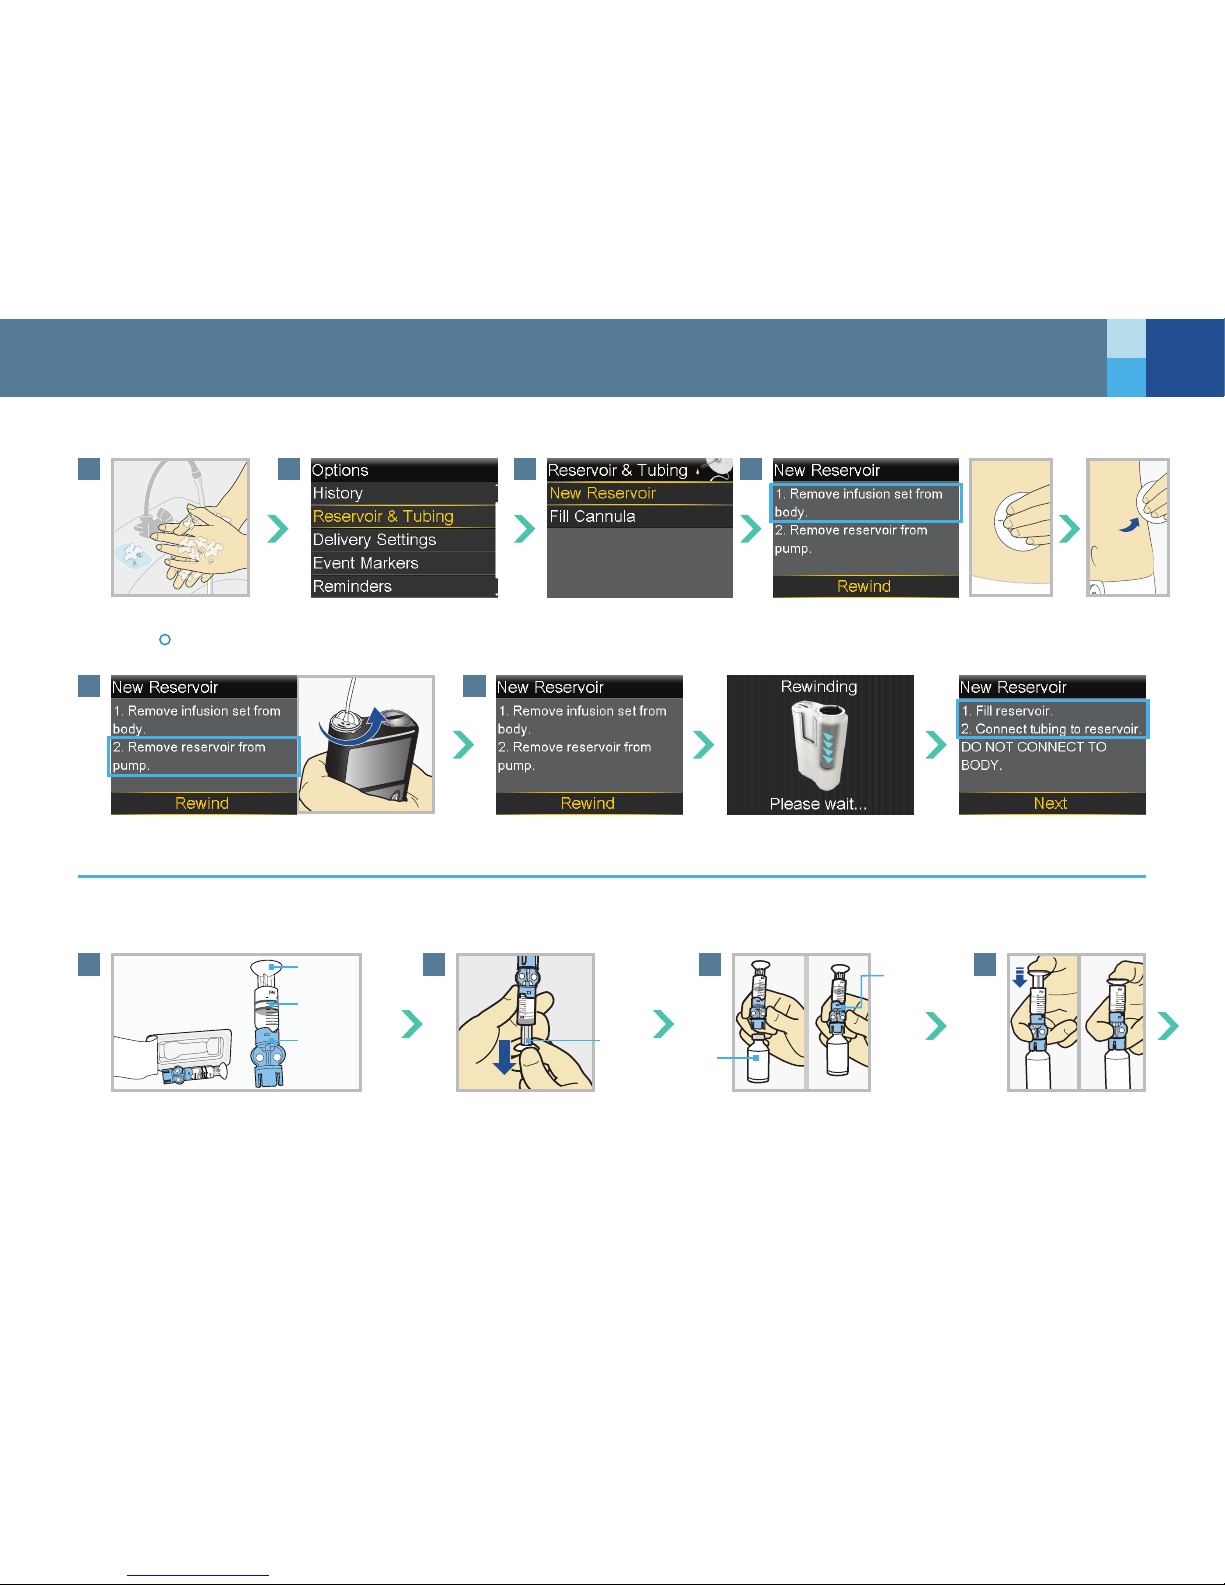
Wash your hands.
Press
. Select Options.
Select Reservoir & Tubing. Select New Reservoir.
Select Rewind.
Remove the infusion set you have been using by
loosening the adhesive and pulling away from body.
Remove the used reservoir from the pump.
Remove from package. Make sure
insulin vial is at room temperature
to reduce the risk of air bubbles.
Follow the next steps to ll reservoir with insulin and connect to the infusion set tubing.
Pull plunger down to
the amount that you
plan to ll with insulin.
Wipe vial with alcohol. Place
vial on table. Firmly press the
blue transfer guard onto vial.
Push and hold
plunger down.
Plunger
rod
Plunger
Transfer
guard
Reservoir
Transfer
guard
Insulin
vial
FILL RESERVOIR & CONNECT TO THE INFUSION SET TUBING
Continued on next page
Page 2
2
MINIMED® 670G SYSTEM | CHANGING THE QUICK-SET INFUSION SET QUICK REFERENCE GUIDE
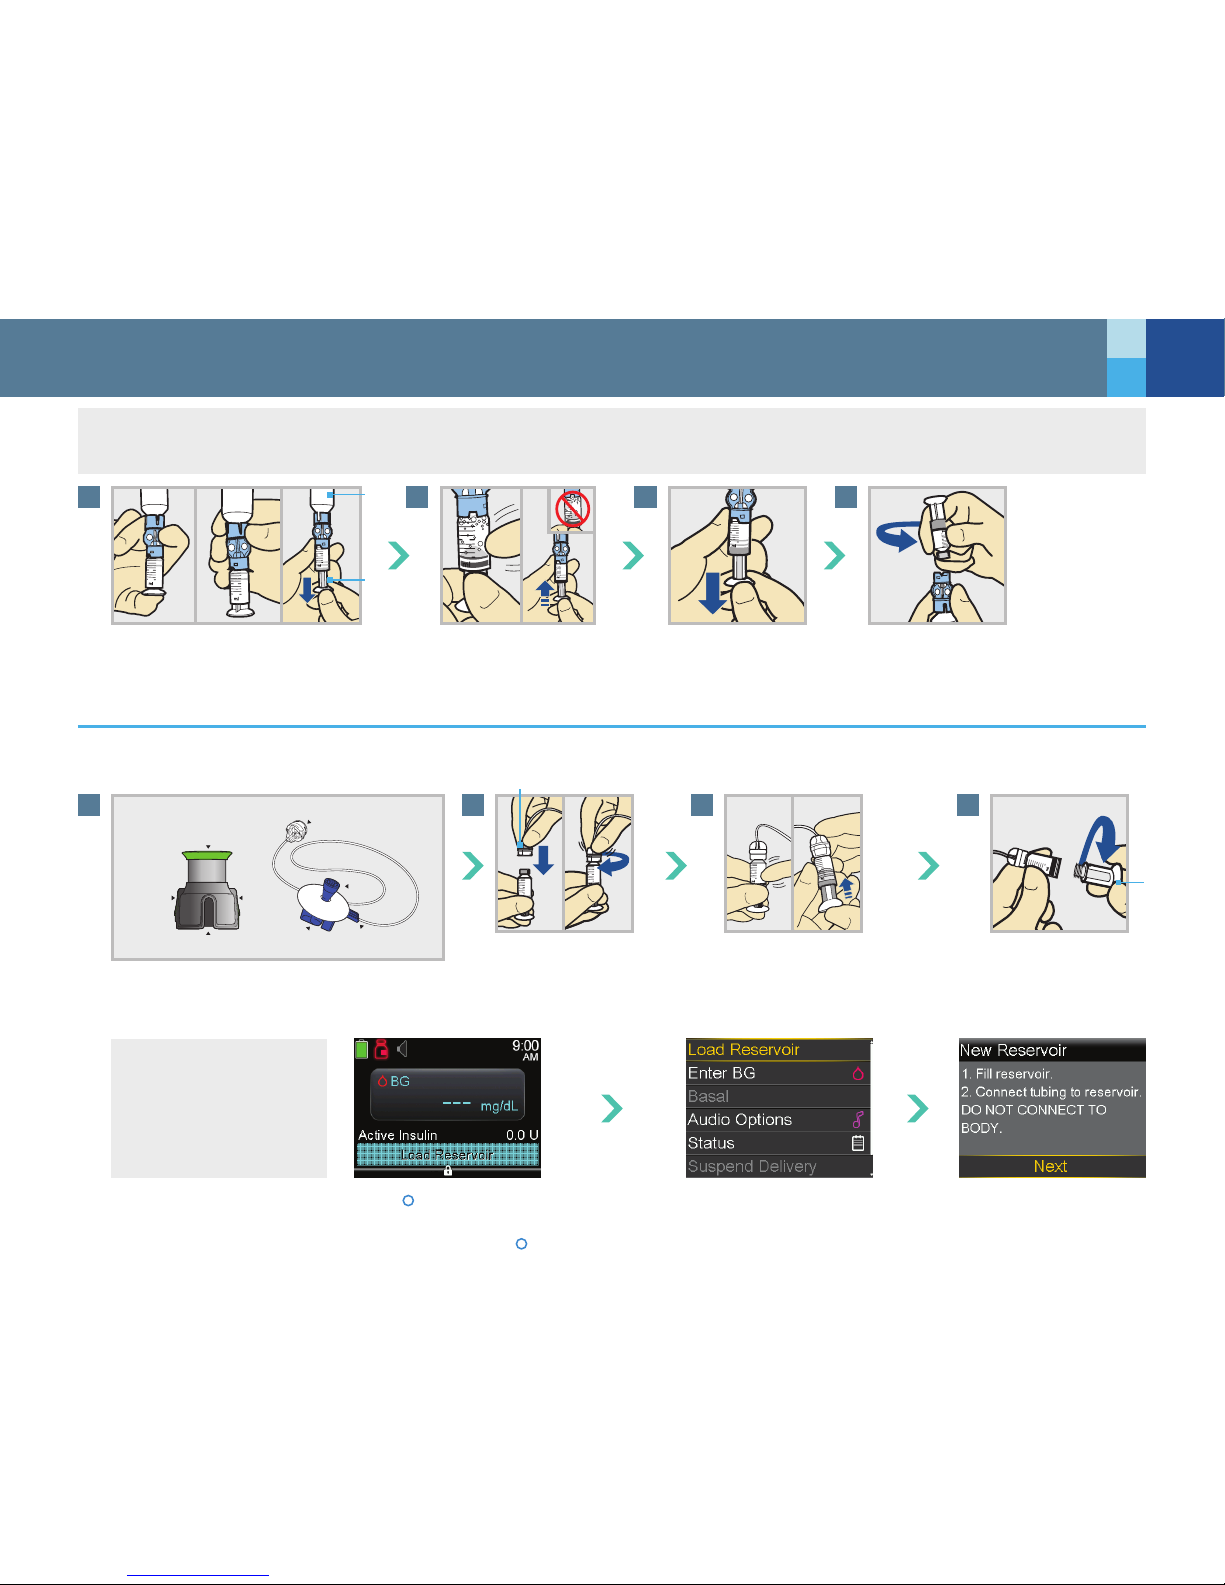
You will place the tubing connector onto the end of the infusion set to the lled reservoir.
5
41
6 7
2
8
3
With your thumb still on the plunger,
ip over so vial is on top. Release
thumb and pull plunger down to ll
with insulin.
Tap the reservoir to move
air bubbles to top of
reservoir. Push plunger
up to move air into vial.
If needed, pull plunger
back down to amount
of insulin needed for
2-3 days.
Gently push the tubing
connector onto reservoir.
Turn clockwise until locked.
You will hear a click.
To avoid getting insulin on the top of the
reservoir, turn vial over so it is upright. Hold
transfer guard and turn reservoir counterclockwise and remove from transfer guard.
If you see air bubbles, tap
reservoir to move them to
top. Push plunger just a bit to
move them into tubing.
Remove infusion set from package. Remove
the paper that holds the tubing together.
Twist plunger counterclockwise to loosen
and remove.
Select Load Reservoir
from the menu.
Press
to open the menu. If the pump
is locked, you will need to unlock the
pump after pressing
.
Select Next.
THE BACKLIGHT MAY
HAVE TURNED OFF
Press any button to turn
the screen back on.
WARNING If insulin or any liquid gets inside the tubing connector, it can temporarily block the vents that allow the pump to properly ll
the infusion set. This may result in the delivery of too little or too much insulin, which could cause hyperglycemia or hypoglycemia.
Insulin
vial
Plunger
Quick-serter
®
Quick-set
®
Tubing connector
Release
button
Tubing
slot
Green side
button
Green side
button
Needle guard
Hub handleBlue hub
Connector
Plunger
CONNECT RESERVOIR TO INFUSION SET
Continued on next page
Page 3
3
MINIMED® 670G SYSTEM | CHANGING THE QUICK-SET INFUSION SET QUICK REFERENCE GUIDE
1 2
3 4
1 2 3
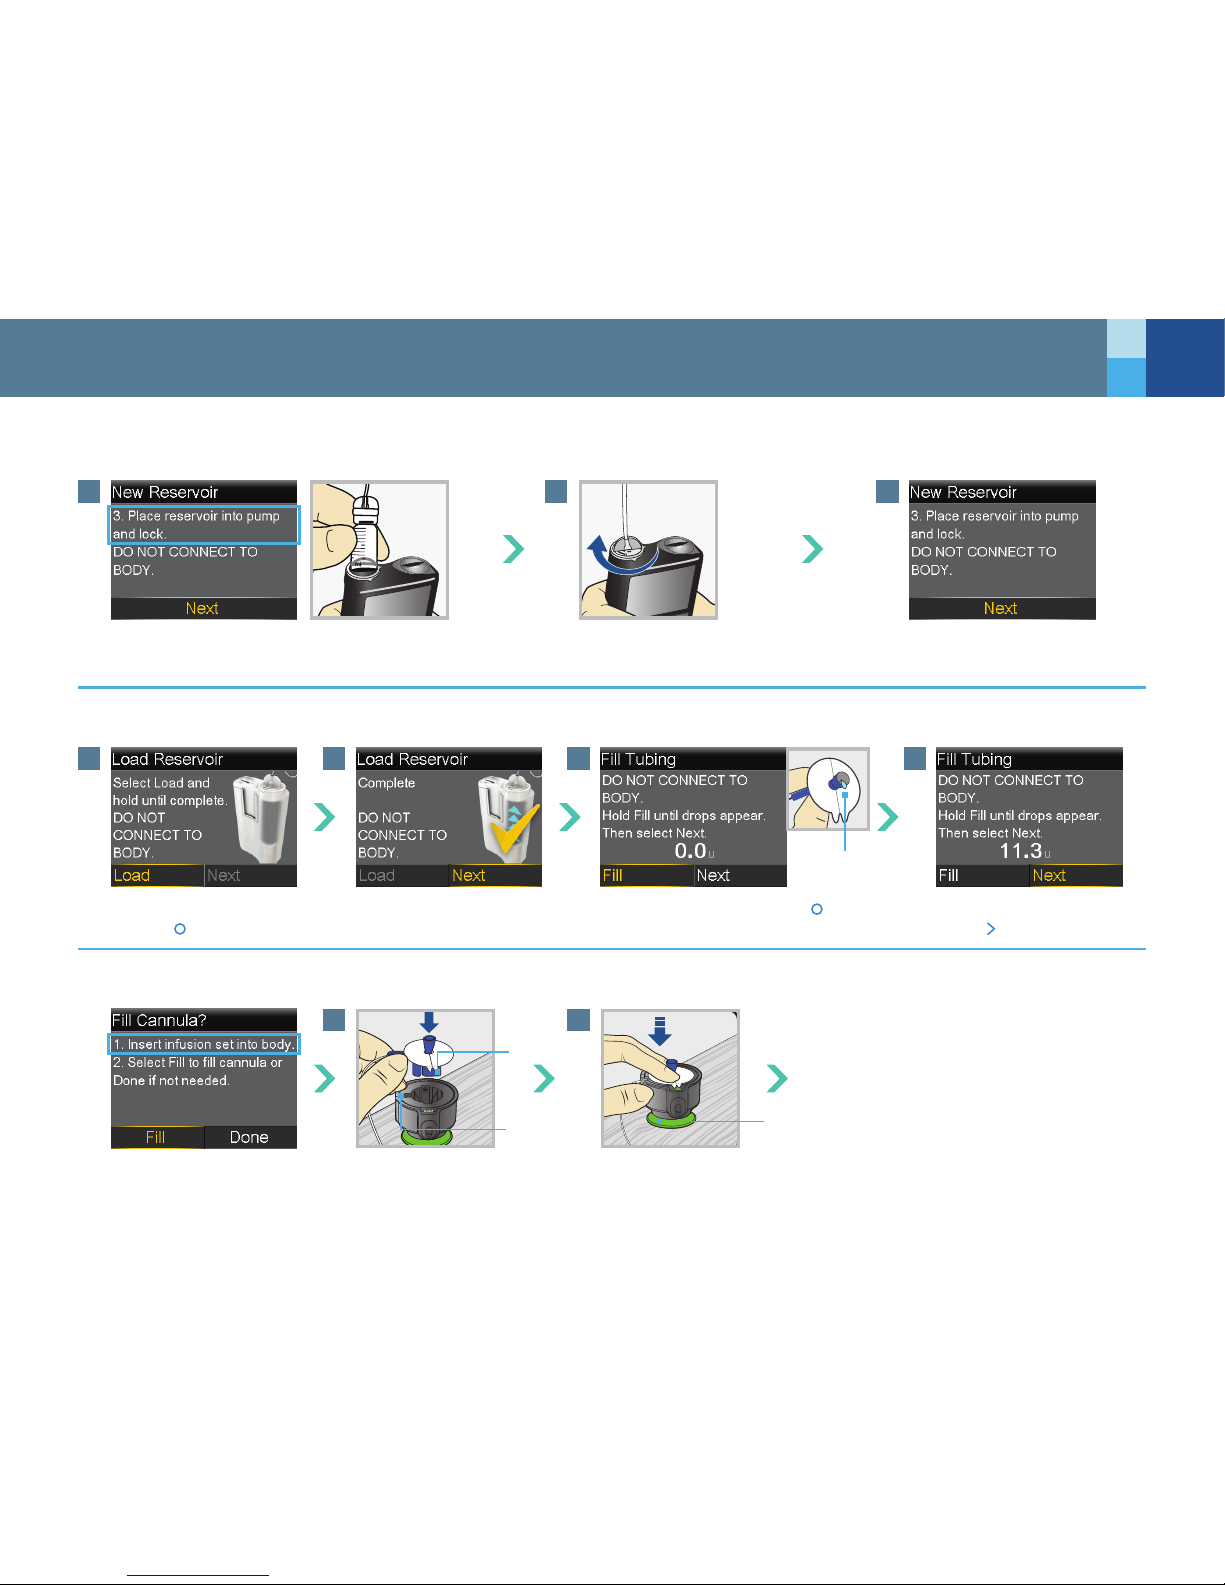
Place reservoir into pump. Select Next.
Select Load and keep
holding
.
When you see this screen,
select Next.
After you see drops,
press
and select Next.
Select Fill and keep holding
until you see
drops at the end of tubing, then let go.
Turn clockwise until you feel
reservoir lock into place.
Place blue hub into serter,
placing the handle in the
tubing slot.
Holding the serter with one hand, gently press infusion set to secure.
Be careful not to push all the way into serter. Do not hold or press on
the blue button.
Drops at end
of tubing
21
Now place the lled reservoir into the reservoir compartment of the pump.
Follow these steps to load the reservoir and ll the tubing.
Next, follow the steps to insert the infusion set into your body.
PLACE RESERVOIR INTO PUMP
LOAD RESERVOIR AND FILL TUBING
INSERT INFUSION SET
Be careful not push or
hold release button
Blue hub
Tubing slot
Continued on next page
Page 4
4
MINIMED® 670G SYSTEM | CHANGING THE QUICK-SET INFUSION SET QUICK REFERENCE GUIDE
3
7
11
4
8
12
5
9 10
6
1
2
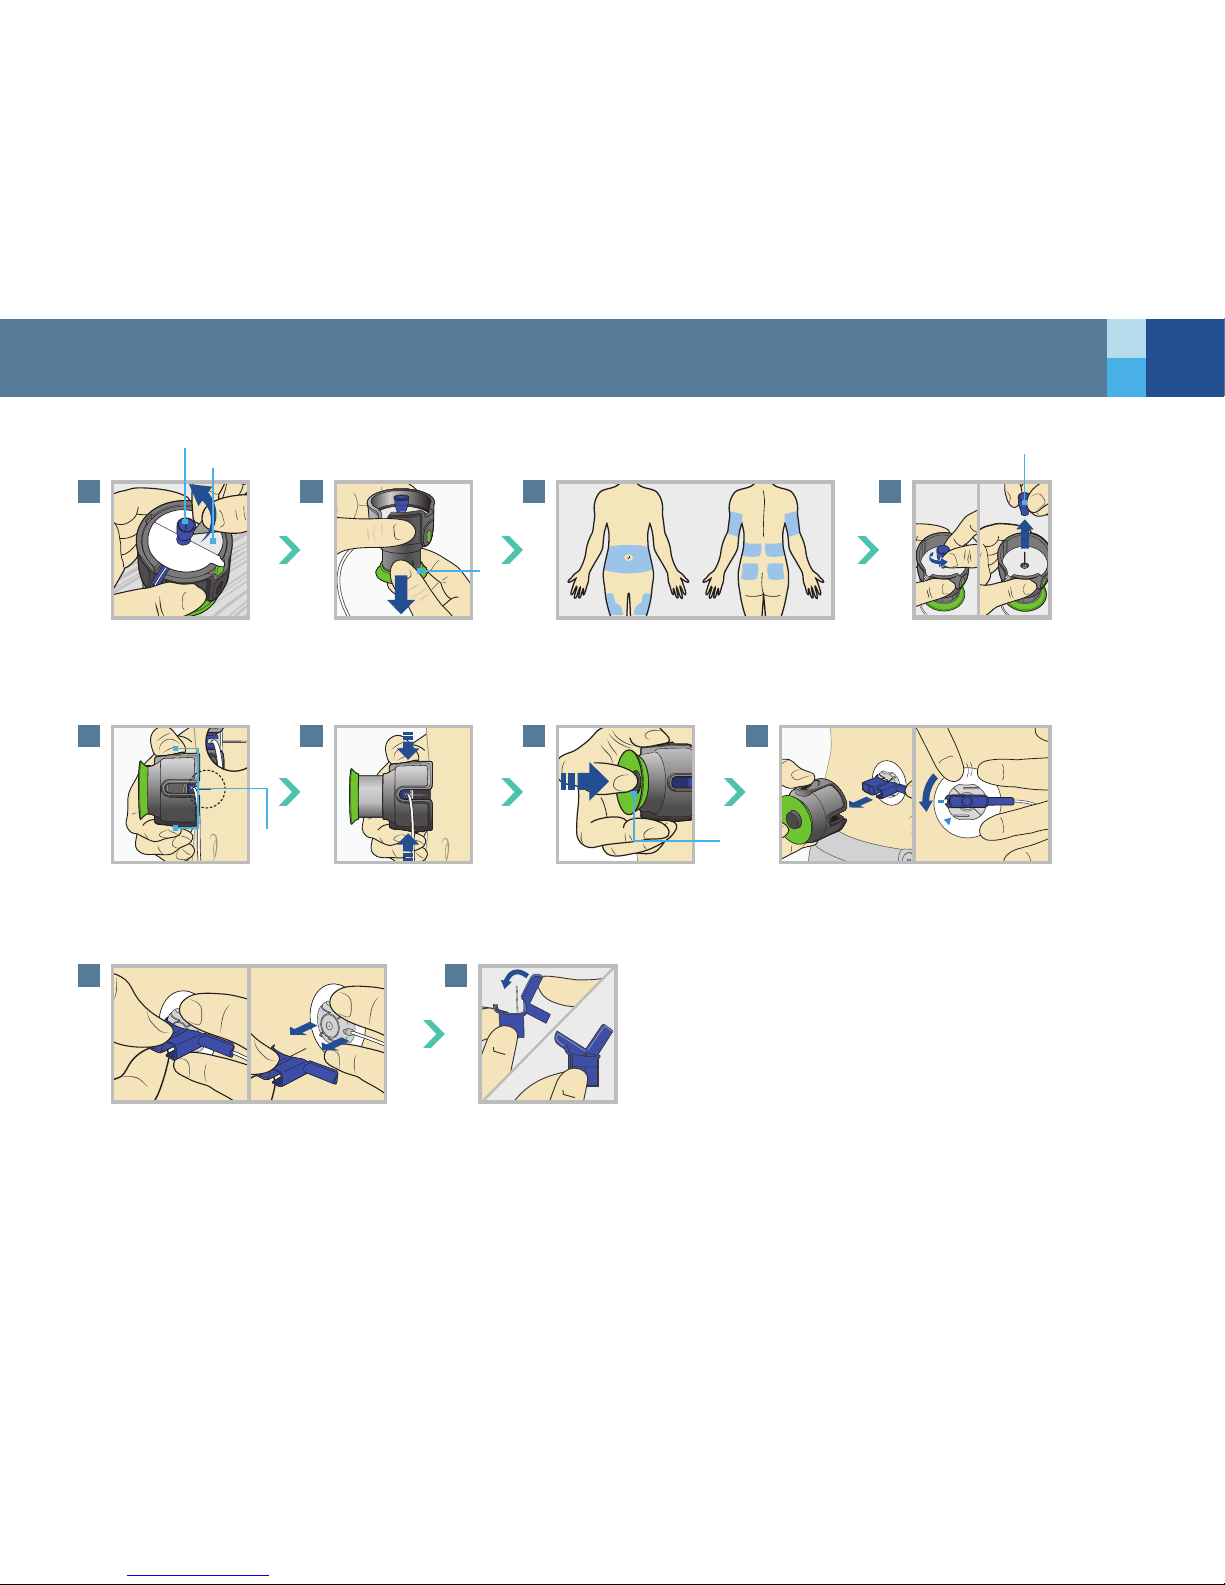
Holding needle guard,
pull o the paper that
covers the adhesive.
Hold serter against
cleaned site.
Hold infusion set. Pull blue handle
straight out to remove needle.
Pull green handle
down until you hear
it click.
Press the two green side
buttons at the same time.
Fold blue handle
until locked.
Choose an insertion site from the
shaded areas shown here. Wipe with
alcohol or other antiseptic.
Press down the release
button to unlock.
Turn to loosen needle
guard and pull.
Pull serter away from body. Press
adhesive against skin.
Release
button
Release
button
Green side
buttons
Needle guard
Needle guard
Adhesive
Continued on next page
Page 5
5
MINIMED® 670G SYSTEM | CHANGING THE QUICK-SET INFUSION SET QUICK REFERENCE GUIDE
1
3
2
4
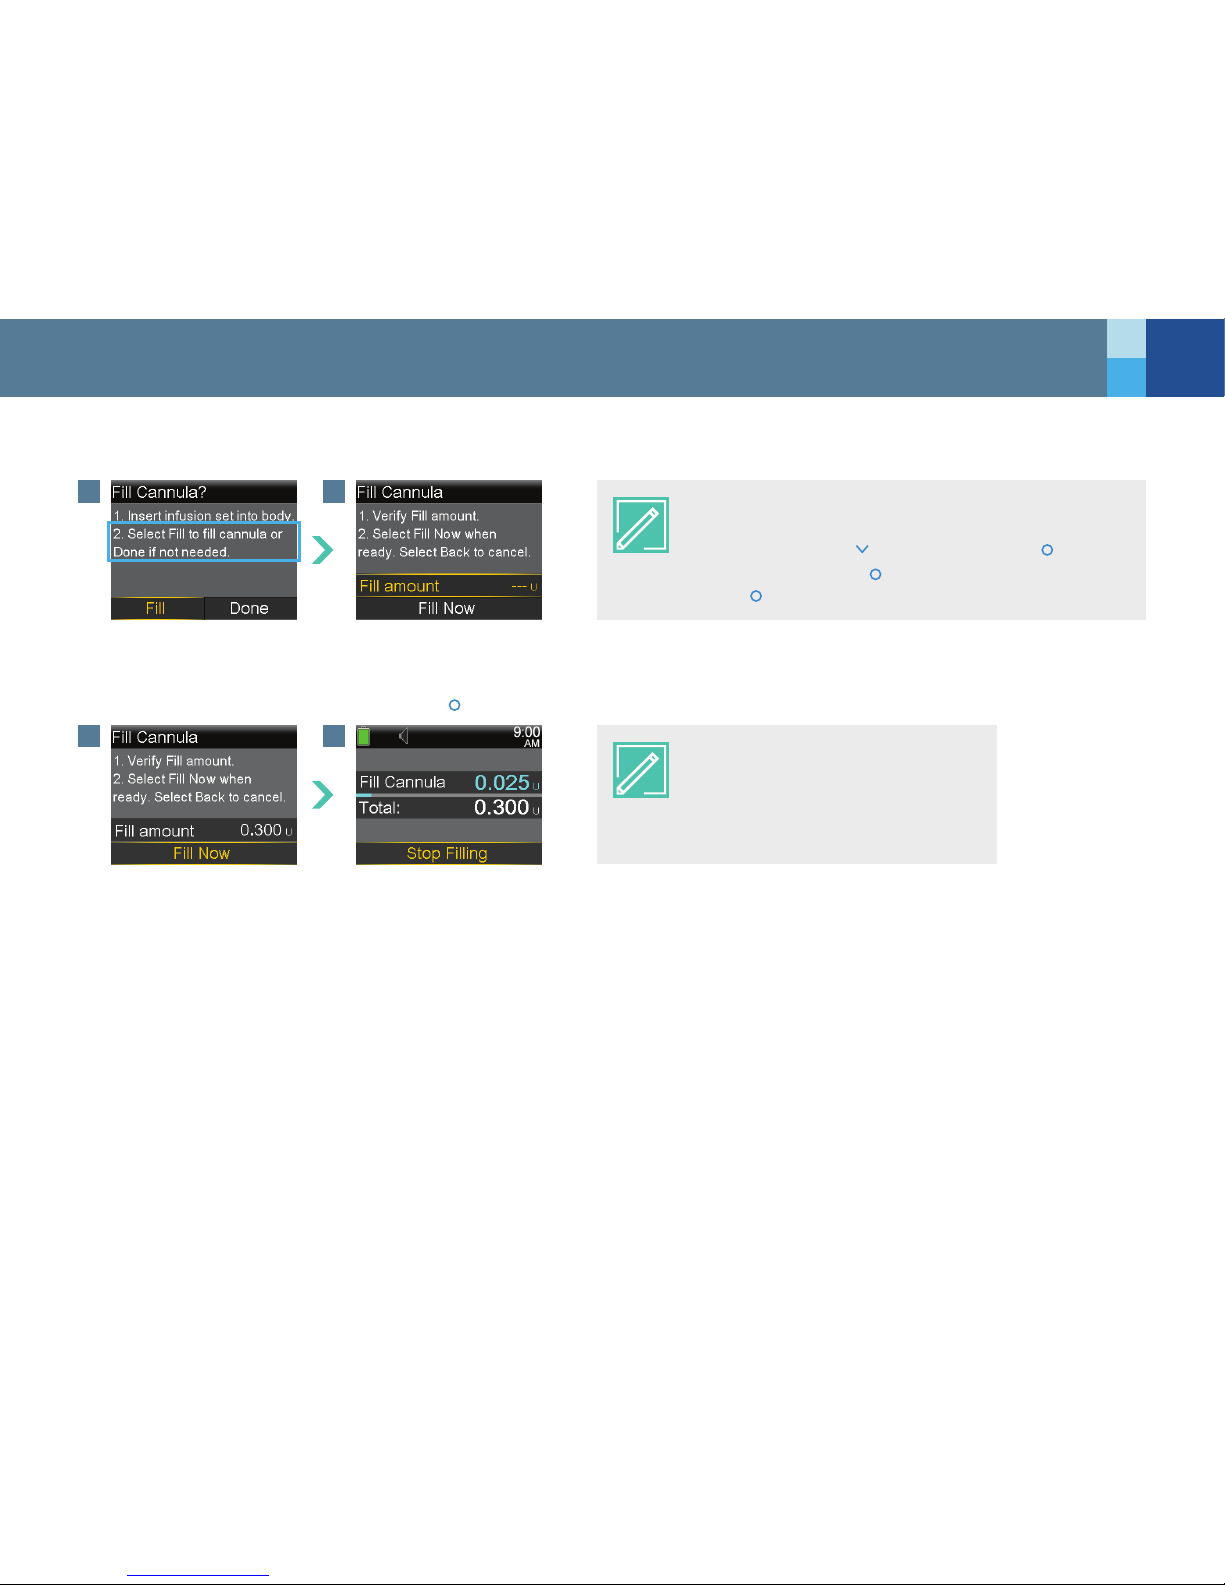
Select Fill.
Select Fill Now.
Select Fill amount and enter :
0.300 if using 6mm cannula
0.500 if using 9mm cannula
Then press
.
The Home screen displays
the insulin as it lls the cannula.
You will now ll the cannula, the little tube under your skin, with insulin.
Your infusion set change is now complete!
FILL CANNULA
NOTE: Your pump will remember the Fill amount that you
used last. Always verify that the Fill amount is correct.
If it is correct, press
to Fill Now and press
.
If it is incorrect, press
. Change to correct amount and
press
. Select Fill Now.
NOTE: Select Stop Filling if you need
to stop, for example, if you notice the
Total amount is incorrect. This should
rarely happen if you have veried the
Fill amount on the previous screen.
950M16510-011 20170401 ©2017 Medtronic MiniMed, Inc. All rights reserved.
 Loading...