

Page 1
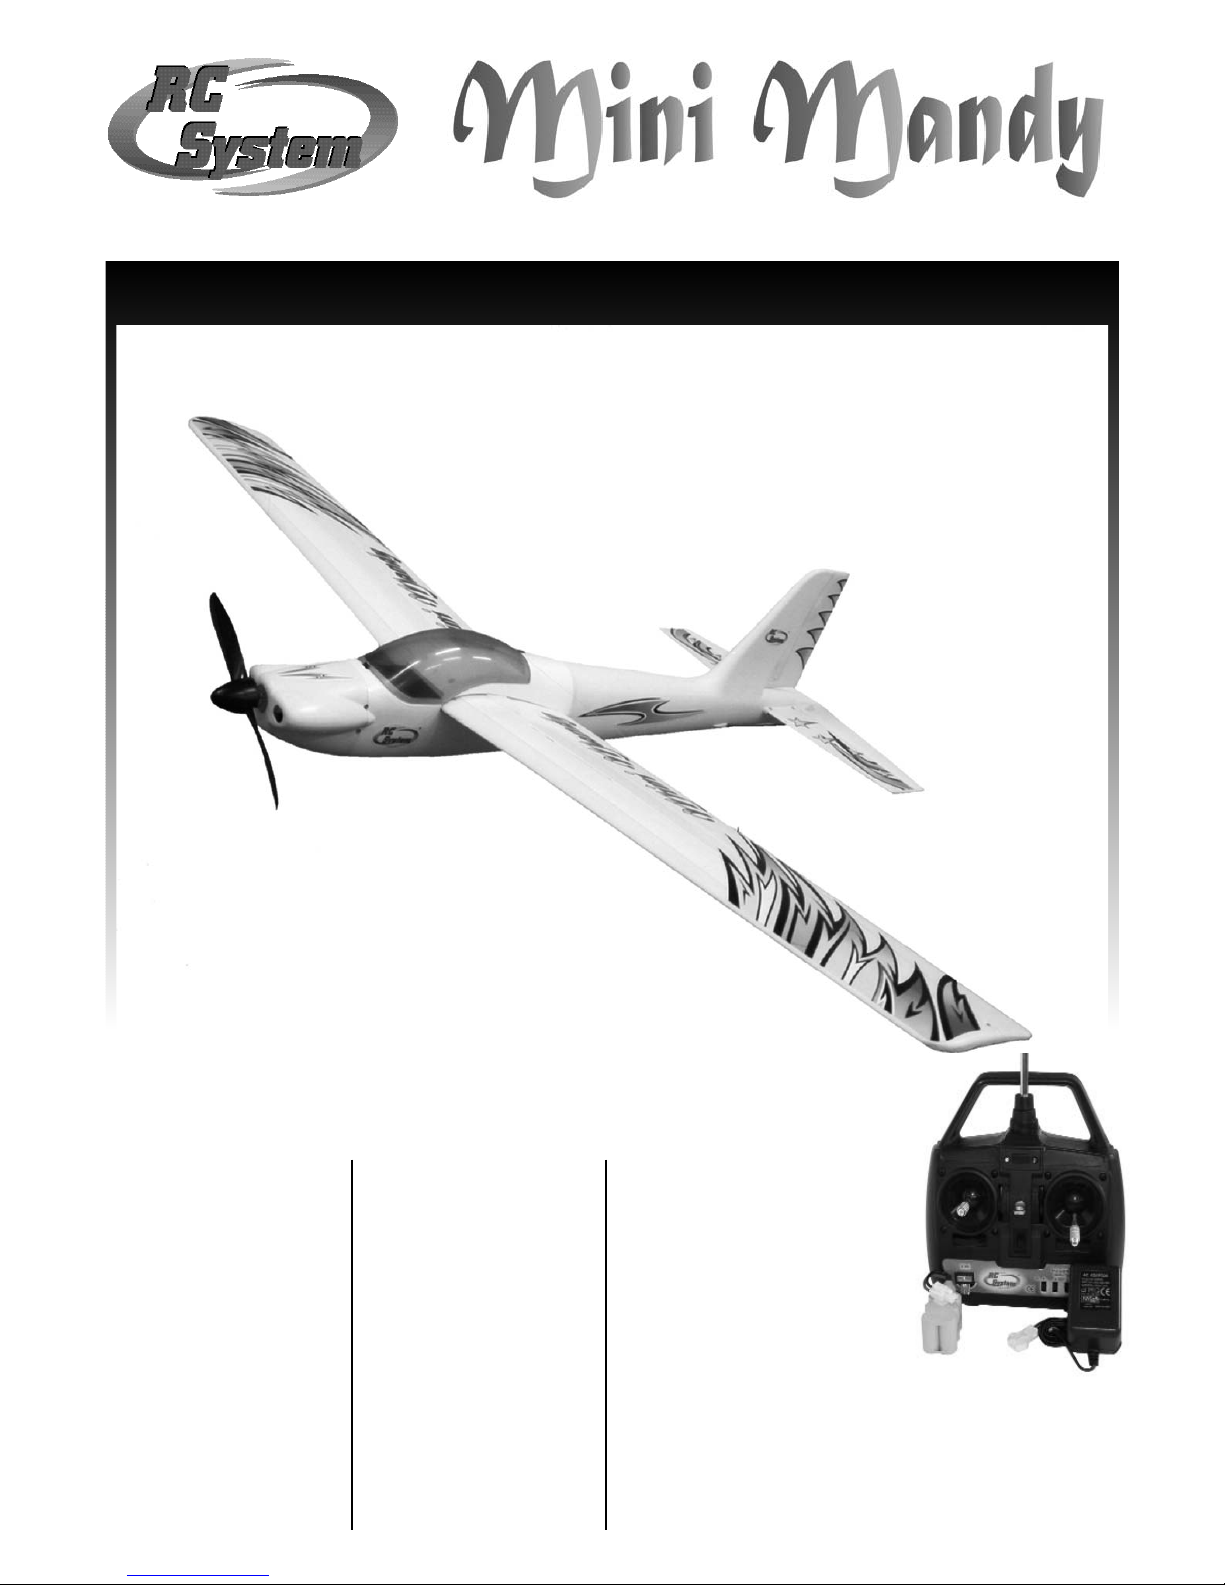
Assembly Manual - Notice de montage - Istruzioni di assemblaggio
RC1000X
Radio included
Radiocommande
incluse
Radiocomando
Incluso
Electric Powered RC Sailplane ARTF
Motoplaneur électrique radiocommandé ARTF
Motoveleggiatore elettrico ARTF
Specifications :
Wing Span : 40"
Length : 29"
Wing Area : 176 sq.in.
Weight : 1.01 lb
Motor : RS380PH
Radio : 3 CH.
WARNING !
This is not a toy.
Assembly and flying of
this product requires
adult supervision.
Caractéristiques :
Envergure : 1020mm
Longueur : 736mm
Surf. alaire : 11,32dm
2
Poids : 456g en vol
Moteur : RS380PH
Radio : 3 voies
ATTENTION !
Ceci n’est pas un jouet.
Le montage et le pilotage de ce produit nécessitent la supervision
d’un adulte.
Caratteristiche Tecniche
Apertura Alare : 1040 mm
Lunghezza : 665 mm
Superf. Alare : 13,00 dm
2
Peso : gr. 470(circa) in volo
Radio : 3 Canali prop.
ATTENZIONE !
Questo non è un giocattolo. Il montaggio ed il pilotaggio di questo prodotto
deve essere condotto sotto
la supervisione di un adulto.
Page 2
INTRODUCTION
All of us at AMERANG Ltd. want to thank you for choosing the best looking, easiest building and best ARF sailplane
available the ... ESAY FLY. Thank you for your interest in RC SYSTEM products. Before beginning the assembly read
thoroughly to give an understanding of the sequence of steps and a general awareness of the recommended assembly
procedures.
WARRANTY
This kit is guaranteed to be free from defects in material and workmanship at the date of purchase. It does not cover
any damage caused by use or modification. The warranty does not extend beyond the product itself and is limited only
the original cost of the kit. By the act of building this user-assembled kit, the user accepts all resulting in liability for
damage caused by the final product. If the buyer is not prepared to accept the liability, it can be returned new and
unused to the place of purchase for a refund.
PRE-ASSEMBLY NOTES
1. If you are not an experienced R/C pilot, plan to have a fully competent pilot check your completed model and help
you with your first flights.
2. Please assemble your model according to these instructions. Do not attempt to modify or change in any way as doing
so may adversely change its flying characteristics.
3. Before you begin, please check the entire contents of this kit against the part list and photo to make sure that no parts
are missing or damaged. Your dealer cannot accept kits for return if construction has begun.
2
INTRODUZIONE
La Safalero s.r.l. vi ringrazia per l’acquisto del Mini Mandy (uno dei migliori motoveleggiatori per debuttanti) e per
l’interesse nei prodotti RC SYSTEM. Leggete queste istruzioni con attenzione e riferitevi alle illustrazioni prima di
iniziare l’assemblaggio del vostro modello.
GARANZIA
Il prodotto è garantito privo di difetti di fabbricazione o materiale alla data d’acquisto. Questa garanzia non copre i danni
derivati dall’utilizzo del prodotto o da sue modifiche. La garanzia copre esclusivamente il prodotto stesso ed è limitata
al valore d’acquisto. Il fatto per l’utilizzatore di assemblare lui stesso gli elementi di questa confezione implica
l’accettazione della responsabilità di tutti i danni causati dal prodotto che è stato acquistato. Nel caso in cui l’acquirente
non accetti le limitazioni di questa garanzia, potrà riportare il prodotto nuovo ed inutilizzato nell’imballo originale presso
il punto vendita ove è stato acquistato per ottenere il rimborso.
CONSIGLI DI MONTAGGIO
1) Se siete un debuttante, chiedete consiglio ad un pilota esperto per verificare la correttezza del vostro montaggio e
per aiutarvi nei vostri primi voli.
2) Montate il modello seguendo questo manuale di istruzioni.
3) E’ estremamente importante verificare la presenza di tutti i particolari prima di iniziare il montaggio. In nessun caso
il venditore potrà accettare il reso di una scatola incompleta se il montaggio è stato iniziato.
INTRODUCTION
MODEL RACING CAR vous remercie pour l’achat du EASY FLY (le meilleur motoplaneur de début) et pour l’intérêt que
vous portez aux produits RC SYSTEM. Lisez très attentivement cette notice et référez-vous aux illustrations avant de
commencer le montage de votre modèle.
GARANTIE
Ce kit est garanti sans défaut de matière ou de fabrication à la date de l’achat. Cette garantie ne couvre pas les
dommages d’usage ni les modifications. La garantie couvre exclusivement le produit lui-même et est limité à la valeur
d’origine du kit. Le fait pour l’utilisateur d’assembler les éléments de ce kit implique l’acceptation de la responsabilité
de tous dommages pouvant être causés par le produit tel qu’il aura été achevé. Dans le cas où l’acheteur n’accepterait
pas cette responsabilité, il peut rapporter le produit neuf et inutilisé dans son emballage d'origine à son détaillant pour
en obtenir le remboursement.
CONSEILS DE MONTAGE
1. Si vous êtes débutant, demandez conseil auprès d’un pilote confirmé pour la vérification du montage de votre
appareil et pour vous aider lors de vos premiers vols.
2. Assemblez votre modèle exactement selon ces instructions.
3. Il est très important de vérifier la présence de toutes les pièces avant de commencer le montage. En aucun cas, le
fournisseur n’acceptera le retour d’un kit incomplet si les assemblages ont déjà été commencés.
Page 3
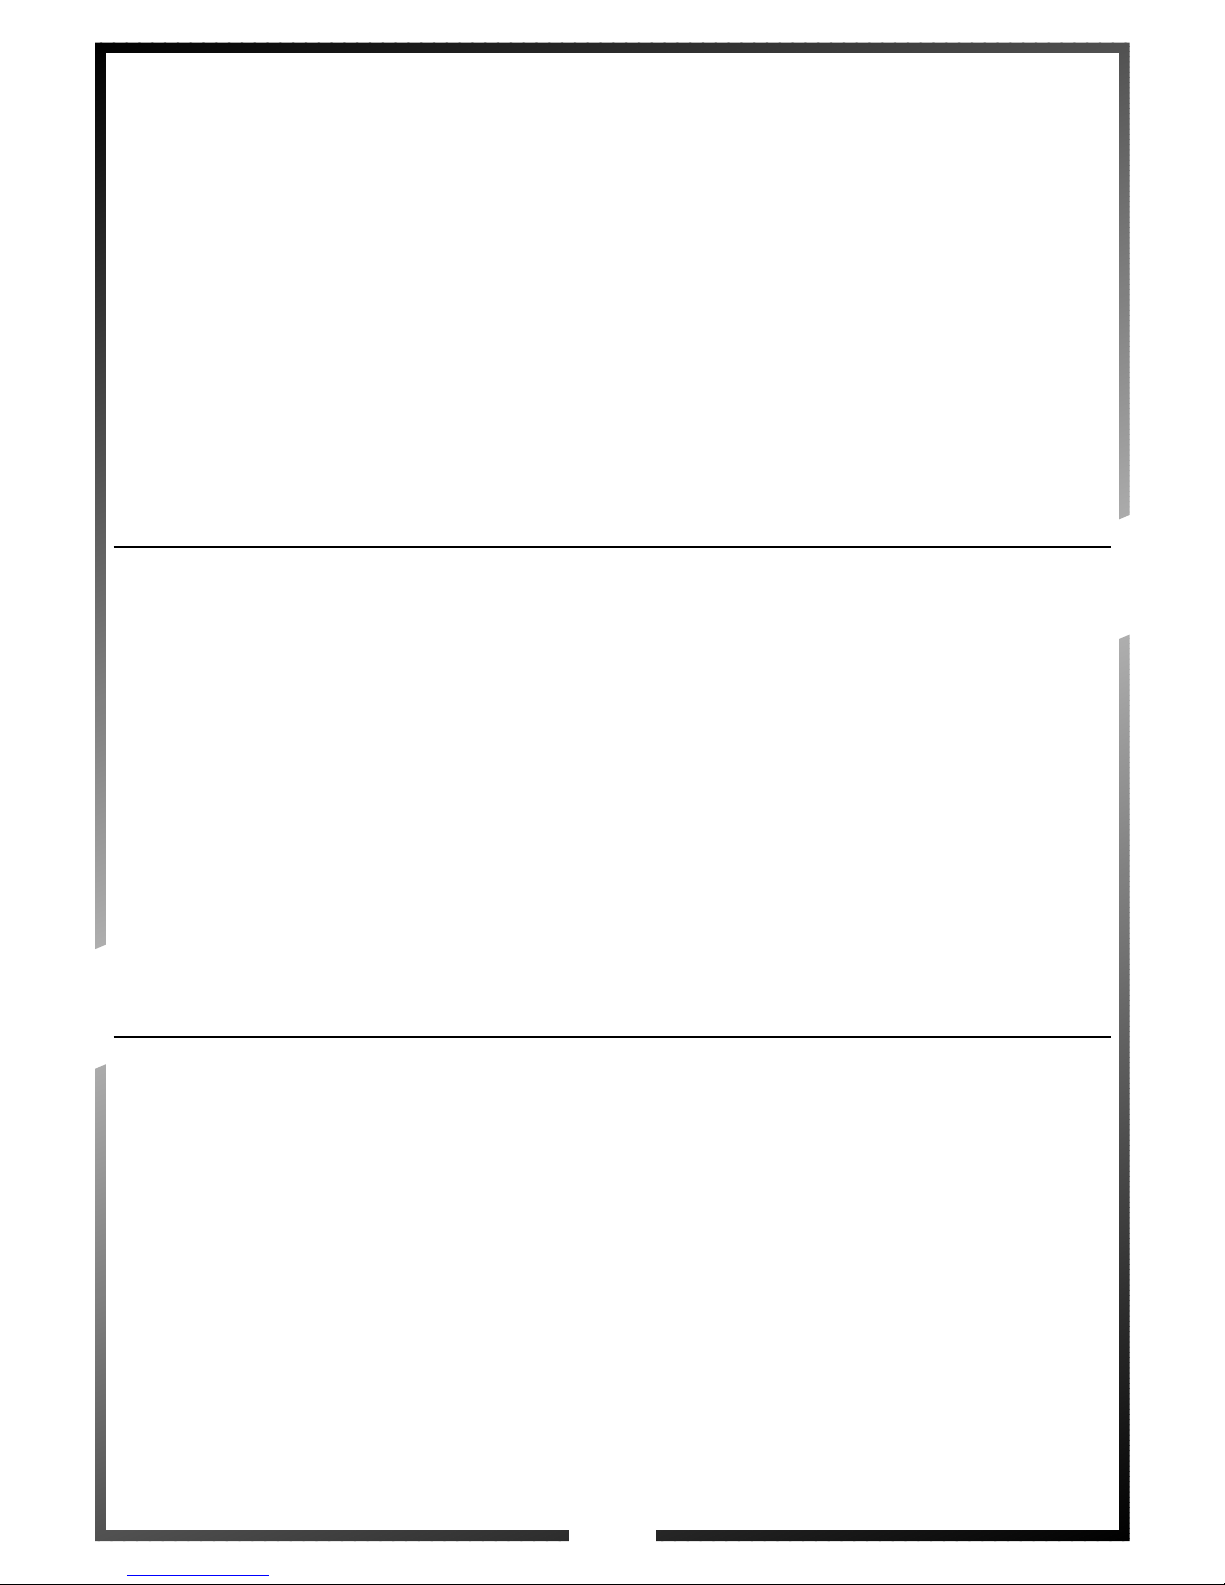
Kit content
1. Fuselage with électronical
components
2. Wing
3. Horizontal tail
4. Vertical tail
5. 3 CH. radio
6. Charger
7. Nicad Battery pack
8. Rubber bands (x4)
9. Ribbon
10. Spare propellor
Required for operation
(not included)
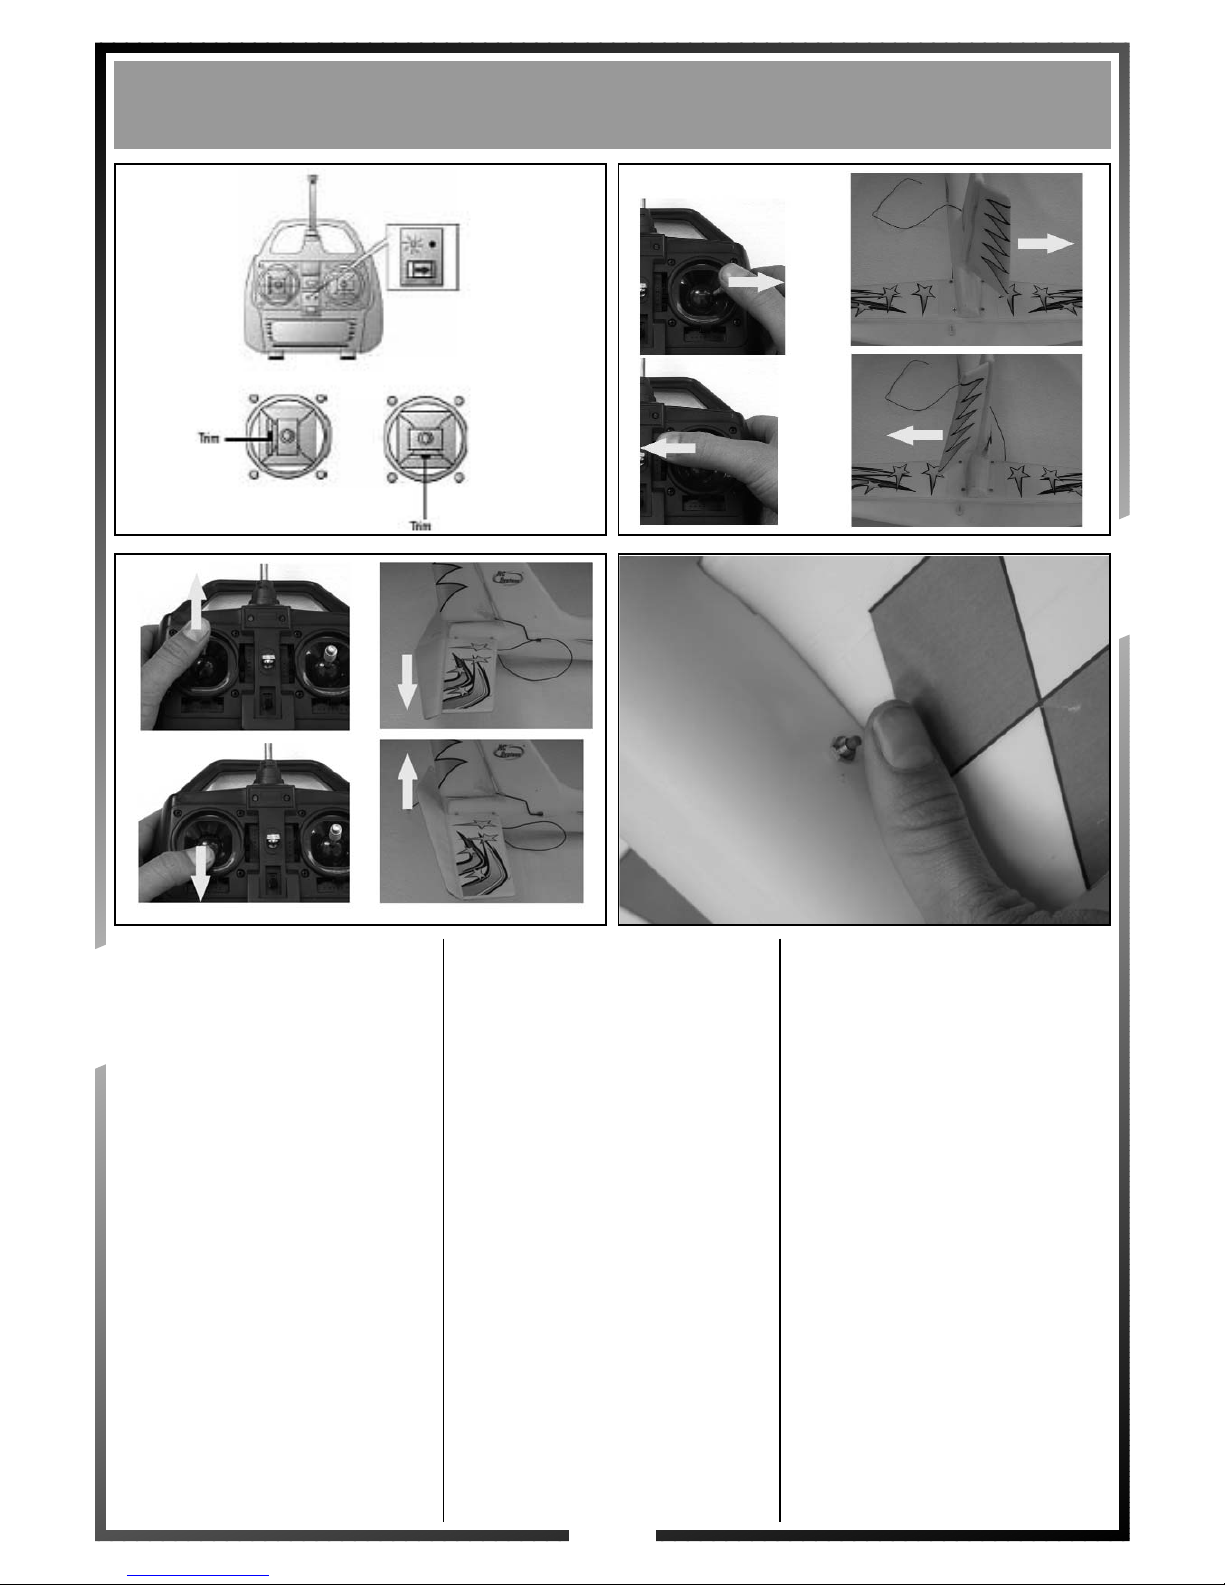
11. Wrench for M3 nuts.
12. Modeling knife
13. 8 x 1,5V dry cells or 8 x Ni-Cd 1,2V
AA batteries (Part No. RC1002)
14. Nut Lock liquid
Contenu de la boîte
1. Fuselage avec électronique
2. Aile
3. Stabilisateur
4. Dérive
5. Emetteur à manches 3 voies
6. Chargeur rapide secteur 220V
7. Batterie Ni-Cd rechargeable 8,4V
8. Rubans caoutchouc (x4)
9. Ruban pour antenne d'émetteur
10. Hélice de rechange
Equipement nécessaire
(non fourni)
11. Clé en croix pour écrou M3.
12. Couteau de modélisme
(Réf. 3.12010)
13. 8 piles alcalines 1,5V LR6 ou 8
batteries Ni-Cd rechargeables AA
(Réf. SA10002)
14. Frein-filet (Réf. 43.013)
Contenuto della scatola
1. Fusoliera con apparecchiatura
elettronica
2. Ali
3. Profondità
4. Trasmettitore 3 canali
5. Caricabatterie rapido 220 Volts
6. Batterie ricaricabili 8,4V NiMH
7. Elica (x2)
8. Ogiva
Equipaggiamento necessario
(non fornito)
9. Frena Filetti (sugg. cod.
GPMR6060)
10. Chiave per dadi M3
11. 8 pile alcaline 1,5V LR6 oppure
ricaricabili AA (sugg.cod. SAF10002)
3
Kit content / Other items required (not included)
Contenu de la boîte / Equipement nécessaire (non fourni)
Contenuto della scatola / Equipaggiamento necessario (non fornito)
1
3
2
4
5
6
7
10
11
8
9
Page 4

4
Fig. 1
Remove the battery cover by pushing
down with your thumbs at the two
marks shown.
Fig. 2
Install 8 fresh AA Alkaline batteries,
being careful to watch that the polatiry
is correct for each battery. Push the
battery cover back into place until you
hear it "click" into position.
Fig. 3
plug the flight battery into the battery
charger connector. Note that the plugs
can be plugged in only one way. When
plugged in properly you should hear
the connectors "click" together.
Fig. 4
Plug the charger into a 240V wall
outlet. Charge the flight battery for 21/2 hours. Be careful not to overcharge
the battery. If the battery becomes
warm, unplug the charger from the
240V wall outlet immediately.
Fig. 1
Enlevez le capot du compartiment à
pile au dos de l'émetteur en pressant
vers la bas avec les 2 pouces sur les
marques.
Fig. 2
Installez les 8 piles ou batteries en
respectant le sens en respectant le
sens des polarités (+ et -). Refermez le
couvercle du compartiment à piles.
Fig. 3
Branchez la batterie de propulsion sur
le chargeur. Les prises ne peuvent se
brancher que dans un sens, ne forcez
pas ! Les 2 prises sont correctement
branchées lorsque l'agrafe de la prise
de la batterie est vérouillée.
Fig. 4
Branchez maintenant le chargeur sur
le secteur. Le temps de charge de la
batterie est de 2h30. Ne dépassez pas
ce temps de charge, vous risqueriez
d'endommager la batterie. Si la
batterie devient chaude, débranchez le
chargeur immédiatement.
Fig. 1
Togliete il coperchio dal compar-timento
pile dul dorso del trasmettitore spingendo
verso il basso con i 2 pollici sui segni
indicati.
Fig. 2
Installate 8 pile alcaline o batterie ricaricabili
rispettando la polarità (+ e - ). Richiudete il
coperchio.
Fig. 3
Collegate la batteria di alimentazione del
motore al caricabatterie. La spi-netta entra
agevolmente in un unico verso. Non
forzate. Le spinette sono collegate
correttamente quando la graffa della
spinetta della batteria è ben serrata.
Fig. 4
Collegate ora il caricabatterie alla rete. Il
tempo di carica è di 2h30 minuti. Non
oltrepassate questo tempo di carica.
Rischierete di danneggiare la batteria. Se
la batteria diventa troppo calda scollegate
immediatamente. Non lasciate il
caricabatterie e la batteria non sorvegliata
durante la carica.
Installing the batteries / Charging the flight battery
Installation des piles / Charge de la batterie de propulsion
Installazione delle pile / Carica della batteria di alimentazione
Fig. 1
Fig. 2
Fig. 3
Fig. 4
Page 5

5
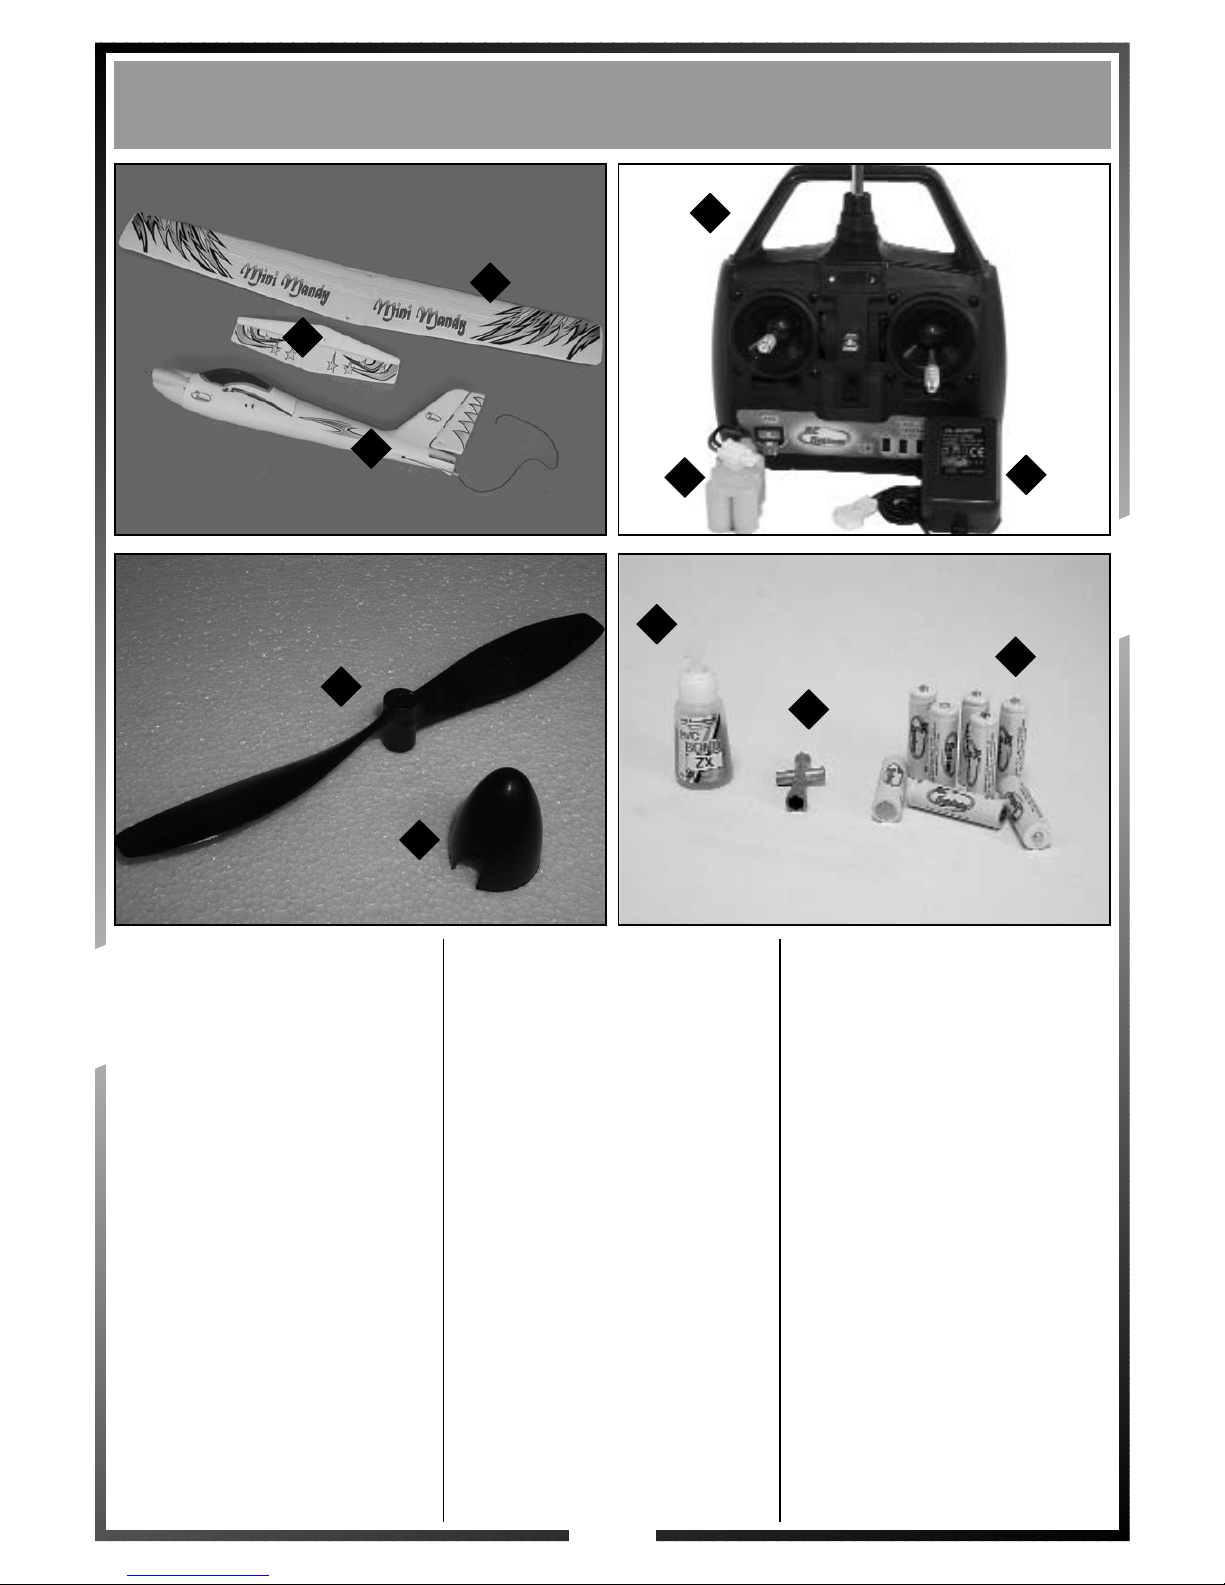
Fig. 5
Remove the two hex nuts that are
preinstalled on the vertical tail
mounting screws.
Fig. 6
Connect the pushrods on the two
horns (elevator & rudder). The upper
hole in the horn gives a smoother
movement, so that the reaction of the
plane is more "soft" for the beginning
pilot.
Fig. 7
Install the tail on rear of the fuselage.
Take care not to damage the antenna
wire inside the tube. Screw the 2 nuts
on the fuselage. Secure them with "Nut
Lock" liquid.
Fig. 8
Please refer to the drawing to set the
travel of each control surface.
Fig. 5
Dévissez et enlevez les écrous M3 des
vis qui tiennent l'empennage.
Fig. 6
Raccordez les tringleries de commande aux guignols de profondeur et
de direction. Le trou supérieur du
guignol donne un débattement faible
de la gouverne, par conséquent les
réactions de l’avion sont plus douces
ce qui facilite l’apprentissage.
Fig. 7
Installez l’empennage sur le tube de
queue en faisant attention à ne pas
abîmer le fil d’antenne qui passe dans
le tube de queue. Vissez les 2 écrous
sur les vis qui traversent le tube de
queue. Sécurisez en mettant une
goutte de Frein-Filet sur chaque écrou.
Fig. 8
Reportez-vous au dessin pour
augmenter ou diminuer le débattement
des gourvernes selon le point
d'ancrage des tringleries sur les
guignols.
Fig. 5
Rivuovete le strisce protettive dal biadesivo
collocato sul piano di coda e posizionatlo
accuratamente nella sede predisposta sulla
fusoliera prestando attenzione a far aderire
perfettamente il biadesivo. La posizione
corretta è data dall'allineamento dei quattro
fori presiposti su piano di coda e fuoliera.
Fig. 6
Fissate il piano di coda con le quattro viti
fornite nella scatola. Sebbene i fori siano già
predisposti fate attenzione a rispettare
l'allineamento del piano di coda. Stringere
accuratamente le viti per fissare
correttamente il piano di coda.
Fig. 7
Collegate la tiranteria di comando alle
squadrette del profondità e del direzionale.
Il foro superiore della squadretta danno
spostamenti modesti delle superfici di
comando, di conseguenza l'aereo avrà dei
movimenti più dolci e questo faciliterà
l'apprendimento.
Fig. 8
Riferitevi all'illustrazione per aumentare o
diminuire il movimento delle superfici di
controllo in funzione del foro di collegamento
delle astine sulla squadretta. Per fare in modo
che le parti mobili siano perfettamente
allineate agire sulle clips, avvitando o
svintando a seconda delle esigenze.
Assembling the tail
Assemblage de l'empennage
Assemblaggio dei piani di coda
Fig. 5
Fig. 6
Fig. 7 Fig. 8
Low - Faible - Debole
Normal - Normal - Normale
High - Fort - Forte
Horn
Guignol
Squadretta
Girare in senso orario per accorciare
Girare in senso antiorario per allungare
Page 6

6
Fig. 9
Position the wing onto the fuselage
and take care it is well centered. Line
up the two marks in the middle of the
wing with the molded centerline of the
fuselage.
Fig. 10
Use two crossed rubber bands to hold
firmly the wing in place.
Fig. 11
Open the cockpit and take the
connector out. Plug the connector on
the flight battery into the connector that
is inside the fuselage. When plugged
in properly, you should hear the
connectors "click".
Fig. 12
Slide the flight battery into the
styrofoam pocket in the front of the
fuselage. The battery wires should be
facing the top of the battery as shown.
Let the rubberband close the cockpit.
Now you have completed the
assembly of your EASY FLY X !
Fig. 9
Positionez l’aile sur le fuselage en
veillant à ce qu’elle soit bien centrée.
Les 2 repères triangulaires de l'aile
doivent pointer sur le trait de moulage
du fuselage.
Fig. 10
Maintenez l'aile en place en croisant
les 2 élastiques sur le dessus de celleci avant de les accrocher au tourillons
sur les côtés du fuselage.
Fig. 11
Ouvrez le cockpit et sortez la prise
d’alimentation. Connectez la batterie
de propulsion chargée en vérifiant que
les prises sont bien vérouillées.
Fig. 12
Installez l’accu dans le fuselage. Il doit
se bloquer entre les 2 flancs en
polystyrène. Laissez le cockpit se
rabattre tout seul sous la pression de
l'élastique.
Votre EASY FLY X est prêt à faire
son premier vol !
Fig. 9
Posizionate l'ala sulla fusoliera controllando che
sia ben centrata. i fori per le viti dell'ala devono
essere posizionati esattamente sopra le rispettive
sedi. Dopo di che posizionate il coperchio
soprastante l'ala che, se l'ala è posizionata
correttamente deve incastrarsi perfettamente su di
essa
.
Fig. 10
una volta posizionato il coperchio fissate l'ala con
le due viti fornite nella scatola, assicuratevi di
avvitare correttamente le viti per aver un fissaggio
dell'ala efficace
Fig. 11
Aprite la capottina e fate uscire la spinetta di
alimentazione. Posizionate correttamente la
batteria all'interno della fusoliera. Deve essere ben
posizionata tra le due fiancate in polistirene (per
maggiore informazione fare riferimento alla
sezione dedicata al centraggio del modello)
Fig. 12
Dopo aver infilato la batteria in fusoliera e
collegate la batteria caricata. Per sicurezza le
spinette possono essere collegate solo in un
senso onde evitare inversioni di polarità. Quando
collegate correttamente sentirete un click che
assicura l'efficacia della connessione. Montate la
capottina
.
Fixing the wing / Connecting the battery
Fixation de l'aile / Installation de la batterie de propulsion
Fissaggio dell’ala / Installazione della batteria di alimentazione
Fig. 9
Fig. 11
Fig. 12
Fig. 10
Page 7

Fig. 13
Posizionate l'elica sull'albero motore e
spingetela fino a far combaciare il dado di
battuta all'elica. Avvitate il secondo dado
sull'albero motore.
Fig. 14
Stringete accuratamente il dado e
blocatelo con una goccia di frena filetti per
fissare saldamente l'elica
Fig. 15
Una volta stretto il dado infilate l'ogiva
facendola combaciare con l'elica.
Assicuratevi di aver spinto fino infondo
l'ogiva per evitare che si sfili durante il
movimento del motore.
Il vostro MINI MANDY è pronto per
effettuare il primo volo.
7
Montaggio dell’elica
Fig. 13
Fig. 14
Fig. 15
Page 8
8
Fig. 13
Make sure that the trim levers are in
neutral position. Turn on the
transmitter. The green LED should be
lit. Note that batteries not completely
charged causes problems during
transmission.
Fig. 14
Check that the radio is working
correctly. Move the right control stick
left, the vertical control surface should
move left. Move the right control stick
right, the vertical control surface
should move right.
Fig. 15
Move the left control stick down, the
horizontal control surface should move
up. Move the left control stick up, the
horizontal control surface should move
down.
Fig. 16
While holding the EASY FLY X upright
in the air with the propellor pointing
away from you, press the red motor
on/off safety arming switch once.
Fig. 13
Assurez-vous que chaque trims est
bien en position neutre. Allumez
l’émetteur. La diode verte s'allume. Si
la diode rouge s'allume, les piles sont
à changer, ne volez pas !
Fig. 14
Contrôlez maintenant les gouvernes.
Bougez le manche droit vers la
gauche, la dérive doit aller vers la
gauche. Bougez le manche droit vers
la droite, la dérive doit aller vers la
droite.
Fig. 15
Bougez maintenant le manche gauche
vers le bas, la profondeur doit monter.
Bougez ce manche vers le haut, la
profondeur doit descendre.
Fig. 16
Tenez l'EASY FLY X par le dessous du
fuselage, nez en l'air pointant devant
vous et appuyez sur le bouton rouge
sur le côté gauche du fuselage.
Fig. 16
Assicuratevi che ogni trim sia ben
centrato in posizione neutro. Accendete
il trasmettitore. Il diodo verde si illumina .
Se si illumina il diodo rosso significa che
le pile del trasmettitore sono scariche.
Non volate in queste condizioni.
Fig. 17
Adesso controllate i comandi. Spostate
lo stick destro verso sinistra. Il
direzionale si deve muovere verso
sinistra. Spostate lo stick destro verso
destra, il direzionale si dovrà muovere
verso destra.
Fig. 18
Spostate lo stick sinistro verso il basso,
il profondità dovrà muoversi verso
l'alto. Spostate lo stick sinistro verso il
basso il profondità dovrà muoversi
verso il basso.
Fig. 19
Te ne te i l M ini M an d y p er l a p ar t e
bassa della fusoliera, naso all’aria che
punti davanti a voi e premete ora il
pulsante rosso sul lato sinistro della
fusoliera.
Pre-flight checks
Vérifications d'avant-vol
Verifiche prima del volo
Switch
Interrupteur
Interrutorre
Fig. 16
Fig. 19
Fig. 17
Fig. 18
Page 9

9
Fig. 17
WARNING : Keep everything clear of
the propellor, especially fingers and
loose clothing. Push the white switch
forward to make the propellor spin at
high rate of speed. Pull the motor
on/off switch toward you to turn off the
motor.
Fig. 18
Choose an open flying area away from
buildings, roads, powerlines, trees and
water.
Fig. 19
Always extend the transmitter's
antenna completely. Before take off,
you should check the direction of the
wind. Beginning pilots should choose a
day with little or no wind.
Fig. 20
First press the red powerswitch "on" on
the fuselage. Then, push the white
transmitter switch forward to start the
motor to full speed. You should
handlaunch your plane upwards (15°)
into the wind.
Fig. 17
ATTENTION : dégagez tout objet de
l'hélice et faites attention à vos doigts.
Poussez l'interrupteur blanc sur
l'émetteur, l'hélice se met à tourner
très vite. Tirez l'inter vers vous pour
arrêter le moteur, l'hélice se replie.
Fig. 18
Choisissez un endroit bien dégagé. Ne
volez pas à proximité de batiments,
routes, arbres, lignes à haute tension
et plans d’eau.
Fig. 19
Toujours d ép lier l ’an tenne e nt ièrement. Vérifiez la direction du vent avec
le ruban noué au bout de l'antenne.
Les pilotes débutants choisiront un
jour sans ou avec peu de vent.
Fig. 20
Pressez l’intérrupteur rouge du
fuselage. Poussez l'interrupteur blanc
pour démarrer le moteur. Lancez votre
avion avec le nez face au vent et avec
une montée de 15° environ.
Fig. 20
ATTENZ ION E :
nessun oggetto deve
essere nel raggio dell’elica e le vostre dita
ben lontane. Spingete in avanti lo stick di
destra come indincato nella foto. Per
spegnere il motore tirare lo stick verso di
voi fino a raggiungere il minimo
Fig. 21
Scegliete un posto ben libero da persone
animale ed oggetti. Non volate in
prossimità di costruzioni, alberi, stra-de,
linee alta tensione e corsi d’acqua
. Tenere
a debita distanza telefoni cellulari per
evitare eventuali interferenze al sistema
radio.
Fig. 22
Estraete sempre completamente l’antenna.
Verifica te la d irezi one del vento c on il
nastro sula punta dell’antenna. Attenzione i
debuttanti dovranno assolutamente
scegliere giornate poco ventose.
Fig. 23
Premete il pulsante rosso sulla fusoliera.
Premete il pulsante bianco per avviare il
motore Lanciate il vostro aeromodello con
il naso contro vento e con un angolo di
salita di circa 15°
.
Pre-flight checks / Flying instructions
Vérifications d'avant-vol / Instructions pour le vol
Verifiche prima del volo / Istruzioni per il volo
Fig. 20 Fig. 21
Fig. 22
Fig. 23
Page 10
10
Fig. 21
ELEVATION ANGLE
Normally the plane should fly straight.
If the plane has a pitch up, it shows
that the nose is too light. You must
adjust the elevation angle from the Vtail by adding a washer between the Vtail and the fuselage, see drawing
(Pitch down).
We recommand you use a washer of
1mm to begin and when necessary
adjust until the plane flies straight.
Fig. 22
If the plane has a pitch down, it shows
that the nose is too heavy. You must
adjust the elevation angle from the Vtail by adding a washer between the Vtail and the fuselage, see drawing
(Pitch up). We recommand you use a
washer of 1 mm to begin and when
necessary adjust until the plane flies
straight.
FLYING A WELL SET-UP
SAILPLANE IS REALLY ENJOYING.
TAKE YOUR TIME TO COMPLETE
THIS IMPORTANT STEP.
Fig. 21
EQUILIBRAGE
Normalement votre avion doit voler
horizontalement. Si l’avion vole avec le
nez en l’air (centrage arrière), c’est
qu’il est trop léger de l’avant. Dans ce
cas, avancez la batterie de propulsion
vers l'avant au plus près du moteur et
ajustez l’angle des empennages en
ajoutant une rondelle entre le fuselage
et l’embase avant au niveau de la vis
de fixation des empennages (voir
schéma calage à piquer).
Nous vous recommandons d’utiliser
pour commencer une rondelle
d'épaisseur 1mm. Vous pourrez alors
ajoutez des rondelles jusqu’à ce que
votre avion vole horizontalement.
Fig. 22
Si l’avion pique anormalement du nez
(centrage avant), c’est qu’il est trop
lourd de l’avant. Vous devrez dans ce
cas reculer la batterie de propulsion au
maximum vers la platine radio et
ajustez l’angle des empennages en
ajoutant une rondelle entre le fuselage
et l’embase arrière au niveau de la vis
de fixation des empennages (voir
schéma calage à cabrer).
Nous vous recommandons d’utiliser
pour commencer une rondelle
d'épaisseur 1mm. Vous pourrez alors
ajoutez des rondelles jusqu’à ce que
votre avion vole horizontalement.
PILOTEZ UN AVION SAIN EST
NETTEMENT PLUS AGREABLE
ALORS NE BACLEZ PAS CETTE
ETAPE TRES IMPORTANTE.
Fig. 24
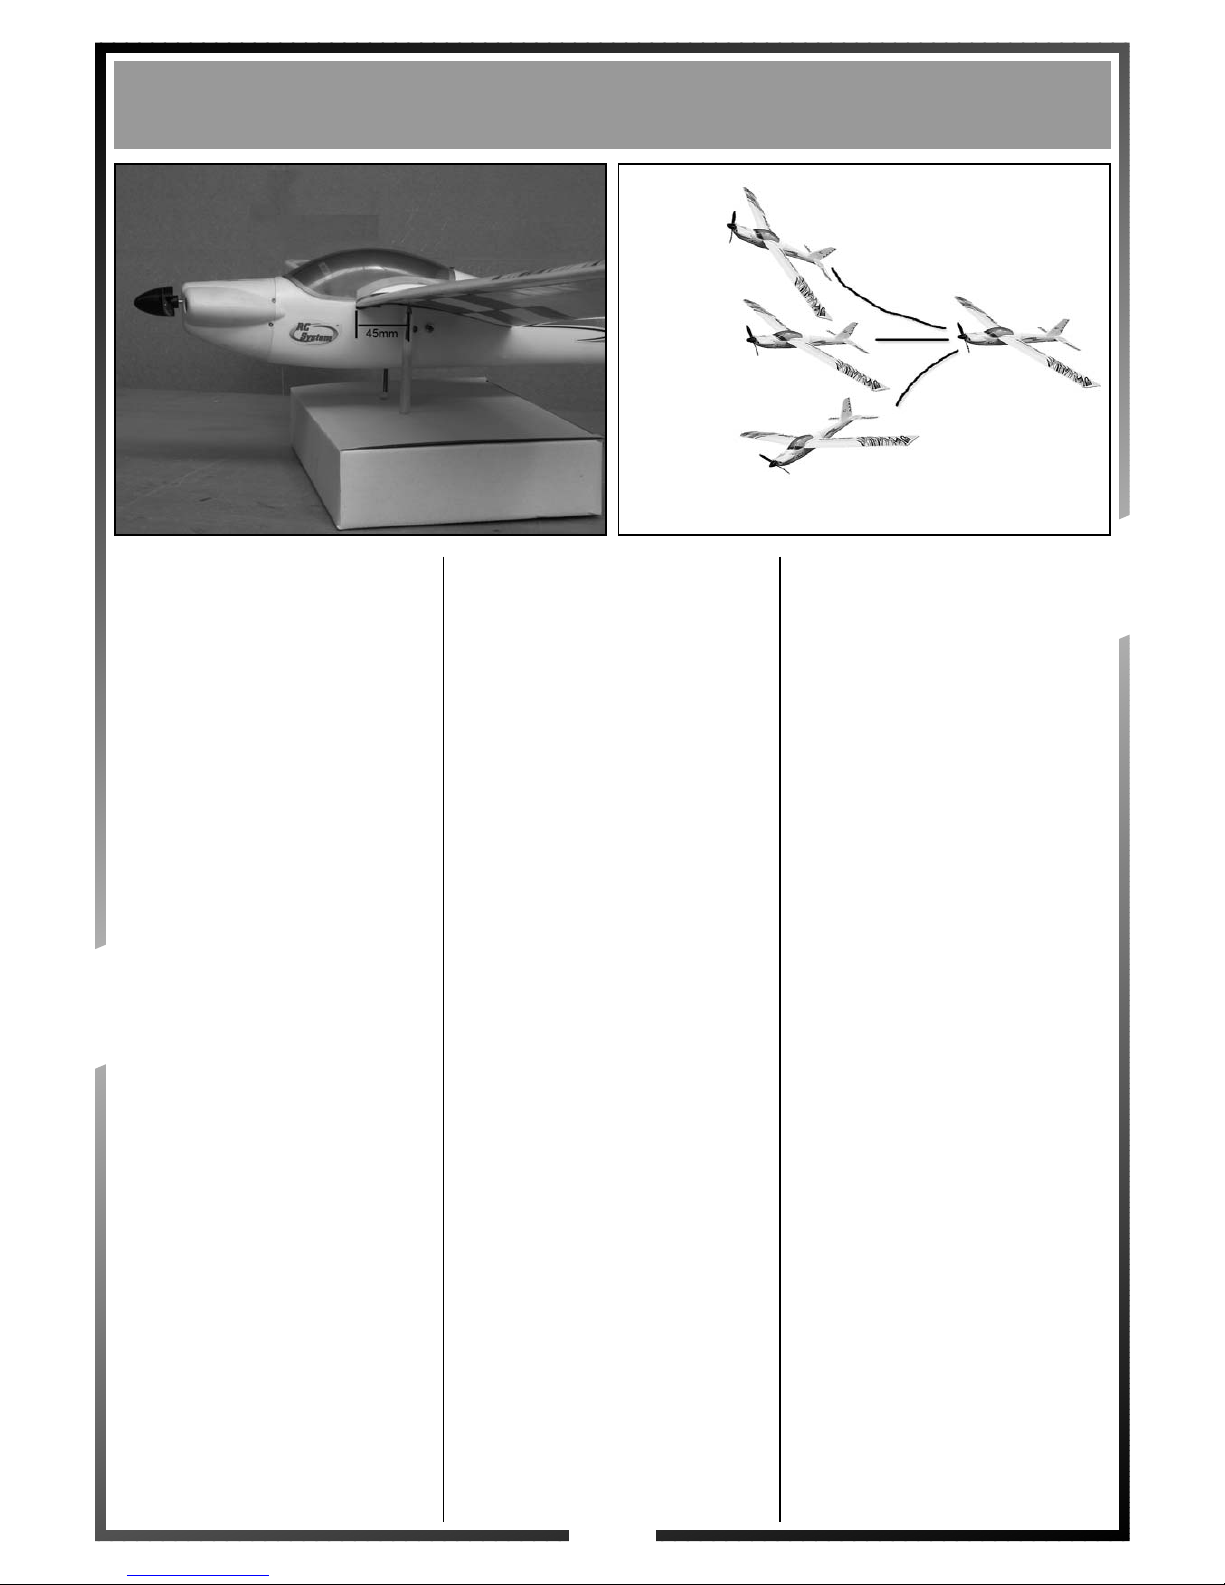
CENTRAGGIO STATICO
Il centraggio statico è fondamentale
per un efficace funzionamento del
modello. Per fare un centraggio
corretto del modello posizionate due
biro (o altro) sotto l’ala precisamente a
45mm dal bordo di entrata dell’ala del
MiniMandy. Se il modello è centrato
correttamente rimmarrà perfettamente
in equilibrio . Altrimenti se il modello
tende ad abbassare la coda, avanzate
leggermente il pacco batterie,
viceversa se il modello tende ad
abbassare il muso arretrate il pacco
batterie fino a raggiungere la posizione
necessaria a tenere il modello
perfettamente in equilibrio. Eseguite
questa operazione con molta
attenzione e verificate, prima di ogni
volo, di installate la batteria nella
giusta posizione ricavata dal
centraggio statico.
Fig. 25
VERIFICA CENTRAGGIO
Il vostro aeromodello dovrà volare
orizzontalmente. Per ottenere questo
risultato è necessario che il centraggio
statico sia corretto. Se il modello tende
ad alzare il naso (cabrato) significa
che è troppo leggero davanti. Spostate
la batteria in avanti verso il motore .
Se il modello tende a buttar giù il naso
(picchiato) significa che è troppo
pesante daventi. Arretrate la posizione
della batteria verso l’impianto radio.
PILOTARE UN AEROMODELLO
BEN CENTRATO E’ MOLTO PIU’
DIVERTENTE E SICURO PERTANTO NO N SALTAT E QUESTO
PUNTO COSI’ IMPORTANTE.
Flying instructions
Instructions pour le vol
Istruzioni per il volo
Fig. 24
Fig. 25
Nose light
Nez trop léger
Naso troppo
leggiero
Normal
Normal
Normale
Nose heavy
Nez trop lourd
Naso troppo
pesante
Page 11

11
Fig. 23
TRIMMING THE CONTROLLS
Normaly the plane should fly
straight !
While flying, if the plane drifts right,
move the trim (located under the right
control stick) to the left to correct the
problem. If the plane drifts left move
the trim right.
If the plane pitches down, pull the trim
(located at left side of the left control
stick) toward you. If the plane pitches
up, push the trim forward until the
plane flies straight.
Fig. 24
FLYING
The left controlstick is for controlling
the elevator function. If you push
forward the left stick the plane will
descend. If you pull the left stick
toward you, the plane will start to
climb. When turning, the plane
naturally drops and power should be
applied after the plane is leveled again.
Beginning pilots should fly at a height
of no more than 50 feet (height of a 5
floor building). Flying too high will give
problems to see the reactions of the
plane and finaly you will loose control.
When flying too, low the reactiontime is
too long and you could crash your
plane.
The flight time is about 10-15 minutes.
When the power is low the motor will
shut off, however the controls will still
work so you can land the plane.
Fig. 23
REGLAGE DES TRIMS
Votre avion doit voler droit !
Pendant le vol, si l’avion dévie vers la
droite, bougez le trim de direction un
peu vers la gauche pour corriger la
trajectoire. Si l’avion dévie vers la
gauche, bougez le trim de direction un
peu vers la droite.
Si l'avion pique un peu du nez, vous
pouvez baissez le trim de profondeur.
Si l'avion vole avec le nez en l'air et
perd sa vitesse, montez un peu le trim
de profondeur pour que l'avion
retrouve son horizontalité.
Fig. 24
PILOTEZ
Le manche de gauche contrôle la
montée et la descente. Si vous
poussez le manche de gauche
(profondeur), l’avion descend. Si vous
tirez le manche, l’avion se cabre et
monte. Lorsque vous tournez, l’ avion
perd de l’altitude et vous devez
compenser en donnant un tirant un
peu le manche de profondeur.
Ne dépassez pas une altitude 15
mètres (environ 5 étages). Si vous
volez trop haut, vous ne distinguerez
pas les réactions de l’avion et
finalement vous perdrez tout contrôle.
Si vous volez trop bas, vous n’aurez
pas le temps de réagir et votre avion
heurtera le sol ou un obstacle.
L’autonomie de vol est de 10~15min,
après ce délai le moteur se coupe
mais vous pouvez toujours contrôler
les gouvernes durant la descente de
votre avion afin d’attérir.
Fig. 26
REGOLAZIONE DEI TRIM
Il vostro aeromodello deve volare
diritto !
Durante il volo se l’aereo devia verso
destra, muovete il trim dello stick del
direzionale un po’ verso sinistra per
correggere. Se il modello devia verso
sinistra muovete leggermente il trim
del direzionale verso destra per
correggere. Effettuate piccole correzioni alla volta. Se il modello picchia
(anche dopo il centraggio) leggermente abbassate il trim dello stick
elevatore per correggere. Se il modello
tende un pò ad alzare il naso spostate
un po’ verso l’alto il trim dell’elevatore
per effettuare la correzione.
Fig. 27
PILOTAGGIO
Il trim sinistro controlla la salita e la
discesa. Se spingete lontano da voi lo
stick sinistro (profondità) l’aereo
scende. Se tirate lo stick verso di voi
l’aereo sale. Durante le virate , l’aereo
tende a perdere altitudine e dovrete
compensare tirando un po’ verso di voi
lo stick del profondità. Cercate di non
oltrepassare l’altezza di 15-20 mt (ca. l’
altezza di un palazzo di 5-6 piani) Se
volate troppo alto non distinguerete più
la reazione del modello e potrete
perderne il controllo. Se volate troppo
basso avrete poco tempo per reagire e
potrà urtare il suolo od un ostacolo.
L’autonomia del motore è di circa 1015 minuti a seconda della carica della
batteria e della temperatura. Dopo
questo tempo il motore si spegnerà ma
avrete ancora energia sufficiente per il
controllo del modello e per atterrare.
How to set the flight of your Mini Mandy
Comment régler le vol de votre Mini Mandy
Regolazioni per il volo del vostro Mini Mandy
Fig. 26
Fig. 27
Page 12
12
Fig. 25
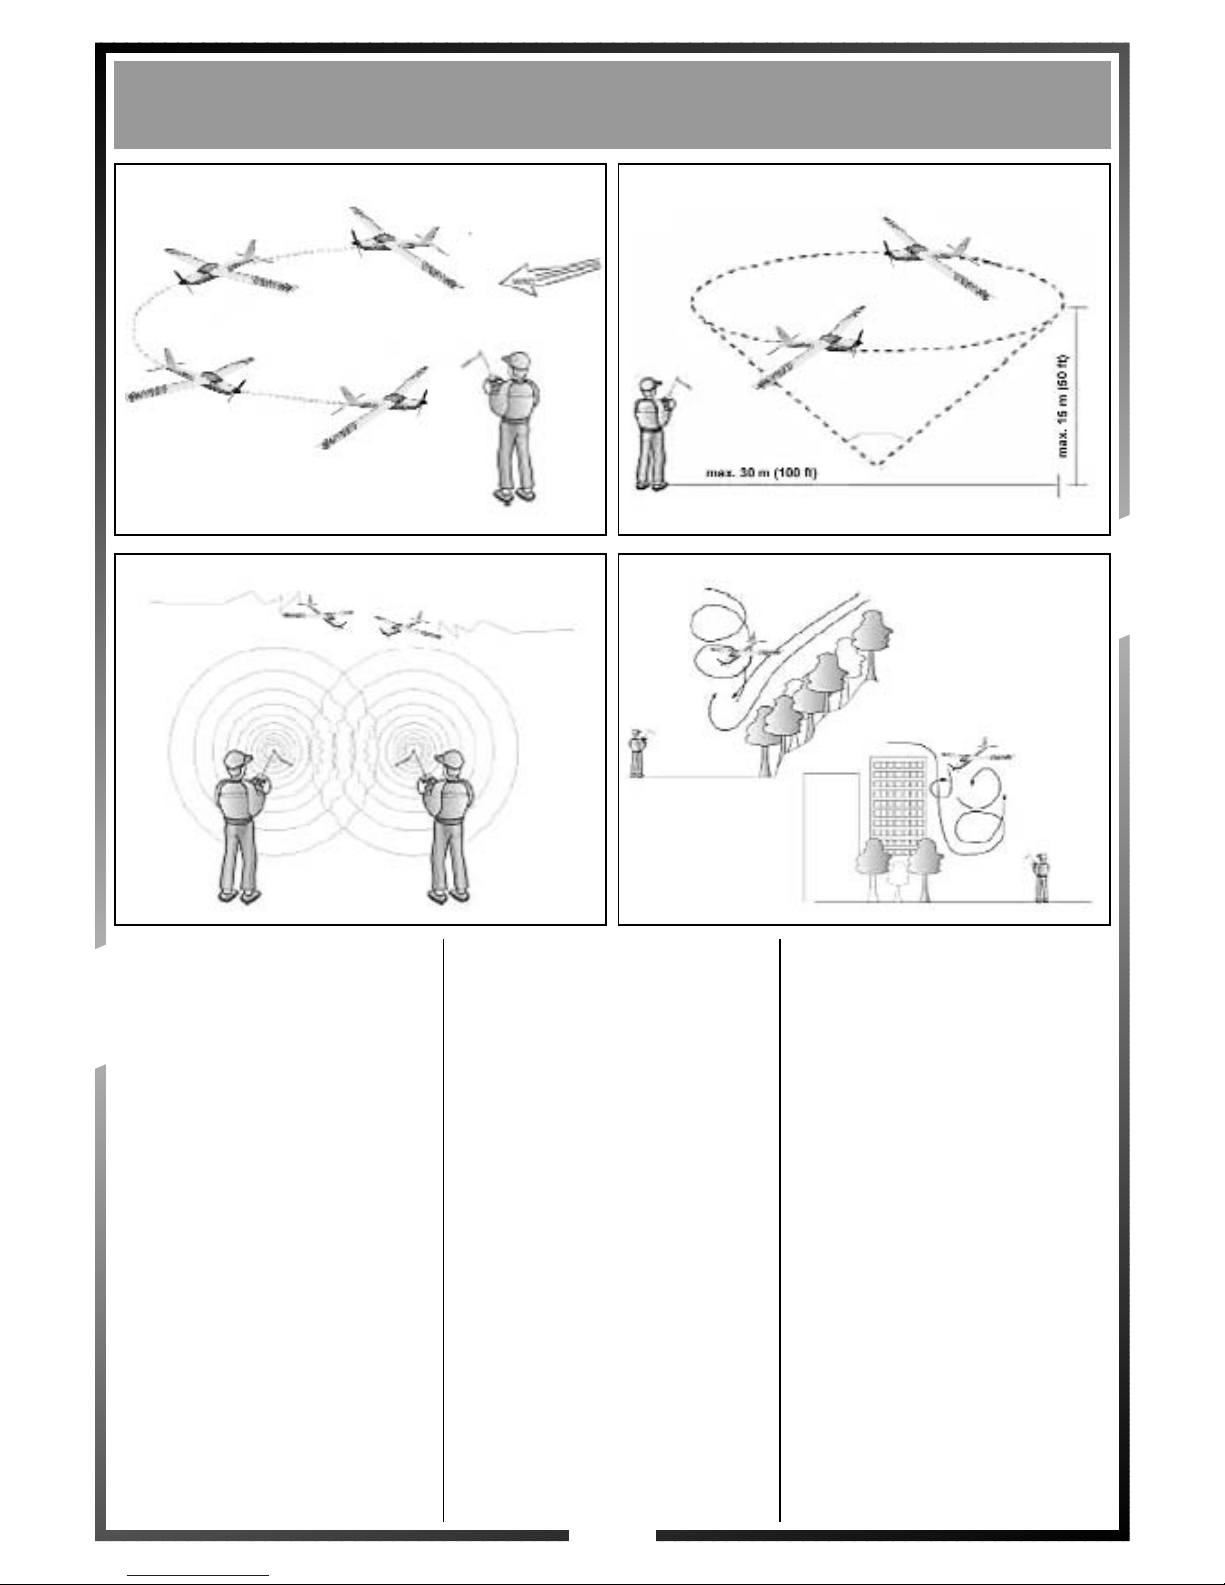
LANDING THE PLANE
When the plane is about 30 feet above
the ground, turn it into the wind and cut
the motor to land.
Fig. 26
The plane should fly in a cone shape
no more than 100 feet away from the
pilot. Always fly the plane in front of
you. Never let it fly directly overhead
because you could easely loose your
perception of how the plane is flying.
Fig. 27
Before flying, you should always check
to see if other planes in the area are on
the same frequency, as this will cause
transmitter interference between the
planes and cause accidents.
Fig. 28
Always stay away from trees, tall
buildings and elevated land because
there is a lot of turbulence. The plane
is lightweight and will be carried away
in the turbulence and will be
uncontrollable and may be lost.
Fig. 25
ATTERISSAGE
Amorcez votre descente, virez pour
être avec le nez face au vent. A une
altitude de ±10 m coupez les gaz afin
d’attérir.
Fig. 26
Votre avion doit évoluer dans une zone
de ±30 mètres face à vous. Gardez
toujours l’avion devant vous, ne le
laissez jamais passer au-dessus de
votre tête, vous perdriez toute
perception de l'évolution de l'avion
dans les airs.
Fig. 27
Avant de voler, vérifiez qu'aucun pilote
n’utilise la même fréquence que vous.
Sinon, il y aura des interférences entre
les avions et donc des accidents.
Fig. 28
Ne volez jamais à proximité d’arbres,
bâtiments ou collines à cause des
turbulences. L’avion étant léger, il
deviendrait incontrolable et pourrait
partir très loin.
Fig. 28
ATTERRAGGIO
Addolcite la discesa, virate per avere il
naso controvento. Ad una altitudine di
± 10 mt. (s e ancora in moto) spegnete
il motore per poter atterrare.
Fig. 29
Dovrete tenere il vostro modello a ca
30 metri in fronte a voi. Tenete sempre
il modello di fronte, non fatevelo
passare sopra la testa, rischierete di
perdere la percezione dell’orientamento del modello in volo.
Fig. 30
Prima di volare verificate attentamente
che nessun altro pilota utilizzi la stessa
frequenza. Altrimenti rischierete
interferenze e perdite di controllo sia
voi che l’altro pilota. Questo potrebbe
portare ad incidenti.
Fig. 31
Non volate mai vicino ad alberi,
costruzioni o colline per via delle
turbolenze. Essendo il modello molto
leggero potrebbe diventare incontrollabile e sfuggirvi.
Flying instructions / Safety precautions
Instructions pour le vol / Consignes de sécurité
Istruzioni per il volo / Consigli di sicurezza
Fig. 28
Fig. 29
Fig. 30 Fig. 31
Page 13
Safety precautions
Consignes de sécurité
Consigli di sicurezza
ATTENTION
1. Always disconnect your battery after each flight or when you transport or store your model.
2. Put the transmitter "ON" before you start the model. After flying, first shut down the model and then the transmitter.
3. Don’t fly facing the sun because you could be blinded and loose control. Always wear a cap and sunglasses for
protection.
4. Keep the propellor away from your face, eyes and fingers.
5. Don’t launch in the direction of people and/or animals.
6. Make sure people around know that you are flying.
7. Throw the plane away from you when launching.
8. Only use your plane in grassy, open areas.
9. Don’t fly in very windy conditions.
10. Don’t fly with temperatures below 7°C (45°F) or the wings will become brittle and may brake. And also the engine
performances will decrease.
11. Don’t fly over high-voltage cables.
12. Don’t leave your plane in direct sunlight and/or extreme heat for excessive amounts of times.
Distribution :
Amerang limited - Lancing, West Sussex BN158TE, England
sales@amerang-group.com
Model Racing Car - 94370 Sucy-en-Brie, France
Tel : 01.49.62.09.60 www.mrcmodelisme.com
Safalero s.r.l. - Italy
www.safalero.it
MINI MADY © 2005
ATTENTION
1. Déconnectez toujours votre batterie de propulsion après chaque vol et lorsque vous transportez votre modèle.
2. Avant le vol, allumez l’émetteur avant l’avion. Après le vol, éteignez l’avion en premier et ensuite l’émetteur.
3. Ne faites jamais passer votre avion dans le soleil, vous seriez aveuglé et perdriez le contrôle. Portez de préférence
une casquette et une paire de lunette de soleil pour combattre les fortes luminosités.
4. Tenez l’hélice éloignée des doigts, des yeux, du visage.
5. Ne lancez pas l’avion en direction de personnes ou d’animaux.
6. Assurez-vous que les personnes autour de vous savent que vous volez.
7. Tenez l’avion éloigné de vous lorsque vous le lancez.
8. Utilisez votre avion uniquement sur un terrain engazoné et suffisamment grand.
9. Ne volez jamais par temps de grand vent.
10. Ne volez pas lorsque la température est inférieure à 7°C car les ailes deviennent cassantes et peuvent se briser.
La performance du moteur est aussi altérée par temps froid.
11. Ne volez pas à proximité de lignes à haute tension.
12. N'exposez pas directement votre modèle aux rayons du soleil ou toute autre source de chaleur pendant une longue
période.
ATTENZIONE
1. Scollegate sempre le batterie di alimentazione motore dopo ogni volo e sempre quando trasportate il modello per
evitare avviamenti accidentali.
2. Prima del volo, accendete sempre prima il trasmettitore. Dopo il volo spegnete sempre prima il modello e dopo il
trasmettitore.
3. Non fate passare il modello nel sole, verrete acciecati e potreste perdere il controllo. Indossate di preferenza un
baschetto ed occhiali da sole per combattere la forte luminosità.
4. Tenete l’elica lontana dalle dita, dagli occhi, dal viso e da oggetti quali stracci fazzoletti etc ...
5. Non lanciate mai il modello verso persone od animali.
6. Assicuratevi che le persone intorno a voi sappiano che state per volare.
7. Durante il lancio tenete il modello lontano da voi.
8. Utilizzate il vostro modello solo su terreni liberi e sufficientemente grandi.
9. Non volate mai in presenza di vento forte.
10. Non volate quando la temperatura scende al disotto dei 7° C in quanto il materiale delle ali diventa fragile e queste
possono rompersi. Inoltre le prestazioni del motore sono compromesse a bassa temperatura.
11. Non volate in prossimità di cavi ad alta tensione.
12 Non esponete direttamente il modello ai raggi del sole o ad altra fonte di calore per lunghi periodi.
 Loading...