

SMILEY BUTTON CAMERA
SKU: SMILEDVR
THANK YOU FOR PURCHASING THE SMILEDVR
Please read this manual before operating the SmileDVR and keep it
handy.
Cute smiley face pin hides high quality video camera and microphone.
The SmileDVR is perfect for trade shows, school, meetings, and
mystery shopping. The clip on pin can be placed on a vest, purse, hat,
book bag, or whatever could use touch of perkiness. Don't be fooled
by its tiny size, it is a capable DVR.
Quality video and audio recording. This gadget records high
resolution video, images and audio from up to ten meters away. It
records up to 16GB to MicroSD and can record for up to two hours
per charge.
All it takes to get the pin recording is the press of a few buttons.
Your purchase should include:
1 x Smiley Button Camera
1 x USB Cable
1 x Instruction Booklet
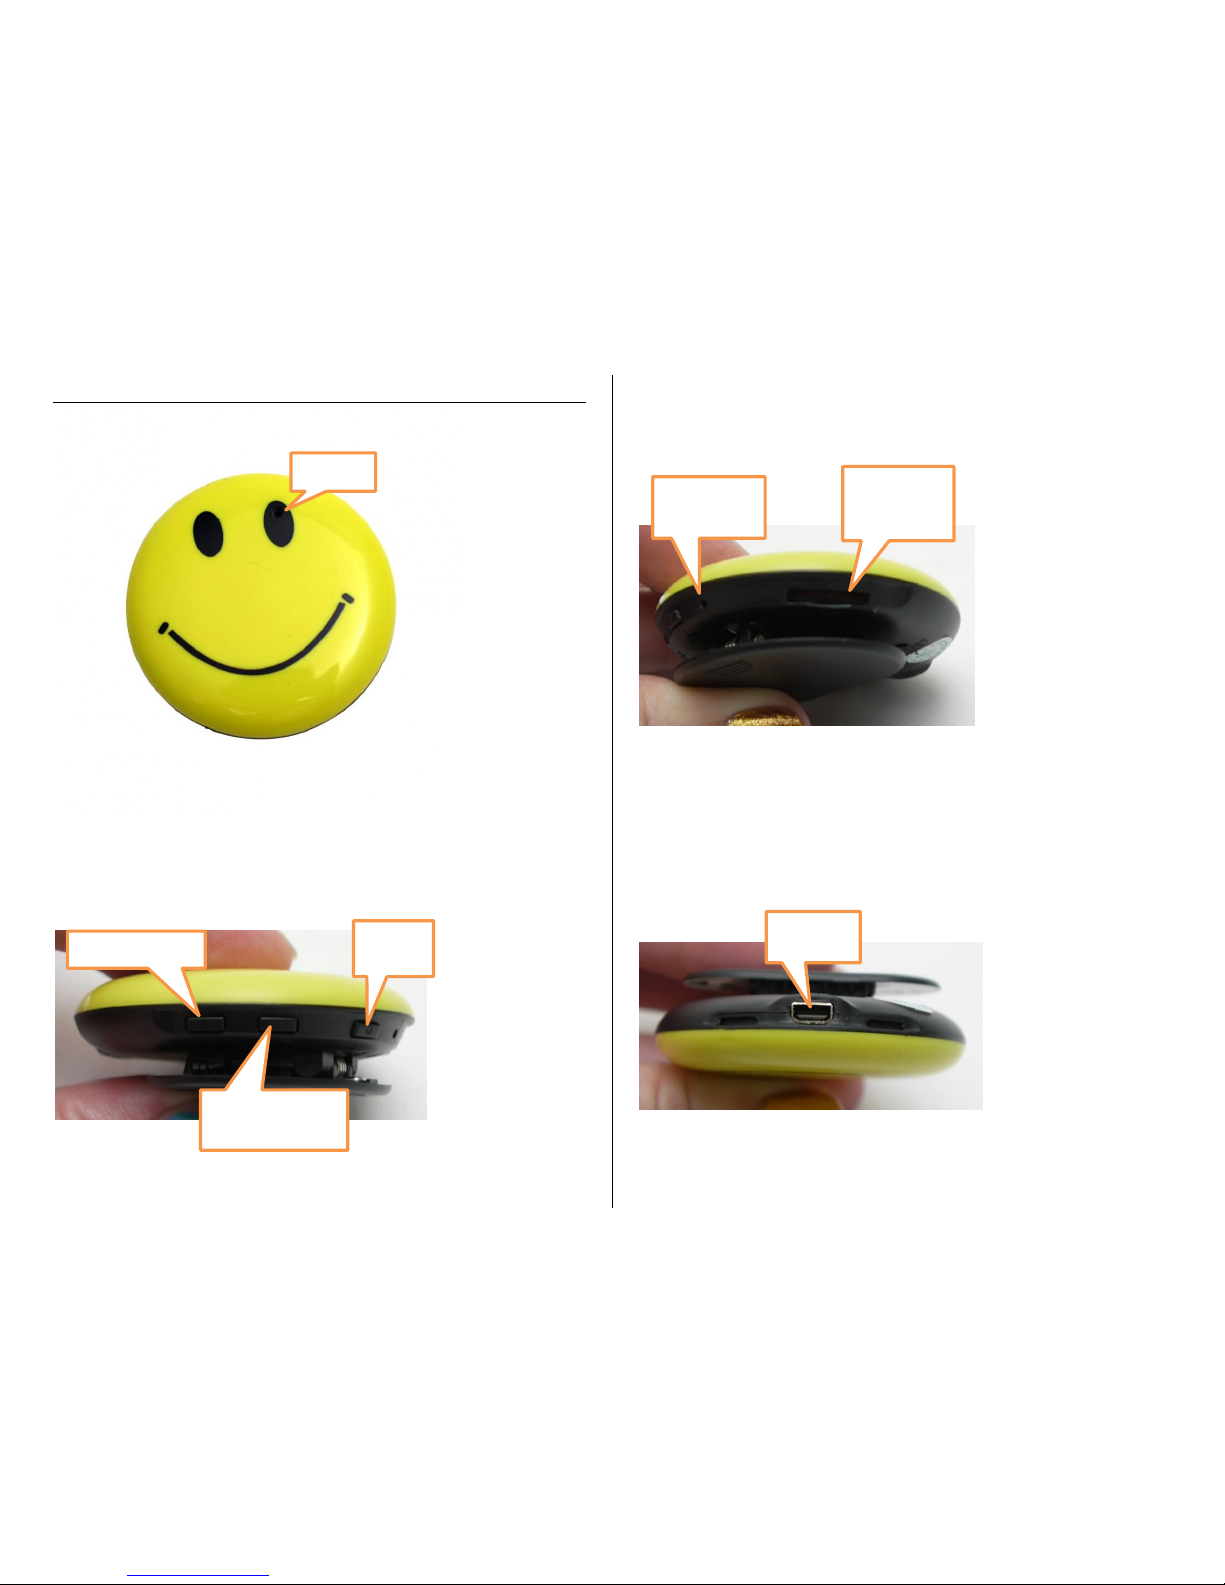
GET FAMILIAR WITH YOUR SMILEDVR
Camera
Indicator
Light
MicroSD
Card Slot
USB Port
Record Button
Camera/Video
Button
On/Off
Button

OPERATING THE SMILEDVR
IMPORTANT NOTICE: Allow the device to charge 4 – 6 hours before
using.
HOW TO CHARGE YOUR SMILEDVR
1. Plug the USB cable into the USB port on the SmileDVR
2. Plug the USB cable into the USB port on your computer
The blue indicator light will turn on
The SmileDVR is now charging
TIP: If the yellow indicator light is flashing the device needs to be
charged or there is no MicroSD Card in the MicroSD Card slot
HOW TO TURN YOUR SMILEDVR ON
1. Ensure your have inserted a MicroSD Card into the MicroSD
Card slot
2. Press and hold the On/Off button for three seconds
The yellow indicator light will flash three times and
then stay on
The SmileDVR is now ON and in standby mode
HOW TO TURN YOUR SMILEDVR OFF
1. Press and hold the On/Off button for three seconds
The yellow indicator light will flash three times and
then turn off
The SmileDVR is now OFF
HOW TO RECORD AUDIO
1. Ensure you have inserted a MicroSD Card into the MicroSD
Card Slot
2. Turn the SmileDVR ON and in standby mode
3. Press the record button once
The blue indicator light will begin flashing
The SmileDVR is now recording audio
4. Press and hold the record button
Your audio recording is now saved
HOW TO TAKE PHOTOS
1. Ensure you have inserted a MicroSD Card into the MicroSD
Card slot
2. Turn the SmileDVR ON and in standby mode
3. Press the camera/video button once
The yellow indicator light will flash once
Your photo has now been saved
HOW TO RECORD VIDEO
1. Ensure you have inserted a MicroSD Card into the MicroSD
Card slot
2. Turn the SmileDVR ON and in standby mode
3. Press and hold the camera/video button for three seconds
The yellow indicator light will blink rapidly
During recording the yellow light will slowly blink
Your video is now being recorded
4. Press and hold the camera/video button again for three
seconds to stop recording and save your video.
HOW TO RESET THE TIME/DATE STAMP
1. Connect the SmileDVR to your computer.
2. Open the removable disk. If you received a pop up asking you
what to do with the device you just connected, choose “Open
Folder to view Files.” (Windows Systems Only)
If you see a file called “Time” that already exists, delete it.
3. Right click one time in the blank space below any folders you
see. Do not click on a folder. You will get a popup menu.
Choose “New” and then “Text Document.”
4. Name it “time” then press the “enter” key to save the name.
5. Double left click on the file you just made to open it in
Notepad.
6. Type the time and date in the following exact format:
2014.11.24 15:25:30
The time must be in military format. The above example is 3:25 PM.
The file will only contain a single line of text. Do not insert any extra
blank lines or spaces before the date or after the time.
7. Go the “File” then choose “Save” to save your time and date.

8. Disconnect the device from the computer and turn it on.
RETRIEVE THE FILES TO YOUR PC
1. Plug the device into your PC using the USB cable
2. Locate “Removable Disk” inside the (My) Computer folder
AutoPlay Removable Disk > Open folder to view files
Or…
Go to Start > Computer > Removable Disk
3. Open the Removable Disk drive
4. Open the DCIM folder
5. Double click the file you want to view
VLC Player is recommended for watching videos
TROUBLESHOOTING
HOW TO RESET THE DEVICE
Press and hold the On/Off button and the camera/video
button at the same time
THE DEVICE WON’T TURN ON
Charge the device for at least 4 hours before the first use
Make sure the charging cable is securely inserted into the
device and into the power source
THE DEVICE ISN’T CHARGING
Replace the battery or charging cable
If you are charging via a wall power source, you may need to
charge via your PC. The AC adapter might be bad
THE DEVICE HAS CRASHED
You need to reset the device
MY COMPUTER DOESN’T RECOGNIZE THE DEVICE
Unplug the device from your PC and reboot the device
Unplug the device from your PC and reboot your PC
Try using a different USB slot on your PC
Replace the USB cable
THE SOUND OR VIDEO IS UNCLEAR
The device needs charging
OTHER PROBLEMS
Call our technical support at 770–694–6923

SPECIFICATIONS
Video Resolution
720x480
Video Format
AVI
Frames per Second
29
Recording Time
2 hours
Motion Detection
NO
Photo Resolution
2048x1536
Photo Format
JPEG
Audio Format
WAV
Water Resistant
No
Battery Life
2 hours
Type of Memory
MicroSD Card
Memory Capacity
16GB
Recording Capacity
2GB ≈ 1 hour
4GB ≈ 2 hours
8GB ≈ 4 hours
16GB ≈ 8 hours
32GB ≈ 16 hours
USB Interface
2.0 USB
Player Software
VLC recommended
Operating Systems
Windows 2000
Windows Me
Windows XP
Windows Vista
Windows 7
Windows 8
Mac OSX
Linux
 Loading...