


25-DAY STANDBY
VOICE RECORDER
SKU: MQ300
THANK YOU FOR PURCHASING THE 25-DAY STANDBY
VOICE RECORDER
Please read this manual before operating the 25-day standby voice
recorder and keep it handy.
This voice activated USB recorder is an upgrade from the VAUSB. This
newer model features the same 4GB of internal storage, but can now
hold up 144 hours of audio. You can hang it on a lanyard or slip into a
pocket for discreet recording at the office or school, or to covertly
record voice as a secret shopper, investigator, or to simply record
notes and interviews.
The flash drive needs no cables or batteries, making perfect for the
covert operative on the go. Recording is as simple as a touch of the
button. Choose from straight normal recording or voice activation.
The voice activation feature allows you to avoid long hours of silent
recording and save battery life. This unit can be on standby for up to
25 days, waiting to pick up any voices there may be.
Your purchase should include:
1 x Voice Recorder
1 x Instruction Booklet
*
GET FAMILIAR WITH YOUR 25-DAY STANDBY VOICE
RECORDER
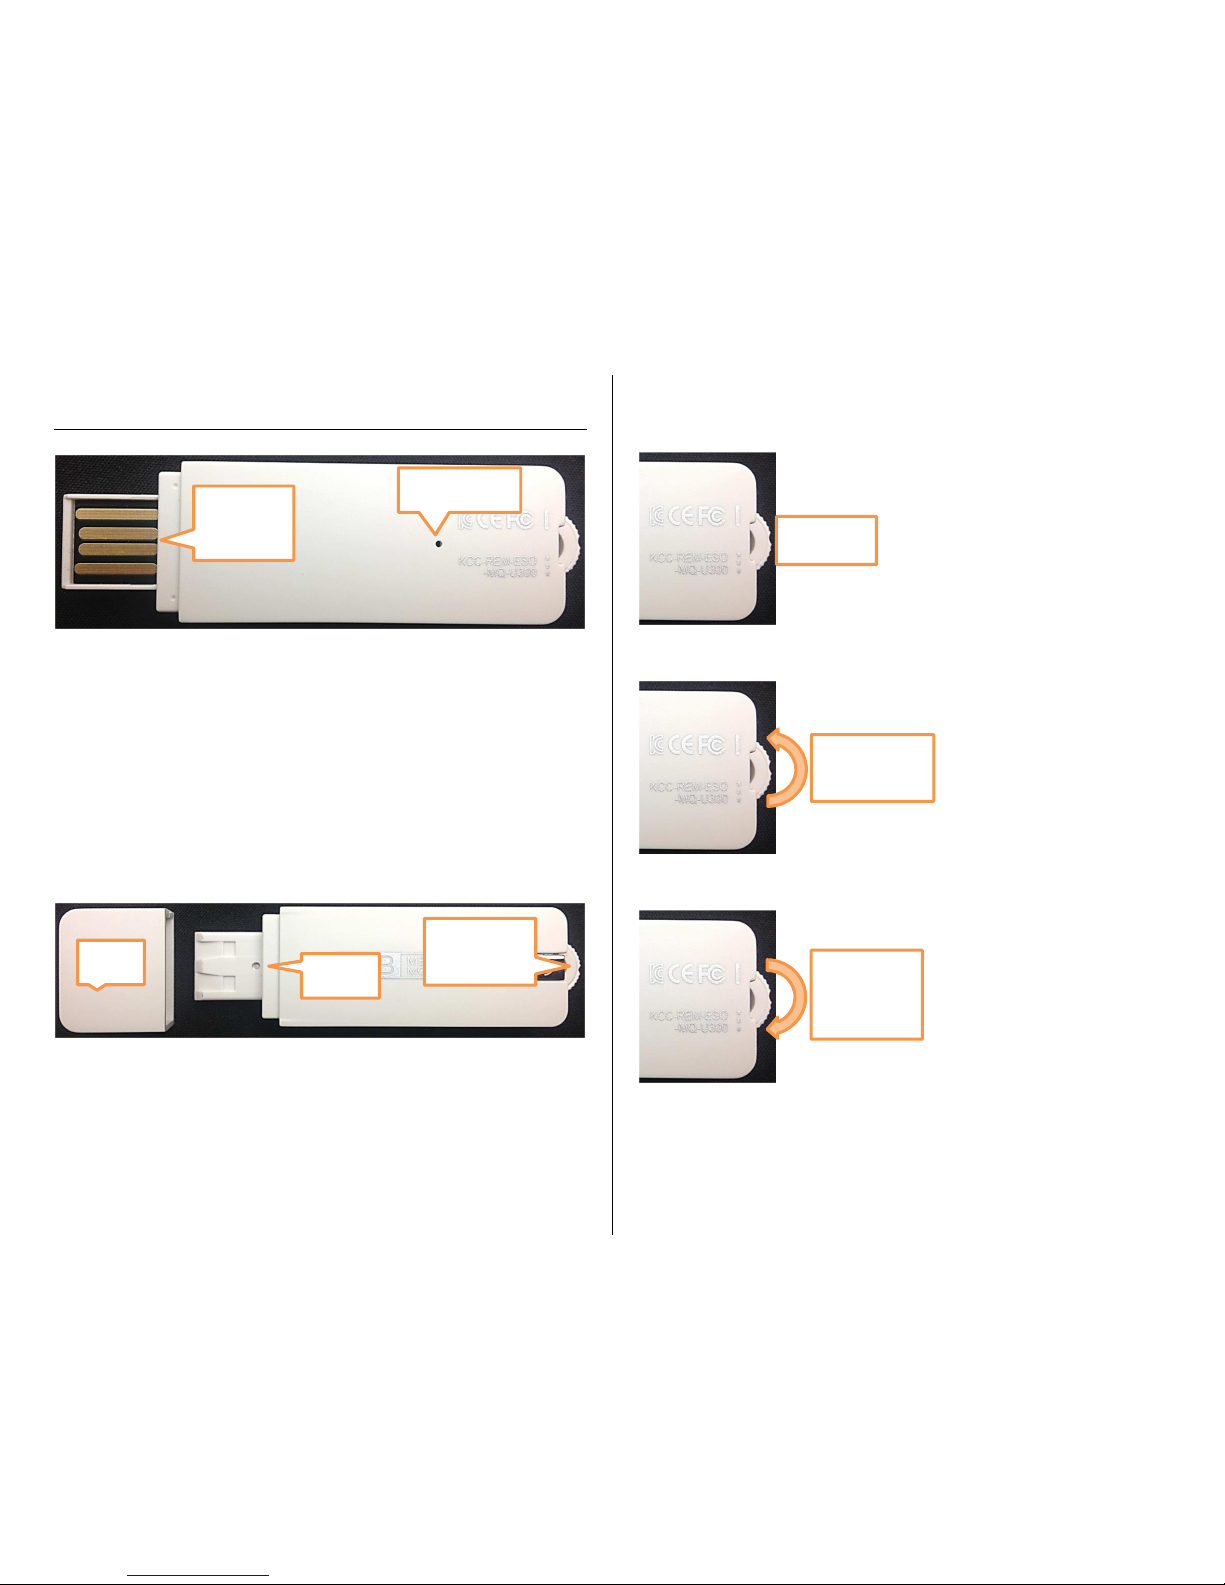
Figure 1: Side A
Figure 2: Side B
Figure 3
Figure 4
Figure 5
Microphone
Indicator
Light
Cap
Reset
Recording
Switch
Stop
Voice
Operated
Recording
Continuous
Recording

*
OPERATING THE 25-DAY STANDBY VOICE RECORDER
IMPORTANT NOTICE: Allow the device to charge 4 – 6 hours before
using.
HOW TO CHARGE THE VOICE RECORDER
1. Remove the cap
2. Insert the USB stick into your PC’s USB jack
• The red indicator light will be solid while charging
• The red indicator light will blink when fully charged
HOW TO CHECK THE REMAINING BATTERY LIFE
1. Eject the USB stick from your PC’s USB jack
• The indicator light will display one of three ways
i. 0%–30% light off
ii. 30%–70% light blink
iii. 70%–100% light on
HOW TO RECORD
1. Turn the Recording Switch into the continuous recording
position (see Figure 4)
• After approx. 3 seconds, the red indicator light will
blink
• The device is now recording
2. Turn the Recording Switch into the stop position (see Figure 3)
• The device has stopped recording and saved the file
HOW TO USE VOICE OPERATED RECORDING
1. Turn the Recording Switch into the voice operated recording
position (see Figure 5)
• After approx. 3 seconds, the red indicator light will
blink
• The device is now recording
2. Turn the Recording Switch into the stop position (see Figure 3)
• The device has stopped recording and saved the file
HOW TO USE LONG RECORDING
Long play is used while the device is plugged into your PC, allowing
you to record for a long time
1. Turn the Recording Switch into the voice operated recording
position (see Figure 5)
• After approx. 3 seconds, the red indicator light will
blink
• The device is now recording
2. Plug the USB stick into your PC’s USB jack
3. Turn the Recording Switch into the stop position (see Figure 3)
• The device has stopped recording and saved the file
IMPORTANT NOTICE
This device is not equipped to have its time stamp adjusted. We
have attempted extensive testing, but unfortunately none of our
known methods have worked. We apologize for any inconvenience
this might cause.

*
RETRIEVE THE FILES TO YOUR PC
1. Plug the device into your PC using the USB cable.
2. Locate “MEMOQ” inside the (My) Computer folder.
• AutoPlay MEMOQ > Open folder to view files
Or…
• Go to Start > Computer > Removable Disk
3. Open the MEMOQ drive.
4. Open the VOICE folder.
5. Double click the file you want to view.
• VLC Player is recommended for watching videos.

*
TROUBLESHOOTING
THE DEVICE WON’T TURN ON
• Charge the device for at least 4 hours before the first use.
• Make sure the charging cable is securely inserted into the
device and into the power source.
THE DEVICE HAS CRASHED
• You need to reset the device.
MY COMPUTER DOESN’T RECOGNIZE THE DEVICE
• Unplug the device from your PC and reboot the device.
• Unplug the device from your PC and reboot your PC.
• Try using a different USB slot on your PC.
THE SOUND OR VIDEO IS UNCLEAR
• The device needs charging.
OTHER PROBLEMS
• Call our technical support at 770–694–6921
SPECIFICATIONS
Recording Time
15 hours
Voice
Detection
Yes
Audio Quality
64 Kbps
Audio Format
MP3
Water Resistant
No
Battery Life 15 hours constant recording
25 days standby
Type of Memory
Internal Storage
Memory Capacity
4GB
Recording Capacity
144 hours
USB Interface
2.0 USB
Player Software
VLC recommended
Operating Systems Windows 2000
Windows Me
Windows XP
Windows Vista
Windows 7
Mac OSX
Linux
 Loading...