

2K Resolution
Recording Watch
SKU: DVMWATCH2K
1 Version 1.0

THANK YOU FOR PURCHASING THE 2K
RESOLUTION RECORDING WATCH
Please read this manual before operating the
camera and keep it handy.
Your purchase should include:
1 x Recording Watch
1 x Manual
1 x USB Cable
2 Version 1.0
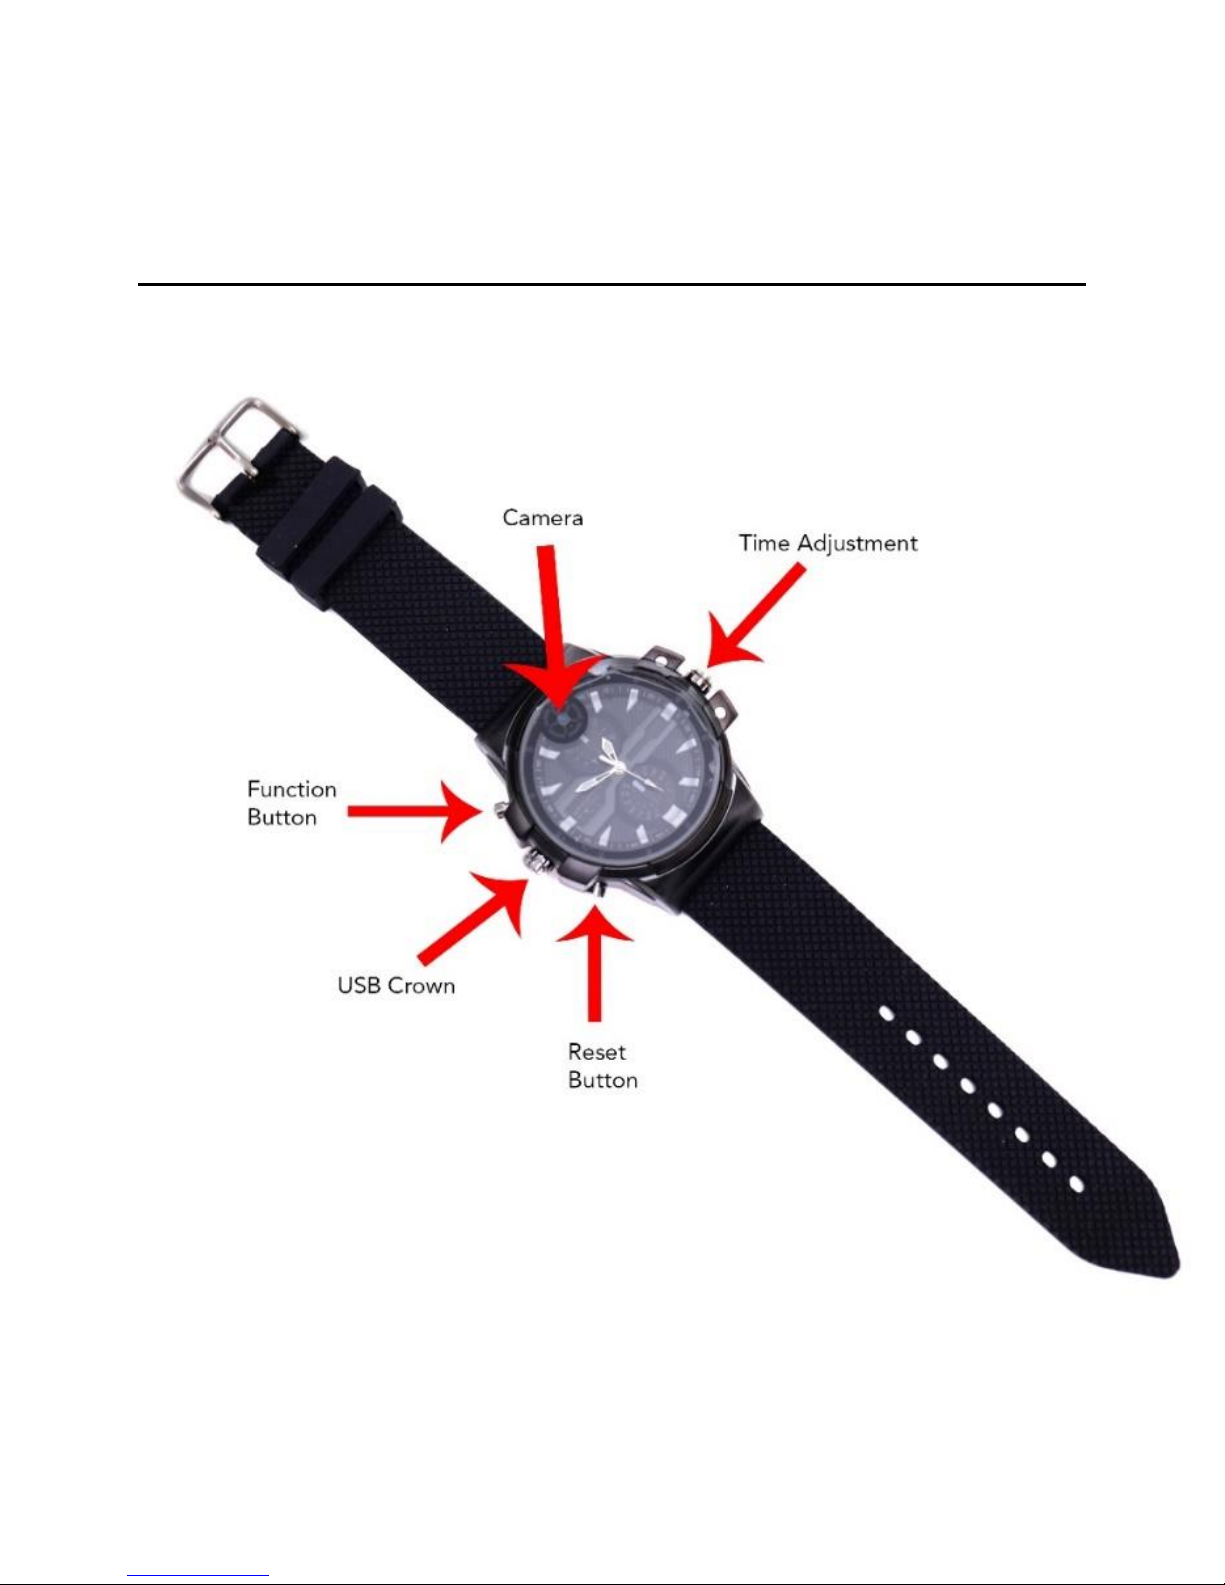
GET FAMILIAR WITH YOUR
DVMWATCH2K
3 Version 1.0

HOW TO CHARGE THE CAMERA
To charge the Watch you can:
1. Plug the camera into the USB port of
your computer.
2. Plug the camera into a DC 5V adapter
(not provided).
If the blue light is flashing while plugged in, this
means that the Watch is charging. When the
blue light stays on continuously, the camera is
fully charged.
4 Version 1.0

OPERATING THE CAMERA
HOW TO TURN ON THE CAMERA
1. Press and hold the function button on
the top of the Watch until the blue
indicator light turns on.
2. After a few seconds, the blue light will
turn off, and a green light will flash
several times then turn off. The camera
is now recording video.
HOW TO ENTER STANDBY MODE
1. The camera begins recording when
powered on.
2. If you press the top function button
while the Watch is recording, the
current recording will be stopped, and
the Watch will enter standby mode.
5 Version 1.0

HOW TO TAKE PICTURES
1. While the Watch is in standby mode,
double click the top function button
quickly.
2. The camera will enter photo mode, and
the blue and green light will blink
alternatively.
3. Press the top button once to take a
picture, and the blue light will blink
twice.
4. To leave photo mode, double click the
function button quickly, and the blue
light will come on steady indicating that
the unit has returned to standby mode.
HOW TO MAKE AUDIO ONLY RECORDINGS
1. While the Watch is in standby mode,
click the top function button 3 times
quickly.
6 Version 1.0

2. The camera will enter audio mode, and
the blue light will blink several times
then turn off. The Watch is now
recording audio.
3. To leave audio mode, click the function
button 1 time, and the blue light will
come on steady indicating that the unit
has returned to standby mode.
HOW TO RECORD MOTION DETECTION
1. While the Watch is in standby mode,
click the top function button 4 times
quickly.
2. The camera will enter motion detection
recording mode, and the green light will
blink. The Watch is now in motion
detection mode.
3. To pause motion mode, press the
function button 1 time, and the green
light will stay on. To resume, press the
7 Version 1.0

button 1 more time, and it will blink
green again.
4. To quit motion mode, click the top
button 4 times quickly, and the blue
light will come on steady indicating that
the unit has returned to standby mode.
AUTO POWER OFF
1. When the battery is low, the light will
blink several times, and the unit will
power off.
2. If no action is chosen when in standby
mode, the camera will power off after 2
minutes.
8 Version 1.0

CHANGING YOUR DEVICE SETTINGS
(INCLUDING THE DATE/TIME STAMP)
Your device comes with a Windows application
for changing various settings including the
date/time stamp. To access these settings:
1. Launch the “Powercam Setup” program
in the root of the device’s internal
memory.
2. Once the application starts you can
adjust the following:
a. Video quality
b. Video Resolution (1296p@30fps,
1080p@30fps, 720p@60fps, and
720p@30fps)
c. Turn the date/time stamp on or
off
d. Optical source freq
e. Color mode
9 Version 1.0

3. When done, click the “Create
Configuration File” button.
4. If you are on a mac and need to edit
these settings you will need to do the
following:
a. Open Finder
b. Go to the Applications folder
c. Open TextEdit
10 Version 1.0

Copy the following information into the
window:
VideoSize=0
VideoQuality=0
RecordWithAudio=0
EV=6
VideoClipTime=5
Color=0
AutoPowerOff=1
Flicker=0
TimeStamp=1
MotionSensitivity=3
TimeStampLogoTXT=Logo
DateTime=2017/03/0716:35:51
delete=1
11 Version 1.0

d. The following settings can be
edited. Do not alter any other
settings:
i. VideoSize
1. 0 = 1296p@30fps
2. 1 = 1080p@30fps
3. 2 = 720p@30fps
4. 3 = 720p@60fps
ii. VideoQuality
1. 0 = SuperFine
2. 1 = Fine
iii. RecordWithAudio
1. 0 = Audio
recording on
2. 1 = Audio
recording off
iv. VideoClipTime
1. Enter any number
between 1-10.
This will be the
number of
12 Version 1.0

minutes the unit
records before
starting a new
file.
v. TimeStamp
1. 1 = on
2. 3 = off
vi. DateTime
1. You may modify
this to correct the
date time stamp.
Keep the format
exactly as it is
listed or the
setting will fail.
e. When done save the file as a
plain text file called usercfg.txt.
f. Eject the device from your
computer and do a test
recording to confirm the
settings.
13 Version 1.0

RETRIEVE THE FILES TO YOUR PC
1. Plug the device into your computer’s
USB port.
2. Locate “Removable Disk” inside the
(My) Computer folder.
AutoPlay Removable Disk > Open
folder to view files
14 Version 1.0

Or…
Go to Start > Computer > Removable Disk
15 Version 1.0

3. Open the Removable Disk drive.
4. Open the appropriate folder.
5. Double click the file you want to view.
VLC Player is recommended for
watching videos.
TROUBLESHOOTING
THE DEVICE WON’T TURN ON
Make sure the device is fully charged.
THE DEVICE HAS CRASHED/FROZEN
Press the reset button one time.
16 Version 1.0

DEVICE CONTINUALLY RECORDS IN MOTION
MODE
Motion detection is measured by
changing pixels during recording. Any
kind of motion, including shifting
shadows or changing lighting conditions,
can set off motion detection.
OTHER PROBLEMS
Call our technical support at 770–694–
6923
17 Version 1.0

SPECIFICATIONS
Video
Resolution
1296P, 1080P, 720P (30
or 60FPS)
Video Format
.MOV
Frames per
Second
Up to 60 fps depending
on resolution
Vision Angle
65°
Battery Life
60 Minutes
Photo
Resolution
4352x3264
Photo Format
.JPG
Type of Memory
16GB Internal
Recording Usage
6GB ≈ 60 mins
USB Interface
2.0 USB
Player Software
VLC recommended
Video
Compression
H.264
18 Version 1.0
 Loading...