

Mini Portable
MPEG-4 DVR
User Manual

Security Instruction
This product is used to control micro-computer chip. At you
before using this product, please carefully read the instructions it
will let you enjoy various features of the machine, For you to
provide more convenient use.
If the low battery
Recording audio and video or transfer files may cause serious system
errors, resulting in data loss!
In order to prevent the use of DC converter operation when
questions, please read the [Manual]
Note:
Avoid the use of this product contact with water or other liquids, or else
there will be an electric shock or fire danger! Your safety, please use the
Product to provide power converters (for the use of non-provided converter
damage caused by products, manufacturers takes no responsibility for),
please note I would like to use with the converter in line with the socket,
otherwise there will be an electric shock or fire danger to DC converter plug
is firmly inserted into a power outlet.
Otherwise there will be an electric shock
hazard!
Touch-DC converter components
May lead to electric shock
Don't open the machine cover!

Security Instruction
Do not use a damaged battery or charger
Do not allow battery charging time exceeds the allotted time
At first the use of batteries or battery unused in a few months after the re -use,
please fully charge the battery.
for the battery is fully charged, the use of its fully discharged, then re-charge in
order to ensure its longer life,
At short-term use after the battery will shorten battery life, in this case, repeatedly
for the battery is fully charged and then fully discharged several times, so you can
use the battery a longer period of time
overcharging or excessive discharge will shorten the life of rechargeable
batteries
When the rechargeable battery life than the use of a new rechargeable battery
short time, replace the new rechargeable batteries.
because of recha rgeable batteries are consumables, so battery life will be
shortened over time.
careful not to let any conductor (such as necklaces, bracelets, etc.) to enable
access to DC converter or a rechargeable battery side short-circuit, or may cause
electric shock or fire

:
Product features
● Multiple record mode:Motion detect record/manual record/Appointment Record
● Storage full over write automatically
●
Fast video recording by one key function
●
Recording, power ON/OFF via remote control
●
Real time Display/Recording at 30fps with date and time stamp
●
960 * 240 high-definition 2.7-inch LCD screen
●
Support 32GB TF memory card
●
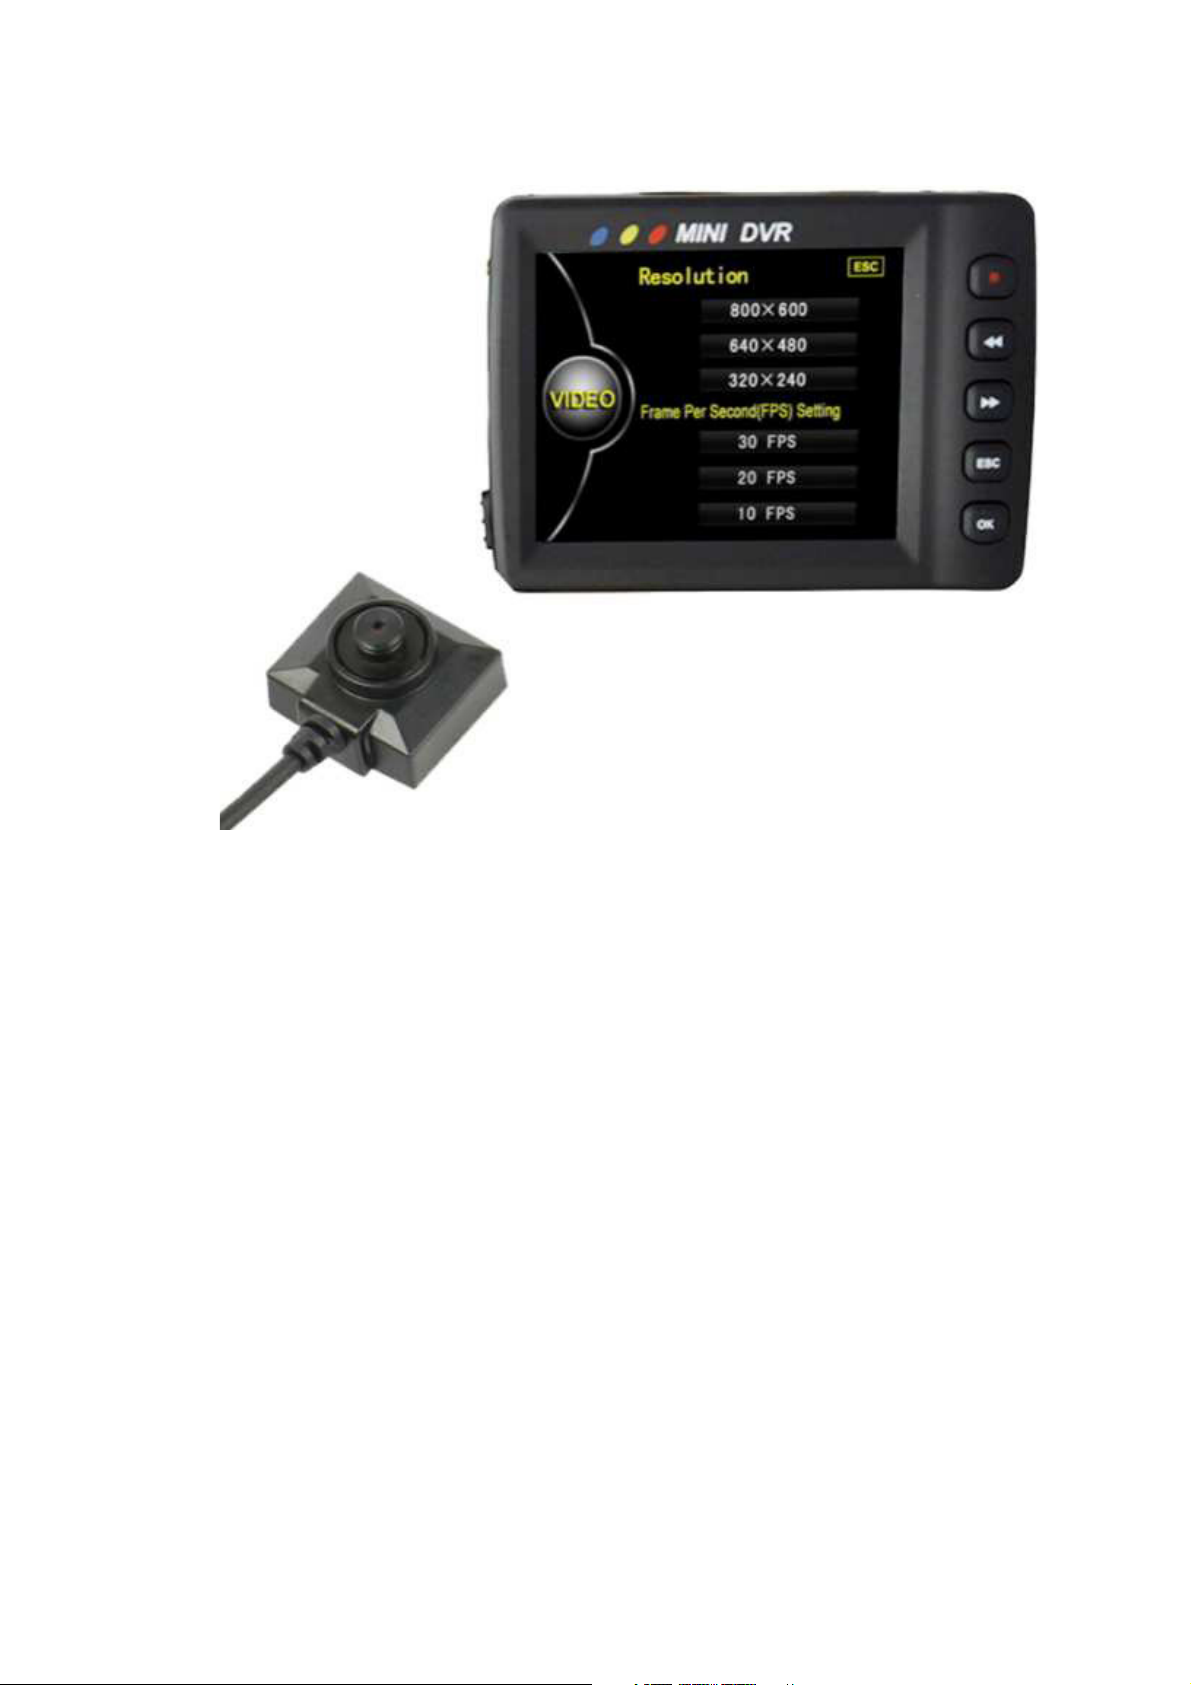
Video resolution: 800*600/640 * 480/320 * 240 optional
●
Video frames 10-30 frames / second optional
●
High-speed USB2.0 interface.
●
Audio and video input / output;
● Configuration removable high-capacity lithium battery, 5 hours of continuous
playback, video recording up to 3 hours standby
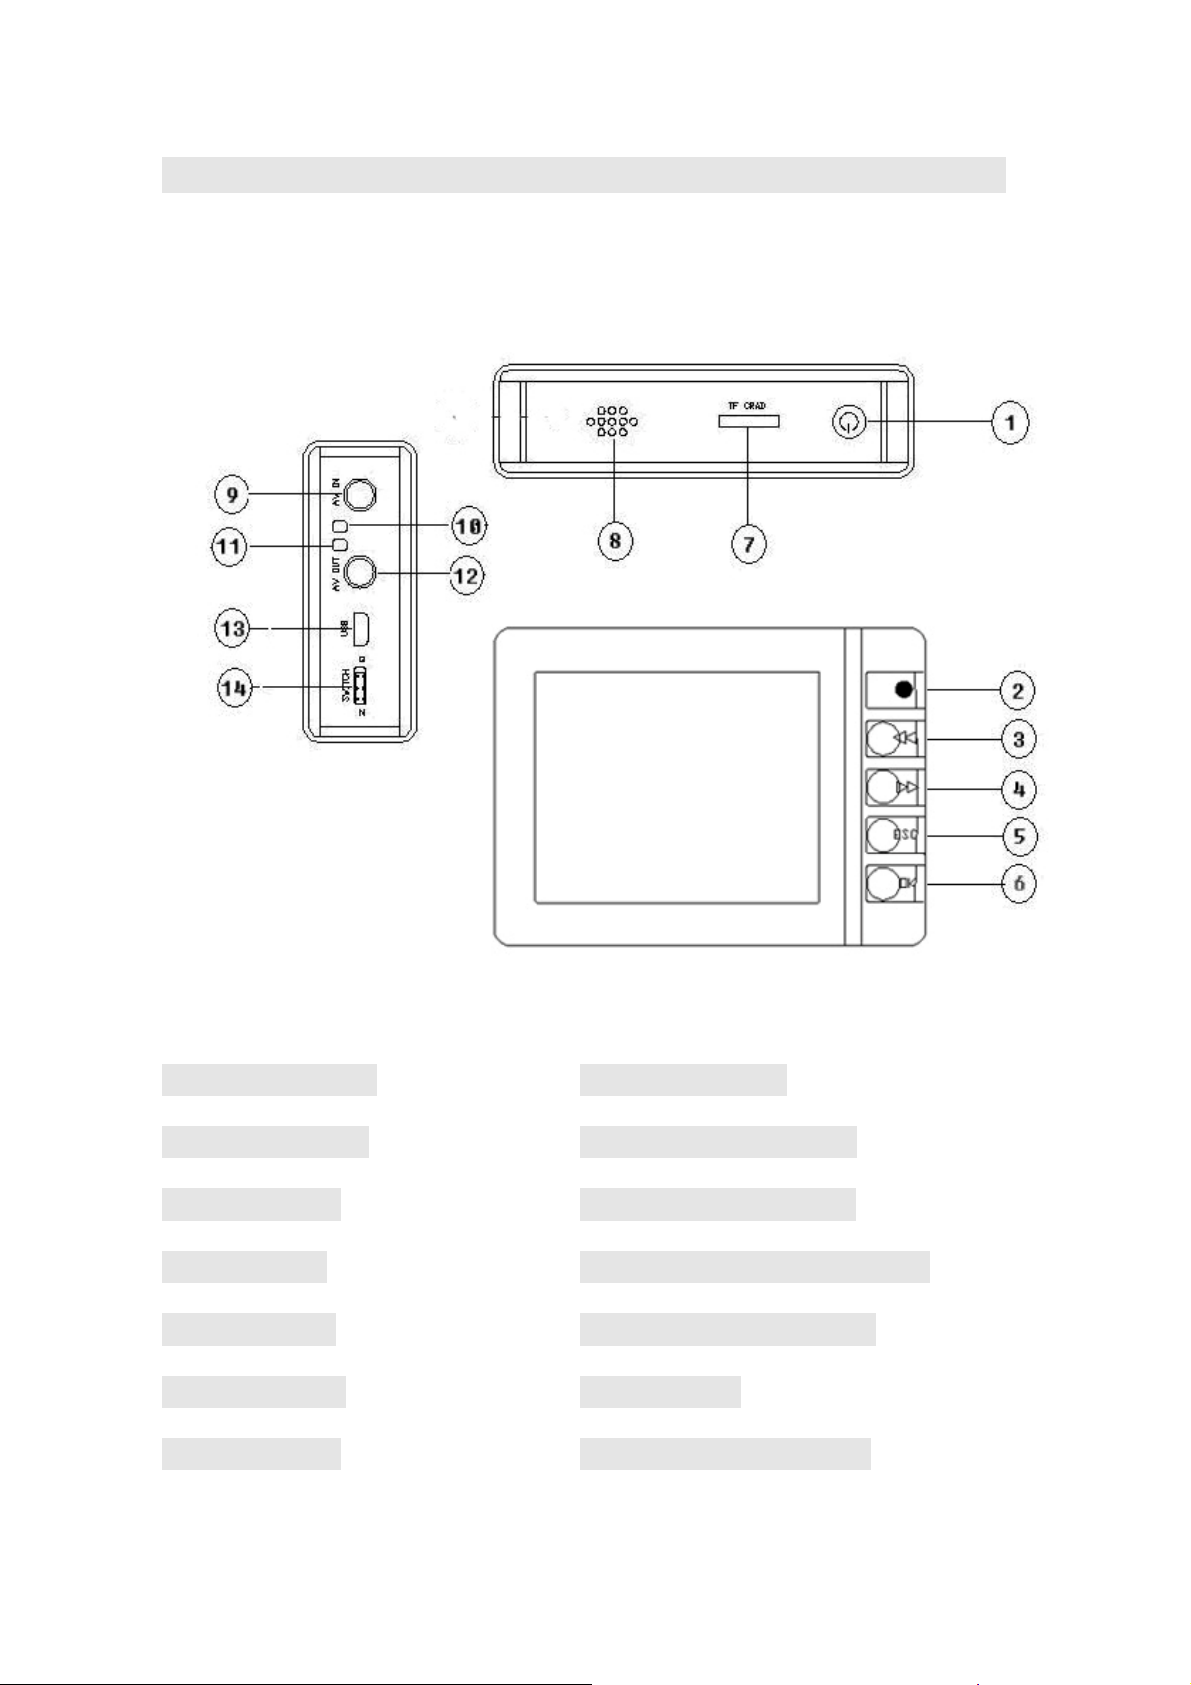
Parts Introduction
1. Power Switch 8. Loudspeakers
2. Record button 9. Video / audio input
3. Select Key 10. Charging Indicator
4. Select Key 11. Recording Indicator LED
5. ESC button 12. Video / audio output
6. Enter button 13. USB port
7. TF card slot 14. Mode switching key
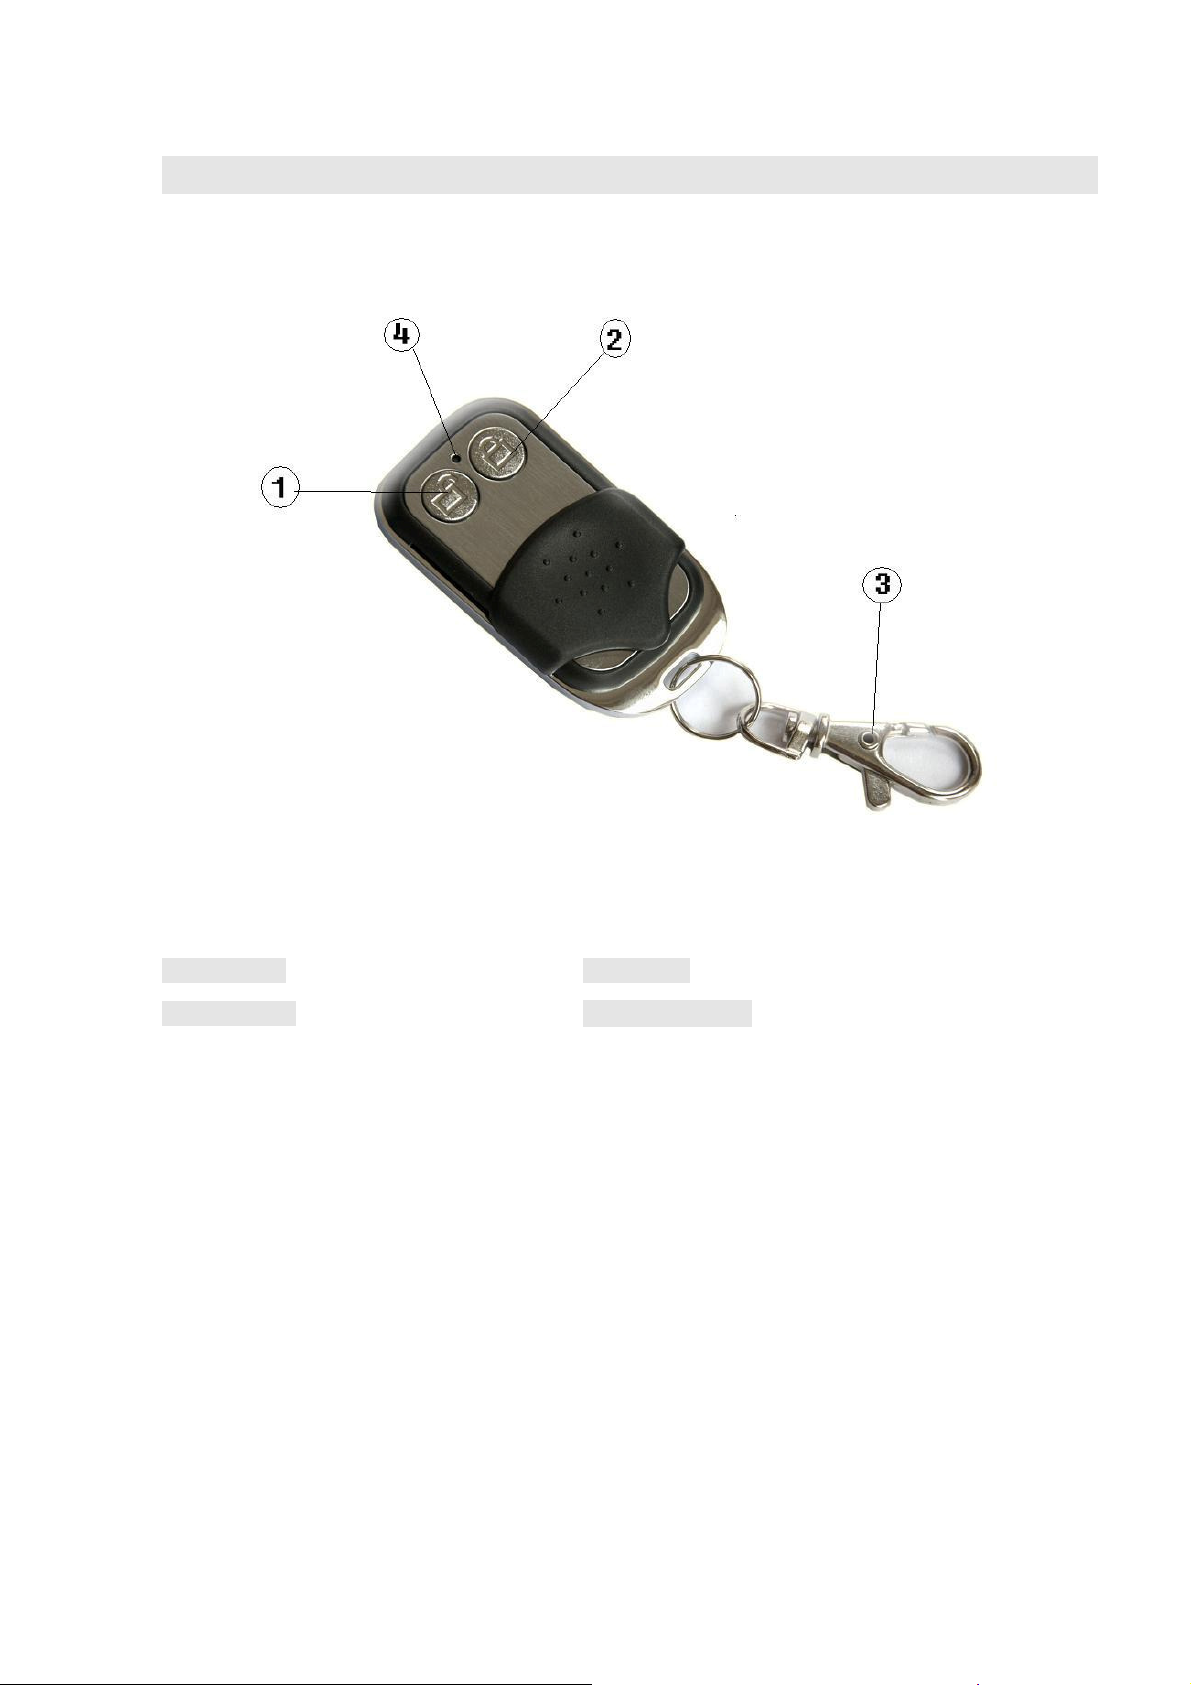
Remote controller
Introduction
1. Power ON 3. Key ring
2. Power OFF 4.LED Indicator

User Guide
Hold the Power On/Off button for 3 Seconds to turn On/Off the Device.
Interface Diagram:
Mode selection
● Video Record - Video Recording Mode
● Audio recording – Audio recording mode
● playback -
Player for / Video / Audio/ Photo Mode
● System Setting - System Settings

The use of model selection
■ Video Record Mode --
■ At the main menu select [video Record] icon to enter the video mode
1. Into the (
2. By [OK] button to enter the [
should not operate simultaneously at the next video). This feature please refer to[
Settings] Operational Guidelines.
3. According to [●] key to record the audio and video camera images, In the recording studio
when the left pulse of flashing lights.
Press ESC button to quit recording.
Quit recording after recording the file will be automatically stored in the (playback -video) file
folder.
Man-in memory, the recording will automatically stop and automatically stored in the (playbackvideo) file folder.
video Record
) mode. Screen appears to the camera collected images,
Record
Settings], then [Menu] key to exit. (Note: this function
Record
Mode Selection
■
Audio Recording mode - Select [ Audio Record ] Icon in the Main Menu

Operational Guidelines:
. The main menu to enter the (Audio recording) mode appears when the screen interface to record
instructions.
By recording [●] button to record the local microphone to receive all the audio. In the recording
studio when the left pulse of flashing lights.
Press [ESC] key to stop recording.
Quit recording after recording the file will be automatically stored in the (playback- audio) file

folder.
Man-in memory, the recording will automatically stop and automatically stored in the
(playback- audio) file folder.
Mode Selection
■
Playback Mode - Select [ Playback] Icon in the Main Menu
Instruction:
1. Once inside [Playback], you will be able to see a list of recorder file. Using the select the

require file that you want to watch, then press [OK] button to start playing the video.
2. To Delete a file, Select a file that you wanted to erase, Press [●] Button, choose [Delete], and the
[OK], you will be able to delete the selected file.

Mode Selection
■ System Configuration Mode - At the main menu select [Settings] icon to enter
the system settings mode
Operational Guidelines:
Use keys to select and then click [OK] to enter sub-menu.
1. System Time settings - set the system date and time (recommended prior to first use the
set)
2. Language settings - set the system language
- English
- 简体中文
- 繁體中文
- Russian
(In the updated version will be more language selection)

3. Switch settings - set DIP switch-Q position
- Lock and Standby
In this mode selection: In the case of shutdown when the Slide Switches Q assigned to the
location of the shortcut to start the machine automatically to enter the video mode, the
screen appears to the camera images collected at the same time display backlight lamp
clearance out, open the lock button function. (DIP switch back position N, the machine
back the video mode, all functions return to normal)
At any boot mode DIP switch assigned to put the location of Q: The display's backlight to
turn off lights, open the lock button function. (N Slide Switches back position, the screen
backlight lights opened out, key lock feature off, return the original model.)
- Lock,Standby and Record Video
Selection in this mode: Regardless of the machine in any status under the DIP switch
assigned to the location of Q, the faster boot drive (shock oscillation time) and enter the
video mode to record audio and video camera images of the left video lantern light, while
the screen backlight to turn off lights, open the lock button function. (DIP switch back
position N, the machine (a vibrator vibration twice) the left side of the video after the lights
went out save by recording just the audio and video camera data to the screen (playbackvideo) file folder and then shutdown .
- Lock,Standby and Record Audio
Selection in this mode: Regardless of the machine in any status under the DIP switch assigned
to the location of Q, the faster boot drive (shock oscillation time) and enter the recording mode to
record the microphone to receive all the audio, the left recording pulse of flashing lights. At the same
time, the backlight display lights are switched off, open the lock button function. (DIP switch back
position N, the machine (a vibrator vibration twice) just after the preservation of audio data to
recording (playback- audio) file folder and then shutdown.
- Motion detect
Selection in this mode: no matter which the state it’s in, when you switch to the Q position,
the device will launch up quickly. (Vibrate for once at the same time) And enter video record mode.
Video record mode: Change to motion detection state. Start to record dynamic video and audio. The
record light on the left side will turn on.
Note: In motion detect mode,. There will be a yellow logo M on the upper left corner. It will
automatically record video when any motion detected. 20 seconds after motion stops, the device will
stop recording automatically and save file just then recorded to the archive.

Note:can’t connect USB with computer under Q mode at the same time
4.Remote Control - Set the remote control function
- Remote control OFF
Selection in this mode: the machine from the controller to control
- Boot and Record video
Selection in this mode: the machine status at shutdown by remote control under
the (Power ON )button, the machine faster boot (vibrator vibration once) and enter the
video mode to record audio and video camera images, the left video lantern light At the
same time, the screen's backlight to turn off lights, open the lock button function.
(
Power OFF ) button by remote control, the machine (a vibrator vibration twice) the left
side of the video after the lights went out save by recording just the audio and video
camera data to the screen (playback- video) file folder and then shutdown
- Boot and record audio
Selection in this mode: the machine status at shutdown by remote control under the (Power ON )
button, the machine faster boot (vibrator vibration time) to enter the recording mode to record the
microphone to receive all the audio , at the left side of recording when recording pulse of flashing
lights. At the same time, the backlight display lights are switched off, open the lock button function.
(Power OFF ) button by remote control, the machine (a vibrator vibration twice) just after the
preservation of audio data to recording (playback- audio) file folder and then shutdown.
Note: not at Slide Switches Slide Switches Q appropriated for state use.
5. Record Time - settings Record Time
-
5
- 15
-
30
Minute
Minute
Minute
6. Forma - set storage format
- Memory
- SD Card
(One was confirmed that all data will be deleted.)

7. Storage select - set the video store directory
- Memory
- SD Card
8. Storage info - has been used to check the memory status
- Memory
- SD Card
9.Time Stamp – set the Time Stamp
- On
- Off
10.Overwrite Enable - storage replication function to automatically set
- ON
ON mode selection: the system default local storage is set to automatic replication, when
the memory storage of video data at the remaining space 1MB, the machine will delete the
earliest days of video information, then continue to the video storage, preservation the latest
video information.
Note: This function must be careful to use to open the automatic replication feature will
be automatically deleted when the first video information!
- OFF
Turn off selection mode: the local system will be at the remaining storage space 0MB,
stop recording, then the screen shows the storage space is full tips, issued a vibrator storage
space is full signal: (signals: Indirect non-stop vibration)
11.Appointment Record- set the
- On
- Off
12. Vibrating - set the Vibrating
- On
- Off
13. Standby settings - standby time video settings
- 10 second

- 20 second
- Never
Note: This function only at the status N Slide Switches can be achieved.
Note: not at Slide Switches Slide Switches Q appropriated for state use.
14. Brightness – Setting for the system Brightness
Button to reduce the brightness or increase the brightness.
15.Display settings - set AV Output
- LCD output
- TV_PAL output
- TV_ NTSC output
16. Default – Setting for reset the factory original setting
- Yes
- No
■ Video settings - in the [video Record] mode, press [OK] button to enter the [Video
resolution Settings] menu, press [Esc] key to exit.

Operational Guidelines:
Use keys to select and then click [OK] to enter sub-menu.
Video Resolution - Set the video resolution
(Video information screen size and great little noodle file settings depending on the resolution
and frame rate settings)
█ Fittings Come Digital Video Recorder
1. Mobile Video Recorder * 1PCS
2 MINI CAMERA
3. DC5V 2A charger * 1PCS
4. User Guide * 1PCS
5. USB PC Line * 1PCS
6. AV Line * 1PCS
7. Headset * 1PCS
8. Lithium electric 1800MA * 1PCS

Parts Instruction
2.7 inch LCD screed
Video output mode
Video mode
Image resolution
Video compact format
Frequency range 20HZ-20KHz
Output channel Stereo
Earphone output
Loudspeaker 1.5W
Flash Moemory 0MB
800*600/640*480 / 320*240
L 20MW+R 20mW [16O](Max volume)
960x240 LCD
NTSC / PAL
NTSC / PAL
AVI
Memory card TF memory card
IBM-PC Windows 98SE.ME.2000,XP
USB USB 2.0
Language selection Chinese / English
Power adapter DC 5V 2A
Built-in battery Li-ion battery 1800Mah
Video recording ≥3 hours
Player equipment ≥5 hours
 Loading...