

Page 1

DX System
User Guide
International HQ
Jerusalem, Israel
Tel: + 972 2 535 9666
minicom@minicom.com
www.minicom.com
North American HQ
Linden, NJ, USA
Tel: + 1 908 4862100
info.usa@minicom.com
Technical support - support@minicom.com
European HQ
Dübendorf, Switzerland
Tel: + 41 44 823 8000
info.europe@minicom.com
5UM20121 V2 6/06
Page 2

DX SY
STEM
Table of Contents
Welcome................................................................................................................4
1. Introduction.......................................................................................................5
1.1 Features.......................................................................................................5
1.2 System components......................................................................................6
1.3 Compatibility.................................................................................................6
2. Pre-installation guidelines.................................................................................6
2.1 Avoiding general rack mounting problems......................................................6
3. DX system outline.............................................................................................8
3.1 The DX Central.............................................................................................8
3.1.1 DX Central LEDs..............................................................................................................8
3.2 DX User units................................................................................................9
3.3 Rack mounting the DX central and User units...............................................10
3.4 Rack mounting the XRICCs.........................................................................10
3.5 Rack mounting the RICCs...........................................................................11
4. Connecting the DX system..............................................................................11
4.1 Connecting an optional local computer to a DX User....................................12
4.2 Connecting servers to the DX Central..........................................................12
4.3 XRICC power supply...................................................................................12
4.4 Connecting a RICC or XRICC PS/2..............................................................13
4.5 Connecting an XRICC SUN.........................................................................14
4.6 Connecting an XRICC USB.........................................................................15
4.7 Connecting an XRICC RS232......................................................................15
4.8 Connecting the CAT5 cables.......................................................................16
4.9 Connecting the DX User to an RS232 Terminal............................................16
4.9.1 Connecting the RS232 terminal.....................................................................................17
5. Power management.........................................................................................17
6. Connecting Legacy KVM switches..................................................................18
7. Cascading DX Central units............................................................................18
7.1 Connecting with an Ethernet Crossover cable..............................................19
7.2 Connecting to a network hub/switch.............................................................19
7.3 Configuring the primary and slave units........................................................20
7.4 Changing the cascade status.......................................................................22
7.5 Connecting the DX Users when cascading...................................................22
7.6 Connecting servers/devices in a cascaded system.......................................23
8. Powering on the system..................................................................................23
9. Configuration wizard (non-DX cascaded system)...........................................23
10. Logging in......................................................................................................24
11. Configuring the DX system...........................................................................24
11.1 Auto detecting system components............................................................25
1
Page 3

USER GUIDE
11.1.1 General information about Auto detect........................................................................26
11.2 Applying changes......................................................................................27
11.2.1 Configuring individual input ports.................................................................................28
11.3 Cascaded DX Central units........................................................................29
11.4 Cascaded Legacy switches........................................................................32
11.4.1 Adding a Legacy switch...............................................................................................33
11.4.2 Editing a Legacy switch type........................................................................................35
11.4.3 The Cascade Inputs tab elements...............................................................................35
11.4.4 Configuring the server ports.........................................................................................37
11.4.5 Deleting a Legacy switch.............................................................................................39
11.5 Configuring a Power management device..................................................39
11.5.1 Adding a new Power profile.........................................................................................40
11.5.2 Configuring the connected servers..............................................................................41
11.6 Other settings to configure.........................................................................42
11.6.1 Admin (User name) Settings........................................................................................43
11.6.2 Security.........................................................................................................................43
11.6.3 IP/Cascade Settings.....................................................................................................44
11.6.4 Extensions....................................................................................................................45
11.6.5 Time Settings................................................................................................................45
12. Creating/editing Users and Groups...............................................................45
12.1 Toolbar buttons.........................................................................................47
12.2 Creating Groups........................................................................................47
12.2.1 General information tab elements...............................................................................48
12.2.2 Access Rights tab.........................................................................................................48
12.2.3 Defining the same access rights for all devices..........................................................49
12.3 Editing Group access rights.......................................................................49
12.4 Creating Users..........................................................................................49
12.4.1 Editing the User box.....................................................................................................51
12.5 Users and Groups - Details view................................................................51
13. Arranging devices.........................................................................................51
13.1 The Servers window..................................................................................52
13.1.1 Device Icon appearance..............................................................................................52
13.2 Creating a new folder.................................................................................53
13.3 Saving changes.........................................................................................54
13.4 Deleting and renaming folders...................................................................54
13.5 Adding devices to a folder..........................................................................54
13.6 Servers/devices display options.................................................................54
13.7 Accessing devices.....................................................................................55
13.7.1 Returning to the DX window........................................................................................55
13.8 Power on/off, reboot..................................................................................56
14. Scanning a group of servers.........................................................................56
15. Adjusting the picture quality.........................................................................57
16. Connect - Private...........................................................................................58
17. Disconnect User............................................................................................58
2
Page 4

DX SY
STEM
18. Connecting to a local computer....................................................................58
19. Updating the DX Central................................................................................58
19.1 System requirements for the DX Central Update program...........................58
19.2 Running the DX Central Update.................................................................59
19.2.1 Upgrading from V1.9 to V2.0.......................................................................................59
19.2.2 DX Central Update.......................................................................................................60
20. Updating the DX User and XRICCS/RICCs....................................................61
20.1 DDC buttons.............................................................................................63
21. Events log......................................................................................................63
21.1 Configuring Log Traps...............................................................................64
21.2 Clearing the Log........................................................................................65
21.3 Saving the Log..........................................................................................65
22. Troubleshooting - Resetting the DX Central.................................................65
23. USB / SUN Combo keys.................................................................................66
24. Technical specifications................................................................................67
25. Terminal hotkeys...........................................................................................68
26. User guide feedback......................................................................................69
3
Page 5

USER GUIDE
Welcome
Thank you for buying the DX system. This system is produced by Minicom
Advanced Systems Limited.
This document provides installation and operation instructions for Minicom’s DX
system. It is intended for system administrators and network managers, and
assumes that readers have a general understanding of networks, hardware and
software.
Technical precautions
This equipment generates radio frequency energy and if not installed in accordance
with the manufacturer’s instructions, may cause radio frequency interference.
This equipment complies with Part 15, Subpart J of the FCC rules for a Class A
computing device. This equipment also complies with the Class A limits for radio
noise emission from digital apparatus set out in the Radio Interference Regulation
of the Canadian Department of Communications. These above rules are designed to
provide reasonable protection against such interference when operating the
equipment in a commercial environment. If operation of this equipment in a
residential area causes radio frequency interference, the user, and not Minicom
Advanced Systems Limited, will be responsible.
Changes or modifications made to this equipment not expressly approved by
Minicom Advanced Systems Limited could void the user’s authority to operate the
equipment.
Minicom Advanced Systems Limited assumes no responsibility for any errors that
appear in this document. Information in this document is subject to change without
notice.
No part of this document may be reproduced or transmitted in any form or by any
means, electronic or mechanical, for any purpose, without the express written
permission of Minicom Advanced Systems Limited.
Trademarks
All trademarks and registered trademarks are the property of their respective
owners.
© 2006 Minicom Advanced Systems Limited. All rights reserved.
4
Page 6

DX SY
STEM
1. Introduction
The DX system from Minicom is a superior solution for centralized KVM & Serial
management.
The DX system combines the following four major functions:
· KVM switching and control
· Serial control
· Power management
· User management
The DX unifies the above functions using AIM (Advanced Integrated
Management). AIM is an innovative embedded Graphical User Interface (GUI) that
supplies advanced management functionality in a hardware-only based solution.
AIM combines the management of all the above four functions within a single
intuitive interface, for truly unified administration of your server environment.
The DX comes in 2 models for 4 or 8 users. Users can access and control multiple
multi-platform computers from Keyboard Video Mouse (KVM) consoles. You can
connect up to 32 devices - computers, Serial devices, KVM switches or more DX
boxes (for cascading) - to either model.
1.1 Features
· Non-blocking user control of 4/8 users, for hundreds of servers
· Mixed multi-platform support: PS/2, SUN, USB and RS232
· Flexible remote IP access: Fit the IP mix to your needs and add IP users as
your business grows.
· Built-in local computer access at every user station.
· CAT5/6/7 all-the-way technology, from server to user.
5
Page 7

USER GUIDE
1.2 System components
· DX Switch 432 (4 users) or 832 (8 users)
· DX Users
· DX User IP (has it’s own Guide)
· X Remote Interface Connection cables (XRICCs) – PS/2, SUN, USB,
RS232
· Remote Interface Connection cables (RICC) – PS/2
· Cables - 3 in 1 CPU cable, RS232 Serial cable, Ethernet Crossover cable
· Rack mounts for the DX units and the XRICCs
· Minicom Flash USB key – containing Installation and Operating guides
and Central unit firmware Update program
1.3 Compatibility
The DX is compatible with:
· PS/2, SUN and USB computers/servers
· VGA, SVGA, or XGA monitors
· Novell, LINUX, Windows, UNIX and other major operating systems
2. Pre-installation guidelines
· Switch off all computers/servers
· Place cables away from fluorescent lights, air conditioners, and machines that
are likely to generate electrical noise
· The maximum distance between each device (computer, KVM switches or
second level DX Central) and the DX Central is 100m/330ft. The maximum
distance between the DX Central and the DX User is also 100m/330ft.
2.1 Avoiding general rack mounting problems
Elevated operating ambient temperature
The operating ambient temperature of the rack environment may be greater than the
room ambient when installing into a closed or multi-unit rack assembly. So install
the equipment in an environment compatible with the maximum rated ambient
temperature.
6
Page 8

DX SY
STEM
Reduced airflow
Install the equipment in a rack in such a way that the amount of airflow required for
safe operation is not compromised. Leave a gap of at least 5cm/2” each side of the
DX Central unit.
Mechanical loading
Mount the equipment in the rack in such a way that a hazardous condition is not
achieved due to uneven mechanical loading.
Circuit overloading
When connecting the equipment to the supply circuit, consider the effect that
overloading of circuits might have on over-current protection and supply wiring.
Reliable earthing of rack-mounted equipment should be maintained. Give attention
to supply connections other than direct connections to the branch circuit (e.g. use of
power strips).
7
Page 9

USER GUIDE
3. DX system outline
Figure 1 illustrates the basic outline of the DX system. The figure shows DX Users
and devices connected to a DX Central unit.
User 1
MINICOM
User 4
DX
Power
User
MINICOM
DX
Power
User
User 8
MINICOM
DX
Power
User
DX UserDX UserDX User
DX 832 Central
132
MINICOM
PowerLink
To computers
X-RICC
Computer
DX432
Central
X-RICC X-RICC
Computer
Computer
Figure 1 DX system outline
3.1 The DX Central
Figure 2 illustrates the front panel of the DX 832 Central unit. The DX 432 Central
model has the same front panel.
MINICOM
PowerLink
Figure 2 DX 832 Central front panel
3.1.1 DX Central LEDs
The LEDs on the front of the DX Central units are as follows:
LED Function
Power Power indicator
Link Blinks when there’s Ethernet activity
8
DX 832
Central
Page 10

DX SY
STEM
The figure below illustrates the rear panel of the DX 832 Central unit. The DX 432
Central model is the same but with only 4 User ports.
RS232 Service
port
www.minicom.com
POWER
100-250 VAC 50/60 Hz
Power
connector
6785
Reset
button
SERVICEI
SERIAL
RS232 Serial
port
1234
USER
User ports
0
18192017
1234
22232421
5678
SERVER
Server ports
26272825
9101112
Figure 3 DX 832 Central unit rear panel
3.2 DX User units
Figure 4 illustrates the front panel of the DX User unit.
MINICOM
Power
Figure 4 DX User front panel
DX
User
The figure below illustrates the rear panel of the DX User unit.
www.minic om.com
POWER
100-250 VAC 50/60 Hz
Monitor
I
0
CONSOLECOMPUTER
SYSTEM
Computer
Video card
USB
ports
USB
RS232
Terminal port
TERMINAL
LOCAL COMPUTER
30313229
13141516
ETHERNET
Ethernet
Power
connector
Mouse
Keyboard
Computer
Mouse port
Computer
Keyboard port
RS232 port to
Local computer
Figure 5 DX User rear panel ports
9
Page 11

USER GUIDE
3.3 Rack mounting the DX central and User units
Use the L-shaped brackets and screws provided to mount the DX units on a server
rack as illustrated below.
www.minicom. com
POWER
100-250 VAC 50/60 Hz
SERVICEI
0
SERIAL
6785
1234
USER
18192017
1234
22232421
5678
9101112
SERVER
26272825
30313229
13141516
ETHERNET
Insert screws to connect
to DX Central side panel
Insert
screws to
connect to
rack
Figure 6 Connecting the L-shaped bracket
3.4 Rack mounting the XRICCs
You can attach the XRICCs to a server rack or computer using the Velcro strips
provided. Or connect it using the bracket provided.
The figure below illustrates the bracket. Use the screws that came with rack to
connect the bracket to the rack. Once secured, clip the XRICC into the bracket.
Insert screws through
2 of the 3 holes in the
bracket and connect
to a rack
Figure 7 Rack mounting the XRICC
10
Page 12

DX SY
STEM
3.5 Rack mounting the RICCs
You can attach the RICCs to a server rack or computer using the Velcro strips
provided. Or connect it using the bracket provided.
The figure below illustrates the bracket.
Insert screws through
bracket and into the
rack
Insert screw through
bracket and into the
back of a computer
Insert screws through
bracket and into the
back of the RICC
Figure 8 Rack mounting the RICC
Insert screws through
bracket and into the
back of the RICC
4. Connecting the DX system
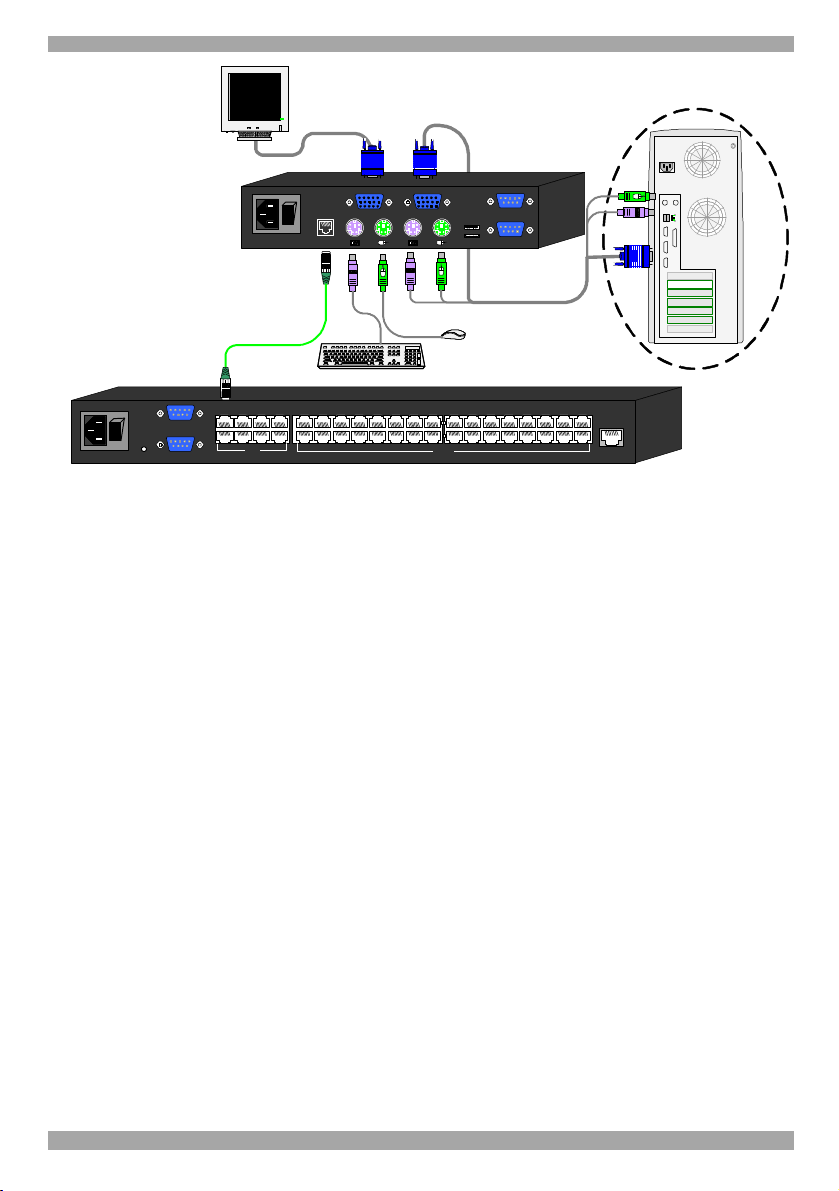
Connect the DX Users to the DX Central as illustrated in Figure 9 below.
To connect the units:
1. Connect a KVM console to the DX User’s Console keyboard monitor and
mouse ports.
2. Connect a CAT5 cable to the DX User’s System port and to one of the DX
Central’s User ports.
11
Page 13
USER GUIDE
SD
P110
Optional local
computer
DX User
www.minicom.com
POWER
100-250 VAC 50/60 Hz
I
0
SYSTEM
CONSOLECOMPUTER
USB
TERMINAL
LOCAL COMPUTER
KB Mouse
100T
Paralle l
Vide oSeria l A
Seri a l B
CAT5 cable
Up to 100M / 330ft
3 in 1 CPU cable
DX Central
www.minicom.com
POWER
100-250 VAC 50/60 Hz
SERVICEI
0
SERIAL
6785
1234
USER
18192017
1234
22232421
5678
9101112
SERVER
26272825
30313229
13141516
ETHERNET
Figure 9 Connecting a DX User to the DX Central
4.1 Connecting an optional local computer to a DX User
A user can work on the DX system just with a KVM console. There is the option to
connect a computer to the DX User unit. A user can then work locally on this
computer.
To connect a local computer:
Connect a computer to the DX User using the 3 in 1 CPU cable, see Figure 9.
1. Connect the connectors of one end of the 3 in 1 CPU cable to the KVM
Computer ports of the DX User.
2. Connect the connectors of other end of the 3 in 1 CPU cable to the KVM ports
of the computer.
4.2 Connecting servers to the DX Central
You use RICCs PS/2 or XRICCs and CAT5 cables to connect servers/devices to the
DX Central. There are 4 types of XRICC:
PS/2, USB, SUN and RS232.
4.3 XRICC power supply
The XRICCs PS/2 and SUN draw their power from the computer’s keyboard port.
The XRICC USB draws its power from the USB port. The XRICC RS232 gets its
power either from a Power adapter or the USB port.
12
Page 14
DX SY
STEM
Figure 10 illustrates the different types of XRICCs connected to the DX Central.
How to connect the different XRICCs follows in detail below.
DX Central
www.minicom.com
POWER
100-250 VAC 50/60 Hz
I
SERVICE
0
SERIAL
6785
1234
USER
18192017
1234
5678
CAT5 cables
Up to 100M / 330ft
X-RICC SUN
X-RICC USB
Figure 10 DX system connections
4.4 Connecting a RICC or XRICC PS/2
Figure 11 illustrates the connections.
22232421
To Server
ports
26272825
9101112
SERVER
X-RICC RS232
30313229
13141516
X-RICC PS/2
ETHERNET
Keybd
VideoSerial A
Serial B
NetServer tc2100
Mouse
100T
Parallel
PCI 33Mx32b
PCI 33Mx32b
PCI 33Mx32b
PCI 33Mx32b
SCSI
To connect the RICC or XRICC PS/2:
1. Connect the Screen connector to the computer’s Video card.
2. Connect the Keyboard connector to the computer’s Keyboard port.
3. Connect the Mouse connector to the computer’s Mouse port.
13
Page 15

USER GUIDE
To Keyboard port
To Mouse port
Mouse
Keybd
100T
RICC / XRICC
PS/2
CAT5 cable to DX Central
Server port
To Video card
Parallel
VideoSerial A
Serial B
Figure 11 RICC / XRICC PS/2
4.5 Connecting an XRICC SUN
Figure 12 illustrates the connections.
To connect the XRICC SUN:
1. Connect the Screen connector to the server’s Video card.
2. Connect the Keyboard connector to the server’s Keyboard port.
To Keyboard PortTo Video Card
CAT5 cable to DX Central
Server port
Figure 12 XRICC SUN
X-RICC SUN
14
Page 16

DX SY
STEM
4.6 Connecting an XRICC USB
The XRICC USB supports Windows 98 SE and later, MAC, SUN and SGI. Figure
13 illustrates the connections.
To connect the XRICC USB:
1. Connect the Screen connector to the server’s Video card.
2. Connect the USB connector to the server’s USB port.
To Video Card
CAT5 cable to DX Central
Server port
Figure 13 XRICC USB
X-RICC USB
4.7 Connecting an XRICC RS232
Figure 14 illustrates the connections.
To connect the XRICC RS232:
1. Connect the RS232 connector to the server’s RS232 port.
2. For power connect either:
A USB cable to the XRICC and the server’s USB port.
Or
A Power adapter to the XRICC.
To USB Port
15
Page 17

USER GUIDE
Connect USB cable for
power or connect Power
adapter
CAT5 cable to DX Central Server port
USB cable
Figure 14 XRICC RS232
To USB Port
(for power only)
X-RICC RS232
To RS232 Port
4.8 Connecting the CAT5 cables
1. Connect one connector to the XRICCs RJ45 port – see Figure 10.
2. Connect the other connector to one of the DX Central’s Server ports.
3. Follow the above 2 steps for each server/device.
Note: You can turn on the devices after connecting the XRICCs to them and before
connecting to the DX Central. The XRICC performs KB/M emulation the moment
it connects to the device and the power is turned on.
4.9 Connecting the DX User to an RS232 Terminal
When there are XRICC RS232s in the DX system, you can control the RS232
devices through an RS232 terminal connected to the DX User units.
When a computer is connected to the DX User, you can control the RS232 servers
via the DX’s Terminal software OR optional RS232 terminal.
16
Page 18

DX SY
STEM
4.9.1 Connecting the RS232 terminal
Connect the RS232 terminal to the DX User as illustrated in the figures below.
Terminal
Login: admin
Password_|
digital
VT420
ContrastBright
To
Terminal
port
www .mi ni com .co m
I
0
POWER
100-250 VAC 50/60 Hz
Figure 15 Connecting the RS232 terminal
TO CENTRAL
CONSOLECOMPUTER
USB
TERMINAL
LOCAL COMPUTER
The table below shows the RS232 Serial cable 9 PIN D-SUB Male pin-out.
Pin Signal Description Pin Signal Description
1
CD
Carrier Detect 6 DSR Data Set Ready
2 RxD Receive Data 7 RTS Request to Send
3 TxD Transmit Data 8 CTS Clear to Send
4 DTR Data Terminal Ready 9 RI Ring Indicator
5 GND System Ground
5. Power management
You can connect a Power management device to the DX Central; the DX Users can
then power devices on and off.
Connect the Power management device to the Serial port of the DX Central using
the Serial cable provided with the Power management device.
Connect the Power management device to each device by following the instructions
in the Power management device User Guide.
17
Page 19

USER GUIDE
6. Connecting Legacy KVM switches
You can cascade Legacy KVM switches by connecting an XRICC PS/2 or RICC
PS/2 to the switch.
To cascade a non-DX KVM switch:
1. Connect an XRICC PS/2 or RICC PS/2 to the User ports of the KVM switch.
2. Connect a CAT5 cable to the Server port of the DX Central.
3. Connect the other end of the CAT5 cable to the XRICC PS/2. The configuration
process is explained at the beginning of the DX System Operating Guide.
To connect devices to the KVM switch, follow the connection instructions in the
User Guide of the KVM switch.
7. Cascading DX Central units
When you need to connect more than 32 severs/devices you can cascade the DX
system by adding more DX Centrals.
For DX systems with only 1 DX Central, skip to section 8 on page 23.
In a cascaded scenario, the DX Centrals communicate via Ethernet using TCP/IP
signals. For this you must assign IP addresses to each DX Central and provide
TCP/IP connectivity between them. Cascaded DX Centrals must be on the same
subnet to communicate with each other.
For up to 56 severs/devices you can connect 2 DX Centrals (8 Users model) with
the supplied Ethernet Crossover cable. To cascade more than 2 DX Centrals, the
DX Centrals must be connected to a network hub/ Ethernet switch. Ethernet
connectivity is essential for the proper operation of the system and is in addition to
the dedicated CAT5 cables for KVM signals. Sections 7.1 and 7.2 illustrate these
connections.
You must also connect one CAT5 cable per DX User to a User port of a secondary
level DX Central and a Server port of the primary DX Central - see Figure 16 and
Figure 17 and section 7.5 on page 22. These cables are used to carry the keyboard,
mouse and video signals from a server to the user station.
When a user clicks on the icon of a server, the primary DX Central sends a
command to the secondary DX Central via the Ethernet port to route the KVM
signals to one of the available User ports.
18
Page 20

DX SY
STEM
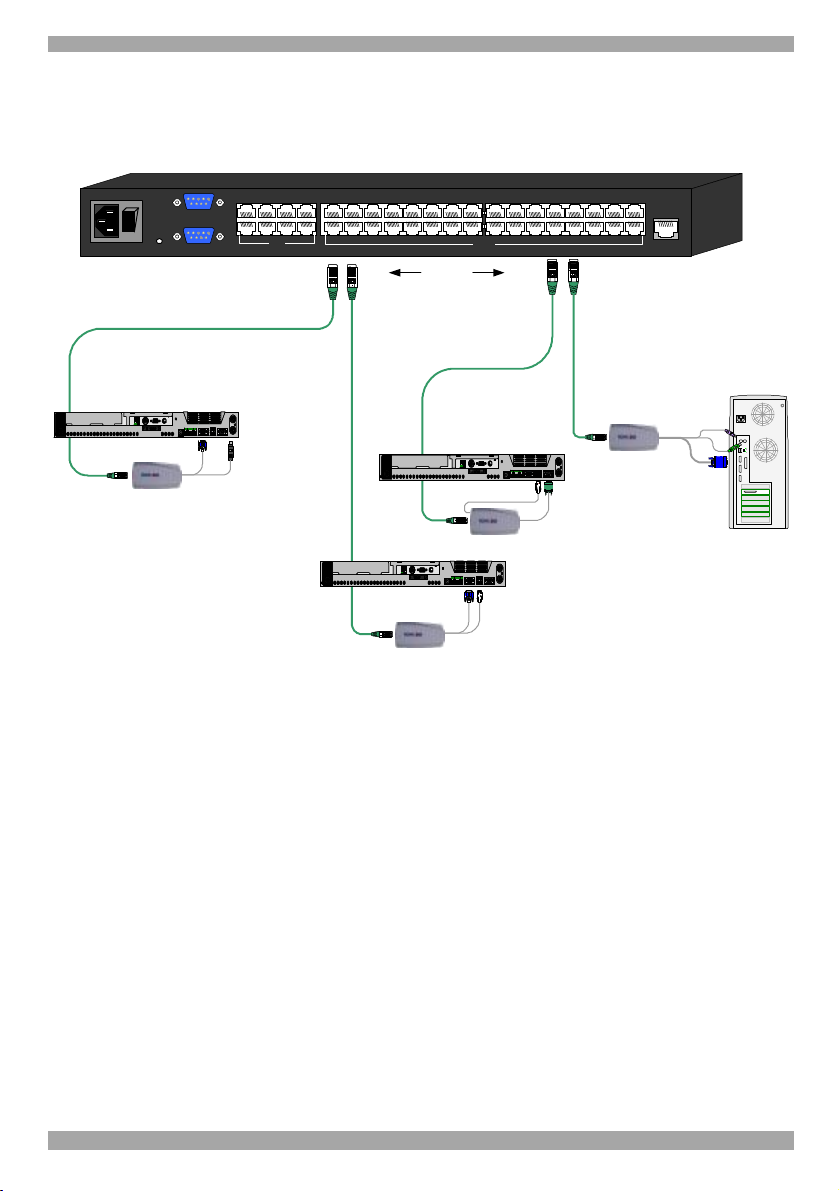
7.1 Connecting with an Ethernet Crossover cable
To connect a secondary level DX Central with an Ethernet Crossover cable:
Connect the Ethernet Crossover cable connectors to the Ethernet ports of the 2 DX
Centrals units, as illustrated in Figure 16.
DX Central
- 1st level
www.minicom.com
POWER
SERVICEI
0
SERIAL
6785
1234
USER
18192017
1234
22232421
5678
9101112
SERVER
To Server
ports
Cascade
CAT5 cables
1 for each DX User in
the system
Up to 8 for 8 x 32
Up to 4 for 4 x 32
To User
ports
DX Central
- Secondary level
www.minicom.com
I
SERVICE
0
POWER
SERIAL
6785
1234
USER
18192017
1234
22232421
5678
9101112
SERVER
Figure 16 Cascaded DX Central units connected with a Crossover cable
The table below shows the Ethernet RJ 45 Connector pin-out.
8
1
Pin Assignment Pin Assignment
1 TX + 5 Not connected
2 TX - 6 RX -
3 RX + 7 Not connected
4 Not connected 8 Not connected
26272825
26272825
30313229
13141516
Ethernet
Crossover
cable
30313229
13141516
ETHERNET
ETHERNET
To
Ethernet
ports
7.2 Connecting to a network hub/switch
To connect to a network hub/switch:
Connect Ethernet Straight cables to the Ethernet ports of the DX Centrals units, as
illustrated in Figure 17.
19
Page 21

USER GUIDE
www.minicom.com
SERVICEI
18192017
1234
0
POWER
5678
SERIAL
22232421
26272825
9101112
SERVER
DX Central
1st level
To User
ports
www.minicom.com
I
0
POWER
6785
SERVICE
1234
USER
SERIAL
6785
1234
USER
13141516
1234
30313229
18192017
5678
To Server
ports
CAT5 cables
1 for each DX User
in the system
Up to 8 for 8 x 32
Up to 4 for 4 x 32
ETHERNET
DX Central units
Secondary level
22232421
26272825
9101112
SERVER
30313229
13141516
ETHERNET
Ethernet
Straight cable
To User
ports
www.minicom.com
I
0
POWER
SERVICE
SERIAL
6785
1234
USER
Ethernet
Straight cable
1234
18192017
Network Hub / Switch
22232421
5678
9101112
SERVER
Ethernet
Straight
cable
26272825
30313229
13141516
ETHERNET
Figure 17 Cascaded DX Central units connected to a hub/switch
7.3 Configuring the primary and slave units
After connecting the cascaded DX Centrals you must configure them to be primary
or slave (secondary level) units.
To do so, connect a DX User to the each DX Central – primary and slave, as
explained above in section 4 on page 11. (Where you don’t have enough DX Users
for all the slaves, after configuring one slave connect the DX User to the next
slave.)
Power on the DX units in the following order:
1. Primary DX Central.
2. Slave/s DX Central(s).
3. The DX User connected to the primary DX Central.
The Configuration wizard appears on the DX User’s monitor, see Figure 18.
Figure 18 Configuration Wizard
1. Check Cascaded DX configuration.
2. Click . The DX Network Configuration box appears. See Figure 19.
20
Page 22

DX SY
STEM
Figure 19 DX Network Configuration
Here you configure the DX Central’s network settings.
All DX Centrals come with the following predefined settings:
· IP Address: 192.168.0.245
· Subnet Mask: 255.255.255.0
3. If the above predefined settings are not suitable for your network, type suitable
parameters into the DX Network Configuration box.
4. Click . The Define DX status box appears. See Figure 20.
Figure 20 Define DX status box
5. Select Primary unit and click .
6. Click . The Login screen appears.
Before logging in you must configure the slaves.
7. Power on the DX User connected to a slave DX Central. The Configuration
wizard appears as set out above.
8. Check Cascaded DX configuration and click . The DX Network
Configuration box appears. See Figure 19.
21
Page 23

USER GUIDE
9. The DX Central slave must have a different IP address than the primary DX
Central, but it must be on the same subnet. Type suitable network parameters for
the DX Central slave into the DX Network Configuration box.
10. Click . The Define DX status box appears. See Figure 20.
11. Select Slave and click . The following box appears.
Figure 21 Primary DX unit IP address box
12. Type in the IP address of the primary DX Central unit.
13. Click . The Login screen appears.
14. Power off the DX User and disconnect it from the slave.
Repeat the above procedure for each slave, and give each one a unique IP address.
7.4 Changing the cascade status
The Configuration wizard only appears automatically the first time you connect and
switch on a DX Central. When you change the cascade status of the DX system,
e.g. by adding or removing an already configured DX Central, you configure the
new cascade status in the same way as above, by connecting a DX User to the
newly added DX Central. You then invoke the Configuration wizard from the
Settings window. This is explained on page 44 – (Configure cascade options).
7.5 Connecting the DX Users when cascading
Once all the slaves are configured, connect all DX Users to the primary DX
Central.
For each DX User in the system connect a CAT5 cable from the primary DX
Central Server port to each DX Central secondary level User port. Figure 16 shows
the CAT5 cables for 1 cascaded DX Central. Figure 17 shows CAT5 cables for 2
cascaded DX Centrals.
22
Page 24

DX SY
STEM
7.6 Connecting servers/devices in a cascaded system
You can connect servers/devices to any available Server port on any level DX
Central.
8. Powering on the system
The devices and servers can be powered on at any time. Power on the DX
components in the following order:
1. The primary and secondary level DX Centrals.
2. The DX Users.
9. Configuration wizard (non-DX cascaded system)
For cascaded DX systems, skip to section 10.
The first time the system is connected and powered on, the Configuration Wizard
box appears on the screen of the DX User. See Figure 22.
Figure 22 Configuration Wizard box
1. Click Single DX configuration.
2. Click , then click . The Login screen appears, see below.
23
Page 25

USER GUIDE
10. Logging in
Once the system is connected and powered on, the Login screen appears on the
monitor of each DX User. See Figure 23.
Figure 23 Login screen
Type the default username ‘admin’ and password ‘admin’ (case sensitive). The
Servers window appears. See Figure 24. The screen initially shows no devices. To
display the devices the system must be configured, as explained below.
Toolbar icons
Created folders
appear here
Figure 24 Servers window
Servers / devices
appear here
11. Configuring the DX system
You must configure the system by inputting details of each server / device
connected to each DX Central. This is done in the DX System Configuration
window.
From the View menu choose DX System Configuration. The DX System
Configuration window appears. See Figure 25.
Note! Any change made to the DX system topology will automatically log out all
other users from the system.
24
Page 26

DX SY
STEM
List of DX Central
units and other KVM
switches
Information about
currently selected
switch
Input ports to DX User units
Output ports to devices
Figure 25 DX System Configuration window
The above figure shows the rear ports of a DX Central unit. You can view the rear
ports of all DX Central units and Legacy switches connected to the system by
clicking a switch from the list on the left.
After configuring the system, the ports appear color coded as outlined by the list of
RICC Types. So a connected PS/2 type server will show up as a blue circle. When
placing the mouse cursor over a configured port the name of the device connected
to that port appears.
11.1 Auto detecting system components
The DX system can auto detect DX User units and the RICC / XRICC types of
servers / devices connected to a DX Central. Once detected, the ports on the picture
of the DX Central unit – see Figure 25 – change color to reflect the connected
devices. You perform auto detect from the DX System Configuration window.
Note! Auto detect does not detect cascaded DX Central units, Legacy switches or
power devices.
To perform auto detect:
1. From the toolbar, click . A prompt appears.
2. Click OK. Auto detect activates. When completed the newly color coded ports
reflect the connected devices.
25
Page 27
USER GUIDE
11.1.1 General information about Auto detect
Each device auto-detected receives a default name e.g. 1Server01.
All devices have the default timeout period of 60 seconds. When a server is
accessed, after 60 seconds of inaction another user may take control of the server or
the present user can regain control by moving the mouse or typing on the keyboard.
You can change this timeout period.
All devices have the default keyboard mode set to PS/2 for Intel based computers.
You must change this setting for other device types.
To change any of the above parameters for a device:
1. Click the devices output port on the picture of the switch. The General tab of the
Computer Port Configuration box appears, see Figure 46.
Figure 26 Computer Port Configuration box
The General tab elements
Name – Type a name for the connected device, e.g. Fax server. This name appears
below the device in the Servers window.
Type – With Autodetect the appropriate XRICC type connected to the port appears
here.
Note!
With an XRICC RS232 type, a Terminal button appears. See Figure 27. Click the
button. Terminal settings appear. Input the correct terminal settings according to the
device parameters you wish to connect to. Click the Terminal button to close the
Terminal settings.
26
Page 28

DX SY
STEM
Figure 27 RS232 Terminal settings
Timeout – Type a timeout period or check the Infinitive box to disable the timeout
feature.
KB Mode – Select the appropriate keyboard mode. By default the keyboard mode
is set to PS/2 for Intel based computers.
For the other systems set the KB mode as follows:
· U1 for HP UX
· U2 for Alpha UNIX, SGI, Open VMS
· U3 for IBM AIX
11.2 Applying changes
In general, to apply changes you may have the following 3 options.
(A) To apply the changes to the selected port click OK.
(B) To apply the changes to all un-configured ports click
(C) To apply the changes to all ports, click .
Note! A name given to a connected device will only be given to the device of the
port being configured and will not be applied to all.
27
Page 29
USER GUIDE
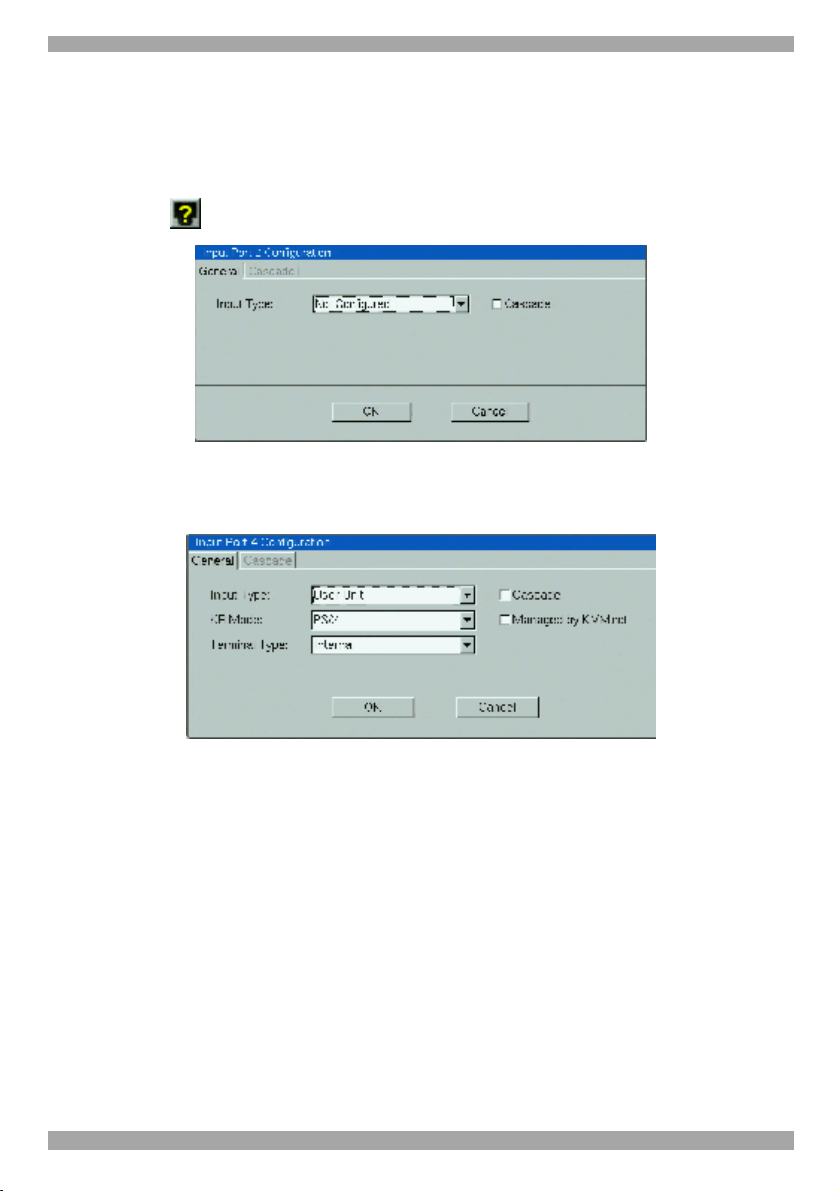
11.2.1 Configuring individual input ports
Configure the input ports to display the DX User icon.
To configure the input ports:
1. On the picture of the switch in the DX System Configuration window, click an
input port . The Configuration box appears see Figure 28.
Figure 28 Configuration box
2. Input Type - From the menu select User Unit. The Configuration box now
appears as in Figure 29.
Figure 29 Configuration box
3. KB Mode – This setting refers to the operating system of an optional local
computer connected to a DX User. When there is no local computer you can
ignore this setting.
The system operates with all major operating systems. By default the KB mode is
set to PS/2 which is suitable for most operating systems.
Listed below is the keyboard mode for particular UNIX systems:
· U1 for HP UX
· U2 for Alpha UNIX, SGI, Open VMS
· U3 for IBM AIX
Set the KB mode according to above list.
28
Page 30

DX SY
STEM
4. Terminal Type – For RS232 devices in the DX system, the DX User can control
them via a terminal emulation window. To operate the RS232 devices with the
DX built-in terminal software – select Internal. Where a Serial cable connects a
computer to the DX User and the emulation software is installed in the computer,
or when using an external Terminal – select External.
5. The Cascade box is explained in the section below.
6. Managed by KVM.net – Where a DX User is connected to a Smart IP Access,
check the box so that the DX system can be managed by KVM.net.
11.3 Cascaded DX Central units
Figure 30 illustrates cascaded DX Centrals.
DX Central
- 1st level
www.minicom.com
POWER
100-250 VAC 50/60 Hz
SERVICEI
0
SERIAL
1234
USER
18192017
1234
22232421
5678
To Server
9101112
SERVER
26272825
30313229
13141516
ETHERNET
ports
Cascade
CAT5
cables
To User
Ethernet
Crossover
cable
ports
DX Central
- Secondary level
www.minicom.com
POWER
100-250 VAC 50/60 Hz
SERVICEI
0
SERIAL
1234
USER
18192017
1234
22232421
5678
9101112
SERVER
26272825
30313229
13141516
ETHERNET
Figure 30 Example of cascaded DX Central units
You must input connections details of the cascaded DX Centrals. You can do this in
2 possible ways.
(A) At the higher level DX Central, configure the cascaded Server ports.
(B) At the lower level DX Central, configure the cascaded User ports.
Method A - higher level DX Central
1. From the list of DX switches, click the higher level DX Central. A figure of its
ports appears.
Note! An alternative method to steps 2-6 is set out in the bordered wording below.
2. On the figure of the DX Central, click a Server port that is cascaded to the lower
level DX Central. In the example in Figure 30 click Server port 1. The Port
Configuration box appears.
3. Tick the Cascade box and click the Cascade tab. Figure 31 appears.
29
Page 31
USER GUIDE
Figure 31 Cascade tab
4. General – From the drop-down menu select the lower level DX Central.
5. Input port No: – From the drop-down menu select the lower level User port the
upper level Server port is connected to. For example in Figure 30 Server port 1
is connected to User port 1.
6. Click OK.
Do the above for each cascaded Server port.
After step 1 above, you can achieve the same result by doing the following:
From the toolbar click . The DX Central Properties box appears. Click the
Cascade Outputs tab. Figure 32 appears.
Figure 32 Cascade Outputs
(Left) Port No: - This is the Server port number.
30
Page 32

DX SY
STEM
Name – From the drop-down menu select the lower level DX Central.
(Right) Port No: - From the drop-down menu select the lower level User port the
upper level Server port is connected to.
Do the above for each cascaded Server port.
Click Save.
Method B - lower level DX Central
1. From the list of DX switches, click the lower level DX Central. A figure of its
ports appears.
Note! An alternative method to steps 2-6 is set out in the bordered wording below.
2. Click a User port cascaded to the higher level DX Central. The Port
Configuration box appears.
3. Tick the Cascade box and click the Cascade tab. Figure 33 appears.
Figure 33 Cascade tab
4. Device Name – From the drop-down menu select the higher level DX Central.
5. Output port No: – From the drop-down menu select the higher level Server
port the lower level User port is connected to. For example in Figure 30 User
port 1 is connected to Server port 1.
6. Click OK.
Do the above for each cascaded User port.
After step 1 above, you can achieve the same result by doing the following:
From the toolbar click . The DX Central Properties box appears. Click the
Cascade Inputs tab. Figure 34 appears.
31
Page 33

USER GUIDE
Figure 34 Cascade Inputs
(Left) Port No: - This refers to the User port numbers.
Name – From the drop-down menu select the higher level DX Central this User
port cascades to.
(Right) Port No: - From the drop-down menu select the higher level Server port
the lower level User port is connected to.
Do the above for each cascaded User port.
Click Save.
Do the above for each cascaded port.
Click OK.
11.4 Cascaded Legacy switches
Where you have cascaded Legacy switches in the DX system, you must configure
them in the DX System Configuration window.
The table below explains the Toolbar buttons used for adding editing and deleting
Legacy switches.
Button Function
Add KVM device
Delete KVM device
Edit KVM device
32
Page 34

DX SY
STEM
11.4.1 Adding a Legacy switch
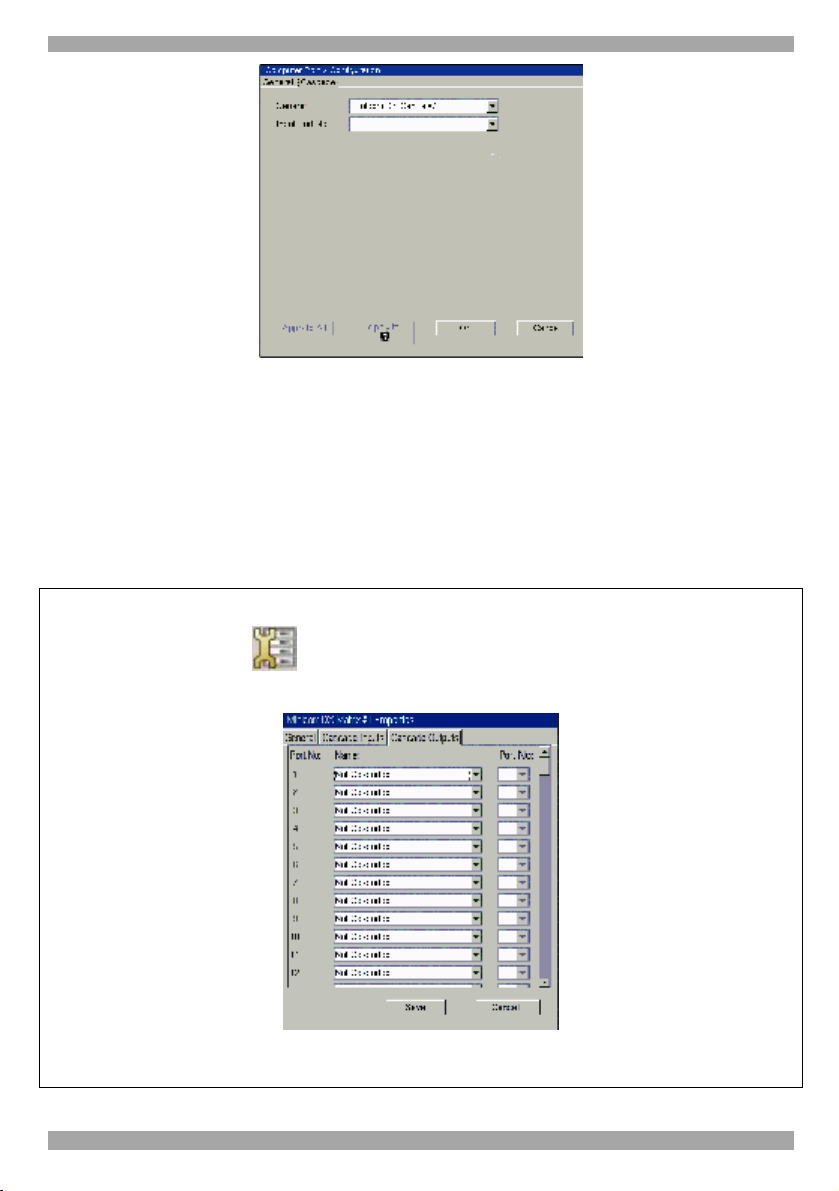
To add a new Legacy switch:
Click . The Add New KVM Device box appears. See Figure 35.
Figure 35 Add New KVM Device box
The General tab elements
Name – Type an identifying name for the new Legacy switch.
Type – From the Drop-down list select the new device type. If it doesn’t appear in
the list, it can be added (explained below - Adding a Legacy switch type).
Users / Servers – Displays the maximum number of users and servers for the
device selected.
Description – type a description of the device. This will appear in the Description
box in the DX System Configuration window when the switch is selected. See
Figure 25.
Adding a Legacy switch type
To add a type of device that does not appear in the Type Drop-down menu:
1. Click . The Add New Device Type box appears. See Figure 36.
33
Page 35

USER GUIDE
Figure 36 Add New Device Type box
2. Type a name for the Legacy switch type (This is not the same as the Name field
in Figure 35. This is name of the switch type that will appear in the Type dropdown menu in Figure 35).
3. Select the number of input and output ports in the Legacy switch. Figure 37
below illustrates input and output ports. The input ports connect to a RICC or
XRICC and the output ports connect to the servers.
www.minicom.com
POWER
100-250 VAC 50/60 Hz
SERVICEI
0
SERIAL
6785
1234
USER
18192017
1234
22232421
5678
9101112
SERVER
26272825
30313229
13141516
DX Central - Primary level
ETHERNET
Cascade
Input port
RICC /
XRICC
New KVM switch Secondary level
Output port
Connects to
server - 1 level
down
To Server
Figure 37 Input and output ports
4. Typematic – This is used to help define the Legacy switch’s access hotkey.
Where the access hotkey requires you to press and release a key before pressing
a further key, the Typematic box should be unchecked. Where the access hotkey
requires you to press and hold down a key and then press a further key, tick the
Typematic box.
5. Click OK. The new type is added to the Type Drop-down menu.
6. Select the new device type.
34
Page 36

DX SY
STEM
11.4.2 Editing a Legacy switch type
To change the number of input and output ports for a Legacy switch type:
1. Click . The currently selected device Properties box opens. See
Figure 38.
Figure 38 Properties box
2. Change the number of input/output ports (see Figure 37), check or uncheck
Typematic as necessary and click .
Note!
From the DX System Configuration window you can edit a Legacy switch type by
selecting it from the list of switches and from the Toolbar pressing .
11.4.3 The Cascade Inputs tab elements
Configure the cascaded input ports of the Legacy switch. You do this by selecting
from a menu the DX Central to which it is cascaded e.g. primary or secondary level
DX Central. Also you select the DX Central’s Server port number the Legacy
switch is connected to.
There are 2 ways to do this
(A) By configuring the cascaded input ports of the Legacy switch.
(B) By configuring the cascaded output ports of the relevant DX Central.
Once you configure the ports on 1 level, you do not have to configure the ports on
the other level.
Method A
In the Add New KVM Device box Figure 35, click the Cascade Inputs tab. Figure
39 appears.
35
Page 37

USER GUIDE
Figure 39 Cascade Inputs box
Left Port No. A row appears for each input port of the Legacy switch.
Name – From the Drop-down list select the DX Central to which the switch is
cascaded 1 level up.
Right Port No – Select the Server port number of the 1 level up DX Central to
which the switch is connected.
Do the above for each cascaded port.
Click OK.
Note! You can configure the cascade inputs by clicking the User ports on the figure
of the Legacy switch. See Figure 41.
Method B
1. On the picture of the DX Central click the output port that cascades to Legacy
switch. The General tab of the Computer Port Configuration box appears.
2. Click the Cascade checkbox to un-gray the Cascade tab.
3. Click the Cascade tab. The Cascade box appears see Figure 40.
36
Page 38

DX SY
STEM
Figure 40 Cascade box
General – Select the cascaded Legacy switch from the Drop-down list.
Input Port No – Select the input port number of the Legacy switch that connects to
the DX Central.
Save changes.
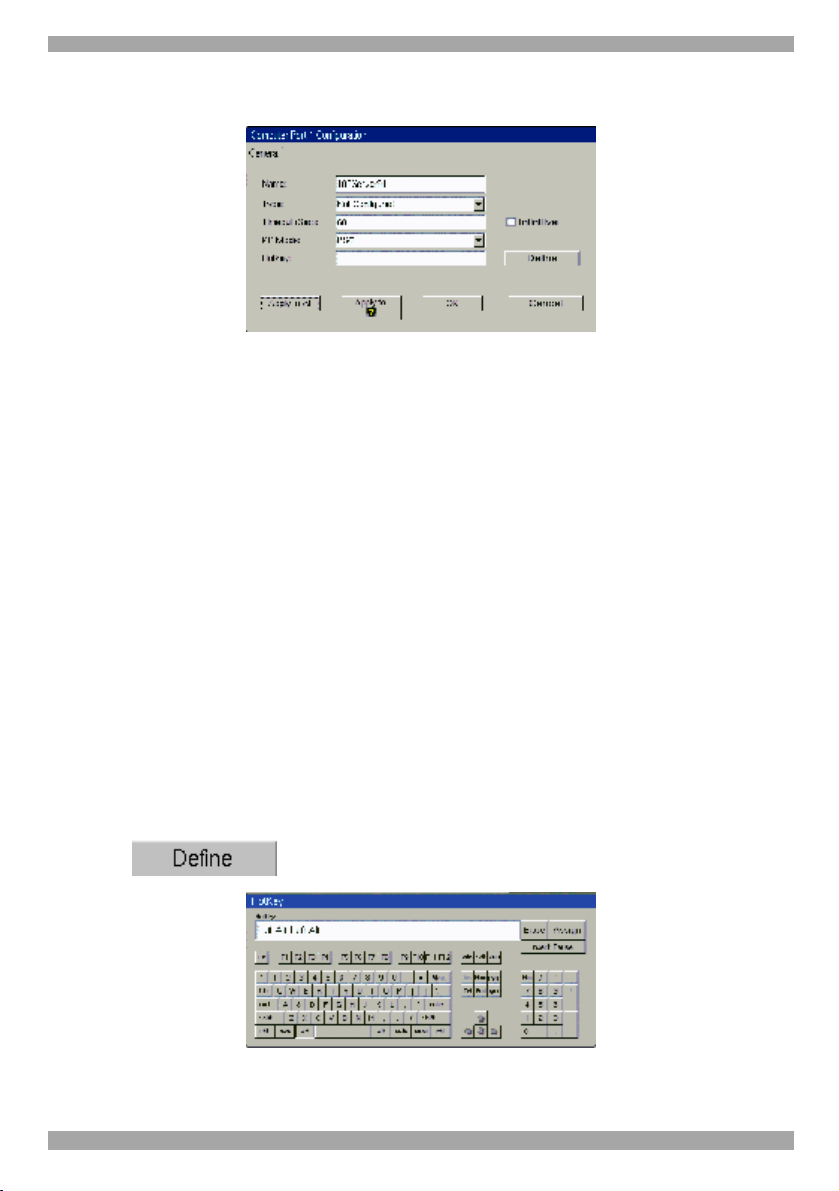
11.4.4 Configuring the server ports
Configure the server ports of cascaded Legacy switches. You must give each server
an identifying name and select the appropriate XRICC type and keyboard mode.
You must also type the appropriate KVM switch access hotkey to the server.
To configure the server ports:
1. In the DX Configuration window, click the desired Legacy switch from the list,
see Figure 41. A figure of the switch ports appears.
Click the
desired
switch from
the list
Cascaded
input ports
Figure 41 Legacy switch configuration
37
Unconfigured Server
ports
Page 39
USER GUIDE
2. Click a Server port. The Computer port configuration box appears, see Figure
42.
Figure 42 Computer port configuration box
Name – Type a name for the connected device, it appears below the device in the
Servers window.
Type – Select Generic KVM port.
Timeout – You can change the timeout period or check the Infinitive box to
disable the timeout feature.
KB Mode – Select the appropriate keyboard mode. By default the keyboard mode
is set to PS/2 for Intel based computers.
For the other systems set the KB mode as follows:
· U1 for HP UX
· U2 for Alpha UNIX, SGI, Open VMS
· U3 for IBM AIX
Hotkey - When configuring the output ports of a Legacy switch you must define
the hotkey to access the server. See the switch’s User guide for the correct hotkey.
To input the hotkey:
1. Click . The HotKey keyboard appears. See Figure 43
Figure 43 HotKey keyboard
38
Page 40

DX SY
STEM
2. Press the hotkey keys on your physical keyboard or on the soft keyboard. The
keys appear in the HotKey box. Some KVM switches may require a pause or
two between the hotkey keys. Use the Insert Pause button to add pauses.
3. Click Assign. The hotkey is assigned.
Note! For hotkeys that require a key to be continually pressed see the Typematic
paragraph on page 34.
11.4.5 Deleting a Legacy switch
To delete a Legacy switch:
Select the desired switch from the list in the DX Configuration window.
Click . Or click then press .
11.5 Configuring a Power management device
When a Power management device is connected to the DX Central Serial port you
must configure it in the DX Configuration window.
To configure the Power management device:
Click the Serial port on the picture of the DX Central. The Power Device Settings
box appears see Figure 44.
Figure 44 Power Device Settings
The Power device settings box elements
Power Device Name – Type an identifying name for the Power device.
Profile – Choose the type of Power device from the Drop-down list. Where the
Power device type does not appear, you can add a Power profile – explained below.
User Name / Password – where the Power device requires a User Name and
Password, type them here.
Click OK.
39
Page 41

USER GUIDE
11.5.1 Adding a new Power profile
To add new Power profile:
Click . The Add New Power Profile box appears, see Figure 45. The
information you need to type should be in the Power device instructions.
Figure 45 Add New Power Profile box
The Add New Power profile box elements
Power Profile Name - Give the profile a name.
Sockets No – Type the number of power sockets in the device.
Session Start/End. Power On/Off. Reboot – For this information see the power
device instructions.
Baud rate/Parity/Data Bits/Stop Bits/Flow Control - For this information see the
power device instructions.
Cascadable – When there are more of the same Power devices in the system, tick
this box. Then choose the number of cascaded Power devices from the drop-down
list.
Click Save to return to the Power device settings window. The added profile
appears in the list of profiles.
To edit a profile click . The Edit profile window appears –it has the
same elements as the Add New Power profile. Make the desired changes and click
Save.
40
Page 42

DX SY
STEM
11.5.2 Configuring the connected servers
You need to configure the Computer ports to show the connection to the Power
device.
To configure the Computer ports:
1. Click a Computer port (connected to the Power device) on the picture of the
switch. The Computer Port Configuration box appears.
2. Click the Power tab, the following appears.
Figure 46 Power tab
Power Device – Select the Power device from the drop-down menu. Drop-down
menus for the Power switch No and Socket No appear.
Power switch No – When there is more than 1 cascaded Power device, type the
cascade level of the device that this output port connects to.
Socket No –Select the socket number of the Power device that the port connects to.
Dual – Where a server has a dual power and requires 2 power sockets, tick the Dual
checkbox. A second set of Power configuration Drop-down menus appears, see
Figure 47. Make the selections as described above.
41
Page 43
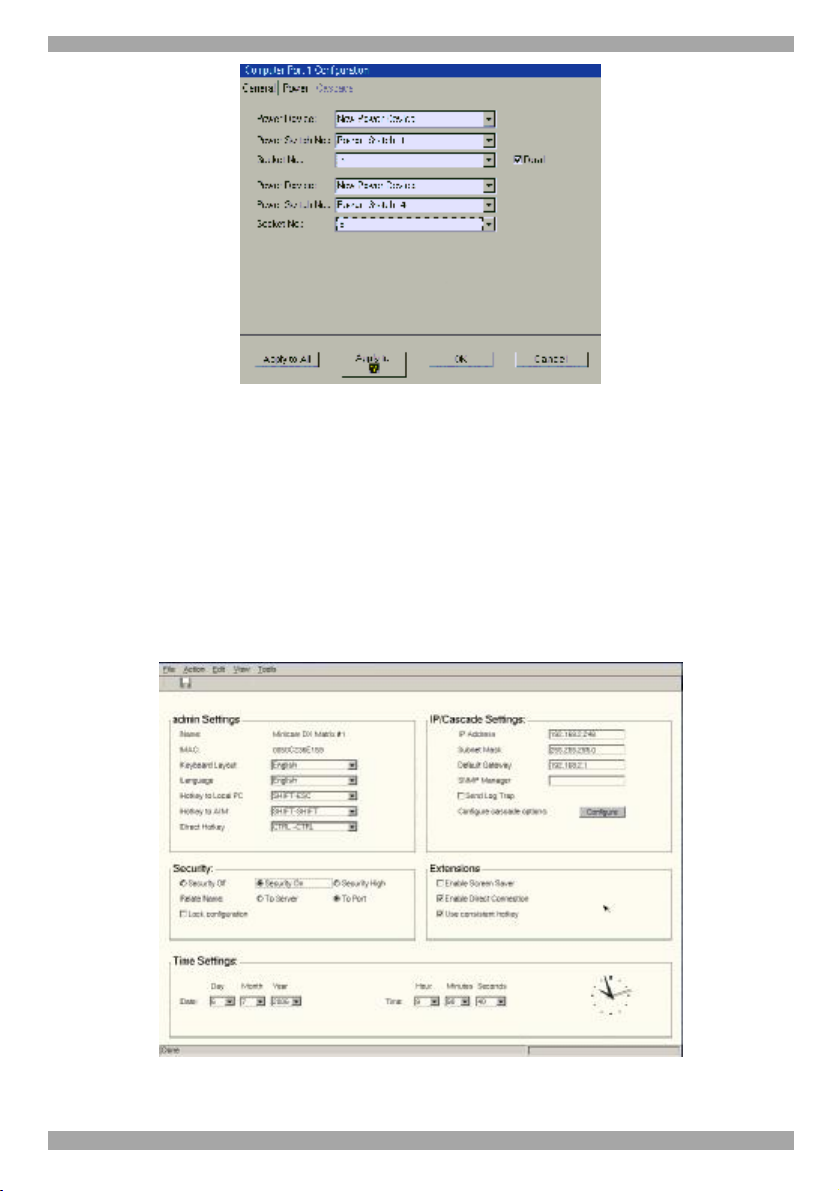
USER GUIDE
Figure 47 Dual Power devices
3. Save changes.
11.6 Other settings to configure
From the Tools menu click Settings, the Settings window appears. See Figure 48.
Important!
Some of the elements in this window must be configured BEFORE using the DX
system. Failure to do so will make the system inoperative. Each section of the
window is explained below.
Figure 48 Settings window
42
Page 44

DX SY
STEM
11.6.1 Admin (User name) Settings
(The title of this section reflects the current user’s name.)
Name – Name given to the DX Central the DX User connects to. In a cascaded
configuration this would be the name of the primary DX Central.
MAC – MAC address of the above DX Central.
Keyboard Layout- Select your keyboard layout, English, French or German.
Language - Select your language - English, French German or Italian. When saved
the menus and other text appear in the chosen language.
Hotkey to Local PC – Choose a hotkey to access a local PC connected to the DX
Central. You can toggle between the local PC and DX system by pressing this
hotkey.
To choose a hotkey select one of the options from the drop-down men.
Hotkey to AIM – Once you have logged into the DX system and you are switched
to a device you can invoke the DX Management (AIM) screen by pressing Shift,
Shift. Where you have cascaded KVM switches in the DX system, the Shift, Shift
hotkey may be assigned as the access hotkey of a particular KVM switch. You
should therefore change the hotkey to invoke the AIM.
To change the hotkey choose one of the options from the drop-down menu.
Direct Hotkey – This is a hotkey used to switch directly from one server screen to
another. The hotkeys appear in the Details view of the Servers window - see page
55. For example while accessing server 1, you want to switch to server 3, press the
(default) hotkey Ctrl, Ctrl, 3, Enter. You switch to server 3. As with the AIM
hotkey above, you may need to change the Ctrl, Ctrl hotkey if it is used as an access
hotkey for a cascaded KVM switch.
To change the hotkey choose one of the options from the drop-down menu.
See also Enable Direct Connection on page 45 below.
11.6.2 Security
You have a choice of security levels ranging from off to high.
Security Off – When checked, there is no login screen. All Users have full access
and control to all devices including power devices.
To change to a different security option, you must login as an Administrator. To
display the login screen:
43
Page 45

USER GUIDE
From the File menu choose Log off. The Login screen appears and the
Administrator can enter his password.
Security On – When checked Users must login to access the AIM.
Security High – When checked Users must login every time they connect to a
server/device.
Relate name – You can relate the name of each device to either the Server or Port.
When related to the Server, the device can be connected to any DX Central Server
port, without the need to reconfigure the port.
When related to the Port, the DX system will only recognize the device when
connected to the original Server port it was connected to. Connecting to any other
DX Central Server port requires the new port to be configured.
Lock configuration – When checked, the system will only recognize the current
devices configured. Any changes in the devices physically connected will not be
recognized by the system.
Note: Relate name and Lock configuration only work for XRICCs and not for
RICCs or Legacy switches.
11.6.3 IP/Cascade Settings
Here the IP elements of the selected DX Central appear as configured in the initial
configuration wizard.
IP Address – A Static IP address in the usual dot notation.
Subnet mask –The net mask of the local network.
Default Gateway – Default Gateway address. Where the DX system is accessible
from networks other than the local one, this IP address must be set to the local
network router's IP address.
SNMP Manager - SNMP - Simple Network Management Protocol is used to
collect information and configure network devices on IP networks. Type the IP
address of the SNMP Manager to send log traps of the DX system.
Send Log Trap check box – When checked SNMP log traps are sent to the SNMP
Manager. The log traps are sent as soon as an event occurs. You can choose the
events to be sent in the View/Activity Log window, see page 63.
Configure cascade options –When you add or remove a cascaded DX Central you
must reconfigure the cascade status of the DX system. This is done using the
Configuration wizard as described on page 20. To display the Configuration
wizard, click .
44
Page 46

DX SY
STEM
11.6.4 Extensions
Enable Screen Saver – Check to enable the DX screen saver. The screen saver
appears if there is no activity for 5 minutes after the Timeout login screen appears.
This 5 minute time period cannot be altered.
Enable Direct Connection - Check to enable Users to use a hotkey to directly
connect to a device without having to access the AIM. See Direct Hotkey on page
43 above.
Use consistent hotkey – Using consistent hotkey assigns Direct hotkeys to servers
according to the Server port number that they are physically connected to. When
not using consistent hotkey, direct hotkeys are assigned in sequence number order.
For example, supposing there are 3 servers in the system, and they are connected to
Server ports 3, 7 and 12. Using consistent hotkey assigns hotkeys as:
Ctrl, Ctrl, 3, Enter.
Ctrl, Ctrl, 7, Enter
Ctrl, Ctrl, 12, Enter.
Not using consistent hotkeys, assigns hotkeys as:
Ctrl, Ctrl, 1, Enter.
Ctrl, Ctrl, 2, Enter.
Ctrl, Ctrl, 3, Enter.
The hotkeys appear in the Details view of the Servers window - see page 55.
11.6.5 Time Settings
Set the time and date so that the logs will record the correct time of the events.
12. Creating/editing Users and Groups
An Administrator can create and edit Users and Groups. These Groups can have
different access permissions such as access only to certain servers or viewing of
servers only with no option to control. These permissions can be altered by an
Administrator. All this is explained in more detail below.
To create/edit Users and Groups:
From the View menu choose Users and Groups. The Users and Groups window
appears. See Figure 49.
45
Page 47

USER GUIDE
Group members
Groups
Figure 49 Users and Groups window
By default there are 3 Groups in the Groups column. Each Group has specific
access rights that cannot be altered.
The 3 default Groups are:
Group Access rights
Administrators Full access and power management of all computers.
Plus:
· Adding and removing devices
· Creating Users and Groups
· Setting time, date and IP address
Power Users Full access and power management of all computers
Users Full access to all computers
To display the members of a group, select the Group. All group members appear in
the Group Members section. By default there is 1 Administrator in the
Administrators Group. All other users must be created by an Administrator.
46
Page 48
DX SY
STEM
12.1 Toolbar buttons
You create and edit Users and Groups using the Toolbar buttons. The table below
explains the functions of the Toolbar buttons.
Button Function
Add User
Add Group
Delete
Properties
Save
12.2 Creating Groups
An Administrator can create Groups and give them tailor-made access permissions.
To create a Group:
Press . The Add New Group box appears. See Figure 50.
Figure 50 Add New Group box
47
Page 49

USER GUIDE
12.2.1 General information tab elements
Group name – Edit the Group name here.
Description – type a description of the group.
Timeout –After this period of inaction a Group member is forced out of the system
and must re-login. You can type a different Timeout period.
Private connection – When a Group member accesses a computer, Private
connection gives the option to prevent other users from viewing the computer.
Can change password – check to allow members to change their passwords.
12.2.2 Access Rights tab
Click the Access Rights tab, the Access box appears. See Figure 51.
List of devices
Figure 51 Access Rights tab
Here the Administrator defines the access rights for each connected device.
Go through each device defining the following access rights:
Denied – By default access is denied to all devices.
View – Check to allow viewing access only – no keyboard/mouse control
Control - Check to allow controlling (and viewing) of the device.
Power – When a power management device is connected to the system, check to
allow powering the device on and off (as well as controlling and viewing of the
device).
Click OK and save changes.
48
Page 50

DX SY
STEM
12.2.3 Defining the same access rights for all devices
To give the Group the same access right to every device, click the desired option
button at the top of the column.
E.g. to give the Group, viewing access to every device:
Click and confirm.
12.3 Editing Group access rights
An Administrator can change General information and Access Rights of nondefault Groups in the following way:
1. Double-click the Group icon or select the Group icon and click . The
Properties box appears. See Error! Reference source not found..
Figure 52 Properties box
2. Edit the elements of the general tab or the Access Rights tab and click OK.
3. Save changes.
12.4 Creating Users
An Administrator can create users. A new user can be added to an existing Group
or a new Group can be created for the new user.
To create a User:
Press . The Add New User box appears. See Figure 53.
49
Page 51

USER GUIDE
Figure 53 Add New User box
User Name – Type a name for the User (case sensitive). This name appears below
the User’s icon in the Users and Groups window.
Full Name - Type the User’s full name.
Description – Type a description of the User.
Password/Confirm password – Type a login password and confirm it (case
sensitive). This can be left blank, so no password is required at login, just the
Username.
Create private Group for the User - Select this option to create a new Group for
the User (to which you can define unique access permissions).
Select existing Group - Select this option to place the User into a predefined
Group:
Choose the desired Group from the Drop-down menu.
Click OK. Where the User is added to an existing Group, a User icon with the User
name below it appears in the Group Members section. Where the User has a new
Group created for it, a new Group icon also appears in the Group section. The
Group name is the same as the User name, plus the word Group.
Click to save changes.
50
Page 52

DX SY
STEM
12.4.1 Editing the User box
An Administrator can edit all the elements that appear in the User box, including
the password and he can move the User to a different Group.
To display a User box:
1. Double-click the User icon or select the User icon and click .
2. Edit and click OK.
3. Save changes.
12.5 Users and Groups - Details view
You can view the Users and Groups window from the servers’ point of view.
To do so:
1. Select View/Details. The Details view appears see Figure 54.
2. Select a server from the list on the left. The permissions for each Group appear
on the right.
When you select a Group a list of members appears below.
Figure 54 Details view
13. Arranging devices
In the Servers window the Administrator or User can create folders into which
devices can be inserted. The User can only view and insert devices that he has
rights of access to. The Administrator defines the rights of access – explained
above.
51
Page 53

USER GUIDE
13.1 The Servers window
From the View menu select Servers/Devices, the Servers window appears. See
Figure 55.
Figure 55 Servers window
13.1.1 Device Icon appearance
The table below explains the color-coding of the icons in the Servers window.
Icon Meaning
Disconnected / powered off *
Grey
Server connected to PS/2, SUN or
Blue
Blue
Green
Green
USB XRICC or RICC or generic KVM
port
User controlling device
User with Private connection
controlling device
User with View Only permission
viewing device
RS232 device connected to XRICC
RS232
User controlling RS232 device
* You can select any device even a grey device to e.g. perform a power function, or
move it between folders.
52
Page 54

DX SY
STEM
The Toolbar buttons and their functions are explained in the following table.
Button Function
Connect to server/devices
Connect to local PC
Power on (Blue)
Power off (Red)
Reboot (Green)
Search for folder/device by name
Sort devices alphabetically A-Z
Sort devices alphabetically Z-A
1 level up
Create new folder
Cut device to paste to another folder
Paste
Delete folder
13.2 Creating a new folder
To create a folder:
From the Edit menu, choose Add Folder
Or.
Click . A new folder appears.
Type a name for the new folder and press Enter.
Save
53
Page 55

USER GUIDE
13.3 Saving changes
To save any changes made in any window:
From the File menu click Save changes.
Or
Click .
13.4 Deleting and renaming folders
To delete a folder:
1. Highlight the desired folder.
2. From the Edit menu choose Delete Folder or press Delete. The folder deletes.
To rename a folder:
1. Highlight the desired folder.
2. From the Edit menu choose Rename Folder.
3. Give the folder a new name.
13.5 Adding devices to a folder
To organize your folders, you can place any device inside a folder and you can
place one folder inside another folder.
To add devices (or folders) to a folder:
1. Click the device. To select more than one device, hold down Ctrl and click the
devices.
2. From the Edit menu click Cut.
3. Click the desired folder.
4. From the Edit menu click Paste. The device appears in the chosen folder and is
removed from the root.
13.6 Servers/devices display options
Display the items in the Server window as:
· Icons (default display)
· A list
· A detailed list.
54
Page 56

DX SY
STEM
From the View menu choose Icons, List or Details. Figure 56 shows the Details
view.
In List view, view up to 100 devices without the need for scrolling.
In Detailed view, you see the device name, Direct hotkey (discussed on page 43),
port number, XRICC type etc.
Figure 56 Details view
13.7 Accessing devices
To access a device:
From the Servers window double-click a device. Or select the device and click .
Or select the device and choose Action/Connect. Or press the hotkey.
For KVM devices, the devices screen appears, and you have KVM control.
For serial devices a Terminal window opens. For a list of Terminal functions and
hotkeys, see page 68.
To other users the device appears busy. They can view the screen but cannot take
control until the present user logs off or is timed out.
13.7.1 Returning to the DX window
To return to the DX window:
Press left Shift, Shift.
Or press the hotkey to AIM as defined in the Settings window, see page 43.
55
Page 57

USER GUIDE
13.8 Power on/off, reboot
The power options are available to Administrators and to Users with Power
management rights.
To perform these power functions:
1. Select the desired device.
2. Select the desired function from the Toolbar buttons or the Action menu.
14. Scanning a group of servers
You can set up a group of servers, and scan their monitors at a speed that you
choose.
To set up a scan group:
1. From the Action menu choose Scan. The Scan box appears see Figure 57.
Figure 57 Scan box
2. Click . The New Scan Group box appears. See Figure 58
Figure 58 New Scan Group box
3. Type a name for the group in the Group Name box.
56
Page 58

DX SY
STEM
4. From the list of servers on the left, highlight the desired servers/devices and
press . To add all servers (without highlighting), press
. The servers transfer to the right and are included in the scan
group.
To remove servers from the scan group: Highlight the desired server and press
. To remove all servers (without highlighting), press .
5. Use the and arrows to change the order of the servers
in the scan group.
6. Click OK. The Scan box reappears.
7. Set the scan time. Check Auto skip to automatically skip unconnected servers.
Check Infinite Loop to make the scan un-ending.
8. Select the group to scan.
9. Press Scan, the scan activates.
10. To exit scan, press Esc.
15. Adjusting the picture quality
Where the picture quality is unsatisfactory, you can adjust the picture quality of
each computer.
To do so:
1. In Servers window, click once on the desired computer’s icon.
2. From the Action menu select Video Tuning. The selected computer’s screen
appears.
3. Use the keyboard Up, Down and Left, Right Arrow keys to adjust the picture.
4. When the picture is satisfactory, press Esc. The Servers window reappears.
5. Apply the changes to the tuned computer or to all the servers connected to the
device.
57
Page 59

USER GUIDE
16. Connect - Private
This option appears in the Action menu and is available to Administrators and to
Users with private connection rights. See page 48.
To activate Connect - Private:
1. Select the desired device.
2. From the Action menu select Connect - Private. Other Users are prevented
from viewing the selected computer.
17. Disconnect User
An Administrator can disconnect a user from any device.
To disconnect a user:
1. Select the desired server/device.
2. From the Action menu select Disconnect User. The user is disconnected from
the device.
18. Connecting to a local computer
When a DX User is connected to an optional local computer, select Action/Local
Computer to work on the local computer.
To exit the local computer, press left Shift, Shift.
Alternatively you can toggle between the DX AIM and the local PC by pressing the
hotkey - explained on page 43.
19. Updating the DX Central
To update the firmware, the DX system must be connected and switched on.
You update the DX Central firmware using the DX Central Update program which
is located on the Minicom Flash USB key. To obtain the latest firmware, go to
www.minicom.com and look in the Support menu. With the Update program you
can also check the DX central version number, change the DX Central settings,
restore factory defaults, backup the DX system database and load a saved database.
19.1 System requirements for the DX Central Update program
· Pentium class computer with 128 MB RAM and 10 MB free Hard Drive
space
· Windows 2000 or later
58
Page 60

DX SY
STEM
19.2 Running the DX Central Update
Install the program on any Windows-based computer connected to the DX network.
A shortcut icon appears on the Desktop . There are 2 Update options:
· DX Central Update
· Upgrading from V1.9 to V2
Where you have V1.9 installed you must first upgrade from V1.9 to V2. Once V2 is
installed you use the DX Central Update program. The Desktop icon only opens the
DX Central Update.
19.2.1 Upgrading from V1.9 to V2.0
1. Select Start/Programs/DX Central Update/ DX Upgrader 1.9x to 2.0. The DX
Central box appears. See Figure 59.
Figure 59 DX Central IP address
2. The default IP address of the DX Central appears. If the IP address is different,
type in the correct IP address and click OK. The DX Central Update Utility box
appears see Figure 60.
Figure 60 DX Central Update Utility box
3. Click Next. The Update Options screen appears. See Figure 61.
59
Page 61

USER GUIDE
Figure 61 Update Options screen
4. Check Update DX and click Next.
5. Locate the V2 upgrade file and click Open. The firmware upgrades. Once the
DX Central firmware is upgraded to V2, all future updates are done using the
DX Central Update program.
19.2.2 DX Central Update
All updates for DX Central with V2 firmware are done through DX Central Update.
1. Select Start/Programs/DX Central Update/ DX Central Update or click the
Desktop icon. The Welcome to DXC update utility box appears. See Figure 62.
Figure 62 Welcome to DXC update utility
2. Select the DX Central to be upgraded from the list or type the DX Central
address in the Input IP address box. Click Next. The login box appears, see
Figure 63.
Figure 63 Login box
3. Type the administrator username and password, and click OK. The DXC update
utility options appear, see Figure 64.
60
Page 62

DX SY
STEM
Figure 64 DXC update utility options
You can choose any of the following:
· Check version
· DX Central Settings (Check and/or change the settings)
· Update the DX Central firmware
· Restore factory defaults – and erase the current database
· Backup System (database)
· Restore System (by loading a saved database)
To do any of the above, check the desired option and click Next.
4. Under DX Central Settings, you can change the DX Central network settings or
IP address.
To update the firmware or load a saved database, locate the file and click Open.
To backup the database, save the current database to the Hard drive.
To restore factory defaults, press OK.
20. Updating the DX User and XRICCS/RICCs
From the DX AIM you can update the firmware for the:
· DX User unit
· XRICCs – PS/2, SUN and USB
· RICC PS/2
To obtain the latest firmware for your system go to www.minicom.com and look in
the Support section.
61
Page 63
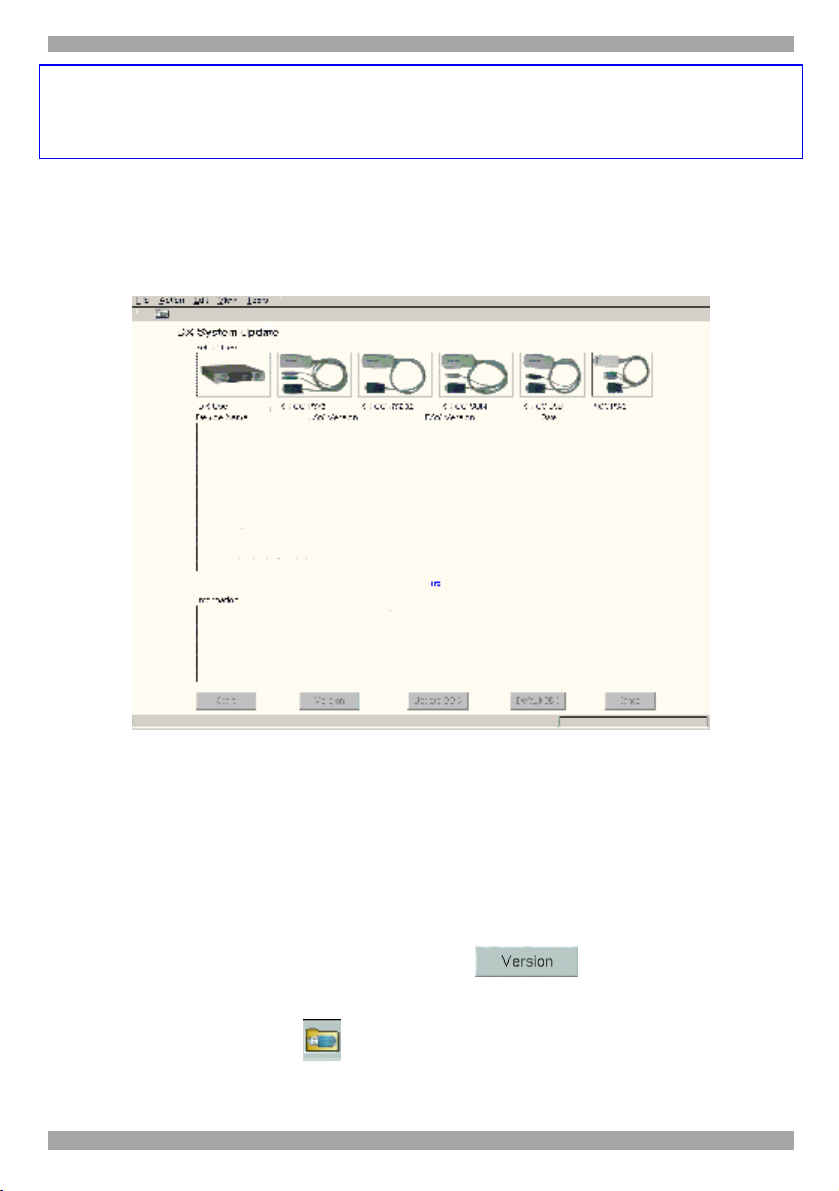
USER GUIDE
Warning!
Never switch off any User unit or computer connected to the system during the
updating process.
1. Download the latest firmware to your hard disk and unzip it to the Minicom
Flash USB key.
2. From the DX GUI, select Tools/Update. The Update window appears see Figure
65.
Figure 65 Update window
3. Insert the USB key into a USB port of a DX User.
4. Click the picture of the device type to be updated. When selecting the DX User,
it’s version details appear in the middle section.
For the XRICCs and RICCs select the ones to be updated from the list. To select
them all, click the one at the top of the list, hold down Shift and click the one at
the bottom of the list. To select more than one, hold down Ctrl and click the
desired devices. For the version details click . The version details
appear.
5. Select File/Open or click . The Open File box appears, see Figure 66.
62
Page 64

DX SY
STEM
Figure 66 Open File box
6. Select the firmware file and click Open. The file appears in the information
section of the Update window.
7. Select . The firmware updates.
8. Reboot the DX User unit.
20.1 DDC buttons
All XRICCs come with the default DDC information of: 1024x768@75Hz. Where
the monitor connected to the DX User has a different resolution, select all
XRICCs/RICCs and press .
If you need to return the XRICCs to the default DDC information, select all the
XRICCs/RICCs and press .
21. Events log
View a log of all the activities that have occurred during the latest session. See the
event, date, time, username of the event initiator and where applicable, a brief
description of the event.
To view the log:
Select View/Activity Log. The Log window appears see Figure 67.
63
Page 65

USER GUIDE
Figure 67 Log window
21.1 Configuring Log Traps
By default event logging is disabled. An Administrator can configure which log
traps to send to the SNMP Manager as follows:
1. Click . The Log Settings window appears see Figure 68.
Figure 68 Log Settings
2. Scroll down the list. Check those you wish to be sent. To check or uncheck all
events click the events category button at the top of the column.
64
Page 66

DX SY
STEM
3. You can choose the icon that appears in the Type column in the Log window to
an event - Figure 67. There are 3 icon options – info, error and warning. To
change an individual event icon, check the appropriate column in the Log
Settings window. To have all events with the same icon, press the appropriate
button at the top of the column.
Note: You can always return to the default status by pressing the Default button.
The Log is saved in the DX Central memory and when configured, is sent to the
SNMP Manager.
21.2 Clearing the Log
To clear the log:
Press .
21.3 Saving the Log
You can save the current log to the Flash USB key.
To do so:
1. Insert the USB key into the USB drive.
2. Press .
3. Save the file. The Log is saved in Tab – delimited format. You can read it using
any ASCII text editor
22. Troubleshooting - Resetting the DX Central
If you need to reset the DX Central, press the Reset button on the rear panel. The
XRICCs are unaffected by this reset.
65
Page 67

USER GUIDE
23. USB / SUN Combo keys
The connected PS/2 keyboard does not have a special SUN keypad to perform
special functions in the SUN Operating System environment. So when a XRICC
USB or SUN is connected to a SUN computer, the XRICC emulates these SUN
keys using a set of key combinations called Combo keys. See the table below.
SUN key Combo key
Stop Left Ctrl + Alt + F1
Props Left Ctrl + Alt + F3
Front Left Ctrl + Alt + F5
Open Left Ctrl + Alt +F7
Find Left Ctrl +Alt + F9
Again Left Ctrl + Alt + F2
Undo Left Ctrl + Alt + F4
Copy Left Ctrl + Alt + F6
Paste Left Ctrl + Alt + F8
Cut Left Ctrl + Alt + F10
Help Left Ctrl + Alt + F11
Compose Application key or Left Ctrl + Alt + Keypad *
Crescent
Scroll Lock
Volume Up Left Ctrl + Alt + Keypad –
Volume Down Left Ctrl + Alt + Keypad +
Mute Left Ctrl + Alt + F12
Sun Left ◊ key
Sun Right ◊ key
Left Windows key
Right Windows key
Alt-Graph Right Alt or Alt Gr
Stop A Left Ctrl + Alt +1
66
Page 68

DX SY
STEM
24. Technical specifications
System
Operating systems Novell, LINUX, Windows, UNIX SUN, MAC and other major
operating systems
Resolution 1600 X1200 @75Hz
User to server
distance
System cable CAT5, CAT6, CAT7
Operating temp. 0° to 40°C/32° to 104°F
Storage temp. -40°C to 40°C/-40°F to 104°F
Security Password, multiple User Profiles
Management Multilingual AIM Advanced Integrated Management,
Mouse Support PS/2, Wheel mouse, 5-button mouse, Microsoft intellimouse
Warranty 3 Years
200m/660ft
DX units
DX Central Unit DX User Unit DXU IP
Cables/Connectors Server Ports –
32 RJ45
Users – 4/8
RJ45
Serial – 2 X DB9
LAN – RJ45
Power
Rack Mountable Yes
Dimensions 43.2x27x4cm /
17X11X1.6”
Power supply
100 – 250 VAC 50/60 Hz
input rating
System – RJ45
Local Console and
CPU KVM + Serial
Video – HDD15
K/M – MiniDin6
Serial – 2 X DB9
Power
2 X USB
21.6x27x4cm /
8.5X11X1.6”
67
System – RJ45
Local Console +
Serial
Video – HDD15
K/M – MiniDin6
Serial – 2 X DB9
LAN – RJ45
Power
2 X USB
43.2x27x4cm /
17X11X1.6”
Page 69

USER GUIDE
RICCS
Server to DX Central
Distance
RICC PS/2
for DX
10m/33ft 100m/330ft
XRICC
PS/2
XRICC
SUN
XRICC
USB
XRICC
RS232
Cables/Connectors
K/M - MiniDin6
Rack mountable Yes
Power supply From Keyboard From USB Power
Dimensions 24x91x41mm /
0.94x3.58x1.61”
26x91x45mm / 1.05x3.58x1.77”
System - RJ45
Video – HDD15
K/M –
MiniDin8
K/M - USB
Serial DB9
Power Jack
Adapter or
from USB
25. Terminal hotkeys
Hotkey Function
Ctrl + A, F Send break
Ctrl + A, E Clear screen
Ctrl + A, T Change terminal setting
Ctrl + A, E Local echo on/off
Ctrl + A, A Add line feed on/off
Ctrl + A, D Browse history
Ctrl + A, W Line warp
68
Page 70

DX SY
STEM
26. User guide feedback
Your feedback is very important to help us improve our documentation. Please
email any comments to: ug.comments@minicom.com
Please include the following information: Guide name, part number and version
number (as appears on the front cover).
69
Page 71

USER GUIDE
Germany
Kiel
Tel: + 49 431 668 7933
info.germany@minicom.com
Regional Offices
France
Vincennes
Tel: + 33 1 49 57 00 00
info.france@minicom.com
www.minicom.com
Italy
Rome
Tel: + 39 06 8209 7902
info.italy@minicom.com
70
Page 72

DX SY
STEM
71
 Loading...