

Page 1
www.minicom.com
International HQ
Jerusalem, Israel
Tel: + 972 2 535 9666
North American HQ
Linden, NJ, USA
Tel: + 1 908 4862100
European HQ
Dübendorf, Switzerland
Tel: + 41 44 823 8000
Customer support - [email protected]
5UM20140 V1.3 7/06
DX User IP
User Guide
Page 2

DX USER IP
1
Table of Contents
1. Welcome.................................................................................................................3
2. Introduction............................................................................................................4
3. Features of DX User IP...........................................................................................5
4. DX User IP components.........................................................................................5
5. Cables.....................................................................................................................5
6. DX User IP front panel............................................................................................6
7. DX User IP rear panel.............................................................................................6
8. Rack mounting the DX User IP...............................................................................7
9. Pre-installation guidelines......................................................................................7
10. Mouse synchronization limitations........................................................................7
11. DX User IP connections..........................................................................................9
12. Connecting the DX User IP to the Wan/LAN...........................................................9
13. Local User.............................................................................................................10
14. Connecting an RS232 terminal.............................................................................10
15. Order of powering on...........................................................................................11
16. Configuring the system........................................................................................11
17. The DX User IP system interface..........................................................................14
18. Logging in.............................................................................................................15
19. Timeout.................................................................................................................16
20. The Work area.......................................................................................................16
21. Remote Console Settings.....................................................................................16
22. Telnet Console......................................................................................................19
23. Status via IPMI......................................................................................................20
24. Event Log via IPMI................................................................................................20
25. File transfer – Virtual Floppy................................................................................20
26. Power Control.......................................................................................................20
27. Keyboard & Mouse Settings.................................................................................22
28. KVM Settings........................................................................................................24
29. KVM Port Settings................................................................................................26
30. Video Settings......................................................................................................28
31. User/Group Management.....................................................................................30
32. User/Group Permissions......................................................................................33
33. Network Settings..................................................................................................34
34. Dynamic DNS........................................................................................................36
35. Serial Port Settings...............................................................................................38
36. Security Settings..................................................................................................41
37. SNMP Settings......................................................................................................45
38. IPMI Settings.........................................................................................................47
39. LDAP Settings......................................................................................................49
Page 3

USER GUIDE
2
40. Maintenance.........................................................................................................50
41. Accessing the remote console.............................................................................54
42. Keyboard layout...................................................................................................54
43. The Control buttons /toolbar icons......................................................................55
44. The Chat window..................................................................................................57
45. The Video settings................................................................................................57
46. Video Settings access..........................................................................................58
47. Mouse synchronization........................................................................................58
Frequently Asked Questions..............................................................................60
Glossary of terms...............................................................................................61
Appendix A: DX User IP Video modes...............................................................62
Appendix B: Key codes......................................................................................63
Appendix C: Pin assignments............................................................................65
Appendix D: Disabling mouse acceleration......................................................67
Appendix E:Technical specifications................................................................69
Page 4

DX USER IP
3
1. Welcome
Thank you for buying the DX User IP system. The DX User IP system is produced
by Minicom Advanced Systems Limited.
Technical precautions
This equipment generates radio frequency energy and if not installed in accordance
with the manufacturer’s instructions, may cause radio frequency interference.
This equipment complies with Part 15, Subpart J of the FCC rules for a Class A
computing device. This equipment also complies with the Class A limits for radio
noise emission from digital apparatus set out in the Radio Interference Regulation of
the Canadian Department of Communications. These above rules are designed to
provide reasonable protection against such interference when operating the
equipment in a commercial environment. If operation of this equipment in a
residential area causes radio frequency interference, the user, and not Minicom
Advanced Systems Limited, will be responsible.
Changes or modifications made to this equipment not expressly approved by
Minicom Advanced Systems Limited could void the user’s authority to operate the
equipment.
Minicom Advanced Systems Limited assumes no responsibility for any errors that
appear in this document. Information in this document is subject to change without
notice.
No part of this document may be reproduced or transmitted in any form or by any
means, electronic or mechanical, for any purpose, without the express written
permission of Minicom Advanced Systems Limited.
© 2006 Minicom Advanced Systems Limited. All rights reserved.
Trademarks
All trademarks and registered trademarks are the property of their respective owners.
Page 5
USER GUIDE
4
2. Introduction
The DX User IP from Minicom Advanced Systems redirects local keyboard, mouse
and video data to a remote computer. All data is transmitted via IP.
DX User IP features remote KVM access and control via a LAN or Internet
connection. DX User IP provides a non-intrusive solution for remote access and
control. Remote access and control software runs on the DX User IP embedded
processors only and not on the servers, so there is no interference with server
operation or impact on network performance.
Using one or several DX User IPs with the DX Central allows access to multiple
remote servers via single remote console. The DX User IP combines digital remote
KVM access via IP networks with a comprehensive and integrated system
management.
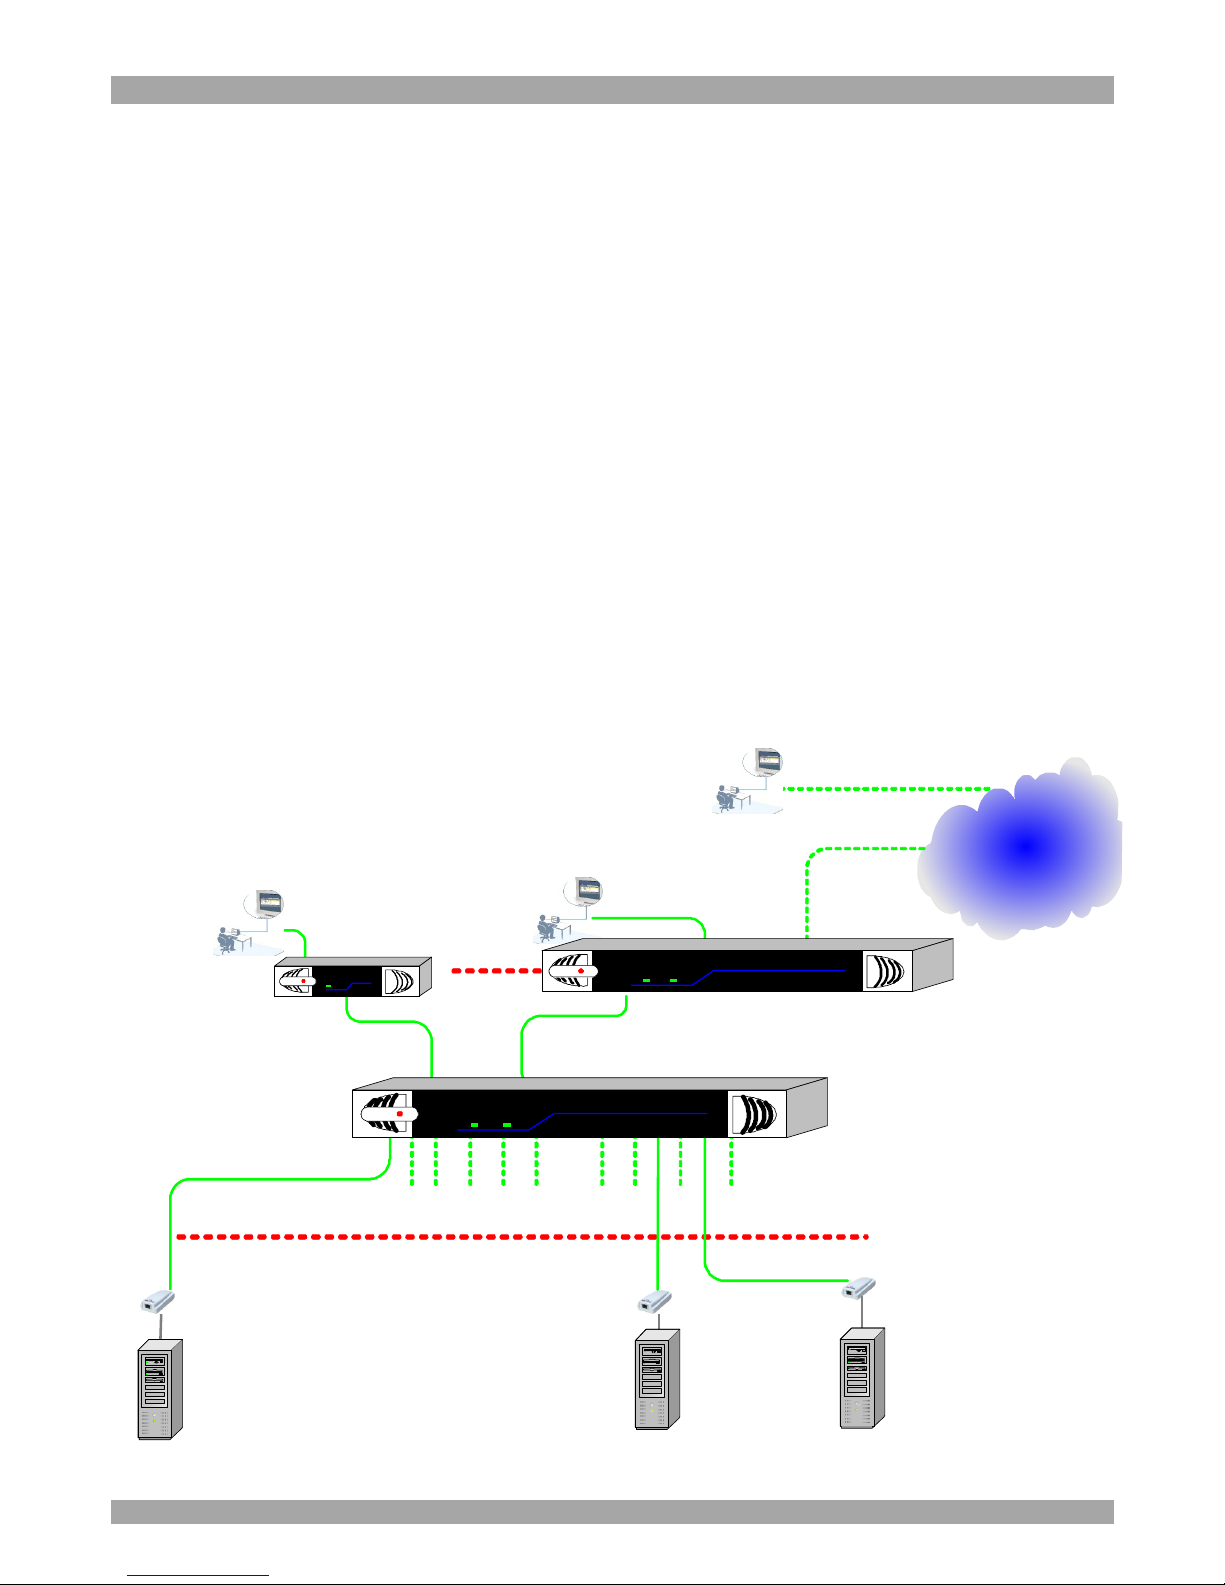
Figure 1 illustrates the basic configuration of the DX system with the DX User IP
and DX Users connected to peripheral devices via the DX Central.
DX 432 Central
X-RICC
X-RICC
X-RICC
132
Computer
To computers
Computer
PowerLink
MINICOM
DX432
Central
User over IP
Local
User
MINICOM
Power
DX
User
DX User
Computer
DX User IP
LAN / WAN
Local
User
MINICOM
SystemOKActivity
DXU-IP
Figure 1 DX User IP usage scenario
Page 6

DX USER IP
5
3. Features of DX User IP
· KVM (keyboard, video, mouse) access over IP or analogous telephone line.
· Automatically senses video resolution for best possible screen capture
· High-performance mouse tracking and synchronization
· Connect a user console for direct access to KVM switch
· Local Mouse suppression (only when using SUN's Java Virtual Machine)
DX User IP supports PS/2 type keyboards and mice and HD 15 video output. See
the pin assignments in Appendix C.
4. DX User IP components
The DX User IP package consists of:
· DX User IP
· Cables
· Brackets to rack mount the DX User IP
· Marketing & Documentation CD
5. Cables
The DX User IP package contains the following cables.
· CAT5 FTP cable (2M/6Ft)
· Serial cable
· Null Modem cable (2 x DB9 connectors)
Page 7
USER GUIDE
6
6. DX User IP front panel
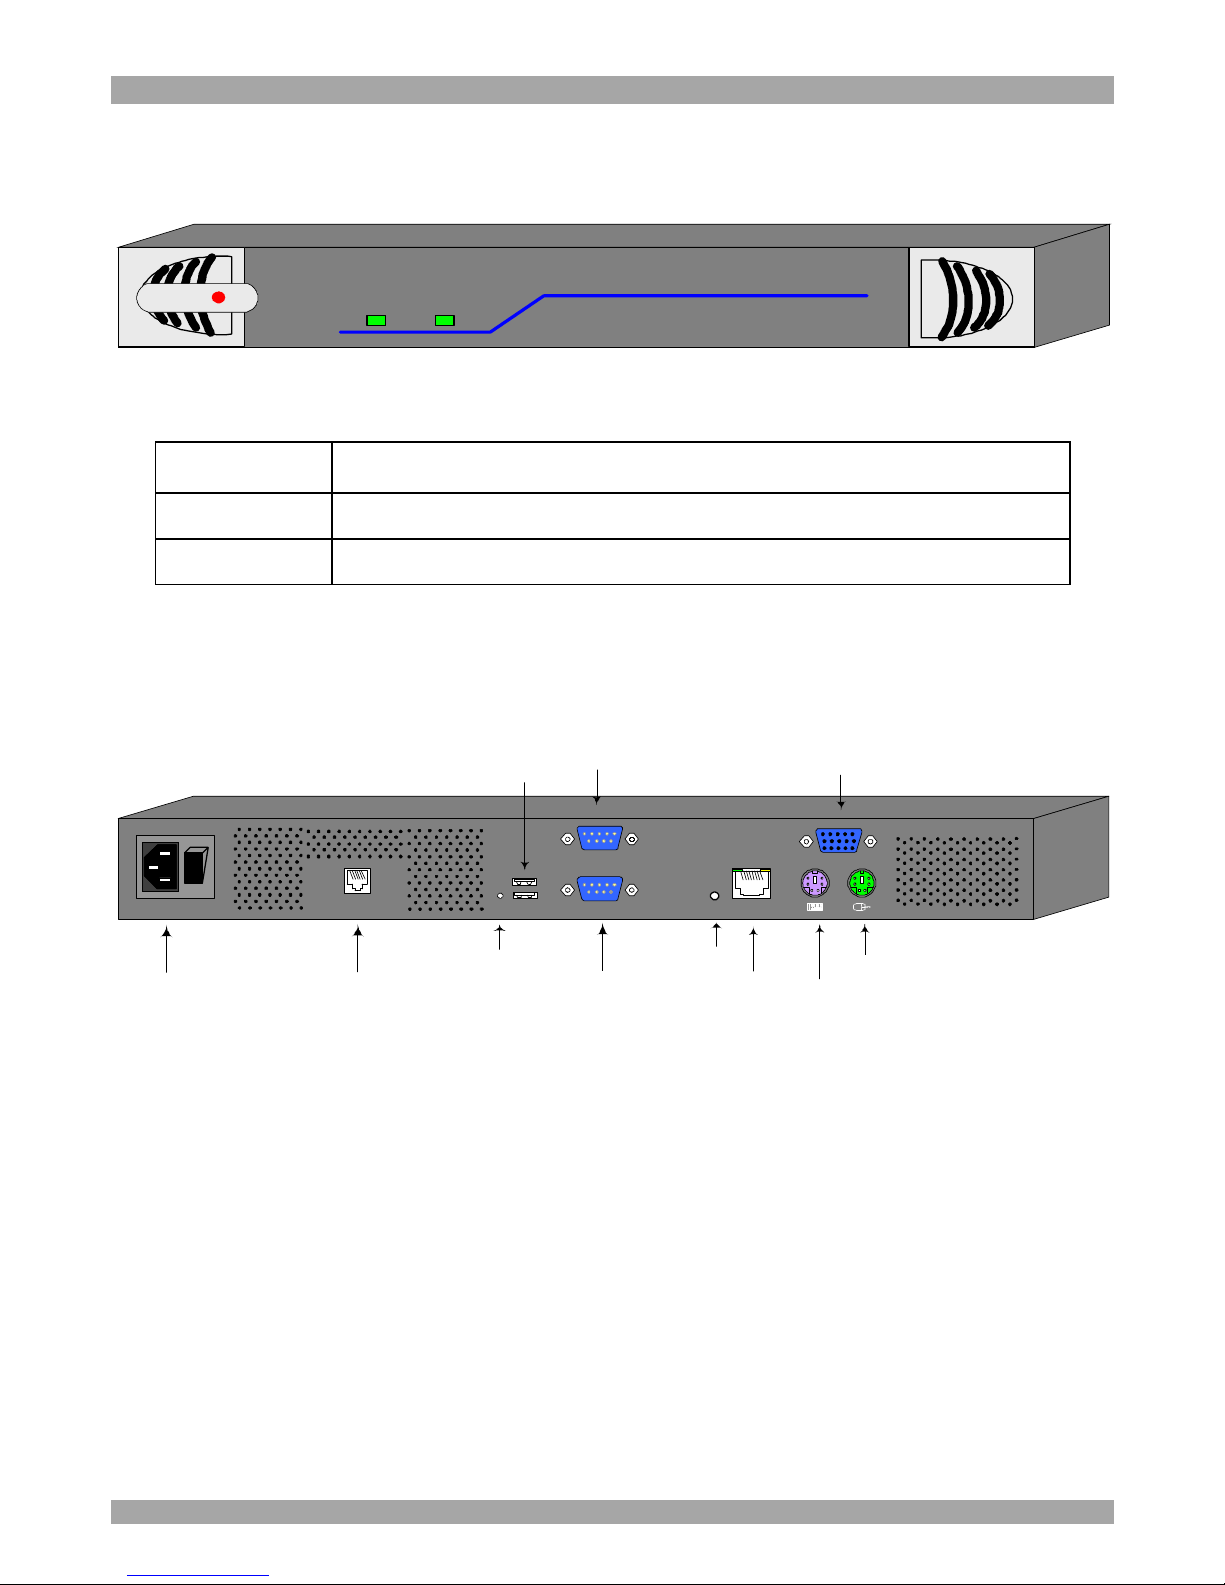
Figure 2 illustrates the DX User IP front panel.
MINICOM
System OKActivity
DXU - IP
Figure 2 Front panel
The table below explains the functions of the front panel LEDs.
LED Function
Activity LED blinks when a remote user operates the DXU IP
System OK LED solid when DX User IP connected and functioning
7. DX User IP rear panel
Figure 3 illustrates the rear panel of the DX User IP.
Power
connector
RS232 Serial
port
POWER
100-240 VAC 50/60 Hz
www.minicom.com
IP Reset
button
Ethernet
port
ETHERNET
SERIAL
I
0
SYSTEM
Keyboard
Mouse
Monitor
USBTERMINAL
USER
USB
ports
RS232
Terminal port
CAT5 to DX
Central
RST
DX Reset
button
Figure 3 DX User IP rear panel ports
Reset buttons
The DX Reset button resets the DX parts of the DX User IP. The IP Reset button
resets the IP parts of the DX User IP.
Serial port
Serial port is used as follows:
· Serial output for modem dial in connection
· Serial pass-through via Telnet
· Initial configuration
Page 8
DX USER IP
7
Terminal port
When there are X-RICC RS232s in the DX system, you can control them through an
RS232 terminal connected to the DX User IP.
Ethernet - Connects the DX User IP to an Ethernet network.
8. Rack mounting the DX User IP
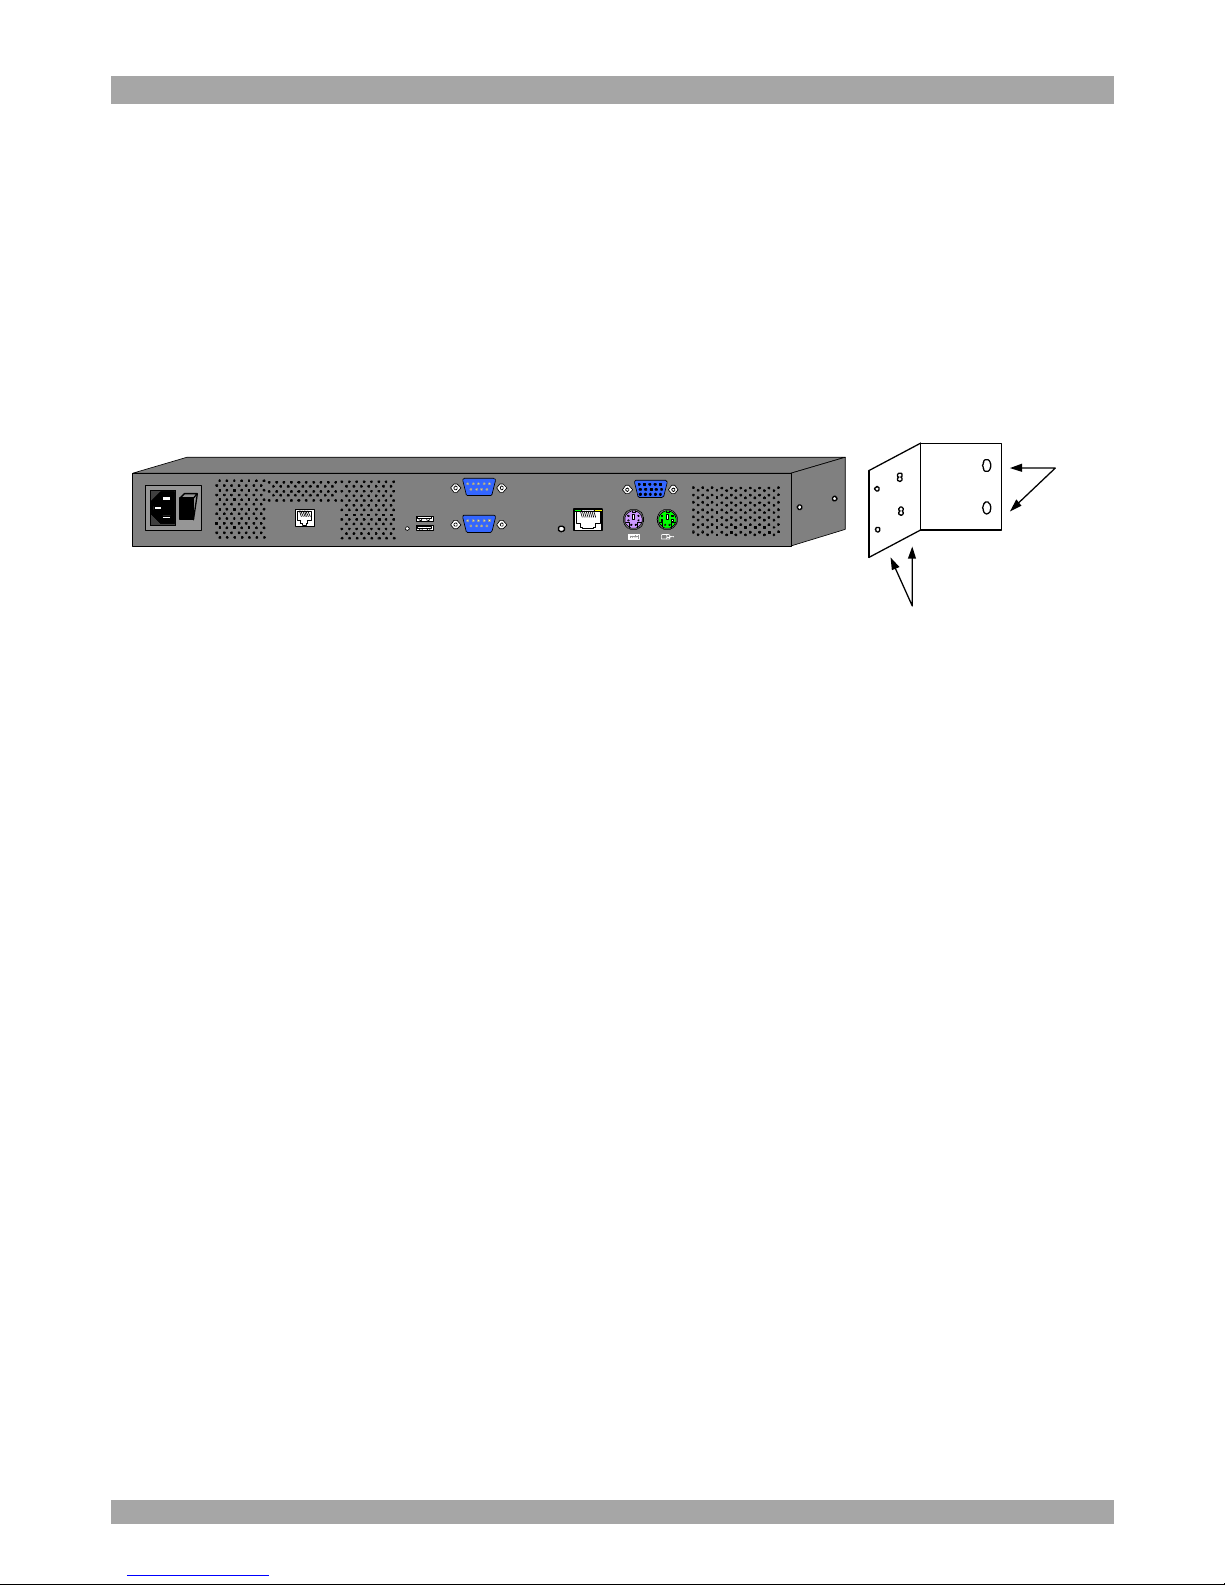
Use the L-shaped brackets and screws provided to mount the DX User IP on a
server rack as illustrated below.
Insert
screws to
connect to
rack
Insert screws to connect
to DX User IP side panel
POWER
100-240 VAC 50/60 Hz
www. minic om.c om
ETHERNET
SERIAL
I
0
SYSTEM
USBTERMINAL
USER
RST
Figure 4 Connecting the L-shaped brackets
9. Pre-installation guidelines
· Switch off all computers
· Place cables away from fluorescent lights, air conditioners, and machines that
are likely to generate electrical noise
· The maximum distance between each device (computer, KVM switch or second
level DX Central) and the DX Central is 100m/330ft. The maximum distance
between the DX Central and the DX User IP is also 100m/330ft.
10. Mouse synchronization limitations
The following will help ensure proper mouse synchronization between the host and
client computers.
Vendor-specific Mouse drivers
Special vendor-specific Mouse drivers disrupt the synchronization process. Ensure
these are not on the host system.
Accelerated mice
DX User IP does not work with accelerated mice. You must disable mouse
acceleration on all computers connected to the system. This is explained below for
Windows 2000 Pro, 2000 Server, XP and 2003 Server. To disable mouse
acceleration for other Operating Systems, see Appendix D on page 67.
Page 9
USER GUIDE
8
Windows 2000 Pro and 2000 Server
Deactivate Mouse Acceleration.
To do so:
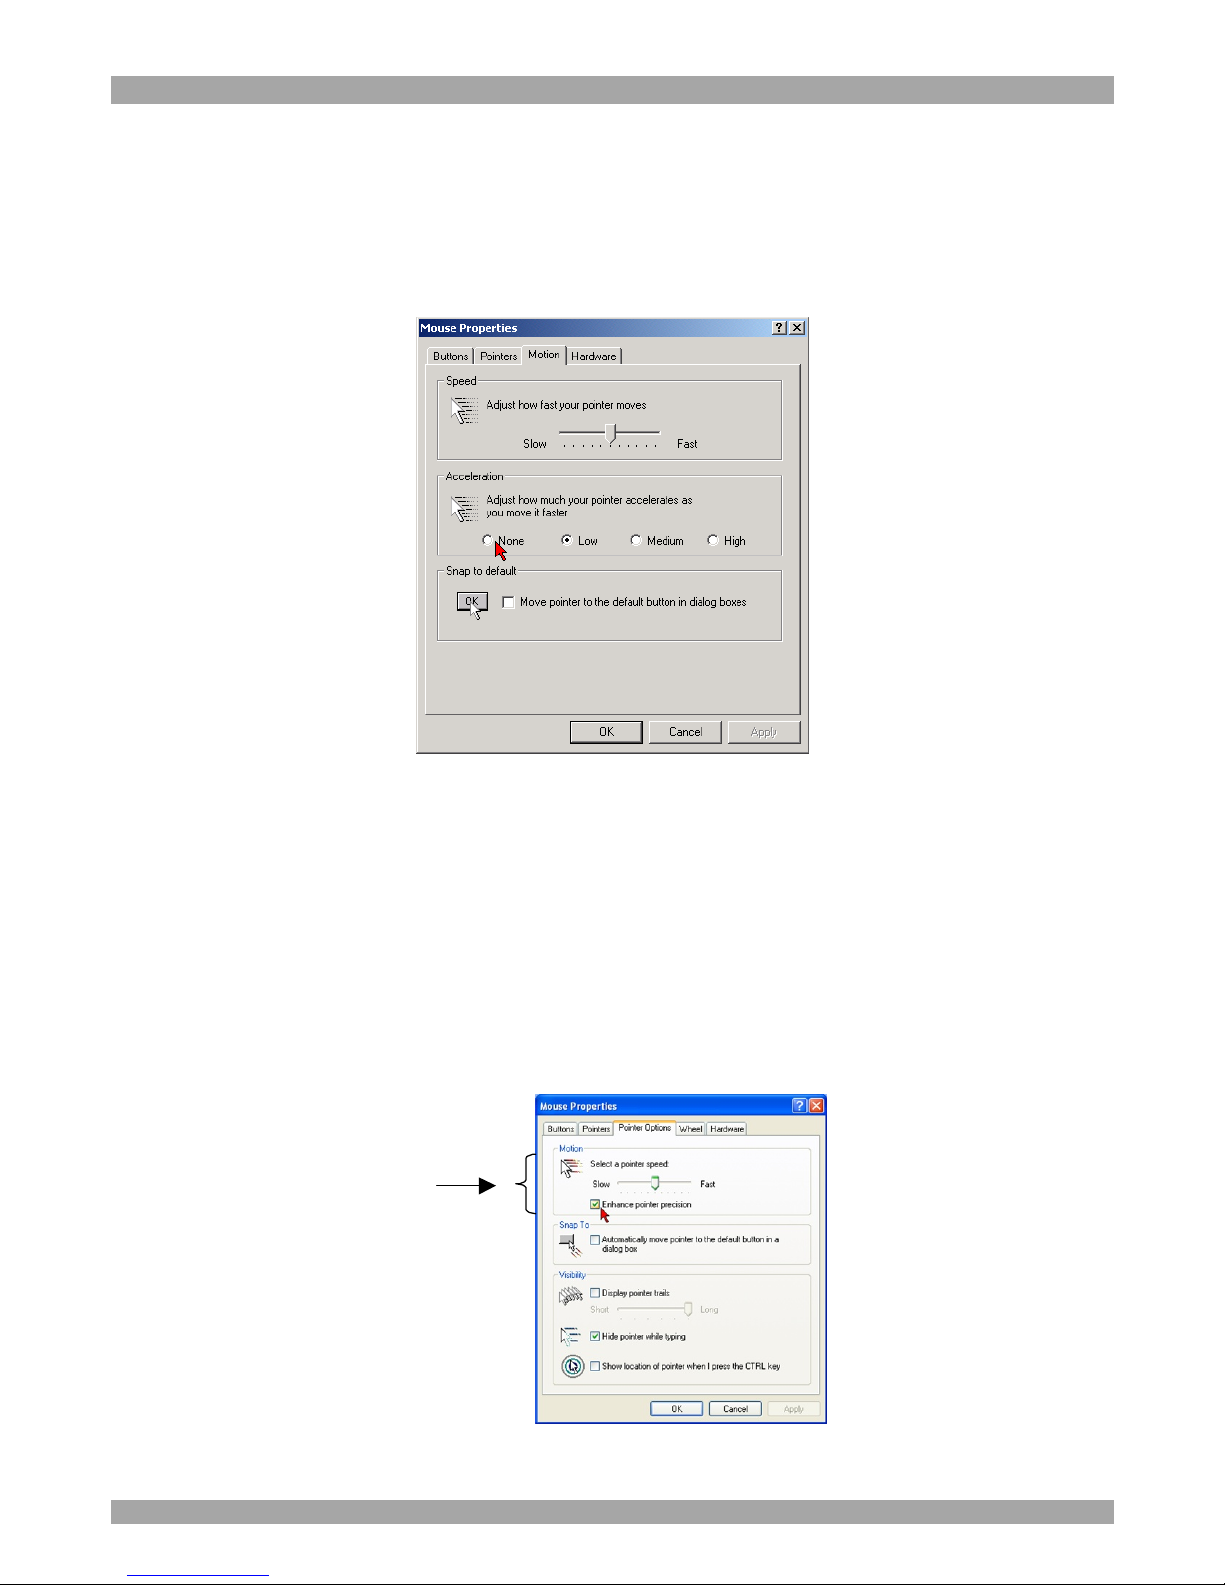
From the Control Panel select Mouse. Select the Motion tab. See Figure 5.
Figure 5 Motion tab
The Speed section slider bar must be in the center, and the Acceleration section
must be set to None. Click OK to save changes.
Windows XP and 2003 Server
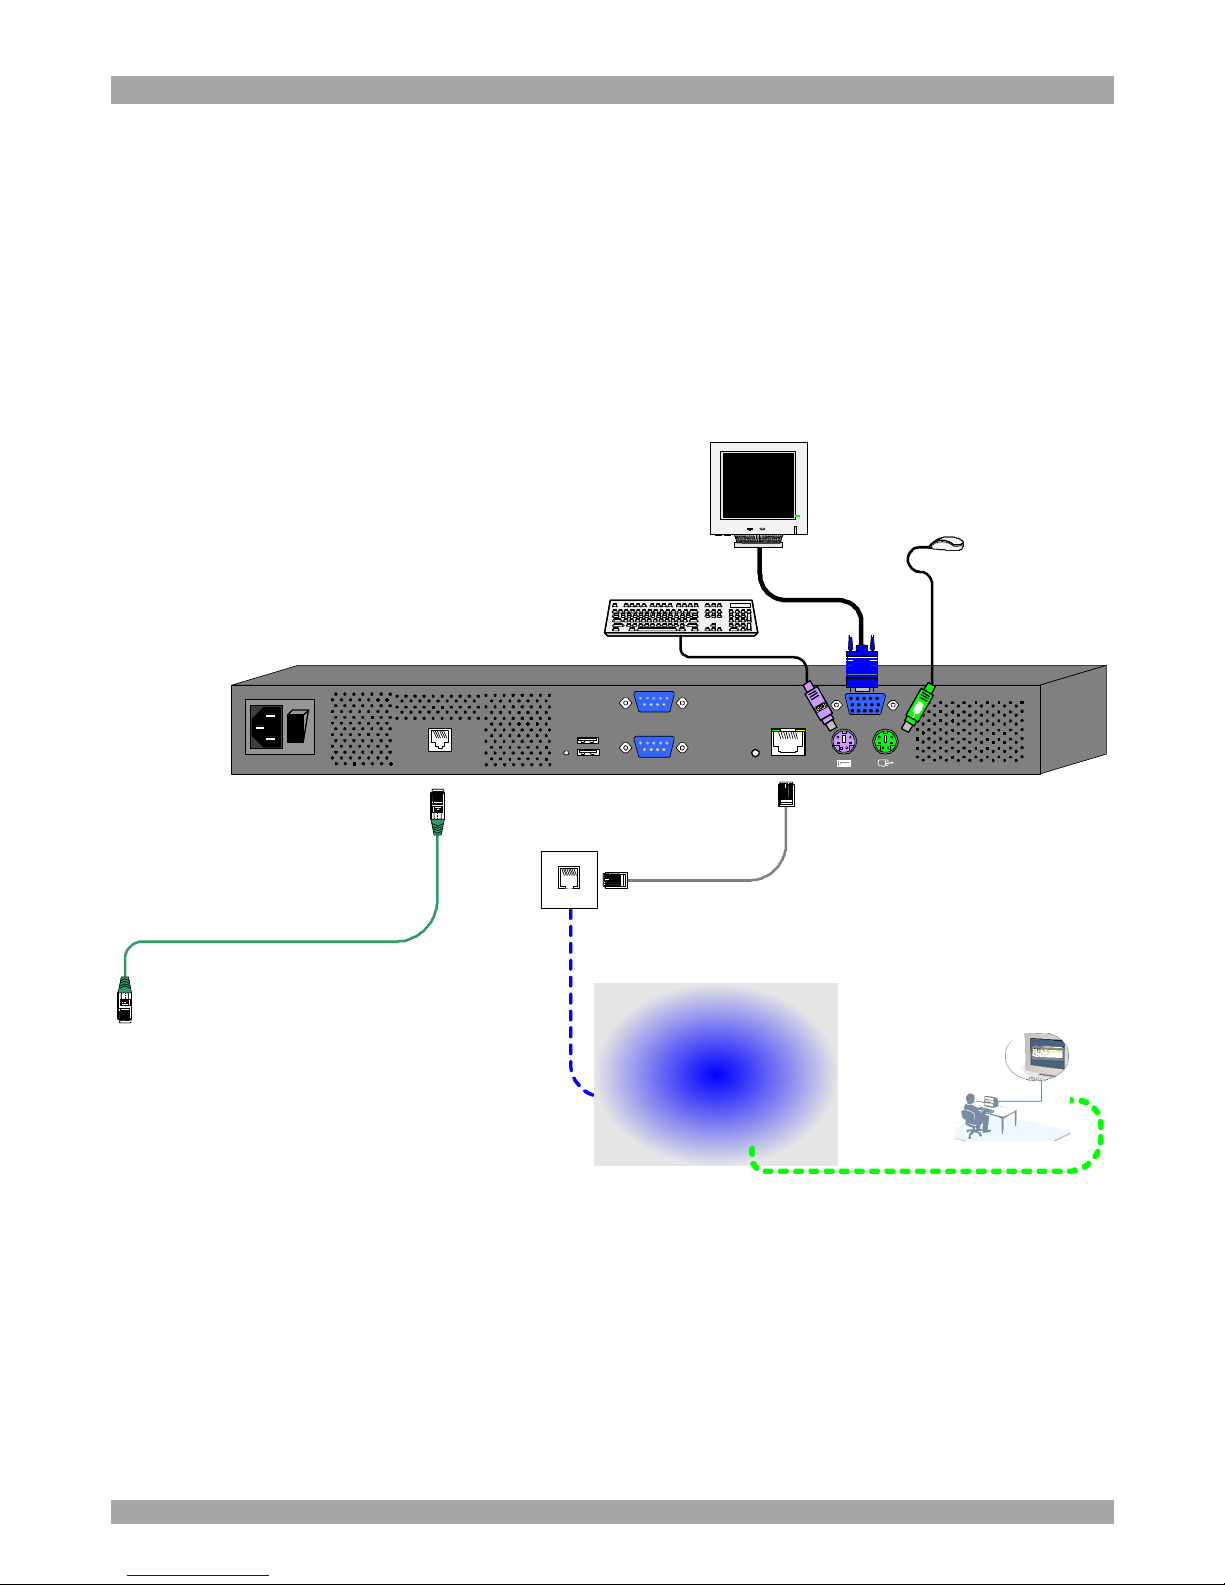
Deactivate Enhanced pointer precision. To do so:
From the Control Panel select Printers and Other Hardware. Click the Mouse
icon. The Mouse Properties box appears. See Figure 6. Select the Pointer Options
tab.
Figure 6 Pointer tab
Page 10
DX USER IP
9
The Motion section slider bar must be in the center, and the Enhanced pointer
precision box must be unchecked. Click OK to save changes.
Disable Active Desktop
Disable Active Desktop, or do not use a plain background, use wallpaper.
11. DX User IP connections
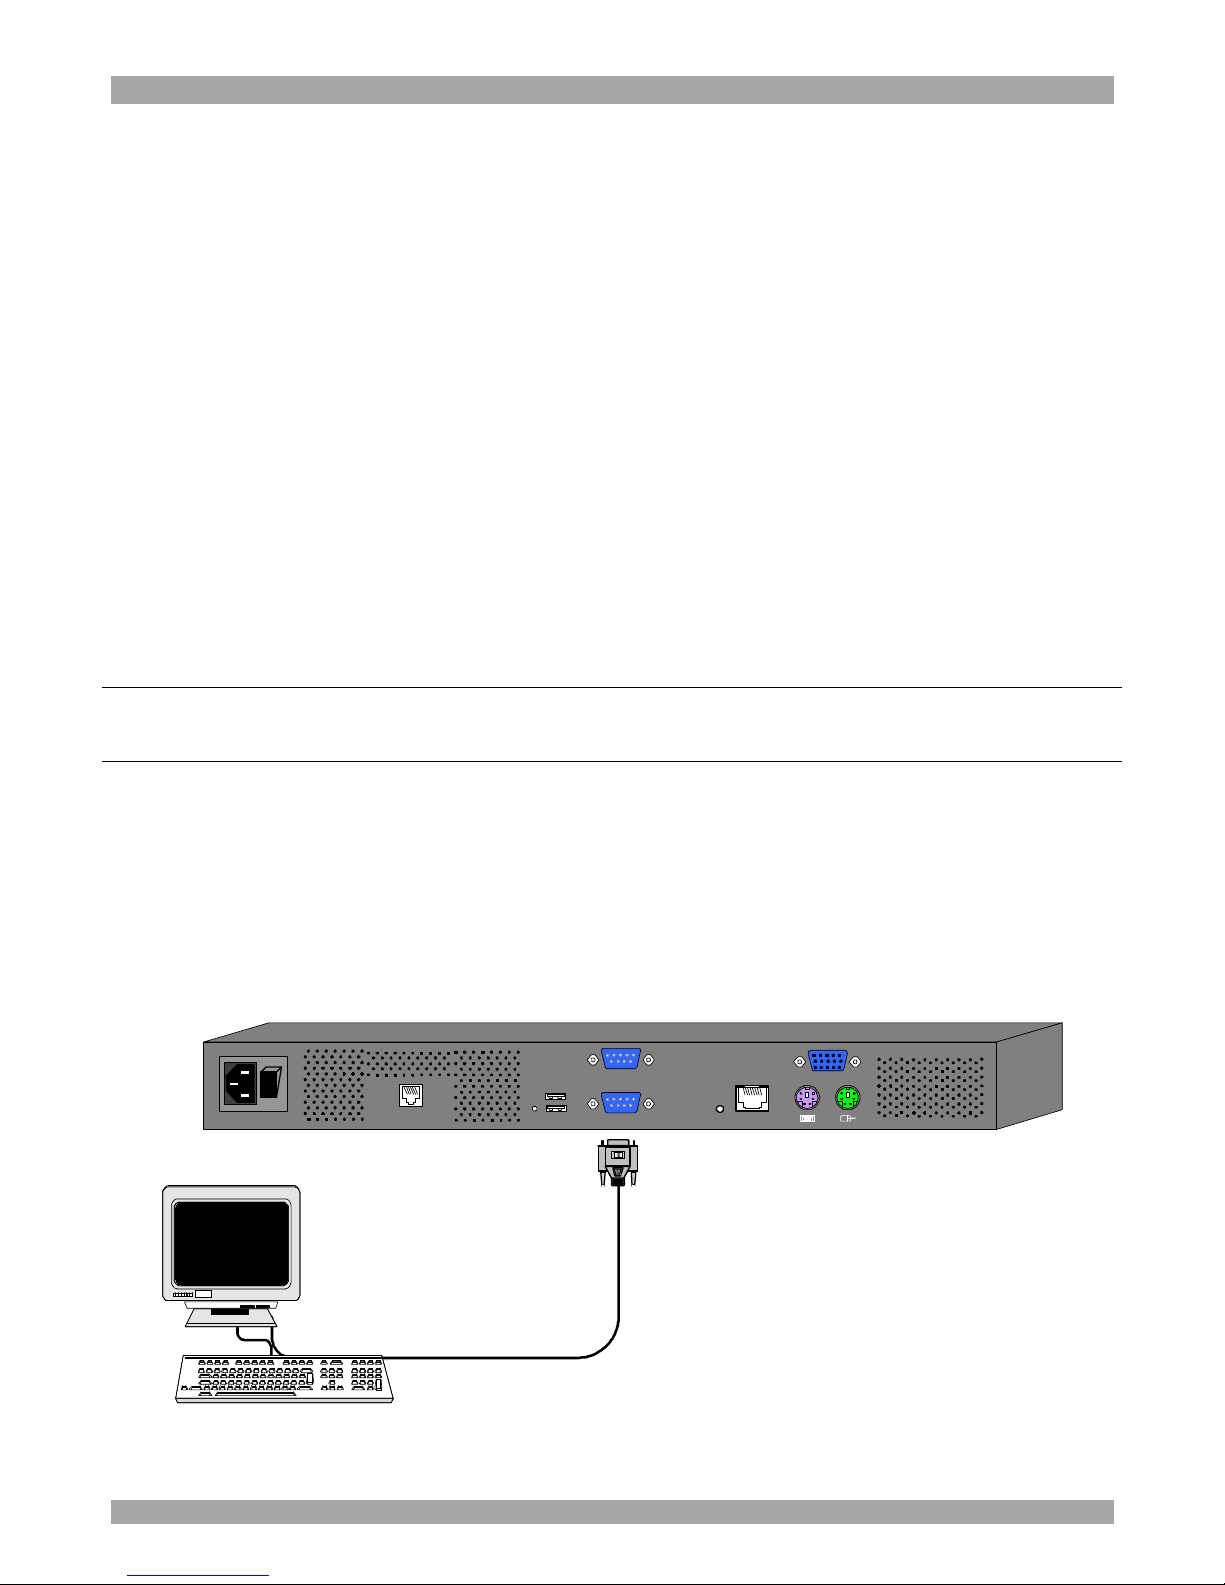
Figure 7 below illustrates the connections of the DX User IP to the DX system. See
below for more details.
SD
P110
CAT5 cable
LAN / WAN
To DX Central
User port
User over IP
Ethernet
cable
POWER
100-240 VAC 50/60 Hz
www.minicom.com
ETHERNET
SERIAL
I
0
SYSTEM
USBTERMINAL
USER
RST
Figure 7 DX User IP connections
12. Connecting the DX User IP to the Wan/LAN
The Ethernet connector on the DX User IP can be used either for a 100 Mbps
100BASE-TX connection or for a 10 Mbps 10BASE-T connection. The adapter
adjusts to the appropriate operation mode automatically.
To connect to a LAN/WAN, connect an Ethernet cable as illustrated in Figure 7. For
the Ethernet - RJ 45 connector pin-out see Appendix C.
Page 11
USER GUIDE
10
10 Mbps connection
For 10BASE-T Ethernet networks, the Fast Ethernet adapter uses Category 3, 4, or 5
UTP/FTP cable. To establish a 10 Mbps connection, the cable must be connected to
a 10BASE-T hub. Ensure the cable is wired appropriately for a standard 10BASE-T
adapter. Align the RJ-45 plug with the notch on the adapter's connector and insert it
into the adapter's connector.
100 Mbps connection
For 100BASE-TX Fast Ethernet networks, the DX User IP supports Category 5 UTP
cabling. To establish a 100 Mbps connection, the cable must be connected to a
100BASE-TX hub.
1. Make sure that the cable is wired appropriately for a standard 100BASE-TX
adapter.
2. Align the RJ-45 plug with the notch on the adapter's connector and insert it into
the adapter's connector.
Note! The UTP/FTP wire pairs and configuration for 100BASE-TX cable are
identical to those for 10BASE-T cable when used with Category 5 UTP/FTP cable.
13. Local User
To use the DX User IP locally, connect a keyboard, video and mouse as illustrated
in Figure 7.
14. Connecting an RS232 terminal
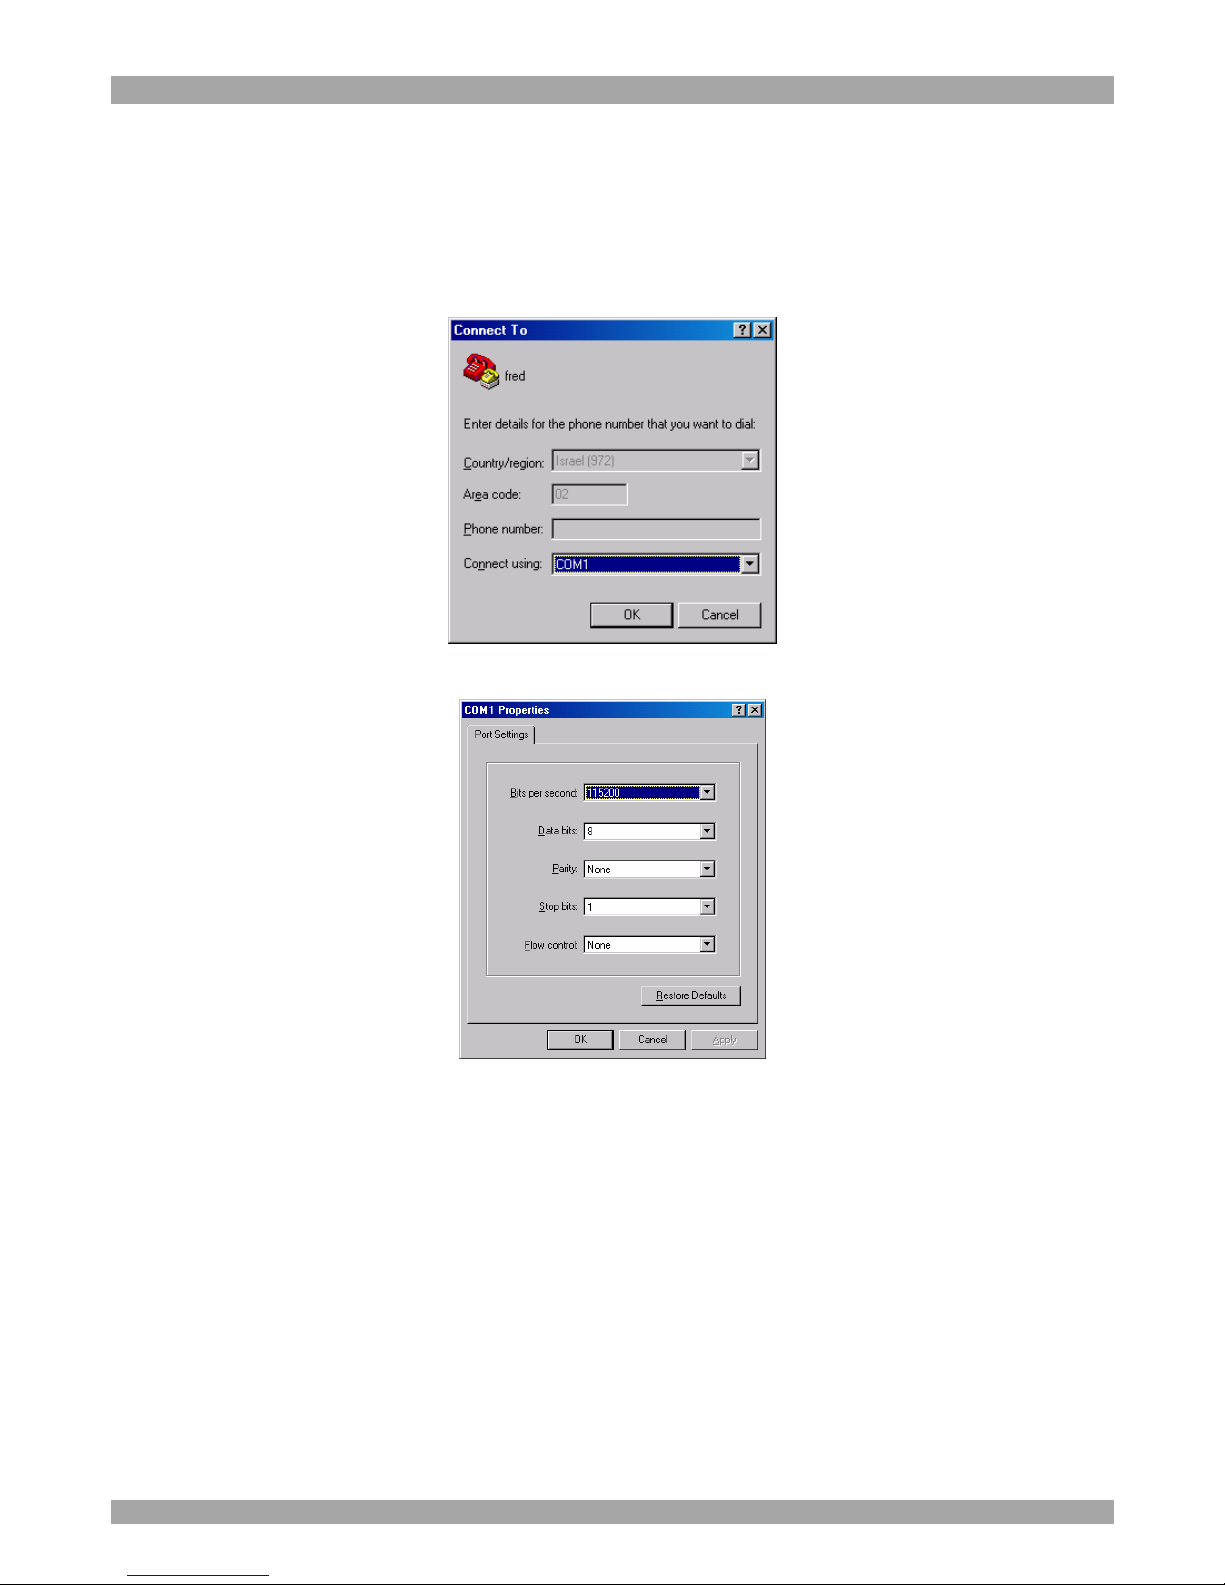
Connect the RS232 terminal to the DX User as illustrated in the figures below.
To
Terminal
port
Terminal
VT420
ContrastBright
digital
Login: admin
Password_|
POWER
100-240 VAC 50/60 Hz
www.minicom.com
ETHERNET
SERIAL
I
0
SYSTEM
USBTERMINAL
USER
RST
Figure 8 Connecting the RS232 terminal
For the Serial SUB-D 9 connector pin-out see Appendix C.
Page 12

DX USER IP
11
15. Order of powering on
Connect the DX User IP to the power supply using the power cord provided.
The devices and servers can be powered on at any time. Power on the DX
components in the following order:
1. The primary and secondary level DX Centrals.
2. The DX User and DX User IP units.
16. Configuring the system
The DX User IP's communication interfaces are based on TCP/IP, and it comes
configured with the values listed below.
· DHCP - disabled
· IP address - 192.168.1.22
· Net mask - 255.255.255.0
· Default Gateway - None
If the above values are unsuitable, you can change the IP configuration. This can be
done in a number of ways as set out below. We recommend configuring a fixed IP
address to the DX User IP. You can find the MAC address on the IP Extender's
underside.
Configuration via DHCP server
If you activate DHCP, DX User IP tries to contact a DHCP server on the network.
The DHCP server provides a valid IP address, gateway address and subnet mask. If
the DHCP connection fails on boot up, DX User IP boots with the last known IP
configuration.
Configuration via local console
There are 3 ways of configuring via local console:
· Serial connection
· Ethernet Crossover connection
· IP Device Setup utility
Via Serial connection
Connect the NULL modem cable to the computer and to DX User IP’s Serial 1 port.
Use any Terminal software to connect to DX User IP. The screen shots below use
Windows Hyperterminal.
Page 13
USER GUIDE
12
1. Choose Start/Programs/Accessories/Communications/Hyperterminal.
2. When prompted enter a name and click OK. The Connect To box appears.
See Figure 9.
3. Fill in the connection details. Select COM 1 in the Connect using box and
click OK. The COM 1 properties box appears. See Figure 10.
Figure 9 Connect To box
Figure 10 COM 1 Properties box
Page 14
DX USER IP
13
4. Set the port settings to the following values:
· Bits/second - 115200
· Data bits - 8
· Parity - None
· Stop bits - 1
· Flow Control - None
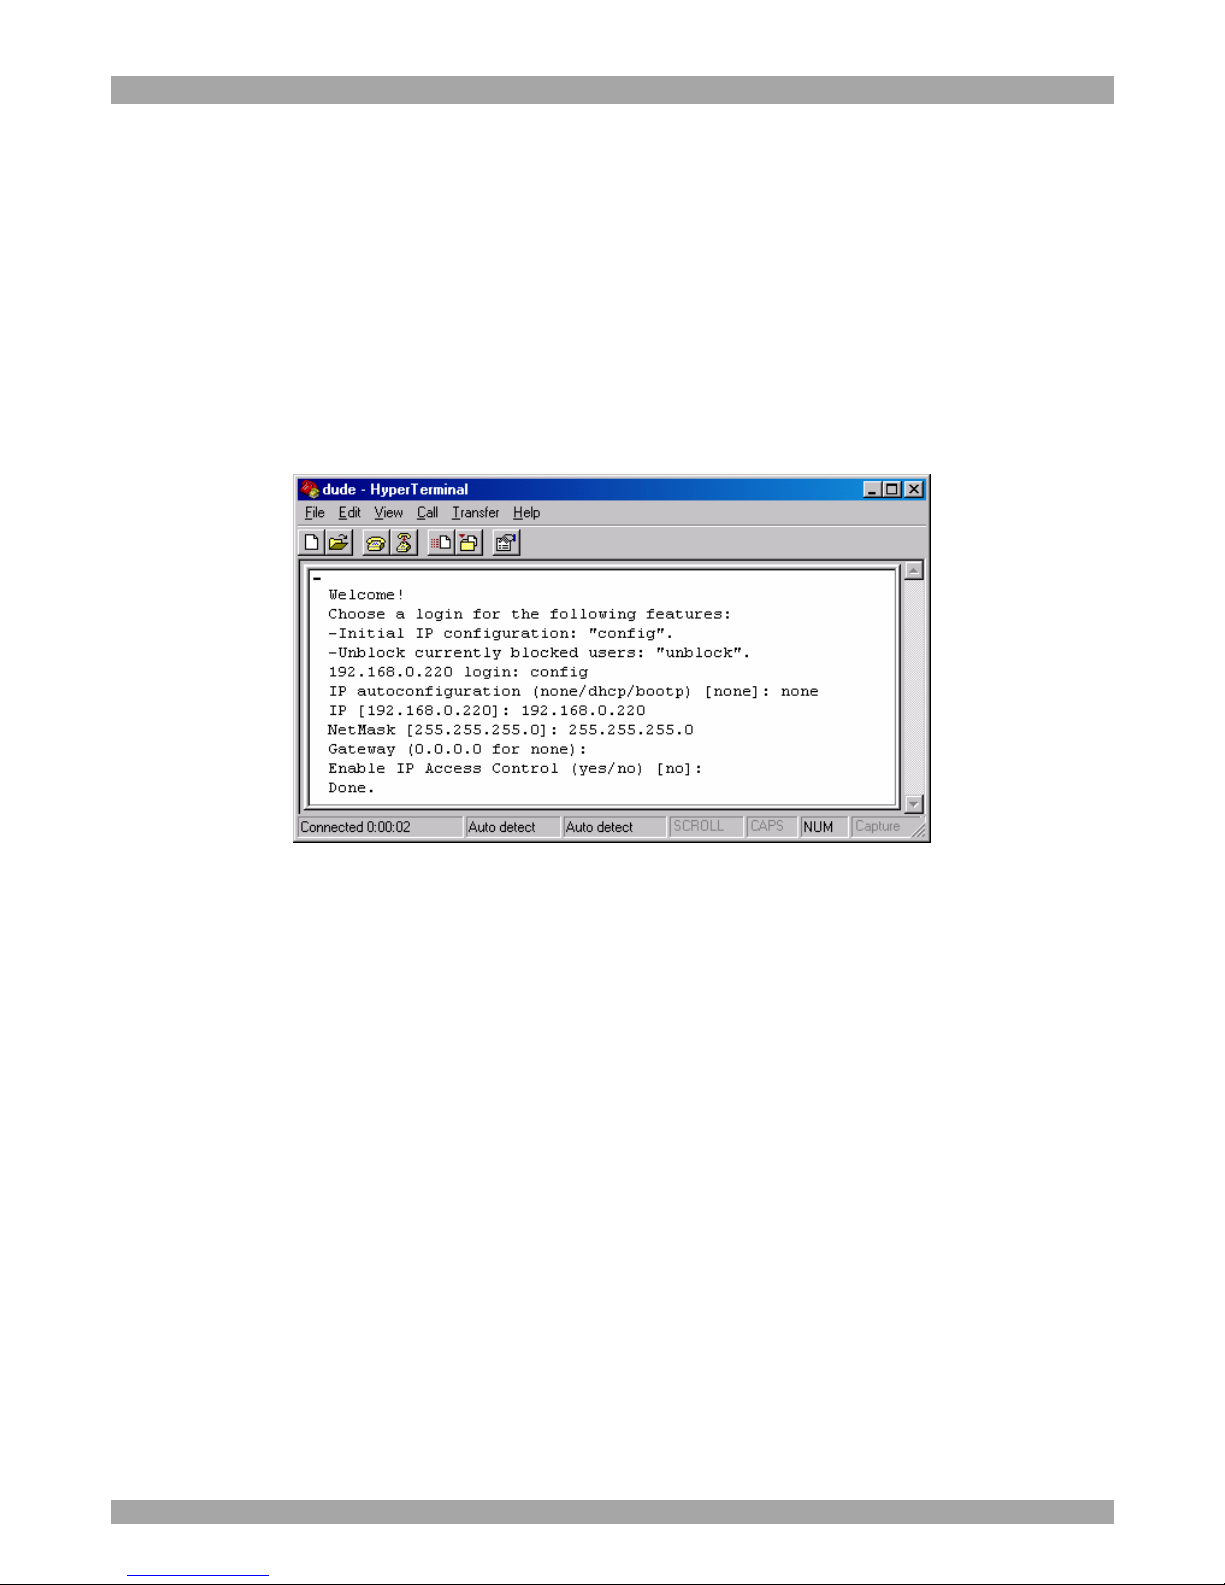
5. Click OK. The Hyperterminal appears. See Figure 11.
Figure 11 The Hyperterminal
6. Press Enter. Some device information and a prompt appear.
7. Type config and press Enter. Configuration questions appear. DHCP must be
disabled. You can change the IP address, net mask and default gateway. Pressing
Enter without entering values keeps the default values. To contact DX User IP
from outside the LAN, configure a gateway. To remove an already configured
gateway, type 0.0.0.0.
The last question – enable IP access control – concerns switching IP packet
filtering on or off. This can re-enable access to DX User IP after an incorrect IP
access configuration has been activated. Page 44 has more information on IP
access control.
8. Confirm the settings. DX User IP resets the configuration.
Page 15
USER GUIDE
14
Via Ethernet Crossover connection
Connect an Ethernet Crossover cable to the DX User IP and to the computer backto-back, the DX User IP is configured to 192.168.1.22, configure your computer to
use a static IP in that range. For example 192.168.1.10. Open your browser and type
192.168.1.22. Configure the device via the WEB interface.
Via the IP Device Setup utility
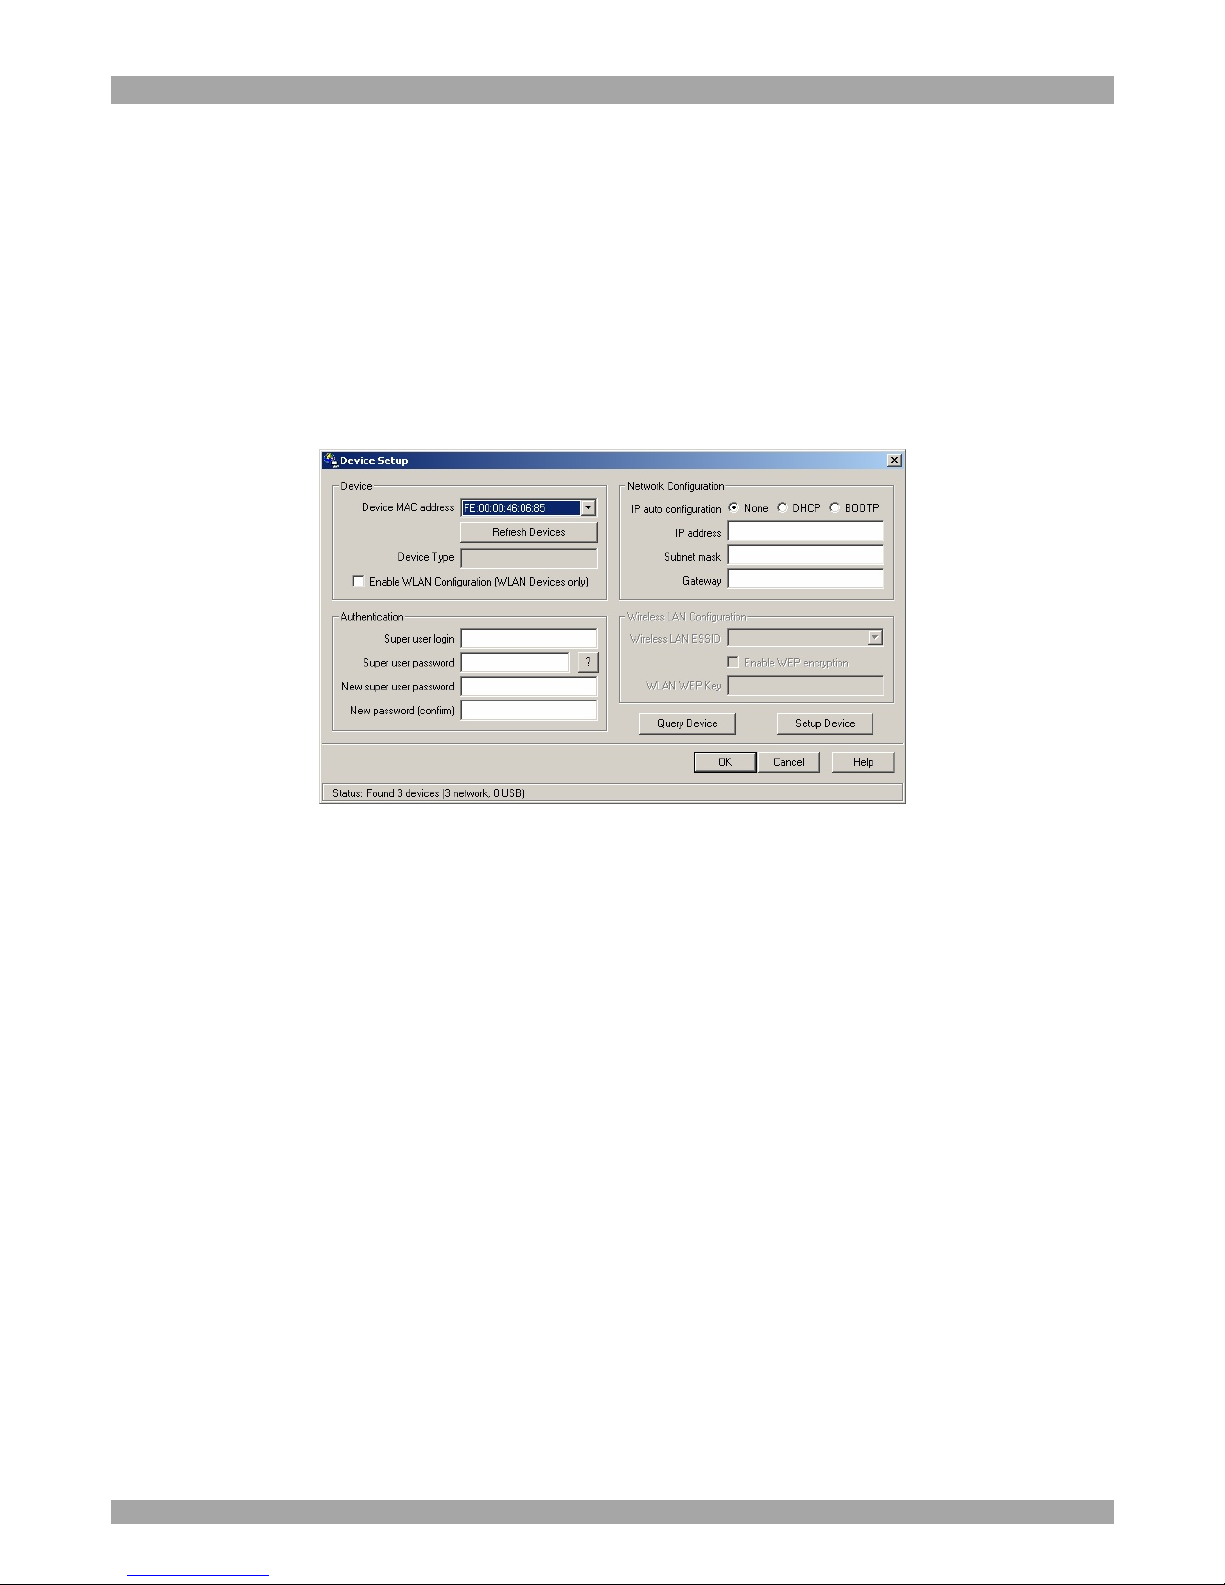
The IP Device Setup utility is located on the supplied CD under Customer
Support/Utilities. Click the IP Device Setup Figure 12 appears.
Figure 12 IP Device Setup utility
The utility locates DX User IP devices on the network and configures them to use a
static IP / DHCP / or Bootp configuration. You can also configure a new password
for the IP device. All other configurations must be done via the Serial / Web
interface methods.
17. The DX User IP system interface
Operate the DX User IP system through one of the following interfaces:
1. HTTP/HTTPS - Any standard Web browser. Depending on the Web browser, you
can access the DX User IP card using the unsecured HTTP protocol or, in case the
browser supports it, the encrypted HTTPS protocol. We recommend using HTTPS
when possible.
3. Telnet - Use a standard Telnet client to access an arbitrary device connected to
one of the DX User IP's serial ports via a terminal mode.
2. SNMP (Simple Network Management Protocol) - Any standard SNMP client can
use this protocol.
All the above interfaces are accessed using the TCP/IP protocol. They can thus be
used via the built-in Ethernet adapter or modem.
Page 16
DX USER IP
15
This section deals with the HTTP interface. The other two interfaces are explained
on pages 19 and 45.
The Web browser must come with a Java Runtime Environment version 1.1 or
higher. Without Java support, you can still maintain the remote host system using
the administration forms displayed by the browser.
We recommend the following browsers for an unsecured connection:
· For Windows 98, ME, 2000 and XP, Microsoft Internet Explorer 5.0 or
higher
· For Windows 98, ME, 2000, and XP, Linux and other UNIX like operating
systems Netscape Navigator 7.0 or Mozilla 1.0
To access the remote host system using a securely encrypted connection you need a
browser that supports the HTTPS protocol. Strong security is only assured by using
key length of 128 Bit. We recommend the following browsers.
· Microsoft Internet Explorer version 5.5 or higher with Windows 98, ME,
2000 and XP
· Netscape Navigator 7.0 or Mozilla 1.0 with Windows 98, ME, 2000, and
XP, Linux and other UNIX like operating systems
18. Logging in
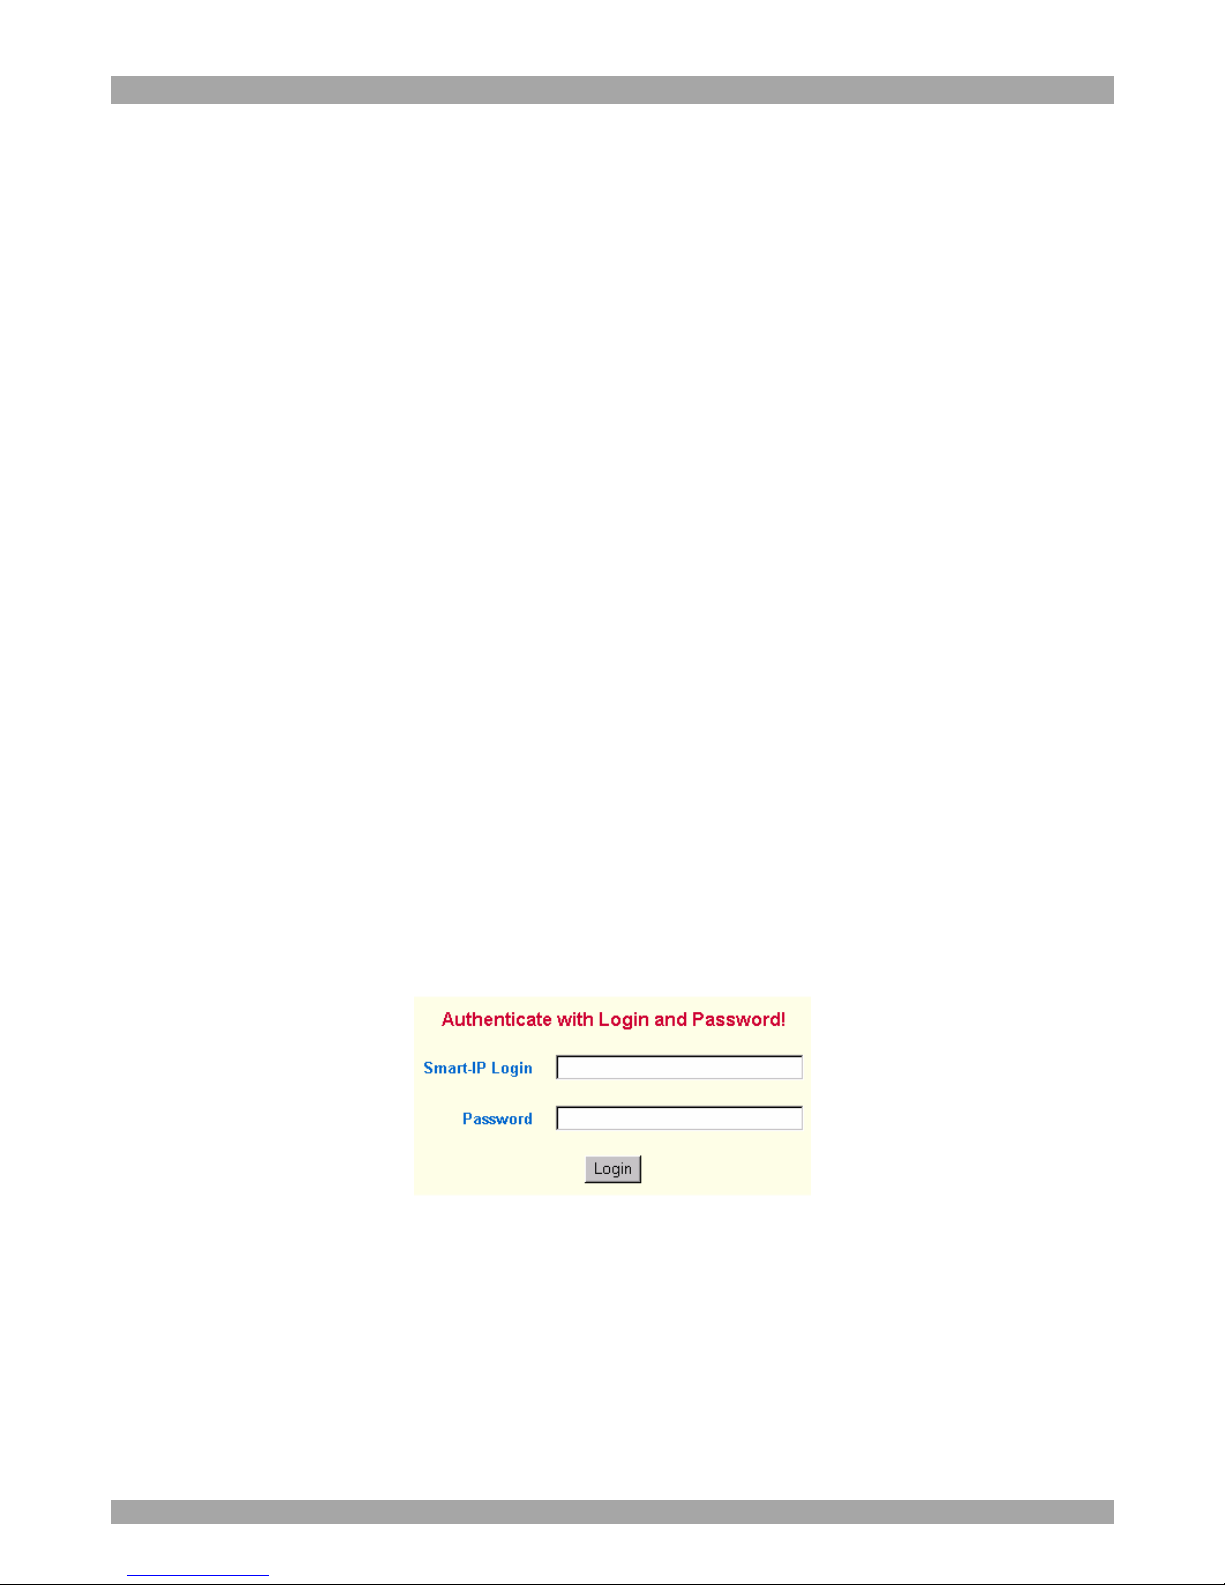
Type the IP address into the Web browser. Either http://192.168.1.22 for an
unsecured connection. Or https://192.168.1.22 for a secured connection. The Login
screen appears. See Figure 13
Figure 13 The Login screen
Initially there is only one user who has unrestricted access to all DX User IP
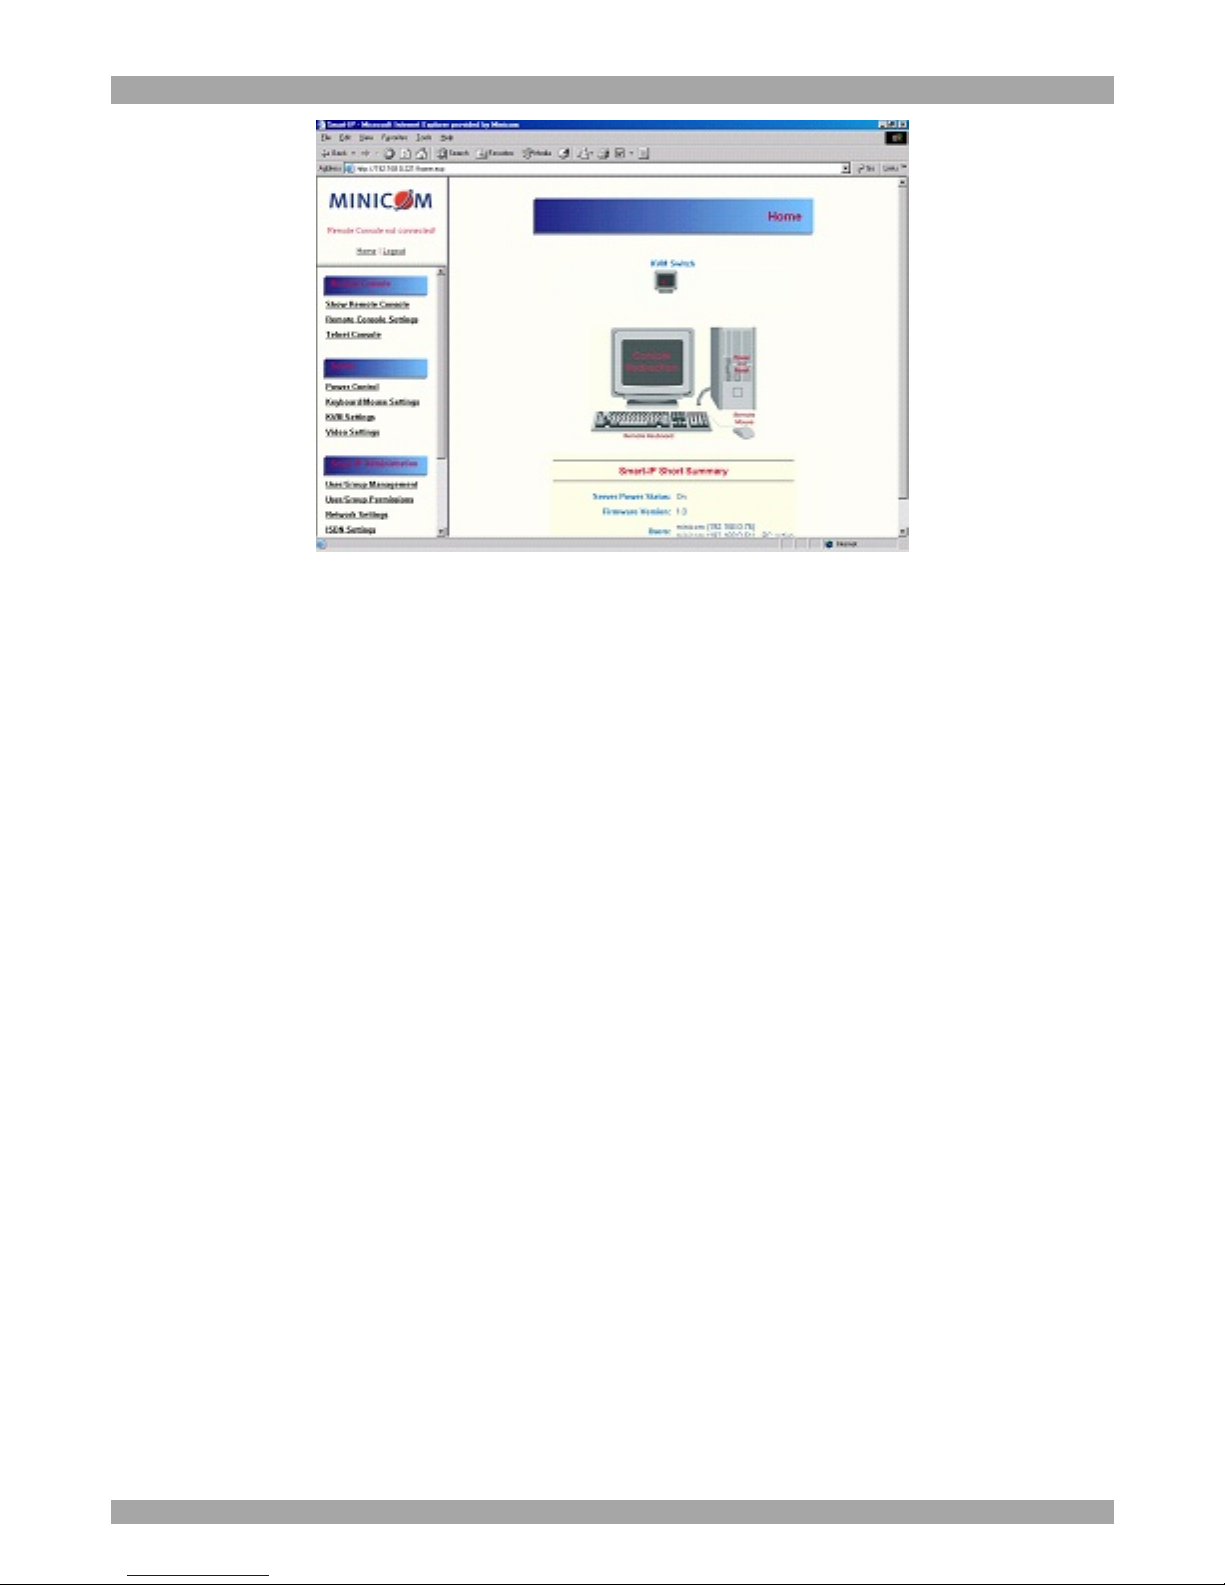
features. Type the default Login name ‘super’ and Password ‘smart’ and click
Login. The DX User IP Home page appears. See Figure 14.
Page 17
USER GUIDE
16
Figure 14 The DX User IP Home page
19. Timeout
After half an hour of non-activity the system automatically logs out. Clicking
anywhere on the screen will lead back to the Login screen.
20. The Work area
The Work area has a short summary about your DX User IP.
· Server Power Status - On or Off
· Firmware Version - installed on your DX User IP
· Device management – self managed or connected to a management device
· Users - all currently logged in users and IP addresses. (Note: when
connected through a proxy server the IP address will be that of the proxy
server).
RC – Remote Control open. Exclusive – Exclusive mode. Idle – time since
last activity.
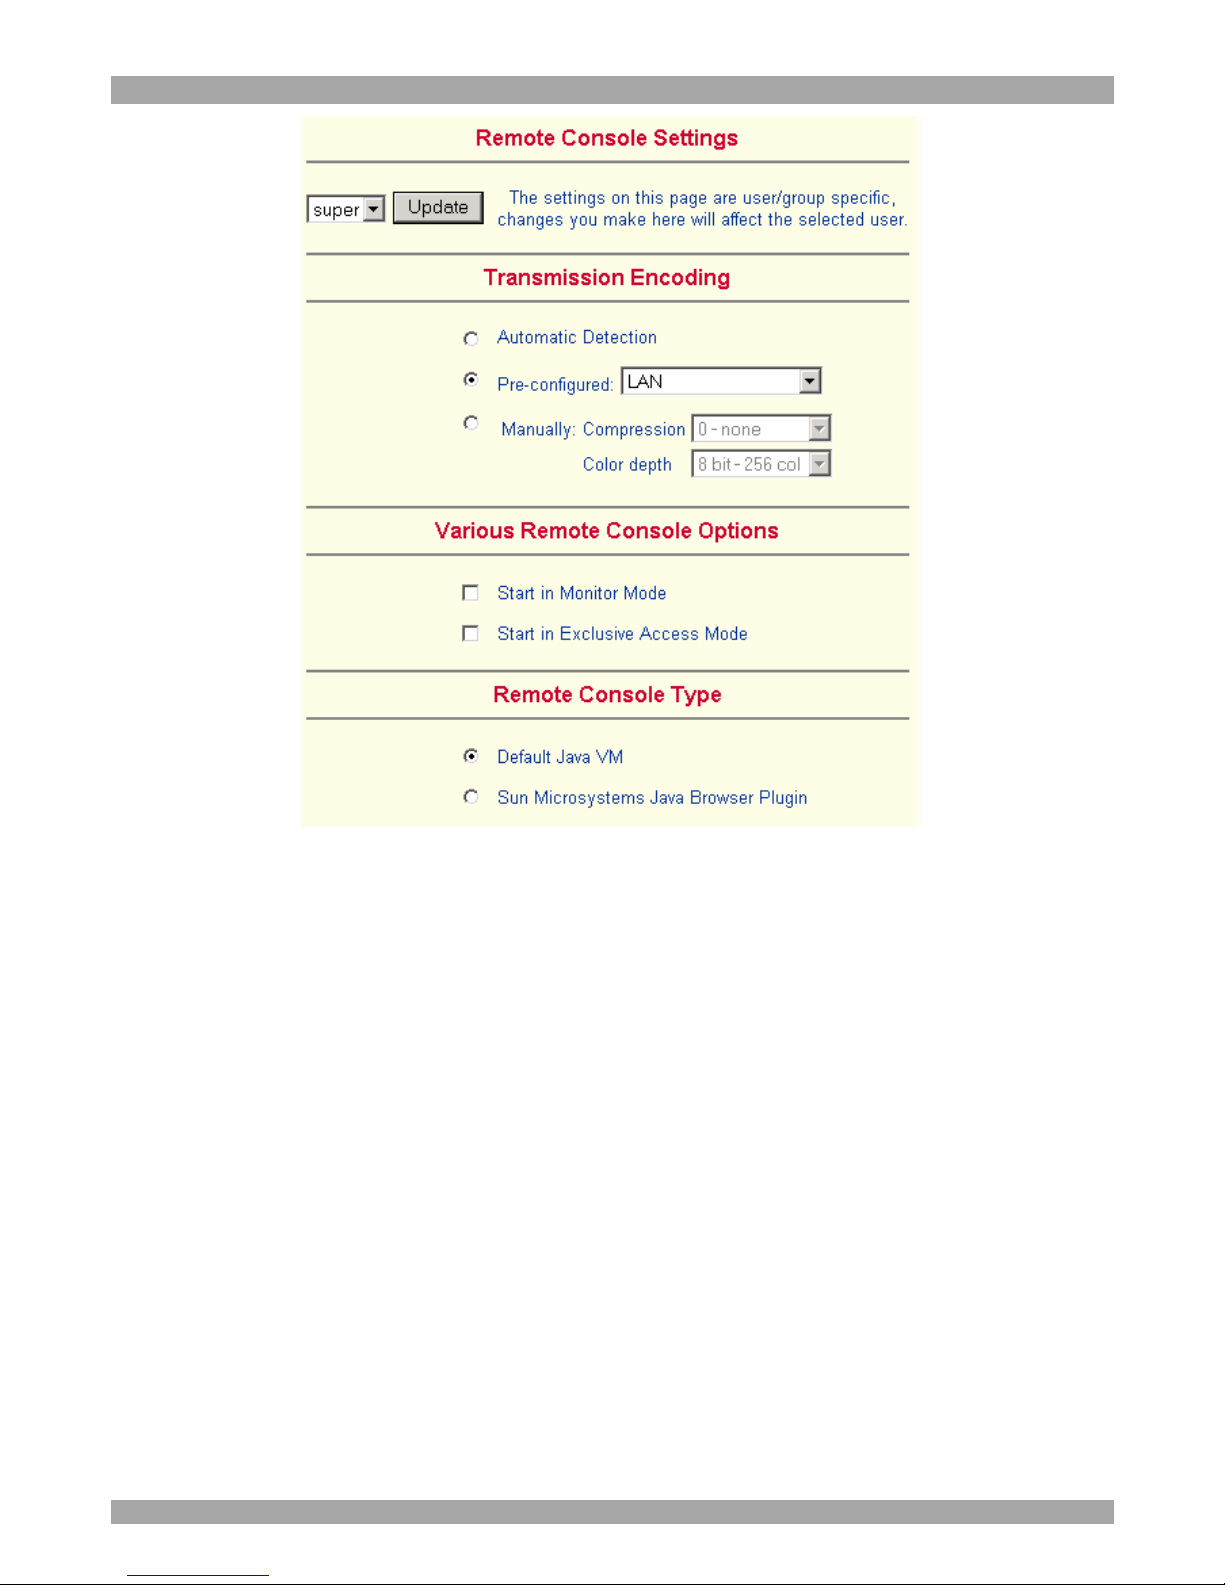
21. Remote Console Settings
Before connecting to the remote console you must configure all required settings. To
do so, from the DX User IP Menu click Remote Console Settings. The Remote
Console Settings window appears. See Figure 15.
Page 18
DX USER IP
17
Figure 15 The Remote Console Settings
All settings are user specific. Choose a user from the Drop-down menu.
Transmission Encoding
Transmission Encoding optimizes the speed of the remote screen depending on the
number of parallel users and the bandwidth of the connection line.
Automatic Detection - The encoding and the compression level is determined
automatically from the available bandwidth and the current content of the video
image.
Pre-configured – Choose the connection method.
Manually: Compression - For low bandwidth connections. 1 is the lowest and 9 the
highest compression rate. The DX User IP takes time to compress the data. This
option shouldn't be used when many users want access simultaneously.
Color Depth – The lower the depth the faster the speed.
Page 19

USER GUIDE
18
Various Remote Console Options
Start in Monitor Mode - Check this option to open the Remote Console window in
read only mode. (No keyboard or mouse transferred to Host computer).
Exclusive Access- Enables the Exclusive Access mode at Remote Console startup.
This forces the Remote Consoles of all other users to close. No one can open the
Remote Console until this user disables the Exclusive Access or logs off.
Remote Console Type
Default Java VM – Uses your Browser’s default Java Virtual Machine. This may
be the Microsoft JVM for Internet Explorer or Sun JRE if it is configured this way.
Use of the Sun JRE may also be forced (see below).
Sun Microsystems Java Browser Plugin - Uses Sun Microsystems Java Browser
Plugin - Sets the administration system’s Web browser to use the JRE (Java
Runtime Environment) of Sun Microsystems. JRE is used to run the code for the
Remote Console window, which is actually a Java Applet. If the Java plug-in is not
installed on your system, it will be downloaded and installed automatically. The
download is about 15 Mbytes. JRE provides a stable and identical Java Runtime
Environment across different platforms. The Remote Console software is optimized
for this JRE version and offers wider range of functionality when run in SUN's JRE.
Tip! The software is on the supplied CD. So, if you have a slow Internet connection,
pre-install the JRE on your administration machine.
ActiveX control - Use an ActiveX control instead of a Java applet - This is the
ActiveX-Control of the KVM Vision Viewer - an application available separately.
You must install the viewer on your local system. See the Viewer Guide for further
information. This option only works with Microsoft Internet Explorer on Win32
Systems. KVM Vision Viewer is on the supplied CD.
Mouse hotkey - Used for fast mouse synchronization in Double Mouse mode and to
free the grabbed mouse when in single mouse mode.
Remote Console Button Keys - Button Keys simulate keystrokes on the remote
system that cannot be generated locally. For example `Control + Alt + Delete' on
Windows and DOS or `Control + Backspace' on Linux.
Define a new Button Key as follows:
Type the required keys e.g. Ctrl+Alt+Delete. The + sign means that the keys are
pressed together. The – sign means the keys are pressed sequentially.
The * sign inserts a pause with a definable duration. See page 25.
Page 20

DX USER IP
19
To require a confirmation request before keystrokes are sent, write confirm at the
start. E.g. confirm Ctrl+Alt+Delete.
For a list of key codes and aliases DX User IP recognizes, refer to Appendix B on
page 63.
Press Apply for the changes to take effect.
Home Page Refresh – Refreshes the DX User IP Home page, so that direct Smart
IP Links updates their status.
22. Telnet Console
The Telnet Console offers a Java applet for the Telnet protocol to open a connection
to DX User IP. Its main use is the pass through option for the Serial port 1 explained
on page 38. The Telnet access has to be enabled in the security settings as well, see
page 44. It is also possible to connect with a standard Telnet client.
Access via Telnet
Connect via a standard Telnet client using DX User IP’s Telnet server. Use it for
passthrough access to a device connected to Serial port 1. Connect any serial device,
which offers terminal access via its Serial port and access it using the Telnet
interface. Set the Serial port settings according to the requirements of the device –
explained on page 39.
Connect to DX User IP in the usual way required by the Telnet client, e.g. in a
UNIX shell: telnet 192.168.1.22 – (The IP address has been replaced by the one
that is actually assigned to DX User IP).
Type a username and password when prompted. These are identical to those of the
Web interface. The user management of the Telnet interface is controlled just like
the Web interface.
Once logged in, the command line appears to type management commands.
The interface supports both the command line and terminal modes. The command
line mode is used to control or display some parameters. In terminal mode the
passthrough access to serial port 1 is activated (if the serial settings were made
accordingly). All inputs are redirected to the device on serial port 1 and the answers
appear on the Telnet interface.
Telnet server commands
Click help to list the following commands:
cls - Clears screen
Page 21

USER GUIDE
20
quit - Logs out current user and disconnects from the client.
version - Shows all available version numbers
terminal - Starts the terminal passthrough mode for serial port 1. The key sequence
`<esc> exit' switches back to command modus.
23. Status via IPMI
The Status via IPMI function shows the current values and the min/max-thresholds
of all fans, temperatures and voltages existing in the host system. Change the
thresholds by editing the values and pressing Apply.
The first time you call this page, it can take up to two minutes until the sensor data
appears.
Note: If IPMI is disabled, Status via IPMI and System Log via IPMI are not
available (the menu options are not visible).
24. Event Log via IPMI
The Event Log via IPMI accesses the SEL (System Event Log) repository and reads
every entry sequentially. The first time you use this function after starting DX User
IP the complete repository has to be read, what may take 1 or 2 minutes.
After reading all entries, DX User IP displays them with their time, sensor and
description in accordance with the filter settings. You have the choice between
several pre-settings (i.e. last day, last week) or an exact declaration of the start and
the end date.
Once you change the filter settings, click `Update' to update the shown entries. If the
Get sensor names box is checked, all sensor IDs are shown with their respective
names.
The time shown in the log entries is the SEL time, meaning it is independent of the
system time. The SEL time is shown at the top of the log table. Click Clear Event
Log to delete all entries in the SEL repository.
25. File transfer – Virtual Floppy
This feature does not currently work.
26. Power Control
The appearance of the power control window depends on the power control option
connected to DX User IP and on the currently activated setting (discussed on page
40). There are 4 options available: Power control disabled. Internal power. External
power. Power control via IPMI.
Page 22
DX USER IP
21
Internal power
Once connected, enable the internal power option using the Serial Port settings on
page 40.
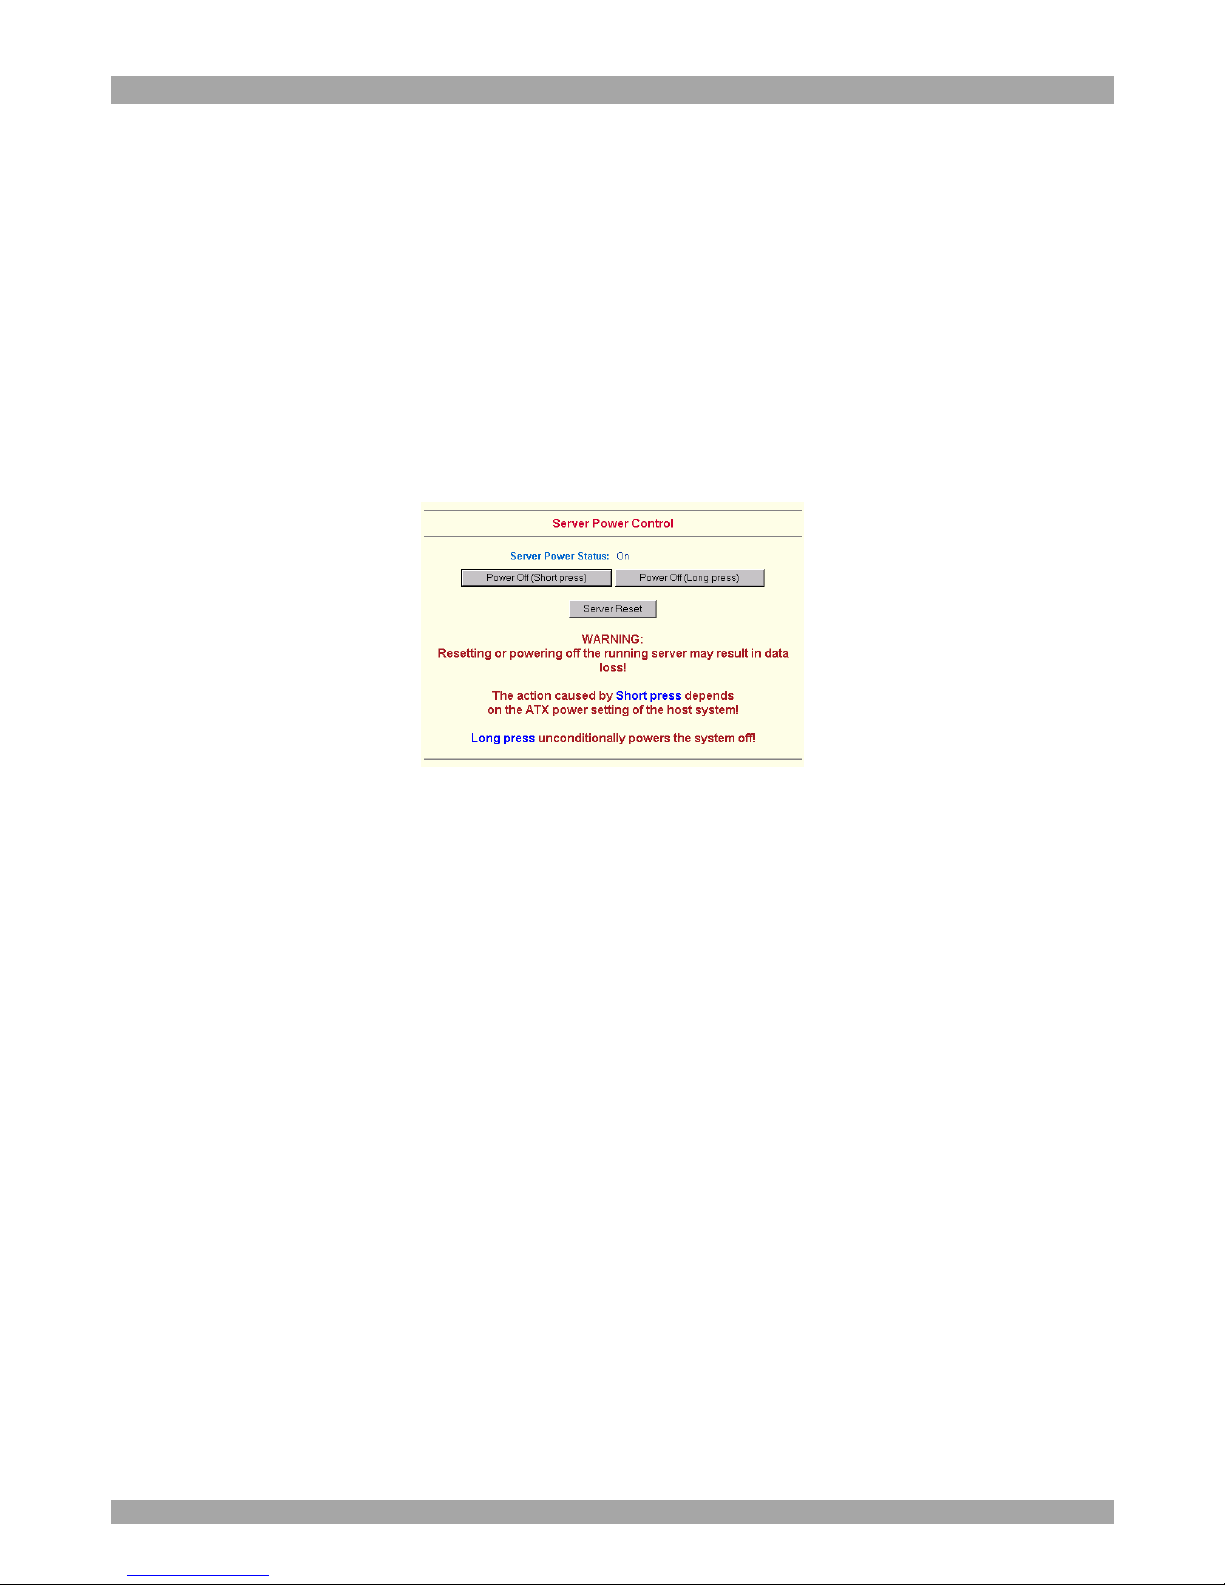
The Power Control panel enables access to the most important external buttons of
your host system. These buttons are the reset and the ATX power button.
The power button represents the ATX power button on your host system. It is used
to switch the power supply on and off. The ATX power button has 2 operation
modes: a short press, and a press of about 4 seconds. As shown in Figure 16 these
two modes are supported separately. The 2 operation modes are explained in the
next section.
Figure 16 Internal Power Control
Note: The prerequisite for the remote power/reset button to work is a correct
installation of DX User IP.
The Remote reset and power button effects are as follows:
Reset - This is similar to pressing the reset button directly on the remote system.
Pressing the reset button will result in a cold start of the system. This might damage
open files and the file system itself.
Power (short press) - A short press on the ATX button is normally caught by the
running operating system that tries to initiate a controlled shut down. Do this to
switch off the system. If this does not work try the long press button.
After pressing, the power state displayed in the administration panel won't
immediately reflect the requested change. A controlled shut down of the system may
take some minutes. Observe the action caused by your button press using the
Remote Console window or by reloading the Server Power Control panel.
Power (long press) - This will unconditionally power off the system. Even if you
have submitted a short press before, this will shut down the power supply of the host
system. The effect of the long button press can be immediately observed on the
panel that is loaded into the browser because of the button press. The power state
will be off.
Page 23
USER GUIDE
22
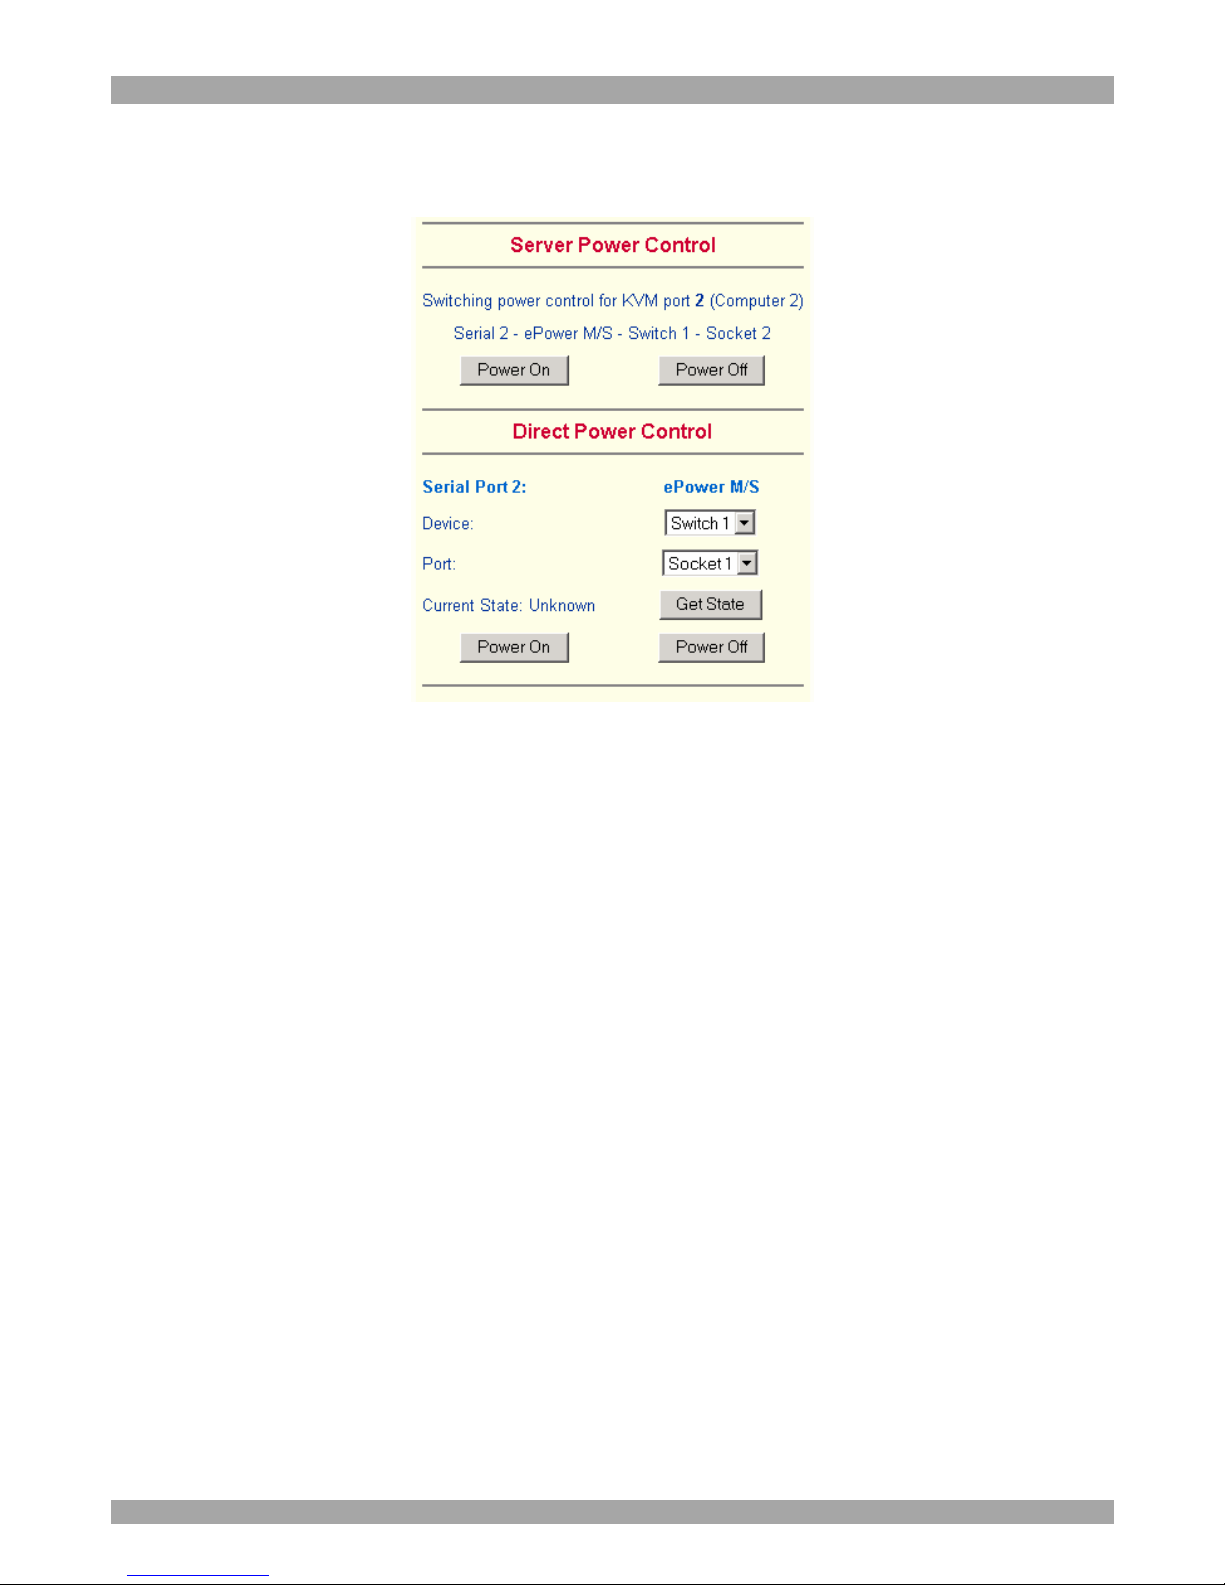
External power
If the external power option is enabled it will look like Figure 17.
Figure 17 External power control
The upper half is used to switch the power for the KVM port currently active. Use
the KVM settings – see page 24 - to assign a port of the external power control to a
KVM port. If no assignment exists, the option is disabled.
The lower half offers controls for switching each port of the external power control
directly. Select the appropriate port and decide whether to power it off or on.
If IPMI is enabled, the power control functions are performed over IPMI requests.
This may take a few seconds.
If IPMI is disabled, the power control functions are performed through the internal
or external power control options.
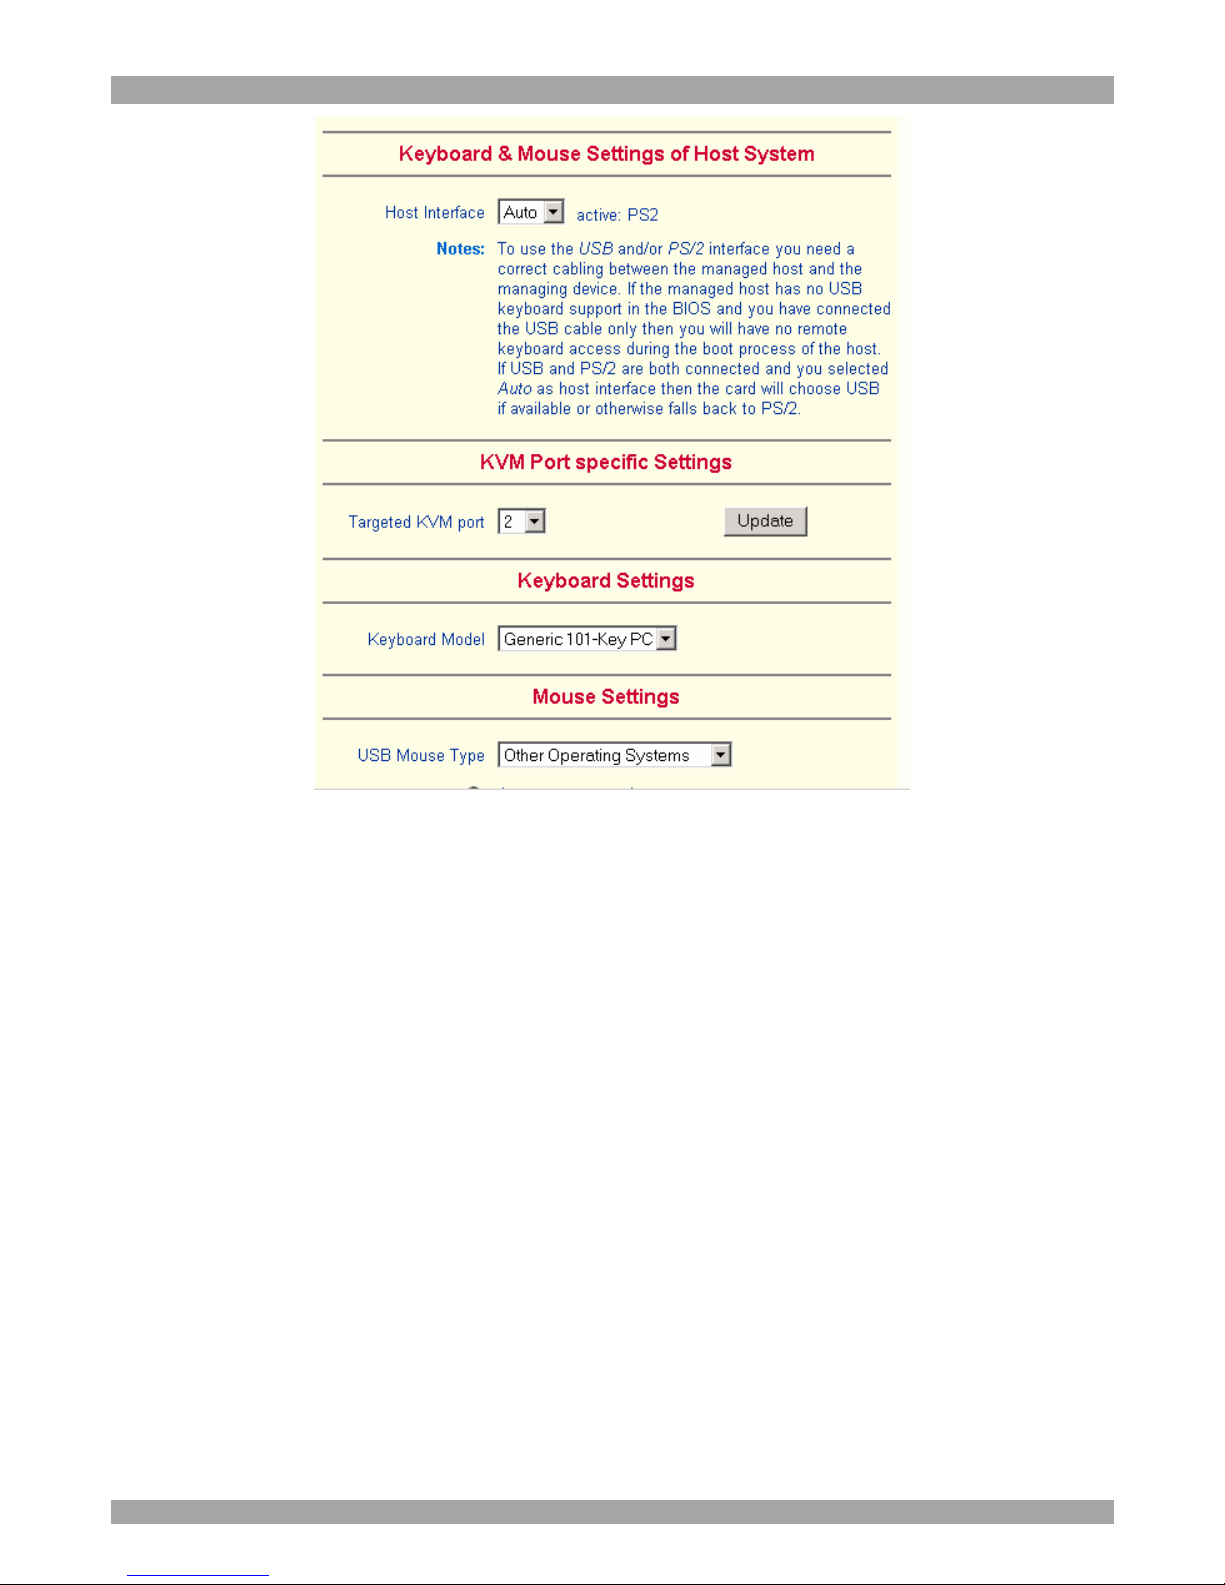
27. Keyboard & Mouse Settings
Click Keyboard & Mouse Settings. Figure 18 appears.
To make the remote keyboard and mouse work properly the DX User IP settings for
the host's mouse and keyboard types must be correct.
DX User IP supports different keyboard and mouse types.
Page 24
DX USER IP
23
Figure 18 Keyboard & Mouse Settings
The elements of the Keyboard & Mouse Settings are explained below.
Host Interface – Only Auto or PS/2 are active. USB is for future applications.
Keyboard Model - Choose the keyboard model for the chosen port. Select Generic
106-key PC when connecting to computers with a Japanese OS.
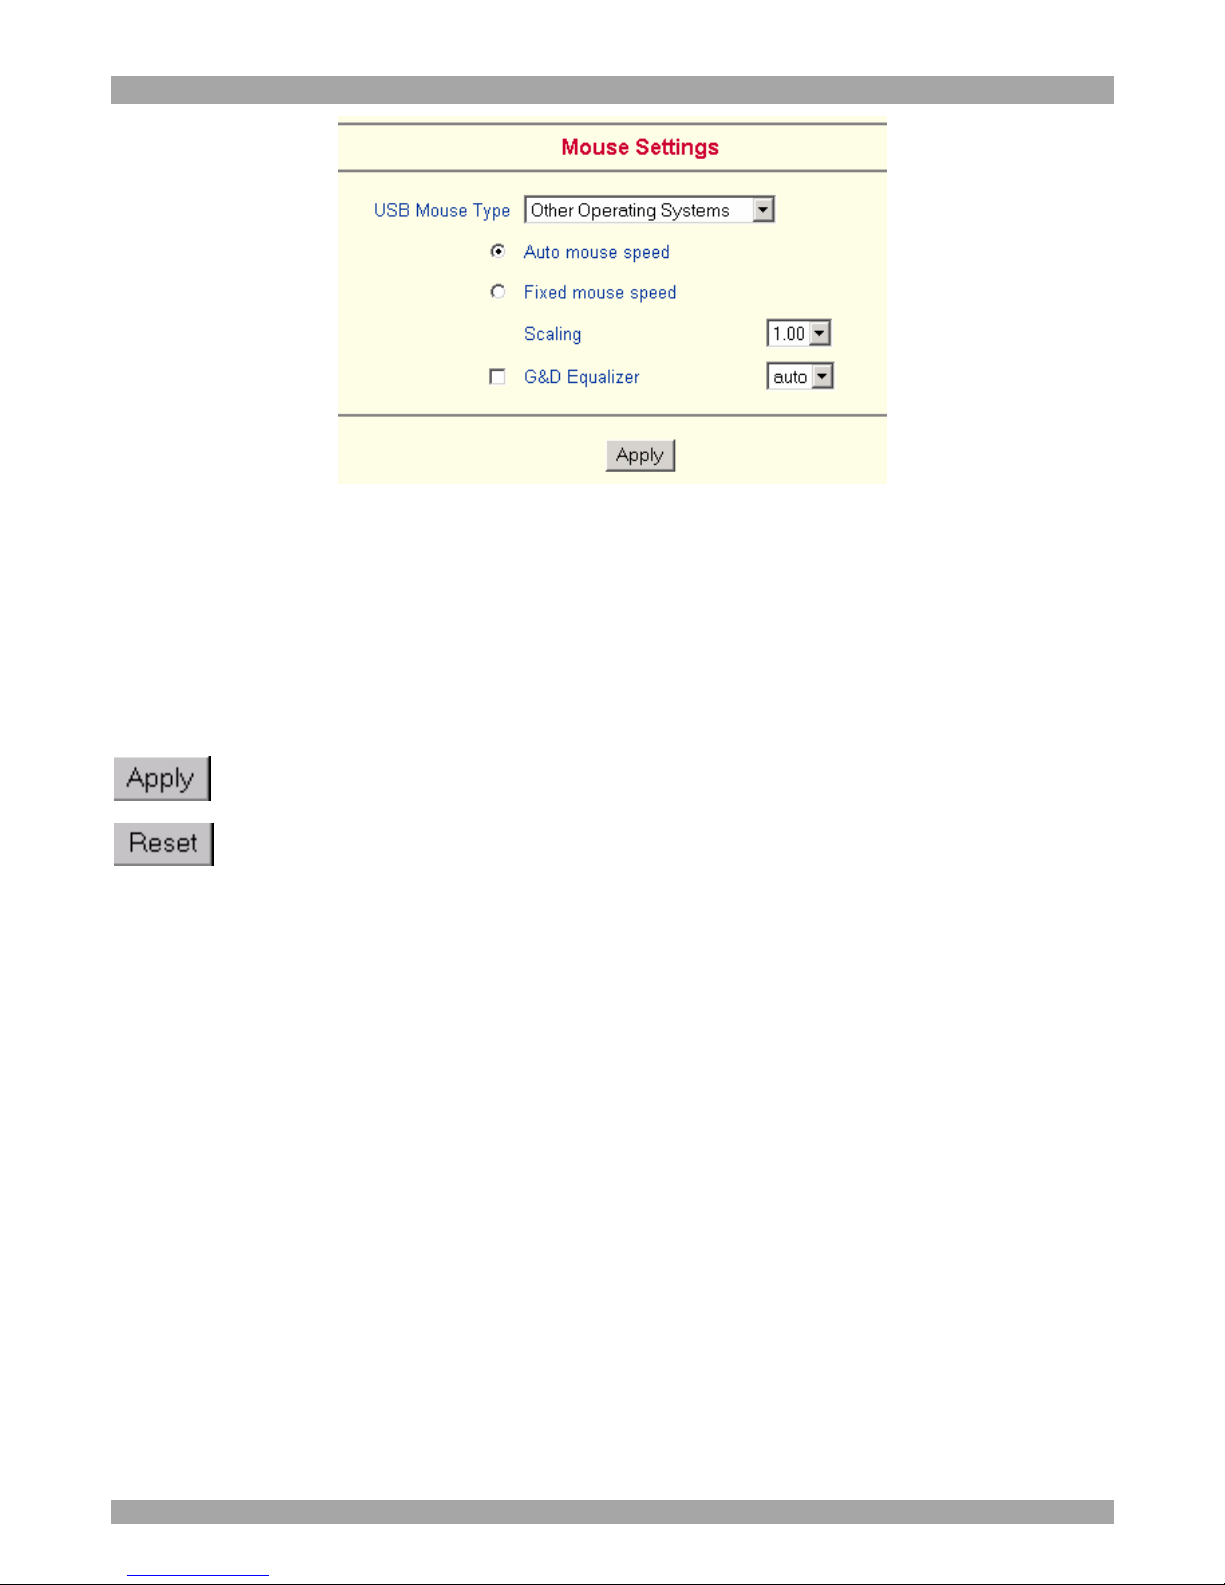
USB Mouse Type – Not active in the system, leave at the default state.
Auto Mouse speed
When Mouse Acceleration on the Host computer is enabled, check Auto Mouse
speed. We highly recommend disabling the Mouse Acceleration.
Fixed Mouse speed
When Mouse Acceleration on the Host computer is disabled, select Fixed Mouse
Speed see Figure 19. Also in the Scaling drop-down menu select 1.00.
Repeat this procedure separately for each Host computer.
Page 25
USER GUIDE
24
Figure 19 Mouse settings
G&D Equalizer – This supports the mouse synchronization for Guntermann &
Drunck KVM switches. These switches perform an internal rescaling of the mouse
movements, which cause the existing algorithm to break if DX User IP is connected
behind such a switch. This option detects the rescaling and compensates for it, so
that the mouse synchronization works. Do not select this option for the DX User IPit may disrupt the normal mouse synchronization.
- Click to apply changes
- If the keyboard or mouse seems to react irrationally click to reset the
keyboard and mouse emulation. It is like disconnecting and reconnecting the
keyboard and mouse connectors.
Adjust keyboard and mouse settings for all DX User IP ports.
28. KVM Settings
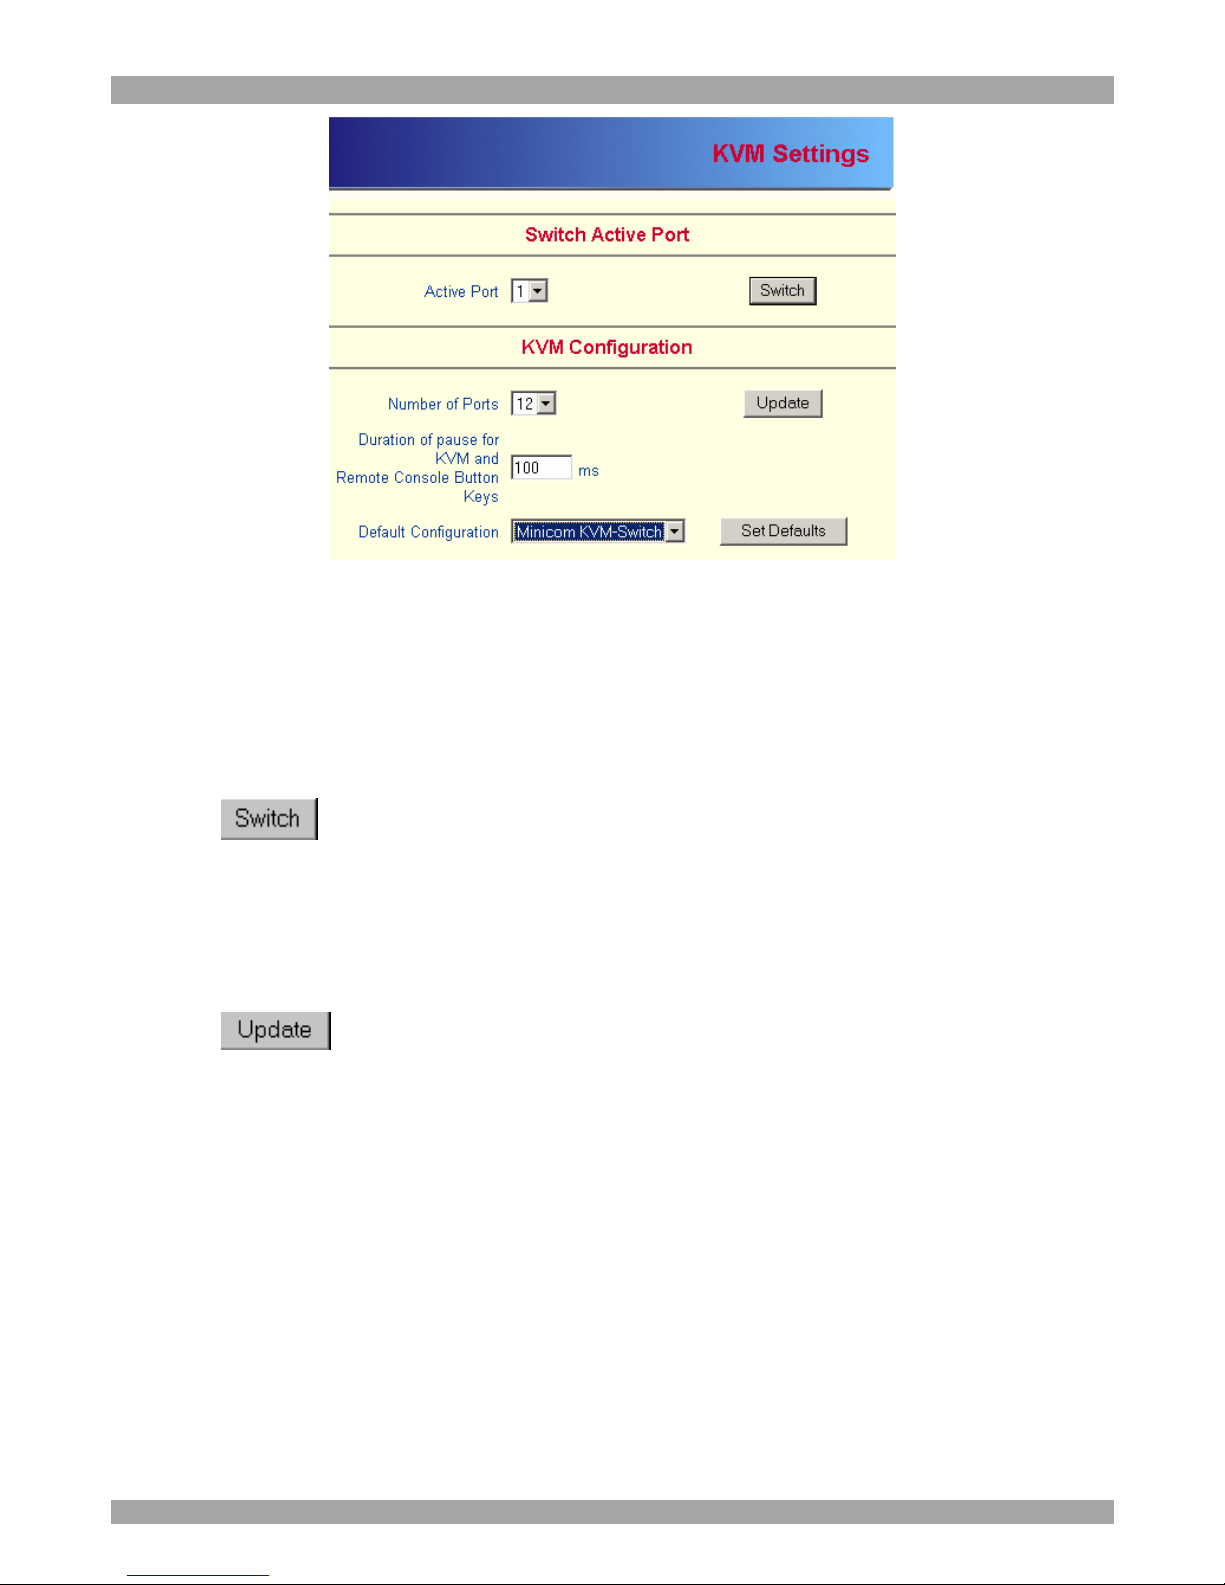
By default the DX User IP is configured for 16 ports. When you want to add more,
adjust the settings for the KVM ports. From the menu choose KVM Settings. The
KVM settings appear. See Figure 20.
Page 26
DX USER IP
25
Figure 20 KVM Settings
The elements of the KVM Settings are explained below.
Active Port
To switch to a computer:
1. Choose a number in the Active port Drop-down list.
2. Press . The computer screen appears in the Remote Console.
Number of Ports
To set the number of ports the KVM uses:
1. Choose a number in the Number of Ports Drop-down list.
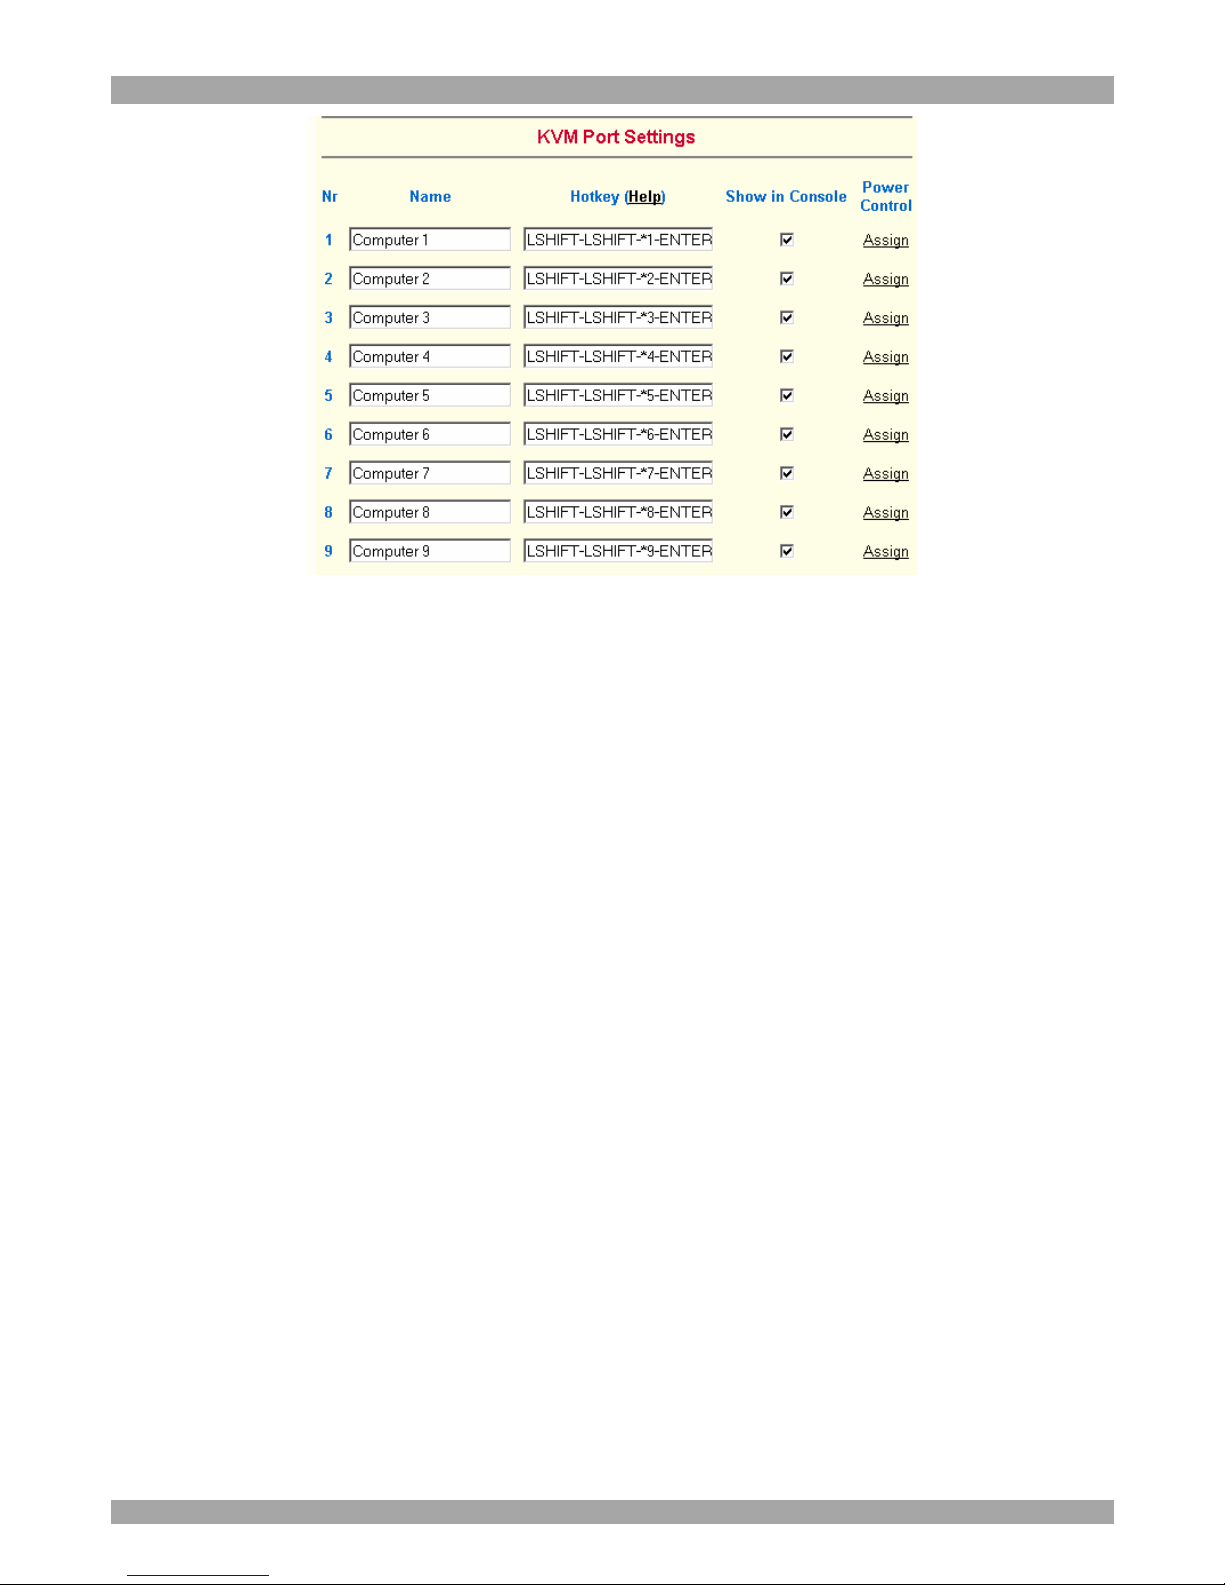
2. Press . The number of rows chosen appears in the KVM Port Settings
list. See Figure 21.
Duration of Pause
Define the pause time for KVM and Remote Console Button Keys in milli-seconds,
represented by the * symbol in all hotkeys and button keys.
Default configuration
This is explained in the section below.
Page 27
USER GUIDE
26
Figure 21 KVM Port Settings
29. KVM Port Settings
1. Assign names for each port.
2. Define hotkeys to switch to each port.
Choose either Minicom default hotkeys by selecting Minicom KVM-Switch in the
Default configuration box, and then click the Set Defaults button.
Or choose your own hotkeys. The syntax to define a new hotkey is as follows:
<keycode> [ + | - | * ] <keycode>.
For example LShift-LShift-*1-Enter. A + sign means that the keys are pressed
together. The – sign means the keys are pressed sequentially. Lshift means the left
Shift key.
The * sign inserts a pause with a definable duration. Add more than one pause if
necessary. See Appendix B on page 63 for a list of key codes.
3. Press Apply at the bottom of the page. The settings are saved.
DX User IP uses separate mouse synchronization settings - see page 58 - and videosettings - see page 57 - for each port.
Note:
It is still possible to apply OSD key combinations through the Remote Console for
switching the KVM port. However, video and mouse synchronization settings will
be shared among the ports and may be unintentionally changed for one of those
ports.
Page 28
DX USER IP
27
If an external power option is enabled it is possible to assign a port of this control
for power switching to each KVM port, see page 20.
Show in console – check this option to have a button with the port name appear on
the top of the Remote console. Click the button to switch to that computer.
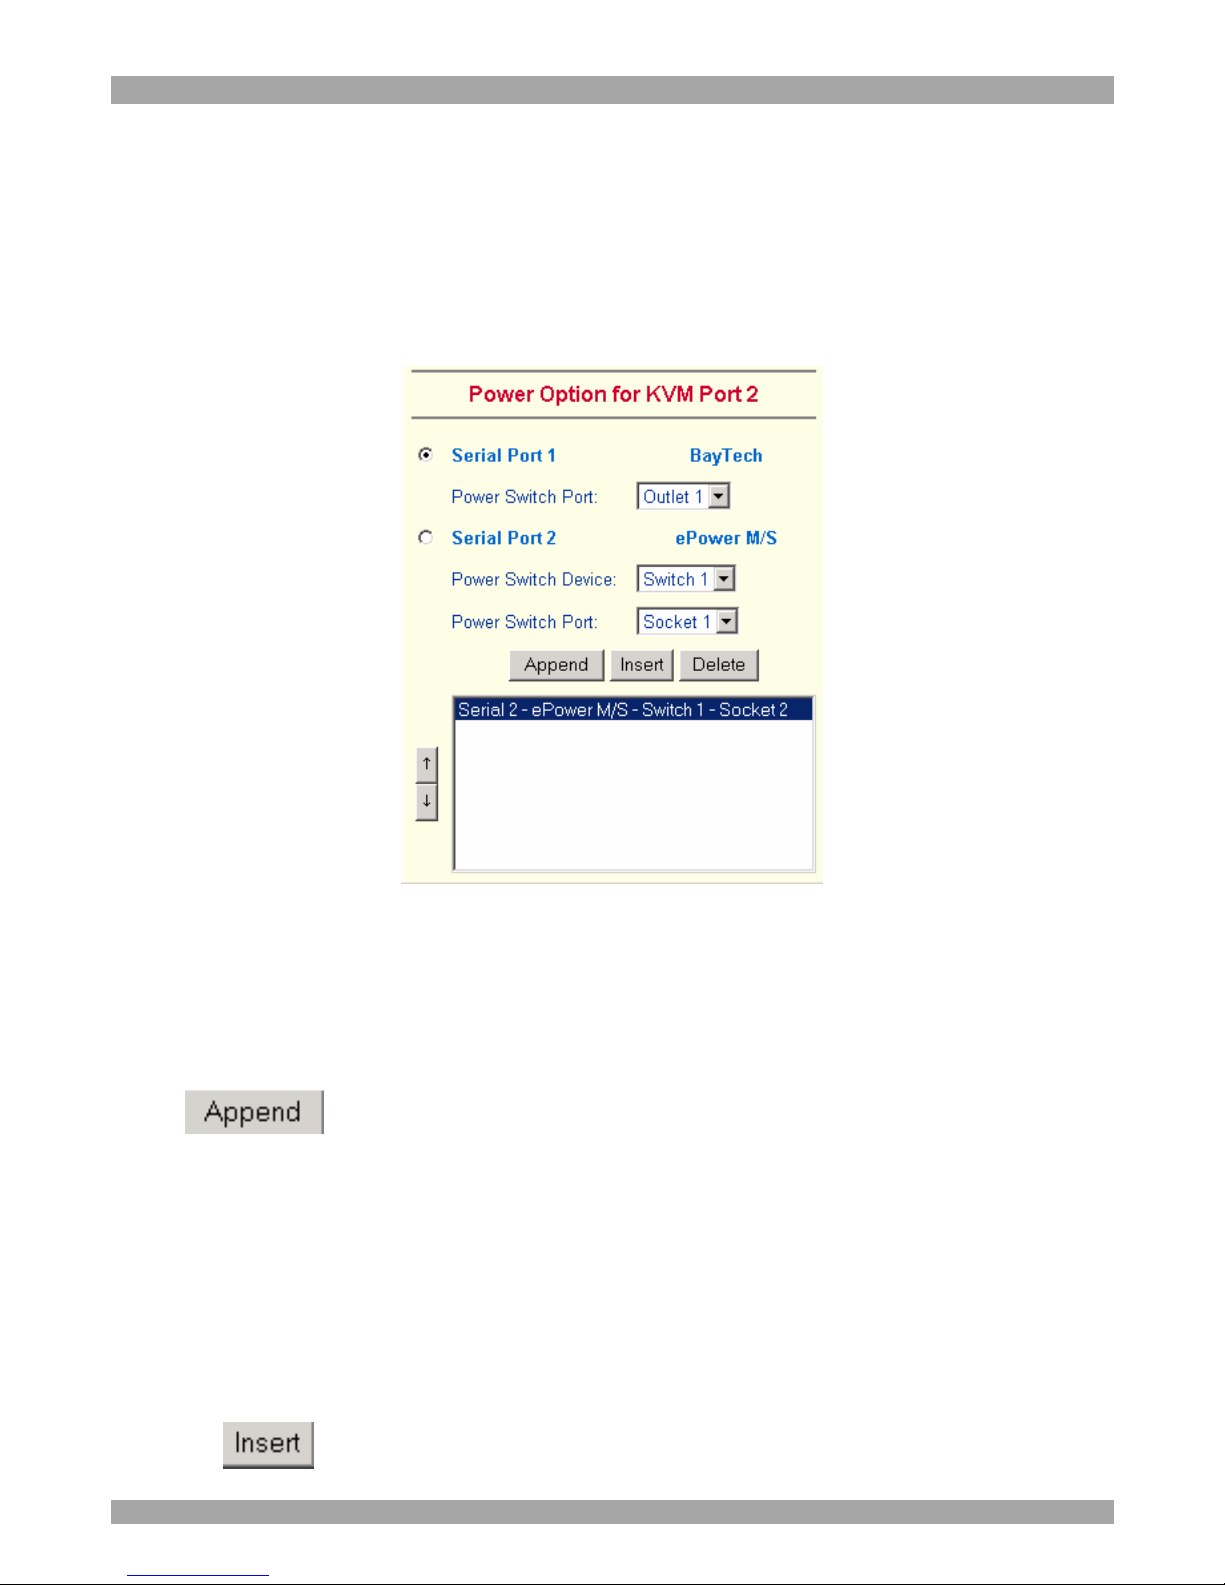
Power Control – Click Assign to configure the power option for each port. The
following screen appears.
Figure 22 Power option
Select the Serial port to which Power switch is connected.
From the drop-down list select the outlets connected to the Power switch.
Appending a socket
Click to add the socket to the end of the list (it will be last to be
powered on/off).
Inserting a socket
To insert a socket in the list:
1. In the currently included socket list highlight the socket above which you want to
insert the new socket.
2. From the Drop-down list select the socket to be inserted.
3. Click . The new socket is added.
Page 29
USER GUIDE
28
Each selection adds the outlet to the list at the bottom. The order of powering off/on,
will be the order as set out in this list.
Changing the order
To change the order the outlets are powered on/off:
Highlight the desired outlet and move it using the arrows.
30. Video Settings
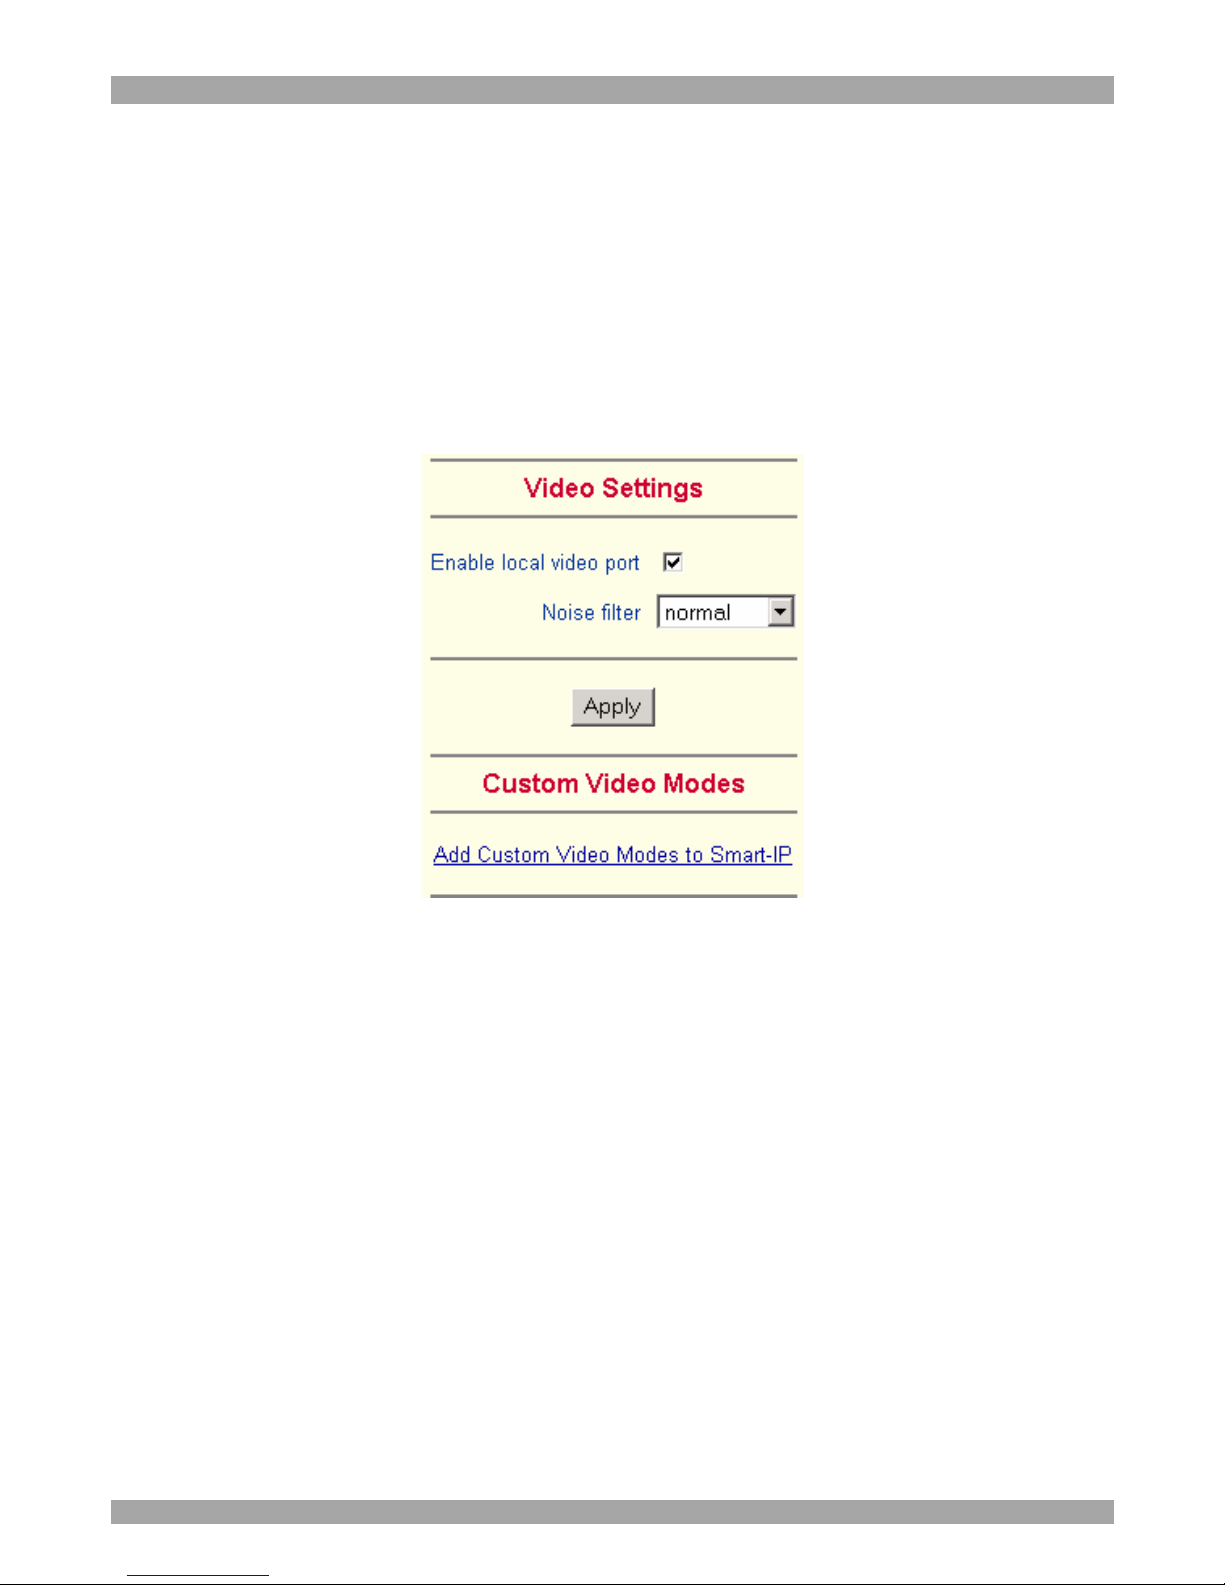
From the menu choose Video Settings. The Video settings appear. See Figure 23.
Figure 23 Video Settings
Enable local video port
This option decides if the video output on the local monitor connected to DX User
IP is active and passing through the incoming signal from the host system.
Use this option to switch off the local monitor connected to DX User IP when
accessing sensitive information on the Host computer.
Noise filter
Define how DX User IP reacts to small changes in the video input signal. A large
tolerance needs less network traffic and leads to a faster video display, but small
changes in some display regions may not be recognized immediately. A small
tolerance displays all changes instantly but may lead to a constant amount of
network traffic even if display content is not really changing (depending on the
quality of the video input signal). The default setting should be suitable for most
situations.
Page 30
DX USER IP
29
Custom Video Modes
DX User IP recognizes a limited number of common video modes. When running
X-Window on the host system, don't use any custom modelines with special video
modes. If you do, DX User IP may not be able to detect these. Use any standard
VESA video mode. Refer to Appendix A on page 62 for a list of all known modes.
If your video mode differs from the standard VESA video mode, you can add up to
4 Custom Video Modes.
Add video modes to DX User IP, which are not recognized using the factory
settings, when for example using special modelines in an X-Window configuration
on the host or with uncommon hosts or operating systems.
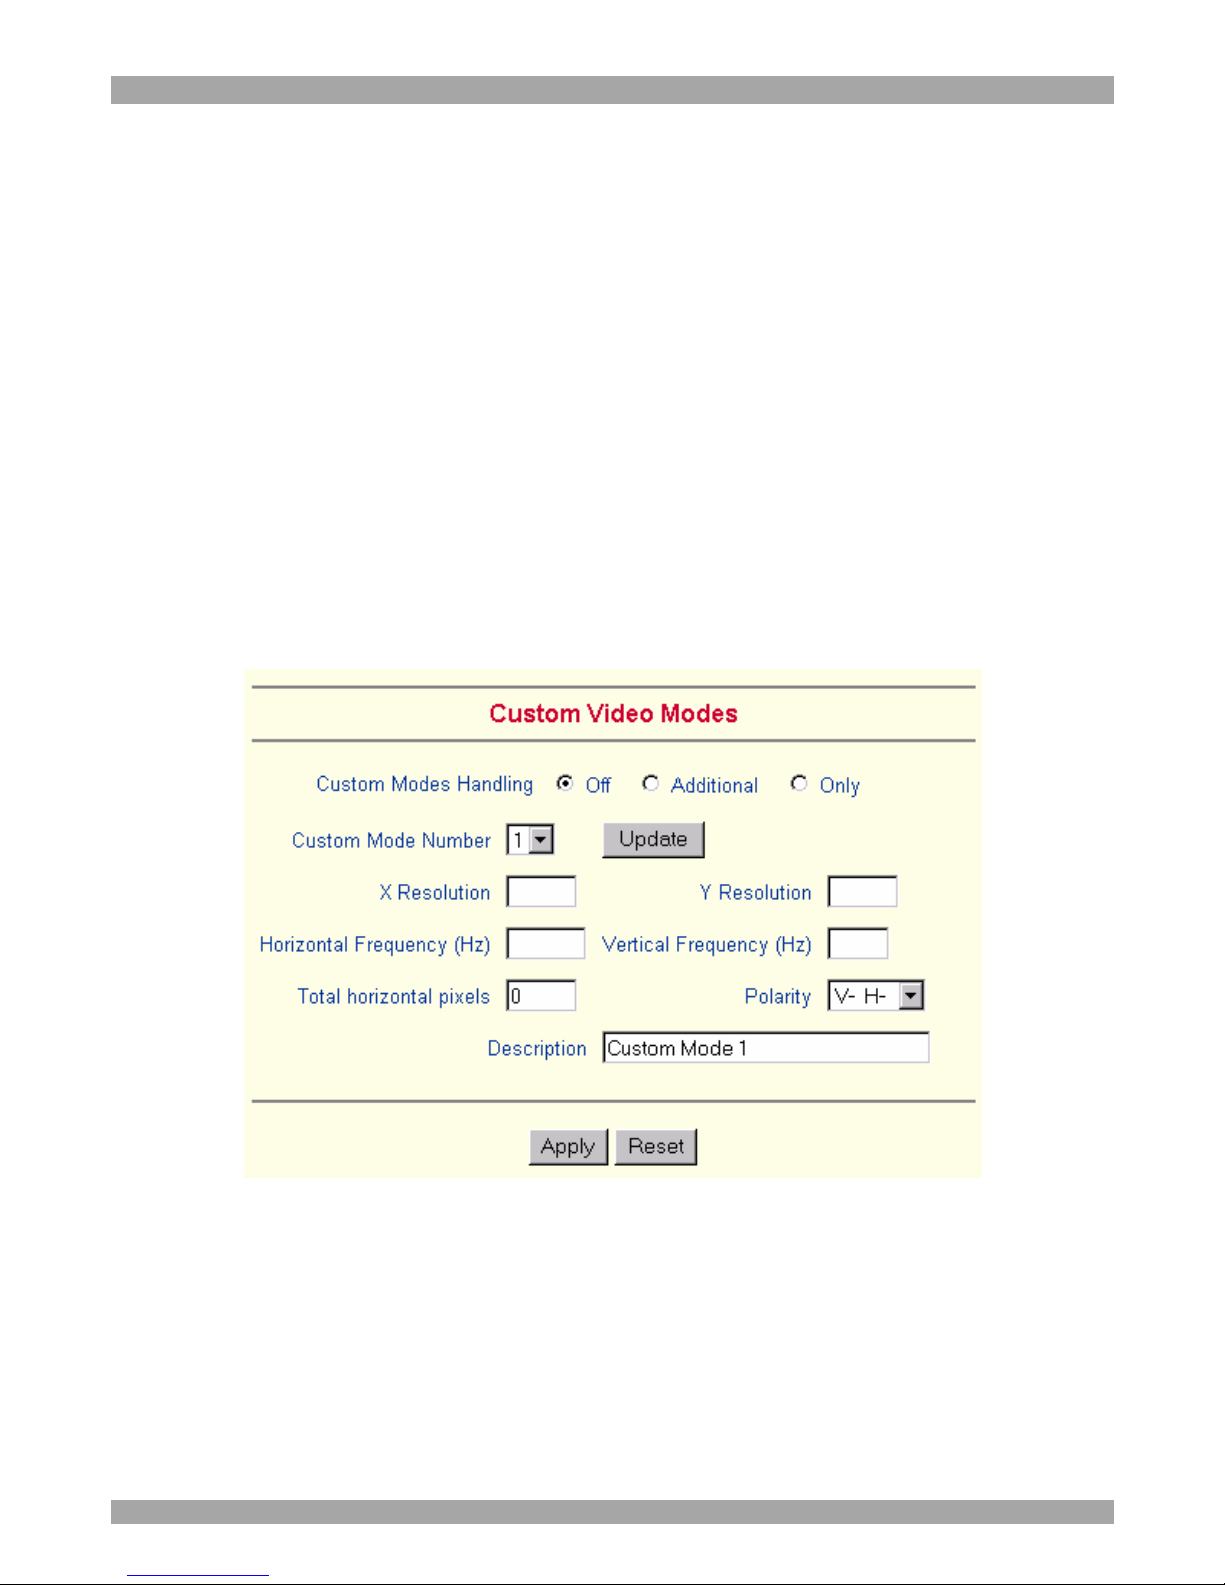
Click Add Custom Video Modes. The Custom Video Modes window appears see
Figure 24.
Note! This option may affect the correct video transmission and is for advanced
users only.
Figure 24 Custom Video Modes window
Custom Modes Handling – switch custom modes off, or use in addition to the
standard video resolutions, or use exclusively - Only. With Only you can force a
special video mode for DX User IP.
To change the parameters for a mode, choose the number and press Update.
X Resolution - Visible number of horizontal pixels.
Y Resolution - Visible number of vertical pixels.
Page 31
USER GUIDE
30
Horizontal Frequency (Hz) - Horizontal (line) frequency.
Vertical Frequency (Hz) - The vertical (refresh) frequency.
Total horizontal pixels - The total amount of pixels per line, including non-visible
and blank areas.
Polarity - The polarity (positive/negative) of the synchronization signals. V means
vertical, H means horizontal.
Description Give the mode a name. The name appears in the Remote Console when
the custom mode is activated.
31. User/Group Management
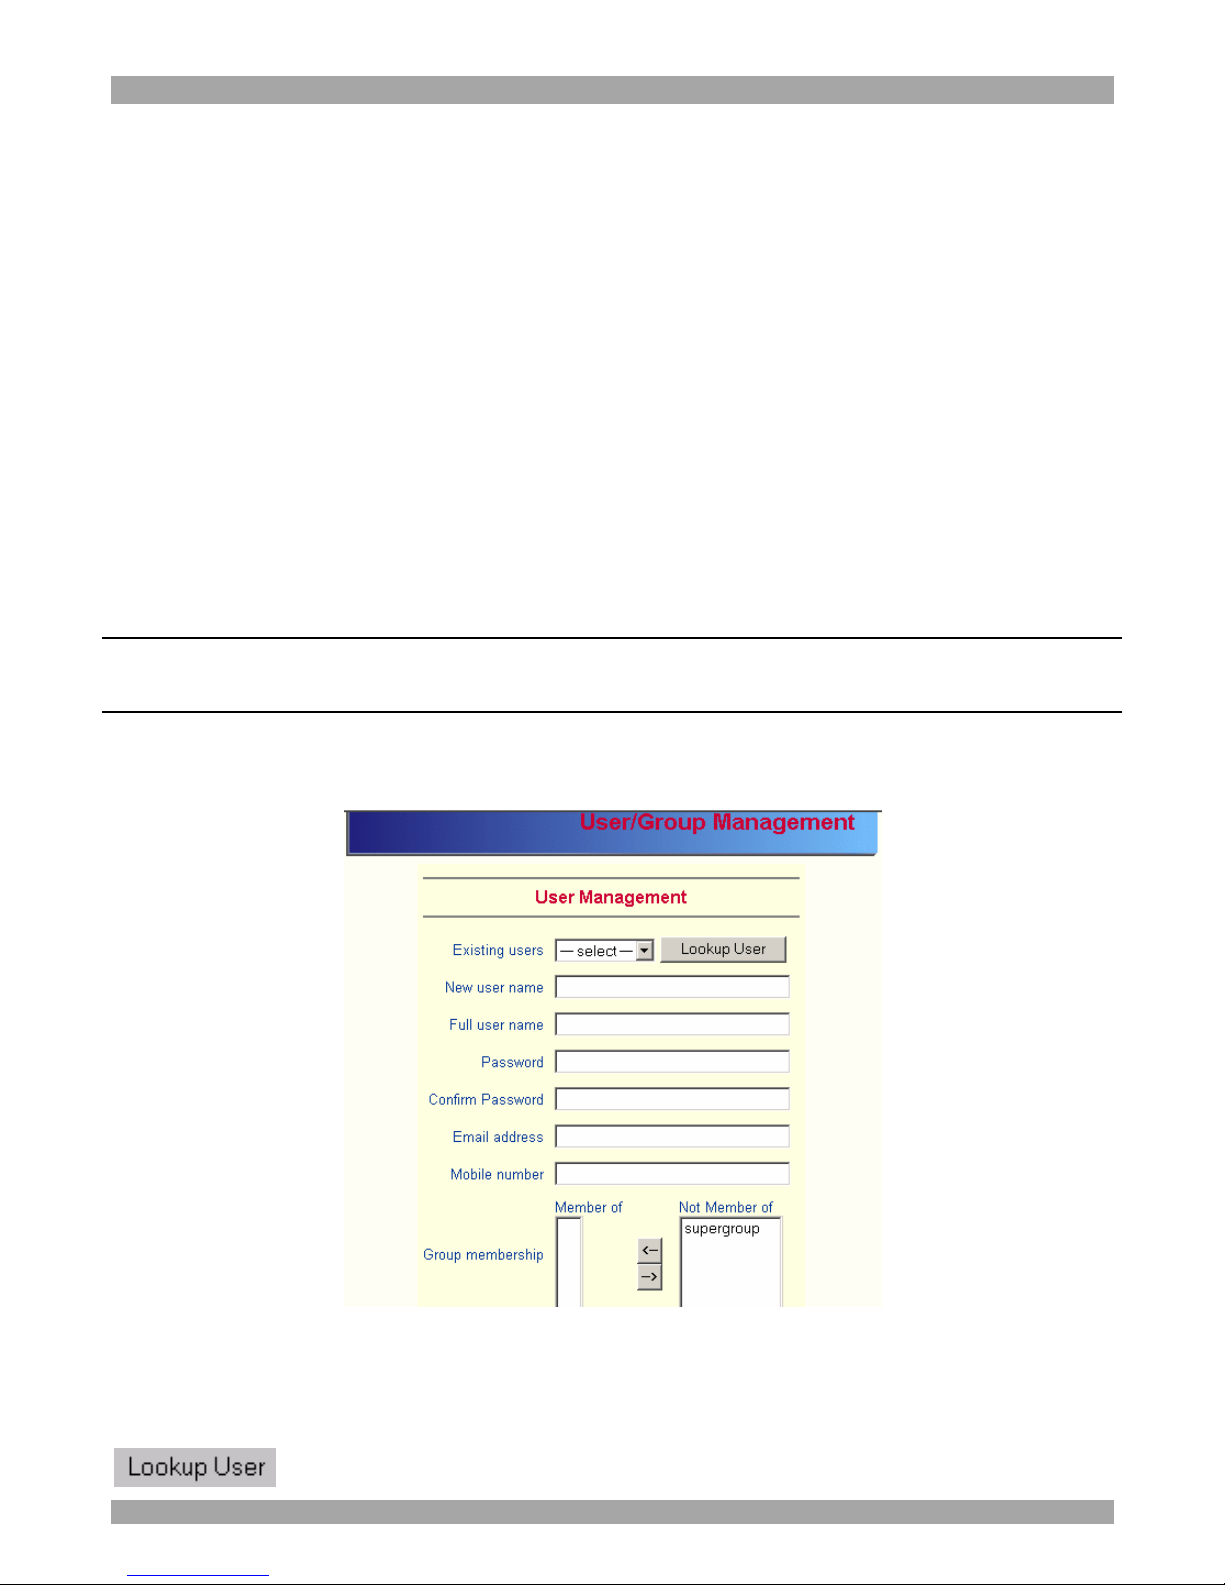
From the menu choose User/Group Management. The User/Group Management
settings appear. See Figure 25. Both users and groups are configurable, meaning that
each user or group can have different access capabilities.
Note! These users and groups are for the IP options only and are different from the
users and groups configured in the DX system.
The DX User IP is factory set with a supervisor user called super with the password
‘smart’. Change the super user password immediately.
Figure 25 The User/Group Management settings
Existing user
Select an existing user for modification or deletion. Once selected, click
to see the user information.
Page 32

DX USER IP
31
New user name
Enter a login name for a new user here. Ensure that it is not the same as an existing
user or group.
Full user name
Write the full name of the new user.
Password / Confirm password
The password must be at least four characters. Confirm password.
Email address /Mobile number
These are optional.
Group membership/Member of/Not Member of
Each user can be a member of one or more groups and inherit the rights of that
group. Use the arrows to add or remove a user from a group.
Existing groups
Select an existing group for copying, modification or deletion.
New group name
To create a new group, enter a new group name.
Create User button
Once the required fields are filled in, click the Create User button to create a new
user.
Delete User button
To delete a user:
1. Select a user in the Existing users Drop-down list.
2. Click the Lookup button. The complete user information appears.
3. Click the Delete User button.
Note: The factory set supervisor user `super' cannot be deleted, but it can be
renamed.
Page 33

USER GUIDE
32
Modify User button
To modify a user:
1. Select a user in the Existing users Drop-down list.
2. Click the lookup button to get all the user's information.
3. All fields can be modified as required. The old password is not displayed, but can
be modified.
4. Click the Modify User button.
Copy User
To copy an existing user’s properties to a new user:
1. Select a user in the Existing user Drop-down list.
2. Enter a new user name in the New user name box.
3. Click the Copy User button. All properties of the selected user will be copied to
the new one, except user specific permissions.
Group Management
The following headings appear under Group Management.
Create group button
To create a group:
1. Type a name into the New group name box
2. Click the Create group button.
Delete Group button
To delete a group:
1. Select a group in the Existing groups Drop-down list.
2. Click the Delete group button.
Modify Group
To modify an existing group select the group in the Existing group control. The
group's name field can be modified. Finally click the Modify group button.
Page 34
DX USER IP
33
Copy Group
To create a group with the properties of an existing group:
1. Select a group in the Existing group Drop-down list.
2. Type a name into the New group name box.
3. Click the Copy Group button.
32. User/Group Permissions
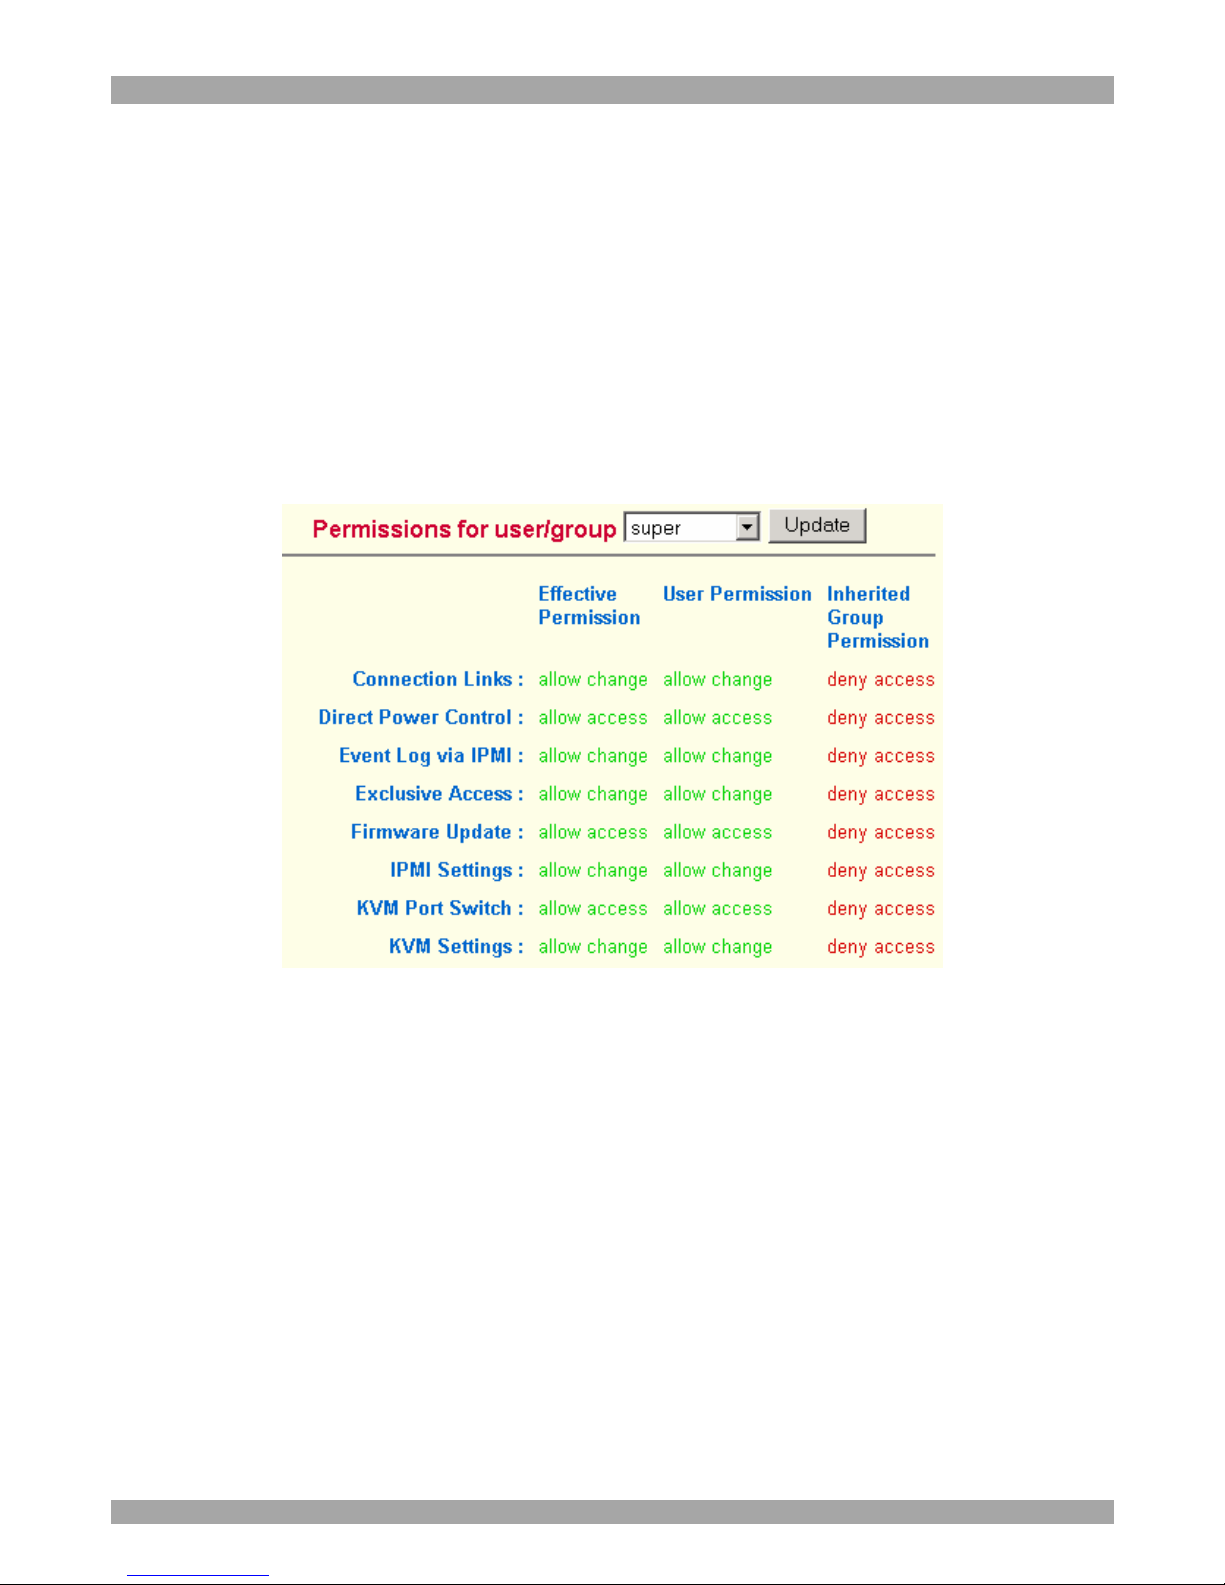
From the DX User IP Menu choose User/Group Permissions. The User/Group
Permissions settings appear. See Figure 26.
Figure 26 User/Group Permissions
Each user or group has a set of access rights to the DX User IP functions. The user
super always has unalterable full access rights. A newly created user has the access
rights of all groups he belongs to.
You can change the access rights in the User/Group Permissions panel. The panel
shows the changes to the access rights inherited by the user's ancestors only. This
means an empty user permission list has exactly the same access rights as the groups
he belongs to.
When one user creates a new user, he can alter his access rights. A user can change
another user or group's access rights if he stands higher in hierarchy. The 'super' user
stands at the top of the hierarchy, and can change everybody's access rights.
A user can never give more access rights than he himself has but he can always
reduce the access rights.
Page 35
USER GUIDE
34
To change access rights:
1. From the Drop down list select a user/group. The selection list shows only users
and groups, which you have the right to change.
2. Click the Update button. The access rights of the user appear. The meaning of the
Permissions is as follows:
Viewing a field. allow view means you can view it. deny access means you cannot
view it.
Changing a field setting. Allow change means you can change it. (This doesn’t give
an automatic right to view the value, the allow view value must also be set). Deny
change means you cannot change it.
Using a function. allow access means you can use it. deny access means you cannot
use it.
3. Select the desired permission and click Apply.
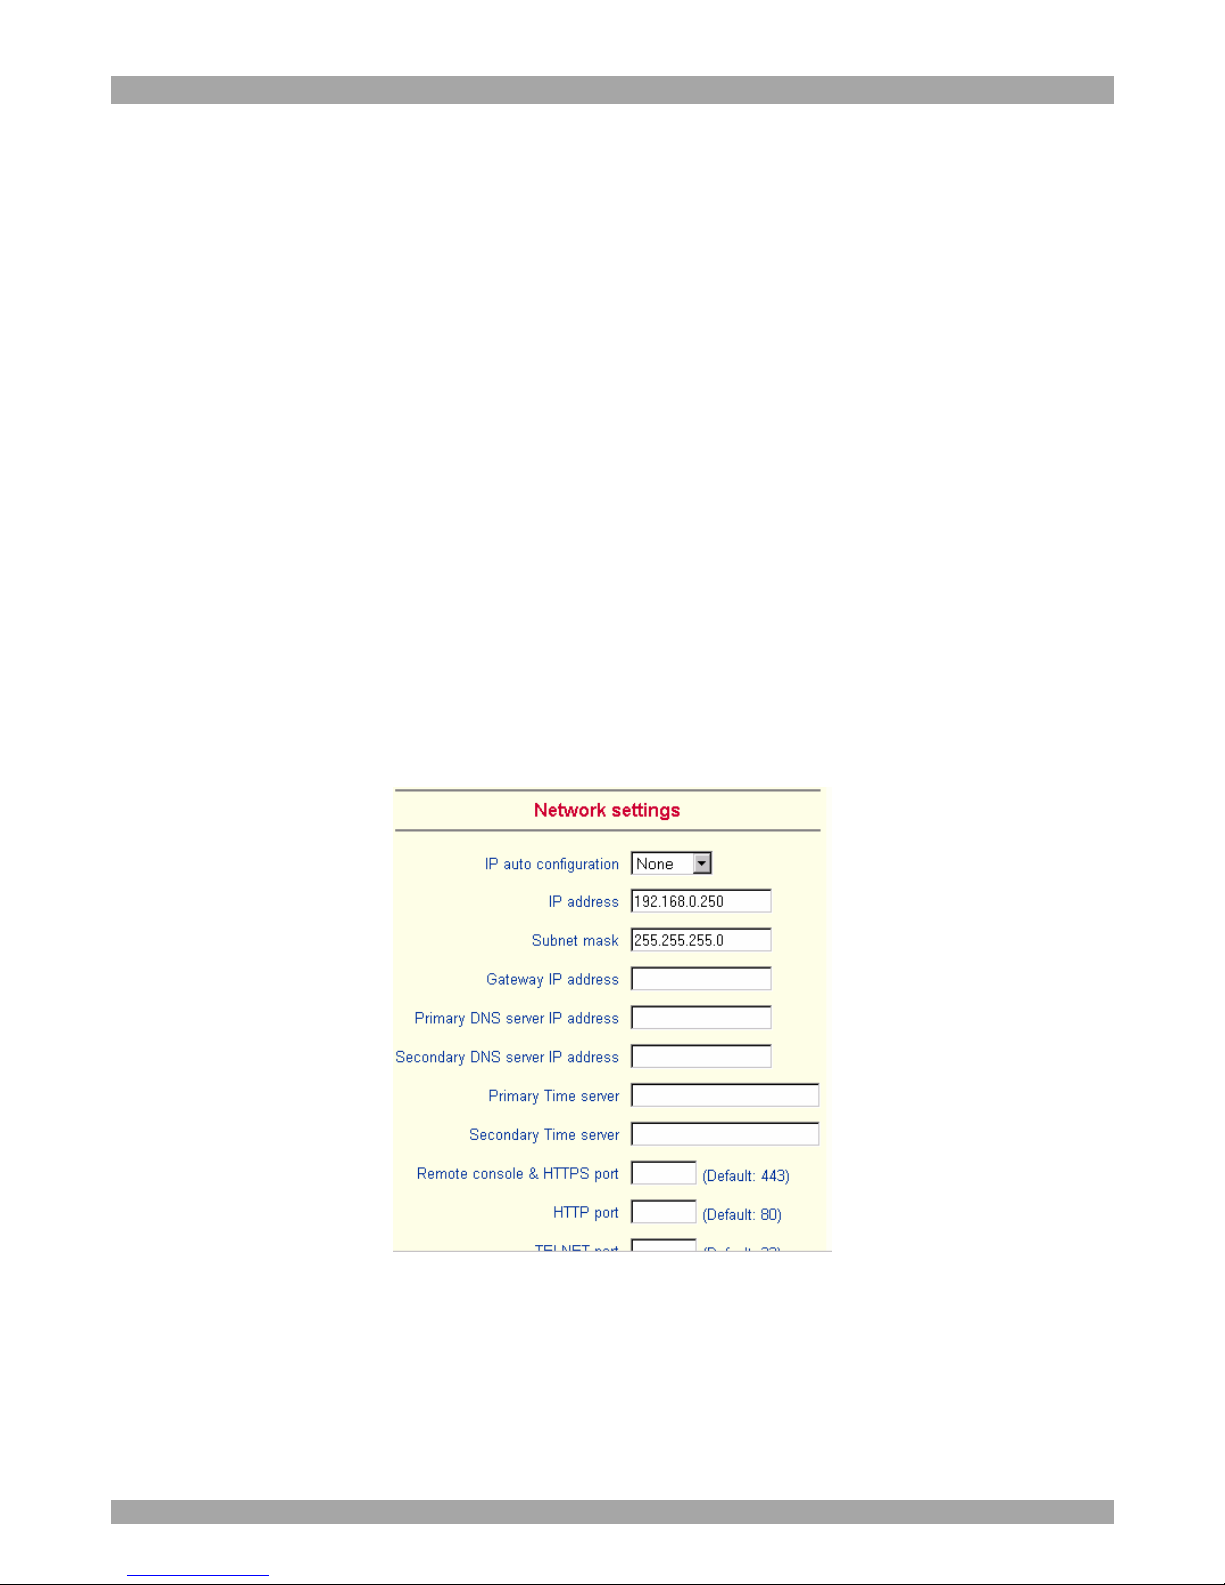
33. Network Settings
From the DX User IP Menu choose Network Settings. The Network Settings appear.
See Figure 27.
Figure 27 The Network Settings
In the Network Settings panel you can change the network parameters.
The initial IP configuration is usually done directly at the host system. However you
can also connect to the DX User IP using its pre-configured IP settings.
Page 36

DX USER IP
35
Warning! Changing the network settings of DX User IP may result in losing the
connection. If you remotely change the settings ensure that all values will give you
access to the DX User IP.
IP auto configuration
Choose between the 3 options.
None – no IP auto configuration. In this case type a static IP address in the
appropriate settings below.
DHCP - When selected, DX User IP will contact a DHCP (Dynamic Host
Configuration Protocol) server in the local sub-net to obtain a valid IP address,
gateway address and net mask. Before you connect DX User IP to your local subnet, complete the corresponding configuration of your DHCP server.
BOOTP - When selected, DX User IP will contact a BOOTP (Bootstrap Protocol)
server in the local sub-net to obtain a valid IP address, gateway address and net
mask.
IP address
Static IP address in the usual dot notation.
Subnet mask
The net mask of the local network.
Gateway IP address
In case the DX User IP should be accessible from networks other than the local one,
this IP address must be set to the local network router's IP address.
Primary DNS Server IP address
IP address of the primary Domain Name Server. This may be left empty, however
DX User IP won't be able to perform name resolution.
Secondary DNS Server IP address
This address will be used in case the Primary DNS Server can't be contacted.
Primary Time Server
IP address of the primary NTP (Network Time Protocol) compliant timeserver. DX
User IP will synchronize its own absolute time with the timeserver's one. This is
important for writing log entries and for the Dynamic DNS Service.
Page 37
USER GUIDE
36
Secondary Time Server
This address will be used in case the Primary Time Server can't be contacted.
Remote Console & HTTPS port
Port number at which DX User IP's Remote Console server and HTTPS server are
listening. If empty the default value is used.
HTTP port
Port number at which DX User IP's HTTP server is listening. If empty the default
value is used.
Telnet port
Port number at which DX User IP's Telnet server is listening. If empty the default
value is used.
Bandwidth limitation
The maximum network traffic generated through the DX User IP Ethernet device.
Disable Setup Protocol
Exclude the DX User IP from the setup protocol.
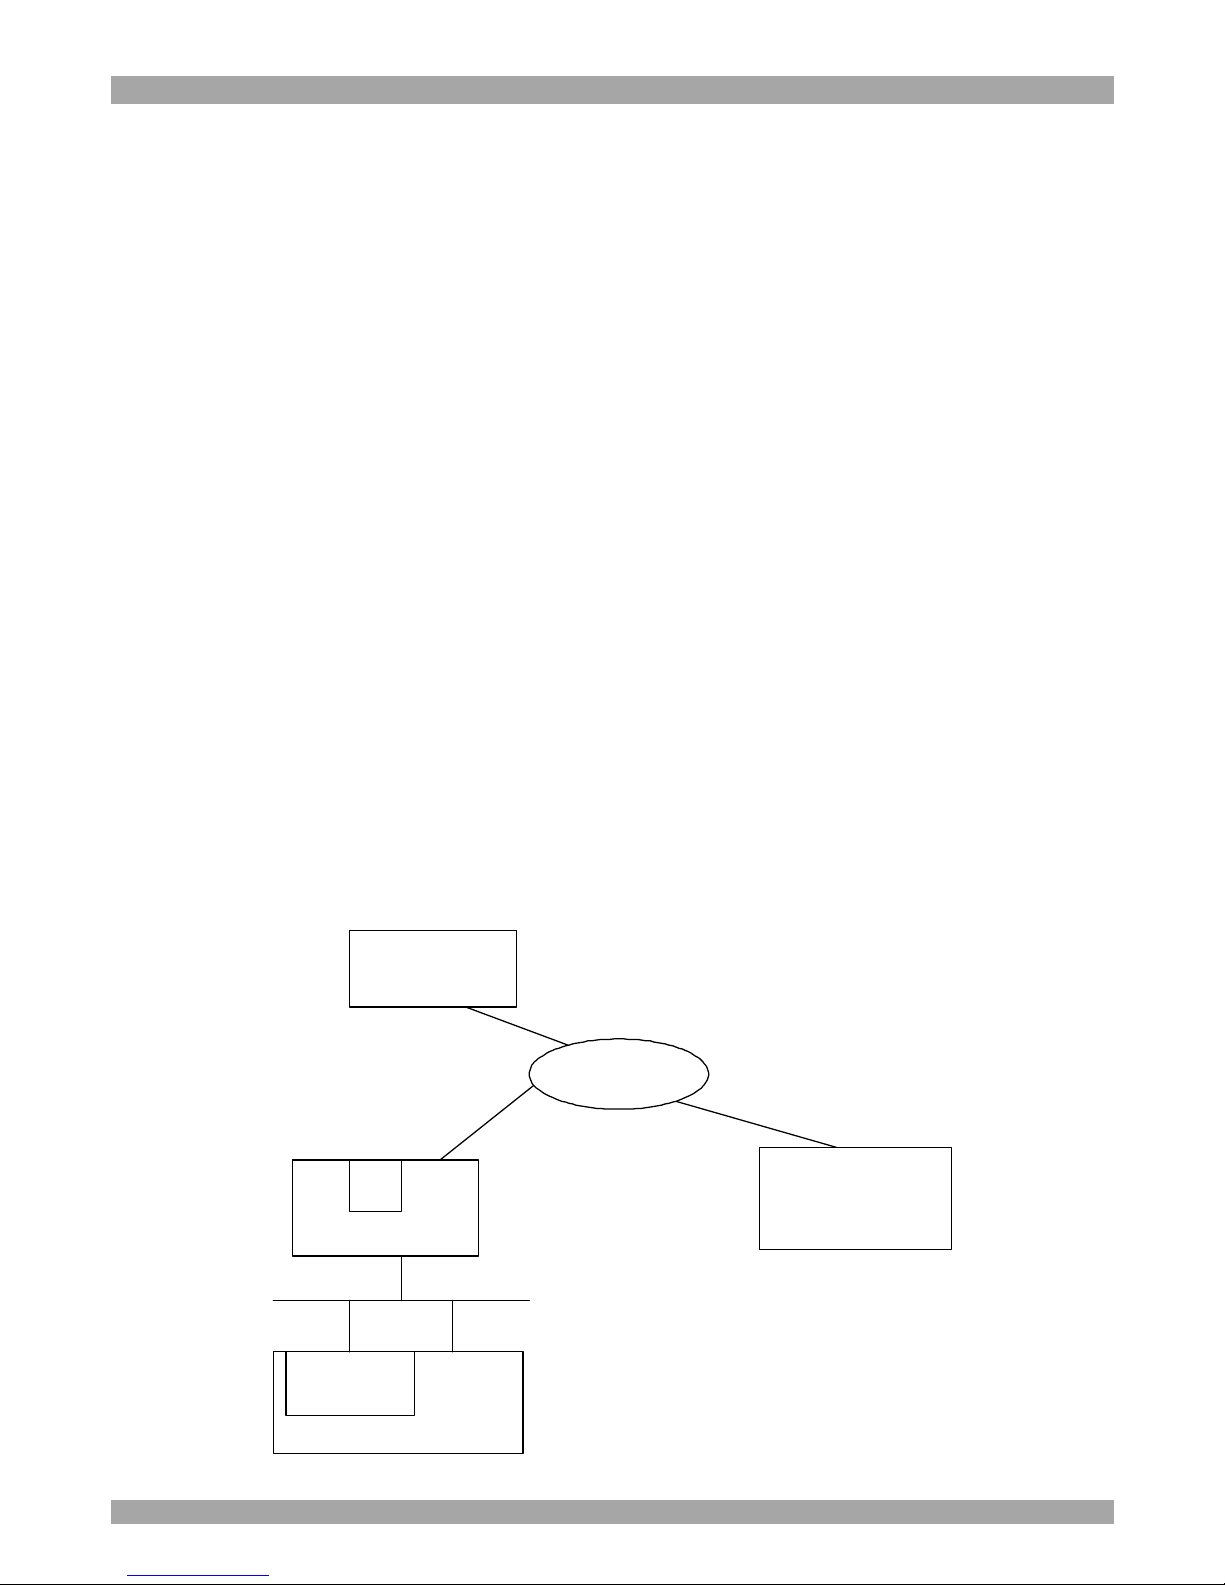
34. Dynamic DNS
Use the free Dynamic DNS service at www.dyndns.org. See Figure 28.
DX
USERIP
Internet
DynamicDNSserver
www.dyndns.org
AdministratorPC
DSL
DynamicIP
NAT
DSLrouter
LAN
Server
Figure 28 Dynamic DNS scenario
Page 38
DX USER IP
37
DX User IP is reachable via the IP address of the DSL router, which is dynamically
assigned by the provider. Since the administrator doesn't know the IP address
assigned by the provider, DX User IP connects to a special dynamic DNS server in
regular intervals and registers its IP address there. The administrator can contact this
server as well and pick up the same IP address belonging to his card.
The administrator has to register a DX User IP that is supposed to take part in the
service with the Dynamic DNS Server. He will get an approved nickname and
password in return to the registration process. This account information is needed in
order to determine the IP address of the registered DX User IP.
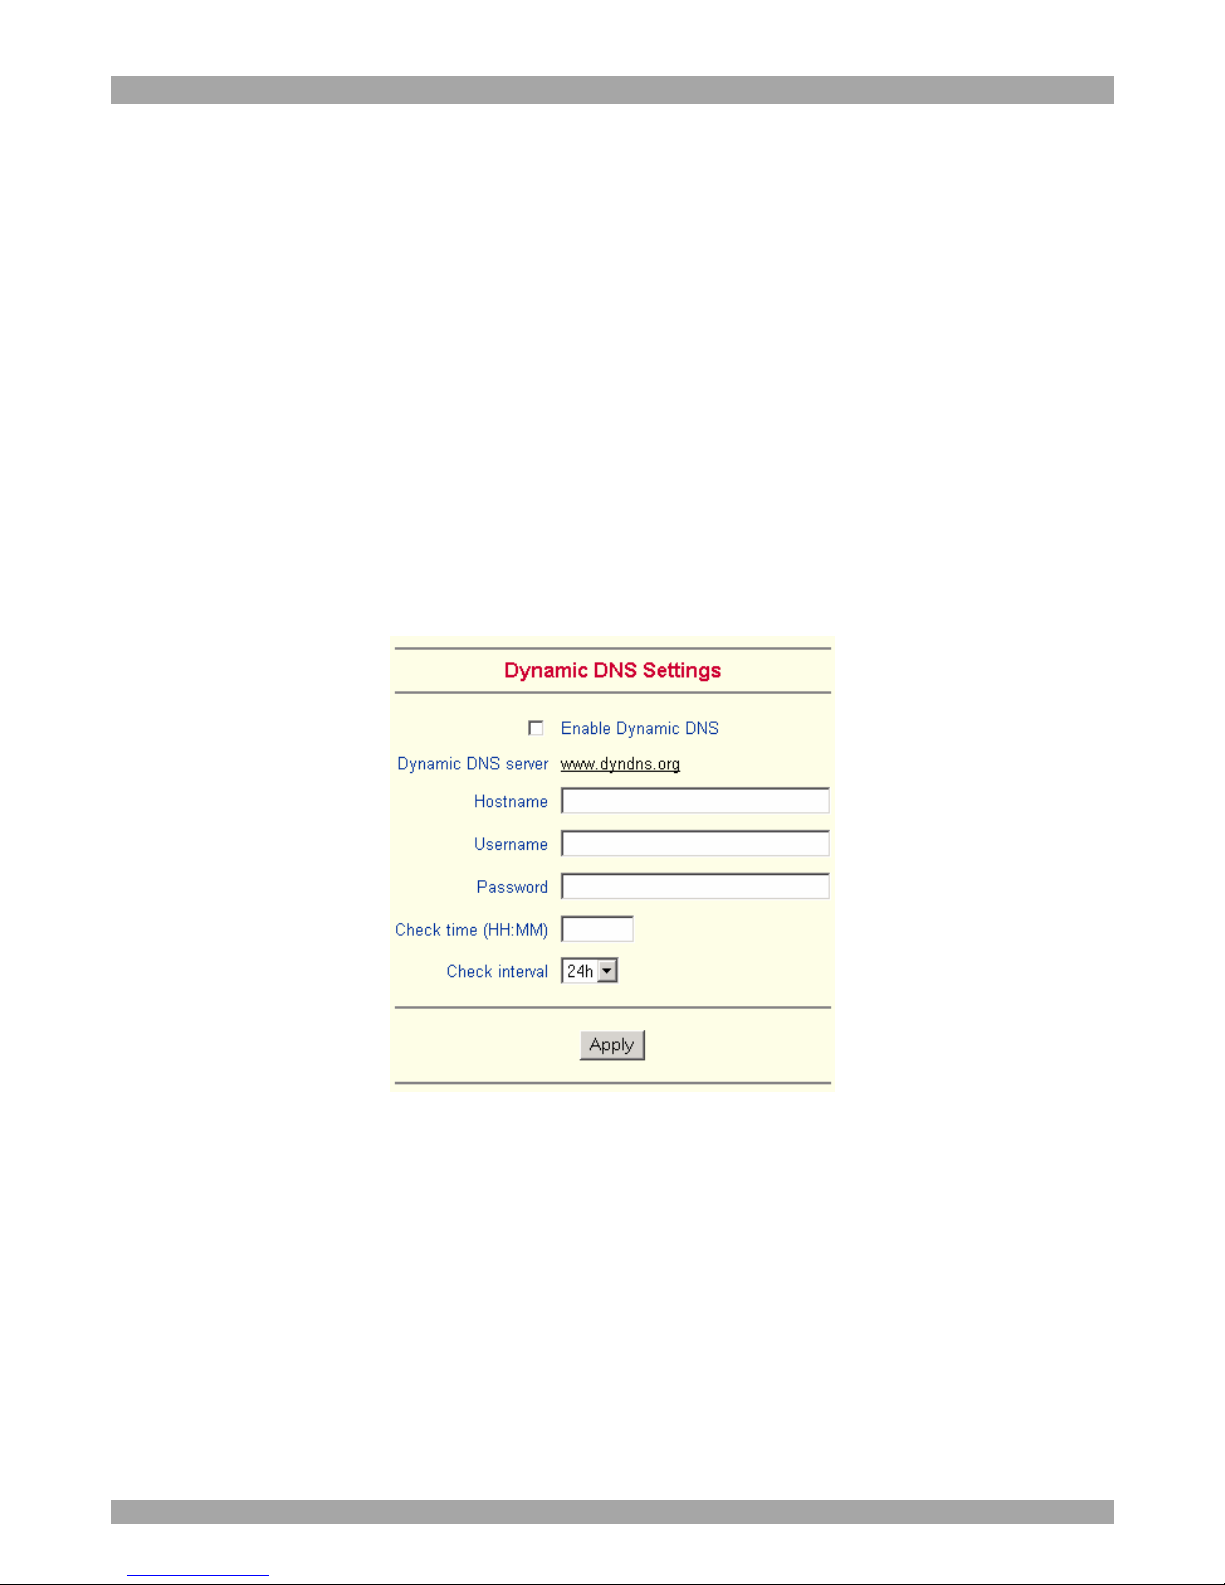
To enable the Dynamic DNS:
1. Ensure the DX User IP LAN interface is properly configured.
2. From the DX User IP menu choose Network Settings / Dynamic DNS. The
Dynamic DNS Settings appear. See Figure 29.
Figure 29 Dynamic DNS Settings
3. Check the Enable Dynamic DNS box.
4. Change the settings as desired.
Hostname - The Hostname registered during manual registration with the Dynamic
DNS Server. Spaces are not allowed in the Hostname.
Username/Password – Fill in the Username and Password.
Check time - DX User IP card registers itself in the Dynamic DNS server at this
time.
Page 39
USER GUIDE
38
Check interval - Interval for reporting again to the Dynamic DNS server by DX
User IP.
DX User IP has its own independent real time clock. Ensure the time setting is
correct by configuring a timeserver see page 35.
DX User IP registers itself to the Dynamic DNS server slightly different from the
time configured. To reduce load peaks on the server we add a random time (0-10
min) to the absolute time value.
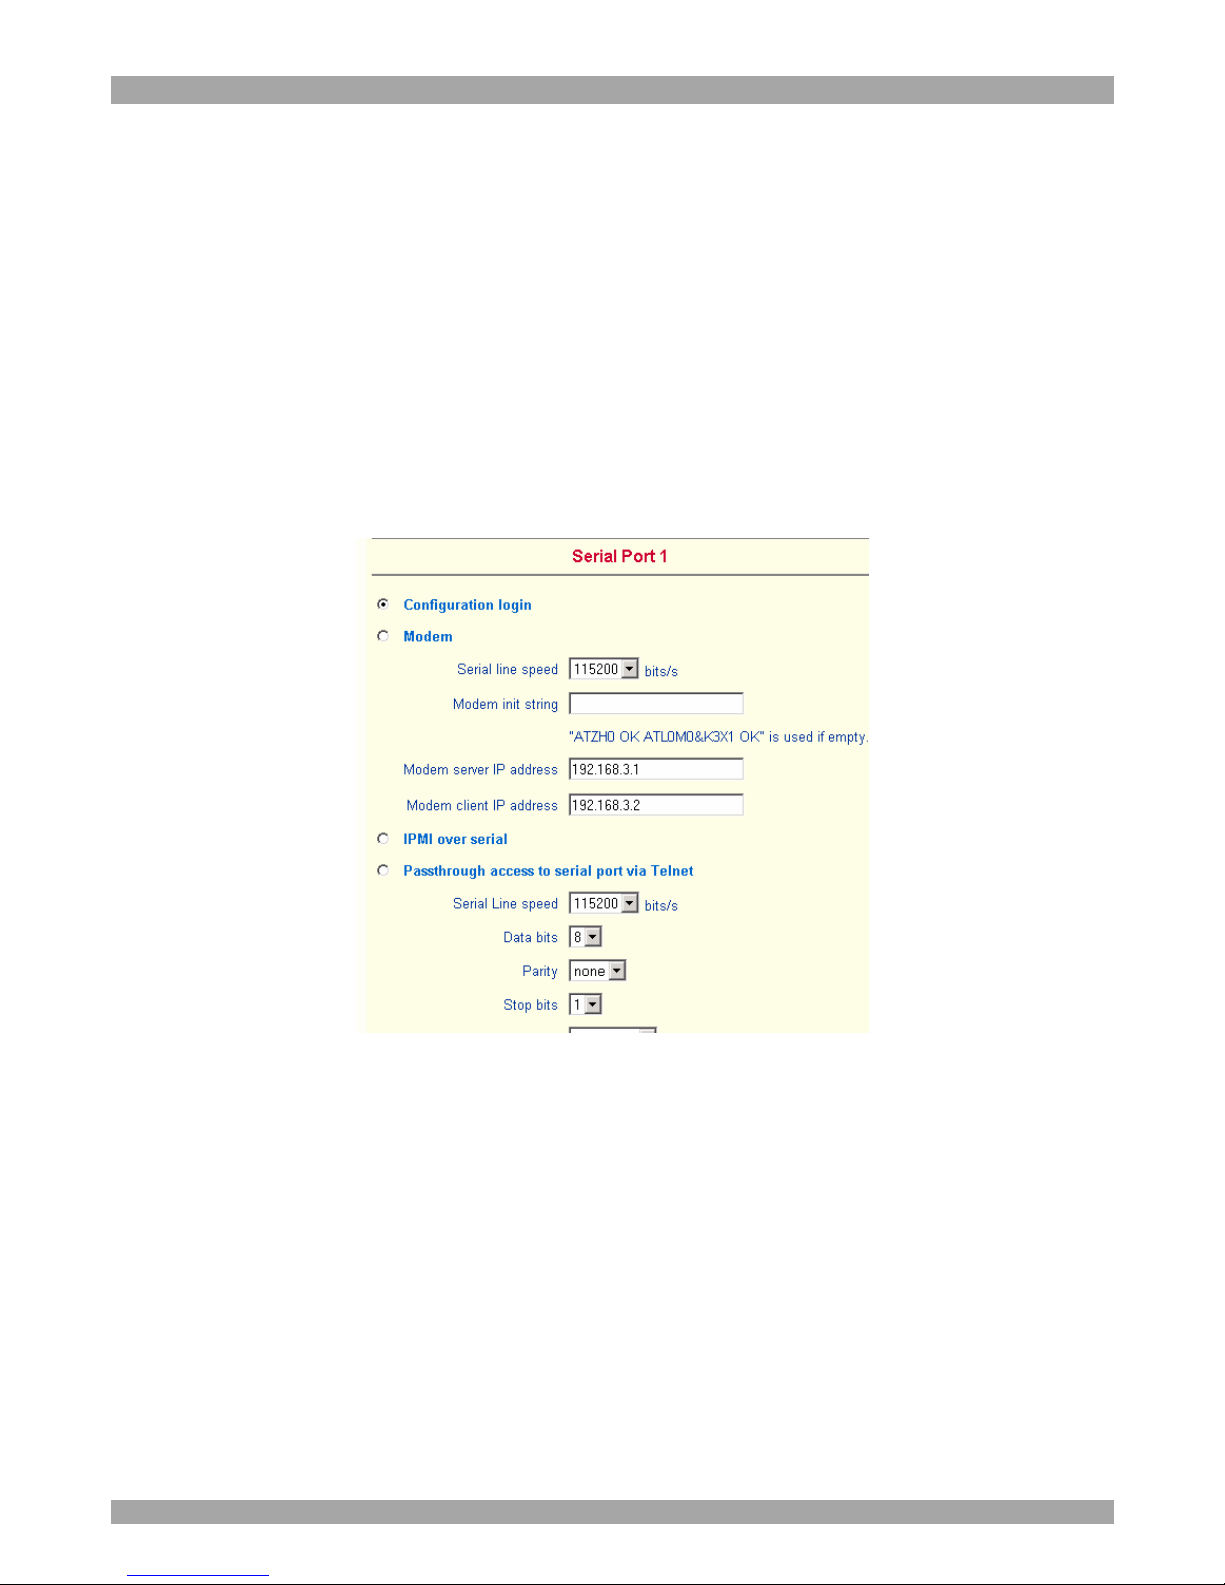
35. Serial Port Settings
From the DX User IP Menu choose Serial Port Settings. The Serial Port Settings
appear. See Figure 30.
Figure 30 Serial Port Settings
In the DX User IP Serial Settings specify the devices connected to the two Serial
ports.
Serial Port 1
The port options are listed below
Configuration login –If this option is checked you can only use the port for the
initial configuration and no other function.
Modem - DX User IP has the option of remote access using a telephone line.
Connect the modem to Serial 1 port. Using a telephone line means building up a
dedicated point-to-point connection from your console computer to the DX User IP.
Page 40

DX USER IP
39
The DX User IP acts as an Internet Service Provider (ISP) to which you can dial in.
The connection is established using the Point-to-Point Protocol (PPP).
Before connecting to DX User IP, configure your console computer accordingly. For
instance on Windows based operating systems you can configure a dial-up network
connection, which defaults to the right settings like PPP.
Serial line speed - Most modems today will support the default value of 115200
bps. For older modems lower the speed.
Modem Init String - Initialization string. The default value works with all modern
standard modems connected to a telephone line. For special modems or if connected
to a local telephone switch that requires a special dial sequence to connect to the
public telephone network, change this setting by giving a new string. See the
modem's manual about the AT command syntax.
Modem Server IP address – This address is used only when connecting to DX
User IP via a modem. When you dial into the DX User IP the client computer will
receive a Modem Client IP address from the DX User IP. Open the Web browser
and type Modem server IP address to login to the DX User IP.
The Client IP (see paragraph below) must be in the same class C subnet as the server
IP. This subnet should not conflict with the Ethernet subnet on the client side and
with the Ethernet subnet on DX User IP Network side.
Modem Client IP address - This address is assigned to your console computer
during the PPP handshake. Since it is a point-to-point IP connection virtually every
IP address is possible but ensure, it is not interfering with the IP settings of DX User
IP and your console computer. The default value will work in most cases.
IPMI over Serial - Check to use this Serial port for IPMI 1.5 over serial. See page
47 for more information.
Passthrough access to serial port via Telnet - Connect an arbitrary device to the
serial port and access it (assuming it provides terminal support) via telnet. Select the
appropriate options for the Serial port and use the Telnet Console (see page 19) or a
standard telnet client to connect to DX User IP.
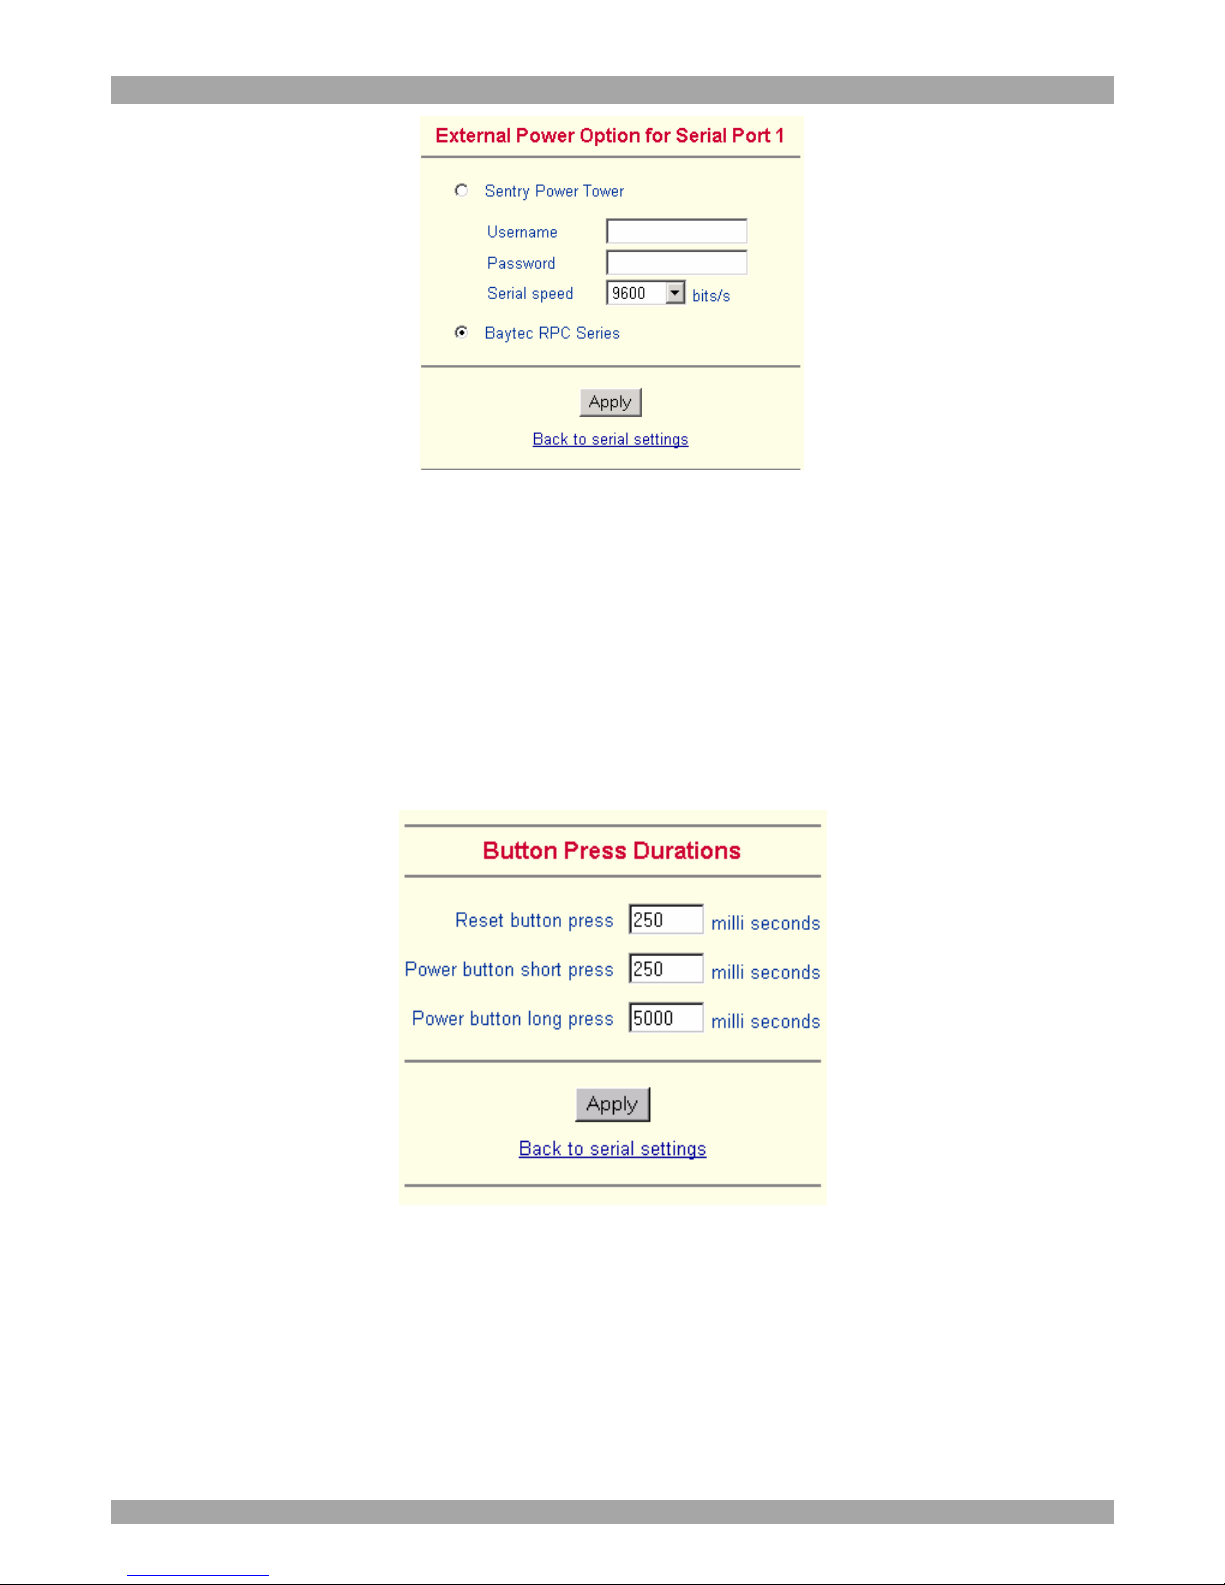
External Power Option – When the External Power Option is the Sentry Power
Tower or Baytec RPC series connected to Serial port 1, configure it by clicking
change external power switch option. The External Power Option for Serial port 1
window appears.
Fill in the Username and password as defined by the Sentry Power Tower.
Page 41
USER GUIDE
40
Figure 31 External Power Option for Serial port 1
Serial Port 2
This port provides the power control options, see page 20. Choose a suitable setting
and fill in additional required options. DX User IP supports the following:
Internal Power Option - This option gives access to the ATX power and reset
functions of a single connected system. You can change the duration of each button
press. To do so, click Change button press durations. The box below appears. Adjust
the time as desired.
Figure 32 Button Press Durations box
External Power Option
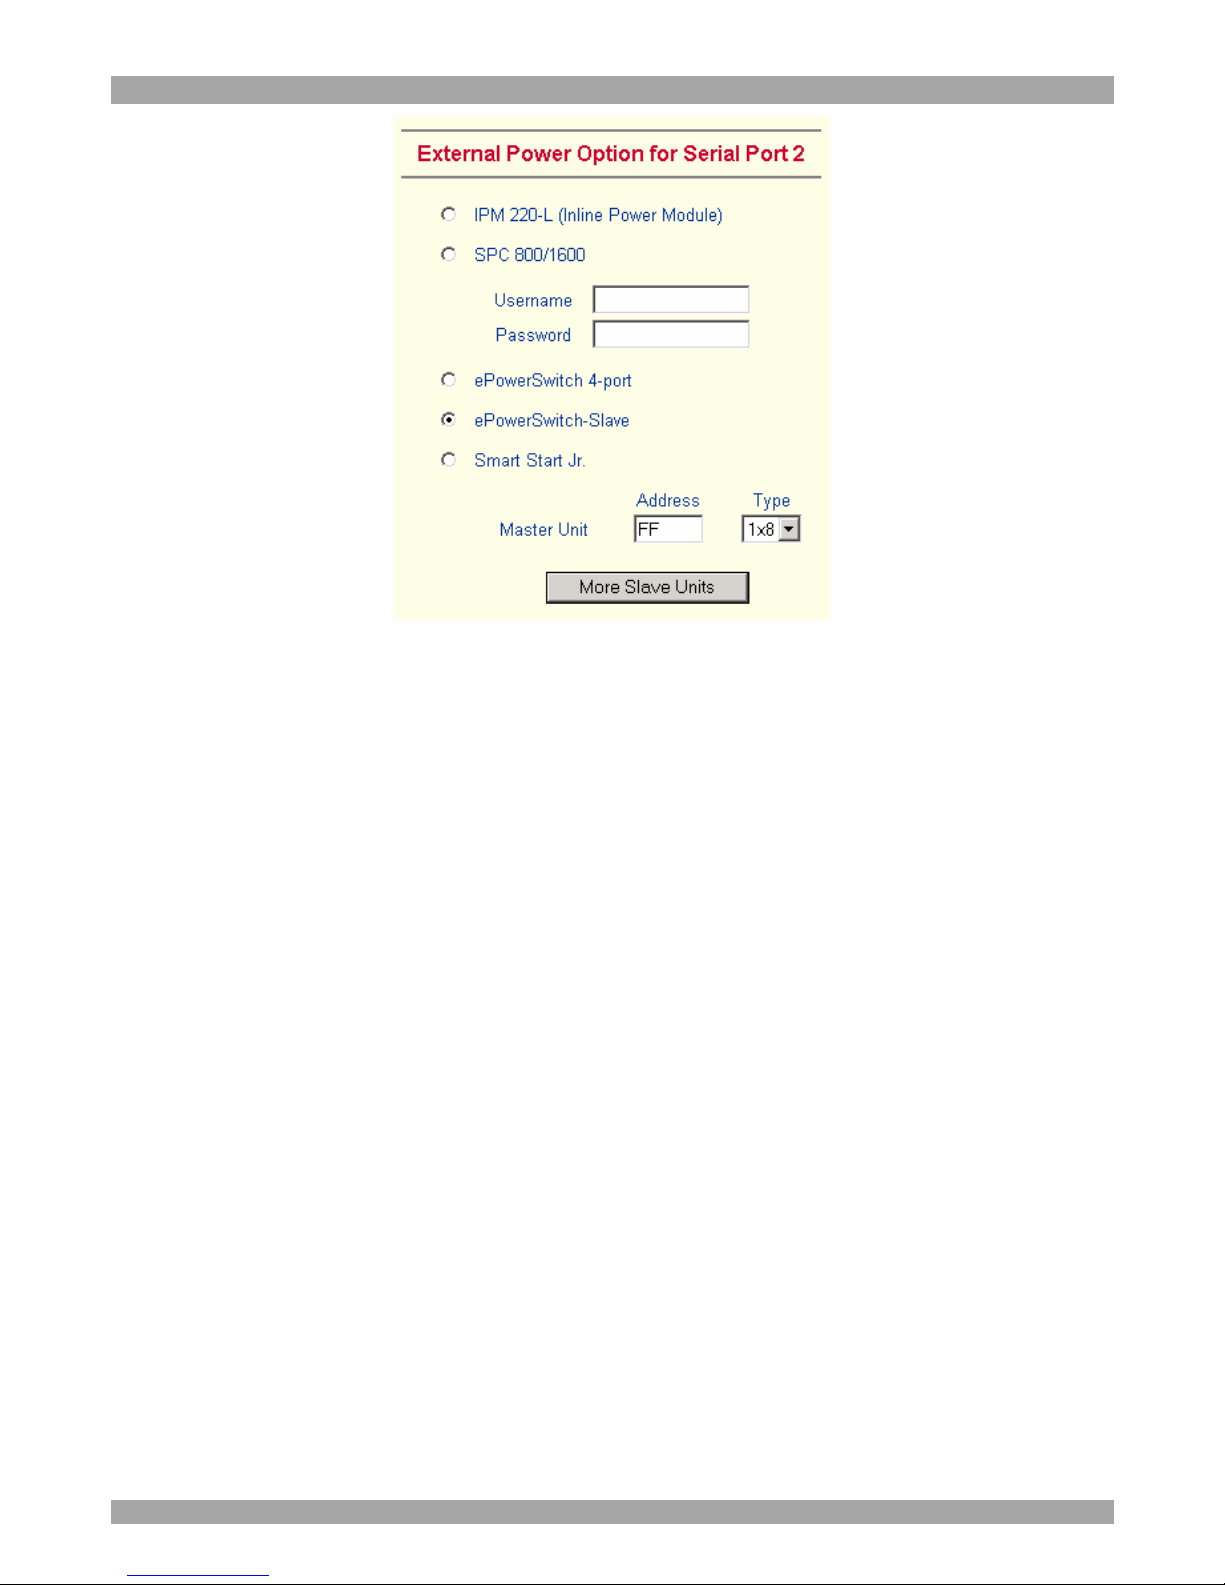
To configure the External Power Option connected to Serial port 2, click change
external power switch option. The following appears.
Page 42
DX USER IP
41
Figure 33 Serial Port 2 external power option
IPM 220-L (Inline Power Module) - External module option to switch power of a
single system by putting it in the power supply line of the controlled system.
SPC 800/1600 - Using the AvocentTM SPC, switch power for more than one system
connected to DX User IP through a KVM switch. To use this device enter a
username and password, which exist on the SPC and have the privileges to switch
power for each port.
ePowerSwitch 4 port - Using this switch, switch power for more than one system
connected to DX User IP through a KVM switch.
ePowerSwitch-Slave – This also refers to the Minicom DX Power Switch S 8
port. Both switches are cascadable to up to 4 power switches with 8 ports. DX User
IP must be connected to the first switch of the cascade via a serial connection.
Smart Start Jr. – Check the box if this option is connected. Add Slave units if
required.
36. Security Settings
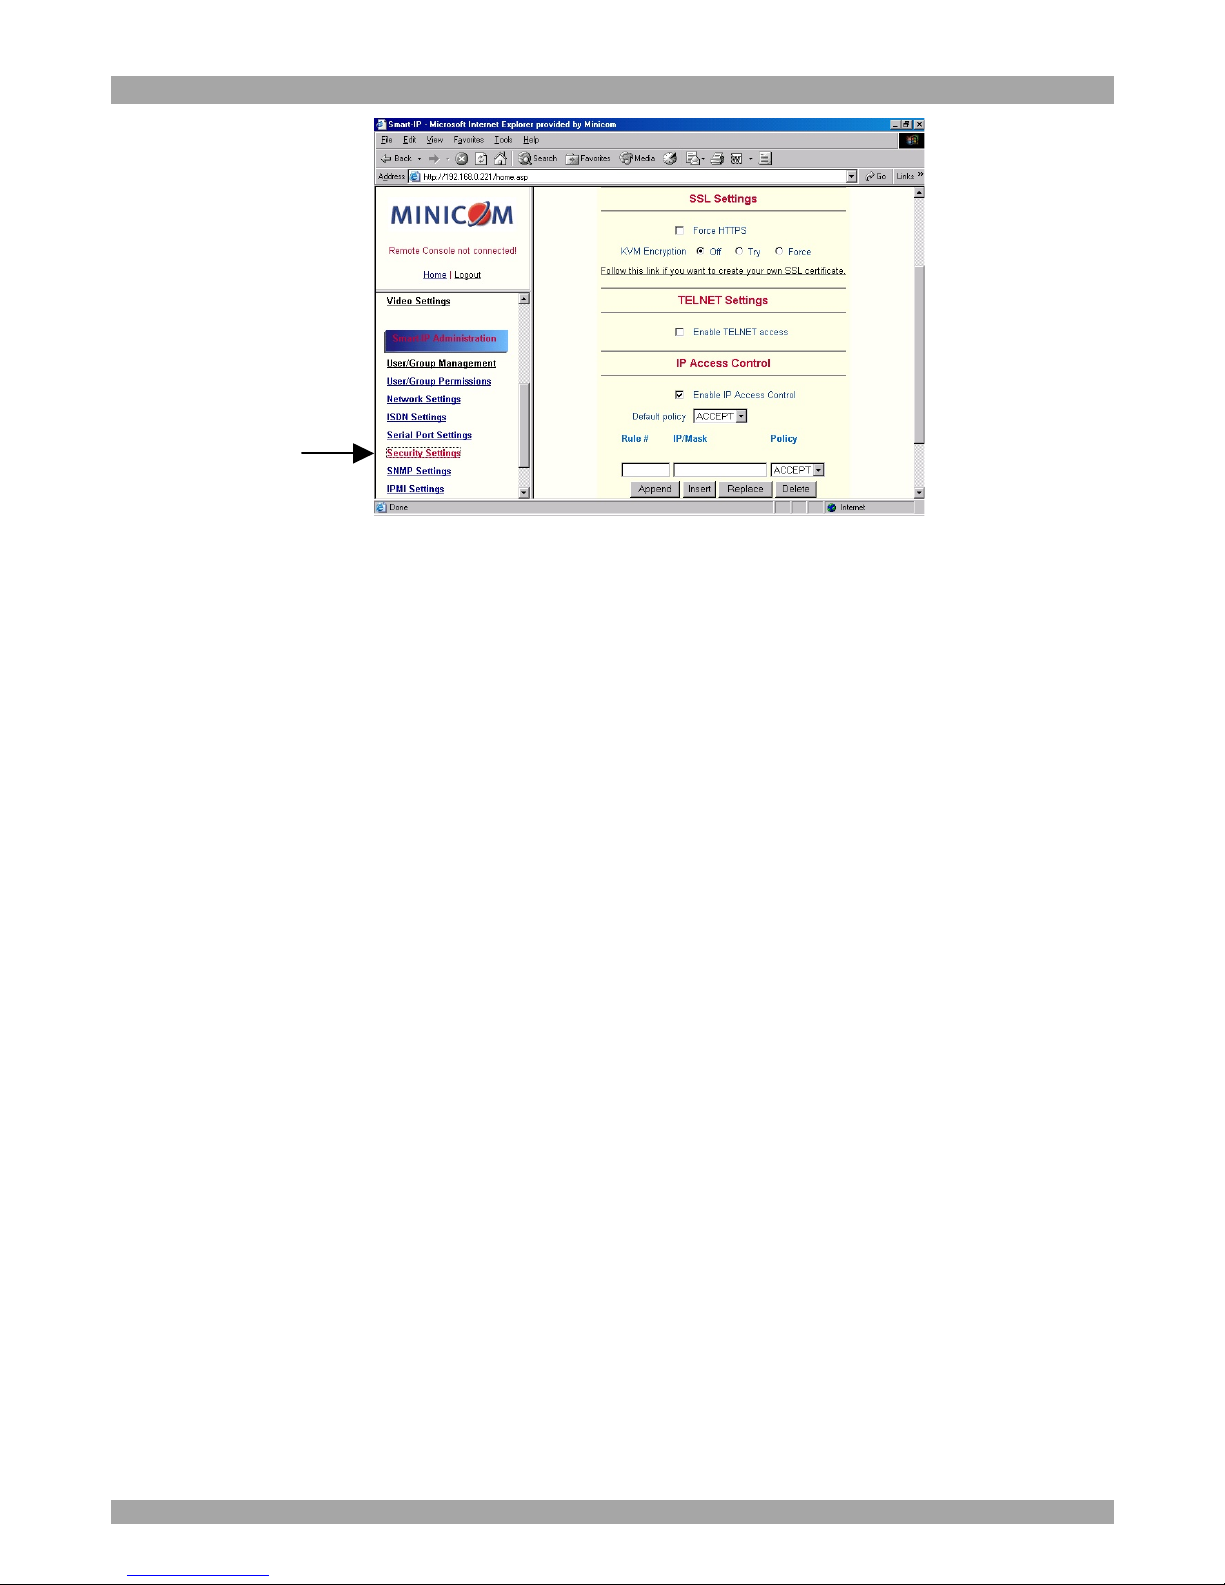
From the DX User IP Menu choose Security Settings. The Security Settings appears.
See Figure 34.
Page 43
USER GUIDE
42
Figure 34 Security Settings
SSL settings
Force HTTPS - Access the Web front-end only using an HTTPS connection. DX
User IP won't listen on the HTTP port for incoming connections.
KVM encryption - Controls the encrypting of the RFB protocol, used by the
Remote Console to transmit the screen data to the administrator machine and
keyboard and mouse data back to the host.
Off - No encryption used.
Try - Tries to make an encrypted connection. If unsuccessful, an unencrypted
connection is used.
Force - Makes an encrypted connection.
SSL Certificate Management
DX User IP uses the SSL (Secure Socket Layer) protocol for any encrypted network
traffic between itself and a connected client. When connecting, DX User IP reveals
its identity to a client using a cryptographic certificate. This is the same for all DX
User IPs and won't match the network configurations applied to the card by its user.
The certificate's underlying secret key is also used for securing the SSL handshake.
Hence, this is a security risk (but better than no encryption at all).
You can generate and install a new certificate unique to a particular card. DX User
IP can generate a new cryptographic key and the associated Certificate Signing
Request that needs to be certified by a certification authority (CA). A CA verifies
you are who you claim to be and signs and issues a SSL certificate to you.
Page 44
DX USER IP
43
To create and install a DX User IP SSL certificate:
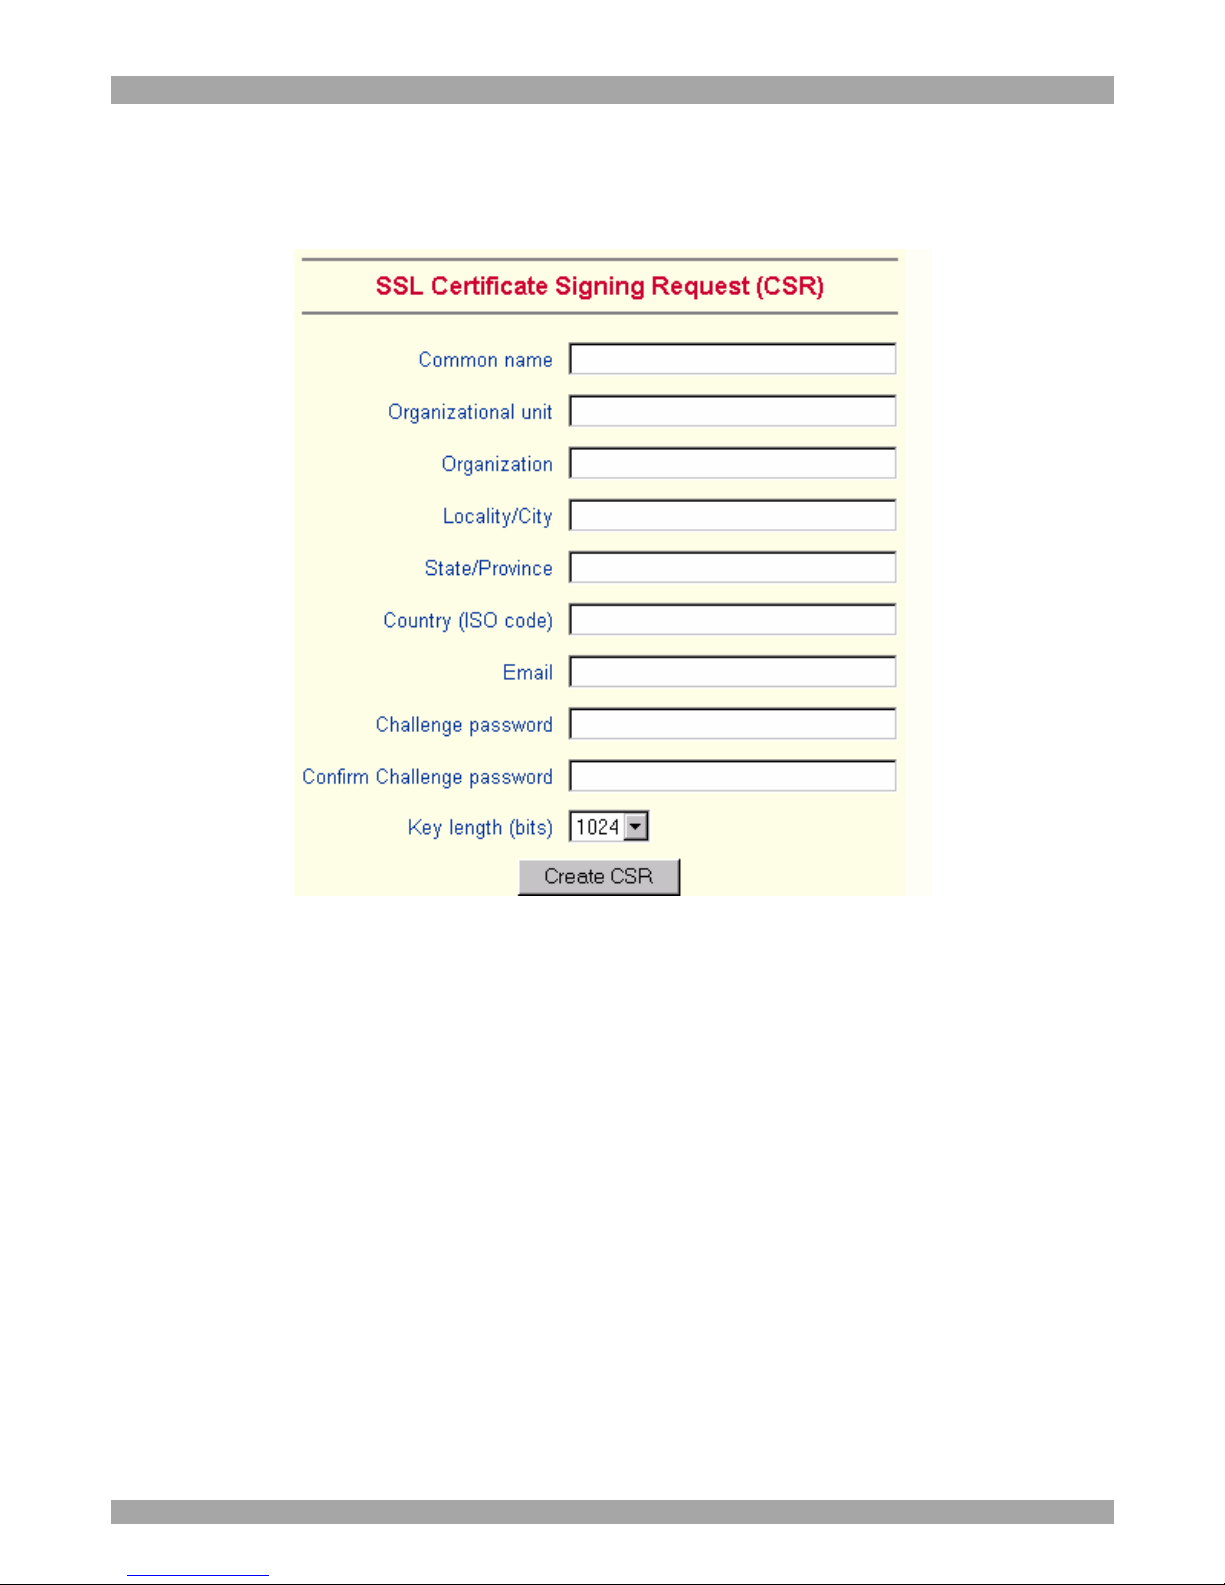
1. From the Security Settings page choose Create your own SSL certificate. The
window appears as in Figure 35.
Figure 35 CSR
2. Fill in the fields:
Common name - Network name of DX User IP once installed in the user's network.
It is identical to the name that is used to access the card with a Web browser. In case
the name given here and the actual network name differ, the browser will pop up a
security warning when the card is accessed over HTTPS.
Organizational unit - Specifies which department within an organization DX User
IP belongs.
Organization/Locality/City/State/Province - Organization to which DX User IP
belongs + location.
Country - Use the 2 letter ISO code, e.g. DE for Germany.
Challenge Password/Confirm- Some certification authorities require a challenge
password to authorize later changes on the certificate. The minimum is 4 characters.
Email - Of a security contact person that is responsible for DX User IP.
Page 45

USER GUIDE
44
Key length - Length of the generated key in bits. 1024 Bits are supposed be
sufficient for most cases. Larger keys may result in slower response time during the
connection.
3. Click .
4. Press Download CSR to download the CSR to your administration machine.
5. Send the CSR to a CA for certification. They will send a new certificate
6. Press Upload to upload the certificate to DX User IP. The certificate uploads.
Important! If you destroy the CSR on DX User IP there is no way to get it back! If
you deleted it, repeat the above steps.
Telnet Settings
Enable Telnet access - Access over Telnet client. For better security disable Telnet
access.
IP Access Control
This is used to limit access to a specific number of clients only. These clients are
identified by their IP addresses.
The IP access control settings apply to the LAN interface only!
Enable IP Access Control - Enables access control based on IP source addresses.
Default policy - Controls arriving IP packets that don't match any of the configured
rules. They can be accepted or dropped.
ATTENTION: If you set this to DROP and you have no ACCEPT rules configured,
access to the Web front-end over LAN is disabled! To enable access, change the
security settings via modem dial in or by temporarily disabling IP access control
with the initial configuration procedure (see page 11).
Rule # - Type the rule number for which the following commands will apply. This is
ignored, when adding a new rule.
IP/Mask - Specifies the IP address or IP address range for which the rule applies.
Numbers attached to an IP address with a `/' is the number of valid bits that are used
for the given IP address. Examples:
192.168.0.22 or 192.168.0.22/32 matches the IP Address 192.168.0.22.
192.168.0.0/24 matches all IP packets with source addresses from 192.168.0.1 to
192.168.0.254.
Page 46

DX USER IP
45
0.0.0.0/0 matches any IP packet.
Policy - Determines what to do with matching packets. They are accepted or
dropped.
NOTE: The order of the rules is important. The rules are checked in ascending order
until a rule matches. Rules below the matching one are ignored. The default policy
applies if no match has been found.
Append a rule – To add a rule to the end of the rule list: Enter the IP/Mask and set
the policy. Then press .
Insert a rule - To insert a rule according to the rule number: Enter the rule number,
IP/Mask and set the policy. Then press . All rules with higher numbers are
shifted below.
Replace a rule - Enter the rule number, IP/Mask and set the policy. Then press
.
Delete a rule - Enter the rule number and press .
Anti Brute Force Settings
Anti Brute Force Settings lets you block access to a specific user, for a fixed amount
of time if a predefined number of unsuccessful login attempts by this user occurred.
Max. number of failed logins – insert a maximum number or leave it blank to
disable Anti Brute Force.
Block time - Block time in minutes - insert a number or leave it blank.
To unblock blocked users. Connect to the DX User IP Serial 1 port using terminal
software, and type unblock. A list of blocked users appears. Select the users to
unblock.
37. SNMP Settings
The following information is available via SNMP:
· Serial number
· Firmware version
· MAC address / IP address / Netmask / Gateway of LAN interface
· Configured users
· Currently active users with login time (login time is only valid if time is
synchronized on DX User IP)
Page 47
USER GUIDE
46
· Server's power state
· The following actions can be initiated via SNMP:
· Reset server
· Power on/off server
· Reset DX User IP
The following events are reported by DX User IP via SNMP:
· Login trial at DX User IP failed
· Login trial at DX User IP succeeded
· Denying access to a particular action.
· Server was reset.
· Server was powered on/off
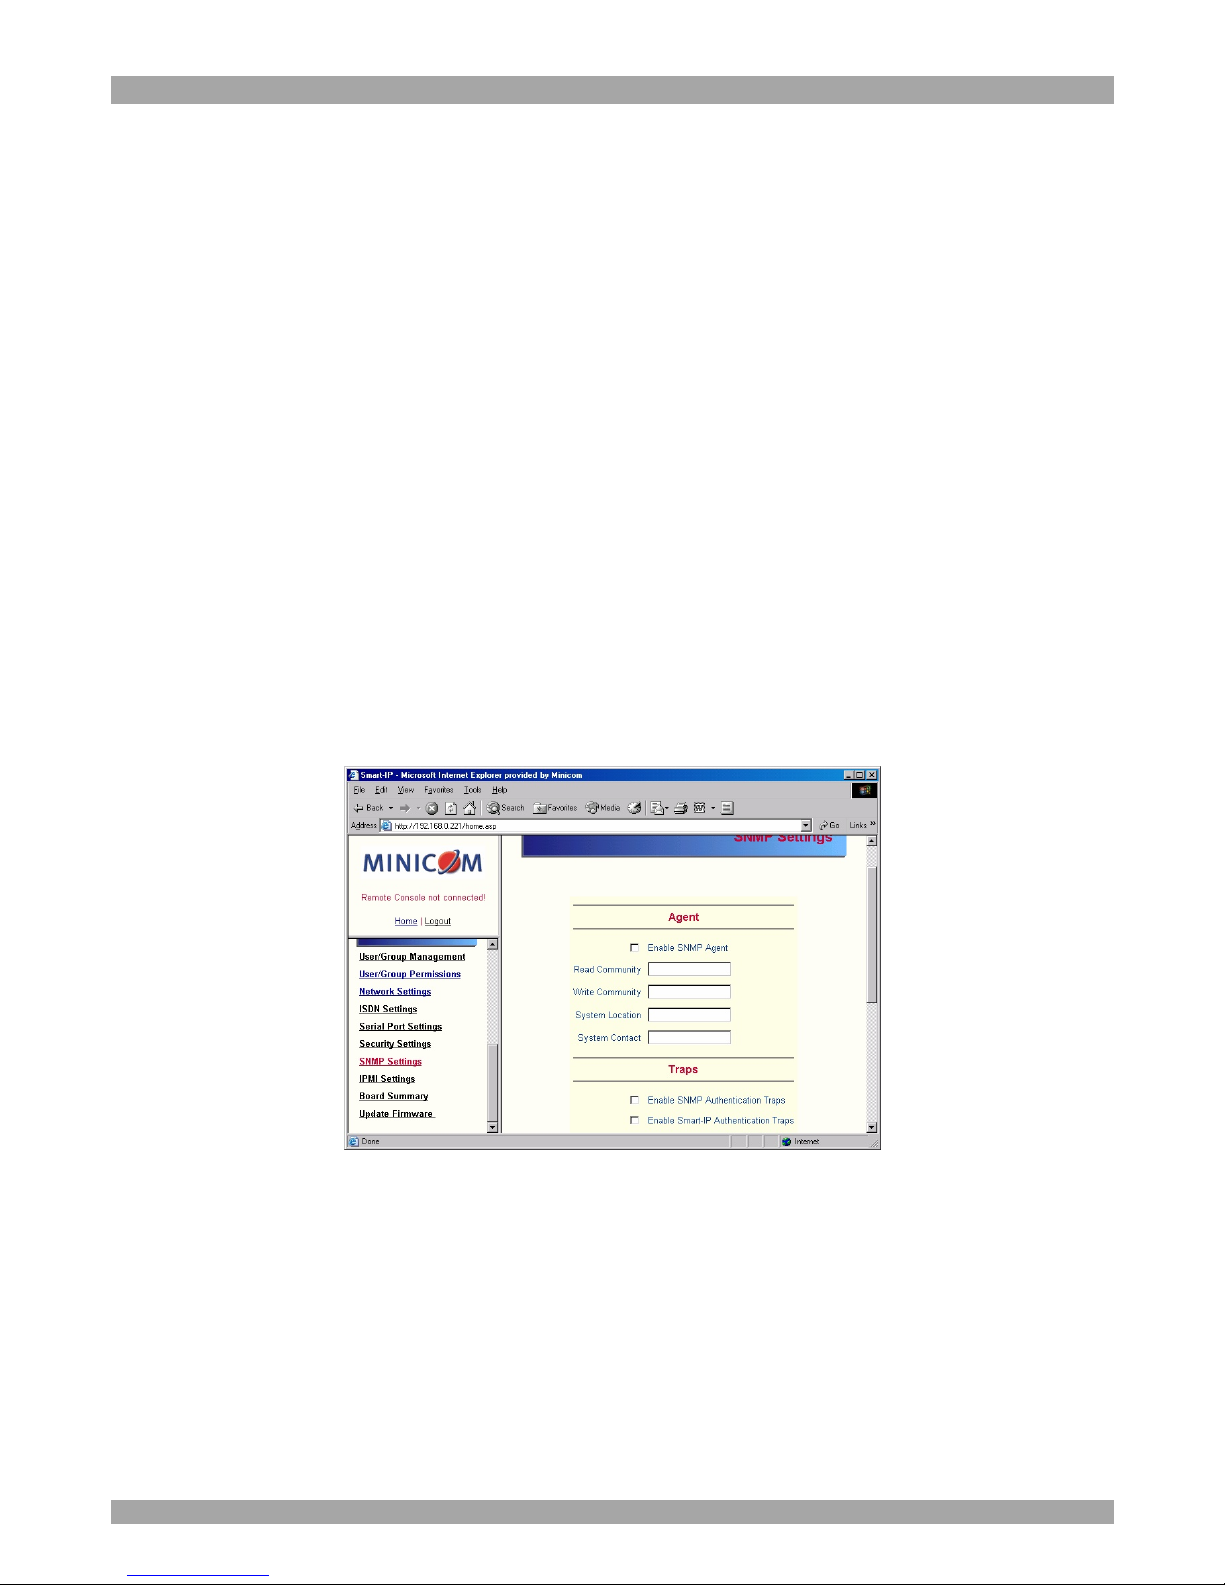
From the DX User IP Menu choose SNMP settings. The SNMP Settings appear. See
Figure 36.
Figure 36 SNMP settings
You can change the following parameters:
Enable SNMP Agent - When checked, DX User IP will answer to SNMP requests.
If a community is blank, you cannot perform the request. E.g. if you want to disable
the possibility to reset DX User IP via SNMP, don't set a write community.
Read Community - This is the SNMP community, which allows you to retrieve
information via SNMP.
Page 48

DX USER IP
47
Write Community - This community allows you to set options and reset DX User
IP or the host via SNMP.
System Location - Type a description of the physical location of the host. This will
be used in reply to the SNMP request "sysLocation.0".
System Contact - Type a contact person for the host. This will be used in reply to
the SNMP request "sysContact.0".
Enable SNMP Authentication Traps -When checked, an SNMP trap will be sent
in case somebody has tried to access DX User IP via SNMP using a wrong SNMP
community.
Enable DX User IP Authentication Traps - When checked, an SNMP trap will be
sent if somebody tries to login via the Web front-end. Both successful and failed
logins trials will be indicated. Furthermore, there will be notification about other
security violations like trying to perform an action via Web front-end for which a
user has no permission.
Enable Host Traps -When checked, DX User IP will send SNMP traps whenever
the host is reset, powered down or powered up.
Trap destinations Enter IP addresses, to which the traps will be sent. For every IP
address, set an according community so that your management client can identify
the SNMP traps.
After making the entries click .
The DX User IP SNMP MIB
Click the link to access the DX User IP SNMP MIB file. With it, an SNMP client
can communicate with DX User IP. Copy the MIB file and import it to the SNMP
client software.
38. IPMI Settings
The DX User IP IPMI (Intelligent Platform Management Interface) is an additional
way to power on or off the system or to perform a hard reset. You can also show an
event log of the host system and the status of some system sensors (i.e. temperature).
If your host system supports IPMI, you can access it in one of the following ways:
· IPMI over Serial
· IPMI over LAN
Both require IPMI V1.5.
Page 49
USER GUIDE
48
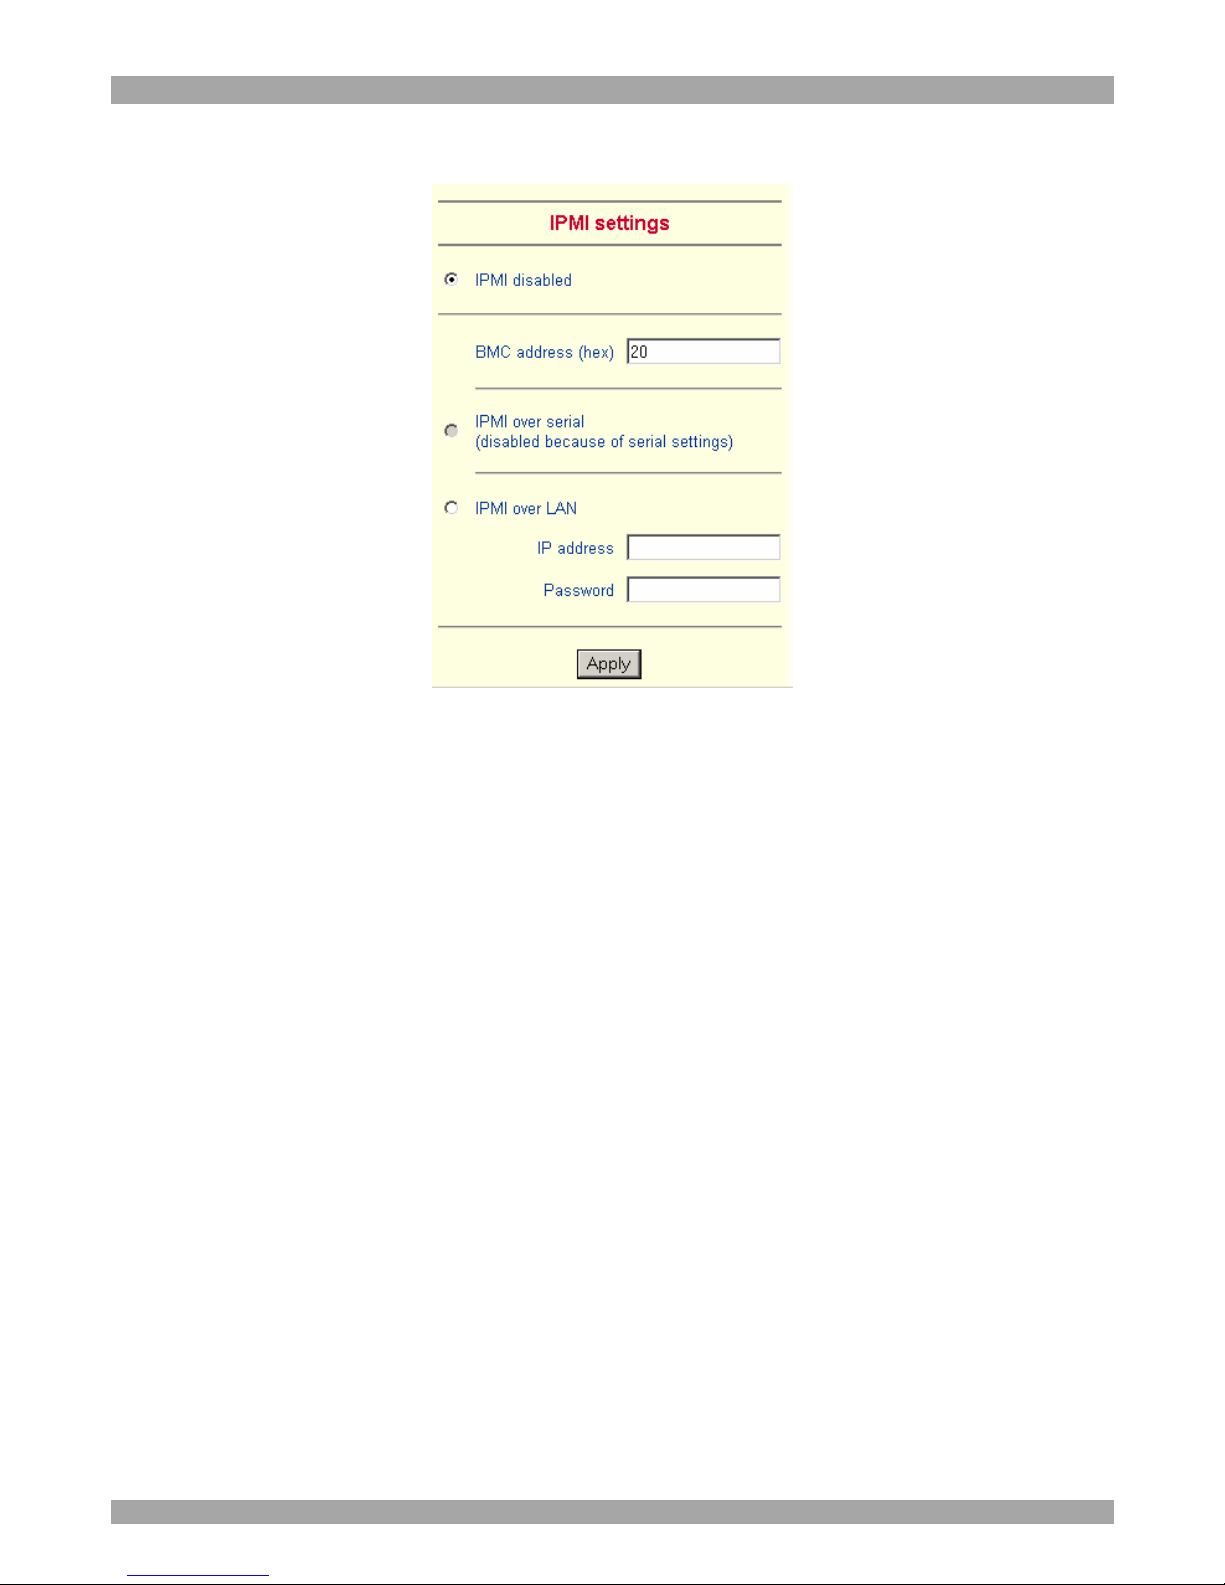
From the DX User IP Menu choose IPMI Settings. The IPMI Settings appears. See
Figure 37.
Figure 37 IPMI Settings
IPMI disabled - Disables IPMI. Status via IPMI and Event Log via IPMI are not
available and the power on/off and reset functions won't use IPMI.
BMC address - Hexadecimal Baseboard Management Controller address. Needed
for all types of communication to the IPMI-interface. Usually you can find this
address in the BIOS of the host system. The default and common value is 20.
IPMI over Serial - If your host system supports IPMI V1.5 and has an Intel EMP
(Emergency Management Port, usually COM2) connector, you can connect IPMI
through serial port 1 on DX User IP. Please note:
· Set the EMP port to Always enable and switch off the Restricted Mode.
· The BMC should accept a null username and a non-null password account
as login.
· Passwords are 4 -16 characters long.
· Use a null modem cable for connection
IPMI over LAN - You can connect the IPMI over a LAN connection. You need a
host system with IPMI V1.5 and a network adapter with a sideband connection to
the BMC (mostly on board). In the IPMI Settings, enter the IP-address of this host
system and the correct password for the LAN connection.
You can also access other IPMI systems when you enter their IP address.
Page 50
DX USER IP
49
39. LDAP Settings
You can keep authentication information in a central LDAP directory. The purpose
of LDAP is simply to confirm the password during login with the LDAP server. The
user must exist on both the LDAP and Smart IP 16 side.
On login Smart IP 16 internal user management checks the user. If the user is
verified the password is then checked against the LDAP server. If the password is
verified the user is logged in and the user rights are taken from Smart IP 16 local
user management
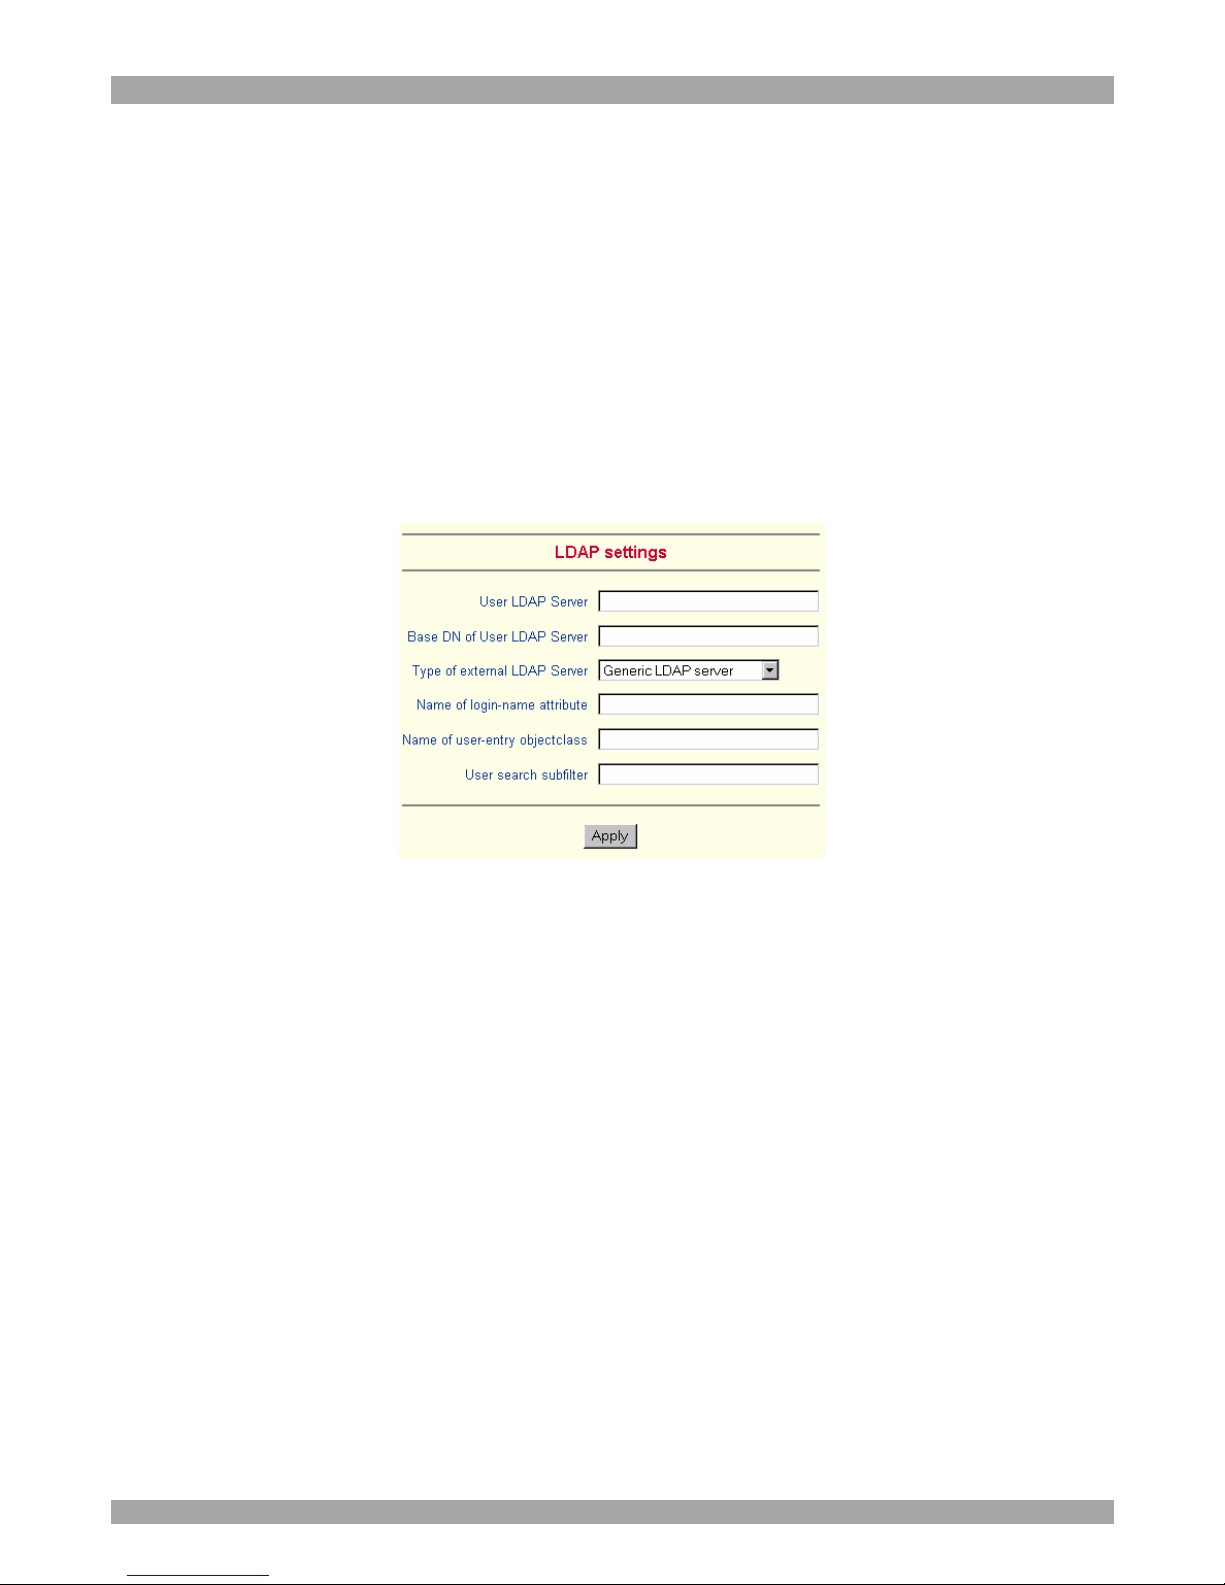
From the DX User IP Menu choose LDAP Settings. The LDAP Settings appears.
See Figure 38.
Figure 38 LDAP Settings
User LDAP Server - Enter the name or IP address of the LDAP server containing
all the user entries. If you use a name, configure a DNS server in the network
settings.
Base DN of User LDAP Server - Specify the distinguished name (DN) where the
directory tree starts in the user LDAP server.
Type of external LDAP Server - Set the type of the external LDAP server. This is
necessary since some server types require special handling. Also the default values
for the LDAP schema are set appropriately. Choose between Generic LDAP Server,
Novell Directory Service and Microsoft Active Directory. If you don’t have Novell
Directory Service or Microsoft Active Directory then choose Generic LDAP Server
and edit the LDAP schema used (see below).
Name of login-name attribute - Name of the attribute containing the unique login
name of a user. To use the default leave this field empty. The default depends on the
selected LDAP server type.
Page 51

USER GUIDE
50
Name of user-entry object class - The object class that identifies a user in the
LDAP directory. To use the default leave this field empty. The default depends on
the selected LDAP server type.
User search subfilter - Refine the search for users that should be known to the DX
User IP.
40. Maintenance
From the DX User IP Menu choose Maintenance. The DX User IP Maintenance
window appears.
Board Summary - This contains information about the DX User IP and its current
firmware.
Updating firmware
You can receive firmware updates by email or download them from the Minicom
Web site. Save the firmware file on the client computer.
To update the firmware:
1. Scroll down the Maintenance window. Under Maintenance features click Update
Firmware. The Update Firmware window appears. See Figure 39.
Figure 39 Update Firmware window
2. Locate and upload the firmware file from your client system. In case of any
errors the upload will be aborted.
After a smooth upload the Update Firmware panel appears showing the current
firmware version number and the uploaded firmware version number.
3. Press the Update button. The firmware updates. Warning! This process is
irreversible; ensure the DX User IP's power supply won't be interrupted during
the update process, as this may cause damage.
4. When prompted reset DX User IP manually by pressing the
button. When pressed all connections to the administration or Remote console
close. 30 seconds later, DX User IP runs with the new firmware. You must login
again.
Page 52
DX USER IP
51
Attention: Only experienced staff members or administrators should perform a
firmware update.
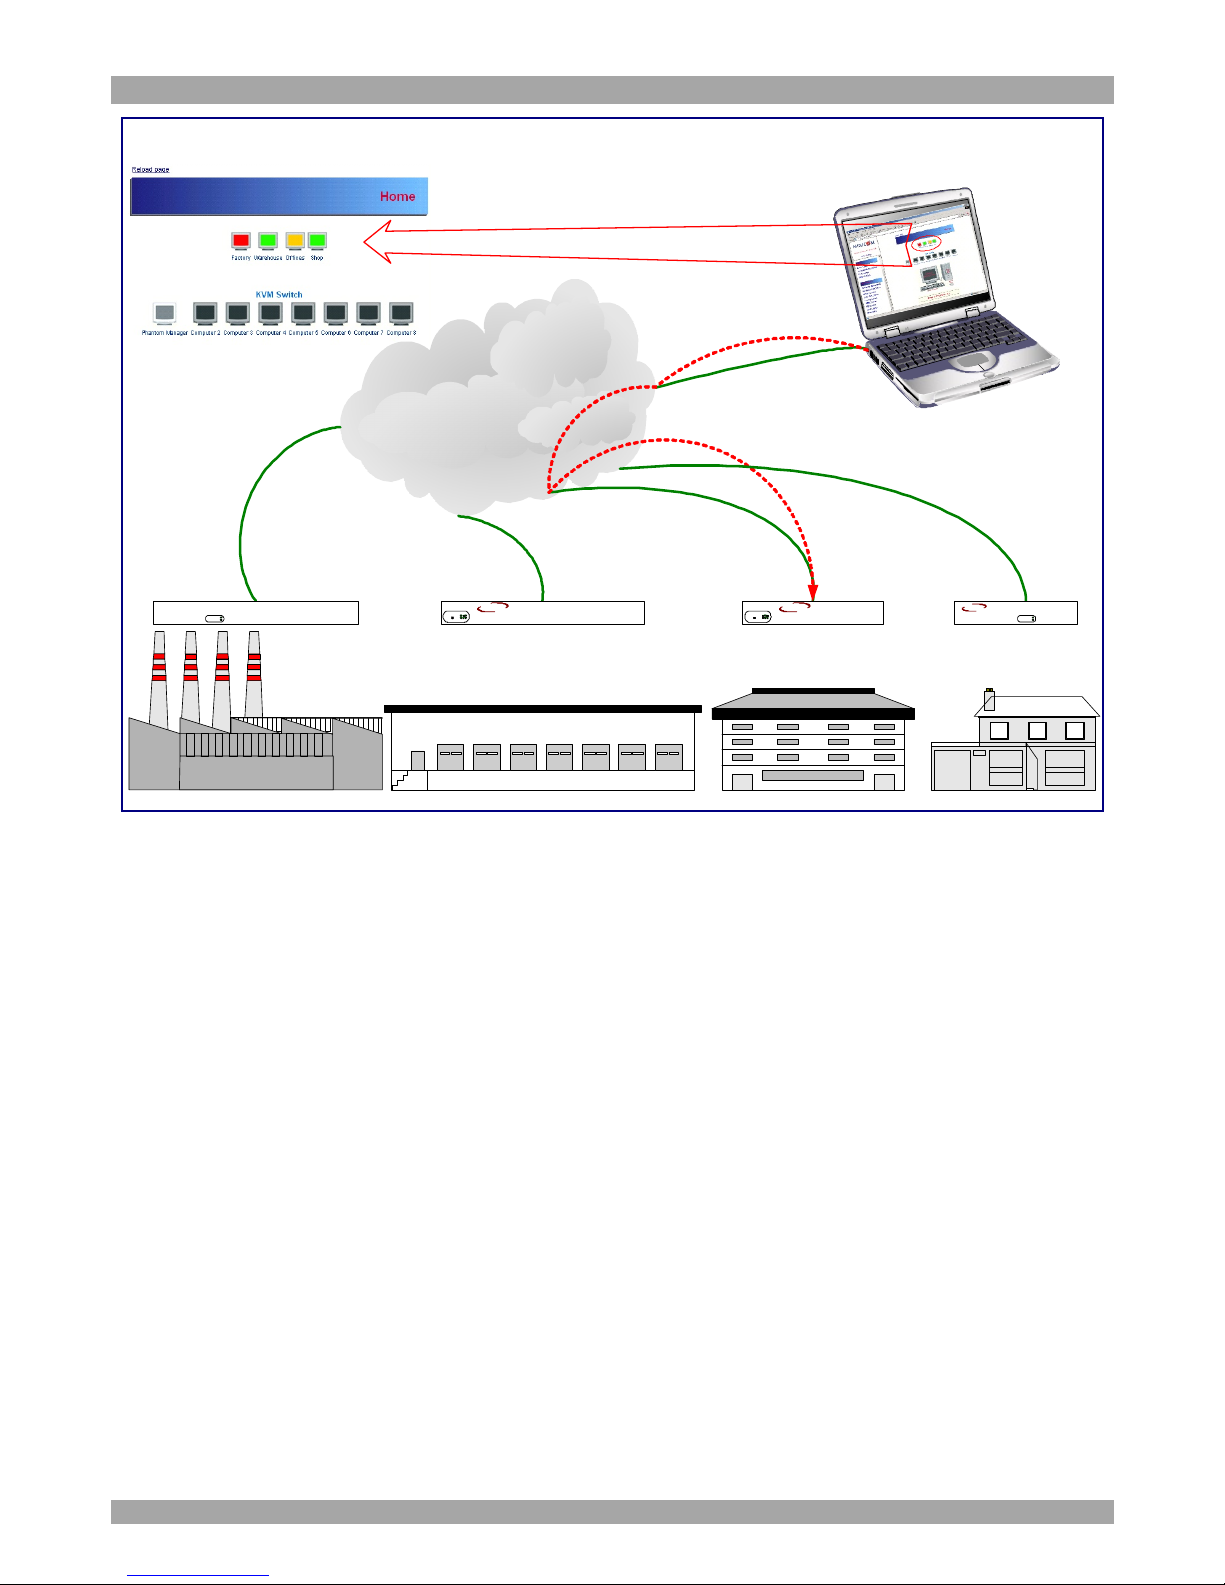
Direct SmartIP Links
You can set up direct links to any Minicom IP hardware over a LAN or WAN. Use
the links to directly connect to these IP units without having to remember their IP
addresses. You can also see the status of the remote IP units as explained below.
All the IP units must have firmware that supports direct connection functionality.
Ensure that firmware of all units is updated to the latest version. See the User Guide
of each IP unit to update the firmware.
To set up the direct connections:
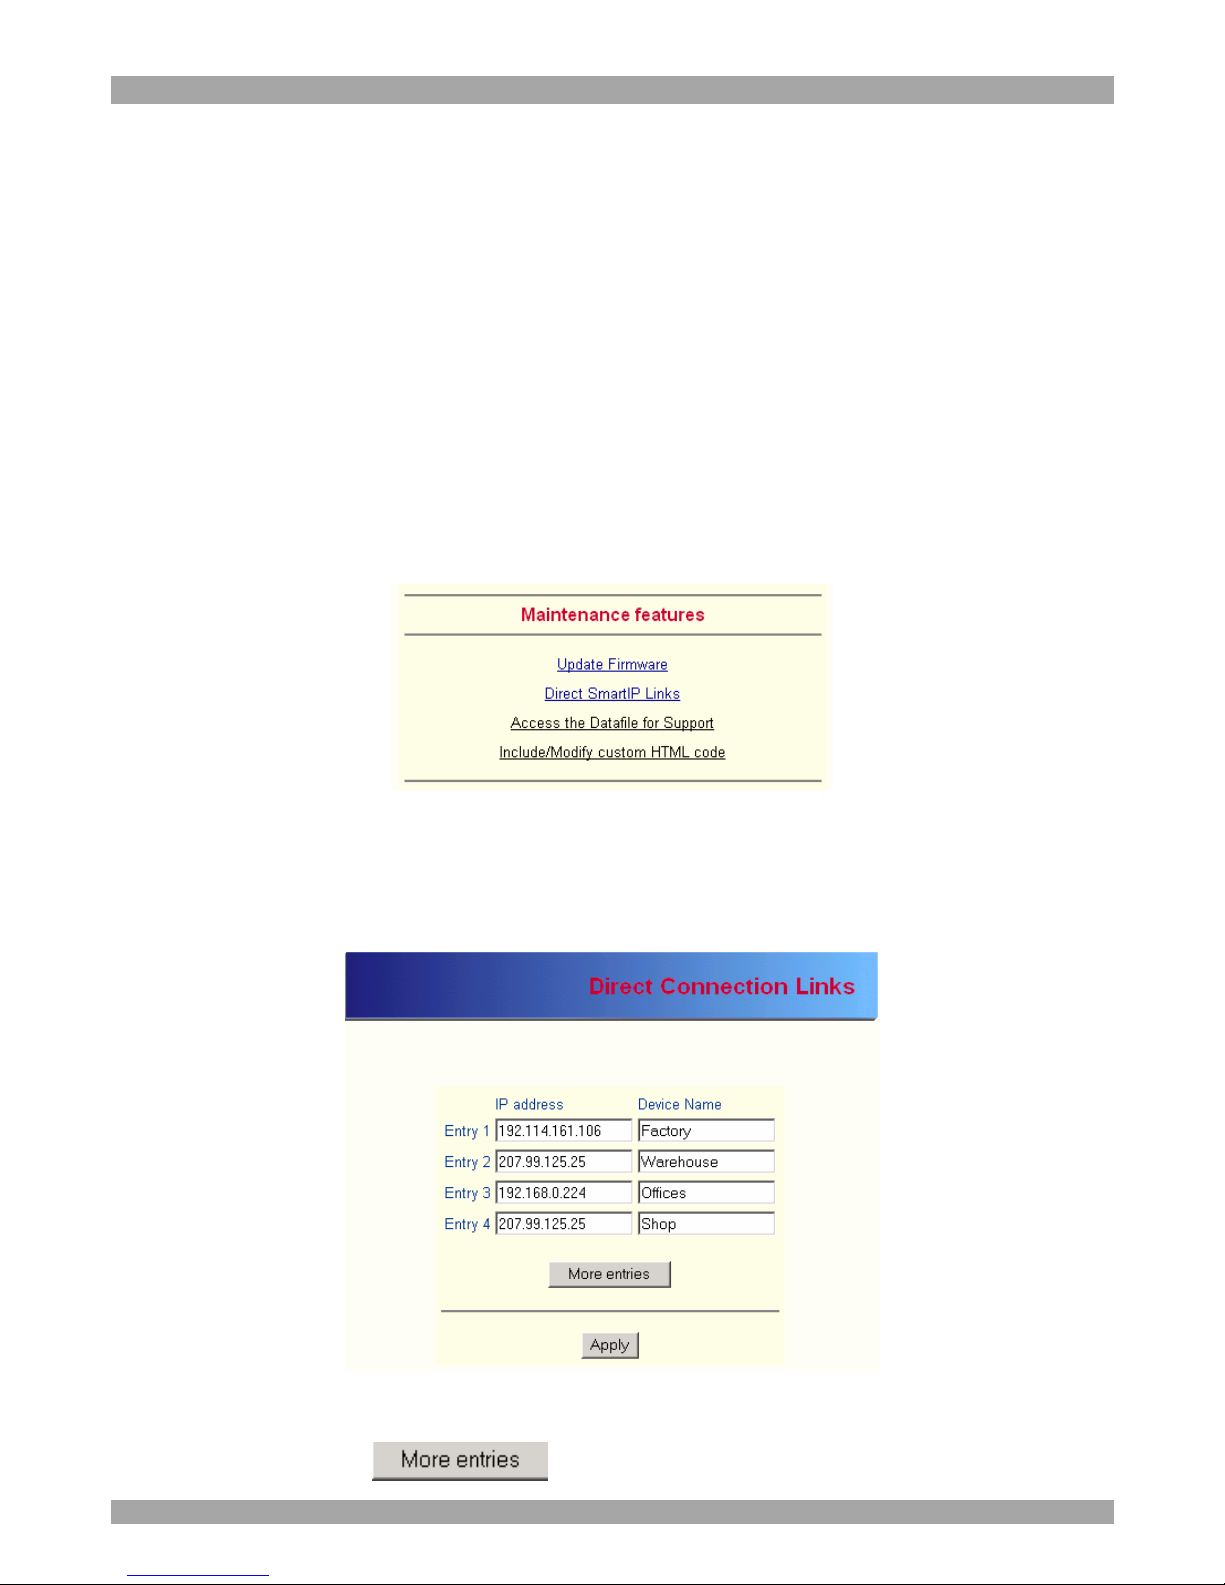
1. Scroll down the Maintenance window to Maintenance Features. See Figure 40.
Figure 40 The Maintenance Features
2. Click Direct SmartIP Links. The Direct Connection Links page opens.
See Figure 41.
Figure 41 The Direct Connections Links page
3. In the IP address column, type IP addresses of the other Minicom IP units. For up
to 16 entries press .
Page 53

USER GUIDE
52
4. In the Device Name column type a description.
5. Click Apply. On the Home page Monitor icons representing the direct connection
IP units appear. See Figure 42.
Figure 42 The Monitor icons
The icons are color coded as follows:
Icon Meaning
Gray
Powered off or disconnected from the network
Green Powered on but no user is logged in
Orange A user is logged in
Red
User is working with the remote console
Note! If the state of one device changes, there may be a delay of some seconds until
icon colors reflect the true situation especially where the network link of this device
is going down.
To connect to an IP unit:
Click the desired icon on the Home page. The Login page of that IP unit appears.
Figure 43 below illustrates a direct connections link scenario.
Page 54
DX USER IP
53
Factory Warehouse
Offices
LAN or WAN
Direct Connection Links
for all Minicom IP Solutions
Shop
On-Line Status and Direct Links to all
Minicom IP products in organization.
Phantom MX IPSmart Switch IP 16Smart IP ExtenderSmart IP Link
Remote Administrator
IP Extender
MINICOM
GI
ERV
F
RESET
SMART
MINICOM
SMART
IPLink
Activity
SystemOK
SWITCHIP
MINICOM
www.minicom.com
GI
ERV
F
RESET
SMART
CAT5
MINICOM
PHANTOM
Activity
SystemOK
MXIP
Figure 43 Direct connections link scenario
Access the Datafile for support
Click the link to access the DX User IP data file. The file contains support
information, which will help us to troubleshoot your problem.
Include/modify custom HTML code
You can modify the HTML code of the Home page to include customized graphics
and text. You can’t save graphics on the DX User IP therefore the graphics should
be accessible on the Network. Define Primary and secondary DNS in the Network
settings if needed.
The system is now fully configured, you can now access the remote console.
Page 55
USER GUIDE
54
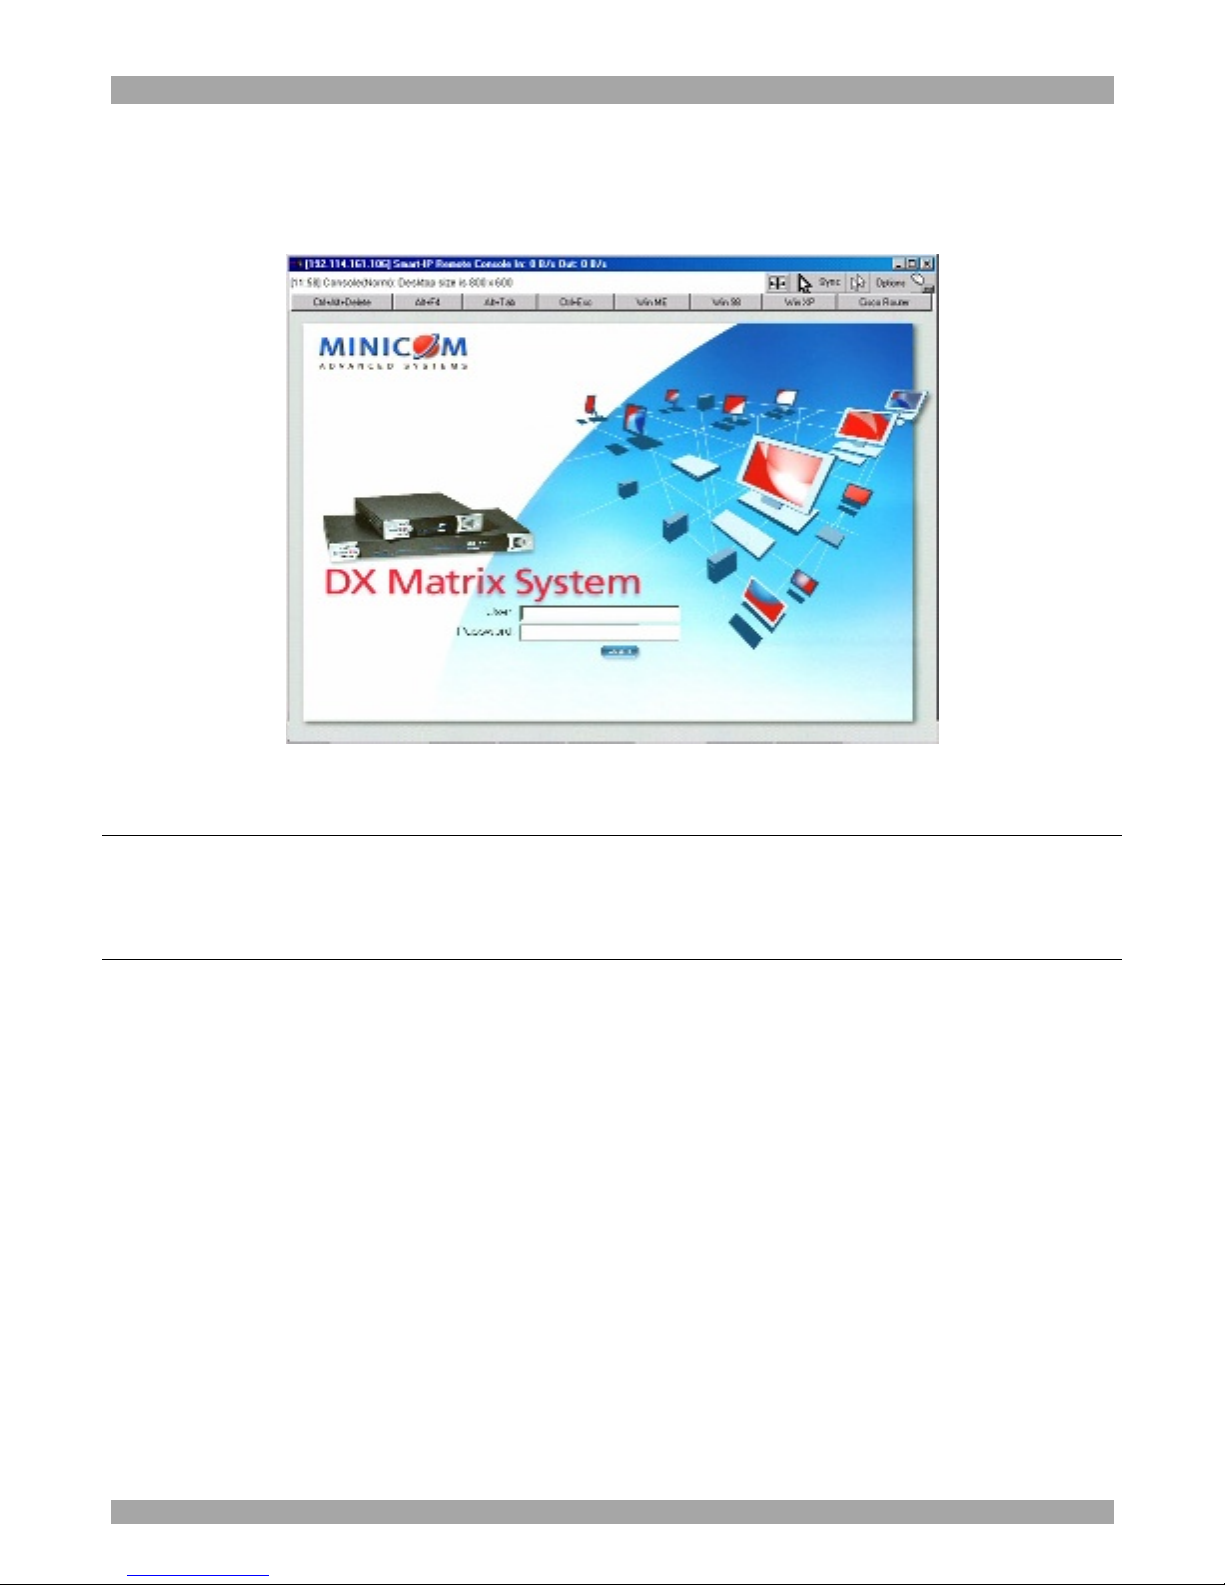
41. Accessing the remote console
From the menu click Show Remote Console. The DX Login screen appears inside
the remote console. See Figure 44.
Figure 44 The DX Login screen inside the remote console
Go to the DX Operating Guide
Type the default username ‘admin’ and password ‘admin’.
To configure/manage the devices connected to the DX system see the DX Operating
Guide.
You can work on the remote console with the keyboard and mouse. The delay with
keyboard and mouse reactions - if any - depends on the line connection bandwidth.
42. Keyboard layout
Your host keyboard changes its layout to match the remote host system. So for
example if the host system uses a US English keyboard layout, special keys on a
German keyboard won't work but will function as US English keys.
To solve this problem, adjust the remote system keyboard to the same mapping as
your host one. Alternatively, use the Soft-Keyboard that is part of the Remote
Console applet.
Page 56
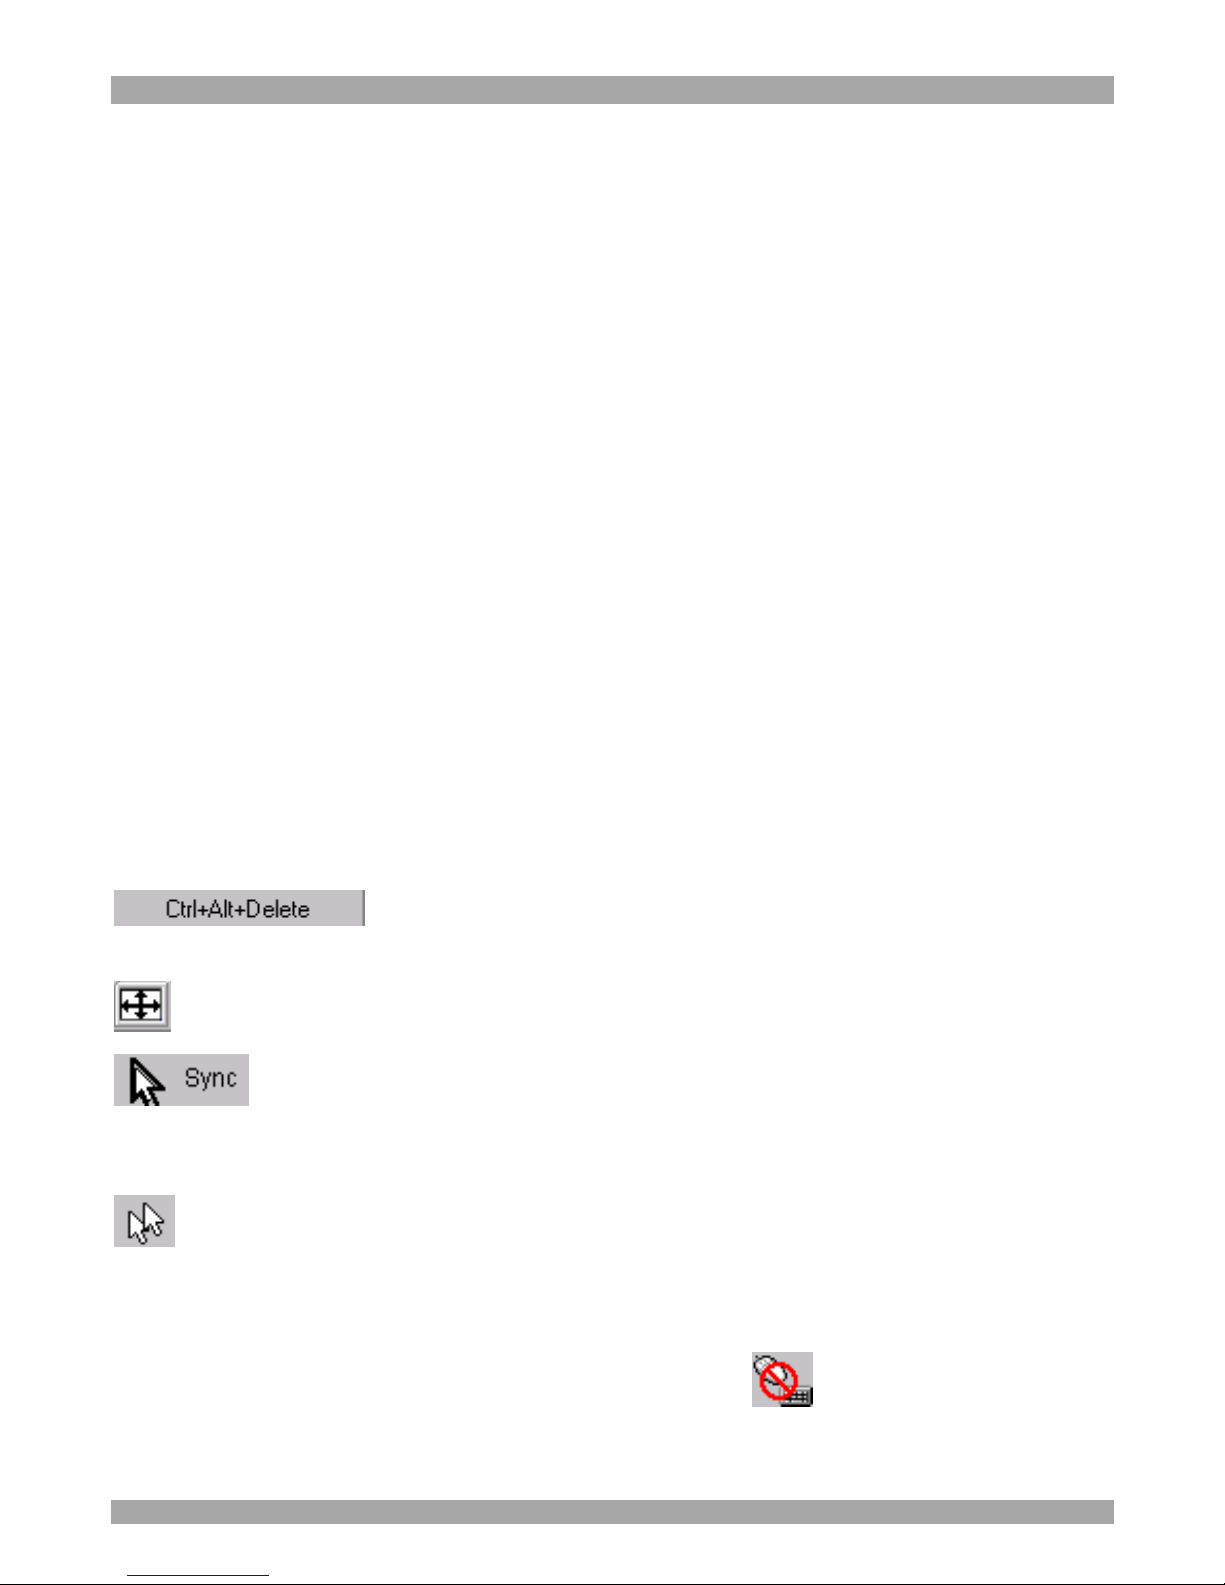
DX USER IP
55
The Remote Console window is a Java Applet that tries to establish its own TCP
connection to DX User IP. The protocol that is run over this connection is not HTTP
or HTTPS but a protocol called RFB (Remote Frame Buffer Protocol). Currently
RFB tries to establish a connection to port number 443. Your local network
environment must allow this connection to be made, i.e. your firewall and, in case
you have a private internal network, your NAT (Network Address Translation)
settings must be configured accordingly.
In case DX User IP is connected to your local network environment and your
connection to the Internet is available using a proxy server only without NAT being
configured, the Remote Console is very unlikely to be able to establish the according
connection. This is because today's Web proxies are not capable of relaying the RFB
protocol. In case of problems, please consult your network administrator in order to
provide an appropriate network environment.
The Remote Console window shows the remote screen at its optimal size. However,
you can always resize the Remote Console window in your host window system.
Hint: The Remote Console window on your local window system is just one
window among others. To make the keyboard and mouse work, your Remote
Console window must have the local input focus.
43. The Control buttons /toolbar icons
The control buttons/toolbar icons have the following functions:
- Sends the `Control Alt Delete' key combination to the remote
system.
Auto adjust - Adjusts the screen to the best visual quality
Sync mouse - Synchronizes the host and remote mice. Necessary when
using accelerated mouse settings on the host system. There is generally no need to
change mouse settings on the host.
- Discussed on page 59.
Click the Options button to get the following options:
Monitor Only - When turned on, the Remote Console does not accept keyboard /
mouse input. The top right hand icon appears like this .
Page 57

USER GUIDE
56
Exclusive access - If a user has the appropriate permission, he can force the Remote
Consoles of all other users to close. No one can open the Remote Console until this
user disables the Exclusive access or logs off.
Readability Filter - Turn the filter on in scaling mode to preserve most of the
screen details. Only available with a Java Virtual Machine version number of 1.3 or
higher.
Scaling - Scale down the Remote Console. Not all display details will be preserved.
Mouse handling - The submenu for mouse handling offers two options for
synchronizing the host and the client mouse pointer - explained on page 58. The
option for 'Fast Sync' shows the hotkey if you defined one using the Remote
Console Settings.
Local cursor - Choose a cursor shape for the host mouse. The number of available
shapes depends on the Java Virtual Machine, only version 1.2 or higher offers the
full list.
Chat Window - Opens the Chat window
Video Settings – To adjust the video settings.
Refresh video - Refreshes the video
Soft Keyboard - Opens the soft-keyboard menu:
· Click Show. The soft-keyboard appears.
· Click Layout. Choose layout
· Click Mapping. Choose the desired language and country
Local Keyboard - Used to change the language mapping of your browser machine
running the Remote Console Applet. Normally the Applet determines the correct
value automatically. However, depending on your particular JVM and your browser
machine settings this is not always possible. A typical example is a German
localized system that uses a US-English keyboard mapping. In this case you have to
change the Local Keyboard setting manually to the right language.
KVM keys – Each key represents a port. See page 26 to define hotkeys to switch to
each port. The keys also appear in the toolbar.
Hotkeys - Button Keys simulate keystrokes on the remote system that cannot be
generated locally. To define hotkeys see page 18.
Encoding – Choose the desired options from the Compression and Color Depth
drop down menus.
Page 58
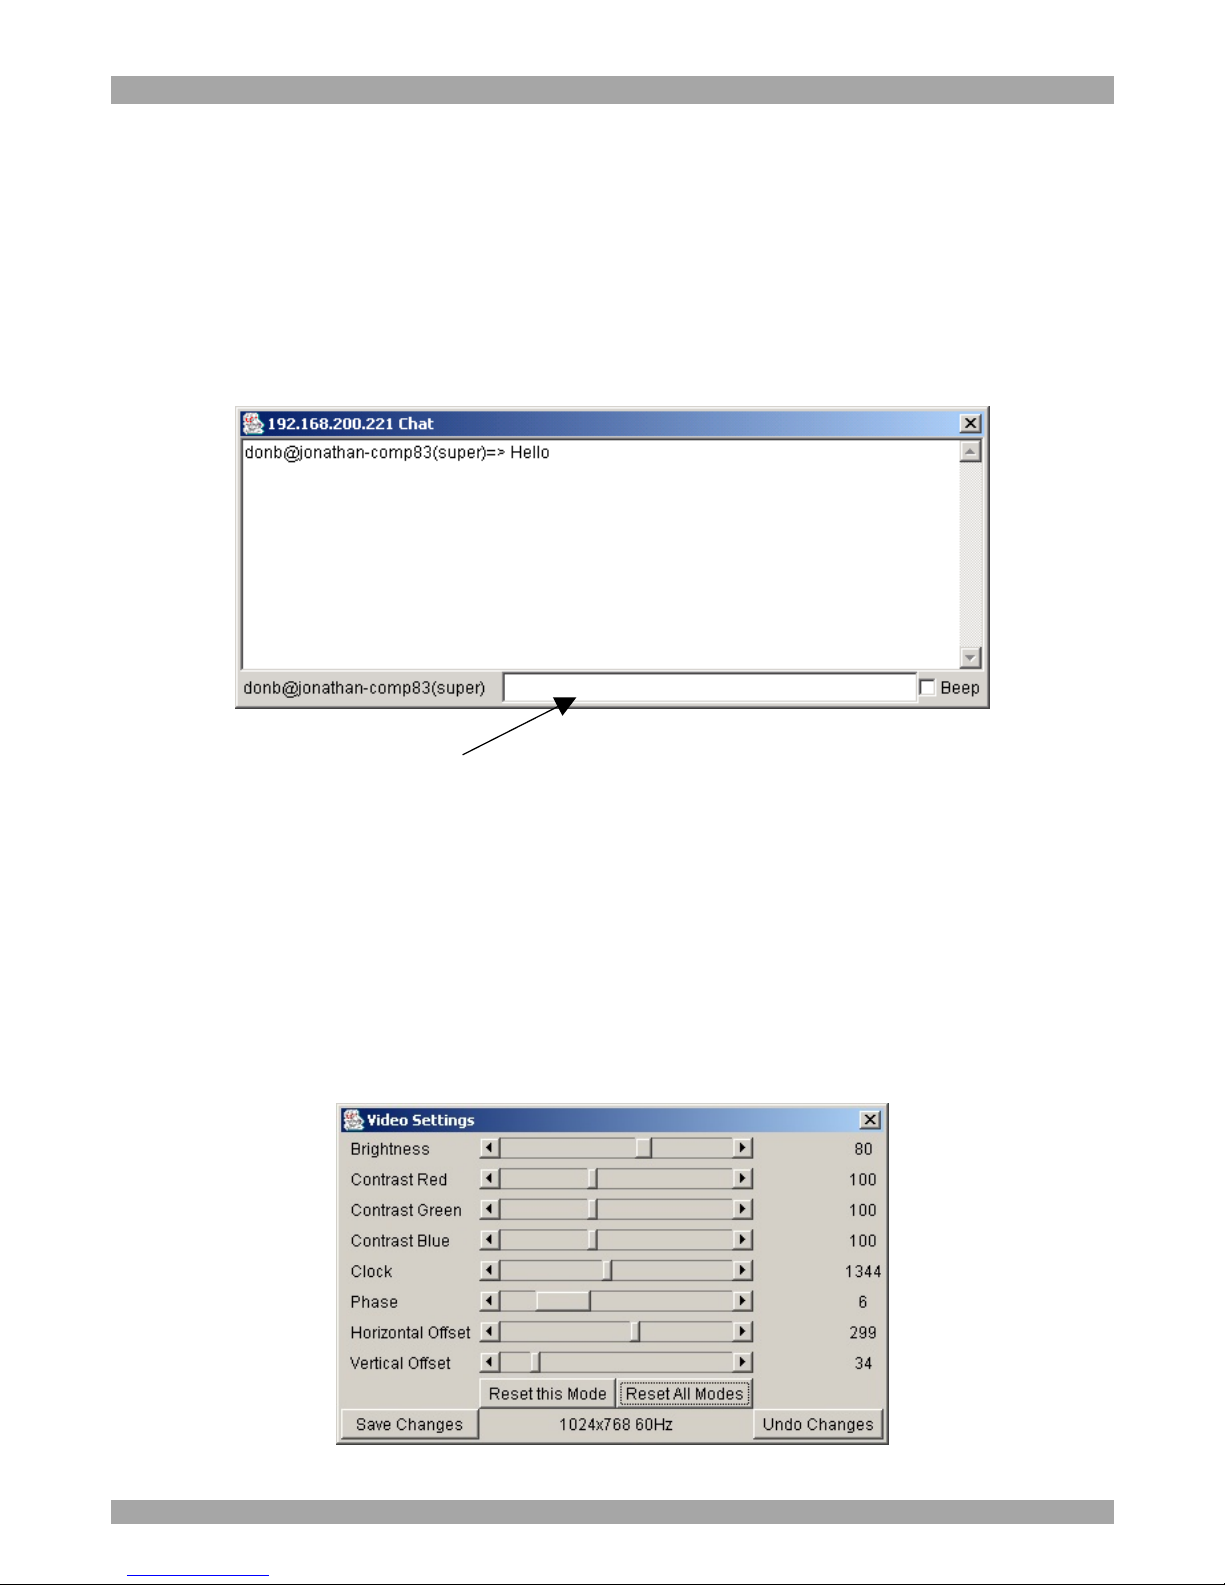
DX USER IP
57
Information bar - Shows the console and connection state and remote screen size.
The value in round brackets describes the connection to the remote system: Norm
stands for a standard connection without encryption; SSL stands for a secured
connection. Double click the bar to see a history of all the status information.
44. The Chat window
Use the Chat window to chat with others logged into the system. Figure 45
illustrates the Chat window.
Type here
Figure 45 Chat window
All messages are broadcast to ALL connected users. There is no option to direct a
message to a particular user only. There is no message history, so messages can only
be received after opening the Remote Console. Type your message and press Enter.
To end the Chat, close the Chat window.
45. The Video settings
From the Options menu choose Video Settings. The Video Settings box appears. See
Figure 46.
Figure 46 The Video settings
Page 59

USER GUIDE
58
The parameters have the following functions:
Brightness - Brightness control.
Contrast Red/Green/Blue- RGB contrast control.
Clock - Sets the horizontal frequency for a video line, this depends on the video
mode. Different video cards may require different values. The default settings and
auto adjustment procedure should be adequate for all common configurations. If not
change this setting together with the sampling phase.
Phase - Sets the phase for video sampling.
Horizontal Offset - Moves the picture in a horizontal direction.
Vertical Offset - Moves the picture in a vertical direction.
Brightness and contrast affect all modes and KVM ports globally; the other settings
are changed specifically for each mode on each KVM port.
- Resets mode to factory defaults.
- Resets all modes to factory defaults.
- Saves changes.
- Undoes changes that have not yet been saved.
46. Video Settings access
In the User/Group Permissions section on page 33, it explained how to set access
levels for all parameters including Video Settings access. A Remote Console user
can always change Brightness, Contrast and picture positions, whatever his Video
Settings access rights. A user who has permission to change the Video Settings can
also change the Clock and Phase parameters and use the reset buttons.
Hint. Always press the Auto Adjust video button before operating the
computer. The screen should be inside the borders of Remote Control window. If the
video doesn’t synchronize properly or there is a lot of incoming traffic, reset all
modes and synchronize video again to improve video transfer.
47. Mouse synchronization
There are two ways to synchronize the host and remote mice:
Fast Sync - Choose Options / Mouse Handling / Fast Sync. This corrects a
temporary, but fixed skew.
Page 60
DX USER IP
59
Intelligent Sync - If fast sync doesn't work or the mouse settings have been changed
on the host system use the Intelligent Sync option.
To do so:
1. Ensure the picture is correctly adjusted, Click Auto Adjust or manually correct
the picture using the Video Settings.
2. Choose Options / Mouse Handling / Intelligent Sync.
Pressing the button leads to a fast sync, except when the video mode
recently changed.
Note! For the intelligent sync to work, the picture MUST be correctly adjusted. Use
the auto adjustment function or the manual correction in the Video Settings panel to
adjust the picture. The video must also be of sufficiently good quality.
Single mouse mode
The information above applies to the Double Mouse Mode, where remote and host
mouse pointers are visible and need to be synchronized. There is also the Single
Mouse mode. In this mode only the client mouse pointer is visible.
Single Mouse mode needs a Sun Java Virtual Machine 1.3 or later.
Select the mode in the Remote console – see Figure 44.
From the Options menu choose Mouse Handling/Mouse Mode/ Single Mouse Mode.
Or press from the Control Buttons toolbar. The client mouse pointer can be
controlled directly.
To leave this mode, you must define a mouse hotkey in the Remote Console Settings
Panel – see page 18. Press this key to free the captured host mouse pointer.
Page 61

USER GUIDE
60
Frequently Asked Questions
Q 1: The client mouse doesn't work or is not synchronized.
A: Ensure the DX User IP mouse settings match the mouse model. Also see page 58
Q 2: Bad video quality or grainy picture
A: Use the brightness and contrast settings - see page 57. Use the auto adjustment
feature to correct a flickering video.
Q 3: Login fails.
A: Was the correct user and password given? On delivery, the user "super" has the
password "smart". Configure your browser to accept cookies.
Q 4: I use the Mozilla Browser 0.9.x., Netscape 6.x and https (secure http). When I
try to open the Remote Console applet loading fails with Bad Magic Number
Exception.
A: This is a bug in some older versions of Mozilla. Don't use https, or upgrade your
Browser.
Q 5: The Remote Console window can't connect to DX User IP.
A: Maybe a firewall prevents access to the Remote Console. Ensure the TCP port
numbers 443 or 80 are open for incoming TCP connections.
Q 6: Cannot connect to DX User IP.
A: Check if the network connection is working (ping the IP address of DX User IP).
If not, check network hardware. Is DX User IP powered on? Check if the IP address
of DX User IP and all other IP related settings are correct. Also verify that all the IP
infrastructure of your LAN, like routers are correctly configured. Without a ping
functioning, DX User IP can't work.
Q 7: Special key combinations, e.g. ALT+F2, ALT+F3 are intercepted by the
console system and not transmitted to the host.
A: Define a so-called 'Button Key'. This can be done in the Remote Console
settings.
Q 8: In the browser the DX User IP pages are inconsistent or chaotic.
A: Ensure your browser cache settings are feasible, and are not set to something like
"never check for newer pages". Otherwise DX User IP pages may be loaded from
your browser cache and not from the card.
Q 9: Windows XP doesn't awake from standby mode
A: This is possibly a Windows XP problem. Try not to move the mouse while XP
goes into standby mode.
Page 62

DX USER IP
61
Glossary of terms
ACPI - A specification that enables the operating system to implement power
management and system configuration.
ATX - Advanced Technology Extended: A particular specification of a motherboard
introduced by Intel in 1995.
BMC - Board Management Controller: implements the IPMI based main board
management functions.
DHCP - Dynamic Host Configuration Protocol: protocol for dynamically assigning
IP configurations in local networks.
DNS - Domain Name System: protocol used to locate computers on the Internet by
their name.
EMP - Emergency Management Port: provides remote emergency access and
control of server resources. EMP offers operating system independent, fundamental
remote management access regardless of the server's current state or network
availability.
HTTP - Hypertext Transfer Protocol: the protocol used between web browsers and
servers.
HTTPS - Hyper Text Transfer Protocol Secure: secure version of HTTP.
IPMI - Intelligent Platform Management Interface
MIB - Management Information Base: describes the structure of the management
information that can be accessed via SNMP.
SNMP - Simple Network Management Protocol: a widely used network monitoring
and control protocol.
SSL - Secure Socket Layer: encryption technology for the Internet used to provide
secured data transmissions.
SVGA - Super VGA: A refinement of Video Graphics Array (VGA) that provides
increased pitch and resolution performance.
Page 63

USER GUIDE
62
Appendix A: DX User IP Video modes
The DX User IP supports the following video modes. Do not use other custom video
settings.
Resolution Refresh rates (Hz)
640x350 70, 85
640x400 56, 70, 85
640x480 60, 67, 72, 75, 85, 90, 100, 120
720x400 70, 85
800x600 56, 60, 70, 72, 75, 85, 90, 100
832x624 75
1024x768 60, 70, 72, 75, 85, 90, 100
1152x864 75
1152x870 75
1152x900 66, 76
1280x960 60
1280x1024 60
1280x1024 75
1600x1200 60
Page 64
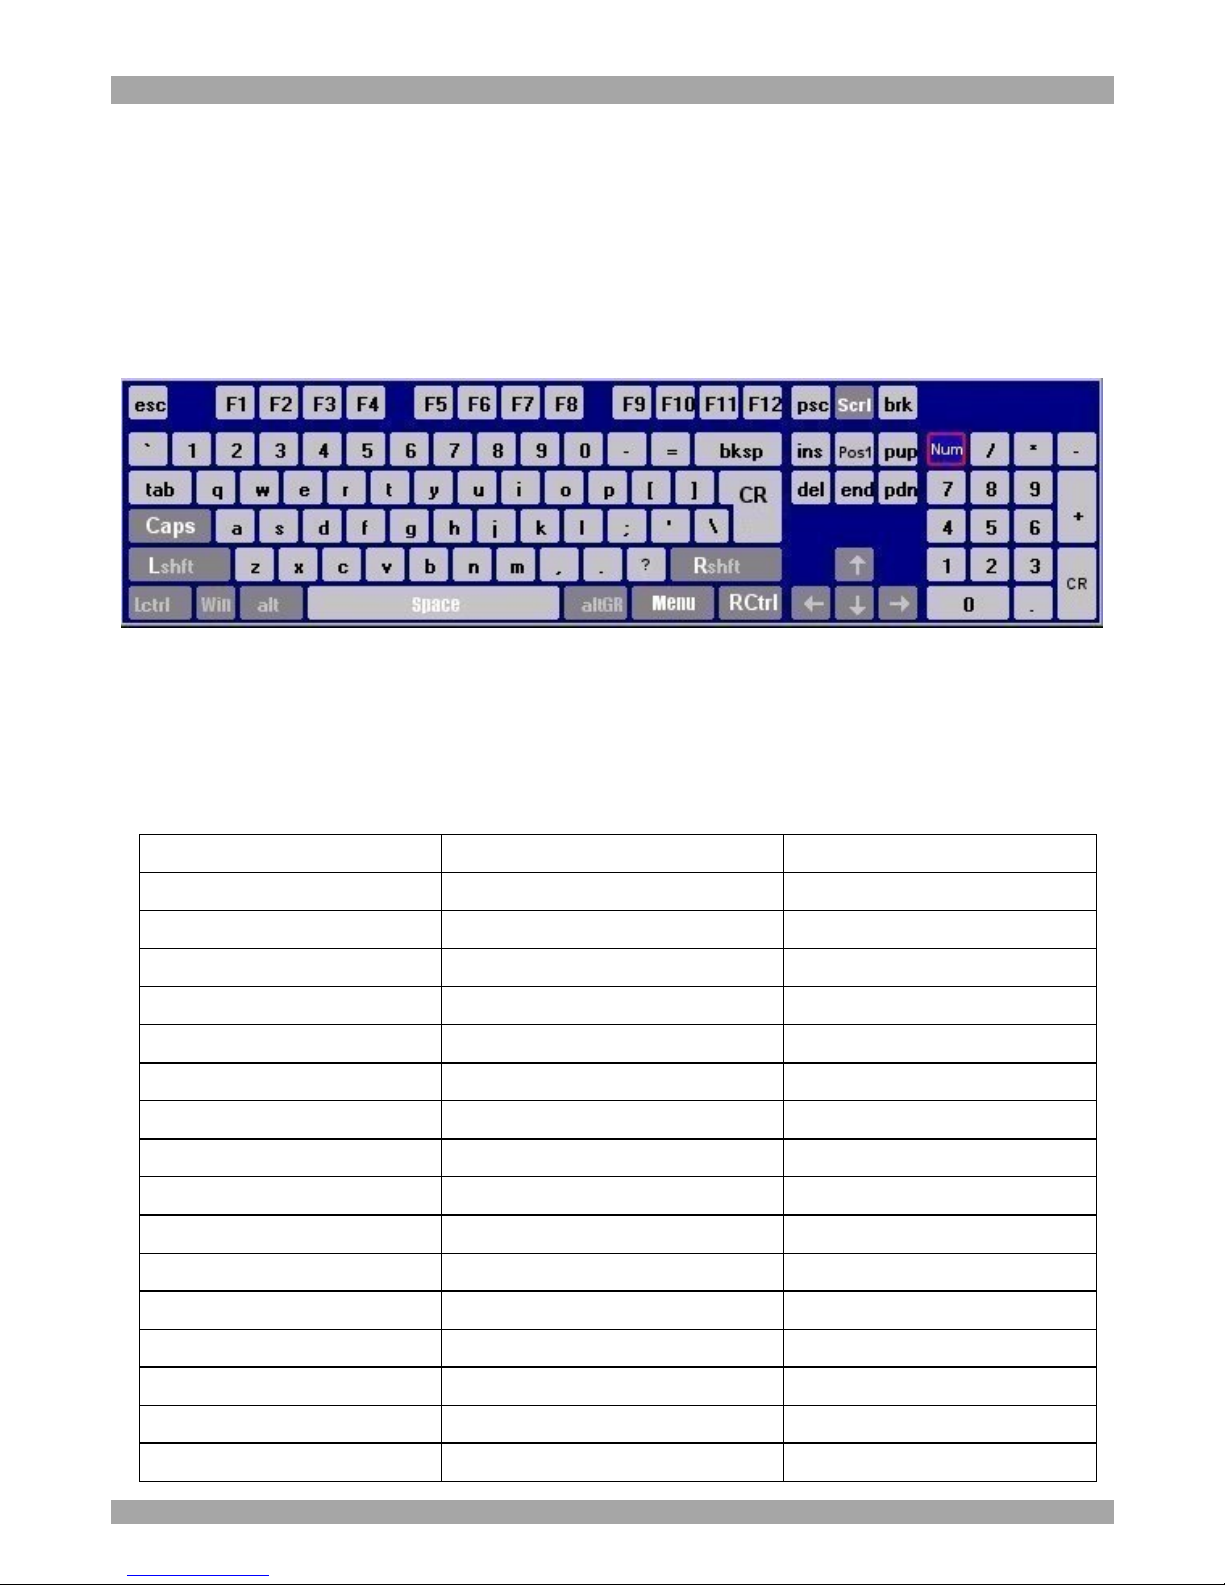
DX USER IP
63
Appendix B: Key codes
Figure 47 illustrates the keys on a standard 104 key PC keyboard with a US English
language mapping. These keys are used to define keystrokes or hotkeys for several
DX User IP functions. The keys may not represent keys used on international
keyboards. Most modifier keys and other alphanumeric keys are in identical
positions, whichever language mapping you are using.
Figure 47 US English keyboard layout
The table below lists keys that that have 2 ways of being written (Alternative) and
also keys that are written in a different way to that which appears on the actual
keyboard key (Key code).
Key Key code Alternative
~ ~ TILDE
- - MINUS
= = EQUALS
< < LESS
/ / SLASH
Bksp BACK_SPACE
Tab TAB
CR ENTER
Caps CAPS_LOCK
\ \ BACK_SLASH
Lshft LSHIFT SHIFT
Lctrl LCTRL CTRL
Win WINDOWS
Alt LALT ALT
AltGR ATGR
Esc ESCAPE ESC
Page 65

USER GUIDE
64
Key Key code Alternative
Psc PRINTSCREEN
Scrl SCROLL_LOCK
Brk BREAK
Ins INSERT
Pos1 HOME
Pup PAGE_UP
Del DELETE
Pdn PAGE_DOWN
UP
LEFT
DOWN
RIGHT
The numerical keypad codes
Key Key code Alternative
num NUM_LOCK
0 NUMPAD0
1 NUMPAD1
2 NUMPAD2
3 NUMPAD3
4 NUMPAD4
5 NUMPAD5
6 NUMPAD6
7 NUMPAD7
8 NUMPAD8
9 NUMPAD9
+ NUMPADPLUS NUMPAD_PLUS
/ NUMPAD/
* NUMPADMUL NUMPAD_MUL
- NUMPADMINUS NUMPAD_MINUS
CR NUMPADENTER
Page 66
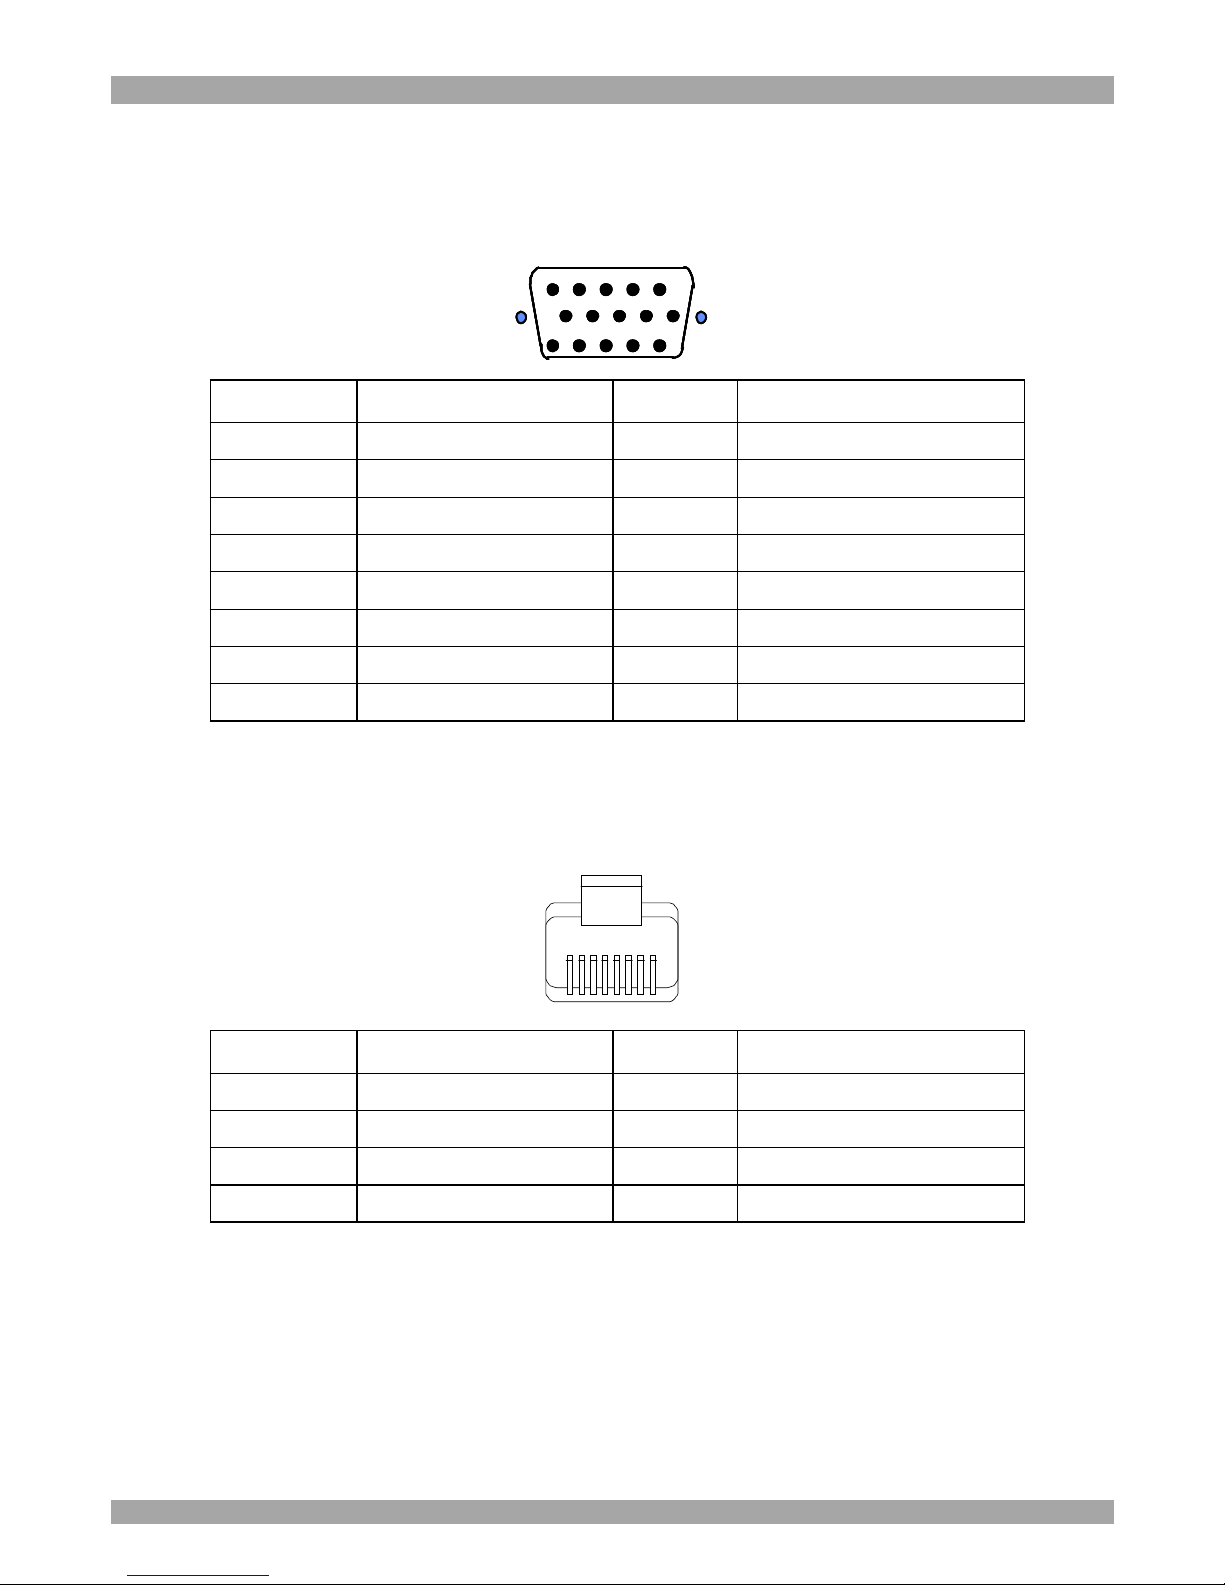
DX USER IP
65
Appendix C: Pin assignments
VGA HD-15
54321
109876
1112131415
5432154321
109876109876
11121314151112131415
Pin Assignment Pin Assignment
1 Red 9 5 V
2 Green 10 GND sync
3 Blue 11 Not connected
4 Not connected 12 SDA, DCC, ...
5 GND 13 HSYNC
6 GND red 14 VSYNC
7 GND green 15 DATA CLOCK
8 GND blue
RJ 45 Connector Ethernet
18
Pin Assignment Pin Assignment
1 TX + 5 Not connected
2 TX - 6 RX 3 RX + 7 Not connected
4 Not connected 8 Not connected
Page 67
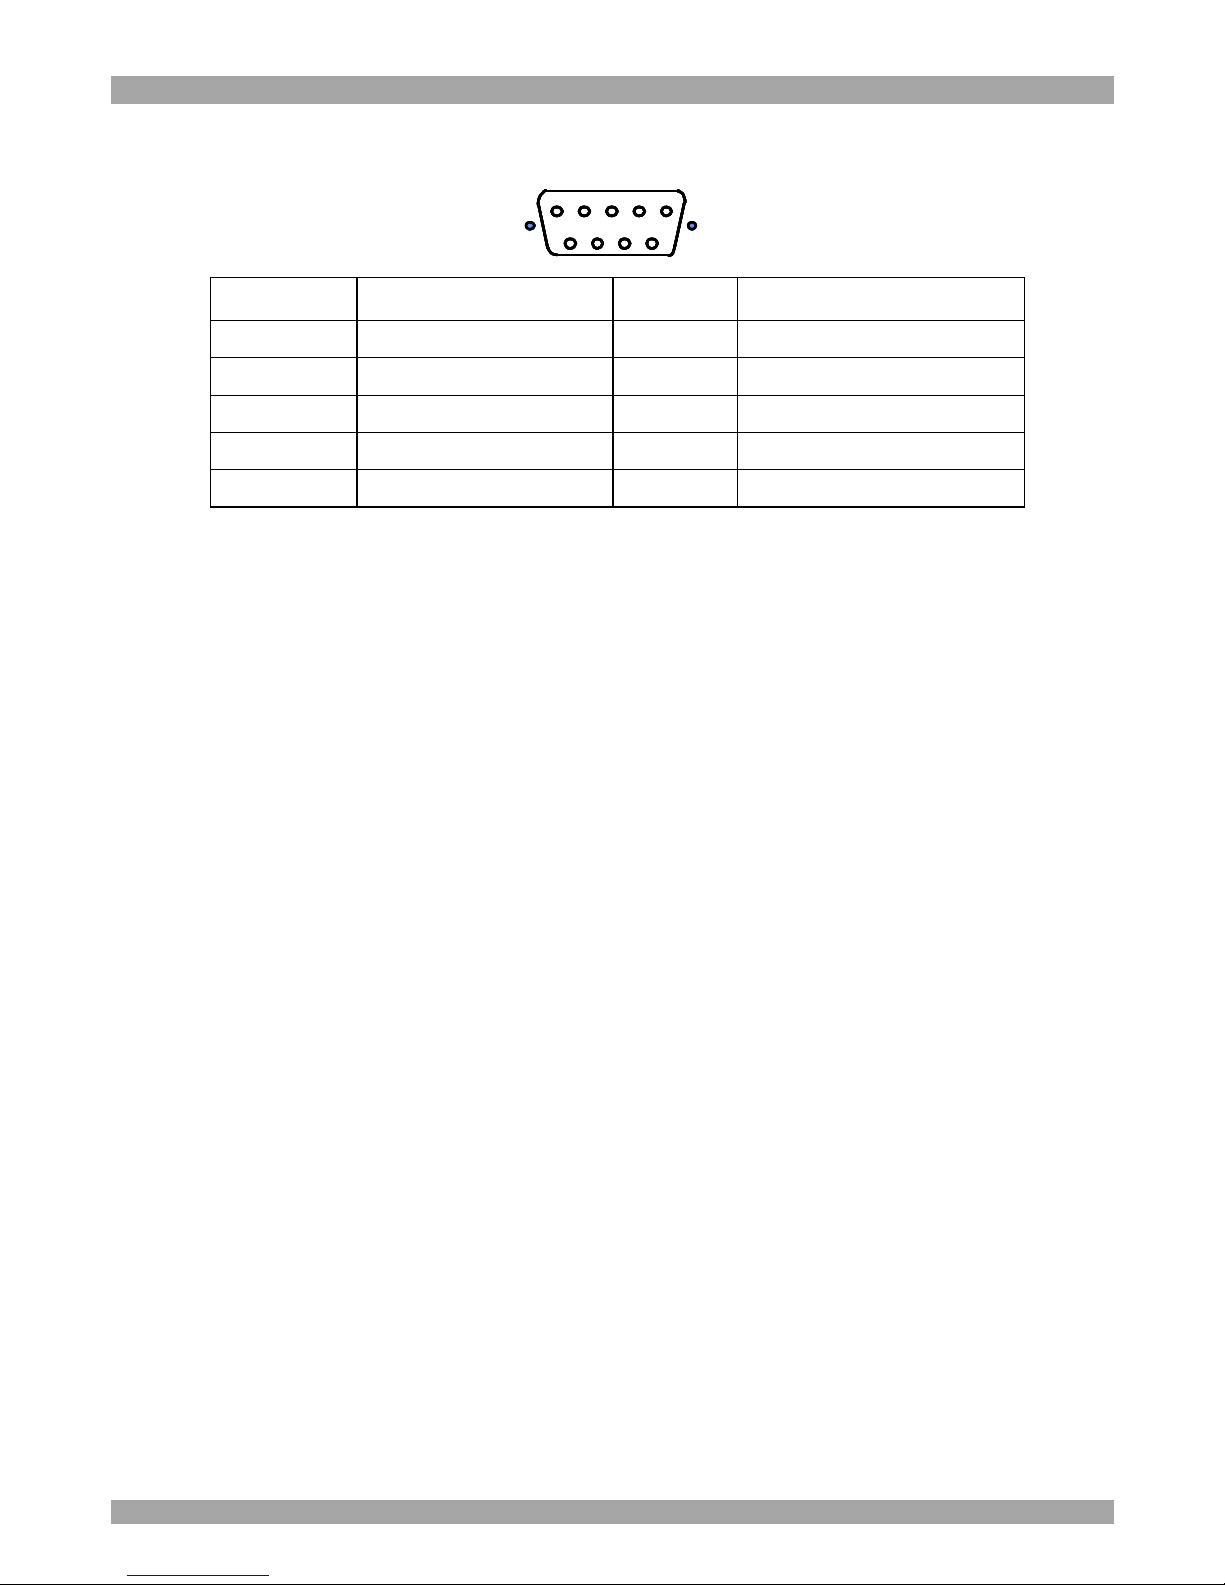
USER GUIDE
66
Serial SUB-D 9 Connector
12345
6789
12345
6789
1234512345
67896789
Pin Assignment Pin Assignment
1 DCD 6 DSR
2 RX 7 RTS
3 TX 8 CTS
4 DTR 9 RI
5 GND
Page 68

DX USER IP
67
Appendix D: Disabling mouse acceleration
The following steps describe how to disable mouse acceleration in a number of
different Operating Systems.
Windows 98 and Windows ME
1. From the Control Panel, click the Mouse icon.
2. From the Mouse Properties dialog box, click the Pointer Options tab.
3. Center the Pointer Speed slider bar
4. Click the Accelerate… button.
5. Deselect Pointer acceleration option.
Windows 98 SE and Windows NT4
1. From the Control Panel, click the Mouse icon.
2. From the Mouse Properties dialog box, click the Motion tab.
3. Set the Pointer speed slider bar completely to the left.
When a Microsoft Intellimouse driver is installed on Windows 98,
Windows ME or Windows NT4
1. From the Control Panel, click the Mouse icon
2. From the Mouse Properties dialog box, click the Pointer Option tab
3. Center the Pointer Speed slider bar.
4. Click Advanced… button.
5. Deselect Enable pointer acceleration option
NetWare 6 servers running Java 1.4.1:
1. From the NetWare 6 Graphical User Interface (GUI) Environment tool Input tab,
select Turn off mouse acceleration.
2. Click Apply and restart the GUI.
NetWare 6 servers running Java 1.3.1 CSP8 or CSP9:
1. Add the following command to the NetWare 6 sys:/java/nwgfx/xinitrc file:
xset m 1
2. Save the file and restart the GUI.
Page 69

USER GUIDE
68
Linux
1. Execute the following command line parameter:
xset 0 255
2. Or-
xset m 0
Page 70

DX USER IP
69
Appendix E: Technical specifications
Host computer Operating systems
Novel, Linux, Windows 98, 2000, XP and later
Client computer Operating systems
Windows 98, ME, 2000, XP and later, Linux.
Internet browser with full Java support.
RS232 terminal: For external RS232 control
Host computer resolution
Up to 1600x1200 @60Hz
Client computer resolution
Recommended resolution should be higher than
host computer resolution
Host mouse driver Microsoft Driver or Operating System default
mouse driver.
DX User IP to local
KVM connection
Screen – HDD15; Keyboard/Mouse – MiniDIN6
Line connection RJ45 – LAN, Autosensing 10/100 Mbit/s
Serial connection DB9:
COM for initial configuration and external modem,
Dimensions 43.2x27x4cm / 17X11X1.6”
Power supply 100 – 240 VAC
50 / 60 Hz
Operating temperature 0°C to 40°C / 32° to 104°F
Storage temperature -40°C to 70°C / -40° to 158°F
Operating humidity 10% to 90% (non-condensing)
Storage humidity 5% to 95% (non-condensing)
Warranty 3 years
Page 71

USER GUIDE
70
User Guide Feedback
Your feedback is very important to help us improve our documentation. Please
email any comments to: [email protected]
Please include the following information: Guide name, part number and version
number (as appears on the front cover).
E.g. Remote Power Switch Operating Guide, 5UM20161, V1
Page 72

DX USER IP
71
Regional Offices
Germany
Kiel
Tel: + 49 431 668 7933
France
Vincennes
Tel: + 33 1 49 57 00 00
Italy
Rome
Tel: + 39 06 8209 7902
www.minicom.com
 Loading...