

Minicam COMBO PRO owners Manual

User manual
Combo pro
a product from the company
minCam
minCam Hermann Fritz, Gruben 1, D – 87561 Oberstdorf, Tel.: +49 8326 384122, info@minCam.de 30.07.2007
Diese Gebrauchsanleitung entspricht dem technischen Stand bei Drucklegung. Änderung in Technik und anderweitige Änderungen vorbehalten

a product from the company
minCam
User manual Combo pro ...............................................................................................................................................1
A. Introduction..............................................................................................................................................................3
B. Directions for use......................................................................................................................................................3
C. Starting up the camera system..................................................................................................................................4
D. Technical Data..........................................................................................................................................................5
E. Warranty...................................................................................................................................................................5
F. Safety hints................................................................................................................................................................6
minCam Hermann Fritz, Gruben 1, D – 87561 Oberstdorf, Tel.: +49 8326 384122, info@minCam.de 30.07.2007
Diese Gebrauchsanleitung entspricht dem technischen Stand bei Drucklegung. Änderung in Technik und anderweitige Änderungen vorbehalten
a product from the company
minCam
A. Introduction
With this Combo pro you have a camera system that is ideal for entry level survey and investigation work in pipelines
from 70 up to 300mm. The self leveling camera head always shows you an upright picture which can be stored easily
on a CF-card as still or video. Even audio can be stored optionally too.
This first part of the user manual shall give you a comprehensive view about the camera system. Here you get the
technical data too.
In the second part you will find the information of how to use the Docu case.
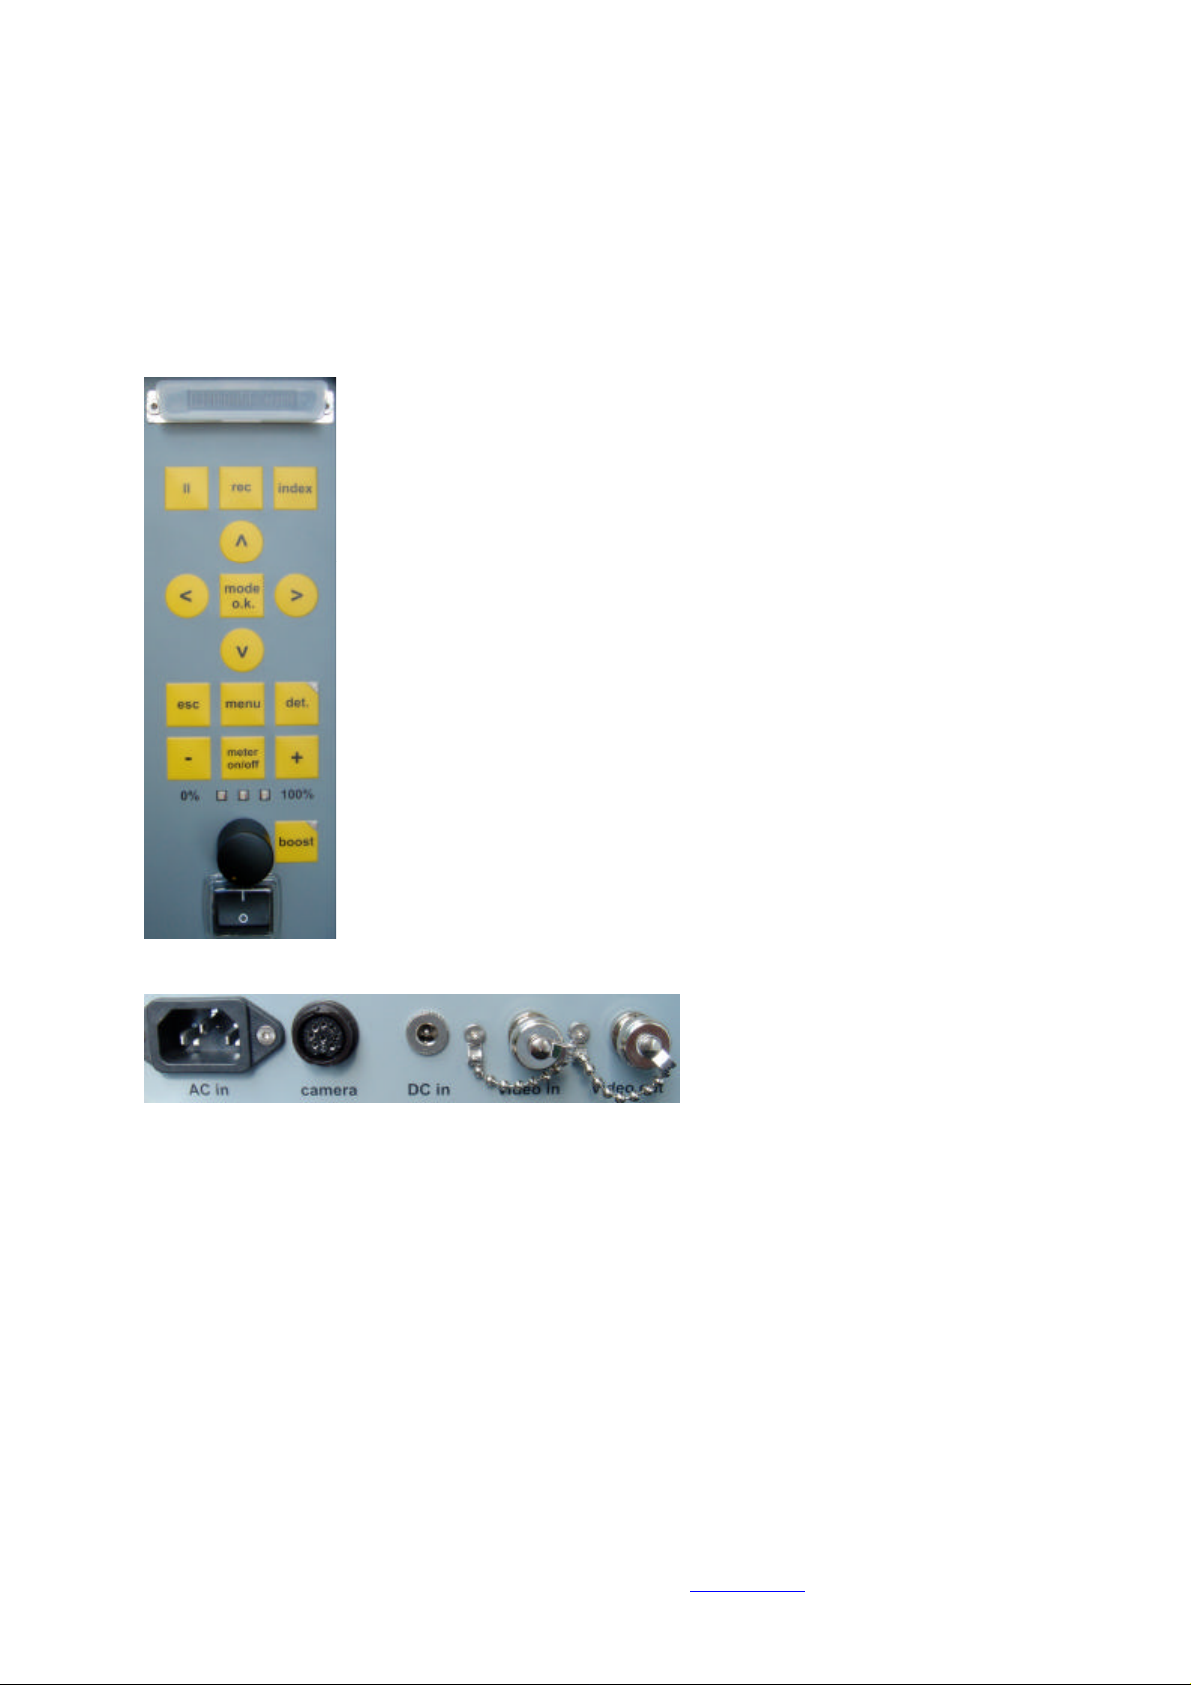
230V in
connector for the drum, reel or winding form
12V cat adapter
Video in
Video out
B. Directions for use
• This camera system is made for optical pipe inspection. It is not made for medical inspection. Please use the
camera system only for the predetermined functions.
• Protect the control unit of dirt and wetness
• Do not clean the camera with high water pressure
• Do not deposit heavy goods on the camera
• Avoid extreme temperatures (hot/cold)
• The camera cable might brake if it is pulled too hard
• Avoid extreme mechanical strain for the camera head
• Beware the camera head and camera cable of extreme traction and pressure
• Do not use the inspection system if the camera cable is broken
• In order to avoid mud and dirt, use a cloth to clean the camera cable while recoiling
• Keep the lens clean (clean it with Q-tips)
• Should there be any need of repair, please contact minCam or an authorised dealer
minCam Hermann Fritz, Gruben 1, D – 87561 Oberstdorf, Tel.: +49 8326 384122, info@minCam.de 30.07.2007
Diese Gebrauchsanleitung entspricht dem technischen Stand bei Drucklegung. Änderung in Technik und anderweitige Änderungen vorbehalten

a product from the company
+
meter
det.
boost
minCam
C. Starting up the camera system
The camera has a normed PAL or NTSC video signal.
Before you start up the camera system, please be sure, that the camera head is connected correctly.
Then put the connection cable from the cable reel into the camera plug on the DocuUnit
• On/Off switch to off
• If the DocuUnit has no battery, please connect the power cable with the jack
• Using further monitors or storage units, connect them via the BNC Video out
• Switch on the camera unit
! CAUTION !
As long as the DocuUnit is on, don´t disconnect the cable reel or the camera head
• With the potentiometer continuously light regulation is possible
• Using the meter counter
-
The meter fade-in can be turned on or off
The meter counter can be set with the help of 2 push buttons
set meter to 0: push + and – at the same time
counts forward: push +
counts backward: push –
• Location Transmitter
Pushing the „det.“ button, will activate the location transmitter. While the transmitter is active, the monitor will
only display a noisy picture. To deactivate the location transmitter, push the „det.“ button again. The transmitter
will send with 512Hz, 1kHz or 33kHz, according the frequency you ordered.
on/off
• Booster (no function here)
Pushing the „boost“ will enforce the LED light for a short period of time.
minCam Hermann Fritz, Gruben 1, D – 87561 Oberstdorf, Tel.: +49 8326 384122, info@minCam.de 30.07.2007
Diese Gebrauchsanleitung entspricht dem technischen Stand bei Drucklegung. Änderung in Technik und anderweitige Änderungen vorbehalten

a product from the company
minCam
D. Technical Data
KK55SL self leveling camera head with outer diameter of 55mm
camera head out of stainless steel
Saphir glass protected lens
focus fixed from 8cm to infinity
high resolution color camera module; 365k pixel (PAL); 1Lux / F1.2; 380 TV-lines
light ring with 16pcs ultra bright LEDs
location transmitter in the camera head
adapter with gold plated collector ring and spring-pins to enable fast changes of camera-heads
water protection: 3 bar (if not specified differently)
temperature: -10° bis +40°C
spacer out of aluminum; 75mm outer diameter
roller skid made out of aluminum with
- one set of rolls for pipes greater than 130mm
- one set of rolls for pipes greater than 200mm
KK29 (optional) camera head with outer diameter of 29mm
camera head out of stainless steel
Saphir glass protected lens
focus fixed from 7cm to infinity
high resolution color camera module; 365k pixel (PAL); 1Lux / F1.2; 380 TV-lines
light ring with 10pcs Chip-LEDs
optional location transmitter in the camera head
adapter with gold plated collector ring and spring-pins to enable fast changes of camera-heads
water protection: 3 bar (if not specified differently)
temperature: -10° bis +40°C
cable reel
galvanized cable reel
fixing brake
50m glas fibre push rod; 6mm (7.2mm) outer diameter
inkremental sensor with 360 steps/revolution for the meter counter value
dimension: about 92 x 55 x 27cm
weight: about 9kg with 50m/6mm push rod cable
(variable length of the push rod cable and diameter can be asked for)
E. Warranty
Limited Warranty
minCam warrants your product to be free from malfunctions and defects in both materials and workmanship for one
year from the date of purchase.
Limited Warranty Coverage
This warranty will be honoured within the geographical location that the product was purchased.
If this equipment does not function properly during the warranty period due to defects in material or workmanship,
minCam will, at its option, either repair or replace the equipment without charge, subject to the conditions and
limitations stated herein. Such repair service will include all labour as well as any necessary adjustments and/or
replacement parts.
minCam Hermann Fritz, Gruben 1, D – 87561 Oberstdorf, Tel.: +49 8326 384122, info@minCam.de 30.07.2007
Diese Gebrauchsanleitung entspricht dem technischen Stand bei Drucklegung. Änderung in Technik und anderweitige Änderungen vorbehalten

a product from the company
minCam
If replacement parts are used in making repairs, these parts may be remanufactured, or may contain remanufactured
materials. If it is necessary to replace the entire system, it may be replaced with a remanufactured system.
Limitations
Warranty service will not be provided without dated proof of purchase.
This warranty does not cover:
Damage caused by attempted repair or modification by anyone other than a certified minCam technician, damage
due to alteration by the end user, faulty installation, damage to parts and/or products due to abuse, misuse, improper
maintenance, mishandling or use in violation of user instructions as furnished by minCam, damage as a result of
accident, water, impact, improper packaging in shipment or any natural forces.
minCam is not responsible for any customer images or other electronic information, returned. Customers should
ensure any information supplied is correctly backed up.
Where the complete system is supplied:
Tampering or opening the equipment, unless authorised by minCam, will void this warranty in its entirety.
How to Get Warranty Service
Before returning any item a Returns Authorisation Number must be obtained. Please contact our support department
to obtain this number before returning any item.
If your minCam product requires to be returned, you must ship them with freight, duties and insurance prepaid.
You must include:
• a copy of the invoice or other dated proof of purchase.
• a written description of the problem.
• your name, address and telephone number.
Failure to comply with any of these requirements will result in a EUR 75,00 charge being made.
F. Safety hints
• Beware the camera system of dirt, rain, cold and hot temperature
• After your daily work, keep the system, with Docu-Unit lid open, in a temperated room
• This operation manual shall help you to get aquainted with this camera system.
• This camera system is made for optical pipe inspection. It is not made for medical inspection. Please use the
camera system only for the predetermined functions.
• Do not alter or reconstruct this camera system.
• Do not open the camera system.
• Do not try to repair the camera system on our own.
• Take care of the product. It can be harmed by mechanical impact.
• Beware of moisture and extreme heat, especially for the monitor and control unit.
• If the operation time of the battery is a lot lower than it was at the beginning, the batteries life time has probably
expired.
• Damage, forced by inappropriate use or handling, may suspend the guarantee.
• Technical enhancements and errors excluded.
minCam Hermann Fritz, Gruben 1, D – 87561 Oberstdorf, Tel.: +49 8326 384122, info@minCam.de 30.07.2007
Diese Gebrauchsanleitung entspricht dem technischen Stand bei Drucklegung. Änderung in Technik und anderweitige Änderungen vorbehalten

a product from the company
minCam
A. Introduction...............................................................................................................................................................8
Capture video and still images ...............................................................................................................................8
Annotate images for later reference .......................................................................................................................8
Simple operation ....................................................................................................................................................8
Typical applications ...............................................................................................................................................8
Technical specifications.........................................................................................................................................9
B. Overview...................................................................................................................................................................9
Switching on...........................................................................................................................................................9
Using the menus...................................................................................................................................................10
Inserting or removing the CompactFlash Card.....................................................................................................11
C. Capturing Images and Video...................................................................................................................................11
Capturing a still image .........................................................................................................................................11
Storage capacity...................................................................................................................................................13
D. Displaying captured Images and Video...................................................................................................................13
Using the image gallery........................................................................................................................................13
Using the GALLERY menu.................................................................................................................................15
E. Audio (optional).......................................................................................................................................................18
This chapter describes the procedures for adding audio annotations to video clips, and setting up the audio options.........18
Setting up audio....................................................................................................................................................18
F. Annotating captured images and video....................................................................................................................19
Using the OSD text editor....................................................................................................................................19
Storing standard annotations................................................................................................................................21
G. Configuring the DocuUnit.......................................................................................................................................21
Using the MAIN MENU To display the MAIN MENU......................................................................................21
Video Settings......................................................................................................................................................21
Display Options....................................................................................................................................................24
System Setup........................................................................................................................................................24
Other options........................................................................................................................................................26
H. Transferring captured images and video to a PC.....................................................................................................26
Installing the card reader......................................................................................................................................26
Transferring images to a PC.................................................................................................................................26
I. Advanced options......................................................................................................................................................27
Updating the DocuUnit firmware.........................................................................................................................27
Installing a splashscreen.......................................................................................................................................28
J. Warranty.....................................................................................................................................................................5
K. Safety hints..............................................................................................................................................................29
minCam Hermann Fritz, Gruben 1, D – 87561 Oberstdorf, Tel.: +49 8326 384122, info@minCam.de 30.07.2007
Diese Gebrauchsanleitung entspricht dem technischen Stand bei Drucklegung. Änderung in Technik und anderweitige Änderungen vorbehalten

a product from the company
minCam
A. Introduction
This chapter gives a general introduction to the Docu Unit, with descriptions of typical applications. It also gives a full
technical specification.
This Docu Unit is a unique product that provides a convenient way of capturing still images or video clips to a
removable CompactFlash card. It is compatible with both PAL and NTSC, S-Video or composite, and a built-in LCD
display allows you to preview the video before saving it to the memory card.
Capture video and still images
Video clips are captured at full NTSC or PAL resolution, at 30 or 25 fps respectively, and stored in Apple QuickTime®
format, allowing thousands of pictures and approximately 80 minutes of video to be stored on a 2GB CompactFlash
card.).
Annotate images for later reference
Captured images and video clips are automatically named with the date and a sequence label; alternatively you can
supply a name using the keypad.
Images can also be annotated with an overlay of up to 10 lines of text, using a standard PC keyboard connected to
the DocuUnit. This provides a convenient way of recording notes with each image, for example to comment on
features in the image or provide information about the conditions under which the image was captured.
Organise images to aid retrieval
Images can be organised into named folders, and a range of cataloguing functions help in archiving and retrieving
images, including the ability to rename images, delete images, and move or copy images between folders.
The Docu Unit includes a convenient thumbnail gallery feature, which allows you to search through the library of
captured images 12 at a time, and then select one for fullsize viewing. Alternatively the images can be uploaded to
a PC using the supplied card reader, where they can be displayed or processed by any suitable image editing
software.
Simple operation
The DocuUnit is simple to operate, using intuitive onscreen displays, and the keypad can be used even when
wearing gloves or protective clothing.
A range of user options allows you to specify how the image files are named, the display orientation, and video
parameters.
Typical applications
The DocuUnit is ideal for any application in which sequences of still images or video clips need to be
captured and stored, either in a laboratory or on site. The DocuUnit is an ideal replacement for a VCR or
computerbased video capture system where still images or video clips need to be captured from a video source. Its
rugged construction and the absence of moving parts make it extremely durable, and it is ideal for use in the field.
minCam Hermann Fritz, Gruben 1, D – 87561 Oberstdorf, Tel.: +49 8326 384122, info@minCam.de 30.07.2007
Diese Gebrauchsanleitung entspricht dem technischen Stand bei Drucklegung. Änderung in Technik und anderweitige Änderungen vorbehalten

Technical specifications
Display
Type 8” TFT
resolution: 1440 x 468 pixel
brightness: 400 cd/m²
constrast: 350 : 1
Video
System: NTSC/PAL (auto detect)
resolution: NTSC – 640 x 480 bei 30 B/s; PAL – 768 x 512 bei 25 B/s
text generator
text overlay: 10 lines with 25 characters
Audio
Media
impedanz: 1,5 to 3 kOhm
16 to 32 Ohm mono
8 Ohm (optional intern/extern)
Flash-storage: CompactFlash®-cards Type I and II
IBM MicroDrive™ (only Type II)
CompactFlash® 2 GB
IBM MicroDrive™ 1 GB
File system
capacity: Root directory – 16 folders; Folders – 1296 files
Format: FAT-16, filename convention
File formats
Still image: JPEG, high quality (256KB)
NTSC – 640 x 480
PAL – 768 x 576
Videoclip: Motion-JPEG (MJPEG)
NTSC – 320 x 240 30 fps
PAL -384 x 288 25 fps
Format: QuickTime CIF
WEE-Registrierungsnummer: WEE/DD0093VW
Approved CompactFlash cards
Type I: Dane-elec, Lexar
Type II: IBM MicroDrive™
a product from the company
minCam
B. Overview
This chapter provides a general overview of the DocuUnit, with a summary of the front panel controls and
connections to enable you to get started as quickly as possible.
Connect a Composite-Video signal (coming from the camera system or use BNC-Video-In).
Switching on
Switch on using the switch on the right bottom side of the unit.
After a brief delay the VIDEO AUTO-SELECTOR screen will be displayed:
minCam Hermann Fritz, Gruben 1, D – 87561 Oberstdorf, Tel.: +49 8326 384122, info@minCam.de 30.07.2007
Diese Gebrauchsanleitung entspricht dem technischen Stand bei Drucklegung. Änderung in Technik und anderweitige Änderungen vorbehalten
 Loading...