

User's Guide For
MINI0806 DASH CAMERA
Please read this manual carefully before using.
This manual should be kept for future reference.
WARNING: The dash camera should be set up before driving.
Concentration should always be maintained on the task of driving, let the
dash camera record accidents caused by others not by youself.


– Do not expose the dash camera to dusty, dirty or sandy conditions, if these
gets into the camera or on the lens it can damage the components.
– Do not expose the dash camera to high temperatures.
The normal operating temperature of the dash camera is 0 C to 40 C (32F to
104F)
High temperatures can shorten the life span of electronic device, and
extremely high temperature will shorten the battery and/or degrade the
plastic components. Note extreme temperatures can be achieved in parked
cars in direct sunlight.
Expose the dash camera to strong sunlight when using Motion Detection
mode may cause the dash camera to malfunction or become damaged as
the temperature can be too high in your car in summer.
– Do not expose the dash camera to a cold environment.
Extremely low temperatures can also damage the electronic components; if
there is water moisture in cold environment, freezing water can cause
damage, as can thawing.
– Do not try to dismantle or open the casing. Doing so may result in electrical
shock and will most likely result in damaging the dash camera.
– Do not mistreat the dash camera, dropping, sudden impact, and vibration
can cause damage.
– Do not clean the dash camera with chemicals, cleaning solution or a high
concentration detergent. Only a slightly damp cloth should be used.
Please download the latest firmware from:
www.mini0806.com
to upgrade the camera for improved stability and extra functions.
Extract the FIRMWARE.BIN file to the root folder of your microSD card; insert
the card into your mini0806 camera and power on. The camera will auto
examine the FIRMWARE.BIN file and popup a confirmation dialogue, press the
UP or DOWN button to choose YES and press OK to upgrade.
The camera will shut down automatically after upgrading is completed.
Enjoy.
PRECAUTIONS
UPGRADING
1
2
3
4
5
6
7
8
9
10
11
24
25
26
mini0806 camera
camera mounting bracket
(GPS logger inside)
27
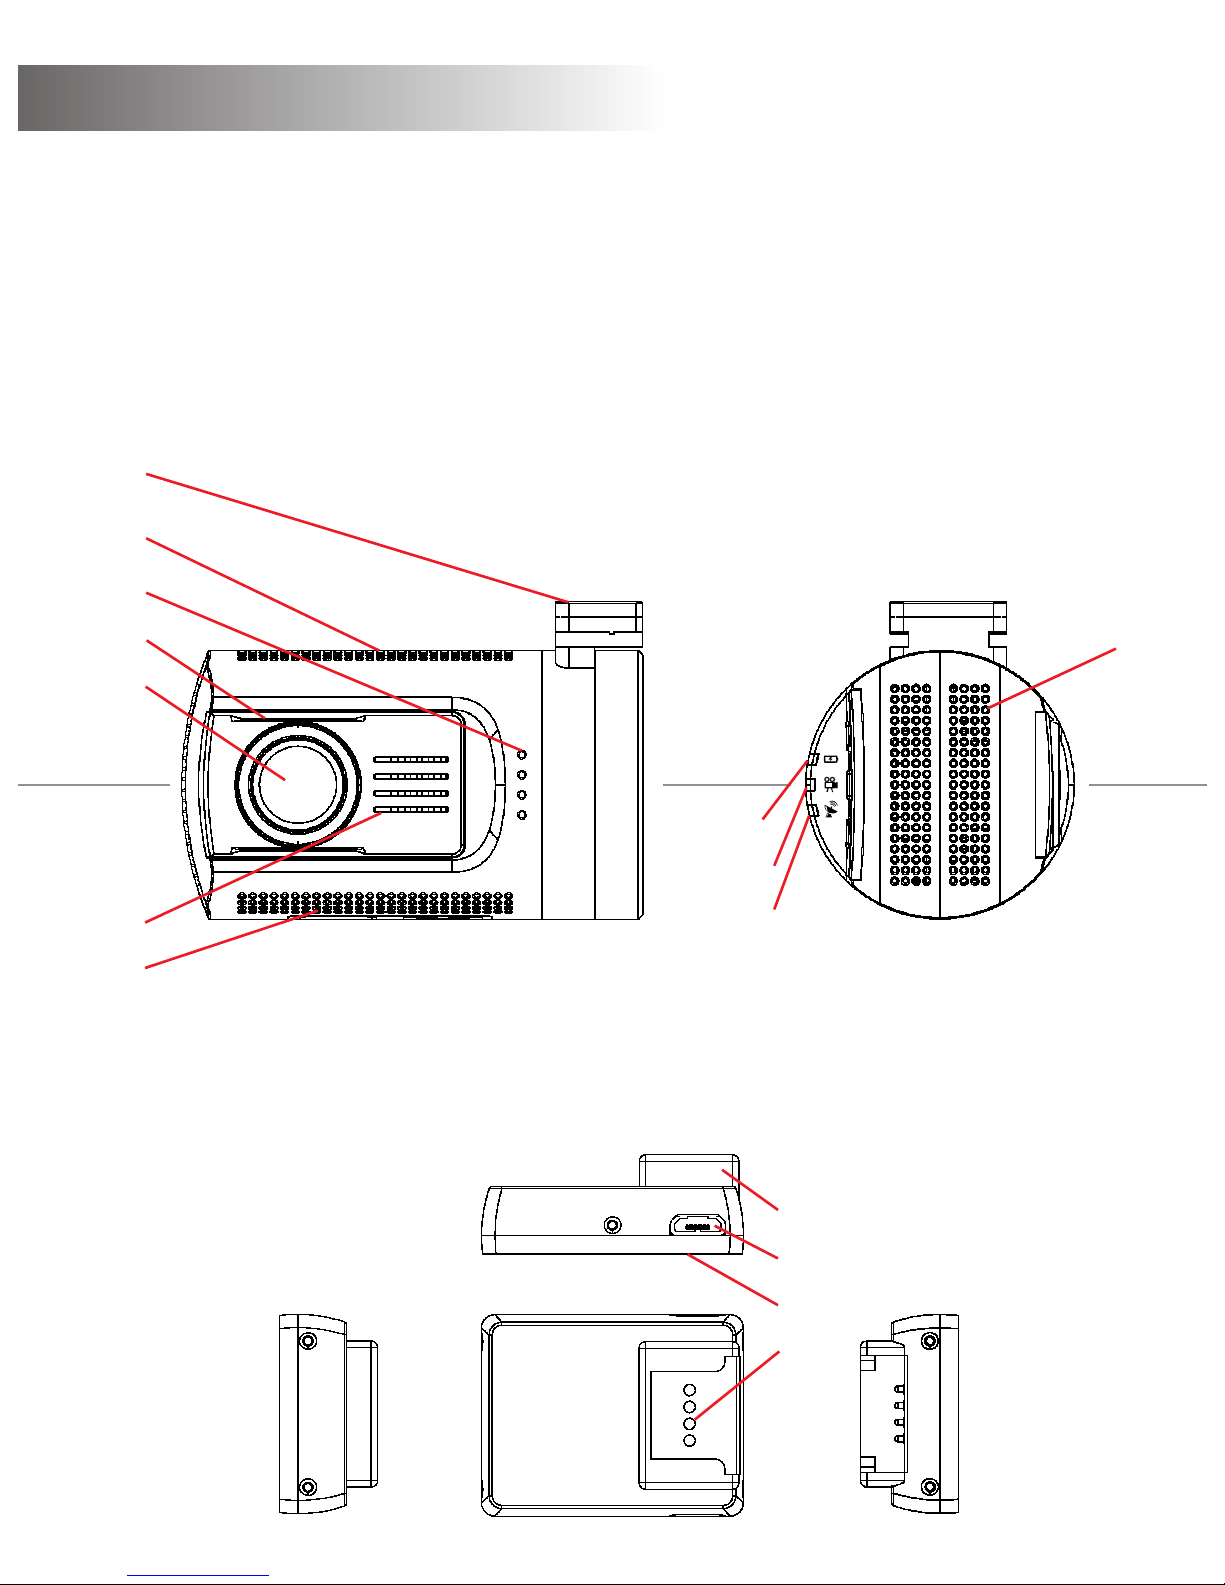
1 - mount
2 - top cooling holes
3 - speaker holes
4 - CPL mounting bar
5 - lens
6 - front cooling holes
7 - bottom cooling holes
8 - side cooling holes
9 - power indicator
10 - recording indicator
11 - GPS/MIC indicator
APPEARANCE
12
13
14
17
18
19
15
16
20
21
22
23
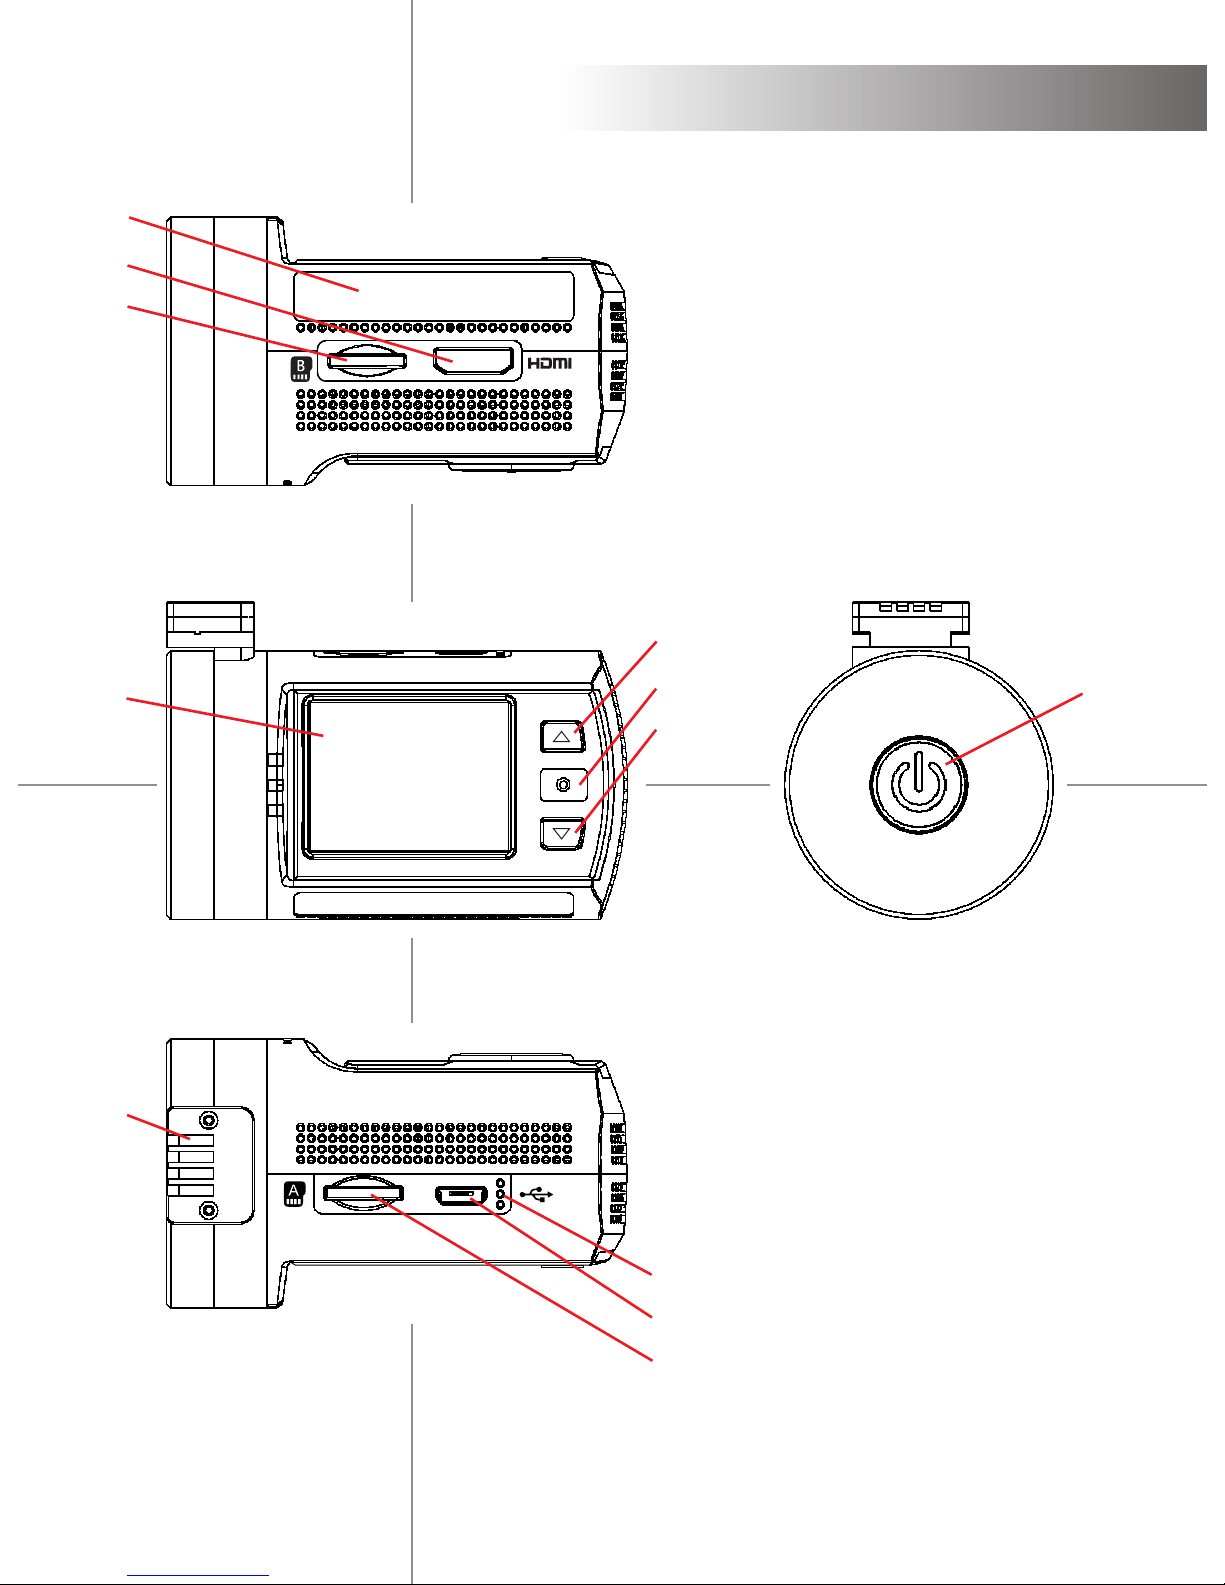
12 - sticker
13 - HDMI output
14 - card B slot
15 - TFT screen
16 - mounting contacts
17 - UP button
18 - OK button
19 - DOWN button
20 - MIC holes
21 - microUSB port
22 - card A slot
23 - POWER button
24 - mount
25 - microUSB port
26 - VHB pad
27 - mounting contacts
APPEARANCE

OPERATION
Read this chapter to know how to operate the camera.
TURN ON /OFF YOUR CAMERA
You may turn on the camera by pressing the power button.
You may turn off the camera by holding the power button for 2 seconds.
The camera is also pre-configured to auto turn on and start recording once
it receives power, e.g. when the car engine is started.
The camera is also pre-configured to auto stop recording and turn off once
it loses power, e.g. when the car engine is stopped.
The camera is also pre-configured to auto turn off if it is in standby for a
long time without any button pressed.
The camera is also pre-configured to auto stop recording and turn off when
the internal battery runs out if there is no external power supply.
STORAGE CARD PREPARATION
The camera supports dual microSD cards, both 128GB MAX. It is
recommended to use Class 6 or Class 10 high speed microSD card to avoid
storage problems.
The videos can be stored in card A or card B depending on the setting.
Insert a microSD card in the card slot, the camera will auto start recording if
the power is on.
RECORDING A VIDEO
When the camera is standby, press the OK button to start video recording.
When the camera is recording, press the OK button to stop and enter
standby.
The camera is also pre-configured to auto start recording once it receives
power, i.e. when the car engine is started.
The camera is also pre-configured to auto stop recording and turn off once
it looses power, i.e. when the car engine is stopped.
TAKING A PHOTO
When the camera is in standby or recording, hold the OK button for 2
seconds to take a photo.
PLAYBACK ON CAMERA
When the camera is in standby, hold the DOWN button to enter playback on
the camera.
When the camera is in playback, hold the DOWN button to standby.
When the camera is in playback, press UP and DOWN buttons to highlight
the video or photo you want to review, then press OK to view.
When the camera is in playback, press UP and DOWN buttons to highlight
the video or photo you want to edit, then hold UP button to active the submenu: Delete file, Protect file, Auto play, Copy to another card, Switch card.
Press UP and Down buttons to choose and then OK button to perform the
action.

OPERATION
PLAYBACK ON TV
When the camera is connected to a TV with an HDMI cable, the camera
screen will be turn off and transfer the display to the TV. The operation will
be the same as when using playback on the camera.
If you want to connect a TV for playback via an AV connection, you need to
use the customized AV-out cable (optional accessory). Plug it into the
microUSB port on the camera body.
SETTING UP THE CAMERA
If you are not satisfied with the default setting, you can customize your own.
With the camera is in standby, hold the UP button to enter the setting menu.
Use UP and DOWN buttons to scroll to the subjects you want to configure,
press OK to select; then press UP and DOWN buttons to choose the option
you want, press OK to confirm and exit.
Hold UP button at any time to cancel.
Please review the SETTING section to learn about setting subjects.
PLAYBACK ON COMPUTER
When you wish to review the videos or photos on computer, a microSD card
reader can be used. GPS PLAYER program is placed in the PLAYER folder
when a microSD card is formatted by the camera, which can playback the
video recording with GPS traces. You can also use a compatible media
player to playback the MOV video files directly, without the GPS trace.
If you don’t have a microSD card reader on hand, you can connect the
camera to your computer with the supplied USB cable. The camera will be
recognized as a mass storage device. You can then use the camera as
microSD card readers for two separate microSD cards for playback.
RECORDING MUTE VIDEO
When the camera is in either standby or recording, you can press the UP
button to mute the microphone inside camera any time. Press the UP
button again to cancel mute status.
SOS MANUAL PROTECT VIDEO
The camera support automatic loop recording which means the oldest
video will be over-written by new video when the card is almost full unless
the video is protected (Read-only file attribute).
The camera can auto protect videos if the G-sensor data exceeds the
configured threshold.
You can also manually protect the video by pressing the DOWN button.
Hold the DOWN button to cancel protected status.
CONNECT CAR DVD/NAVIGATION
When need to live view or playback on car DVD/navigation system, you
need to use the customized AV-out cable (optional accessory). This plug
into the microUSB port on camera body.

The 0806 camera is pre-configured to provide you with a simple plug and play
experience - the default settings are the most popular options.
Please read this chapter to help you to customize the camera setting, when
you require a slightly different experience.
The default setting are listed in BOLD.
SETTING
VIDEO RESOLUTION
Here you can choose the video resolution you want to use; higher resolution
videos will take more storage space.
options: 2560x1080 30fps 21:9 (cinema mode)
2304x1296 30fps 16:9
1920x1080 45fps 16:9
1920x1080 30fps 16:9
HDR 1920x1080 30fps 16:9
1280x720 60fps 16:9
1280x720 30fps 16:9
VIDEO QUALITY
Here you can adjust the video quality; the quality will affect video grain,
sharpness, contrast and so on. Better quality videos will result in higher bit
rate and take more storage space.
options: Super Fine
Fine
Normal
PHOTO RESOLUTION
Here you can choose the photo resolution you want to use; higher resolution
photos will take more storage space.
options: 4M (2688x1512 16:9)
9M (4000x2250 16:9)
13M (4800x2700 16:9)
PHOTO QUALITY
Here you can adjust the photo quality; the quality will affect photo grain,
sharpness, contrast and so on. Better quality photos will take more storage
space.
options: Super Fine
Fine
Normal
AUTO EXPOSURE METERING
Here you can set the measuring area for Auto Exposure; this setting will affect
the video brightness and quality. CENTER is recommended if there is no
special requirement.
options: CENTER
AVERAGE
SPOT

SETTING
FLICKER
Here you can set the sensor flicker frequency to fit your AC power frequency
and reduce the effect of flickering lamps. Please leave it AUTO if you don’t
know which frequency is in use in your country.
options: AUTO
60HZ
50HZ
WHITE BALANCE
Here you can set the image white balance mode to improve colour balance in
videos/images in different weather and lighting conditions. Auto is recommend
to fit most conditions.
options: AUTO
SUNNY
CLOUDY
TUNGSTEN
FLUORESCENT
EXPOSURE COMPENSATION
Here you can manually adjust the Exposure Values to improve the image
brightness.
options: -2.0
-1.7
-1.3
-1.0
-0.7
-0.3
0
+0.3
+0.7
+1.0
+1.3
+1.7
+2.0
ROTATE IMAGE 180°
When you want to mount the camera up-side-down, the setting will rotate the
recorded image 180° so that appears the correct way up on your TV/computer.
The button functions will be changed at the same time so that the UP button is
still at the top when the camera is rotated.
options: OFF
ON
LOOP RECORDING
The 0806 camera supports automatic loop recording when the card is full.
Here you can set the segment length according your requirement. If you need
a continuous video without any segmentation, please set it to OFF but be

SETTING
MOTION DETECTION
Motion detection is used to reduce the amount of storage space used. When
there isn’t obvious motion detected the camera will switch standby. Once
motion over the threshold value is detected, the camera will start recording
and continue until 15 seconds after the motion stops. Here you can set the
detection sensitivity.
options: OFF
LOW
MIDDLE
HIGH
LDWS DETECTION
The camera will warn when it detects a lane departure, including normal
planned lane departures. Here you can define the speed threshold above
which the LDWS will become active.
If you wish to use LDWS then it is recommended to use the HIGH SPEED
setting so that it only operates on the highway, otherwise you may become
desensitised to the warnings.
options: OFF
LOW SPEED
MIDDLE SPEED
HIGH SPEED
LDWS CALIBRATION
This adjusts the LDWS reference lines to improve the LDWS operation. Please
use the UP and DOWN buttons to move the top line to the height of the horizon
and the bottom line to the height of the front of your car. Use the OK button to
confirm the adjustment of each line.
PARKING GUARD
When you have turned off your engine, the 0806 camera will detect the battery
voltage change and launch Parking Guard mode. The video recording will then
be low frame rate to save storage space. Once any impact over the threshold
value is detected, the camera will change to normal recording mode to save a
30 second video clip. This file will be protected from over-write by the loop
recording function.
(You need the Parking Guard mounting bracket to support the Parking Guard
function, which is an optional accessory.) Here you can define the impact
detection sensitivity.
aware that the maximum video file size is 4GB.
options: 1 MIN
3 MIN
5 MIN
OFF

SETTING
GPS STAMPING
The 0806 camera can record your driving track and stamp the GPS data on
video. Here you can define the GPS data stamping method.
options: OFF
2G
2.5G
3G
3.5G
4G
4.5G
POWER OFF DELAY
If there are no button actions when the camera is on standby, the camera will
auto power off to save power (Unless the camera is on Motion Detection mode
or Parking Guard mode). Here you can define the delay time.
options: 1 MIN
3 MIN
5 MIN
OFF
SCREEN OFF DELAY
If there are no button actions when the camera is on standby or recording, the
camera will auto turn off the screen to save power. (You can press the POWER
button to turn on/off screen at any time.) Here you can define the delay time.
options: 15 SEC
30 SEC
1 MIN
3 MIN
5 MIN
OFF
G-SENSOR SENSITIVITY
The G-sensor is used to detect the 3-axis impacting forces. If any impact over
the threshold value is detected, the current recording file will be
locked/protected to avoid being over-writen. Here you can define the
sensitivity threshold value.
options: OFF
LOW
MIDDLE
HIGH
GREEN INDICATOR
Here you can define the indicating function of the Green Indicator.
options: GPS STATUS
MIC STATUS
OFF

SETTING
LANGUAGE
Here you can set the language you prefer.
options: ENGLISH
РУССКИЙ
DRIVER NUMBER
Here you can define the driver number or your customized information to
stamp on the video (9 characters or numbers).
000000000
DATE STAMPING
Here you can define the date stamping format on video.
options: OFF
YYMMDD
MMDDYY
DDMMYY
TIME STAMPING
Here you can define the time stamping format on video.
options: OFF
12 HOURS
24 HOURS
DATE AND TIME
Here you can set the system date and time manually. The date/time
information will be automatically updated if GPS satellites are connected.
00 2014 / 11 / 11 12:12
ti me zone dat e ti me
The time zone, corrected for daylight saving time, will need to be set before the
GPS signal can correctly update the time.
SPEED STAMPING
The 0806 camera can record your driving speed and stamp the speed data on
video. Here you can define the speed data display method
options: OFF
KM/H
MPH
DRIVER NUMBER STAMPING
The 0806 camera can stamp your driver number or your customized
information on video. Please define the driver number in next title. Here is the
switch.
options: OFF
ON
options: OFF
LOG ONLY
ON

CHOOSE CARD
Here you can choose the card(s) on which you want to store the videos and
photos. If set to AUTO, the recording will be alternated between card A and
card B once it is full .
options: AUTO
CARD A ONLY
CARD B ONLY
RESTORE DEFAULTS
Here you can restore all the settings to the factory default settings.
options: NO
YES
FORMAT CARD
Here you can format the currently selected card. Please check the card icon
shown on screen carefully before formatting. All files will be lost once you start
the formatting process.
(If you are using microSD cards bigger than 32GB, please format the cards on a computer to
be FAT32 format. )
options: NO
YES
SETTING
FIRMWARE VERSION
Here you can find the current version of the firmware in your camera. You may
need this information when you are trying to upgrade the camera to a later
firmware. The firmware is sorted by releasing date; the suffix number means
the sequence on that date.
option: FW 20141224 V1.0

UI & PLAYER
WHITE BALANCE
0.0EV
EXPOSURE
COMPENSATION
LOOP RECORDING
DUAL CARDS
FILE LOCKED
MIC ON
VIDEO RECORDING MODE
BATTERY POWER
GPS INVALID
MOTION DETECTION
PARKING GUARD
CARD B WORKING
RECORDING
SYSTEM TIME
REMAINING TIME
RECORDING TIME
VIDEO AREA
PROGRASS
BAR
CONTROL
BAR
FILE LIST
MAP AREA
LONGITUDE
& LATITUDE
SPEED
G-SENSOR
DATA

SPECIFICATION
mini0806 camera box content
dash camera unit
GPS logging mounting bracket
2° and 4° angle mounting wedge
wedge mounting screws M1.4*5mm
power lead for cigar lighter socket
USB Cable
VHB sticker pads
lens cleaner
manual
optional: 24mm CPL filter, no GPS mounting bracket, Parking Guard
mounting bracket and power lead, hardwire kit, external GPS antenna,
HDMI cable, AV-out cable, microSD-USB card reader, microSD-SD
adapter, microSD-WiFiSD adapter, microSD-microUSB OTG card reader,
microSD card(s)
mini0806 camera specification
4MP CMOS image sensor
135 degree angle view field, F2.0 aperture
1.5inch TFT LCD screen
cinema mode recording 2560*1080px 21:9 30fps
super HD recording 2304*1296px 16:9 30fps
full HD recording 1920*1080px 16:9 45fps
HD recording 1280*720px 16:9 60fps
H.264 coding MOV file recording
supports dual microSD card 128GB*2
supports High Dynamic Range boost
supports GPS route logging
supports G-sensor file protection and SOS manual file protection
supports parking guard (with Parking Guard mounting bracket)
supports movement detection
supports Lane Departure Warning System
supports Forward Collision Warning System
supports up-side-down mounting
supports HDMI output to TV and optional AV-out
supports Circular Polarizing Filters
supports 160degree rotating and 6 degree offset
built in 3.7V 200mAh Li-Polymer Battery
PC System Requirements
Windows XP or later operating system, MAC 10.1
Intel Pentium 4 2.8GHz CPU or above (recommended 3GHz)
at least 2GB RAM or above (recommended 4GB)
internet connection (for GPS log playback)

MOUNTING
The 0806 camera is designed for easy & quick mounting to your windshield
with the VHB sticker pad.
1st, mount the camera to the mounting bracket with power cable plugged into
either the mount or camera body;
2nd, simulate the unit on your windshield with the camera powered on, rotate
the camera vertically to find the best mounting location;
3rd, you may need to fit the wedge(s) if you want to mount at an offset location
from the center of the windshield; just screw the wedge(s) to the mount
bracket, or use the VHB pads in the accessory bag. (screws M1.4*5mm are
also in the accessory bag)
4th, stick the VHB sticker pad to the mount bracket or wedge, and attach to
your windshield, hold the mount for a few seconds to ensure good adhesion;
5th, power on the camera and check the camera display again.
When you want to demount the camera, just slide the camera out from the
mounting bracket; no need to take the mounting bracket down.
When you want to remove the mounting bracket from your windshield, please
use a thin cord with a sawing motion to cut between the VHB sticker and your
windshield and pull the cord to break the mount off from your windshield. Then
remove the sticker residual with WD-40 spray.
Please don’t break off the mount bracket from windshield with a rigid crowbar,
which may damage the mount bracket or your windshield.
The recommended mounting location for mini0806 camera is at the center of
the windshield, just behind the rear view mirror. That is the most invisible
location to hide the camera, and will never interrupt you when driving.
If you have to place the camera offset from center, you may need to use the
wedges to adjust the camera view direction. There are two wedges attached in
accessories bag, one is 2° angle and another is 4° angle. With these you can
mount the mini0806 camera at a 2°, 4°, or with both together 6° offset location.
mini0806mount
with 2° wedge
mini0806mount
with 4° wedge
mini0806mount
with 2° + 4° wedges

POWER SOURCE
The mini 0806 camera can be powered by power lead for cigar lighter socket,
or hardwire kit.
Power lead for cigar lighter socket is a easy&fast connecting method for
cameras, the only thing you need to do is plug the power lead into the cigar
light socket in your car. The camera will be powered once the engine is start.
The disadvantage of power lead for cigar lighter socket is it will engage your
cigar lighter socket, and maybe alignment difficulty for the long cable.
Hardwire kit is used to solve the problems above. The 12V leads are
connected to the car fuse or car battery and the 5V lead is connected to your
camera. The output power can be constant to support the Montion Detection
function of camera. There is Low Voltage Protection in hardwire kit to protect
the car battery from drain. You may need some professional skill to install the
hardwire kit.

CPL filter
Parking Guard
mounting bracket
ACCESSORIES
GPS / no GPS
mounting bracket
external
GPS antenna
All the accessories listed in this page are optional.
Reduce the reflection from shiny
surface like vegetation, sweaty
skin, water surface, glass, road,
and let the natural color come
through at the same time.
Some of the light coming from the
sky is also polarized to give a more
dramatic sky and high contrast
clouds, rendering outdoor scenes
crisper with deeper color tones.
Align the white white line on CPL
with the dot on camera will bring
the best reflection reducing effect.
Work with NO GPS mounting bracket
Support Parking Guard function with
a continuous power supply
Spare mount for another mounting
location or another car
HDMI cable
AV-out cable
microSD-WiFiSD adapter
Using a WiFi SD card
inside a digital camera,
one can wirelessly and
automatically upload
digital photos to a local
computer or a mobile
device

TROUBLESHOOTING
Can't record a video or take picture
Please check that there is enough storage space on the microSD card, or if you have Loop
Recording on that the files are not all protected (read only attribute).
Camera stops recording occasionally
Because the data stream of high-definition video is huge, please use a high-speed Class 6 or
Class 10 microSD card that compatible with SDHC.
“File Error” prompt while playback the video or image
Corrupt data storage results the file error, please use the "FORMAT CARD" Menu to format
the microSD card. (please format the card on a computer to be FAT32 format if it is bigger than
32GB.)
No image display on TV/DVD screen
Please confirm the AV, HDMI cable is connected correctly, and the TV/DVD is set to the correct
AV, HDMI mode.
Image is blurred
Maybe the lens or windshield is not clean, please check if there is dust, fingerprint, or
something else on the lens .Use lens cleaner to clean the lens before using. Please remember
to remove the lens protecting film before first use.
Power indicator doesn't work
If the power supply is less than 600mA current, the camera can’t be charged and the power
indicator will not work.
Image has horizontal stripes interference
This is due to the wrong setting of “Flicker” .Please adjust it depending the local power supply
frequency, reset the Flicker: 50 Hz/60 Hz.
Camera doesn’t auto start recording when the car engine is started
Please make sure the loop recording is 1/3/5 minutes, not OFF, it won't auto start recording
when loop recording is OFF; Additionally, please check if the microSD card is full; if yes then
please try to format the microSD card.
The camera continues automatic recording and won't stop .
Maybe the camera is working on Motion Detect mode; you can check whether there is an icon
on the screen. When the Motion Detection is ON, it will auto start recording when a moving
object appears within the range of camera. When the mention ceases, the recording will stop
automatically until a moving object appears again. It is not easy to turn Motion Detection
function off with the camera in hands.
Auto Power Off setting doesn’t work
Please ensure that motion detection is turned off. If the motion detection is on, the camera will
always be in standby mode (it will start recording when it sees a moving object), the camera
will not automatically shut down until the power goes off.
What to do if the camera has locked up and will not respond to button presses?
Remove the camera from the mount or turn off the power, then hold the power button for 20
seconds, the camera will auto reset.
More questions?
Please get help from www.mini0806.com!

MORE THAN A DASH CAMERA
www.mini0806.com
 Loading...