

MINGLIONG 724 User Manual

724 User Guide
1
724 user guide: Table of Contents
Table of Contents............................................................................................................................1
1. Outlook Description....................................................................................................................3
2. Getting Started Guide.................................................................................................................4
2.1 Battery Charging.................................................................................................................4
2.2 How to use Memory Card...................................................................................................4
2.3 Storage Space......................................................................................................................5
2.4 Power On and Off ...............................................................................................................5
2.5 Vibrate.................................................................................................................................5
2.6 Interface switching..............................................................................................................5
2.7 External Network Cable and U Disk...................................................................................5
2.8 Connecting to the internet...................................................................................................6
2.9 USB connection ..................................................................................................................6
3. Input operation............................................................................................................................6
3.1 Keyboard.............................................................................................................................6
3.2 T ouch Screen.......................................................................................................................7
4. Desktop.........................................................................................................................................7
4.1 Status Bar............................................................................................................................7
4.2 Shortcuts .............................................................................................................................7
4.3 Current desktop lamp..........................................................................................................7
4.4 A quick way to add gadgets.................................................................................................7
5. Web browsing..............................................................................................................................8
6. Application Management...........................................................................................................8
6.1 Install and Uninstall............................................................................................................8
6.2 App Store.............................................................................................................................9
7. Typical applications introduced...............................................................................................12
7.1 Chat Tool...........................................................................................................................12
7.2 E-mail................................................................................................................................12
7.3 File Explore.......................................................................................................................12
7.4 My Photo...........................................................................................................................13
7.5 My Video...........................................................................................................................13
7.6 Youtube .............................................................................................................................14
7.7 Magic Album.....................................................................................................................14
7.8 My Music..........................................................................................................................15
7.9 Camera..............................................................................................................................15
8. Tips and Tricks .........................................................................................................................16
8.1 Some convenient mode of operation.................................................................................16
8.2 Convenient Set..................................................................................................................16
8.3 Battery Tips.......................................................................................................................17
9. Personalized settings.................................................................................................................17

724 User Guide
2
9.1 Wireless controls...............................................................................................................17
9.2 Sound and display.............................................................................................................18
9.3 Applications ......................................................................................................................19
9.4 SD cards and devices ........................................................................................................19
9.5 Date and Time ...................................................................................................................19
9.6 Locale and text..................................................................................................................20
9.7 About device .....................................................................................................................20
9.8 T ouchpanel calibration......................................................................................................21
10. MID locked..............................................................................................................................21
11. Troubleshooting ......................................................................................................................21
11.1 Forced shutdown.............................................................................................................21
11.2 Restore default settings...................................................................................................21
724 User Guide
3
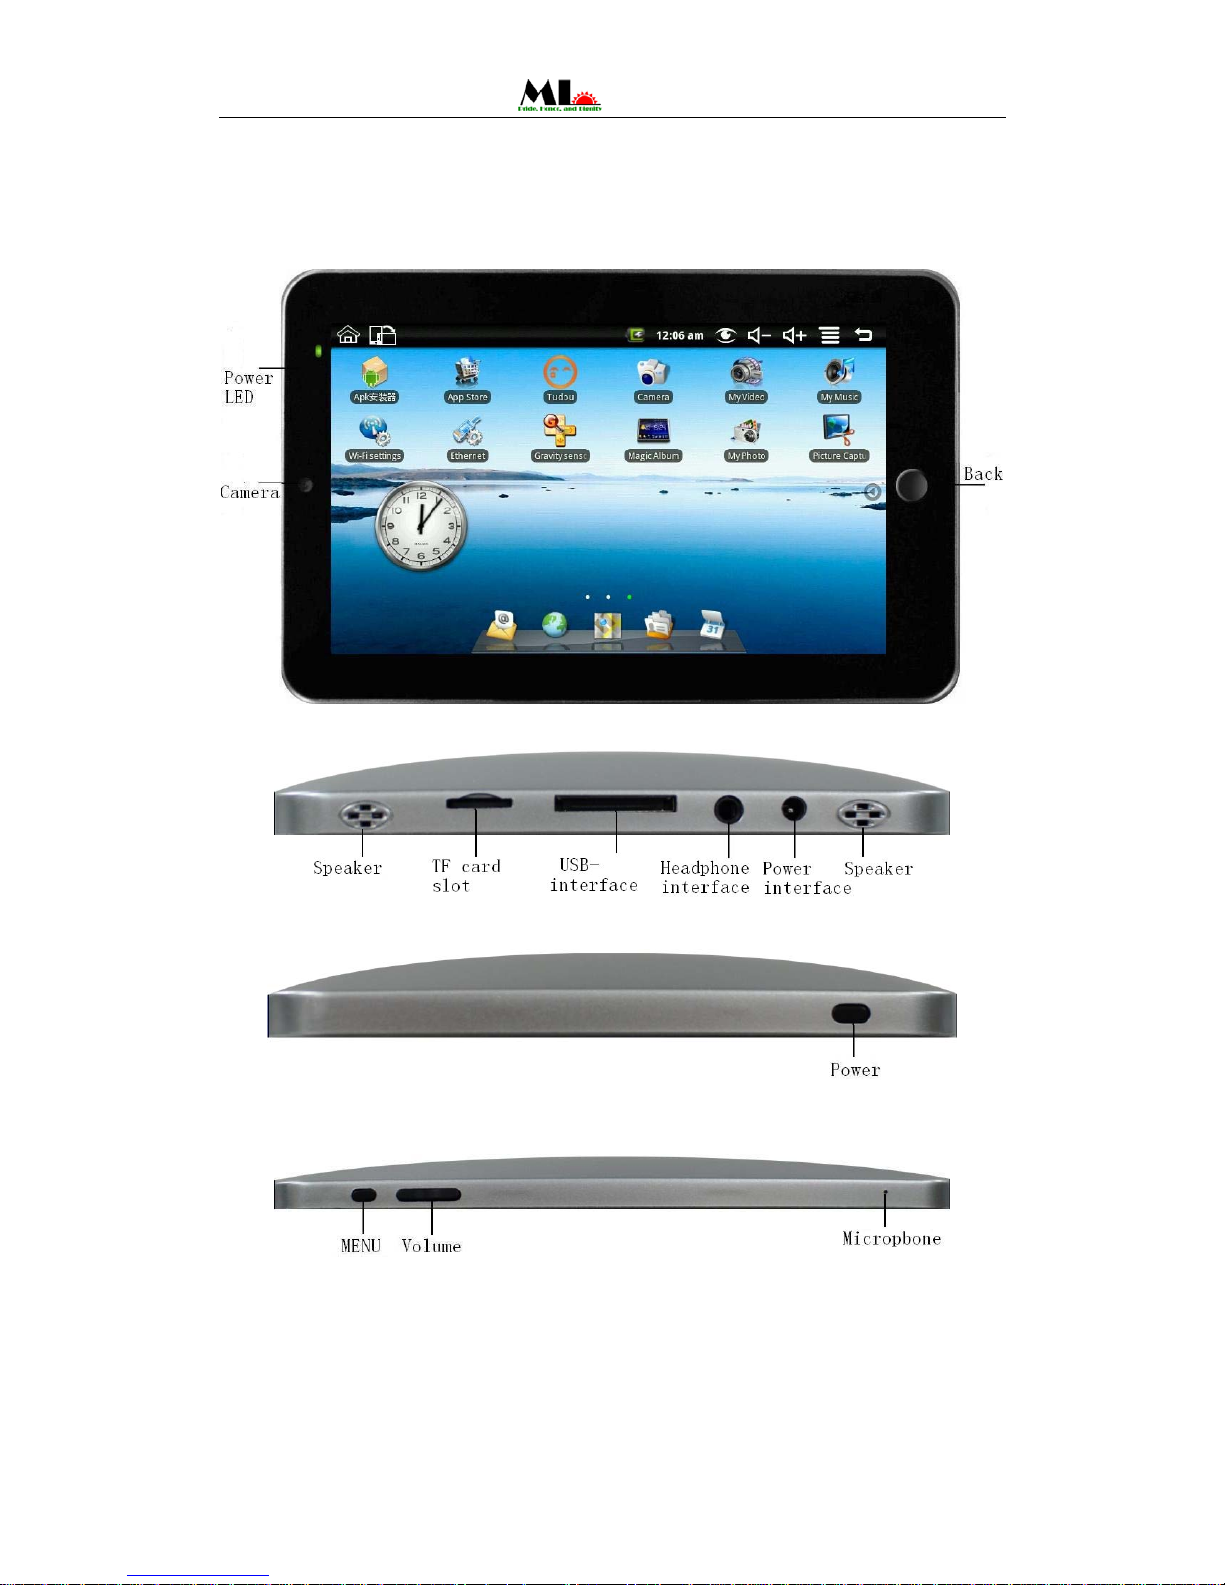
1. Outlook Description
Front View:
Right side View:
Left side View:
Top View:
724 User Guide
4
2. Getting Started Guide
Statement:The company has committed to quality, while software update. If the final version of
products has any differences from the description of the user guide, please subject to the final
product. Thank you!
2.1 Battery Charging
MID has an internal charging battery. We suggest to charge up the battery when the battery power
is low.
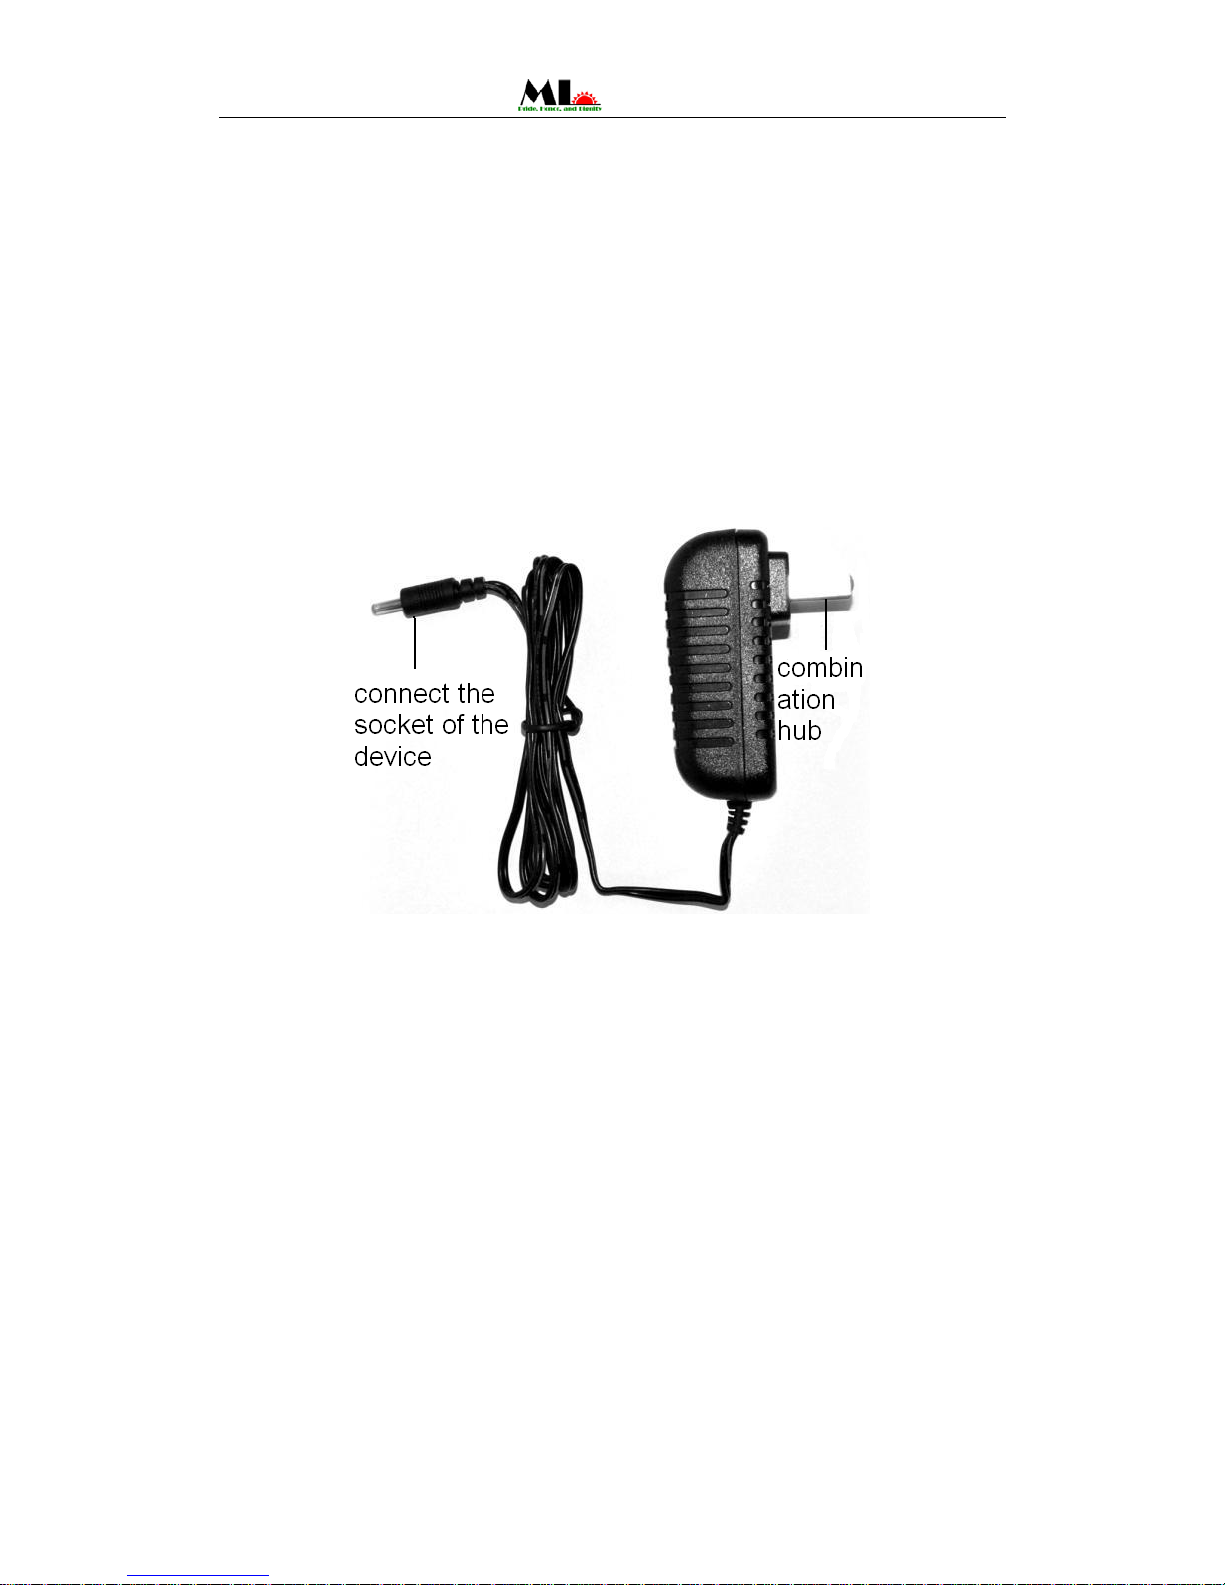
Power Adapter
One end of the power adapter connecting the socket, and the other end of the power adapter
connecting the socket of the device, then the device can be charged.
Way to Charging Battery
1. Plug in the power adapter, the battery charge indicator turns red, indicating charging. Plug when
the battery is fully charged, the indicator shows green. After unplug the power adapter, the
indicator always shows green.
2. During Battery Charging, user can operate MID.
Note:
The charging time will be longer when operating and charging at same time.
2.2 How to use Memory Card
Insert memory card:
Insert memory card to the Card slot. Use finger to put the card into the slot until “click” sound
heard.
Upper left corner of the screen will prompt: SD cards are ready.
Browsing files in memory card:
Run "File
explore " program, showing all the files under the root directory. Select "SD card" open
to browse the contents of Cary.
Remove memory card:
Close all applications or documents which have been opened from the card.
Press the card lightly. It will be ejected partly. Pull the card out. Upper left corner of the screen
will prompt "has been removed SD card".
Note:

724 User Guide
5
1. Insert card to the right position. Otherwise it will damage the card.
2. Once the card has been locked, it can not be formatted or written.
3. Don’t insert and remove the card repeatedly in a short time. It may cause the card damaged.
4. Suggest using major brands of memory card to avoid any incompatibility.
2.3 Storage Space
The device has three storage spaces: internal device storage, U disk and memory card. The internal
device storage named “LocalDisk”; the memory card named “sdcard”; and the external U disk
named “udisk”. The user can use space in the localdisk is probably 1G. The U disk and memory
card is on its specific capacity, the maximum support to 32G memory card.
2.4 Power On and Off
1、Power On: When power adaptor is plugged, User can press Power button to enter the Window
Platform.
2、Power Off: User can long press (2 seconds) power button, then system will pop up equipment
selection dialog box. Select shutdown, System will then pop off the confirmation dialog box,
select OK you can shut down. User can long press (8 seconds) power button to shut down the
machine.
3、Hibernate: User can long press (2 seconds) power button, then system will pop up equipment
selection dialog box. Select dormancy, the system will into hibernation. Then press the power
button to boot.
4、Airplane mode: User can long press (2 seconds) power button, then system will pop up
equipment selection dialog box. Select airplane mode, the system will into airplane mode.
2.5 Vibrate
Open vibrate:
Click volume icon on the status bar to adjust the volume to zero to put it on vibrate mode.
Close vibrate:
Make the volume is not zero, and then the vibrate mode closed.
2.6 Interface switching
System interface can switch the screen automatically according to the direction of the device.
Screen time on a two second, the conversion process will become dimmer, the screen switch to
normal after finishing
2.7 External Network Cable and U Disk
T ransfer Box:
If you want to connect Ethernet or USB, you need to connect a transfer box first.
External network cable:
Make the interface of the adapter connect to
the USB interface of the device. There are
two USB interface and an Ethernet interface
on the adapter. You can connect external
network cable and U disk.
Insert the network cable into the Eth erne t inte rface like th e le ft
picture after the adapter is connected to the device. You can
get the IP address automatically and also can select to set the
IP address by hand.

724 User Guide
6
External U disk:
2.8 Connecting to the internet
Connecting to the internet by Ethernet:
Make the transfer box connected to the USB switch interface of the devices, and then plug the
network cable into the Ethernet port of the transfer box, in the upper right corner of the screen
appears "ETH".MID automatically obtain IP address via DHCP to connect the network. If you
want to set IP, please go to the Ethernet, and refer to “8.Tips and Tricks”.
Connecting to the internet by Wi-Fi:
1. Click MENU key to pop-up the menu, and then select "Settings";
2. Select "Wireless Control" in the settings menu;
3. Select the box behind the open Wi-Fi;
4. Open Wi-Fi Settings;
5. All the AP in the vicinity will be listed, click to select the nam e you want to conne ct to AP;
6. If the device before the connection is successful, the equipment information will be saved in the
pop-up window, select "Connect" starts to connect, choose "forget" to remove device information;
7. If the device is not encrypted, in the pop-up window, select "Connect" Start Connection;
8. If the device is encrypted, enter the password in the pop-up window, and click "Connect" Start
Connection;
9. When internet connections are successful, the wireless connection icon in the status bar appears.
2.9 USB connection
Device can connect to the computer, and then can copy files each other. If the devices with
memory card, it will display two disks in the computer after connecting the computer. One is
memory card, and the other is the internal device storage.
Connect:
1. Make the transfer box connected to the USB switch interface of the devices, and then plug the
USB cable into the USB interface of the transfer box and connect USB interface of the com puter;
2. T ap MENU→Notification→USB connected;
3. Tap "Mount" after the pop-up boxes;
4. Now the device has been connected with the computer, then going to My Computer under
removable disk devices can copy files among the internal device storage, SD card and the
computers.
Turn off:
Method 1.Tap MENU→Notification→Turn off USB storage, and then tap “Turn off” you can
disconnect the device and the computer after the pop-up boxes.
Method 2.Click to move the letter icon on the computer, and select the security you can disconnect
the device connected to the computer.
You can unplug the USB cable after disconnecting.
3. Input operation
3.1 Keyboard
When you need to enter text and numbers using the program or file, the touch screen keyboard
Insert the U disk into the USB interface
like the left picture after the adapter is
connected to the device. You can copy files
among SD card, U disk and internal device
storage after the U disk is connected to the
device. Copy method you can refer to“7.3
File Explore”.
724 User Guide
7
will appear automatically.
Note: This machine supports an external USB keyboard, but when using an external USB
keyboard, some keys may not work properly.
3.2 Touch Screen
Touch Screen senses the finger trajectory and can do the following:
Note: Please do not place objects on the touch screen surface, it may be scratched or crushed.
Click: Select an icon to click, and then you can select the icon or option;
Long press: Select a single icon and do long press and then you can drag it to the desktop display.
Drag and Drop: Drag the desktop you can switch between the three interfaces.
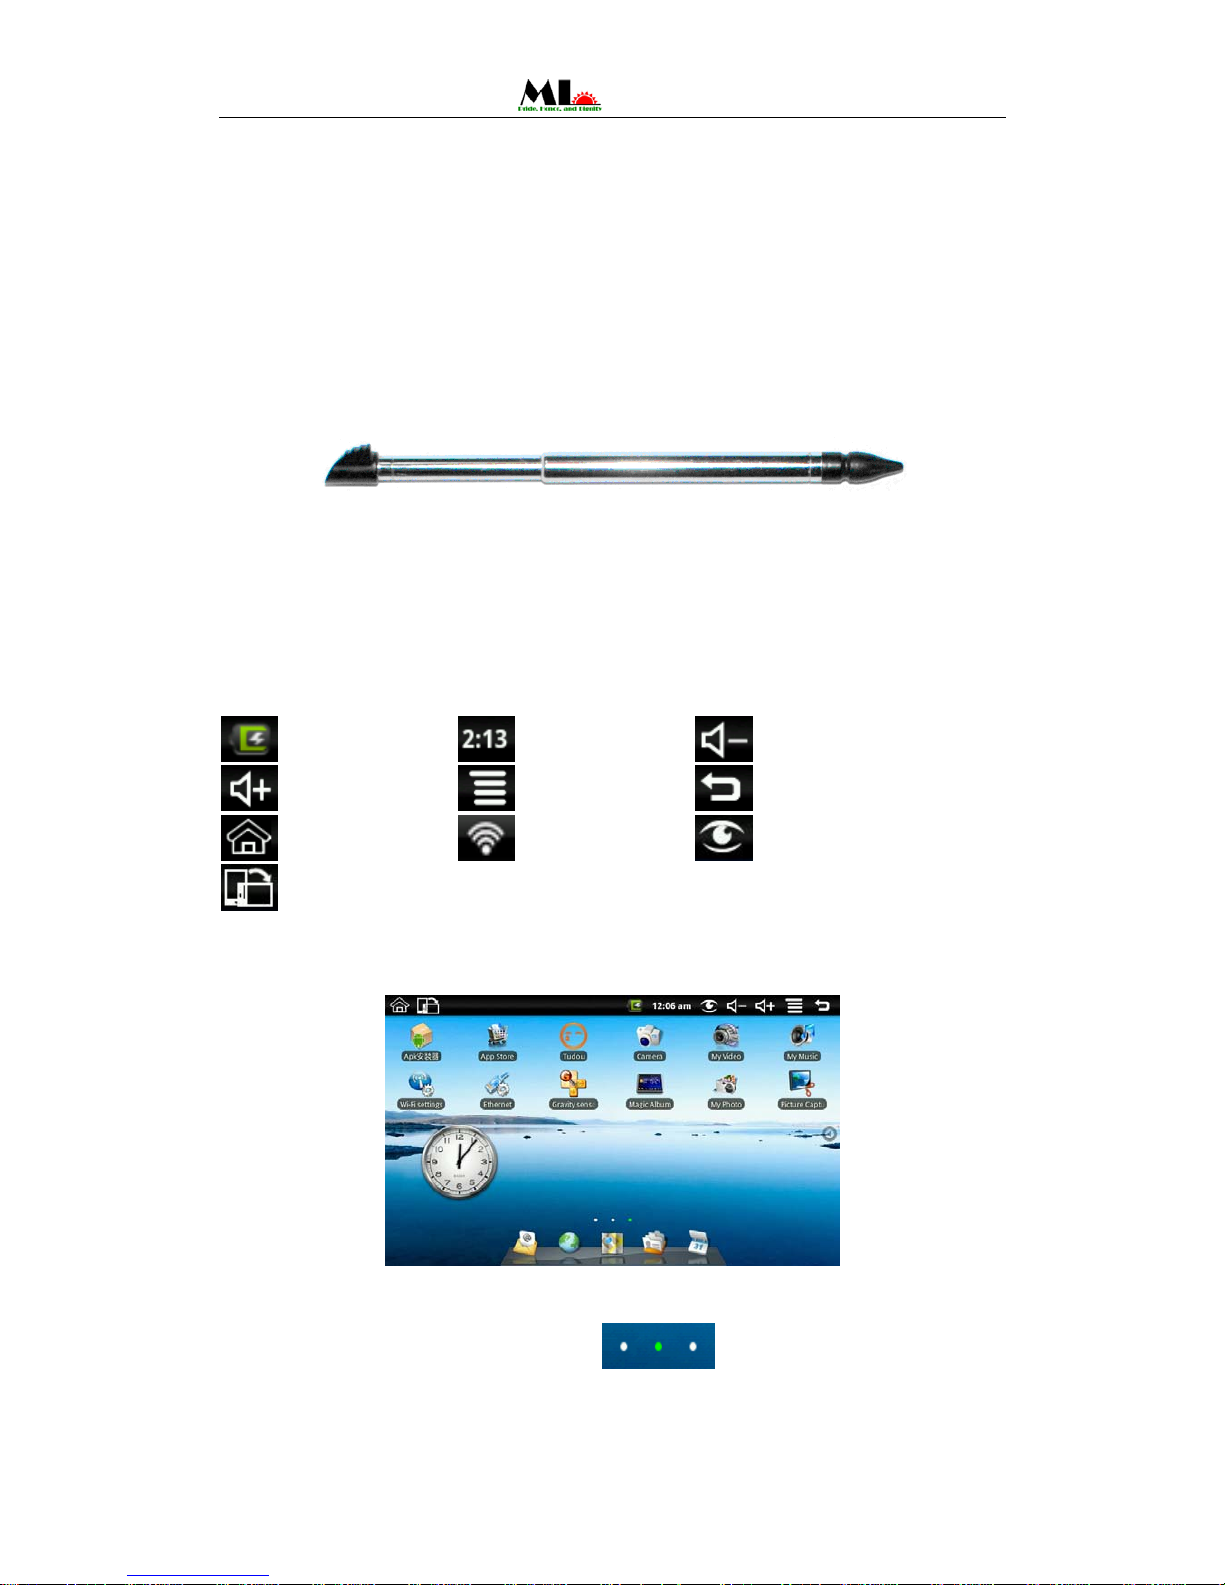
Use of the screen process can use a pencil instead.
4. Desktop
4.1 Status Bar
The top screen for the status bar, display SD card, network, battery status, time and volume
change, etc…
Battery status icon Time display Volume reduction icon
Volume increase icon Shortcut menu icon Back icon
Desktop icon Wi-Fi status icon Picture capture icon
Rotating screen icon
4.2 Shortcuts
On the desktop, press the MENU, bottom of the screen will pop up the shortcut menu. Menu items
include: Add, wallpaper, search, notification, settings and hide. It shows like the following picture:
4.3 Current desktop lamp
The device Desktop has three dots light, that is, a total of three interfaces, the current interface will
display the green dot. If the indicator shows like
, then the current in the second
interface.
4.4 A quick way to add gadgets
 Loading...