

User Manual
BLUETOOTH SPEAKER BOX
Brand Name:MINGDA
Model Name:Micro box
FCC ID: Z8NMICROBOX
USER MANUAL
MICROBOX V1
PLEASE READ THIS USER MANUAL COMPLETELY BEFORE OPERATING THIS UNIT
AND RETAIN THIS BOOKLET FOR FUTURE REFERENCE.

1
IMPORTA IMPORTANT SAFETY INSTRUCTIONS
When used in the directed manner, this unit has been designed and manufactured to
ensure your personal safety. However, improper use can result in potential electrical
shock or fire hazards. Please read all safety and operating instructions carefully before
installation and use, and keep these instructions handy for future reference. Take special
note of all warnings listed in these instructions and on the unit.
1. Read these instructions – All the safety and operating instructions should be read
before the appliance is operated.
2. Keep these instructions – The safety and operating instructions should be kept for
future reference.
3. Heed all warnings – All warnings on the appliance and in the operating instructions
should be adhered to.
4. Follow all instructions – All operation and use instructions should be followed.
5. Do not use this apparatus near water – The appliance should not be used near water;
for example, near a bath tub, washbowl, kitchen sink, laundry tub, in a wet basement,
or near a swimming pool.
6. Clean only with dry cloth – The appliance should be cleaned only as recommended
by the manufacturer.
7. Do not block any ventilation openings. Install in accordance with the manufacturer’s
instructions. The appliance should be situated so that its location or position does not
interfere with its proper ventilation. For example, the appliance should not be situated
on a bed, sofa, rug, or similar surface that may block the ventilation openings; or
placed in a built-in installation, such as a bookcase or cabinet that may impede the
flow of air through the ventilation openings.
8. Do not install near any heat sources such as radiators, heat registers, stoves, or
other apparatus (including amplifiers) that produce heat.
9. Only use attachments / accessories specified by the manufacturer.
10. Refer all servicing to qualified service personnel. Servicing is required when the
apparatus has been damaged in any way, such as power-supply cord or plug is
damaged, liquid has been spilled or objects have fallen into the apparatus, the
apparatus has been exposed to rain or moisture, does not operate normally, or has
been dropped.
11. This appliance shall not be exposed to dripping or splashing water and that no object
filled with liquids such as vases shall be placed on the apparatus.
12. Power Sources – The appliance should be connected to a power supply only of the
type described in the operating instructions or as marked on the appliance. Do not
overload wall outlet.
13. Danger of explosion if battery is incorrectly replaced. Replace only with the same or
equivalent type.
14. There is a high energy rechargeable battery inside the speaker box, do not throw it
into fire to avoid danger of explosion.
15. Do not charge the internal rechargeable battery longer than specified to prevent
danger of fire. Overcharging rechargeable batteries may shorten their life span.
16. Do not attempt to dismantle, open or repair this product yourself. If a fault occurs,
seek advice from your local qualified service technician or contact the distributor via
the telephone number at the back of this instruction manual.
17. Caution marking and nameplate are located on back of product.

2
IMPORTANT NOTES
Avoid installing the unit in locations described below:
• Places exposed to direct sunlight or close to heat radiating appliances such as
electric heaters.
• Places subject to constant vibration.
• Dusty, humid or moist places.
NOTE: This product is not magnetically shielded and may cause color distortion on the
screen of some TVs or video monitors. To avoid this, you may need to move the
unit further away from the TV or monitor if unnatural color shifts or image
distortion occurs.
COMPLIANCE WITH FCC REGULATIONS
This device complies with Part 15 of the FCC Rules. Operation is subject to the following two
conditions:
(1) this device may not cause harmful interference, and
(2) this device must accept any interference received, including interference that may cause
undesired operation.
CAUTION: Changes or modifications not expressly approved by the party
responsible for compliance could void the user’s authority to operate the
equipment.
PROTECT YOUR FURNITURE
This model is equipped with non-skid rubber 'feet' to prevent the product from moving
when you operate the controls. These 'feet' are made from non-migrating rubber material
specially formulated to avoid leaving any marks or stains on your furniture. However
certain types of oil based furniture polishes, wood preservatives, or cleaning sprays may
3
cause the rubber 'feet' to soften, and leave marks or a rubber residue on the furniture. To
prevent any damage to your furniture we strongly recommend that you purchase small
self-adhesive felt pads, available at hardware stores and home improvement centers
everywhere, and apply these pads to the bottom of the rubber 'feet' before you place the
product on fine wooden furniture.
PRODUCT FEATURES
This unit is a Bluetooth portable speaker with the following features:
z Auxiliary input jack to play music from your iPod or digital audio player
z Wireless playback of music from your cell phone via the Bluetooth connection
z Hands-free for phonecall
z Up to 33 feet (10 meters) operating range
z Digital volume control
z Charge an out-of-power cell-phone for emergency use
z
Built-in UL-approval 1,000 mAH Li-Polymer rechargeable battery.
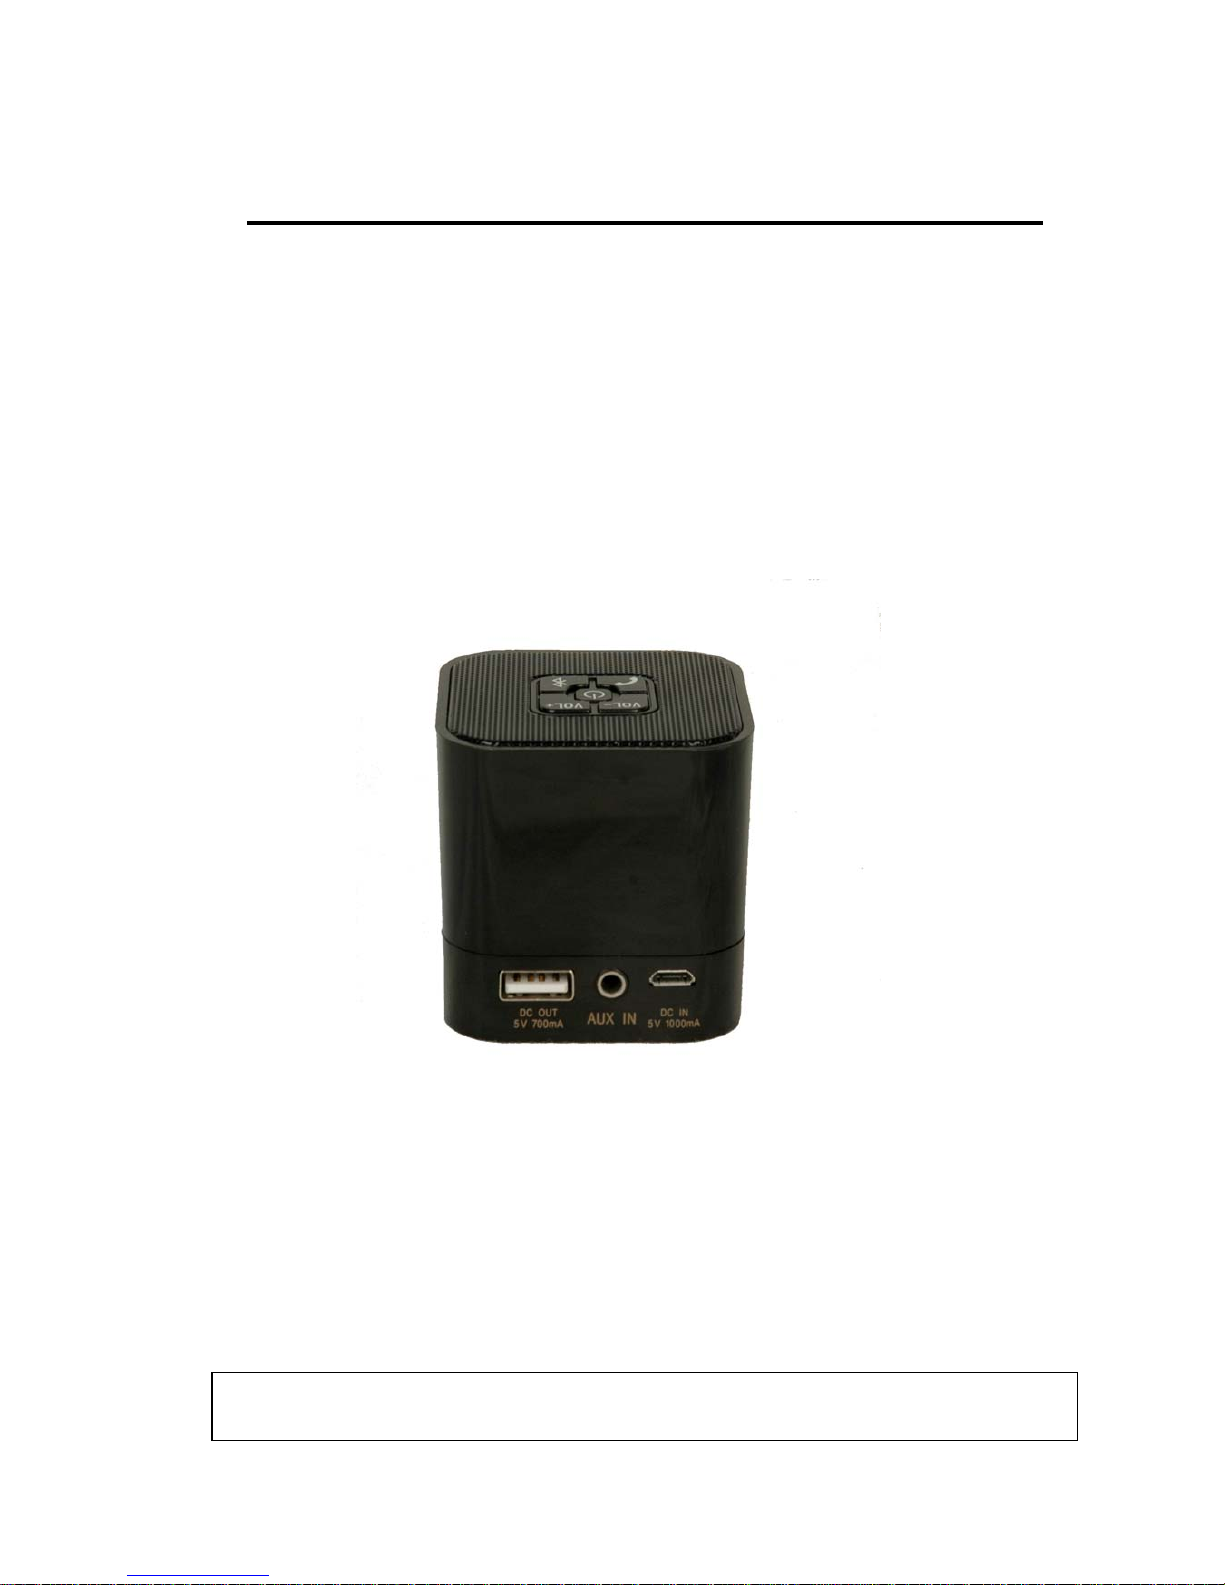
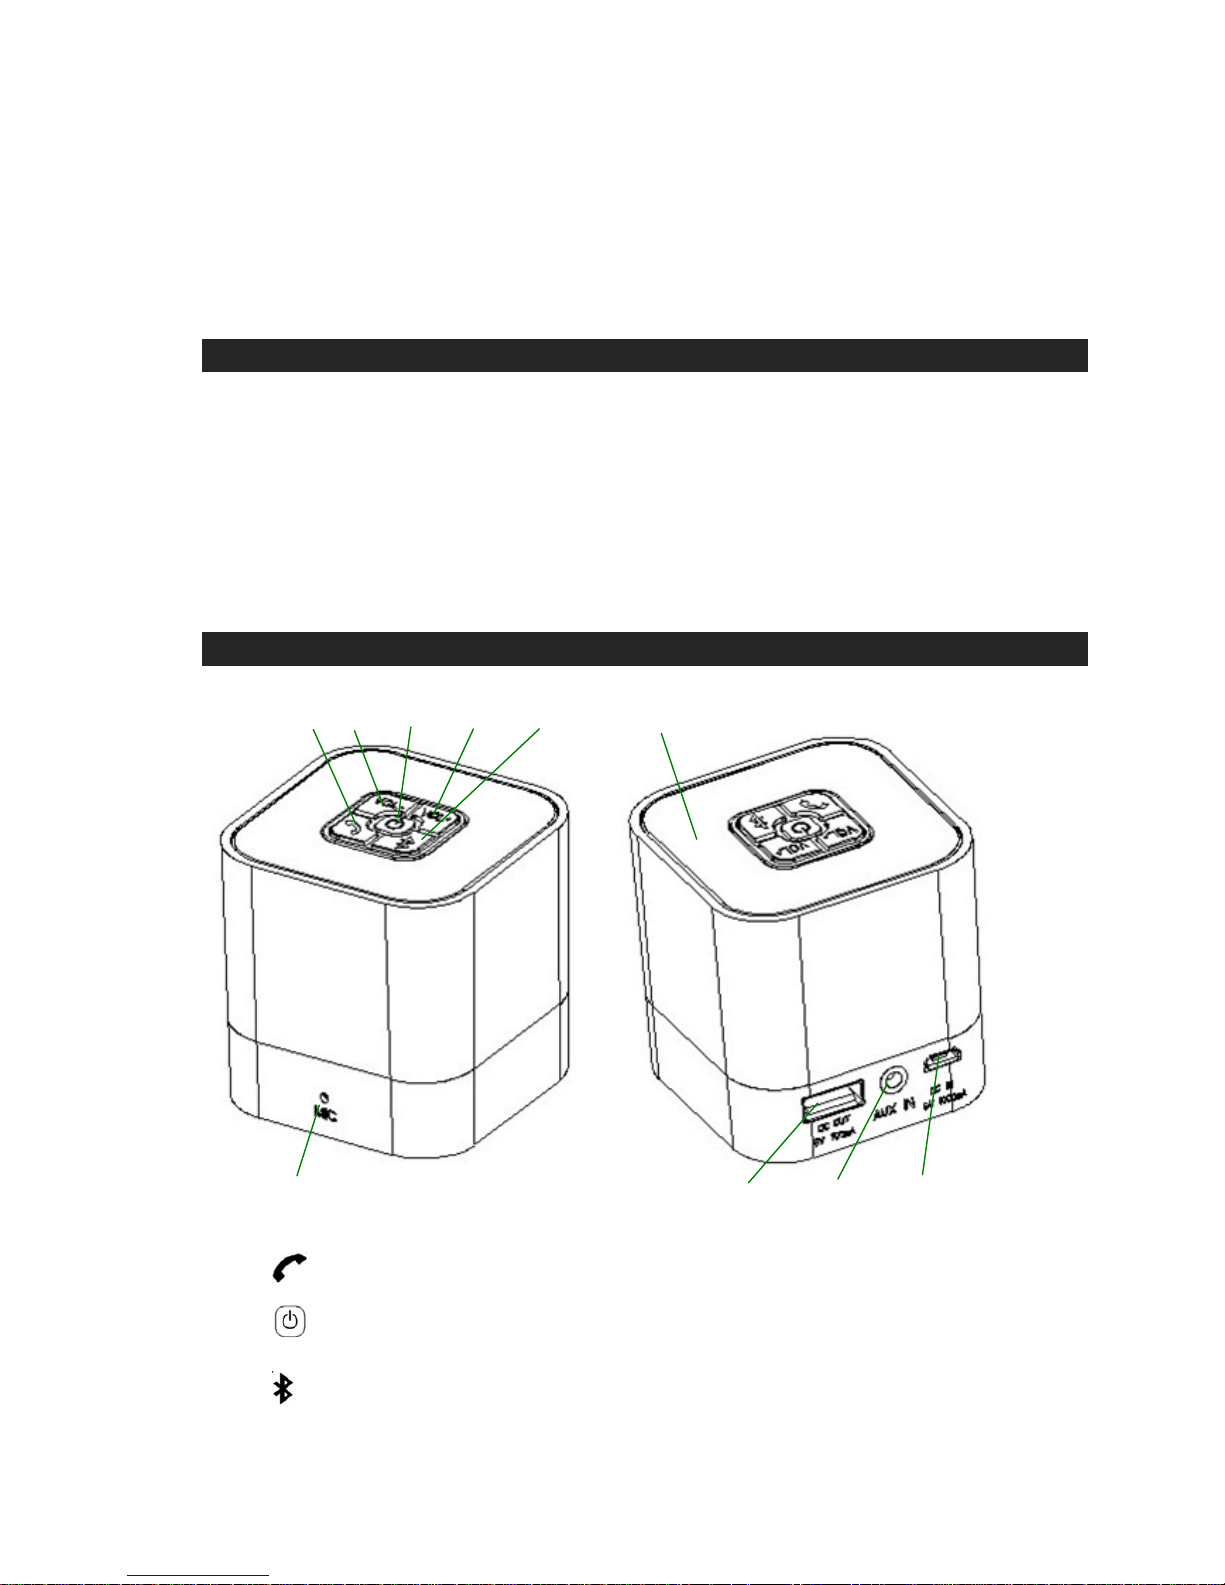
LOCATION OF CONTROLS
1 2 3 4 5 10
1. 6 7 8 9
1. PHONE BUTTON
2. VOLUME DOWN (-) BUTTON
3. POWER ON/OFF BUTTON; 5V DC-OUT BUTTON; POWER/CHARGING INDICATOR
4. VOLUME UP (+) BUTTON
5. BLUETOOTH ON/OFF BUTTON; BLUETOOTH STATUS INDICATOR
6. CONDENSOR MIC

4
7. DC IN/BUILT-IN BATTERY CHARGING JACK
8. AUX-IN JACK
9. DC OUT/AUXILIARY BATTERY CHARGING JACK
10. SPEAKER
LED STATUS INDICATORS
POWER LED(Red & Green , beneath Power button)
MODE STATUS LED INDICATION
Power OFF
Power off LED off
Battery in charging Slow flashing Red
Battery fully charged Solid Red
Power ON
Battery at working level Slow flashing Green
Battery at low level Slow flashing Green & fast flashing Red
No power LED off
Battery in charging Slow flashing Red & Green
Battery fully charged Solid Red & Green
Remarks: Fast Flashing : 1 second apart.
Slow Flashing : around 3 - 4 seconds apart.
Battery at working level : Voltage at 3V –4.2V
BLUETOOTH LED (Red & Blue , beneath Bluetooth button)
Tap POWER button to turn
on Bluetooth. It starts to pair
with your Bluetooth device in
7 seconds.
Not in pairing LED Off
In pairing Red & Blue flash alternatively
Failed to link Red flashes twice per second
Linked Blue flashes twice per second
Tap POWER button to turn
on Bluetooth which will link
with the previously paired
device automatically.
Failed to link Red flashes twice per second
Linked Blue flashes twice per second
Bluetooth will turn off automatically if unlinked for over 5 minutes

5
CHARGING INSTRUCTIONS
This unit operates on a built-in Li-ion battery that can be recharged either using the USB
port on your computer or from a USB power adaptor (not included) with a rated output of
DC 5V, 1000mA.
Note: The DC input jack located on this unit is mainly designed for charging the built- in
Li-ion battery . The unit will still operate normally while charging, but doing this may
reduce the battery life.
CHARGING THE BATTERY
1. Charge the built-in Li-ion battery a minimum of 4 hours prior to first use.
2. Plug the unit into a USB port on your computer or into a USB power adaptor
(not included) using the included USB cable.
3. Unplug the USB cable from the power source once the battery is fully charged.
4. After prolonged use, the battery voltage may discharge and operation might become
intermittent. When the internal battery charge is very low, the power button backlight
will begin flashing slow green & fast red alerting you to recharge the internal battery.
Battery Note and Care
* Do not burn or bury batteries.
* Do not puncture or crush.
* Do not disassemble.
* Recycle Li-ion batteries. Do not dispose of in the trash.
* Use only chargers rated for Li-ion cells. Be sure the charger ’s voltage and current
settings are correct for the battery pack being charged.
* Charge batteries on a fireproof surface away from flammable items or liquids.
* Batteries should NEVER be left unattended while charging. Only adults should
charge the batteries.
* Follow the manufacturer ’s instructions for charging the product and do not charge
longer than recommended. Unplug the charger when the battery is charged or not
in use.
TURNING THE SPEAKER POWER ON/OFF
1. In standby mode, tap the POWER button to turn on the unit, the power button
backlight will light up green and begin blinking slowly.

6
2. In power on mode, tap the POWER button to turn the unit off, the green power
button backlight turns off.
3. At power-on mode 5V DC-OUT is turn on and ready for charging your cell phone.
4. At ON and Bluetooth mode the Bluetooth button back light flashes blue and red
alternatively.
Turn on the Bluetooth of your device to perform pairing in case it fails to linking
with the previously paired device.
Note: Before first use, please charge the speakers for at least 4 hours because the
batteries may not fully charged, even though the charging LED lights.
BLUETOOTH OPERATION
Power on the unit and follow the directions below to use the A2DP profile Bluetooth
features of this unit.
Turn on the Bluetooth
At OFF mode , tap POWER button to turn the speaker on and its Bluetooth as well , the
Bluetooth button back light flashes red. It will start pairing with your Bluetooth device in 7
seconds. Blue and red flash alternatively when pairing is succeeded
At ON mode tap POWER button to shut down and tap again to turn on power and
Bluetooth. It will link with the previously paired device automatically.
Turn off the Bluetooth
In Bluetooth ON mode, press and hold the Bluetooth button and hold for about 5 seconds
until a beep sound is heard and the Bluetooth button backlight flashes one red and then
all lights go off.
Bluetooth will turn off automatically if linking was not processed or the link has been
interrupted for over 5 minutes.
PAIRING (LINKING) A BLUETOOTH ENABLED CELL PHONE OR OTHER
BLUETOOTH ENABLED DEVICE TO MICROBOX
1. Turn Power and Bluetooth on , it will beep twice , followed by alternative flashing of
blue and red lamp to indicate pairing completed.
2. The unit is ready to pair (link) with your Bluetooth cell phone or device.
3. Turn on the Bluetooth feature of your cell phone and enable the search or scan feature
to find the " MICROBOX ".
4. Select " MICROBOX " from the device list when it appears on your screen. If required,
enter the pass code “0000” to pair (link) the unit with your cell phone.

7
5. After successfully pairing (linking) with your cell phone, you can play music from your
cell phone wirelessly to the unit.
6. Press the Volume Up (+) / Down (-) button to adjust the desired volume level.
7. Simply tap POWER button to turn off Bluetooth. Make sure the Bluetooth of your
device is also turned off.
Notes:
1. Refer to manual of your cell phones, iPad, computer or other Bluetooth enabled
device for Bluetooth operation, since it may vary from model to model.
2. Your Bluetooth enabled device will not play the music through the speaker, even it
can be connected, if the device does not support A2DP.
3. If the built in Li-ion battery reaches a very low power level that affects Bluetooth
operation, the Power button backlight will begin to rapidly blink red two times every
second , followed by three long type sounds prior to the unit is turned off. This will
alert you to recharge the speaker battery immediately.
4. Do not plug in the Audio jack when the Bluetooth is in operation.
5. If you are pairing (linking) your computer to the unit using Bluetooth, you may need
to set the unit as your computer’s default sound device.
6. MICROBOX will reset its volume at 70% full-scale every time the power is turned of
and turned on. Adjust to the level to your desire by with Vol+/Vol- buttons.
Using MICROBOX as a Hands Free Bluetooth Speakerphone
1. Link your cell phone to the speaker via Bluetooth as described above.
2. When receiving an incoming call on your cell phone, tap the PHONE button on
MICROBOX to switch an incoming call from cell phone to MICROBOX. A short beep
sound will be heard confirming the call was answered. Complete your call using the
built-in microphone and speaker of MICROBOX .
3. Press the VOLUME UP(+) /DOWN (-) button on MICROBOX to adjust the volume to
your desired sound level. Adjusting volume of linked device will do as well.
4. To end the call, just tap the PHONE button again on MICROBOX . A short beep
sound will be heard and the call will end. If you were streaming music from your cell
phone to MICROBOX, the music will automatically resume streaming to MICROBOX.
To reject an income-call, simply press and hold the PHONE button on the
MICROBOX for about 3 seconds, a long beep sound will be heard.
5. In a phonecall hands-free mode will be transferred to cellphone mode by tapping
PHONE button for 3 seconds. Tapping PHONE button again for 3 second will resume
hands-free mode.
6. MICROBOX will shut down its Bluetooth automatically at receiving no input signal for
5 minutes.
7. You may also shut down Bluetooth by tapping Bluetooth button of MICROBOX for 5

8
seconds.
8. The MICROBOX will automatically redial the last number you dialed by tapping the
PHONE button twice.
A quick press on the Phone button will end the call in progress. A short beep tone will
be heard confirming the redialing is ended.
9. If your cell phone is already paired with MICROBOX but became unlinked even
with both Bluetooth devices turned on, you need to do nothing as MICROBOX will
re-link with the cellphone automatically.
The Bluetooth button status indicator will blink two red with two short beeps if
MICROBOX and your cellphone have been re-linked successfully.
10. To unlike , press and hold the Bluetooth button and hold for about 5 seconds until a
beep sound is heard and the Bluetooth button backlight flashes one red and then all
lights go off. Alternatively pressing Power button will do as well.
NOTE : Re-link MICROBQX by using Bluetooth operation guided in Manual of your cell
phone in case automatic re-linking failed.
PLAYING MUSIC USING THE AUXILIARY INPUT
The MICROBOX features an auxiliary audio signal input jack for connecting external
audio devices like MP3 players, CD players, iPhones or iPods (except iPod shuffle 3rd
gen) and listen to them your through the speaker of MICROBOX.
1. Use the audio cable (included) with one 3.5 mm stereo plug on each end of the cable.
2. Plug one end into the AUX-IN jack on the MICROBOX and the other end of the cable
into the Line-out Jack or Headphone Jack of your external audio device.
3. Tap the POWER button to turn on the MICROBOX. The POWER button backlight
will turn green and begin flashing slowly.
4. Turn on your external audio device.
5. Press the VOLUME UP (+) / DOWN (-) button to adjust the desired volume level.
6. Operate all other functions on the auxiliary device as usual.
NOTES:
(1). If you’re connected to the Line Out Jack of your external device then you only need
to adjust the volume control on the MICROBOX. If you’re connected to the
Headphone Jack of your external device, then you may need to adjust both the
volume control of your external device and the volume control on the MICROBOX
to find the most desirable volume setting.
(2). If you use AUX IN function in Bluetooth on mode, Bluetooth audio will be temporarily
disconnected when the audio cable plugged in. Unplugging the audio cable will

9
resume Bluetooth audio.
(3). We suggest you turn off the Bluetooth to save battery power when playing music via
AUX IN mode.
(4). Turn the power of MICROBOX off when not in use. Make sure the auxiliary device is
also turned off.
RECHARGING MICROBOX BATTERY
When you listen to music, the built-in rechargeable Li-ion battery will eventually reach
a low power condition. The power indicator will turn red and start flashing quickly, so
please charge the speaker battery as soon as possible.
1. Plug the unit into a USB port on your computer or into a DC 5V, 1000mA USB
power adaptor (not included) using the included USB cable.
2. Plug the other plug of the cable to the micro USB port of MICROBOX.
Charging in Power On mode
z The Red & Green LEDs slowly flash simultaneously if battery is charged up to a
workable level.
z Both Green & Red LED lit solid if battery is fully charged.
Charging in Unit Power Off mode
z The Red LED turns on and starts flashing slowly.
z The Red LED lights solid when the battery is fully charged after charging for
about 4 hours.
NOTES : 1. Charging time will vary if you are listening to music while charging the
speaker battery. We recommend you switch off the speaker power during
the charging process or until the speaker batteries are fully charged.
2. To prolong the life of a rechargeable battery, it is recommended to
completely discharge it before fully charging it again.
3. Rechargeable batteries need to be cycled for maximum performance and
longer battery life. If you don’t use the player that often, be sure to recharge
the battery at least once a month in order to keep the internal battery
working properly.
MICROBOX TO RECHARGE CELLPHONE BATTERY
The MICROBOX is feature with a USB port for recharging your cellphone at
emergency. With a 700mA DC current maximum the MICROBOX is capable of

10
charging devices of 3,000mAH or below.
1. Connect DC OUT jack of MICROBOX to charging port of your cellphone with the
USB cable included in the pack of the cellphone when being purchased.
2. Turn on MICROBOX by tapping POWER button. The 5V DC-OUT is on.
3. Check charging status indicator of your cellphone to make sure of proper charging.
4. To cease charging simply tap Power button which turns off both 5V DC-OUT and
power of MICROBOX.
Alternatively press Power button for 3 second to turn off 5V DC-OUT while leaving
MICROBOX at power-on mode.
5.Tap the Power button of MICROBOX again for music play.
NOTE : Make sure the battery of MICROBOX is fully charged before charging your
cell phone or other devices.
Do not charge MICROBOX battery while leaving 5V DC-OUT at charging
condition as this will prolong charging time for cellphone and might shorten
life-time of MICROBOX battery.
CARE AND MAINTENANCE
1. Avoid operating your unit under direct sunlight or in hot, humid or dusty places.
2. Keep your unit away from heating appliances and sources of electrical noise such
as fluorescent lamps or mo to rs.
3. Unplug the unit from the electrical power outlet immediately in case of malfunction.
CLEANING THE UNIT
z To prevent fire or shock hazard, disconnect your unit from the USB port of power
source when cleaning.
z The finish on the unit may be cleaned with a dust cloth and cared for as other
furniture, Use caution when cleaning and wiping the plastic parts.
z If the cabinet becomes dusty wipe it with a soft dry dust cloth. Do not use any wax or
polish sprays on the cabinet.
z If the front panel becomes dirty or smudged with fingerprints it may be cleaned with a
soft cloth slightly dampened with a mild soap and water solution.
z Never use abrasive cloths or polishes as these will damage the finish of your unit.
CAUTION: Never allow any water or other liquids to get inside the unit while cleaning.
TROUBLESHOOTING GUIDE

11
SYMPTOM POSSIBLE PROBLEM SOLUTION
No Charging
AC adaptor or USB cable not plugged
properly
Plug the AC adaptor into a wall outlet and plug the
connector into the supply jack on the unit.
Defective AC adaptor Use a good adaptor to verify.
Defective AC outlet Use other AC-powered product to verify.
Defective USB port of PC
Make sure PC is on and use the other USB port to
verify.
No Sound in
Bluetooth mode
Bluetooth shut-down due to low
battery power
Charge the battery.
Unlinked to cell phone Link with cell phone as guided.
MICROBOX is placed out of working
range
Place MICROBOX within 30-ft of cell phone
Volume level was set too low
Increase volume of MICROBOX , and that of
source device if necessary.
AUX IN socket was plugged Unplug AUX IN .
AUX no sound
Audio cable not plugged properly
Check if the audio cable is properly and firmly
plugged.
Volume level was set too low
Increase volume of MICROBOX , and that of
source device if necessary.
Sound Distortion
Volume level was set too high Lower down volume by tapping VOL- button.
Source distortion or noise
Poor sound quality from cell phone. This can be
verified with Bluetooth devices of other types like
CD player.
Lower down volume level, shut down BASS or
adjust EQ of the old-version iPod if used.
Battery low Recharge the battery .
Unit hot Long-time operation at high volume
Lower down volume level or shut down power
for a while.
No output from USB
DC OUT
Battery low Recharge the battery.
DC OUT is not on
Tap Power button for 2 seconds and back-light
flashes red & green alternatively to power on.
Charger cable not connected properly
Check to make sure the cable is properly and
firmly connected.
Defective charging cable Use a good cable to verify.
 Loading...