

Page 1
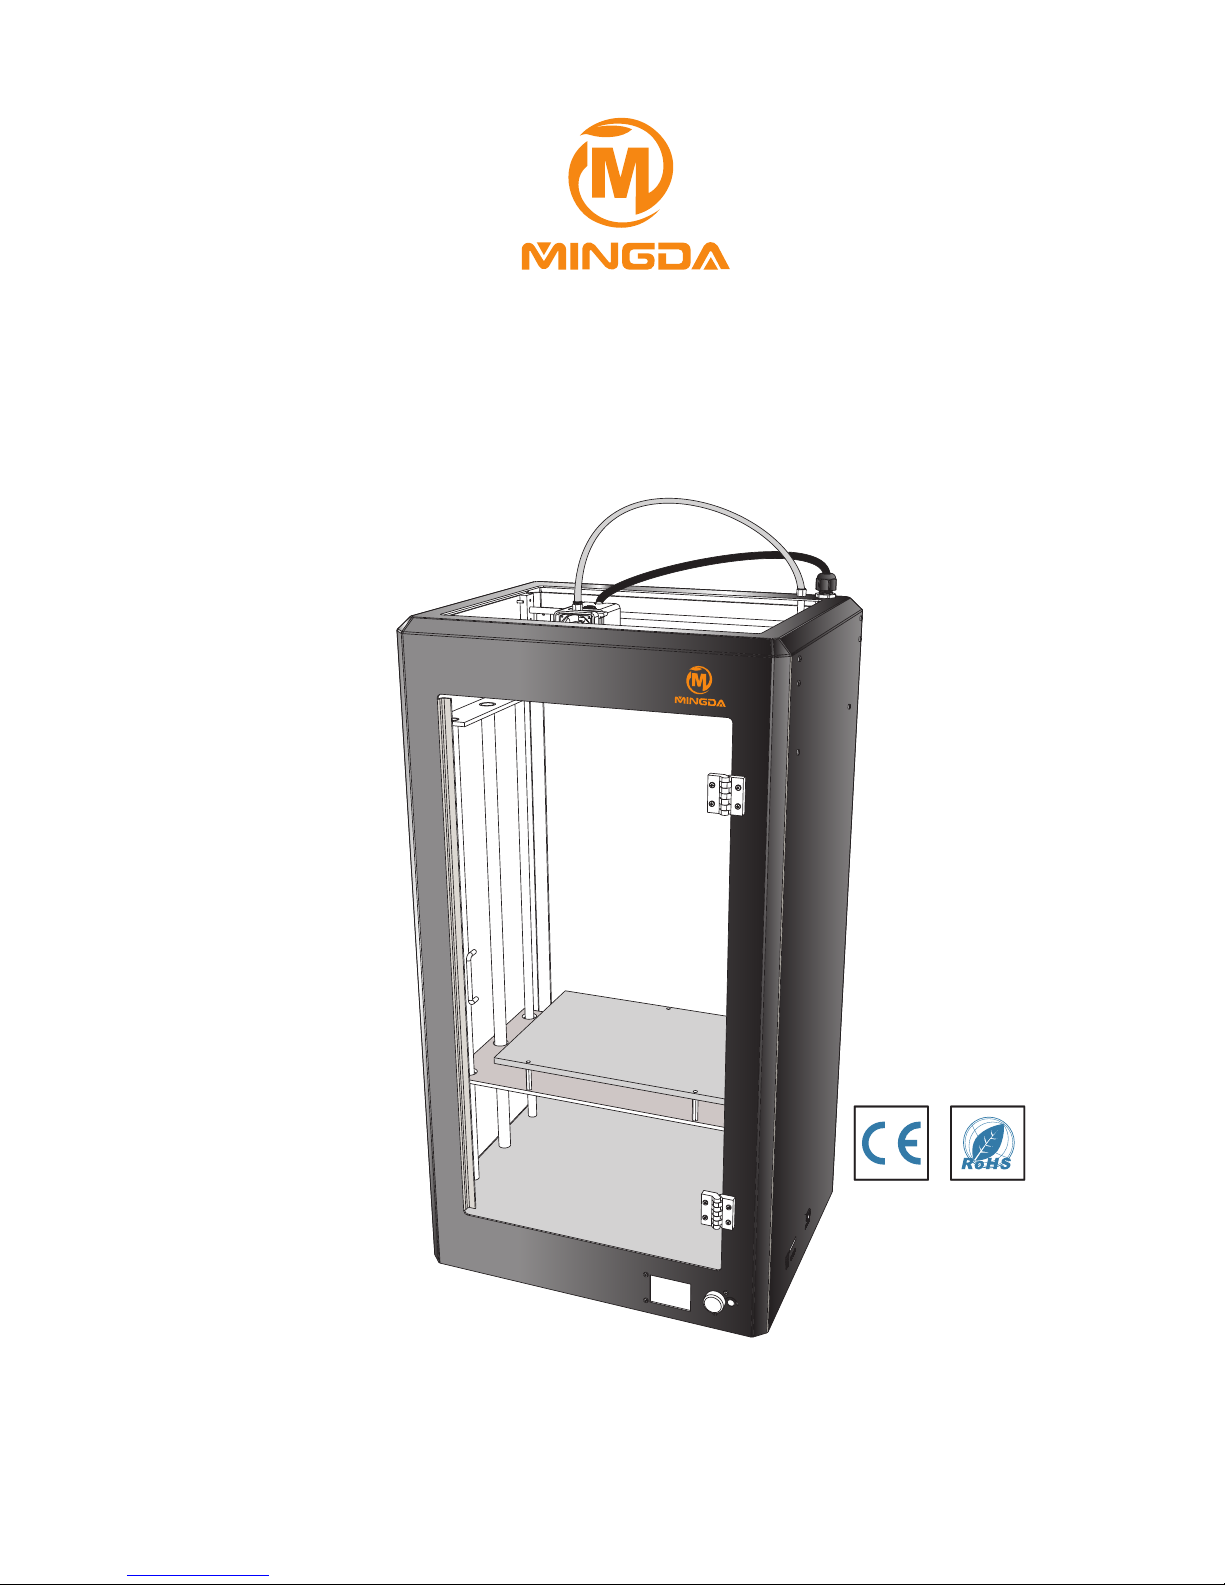
Glitar Series Desktop 3D Printer
User Guide
MINGDA Technology Co.,LTD
MINGDA
Glitar 6
Page 2
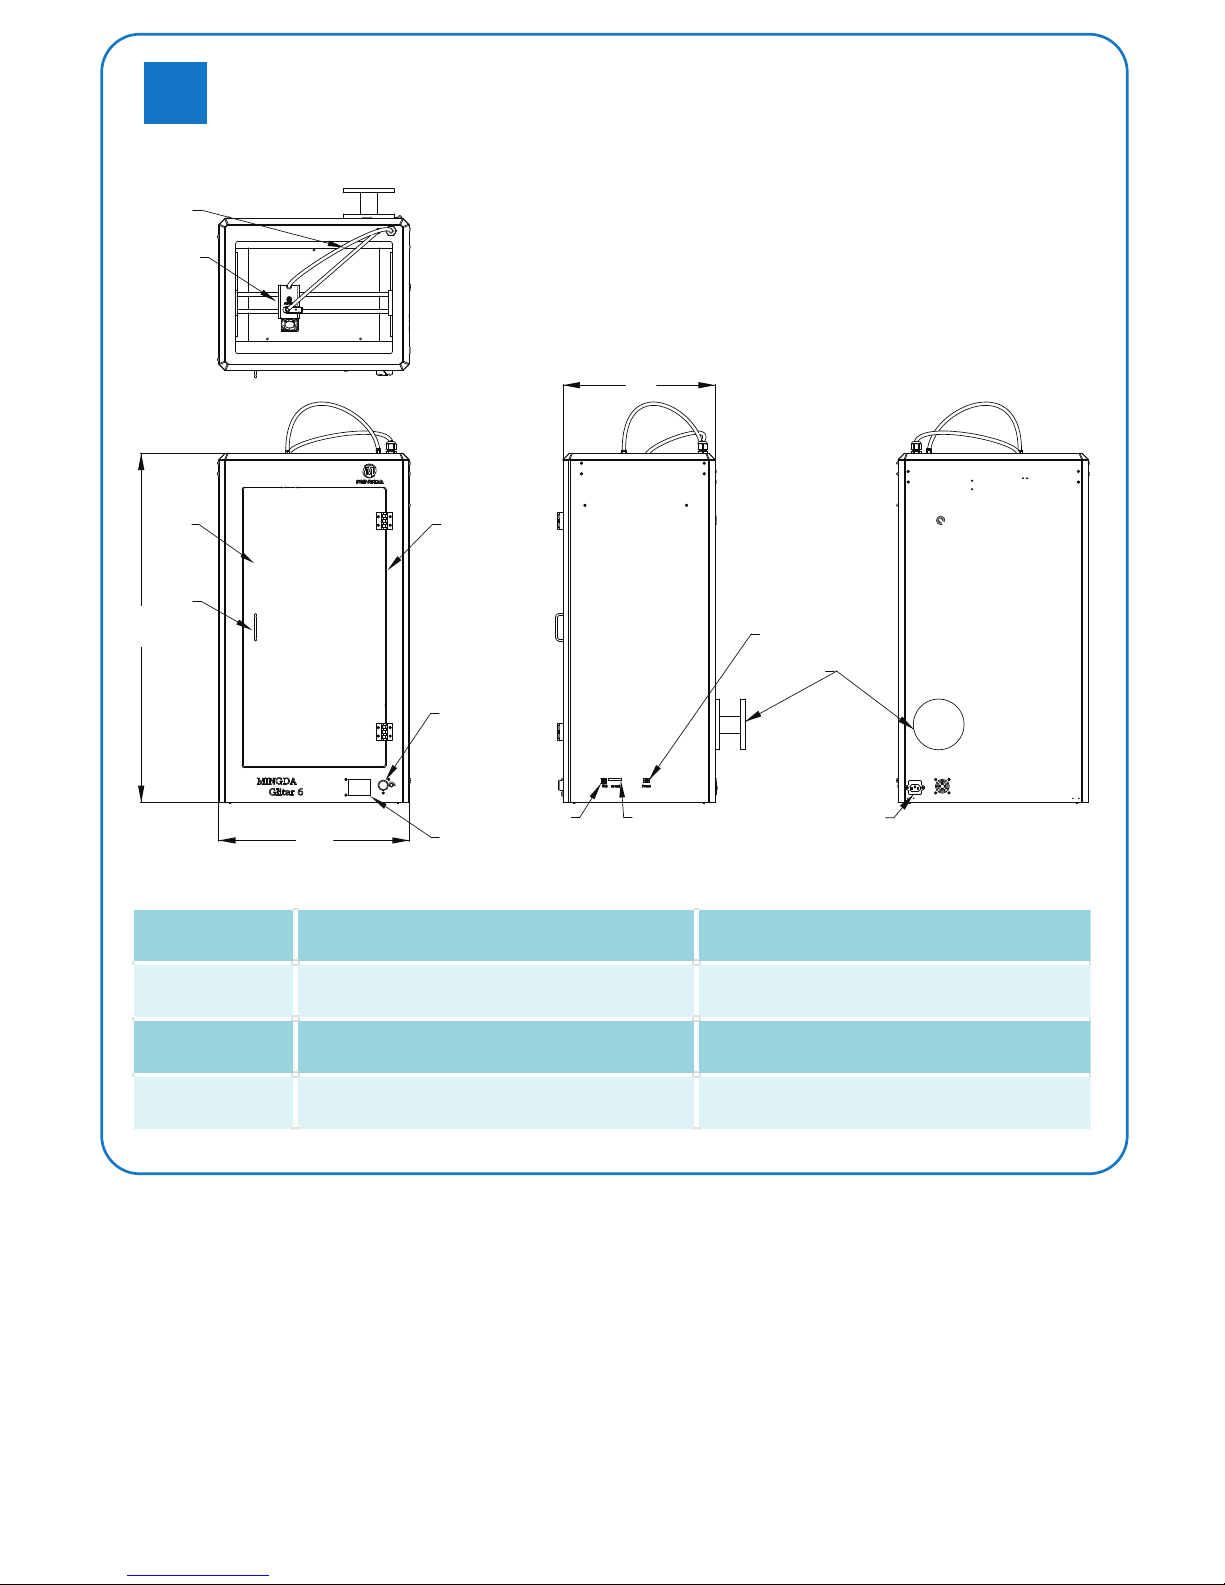
Material bracket
H
W
Door
Knob
Metal housing
Control knob
Display
D
USB port
SD card
Power switch
Extruder
Material tube
Power inlet
Overview
1
Model Dimensions(H×W×D)mm Print range(H×W×D)mm
Glitar 4
Glitar 5
Glitar 6 825×450×360 600×300×200
Page 3
Installation3
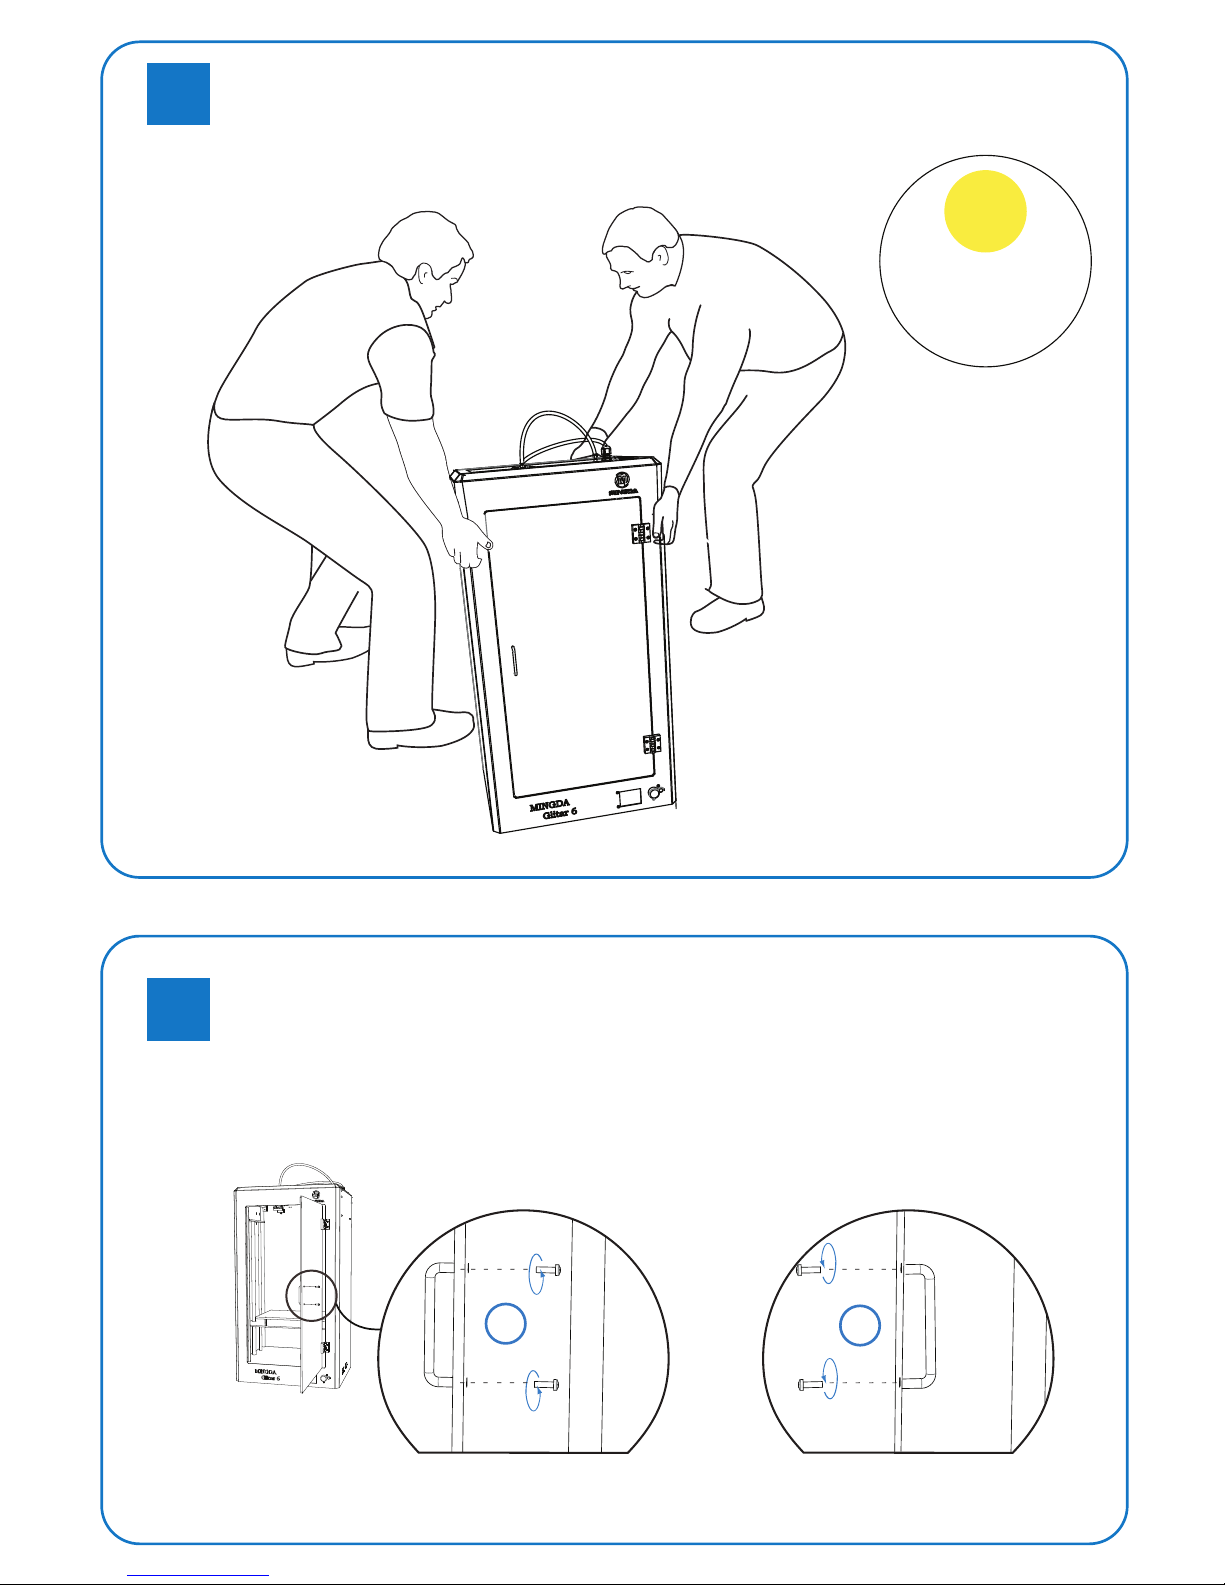
Unpack
2
!
35kg
1
Disassemble screws
2
Assemble screws on opposite
Page 4
6
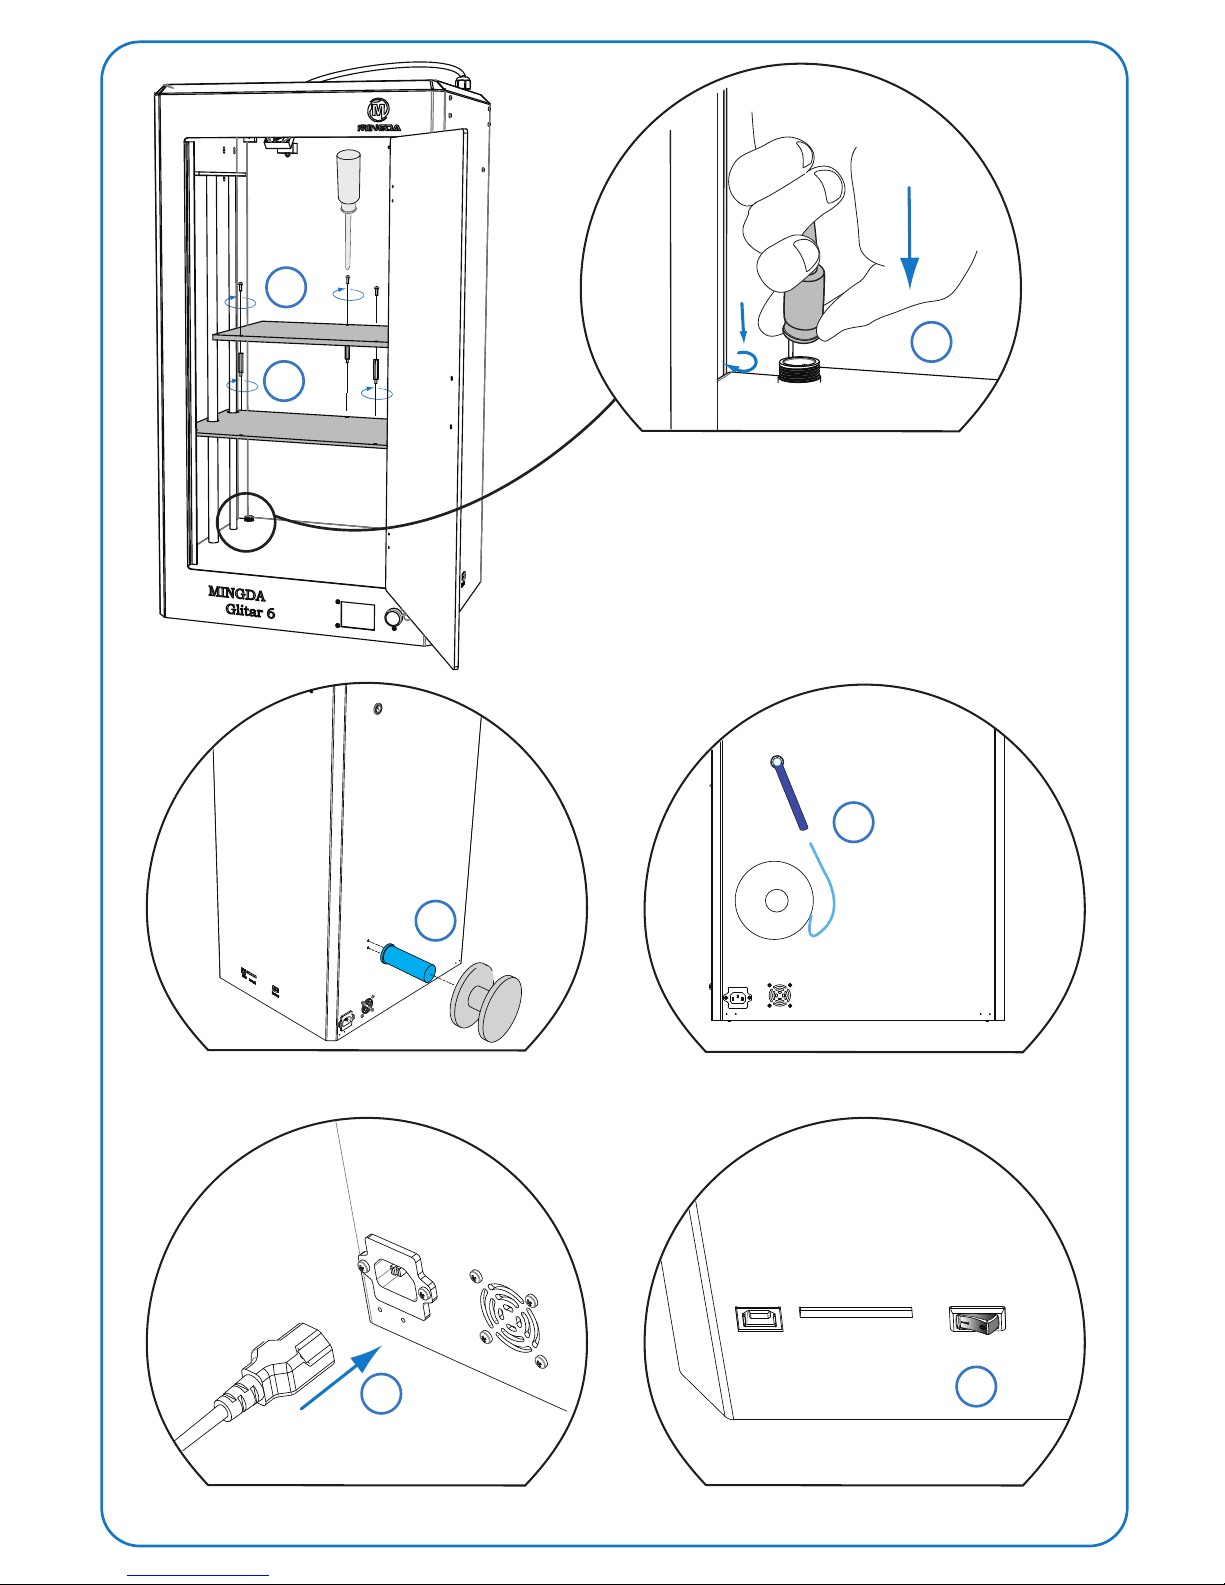
Install material bracket&filament material
7
Insert filament material to tube
Connect power cable Turn the power ON
3
4
5
Install hot bed
8
9
USB
SD Card
Power
Because Mingda 3D printer is very exact, in case of hot bed has
deviation during transportation, hot bed was packed individually.
Note:
Page 5
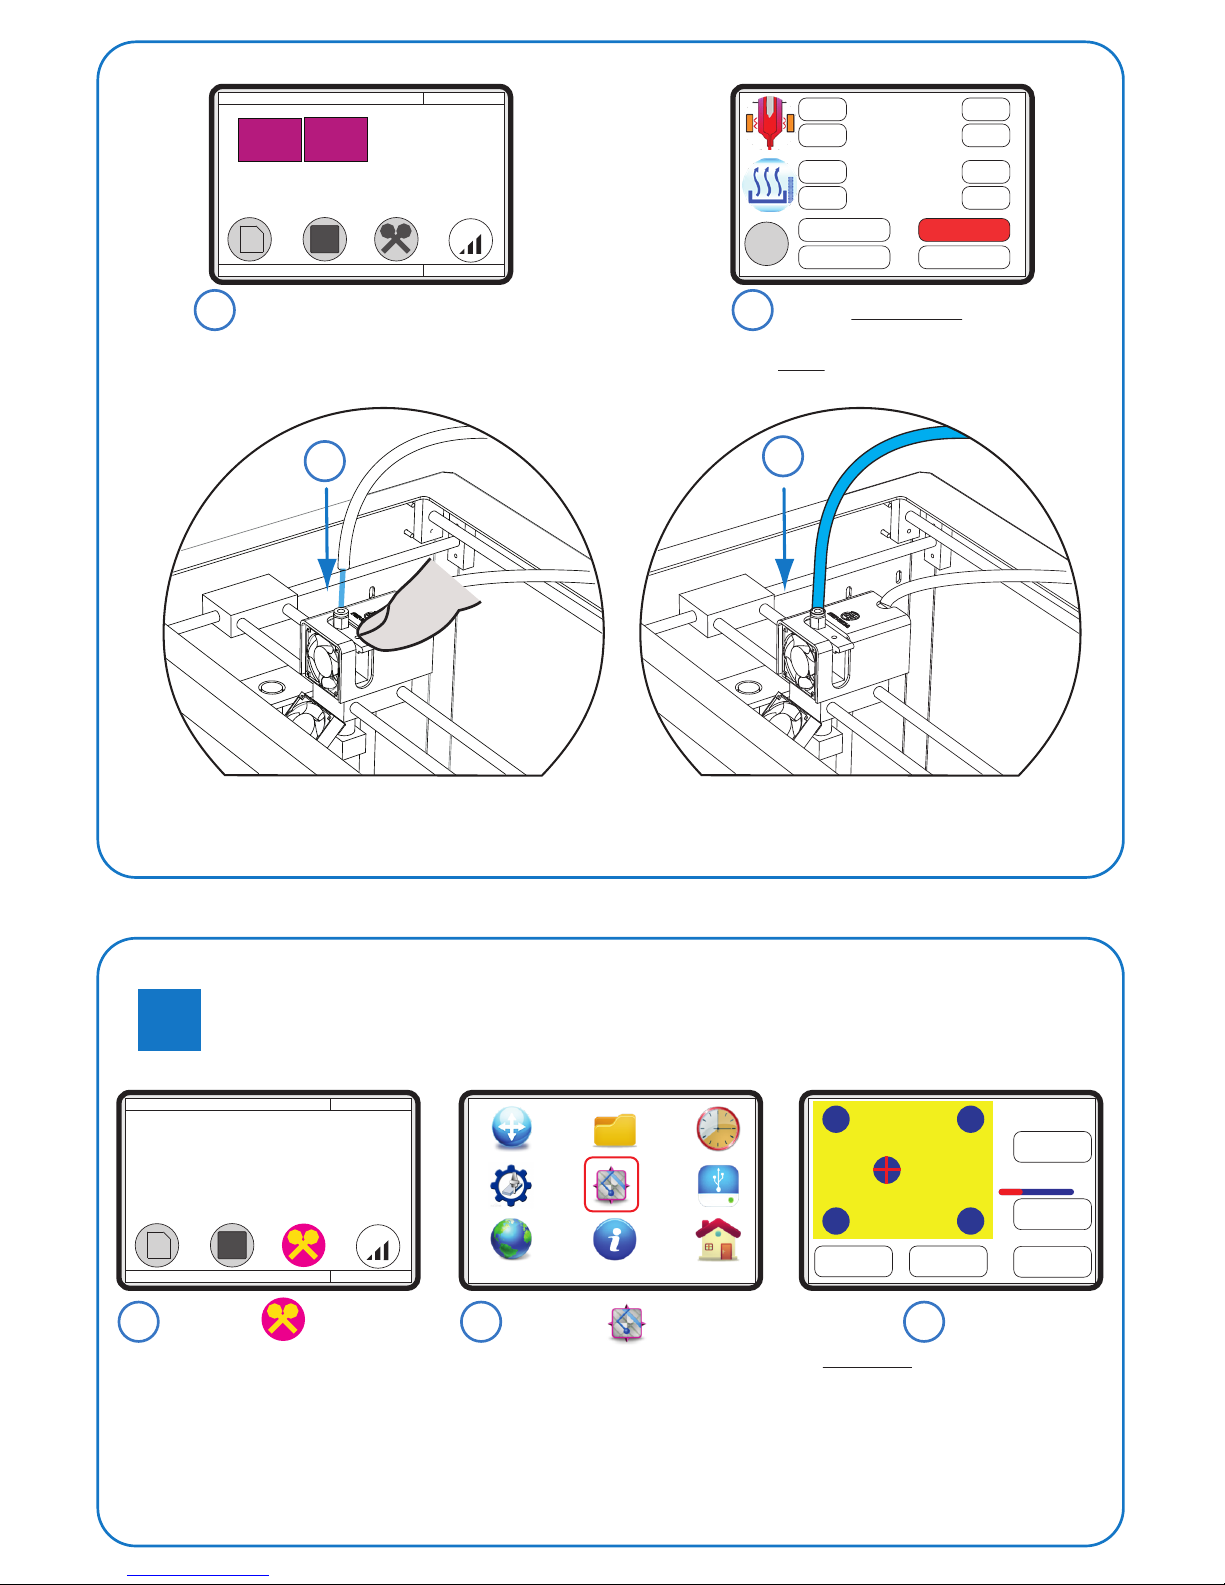
Welcome-MING DA-15.3262 5:23:28
OFFLINE
25 00
25/0 0/0
X:0 Y:0 Z:0 E:0
SD: No SD file to print!
SD
PreheatPLA
Back
PreheatABS
+1
-1
+1
-1
+10
-10
+10
-10
ClearBed ClearHead
200
80
Rotate control knob to
temperature option, press control knob.
Select PreheatPLA,
change the nozzle temperature to 200°C,
select Back to return main interface.
10
Welcome-MING DA-15.3262 5:23:28
OFFLINE
200 00
200/0 0/0
X:0 Y:0 Z:0 E:0
SD: No SD file to print!
SD
12
Once temperature is up to
200 °C, press retainer, and
then insert material to nozzle.
13
Once melting wire flows out
from nozzle, it means loading
material is successful, then insert material tube.
11
Calibration4
Only need to calibrate for the first time.
Notes:
Select
1
Select
2
Select NextStep for 5 times, and review
the gap between nozzle with hot bed,
it’s recommended by ~0.1 mm
(It’s proximate to the thickness of paper).
3
Adjust Platform
LastStep NextStep
Back
Retreat
Feed
Preheat...
Page 6
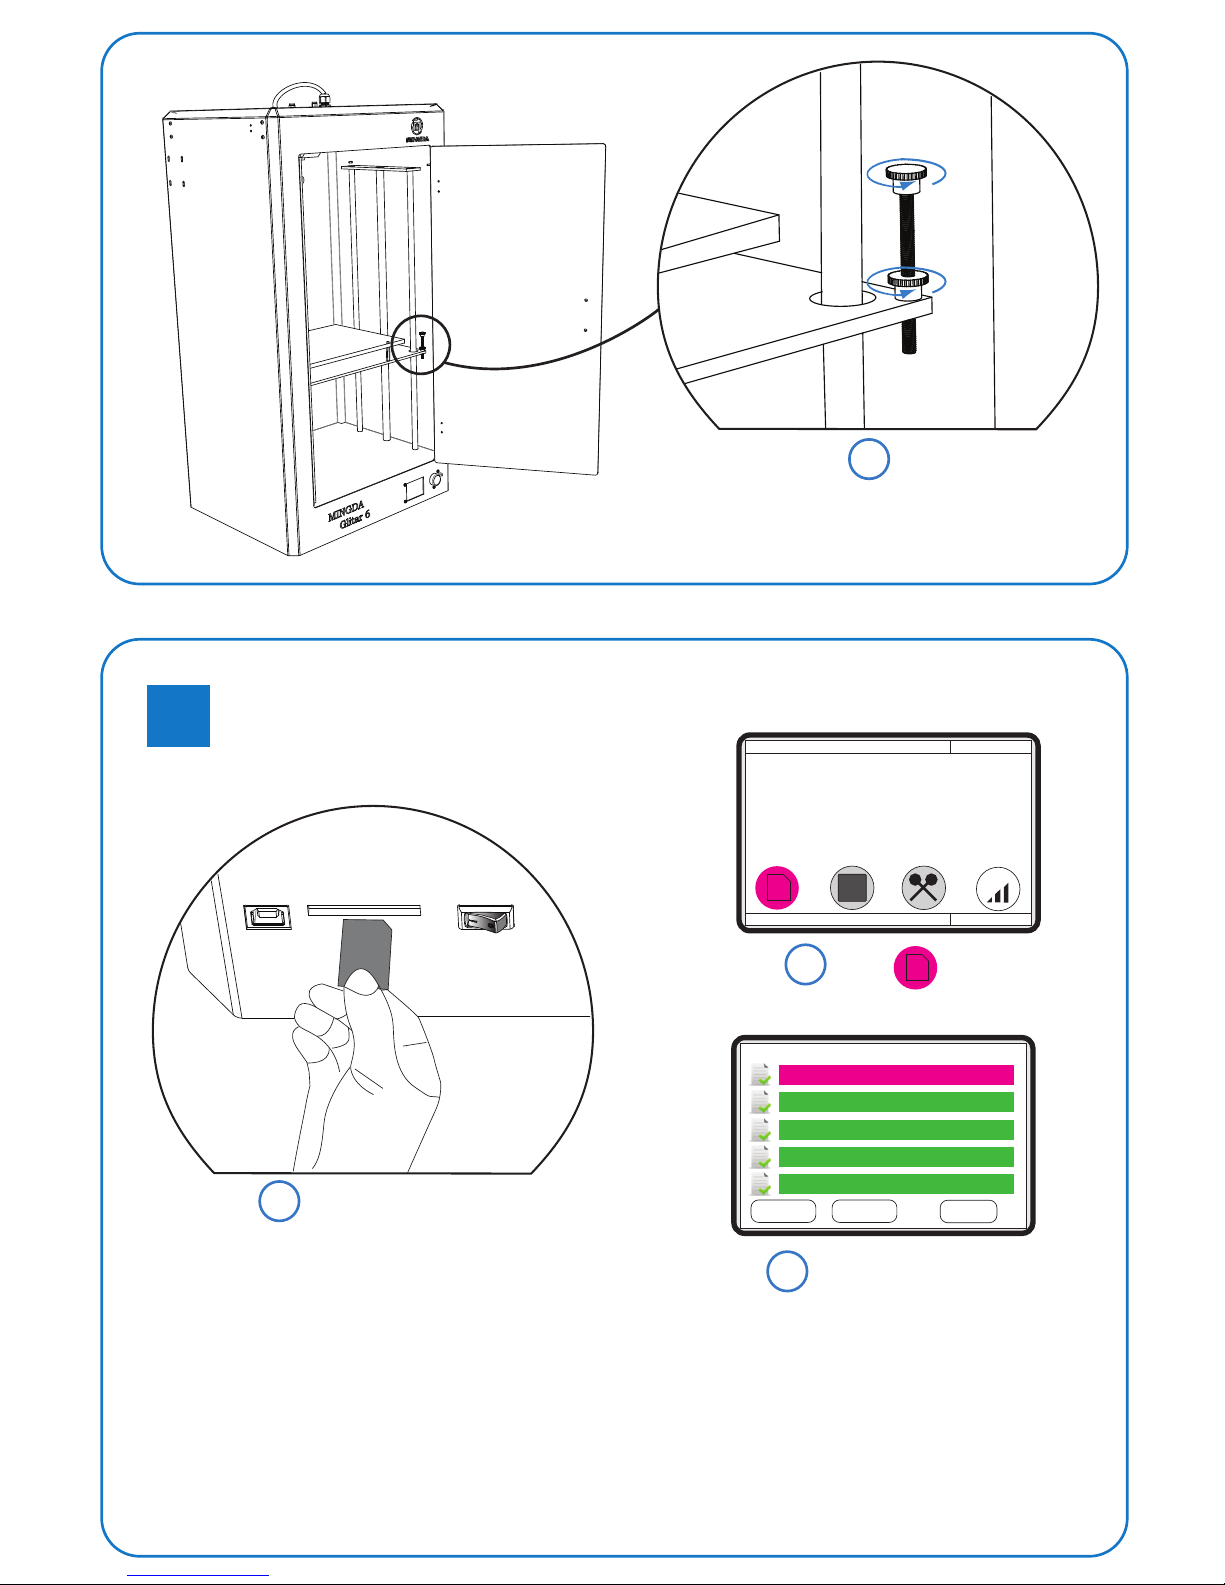
If gap is too large or too less, it
needs to adjust the stopping switch.
3
Printing5
USB
SD Card
Power
S
D
Insert SD Card
Welcome-MING DA-15.3262 5:23:28
OFFLINE
200 00
200/0 0/0
X:0 Y:0 Z:0 E:0
SD: Mingda
SD
Select
1
2
SD
Choose File(*.gcode)
Select .gcode file to print.
3
Mingda1.gcode
Mingda2.gcode
Mingda3.gcode
Mingda4.gcode
Mingda5.gcode
LastPage NextPage
Back
It’s recommended to stick a masking tape on the hot bed.
Notes:
Page 7
1
3
5
6
2
4
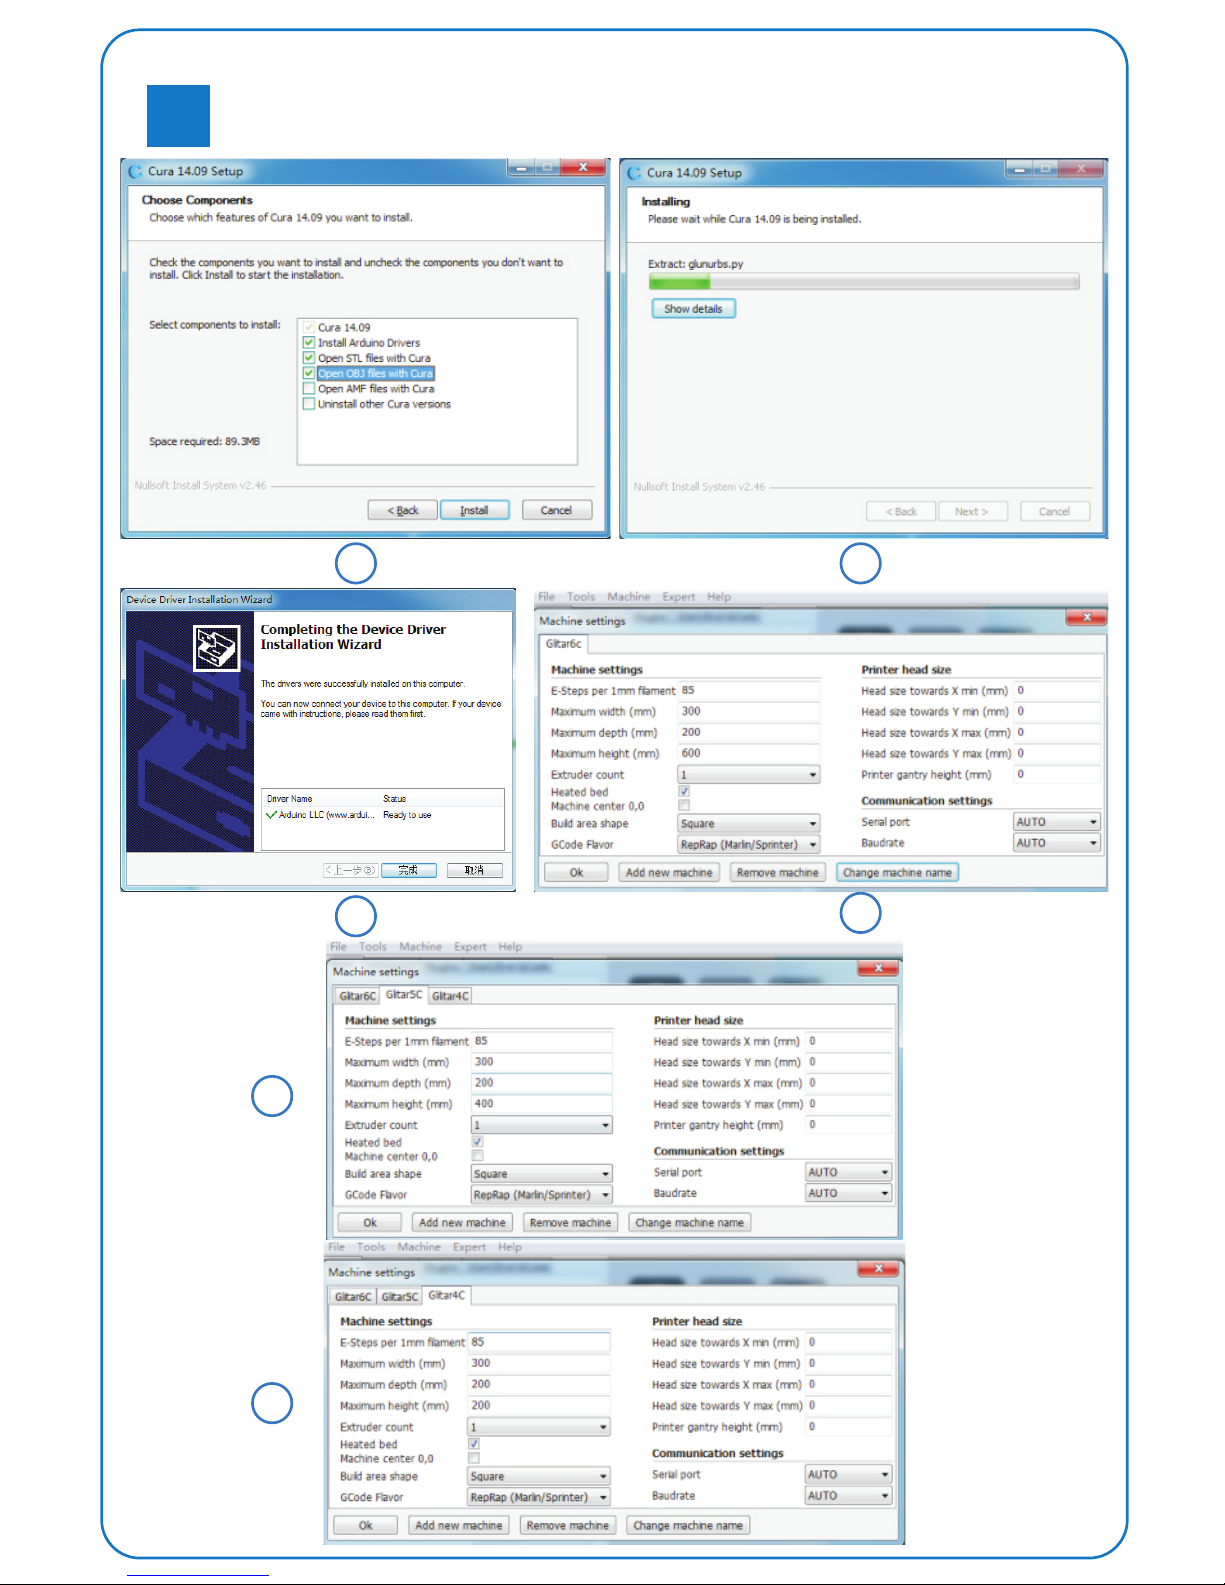
Installing Cura 14 version and guide6
Page 8
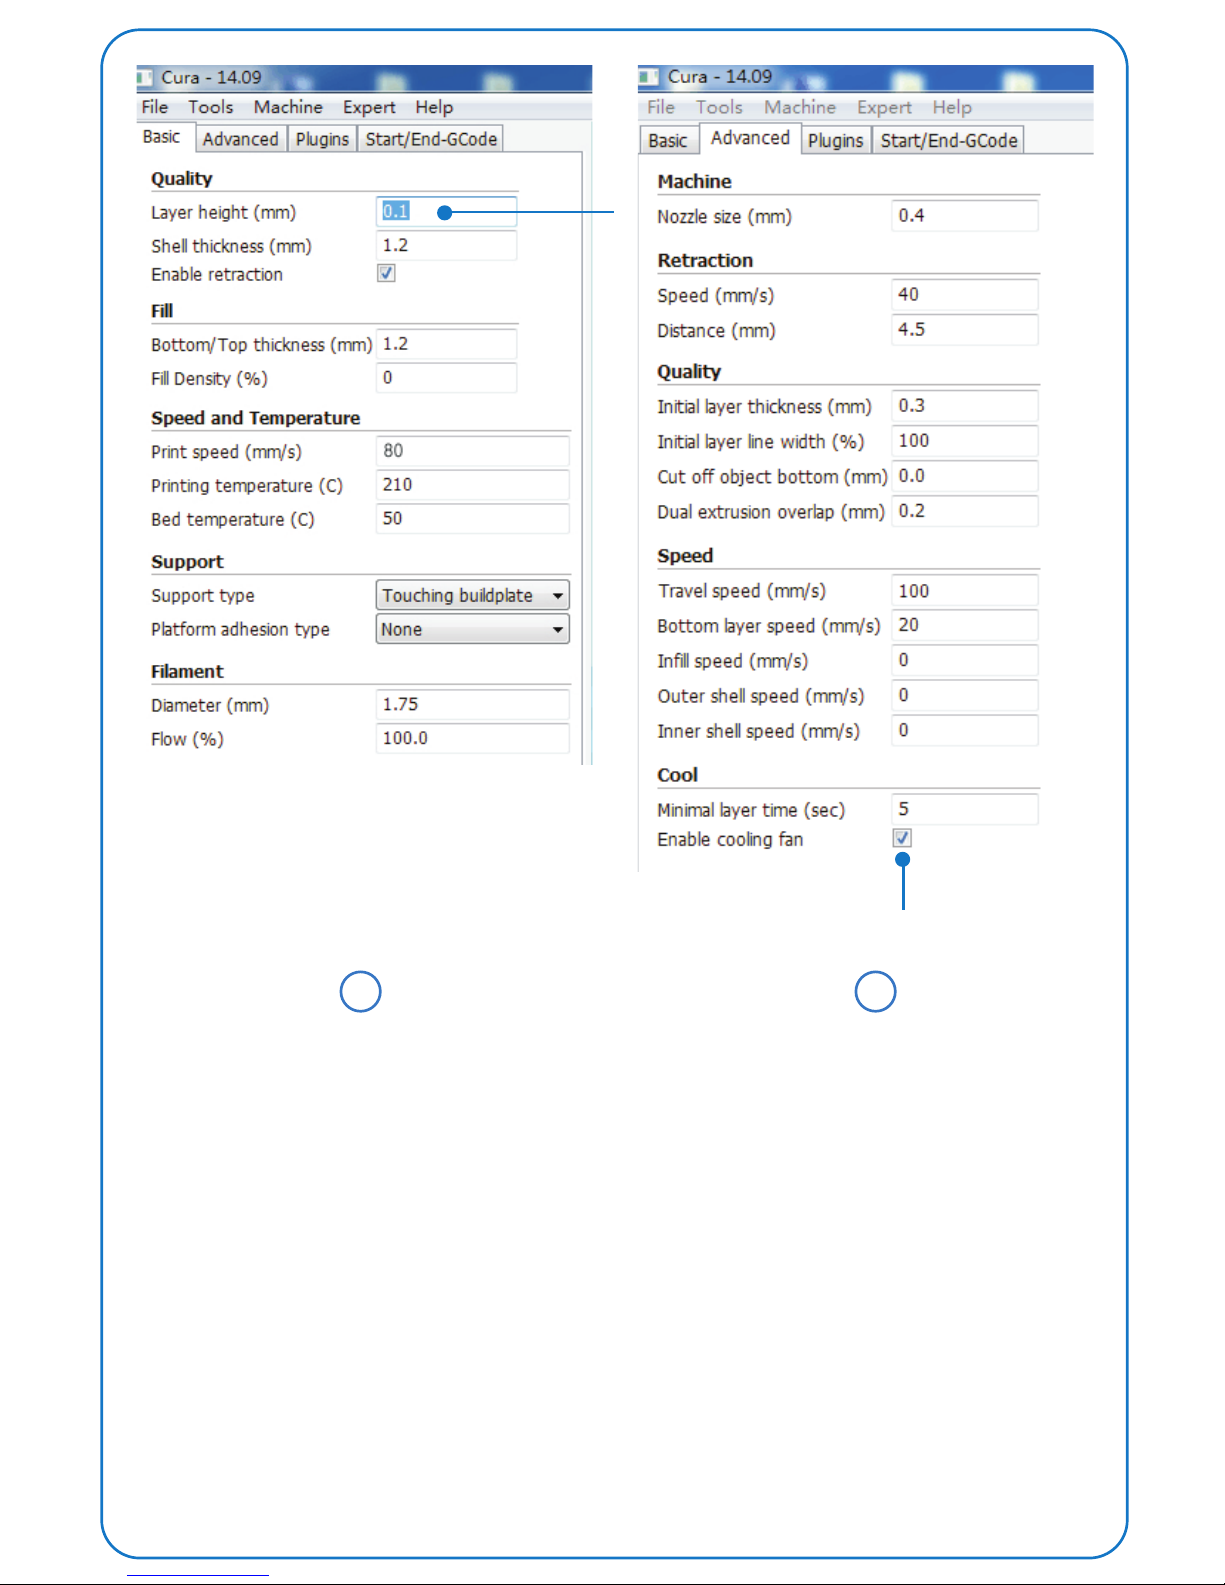
It’s not available for ABS material.
Range 0.1~0.2
7 8
Page 9

FAQ&Solutions7
Printing Problem
Q1: The filament doesn't stick onto the build plate.
- A1: The gap between nozzle and build plate is too big.
- A2:The build plate has not been leveled yet.
- A3: Kapton tape has not been sticked on the build plate yet; or the non-sticky top layer
of the Kapton tape is not removed.
- A4: The first layer’s height is too small, recommended setting as ≥0.2
Q2: Print in the air.
A: The nozzle is too far from plate, please adjust the limitation switch or the screws under
the heat bed.
Q3: No filament output from the nozzle.
A: The filament has not entered into the end of the nozzle yet when you feed the filament.
Q4: Model surface is loose with crack
A: The layer thickness is too big; Or printing speed is too high( the nozzle temperature
needs to do responded balance to have a faster printing speed); Or the temperature is
too low; Or the wall thickness is too thick; Or the feeding device’s fixing screw is too
loose; Or wrong choice of filament diameter; Or filament quality is poor; Or the
filament gets stuck and could not be fed smoothly.
Q5: Model surface is unsmooth
A: Reduce the retraction travel; Or reduce minimal extrusion before retracting;
Q6: Failed prototyping of small model
A: If printing a small model, the extruder will always move in a small space, so the heat will
be concentrated in the model, and hard to be distributed. The solution is to print 3-4
pieces of the small model together. If so, the extruder will move among different models,
leaving time for heat dissipation.
Hardware problem
Q7: Filament Feeder Motor make intermittent noise
A: 1. The clamp of the feeding device is too tight. Loosen the screw of the clamp.
2. Nozzle clogging, causing the filament not to be fed smoothly.Please clean the nozzle
with drill and needle.
Page 10

Q8: Nozzle clogged
A:1. There is the impurity in the filament, which is stacked in the nozzle.Please clean the
nozzle by the needle; or take the nozzle off and clean inside of the nozzle by needle
and drill.
2. The nozzle is overheated causing the filament carbonized inside.Please clean the nozzle
by needle; or take the nozzle off and clean inside of the nozzle by needle and drill.
3. The deformation of the nozzle hole occurred by external force.Please replace the
nozzle.
Q9: The nozzle heating failed
A: 1.The heating tube connection is too loose.Please tighten the connection.
2. Check the heating wire is well connected to mainboard.
Q10: Print Head Stuck/Cannot move
A: 1. The axis lack of lubricating oil. Please clean the axes and smear the lubricating oil evenly.
2. The deformation of machine framework caused by external force during the
transportation.
3. The cable connection of X.Y motor is loose.Please open the machine base, check and
re-connect the cable.
Mingda Technology Co.,Ltd.
Address: MinLe Technical Building,Minle Industrial Zone, Meiban Road,
Longhua New district,Shenzhen,Guangdong Province, China.
Sales director: Doris Cell Phone: 86-13500068891
Hot line: 86-0755-82783379 Fax: 86-0755-82788221
Email: [email protected] Skype: mdantistatic
Website: www.md-3d.com QQ: 751326193
 Loading...