

Page 1

VANQUISH 340 USER MANUAL
Page 2

Contents
QUICK START ��������������������������������������������������������������������������������������������� 3
SEARCH MODES ������������������������������������������������������������������������������������ 3
Coin ������������������������������������������������������������������������������������������������������������������� 3
Jewellery ������������������������������������������������������������������������������������������������������ 3
All‑Metal ������������������������������������������������������������������������������������������������������� 3
CONTROLS ���������������������������������������������������������������������������������������������������� 4
DISPLAY ������������������������������������������������������������������������������������������������������������ 5
DETECTOR SETTINGS �������������������������������������������������������������������� 6
Volume ������������������������������������������������������������������������������������������������������������ 6
Sensitivity ���������������������������������������������������������������������������������������������������� 6
To Adjust the Sensitivity Level ���������������������������������������������������� 6
Excessive Noise ���������������������������������������������������������������������������������� 6
PINPOINT ���������������������������������������������������������������������������������������������������������7
Locate a Target ����������������������������������������������������������������������������������������7
BATTERIES AND CHARGING ����������������������������������������������� 10
Battery Level ������������������������������������������������������������������������������������������� 10
Low Battery ������������������������������������������������������������������������������������������ 10
Automatic Shut‑Down ������������������������������������������������������������������� 10
Battery Run/Charge Times ��������������������������������������������������������� 10
Rechargeable Batteries ����������������������������������������������������������������� 10
DETECTOR CARE AND SAFETY ����������������������������������������11
ERROR CODES �����������������������������������������������������������������������������������������12
TROUBLESHOOTING �����������������������������������������������������������������������12
TECHNICAL SPECIFICATIONS �������������������������������������������13
FACTORY RESET ����������������������������������������������������������������������������������14
DEPTH GAUGE �������������������������������������������������������������������������������������������7
TARGET IDENTIFICATION ��������������������������������������������������������� 8
Target Identification Number ����������������������������������������������������� 8
Discrimination Segments �������������������������������������������������������������� 8
Discrimination Patterns �����������������������������������������������������������������8
All‑Metal ������������������������������������������������������������������������������������������������������� 9
Enable All‑Metal ���������������������������������������������������������������������������������� 9
Using All‑Metal to Check a Target �������������������������������������������� 9
Target Tone ������������������������������������������������������������������������������������������������� 9
This work is licensed under the Creative Commons Attribution‑NonCommercial‑NoDerivatives
4�0 International (CC BY‑NC‑ND 4�0) International License�
To view a copy of this license, visit: http://creativecommons�org/licenses/by‑nc‑nd/4�0/
2
Page 3

Quick Start
Wait For 5
Turn On
1 2 3
Seconds
Go Detecting
Search Modes
The VANQUISH 340 has three Search Modes that each have unique Discrimination Patterns.
Choosing the right Search Mode will help you find more of what you’re looking for.
COIN
Find common modern coins from
around the world while ignoring trash in
parks and at the beach�
Coin Mode is recommended for trashy
locations because it has excellent
target separation abilities� This means
you won’t miss good targets that are
buried directly next to ferrous trash�
The discrimination pattern for this
mode rejects all ferrous (iron) targets
and also rejects small non‑ferrous
trash such as foil�
JEWELLERY
Recover precious jewellery no matter
where it was lost�
Jewellery Mode has excellent target
separation and depth, making it a good
all‑rounder�
This Mode is ideal for finding jewellery
of all shapes, sizes, and metal
composition�
The discrimination pattern for this
mode rejects only ferrous (iron) targets�
Press the Search Mode button to select the next Search Mode�
ALL‑METAL
Find all targets that contain metal,
including iron�
Detecting in All‑Metal Mode guarantees
you will not miss any targets, however
you will also detect more trash�
The discrimination pattern for this mode
accepts all ferrous (iron) and non‑
ferrous targets� The tones are adjusted
to classify as trash common non‑
ferrous targets such as foil�
This Mode can be used to check a target
detected in Coin or Jewellery Modes to
see if it contains iron (see page 9)�
CONTENTS
3
Page 4
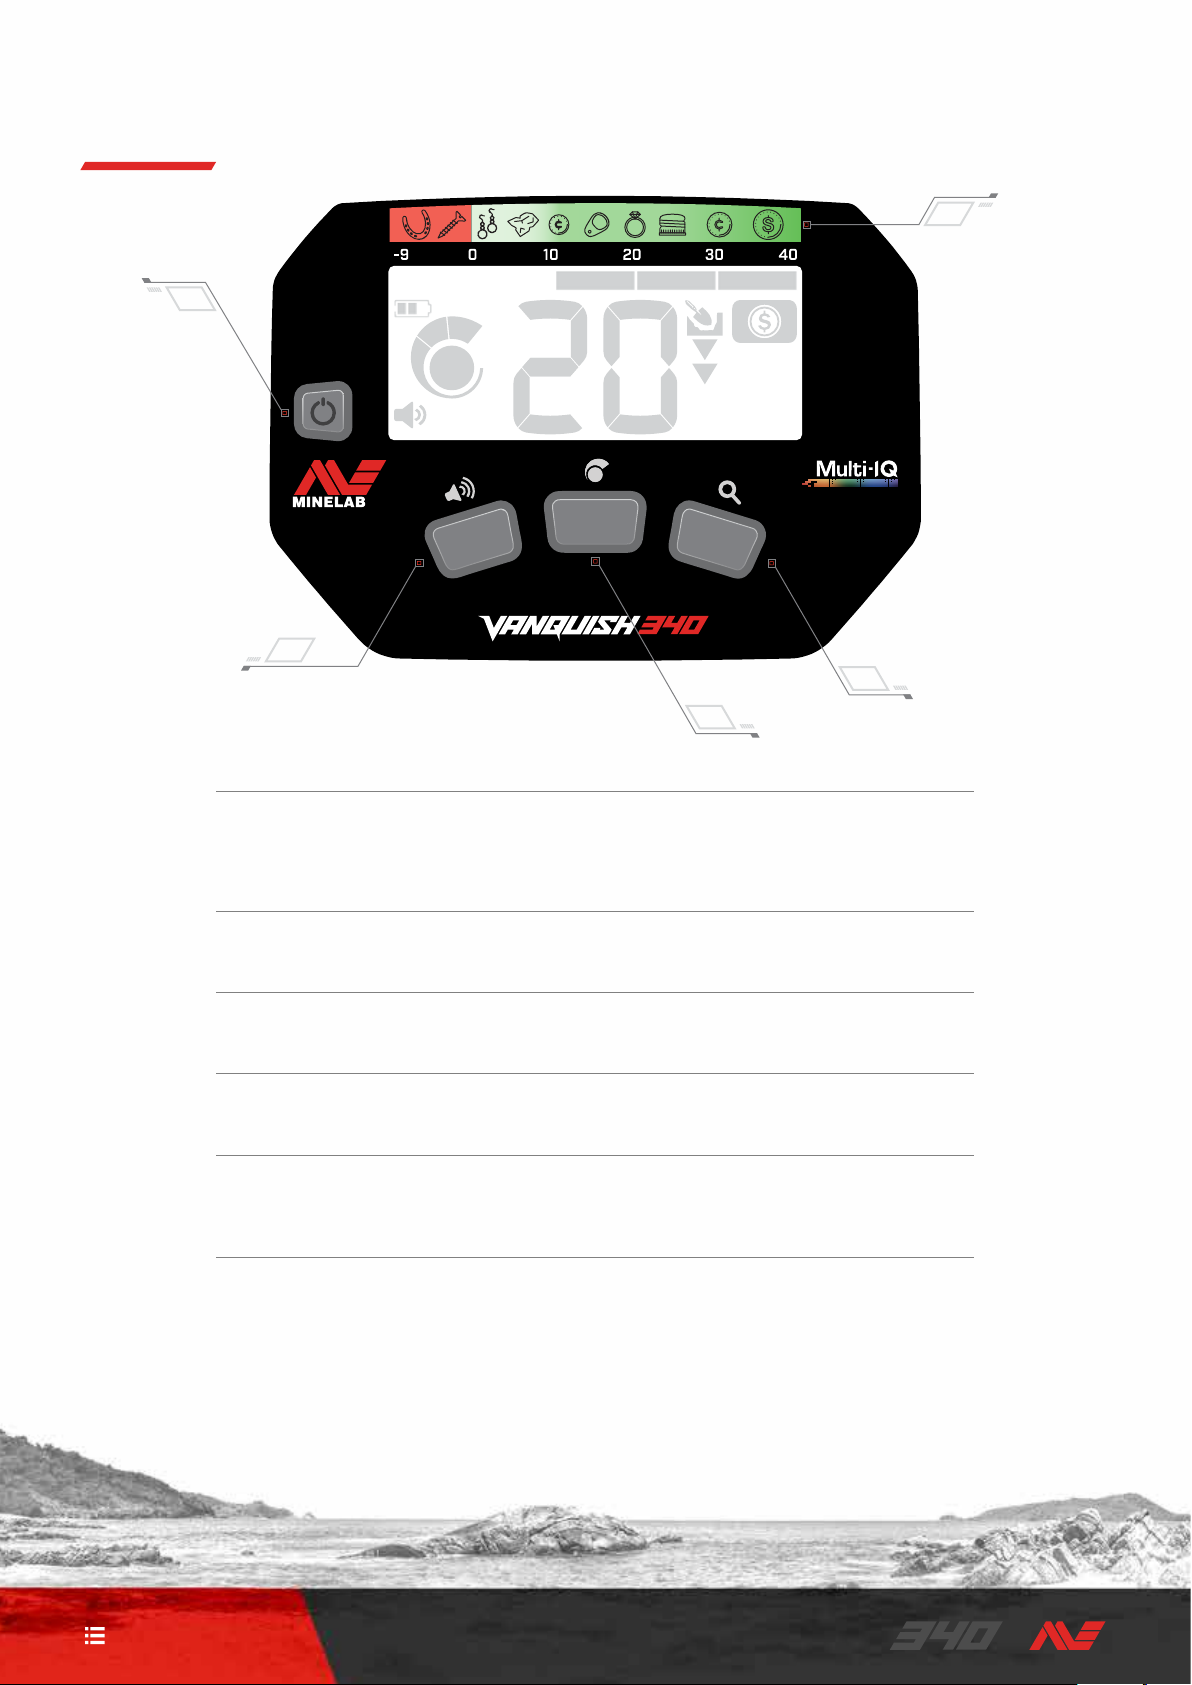
Controls
1
5
2
4
3
1. Power On/Off
Turns the detector on and off�
Press and hold from Off (7 seconds) to restore factory settings (page 14)�
2. Volume Adjust
Adjusts the audio Volume Level (page 6)�
3. Sensitivity
Adjusts the Sensitivity Level (page 6)�
4. Search Mode
Selects the next available Search Mode (page 3)�
5. Target Identification Guide
A reference guide indicating the types of targets that can be found for the corresponding
Target Identification Segment�
CONTENTS
4
Page 5
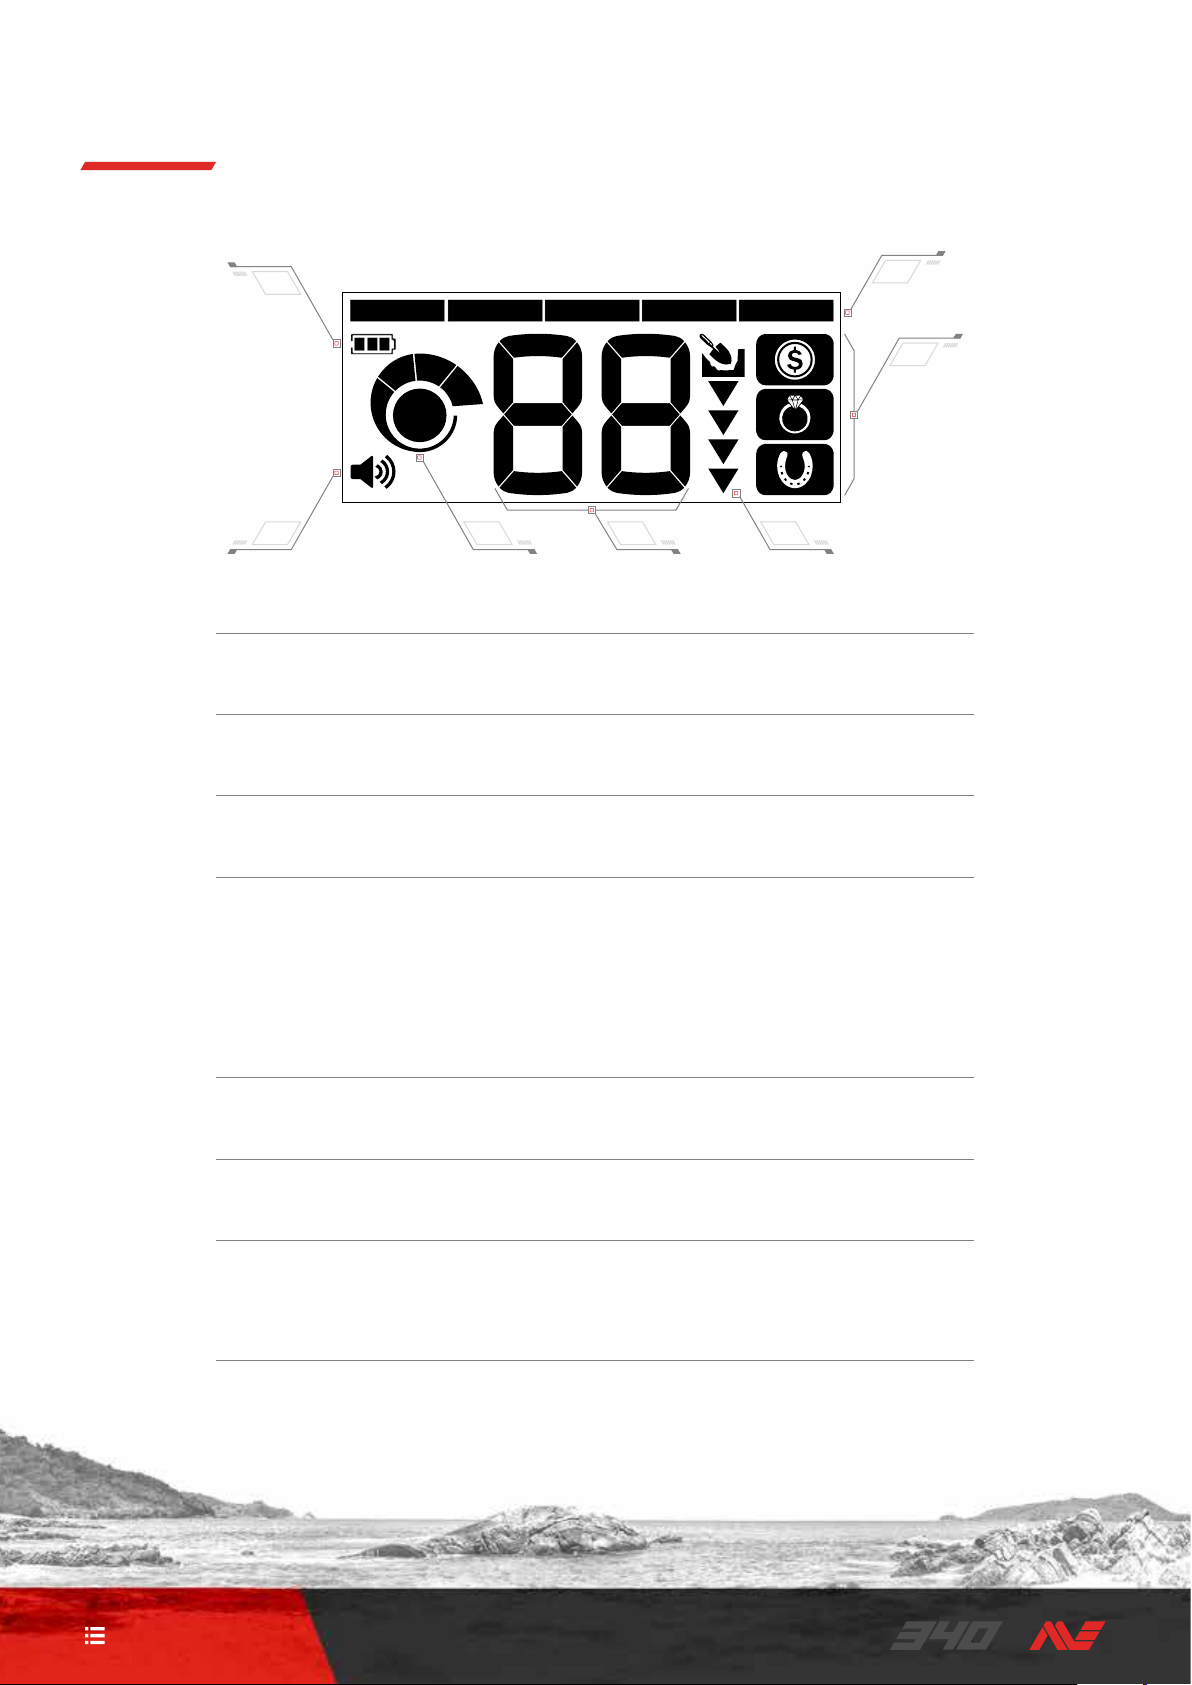
Display
1
1. Battery Level
Indicates the current battery level (page 10)�
2. Volume Level
Displays the detector audio volume (page 6)�
3. Sensitivity Level
Displays the Sensitivity level (page 6)�
7
6
5432
4. Target Identification Number
Indicates the numerical value of a detected target, allowing the identification of an object
before digging� For example, a US quarter will always display the same Target Identification
(ID) Number�
Negative numbers are ferrous, positive numbers are non‑ferrous from fine gold (low ID’s) to
large silver (high ID’s)�
5. Depth Gauge
Shows the approximate depth of a detected target (page 7)�
6. Search Modes
Displays the active Search Mode (page 3)�
7. Discrimination Segments
Represents groupings of Target Identification Numbers as a single segment on a scale�
Discrimination Segments align with the Target Identification Guide�
CONTENTS
5
Page 6

Detector Settings
VOLUME
The Volume control changes the loudness of target signals�
Use the Volume button to adjust the Volume Level� Each press
of the Volume button will advance to the next Volume Level
from low to high� Once maximum Volume is reached, pressing
the Volume button will return to the lowest Volume Level�
The Volume button
The Volume Level indicator on the display shows the current
Volume Level� Each bar represents one level�
The Volume Level indicator showing
maximum volume (level 3)
SENSITIVITY
The VANQUISH Series detectors are highly sensitive and have
adjustable sensitivity� Setting the correct sensitivity level for
individual detecting conditions will maximise detection depth�
Always choose the highest stable Sensitivity setting to ensure
optimum performance�
Use the Sensitivity button to adjust the Sensitivity Level�
Each press of the Sensitivity button will advance to the next
Sensitivity Level from low to high� Once maximum Sensitivity
is reached, pressing the Sensitivity button will return to the
lowest Sensitivity Level�
The Sensitivity button
To Adjust the Sensitivity Level
1� Hold the coil stationary, then use the Sensitivity button to
increase the sensitivity until false signals begin to occur�
2� Reduce the Sensitivity Level just enough that the false
signals disappear, by pressing the Sensitivity button (if
Level 2, 3, or 4 is selected, press three times to reduce
the sensitivity by one level)�
3� Sweep the coil over a clear patch of ground, and reduce
the Sensitivity Level further if any ground noise is
encountered�
Excessive Noise
Sometimes, excessive noise is encountered whilst detecting�
This can be caused by environmental electromagnetic
interference (EMI) from sources such as power lines, mobile
phone towers, or other metal detectors�
If noise is a problem, try the following steps in order until the
noise is eliminated�
1� Move away from local sources of Electromagnetic
Interference (EMI)�
2� Restart the detector, and wait for the automatic Noise
Cancel process to complete�
3� If restarting the detector does not eliminate the excessive
noise, then try reducing the Sensitivity Level�
Automatic Noise Cancel
VANQUISH Series detectors have an automatic Noise
Cancel process that occurs every time the detector is
powered on� It calibrates the detector so that excessive
noise is not experienced�
The Sensitivity Level indicator on the display shows the
current Sensitivity Level� Each bar represents one level�
The Sensitivity Level indicator showing
maximum sensitivity (level 4)
CONTENTS
For best results, the coil should be held stationary just
above the ground until Automatic Noise Cancel is complete
(indicated by two large dashes displayed on the Target ID
Number field)�
6
Page 7

Beep!
Pinpoint
LOCATE A TARGET
Once a target has been detected, the manual pinpointing
technique locates the exact position before digging� This
means less digging, and faster recovery of the target�
1� Sweep the coil slowly across the target location keeping
the coil parallel to the ground�
2� Locate the centre of the target by listening for the loudest
target signal response�
3� Make a mental note of the position, or mark a line on the
soil with your shoe or a digging tool�
4� Move to one side so that you can pass the coil over the
target at right angles to your initial direction�
5� Repeat steps 1 and 3 from your new position� The target is
located where the two imaginary lines cross�
1‑3
Make a line where the
strongest signal is heard�
4‑5
Stand at right‑angles to
your initial position and
repeat�
The intersection of the
two lines marks the exact
location of the target�
Beep!
Beep!
Depth Gauge
The Depth Gauge indicates the approximate depth of a
detected target�
The Depth Gauge is a guide only� Fewer arrows indicate a
shallower target, more arrows indicate a deeper target� The
accuracy can vary depending on the target type and ground
conditions�
After a target is detected, the Depth Gauge will remain on the
LCD for up to 5 seconds, or until the next target is detected�
When there is no detection, the Depth Gauge icon and arrows
are turned off�
Here is an example of the Depth Gauge reading and the
approximate target depth for a US quarter�
50mm
2"
100mm
4"
150mm
6"
>150mm
>6"
CONTENTS
7
Page 8

Target Identification
TARGET IDENTIFICATION NUMBER
Target Identification (Target ID) numbers range from –9 to 40
with ferrous (iron) targets ranging from –9 to 0�
When a target is detected, it is represented as a number that
appears on the Target Identification Number field on the
display� This indicates the target’s ferrous or non‑ferrous
properties for quick and easy identification�
For example, a US quarter has a Target ID of 29� This means
that each time a Target with an ID of 29 is detected, there is a
good chance that it will be a US quarter�
A Target ID number appears when a target is detected� This example shows
the detection of a shallow US quarter� The corresponding Target ID Segment
flashes upon detection (shown in grey)�
DISCRIMINATION SEGMENTS
Discrimination Segments are located along top of the LCD�
They display Target IDs grouped into zones�
Each Target Identification Number has a corresponding
Discrimination Segment that will flash when a target with that
ID is detected�
DISCRIMINATION PATTERNS
Discrimination Segments are turned on or off to either detect
or ignore targets� All segments that are on will be heard
(accepted), and all segments that are off will not be heard
(rejected)�
The combinations of accepted and rejected segments are
called Discrimination Patterns�
VANQUISH 340 has three discrimination patterns: Coin and
Jewellery Modes (below), and All‑Metal (see page 9)�
The last detected Target ID remains on the display for five
seconds or until another target is detected� If there is no
detection or the detector passes over a target that it rejects,
the display shows two large dashes�
Two large dashes on the Target Identification Number field when
there is no detection�
The Coin Mode Discrimination Pattern showing Accepted segments ( ) and
Rejected segments (
The Jewellery Mode Discrimination Pattern showing Accepted segments ( )
and Rejected segments (
)�
)�
CONTENTS
8
Page 9

Target Identification
ALL‑METAL
In All‑Metal Search Mode, all Discrimination Segments are on
so that all metal targets will be detected, including iron�
The VANQUISH 340 All‑Metal discrimination pattern�
Detecting in All‑Metal Mode is a strategy that guarantees you
will not miss any targets, however you will also detect more
trash that contains iron�
Enable All‑Metal
1� Press the Search Mode button until the All‑Metal Search
Mode is selected�
The Search Mode
button
2� All of the Discrimination Segments will turn on and all
metal objects will be detected�
The All‑Metal
Search Mode icon
TARGET TONE
Groups of Target IDs are assigned Target Tones of different
pitch so that the operator can broadly classify the Target ID
without having to look at the display�
VANQUISH 340 has three Target Tones: Low, Mid, and High�
The tone break position is the point on the discrimination
scale at which the Target Tone changes from one pitch to
another� Note that the exact tone break positions vary slightly
for each Search Mode�
Low Mid High
VANQUISH 340 tone break positions (approximate)�
3� To disable All‑Metal, press the Search Mode button to
select either Coin or Jewellery Mode�
Using All‑Metal to Check a Target
All‑Metal can be used to check a non‑ferrous detection to see
if it also contains ferrous material�
If the target gives a mixed response (both non‑ferrous and
ferrous) when in All‑Metal mode, then there is a chance that
the target is a large iron object or a crown bottle cap�
If there is a repeatable non‑ferrous response, then the target
does not contain iron� This means that the target is more
likely to be a good (non‑ferrous) target�
Note, targets such as large iron objects or crown bottle caps
commonly appear as a non‑ferrous target to other detectors�
The VANQUISH 340 has been designed to classify these
Targets as trash to make detecting sessions more productive�
The All‑Metal Search Mode can be used if you want to detect
these targets�
CONTENTS
9
Page 10

Batteries and Charging
The VANQUISH Series is compatible with both rechargeable
and non‑rechargeable AA batteries�
WARNING: Never use a combination of non‑
rechargeable and rechargeable batteries in the
detector, as this may result in damage to the
detector or batteries�
WARNING: There is a risk of explosion if the battery
is replaced by an incorrect type�
BATTERY LEVEL
The Battery Level indicator shows the current battery level�
The battery Level Indicator
Note that rechargeable and non‑rechargeable batteries
have different discharge rates, therefore the Battery Level
Indicator is approximate only�
Low Battery
If using non‑rechargable batteries, the Battery Level Indicator
will flash for approximately 20 minutes before automatic
shut‑down�
If using rechargeable batteries, the Battery Level Indicator
will display a single battery segment for approximately 20
minutes before automatic shut‑down�
Battery Run/Charge Times
Minelab rechargeable AA NiMH batteries have an
approximate charge‑time of 8 hours, and a run‑time of
approximately 11 hours�
Non‑rechargeable AA alkaline batteries have a run‑time of
approximately 10 hours�
RECHARGEABLE BATTERIES
Minelab rechargeable AA NiMH batteries (4 pack) and a
Minelab AA NiMH Battery Charger are available to purchase
separately�
Minelab AA NiMH
Battery Charger
Instructions, compliance and safety information for the
Minelab AA NiMH Battery Charger are included with the
charger�
WARNING: The Minelab NiMH Battery Charger must
only be used to charge NiMH rechargeable batteries�
Minelab rechargeable
AA NiMH batteries
Automatic Shut‑Down
When the battery level is critically low, the detector will
automatically shut‑down� 5 seconds before automatic shut‑
down, ‘bF’ displays on the Target ID Number, accompanied by
a shut‑down audio tune�
'bF' on the Target ID Number field�
Note that when using some brands/types of rechargeable
batteries, the detector may not show ‘bF’ before automatic
shut‑down�
CONTENTS
10
Page 11

Detector Care and Safety
Wash your hands before handling the detector after
applying sunscreen or insect repellents�
Do not use solvents to clean� Use a damp cloth with a mild
soap detergent�
Never allow the detector to come into contact with
gasoline/petrol or other petroleum‑based liquids�
Avoid getting sand and grit in the shafts and fastenings
(e�g� coil yoke assembly and camlocks)� If sand and grit
accumulates in these parts they should be wiped clean
with a damp cloth�
Do not bring the detector or accessories into contact with
sharp objects as this may cause scratches and damage�
If the shafts become noticeably scratched, wipe them
thoroughly with a damp cloth�
Do not leave the detector in excessive cold or heat longer
than necessary� Covering it when not in use will help
protect it� Avoid leaving it in a hot vehicle�
Ensure the coil cable is in good condition and not subject
to undue stress�
Take precautions when transporting or storing the
detector� Although the detector is constructed from the
highest quality materials and has undergone rigorous
durability tests, the display screen could be prone to
scratching or serious damage if not treated with due care�
Do not expose the detector to extreme temperature
conditions� The storage temperature range is from ‑20°C
to +70°C (‑4°F to +122°F)�
Do not expose accessories not listed as waterproof to
liquid/moisture or excessive humidity�
Do not allow children to play with the detector or
accessories, small parts are a choking hazard�
Only charge rechargeable batteries and accessories
according to the instructions provided�
Avoid charging rechargeable batteries and accessories in
extreme temperature conditions�
Remove batteries prior to air transportation�
CONTENTS
11
Page 12

Error Codes
Some detector faults will display an Error Code on the Target ID Number field� Try the recommended actions shown below
before contacting an Authorised Service Centre�
Coil Disconnect
'Cd' will appear on the Target ID Number in
the event of a Coil Disconnect Error�
In the event of a Coil Disconnect Error, follow these steps:
1� Check that the coil connector is connected properly at the
back of the control unit�
2� Check the coil cable for damage�
3� Check the coil connector pins are free of dirt and debris�
4� Check the coil for visible signs of damage�
5� Try another coil if you have one available�
6� Perform a Factory Reset by powering off the detector,
then press and hold the Power button for 7 seconds (see
“Factory Reset” on page 14�)
7� If the error still remains, return the detector to your
nearest Authorised Service Centre for repair�
System Error
System Error code ‘E’ is accompanied by an Error Code
Number e�g ‘E2’� The detector will shut down 5 seconds after
reporting a system error�
Example Error Code ‘E2’ displayed on the
Target ID Number
In the event of a System Error, follow these steps:
1� Restart the detector to determine if the error still remains�
2� Confirm the coil is attached correctly�
3� Perform a Factory Reset by powering off the detector,
then press and hold the Power button for 7 seconds (see
“Factory Reset” on page 14�)
4� If the error still remains, return the detector to your
nearest Authorised Service Centre for repair�
Troubleshooting
Detector does not turn on, or turns off by itself (with
or without ‘bF’ indication)
1� Replace the batteries�
Erratic/excessive noise
1� Move away from local sources of Electromagnetic
Interference (EMI)�
2� Restart the detector and wait for Automatic Noise Cancel
to complete�
3� Reduce the Sensitivity level (page 6)�
No sound – Wired headphones
1� Check that the detector is on, and start‑up has completed�
2� Check that the headphones are plugged in�
3� Check that Volume is set to an audible level�
4� Unplug the headphones and confirm that the detector
speaker is audible�
5� If available, try using a different set of headphones�
CONTENTS
12
Page 13

Technical Specifications
Search Modes
All‑Metal Shortcut
Custom User Search Profile
Operating Frequencies (kHz)
Noise Cancel
Bluetooth Audio
Iron Bias
Sensitivity
Volume
Target Tones
Discrimination Segments
Discrimination Notch
Pinpoint Mode
Target ID’s
Depth Indicator
Length
Weight (incl. batteries)
Display
Supplied Coil
Audio Output
Supplied Headphones
Supplied Batteries
Additional Included
Accessories
Waterproof
Water Resistant
Operating Temperature
Range
Storage Temperature Range
Key Technologies
Coin, Jewellery, All‑Metal Coin, Relic, Jewellery, Custom
No Yes
No Yes
Multi‑IQ
Auto (19 channels)
No Yes
High High (default), Low
4 levels 10 levels
3 levels 10 levels
3 tones (Low, Mid, High) 5 tones
5 segments 12 segments 25 segments
No Yes
No Yes
‑9 to 40
4 levels 5 levels
Extended: 145 cm (57 in) Collapsed: 76 cm (30 in)
1�2 kg (2�6 lbs) 1�3 kg (2�8 lbs)
Monochrome LCD
V10 10″×7″ Double‑D V12 12″×9″ Double‑D
In‑built loudspeaker
Wired 3�5 mm (1/8″) headphones
—
4 × AA Alkaline non‑rechargeable 4 × AA NiMH rechargeable
Getting Started Guide
Getting Started Guide
Coil to 1 m (3�3 ft)
Control box (with Rain Cover attached)
–10°C to +40°C (+14°F to +104°F)
–20°C to +70°C (–4°F to +158°F)
Multi‑IQ
VANQUISH 540 Pro‑Pack is based on the standard VANQUISH 540 with the following
differences: Includes Bluetooth wireless headphones and a V8 8″×5″ Double‑D coil and a
V8 skidplate� Excludes wired 3�5 mm (1/8″) headphones�
Wired 3�5 mm (1/8″) headphones
Rain Cover
Armrest strap
V10 skidplate
Monochrome LCD with
red backlight
In‑built loudspeaker
Wired 3�5 mm (1/8″) headphones
Bluetooth wireless audio
Getting Started Guide
Rain Cover
Armrest strap
V12 skidplate
Multi‑IQ, Bluetooth,
aptX™ Low Latency
Equipment may vary according to the model or items ordered with your detector� Minelab reserves the right to respond to
ongoing technical progress by introducing changes in design, equipment and technical features at any time�
For the most up‑to‑date specifications for your VANQUISH detector visit: www�minelab�com
CONTENTS
13
Page 14

Factory Reset
The Factory Reset function returns all detector settings to
their Factory Preset state�
1� Ensure the detector is turned Off�
2� Press and hold the Power button (for approximately 7
seconds)�
The Power button
3� ‘FP’ will appear on the Target ID display, indicating that
Factory Presets have been restored�
'FP' will appear on the Target ID display
when Factory Presets are restored�
4� Release the Power button� Automatic Noise Cancel will
begin when Factory Reset is complete�
DISCLAIMER
The Minelab metal detector described in this instruction manual has been expressly designed and manufactured as a quality
metal detector and is recommended for treasure and gold detecting in non‑hazardous environments� This metal detector has
not been designed for use as a mine detector or as a live munitions detection tool�
The Bluetooth® word mark and logos are registered trademarks owned by the Bluetooth SIG, Inc� and any use of such marks by
Minelab is under license�
Qualcomm aptX is a product of Qualcomm Technologies, Inc� and/or its subsidiaries� Qualcomm is a trademark of Qualcomm
Incorporated, registered in the United States and other countries� aptX is a trademark of Qualcomm Technologies International,
Ltd�, registered in the United States and other countries�
COMPLIANCE STATEMENT FOR CANADA
This product meets the applicable Innovation, Science and Economic
Development Canada technical specifications�
INFORMATION RÉGLEMENTAIRE
Avis de conformité canadien Le présent produit est conforme aux
spécifications techniques retenues par l’Innovation, Sciences et
Développement économique Canada (ISDE)�
CONTENTS
14
Page 15

Minelab Electronics Pty. Ltd.
Australia & Asia Pacific
+61 8 8238 0888
minelab@minelab�com�au
Minelab Americas Inc.
North, South & Central America
+1 630 401 8150
info@minelabamericas�com
Minelab International Ltd.
Europe & Russia
+353 21 423 2352
minelab@minelab�ie
Minelab MEA General Trading LLC
Middle East & Africa
+971 4 254 9995
minelab@minelab�ae
Minelab do Brasil
Brazil
+55 47 3406 3898
minelabdobrasil@minelab�com
minelab.com/vanquish
4901‑0300‑1‑MW
 Loading...