

Page 1
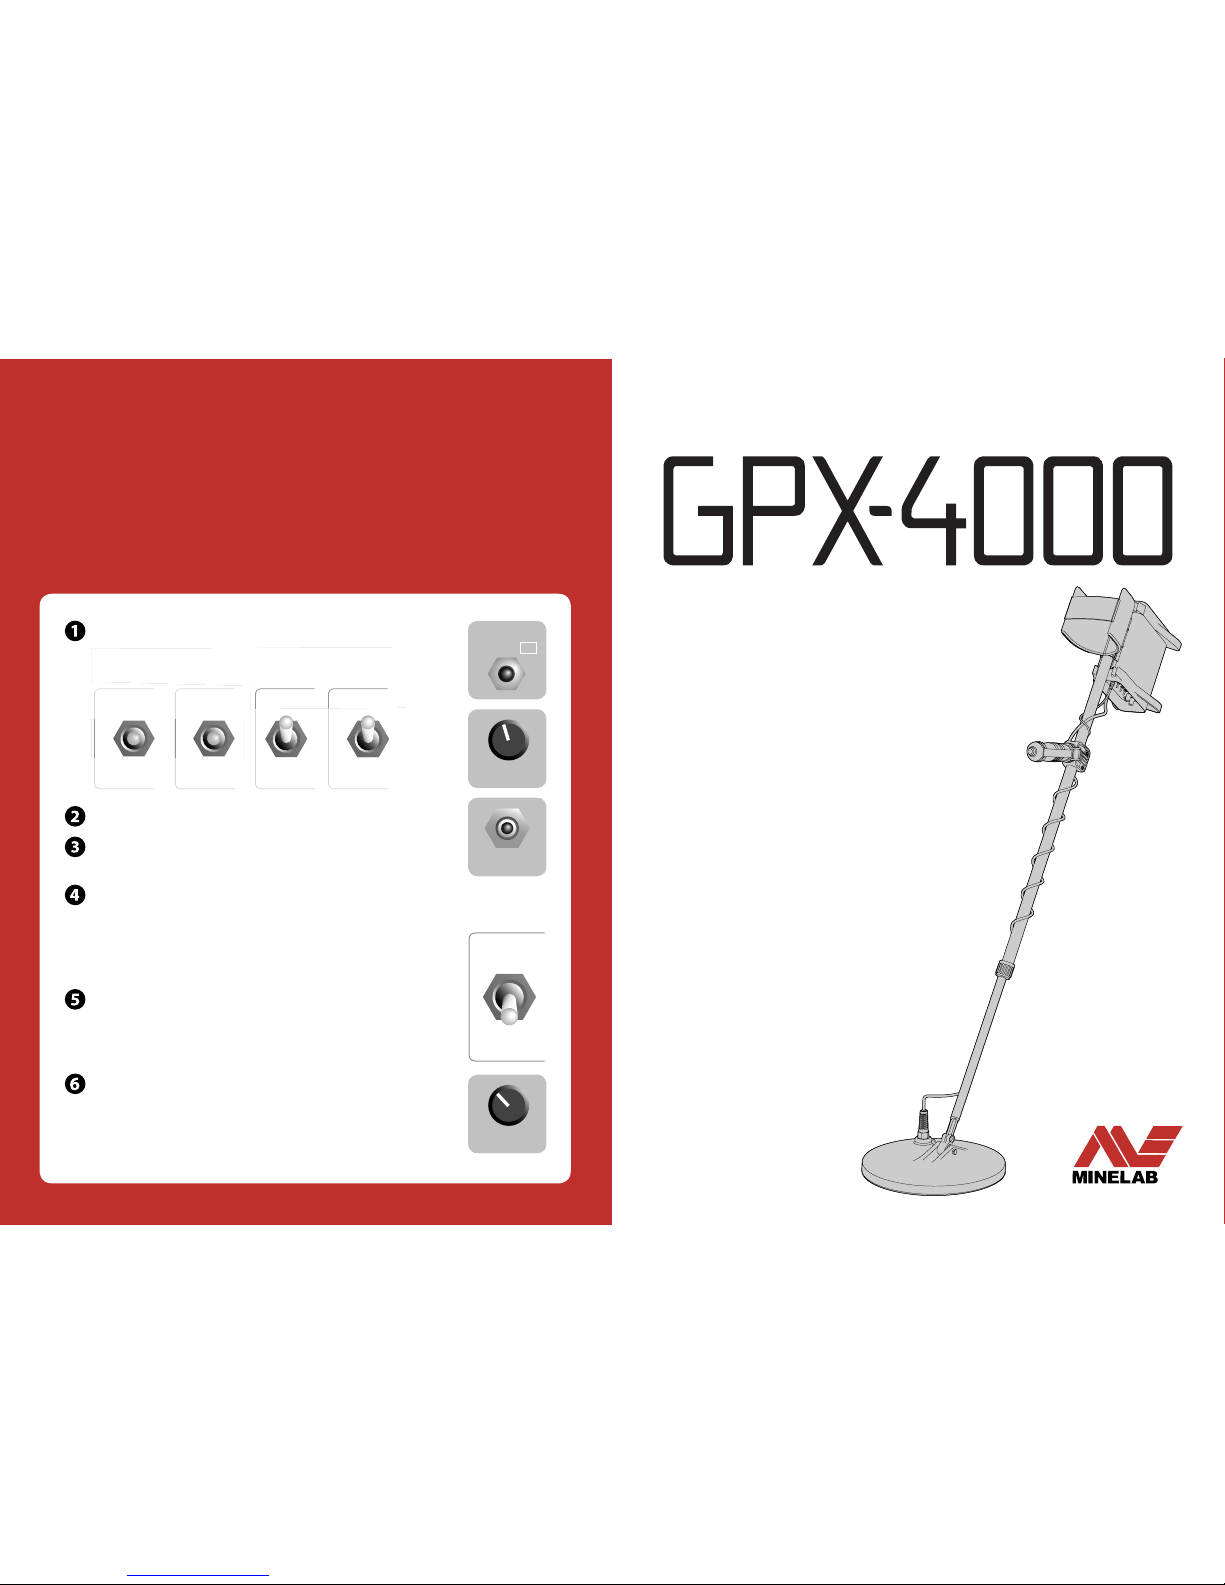
Search
Mod
e
Soil
/
T
imings
Ground
B
alanc
e
Coil
/
Cance
lTrackin
g
Salt
D
eep
Patch
S
ensitiv
e
Fixed
Double D
M
N
G
Set the front panel switches to the following positions:
Threshold
Auto Tune
Ground
Balance
Tracking
Fixed
Threshold
On/Off
Hold for FP
Press the On/Off button on the rear control panel. (pg. 25)
Turn the Threshold control up until a tone is audible
through the headphones.
(pg. 34)
Raise the coil off the ground and Press the Auto Tune
button to reduce electrical interference. The tuning
process takes approximately 60 seconds. Do not move the
coil or pass metal objects near the coil during the tuning
process.
(pg. 33)
Whilst lowering and raising the coil between 25mm and
100mm (1" and 4") from the ground, change the Ground
Balance switch to Tracking. Any variations in the Threshold
will smooth out within 3-5 seconds.
(pg. 40)
Adjust the Threshold to a very faint but still audible level.
It should be smooth with only minor fluctuations.
(pg. 34)
You are now ready to start searching!
Quick Start
Search
Mode
Soil /
Timings
Ground
Balance
Coil /
Rx
Patch Sensitive Fixed Double D
NG
Page 2

Minelab Electronics Pty Ltd
PO Box 537, Torrensville Plaza
Adelaide, South Australia, 5031
Australia
Tel: +61 (0) 8 8238 0888
Fax: +61 (0) 8 8238 0890
Email: minelab@minelab.com.au
Minelab International Ltd
Laragh, Bandon
Co. Cork
Ireland
Tel: +353 (0) 23 52101
Fax: +353 (0) 23 52106
Email: minelab@minelab.ie
Minelab USA Inc
871 Grier Drive, Suite B1
Las Vegas, Nevada, 89119
USA
Tel: +1 702 891 8809
Fax: +1 702 891 8810
Email: info@minelabusa.com
For further product information
and detecting tips, refer to:
WWW.MINELAB.COM
Minelab is always interested in your opinions.
If you have any questions or comments regarding
the GPX-4000 or any other Minelab product, please
feel free to contact us via your local Authorised
Minelab dealer, or write to us:
The World Leader in Metal Sensing Technology
From our origins in 1985, Minelab have specialised i n advanced electronics
technologies. O ur competitive advantage was created almost imm ediately with
a highly competent and innovative Rese arch and Development team, inspired by
the genius of Mr. Bruce Candy.
This commitment to innovation has enab led us to successfully market feature-
packed Consumer coin and treasure detecto rs enjoyed by hobbyists worldwide
as well as high quality gol d detectors used by both professionals and am ateurs.
Minelab’s advanced technology is also incorporated in detection equipment
designed for military and huma nitarian de-mining projects throu ghout the world.
Today Minelab has manufacturi ng, distribution and customer service op erations
in Australia, Europe and the United States, and is an ISO 90 01 Quality Endorsed
Company. ISO 9001 is a worldwide qualit y standard certification that ensures the
highest level of produc t quality for our customers.
Item Number: 4901 - 0060
Revision: 1.1
THIS DEVICE COMPLIES WITH
PART 15 OF THE FCC RULES
Operation is subject to the following two
conditions: (1) this device may not cause
harmful interference, and (2) this device
must accept any interference received,
including interference that may cause
undesired operation.
For Consumers within the European Union:
Do not dispose of this equipment in general
household waste.
The crossed out wheeled bin indicated
on this equipment is an indicator that
this unit should not be disposed of in
general household waste, but recycled
in compliance with local government
regulations or environmental requirements.
Please dispose of this equipment via a
recycling service or centre, or by returning
the unit to the respective Minelab or Halcro
outlet as appropriate for your unit. This will
enable the equipment to be disposed
of in an environmentally safe manner.
Disposal of unwanted electronic equipment
in landfi lled waste may contribute to
adverse long term environmental eff ect
due to the leaching of contaminating and
toxic substances contained within some
electronic equipment.
Working for a Clean er,
Greener Future
Disclaimer:
The Minelab metal detector discussed
in this operating manual has been
expressly designed and manufactured as
a quality hobbyist metal detector and is
recommended for use in coin, treasure and
general metal detection in non-hazardous
environments. This metal detector has not
been designed for use as a mine detector
or as a live munitions detection tool.
Please note:
Since there may be a variety of options
available for this detector, equipment
may vary according to the Model or
items ordered with your detector. Certain
descriptions and illustrations may also diff er
(in this manual) from the exact Model that
you purchased. In addition, Minelab
reserves the right to respond to ongoing
technical progress by introducing changes
in design, equipment and technical
features at any time.
©
Minelab Elect ronics Pty Ltd
This document contains proprietary
information w hich is protected by
copyright. Ap art from any use as pe rmitted
under the Copyr ight Act 1968, no part m ay
be reproduced b y any process without
written permission from Minelab Electronics
Pty Ltd, 118 Hayward Avenue, Torrensville,
SA 5031, Australia.
WARNING. This doc ument contains Minelab
Electroni cs Pty Ltd rights, te chnical data or
restricte d rights data, or both . Patents and
trademarks apply.
Page 3

1
Gold detecting is a fascinating and rewarding
activity enjoyed by people all over the world. By
getting to know your GPX-4000 you can become
one of the many who find gold and valuable
treasure.
The GPX-4000 is Minelab's most advanced
gold detector. It is a high precision instrument
incorporating Multi-Period Sensing (MPS), Dual
Voltage Technology (DVT), and the latest in
high-tech analogue components combined with
advanced digital processing.
The GPX-40 00 will locate gold in all types of terrain,
especially highly mineralised ground conditions,
with greater efficiency than any previous detector.
This manual is designed to help both the beginner
and expert prospector get the best performance out
of the GPX-4000.
Minelab wishes you every success in your quest
for gold and treasure!
Congratulations on
Purchasing the Minelab
GPX-4000
Page 4
2 3Contents
Quick Start Back Cover
Introducing the GPX-4000 4
List of Parts 6
Assembly 8
Adjusting the Detector for 16
Comfortable Detecting
Charging the Battery 18
Battery LED Patterns 20
Taking Care of Your Battery 21
Functions 46
Settings 47
Accessing Functions 48
Accessing Settings 49
Detecting Basics 22
Detector Sounds 23
Front Control Panel 24
Rear Control Panel 25
Turning the Detector On 26
LCD Menu Structure 27
Search Mode 28
Factor y Pres ets 30
Pinpointing / Locating the Target 70
Recovering the Target 72
Detecting Tips 74
Commande r Coils 76
Choosing the Right Coil for the Job 78
User Preferences 80
Tun e / Reducing Electrical Interference 32
Auto Tune 33
Threshold / Adjusting the Background Audio Level 34
Soil/Timings / Optimising for Soil & Target Types 36
Ground Balance / Reducing Ground Noise 38
Ground Balance Procedure for Tracking 40
Ground Balance Procedure for Fixed 42
Coil/R x / Changing Sensitivity & Rx Fields of the Coil 44
Function
Select
Setting
On/Off
Hold for FP
Auto Tune
Search
Mode
Soil /
Timings
Ground
Balance
Coil /
Rx
CancelTrackingSaltDeep
Patch Sensitive Fixed Double D
MNG
Threshold
Coil
Smart
Point
Troubleshooting 81
Glossary of Terms 82
Taking Care of Your Detector 85
Technical Specifications 86
Warranty 87
Service Repair Form 88
Volu me Limi t / Setting the Max Volume of all Sounds 50
Audio Tone / Adjusting the Pitch of the Threshold 52
Signal Peak / Adjusting Pitch Variation of Target Signals 53
Tracking Speed / Keeping up with Changing Ground 54
Sensitive / Soil/Timings 55
Ground Balance Type 56
Ground Balance Procedure for Specific 57
Iron Reject Off (All Metal) / Accepting All Target Types 58
Iron Reject / Rejecting Iron Targets 60
Battery Test / Viewing the Battery Voltage 62
Manual Tune / Reducing Electrical Interference 63
Audio Type / Changing the Response of Target Signals 64
Gain / Adjusting the Sensitivity of the Detector 65
Motion / Adjusting Sweep Speed 66
Response / Inverting the Pitch of the Target Signal 68
Page 5
4 5Introducing
the GPX-4000
New Functions
Gain – The Gain function sets the overall sensitivity
level of your detector. In areas where conditions are
mild, you can increase the Gain. In areas that are
more dif ficult, Gain can be reduced.
Timings – The GPX-4000 features an improved
set of timings, increasing performance in different
conditions.
Ground Balance Type – In addition to Ground
Balance there is now the choice of two Ground
Balance Types, Normal and Specific. Specific Ground
Balance is designed to be used in very hot ground
and is especially useful with Monoloop coils.
Response – The Response function allows you to
invert the target response. Deep targets can now
sound like the more familiar, 'rising and falling' pitch
of a shallow target signal.
Motion – The speed at which you sweep the coil
has an effect on target response time and Ground
Balance adjustment. Matching your preferred coil
sweep speed with the corresponding Motion setting
can reduce noise.
The GPX-4000 utilises Minelab’s proven 'Dual
Voltage Technology' (DVT). This ensures an accurate
Ground Balance to provide maximum sensitivity and
depth in all ground types. The GPX-4000 can handle
heavily mineralised and salty ground conditions
with greater ease than previous detectors, which
effectively opens up NEW detecting areas.
The GPX-4000 offers three pre-programmed
Search Modes, set up for the three common search
techniques – Patch finding; General detecting and
Deep slow careful detecting. As you become familiar
with all the new functions of the GPX-4000, you can
then program your own settings for each Search
Mode.
All setting changes are automatically saved when
the detector is turned off and loaded when you
switch the detector back on. You can also restore the
Factory Preset settings at any time.
There is an LCD on the rear of the control box. Simply
scroll through the various functions of the detector
and adjust the setting. This is more accurate than
the old method of turning the control to ‘about 2o’clock’. Now you can accurately compare the effect
of different settings and easily remember your
preferred levels.
Page 6
6 7
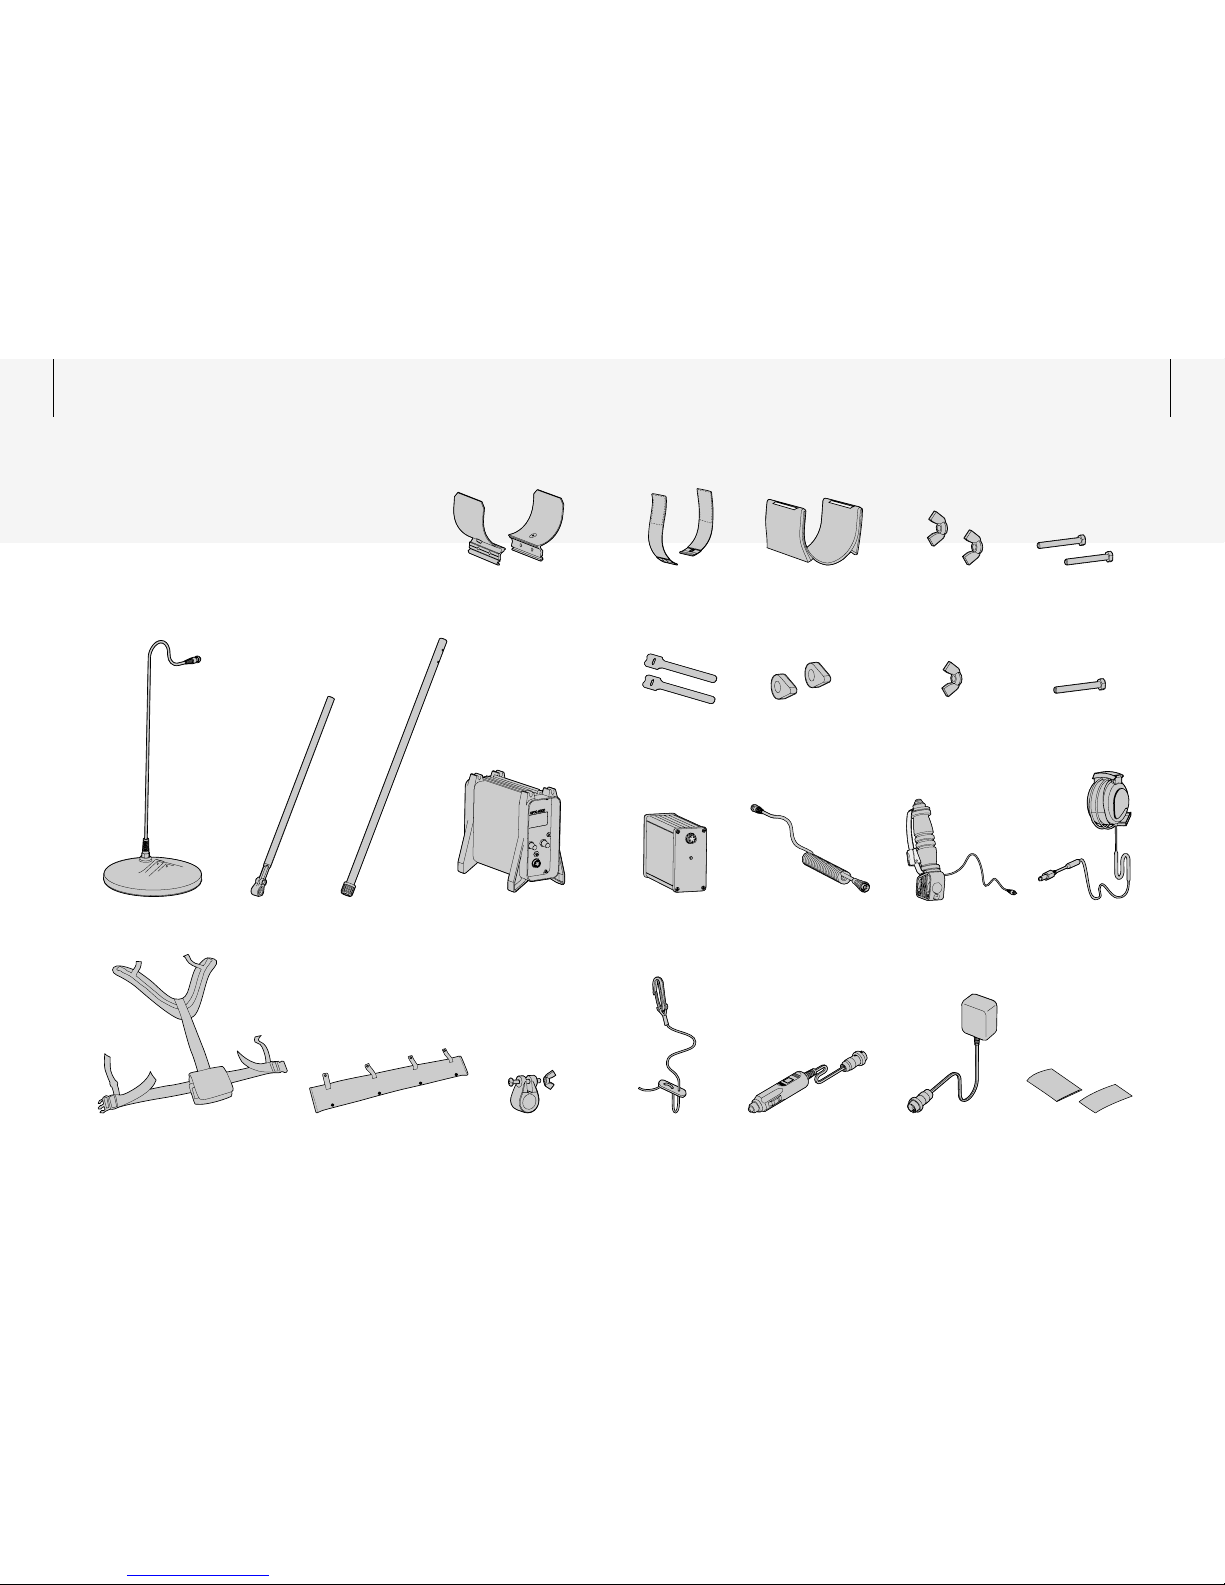
8BJTUCFMU
#BUUFSZ)BSOFTT
-PXFS4IBGU%%$PJM
6QQFS4IBGU
)BOEMF
XJUI2VJDL5SBL
#VUUPO
1PXFS$BCMF-JUIJVN*PO#BUUFSZ$POUSPM#PY )FBEQIPOFT
*OTUSVDUJPO.BOVBM
8BSSBOUZ$BSE
"SNSFTUTFDUJPOT
"SNSFTU#PMUT"SNSFTU8JOHOVUT"SNSFTU4USBQT "SNSFTU$PWFS
7FIJDMF$IBSHFS"EBQUPS
7FMDSP5BCT
#VOHZ$PSE$MBNQ
#PX,OVDLMF
#PMU
8JOHOVU
#VOHZ$PSE .BJOT$IBSHFS"EBQUPS
-PXFS4IBGU8BTIFST
-PXFS4IBGU#PMU-PXFS4IBGU8JOHOVU
List of Parts
Page 7
8 9
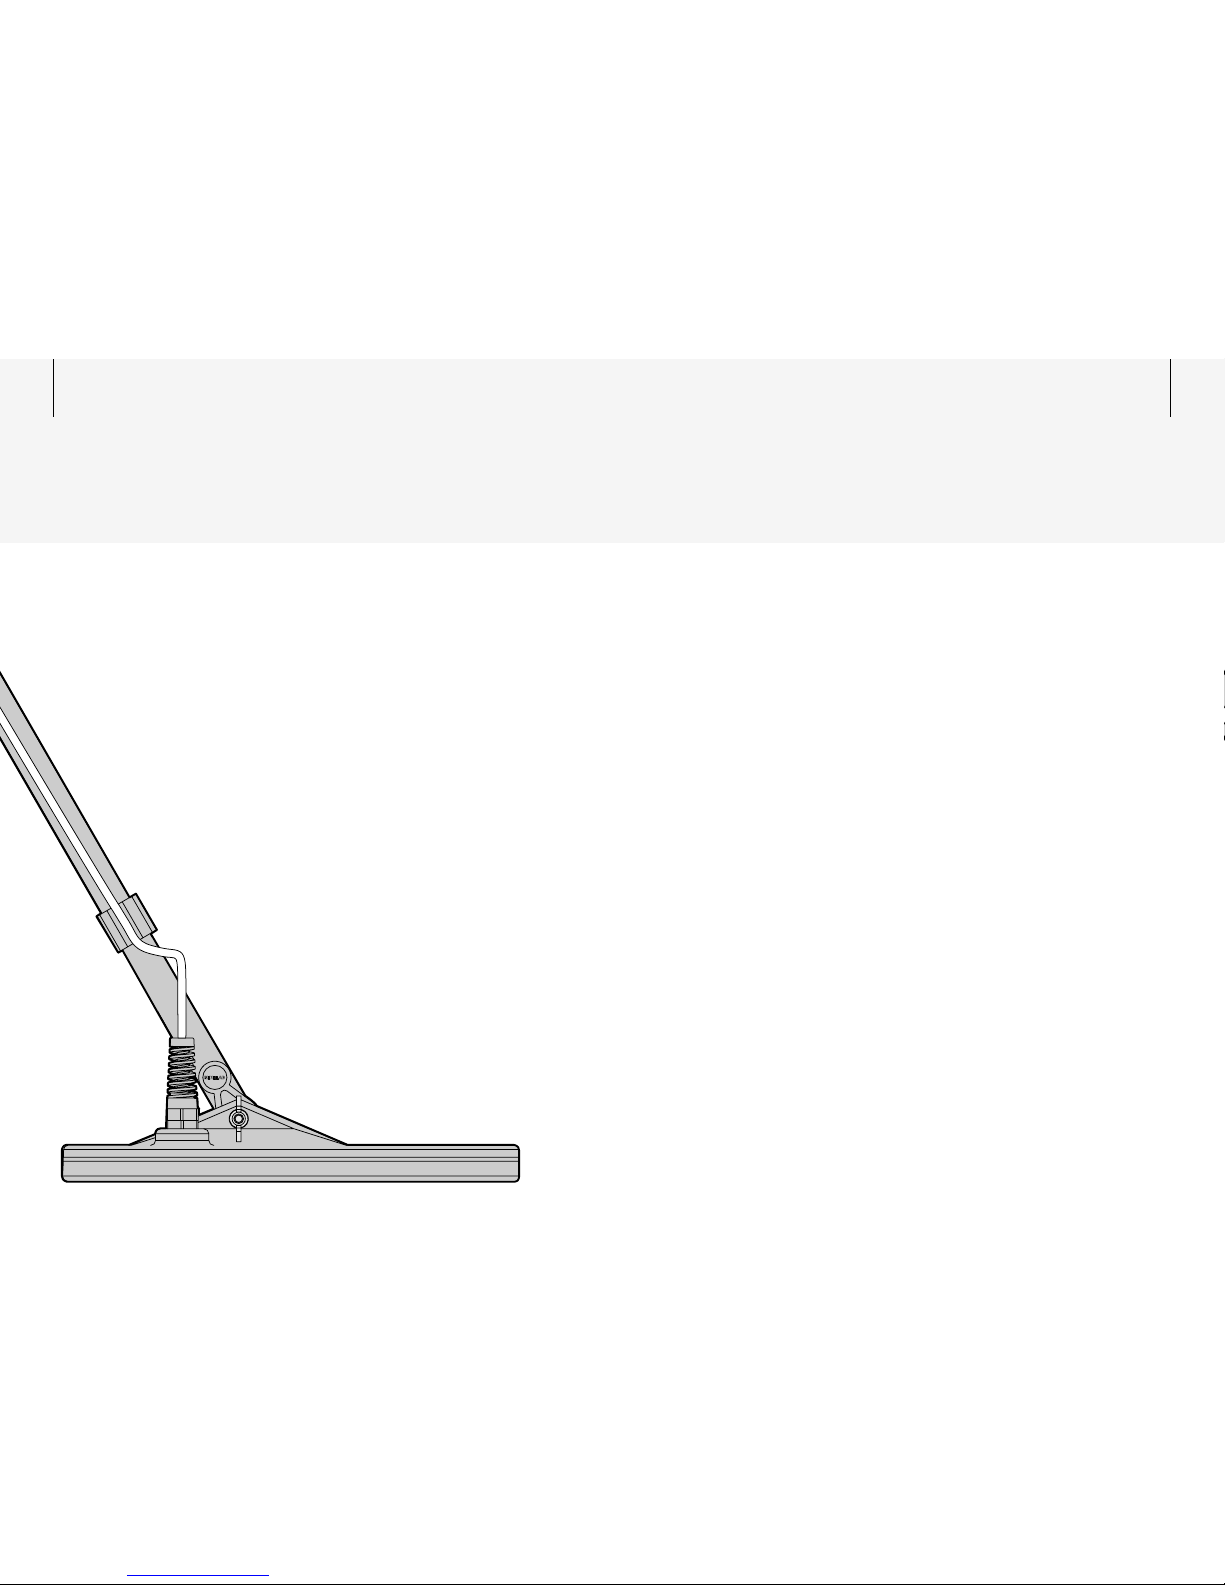
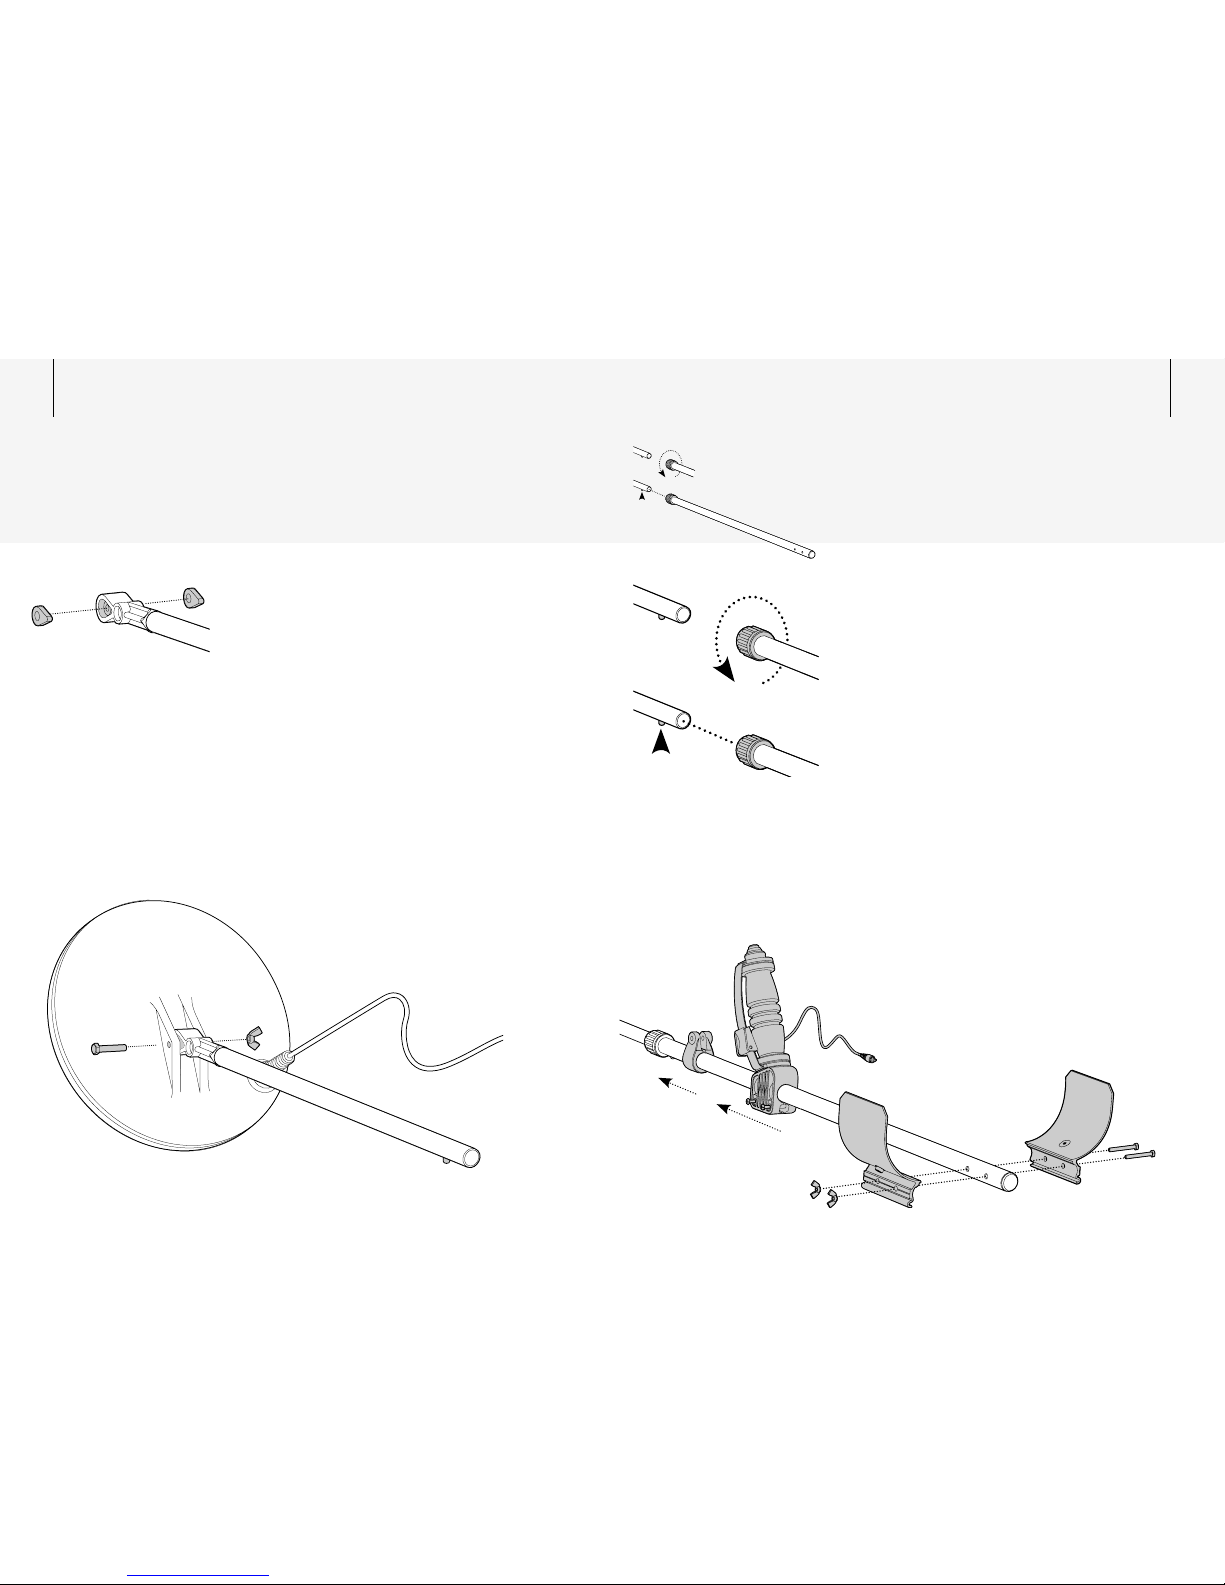
Attaching the Coil to the Lower Shaft:
1 Plug the two rubber washers into the holes on
either side of the lower shaft.
2 Ensure that the spring loaded pin of the lower
shaft is pointing downwards. Slide the lower shaft
into the bracket on top of the coil.
3 Insert the bolt through the lower shaft and the
bracket on top of the coil. Fasten with the nut
provided, being careful not to damage the thread
of the nut by over-tightening. This may need to
be loosened to adjust the coil to a comfortable
detecting angle.
The coil cable is directly wired into the coil and is not
removable. Any attempt to disconnect this cable will
void your warrant y.
If the coil becomes loose over time, the rubber
washers may need to be replaced.
Assembly
Attaching the Lower Shaft to the Upper Shaf t:
1 Rotate the twistlock of the upper shaft counter-
clockwise to ensure that it is loosened.
2 Compress the spring loaded pin of the lower shaft.
Slide the lower shaft into the upper shaft until
the pin reaches an adjustment hole. The pin will
spring out and clip into place.
Attaching the Handle to the Upper Shaft :
1 Slide the bungy cord clamp onto the upper shaft.
2 Slide the handle onto the upper shaft so that it
slopes away from you.
Attaching the Armrest to the Upper Shaft:
1 Place the two armrest halves on either side of the
upper shaft, aligning the armrest and upper shaft
holes.
2 Insert the bolts through the armrest and upper
shaft holes.
3 Loosely fasten the wing-nuts onto the bolts (these
will be tightened after the control box is attached).
spring loaded pin
Page 8

10 11Assembly
Connecting t he Coil Cable:
1 Wind the coil cable around the lower and upper
shafts enough times to take up the slack. Leave
enough slack at the bottom of the cable near the
coil to allow the angle of the coil to be adjusted
while detecting.
2 Use the Velcro straps to keep the coil cable in
place against the shaft.
3 Plug the coil connector into the coil socket on the
control box, firmly tightening the retaining ring to
hold it in place.
Attaching the Armrest Strap to the Armrest :
1 Press both strap studs onto the armrest studs.
2 Push the armrest straps through the slots in the
armrest cover and then push the cover over the
armrest.
Connecting the Control Box to the Upper Shaft :
1 Place the detector on a flat surface, with the
handle facing upwards.
2 Position the armrest on top of the control box.
3 Clip the control box onto the armrest, ensuring
that the battery plug faces the rear.
4 Fasten with the wing-nuts.
5 Wind the Quick-Trak button cable around the
upper shaft and plug it into the Smart Point
socket in the control box. Ensure that the cable is
wrapped firmly, but avoid strain on the connector.
If the Quick-Trak cable
becomes loose, try securing
it onto the shaft with
electrical tape.
Always ensure that the control box is turned
off before connecting or disconnecting the coil
to avoid damage to the detector's electronics.
Page 9
12 13
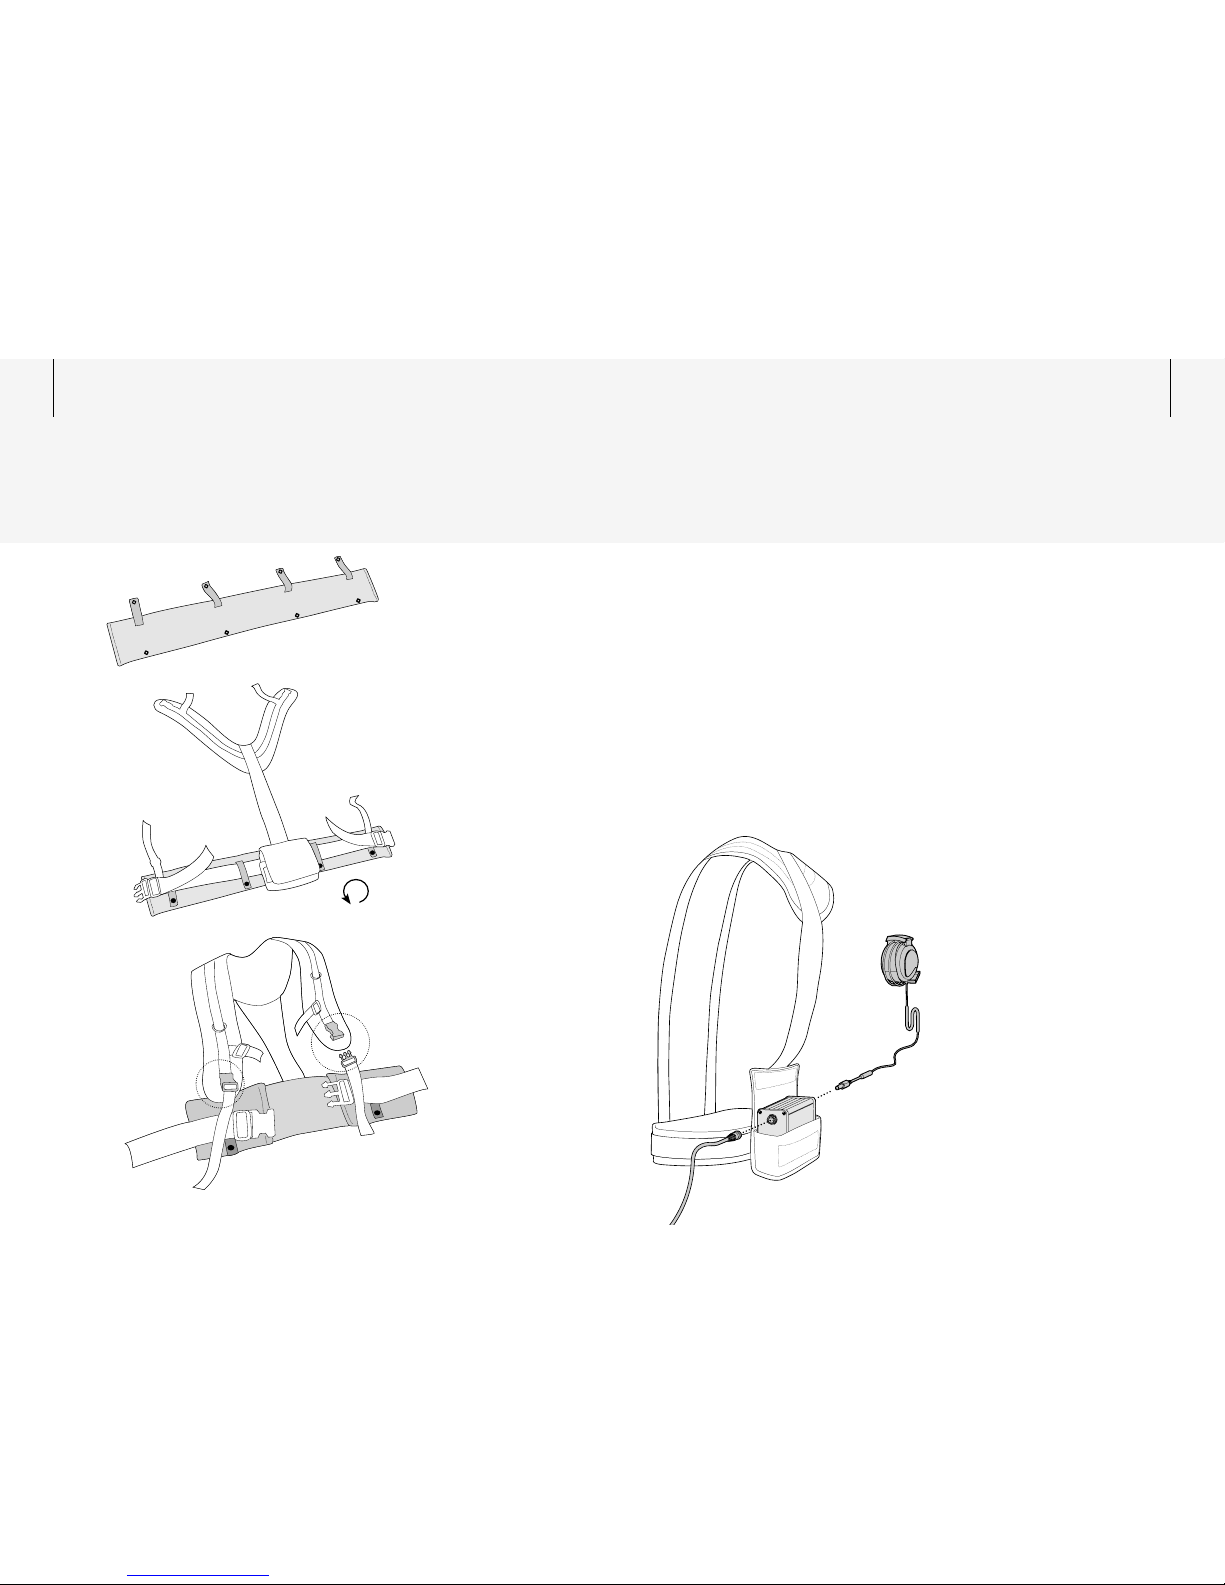
Attaching the Waistbelt to the Batter y Harness:
1 Place the belt on a flat surface with the studs
facing up. Ensure that all the studs are unclipped.
2 Place the harness on top of the belt, with the
battery pouch facing up. Press the belt studs over
the harness strap to hold the belt in place.
3 Turn the harness and waistbelt over so that the
pouch faces downwards.
4 Clip the shoulder strap buckles together.
Connecting the Battery Pack:
1 Place the battery into the battery harness pouch.
2 Connect the headphones and the power cable to
the appropriate sockets in the battery.
Assembly
#LIPTOGETHER
4URNOVER
Note: The illustration shows
the battery oriented for a user
holding the detec tor with their
left hand.
Page 10
14 15Assembly
Fitting the Battery Harness:
1 Thread your arms through the harness,
so the battery pack sits on your back.
2 Clip the waist and chest buckles together.
Adjusting the Detector for Comfortable
Detecting, pg. 16.
Attaching the Bungy Cord:
1 Create a loop in the bungy cord.
2 Undo the plastic wing-nut and remove
the bolt from the clamp.
3 Push the bolt back through the clamp and
loop to secure the bungy cord to the shaft.
4 Fasten the screw with the wing-nut.
5 Clip the bungy cord onto one of the harness
shoulder strap rings.
Adjusting the Detector for Comfortable
Detecting, pg. 16.
Page 11

16 17
For comfortable, long term
detecting, it is important
that you take the time
to adjust the detector
correctly.
Adjusting the Detector
for Comfortable Detecting
Adjusting the Batter y Harness:
A comfortable fitting of the battery harness will
ensure the longest detecting session possible,
without fatigue.
Ideally, the battery should be placed on your back so
that it counter-balances the weight of the detector.
You should be able to reach the switches of the
detector without putting excess strain on the bungy
cord.
Pull the straps outwards and downwards to tighten.
Push the straps back through the buckle to loosen.
Adjusting the Bungy Cord Clamp
(Bow Knuckle):
The correct position of the bungy cord clamp (bow
knuckle) along the shaft can help take the weight of
the coil.
Loosen the clamp screw so it can slide along
the shaft. Slide it to a position that feels most
comfortable for you.
You may need to change the length of the bungy cord
or the position of the bungy cord clamp when you
change coils or d etect on sloping ground .
Holding the Detector:
Thread your arm through the armrest and strap.
Grasp the handle of the detector and rest your
forearm in the armrest.
Adjusting the Position of the Handle:
Your elbow should sit just above the back of the
armrest and you should comfortably grip the handle.
Slide the handle into position. Using a screwdriver,
tighten the two screws to hold the handle onto the
shaft. Adjust the strap on the handle for your own
comfort.
Adjusting the Length of the Lower Shaft:
The correct length of the lower shaft should allow
you to swing the coil in front of your body without
any uncomfortable stretching or stooping.
If the coil is too far from your body it will be difficult
to balance and manoeuvre while detecting.
If the coil is too close to your body it may detect your
pick, the battery or any other metal which you are
carrying, causing confusing sounds.
Rotate the twistlocks of the shafts counter-clockwise
to ensure that they are loosened.
Compress the spring pins of the shafts and move
them up or down to suit. Once all shafts are clipped
into position, rotate twistlocks clockwise onto the
shafts until they are firmly clamped.
Caution: Some operators
may find it more
comfortable to fit the
battery around the waist.
This is fine, but just make
sure that the detec tor isn't
producing a signal from the
battery. If using a large coil,
have the battery as high up
on your back as p ractical
and comfortable to avoid
any unwanted interference.
Page 12

18 19
The aluminium battery case contains the 7.4V
Lithium Ion battery pack and an internal charging
circuit. Supplied with the GPX-4000 is a mains
charger adaptor and a 12V vehicle charger adaptor.
When fully charged, the battery will provide enough
power to operate the detector for 12+ hrs.
The charger will recharge a flat battery in
approximately 4 hours. Partially discharged batteries
will require a shorter period of time to recharge.
There is no need to fully discharge the Li-Ion battery
before recharging. The batter y may be recharged at
any time when not detecting.
Vehicle Charger Adaptor
The vehicle charger adaptor will charge the battery
from the accessories socket (cigarette lighter) of
most motor vehicles. The socket must be 12-24VDC.
To prevent damage to the battery, do not start the
vehicle while the battery is connected.
Make sure your vehicle battery is in good cond ition
and charged before using it to charge the GPX-4000
battery.
To Charge with the Vehicle Charger Adaptor:
1 Disconnect the power cable from the battery.
2 Connect the vehicle charger adaptor to the
battery and to the vehicle accessories socket.
The colour scheme of the tri-colour LED will
indicate the status of the charging process.
(pg. 20)
Don't leave the battery on charge in a closed vehicle
on a hot day as it is temperature protected and will
stop charging.
Charging the Battery
A spare battery is available
as an accessory. If travel ling
into remote areas, a spare
batter y will ensure you can
continue detecting for long
periods of time.
Mains Charger Adaptor
The mains charger adaptor will charge the battery
from local mains (AC) power outlets.
To Charge with the Mains Charger Adaptor:
1 Disconnect the power cable from the battery.
2 Connect the mains charger adaptor to the
battery power plug and the wall socket.
3 Switch the wall socket on.
The colour scheme of the tri-colour LED will
indicate the status of the charging process.
(pg. 20)
Page 13

20 21
The Lithium Ion battery is specif ically designed
for the GPX-4000.
The Lithium Ion battery is not compatible with
previous detectors and for this reason it is supplied
with a power lead with non-compatible plugs.
• Do not charge the battery at temperatures above 45°C (113°C).
• Do not charge the battery at temperatures below 0°C (32°F).
• Do not leave the battery in hot conditions (e.g. on the dashboard
of your car or rear parcel shelf).
• Do not immerse the battery in any liquid or allow water ingress.
• Do not to throw the battery or impact it in any way.
• Do not short-circuit the battery.
• Do not use the battery if it is damaged or deformed.
• Do not disassemble or reconstruct the battery.
• Do not incinerate the battery.
Return the battery to a Minelab authorised service centre for repair.
The use of non-approved components will VOID YOUR WARR ANTY.
There are no user serviceable parts within this battery pack.
Battery LED Patterns
Brief cycling red-orange-green: Occurs once (or a few times) when
the detector is turned on or when
a new battery is connected
Very brief orange blink: Beginning of charge
Solid orange: First phase of charge
Orange with green blink: Last phase of charge
Solid green: Battery is charged
Slow orange blinking: The battery has not been used for a long
time and its voltage has dropped below the
minimum charge. When the voltage increases
the routine battery charge will commence.
Slow red blinking: The battery is too hot. It has reached a
temperature over 60°C and will not charge.
Disconnect the battery and wait for it to
cool below 40°C in a cool place before
reconnecting.
Continuous orange blinking: The battery has been on charge for too long
and will no longer charge. Contact your dealer.
Rapid red-orange blinking: Output paused while the input voltage
is too low.
Solid red: There is a fault with the battery.
Disconnect and reconnect the battery.
If the LED is still red, contact your dealer.
Routine
Exceptions
Taking Care
of Your Battery
Page 14
22 23Detector Sounds
Threshold (Background sound)
This is the background sound produced by the
detector. When a target is detected, the Threshold
changes in volume and pitch. Listen to the Threshold
carefully. Concentration is an important part of
detecting. A very deep or small target may only give
a minor change to the Threshold.
(pg. 34)
Target Response (Metal Object Response)
This is a change in the tone (pitch) and volume of
the Threshold when a target is detected and not
discriminated (rejected).
Electrical Interference
The detector may also produce sounds when not
over the ground. These will not be target signals, but
signals caused from the surrounding environment.
The GPX-4000 has a Tune function to overcome
electrical interference. (pg. 32)
Ground Noise
The detector may also produce various random
signals caused by different minerals in the ground,
sometimes referred to as false signals. The GPX4000 has an automatic Ground Balance function to
overcome ground noise. (pg. 38)
Blanking
When sweeping over a rejected target, the Threshold
‘blanks’ (becomes silent) indicating that a target is
located underneath the coil, but has been rejected.
Blanking is a useful way of distinguishing between
desired and undesired targets. (pg. 59)
Low Battery
When the battery is low, a series of alarm signal
pulses are given at 1 minute intervals.
(pg. 62)
Tar ge ts
Buried metal objects are
referred to as targets.
Targets are comprised of
both ferrous and nonferrous metals.
The GPX-4000 is a ‘motion’
detector. This means it
must be moving over a
target to detect it.
Detecting Basics
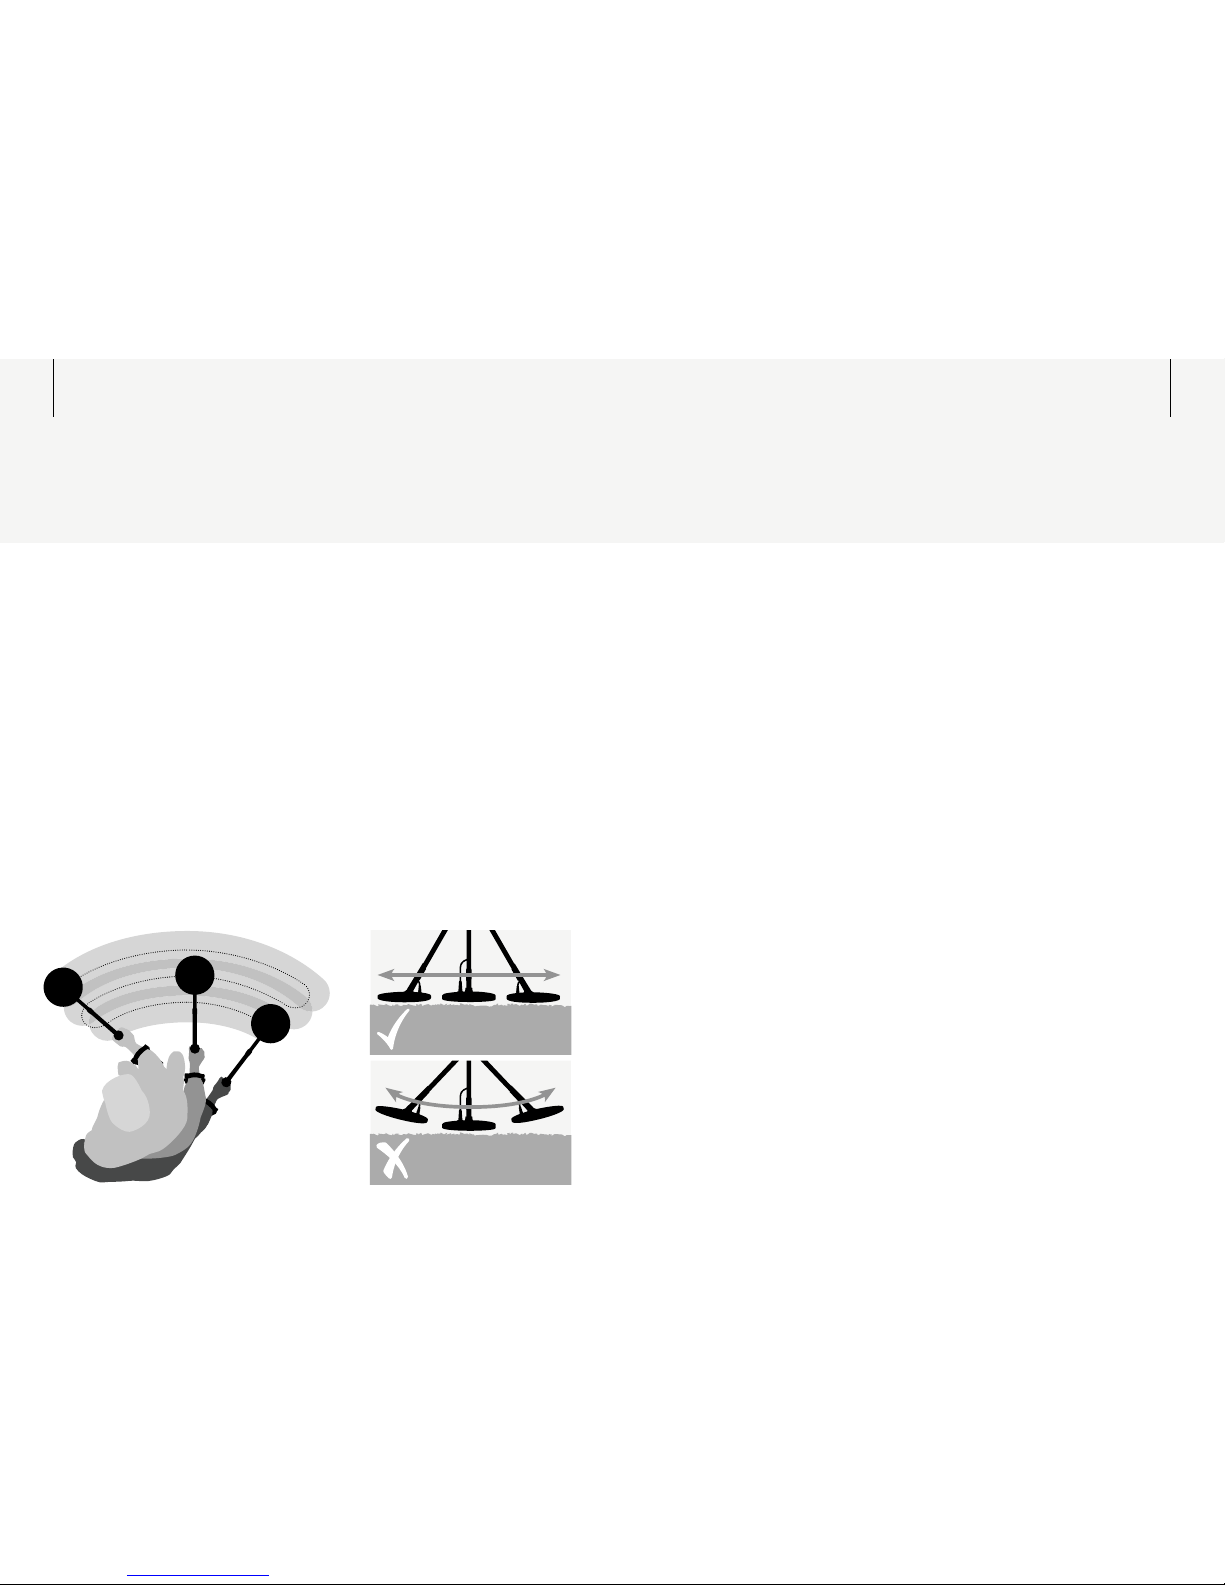
The GPX-4000 will perform at its best when the coil
is kept close and parallel to the ground at all times.
This will increase detection depth and response to
small objects.
Practise sweeping the coil over the ground in a
side-to-side motion, while walking forward slowly at
the end of each sweep. Slightly overlap the previous
sweep to ensure full ground coverage. An average
sweep speed is four seconds from left to right to left.
A variation in coil height at the end of each swing
may cause confusing sounds and reduce detection
depth, so an even, flat sweep is desirable.
When using a Monoloop coil, more overlap is required
to ensure that targets at maximum depth are not
overlooked.
Page 15
24 25
Auto Tune
Search
Mode
Soil /
Timings
Ground
Balance
Coil /
Rx
CancelTrackingSaltDeep
Patch Sensitive Fixed Double D
MNG
Threshold
Coil
Smart
Point
Search Mode
Each Mode has
factory preset
settings to suit that
style of searching.
Search Modes can
also be customised
to suit different
detecting conditions.
(pg. 28)
Soil/Timings allows
you to change the
electronic pulses/
timings of the
detector to optimise
performance for
different soils and
target types.
(pg. 36)
Ground Balance
reduces the
effect caused by
mineralisation
in the ground.
(pg. 38)
Coil/R x allows
you to change the
sensitivity and
receive (Rx) fields
of the coil.
(pg. 44)
Auto Tune automatically reduces
electrical interference.
(pg. 33)
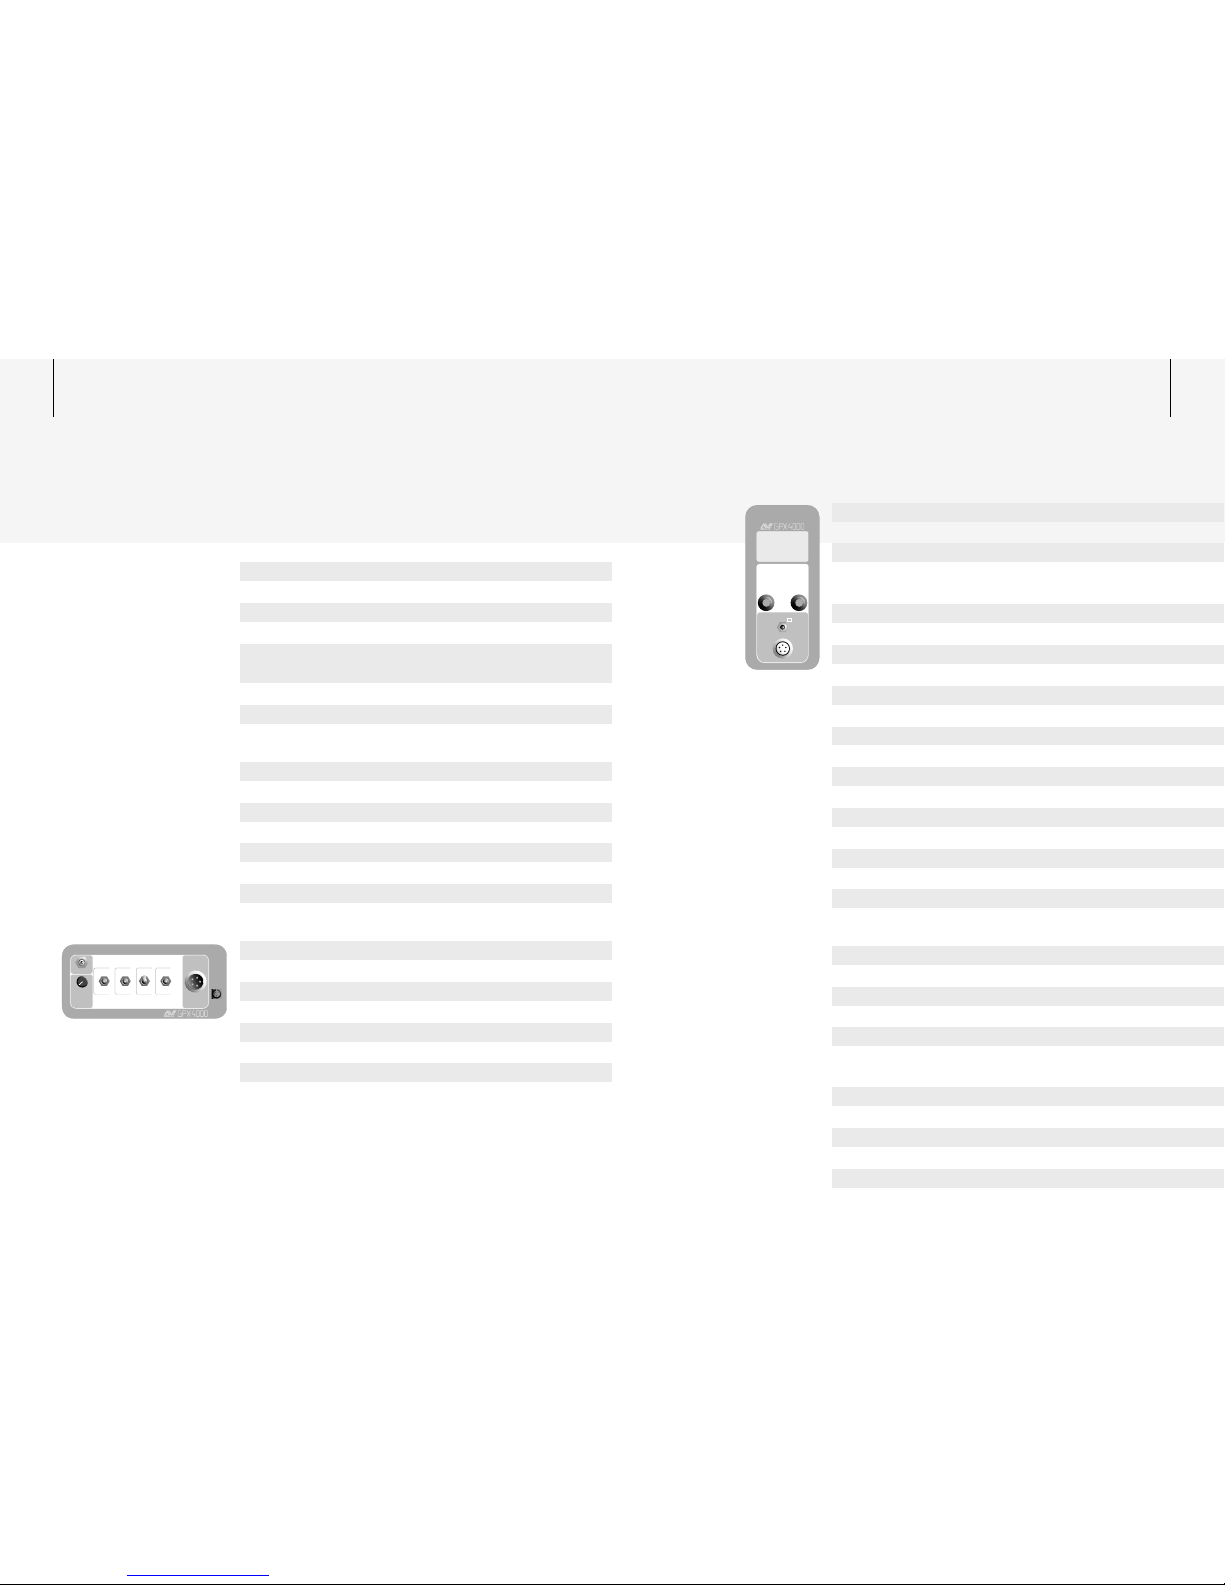
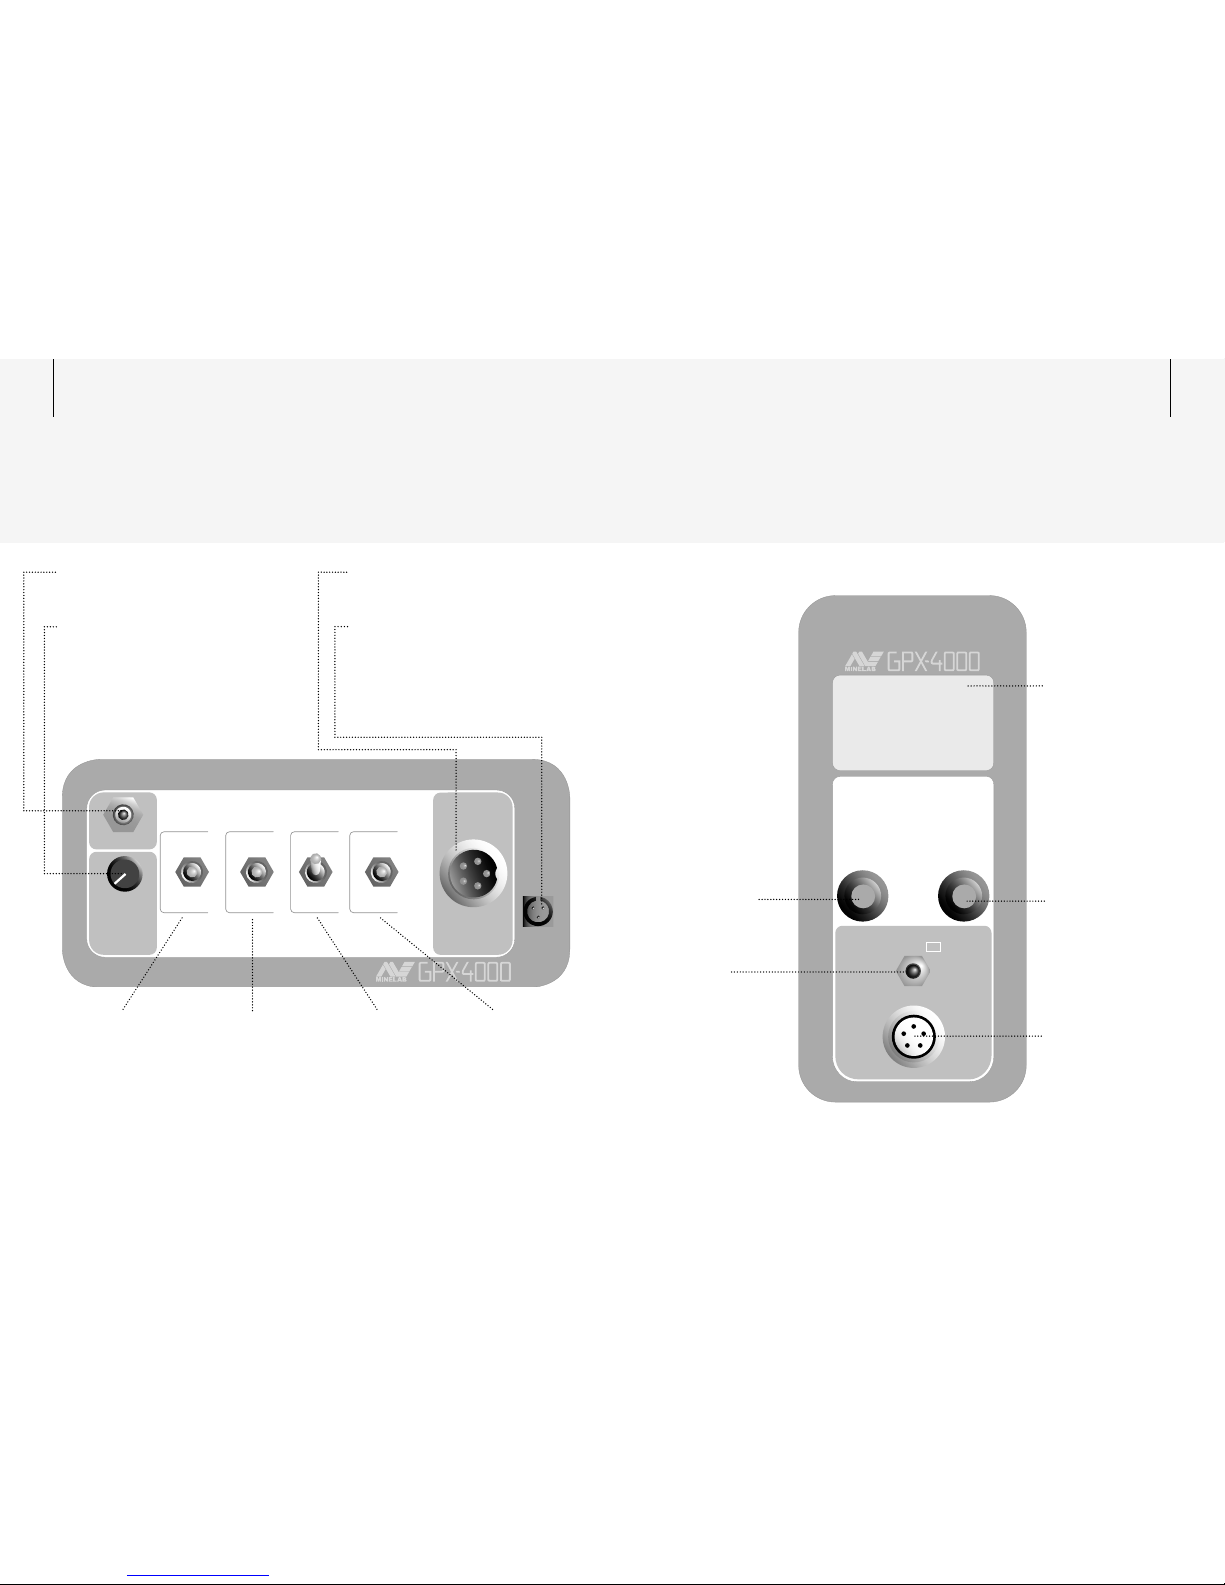
Coil Conne ctor
Connects the coil to the control box.
Smart Point is a connection point
for the Quick-Trak button, located on
the handle. Minelab also uses this as a
test port to ensure that your detector
is operating at peak performance
before it leaves the factory.
Threshold is the constant background
audio produced by the detector. This
control increases / decreases the level
of the Threshold.
(pg. 34)
Front Control Panel Rear Control Panel
Function
Select
Setting
On/Off
Hold for FP
Once a function
has been selected,
Setting allows you
to adjust its value.
(pg. 47)
Function Select
scrolls up or down
through the list
of functions.
(pg. 46)
LCD
(Liquid Crystal Display)
Displays all the menu
functions and settings.
Battery Connector
connects the control
box to the battery
and headphones.
On / Off
turns the detector
on and allows you
to restore Factory
Presets.
(pg. 26)
Page 16

26 27Turning the Detector On
Function
Select
Setting
On/Off
Hold for FP
It is best to only turn the detector on
when outdoors and away from sources
of electromagnetic disturbance such
as power lines, transmitters, electric
fences and phone towers. These
sources may cause the detector to
perform erratically, giving numerous
false signals.
If the detector emits an overload
sound, move the coil away fr om any
large metal objects. Overloading is
not harmful to the electronics of the
detector.
The On / Off button is located
on the back control panel.
To turn the de tector on or of f:
Press and release On / Off.
Many of the GPX-4000
functions are accessed
through the LCD Menu.
These are explained in
further detail throughout
the rest of this manual.
(pg. 46, 47)
Until you become more
familiar with the GPX4000, the detector can
simply be operated with
the Factory Presets and
the front panel controls.
Functions Settings
LCD Menu Structure
Avoid turning the detector on and off repeatedly.
If this happens the Coil Overcurrent screen will
appear. Turn the detector off and wait for a short
time before turning the detector on again.
Page 17

28 29Search Mode
The GPX-4000 has 3 separate Search Modes:
General (G), Patch & Deep. Each Search Mode has
a series of Factory Preset settings saved, which can
also be customised with personal preferences to
suit different detecting conditions.
Selecting the Search Mode
To begin detecting, select the desired Search Mode
that best suits the style of detecting you intend on
doing. As you switch between Search Modes, the
Main Menu settings will remain the same while the
Mode Edit settings will change.
Following is a brief summary of the characteristics
of each mode in the Factory Preset settings:
General (G)
The General Mode will provide the best compromise
of sensitivity, depth and signal response under a
variety of conditions. Until you are comfortable with
the different functions and settings of the GPX-4000,
General Mode should be used.
Patch
The Patch Mode can be used when searching new
areas. Patch can be used to find the first nugget
quickly. You will be able to cover more ground at a
faster pace than in General mode. Patch Mode isn’t
as quiet or stable as either General or Deep, but
allows a faster than normal sweep speed and will
provide a very sharp target response.
When you want to search the area more thoroughly,
change to either General or Deep Mode.
Search
Mode
Deep
Patch
G
Deep
The Deep Mode should be used when you are
detecting a small area very slowly and carefully ,
such as when chaining, or when cross-griding a
run of nuggets on a slope. Deep Mode is optimised
for a very slow sweep to provide maximum depth,
sensitivity, and Threshold stability.
Editing the Mode
When you have tried the different preset Mode
options and would like to change some of the
settings, you can select your own settings for
each Mode via the menu. Scroll down to the Mode
functions. Select the function you wish to edit and
alter the setting using the Setting control. Any
changes made to the settings are automatically
saved into the current Mode when the detector is
turned off.
G
Patch
Deep
G
The Main Menu
functions are the
same for each
Search Mode.
The Mode Edit
functions can be
saved with different
settings for each
Search Mode.
G
Patch
Deep
G
Page 18

30 31
The GPX-40 00 is provided with a Factory Preset
selection of menu settings, suitable for first-time
users.
Until you become more familiar with the
GPX-4000, the detector can simply be operated with
the Factory Presets and the front panel controls.
To restore all Factory Preset settings:
1 Turn the detector off.
2 Press and hold On/ Of f until the Reset Defaults
menu appears (approx. 5-6 seconds).
3 Turn Function Select to the right to select All
Settings, as shown on the diagram.
4 Turn Setting left or right to restore all Factory
Presets.
To restore Factory Preset settings for the
current search mode:
1 Turn the detector off.
2 Press and hold On/ Of f until the Reset Defaults
menu appears (approx. 5-6 seconds).
3 Turn Function Select to the right to select the
current mode. The current mode is dependent on
the mode switch on the front panel.
Note: If the
displayed mode is not the one you wish to restore
you must change the mode on the front panel.
4 Turn Setting left or right to restore Factory
Preset settings for that mode.
Function
Select
Setting
On/Off
Hold for FP
FP
Function
Select
Setting
On/Off
Hold for FP
Factory Presets
Main Menu: Range: Factory Preset:
Volume Limit 1 to 40 25
Audio Tone 1 to 100 50
Signal Peak 1 to 20 15
Track Speed Slow
Medium
Fast
Medium
GB Type General
Specific
General
Sensitive Extra
Smooth
Smooth
Iron Reject Off (All Metal)
1 to 30
Off (All Metal)
Battery Volts - -
Manual Tune 0 to 255 -
Mode Edit: General: Patch: Deep :
Audio Quiet
Normal
Boost
Deep
Normal Boost Deep
Gain 1 to 15 879
Motion Very Slow
Slow
Medium
Fast
Slow Medium Very Slow
Response Normal,
Inverted
Normal Normal Inverted
Page 19

32 33
Tuning should be done
initially with the Coil
switch in Double-D
or in Monoloop (M). If
the interference is still
severe after completing
the tuning operation,
change the Coil switch to
Cancel and only re-tune
the detector again if
necessary.
Tun e
Reducing Electrical Interference
To Perform an Automatic Tune:
1 Hold the detector at waist height and the coil
vertical and slowly rotate through a half-circle,
making sure there are no large targets or obvious
electrical interference sources close by. Listen for
any increase in interference as you move.
Note: If you have difficulty holding the detector very
still for 60 seconds, you can place the detector on the
ground with the coil vertical.
2 Press the Auto Tune button. Keep the detector
completely still during the automatic channel
selection.
A single beep indicates the beginning of the Auto
Tune. The detector will begin to scan each channel
for the least interference. This may take up to 60
seconds.
The detector will then select the quietest
operating channel that was identified. The end
of the Tuning process will be indicated by three
sharp ‘beeps’.
When tuning the detector in close proximity to other
detectors , each operator needs to take turns t uning.
Do not try to tune two detectors at the same time.
The detector may become noisy due to electrical
interference from powerlines, radio transmitters
electrical equipment or other detectors operating
close by. The detector interprets this interference by
the Threshold becoming erratic.
So that the detector experiences the least
interference for the current environment, the search
channel can be changed automatically by the Auto
Tune button on the control panel, or manually in the
Manual Tune setting via the menu. (pg. 63)
Auto Tune instructs the detector to automatically
listen to every channel and select the quietest
channel. Automatic tuning may take up to 60
seconds.
The Manual Tune setting, via the main menu, allows
you to manually select and listen to every channel
for the least interference.
The best channel to select will be the one where the
audio response to electromagnetic disturbances
(e.g. powerlines) is the most reduced.
It is best to select a channel with the coil away from
the ground and as still as possible. This gives the
detector the best chance of hearing all surrounding
interference (not from the ground or targets) and
selecting the quietest channel.
Interfere nce in some locations can change during the
course of the day so you may need to re-tune from time
to time to maintain a smooth Threshold as you move
around the area.
Note: There is only one Tune setting. Any changes
made manually will override the Auto selection.
Auto Tune
Auto Tune
If you would like to know
what channel has been
chosen after an automatic
Tune, access the Manual
Tune screen and check the
channel displayed.
If Auto Tune is not working
well in Slow or Very Slow
Motion, try selecting Medium
setting. Perform another
Auto Tune and then return to
the original set ting.
500mm (20" )
Page 20

34 35
5ISFTIPMEMFWFM
"VEJP3BOHFUIBU
ZPVBSFBCMFUPIFBS
Threshold
Adjusting the Background
Audio Level
Threshold is the constant audible background audio
tone or 'hum' produced by the detector.
The level of the Threshold should be set low, but still
audible and stable. Ideally it should be a smooth,
gentle hum.
Small targets or large deep targets may not produce
a distinct target signal, but may cause only a small
variation in the Threshold.
If the Threshold level is set too high or too low, these
very small variations may be missed.
Listening for a target signal with a high Threshold
would be like trying to hear a whisper within a
crowded noisy room. A high Threshold volume may
also be uncomfortable for your hearing.
If the Threshold is set too low, the target signal
needs to be loud enough to become audible,
therefore very soft target signals from small or very
deep targets may not be heard.
It is important to reset the Threshold level as
conditions change. For example, your ears may
adjust to the low levels of audio after an hour or so,
or the conditions may have become windy.
Threshold
"VEJP3BOHFUIBU
ZPVBSFBCMFUPIFBS
5ISFTIPMEMFWFM
5ISFTIPMEMFWFM
"VEJP3BOHFUIBU
ZPVBSFBCMFUPIFBS
When the Threshold is
too high, a faint signal is
masked, and only the peak
of the loud signal is audible
above the Threshold.
With the Threshold set
correct ly, both target
signals are easily heard.
A Threshold level that is too
low does not allow faint
target signals to b e heard.
Page 21

36 37
Soil /
Timings
Salt
Sensitive
N
The Soil/Timings switch has the ability to change
the electronic 'timing' or pattern of the pulses. This
optimises the detector for different soil conditions,
the type of coil being used and desired target sizes.
Soil/Timings can make a big improvement to your
finds.
Put simply, certain combinations of pulse patterns
(timings) have a particular affinity to certain soil
conditions, (be it magnetic/alkaline/neutral, etc.)
and on different target sizes and conductivities.
By using the Soil/Timings switch, changes to the
timings can be made to improve the performance in
different conditions.
Sensitive
Sensitive timings have been optimised for an
improved response on smaller, shallow nuggets.
There is a slight loss of depth on bigger targets, so
you should not use this setting when seeking out
large deep nuggets.
There are two types of Sensitive settings available
via the LCD, Extra and Smooth
(pg. 55). Smooth is
the factory Preset setting and is very dif ferent to
previous GP models. It will eliminate most false
signals from hot rocks and ground mineralisation
whilst retaining excellent sensitivity to small targets.
When switching between Soil/Timings, there is a 1
second pause (ie. 1 secon d of Threshold) to allow the
change in the detectors electronics to take effect.
Normal (N)
Normal gives you the best performance on a wide
range of soil conditions and will provide the best
depth on a wide variety of target sizes. You will use
this setting most of the time. You should always use
Normal in new areas where you are unsure of the soil
mineralisation and the depth of targets.
Salt
The effect of alkaline salt mineralisation is vastly
different to the effect of ironstone and mineralised
clays. Anyone who operates on dry salt flats will
know how difficult it is to detect. In these areas,
Normal should be tried first, but if the Threshold
is too unstable, then better performance will be
obtained in Salt.
Using the Salt setting may result in a slight loss in
signal response to smaller targets. The response
on larger items remains relatively unaffected and
ground noise is usually minimised. Therefore,
when searching for large deep nuggets in highly
mineralised soil, the Salt setting can be used to
obtain a smoother Threshold, allowing you to hear
those mellow deep nugget signals.
Sensitive
N
Salt
Soil/Timings
Optimising the Detector
for Different Soil and Target Types
Always remember to re-Ground Balance
the detector after making any changes
to the Soil/Timings switch.
Page 22

38 39
Ground
Balance
Tracking
Fixed
Tracking
Fixed
Ground Balance
Reducing Ground Noise
The ground contains not only sand, but also many
different chemicals, minerals and salts. These extra
materials are referred to as ground mineralisation.
This ground mineralisation may often produce
erratic sounds, known as ‘ground noise’.
The Ground Balance function minimises the ground
noise while retaining maximum sensitivity to metal
targets. Ground Balancing the detector ensures that
signals from targets, such as gold nuggets, are not
confused with interfering ground noises.
The GPX-4000 has the ability to cancel out the
effects of ground mineralisation automatically, and
the Tracking function will maintain a perfect Ground
Balance while you search.
Tra ck ing
Tracking instructs the detector to test for changes in
ground mineralisation and will automatically adjust
the Ground Balance setting, when necessary, during
detecting.
Tracking is preferred in heavily mineralised ground,
especially where the mineralisation is changeable,
or when you want to cover a large area quickly and
efficiently.
Fixed
Fixed holds the last Ground Balance setting. In
ground where conditions allow, Fixed will provide
greater depth, sensitivity and sharper target
signals, provided that a perfect Ground Balance is
maintained.
Fixed will give slightly improved performance but
will require re-balancing when necessary. Using the
Quick-Trak button is an easy way to do this.
(pg. 43)
Where possible, always search in Fixed position to
maximise depth and sensitivity, and only use Tracking
in areas with excessive ground noise and/or rapidly
changing mineralisation.
Quick-Trak Button
The Quick-Trak button found on the handle
assembly allows you to temporarily switch between
Fixed and Tracking, or vice versa.
The Quick-Trak button only changes the Ground
Balance position (Fixed or Tracking) while the button
is pressed. Once the button is released, the Ground
Balance setting returns to the switch position
selected on the front control panel.
The Quick-Trak button will most commonly be used
to Ground Balance the detector and also to fix or
hold the Ground Balance setting while pinpointing.
(pg. 43)
Page 23

40 41
Tracking
Ground Balance Procedure
for Tracking
(For Ground Balance Type – General)
100 mm (4")
1 Find a clear area of ground without any targets.
2 Change the Ground Balance switch to Fixed.
3 Whilst keeping the coil parallel to the ground, lower
and raise the coil between 25mm and 100mm
(1" and 4") over the ground. Try to lower the coil as
close to the ground as possible without touching it.
4 While moving the coil
(see note), change the Ground
Balance switch to Tracking and continue moving the
coil up and down until the audio has stabilised and
any ground noise has stopped.
A persistent signal may indicate a target in the ground.
If this occurs, then move the coil to a new location and
repeat the proce dure.
5 When there is no longer a change in the Threshold,
the detector is ‘Ground Balanced’, and you can
commence detecting.
Note: When changing the Ground Balance switch from
Fixed to Tracking, a very fast auto-Ground Balance is
initiated prior to returning to a normal Tracking speed.
This fast Ground Balance only lasts a short time, so it is
important to be moving the coil before at tempting to
ground-balance.
Ground Balance re-set in Tracking
Whilst sweeping the coil, you can test if you are still
in harmony with the ground by stopping, and raising
and lowering the coil – if the Threshold remains
stable then you are still Ground Balanced. If there is a
change in the Threshold, then you need to re-set the
Ground Balance setting.
While moving the coil, press and release the
Quick-Trak button. A short ‘beep’ will be heard
which lets you know that a 3 second fast autoGround Balance is initiated prior to returning to
Tracking. Once the audio has stabilised, you can
continue searching.
If you find that the Ground Balance needs to be
re-set quite regularly, you can select a Faster
Tra cki ng spe ed.
(pg. 54)
Fixed
As Tracking continually updates the Ground
Balance setting automatically, repeated passes
over a target may result in the detector balancing
to the target instead of the ground, diminishing
the target signal and increasing ground noise.
Therefore, it is important to use Fixed when
pinpointing or when investigating a potential faint
signal with repeated sweeps.
Page 24

42 43Ground Balance Procedure
for Fixed
(For Ground Balance Type – General)
1 Find a clear area of ground without any targets.
2 Change the Ground Balance switch to Fixed.
3 Whilst keeping the coil parallel to the ground, lower
and raise the coil between 25mm and 100mm
(1" and 4") over the ground. Try to lower the coil as
close to the ground as possible without touching it.
4 While moving the coil, press and hold the Quick-Trak
button. The Tracking program initiates a very fast
Ground Balance for a short time. This is the same
effect as changing the Ground Balance switch to
Tracking on the front panel.
5 Continue moving the coil up and down until the
ground noise has stopped. When there is no longer
a change in the Threshold, the detector is ‘Ground
Balanced’.
A persistent signal may indicate a target in the ground.
If this occurs, then move the coil to a new location and
repeat the proce dure.
6 Release the Quick-Trak button to return to the Fixed
position and commence detecting.
Ground B alance re-set in Fixed
Whilst sweeping the coil, test if you are still in
harmony with the ground by stopping, and raising
and lowering the coil. If the Threshold remains
stable then you are still Ground Balanced. If there is a
change in the Threshold, then you need to re-set the
Ground Balance setting.
This is achieved by simply repeating steps 3-6 of the
Ground Balance procedure for Fixed.
Fixed
Ground Balancing Tips
When going over old patches, i.e. small
concentrated areas known to have produced
gold nuggets, run in Fixed Ground Balance
and periodically re-Ground Balance with the
Quick-Trak button every few metres.
When Ground Balancing in very rocky terrain,
lower the coil to the height above the ground
that you will actually be swinging it at.
In highly magnetic soils, you may have trouble
ground balancing the coil all the way to the
ground (most common with larger Monoloop
coils). If you experience this, you can change the
Ground Balance type to Specific. (p g 56)
It is very important when
searching with a Fixed
Ground Balance, that the
Ground Balance setting
is regularly checked and
maintained. Testing by
raising & lowering the coil
is quick and simple and
should become a regular
part of your detecting
technique.
100 mm (4")
Page 25

44 45
Coil/Rx allows you to change the sensitivity and
search patterns of receive (Rx) fields of the coil.
The GP series or Commander Range of Double-D
coils can change characteristics to suit different
detecting conditions and targets.
Coils not specifically designed for the GPX-4000
may behave erratically or be ineffective in either
Monoloop (M) or Cancel.
It is very important that you always switch off the
detector before changing coils.
You will need to re-Ground Balance every time you
select a new position for the ‘Coil’ switch.
Double-D
This is the most suitable electromagnetic field for
areas of medium to very high mineralisation. It is
also excellent for pinpointing as the target response
is strongest from the centre of the coil.
The search pattern of this position is the
conventional blade or wedge shaped signal through
the centre of the coil.
Monoloop (M)
This setting may be used in most locations of low to
medium mineralisation. Monoloop is also suitable
for locating small nuggets with Soil/Timings switch
set to Sensitive.
Use of Monoloop will often increase the sensitivity
of the detector but may also be a little more
unstable in heavily mineralised ground. Pinpointing
is not centred in the middle of the coil, but to the left
side and may give a complex signal when the target
is very close to the coil, so it is recommended to use
the left edge of the coil to pinpoint shallow targets.
Cancel
This setting provides a receive field that is
particularly stable in areas of electrical inter ference.
This position is ideal for detecting close to
neighbourhoods or where the Tune function has
difficulty selecting a quiet operational channel
(e.g. near power lines, phone towers or under poor
atmospheric conditions).
Pinpoint in Cancel will be to the lef t side of centre
and signals may be complex if the target is close to
the coil. In Cancel, Sensitivity and depth are slightly
reduced.
Tip: You may be a ble to increase Gain if using Cancel .
(pg. 65)
Coil /
Rx
Cancel
Double D
M
Double D
M
Cancel
Salty Environments:
In highly saturated salt
conditions such as ocea n
beaches or large inland salt
lakes, the use of Cancel may
give better performance
than Salt. As a general
performance comparison,
Cancel will be more
sensitive, but Salt has a
greater depth potential on
larger targets.
The detector will not detect targets
if Cancel is used with a Monoloop coil.
Tra nsm it
Receive
Double D Monoloop
Cancel
+–
T R T RR T RR
Coil/Rx
Changing the Sensitivity and
Receive (Rx) Fields of the Coil
+++
Minelab Monoloop coils
can be used on the
GPX-4000 with excellent
results. We recomme nd
their use in conjunction
with the Coil/Rx switch in
Monoloop (M).
Page 26

46 47
Function
Select
Setting
Function
Select
SettingFunction
Selec
t
Navigation Arrows
indicate which way
the setting can be
adjusted
Funct ion
Factory Preset
Indication
Function Setting
(Visual Scale)
Function Setting
(Numerical)
Functions Settings
Once a function has been selected,
the Setting control accesses a settings
adjustment screen.
The Function Select control scrolls
through a list of functions.
Navigation Arrows
indicate which way
the menu can scroll
Title
indicates what type
of function you are
viewing (general or
mode dependant).
Func tions
There are two
types of functions,
general functions
(under the Main
Menu heading) and
mode dependant
functions (under
the Mode Edit
heading).
Function Setting
New Value Icon
Indicates that this
value is not the
Factor y Preset
Settin
g
Setting
Page 27

48 49
The Main Menu
functions are the
same for each
Search Mode.
The Mode Edit
functions can be
saved with different
settings for each
Search Mode.
G
Patch
Deep
G
With a function highlighted,
turn the Setting control to the
left or right to adjust the setting.
Accessing Functions
Tur n the Function Select
control right to scroll down
the list. The currently selected
function is highlighted.
Accessing Settings
Function
Select
SettingFunction
Select
SettingSettin
g
Settin
g
Function
Select
Setting
F
unction
S
elec
t
Function
Select
SettingSettin
g
To return to the list of functions,
turn the Function Sele ct
control lef t or right.
Note: The Battery Test screen will
automatically return to the list
of functions after 7 seconds.
Tur n the Function Select
control left to scroll up the
list. The currently selected
function is highlighted.
Page 28

50 51
Range
Fac tor y Preset
1 to 40
25
Volume Limit is the maximum level of sound emitted
by the detector when a target is detected.
If the Volume is set to maximum, all target signals
will be heard and will sound proportional to the
target size and depth. Maximum limit allows you to
hear the difference between a small and large target,
but may be uncomfortable to your hearing if a large
target is found close to the coil.
If the Volume is set to half-way the target signal is
unaffected for a small target, but is limited for a very
large target.
If the Volume is set to minimum, most targets will
potentially be very limited. A low volume will be
more comfortable on your hearing, but will increase
the risk of missing small targets.
Try using a large and small target to adjust the
Volume to a comfortable level.
Threshold should be reset after adjusting the Volume
level.
The detector is able to produce an extremely high
volume if a large or shallow target is located.
Protect your ears!
Volume Limit
Setting the Maximum
Volume of all Sounds
7PMVNF-JNJU
7PMVNF-JNJU
7PMVNF-JNJU
Maximum Volume Limit:
Faint and loud signals are
unaffected.
Mid-Range Volume Limit:
Faint Signals are
unaffected, but loud
signals are limited.
Minimum Volume Limit:
Both loud and faint signals
are reduced to quiet levels.
Page 29

52 53
You are more likely to hear a target signal when both
the volume and the tone of the target signal change
upon detection rather than the volume alone.
A target signal on the GPX-4000 is normally a twotone signal. A target signal that first falls in pitch and
then rises is normally a deep target. A 'rise and fall' of
the pitch characterises a small target.
The Signal Peak control sets the level of variance
between the high and low pitch of the signal.
Signal Peak
Adjusting the Pitch Variation
of Target Signals
Tone is the pitch of the Threshold emitted by the
detector.
Large, deep targets produce a different response to
small shallow targets. It is important that you adjust
the Tone to suit the type of target you are searching
for.
A high Tone setting may help identify ground signals
from small targets. A low Tone setting may be more
comfortable on your ears.
Tone is also a personal preference. You may find that
you hear targets better in a particular range of Tone.
Try using a large and small target to adjust the Tone
to produce the most audible target signal for your
hearing.
Audio Tone
Adjusting the Pitch
of the Threshold
A high Signal setting
will increase the pitch
variation of the target
signal, however in highly
mineralised ground this
high variance of signal
may make the detector
appear noisy.
A low Signal setting
will decrease the pitch
variation, so target
signals will sound more
monotone.
People who suffer hi gh
frequency hearing loss may
prefer to use a Signal Peak
setting of 10 or less .
-PX
1JUDI7BSJBODF
1JUDI7BSJBODF
3JTJOH5POF
'BMMJOH5POF
1JUDI7BSJBODF
1JUDI7BSJBODF
3JTJOH5POF
'BMMJOH5POF
)JHI
Range
Fac tor y Preset
Range
Fac tor y Preset
Range
Fac tor y Preset
1 to 20
15
Range
Fac tor y Preset
1 to 100
50
Page 30

54
Range
Fac tor y Preset
Slow, Medium, Fast
Medium
55Tracking Speed
Keeping up with Changing Ground
(Ground Balance, pg. 40)
When searching in highly variable mineralisation,
Tracking Ground Balance is the preferred setting.
Tracking Ground Balance automatically adjusts the
Ground Balance as necessary to maintain stability
and detection depth.
The GPX-4000 has three Auto Tracking Speed
options: Slow, Medium & Fast.
If the ground being detected has mineralisation
which is changing too often for you to search in
Fixed, then Tracking Speed allows you to gradually
increase from Slow Tracking Speed, into Medium
Tracking Speed, then into Fast Tracking Speed, as
required.
The preferred Tracking Speed is the slowest speed
which still keeps up with the variability of the
ground mineralisation.
In ground conditions that make operating in Fixed
impractical, the factory preset Medium setting
provides a good compromise between effectively
maintaining the Ground Balance and pausing the
Ground Balance when a target is located.
Coils wit h Tracking
The Fast Tracking Speed is very effective at adjusting
the Ground Balance in highly variable soils. Its use
will only be required in extreme cases.
When using a Monoloop coil, the nature of the
Tra cki ng ten ds to be m ore aggressive. Faint, deep
targets may be 'tracked out'. In these extreme,
highly variable soil types, you may achieve better
performance by opting to use a Double D coil
instead of a Monoloop and then selecting the most
appropriate Tracking Speed.
Ground
Balance
Tracking
Fixed
Initial Very Fast Ground
Balance
Every time you switch
from Fixed to Tracking on
the front control panel or
via the Quick-Trak button,
the GPX-4000 will initiate
a very fast auto Ground
Balance. The Tracking
Speed does not affect the
speed of the initial very
fast auto Ground Balance.
The GPX-4000 offers two separate Sensitive Soil/
Timings options - Smooth and Extra.
The Sensitive timing found on previous GP series
detectors is now called Extra, and provides an
increase in signal response and depth on smaller
targets where ground conditions allow it to be used
effectively.
In milder ground conditions, with minimal ground
signals, the Sensitive Extra setting is the preferred
option, however Minelab recommends new users to
first become fami liar with the GPX-4000 using the
Factory Preset Sm ooth setting.
Extra
This setting may increase the signal from certain
hot rocks near the surface, but can actually help
smooth out the Threshold in certain ground types,
particularly with Double -D coils. In mild ground
conditions, Extra will provide the best signal
response on a small, deep target.
Smooth
The all-new Smooth option is the Factory Preset
setting for Sensitive. It is a radically different timing
that sacrifices some depth, but does an excellent
job at eliminating most signals from hot rocks
and ground noises. Highly mineralised areas that
produced small and relatively shallow nuggets, are
well worth another search, particularly those areas
where a Monoloop coil was previously unusable.
The Smooth option can work well in combination
with the factory preset Patch Mode (pg. 28),
particularly when you are after the smallest bit of
gold, to let you know you are in the right area.
Sensitive
Soil/Timings
Range
Fac tor y Preset
Smooth, Extra
Smooth
Page 31

56 57Ground Balance Type
(Ground Balance, pg. 38)
General
This is the best Ground Balance Type for use in over
90% of goldfield soils and uses the conventional
automatic Tracking on the previous Minelab model,
the GP3500. In Tracking, General Ground Balance
samples variations in the ground mineralisation and
sets a continuously changing average of the Ground
Balance level. General Ground Balance is ideal for
most mineralised grounds and is the preferred
Ground Balance Type for soils that have highly
variable mineralisation.
Specific
This is a special Ground Balance Type for use in
areas of highly magnetic, iron-rich soils. Use of
Specific Ground Balance will allow you to keep the
coil closer to the ground and allows Monoloop
coils to be accurately Ground Balanced in areas
that would normally be too ‘hot’ for their use. The
Tracking function in Specific is more conservative
than in General, and will pause on even the faintest
response, removing the risk of 'Tracking out' faint
signals.
The disadvantage of using Specific is the possibility
of more ground noise in variable soils. It is
recommended that the operator be more active in
checking their Ground Balance setting by stopping
periodically and raising and lowering their coil,
and listening to any variations. Ideally, Specific
Ground Balance should only be used in soils that are
reasonably uniform or non-variable.
Range
Fac tor y Preset
Specific, General
General
Ground Balance Procedure
for Specific
When moving to a new area, the first Specific
Ground Balance must be done with the Ground
Balance switch – not the Quick-Track button.
Tracking
Fixed
1 Find a clear area of ground
without any targets.
2 Change Ground Balance to Fixed.
3 Hold the coil 300mm–450mm
(12"–18") above the ground.
4 Change the Ground Balance
switch to Tracking. You will hear a
high pitched Threshold that only
lasts 1 second.
5 When the low pitch tone begins,
immediately start lowering and raising
the coil over the ground. Try to lower
the coil parallel and as close to the
ground as possible without touching it.
6 Continue moving the coil up and down
until the audio has stabilised and any
ground noise has stopped. When there
is no longer a change in the Threshold,
the detector is ‘Ground Balanced’.
7 Change the Ground Balance back to
Fixed and commence detecting.
Tracking
Audio Tone
Time
23 4 5 7
Page 32

58 59
The GPX-4000 is capable of rejecting many iron/
ferrous targets while still detecting non-ferrous
targets.
While detecting in littered goldfields, much of the
iron rubbish may be ignored, with a high probability
that valuable targets will not be missed.
When Iron Reject is turned off , no iron targets
will be rejected, therefore all types of metals
will produce a target response. This is known as
'All Metal' and is the preferred setting for most
situations.
In All Metal, the detector will give varying volume
and pitch signals. This information does not indicate
the type of metal in the object.
If Pinpointing a target prior to digging, best results
will be obtained from turning Iron Reject Off.
Iron Reject Off (All Metal)
Accepting all Targets Types
When Iron Reject is activated, iron or ferrous objects
are rejected by blanking the normal target signal, so
that the Threshold Tone goes silent as the coil passes
across the target.
Discrimination is dependent on target signals being
strong enough for the GPX-4000 to determine if the
target is ferrous or non-ferrous. If the signal is weak,
the detector will give a non-ferrous response until
the signal becomes stronger due to a hole being dug
and the coil getting closer to the target. The Iron
Reject function is designed this way for maximum
accuracy.
Caution: Do not attempt to discriminate by raising
and lowering the coil on a deep or partially dug
target. An accurate discrimination requires an even
side-to-side coil motion.
"MM.FUBM
'FSSPVT5BSHFU
"VEJP4JHOBM
/PO'FSSPVT5BSHFU
%JTDSJNJOBUJPO#MBOLJOH
"VEJP4JHOBM
#MBOLJOH4JHOBM
'FSSPVT5BSHFU
/PO'FSSPVT5BSHFU
When a target has been
located, the coil should be
passed back and forth over
the target centre several
times. Remember to set
Ground Balance to Fixed
for this and keep the sweep
across the target at an even
height and as close to the
ground as possible.
For deep targets, the hole
being dug may not be
wide enough for the coil
to move sideways a cross
the target. Therefore the
discrimination may not
be accurate. You should
always test the target from
at least two directions (90˚
to each other) so that the
detector 'sees' the target
from different profiles.
Range
Fac tor y Preset
Off (All Metal), 1 to 30
Off (All Metal)
Page 33

60 61
There is usually some merging of characteristics
between targets that are clearly ferrous and others
that are ‘maybe’ ferrous. Iron Reject allows you to
make fine adjustments in the determination of the
‘maybe ’ signals.
A low level of Iron Reject will keep the discrimination
conservative. ‘Maybe’ targets will respond with a
normal non-ferrous signal and only definite ferrous
targets will cause the Threshold and target signal to
blank. If the target response is too weak for accurate
discrimination, the detector will give a normal target
signal until you dig closer to the target and the
signal strength improves.
A medium level of Iron Reject is a little less
conservative and will enable you to reject most
ferrous targets from the non-ferrous targets.
A high level of Iron Reject will be less conser vative
again and more ‘maybe’ targets may be rejected as
ferrous targets, therefore giving a blanking signal.
With this setting some small non-ferrous targets,
e.g. gold coated ironstone could be mistaken
for ferrous targets.
Iron Reject
Rejecting Iron Targets
A low level of Iron Reject requires a stronger ferrous
signal before discrimination occurs. A high level of
Iron Reject will cause blanking on a smaller ferrous
targets. Very weak ferrous target responses will give
normal ‘all metal’ type signals.
Select the level of Iron Reject depending on how
cautious you want to be and how much trash is in
the area.
If the area is heavily littered, you may want to use
a higher level of Iron Reject. If there is little trash in
the area and it is mostly close to the surface you may
prefer a more conservative, low level of Iron Reject.
It is usually best to recover all targets, especially
when you are on a known gold producing site or a
successful patch. However, careful use of the Iron
Reject feature can be rewarding in areas other
operators have avoided.
Iron Rejec t will give the
best results when used
in combination with the
specially designed GP Series
or Commander DoubleD coils and will not work
when using Monoloop coils.
-PX4FUUJOH
)JHI4FUUJOH
/POGFSSPVT
)PSTFTIPF #SPLFOSVTUZUJO *SPOTUPOFDPBUFEOVHHFU $MFBOOVHHFU $PQQFSDPJO/BJM
'FSSPVT
Range
Fac tor y Preset
Off (All Metal), 1 to 30
Off (All Metal)
Page 34

62 63
Manual Tune allows you to select a particular
channel, or you may want to fine tune the detector
after performing an auto-tune. If detecting in a quiet
area with no interference, you may find that you can
select a channel at one end of the scale or the other.
Low numbers are lower frequency channels and
high numbers are higher frequency channels.
High frequency channels can give slightly more
sensitivity to smaller targets close to the surface.
Low frequency channels can give a little more depth
to larger targets, but the difference is only marginal.
1 Hold the coil vertical and 100mm (4") above the
ground, making sure there are no large targets or
obvious electrical interferences close by.
2 Access the Manual Tune screen via the menu.
3 Slowly increase or decrease the numbers, pausing
after each change to test the stability.
4 Listen to each channel in the range until you hear
the least noise.
Manual Tune
Reducing Electrical Interference
(Auto Tune, pg. 33)
As it takes a while to go through the full range of
band numbers, we recommend that you use the
Manual Tune for fine adjustments after performing
an Auto Tune.
If interference persists after tuning, try reducing the
Gain setting, but in high interference areas you may
need to use Cancel on the Coil/Rx switch.
If the setting control is turned quickly you will notice
noise caused by rapid movement through the
channels. This is normal and will not be present when
the control is turned slowly.
Range 0 to 255
Battery Test
Viewing the Battery Voltage
The Battery Volts screen allows you to view the
current voltage of the battery. This screen can be
viewed at any time.
When the battery is low, a series of alarm signal
pulses are given at 1 minute intervals.
Note: The Battery Volts screen will display for a short
time and then the menu wi ll automatically return.
Shutdown
at 7.1V
2
014
4
8
Fully Charged at 8.4V
6
Low Battery Audio
Signal Warning at 7.3V
1
3
5
7
9
24681012 16
Time (Hours)
Volta ge (Vo lts)
Lithium Ion batteries have the advantage of holding power through
most of the life of the charge before going into a rapid shutdown.
100 mm
(4")
A slower Motion speed will
also reduce instability due
to interference. (pg. 66)
Page 35

64 65Gain
Adjusting the Sensitivity
of the Detector
The Gain function allows the GPX-4000 to be
optimised for differing conditions, controlling the
sensitivity of the detector to its environment and to
targets.
The detector, with a high Gain setting, will detect
smaller and deeper targets but may respond to
unwanted noise and ground signals. A high Gain
setting is recommended for mild soil conditions and
areas of low interference.
The detector, with a low Gain setting, will detect less
unwanted noise and ground signals, but may miss
deep targets. A lower Gain setting is preferable for
variable ‘noisy’ conditions or high interference areas.
The Gain control should be adjusted to suit the soil
conditions, as well as the coil being used. E.g. if you
have found some nuggets in an area and wish to
detect the same spot with a larger Monoloop coil, it
may be necessary to reduce the Gain setting.
Always ensure that you are properly Ground
Balanced and that the detector is tuned before
making any changes to the Gain setting.
Note: Try using a slower Motion setting (pg. 66) and/or
the Coil/Rx switch in Cancel (pg. 44) to allow a higher
Gain setting.
Range
Fac tor y Pre set
1 to 15
Patch 7 General 8 Deep 9
Audio Type
Changing the Audio
Response of Target Signals
The Audio Type function replaces the Boost switch
on the previous GP Series detectors. There are four
options to choose from. Each setting changes the
way that the detector interprets a signal and how
that signal is produced as an audio response.
Normal
This may be used for general detecting conditions.
Normal provides the best compromise for signal
response and Threshold stability.
Quiet
This gives the most reduction of both ground noises
and interference. The signal response is slightly
quieter compared to the other Audio Types, so
should only be used in the most ex treme situations.
Boost
This is a more aggressive Audio Type. Boost will
provide very sharp target signals but will also
increase any signal caused by ground noises or
electrical inter ference. It is best used in milder soils
and well away from electrical interference.
Deep
This is the preferred Audio Type when searching for
larger targets at depth. It works well in combination
with the slower Motion options, where target signals
come through loud and clear, but noises from
ground and mineralisation are somewhat filtered
out.
Note: Each Audio Type will have a different optimum
Gain setting you should check the level of Gain if you
make changes to Aud io Ty pe.
Range
Fac tor y Preset
Normal, Quiet, Boost, Deep
Patch Boost General Normal Deep Deep
Page 36

66 67Motion
Adjusting Sweep Speed
The speed at which you sweep the coil has an
effect on target response time and Ground Balance
adjustment. Matching your preferred coil sweep
speed with the corresponding Motion setting can
reduce noise.
Very Slow and Slow
When carefully detecting a small area, a slow Motion
setting will allow for maximum depth and sensitivity
to small targets. Slow Motion can be used in
combination with a higher Gain and Deep or Boost
Audio Type to achieve maximum performance.
Range
Fac tor y Preset
Very Slow, Slow, Medium, Fast
Patch Med General Slow Deep V. Sl ow
Medium
Is ideal for general detecting when normal 'slow &
low’ techniques are being used.
Fast
Fast is useful when using a fast sweep speed to cover
ground quickly. In these circumstances, a quick
sharp target response is used to alert the operator
to a target. Fast will often have more ground noise
but will allow you to cover more ground in a shorter
amount of time.
Note: The Motion speed also effects how susceptible
the detector is to external interference. Basically the
slower the Motion sp eed, the less interference you wi ll
get, resulting in a smoother Threshold.
If you are using a Fast Motion and the Threshold is too
unstable, you can either select Quiet Audio Type
(pg. 64) o r reduce Gain (pg. 65).
Page 37

68 69Response
Inverting the Pitch
of the Target Signal
/PSNBM4NBMM5BSHFU
3JTJOH5POF
'BMMJOH5POF
*OWFSUFE4NBMM5BSHFU
3JTJOH5POF
'BMMJOH5POF
/PSNBM%FFQ5BSHFU
3JTJOH5POF
'BMMJOH5POF
*OWFSUFE%FFQ5BSHFU
3JTJOH5POF
'BMMJOH5POF
Range
Fac tor y Preset
Normal, Inverted
Patch Normal General Normal Deep Inverted
The Response function allows you to invert the
normal pitch combination of target signals to
different size targets.
If a person is used to hearing a rising and then falling
tone sequence on small targets, and then goes to
deep ground searching big nuggets, the target
signal response can be inverted so that the larger
deep targets are giving the target signal they are
most used to listening for.
Normal
When Normal is selected and a small target is
detected, the pitch normally rises to a higher pitch
and then falls to a lower pitch. When a deep/large
target is detected the pitch normally falls and then
rises.
Inverted
When Inverted is selected and a small target is
detected, the pitch will first fall to a lower pitch and
then rise, and a deep/large target will first rise in
tone and then fall.
Response is a personal preference and is quite
dependant on a person's hearing.
Page 38

70 71Pinpointing
Locating the Target
To find an object and reduce the size of the
hole required to remove it from the ground, it is
necessary to pinpoint the exact location of the
object.
If a target is heard, first confirm it by setting an
accurate Ground Balance away from the target and
then pinpointing. To Ground Balance, if detecting in
Fixed position, hold down the Quick-Trak button and
pass the coil around the area of the target, making
sure that the target is not detected (keep the coil
well away from where the target is). Once completed
release the button.
If detecting in Tracking, move the coil slowly around
the area of the target, keeping well away from the
target itself, then hold down the Quick-Trak button
to go to Fixed and pinpoint across the target.
Double-D Setting Monoloop (M) Setting (wit h DD coil)
Stronges t Signal
When a target is detected, sweep the general area
with the coil, taking note of where the strongest
signal is received.
By shortening the length of the sweep it should be
possible to draw an imaginary line in the ground
where the strongest signal is located.
Line up the target at 90° from the initial direction
and repeat the process. The object is located where
the two imaginary lines cross.
Note: With the Coil/Rx switch set to Monoloop or
Cancel, pinpointing will not locate a target in the
centre of the coil, the target will be slightly to the left.
Stronges t Signal
M
Page 39

72 73Recovering the Target
It is essential to carry at least one of the following
digging tools with you when searching:
- a small, strong digging spade or shovel
- a pick with broad scraping blade
- a crowbar (for very deep objects in hard ground).
Backfill Every Hole You Dig
Always refill any holes and scatter leaves, before
leaving the area. Help restore the area to its
original condition. Any rubbish you recover
should be taken away with you and disposed of
properly.
Refilling holes and removing rubbish will help
detector users maintain a good reputation. This
should lead to more areas being readily accessible
for prospecting.
1 Clear the area of loose surface material and check
that the target signal is still there. If it is not, the
target should be amongst the moved surface
material.
2 Remember if there are other signals close to your
target. This is important so that when you come to
dig your hole, you do not heap the loose dirt on top
of another target already in the ground.
3 If the target signal is still present, use your pick to dig
to a depth of approx. 50mm (2").
4 Sweep the coil over the hole to determine if it has
been dug. If the target signal is not heard, then the
target should be in the pile just dug. Otherwise dig a
little deeper and check again.
5 Start digging approx. 100mm (4") in front of
the target to reduce the chance of damaging it.
Damaging a nugget may reduce its value.
6 If the target signal disappears from the hole, sweep
the coil over the loose dirt and pinpoint its exact
position.
7 Take a handful of the dirt and pass it over the coil.
8 If there is no signal, place the handful carefully in a
new pile, pinpoint the position of the target again,
and repeat with another handful of soil.
9 Once the target is in your hand, transfer half of the
dirt to the other hand. Test each handful of dirt
across the coil.
10 If the target is too small to see, drop the dirt onto
the top of the coil and with your finger move any
suspect objects. A target signal will only be given
when the target is moved.
You r ha nds and wris ts
must be free o f any
metallic jewellery and
watches when passing
dirt over the coil.
When digging, avoid
sharp edges to the
hole as they can
produce false signals,
potentially masking the
target. Slope the edges
of the hole to avoid any
problems.
Page 40

74 75
• Do not try to eliminate what might appear to be
a faint, isolated ground noise by balancing the
detector over the target because you may be
‘balancing out’ the target response from a deeply
buried metallic target. It is better to Ground
Balance around the target without going across it,
then switch to Fixed and try Pinpointing.
• Dig all target signals, even in previously detected
areas. The GPX-4000 has superior ground
balancing and depth so it is possible to find
new targets in well-worked areas where other
detectors have been unable to cope with the high
degree of mineralisation and/or salt.
• In some goldfields, a response may be received
from a concentration of orange/reddish dyke
material or clay. Remember, a metal target will get
louder by moving the coil even centimetres closer.
• If detecting areas of extremely variable
mineralisation, detect along the ground contours
rather than across them. This will often stabilise
the effect.
• In heavily mineralised areas the operator may
need to sweep the coil 10 – 20 mm ( ½" – 1")
above the ground. This should give a more stable
Threshold and less ground noise.
• Very sudden or large changes in the mineralisation
of an area may produce a signal from the detector.
Usually this signal is very broad, and often only
present in one direction.
Follow these hints and
techniques for better
detecting and happy
prospecting that will help
you to utilise the power of
your GPX-4000.
Detecting Tips
Identifying Target Signals
• Metallic targets will usually give a ‘solid’ sounding
signal when the coil is swept across the object
from any direction. A metallic target generally
produces a short, sharp and mostly symmetrical
signal. Ground noises usually give a broad uneven
signal when the coil is swept from different
directions and often may only give a signal from
one direction and no signal on the return sweep.
• If you are not sure if the sound is ground noise
or a target signal, you should investigate. Scrape
a shallow hole about 70 - 100mm (2½" - 4") deep
over the suspected target. Sweep the coil over
the hole at the original ground level. Do not dip
the coil into the hole. If the signal has decreased
in volume or is less def ined, it is probably ground
noise. If the signal remains the same or becomes
louder, it is likely a metallic target. If you are still
not sure, make the hole deeper and repeat the
process.
• A ‘halo effect’, which may be built up around a
buried metal object, makes the object appear to
be larger to the detector than it actually is. This
will be reduced once the target is disturbed from
its position in the ground (e.g. a small object,
detected at a substantial depth, may be more
difficult to detect once disturbed from the ground
and lying in the loose dirt. If the object is reburied,
the ‘halo effect’ will not be present).
For Maximum Gold
Recovery
Keep the coil as close
to the ground as
possible.
Listen carefully.
This is more important
than looking.
Slow down, do not
rush, take your time.
Have a positive mind
set, and imagine a
nugget at every next
sweep!
Remember that
covering a small
section of ground
thoroughly will be
more productive than
randomly searching a
larger area.
Big Gold
Big Gold gives a much
different response to
the smaller shallower
pieces. The signal is
often quite broad, and
there is very little pitch
variance.
False Signals
If false signals are
occurring as you sweep
the coil, check that they
are not produced by
any metal that you are
carrying, such as your
pick, battery or steel toe
boots.
Move the coil closer,
and then further away
from your body, in
order to check if the
signals are coming from
these items. If they are,
increase the distance
between the coil and
these items.
Avoid carr ying metallic
objects in your pants
pockets as these are too
close to the coil.
Page 41

76 77
.POPMPPQ
%PVCMF%
%PVCMF%
4JEFWJFX
The GPX-4000 is supplied
with the 11" Double-D coil.
This coil has an excellent
combination of depth,
sensitivity and stability.
Commander Coils
18" Round Double-D
A serious coil for the serious operator. The
18" Double-D punches deep through heavy
mineralisation, while running smooth to allow you
to hear those mellow, deep nugget responses.
8” Round Monoloop
The most sensitive of the Commander series, the 8”
round provides the best depth on sub-gram nuggets
in light to moderately mineralised soils. A popular
coil for use on old diggings, it is also a great coil for
detecting in heavy vegetation.
11” Round Monoloop
A lighter, more sensitive and deeper seeking coil
compared to its Double-D brother, the 11” Monoloop
is a brilliant coil for almost any situation. The second
most sensitive Commander Monoloop, it is also one
of the most stable Monoloop coils available, and
remains stable in most soil types.
15” x 12” Semi - Elliptical Monoloop
On larger nuggets, this coil has better depth than the
11” Monoloop and the 15"x12" Double-D. It is very
sensitive for its size. This coil is great for searching
open areas for new patches, and also when seeking
out deeper nuggets in areas that are too vegetated
to allow effective use of the 18” Monoloop. It is an
extremely stable coil and runs smooth in all but the
worst soil conditions. This coil has already become a
favourite for many operators.
18" Round Monoloop
Superb depth and good sensitivity in low to medium
mineralisation. This coil will find targets in heavily
worked areas where other operators have given up.
In addition to this there are also a number of
other size coils now available to give improved
performance to your detector. These range from
smaller coils which give greater sensitivity to small
targets and are lighter and manoeuvrable in heavy
vegetation, up to larger coils which give greater
depth.
10” x 5” Elliptical Double- D
This is the coil that every prospector should carry
as its versatility is endless. Great in thick scrub,
heavy mineralisation, and high trash, it has superb
sensitivity, and surprising depth for such a small coil.
It is also great for pinpointing deep targets found
with one of the larger coils, and is extremely stable
in all soils.
15” x 12” Semi - Elliptical Double-D
This coil has greater depth and ground coverage
than the 11” DD, it provides stable operation in
all soils. This is a great coil for all-round use in
highly variable mineralisation, and a lighter, more
manoeuvrable alternative to the 18” DD when
seeking out large nuggets in heavy mineralisation.
Its semi-elliptical design provides impressive
sensitivity for its size.
Page 42

78 79Choosing the Right
Coil for the Job
Coil Size and Depth
A larger coil will typically find targets buried deeper
in the ground, but they can be less sensitive to
smaller targets. A smaller coil is typically more
sensitive to small targets, but does not go as deep as
a larger coil.
Mineralisation
A Monoloop coil will often have improved
performance over a Double-D coil but can be more
difficult to Ground Balance and therefore possibly
more noisy. A Double-D coil is often more stable in
heavily mineralised areas.
Terrain and Vegetation
A small coil can be easier to manoeuvre through
thick scrub or rough terrain. A smaller coil is also a
lighter weight than a larger coil.
Discrimination
In areas where discrimination is required, a DoubleD coil is needed for discrimination to work. In high
trash concentrations, a smaller coil is preferable.
Search Pattern
A Double-D coil will typically provide a 'blade-like'
detection pattern from the toe to the heel of the coil,
which gives excellent ground coverage. A Monoloop
coil has a detection field that is typically cone
shaped, which requires overlapping of sweeps to
ensure thorough ground coverage.
There are five main things
that you should consider
when deciding which coil
is best for your terrain and
target:
Small,
Shallow
Nugget
Large, Deep
Nugget
Highly
Mineralised
Less
Mineralised
Open
Ground
Heavy
Scrub
Iron
Disc.
10" x 5"
Elliptical
Double-D
15” x 12"
Semi-Elliptical
Double-D
18” Round
Double-D
8” Round
Monoloop
11” Round
Monoloop
15” x 12"
Semi-Elliptical
Monoloop
18” Round
Monoloop
In some circumstances,
non Minelab Double-D and
Monoloop coils will work
on the GPX-4000. However,
there are limitations which
means that some functions
will not work properly.
In some cases the use of
coils not designed for the
GPX-4000 may cause the
detector to be unstable and
noisy.
Page 43

80 81Trou bleshooting
No sound
• Check that the detector is on (battery, power
cable, connections and LCD)
• Turn the Threshold control fully clockwise
• Turn the Volume Limit to maximum (40)
• Check that the headphones are plugged in
• Try using a different set of headphones or a
different battery
Threshold but
no target signal
• Try testing different coils with a known target
Random noise
• Ground Balance again
• Retune using the Auto Tune button
• Set the Coil/Rx switch to Cancel
• Reduce Gain
• Move away from other detec tors working nearby
• Move away from thunderstorm build-up
Battery will not charge
• Check that there is power to the accessories
socket using vehicle charger
• Check the fuse in the 12V charger plug (M205-5A)
• Check the battery LED patterns (pg. 20)
Battery not holding c harge
• Try an alternative charger adaptor
• Change the battery
'Coil Overcurrent' screen
appears
• Turn the detector off, wait for a few seconds
before turning it back on again
User Preferences
Main Menu: Range: User Preferences:
Volume Limit 1 to 40
Audio Tone 1 to 100
Signal Peak 1 to 20
Track Speed Slow
Medium
Fast
GB Type General
Specific
Sensitive Extra
Smooth
Iron Reject Off (All Metal)
1 to 30
Battery Volts - -
Manual Tune 0 to 255 -
Mode Edit: General: Patch: Deep :
Audio Quiet
Normal
Boost
Deep
Gain 1 to 15
Motion Very Slow
Slow
Medium
Fast
Response Normal,
Inverted
Page 44

82 83
Hot Rock
An individual rock which has a high
degree of mineralisation in comparison
to the surrounding ground around it.
Due to this difference, the detector
does not have the opportunity to
Ground Balance to the individual hot
rock so therefore gives a false signal.
The signal will diminish rapidly by
increasing the coil height above the hot
rock.
Interference
Electricity or radio waves in the area
being detected can cause instability
or chattering of the Threshold.
Interference commonly occurs due to
power lines, underground cables, radar,
other detectors or climatic conditions
like thunderstorms.
Mineralisation
Most ground contains some minerals,
which can cause false ground signals
to be detected. Heavily mineralised
ground requires different detector
processing than does neutral or lightly
mineralised ground. Ground containing
heavy salt concentrations require
entirely different processing again.
Monoloop Coils
Monoloop coils are the style of coil
where the multiple strands of wire are
wound in a single loop around the
circumference of the coil. The field of
search of Monoloop coils tends to be
cone shaped. They provide greater
depth and sensitivity compared to a
Double-D coil of equivalent size in lowmedium mineralisation.
Non-Ferrous Metals
Metals that do not contain significant
levels of iron. Non-magnetic metals
such as Gold, Silver, Copper, Brass, Lead
or Aluminium.
Pinpoint
The method of determining the precise
location of a target prior to digging.
Pinpointing uses the design of the
search coil windings to determine the
exact position of the detected target.
Rx (Receive)
Refers to the response or
electromagnetic field which is received
back by the coil and is used by the
control box circuitry to detect a metal
item in the ground.
Control Box
This encloses the electronic circuitry
of the detector. The control box
generates the Tx (transmit) signals
sent by the coil and processes the Rx
(receive) signals detected by the coil.
All user selectable functions are located
on the front and rear panels of the
control box.
Discrimination
The ability of a detector to determine
if a located target is made from ferrous
metal (iron or steel) or non-ferrous
metal (non-magnetic).
Double-D Coils
Two windings of wire that overlap in
the shape of two D's (one reversed).
The characteristics of a Double-D
coil are stability, especially in heavily
mineralised ground, good depth and
sensitivity and a very thorough search
pattern.
Electromagnetic Field
Commonly called the 'signal from
the coil'. An electromagnetic field is
generated within the wire windings of
the search coil and this field is pulsed
or sent into the ground. The presence
of a metal target in the ground will
disturb the pattern of this field and this
disturbance is sensed by the receive
system of the detector and indicated to
the operator by an audible 'beep'.
Glossary of Terms
False Signals
These sound similar to target signals
but are caused by other factors.
Common causes for false signals are
incorrect Ground Balance, hot rocks,
signals caused by knocking the coil
on obstacles, etc. With experience,
the operator will learn methods to
minimise false signals and to hear
subtle differences between target
signals and false signals.
Ferrous Metals
Metals composed of or containing
iron. A ferrous item will be attracted
to a magnet and is predominantly or
completely made of iron or steel.
Ground Balance
The ability of the metal detector to
compensate for the effects of ground
mineralisation. The GPX-4000 has
'automatic Ground Balance'. When
Ground Balance is used in the Tracking
setting it continually compensates for
changes in the ground mineralisation.
Halo Effect
After a metal object has remained
undisturbed in the soil for a
considerable amount of time, a
diffusion occurs around the object.
This has the effect of the object
appearing to the detector to be
a larger size.
Page 45

84 85
The GPX-4000 is a
high quality electronic
instrument. Take care
of your detector in the
following way:
Taking Care
of Your Detector
The control box is water resistant, but not
waterproof. Keep all electrical connectors clean
and dry.
The coil may be used in light rain but take care
not to immerse it in water.
The control box and coil should not come into
contact with petrol or other oil-based liquids.
Regularly remove loose dirt and dust from the
control box using a dry paint brush. Clean the
detector shaft and coil with a damp cloth using a
mild soap detergent. Do not use solvents.
The coil housing will eventually wear through if you
scrub the ground with it while searching. Use of a
replaceable skid plate will help to protect your coil.
Regularly replace such items as coil washers and
skidplates to increase the life to your detector.
To prevent dirt entering between the coil and the
skidplate, silk tape, e.g. Leukosilk®, which is available
from chemists, may be used. The use of some other
carbon based tapes, e.g. insulation tape, may result
in some loss of sensitivity.
Do not expose the detector to high temperatures
or leave it in the sun for longer than is necessary.
Shading will help protect it. Do not leave the
detector in a closed vehicle, especially in the sun.
Do not open the control box as this will void your
warranty. All control box, battery and coil repairs
should be sent back to Minelab or a Minelab
authorised repairer.
(Taking Care of your Battery, pg. 21)
Salt Mineralisation
Salt content in the ground causes a
negative (–) response rather than the
positive (+) response of laterite soils.
A large salt content in the ground will
have a different effect on the detector
than other types of mineralisation.
Therefore the detector needs to
use different filtering techniques to
overcome this effect.
Search Coil
The search coil is the circular plate
which is swept across the ground
surface during detecting. It transmits
electromagnetic signals into the
ground and receives the response.
Search Pattern
The search pattern is the area of ground
underneath the coil which is being
scanned. Depending on the style of
coil (Double-D or Monoloop) and the
Coil/Rx setting being used (DoubleD/Monoloop/Cancel), different coils
will have a different shaped area being
covered by each sweep.
Threshold
The continuous audible level of sound
emitted by the detector is referred to
as the Threshold. Threshold can be set
anywhere between silent and loud,
but a soft, audible level is normally
suggested.
Tar get Sig nal
This is a change in the tone (pitch) and
volume of the Threshold when a target
is detected and not discriminated
(rejected).
Tra ck ing
The function of automatic Ground
Balance where the detector makes
continuous adjustments to the Ground
Balance to compensate for changes in
the mineralisation of the ground.
Tx ( Tran smi t)
This refers to the transmit signals or
electromagnetic pulses, sent into the
ground by the coil.
Glossary of Terms
(Continued)
Page 46

86 87Warranty
The GPX-4000 control box has a 2 year warranty
covering parts and labour.
The GP series / Commander coils have a warranty for
one year against malfunction.
The commencement of the warranty is the date of
purchase. Refer to the Product Warranty card for
specific details.
The Minelab warranty does not cover damage
caused by accident, misuse, neglect, modifications
or unauthorised service.
This warranty is not transferable. The enclosed
warranty registration card needs to be returned
to Minelab Electronics Pty. Ltd. or an authorised
Minelab Electronics Pty. Ltd. regional distributor
within 14 days of the original purchase date.
If you need to return your detector to Minelab for
service, please fill out the Minelab Service Repair
Form. Please supply your name, address and phone
number along with purchase date and serial number
when sending detector parts for repair. Supply as
much detail about the fault as possible to assist our
service engineers to rectify the problem quickly and
efficiently. Return the form with the detector / parts
in a cardboard box for protection.
Do not open the control box as this will void your
warranty.
It is the responsibility of the owner to pay all
transport costs for the detector to Minelab.
The repaired detector will be returned to the owner
freight free.
Technical Specifications
Transmission Bi-Level Pulse Induction
Technology MPS Dual Voltage Technology
Coil (Standard) 11" Round Double-D
Audio Output 6.35mm (¼") headphone socket
Headphones supplied
LCD 64x128 pixels
Non-backlight reflective
Length Extended: 1300 mm
Unextended: 1100 mm
Weight Including 11" Coil,
(Excluding Battery and Accessories)
2.4 kg
Operating temperature range 0°C to 45°C
Storage temperature range -20°C to +65°C
Typ e L ithi um I on
Output Voltage 7.4VDC, 8.4V DC when fully charged.
Max discharge current is 1A
Capacity 9.2 Ah
Input (Charge) 12-24V DC / 2-3 A
Weight
870g
Operating temperature range 0°C to 45°C
Storage temperature range -5°C to 65°C max, preferred: 5°C to 25°C.
Battery charge temperature range: 0°C to 45°C
Battery
Detector
Page 47

Tod ay’s Date
Detector / Model
Serial Number
Purchased From
Purchase Date
Faulty Part (s)
Owner’s Name
Address
Telephone ( ) Day Home
Fax ( )
Email
Service Repair Form
Description of Fault
cut out or photocopy
Please explain how we can replicate the problem in order to fix your detector.
 Loading...