

Page 1
5
Quickstart
However experienced you are at using a
metal detector, it is important that you
read this chapter to understand how to
use the Explorer II in Quickstart mode.
THE MINELAB EXPLORER II
5
QUICKSTART
37
Page 2

www.minelab.com
5
QUICKSTART
THE MINELAB EXPLORER II
GETTING STARTED
Now that your detector is assembled, batteries inserted and you are familiar with the control
panel, you should be ready to start detecting. This chapter on Quickstart is designed to be
the starting point for all users of the Explorer II.
Introducing Quickstart
POWER
P0400-B
P0400b
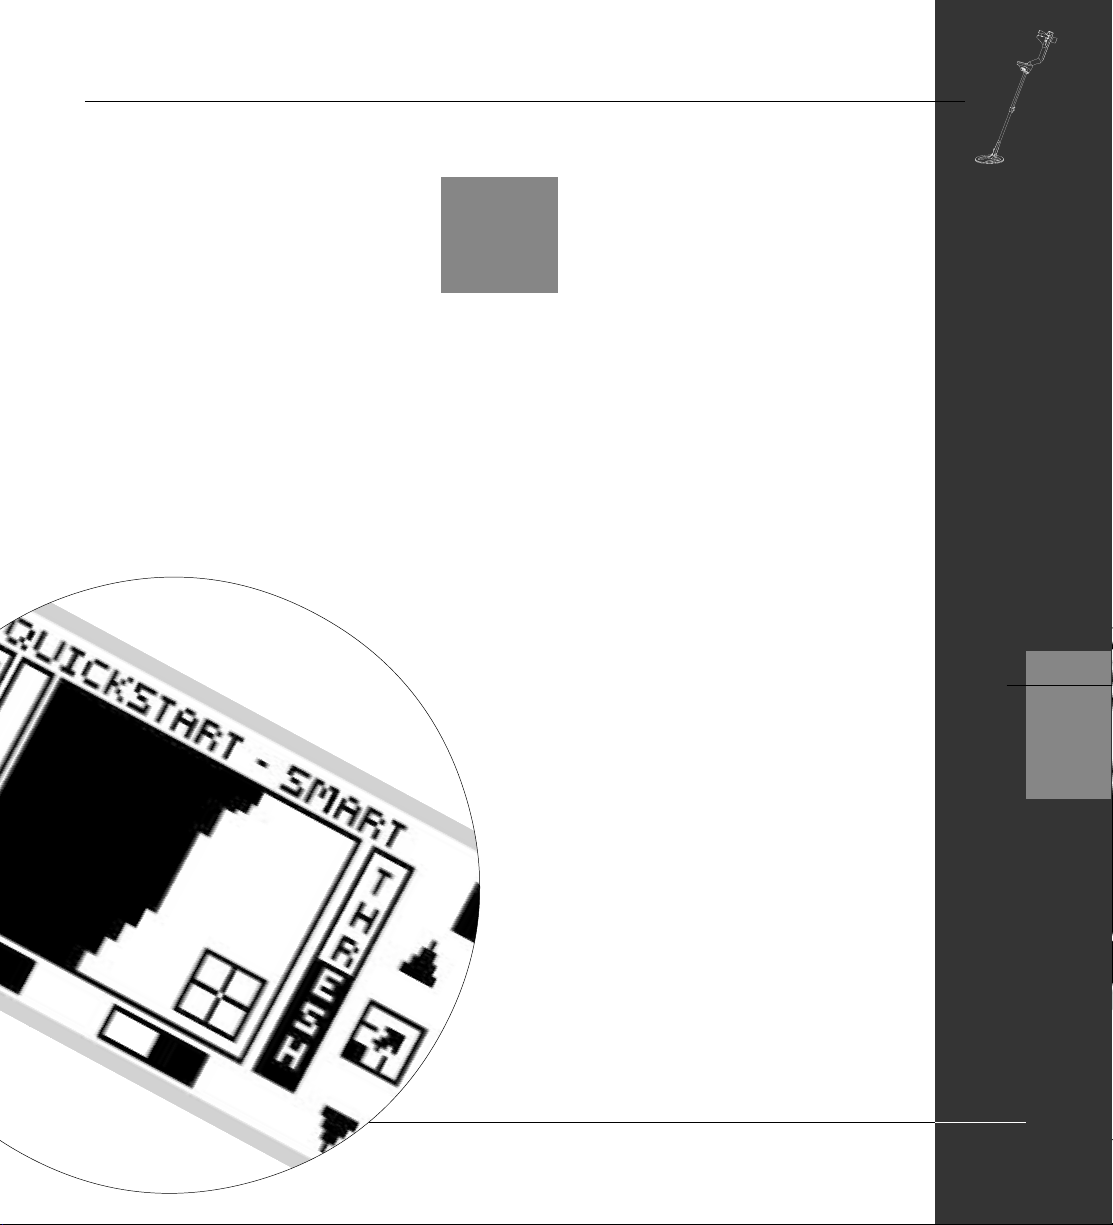
Figure 5.1 Quickstart’s opening screen
Display memory
The Explorer II’s factory setting is
to start in Smartfind for your first
detecting session.
If the alternative Digital display is
the last used, the Explorer II opens
with this screen next time you turn
on the detector. It also retains all
adjustments to
settings made in the previous
session (including those
made in Smartfind).
Figure 5.1
When you first turn on the Explorer II, the Quickstart Smartfind
display will appear and you are able to begin detecting. The
detector is prepared to respond to non-ferrous targets while filtering
out ground signals.
The following pages in this chapter outline the basics of metal
detecting and use of the Explorer II. Y ou will learn how to interpret
its responses to targets and make your own adjustments to the
settings.
Regardless of your level of experience with metal detecting, Minelab
recommends you begin in Quickstart mode to familiarize yourself with
basic features and operation before experimenting with the
detector’s advanced features (detailed in Chapter 6: Advanced
Use).
A number of additional functions and features that are likely to be
accessed frequently while detecting are also explained.
These include:
• Target SENSITIVITY and THRESHOLD levels, adjusted with
shift buttons
• IRON MASK and PINPOINT, activated by shortcut buttons.
• MENU functions, accessed from the control panel shift
buttons. These enable you to adjust the display and audio,
define targets and move into Advanced mode.
38
GETTING STARTED
Page 3

BEGINNER USE
THE MINELAB EXPLORER II
CORRECT
INCORRECT
Figure 5.2 Sweeping the coil
Audio Overload
Sometimes it is possible that a
large object close to the search
coil will overload the detector’s
electronics. When this happens,
the Explorer II emits a low ‘warble’
which will repeat until the coil is
moved away from the source of the
overload.
Trying out the detector
Figure 5.2
Don’t try this at home!
If you attempt to begin detecting while you are inside your home,
you will quickly find that there are many metallic objects (such as
nails or reinforcing in the floor) which will result in almost
continuous detection. There will also be interference from TV sets
and other household appliances. Placing the sensitive detector coil
near large metallic objects can result in temporary saturation of the
sensor, meaning that it then cannot detect small objects. Therefore
it is best to turn your detector off and head outside, as far away as
P0265-A
you can from sources of electromagnetic disturbance.
Sweeping the coil
The Explorer II will perform at its best when the coil is kept in close
proximity to the ground. This will increase detection depth and
response to small objects. Becoming practised at sweeping the
coil is very important, as variation in coil height at the end of each
swing can cause confusing sounds and reduce detection depth.
Each sweep of the coil should overlap the last one (Figure 5.2).
This will ensure good ground coverage.
You think you’ve found something?
When an object is detected, the Explorer II emits an audio response
and visually displays a target classification on the control panel’s
screen.
Before you attempt to pinpoint or recover the object –
which is explained later in this chapter – it is vital you
understand how to interpret these audio and visual
responses.
This is explained over the next few pages.
5
QUICKSTART
BEGINNER USE
39
Page 4

www.minelab.com
THE MINELAB EXPLORER II
QUICKSTART DISPLAY
easy reference
The Quickstart display visually represents everything from target details to the
Explorer II’s operating settings. Quickstart’s Smartfind display (pictured below)
and alternate Digital display share many common elements.
5
QUICKSTART
10
8 8
1
3
5
4
6
2
7
9
40
QUICKSTART DISPLAY
Page 5

QUICKSTART DISPLAY
easy reference
THE MINELAB EXPLORER II
Sensitivity level. The sensitivity bar and
1
numbers indicate how responsive the detector is
to a target in the presence of ground noise and/or
electromagnetic interference. Numbers range
between 1 and 32. When the shift button next to
the number is pressed the detector moves
between semi-auto and manual sensitivity. See
page 49 for details.
Threshold level. The threshold setting controls
2
the audible level of threshold ‘hum’ during
detecting. When the shift button next to the
adjustment arrow is pressed, the threshold hum
increases or decreases. See page 50 for details.
Depth indicator. The clear portion of the depth
3
indicator represents the approximate distance of
a target below the coil. The top of the indicator
represents the position of the coil and the bottom
represents 300mm (12 inches) from the coil. The
bar will be clear if the target is too far from the
coil or its depth cannot be accurately gauged.
4
Iron Mask. This shaded block indicates whether
IRON MASK function is ON or OFF.
See page 45.
Smartfind display. The shaded and unshaded
5
areas of the screen are Smartfind’s preset
Discrimination setting. Smartfind also has an
alternative Iron Mask setting. See pages 42-43.
Pinpoint. This shaded block indicates whether
6
PINPOINT is ON or OFF. See page 59.
Battery life. This icon indicates the charge remaining
7
in the installed batteries. See page 27.
Adjustment arrows. Pressing shift buttons next to
8
these arrows increases or decreases preset
settings.
Full screen icon. Selection enlarges display to fill
9
screen. See page 48. This icon temporarily
changes to show the threshold level setting when
threshold is being adjusted.
Target crosshair. Represents the detected
10
object’s properties on a two-dimensional scale of
discrimination. See page 42-43.
5
QUICKSTART
QUICKSTART DISPLAY
41
Page 6

www.minelab.com
THE MINELAB EXPLORER II
QUICKSTART’S SMARTFIND DISPLAY
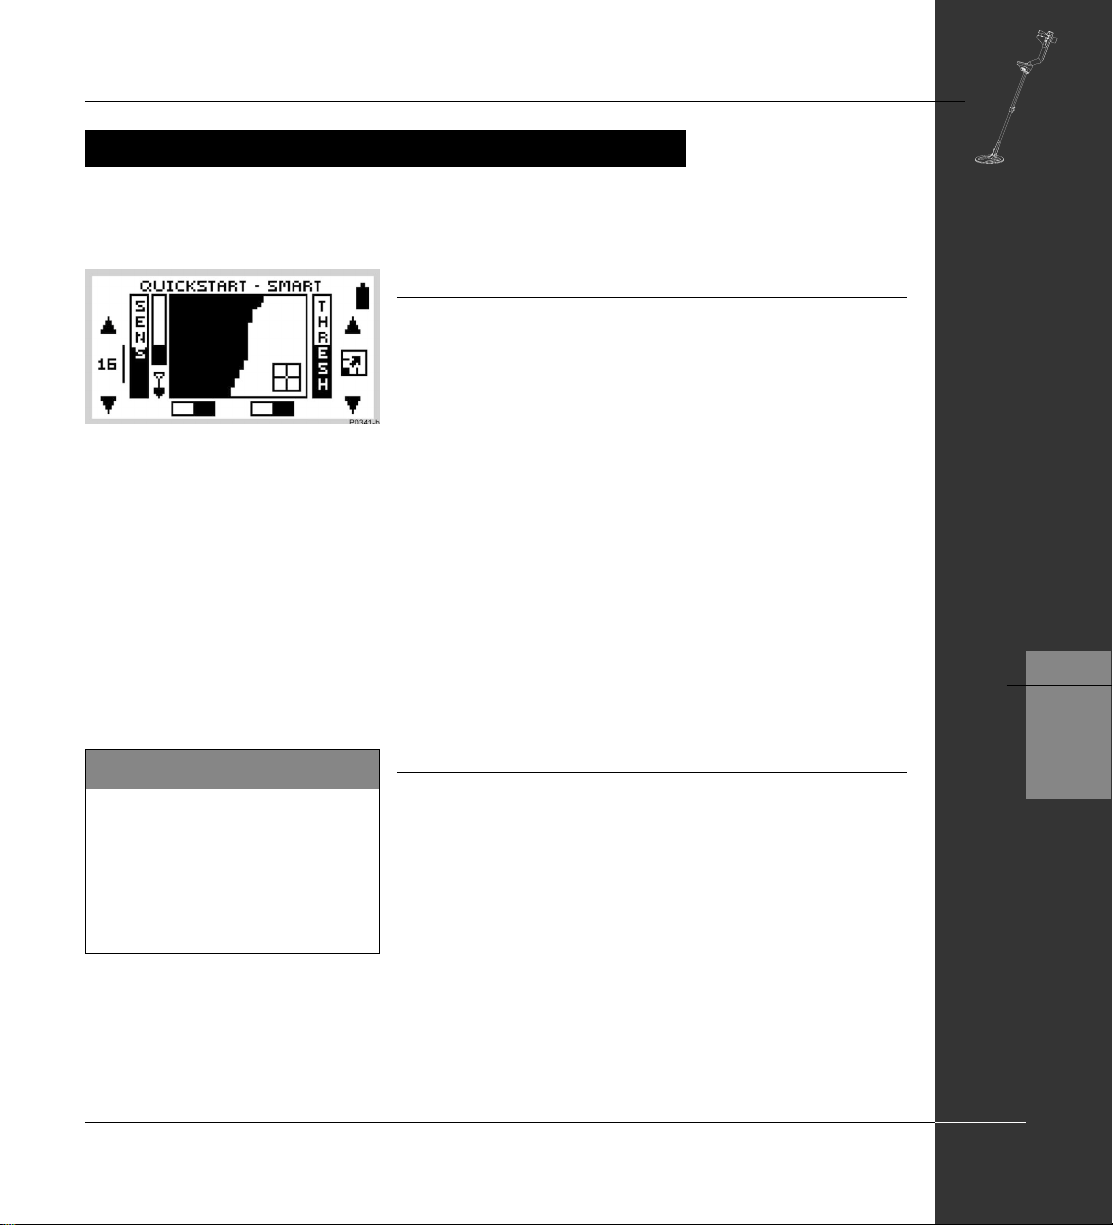
When first using the detector, you will see the Smartfind screen. Smartfind displays an
object's characteristics using a two-dimensional scale of target discrimination.
Two-dimensional discrimination
Figure 5.3
When an object is detected, Smartfind indicates what kind of
object you have found with a target crosshair. The location of this
crosshair on the Smartfind screen is based on Minelab's unique
Figure 5.3 Smartfind display with preset
Coins discrimination pattern
two-dimensional scale of discrimination. An understanding of this
will be helpful before Smartfind's Iron Mask and Discrimination
functions are explained in the next few pages.
Two-dimensional discrimination explained
5
QUICKSTART
42
The Explorer II rates detected objects according to their conductivity
(like most traditional detectors). What makes two-dimensional
discrimination unique is a rating of the same object's ferrous
content. Smartfind graphically represents both of these target
properties on the same display.
• The vertical dimension (or axis) rates the object on size/
conductivity.
QUICKSTART’S SMARTFIND DISPLAY
Page 7

THE MINELAB EXPLORER II
Discrimination
Discrimination is the ability of a
metal detector to identify the user’s
desired target (e.g. jewelry) and
eliminate signals from unwanted
material (e.g. nails).
The Explorer II can be programmed
in a number of ways to discriminate
against unwanted targets in different
types of ground.
• The horizontal dimension (or axis) rates the extent of the
object’s resemblance to ferrous characteristics.
• The object’s cross-referenced rating is represented by a
‘target crosshair’ inside the rectangular display area.
Interpreting target responses
Conductivity
• Objects with high conductivity (e.g. large silver coins, copper
items) will cause the target crosshair to appear at the top of
the Smartfind screen.
• Objects with low conductivity (e.g. small alloy coins, foil) will
cause the target crosshair to appear at the bottom of the
Smartfind screen.
Along with the type of metal, the size of objects will have some
effect on the conductivity rating for targets. Generally , the larger
the target, the higher the corresponding conductivity rating (and
proximity of the target crosshair to the top of the screen).
Ferrous content
• Objects with high ferrous content cause the target crosshair
to appear on the left of the screen unless its rating would
situate the object in the dark area of the discrimination pattern
(see page 44).
5
QUICKSTART
• Objects with low ferrous content (e.g. jewelry, coins) cause
the target crosshair to appear on the right of the screen.
The preset discrimination setting is designed to search for Coins.
NOTE Both ferrous and non-ferrous objects have varying
degrees of inductive response to electromagnetic waves.
This characteristic – in addition to conductivity – allows for
more accurate identification of targets.
QUICKSTART’S SMARTFIND DISPLAY
43
Page 8

www.minelab.com
THE MINELAB EXPLORER II
Introducing Discrim
Discrim (an abbreviation of Discrimination) instructs the detector to
accept some types of targets and reject others. It uses Smartfind's
two-dimensional discrimination, allowing you to specify one or more
target patterns for detection.
5
QUICKSTART
Figure 5.4 Smartfind’s preset Discrim
function
Smartfind Discrimination pattern
Figure 5.4
When you begin in Quickstart, you will see a Smartfind display
resembling Figure 5.4. This display shows that the detector is
ready to operate in its preset Coins Discrim function.
The discrimination pattern represents the typical characteristics of
non-ferrous coins (actually a composite of hundreds of coins from
around the world). When the search coil passes over an object
matching the conductive and ferrous characteristics of coins, the
target crosshair will appear in the clear area and a target response
will sound. Objects outside of the accepted (clear) area are not
displayed and the threshold ‘hum’ is temporarily silenced. The target
crosshair will remain locked in the position of the last accepted target.
The discrimination pattern 'maps' the specific ferrous and conductive
properties of coins, providing excellent accuracy in detection of this
particular type of target.
NOTE Quickstart offers a range of discrimination patterns
which may be used on their own or in combination. This is
detailed in Selecting Targets, page 62.
44
QUICKSTART’S SMARTFIND DISPLAY
Page 9

THE IRON MASK
THE MINELAB EXPLORER II
Adjusting the Iron Mask
Figure 5.5
Pressing the IRON MASK shortcut button on the control panel will
display the Iron Mask adjustment screen.
Figure 5.5 Adjusting the Iron Mask
Iron Mask Shortcut
The Iron Mask shortcut button on
the control panel allows you to
switch between Iron Mask and
Discrimination.
Before you experiment with this,
an understanding of the features
of these functions will greatly
assist in deciding which will
locate the kind of targets you want
and how to adjust the Explorer II
to suit your preferences.
Preset Level
The Explorer II's Iron Mask is set at a rating of -6. This is suitable
when detecting non-ferrous metals.
Detecting more ferrous objects
If you want target responses from more ferrous objects (e.g. war
relics) it is necessary to reduce the level of ferrous rejection. This
is done by pressing the bottom left shift button next to the slider
control, reducing the extent of the Iron Mask. You may need to
experiment a little with the settings.
Detecting all ferrous objects
If you wanted to detect all objects, regardless of ferrous content,
ferrous rejection can be reduced to a minimum level of -16. The
screen will be completely clear and all objects will sound a target
response.
Rejecting all ferrous objects
If you want target responses to be suppressed for all ferrous
objects, the Iron Mask may be increased to a level of 0. This is
represented by the mask extending to half way across the
Smartfind screen (as depicted in the section explaining
two-dimensional discrimination, see page 42).
5
QUICKSTART
The tutorials featured later in this
chapter also assume a basic
understanding of Iron Mask and
Discrimination functions.
45
THE IRON MASK
Page 10

www.minelab.com
THE MINELAB EXPLORER II
Figure 5.6 Smartfind in Iron Mask
Operating in Iron Mask
Figure 5.6
Pressing the IRON MASK shortcut button again will display a
Smartfind screen resembling Figure 5.6. This display shows that the
detector is ready to operate in Iron Mask. This function is
programmed to reject ferrous targets and make it easier for you to
find more desirable (non-ferrous) objects like coins and jewelry .
Iron Mask is preset to reject ferrous objects at a level suitable for
basic detecting. This is shown in Figure 5.5 as a rating of -6 with
the dark area filling the left third of the screen. Smartfind will not
display an object when its target crosshair would appear in this
dark, masked area of the screen and the ExplorerII’s threshold
‘hum’ will disappear momentarily .
However, if you wish to locate specific types of objects you may
need to modify the ExplorerII's level of ferrous rejection. This is
done by adjusting the Iron Mask as explained previously on page
45.
5
QUICKSTART
46
THE IRON MASK
Page 11
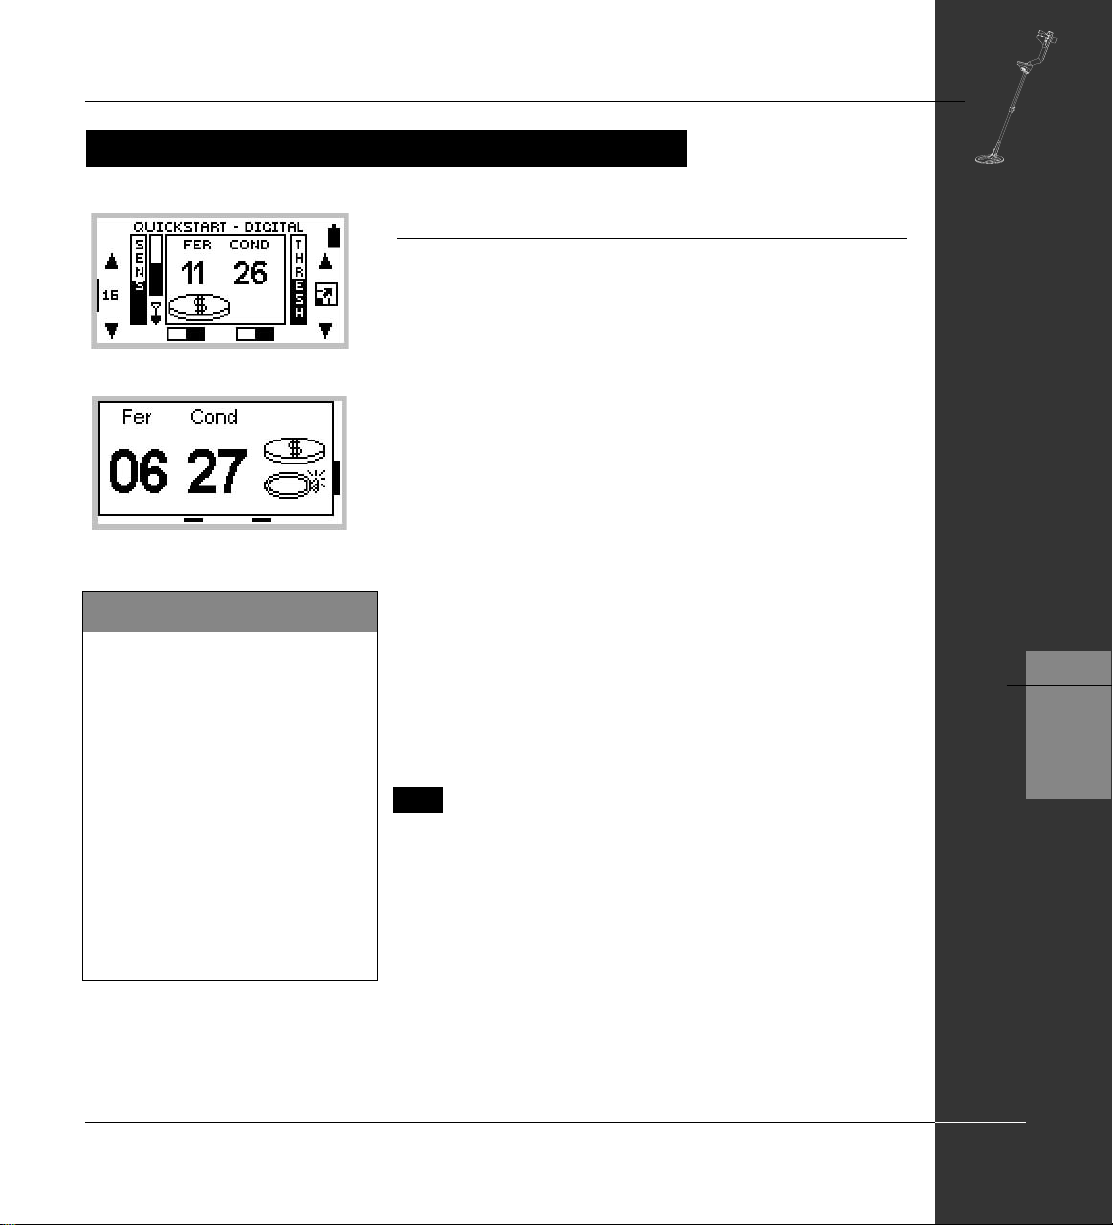
QUICKSTART’S DIGITAL DISPLAY
Digital display
Figure 5.7, 5.8
When the Smartfind screen is displayed, pressing the DETECT
shortcut button on the control panel switches to the Explorer II’s
P0611-A
Figure 5.7 Quickstart’s Digital Display
P0612-A
Figure 5.8 Digital as full screen display
Preferred Display
alternative Digital display.
The display rates both the ferrous content and the conductivity of an
object with numbers from 0-31. The number for ferrous content is
under the label ‘Fer’ and that for the conductivity is under the label
‘Cond’. A value of 0 represents low ferrous content and 31
represents high ferrous content. Similarly, 0 represents low
conductivity and 31 represents high conductivity.
The right of the digital read-out you will see an icon representing the
possible target and, in full screen display, a list of displaying up to
three possible target classifications.
THE MINELAB EXPLORER II
The Explorer II remembers which
display was last used in your
detecting. If this happens to be
Digital, this display will appear
next time you turn on the detector.
It should be noted that any
adjustments to discrimination that
are made in Smartfind will be
retained and used in Digital.
It is important to note that the discrimination settings (either the
current Discrimination Pattern or the Iron Mask are still active and
targets outside the accepted area will not update the display. If you
want to adjust the discrimination, simply press the DETECT button to
return to the Smartfind display.
HINT The digits shown in Digital display are a numeric
estimation of the horizontal and vertical position of the
target crosshair displayed in Smartfind mode (that is, its
ferrous and conductivity rating).
As you familiarize yourself with each display, try switching
from one to the other to compare the results.
QUICKSTART’S DIGITAL DISPLAY
5
QUICKSTART
47
Page 12

www.minelab.com
5
QUICKSTART
THE MINELAB EXPLORER II
MODIFYING THE DISPLAY
Figure 5.9 Quickstart’s standard screen
Figure 5.10 Quickstart as full screen display
Full screen display
Figure 5.9, 5.10
If you wish to enlarge the Smartfind or Digital display during
detecting, it is possible to instruct the detector to remove the display
border and other screen elements leaving only the target details
displayed on the full screen.
STEP 1 Press the shift button next to the full screen icon at the right of
the control panel. This will increase the viewing area from
that depicted in Figure 5.9 to that in Figure 5.10.
STEP 2 T o return to the original screen, press the same shift button
again (next to the small bar at the edge of screen).
Adjusting the display contrast
Figure 5.11, 5.12
If brighter or more overcast conditions make the detector display
harder to see, it is possible to adjust the display contrast.
48
Figure 5.11 Quickstart’s Main Menu
Figure 5.12 Display menu’s contrast
adjustment screen
MODIFYING THE DISPLAY
STEP 1 Press the MENU shortcut button on the control panel. This
will display the MAIN MENU (Figure 5.11).
STEP 2 Four menu items will be displayed, each with a
turned-down corner. This indicates a following screen.
STEP 3 Press the shift button next to the DISPLAY option. To denote
selection, the box will fill in with solid black and a new screen
with a slider control will appear (Figure 5.12).
STEP 4 Press the shift buttons next to the arrows of the slider control
to change the contrast of the screen display from the factory
setting of 6.
STEP 5 Press the DETECT shortcut button again to continue
detecting.
Page 13

ADJUSTING SENSITIVITY
Noise Cancel
So that you can detect in best
conditions, we would advise you to
always choose the channel with
least interference before beginning
your detecting session.
If the detector becomes noisy and
you suspect electromagnetic
interference, change to a better
channel before adjusting
sensitivity.
To do this automatically, press the
Noise Cancel shortcut button, or
manually select the least noisy
channel.
THE MINELAB EXPLORER II
Sensitivity control
The sensitivity bar indicates how responsive the detector is to a
target in the presence of ground noise and/or electromagnetic
interference.
The degree of sensitivity is increased by pressing the top shift
button and decreased by pressing the bottom shift button (on the
left side of the control panel). Pressing the center left shift button
switches between semi-auto and manual sensitivity.
Semi-auto
A line cycling around the number indicates that the detector’s
sensitivity is in semi-automatic mode. In this mode, the detector
continuously monitors the environmental conditions and will adjust
actual detector sensitivity as close as possible to your specified
level of stability, depending on these conditions.
Manual
In the manual mode (where the line does not cycle around the
number) the adjustment controls the sensitivity directly. This mode
is suitable for the beach and very quiet (unmineralized) ground.
Manual sensitivity is also recommended for high trash areas when
best results are obtained by sweeping the coil very slowly.
A high manual number is preferable for stable conditions with low
interference. A low number is suggested for very variable, ‘noisy’
conditions.
Adjusting sensitivity
The highest sensitivity setting (32) is suitable in only the least
‘noisy’, most stable environments. Decreasing sensitivity will
stabilize the detector where it is affected by noise or interference,
but will marginally affect depth penetration and detection of small
objects. This may still be preferable to operating with excessive
background ‘chatter’.
5
QUICKSTART
ADJUSTING SENSITIVITY
49
Page 14

www.minelab.com
5
QUICKSTART
THE MINELAB EXPLORER II
ADJUSTING THRESHOLD
Display Icon
The icon between the adjustment
arrows for threshold is not
related to this function. It
changes the display to full screen
(explained on page 48).
Threshold control
The Explorer II usually emits a constant tone or threshold ‘hum’ in
the absence of a target. The threshold setting controls the audible
level of this sound during detecting. Minelab recommends setting the
threshold to a comfortable audible level in the early stages of your
detecting session, as this feature is designed to highlight the
variations in signal response which often indicate detection of a
target.
Threshold level is increased by pressing the top shift button and
decreased by pressing the bottom shift button (on the right side of
the control panel). A number corresponding to the threshold level
will appear temporarily between the two adjustment arrows.
Preset threshold
The preset level of 20 will usually emit a constant threshold hum.
This level is programmed to enable audible response to most target
signals.
Suggested threshold setting
Everyone’s hearing is different, so Minelab suggests that your
preferred level of threshold be set to a very low, but still audible
level. The threshold setting may need to be adjusted when moving
from speaker to headphones.
Reducing threshold
With the level set at 8, there will usually be no constant threshold
hum. Adjusting the level to 0 will ensure silent operation but could
mask audio response to small targets.
50
Increasing threshold
The threshold hum will become louder as the threshold level is
increased. Small target responses will become difficult to discern
as threshold nears a maximum setting of 40 when there is certain to
be a persistently loud threshold hum.
ADJUSTING THRESHOLD
Page 15
THE MINELAB EXPLORER II
AUDIO RESPONSE
The Explorer II emits a target audio response that varies in pitch and volume depending
on what type of object it detects.
Pitch of response
Figure 5.13
Generally, a target that is highly conductive (e.g. a large silver
coin) emits a high pitched signal. A low pitch is sounded for less
conductive targets. Large targets or targets close to the ground
Figure 5.13 Target sounding response
surface emit a louder signal.
In Quickstart’s preset function, Coins Discrimination, the target
audio response is emitted if a target is predominantly non-ferrous –
when the target crosshair is displayed in the clear part of the
Smartfind screen (Figure 5.13).
As you detect different targets you will quickly find it easy to
identify objects by the audio and visual responses of the Explorer II.
Directions for familiarizing yourself with specific target responses
appear toward the end of this chapter.
5
QUICKSTART
Headphones Caution!
When using headphones, volume
level should be adjusted to protect
your hearing from excessive
sound.
Adjusting the volume
The preset volume control on the Explorer II is turned up to
maximum volume. This is usually appropriate with either the
detector’s built-in speaker or headphones. If the volume is too loud
in the headphones, use the volume control.
Main Menu > Audio > V olume > Max. Limit can be set to reduce
potentially loud signals (see page 54).
51
AUDIO RESPONSE
Page 16
www.minelab.com
5
QUICKSTART
THE MINELAB EXPLORER II
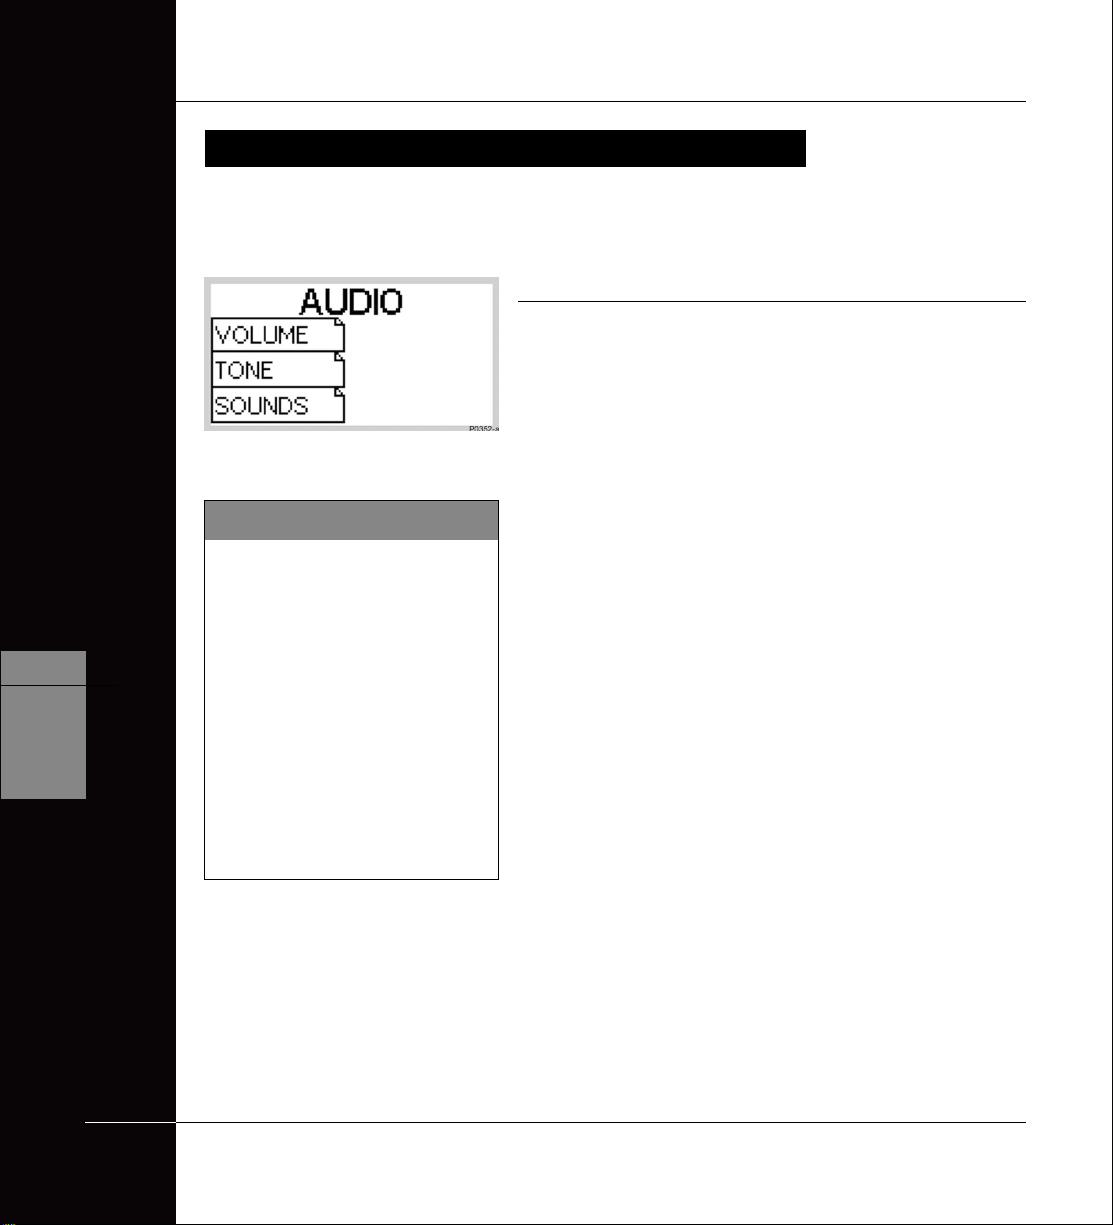
AUDIO MENU
Features accessed through the Audio menu allow you to define the various audio
properties of your Explorer II.
Introduction to the Audio menu
Figure 5.14
Main Menu > AUDIO
As mentioned earlier in the section on Audio Response, the
Explorer II emits a target signal that varies in volume and pitch
Figure 5.14 The Audio menu
Headphones
Use of the Explorer II with
headphones will allow you to
discern subtle variations in audio
response and lessen exposure to
adverse conditions (i.e. wind)
which may distort sound from the
speaker. Headphones also minimize
disturbance from your treasure
hunting for other people in the
area.
depending on the object it detects. Generally, large targets or
targets close to the ground surface emit the loudest signal.
A target that is less conductive emits a low pitched signal and a
highly-conductive target emits a high pitched signal.
The AUDIO menu allows you to modify the detector’s operating
VOLUME, TONE and define the SOUNDS emitted to lend greater
refinement to audio responses.
52
AUDIO MENU
Page 17
AUDIO: ADJUSTING THE VOLUME
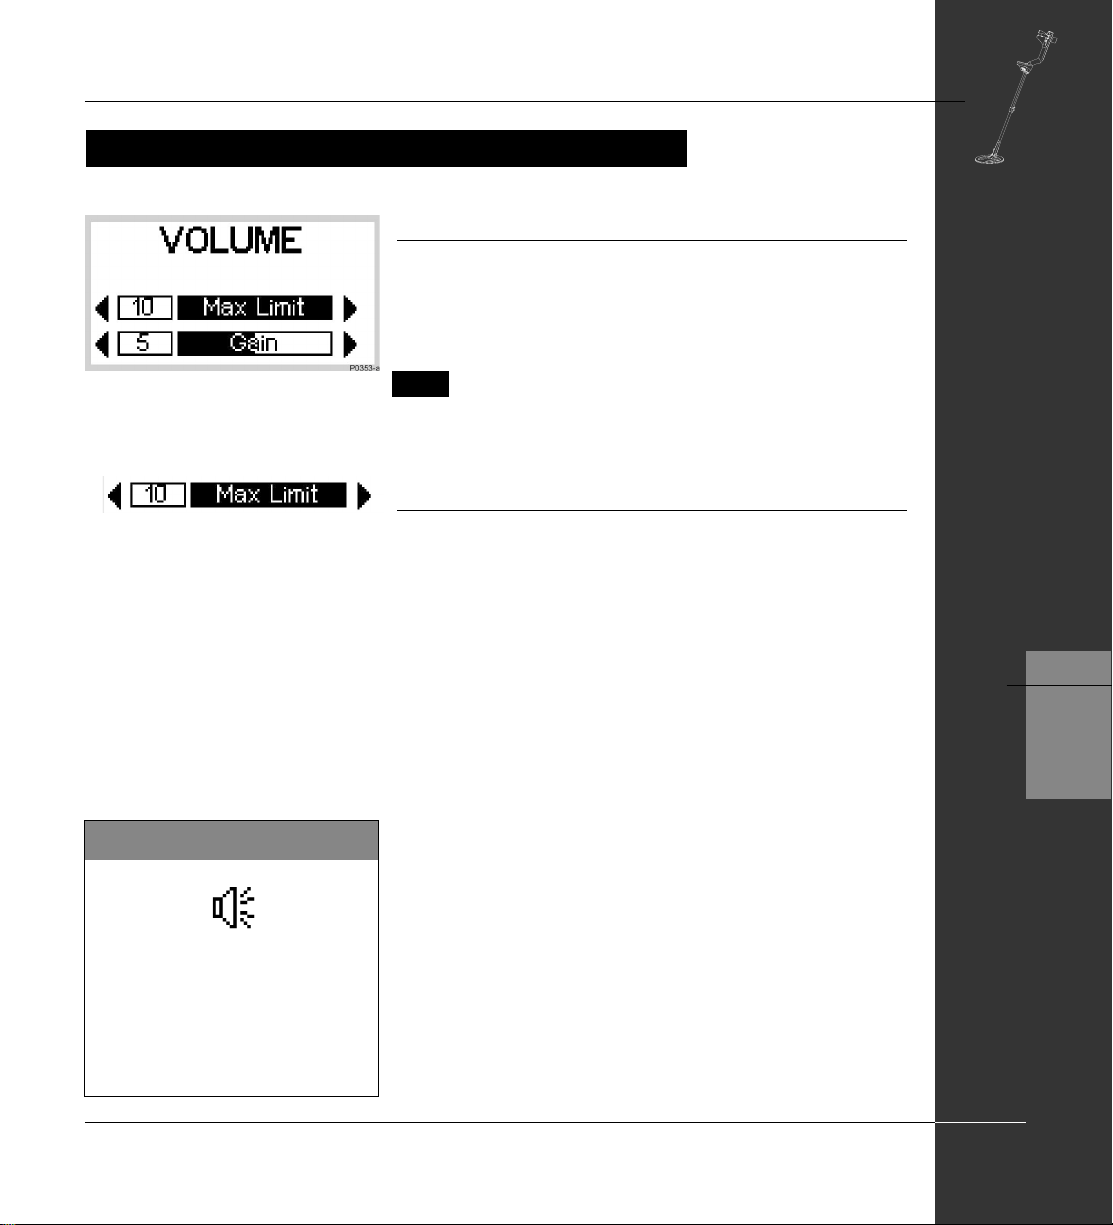
Introducing Volume
Figure 5.15
Main Menu > Audio > VOLUME
The VOLUME screen of the Audio menu displays two slider
controls: MAX LIMIT and GAIN (Figure 5.15).
Figure 5.15 Volume adjustment screen
NOTE To test sounds upon selection it is necessary to
move the coil across the target.
Max limit
Main Menu > Audio > Volume > MAX LIMIT (adjustment)
This setting is the detector’s overriding volume control. It controls
the ‘loudness’ of a signal response emitted from the detector ,
much like the volume knob on a stereo system.
THE MINELAB EXPLORER II
Volume
It is also possible to access the
volume menu (see page 71) from the
icon shortcut of the Advanced
mode’s LEARN screen.
A setting of 0 instructs the detector to be completely silent.
A setting of 10 instructs the detector’s audio to operate at its
maximum level of ‘loudness’.
Lower settings are likely to help extend battery usage time.
(Continued next page)
AUDIO: ADJUSTING THE VOLUME
5
QUICKSTART
53
Page 18
www.minelab.com
5
QUICKSTART
THE MINELAB EXPLORER II
Normal alisasing
5
Figure 5.16 Volume gain settings Figure 5.17 Volume gain preset
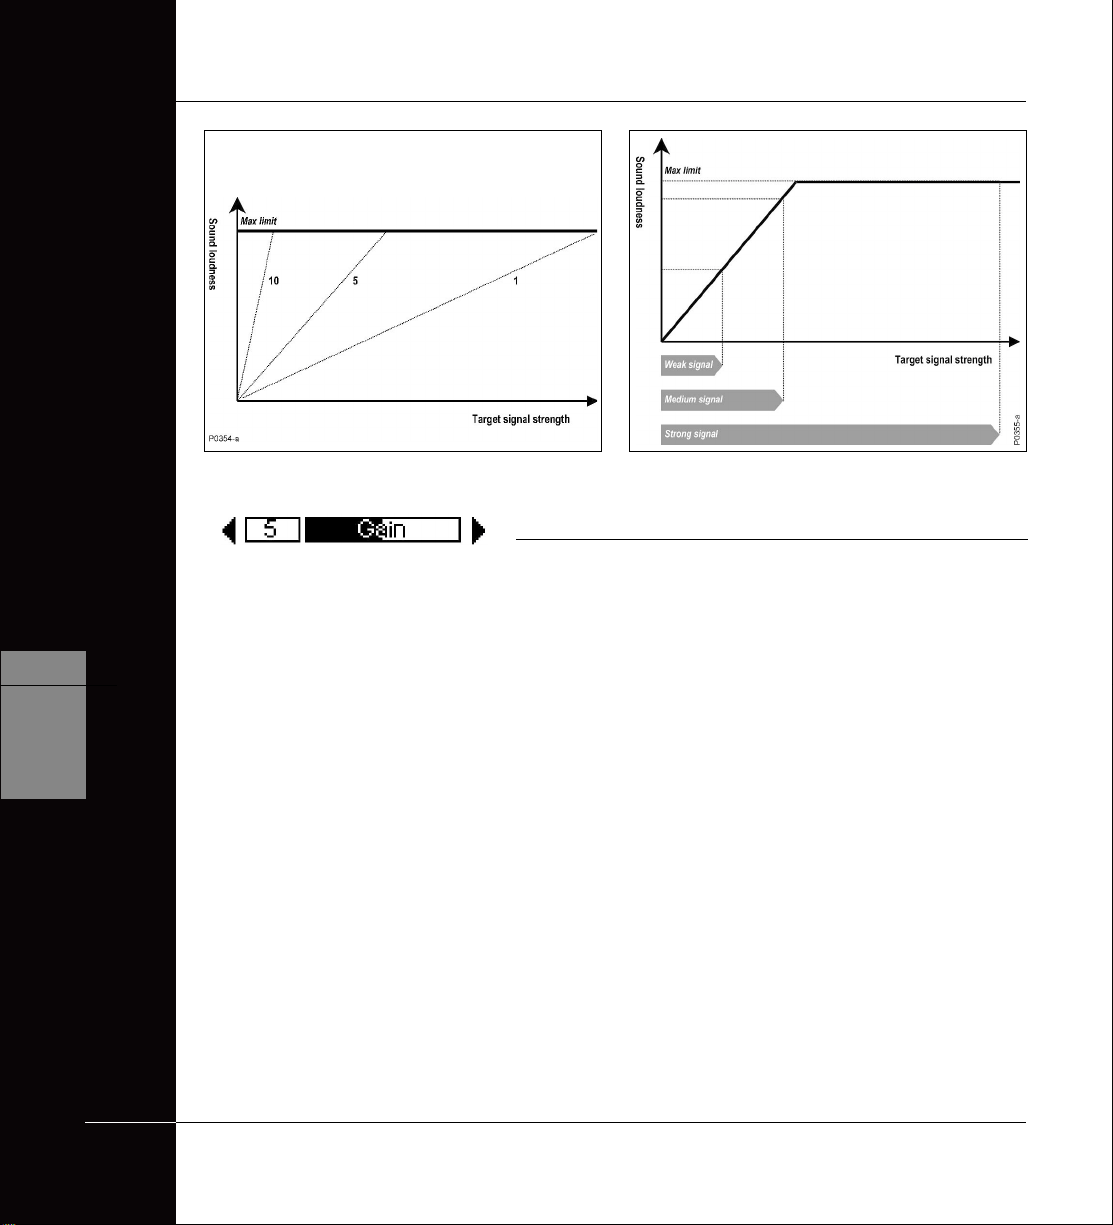
Gain
Figure 5.16, 5.17
Main Menu > Audio > Volume > GAIN (adjustment)
Volume gain affects the way the detector amplifies target audio
responses in respect to the strength of the original signal.
Looking at figure 5.16, it is clear that with a setting of 1 the sound
produced will be proportional to the strength of the signal for the
whole range of signals. Based on this and the depth indication,
some information on the size of the target can be inferred. It
should be noted that in this case weak signals will produce an
accordingly faint audio signal.
54
With the preset value of 5, the audio response is being partially
amplified. Weak to medium strength signals will give proportional
responses, but strong signals will not sound much louder than
medium ones because the sound has reached its maximum limit
(Figure 5.17).
On the other hand, with a setting of 10, all but the weakest signals
will be amplified to a very strong audio response (Figure 5.16). No
indication of size or strength of target signal can be deduced in this
case, but even weak target signals will be easier to hear.
AUDIO: ADJUSTING THE VOLUME
Page 19

AUDIO: ADJUSTING THE TONE
Introducing Tone
Figure 5.18
Main Menu > Audio > TONE
Tone is the frequency of sound emitted on target detection. It is
important to experiment with tone settings and listen carefully to
Figure 5.18 Tone menu
tone variations during your detecting. To test variation in tones
upon selection it will be helpful to move the coil across a few
different targets spaced apart.
Threshold tone
Threshold Tone allows you to adjust the tone of the threshold
‘hum’. This can be modified using the slider control to suit your
preferred threshold tone.
THE MINELAB EXPLORER II
Variability
Variability controls how much the tone will change depending on
the target’s characteristics. A setting of 10 represents significant
variation from target to target. A setting of 1 represents minimum
change in pitch. Variation of pitch between targets can greatly
assist in identifying targets in close proximity to one another.
Limits
This sets the upper limit of all tones emitted by the Explorer II.
Minelab recommends setting the upper limit to the highest frequency
you are comfortable with. Y ou can test the upper limits with a highly
conductive object (e.g. a large silver coin). Setting the limit to 1 will
produce only low pitch target signals, a setting of 10 will provide
very high as well as low pitch signals.
AUDIO: ADJUSTING THE TONE
5
QUICKSTART
55
Page 20

www.minelab.com
5
QUICKSTART
THE MINELAB EXPLORER II
AUDIO: ADJUSTING THE SOUNDS
Introducing Sounds
Figure 5.19
Main Menu > Audio > SOUNDS
The SOUNDS menu allows you to define how the pitch varies with
target characteristics. This can be a very useful feature in identifying
Figure 5.19 Sounds menu
targets in close proximity to one another. It is possible to instruct the
detector to emit a distinct sound responding to an object’s ferrous
characteristics, rather than its conductive properties. T o test sounds
upon selection it is necessary to move the coil across one or more
targets with different conductive and ferrous properties.
Constant
Main Menu > Audio > Sounds > CONST
Selecting CONST eliminates the variation of the pitch upon detection.
If selected, the Explorer II will emit a consistent tone regardless of the
target detected.
56
Conductivity
Main Menu > Audio > Sounds > CONDUCT
Conduct is the factory preset and Minelab’s recommended option.
Selecting CONDUCT adjusts the tone to identify the object relative to
its conductivity (the vertical axis of the Smartfind screen).
A high pitched tone denotes a large, highly conductive object with
target crosshair displayed near the top of the Smartfind screen
(or near a Digital rating of 32).
A low pitched tone denotes a small object with low conductivity . The
target crosshair is displayed near the bottom of the Smartfind screen
(or near a Digital rating of 1).
AUDIO: ADJUSTING THE SOUNDS
Page 21

THE MINELAB EXPLORER II
Ferrous
Main Menu > Audio > Sounds > FERROUS
Selecting FERROUS adjusts the tone according to the target’s
ferrous content (the horizontal axis of the Smartfind screen or the
first number in the Digital display). A low ‘blaat’ tone denotes a highly
ferrous object, displayed on the left of the screen and having a high
‘Fer’ number. A high pitched ‘squeak’ tone denotes a non-ferrous
target, displayed on the right of the Smartfind screen and having a
low ‘Fer’ number.
Clear the Smartfind screen to test the Ferrous sound. There are two
ways to do this: adjust the Iron Mask level to -16 or choose CLEAR
from Main Menu > Discrim > SELECT .
NOTE When the Iron Mask is set to the left of the Smartfind
screen (setting -16) there will be a maximum variation in
pitch between detected objects. When the Iron Mask is fully
activated (setting 0) there will be no signal for objects with
ferrous content.
AUDIO: ADJUSTING THE SOUNDS
5
QUICKSTART
57
Page 22

www.minelab.com
THE MINELAB EXPLORER II
TESTING TARGET AUDIO RESPONSES
5
QUICKSTART
tutorial
Take some time to become familiar with how the Explorer II
responds to various metal objects. This tutorial is
designed for Smartfind’s Iron Mask and Discrimination
functions. Repeat the procedure to familiarize yourself
with both.
Gather a collection of different metal objects like a rusted nail,
pull-tab, brass button, aluminium foil, various coins, and some
gold and silver jewelry . Take the detector outside, away from
known electromagnetic devices or metal objects.
STEP 1 Find an area of ground without targets.
STEP 2 Lay objects in a line, sufficiently spaced apart to allow
the coil to pass between the objects.
STEP 3 One at a time, pass the coil across the test objects. The
detector should ‘beep’ on the non-ferrous objects and
ignore the ferrous objects.
STEP 4 Take note that as the coil is passed over the nail, the
threshold ‘hum’ disappears, indicating that the object
ignored was ferrous.
!
58
STEP 5 Passing the coil over different non-ferrous objects will
produce different signal tones. Objects with high
conductivity, such as silver or lead, produce a highpitched signal tone while objects with lower conductivity,
such as aluminium foil, produce a lower pitched signal
tone.
With experience (and adjustments to the Audio settings) it will
be possible to use the signal tone from an object to accurately
determine the type of object discovered before recovering it
from the ground.
TESTING TARGET AUDIO RESPONSES
Page 23

PINPOINTING THE OBJECT
Figure 5.20 Pinpoint shortcut button
THE MINELAB EXPLORER II
Introducing Pinpoint
Figure 5.20. See also Pinpoint overview in Chapter 4: Control Panel, page
34.
During normal operation the Explorer II operates with discrimination
settings like Iron Mask or targets chosen from the Select target list.
When the approximate location of a target has been determined, it is
necessary to identify the object’s exact position. This is done using
the Explorer II’s Pinpoint function.
Enabling Pinpoint instructs the Explorer II to temporarily disengage
discrimination and become an ‘all metal’ detector. This means that
objects normally discriminated against will emit a target signal when
beneath the coil.
For example, Iron Mask is activated and the Explorer II has
detected the approximate location of a non-ferrous coin but ignored
the rusty nail buried nearby. Selection of Pinpoint instructs the
Explorer II to respond to all metals positioned directly beneath the
coil. Now, instead of a single signal for the coin the detector will also
respond to the nail.
5
QUICKSTART
It should be noted that the Pinpoint function is designed to zone in on
a target with subsequent passes. For this reason it is recommended
that you maintain the same sweep height above the target and not to
pass repeatedly back and forth across the target at various heights.
This incorrect method can cause the detector to desensitize and
reduces the depth of Pinpoint. If this happens, remove the coil from
the area of the target for a few seconds so its sensitivity can recover.
For this reason, Minelab recommends Pinpoint is only used
once the approximate location of a target has been
determined. The display screen’s Pinpoint indicator will flash to
remind you to turn Pinpoint off before resuming normal detecting.
Instructions for the use of Pinpoint appear on the following page.
PINPOINTING THE OBJECT
59
Page 24

www.minelab.com
5
QUICKSTART
THE MINELAB EXPLORER II
Using Pinpoint
Figure 5.21
Once the Explorer II has found the approximate position of a target it
is necessary to locate its exact position using Pinpoint.
STEP 1 Move the search coil to one side of the approximate target
location and press the PINPOINT shortcut button. If this
step is not taken the Explorer II will sound when moved
away from the object.
STEP 2 Slowly sweep the search coil over the target a couple of
times. Y ou will only hear a sound when the center-bar of the
coil is directly in line with the target.
STEP 3 Taking note of the detector response, reduce the span of
each successive pass of the coil until you are confident of
the target’s location. Make a mental note of the position.
STEP 4 Move to one side so that you can pass the coil over the
target at a right angle to your initial direction.
STEP 5 When the detector sounds you should know exactly where
to dig.
STEP 6 If you have difficulty pinpointing the target, press the
Pinpoint shortcut button again to take the detector out of
Pinpoint and sweep the coil over the area again before
returning to STEP 1.
60
NOTE The Pinpoint indicator will
flash to remind you to turn
Pinpoint off to resume normal
detecting.
Pinpointing works best when the
search coil is swept slowly.
Figure 5.21 Pinpointing the object
PINPOINTING THE OBJECT
Page 25

"
RECOVERING THE OBJECT
For this procedure you’ll need: a knife or trowel, a small
spade and a sheet of plastic.
STEP 1 Once the object has been pinpointed, clear the surface of
STEP 2 If the object is still in the ground, check again using Pinpoint.
STEP 3 Dig carefully to avoid defacing or devaluing the object. The
STEP 4 Place the grass plug and all soil you dig onto a plastic sheet
Fill your holes!
#
THE MINELAB EXPLORER II
loose material and check again for the signal. If there is no
signal then the object is amongst the surface material. In this
case, search the surface material until the object is located.
If you are about to dig in a grassy area, first remove a plug of
grass using a sharp knife or trowel.
use of probes can often aid in locating the exact position of
the object prior to digging.
beside the hole. This sheet (which can be folded small
enough to fit into your pocket) enables you to keep all soil
for refilling the hole and prevents material being scattered
about the area.
5
QUICKSTART
For the safety of others and in the
interests of respecting the
environment, ensure you leave an
area of ground as you found it.
Leaving holes, or an area ‘scarred’
may result in action being taken to
prevent the use of metal detectors
(which spoils the hobby for others
as well as yourself!)
STEP 5 Check the hole for the object. If it is not in the hole, place
the detector on the ground and with the coil flat, pick up dirt
by the handful and pass over the coil. Be sure you are not
wearing any metal objects like rings, bracelets or a watch
which may interfere with the signal. If you receive no
response, return the dirt to the hole. Repeat this procedure
until the object is located.
STEP 6 Check the hole again with the detector. Ensure that no other
objects remain, then refill the hole. All soil on the plastic
sheet should be returned to the hole followed by the plug of
grass. This should leave the area as you found it.
61
RECOVERING THE OBJECT
Page 26

www.minelab.com
THE MINELAB EXPLORER II
SELECTING TARGETS
This section of the chapter and the following tutorial will help you to effectively use the
targeting features of the Explorer II.
Select targets list
Figure 5.22, 5.23
As outlined earlier in this chapter, Quickstart provides the option of
identifying targets based upon Smartfind’s two-dimensional
discrimination. If you wish to detect one or more object types it is
Figure 5.22 Quickstart’s Main Menu
necessary to specify which the Explorer II should detect or reject.
Choosing SELECT from Quickstart’s MAIN MENU (Figure 5.22)
displays the SELECT target list (Figure 5.23). It is possible to
move down this list using the left middle and lower shift buttons.
The selections, in order of appearance are:
• CLEAR (clears Smartfind screen)
5
QUICKSTART
62
Figure 5.23 The Select menu
SELECTING TARGETS
• COINS (non-ferrous coins)
• FE COINS (ferrous coins)
• JEWELRY (rings, bracelets, necklaces)
• FOIL (aluminium foil)
• PULL T AB (aluminium ring from can)
• CROWNCAP (crown seal bottle cap)
• SCREWCAP (screw-on bottle cap)
• NAIL (nails, screws, short lengths of wire, shards of rust)
Once you have made your selection(s) with a tick or cross – as
shown in the following tutorial – press the DETECT button on the
control panel to begin detecting with your new target setting(s).
NOTE When you enter the SELECT menu and make
choices the Iron Mask indicator will be automatically
switched to the OFF position when you return to the
Smartfind screen.
Page 27
THE MINELAB EXPLORER II
SELECTING TARGETS
easy reference
Quickstart’s SELECT menu lists eight object types typically encountered during
treasure hunting. It is up to you to select one or more to modify the Explorer II’s
discrimination pattern.
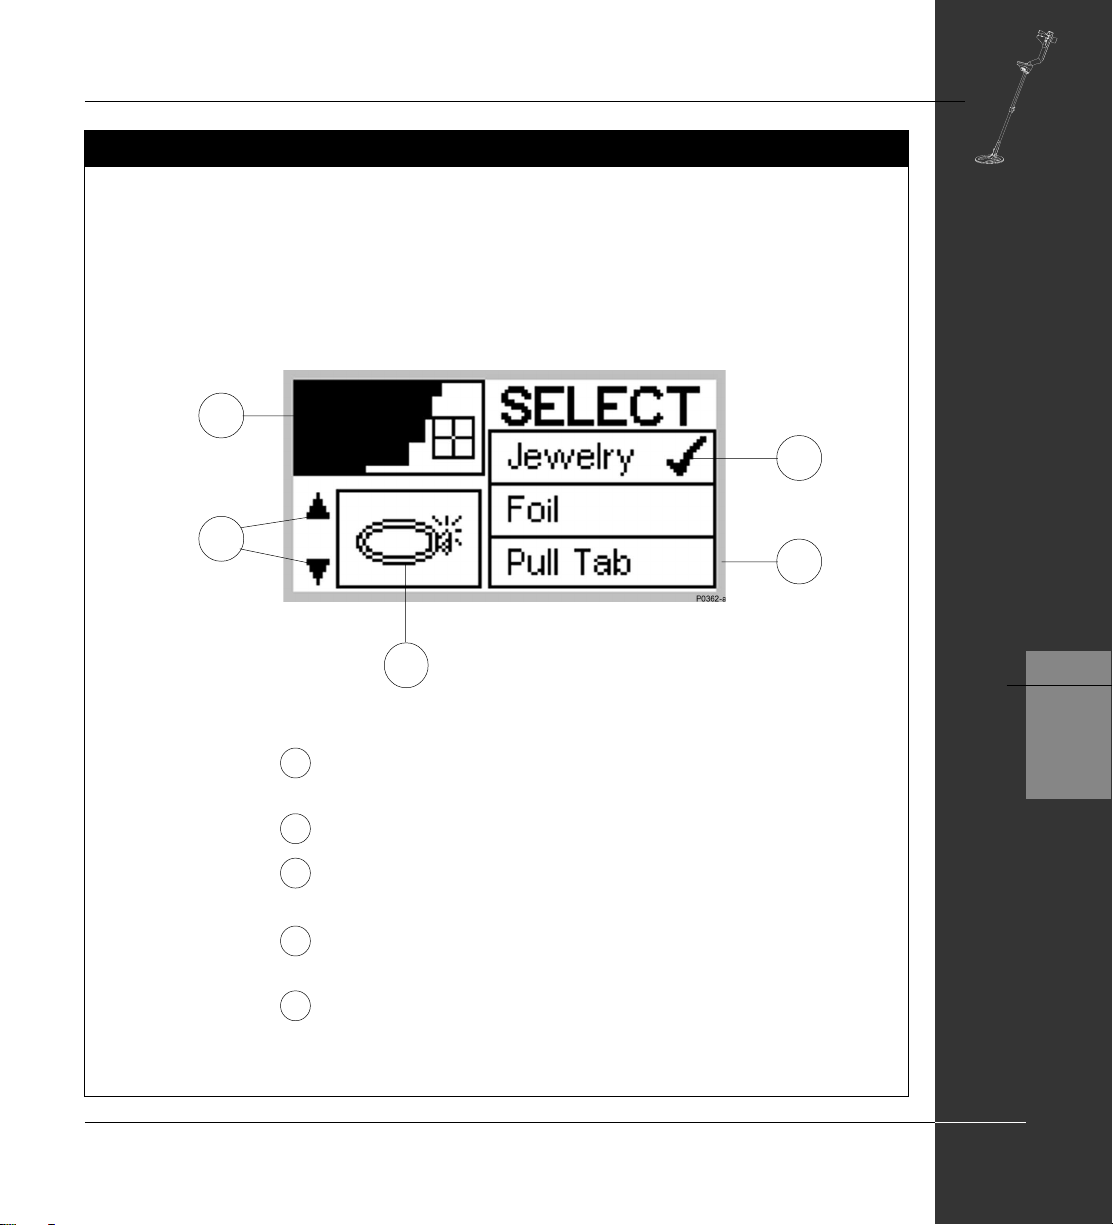
1
5
2
4
3
Smartfind thumbnail. Discrimination pattern for current
1
selection(s) from target list.
2
Arrows for moving up or down target list.
3
Target icon as shown in Digital display mode.
Displays most recent selection from target list.
Target list. Menu of typical target items
4
(CLEAR function is also provided).
5
Accepted target. Tick indicates this target is desirable.
A cross indicates the target is not wanted.
5
QUICKSTART
63
SELECTING TARGETS
Page 28

www.minelab.com
THE MINELAB EXPLORER II
ACCEPTING AND REJECTING TARGETS
5
QUICKSTART
Figure 5.24 Cleared SELECT menu
Figure 5.25 Accepting jewelry
Figure 5.26 Rejecting bottle cap
tutorial
This tutorial outlines how to instruct the Explorer II to
accept JEWELRY and reject bottle CROWNCAPS as
targets.
STEP 1 Switch to Smartfind’s Discrim function using the IRON
MASK shortcut button.
STEP 2 Choose SELECT from the MAIN MENU. This displays a
target list and the discrimination pattern for COINS, the
Explorer’s II Discrim factory setting.
STEP 3 (Figure 5.24) Press the shift button next to the CLEAR
option. This clears the Smartfind thumbnail screen in the
top left corner of all discrimination patterns.
STEP 4 (Figure 5.25) To accept jewelry, use the bottom left shift
button to move down the target list until JEWELRY option
is visible. Press the adjacent shift button once to accept
jewelry. A tick will appear next to the selection and the
Smartfind thumbnail and icon for jewelry will be displayed.
STEP 5 (Figure 5.26) To reject crowncaps, use the bottom left
shift button to move down the target list until
CROWNCAP is displayed. Press the adjacent shift button
twice to display a cross. This rejects bottle caps from the
discrimination pattern. The detector is now set to detect
for jewelry and exclude crowncaps.
!
64
Figure 5.27 New discrimination pattern in
Discrim mode
ACCEPTING AND REJECTING TARGETS
STEP 6 (Figure 5.27) Press the DETECT shortcut button to begin
detecting in Smartfind with your new target settings.
NOTE If SELECT is chosen from the MAIN MENU while
the Explorer II is functioning in Iron Mask, the current Iron
Mask Smartfind thumbnail will be displayed. As soon as a
selection is made from the target list, a thumbnail of the
chosen discrimination pattern will replace the Iron Mask.
Page 29

THE MINELAB EXPLORER II
ADVANCED MODE OPTION
Once you have experimented with target options and the other features of Quickstart,
it may be time to investigate the features of the Explorer II available to the advanced user.
Moving to Advanced mode
Figure 5.28, 5.29
Main Menu > Options > ADVANCED
Press the MENU shortcut button, select OPTIONS from the
displayed list and then select ADVANCED mode.
Figure 5.28 Options screen in Quickstart
Figure 5.29 Options screen in Advanced
The detector moves into ADVANCED mode and a new OPTIONS
menu appears displaying the broader array of options available to
you in Advanced mode.
If you are ready for advanced detecting, read through Chapter 6:
Advanced Use. It is likely you will only need to return to this
chapter for background on basic adjustments and general
detector operation.
Just remember that it is always possible to return to Quickstart
mode. If at any time you become a little confused with the settings
for your detector, or just want to brush up on basic detector use, it
is simple to reset the Explorer II to its original factory settings. T o
reset the detector:
5
QUICKSTART
• Turn the detector off
• Press and hold the POWER button until a six-note musical tune
is sounded. The Minelab logo and the words ‘Factory Presets’
will be briefly displayed on screen.
Y ou will be returned to the original Quickstart settings and you may
resume basic detecting or make selections from the Main Menu.
You are now ready to proceed to Chapter 6: Advanced Use.
$
ADVANCED MODE OPTION
65
Page 30

www.minelab.com
THE MINELAB EXPLORER II
5
QUICKSTART
66
 Loading...