

Page 1

THANK YOU
Page 2

CAMERA SETTINGS 15
Modes
Shutter Speed
Aperture
Focus & Zoom
ISO
White Balance
Capture Format
GEAR 19
CHECKLIST 20
Clouds 22
Traffic 23
Crowds 24
Stars 25
City 26
Water 27
Landscape 28
Scenarios
2
CONTENTS
ANATOMY 5
Batteries
Connectivity
Programming
Start Buttons
Status LED
MODES 7
Time-lapse Mode
Panorama Mode
Smartphone Mode
Lock Mode
GETTING STARTED 9
Attach Tripod Plate
Mount Camera
Connect Camera
Set Up a Program
Start/Cancel a Program
EXTENDED USES 11
Tilt
Pan-tilt
WHAT IS TIME-LAPSE? 13
Frames per Second
Recorded FPS
Playback FPS
Astro User Manual
Time-lapse Guide
1
3
12
21
Page 3
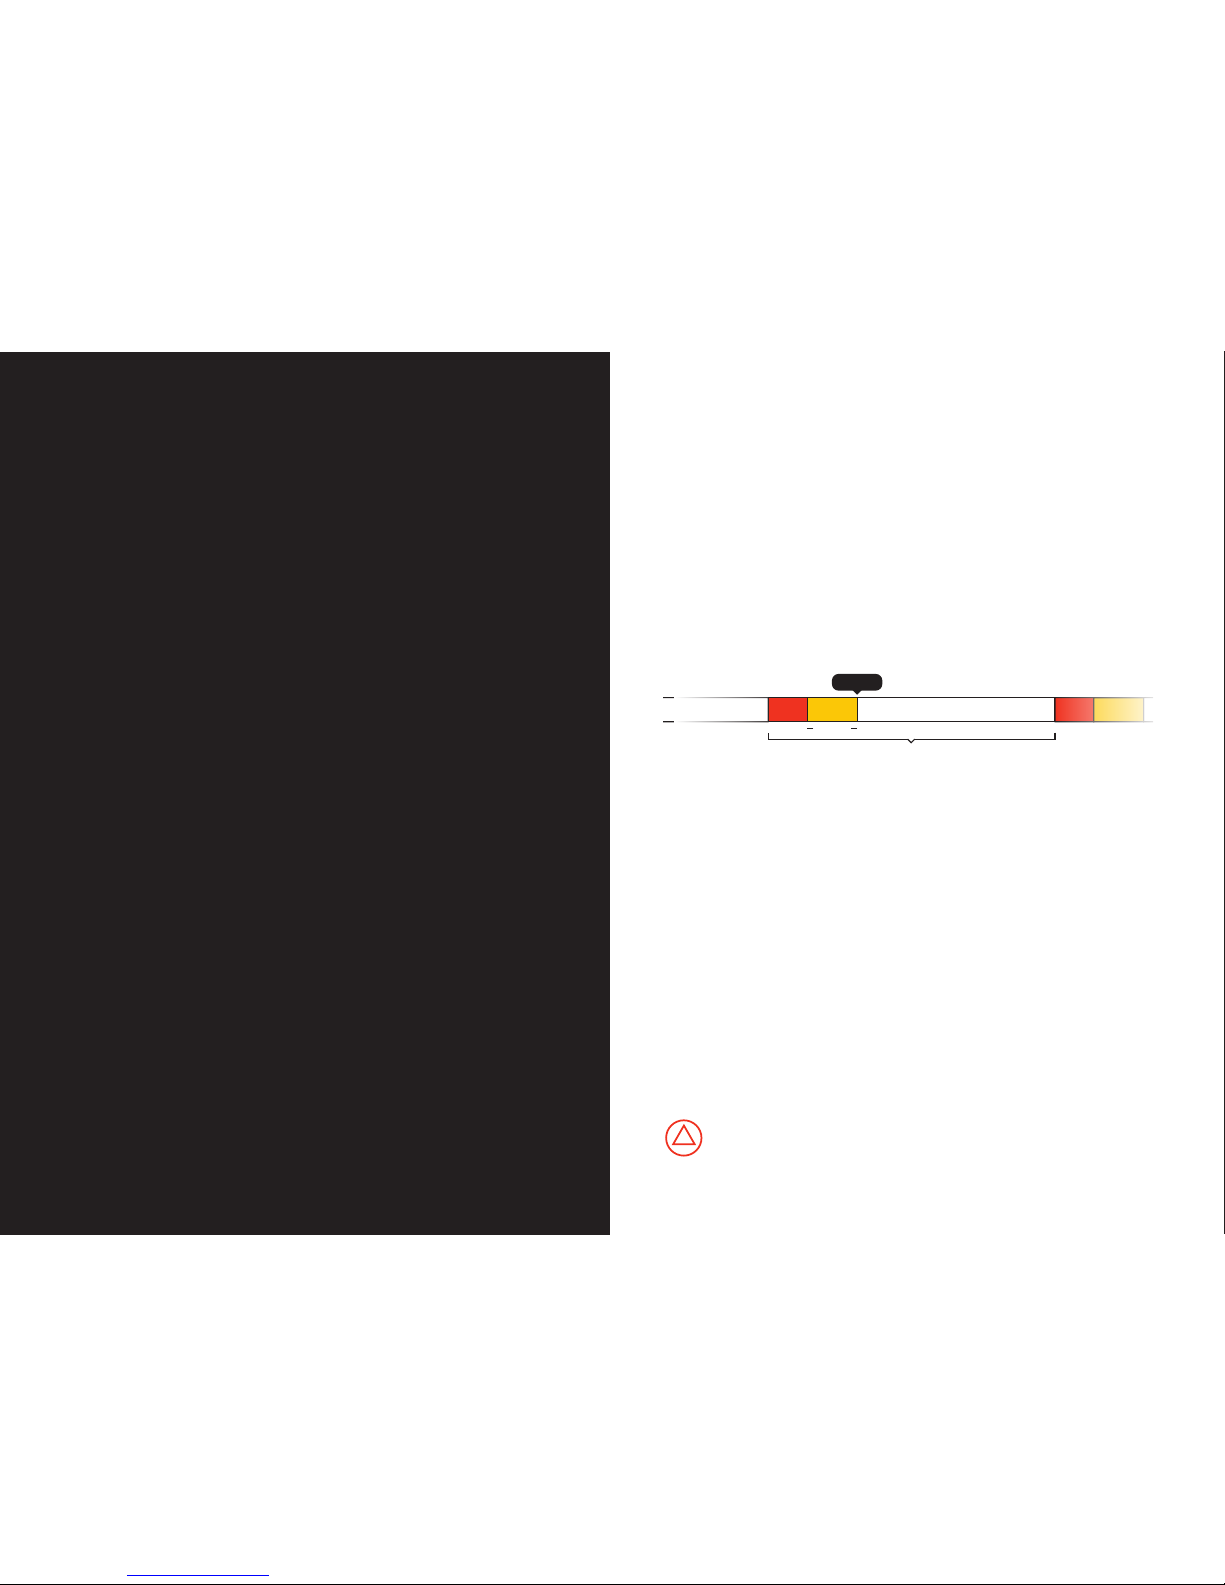
Astro is the simplest intervalometer and motion control device for
time-lapse photography. In this guidebook you will find everything
you need to know about using Astro. In addition, we will share a lot of
the things we have learned about time-lapse while making this project.
Let’s get started with the basics.
Astro works as a remote to control DSLR cameras. Based on the
settings that you program, it will trigger your camera at specific
intervals and make small movements between photos. It has a
standard 2.5 mm jack, and connects to your camera through the
cable included in your package.
ASTRO USER MANUAL
4
Despite its simple appearance, Astro is a complex device. Please
handle it with care. Do not expose to liquid, excessive moisture or
rain. Do not drop, crush or hit. Do not tamper or disassemble.
Read this user manual carefully before using Astro.
Interval
Move Settle Idle (maximum shutter duration)
Trigger
100ms
Once Astro is done taking pictures, you can upload all of the
images to your computer and assemble them into a time-lapse
video. To assemble your videos you can use one of the many
free software alternatives, such as iMovie for Mac, or Windows
Movie Maker for PC. For greater control, we recommend using
more advanced software like Adobe Lightroom, LR Timelapse,
and Adobe After Effects.
Technical Details:
Power source: 2 AA batteries (not included)
Maximum speed: 6 deg/second in panorama mode
Maximum load when panning: 22 lb / 10 Kg (centered weight)
Maximum load when tilting: 6.6 lb / 3 Kg (centered weight)
Operating Temperature: 32 to 104° F / 0 to 40° C
Page 4
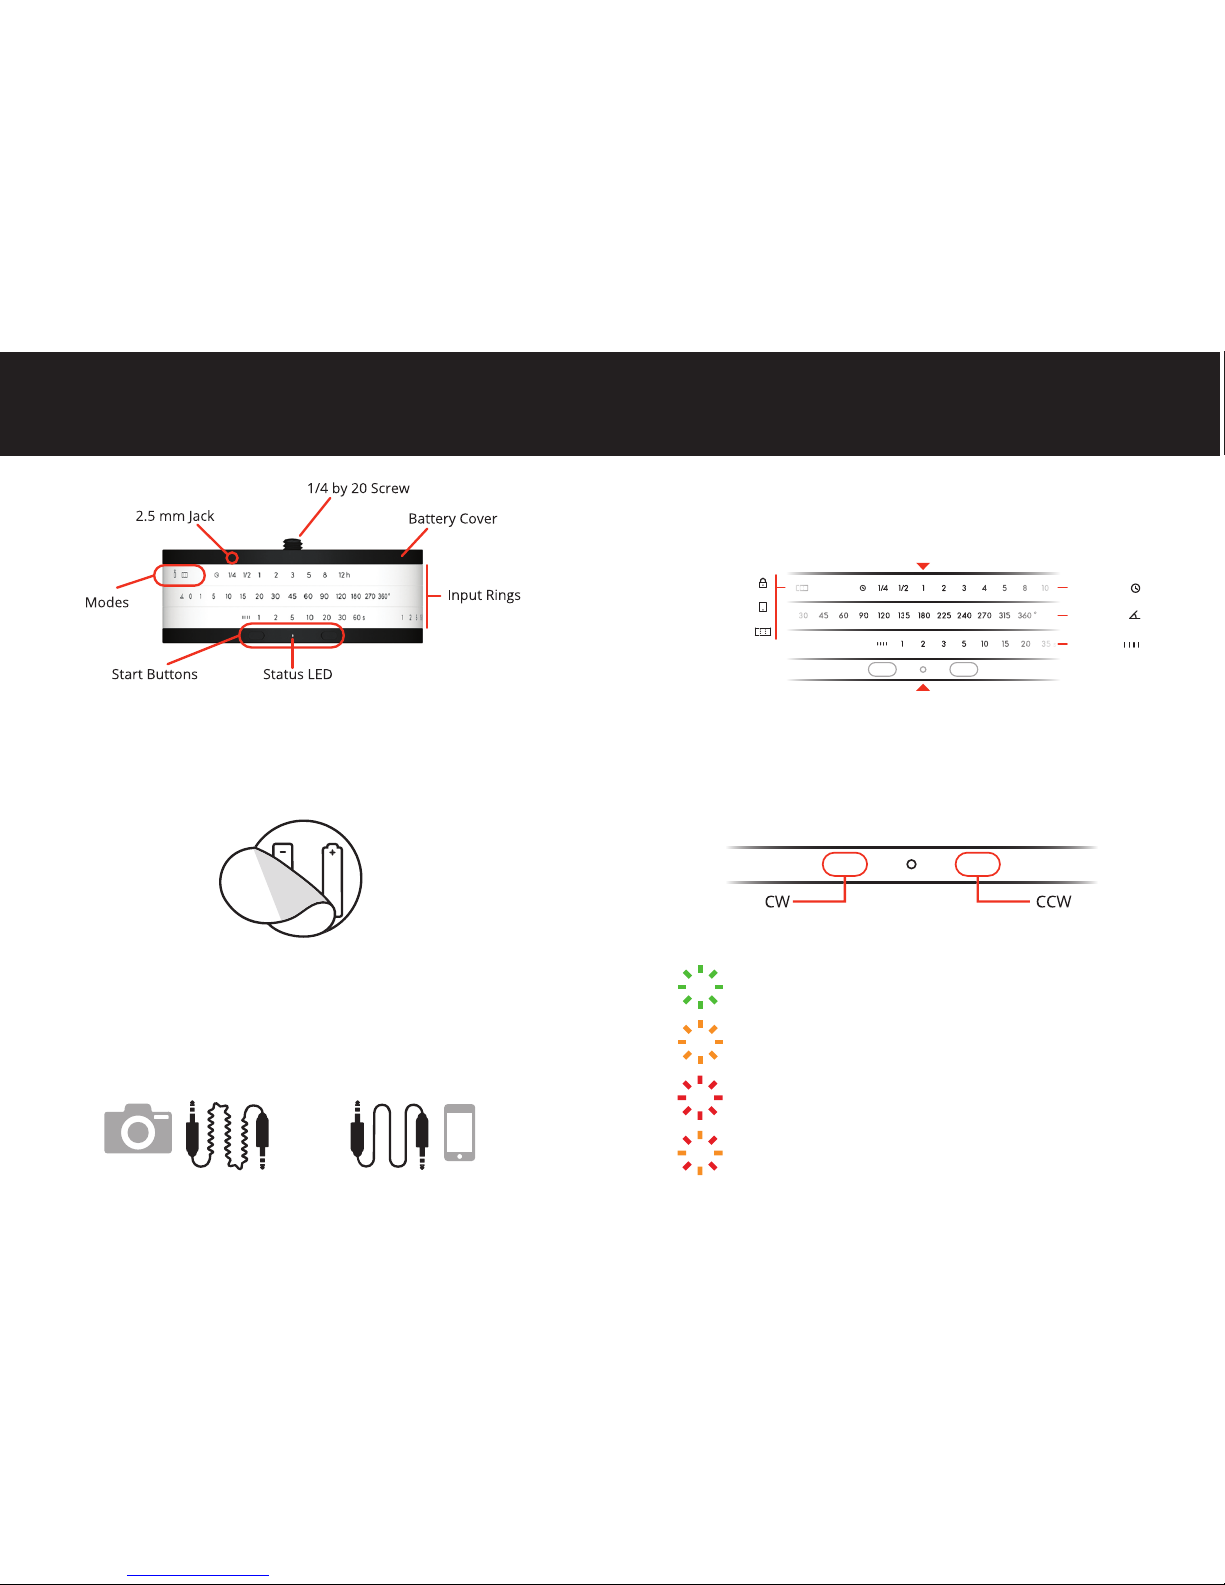
Single Blink: The LED flashes every time Astro moves.
Fast Blinking: Smartphone Mode. Waiting for
smartphone program transfer.
Fast Blinking: Error starting program.
Continuous: Canceled program.
Fast Blinking: Replace batteries.
Astro has three input rings. Align them with the Satus LED to set a
mode or create a program.
Press one of the two Start Buttons to start running the program in
the desired direction (CW or CCW). Long press to make Astro move
continuously to adjust its position. To cancel a program, press either
one of the buttons for five seconds until the LED turns red.
Programming
Start Buttons
Status LED
6
Smartphone
Panorama
Lock
Duration
Rotation
Interval
Peel back the rubber Battery Cover on top of Astro and insert
two AA batteries.
Astro comes with two cables:
The Camera Cable has a specific connector for your camera on one
end, and a plug on the other that connects to the 2.5 mm Jack in Astro.
The Smartphone Cable connects to your smartphone’s headphone
jack on one end, and to Astro through the 2.5 mm Jack.
ANATOMY
Batteries
Connectivity
5
We recommend using high capacity, lithium rechargeable batteries.
Page 5
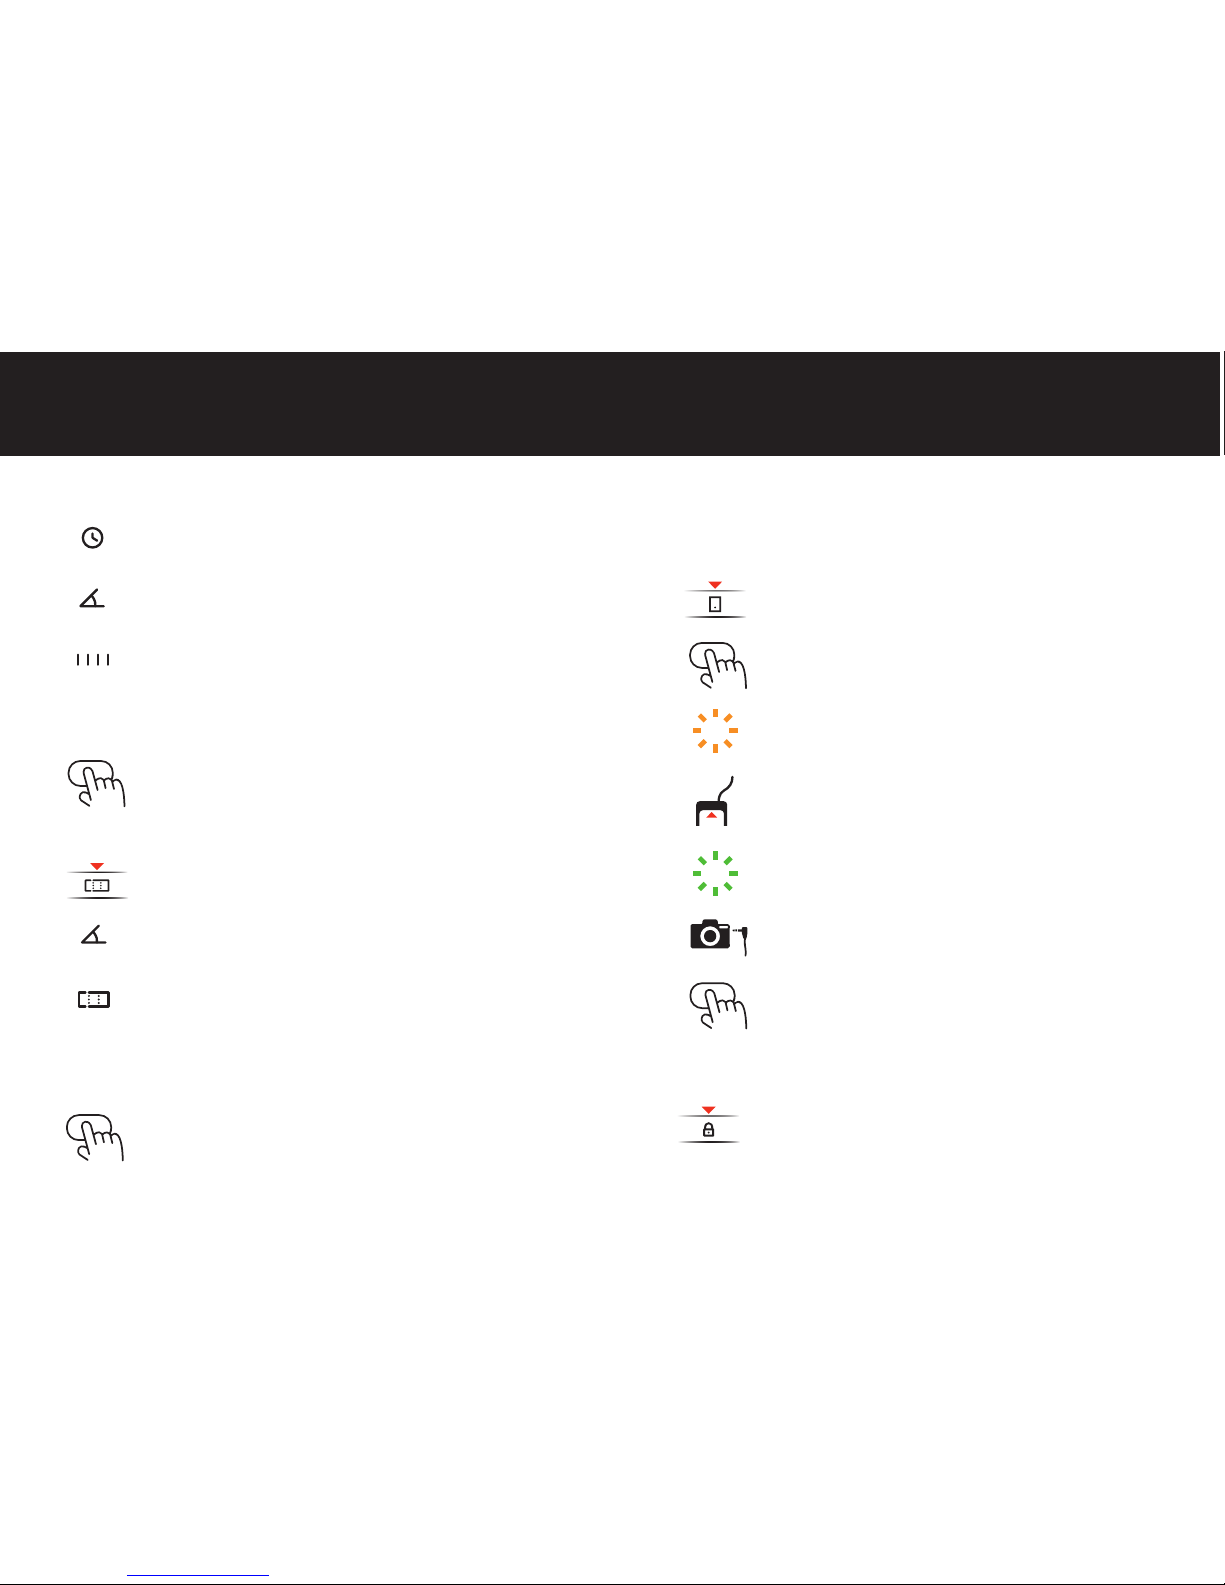
Lock Mode
Smartphone Mode
Set the top Input Ring to Smartphone Mode to
transfer a program from a smartphone or computer.
Press either one of the Start Buttons.
The Status LED will start blinking yellow to indicate
Astro is ready to receive a program.
Connect Astro to the smartphone with the
Smartphone Cable and send the program through
the application.
A green blinking Status LED indicates the program
has been successfully downloaded to Astro.
Disconnect the Smartphone Cable and connect Astro
to the camera with the Camera Cable.
Press one of the two Start Buttons to start running
the program in the desired direction (CW or CCW).
Set the top Input Ring to Lock Mode so that Astro
won't start running if buttons are pressed.
You can use our smartphone application to create custom programs
for Astro. Visit www.mindarin.com/downloads for more info.
1
2
3
4
5
6
7
8
Time-lapse Mode
Panorama Mode
Duration: Use the numbers on the top Input Ring to set
the total duration of the time-lapse from 15 min to 12 hrs.
Rotation: Use the numbers on the middle Input Ring to
set the total rotation angle in degrees.
Interval: Use the numbers on the bottom Input Ring to
set the triggering interval in seconds.
Set the top Input Ring to Panorama Mode.
Rotation: Use the numbers on the middle Input Ring to
set the total rotation angle in degrees.
Interval: Use the numbers on the bottom Input Ring to
set the triggering interval in seconds.
MODES
Note: The bottom Input Ring has two sets of values on it. Only the values
that follow the Interval icon work in Time-lapse Mode.
Press one of the two Start Buttons to start running the
program in the desired direction (CW or CCW).
Press one of the two Start Buttons to start running the
program in the desired direction (CW or CCW).
Note: The bottom Input Ring has two sets of values on it. Only the values that
follow the Panorama icon work in Panorama Mode. In this mode, Astro will
rotate at its maximum speed between photos (6 deg/second).
7
Page 6
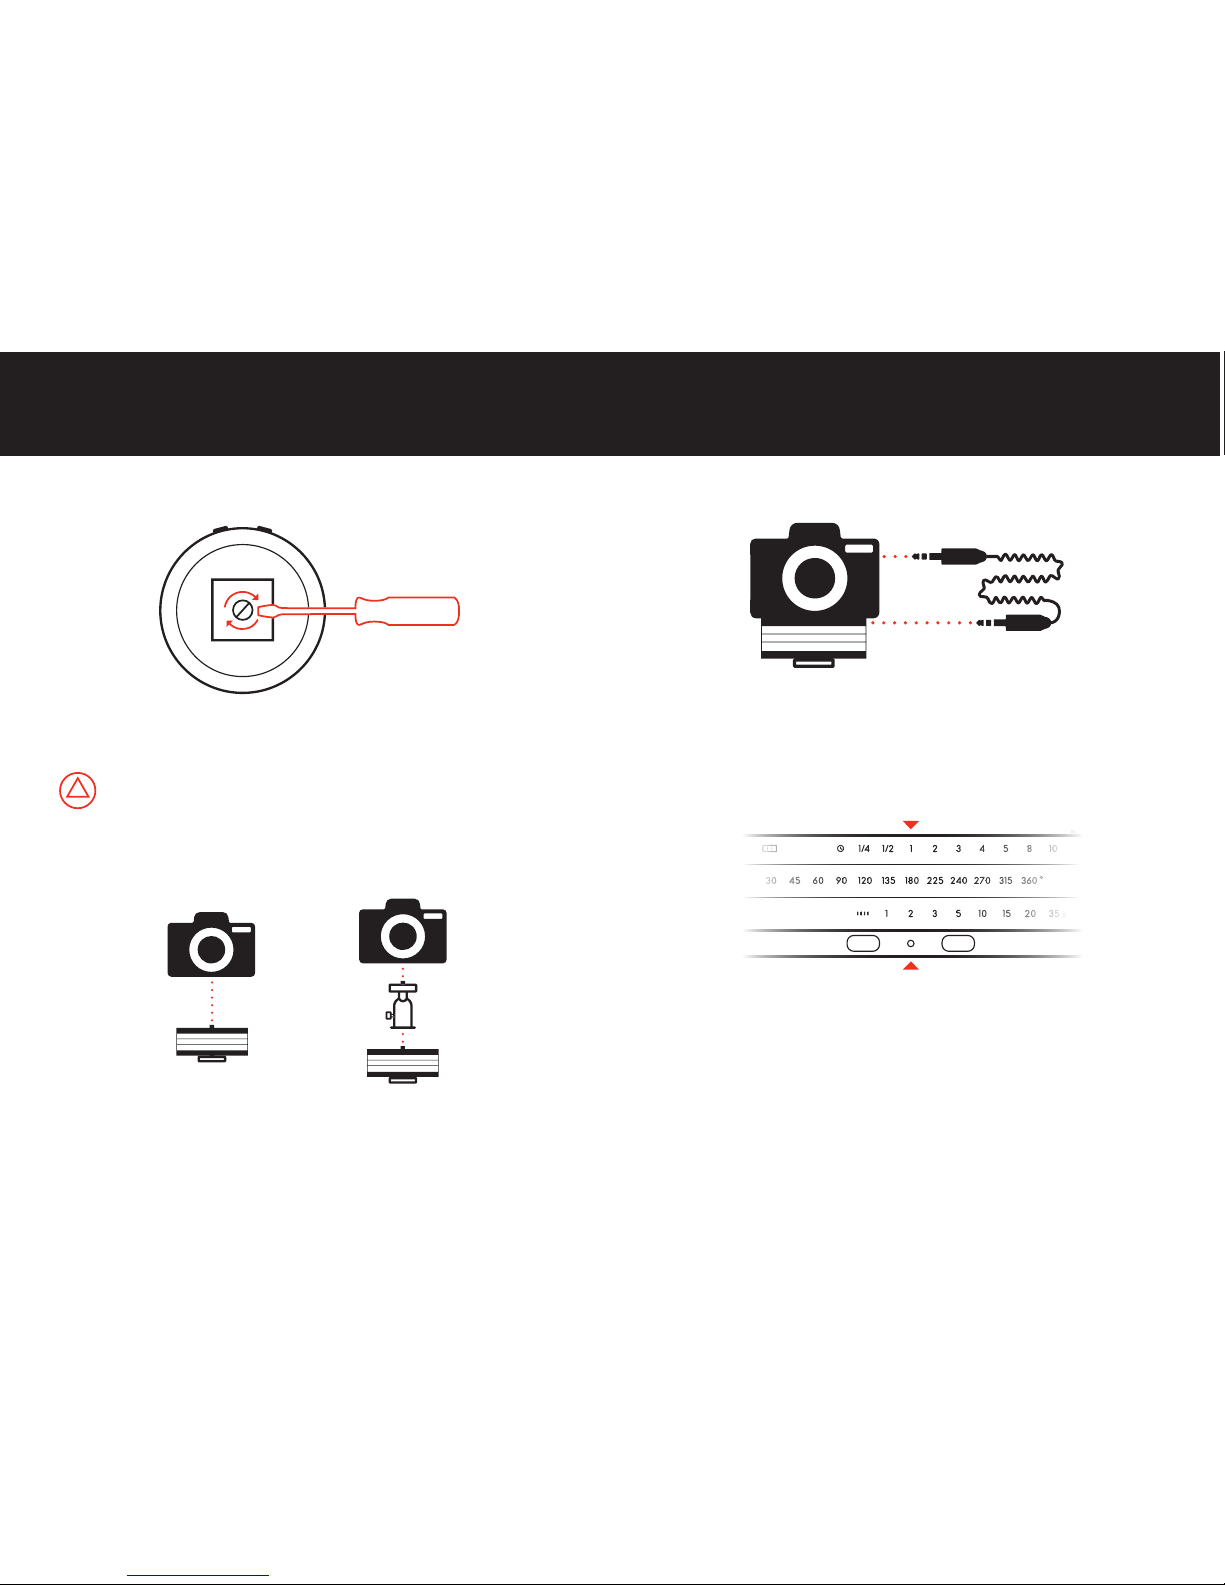
3 Connect Camera
4 Set Up a Program
5 Start/Cancel a Program
Connect Astro to your camera using the Camera Cable.
Align the three Input Rings with the Status LED to select the
desired settings.
Press one of the two Start Buttons to start running the program
in the desired direction (CW or CCW). To cancel a program, press
either one of the buttons for five seconds until the LED turns red.
Set the camera to Manual Focus. Auto Focus delays can cause interval
discrepancies or failure to shoot.
10
GETTING STARTED
1 Attach Tripod Plate
2 Mount Camera
Hold Astro upside down and attach a tripod plate. Tighten until
plate is firmly in place.
Screw Astro directly to your camera or to a ballhead.
Do not attach Astro directly to your tripod. Always use a tripod plate and
always attach/detach by using a screwdriver or coin. Twisting or forcing
Astro's bottom plate will cause permanent damage to internal components.
9
Using a ballhead offers more flexibility when composing shots and aligning the
camera. Attaching a ballhead might require a 1/4 to 3/8 thread adapter.
Page 7
1
2
3
4
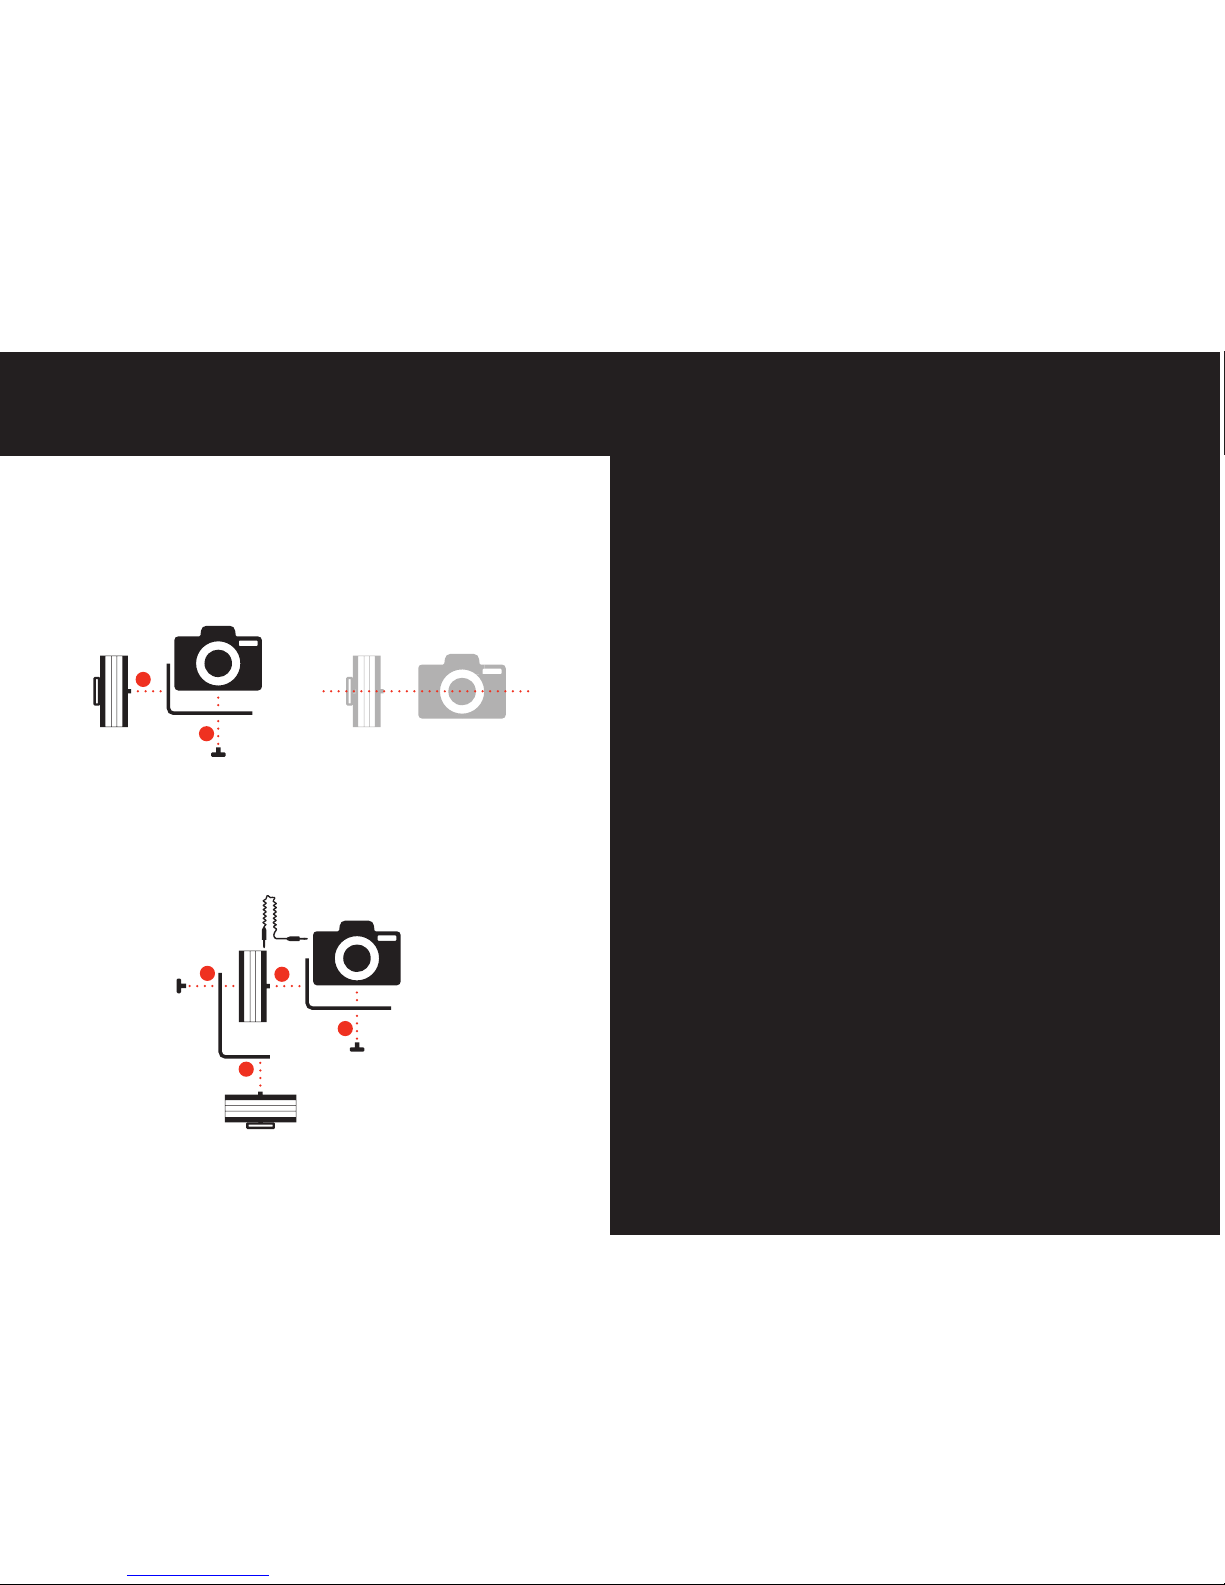
Start the program on the panning Astro first, and immediately start
the program on the tilting Astro.
2
1
TIME-LAPSE GUIDE
EXTENDED USES
11
Tilt
Pan & Tilt
Set up a tilting Astro. For panning, screw a second Astro into a
second L-bracket using the outtermost thread, and attach the
second L-bracket into the tilting Astro with the thumb screw.
Screw Astro into one of the 5 threads on the L-bracket. Use the thread
that properly centers your camera with Astro. Attach the camera to
the L-bracket with the thumb screw, and connect the camera to Astro.
Note: Only the tilting Astro connects to the camera. Both Astros should be
programed with the same total duration and same interval. The rotation
angle can be different.
By using an L-bracket, you can create tilting time-lapses. With two
Astros and two L-brackets you can pan and tilt simultaneously.
Page 8
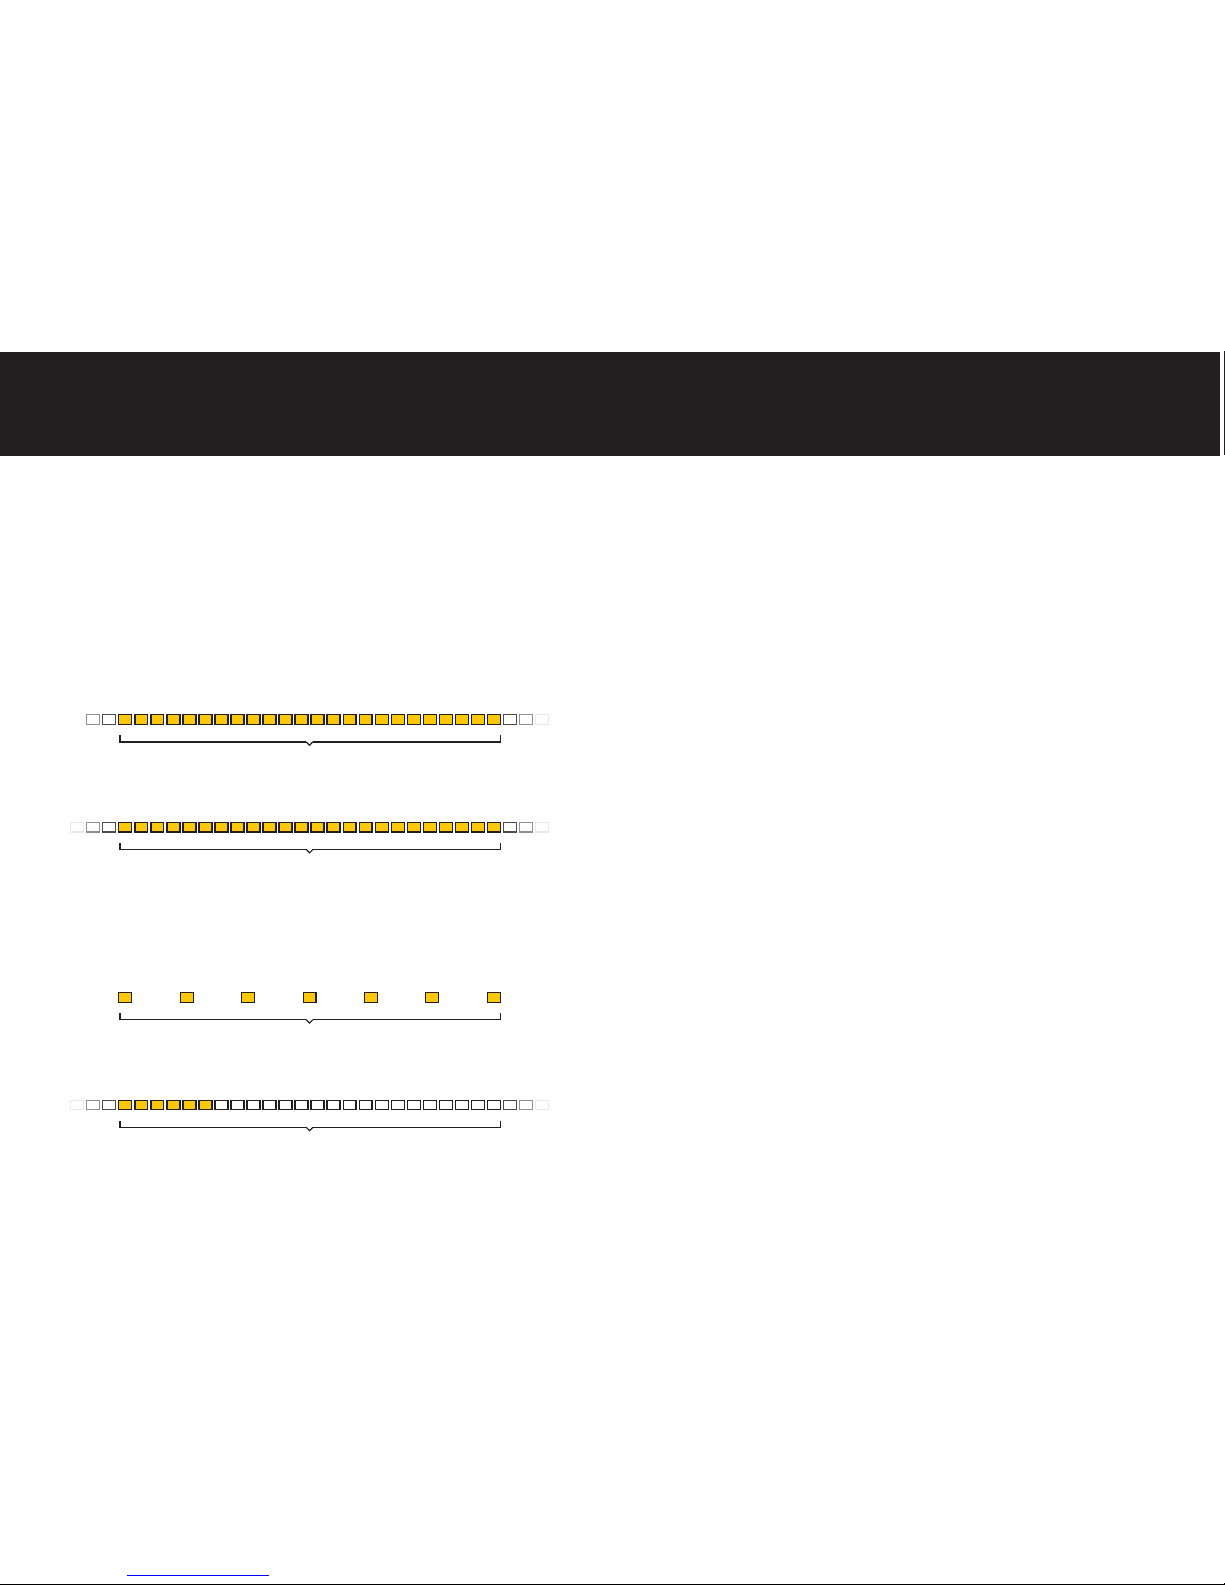
Abbreviated FPS, it just means how many pictures fit in a second
of video footage. Most videos are either 24 or 30 FPS.
This refers to the speed at which individual pictures/frames will
be played back. Since a video is essentially a collection of photos,
Playback FPS means how many pictures will be shown in one
second. Most videos playback at 24 or 30 FPS.
With a traditional video, the Recorded FPS and the Playback FPS
are the same; and thus, you don’t have to worry about it. In timelapse photography you control the Recorded FPS (interval between
photos) to achieve your desired results. Time-lapse photography
works by taking pictures at long intervals and playing them back
much faster, usually at 24 or 30 FPS.
Example: If photos are taken using a 15 second interval and played
back at 30 FPS, the video will playback 450 times faster than realtime, and 12 hours will be compressed into just 96 seconds.
This is the number of pictures taken per second. Since time-lapse
photography requires taking pictures one or more seconds apart,
it is more practical to call it Interval. A long interval means that
photos will be taken further apart; while, a short interval captures
images in quick succession. For reference, traditional movies
are recorded at 24 FPS which means each picture is taken at an
interval of 1/24 seconds. In contrast, taking pictures in 2 second
intervals would be .5 FPS.
Frames per Second
Recorded FPS
Playback FPS
14
WHAT IS TIME-LAPSE?
Time-lapse photography is the process of capturing an event that
happens over a long period of time and playing it back as a video
of much shorter duration. While DSLR cameras are great, they are
not specifically designed to take time-lapse videos. For this reason
it is important to understand some basic concepts of time-lapse
photography and its potential pitfalls in order to achieve the best
results.
13
1 second
PLAYBACK AT 24 FPS
1 minute
RECORDED AT 10s INTERVAL
1 second
PLAYBACK AT 24 FPS
1 second
RECORDED AT 24 FPS
TIME-LAPSE VIDEO
TRADITIONAL VIDEO
Page 9
16
Shutter Speed
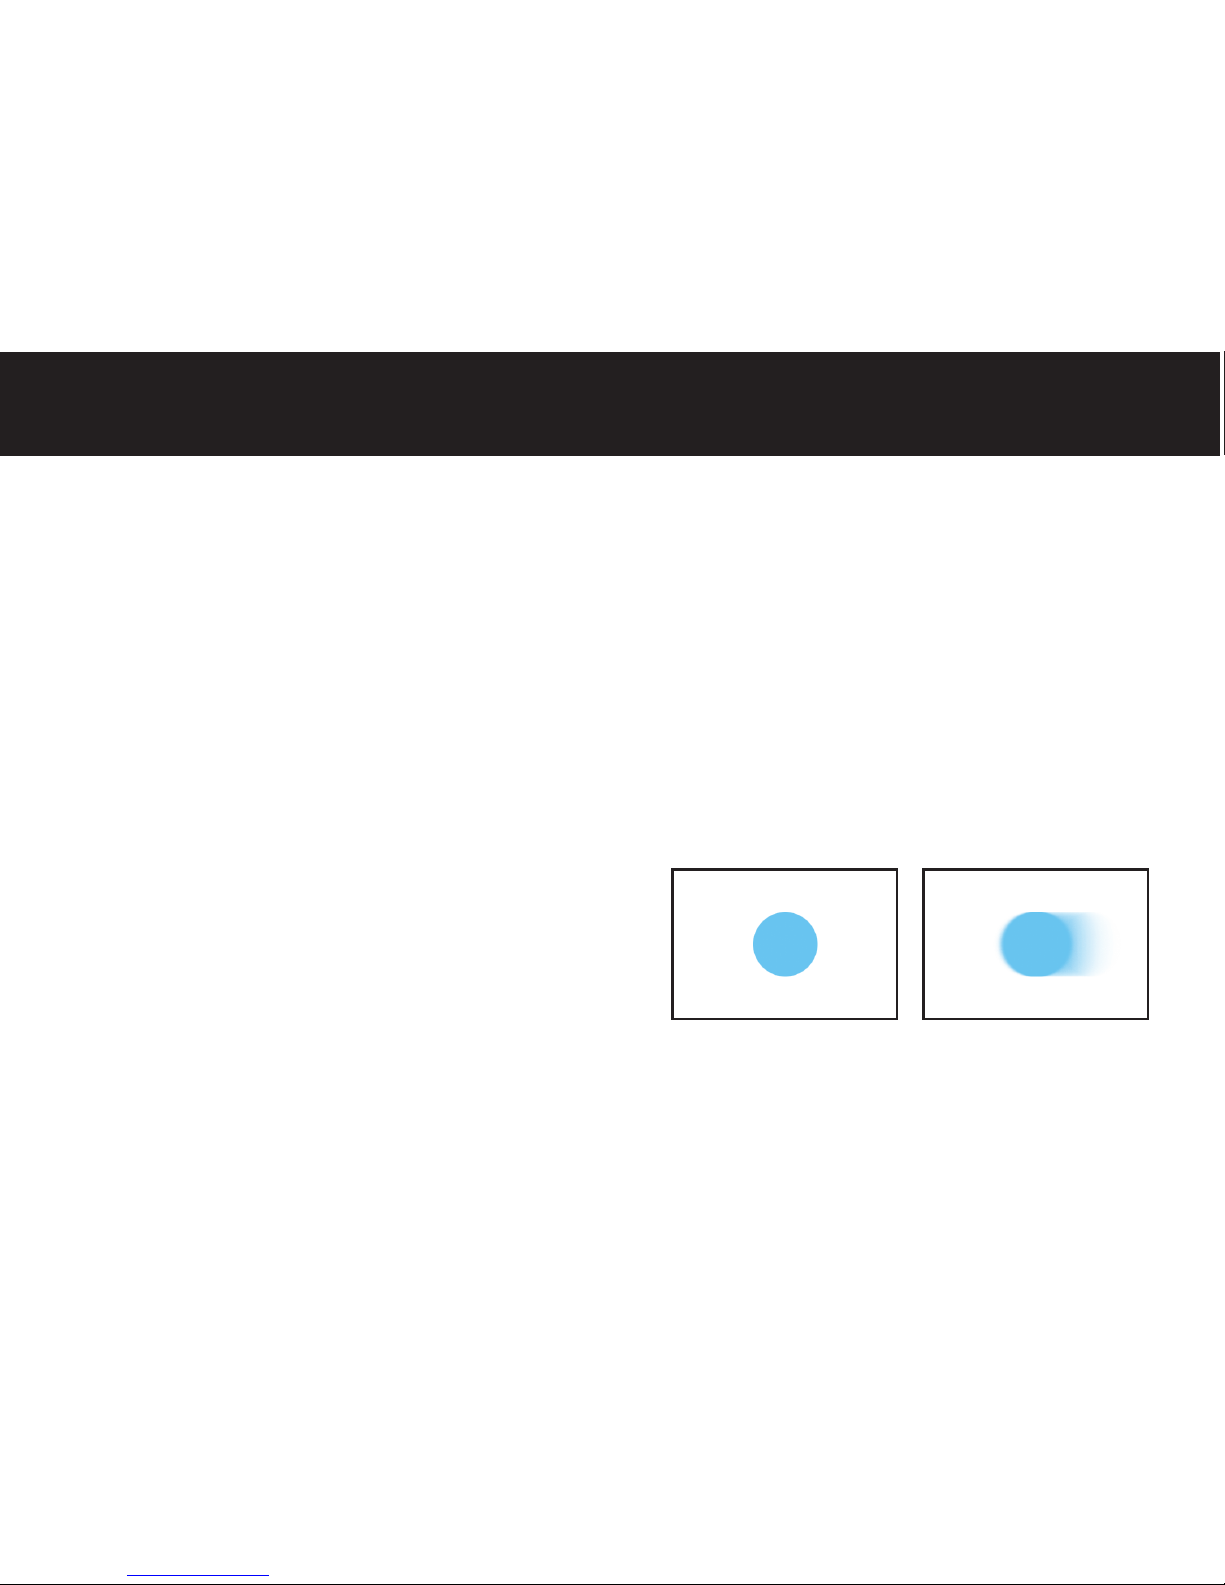
Shutter speed controls the amount of time that the shutter will
stay open for the sensor to capture light. This not only affects the
amount of light it receives, but also the amount of movement
that is captured. A fast shutter speed will freeze a moving object;
whereas, a slow setting will produce a blurred result. A neutral
density filter (ND filter) may be needed to achieve long exposures
in bright light.
Depending on the subject, you may want to use a slow or fast
shutter speed. For fast moving subjects like cars, a fast shutter
speed will produce jumps or even make cars appear in one frame
and disappear in the next. The discontinuity can be distracting and
is normally undesirable in a time-lapse video. On the other hand,
using a slow shutter speed will produce smooth and continuous
motion but will reduce sharpness.
Everytime your camera takes a picture, the shutter opens and
closes. This process is not perfectly consistent every time; the
small variations cause every picture to have slightly different
exposures and become noticeable as flicker. To prevent that from
happening, you can use a lens with manual aperture control, or
avoid shutter times shorter than 1/100 seconds.
Fast Shutter Slow Shutter
CAMERA SETTINGS
When shooting time-lapse, it is better to have control over all of the
camera’s settings in order to get the best results. We recommend
against automatic settings because the camera will calculate them
differently for each photo and potentially introduce unpleasant
flicker in the final video.
Av Aperture Priority: This mode allows you to select a constant
aperture while the shutter speed is set by the camera. It is not
recommended to use this mode for time-lapse photography
unless you are using it for a day to night sequence. Even for day
to night sequences, the small variations in shutter speed will
introduce flicker in the video that will have to be removed in postproduction.
Tv Shutter Priority: In shutter priority mode you can set the
shutter speed and let the camera choose an appropriate aperture.
This mode is not ideal for time-lapse as it will not only introduce
light flicker but also DOF (depth of field) flicker that cannot be
corrected in post-production.
B Bulb: Most cameras have a 30 second exposure limit. Bulb
mode allows you to use an external device to control the duration
of the shutter beyond 30 seconds.
M Manual: In manual mode you set both the aperture and
shutter speed. We recommend always using manual mode when
taking time-lapse sequences. If you are shooting in manual mode
(and you really should), it is important to understand how each
setting affects the time-lapse.
Modes
15
Page 10
18
ISO
Capture Format
White balance refers to the temperature of the color in the
picture. It is best to manually choose the desired temperature or
a preset to ensure consistent results and reduce flicker.
There is one simple rule to time-lapse photography: capture as
much information as possible.
This means using RAW image format. It is okay to use JPG for tests
or rough sequences, but always use RAW when capturing your
final sequence.
Aperture
Focus & Zoom
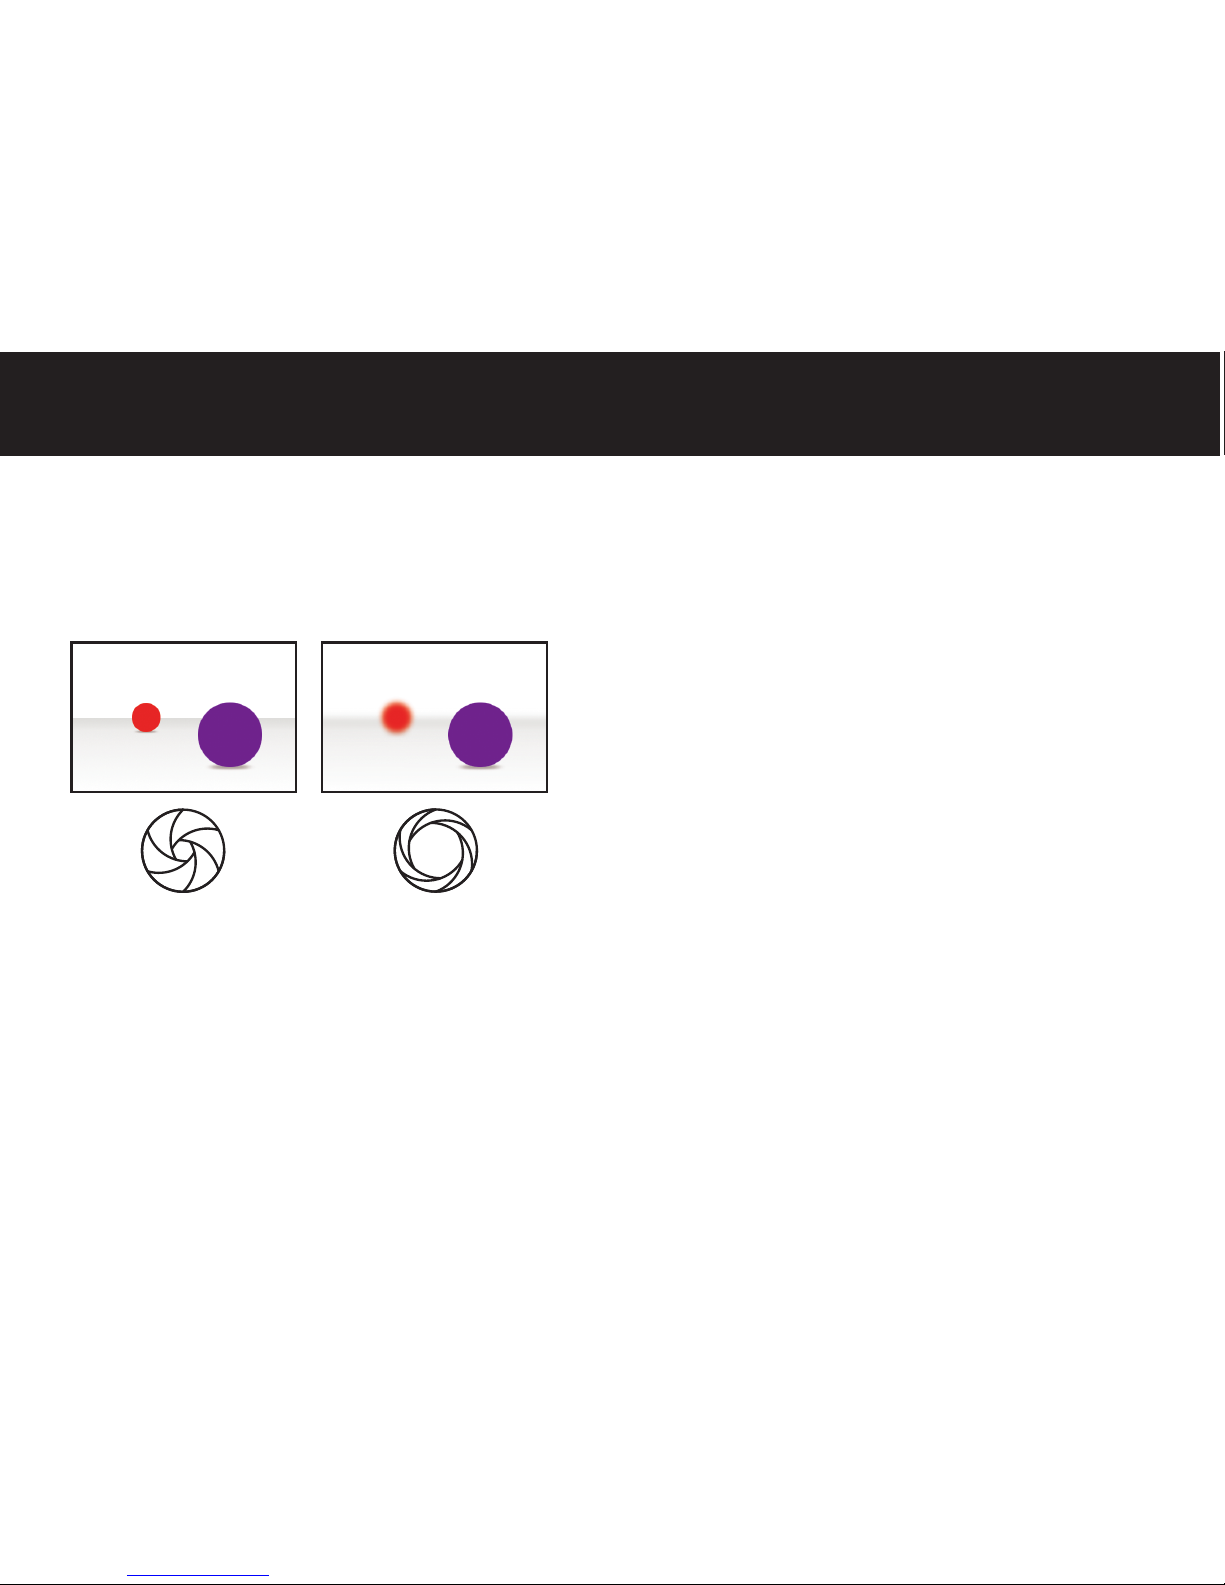
The aperture setting controls the amount of light that enters
the camera as well as the depth of field (DOF). A large aperture
lets in more light and produces a shallow DOF; whereas, a small
aperture will capture less light and show more objects in focus.
First, make sure you disable autofocus and image stabilization
on your lens or camera. Choose a focal length that allows you to
capture enough context around your subject.
Time-lapse photography is all about change; many times the
subtle changes around your main subject are what make a timelapse great. For the same reason, avoid extreme zoom.
17
Small Aperture Large Aperture
White Balance
ISO refers to the sensitivity of the camera to light. A small number
provides less sensitivity, while a high number generates high
sensitivity. Low settings generate cleaner images. In contrast high
ISO settings produce nosier images as the camera tries to extract
as much information as possible from the sensor. Every camera
is different; take a couple of test photos at varying ISO settings to
see if the noise level is acceptable. Much like the other settings we
have discussed, never use auto ISO because it can produce flicker
and other inconsistencies.
Page 11
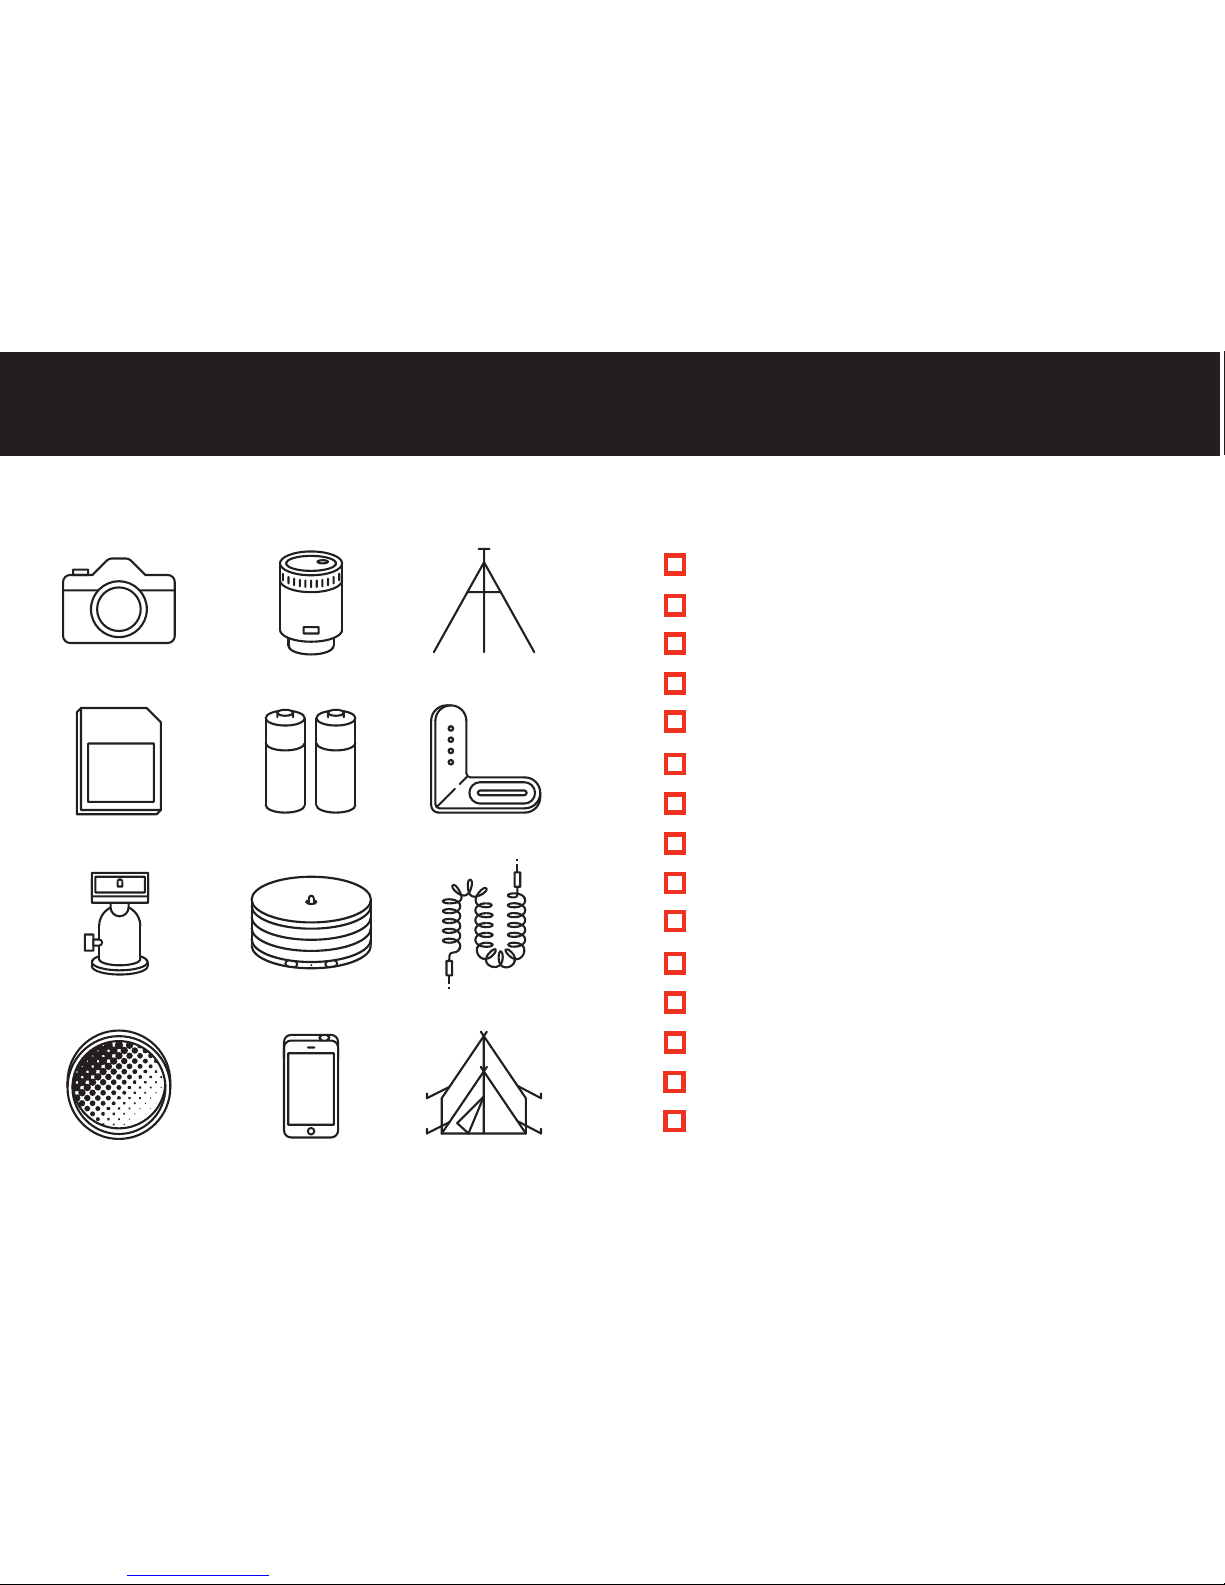
With so many things to control, it is easy to forget something. We
always go through this checklist to help us remember everything.
Charged and spare batteries
Enough memory (formatted card if possible)
Set lens to manual focus and disable image stabilization
Set camera to manual
Adjust shutter (shutter not faster than 1/100 seconds)
Set the aperture (larger is better)
Set ISO
Set white balance (use a preset)
Set capture format to RAW
Program and connect Astro
Level the camera
Focus
Take a couple of test shots
Start the program
Be patient :)
CHECKLIST
20
L-Bracket
Cables
Tent
19
This is a list of useful items for shooting time-lapse. You might not
need all the equipment every time, but it is good to have these
items on hand.
Camera
Memory
Ballhead
ND Filter
Astro
Smarpthone
Batteries
Tripod
Lenses
GEAR
Page 12
SCENARIOS
22
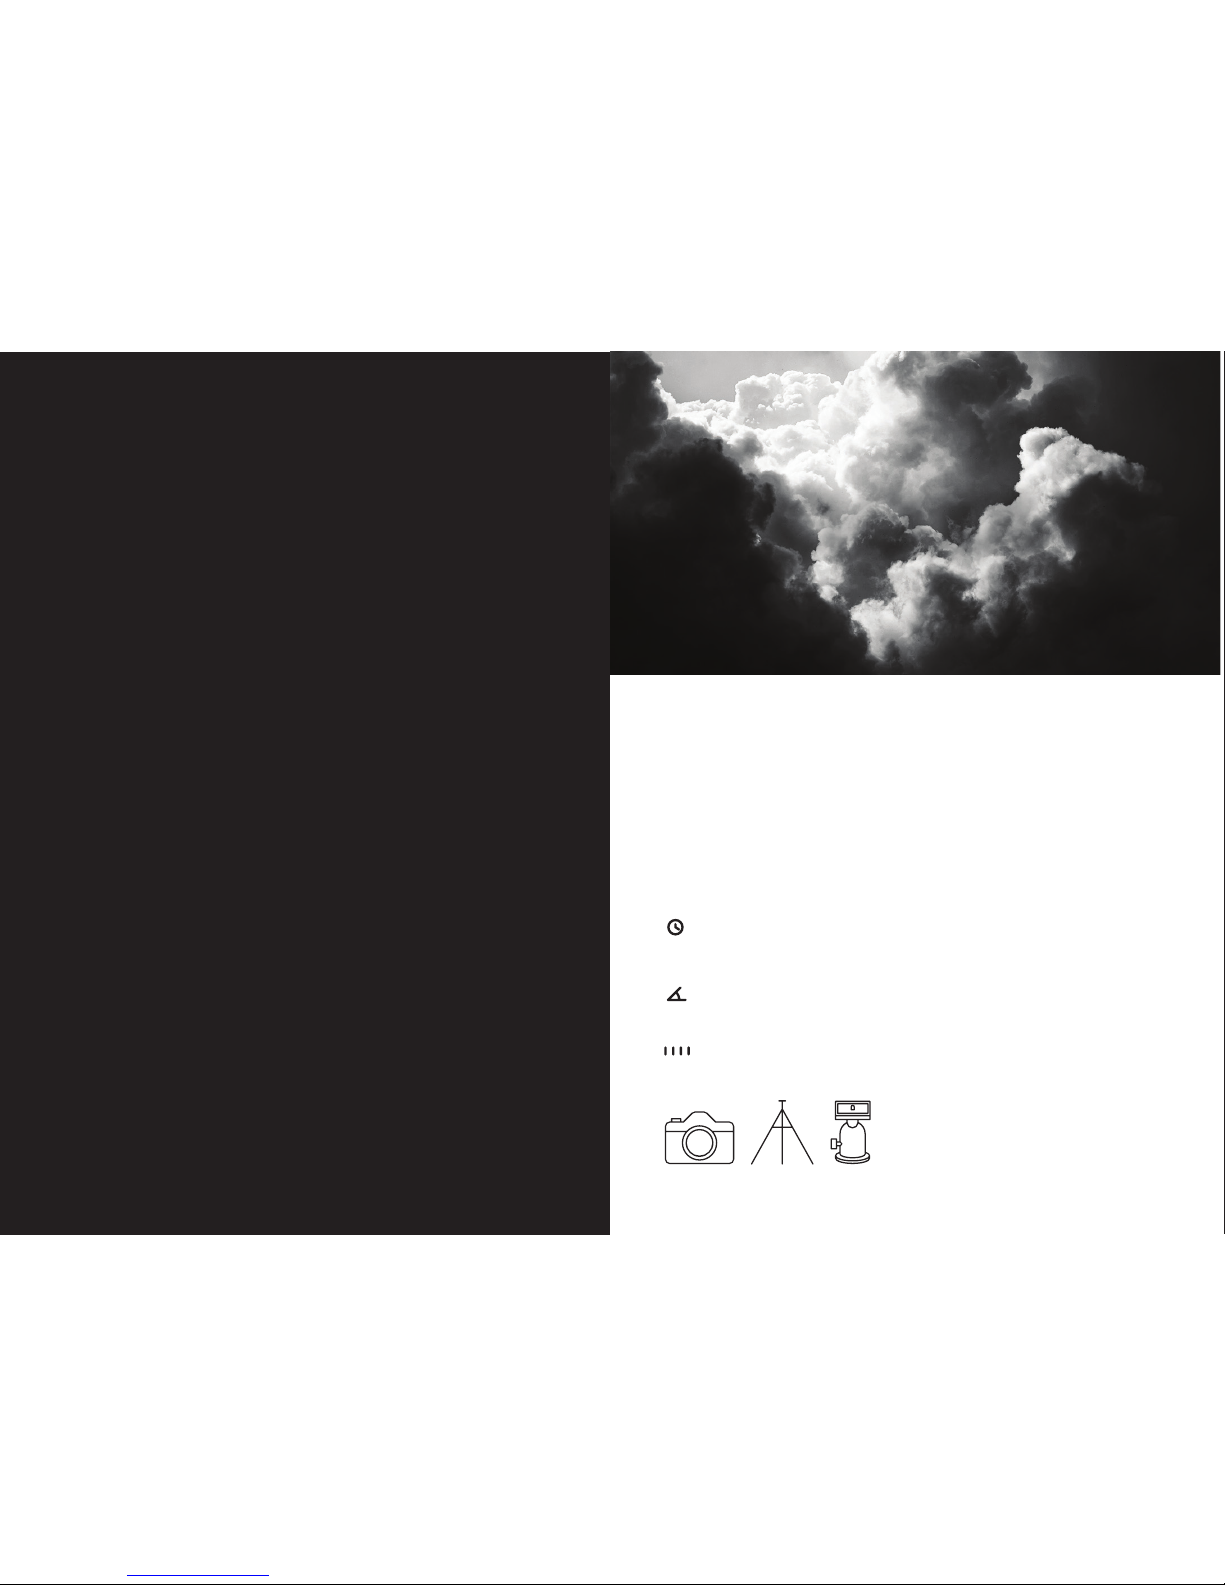
CLOUDS
Moving clouds can be impressive yet difficult subjects; pay close
attention to light changes.
Duration: Depending on how much the clouds are moving,
use 30 minutes–1hour.
Rotation: Concentrate on big cloud formations and rotate
only 15–30 degrees.
Interval: Clouds move faster than it appears; use a small
interval, 2–4 seconds.
Aperture: Use a small to medium aperture to keep everything in
focus, f 4–f 11.
Shutter: Use fast shutter speeds to capture crisp slow moving
clouds, 1/100 seconds. If the clouds are above you and causing
a lot of light variation, it is a good idea to use a slower shutter
speed, around 1/3 seconds.
Page 13
24
23
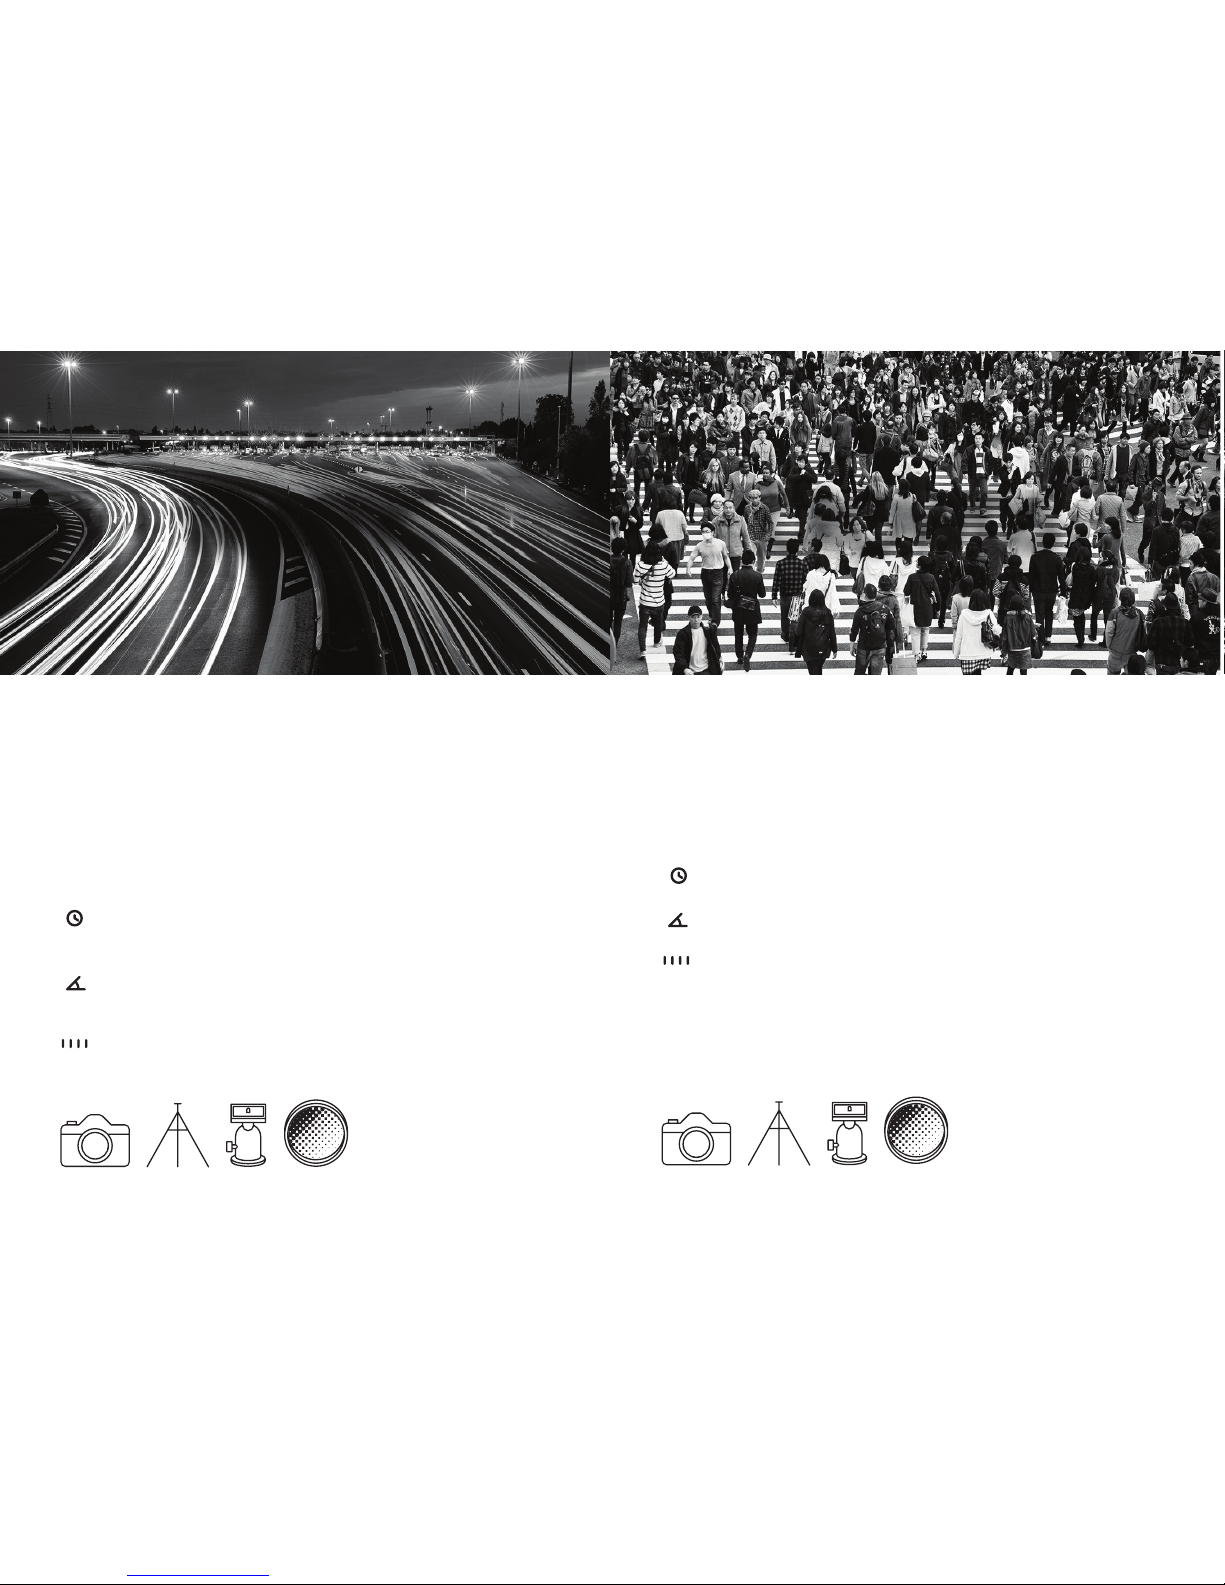
CROWDS
Busy crowds can be very interesting subjects. Use a slightly long
shutter time to smooth the motion and make it fluid.
Duration: 15 minutes–1 hour.
Rotation: Slight motion will work best, 0–30 degrees.
Interval: Take a photo every 1–3 seconds to keep the motion fluid.
Aperture: Use a small aperture to keep everything in focus, f8
–f11.
Shutter: Your shutter speed should be around 3/4 of the interval
to capture the motion. You might need an ND filter.
Aperture: Use a small aperture to keep everything in focus and
allow for long shutter times, f8–f 11.
Shutter: Use a shutter speed of about 3/4 of the interval, allowing
some time for the camera to process the photo. If you are shooting
in daylight, you may need an ND filter to allow for long exposures.
TRAFFIC
Moving traffic is one of the best scenarios to use slow shutter
speeds to smooth motion.
Duration: Fast paced cities are captured best in 15–30
minutes.
Rotation: Since the subject is already moving, a slight rotation
of 30–60 degrees goes a long way.
Interval: A 1–3 seconds interval will work best.
Page 14
26
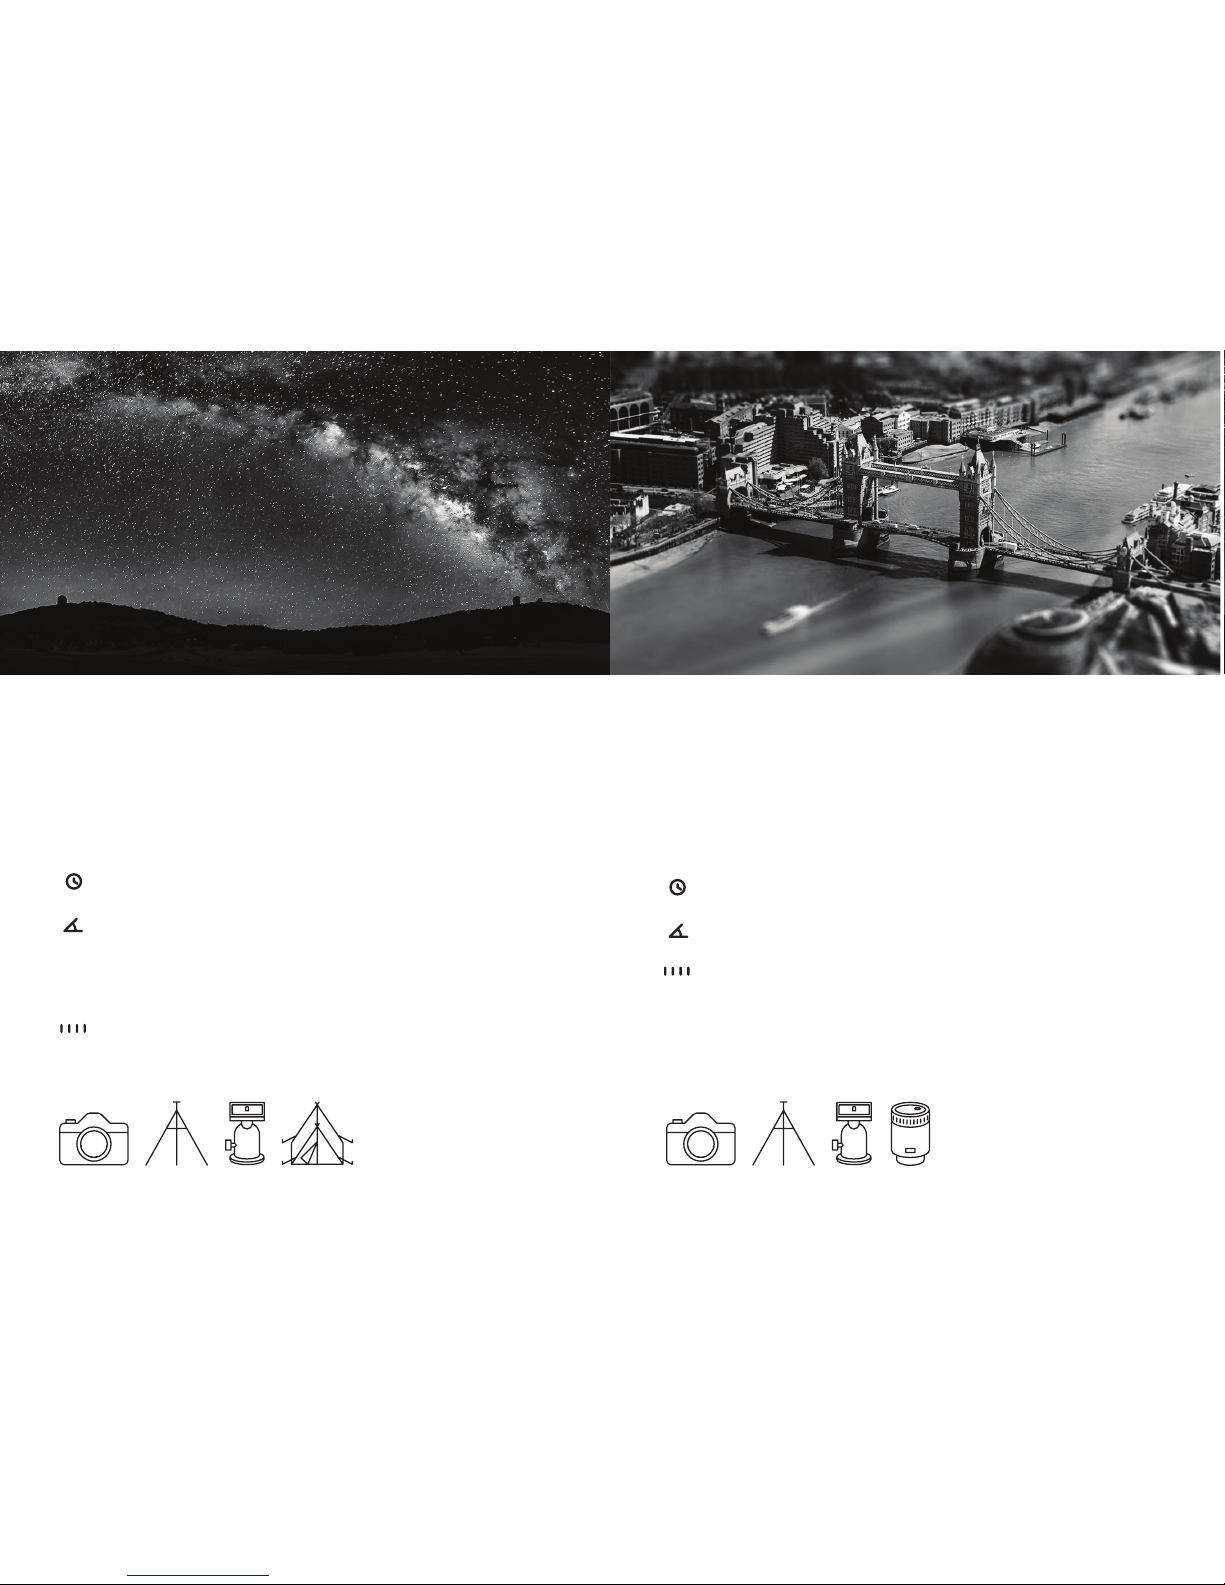
CITY
Using a tilt-shift effect it is possible to make cities look like
miniature toy cities. You can use a special tilt-shift lens or simulate
it using software.
Duration: 30 minutes–1hour.
Rotation: Slight motion will work best. 0–15 degrees.
Interval: Take a photo every 2–5 seconds to keep the motion
somewhat fluid.
Aperture: Use a medium aperture for maximum sharpness. f 3.6–f5.
Shutter: Use very short exposures, around 1/100 seconds. In this
case, it is desirable to freeze motion to cause a staccato effect.
25
STARS
Some of the most beautiful time-lapse videos capture the sky at night.
Duration: Shoot all night! 6 hours or more.
Rotation: Stars move a lot during the night. If you are
pointing straight up, keep movement to the minimum. We
recommend framing a landmark for orientation and moving
anywhere from 0–30 degrees.
Interval: Set the interval a little higher than the shutter
duration to allow for processing time. For example, use a 35
second interval with 30 second exposures.
Aperture: Use a large aperture, this will let a lot of light in and
keep the image sharp. f 2.8–f 4.
Shutter: You will need long exposure times, between 20–30 seconds.
Make sure you disable long exposure noise reduction (LENR).
Page 15
28
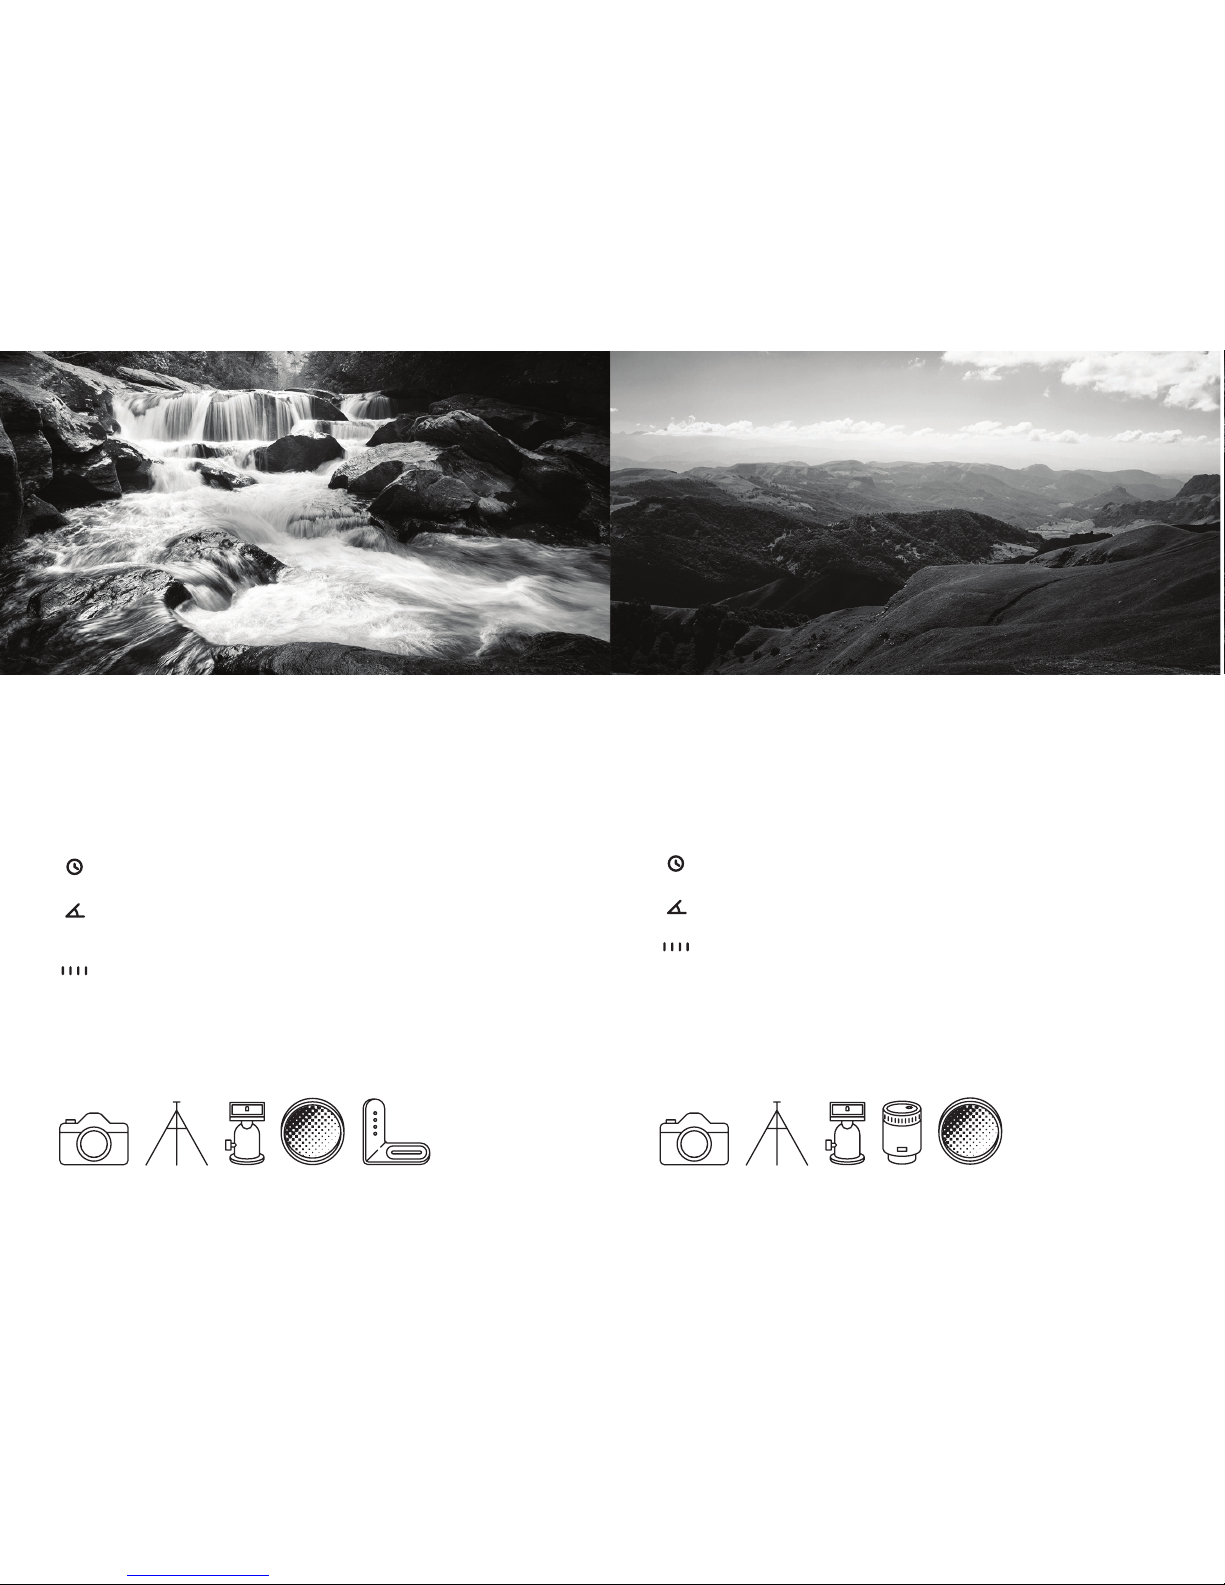
The idea here is to capture how shadows move over time, avoid
cloudy days and fast moving subjects. For better results, use a
wide angle lens.
Duration: 3–5 hours will bring shadows to life.
Rotation: Use 45–90 degrees to get a great field of view.
Interval: To capture the maximum amount of detail, use 20
second intervals.
Aperture: Use a small aperture to keep everything in focus f 11–f 16.
Shutter: Sharpness is key, use 1/100 seconds.
LANDSCAPE
27
WATER
In time lapse videos, flowing water looks like a mysteriously
peaceful mist.
Duration: 30 minutes–2 hours.
Rotation: Tilt up or down 30–45 degrees to capture a waterfall
or pan 15–45 degrees to capture a river.
Interval: Set the interval a little higher than the shutter speed
to allow for processing time.
Aperture: Use a large aperture to keep the image sharp. f 2.8–f 4.
Shutter: You will need an ND filter to allow for long exposure
times. 5–10 seconds.
Page 16
FCC Compliance Statement
This device complies with Part 15 of the FCC Rules. Operation is subject
to the following two conditions: (1) this device may not cause harmful
interference, and (2) this device must accept any interference received,
including interference that may cause undesired operation.
Europe - EU Declaration of Conformity
Se www.mindarin.com/eurocompliance.
This product should be disposed off separately from household waste.
© 2014 Mindarin, LLC All rights reserved.
Mindarin, the Mindarin logo and the Astro logo are trademarks or
registered trademarks of Mindarin, LLC in the United States of America
and/or other countries. All trademarks, trade names, icons, logos, written
material, images, code, and product names used in association with
this product are copyrights, trademarks, or other intellectual property
exclusively owned and controlled by Mindarin, LLC.
Adobe After Effects and Adobe Lightroom are trademarks of Adobe
Systems, Inc., registered in the U.S. and other countries. iMovie is a
trademark of Apple Inc., registered in the U.S. and other countries.
Windows Movie Maker is a registered trademark of Microsoft Corporation
in the United States and other countries.
Patent Pending.
For more information and customer support visit www.mindarin.com
 Loading...