

Page 1
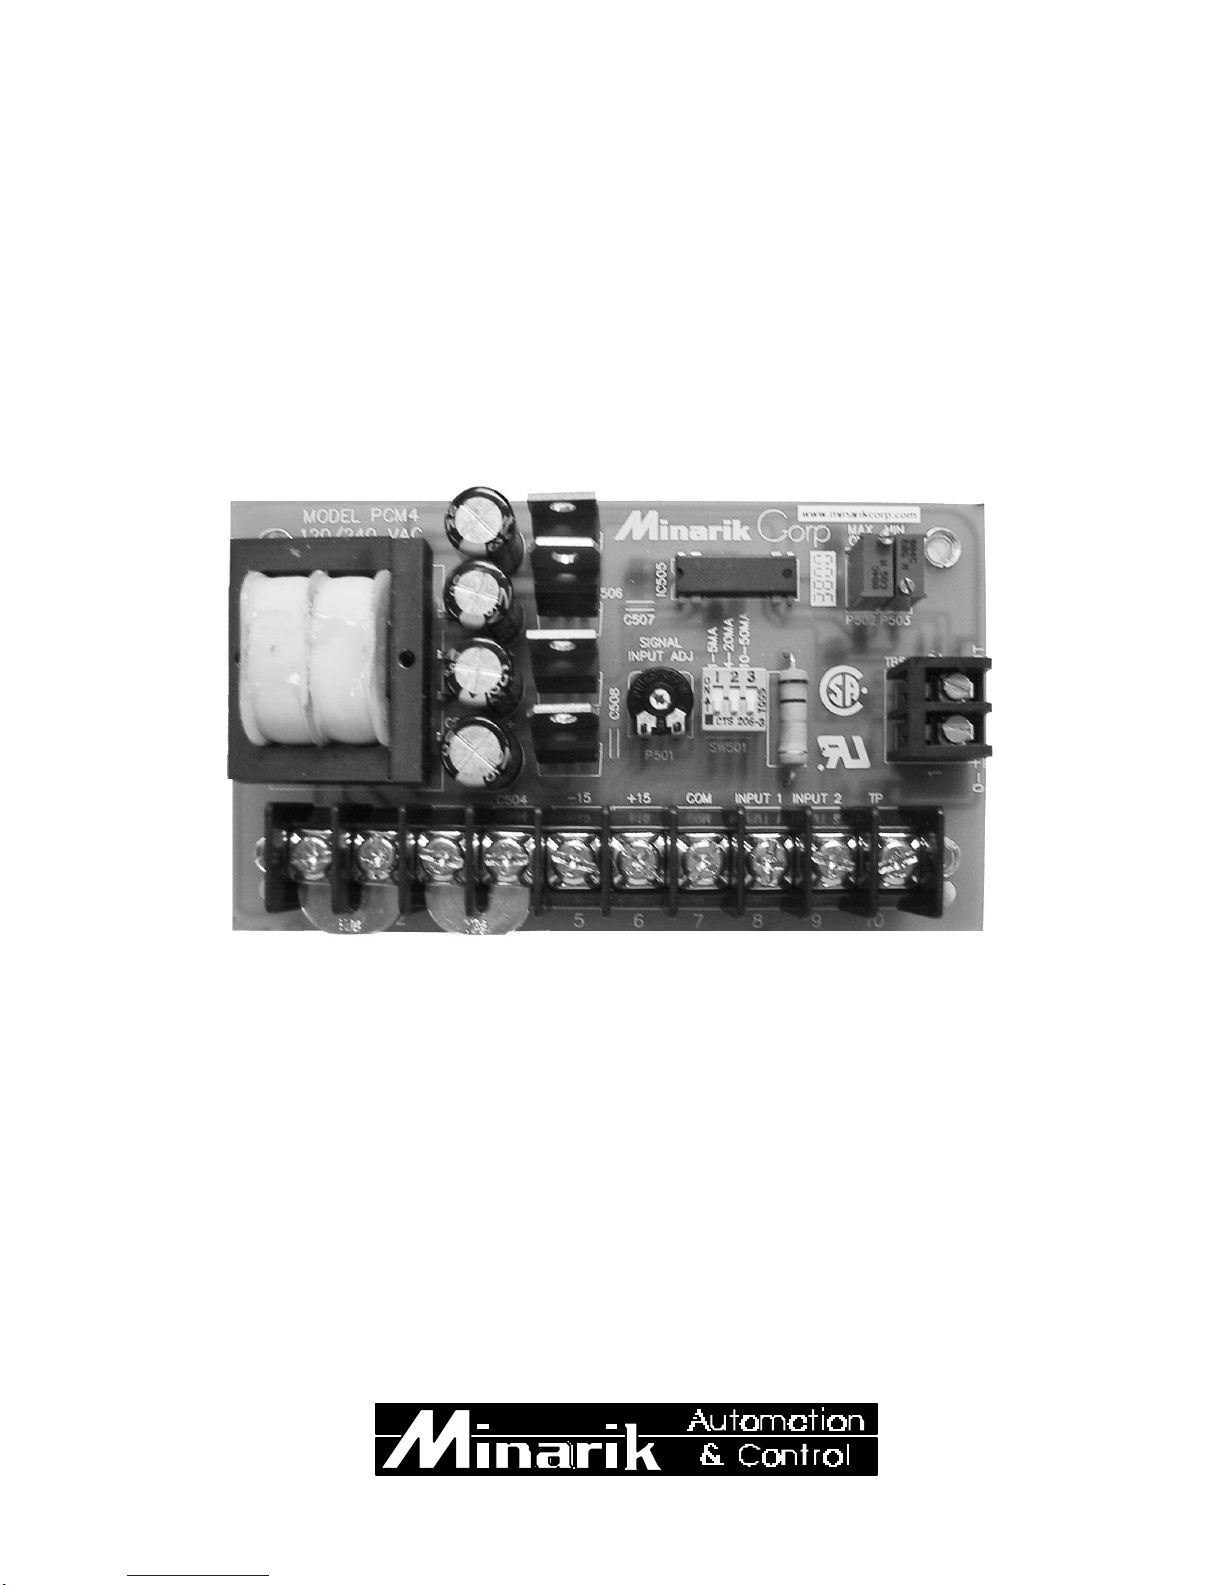
USER’S MANUAL
PROCESS CONTROL
MODULE PCM4
Page 2

All rights reserved. No part of this manual may be reproduced or transmitted in any
form without written permission from Minarik Corporation. The information and
technical data in this manual are subject to change without notice. Minarik
Corporation and its Divisions make no warranty of any kind with respect to this
material, including, but not limited to, the implied warranties of its merchantability
and fitness for a given purpose. Minarik Corporation and its Divisions assume no
responsibility for any errors that may appear in this manual and make no
commitment to update or to keep current the information in this manual.
Printed in the United States of America.
Copyright 2001 by
Minarik Corporation
Page 3

Safety Warnings
• This symbol m denotes an important safety tip or warning.
Please read these instructions carefully before performing
any of the procedures contained in this manual.
• DO NOT INSTALL, REMOVE, OR REWIRE THIS
EQUIPMENT WITH POWER APPLIED. Have a qualified
electrical technician install, adjust and service this equipment.
Follow the National Electrical Code and all other applicable
electrical and safety codes, including the provisions of the
Occupational Safety and Health Act (OSHA), when installing
i
equipment.
• Reduce the chance of an electrical fire, shock, or explosion by
proper grounding, over-current protection, thermal protection,
and enclosure. Follow sound maintenance procedures.
Circuit potentials are at 120 VAC or 240 VAC above earth
m
ground. Avoid direct contact with the printed circuit board
or with circuit elements to prevent the risk of serious injury
or fatality. Use a non-metallic screwdriver for adjusting the
calibration trimpots. Use approved personal protective
equipment and insulated tools if working on this drive with
power applied.
Page 4

ii
Contents
Safety Warnings . . . . . . . . . . . . . . . . . . . . . . . . . . . . . . . . . .i
Specifications . . . . . . . . . . . . . . . . . . . . . . . . . . . . . . . . . . . .1
Dimensions . . . . . . . . . . . . . . . . . . . . . . . . . . . . . . . . . . . . . .2
Introduction . . . . . . . . . . . . . . . . . . . . . . . . . . . . . . . . . . . . . .3
Installation . . . . . . . . . . . . . . . . . . . . . . . . . . . . . . . . . . . . . . .4
Mounting . . . . . . . . . . . . . . . . . . . . . . . . . . . . . . . . . . . . . . .4
Wiring . . . . . . . . . . . . . . . . . . . . . . . . . . . . . . . . . . . . . . . . .5
Shielding guidelines . . . . . . . . . . . . . . . . . . . . . . . . . . . . .6
Screw terminal block . . . . . . . . . . . . . . . . . . . . . . . . . . . . . .7
Connections . . . . . . . . . . . . . . . . . . . . . . . . . . . . . . . . . . . . .8
AC line connections . . . . . . . . . . . . . . . . . . . . . . . . . . . . .8
Input signal connections . . . . . . . . . . . . . . . . . . . . . . . . 10
Master signal generator . . . . . . . . . . . . . . . . . . . . . . . . . . .11
Output voltage connections . . . . . . . . . . . . . . . . . . . . . . . . 14
Multiple follower requirements . . . . . . . . . . . . . . . . . . . . . . 17
MM30000 series . . . . . . . . . . . . . . . . . . . . . . . . . . . . . . 17
Multiple drives following a single signal input . . . . . . . . . 19
Master PCM4 with multiple drives following . . . . . . . . . . 20
Page 5

iii
Calibration . . . . . . . . . . . . . . . . . . . . . . . . . . . . . . . . . . . . . . 21
Signal Input Adjust . . . . . . . . . . . . . . . . . . . . . . . . . . . . . . 22
DIP switches . . . . . . . . . . . . . . . . . . . . . . . . . . . . . . . . . . . 23
Input signal calibration . . . . . . . . . . . . . . . . . . . . . . . . . . . .24
Input voltage calibration . . . . . . . . . . . . . . . . . . . . . . . . . . 24
Input current calibration . . . . . . . . . . . . . . . . . . . . . . . . . . .25
Troubleshooting . . . . . . . . . . . . . . . . . . . . . . . . . . . . . . . . . 26
Before troubleshooting . . . . . . . . . . . . . . . . . . . . . . . . . . . 26
Unconditional Warranty . . . . . . . . . . . . . . .inside back cover
Page 6

iv
Illustrations
Figure 1. Process Control Module (PCM4) Dimensions . . . . . . . . . .2
Figure 2. Screw Terminal Block . . . . . . . . . . . . . . . . . . . . . . . . . . . .7
Figure 3. 115 VAC Power Connection . . . . . . . . . . . . . . . . . . . . . . .9
Figure 4. 230 VAC Power Connection . . . . . . . . . . . . . . . . . . . . . . .9
Figure 5. Connection – Following an External Signal . . . . . . . . . . .10
Figure 6. Unidirectional Manual Master Signal Source Connection .13
Figure 7. Bidirectional Manual Master Signal Source Connection . .13
Figure 8. Connection – Output Voltage . . . . . . . . . . . . . . . . . . . . . .16
Figure 9. Connection – Multiple Follower System . . . . . . . . . . . . . .18
Figure 10. Signal Input Adjust . . . . . . . . . . . . . . . . . . . . . . . . . . . .19
Figure 11. Connection – Ratio Potentiometers Multiple
Follower System . . . . . . . . . . . . . . . . . . . . . . . . . . . . . .20
Figure 12. SIGNAL INPUT ADJ - Calibration Positions . . . . . . . . . .22
Figure 13. DIP Switch Settings . . . . . . . . . . . . . . . . . . . . . . . . . . . .23
Page 7

1
Specifications
Power Requirements
Line input 120/240 VAC, 50/60 Hz, single phase
Input Signal Ranges (input circuit is isolated)
Voltage signal
Narrow range –25 to +25 VDC
Wide range –250 to +250 VDC
Current signal 1–5 mADC, 4–20 mADC, 10–50 mADC
Input Impedance
Voltage signal >25K ohms
Current signal
1–5 mADC 1K ohm
4–20 mADC 235 ohms
10–50 mADC 100 ohms
Output
Impedance 800 ohms
Voltage range, max –10 to +10 VDC
Linearity 0.01%
Operating Temperature Range 0 – 50 °C
Page 8
2
Dimensions
4.83 [123]
4.83 [123]
1.93 [49]
1.93 [49]
2.70 [69]
2.70 [69]
1.30 [33]
1.30 [33]
T501
1
MODEL PCM4
120/240 VAC
2.1 WATTS
TB501
C501
C502
C503
C504
C505
IC501
C506
IC502
IC503
IC504
-15
IC505
C507
SIGNAL
INPUT ADJ
C508
P501
+15
COM
65
7 8
4-20MA
1-5MA
1 2 3
SW501
INPUT 1
WWW.MINARIKCORP.COM
MAX
MIN
OUT
OUT
P502P503
10-50MA
R501
R
INPUT 2 TP
9 10
TB502
R
21
0-±10VDC OUTPUT
0.35 [9]
0.35 [9]
ALL DIMENSIONS IN INCHES [MILLIMETERS]
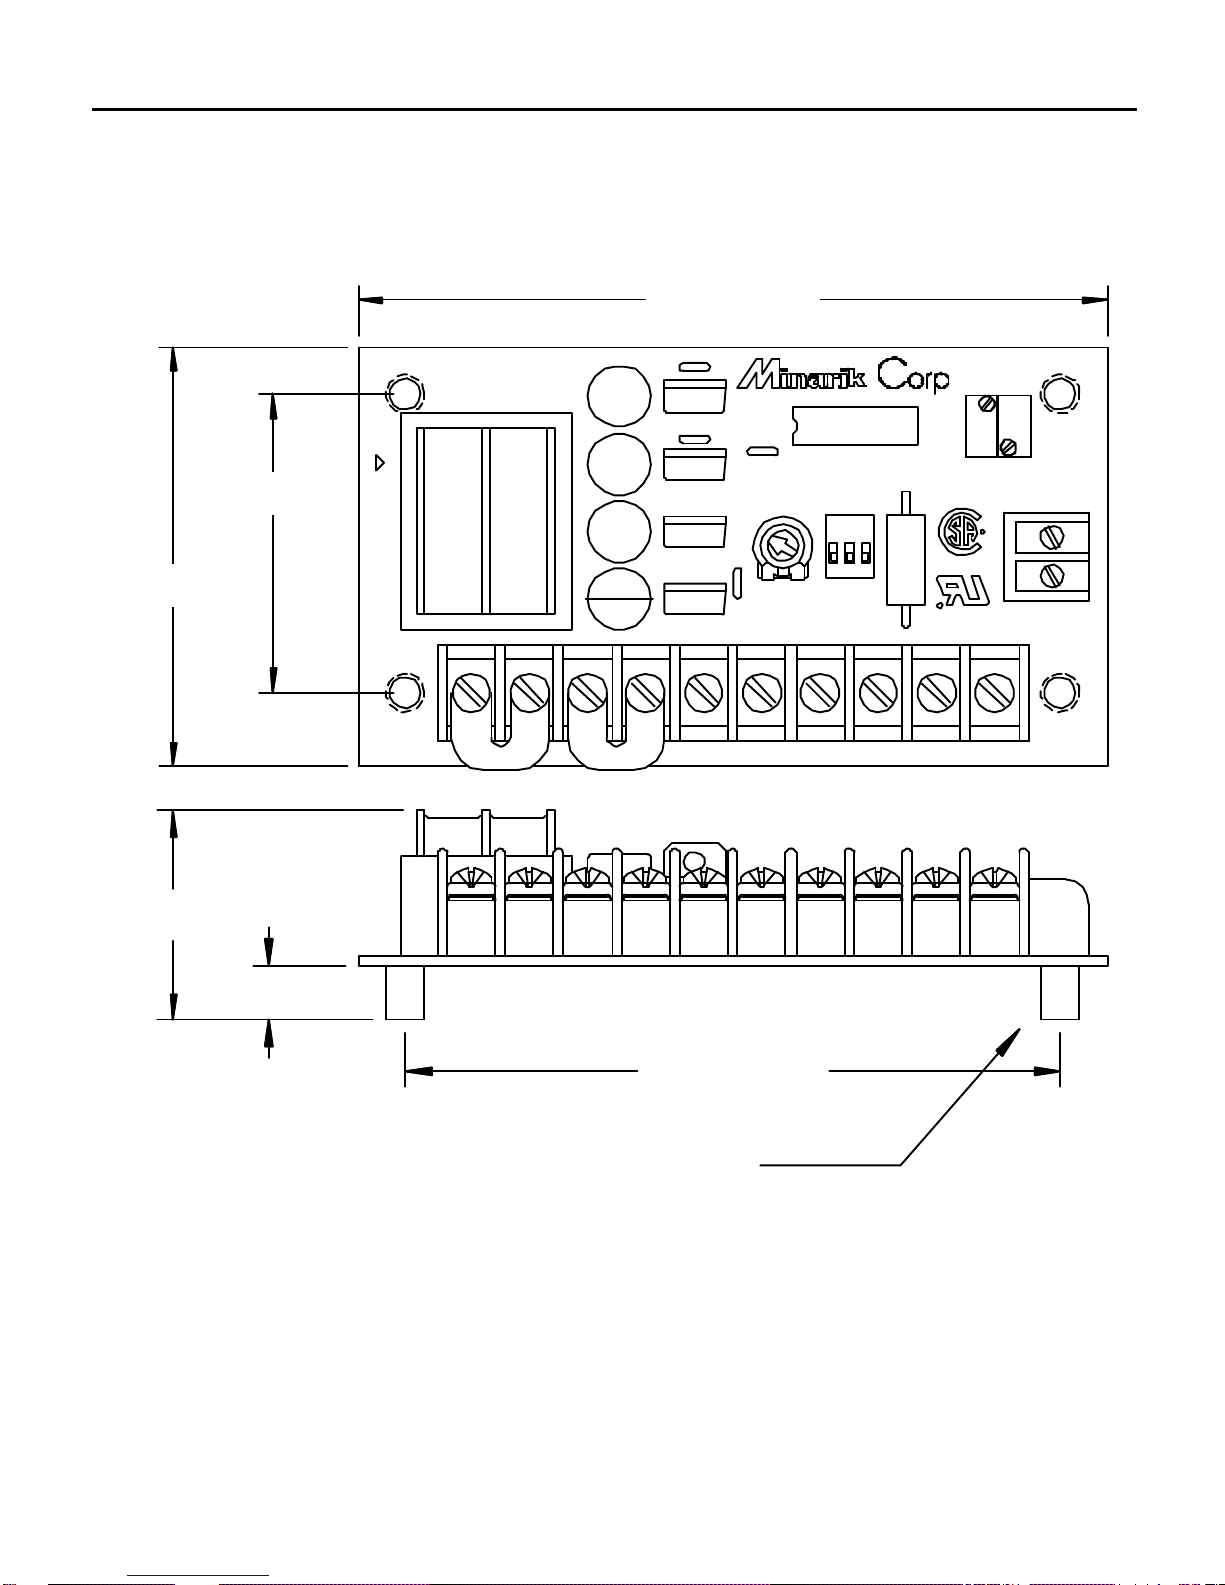
Figure 1. Process Control Module (PCM4) Dimensions
4.22 [107]
4.22 [107]
4 x 0.25 [6] STANDOFF
4x 0.25 [6] STANDOFF
USE #8 PANHEAD SCREWS
USE #8 PANHEAD SCREWS
Page 9

Introduction
Model PCM4 accepts a grounded or floating, bipolar, DC signal
input and generates a proportional floating output voltage. The
output of the PCM4 follows the variations of its input: it increases
as the signal increases and decreases as the signal decreases.
This output can be supplied to the speed setting circuit of a motor
drive to rotate the motor at a speed proportional to the signal
input. Because the PCM4 can follow bipolar input voltage
3
signals, it can drive a regenerative variable speed drive through
the complete range of motor speeds in both forward and reverse
directions.
This manual contains specifications, installation procedures,
connections, and calibration procedures for the process control
module, model PCM4. Refer to your variable speed drive user’s
manual for additional installation, operation, and troubleshooting
procedures.
Page 10

4
Installation
Warning
m
Do not install, rewire, or remove this control with input
power applied. Doing so may cause fire or serious injury.
Make sure you have read and understood the Safety
Warnings before attempting installation.
Mounting
• PCM4 components are sensitive to electrostatic fields. Avoid
contact with the circuit board directly.
• Protect the PCM4 from dirt, moisture, and accidental
contact. Provide sufficient room for access to the terminal
block.
• Mount the PCM4 away from other heat sources. Operate
within the specified ambient operating temperature range.
The operating temperature range for the PCM4 is 0°C
through 50°C.
• Prevent loose connections by avoiding excessive vibration of
the process control module board.
• Mount the PCM4 in either a horizontal or vertical plane.
• The PCM4 is mounted using 4 – 0.25 inch [6mm] standoffs.
See Figure 1, page 2 for the physical locations of these
standoffs. Use #8 panhead screws to fasten the standoffs to
the mounting surface.
Page 11

Wiring
Warning
m
Do not install, remove, or rewire this equipment with power
applied. Failure to heed this warning may result in fire,
Installation
5
(
explosion, or serious injury.
Circuit potentials are at 120 or 240 VAC above ground. To
prevent the risk of injury or fatality, avoid direct contact with
the printed circuit board or with circuit elements.
• Use 18-24 AWG wire for signal wiring. Use 16-18 AWG wire
for AC line (L1, L2) wiring.
Page 12

6
Installation
Shielding guidelines
Warning
m
Under no circumstances should power and logic leads be
bundled together. Induced voltage can cause unpredictable
behavior any electronic device.
As a general rule, Minarik recommends shielding of all
conductors.
If it is not practical to shield power conductors, Minarik
recommends shielding all logic-level leads. If shielding of logic
level leads is not practical, the user should twist all logic leads
with themselves to minimize induced noise.
It may be necessary to earth ground the shielded cable. Do not
ground both ends of the shield.
If the drive continues to pick up noise after grounding the shield,
it may be necessary to add AC line filtering devices, or to mount
the drive in a less noisy environment.
Logic wires from other input devices, such as motion controllers
and PLL velocity controllers, must be separated from power lines
in the same manner as the logic I/O on the PCM4.
Page 13
Screw terminal block
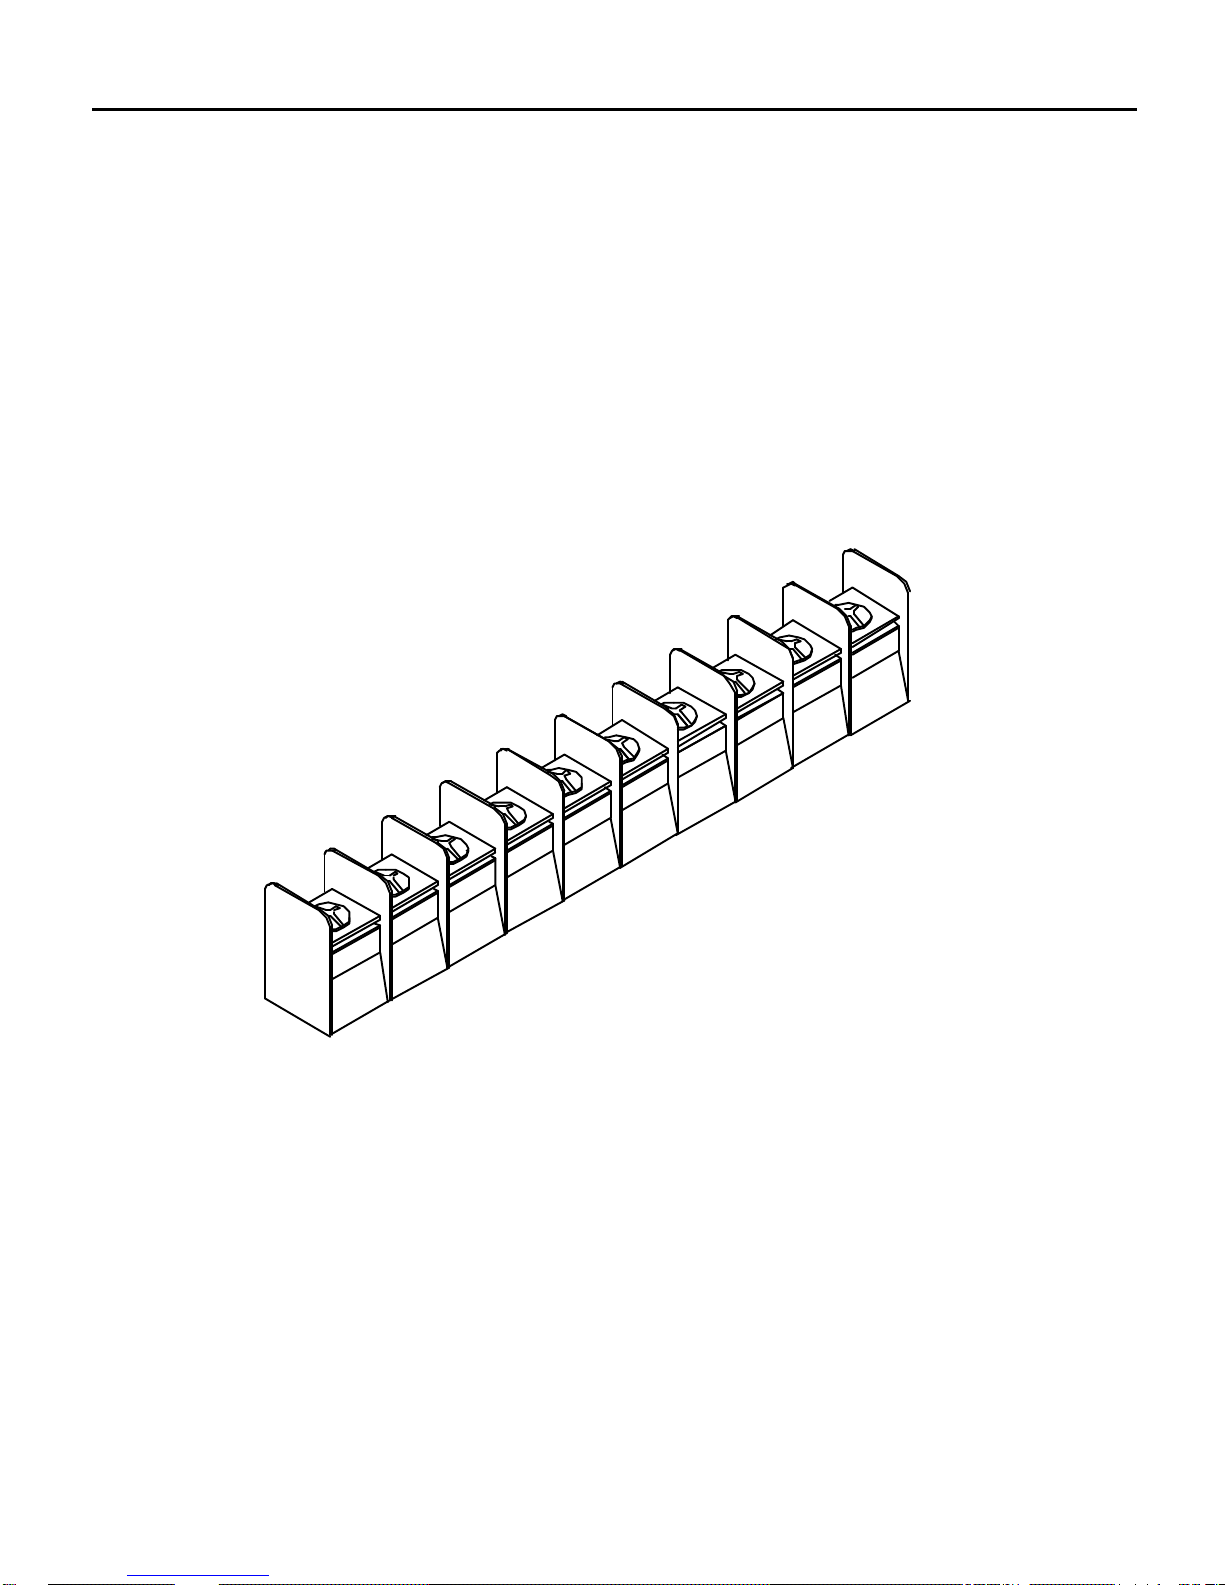
Connections to Minarik’s PCM4 are made to a screw terminal
block. Using a screwdriver, turn the terminal block screw counterclockwise to open the wire clamp. Insert stripped wire into the
wire clamp. Turn the terminal block screw clockwise to clamp the
wire. See Figure 2.
Installation
7
Figure 2. Screw Terminal Block
Page 14

8
Installation
Connections
Warning
m
Do not connect this equipment with power applied.
Failure to heed this directive may result in fire or
serious injury.
Minarik strongly recommends the installation of a
master power switch in the voltage input line. The
switch contacts should be rated at 2 amps AC and
250 volts.
AC line connections
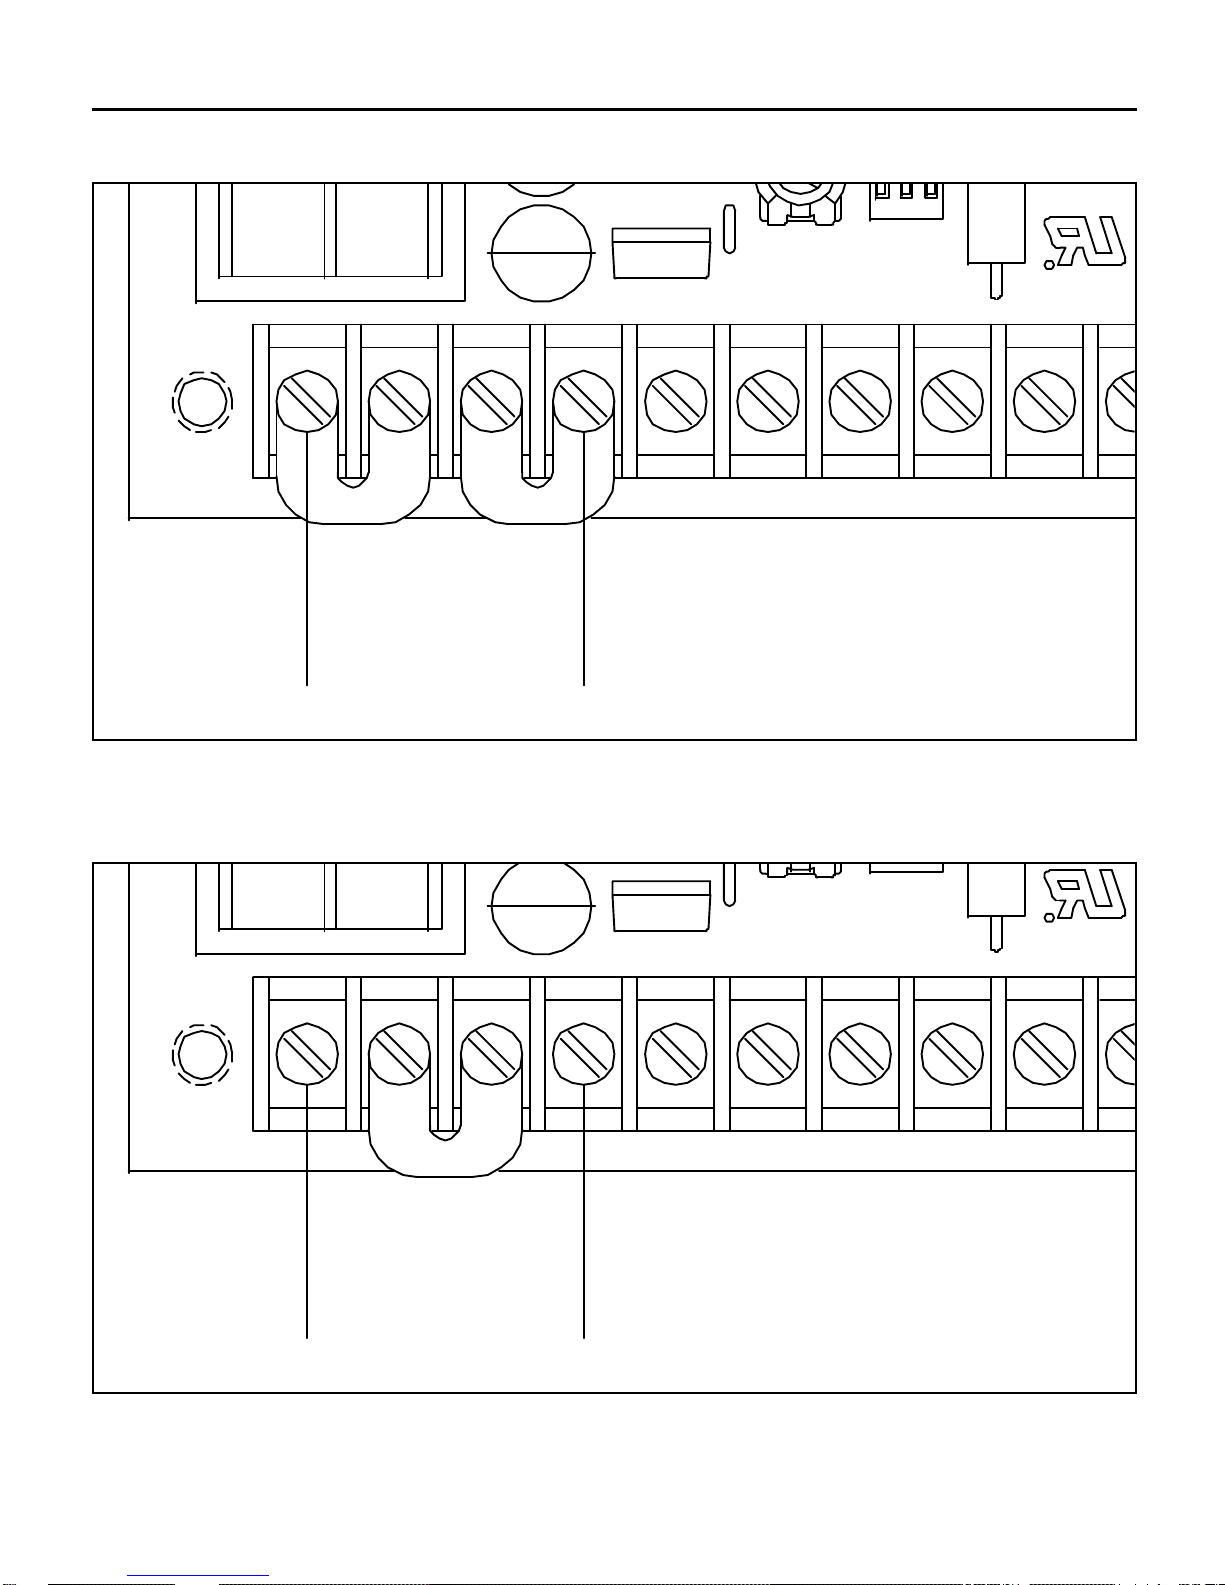
When operating on 120 VAC, leave the jumper bars installed
between terminals 1 and 2 and between 3 and 4 (see Figure 3).
This is how the unit is shipped from the factory. When operating
on 230VAC, remove both jumper bars and place one jumper bar
between terminals 2 and 3 (see Figure 4).
Connect the AC power leads to terminals 1 and 4.
Page 15
IC504
R501
10
TP
C508
R501
10
TP
Installation
9
TB501
C503
C504
1 4
1 4
AC POWER
AC POWER
115 VAC
115 VAC
IC504
-15
P501
+15
65
SW501
COM
INPUT 1
7 8
R
INPUT 2
9
TB501
Figure 3. 115 VAC Power Connection
C504
1 4
1 4
AC POWER
AC POWER
230 VAC
230 VAC
P501
-15 INPUT 1
+15
65
SW501
COM
7 8
R
INPUT 2
9
Figure 4. 230 VAC Power Connection
Page 16
10
P501
P501
Installation
Input signal connections
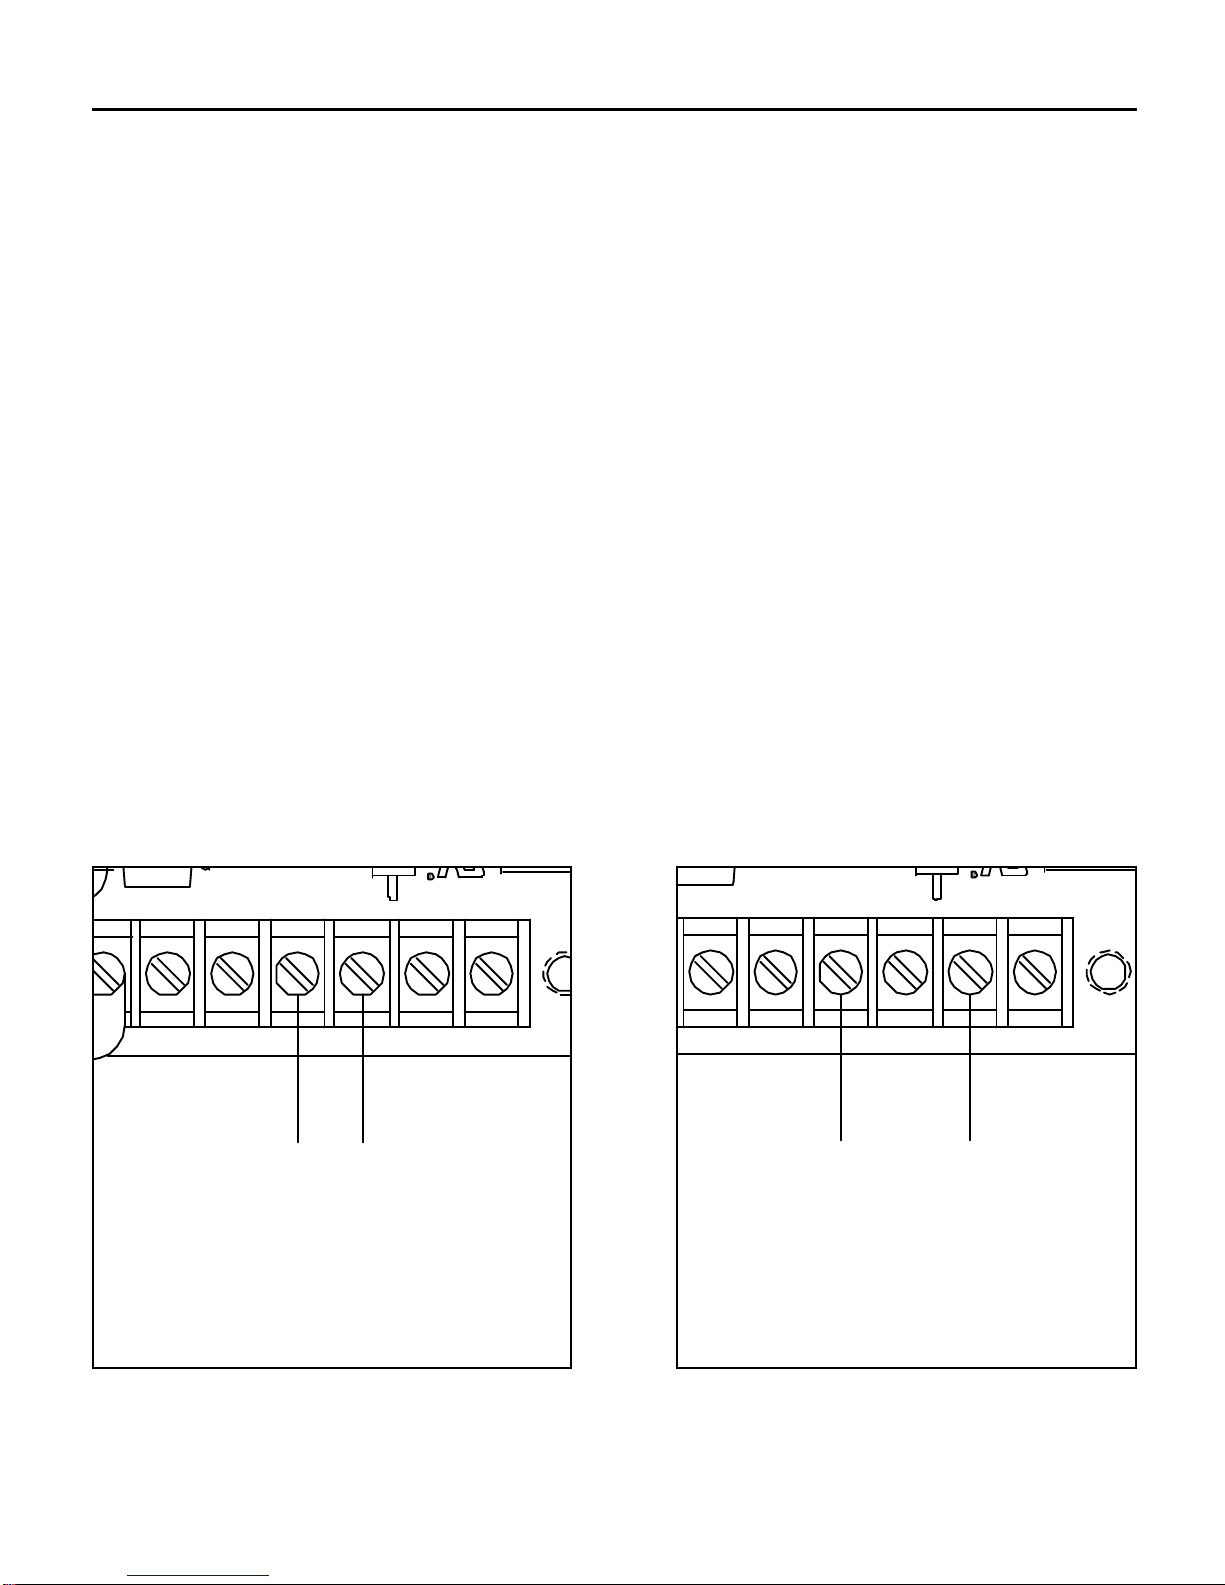
Connect the incoming voltage or current signal leads to
INPUT 1 (terminal 8) and to COM (terminal 7). If the maximum
input voltage will exceed 25V, connect the signal leads to INPUT
2 (terminal 9) and to COM (terminal 7). See Figure 5 below.
Use insulated shielded wire or twisted pair for PCM4 input and
output signal leads longer than 18 inches. Connect the shielding
to earth ground at the end away from the PCM4 and trim the
exposed shielding at the PCM4 to preclude accidental grounding
of the PCM4.
Bundle the signal-carrying leads separately from the motor leads
or AC power leads.
R
-15 INPUT 1
+15
COM (-)
VOLTAGE SIGNAL RANGE
VOLTAGE SIGNAL RANGE
CURRENT SIGNAL RANGES
CURRENT SIGNAL RANGES
COM
65
7 8
SIG (+)COM (-)
SIG (+)
0 - ±25VDC
0 - ±25 VDC
1 - 5 mA
1 - 5mA
4 - 20 mA
4 - 20mA
10 - 50mA
10 - 50 mA
INPUT 2 TP
9 10
1
-15 INPUT 1
+15
65
COM
7 8
COM (-)
VOLTAGE SIGNAL RANGE
VOLTAGE SIGNAL RANGE
0 - ±250VDC
0 - ±250 VDC
R
INPUT 2 TP
9 10
SIG (+)COM (-)
SIG (+)
1
Figure 5. Connection – Following an External Signal
Page 17

Master signal generator
Warning
m
Bidirectional output mode should never be used with
standard SCR (single quadrant) variable speed drives.
These drives only respond to one polarity in their speed
setting circuits.
The PCM4 can be used as a master controller to:
(1) provide a floating DC master voltage input to other PCM4
Installation
11
modules interfacing with standard variable speed drives or
(2) to drive several variable speed drives directly, provided that
their circuit design permits wiring of their speed circuits in
common.
Unidirectional applications require a positive PCM4 output.
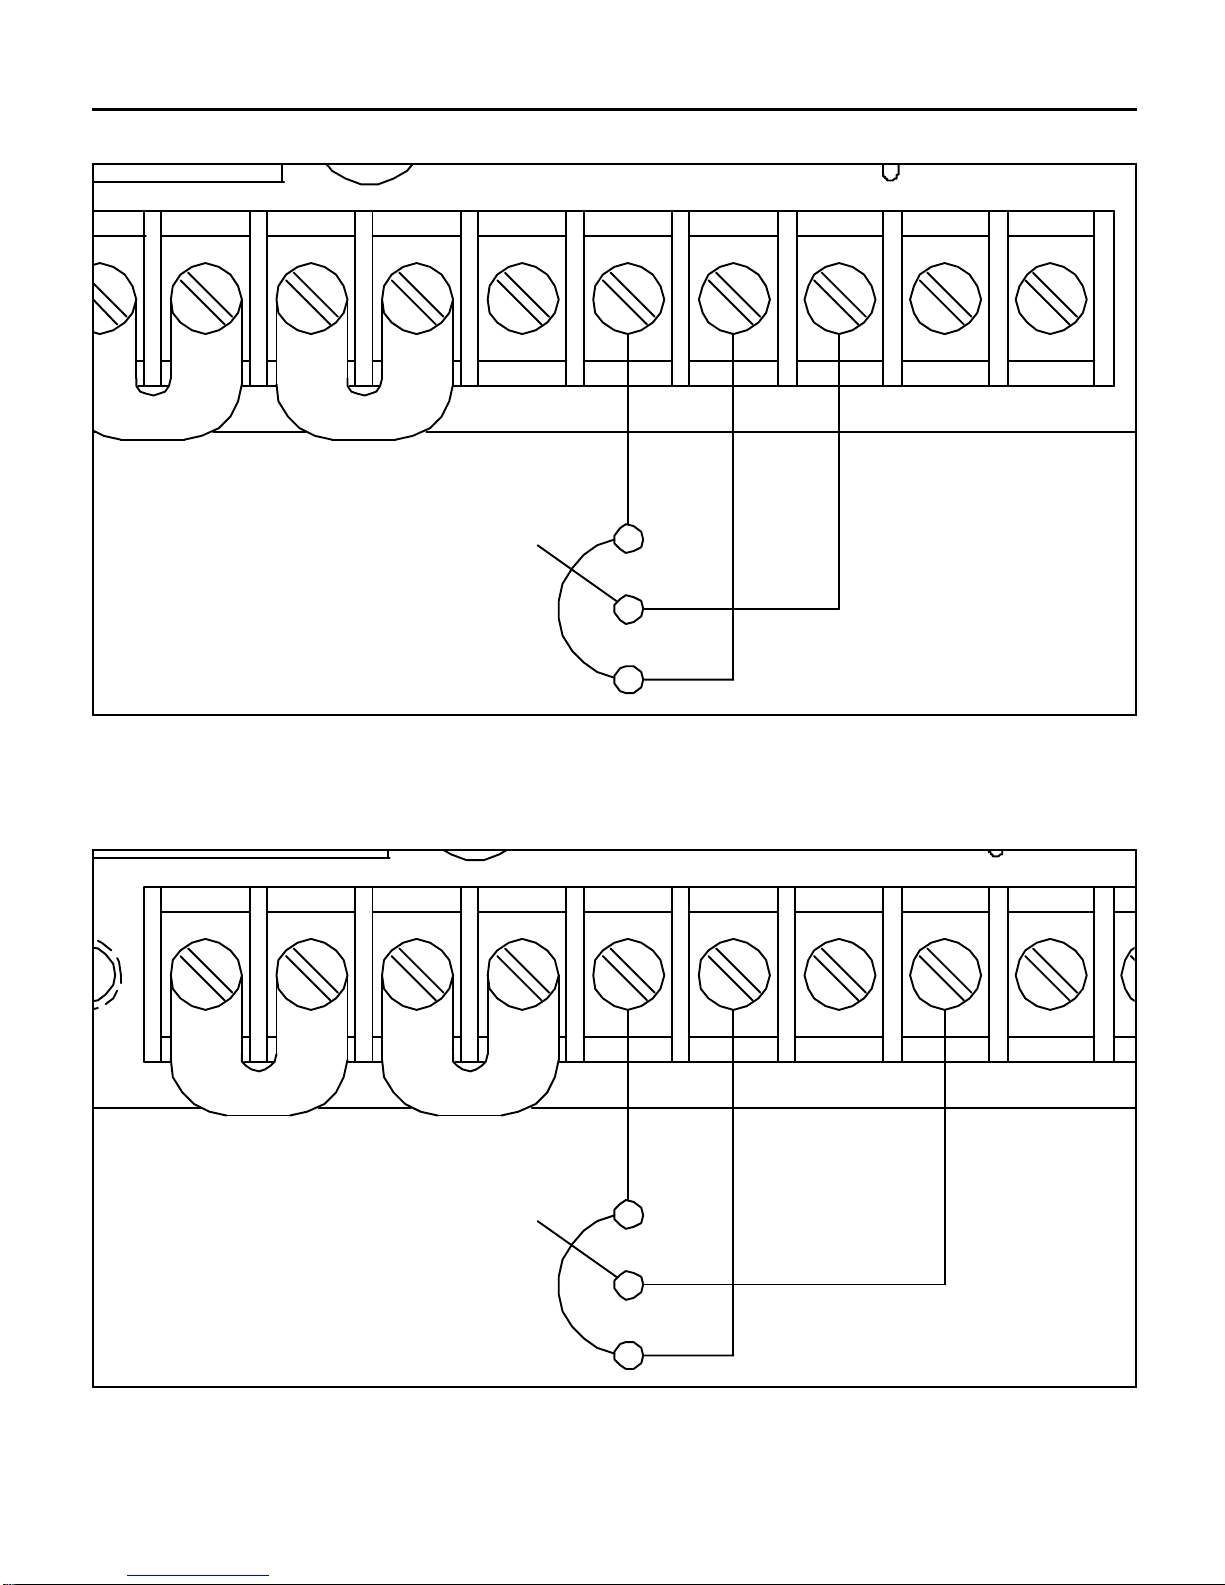
Connect a 10K ohm potentiometer (not provided with the PCM4)
as the master control pot using the +15 VDC supply on the
PCM4.
The normal wiring of an external master control potentiometer is
the CW side of the potentiometer to +15 V supply (terminal 6),
and the CCW side to COM (terminal 7). The potentiometer wiper
is connected to INPUT 1 (terminal 8). See Figure 6 (page13) .
The potentiometer is rotated clockwise to increase the voltage at
INPUT 1 and, therefore, increasing the PCM4 output voltage.
Page 18

12
Installation
Bipolar input is necessary to control motor reversals when the
motor is being driven by a four quadrant, regenerative variable
speed drive.
To wire the external master control potentiometer to provide a
bipolar, adjustable voltage input signal, wire the potentiometer
across the –15 and +15V supply terminals, with the CW end at
+15V. Connect the pot wiper to the INPUT 1 (terminal 8). See
Figure 7 (page 13).
The center position of the wiper produces zero input voltage.
Potentiometer rotation CW from center produces increasing
positive voltage; CCW rotation from center produces increasing
negative voltage.
Page 19
Installation
13
CW
CW
+15
65
COM
7 8
INPUT 2 TP
9 10
C504
10K OHM
10K OHM
SPEED ADJUST
SPEED ADJUST
POTENTIOMETER
POTENTIOMETER
(NOT PROVIDED)
-15 INPUT 1
(NOT PROVIDED)
Figure 6. Unidirectional Manual Master Signal Source Connection
C504
10K OHM
10K OHM
SPEED ADJUST
SPEED ADJUST
POTENTIOMETER
POTENTIOMETER
(NOT PROVIDED)
(NOT PROVIDED)
-15 INPUT 1
-
-
+
+
+15
65
COM
7 8
INPUT 2
9
Figure 7. Bidirectional Manual Master Signal Source Connection
Page 20

14
Installation
Output voltage connections
Warning
m
Always check the instruction manual supplied with the
variable speed drive that will be interfaced with the PCM4
module. The scheme shown for wiring to an external voltage
source, as well as the specifications on that input, must be
well understood before proceeding.
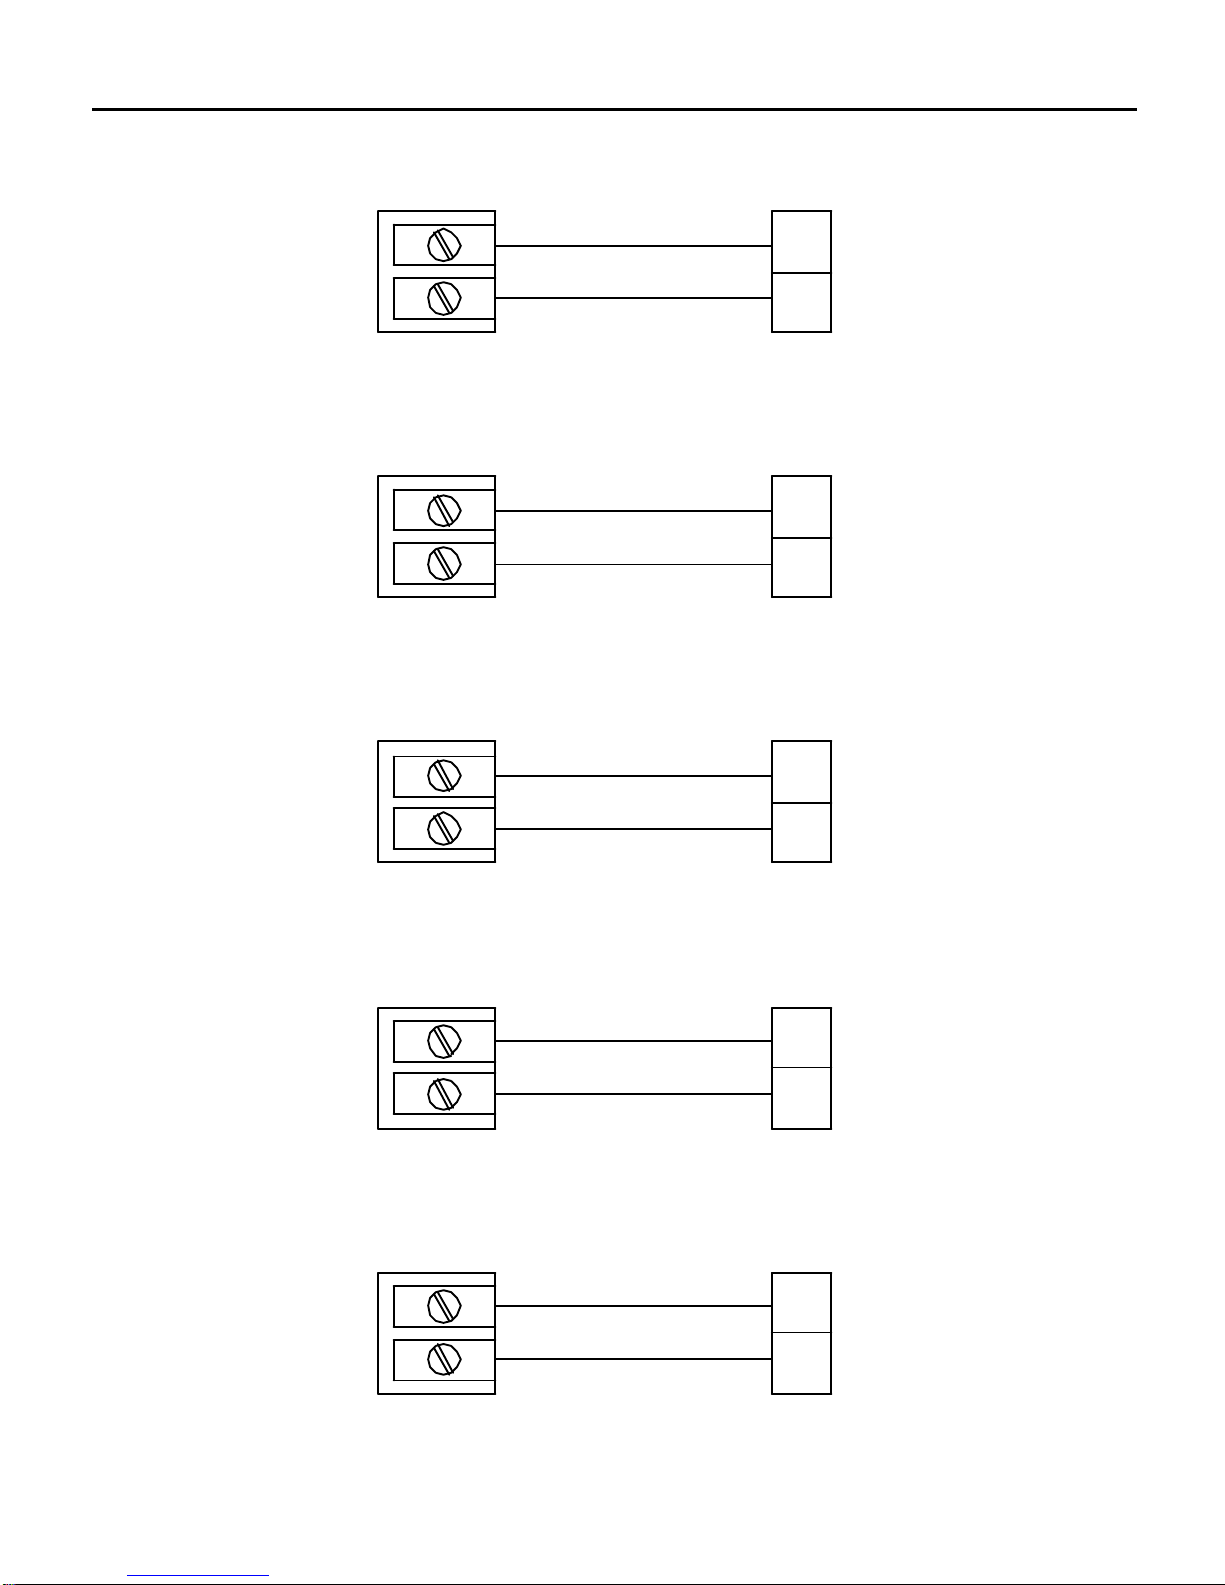
Output connections are made to the small terminal block on the
board (TB502). Connect the output leads to terminal 1 and 2
(Figure 8, page 16). When the input signal at INPUT1 is positive
with respect to COM terminal 2 will be positive.
The exception to this polarity rule occurs when the PCM4 has
been calibrated to bias its output as a voltage follower. An input
of zero volts can be calibrated to produce a finite positive or
negative output voltage.
The PCM4 output is a floating DC voltage. It is brought into the
speed setting circuit of a variable speed drive to replace the main
speed adjust potentiometer.
Page 21

Installation
15
Most Minarik SCR–type, non-regenerative drives are designed
with the speed setting voltage positive with respect to board
common. The positive external signal is brought to the “speed pot
wiper” terminal, usually designated S2, and the common signal
lead to the “speed pot CCW’ terminal usually S1.
Page 22
16
XL/XLT
PCM 4
Installation
PCM4
TB502
PCM4
PCM 4
TB502
PCM4
TB502
0 - + 5VDC OUTPUT
0 - +5 VDC OUTPUT
1 2
0 - +2.8 VDC OUTPUT
0 - + 2.8VDC OUTPUT
1 2
0 - ±10 VDC OUTPUT
0 - ± 10VDC OUTPUT
XL / XLT
SERIES DRIVE
SERIES DRIVE
S2
S1
MM20000
MM20000
SERIES DRIVE
SERIES DRIVE
S2
S1
RG51UA
RG51UAPCM 4
S2
PCM4
PCM 4
TB502
PCM4
PCM 4
TB502
1 2
0 - ±10 VDC OUTPUT
0 - ± 10VDC OUTPUT
1 2
0 - ±10 VDC OUTPUT
0 - ± 10VDC OUTPUT
1 2
S0
RG300, RG310
RG300, RG310
RG400
RG400
RB2
RB1
RG300A, RG310A
RG300A, RG310A
RG400A
RG400A
RB1
S2
Figure 8. Connection – Output Voltage
Page 23

Multiple follower requirements
Warning
m
Most Minarik variable speed drives cannot be wired with
their speed-setting circuits in common with each other. They
require a dedicated PCM4 for each variable speed drive.
Included are all Minarik models in the MM20000 series, XL
series, and all regenerative drives (RG series). A multiple
follower system using any of these drives must consist of a
master PCM4 driving follower PCM4 modules. See pages
Installation
17
18 and 19 of this manual.
MM30000 series
Minarik’s MM30000A series drives can be operated with their
boards sharing one common. This series of drives is the only
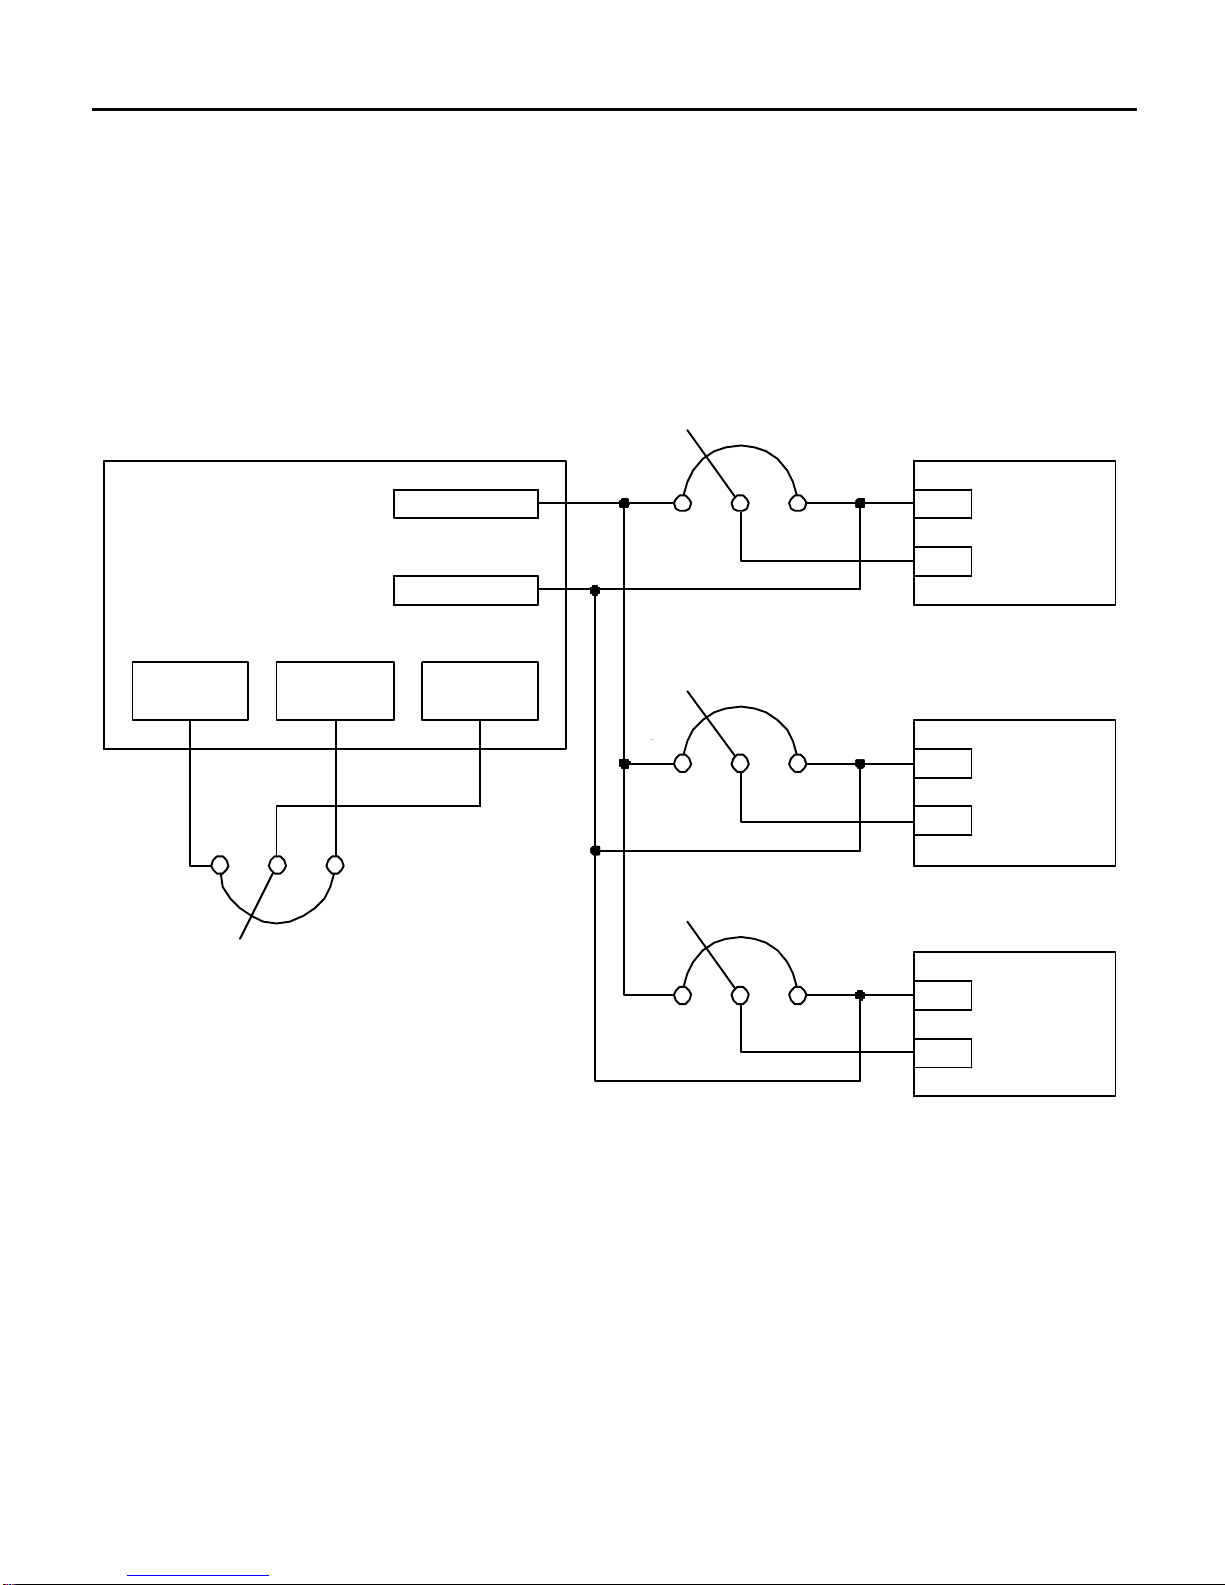
Minarik series that permits more that one drive to follow a single
PCM4 module. See Figure 9.
The number of MM30000-type drives that can be driven by one
PCM4 is limited by the output impedance of the PCM4.
Potentiometers may be wired in parallel with the PCM4 output
for final speed adjustments and ratioing. The net resistance of
these paralleled ratioing pots must be at least 800 ohms.
Page 24
18
MM31002A DRIVE
When using ratioing potentiometers, connect each MM30000
series drive to the master PCM4 as detailed in Figure 9. The input
to the master PCM4 can be any of the standard single quadrant
inputs discussed in this manual.
PCM 4
PCM4
Installation
OUTPUT 2
OUTPUT 2
OUTPUT 1
OUTPUT 1
CW
CW
MM31002A DRIVE
INH2
INH2
S2
S2
+15
+15
(TERM 5)
(TERM 6)
CW
CW
COM
COM
(TERM 7)
(TERM 7)
INPUT
INPUT
(TERM 8)
(TERM 8)
CW
CW
CW
CW
MM31002A DRIVE
MM31002A DRIVE
INH2
INH2
S2
S2
MM31002A DRIVE
MM31002A DRIVE
INH2
INH2
S2
S2
Figure 9. Connection – Multiple Follower System
Page 25

P501
SIGNAL
Installation
Multiple drives following a single signal input
When more that one Minarik drive must follow one voltage
signal, each must be wired individually to dedicated PCM4
modules. Each PCM4 module then receives the “master” input
signal. The MM30000 series discussed in the preceding
paragraphs is the only exception.
Each of the PCM4 units must first be modified.
1. Check that all 3 DIP switches (SW501) , located near the
19
center of the board, are in their OFF position.
2. Cut the left hand (CCW) pin of P501, the SIGNAL INPUT
ADJ, off each PCM4. The figure below shows this trimmer
potentiometer.
SIGNAL
INPUT ADJ
INPUT ADJ
CUT AND REMOVE LEFT PIN OF
THE SIGNAL INPUT ADJ TRIMPOT
ON EACH PCM4 BOARD
Figure 10. Signal Input Adjust
P501
Page 26
20
+
Installation
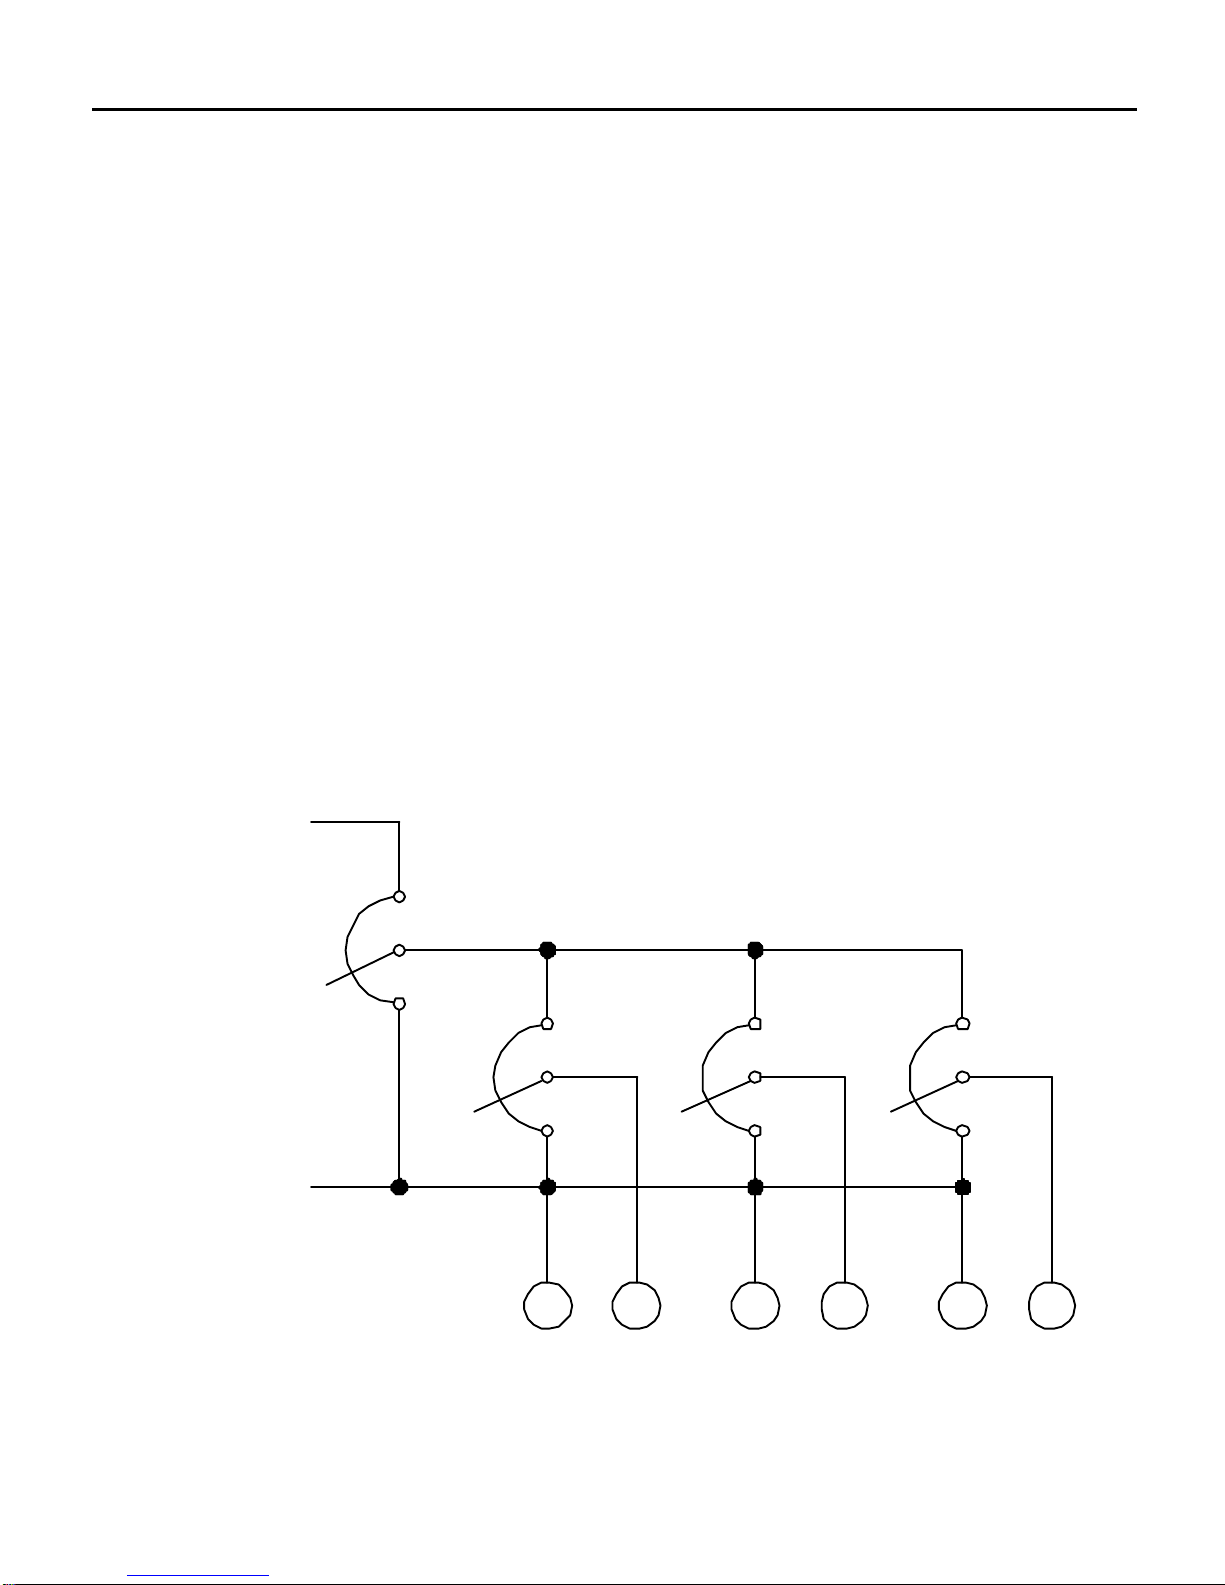
Connect one 50K ohm ratioing potentiometer across the master
input voltage signal for each dedicated PCM4 module. Wire each
ratioing pot to the input signal source potentiometer as shown in
Figure 11 below.
Master PCM4 with multiple drives following
If a PCM4 is to provide the master input voltage signal as
detailed on pages 14 - 15, dedicated PCM4s are again necessary.
Each of the PCM4s must be modified as detailed on page 19.
Ratioing potentiometers may then be wired with their CW sides
to terminal 2 of the master PCM4 and their CCW sides to
terminal 1 of the master PCM4.
+
MASTER
MASTER
INPUT SIGNAL
INPUT SIGNAL
POTENTIOMETER
POTENTIOMETER
-
-
50K
50K 50K 50K
50K 50K
Figure 11. Connection – Ratio Potentiometers Multiple Follower System
7 10 7 10 7 10
PCM4
PCM4
107 107 107
PCM4
PCM4
#1
#1
#2
#2
PCM4
PCM4
#3
#3
Page 27

Calibration
Warning
m
Dangerous voltages exist on the PCM4 when it is powered.
If the trimpots must be adjusted with power applied, use
insulated tools and the appropriate personal protection
equipment. BE ALERT. High voltages can cause serious or
fatal injury.
21
Page 28

22 Calibration
0 - 5 VDC
0 - 10 VDC
0 - 25 VDC
0 - 250 VDC
Signal Input Adjust
The SIGNAL INPUT ADJ potentiometer is used to set the
maximum Test Point voltage to approximately 5 VDC, as
measured between terminals TP and COM. The importance of
this step is to scale the input signal voltage to keep it well within
the range of the PCM4’s comparator chip. This calibration is only
approximate. A tolerance of 0.2 Volts is acceptable.
The SIGNAL INPUT ADJ is calibrated only when the PCM4 is
following a voltage signal. When the PCM4 is following a current
signal set the SIGNAL INPUT ADJ fully CW. See Figure 12 for
approximate calibration of SIGNAL INPUT ADJ.
To calibrate the SIGNAL INPUT ADJ:
1. Apply the true maximum voltage input.
2. Check voltage at TP vs. COM to verify that it is approximately
5V. Adjust SIGNAL INPUT ADJ if needed.
0 - 5 VDC 0 - 10 VDC 0 - 25 VDC 0 - 250 VDC
Figure 12. SIGNAL INPUT ADJ - Calibration Positions
Page 29
DIP switches
Warning
m
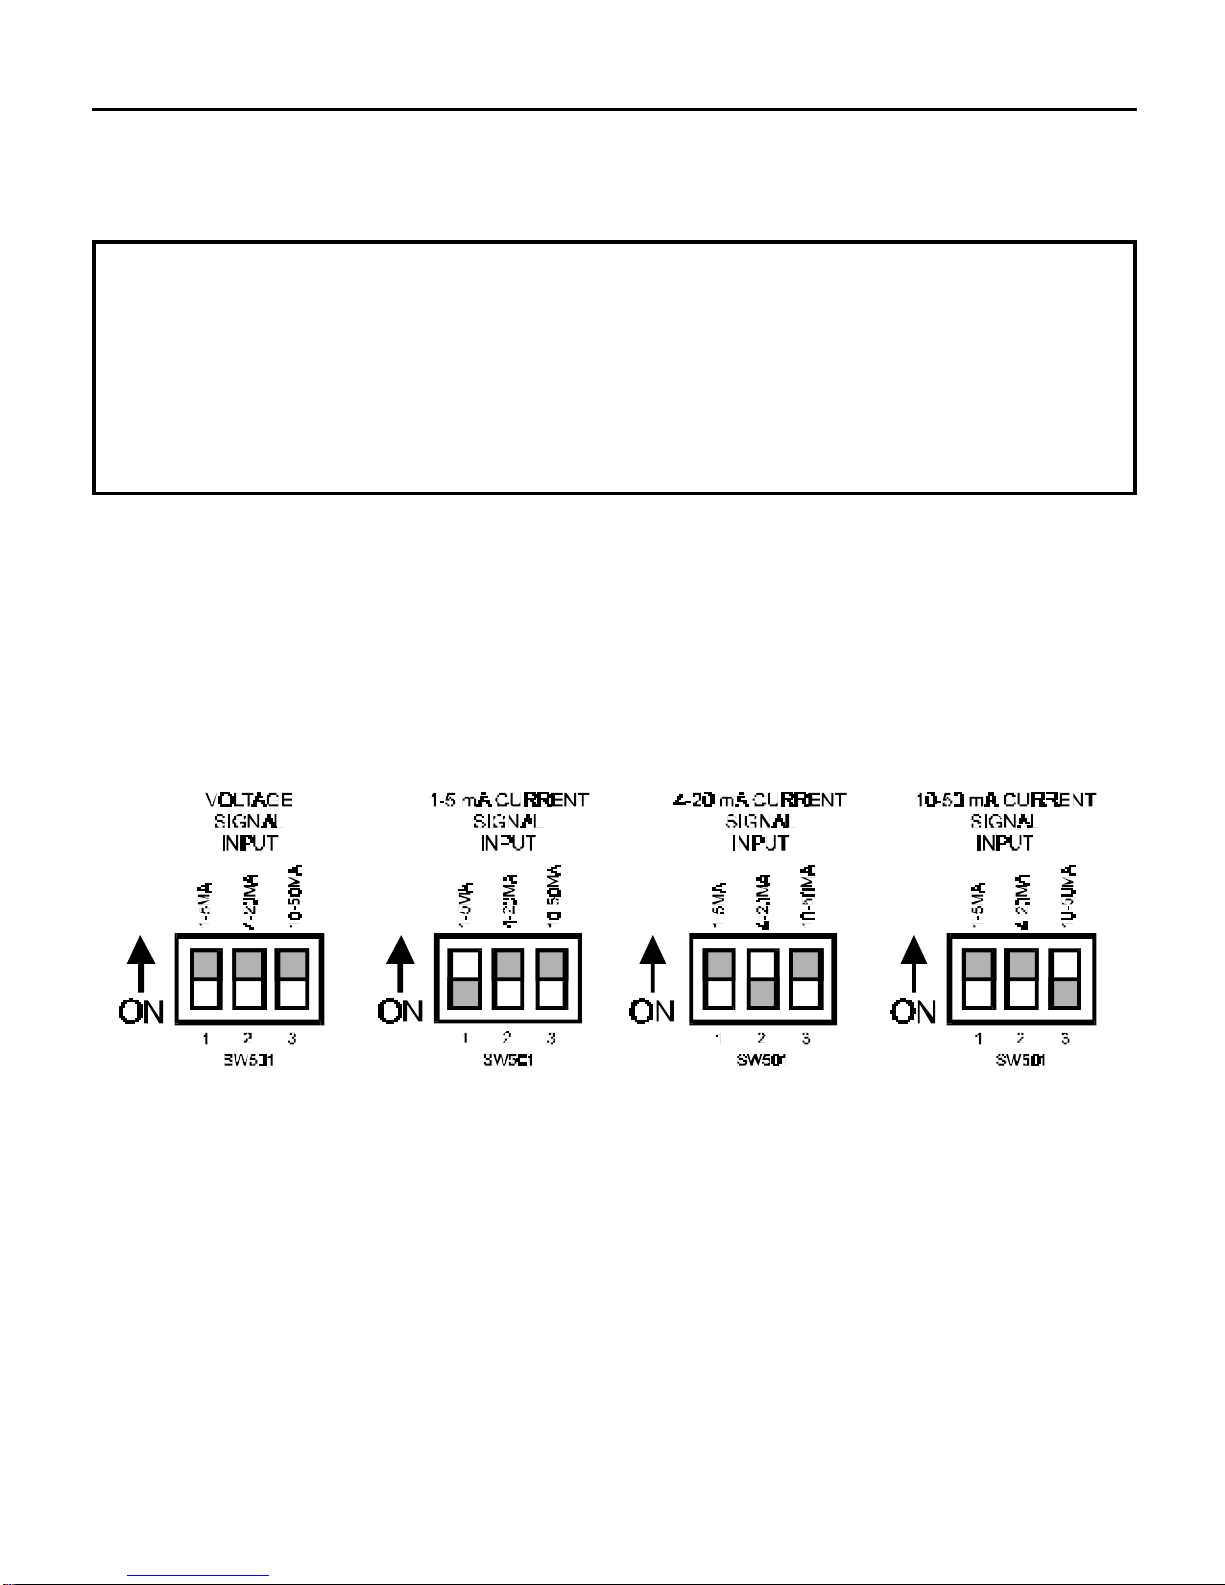
Only one DIP switch should be ON at a time and only when
the PCM4 is set up to follow a current signal. All three DIP
switches must be OFF when following a voltage signal.
Each DIP switch selects the range for input current following.
DIP switch 1 is for 1 – 5 mA input, DIP switch 2 is for
Calibration
23
4 – 20 mA input, and DIP switch 3 is for 10 – 50 mA input.
Figure 13. DIP Switch Settings
Page 30

24
Calibration
Input signal calibration
Calibration of the MIN OUT and MAX OUT 15–turn trimpots is
required to establish the relationship between the input voltage
signal range and the output range.
The true maximum and minimum input signal values are not
required. Because the PCM4 response is linear, any two
calibration points define the output vs. input relationship. Select
points as close to the range extremes as possible to minimize
extrapolation error.
The absolute maximum output from the PCM4 is 10 VDC. The
minimum input voltage to the PCM4 that can produce 10 VDC
output is 5 VDC.
Input voltage calibration
To calibrate when using a voltage input signal:
1. Verify that all DIP switches are OFF.
2. Set the SIGNAL INPUT ADJ to the input range position, as
indicated on Figure 12, page 22.
3. Apply the lower voltage input.
4. Set MIN OUT adjustment to obtain the desired lower voltage
output.
Page 31

5. Apply the higher voltage input.
6. Set MAX out adjustment to obtain the desired higher voltage
output.
7. Apply the true maximum input voltage.
8. Check voltage at TP vs. COM to ensure that it is
approximately 5VDC at the maximum input voltage. Adjust
SIGNAL INPUT ADJ if necessary.
9. Repeat steps 3 – 6 until no further recalibration is needed.
Input current calibration
Calibration
25
To calibrate when using a current input signal:
1. Verify that the correct DIP switch is ON and that the others are
in the OFF position.
2. Set the SIGNAL INPUT ADJ fully CW.
3. Apply the lower current input.
4. Set MIN OUT adjustment to obtain the desired lower voltage
output.
5. Apply the higher current input.
6. Set MAX OUT adjustment to obtain the desired higher voltage
output.
7. Repeat steps 3 – 6 until no further recalibration is necessary.
Page 32

26
Troubleshooting
Warning
m
Dangerous voltages exist on the PCM4 when it is powered.
High voltages can cause serious or fatal injury.
Before troubleshooting
Perform the following steps before starting any procedure in this
section:
1. Disconnect AC line voltage from the PCM4 and variable
speed drive.
2. Check the PCM4 and drive closely for damaged components.
3. Check that no conductive or other foreign material has become
lodged on the printed circuit board.
4. Verify that every connection is correct and in good condition.
5. Verify that there are no short circuits or grounded connections.
6. Check that the input voltage jumpers are installed properly for
the input voltage being used (see page 6).
7. Check that the drive’s rated armature and field outputs are
consistent with the motor ratings.
Page 33

Troubleshooting
27
Problem
Motor attached to the
drive does not run.
Possible
Causes
1. No output voltage
from PCM4 (TB502).
2. Loose connections
between PCM4 and
motor drive.
3. PCM4 is not
Suggested
Solutions
1. Recalibrate the
PCM4. If there is still
no output send
PCM4 to Minarik for
repair.
2. Check connections
between TB502 and
the input of motor
drive.
3. Apply AC line
receiving AC line
voltage.
4. Input signal is not
connected.
5. SIGNAL INPUT
ADJ potentiometer
is not calibrated.
6. Motor drive not
calibrated properly.
voltage to terminals
1and 4.
4. Check that the PCM4
is receiving voltage
(or current) input
signal.
5. Calibrate SIGNAL
INPUT ADJ (page
26).
6. Re-calibrate motor
drive according to
manufacturer’s
instructions.
Page 34

28
Troubleshooting
Problem
Motor is not running
at full speed.
Possible
Causes
1. Voltage out (TB502)
is not changing as
input changes
2. Loose connections
between PCM4 and
motor drive.
Suggested
Solutions
1. Check that the
voltage out (TB502)
is changing as input
changes. Recalibrate
the PCM4. If voltage
is still not changing
send the drive to
Minarik repair.
2. Check connections
between TB502 and
the input of motor
Motor runs too slow,
or too fast.
1. DIP switches are not
set properly for
current input.
2. Motor drive not
calibrated properly.
drive.
1. Check DIP switch
positions if using
current input.
2. Re-calibrate motor
drive according to
manufacturer’s
instructions.
Page 35

Notes
29
Page 36

30
Notes
Page 37

Notes
31
Page 38

32
Notes
Page 39

Unconditional Warranty
A. Warranty - Minarik Corporation (referred to as “the Corporation”) warrants that its
products will be free from defects in workmanship and material for twelve (12) months or
3,000 hours, whichever comes first, from date of manufacture thereof. Within this warranty
period, the Corporation will repair or replace, at its sole discretion, such products that are
returned to Minarik Corporation, 901 East Thompson Avenue, Glendale, CA 91201-2011
USA.
This warranty applies only to standard catalog products, and does not apply to specials. Any
returns for special controls will be evaluated on a case-by-case basis. The Corporation is
not responsible for removal, installation, or any other incidental expenses incurred in
shipping the product to and from the repair point.
B. Disclaimer - The provisions of Paragraph A are the Corporation’s sole obligation and
exclude all other warranties of merchantability for use, express or implied. The Corporation
further disclaims any responsibility whatsoever to the customer or to any other person for
injury to the person or damage or loss of property of value caused by any product that has
been subject to misuse, negligence, or accident, or misapplied or modified by unauthorized
persons or improperly installed.
C. Limitations of Liability - In the event of any claim for breech of any of the Corporation’s
obligations, whether express or implied, and particularly of any other claim or breech of
warranty contained in Paragraph A, or of any other warranties, express or implied, or claim
of liability that might, despite Paragraph B, be decided against the Corporation by lawful
authority, the Corporation shall under no circumstances be liable for any consequential
damages, losses, or expense arising in connection with the use of, or inability to use, the
Corporation’s product for any purpose whatsoever.
An adjustment made under warranty does not void the warranty, nor does it imply an
extension of the original 12-month warranty period. Products serviced and/or parts replaced
on a no-charge basis during the warranty period carry the unexpired portion of the original
warranty only.
If for any reason any of the foregoing provisions shall be ineffective, the Corporation’s liability
for damages arising out of its manufacture or sale of equipment, or use thereof, whether
such liability is based on warranty, contract, negligence, strict liability in tort, or otherwise,
shall not in any event exceed the full purchase price of such equipment.
Any action against the Corporation based upon any liability or obligation arising hereunder
or under any law applicable to the sale of equipment or the use thereof, must be commenced
within one year after the cause of such action arises.
Page 40

901 East Thompson Avenue
Glendale, CA USA 91201-2011
Tel: 1-800-MINARIK (646-2745)
Document number 250–0152, Revision 5
North America $10.00, Outside North America $11.00
Fax: 1-800-394-6334
www.minarikcorp.com
Printed in the U.S.A – 4/01
 Loading...